Loading ...
Loading ...
Loading ...
5
2. Setting up the display
2. Setting up the display
2.1 Installation
1
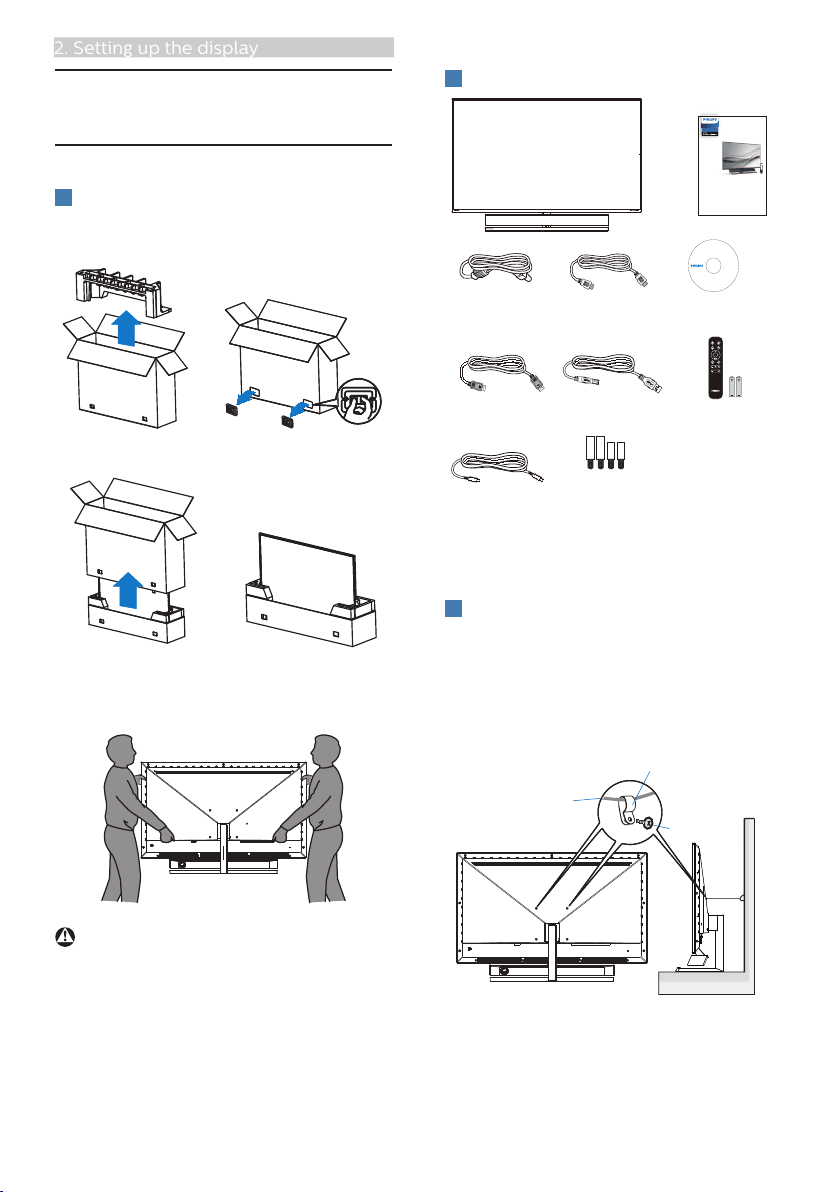
Unpacking
1. Open the the top ap and remove
clips on the bottom of the package.
2. Remove the upper package.
3. Lift up the display from the
packaging cushion, a shown in the
image below.
Warning
•This display is heavy, so two
people are required to lift up the
display.
•Do not press on the panel to avoid
any accidental damage.
2
Package contents
Momentum
559M1
Register your product and get support at
www.philips.com/welcome
Quick
Start
OK
VOL
*DP
Power *HDMI
2
0
2
1
©
T
O
P
V
i
c
t
o
r
y
I
n
v
e
s
t
m
e
n
t
s
L
t
d
.
A
l
l
r
i
g
h
t
s
r
e
s
e
r
v
e
d
.
U
n
a
u
t
h
o
r
i
z
e
d
d
u
p
l
i
c
a
t
i
o
n
i
s
a
v
i
o
l
a
t
i
o
n
o
f
a
p
p
l
i
c
a
b
l
e
l
a
w
s
.
M
a
d
e
a
n
d
p
r
i
n
t
e
d
i
n
C
h
i
n
a
.
V
e
r
s
i
o
n
This product has been manufactured by and is sold
under the responsibility of Top Victory Investments Ltd.,
and Top Victory Investments Ltd. is the warrantor in
relation to this product. Philips and the Philips Shield
Emblem are registered trademarks of Koninklijke Philips
N.V. and are used under license.
Contents:
Drivers
User’s Manual
User’s Manual
www.philips.com/welcome
使用产品前请阅读使用说明
保留备用
Monitor
*USB A-B
Wall mount screw
with spacer
Lx2, Sx2
*Remote Control
Batteries AAA R03 1.5V
*
CD
OK
VOL
*USB C-C
L L
S S
*Different according to region
*Battery:Zinc carbon AAA R03 1.5V
3
Prevent Tipping
When using the display, fasten the LCD
to a wall using a cord or chain that
can support the weight of the monitor
in order to prevent the monitor from
falling.
Cord or chain
M6 Screw
Clamp
Release the screws then
fix the clamp.
Loading ...
Loading ...
Loading ...