
Please read these instructions carefully
and retain for future reference.
Espresso Vita
15 BAR Pump espresso
machine with gauge
Instruction Booklet
EM6200


Important instructions – retain for
future use.
Contents
Sunbeam’s Safety Precautions 2
About espresso coffee 3
Features of your Sunbeam Espresso Vita 4
Using the control panel 8
Reference guide to using your espresso
machine 12
Programming your espresso machine 17
Preparing your espresso machine
before use 19
Guide to the perfect espresso 20
Guide to milk texturing 22
Using the hot water function 23
Espresso Recipes 24
Care and Cleaning 26
Descaling 28
Advanced programming options 30
Trouble shooting guide 34

Sunbeam’s Safety Precautions
SAFETY PRECAUTIONS FOR YOUR SUNBEAM
ESPRESSO MACHINE.
• Alwaysplacetheunitonaflat,levelsurface.
• Donotoperatewithoutwaterinreservoir.
Fillreservoirwithonlycleanandcoldwater.
Observethemaximumfillingvolumeis2.5litres.
• Donotremovethefilterhandleduringtheespresso
pourorwaterflowastheunitisunderpressure.
Removingthefilterhandleduringeitherofthese
operationscanleadtoascaldingorinjury.
• Thesteamwandbecomesveryhotduringtexturing
milkandwaterflow.Thismaycauseburnsincase
ofcontact,thereforeavoidanydirectcontactwith
thesteamwand.
• Alwaysdisconnecttheplugfromthepoweroutlet
priortocleaningtheespressomachineorifthere
isanyproblemduringthecoffeemakingprocess.
• Donotallowthepowercordtocomeintocontact
withthehotpartsoftheespressomachine,
includingthecupwarmingplateandsteamwand.
• Donotplacehandsdirectlyunderthesteam,hot
waterorcoffeepourasthiscanleadtoascalding
orinjury.
2
Sunbeam is very safety conscious when
designing and manufacturing consumer products, but
it is essential that the product user also exercise care
when using an electrical appliance. Listed below are
precautions which are essential for the safe use of an
electrical appliance:
• Readcarefullyandsavealltheinstructions
providedwithanappliance.
• Alwaysturnthepoweroffatthepoweroutletbefore
youinsertorremoveaplug.Removebygrasping
theplug-donotpullonthecord.
• Turnthepoweroffandremovetheplugwhenthe
applianceisnotinuseandbeforecleaning.
• Donotuseyourappliancewithanextensioncord
unlessthiscordhasbeencheckedandtestedbya
qualifiedtechnicianorserviceperson.
• Alwaysuseyourappliancefromapoweroutletof
thevoltage(A.C.only)markedontheappliance.
• Thisapplianceisnotintendedforusebypersons
(includingchildren)withreducedphysical,sensory
ormentalcapabilities,orlackofexperienceand
knowledge,unlesstheyhavebeengivensupervision
orinstructionconcerninguseoftheappliancebya
personresponsiblefortheirsafety.
• Childrenshouldbesupervisedtoensurethatthey
donotplaywiththeappliance.
• Thetemperatureofaccessiblesurfacesmaybehigh
whentheapplianceisoperating.
• Neverleaveanapplianceunattendedwhileinuse.
• Donotuseanapplianceforanypurposeotherthan
itsintendeduse.
• Donotplaceanapplianceonornearahotgas
flame,electricelementoronaheatedoven.
• Donotplaceontopofanyotherappliance.
• Donotletthepowercordofanappliancehangover
theedgeofatableorbenchtoportouchanyhot
surface.
• Donotoperateanyelectricalappliancewitha
damagedcordoraftertheappliancehasbeen
damagedinanymanner.Ifdamageissuspected,
returntheappliancetothenearestSunbeam
AppointedServiceCentreforexamination,
repairoradjustment.
• Foradditionalprotection,Sunbeamrecommend
theuseofaresidualcurrentdevice(RCD)
withatrippingcurrentnotexceeding30mAin
theelectricalcircuitsupplyingpowertoyour
appliances.
• Donotimmersetheapplianceinwateroranyother
liquidunlessrecommended.
•Appliancesarenotintendedtobeoperatedby
meansofanexternaltimerorseparateremote
controlsystem.
•Thisapplianceisintendedtobeusedinhousehold
andsimilarapplicationssuchas:staffkitchenareas
inshops,officesandotherworkingenvironments;
farmhouses;byclientsinhotels,motelsandother
residentialtypeenvironments;bedandbreakfast
typeenvironments.
Ifyouhaveanyconcernsregardingtheperformanceanduseofyourappliance,
pleasevisitwww.sunbeam.com.auorcontacttheSunbeamConsumerServiceLine.
Ensuretheabovesafetyprecautionsareunderstood.

About espresso coffee
Congratulationsonthepurchaseofyour
Sunbeamespressomachine.
Themasteryofcoffeemakingdemandsa
machinethatyoucantrusttoperformtime
andtimeagain.Poweredbyaone-piece
stainlesssteellinedthermoblockand15
BARpump,theespressomachinewilldeliver
theperformanceatrueartistandcoffee
connoisseurhascometoexpect.
TheSunbeamEspressoVitamakesproducing
espressocoffeesathomeapleasurewith
itssimpletousepushbuttonoperation.
SeamlesslyintegratedPIDtechnology
monitorsandcontrolsthethermoblock
heatingsystemtoachievetheprecisewater
temperaturerequiredforeachtask,whether
youareextractingespresso,texturingmilkor
brewingtea.
Designedandengineeredtolast,the
componentsandfeaturesoftheSunbeam
EspressoVitaareencasedinfullmetal
housing,accentuatedbyapolished
chromebrewhead.Theelegantstylingand
craftsmanshipemployedinitsdesigndraw
inspirationfromthetraditionofEuropean
espressomachinequalityanddesign.Now
youcanbringtheartofcoffeemakinginto
yourhomewiththeSunbeamEspressoVita.
Wehopeyouenjoyyournewespresso
machineandshouldyouneedanyfurther
assistance,pleasevisittheSunbeamwebsite,
www.sunbeam.com.au.
33
4
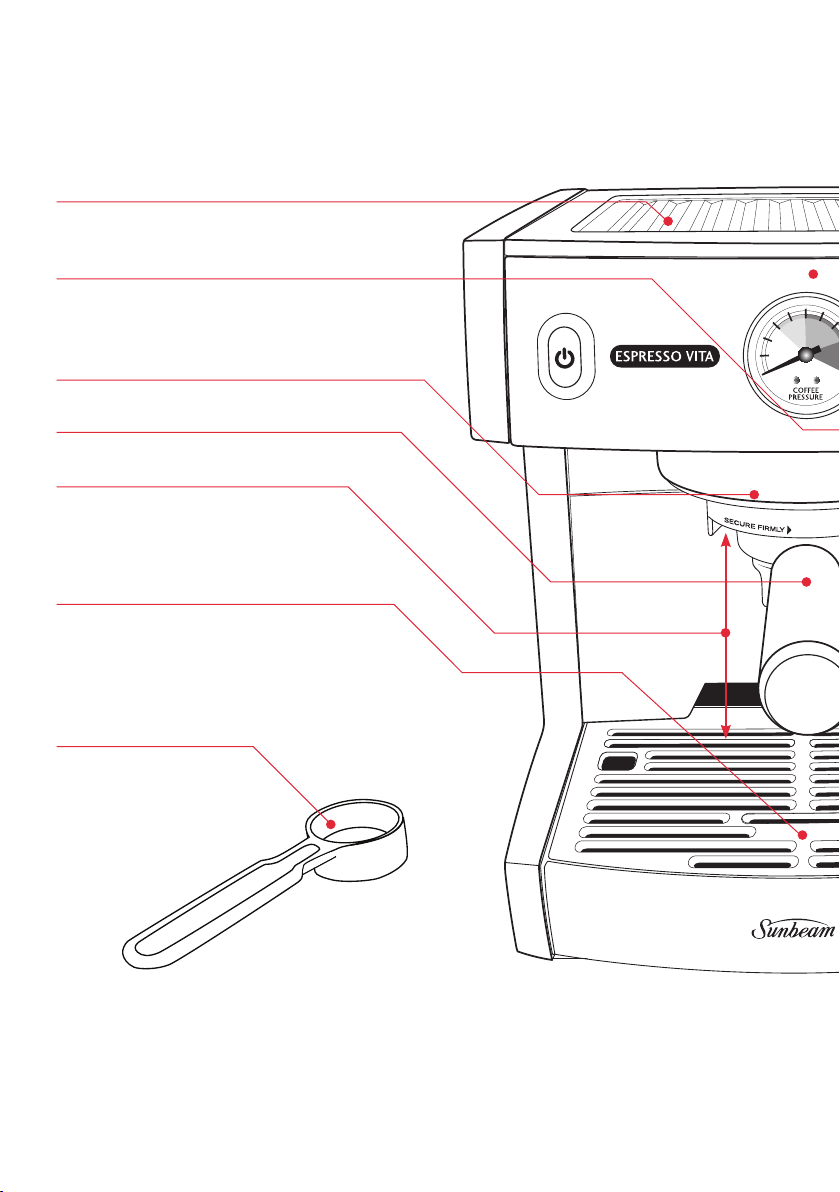
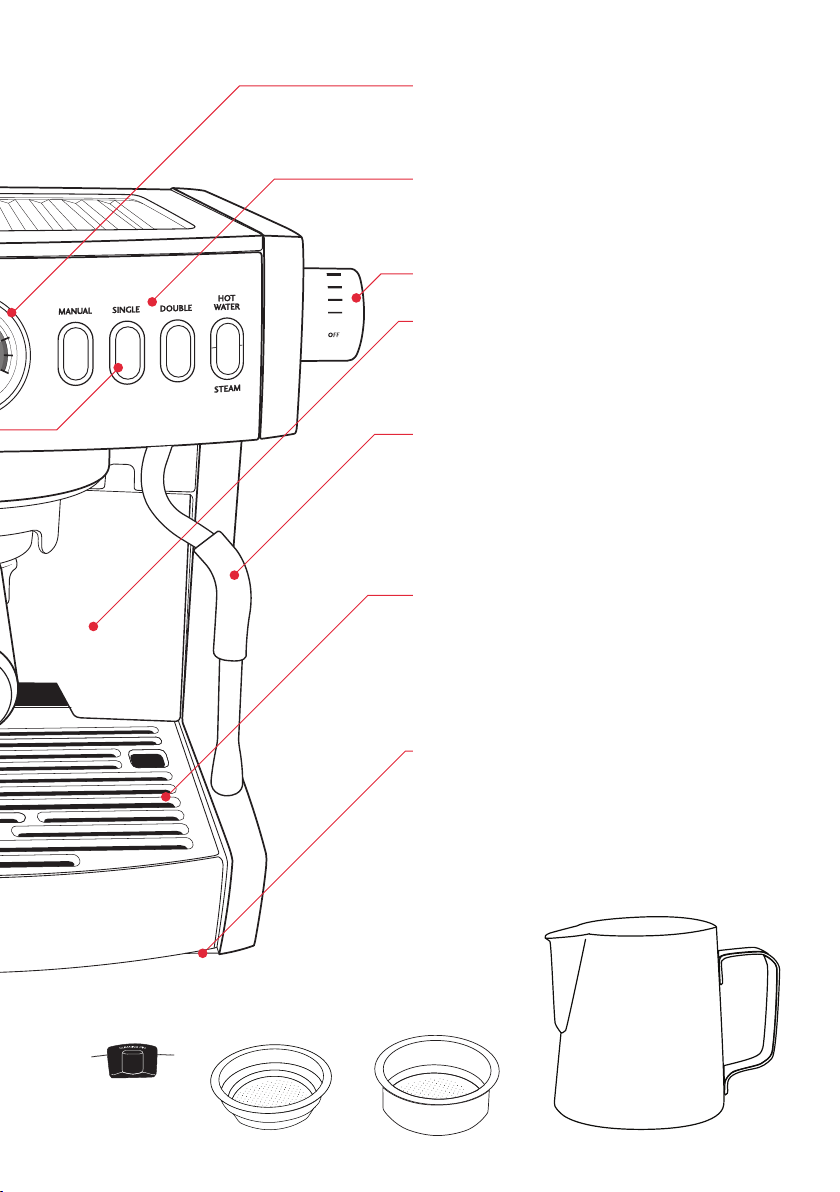
Warming plate
Effectivelypre-warmscups
Push button control panel
Easytousecontrolpaneldeliversanespresso
pour,steamorhotwaterfunctions.
Group head
Brass and phenolic group handle
Extra cup height clearance
Additionalclearancebetweenthefilter
handleandthedriptrayisdesignedtosuit
tallercups.
Water level indicator
Thewaterlevelindicatorfloatsthroughthe
driptraygridindicatinghowfullthedrip
trayis.Theindicatoriscolouredredforeasy
identification.
Measuring spoon / Tamp
4
Features of your Sunbeam
Espresso Vita
55
Espresso gauge
Thegaugemeasurestheresistancetothe
espressopour.
Programmable control panel
Foraconsistentshotofespressoeverytime,
simplypresseitherthesingleordoublebutton.
Steam and hot water control dial
2.5L water reservoir
Removablefromthefrontforeasyfillingatthe
tap.Watercanalsobeaddedatthetopofthe
unit.
Steam and hot water wand
Suppliespowerfuldrysteamforachieving
silky,denseandrichmilk.Alsodispensesa
controlledflowofhotwater.Thecommercial
360
0
balljointallowsthesteamwandtobe
movedintotheidealposition.
Removable drip tray and grill
Thelargecapacitydie-castmetaldriptrayis
linedwithplastic,preventingstainingfrom
espressooils,lightweightforeasyremovaland
designedwithnodirttrapsforsimplewipe
downcleaning.
Non-slip rubber feet
Makestheunitsturdy,preventingitfrom
slippingorscratchingthebenchtop.
Single filter basket Double filter basket
600ml jug
Cleaning tool
6
Features of your Sunbeam
Espresso Vita
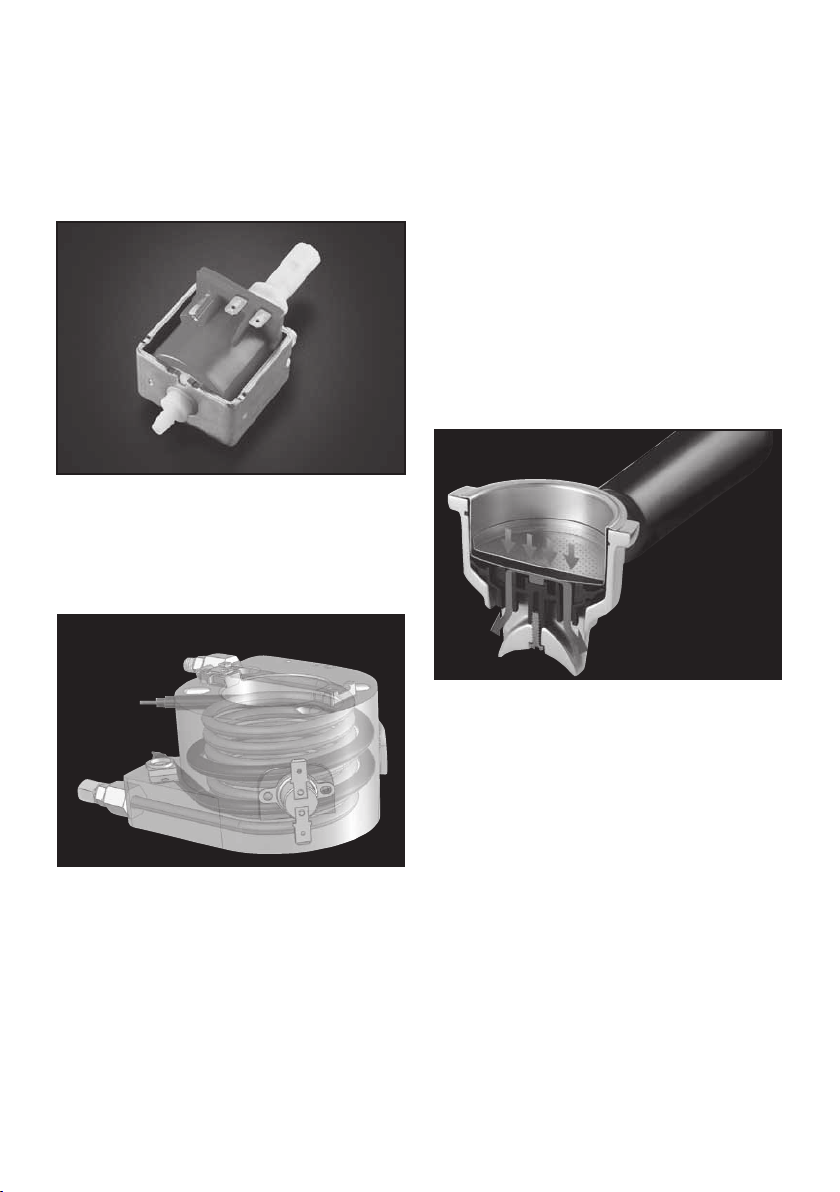
15 Bar Pump
Themachineisfittedwitha15BARpump
whichgeneratesthepressurerequiredto
deliveracompleteextractionofoils,coffee
solidsandaroma.
Thermoblock Heating System
Thethermoblockheatingsystemheatsthe
waterensuringtheprecisetemperatureis
achievedforeachfunction.Additionally,the
one-piececonstructionandstainlesssteel
tubingofthethermoblockeffectivelyslows
scalebuildupandreducesthefrequencyof
cleaningrequired.
Pre-Infusion
Pre-infusionisprogrammedintothe
MANUAL,singleanddoubleespresso
operations.Itisagradualincreaseofwater
pressurepre-soakingthecoffeecakebefore
fullwaterpressureisapplied.Thisinturn
deliversgreaterbodyandsweetnesstothe
espresso.
Crema System
Thespeciallydesignedcremasystemconsists
ofadual-floorfiltercreatingadditional
backpressureandastabilisingbafflethat
helpsretaintemperatureandproducesa
steadypourofespresso.Thedual-floorfilter
basketsaredesignedtoslowtheflowof
liquidespressocreatingasubtleaerationto
ensureagoldencrema.
7
Features of your Sunbeam Espresso Vita (continued)
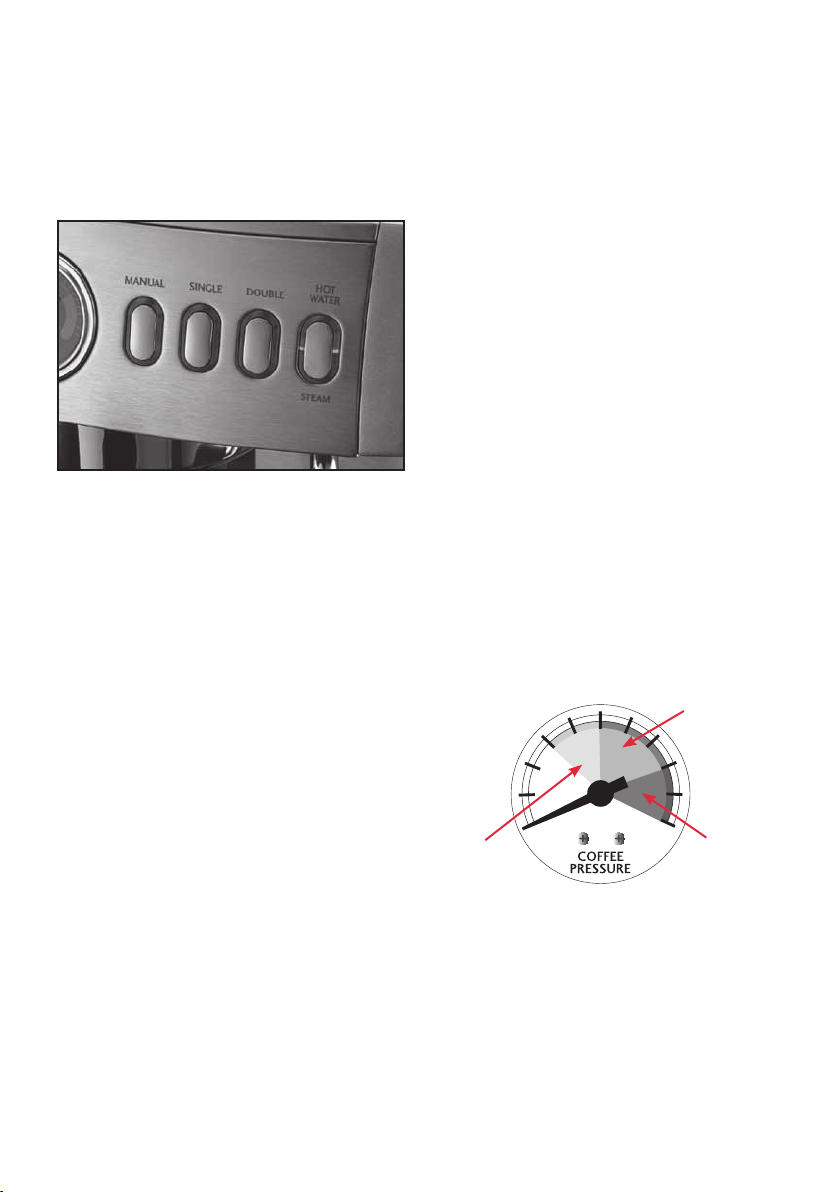
Push Button Control Panel
Aneasytousecontrolpanelprovidesthe
choiceofmanualoperationorutilisingthe
programmedespressopourlengths.The
programmedespressopourissetto30mls
percupwhilethePROGRAMfunctionallows
userstopersonaliseandsavetheirown
espressovolumes.Theuserisalsoableto
personaliseandsavetheirownsettingsfor
coffeetemperature,steamtemperatureand
steamflow.
Espresso Gauge
Theespressogaugeisanindicatorofthe
qualityoftheespressopourandshouldbe
usedasaguide.
Itmeasuresthepressureorresistance
createdbywaterbeingpumpedthroughthe
tampedcoffeegrindsinthegrouphandle.
Whilsttheneedleiswithinthetargetareaon
thegaugeitindicatesthataqualityserveof
espressohasbeenmade.Thisisindicated
byaslowandsteadypourofliquidespresso
withaconsistencysimilartothatofdripping
honey.Thecremashouldbedarkgoldenin
colour.
Shouldtheneedlefailtoreachthetarget
areathisisanindicationthattheserveof
espressois‘under-extracted’.Thisoccurs
whenwaterpassestooquicklythroughthe
tampedcoffeegrindsandisanindication
thateitherthegrindneedstobemadefiner
orthefilterbaskethasbeenunder-dosed.
Thepourisquickandlightincolourandthe
resultingcremaisthinwithacreamylight
browncolour.
Whentheneedlegoesbeyondthetargetarea
itisanindicationthattheserveofespresso
is‘over-extracted’.Thisoccurswhenthe
waterpassesveryslowlythroughthetamped
coffeegrindsandisanindicationthateither
thegrindistoofineorthefilterbaskethas
beenover-dosed.Inthissituationthehot
waterisincontactwiththecoffeegrinds
fortoolongthuscreatingaburntandbitter
tastingespresso.Thisischaracterisedby
theespressoonlyslowlydrippingduringthe
entirepourandthecremaisverydark.
Under
Extracted
Pour
Over
Extracted
Pour
Optimum
Pour
8
Using the control panel
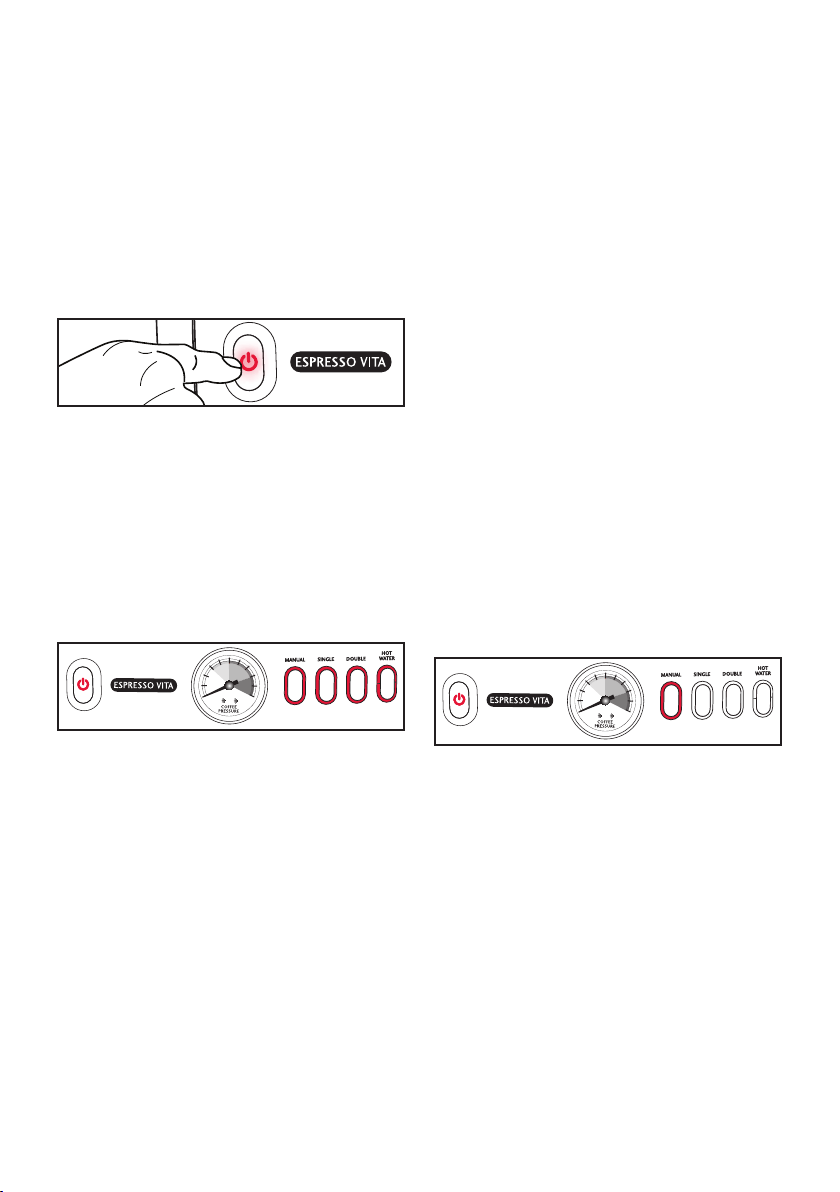
Power
Pressthe‘POWER’buttononcetoturnthe
espressomachineon.Thelightonthebutton
willstartflashing;thisistoindicatethatyour
espressomachineisonandisheatingup.
Ready Mode
Whenthelightonthe‘POWER’buttonstops
flashingandturnstoaconstantredlight,
thisindicatesthattheespressomachineis
heatedandreadytouse.Thelightsaround
the'MANUAL','SINGLE','DOUBLE'and
'HOTWATER/STEAM'buttonswillshowa
constantredlight.Themachineisnowin
ReadyMode.
Note:Rememberthatifthelightonthe
‘POWER’buttonisflashingitmeans
theespressomachineisadjustingthe
temperatureoftheheatingsystem.
Toturntheespressomachineoff,simply
pressthe‘POWER’button,theredpower
lightandallotherlightsonthecontrolpanel
willturnoff.
Manual
Note:Beforeactivatingtheespressocoffee
functionensurethatthesteamandhotwater
controldialisintheOFFposition.
The‘MANUAL’buttonallowsthecoffee
makertohavecompletecontroloverthe
lengthoftheespressopour.
Oncetheespressomachineisswitchedon
andheated,sothelightonthe‘POWER’
buttonisredandthelightsaroundthe
‘MANUAL’,‘SINGLE’and‘DOUBLE’espresso
buttonsshowaconstantredlight,thecoffee
makerisabletousethemanualoperation.
Thecoffeemakersimplyneedstopressthe
‘MANUAL’buttononcetostartthepourand
againtostop.
Important:Oncethemanualoperationis
activated,beforetheespressopourstartsthe
pre-infusionfeaturewillreleasethreeshort
burstsofgradualwaterpressureontothe
coffeecake.Afterthisthefullwaterpressure
isappliedandtheespressowillpourfreely.
Note:Whenthecoffeemakerhasactivated
the‘MANUAL’operationthelightsaroundthe
‘SINGLE’and‘DOUBLE’espressobuttons
willgooff.Thelightsonthe‘POWER’and
aroundthe‘MANUAL’buttonswillremainon.
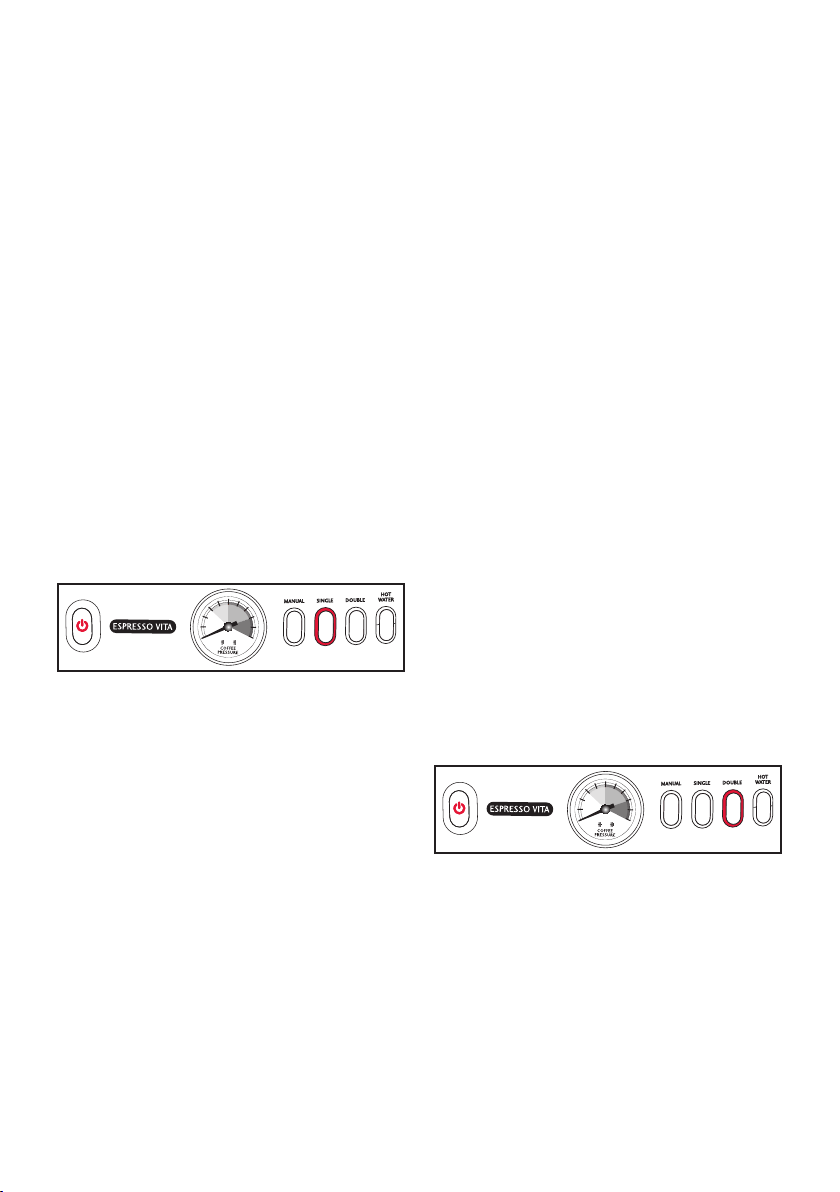
Single Espresso
Note:Beforeactivatingtheespressocoffee
functionensurethatthesteamandhotwater
controldialisintheOFFposition.
The‘SINGLE’espressofunctionremovesthe
guessworkandisprogrammedtopour30mls
ofliquidespresso.
Tip:Werecommendusingthesinglecup
filterwhenusingtheprogrammed‘SINGLE’
espressooperation.
Oncetheespressomachineisswitchedon
andheated,sothelightonthe‘POWER’
buttonisredandthelightsaroundthe
‘MANUAL’,‘SINGLE’and‘DOUBLE’espresso
buttonsshowaconstantredlight,thecoffee
makerisabletousethe‘SINGLE’espresso
9
Using the control panel (continued)
operation.Thecoffeemakersimplyneedsto
pressthe‘SINGLE’espressobuttononceto
startandthepourofliquidespressowillstop
automatically.
Important:Oncethe‘SINGLE’espresso
operationisactivated,beforetheespresso
pourstartsthepre-infusionfeaturewill
releasethreeshortburstsofgradually
increasingwaterpressureontothecoffee
cake.Afterthisthefullwaterpressureis
appliedandtheespressowillpourfreely.
Note:Whenthecoffeemakerhasactivated
the‘SINGLE’espressooperationthelights
aroundthe‘MANUAL’and‘DOUBLE’
espressobuttonswillgooff.Thelightsonthe
‘POWER’andthe‘SINGLE’espressobuttons
willremainon.
Note:Thecoffeemakerdoesnotneedto
pressthesingleespressobuttonagaintoend
thepourastheespressomachinewillstop
automatically.
Oncethepourofliquidespressostopsthe
espressomachineisreadytomakeanother
espresso.
Note:Whenusingthesingleespresso
operationyoucanstopthepourofespresso
atanytimebypressingthe‘MANUAL’,
‘SINGLE’,or‘DOUBLE’espressooperation
buttons.
Double Espresso
Note:Beforeactivatingtheespressocoffee
function,ensurethattheSTEAMandHOT
WATERcontroldialisintheOFFposition.
The‘DOUBLE’espressofunctionremovesthe
guessworkandisprogrammedtopour60mls
ofliquidespresso.
Tip:Werecommendusingthedoublecup
filterwhenusingtheprogrammed‘DOUBLE’
espressooperation.
Oncetheespressomachineisswitchedon
andheated,sothelightonthe‘POWER’
buttonisredandthelightsaroundthe
‘MANUAL’,‘SINGLE’,and‘DOUBLE’
espressobuttonsshowaconstantredlight,
thecoffeemakerisabletousethe‘DOUBLE’
espressooperation.Thecoffeemakersimply
needstopressthe‘DOUBLE’espressobutton
oncetostartandthepourofliquidespresso
willstopautomatically.
Important:Oncethe‘DOUBLE’espresso
operationisactivated,beforetheespresso
pourstartsthepre-infusionfeaturewill
releasethreeshortburstsofgradually
increasingwaterpressureontothecoffee
cake.Afterthisthefullwaterpressureis
appliedandtheespressowillpourfreely.
Note:Whenthecoffeemakerhasactivated
the‘DOUBLE’espressooperationthelights
aroundthe‘MANUAL’and‘SINGLE’buttons
willgooff.Thelightsonthe‘POWER’and
‘DOUBLE’espressobuttonswillremainon.
Note:Thecoffeemakerdoesnotneedto
pressthe‘DOUBLE’espressobuttonagain
toendthepourastheespressomachinewill
stopautomatically.
Oncethepourofliquidespressostopsthe
espressomachineisreadytomakeanother
espresso.
Note:Whenusingthe‘DOUBLE’espresso
operationyoucanstopthepourofespresso
atanytimebypressingthe‘MANUAL’,
‘SINGLE’or‘DOUBLE’espressooperation
buttons.

10
Using the control panel (continued)
Programming the Single or Double pours
Theprogramfunctionallowsthecoffeemaker
topersonaliseandsavetheirownespresso
poursettings.
Toprogramthe‘SINGLE’and‘DOUBLE’
coffeepourstheespressomachineneedsto
beinSTANDBYMODE(sothemachineis
pluggedinandturnedonatthewall,but
thepoweronthemachinehasnotyetbeen
turnedon).
Toactivatetheprogramfunctionforthe
‘SINGLE’and‘DOUBLE’espressopours,the
coffeemakerneedstopressandholddown
boththe‘SINGLE’and‘DOUBLE’buttons.
Whilestillholdingdownthesetwobuttons
brieflypressthe‘POWER’buttonandrelease
allbuttons.Wheninprogrammingmodethe
lightsaroundthe‘SINGLE’and‘DOUBLE’
buttonswillslowlyflash(dimmingupand
down).
Dependingonwhichpouryouwantto
program,presseitherthe‘SINGLE’or
‘DOUBLE’espressopourbuttons,upon
releasethepourwillbegin.
Note:Forbestresultsthecoffeemakeshould
onlymakechangestothe‘SINGLE’and
‘DOUBLE’coffeepourvolumesbyengaging
thecoffeehandlefittedwitheitherthesingle
ordoublebasket,packedwithcoffee.
Whenthedesiredpouramounthasbeen
reachedpresstheflashingcoffeebutton
tosetthenewvolume.Alongbeepwill
soundconfirmingtheprogramsavedandthe
machinewillgointo‘READYMODE’.
Note:Formoredetailedinformationon
programmingrefertopage17‘Programming
yourespressomachine’.
Steam
Thesteamfunctionallowsthecoffeemaker
toproducesteamoutofthesteamwandfor
texturingmilk.
Toactivatethesteamfunction,thecoffee
makersimplyneedstopressthe‘STEAM’
button.Bydesignthetemperatureofthe
espressomachinewilladjustasnecessary.
Theremaybeashortdelaywhileyouwait.
Note:Whenthecoffeemakerhasactivated
thesteamfunctionthelightaroundthe
‘STEAM’buttonwillshowaconstantred
lightandthelightbehindthe‘MANUAL’,
‘SINGLE’and‘DOUBLE’buttonswillgooff.
Additionallythelightonthe‘POWER’button
willremainon.
Note:Ifthelightbehindthe‘STEAM’button
isflashingitmeanstheespressomachine
isadjustingthetemperatureoftheheating
system.Youwillbeabletousethesteam
whileitisheatingupbutthisisnotadvised
asthesteamwillbewetterthanifthe
machineisfullyheatedup.
Oncetheespressomachineisheatedtothe
correcttemperature,sothelightbehindthe
‘STEAM’buttonstopsflashingandshowsa
constantredlight,thecoffeemakerisableto
usetheespressomachine.
Thecoffeemakersimplyneedstoturn
thesteamandhotwatercontroldialanti-
clockwisetothe‘MAX’settingtostartand
turnitbacktothe‘OFF’positiontostop.
Pressthe'STEAM'buttonagaintodeactivate
thesteamfunction.
Note: Whenyouhavefinishedsteaming,
ensurethesteamandhotwatercontroldial
isfullyturnedoff.Ifthesteamandhotwater
controldialisleftopen,thecoffeemaker
willnotbeabletoswitchtothe‘COFFEE’or
‘HOTWATER’functions.

Using the control panel (continued)
11
Note:After10minutesofinactivityinthe
steammode,theespressomachinewill
automaticallyswitchbacktothe‘READY
MODE’.
Hot Water
Thehotwaterfunctionallowsthecoffee
makertoreleaseacontrolledflowofhot
waterformakinglongblacks,hotchocolates,
pre-heatingcupsandglassesandbrewing
teas.
Toactivatethehotwaterfunction,the
coffeemakersimplyneedstopressthe‘HOT
WATER’button.
Note:Whenthecoffeemakerhasactivated
thehotwaterfunctionthelightaroundthe
‘HOTWATER’buttonwillshowaconstant
redlightandthelightbehindthe‘MANUAL’,
‘SINGLE’and‘DOUBLE’buttonswillgooff.
Additionallythelightonthe‘POWER’button
willremainon.
Thecoffeemakersimplyneedstoturn
thesteamandhotwatercontroldialanti-
clockwisetothe‘MAX’settingtostartand
turnitbacktothe‘OFF’positiontostop.
Pressthe‘HOTWATER’buttonagainto
deactivatethehotwaterfunction.
Note:Whenyouhavefinishedusingthehot
water,ensurethesteamandhotwaterdialis
fullyturnedoff.Ifthesteamandhotwater
dialisleftopen,thecoffeemakerwillnotbe
abletoswitchtothe‘COFFEE’or‘STEAM’
functions.
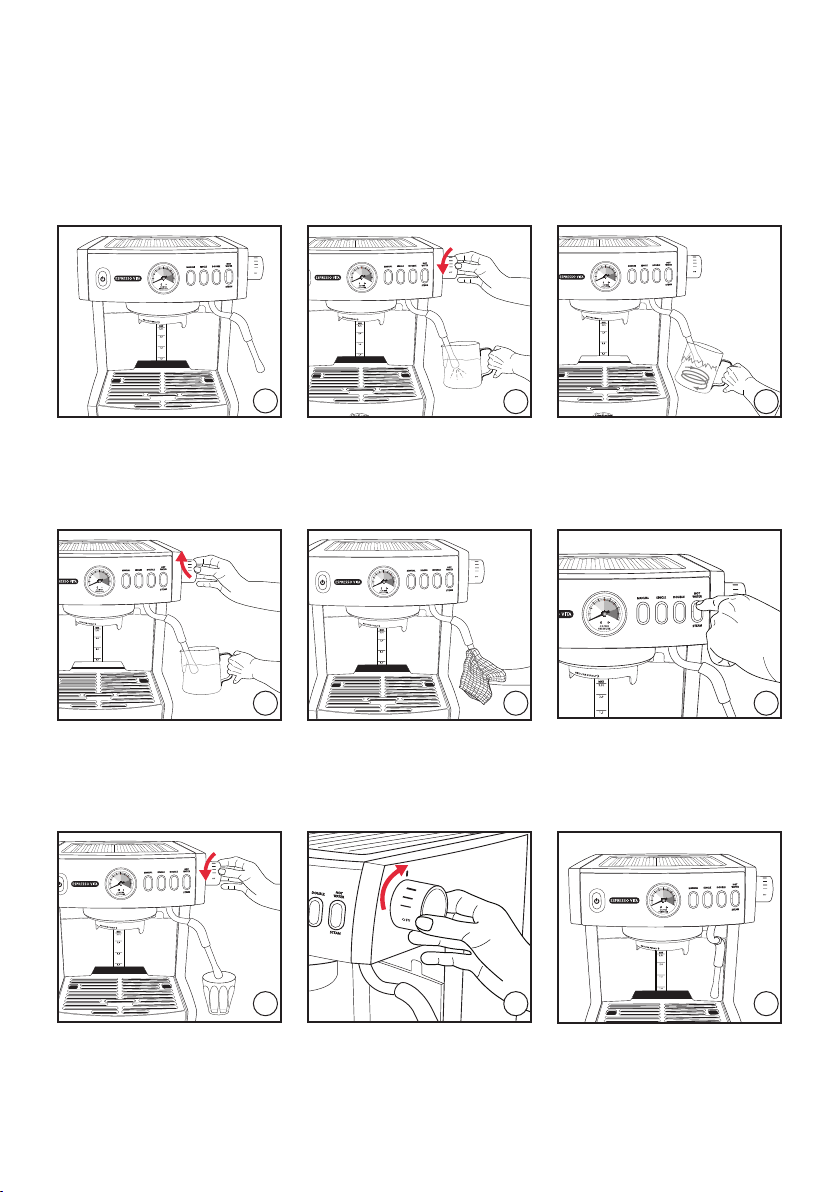
1212
Reference guide to using your
espresso machine
1
2
3
8
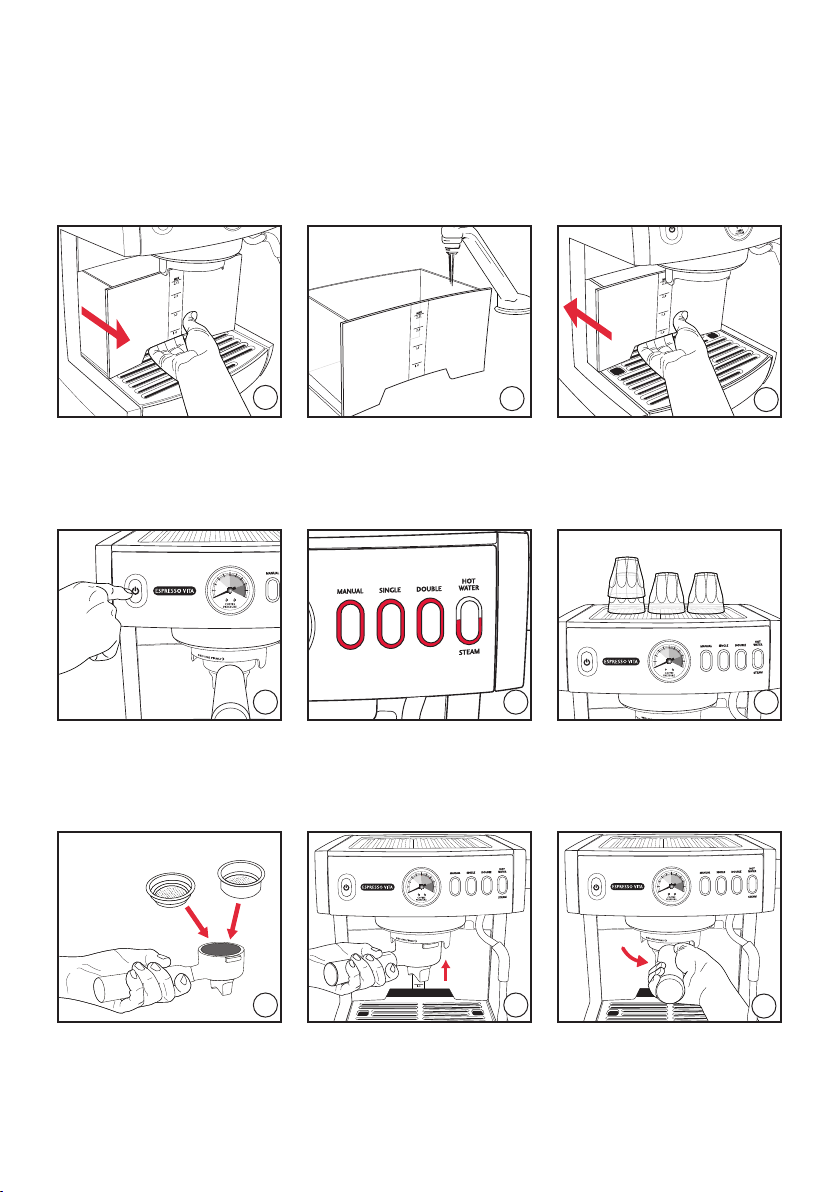
Preparing the espresso machine
4 5 6
Double filter basket
Single filter
basket
9
Selectappropriatefilterand
placeintogrouphandle.
Placegrouphandleonto
grouphead.
Turngrouphandletothe
right,soitisfirmlylocked
intoposition.
7
Press'POWER'buttontoturn
uniton.
Controlpanellitandreadyto
use.(ReadyMode)
Warmingtheespressocups.
Removewaterreservoirfrom
frontofunit.
Fillatsinkwithcoldwater. Replacethewaterreservoir.
Reference guide to using your espresso machine (continued)
16
12
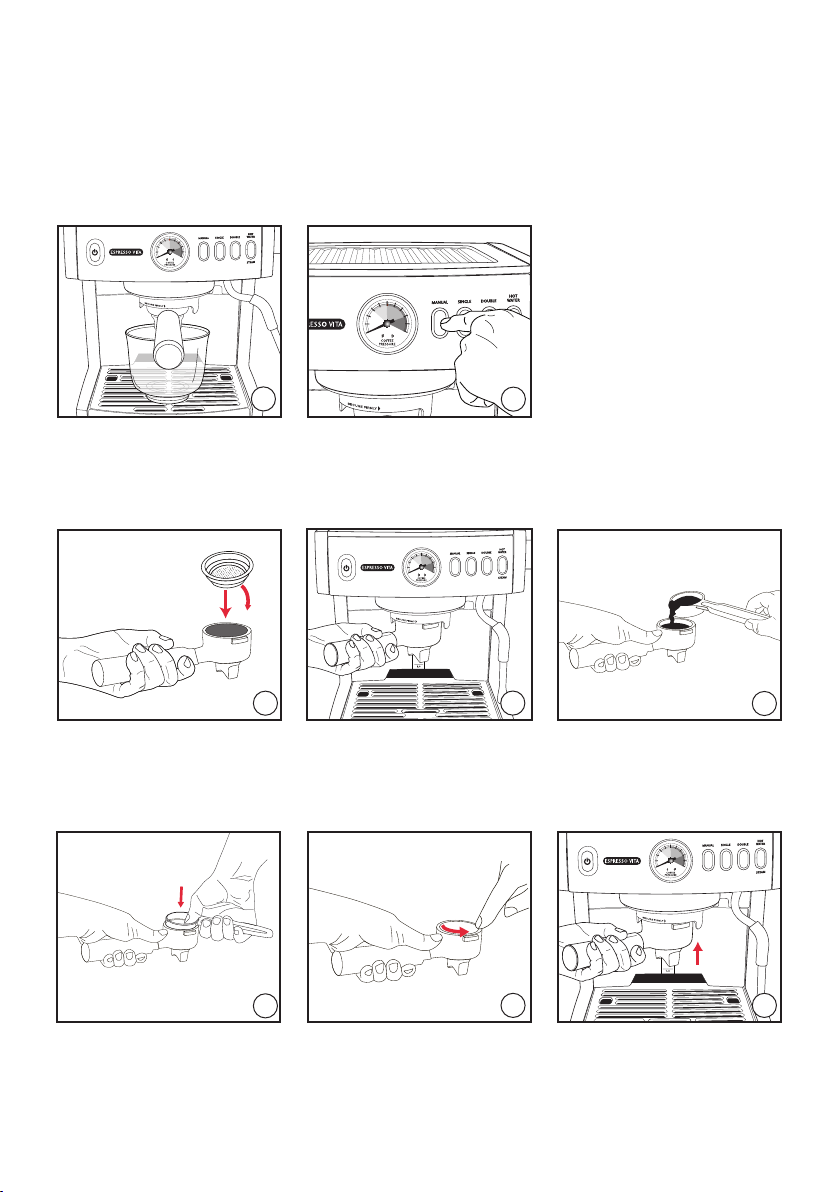
Making the espresso
15
10
11
13
Placelargecontainerunder
bothpouringspouts.
Pressthe‘MANUAL’button
andallowthewatertorun
through.Pressbuttonagain
tostop.
Selectappropriatefilterand
placeintogrouphandle.
Holdgrouphandleunder
groupheadandpurgewith
watertopreheat.
Placefinelygroundcoffee
intofilterbasket.
14
Tampthecoffeegrinds.The
levelofcoffeemustbe3mm
belowthefilterbasketrim.
Wipetheedgeoffilterto
removeanycoffeegrinds.
Placegrouphandleonto
grouphead.
17
13
14
Reference guide to using your espresso machine (continued)
14
19 20
25
23
18
21 22
24
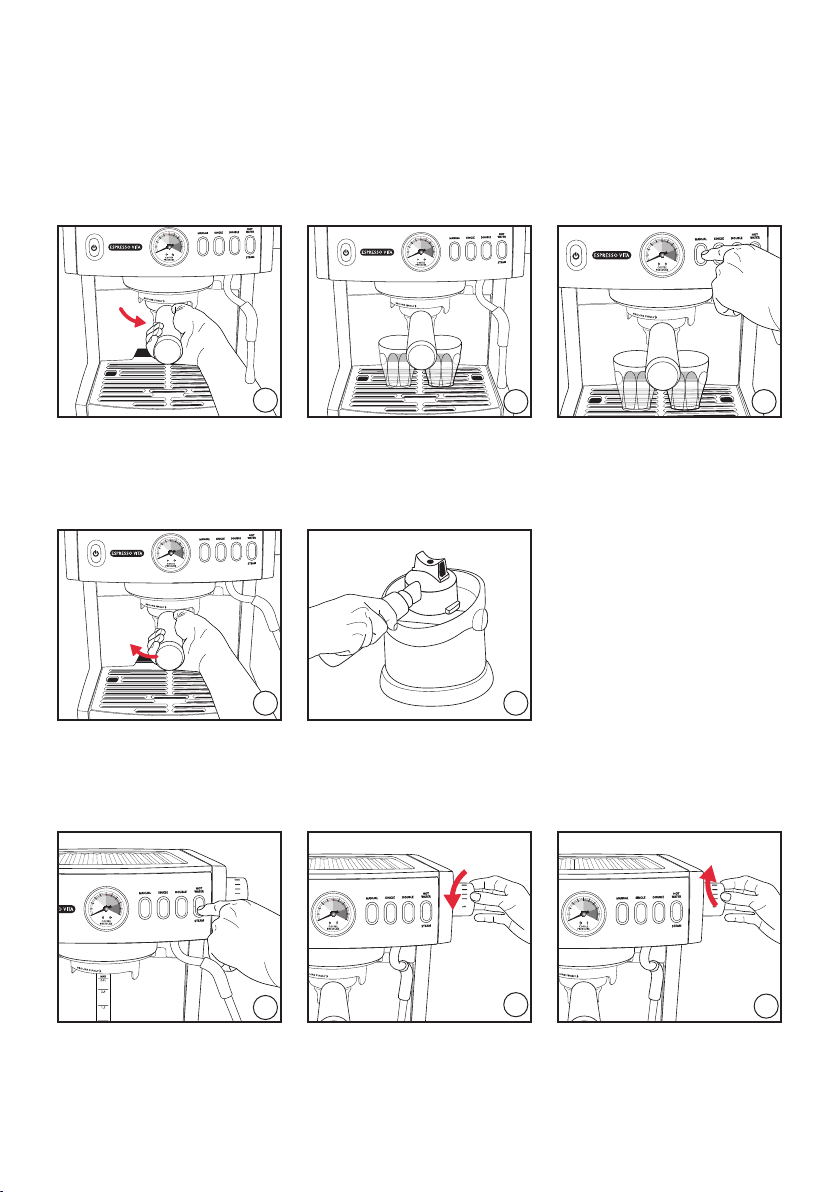
Removegrouphandleby
turningtotheleft.
Discardtheusedcoffee
grinds.
Pressthe'STEAM'buttonto
activatesteammode.
Purgethesteamwandby
turningdialanti-clockwise.
Turnoffsteambyturning
dialclockwise.
Turngrouphandletothe
right,soitisfirmlylocked
intoposition.
Placeglasses/cupsbelow
pouringspouts.
Pressthe‘MANUAL’button
foracontinuouspour.Press
buttonagaintostoppour.
Texturing milk
Reference guide to using your espresso machine (continued)
26
29
27 28
30
32 33 34
Placecupunderhotwater
nozzleandactivatethehot
waterfunctionbyturningdial
anti-clockwise.
Closethehotwaterby
turningdialclockwise.
Swingthesteam/hotwater
wandoverthedriptray.
Closethesteambyturning
dialclockwise.
Wipesteamnozzleandwand
withdampclothandpurgea
smallamountofsteam.
Pressthe'HOTWATER'
buttontoactivatehotwater
mode.
Swingsteamwandtothe
sideofespressomachine.
Placesteamwandintomilk,
approx.1cmbelowsurface
andactivatethesteam
function.
Anglejugtoreststeamwand
onspoutandplacenozzlejust
belowsurfaceofthemilk.
Hot water
31
15
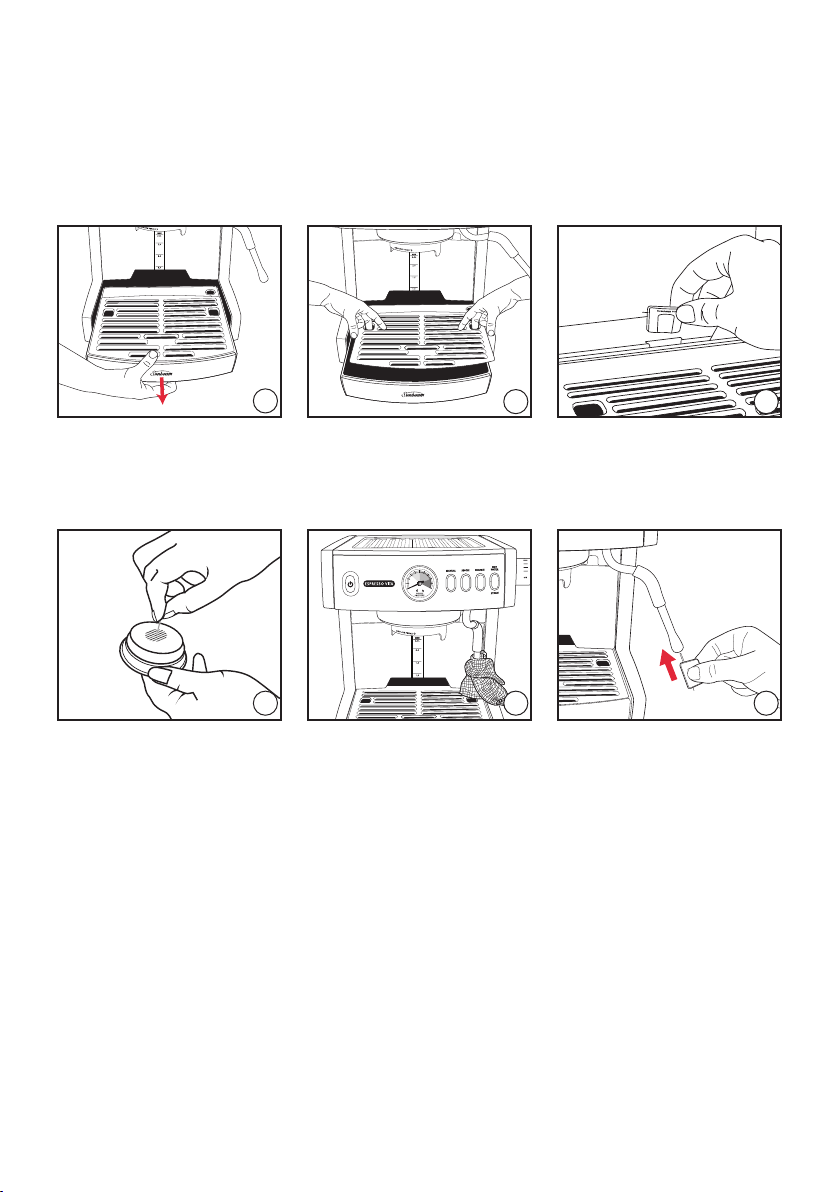
16
CLEANING PIN
Removethedriptray. Removedriptraygrill. Removeboththewater
reservoiranddriptraytoget
tothe'cleaningpin'.
Insertthinnerendof
cleaningpinintothesingle
holeinthebaseofthefilter.
Wrapsteamwandwithdamp
clothandturnsteamonfor
10seconds.
Insertthickerendofcleaning
pinintotheholeinthebase
ofthesteamwand.
35
36 37
38 39 40
Reference guide to using your espresso machine (continued)
16
Cleaning

Programming your espresso
machine
TheEspressoVitahasprogramming
capabilities.Basedoncafésettingsthe
‘SINGLE’and‘DOUBLE’espressofunctions
aresetat30and60mls.Howeverby
followingafewsimplestepsthecoffeemaker
canpersonalisetheespressomachineto
achieveaserveofespressotoexactlyhow
theylikeit.
Programming Single Espresso
1.Tostartprogrammingtheespressomachine
needstobein‘STANDBYMODE’.Sothe
machineispluggedinandswitchedonat
thepowerpoint,butthemachineitselfis
notpoweredon.
2.Preparethefilterhandle.Fitthegroup
handlewiththesinglefilterbasket(12)
andfillwithfinelygroundcoffee(14).
Usingthecoffeetampsupplied,tamp
thecoffeegrinds(15).Securethegroup
handletothegrouphead(17)(18).
3.Placeacupunderbothpouringspouts
(19).
4.Tocommenceprogrammingpressandhold
downboththe‘SINGLE’and‘DOUBLE’
espressobuttonswhilestillholdingdown
thesebuttonsbrieflypressthe‘POWER’
buttonandreleaseallbuttons.Thelights
aroundthecoffeebuttonswillstartto
slowlyflash,dimmingupanddown.
5.Pressthe‘SINGLE’espressobuttononce
tostarttheespressopour.
6.Allowtheespressotopouruntilthedesired
level.Oncethedesiredlevelisreached
stoptheespressopourbypressingthe
‘SINGLE’espressobutton.Alongbeep
willsignifythatthenewsettingforthe
‘SINGLE’espressooperationhasbeen
programmedandstoredintothemachines
memory.
7.Theespressomachinewillthengointo
‘READYMODE’andisreadytomake
espressoatthepushofabutton.
Programming Double Espresso
1.Tostartprogrammingtheespressomachine
needstobein‘STANDBYMODE’.Sothe
machineispluggedinandswitchedonat
thepowerpoint,butthemachineitselfis
notpoweredon.
2.Preparethegrouphandle.Fitthegroup
handlewiththedoublefilterbasket(12)
andfillwithfinelygroundcoffee(14).
Usingthecoffeetampsupplied,tamp
thecoffeegrinds(15).Securethegroup
handletothegrouphead(17)(18).
3.Placetwocupsundereachpouringspout
(19).
4.Tocommenceprogrammingpressandhold
downboththe‘SINGLE’and‘DOUBLE’
espressobuttonswhilestillholdingdown
thesebuttonsbrieflypressthe‘POWER’
buttonandreleaseallbuttons.Thelights
aroundthecoffeebuttonswillstartto
slowlyflash,dimmingupanddown.
5.Pressthe‘DOUBLE’espressobuttononce
tostarttheespressopour.
6.Allowtheespressotopouruntilthedesired
level.Oncethedesiredlevelisreached
stoptheespressopourbypressingthe
‘DOUBLE’espressobutton.Alongbeep
willsignifythatthenewsettingforthe
‘DOUBLE’espressooperationhasbeen
programmedandstoredintothemachines
memory.
7.Theespressomachinewillthengointo
‘READYMODE’andisreadytomake
espressoatthepushofabutton.
Resetting the Factory Settings
Torevertbacktotheoriginalfactorysettings;
1.Insertthepowercordintoa230-240VAC
poweroutletandswitchthepower‘ON’.
17

18
Important:Althoughtheespressomachineis
onatthepoweroutletensurethattheactual
espressomachinepoweris‘OFF’.Therefore
nolightswillbeilluminatedontheespresso
machinecontrolpanel.
2.Pressandholddownthe‘POWER’button.
3.Whenyouhearasinglelongbeepthis
willindicatethattheespressomachine
willhavereturnedtotheoriginalfactory
settings.
Programming your espresso machine (continued)

19
Preparing your espresso machine
before use
1.Placetheespressomachineontoadry,
stablebenchtop.
2.Ensurethedriptrayandgrillareinplace.
3.Filltheespressomachinewithwater.To
doso,ensurethegrouphandlehasbeen
takenoutofthegroupheadandswing
thesteamwanttotheright,outofthe
way.Thenusingthehandleatthefront
ofthewaterreservoirsimplyslideoutthe
reservoirfromthefrontoftheespresso
machine(1).Thenfillwithfreshcoldwater
orfilteredwater(2).Replacethewater
reservoirfirmlybyslidingitbackintoplace
(3).
4.Insertthepowercordintoa230-240V
ACpoweroutletandswitchthepoweron.
Pressthe‘POWER’buttononcetoturnthe
espressomachineon(4).Thelightonthe
‘POWER’buttonwillilluminateredand
startflashing.Thisistoindicatethatyour
espressomachineisonandisheatingup.
Whentheredlightonthe‘POWER’button
stopsflashingandturnstoaconstant
redlight,thisindicatesthattheespresso
machineisheatedandreadytouse.The
lightsaroundthe‘MANUAL’,‘SINGLE’,
‘DOUBLE’,‘STEAM’and‘HOTWATER’
buttonswillalsoshowaconstantredlight
(5).Whenthecontrolpanelislitinthis
way,thisindicatesthatthemachineisin
readymode.
5.Placeglassesandcupsonthewarming
plate(6).
Important:Forfirsttimeuseorifthemachine
hasnotbeenusedforsometime,itis
importantthatthemachineisrinsedas
follows:
6.Fitthegrouphandlewitheitherthesingle
ordoublefilterbasket(7).Securethe
grouphandletothegrouphead(8)(9).
7.Placeasufficientlylargecontainerunder
bothpouringspouts(10).
8.Oncetheespressomachineisswitchedon
andheated,sothelightonthe‘POWER’
buttonisredandthelightsaroundthe
‘MANUAL’,‘SINGLE’,‘DOUBLE’and‘HOT
WATER’buttonsshowaconstantredlight,
theespressomachineisheatedandready
touse.
Tip:Rememberifthe‘POWER’lightis
flashingred,thisindicatesthattheespresso
machineisonandisheatingup.
9.Pressthe‘MANUAL’button(11)andallow
thewatertorunthroughuntilthewater
reservoirisempty.
Note:Youwillneedtopressthe‘MANUAL’
buttonagaintostopthewaterflow.Itdoes
nothappenautomatically.

Preheat Glasses
1.Preheattheglasses/cupsbyfillingthem
withhotwaterasthiswillassisttopreserve
thecremaoftheespresso.Settheglasses/
cupsaside.
Caution:Thehotwaterwillbeclosetoboiling
temperature.Takecaresoasnottocrackthe
glassesorburnyourself.
Preheat Group Handle and Filter Basket
2.Selecttheappropriatefilterbasketand
placeitintogrouphandle(12).
Tip:Usethesinglefilterbasketforasingle
serveofespressoandthedoublefilterbasket
foradoubleserveofespresso.
3.Takethegrouphandle,holditunderthe
groupheadandpurgewater.Withthefilter
basketpositionedunderthegrouphead
pressthe‘MANUAL’buttontostartthe
waterflowandpressitagaintostop(13).
4.Drythefilterbasket.
Dosing and Tamping
5.Usingagrinderorthemeasuringspoon
supplied,placetheappropriateamountof
finelygroundcoffeeintothefilterbasket
(14).
6.Resetthegrouphandlewiththefilter
basketinpositionontothebenchtop.Take
thecoffeetamp,applyfirmlevelpacking
pressure(15),twisting90degreesto
polishthegrounds.Thissealsthesurface
ofthecoffeecake.
7.Brushanyexcesscoffeegroundsfrom
aroundtheedgeofthefilterbasket(16).
Important:Besuretoplaceasufficient
amountofcoffeegrindsintothefilterbasket
withoutoverdosingitwithcoffee.Once
tampedthelevelofcoffeeshouldbeonlya
fewmillimetresbelowtherimofthefilter
basket.Tocheckthis,lockthegrouphandle
ontothegrouphead(17)(18).
Thenwithouthavingmadeacoffeeremove
thegrouphandle(21)andinspectthetop
ofthetampedcoffee-itshouldhaveonlya
slightindentfromtheshowerscreen.Ideally
thetopofthetampedcoffeeshouldbe
fractionallybelowtheshowerscreenandthen
duringtheespressopourthecoffeecakewill
expandupandontotheshowerscreen.
Tip:Thecoffeedosageandthedegreeof
tampingshouldremainthesameeverytime
youmakeacoffee.Theonlythingthatshould
varyisthecoarsenessofthecoffeegrounds
andthiswillvarydependingonthebean.For
exampletoachieveaslowerespressopour
rateuseafinergrindandacoarsergrindfor
afasterespressopourrate.
Note: Ifpurchasingpre-groundcoffeeor
youhavesomeonegrinditforyou,request/
purchaseaveryfinegrind,thesamethat
wouldbeusedforacommercialespresso
machine.
Tip:Ensurethecoffeetampisdrybecauseif
itiswetthecoffeegrindswillsticktoit.
The Espresso Pour
8.Lockthegrouphandleontothegrouphead
(17)(18).
9.Emptytheglasses/cupsandplacebelow
thepouringspouts(19).
Note: Checktoseethattheespressomachine
isreadyforuse(seep8ReadyMode).
Rememberthatifthe‘POWER’lightis
flashingred,thisindicatesthattheespresso
machineisonandheatingup.
10.Pressanyofthecoffeebuttonstostart
theespressopour.
Important: Shouldcoffeegrindscomeout
fromthetopofthegrouphandlethisisa
signthatthegrouphandlehasnotbeen
firmlylockedintopositionand/orthelevelof
coffeeinthebasketistoohigh.
Guide to the perfect espresso
20

Guide to the perfect espresso (continued)
Pre-Infusion
11.Oncetheespressooperationhasbeen
activated,beforetheespressopourstarts,
theprogressivepre-infusionfeaturewill
releasethreeshortburstsofgradually
increasingwaterpressureontothecoffee
cake.Afterthis,thefullwaterpressure
isappliedtothecoffeecakeandthe
espressowillpourfreely.
12.Checktheespressopour.Theideal
pourstartsoutdarkandthensoon
afterbecomescaramelwithreddish
reflections.Thepourshouldhang
verticallyoneachspoutandflowslowly
likedrippinghoney.
Tip:Oncetheespressopourstartstolighten
incolouryoushouldcutoffthepour.
13.Serveespressoimmediately.
Caring for your Espresso Machine
13.Removethegrouphandlefromthegroup
head(21).
14.Discardtheusedcoffeegrindsfromthe
filterbasket(22).
Tip:Aftereachuseoftheespressomachine
werecommendthatasmallamountofwater
iscycledthroughthegroupheadasthiswill
washoutanyoldorusedcoffeegrindsstuck
totheundersideofthegrouphead.Simply
pressthe‘MANUAL’buttonandallowsome
watertorunthrough.Pressbuttonagain
tostop.Wealsorecommendthatasmall
amountofwaterispurgedthroughthesteam
wandaftereachuse.
Eco Mode and Standby Mode
After1hourofnon-useinReadyModethe
espressomachinewillautomaticallyswitch
toEcoMode.Anindicationthatthemachine
isinEcoModeisthelightonthe‘POWER’
buttonwillslowlyflashred.WhileinEco
Modethemachineusesreducedpowerand
maintainsalowertemperature.WhileinEco
Mode,theespressomachinefunctionscan
easilybereactivatedbysimplypressingthe
‘MANUAL’,‘SINGLE’,‘DOUBLE’,‘STEAM’
or‘HOTWATER’buttons.Thetemperature
oftheespressomachinewillthenadjustas
necessary.
Afterafurther1hourofnon-usein
EcoModetheespressomachinewill
automaticallyswitchtoStandbyMode.The
lightsonthecontrolpanelwillallswitchoff.
TobringtheespressomachineoutofStandby
Modesimplypressthe‘POWER’button.
Themachinewillthenpoweronandbegin
heatingup.
21

Milktexturingisthesteamingofmilk.The
steamdoestwothings,heatsthemilkand
alsothesteammixesairwiththemilkto
forman‘emulsion’oftinybubblesthatgives
asilkyvelvettexture.Similartomakingan
espresso,perfectingtheartofmilktexturing
takestimeandpractice.
Tip: Rememberespressoisthefoundationfor
allespresso-coffeedrinksandthemilkisthe
variable.
Beforestartingtoprepareformilktexturing,
ensuretheespressomachineisinsteam
mode,sotheredlightonthe'POWER'
buttonandredlightaroundthe'STEAM'
buttonareilluminated.
Note:Shouldtheespressomachinenotbe
insteammode,simplypressthe'STEAM'
buttontoactivate(23).
Tip:Itisrecommendedtousethesteam
functionafterfirstmakingespressoorusing
thehotwaterfunction.Makingcoffeein
thisorderwillreduceanywaitingtimeor
waterusagewhilethemachineadjuststothe
correcttemperature.
1.Determinehowmuchmilkisneededbased
onthenumberofcupsbeingmadeorthe
sizeofthetexturingjug.
Tip: Keepinmindthatthevolumeofmilk
willincreaseor’stretch’duringthetexturing.
2.Pourcoldrefrigeratedmilkintoastainless
steeljug,between¹/
³
to²/
³
full.
Tip: Bestresultswillbeachievedbyusinga
cleanjugandcold,freshmilk.
3.Purgethesteamwandofanywater.With
thesteamwandpositionedoverthedrip
trayactivatethesteamfunctionbyturning
thesteamandhotwatercontroldialanti-
clockwiseasfarasitwillgo(24).Once
anywaterhasbeenpurgedclosethesteam
byturningthesteamandhotwatercontrol
dialclockwise(25).
4.Swingthesteamwandtothesideofthe
espressomachine(26).
5.Placethesteamwandintothemilksothat
thetipofthesteamnozzleisjustbelow
thesurfaceofthemilkandactivatethe
steamfunctionbyturningthesteamand
hotwatercontroldialanti-clockwiseasfar
asitwillgo(27).
6.Anglethejugsothatthesteamwandis
restingonthespoutofthejugandlower
thejuguntilthetipofthesteamnozzle
isjustbelowthesurfaceofthemilk.The
nozzleshouldsitjustoffcentreinthe
milk.Thiswillstarttocreateawhirlpool
actioninthemilk(28).
Note:Howweintroducetheairtothemilk
willdeterminetheconsistencyofthefoam.
Ifwecatchlargegulpsofairthequalityof
thefoamwillreflectthisbyhavinglarge
bubbles.Ifwecanintroduceairtothemilk
inacontrolledgentlefashionindicatedbya
gentlehissingsoundthemilkwillhaveafine
aeratedbeadinthetexturedfoam.
7.Asthesteamheatsandtexturesthemilk,
thelevelofthemilkinthejugwillbeginto
rise.Asthishappensfollowthelevelofthe
milkbyloweringthejug,alwayskeeping
thetipofthesteamnozzlejustbelowthe
surface.Thiswillcreateaslighthissing
noise.
Tip:Theamountoffoamrequiredwillvary
dependingonthedrinksbeingmade,for
exampleacappuccinorequiresmorefoam
thanaflatwhite.
8.Closethesteamimmediatelywhenthe
milkisheatedtobetween60-65°Cby
turningthesteamandhotwatercontrol
dialclockwise(29).
Tip:Theoptimumdrinkingtemperatureof
milkisbetween60-65°Candweadvise
youuseamilkthermometertoachieve
Guide to milk texturing
22

Using the hot water function
thecorrecttemperature.It'simportantto
rememberthatifthemilkisnotheated
longenoughthedrinkwillbetoocooland
ifheatedfortoolongitwillstarttoboilat
around72°Candalltexturewillbelost.
Tip:Ifyoudon’thaveathermometeragood
indicationthatthecorrecttemperaturehas
beenreachediswhenthejugbecomestoo
hottoleaveyourfingersincontact.
Important:Donotboilthemilkasthetexture
andtastewillbeaffected.
9. Removethejug,immediatelywipethe
steamnozzleandwandwithacleandamp
cloth(30)andpurgeasmallamountof
steam.
10.Withthejuginhandtapthejugonthe
benchtoptoreleasethetrappedair
bubbles.Agitatethemilkasthishelps
themilkandfrothcombineforaneven
consistency.
Note:After10minutesofnon-usein
steammode,theespressomachinewill
automaticallyreturntoreadymode.
Thehotwaterfunctionisidealforpreheating
cupsandglasses,brewingteas,preparing
longblacks,hotchocolatesandfillingcoffee
plungers.
Whenusingthehotwaterfunctionthe
espressomachineneedstobein‘HOT
WATER’mode,sotheredlightonthe
‘POWER’buttonandtheredlightaroundthe
‘HOTWATER’buttonareilluminated.
Note:Shouldtheespressomachinenotbe
inhotwatermode,simplypressthe‘HOT
WATER’buttontoactivate(31).
1.Swingthesteamandhotwaterwandtothe
sideoftheespressomachine.
2.Placethecuporcontainerunderthe
steam/hotwaternozzleandactivatethehot
waterfunctionbyturningthesteamand
hotwatercontroldialanti-clockwiseasfar
asitwillgo(32).
Caution:Thewaterfromthehotwaternozzle
willbeclosetoboilingtemperature.Take
careasboilingwatermayscald.Additionally,
thewandwillbehotandmayburn.
3.Onceyouhavedispensedtherequired
amountofhotwaterintothecupor
container,closethehotwaterbyturning
thesteam/hotwatercontroldialclockwise
(33).
4.Removethecuporcontainerandswingthe
steam/hotwaterwandoverthedriptrayto
catchanydripsofwater(34).
Guide to milk texturing (continued)
23
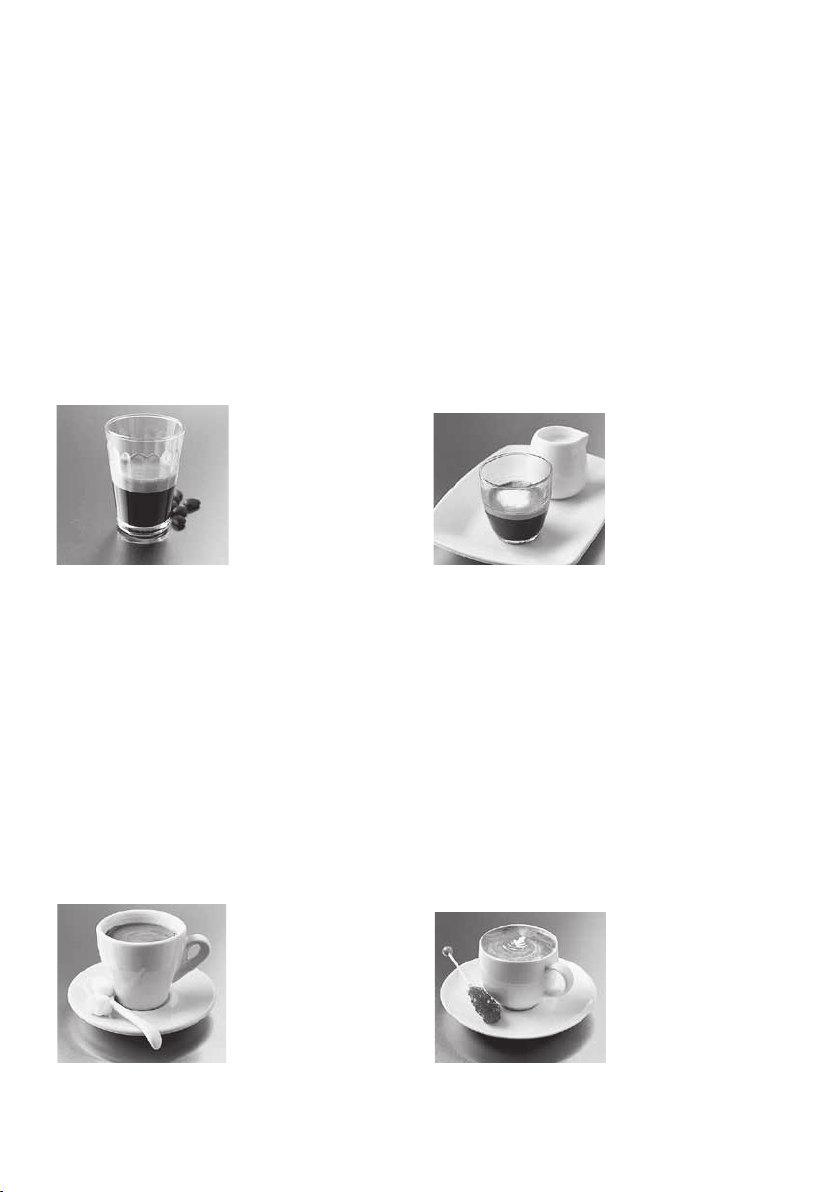
ESPRESSO (SHORT BLACK)
Espressoisaconcentrated,fullbodiedcoffee
withastablelayerofcreamontop–known
as‘crema’.Anespressoisthefoundationof
allcafécoffee.Variationsareachievedby
addingdifferentamountsofmilkandfroth.
•90mLespressoglassordemitassecup
•singleespresso(30-35mL)
LONG BLACK
Astandardespressowithhotwater,servedin
aregularcoffeecupormug.Thehotwateris
addedfirstsothatthe‘crema’ismaintained.
•190mLcup
•hotwater(totaste)
•singleordoubleespresso
MACCHIATO
Macchiato,Italianfor‘tostainormark’.
Traditionallyservedasastandardespresso
withadashofmilkandasmalldollopof
frothintothemiddleofthe‘crema’.
•90mLespressoglassordemitassecup
•singleordoubleespresso
•markedwithsteamedmilkfroth
FLAT WHITE
Anotheroldfavourite,theFlatWhiteis
anespressowithsteamedmilk,servedin
aregularcoffeecupormug.Thelayerof
frothedmilkontopshouldbe2mmtoseal
thecoffee.
•190mLcup
•singleordoubleespresso
•steamedmilk
Espresso Recipes
24
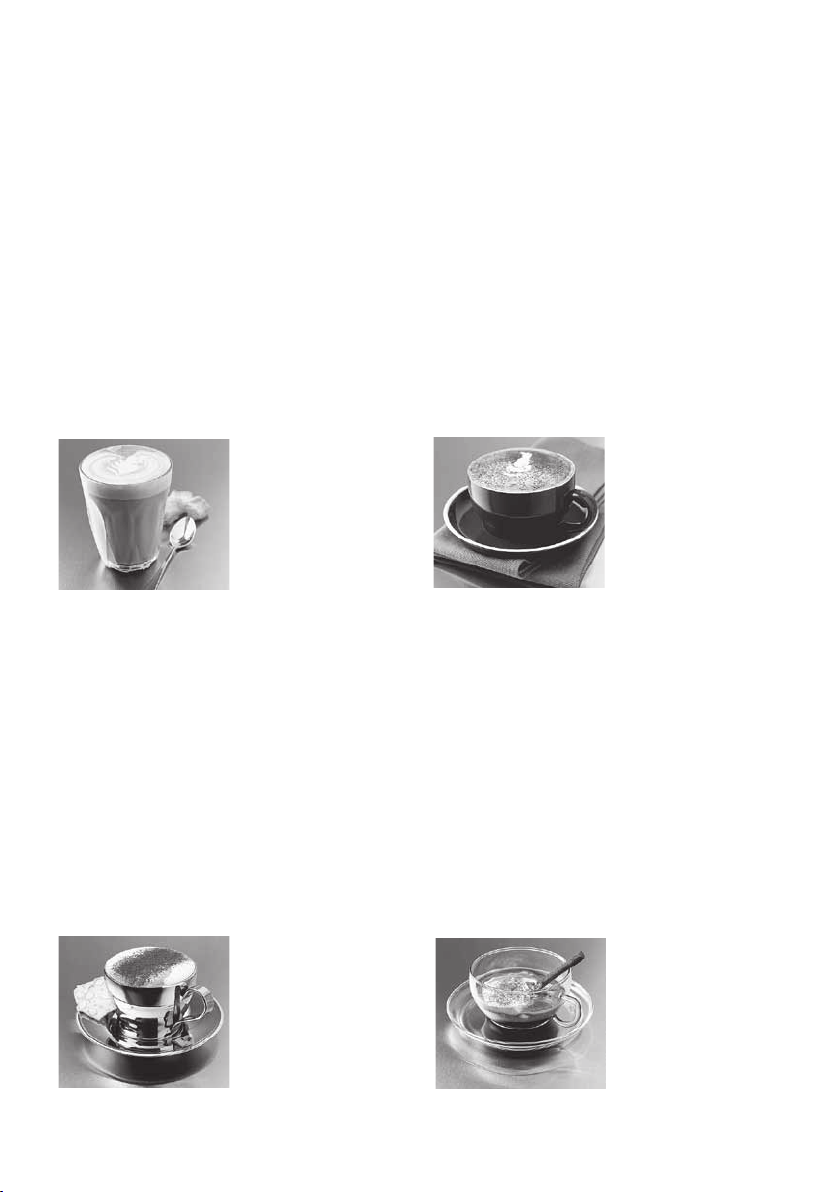
CAFFE LATTE
Anespressowithsteamedmilk,typically
servedinaglass.Thelayeroffrothedmilkon
topshouldbe10mmtosealthecoffee.
•220mLglassorcup
•singleordoubleespresso
•steamedmilk
CAPPUCCINO
Thisdeliciousdrinkisanespressowith
steamedmilk,toppedwithcreamyfrothand
adustingofchocolate.Theresultingdrinkis
approximatelytwo-thirdsmilkycoffee,one-
thirdfroth.
•190-240mLcup
•singleordoubleespresso
•two-thirdsmilkycoffee,one-thirdfroth
•dustedwithchocolate
CAFFE MOCHA
Madeinasimilarwaytoacappuccinobut
withtheadditionofdrinkingchocolate.
Simplystirthechocolateintotheespresso
priortoaddingthesteamedmilkandfroth.
•190-240mLcuportallglass
•singleordoubleespresso
•twoteaspoonsofdrinkingchocolate
•two-thirdsmilkycoffee,one-thirdfroth
CON PANNA
AvariationontheoriginalViennacoffee,this
deliciousdrinkismadeupofanespresso
toppedwithlightlywhippedcream.Itcan
alsobedustedwithcinnamonordrinking
chocolate.
•190mLcup
•singleordoubleespresso
•lightlywhippedcream
•dustedwithcinnamonorchocolate
Espresso Recipes (continued)
25

Care and Cleaning
Thecoffeemakingprocessinvolvesextracting
oilsoutofcoffeegrindstomakeespresso
coffee.Depositsoftheseoilsbuildupover
timeandaffectthetasteofthecoffeeand
operationoftheespressomachine.
Regularcleaningtoremovetheseoilsis
essentialandwillmaintainthequalityofthe
coffeetheespressomachineproducesand
resultinlessmaintenancebeingrequired.
Thisiseasytodobyfollowingafewquick
andeasycleaningstepsaftereachcoffee
makingsession;
Cyclewaterthroughthegrouphead,
Purgesteamthroughthesteamwand,
Wipethesteamwandcleanwithadamp
clothimmediatelyafteruse,
Removethefilterbasketfromthegroup
handleandcleanawayanyoldcoffeeoils,
and
Emptythedriptrayandrinse.
Important:Neverwashanyoftheespresso
machinepartsoraccessoriesinthe
dishwasher.
Drip tray and grill
Removethedriptrayandgrillatregular
intervalstoempty(35)(36).Cleanwith
waterandalittlenon-abrasivewashingup
liquid,rinseanddry.
Overtimeitisnormalfortheinsideofthe
driptraytobestainedbytheoilsinthe
coffee.
Group head, group handle & filter baskets
Thefilterbasketsandgrouphandleshould
berinsedwithwarmwateraftereachuseand
thendriedthoroughly.
Tocleanthegroupheadofanyoldcoffee
grindscyclewaterthroughandwipethe
groupheadandaroundtheinsiderimwitha
dampcloth.
Shouldtheholesinthefilterbasketsbecome
cloggedwithcoffeegrindsuseafinebristled
brushtoremovethem.Alsoyoucanuse
thecleaningpinwhichissuppliedwiththe
espressomachine.Thecleaningtoolis
locatedbehindthewaterreservoiranddrip
tray(37).Thecleaningtoolhastwopinsat
eitherend.Oneisthethinnerandshorter
ofthetwoandisforcleaningouttheholein
thefilterbasket.Insertthecleaningpininto
thesingleholeinthebaseofthefilter(38).
Group head rubber seal
Thegroupheadsealislocatedonthe
undersideofthegroupheadandcreatesa
sealagainstthegrouphandleduringthe
espressopour.
Note:Duringlongperiodsofnon-usewe
recommendthatthegrouphandlenotbe
leftattachedtothegroupheadasthiswill
reducethelifeoftheseal.
Overtimethesealwillloseitselasticity
andrequirereplacement,dependingonuse
usuallyevery12months.Signsthattheseal
isdeterioratingarewhenthegrouphandle
cannotcreatethenecessarysealandsteam
and/orwaterescapesfromaroundthegroup
headduringtheespressopour.Anothersign
maybewhenthegrouphandlelocksoffto
therightratherthanthefront.
Note:ContactSunbeamon1300881861
shouldyouthinkthatthegroupheadseal
needsreplacing.Pleasedonotattempt
tochangethesealwithoutfirstconsulting
Sunbeam.
26

Cup warming plate and exterior
Wipeovertheunitwithadampclothandwipe
dry.Donotuseabrasivesormetalscourersas
thesewillscratchtheexteriorsurface.
Steam wand
Keepingthesteamarmcleanisessential
toensuremaximumefficiencyofthesteam
function.Abuildupofcaramelised/driedmilk
onthesteamwandwillimpairthesteaming
andtexturingabilityoftheespressomachine.
Thesteamnozzlehasbeenspeciallydesigned
tobeperfectlysmooth.Thiswillhelpto
reducebuildupofdriedmilk.
Important:Wipethesteamwandcleanwitha
dampclothimmediatelyaftereachuseand
purgeasmallamountofsteam.
Shouldthemilkdry/carameliseonthe
steamwand,simplywrapthewandwitha
cleandampcloth,swingthesteamwand
overthedriptrayandturnthesteamonfor
approximately10seconds(39).Withthe
clothstillonthesteamwandleavetositfor
about5minutesandyouwillfindthatafter
thistimethedry/caramelisedmilkwilleasily
wipeaway.Repeatprocessifstilldirty.
Important:Nevercleanthesteamwandwith
anabrasivepadasthiswilldamagethe
steamwand.
Shouldthesteamwandbecomeblocked,
suppliedwiththeespressomachineisa
cleaningpin.Thecleaningtoolislocated
behindthewaterreservoiranddriptray(37).
Thecleaningtoolhastwopinsateitherend.
Thethicker,longerpinisforcleaningthe
steamwand.Insertthecleaningpinintothe
holeinthebaseofthesteamnozzle(40).
Shouldthesteamwandremainblocked
unscrewthesteamnozzlefromthesteam
wand.Cleanthesteamnozzlebyonceagain
usingthecleaningpinthenflushunder
runningwater.
Care and Cleaning (continued)
27

Scaleisasurfacebuildupofmineralsthat
naturallyoccurovertimeinallappliances
thatareinvolvedwiththeheatingofwater.
Thereforetheespressomachinewillrequire
occasionaldescaling.Itisrecommended
thattheespressomachineisdescaledevery
4-6months,thiswillvarydependingonthe
frequencyofuseandwaterhardness.
Descaling solution
Useanyofthefollowingwhendescalingthe
espressomachine:
SunbeamEspressoMachineDescaling
Tablets(EM0010)
SunbeamLiquidDescaler(KEO100),or
VinegarSolution.
Descaling the espresso machine
Note:Ensuretheespressomachineisturned
offandthepowercordisunplugged.
1.Removethewaterreservoirandrinseclean.
Dependingonthedescalingsolutionbeing
useduseoneofthefollowing:
A.SunbeamEspressoMachineDescaling
Tablets
Fillthewaterreservoirwith1litreofwarm
waterandplaceadescalingtabletintothe
reservoir.Oncethetablethasdissolved
replacethereservoir,thistakesabout5-7
minutes.
B.SunbeamLiquidDescaler
Fillthewaterreservoirwithapproximately
1.5litresofwater,add1capfulof
SunbeamLiquidDescalerandreplacethe
reservoir.
C.Vinegarsolution
Fillthewaterreservoirwithapproximately
1.5litresofwarmwater,add3tablespoons
ofvinegarandreplacethereservoir.
2.Shouldthegrouphandlebeattachedto
thegroupheadremoveit,rinsethoroughly
underrunningwaterandsetaside.
3.Usingascrewdriverunscrewthebrewing
filter/showerscreenfromtheundersideof
thegrouphead.
4.Removeandsetasidethefilter/screen,
washerandscrewinasafeplace.
Important: Becarefulnottolosethefilter/
screen,washerandscrewonceyouhave
disassembledthegrouphead.
5.Usingasmallbrushscrubinandaround
theareaatthebrewinghead,removingall
coffeegrinds.
6.Placeasufficientlylargecontainerunder
thegrouphead.
7.Insertthepowercordintoa230-240VAC
poweroutletandswitchthepower‘ON’.
Pressthe‘POWER’buttononcetoturnthe
espressomachineon.
Note:Checktoseethattheespressomachine
isreadyforuse(seep8ReadyMode).
Rememberifthe‘POWER’lightisflashing
redthisindicatesthattheespressomachine
isonandisheatingup.
8.Pressthe‘MANUAL’buttonandallow
halfthesolutiontocyclethroughthe
groupheadandthenonceagainpressthe
‘MANUAL’buttontostoptheflow.
Important:Donotrundescalingsolution
throughthesteamwand.
Note:Dependingonthesizeofthecontainer
underthegroupheadonoccasionthismay
needtobeemptiedthroughoutthisprocess.
9.Afterhalfthesolutionhascycledthrough
pressthe‘MANUAL’buttontostoptheflow
andthenpressthe‘POWER’buttontoturn
themachineoff.
Descaling
28

10.Leavethemachineofffor10-15minutes
toallowthedescalingsolutiontotake
affect.
11.Pressthe‘POWER’buttononcetoturn
theespressomachineon.
12.Pressthe‘MANUAL’buttonandallowthe
remainingsolutiontocyclethroughthe
grouphead.Pressbuttonagaintostop.
13.Removethewaterreservoirfromthe
machineandrinsethoroughlyunder
runningwater,ensuringthatalltraces
ofthedescalingsolutionareremoved.
Fillwithcleanwaterandreplacethe
reservoir.
14.Pressthe‘MANUAL’buttonandallowthe
entirewaterreservoirtocyclethroughthe
grouphead.Pressbuttonagaintostop.
Note:Dependingonthesizeofthecontainer
underthegroupheadonoccasionthismay
needtobeemptiedthroughoutthisprocess.
15.Whenthisisfinishedremovethe
containerunderthegroupheadandgive
themachineagoodwipeover.
16.Carefullyreplacetherubberseal,brewing
filter/showerscreenandwashertothe
grouphead.
Important: Ensurethescrewistightenedwell.
17.Fillthewaterreservoirwithfreshwater
andpositionitintothemachine.
Descaling (continued)
29

30
Advanced programming options
Espresso Thermoblock Temperature
Thewatertemperatureofthisespresso
machinehasbeencalibratedtotheprecise
temperatureof92°Catthegrouphead.The
temperatureofthewateratthegrouphead
canbemodifiedinincrementsof2°Cupand
downshoulditbedesired.
Todothisyouneedtofollowtheinstructions
below:
1.Insertthepowercordintoa230-240VAC
poweroutletandswitchthepower‘ON’.
Note:AlthoughtheespressomachineisON
atthepoweroutletensurethattheactual
espressomachinepoweris‘OFF’.Therefore
nolightswillbeilluminatedontheespresso
machinecontrolpanel.
2.Pressandholddownthe‘MANUAL’button.
3.Whilestillholdingdownthe‘MANUAL’
buttonbrieflypressthe‘POWER’button
andreleaseallbuttons.
Note:Aseriesofbeepswillindicatethe
currentsetting.
Note:The‘MANUAL’buttonLEDwilllightup
aswillthe‘SINGLE’and‘DOUBLE’buttons.
Note:Thesequenceofbeepswillindicatethe
currentsetting.
4.Pressthe‘SINGLE’buttontodecreasethe
Espressotemperaturesettingorpressthe
‘DOUBLE’buttontoincreasetheespresso
temperaturesetting.Pleaserefertothe
chartbelow.
5.Onceyouhaveselectedthedesired
temperature,pressandholdthe‘MANUAL’
buttontosavethenewsetting.Asingle
longbeepwillsoundtoindicatethenew
settinghasbeensaved.Theespresso
machinewillthenturnonto‘READY
MODE’.
Remember:Ifyoudonotpressthe‘MANUAL’
buttonwithin30secondstheprogramwill
returntotheFactorySettingandtheespresso
machinewillthenpoweronandbegin
heatingup.
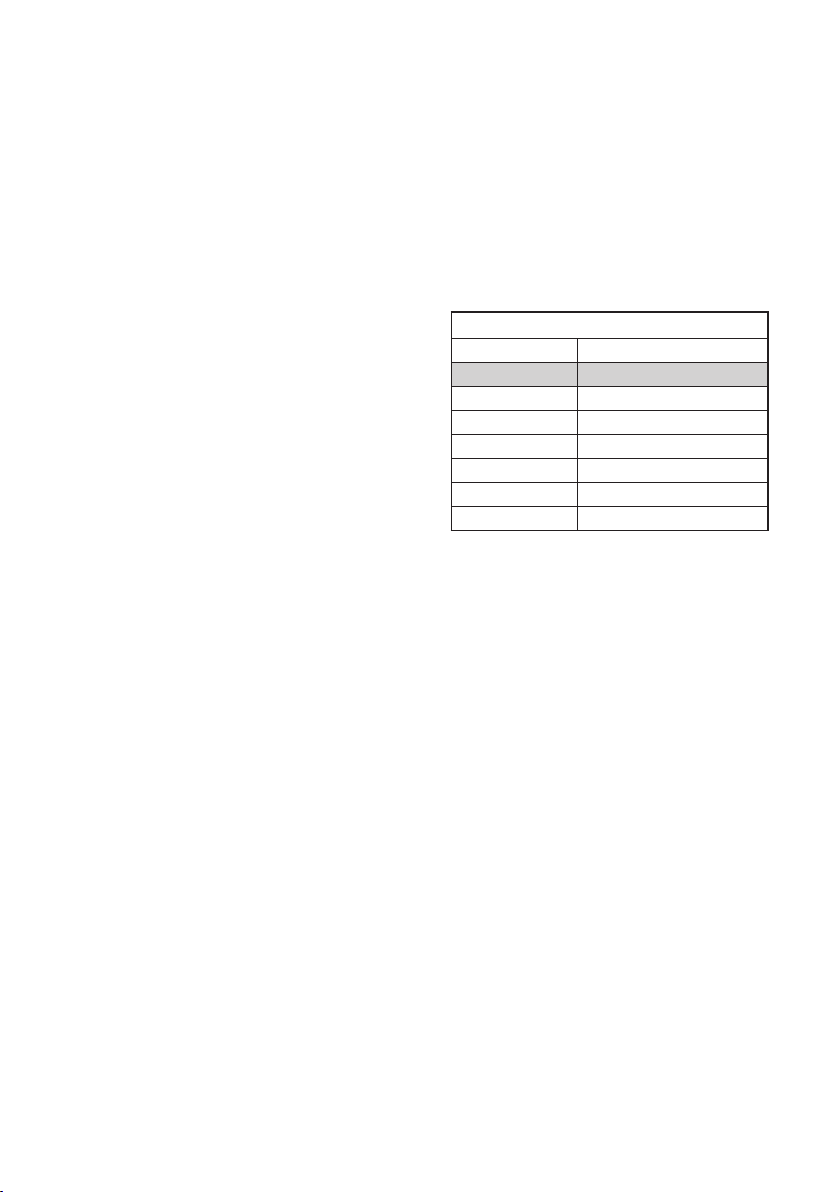
Espresso Temperature Programming
Setting BeepSequence
+3 3ShortBeeps
+2 2ShortBeeps
+1 1ShortBeep
0(FactorySetting) 1ShortBeepand1LongBeep
-1 1LongBeep
-2 2LongBeeps
-3 3LongBeeps

31
Advanced programming options (continued)
Steam Thermoblock Temperature
Thesteamtemperatureofthisespresso
machinehasbeencalibratedtodelivera
powerfulanddrysteamfortexturingmilk.
Thetemperatureofthesteamcanbe
modifiedinincrementsof2°Cupanddown
shoulditbedesired.
Todothisyouneedtofollowtheinstructions
below:
1.Insertthepowercordintoa230-240VAC
poweroutletandswitchthepower‘ON’.
Note:AlthoughtheespressomachineisON
atthepoweroutletensurethattheactual
espressomachinepoweris‘OFF’.Therefore
nolightswillbeilluminatedontheespresso
machinecontrolpanel.
2.Pressandholddownthe‘HOTWATER/
STEAM’button.
3.Whilestillholdingdownthe‘HOTWATER/
STEAM’buttonbrieflypressthe‘POWER’
buttonandreleaseallbuttons.
Note:Thisactivatestheprogrammabilityof
theSteamThermoblockTemperatureand
tosignalthisaseriesofbeepswillfollow
andthe‘HOTWATER/STEAM’buttonLED
willlightup.Additionallythe‘SINGLE’and
‘DOUBLE’buttonLEDSwillstarttoflash.
Note:Aseriesofbeepswillindicatethe
currentsetting.
4.Pressthe‘SINGLE’buttontodecreasethe
steamtemperatureortoincreasethesteam
temperaturepressthe‘DOUBLE’button.
Pleaserefertothechartbelow.
5.Onceyouhaveselectedthedesired
temperature,pressandholdthe‘HOT
WATER/STEAM’buttontosavethenew
setting.Asinglelongbeepwillsoundto
indicatethenewsettinghasbeensaved.
Theespressomachinewillthenturnonto
‘READYMODE’.
Remember:Ifyoudonotpressthe‘HOT
WATER/STEAM’buttonwithin30seconds
theprogramwillreturntotheFactorySetting
andtheespressomachinewillthenpoweron
andbeginheatingup.
Steam Temperature Programming
Setting BeepSequence
+3(FactorySetting) 3ShortBeeps
+2 2ShortBeeps
+1 1ShortBeep
0 1ShortBeepand1LongBeep
-1 1LongBeep
-2 2LongBeeps
-3 3LongBeeps
32
Steam Wetness or Steam Pump Rate
Thesteampumprateofthisespresso
machinehasbeenpreset.Modifyingthe
steampumprateenablesyoutomakethe
steamwetterordryerandaidsinthedelivery
ofapowerful,drysteam-idealfortexturing
milk.Thesteampumpratecanbemodified
inflowrateincrementsupordownshouldit
bedesired.
Todothisyouneedtofollowtheinstructions
below:
1.Insertthepowercordintoa230-240VAC
poweroutletandswitchthepower‘ON’.
Note:AlthoughtheespressomachineisON
atthepoweroutletensurethattheactual
espressomachinepoweris‘OFF’.Therefore
nolightswillbeilluminatedontheespresso
machinecontrolpanel.
2.Pressandholddownboththe‘MANUAL’
and‘HOTWATER/STEAM’buttons.
3.Whilestillholdingdownthe‘MANUAL’
and‘HOTWATER/STEAM’buttonsbriefly
pressthe‘POWER’buttonandreleaseall
buttons.
Note:Thisactivatestheprogrammabilityof
theSteamPumpRateandtosignalthisa
seriesofbeepswillfollowandthe‘MANUAL’
and‘HOTWATER/STEAM’buttonLEDS
willlightup.Additionallythe‘SINGLE’and
‘DOUBLE’buttonLEDSwillstarttoflash.
Note:Aseriesofbeepswillindicatethe
currentsetting.
4.Pressthe‘SINGLE’buttontodecrease
todecreasethesteampumprateor
toincreasethesteamratepressthe
‘DOUBLE’button.Pleaserefertothechart
below.
5.Onceyouhaveselectedthedesired
steampumprate,pressandholdboth
the‘MANUAL’and‘HOTWATER/STEAM’
buttonstosavethenewsetting.Asingle
longbeepwillsoundtoindicatethesetting
hasbeensaved.Theespressomachinewill
thenturnonto‘READYMODE’.
Remember:Ifyoudonotpressthe‘MANUAL’
and‘HOTWATER/STEAM’buttonswithin
30secondstheprogramwillreturntothe
FactorySettingandtheespressomachine
willthenpoweronandbeginheatingup.
Advanced programming options (continued)
Steam Pump Rate Programming
Setting BeepSequence
+3(FactorySetting) 3ShortBeeps
+2 2ShortBeeps
+1 1ShortBeep
0 1ShortBeepand1LongBeep
-1 1LongBeep
-2 2LongBeeps
-3 3LongBeeps

Advanced Programming Options (continued)
33
Factory Reset
Toundoanychangesmadetotheprogram
youcanrevertbacktotheoriginalfactory
settings.
Todothisyouneedtofollowtheinstructions
below:
1.Insertthepowercordintoa230-240VAC
poweroutletandswitchthepower‘ON’.
Note:AlthoughtheespressomachineisON
atthepoweroutletensurethattheactual
espressomachinepoweris‘OFF’.Therefore
nolightswillbeilluminatedontheespresso
machinecontrolpanel.
2.Pressandholddownthe‘POWER’button.
Asinglelongbeepwillindicatea
successfulreset.Theespressomachine
willthenturnonto‘READYMODE’
Note:ThisresetsALLtheprogramsettings
backtofactorysettings,includingthe
programespressopourvolumes,espresso
&steamthermoblocktemperaturesandthe
steampumprate.

Trouble shooting guide
PROBLEM POSSIBLE CAUSE WHAT TO DO
Coffee runs down the side of Grouphandleisnotattachedcorrectly,Ensurethehandleisfirmlypositioned
the group handle. orhasnotbeentightenedsufficiently. ontothegrouphead.See“Guideto
theperfectespresso”pg20.
Edgeoffilterbasketisnotfree Cleanaroundthetopedgeofthe
ofcoffeegrinds. filterandwipethegroupheadclean
ofcoffee.
Thegroupheadisdirty. Wipegroupheadwitha
dampcloth.
Thegroupheadisdefective. ContactaSunbeamServiceCentre.
Groupheadrubbersealisdamaged, ContactaSunbeamServiceCentre.
orworn.
No coffee runs through. Nowaterinthewaterreservoir. Fillreservoirwithwater.
Waterreservoirnotcorrectly Pushwaterreservoirallthewaytothe
positioned. backoftheunittoensureitis
correctlypositioned.
Steamandhotwatercontroldial
Ensurethesteamandhotwatercontrol
leftopen. dialisintheoffposition.
Groupfiltermaybeblocked. See“Descaling”pg28.
Thefilterisblocked,thecoffee Emptyoutthefilterandrinseunder
groundsaretoofineortamped watertoclean.Wipethegrouphead
downtoohard. withacloth.Repackthefilteranddo
nottampthegroundssofirmly.
Coffee pours out in drops. Coffeegrindistoofineor Ensureyouareusinganevenlyground
toocompacted. coffeeanddonotcompactthegrounds
sofirmly.
Machineblockedbyscalebuildup. See“Descaling”pg28.
Espresso does not have any Coffeeisoldordry. Usefreshcoffeeandonceyouopenthe
crema. coffeebesuretostoreitinanairtight
container.
Coffeenotcompactedfirmlyenough. Compactcoffeegroundsmore
firmly.
Coffeetoocoarse. Grindthecoffeetoafinertextureor
changebrandsofespressocoffeetoa
finergrind.
34

Trouble shooting guide (continued)
Espresso does not have any Notenoughcoffeeinfilter. See"Guidetotheperfectespresso"
crema. pg20.
Handle comes off during group. Coffeetampedtoohard. Tampthecoffeegroundslighter.
Coffeegrindistoofine. Changetoacoarsergrindofcoffee.
Filterhandleisnotattachedcorrectly, Ensurethehandleisfirmlypositioned
orhasnotbeentightenedsufficiently. ontothegrouphead.See"Guide
totheperfectespresso"pg20.
Topedgeoffilterisnotfreeofcoffee Cleanaroundtheedgeofthefilterand
grinds. wipethegroupheadcleanofcoffee.
Thegroupheadisdirty. Wipegroupheadwithadampcloth.
Thegroupheadisdefective. ContactaSunbeamServiceCentre.
Groupheadrubbersealiswornor ContactaSunbeamServiceCentre.
damaged.
Coffee is too cold. Cups,filterbasketand Pre-heatcups,filtersandgrouphandle.
grouphandlearecold. See"Guidetotheperfect
espresso"pg20.
Ifmakingacappuccinoorlatte Ensurethatmilkisheatedproperly
themilkmaynotbeheatedenough. duringtexturing,butbesurenottoboil
themilk.See"Guidetomilktexturing"
pg22.
No steam from the steam nozzle. Steamnozzleisblocked. See"Care&Cleaning"pg26.
'STEAM'modeisnotselected. Pressthe'STEAM'buttonsoitis
illuminated.
Not enough froth when frothing Milkisnotfresh. Ensurethemilkisfresh.
Milktemperatureistoowarm Ensurethatthemilkiswellrefrigerated
tobeginwith. beforeuse.
Jug Forbesttexturingresultsuseastainless
steeljugandifpossiblerefrigerateor
runthejugundercoldwaterbeforeuse.
Steamnozzleisblocked. See"Care&Cleaning"pg26.
Milkhasbeenboiled. Startagainwithfresh,chilledmilk.
Steamnozzlenotincorrectposition. Positionsteamnozzlejustbelowthe
surfaceofthemilk.
35

Uneven cup filling. Uneventampingorobstructioninthe Ensurecoffeeistampedevenly
pouringspouts. andcheckthatthereisnothing
obstructingthepouringspouts.
Defectivebaffleinfilterhandle. ContactaSunbeamServiceCentre.
Benchsurfaceisuneven Repositionthemachineonalevel,
evensurface.
Espresso tastes burnt. Typeofcoffeebeingused. Experimentwithdifferentbrandsof
coffee.
Appliancehasnotbeenrinsed Runareservoirfullofwaterproperly
afterdescaling. throughthemachinebeforemaking
anothercoffee.
Coffeepouristooslowasa Increasethecoarsenessofyour
resultoffinegrind. coffeegrind.
Pump makes an unusually Nowaterinreservoir. Fillthewaterreservoir.
load noise.
Waterreservoirnotcorrectly Replacethewaterreservoir
positioned. firmlyintotheunit.
Machine does not operate. Groupheadfiltermaybeblocked. Removegrouphandleandcleangroup
head.See"Care&Cleaning"pg26.
Machineblockedbyscale See“Descaling”pg28.
buildup.
PleasecontactSunbeamdirectlyon1300881861,ifthisguidedoesnotsolveyourquery.
Wehaveexperiencedstaffonhandtoassist,MondaytoFriday.
Trouble shooting guide (continued)
36

Shouldyouexperienceanydifficultieswith
yourappliance,pleasephoneourcustomer
servicelineforadviceon1300881861in
Australia,or0800786232inNewZealand.
Alternatively,youcansendawrittenclaim
toSunbeamattheaddresslistedbelow.
Onreceiptofyourclaim,Sunbeamwill
seektoresolveyourdifficultiesor,ifthe
applianceisdefective,adviseyouonhow
toobtainareplacementorrefund.
YourSunbeam12MonthReplacement
Guaranteenaturallydoesnotcovermisuse
ornegligenthandlingandnormalwearand
tear.
Similarlyyour12MonthReplacement
Guaranteedoesnotcoverfreightoranyother
costsincurredinmakingaclaim.Please
retainyourreceiptasproofofpurchase.
Thebenefitsgiventoyoubythisguarantee
areinadditiontoyourotherrightsand
remediesunderanylawswhichrelatetothe
appliance.
Ourgoodscomewithguaranteesthatcannot
beexcludedundertheAustralianConsumer
LawandundertheNewZealandConsumer
GuaranteesAct.
InAustraliayouareentitledtoa
replacementorrefundforamajorfailureand
forcompensationforanyotherreasonably
foreseeablelossordamage.Youarealso
entitledtohavethegoodsrepairedor
replacedifthegoodsfailtobeofacceptable
qualityandthefailuredoesnotamountto
amajorfailure.
Shouldyourappliancerequirerepairor
serviceaftertheguaranteeperiod,contact
yournearestSunbeamservicecentre.
ForacompletelistofSunbeam’sauthorised
servicecentresvisitourwebsiteorcall:
Australia
www.sunbeam.com.au
1300881861
Units5&6,13LordStreet
BotanyNSW2019Australia
New Zealand
www.sunbeam.co.nz
0800786232
26VesteyDrive,MtWellington
Auckland,NewZealand
In the unlikely event that this appliance develops any malfunction
within 12 months of purchase (3 months commercial use) due to
faulty materials or manufacture, we will replace it for you
free of charge.
12 Month Replacement Guarantee

Need help with your appliance?
Contactourcustomerserviceteamorvisit
ourwebsiteforinformationandtipson
gettingthemostfromyourappliance.
In Australia
Visit www.sunbeam.com.au
Or call 1300 881 861
In New Zealand
Visit www.sunbeam.co.nz
Or call 0800 786 232
Made in China.
Due to minor changes in design or otherwise,
the product may differ from the one shown in this leaflet.
© Copyright.
Sunbeam Corporation Limited 2012.
ABN 45 000 006 771
Units 5 & 6, 13 Lord Street
Botany NSW 2019 Australia
Unit 3, Building D
26 Vestey Drive
Mt Wellington Auckland
New Zealand
Sunbeam Corporation is a division of GUD Holdings Ltd.
03/12
is a registered trademark.