Waiting on Front
Cover from Energi

Important instructions – retain for
future use.
Contents
Sunbeam's Safety Precautions 1
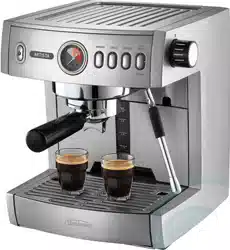
Features of your Café Series
®
Espresso Machine 2
Using your espresso machine 7
Advanced Programming 10
Preparing your espresso machine
for the first time 14
Guide to coffee making 15
Guide to milk texturing 17
Espresso recipes 18
Care and cleaning 20
Coffee Thermoblock Cleaning Cycle 22
Descaling Cycle for both the Coffee
and Steam Thermoblocks 23

Sunbeam’s Safety Precautions
SAFETY PRECAUTIONS FOR YOUR SUNBEAM
ESPRESSO MACHINE
• Alwaysplacetheunitonaflat,levelsurface.
• Donotoperatewithoutwaterinreservoir.
Fillreservoirwithonlycleanandcoldwater.
Observethemaximumfillingvolumeis3litres.
• Donotremovethefilterhandleduringtheespresso
pourorwaterflowastheunitisunderpressure.
Removingthefilterhandleduringeitherofthese
operationscanleadtoascaldingorinjury.
• Thesteamwandandhotwatertapbecomevery
hotduringtexturingmilkandwaterflow.Thismay
causeburnsincaseofcontact,thereforeavoidany
directcontactwiththesteamwandorhotwater
tap.
• Alwaysdisconnecttheplugfromthepoweroutlet
priortocleaningtheespressomachineorifthereis
anyproblemduringthecoffeemakingprocess.
• Donotallowthepowercordtocomeintocontact
withthehotpartsoftheespressomachine,
includingthecupwarmingplate,hotwatertapand
steamwand.
• Donotplacehandsdirectlyunderthesteam,hot
waterorcoffeepourasthiscanleadtoascalding
orinjury.
Sunbeam is very safety conscious when designing and
manufacturing consumer products, but it is essential
that the product user also exercise care when using
an electrical appliance. Listed below are precautions
which are essential for the safe use of an electrical
appliance:
• Readcarefullyandsavealltheinstructions
providedwithanappliance.
• Alwaysturnthepoweroffatthepoweroutletbefore
youinsertorremoveaplug.Removebygrasping
theplug-donotpullonthecord.
• Turnthepoweroffandremovetheplugwhenthe
applianceisnotinuseandbeforecleaning.
• Donotuseyourappliancewithanextensioncord
unlessthiscordhasbeencheckedandtestedbya
qualifiedtechnicianorserviceperson.
• Alwaysuseyourappliancefromapoweroutletof
thevoltage(A.C.only)markedontheappliance.
• Thisapplianceisnotintendedforusebypersons
(includingchildren)withreducedphysical,sensory
ormentalcapabilities,orlackofexperienceand
knowledge,unlesstheyhavebeengivensupervision
orinstructionconcerninguseoftheappliancebya
personresponsiblefortheirsafety.
• Childrenshouldbesupervisedtoensurethatthey
donotplaywiththeappliance.
• Thetemperatureofaccessiblesurfacesmaybe
highwhentheapplianceisoperating.
• Neverleaveanapplianceunattendedwhileinuse.
• Donotuseanapplianceforanypurposeotherthan
itsintendeduse.
• Donotplaceanapplianceonornearahotgas
flame,electricelementoronaheatedoven.
• Donotplaceontopofanyotherappliance.
• Donotletthepowercordofanappliancehangover
theedgeofatableorbenchtoportouchanyhot
surface.
• Donotoperateanyelectricalappliancewitha
damagedcordoraftertheappliancehasbeen
damagedinanymanner.Ifdamageissuspected,
returntheappliancetothenearestSunbeam
AppointedServiceCentreforexamination,repair
oradjustment.
• Foradditionalprotection,Sunbeamrecommend
theuseofaresidualcurrentdevice(RCD)
withatrippingcurrentnotexceeding30mAin
theelectricalcircuitsupplyingpowertoyour
appliances.
• Donotimmersetheapplianceinwateroranyother
liquidunlessrecommended.
•Appliancesarenotintendedtobeoperatedby
meansofanexternaltimerorseparateremote
controlsystem.
•Thisapplianceisintendedtobeusedinhousehold
andsimilarapplicationssuchas:staffkitchenareas
inshops,officesandotherworkingenvironments;
farmhouses;byclientsinhotels,motelsandother
residentialtypeenvironments;bedandbreakfast
typeenvironments.
Ifyouhaveanyconcernsregardingtheperformanceanduseofyourappliance,
pleasevisitwww.sunbeam.com.auorcontacttheSunbeamConsumerServiceLine.
Ensuretheabovesafetyprecautionsareunderstood.
1
2
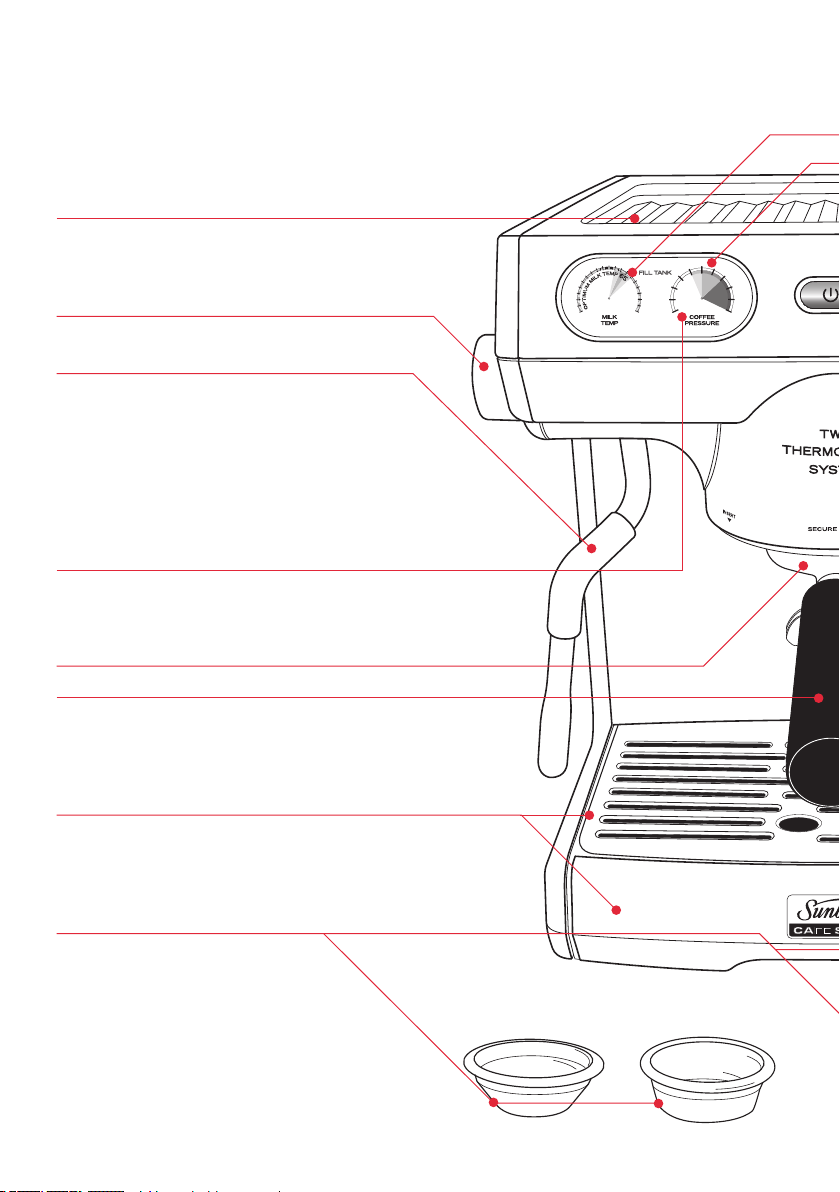
Warming plate
Thelargewarmingplateeffectivelypre-warmscups
helpingtoretaintheessentialcharacteristicstrueof
espresso-sweet,richtastingandaroma.
Steam control dial
Usedtoopenandclosethesteam.
Temperature sensing steam wand
Thetemperaturesensingsteamwand
ensuresmilkistexturedtothecorrecttemperature,
asmilkheatedtothecorrecttemperatureenhances
thesweetnessandtaste.Fittedwithadedicated
thermoblockandpumpprovidesaninstantandconstant
supplyofpowerfuldrysteamforachievingsilky,dense
andrichmilk.Thecommercialballjointallowsthe
steamwandtobemovedintotheidealposition.
Espresso gauge
Thegaugemeasurestheresistancetotheespressopour
andataglancethecoffeemakercangaugethequality
oftheespressopour.
Commercial size group head
Commercial size sloping group handle
with tamping pad
Theslopinghandleisdesignedforimprovedergonomic
useandwhenrestedonthebenchprovidesaneven
tampingsurface,resultinginabettertastingespresso.
Removable drip tray and grill
Thelargecapacitydriptrayislinedwithplastic,
preventingstainingfromespressooils,lightweightfor
easyremovalanddesignedwithnodirttrapsforsimple
wipedowncleaning.
Accessories
Alltheessentialaccessoriestomakean
authenticcafé-qualityespresso.
Features of your Café Series
®
Espresso Machine
2
Single filter basket Double filter basket
3
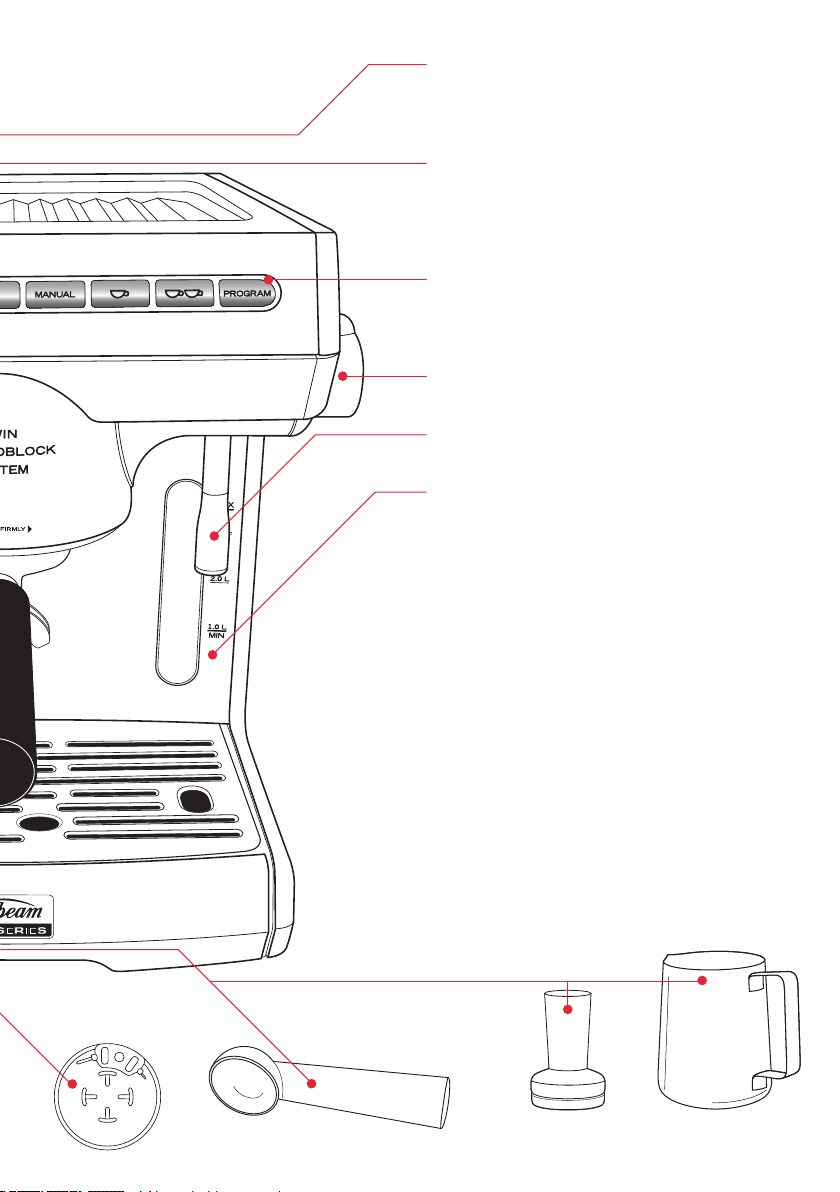
Milk temperature gauge
Thegaugedisplaysthetemperatureofthemilk
tohelpthecoffeemakerachievethedesired
temperatureeverytime.
Control board with dual gauges, low water indicator
& large buttons
Slightlyangledforeasyviewingthecontrolboard
housesalltheinformationthecoffeemakerneeds
tocreateagreattastingespresso.
Programmable control panel
Aneasytousecontrolpanelprovidesthechoice
ofmanualoperationorutilisingtheprogrammed
1and2cupespressoservepours.
Hot water control dial
Usedtoopenandclosethehotwater.
Hot water wand
Dispensesacontrolledflowofhotwater.
3 litre water reservoir
Removable3litrewaterreservoirisfittedwithan
anti-calcfilterandcanbefilledfromthetoporis
removablefrombehind.
FEATURES YOU CAN'T SEE
Twin pump and thermoblock allowsyoutotexture
milkandbrewespressoatthesametime.
15 BAR Italian espresso pump fittedwithapressure
relief system.
Twin thermoblocks with stainless steel tubing.
PID technology controlswatertemperature
preciselyforbothespressandsteamfunctions.
Pre-infusion; 3programstochoosefrom.
Brass collar isdurableandidealforfrequentuse.
Advanced Programming toadjustpumpand
temperaturesettingsforoptimalsteamand
brewingperformance.
Stainless steel and die-cast metal design
Power saving mode
3
Tamp
Measuring spoon
600ml jug
Cleaning Disc
4
Required Espresso Pressure
The15BARItalianpumpproducesthe
requiredpressureforbrewingespresso
consistently.Fittedwithapressurerelief
system,ensuresthatanyremainingpressure
aftertheextractionisreleasedintothedrip
tray,allowingforquick,successivebrews.
Espresso Temperature
Independentthermoblockheatingsystems
arelinedwithstainlesssteelandfitted
withPIDtechnology.ThePIDproportional-
integral-derivativetechnologycontrolsthe
thermoblocktodeliverwatertemperature
precisely.
Twin Pump & Thermoblock
Truetocommercialuse,theuniquetwin
pumpsandtwinthermoblocksallowsthe
coffeemakertotexturemilkandpouran
espressosimultaneously.
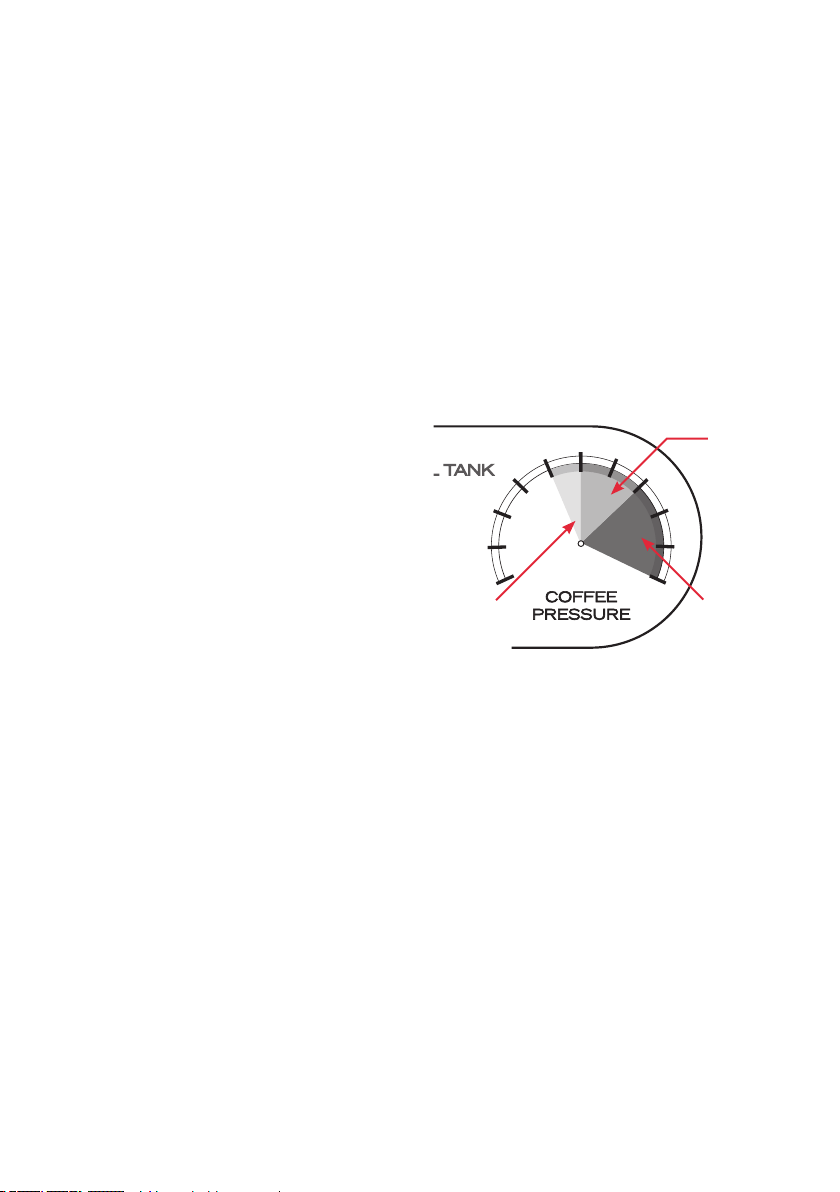
Espresso Gauge
Theespressogaugeisanindicatorofthe
qualityoftheespressopourandshouldbe
usedasaguide.
Itmeasuresthepressureorresistance
createdbywaterbeingpumpedthroughthe
tampedcoffeegrindsinthegrouphandle.
Whilsttheneedleiswithinthetargetareaon
thegaugeitindicatesthataqualityserveof
espressohasbeenmade.Thisisindicatedby
aslow,butflowingpourofespressowitha
consistencysimilartothatofdrippinghoney.
Thecremashouldbedarkgoldenincolour.
Shouldtheneedlefailtoreachthetarget
areathisisanindicationthattheserveof
espressois‘under-extracted’.Thisoccurs
whenwaterpassestooquicklythroughthe
tampedcoffeegrindsandisanindication
thateitherthegrindneedstobemadefiner
orthefilterbaskethasbeenunder-dosed.
Thepourisquickandlightincolourandthe
resultingcremaisthinwithacreamylight
browncolour.
Whentheneedlegoesbeyondthetargetarea
itisanindicationthattheserveofespresso
is‘over-extracted’.Thisoccurswhenthe
waterpassesveryslowlythroughthetamped
coffeegrindsandisanindicationthateither
thegrindistoofineorthefilterbaskethas
beenover-dosed.Inthissituationthehot
waterisincontactwiththecoffeegrinds
fortoolongthuscreatingaburntandbitter
tastingespresso.Thisischaracterisedby
theespressoonlyslowlydrippingduringthe
entirepourandthecremaisverydark.
Features of your Café Series
®
Espresso Machine continued
Under
Extracted
Pour
Over
Extracted
Pour
Optimum
Pour
Features of your Café Series
®
Espresso Machine continued
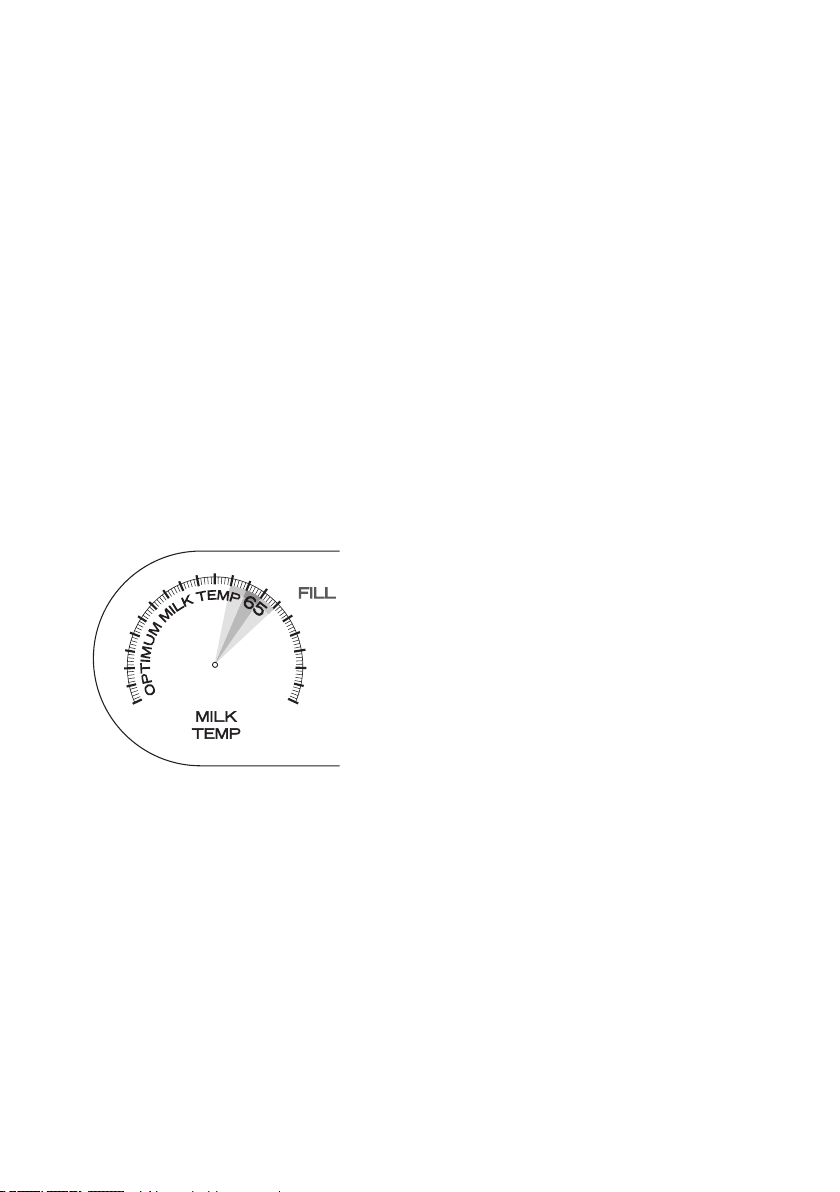
Milk Temperature Gauge
The4BARsteampumpproducesinstant,
constantsteampressurefortexturingmilk.
Animportantfactorwhencreatingmilkfoam
istemperature.Thesteamwandintegrates
atemperaturesensingdevicethatrelaysthe
temperatureofthemilkduringtexturingto
themilktemperaturegaugeonthecontrol
board.
Asmostcoffeesaremilkbased,this
highlightstheimportanceofgettingthemilk
right.Theendproductshouldbesmooth,
velvetywithnoneorbarelyvisiblebubbles.
Milktexturedtotheoptimumtemperature
improvesandsweetensthetaste.
Commercial Size Group Head & Group Handle
Thegrouphead,grouphandleandfiltersare
designedtocommercialspecificationsusing
brassandstainlesssteelcomponents.These
elementshelpcontributetothepreparation
ofanespressoserve,asitallowsthecoffee
makertopackthenecessaryamountof
coffeegrinds,whichthenexpandfirmlyand
evenlyontotheshowerscreen.
Theslopinggrouphandlegivesthecoffee
makeramoreergonomicactionwhen
attachingandremovingthehandlefromthe
grouphead.Alsowhenrestedonthebench
thefilterbasketsitslevel,thisresultsina
moreeventampensuringanevenextraction.
Theunder-sideofthebaskethasatamping
padsothecoffeemakercanlocatethegroup
handleontothesideofthebenchandonce
againensuresthebasketsitslevel.
5

6
Control Board
Slightlyangledforeasyviewing,the
controlboardcommunicatestheessential
informationthecoffeemakerneedstocreate
agreattastingcoffee.Alsohousingalarge,
easytousepushbuttonsforespressoand
programmingfunctions,thecoffeemaker
isprovidedwiththechoiceof‘MANUAL’
operationorusingeitheroftheprogrammed
coffeepourvolumesfor1or2cups.The
programmedespressopourissetto30mls
percupwhilethePROGRAMfunctionallows
userstopersonaliseandsavetheirown
espressovolumes.
Pre-Infusion
Thereare3programmablepre-infusion
settingstohelpachievetheperfect
extraction.
Pre-infusionisprogrammedintothe
MANUAL,1CUPand2CUPespresso
operations.
1.Constant-deliversaconstantwaterflow
fromstarttofinish.
2.Progressive-smallamountsofwaterare
releasedontothetampedcoffeepriortoa
steadywaterflow.
2.Infusion-smallamountofwaterisreleased
ontothetampedcoffee,thentheirisa
shortinfusiontimebeforeasteadyflowof
waterisreleased.
Anti-Calc Filter
AnAnti-Calcwaterfilterreducesimpurities
thattainttheflavourandodourofthe
water,improvingthetasteandaromaofthe
espressobrewed.Additionally,scalebuildup
isslowedreducingthefrequencyofcleaning
required.
TheAnti-Calcwaterfilterfittedinsidethe
3litrewaterreservoirhasa12monthlife
fordomesticuseanda3monthlifefor
commercialuse.
Note:ContactSunbeamon1300881
861forreplacementfilters(Partcode:
EM69101).
Note:Theespressomachinecanoperate
normallywithoutthefilterandiseasily
removedbygentlypullingitout.
Features of your Café Series
®
Espresso Machine continued
7
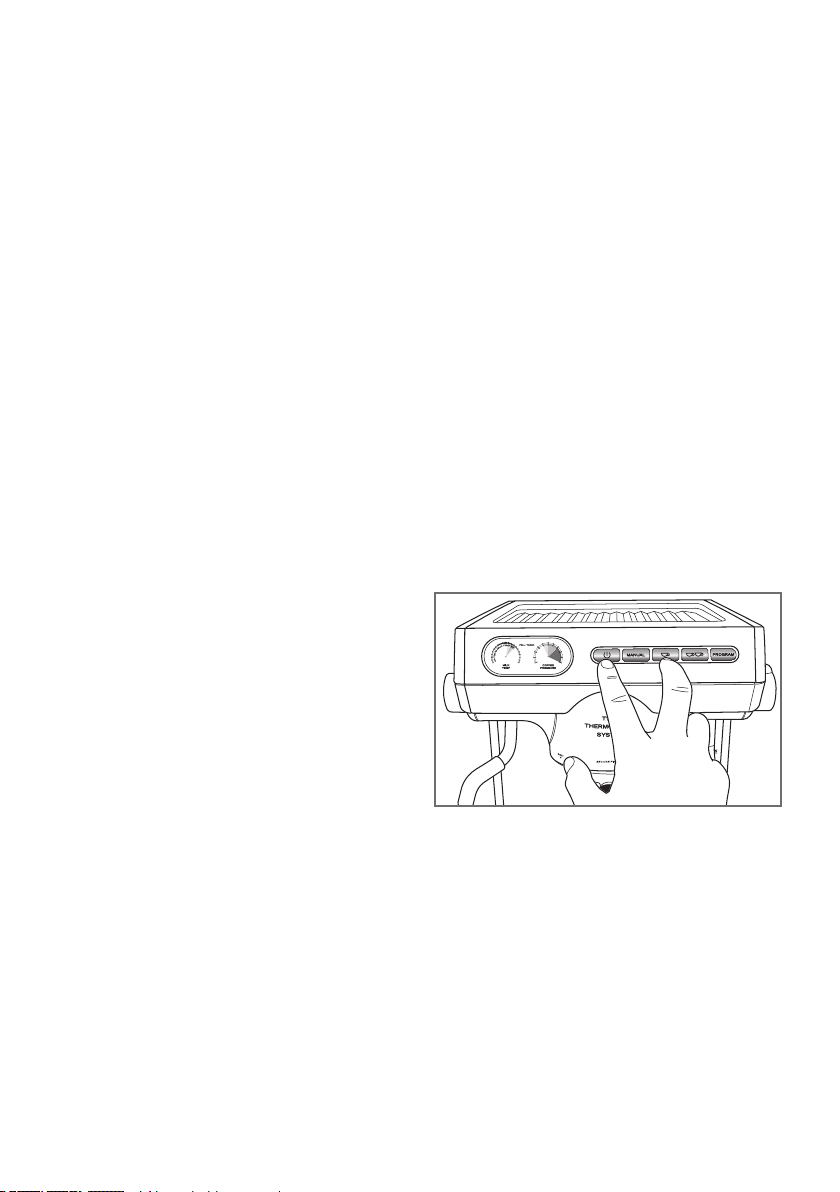
Using your espresso machine
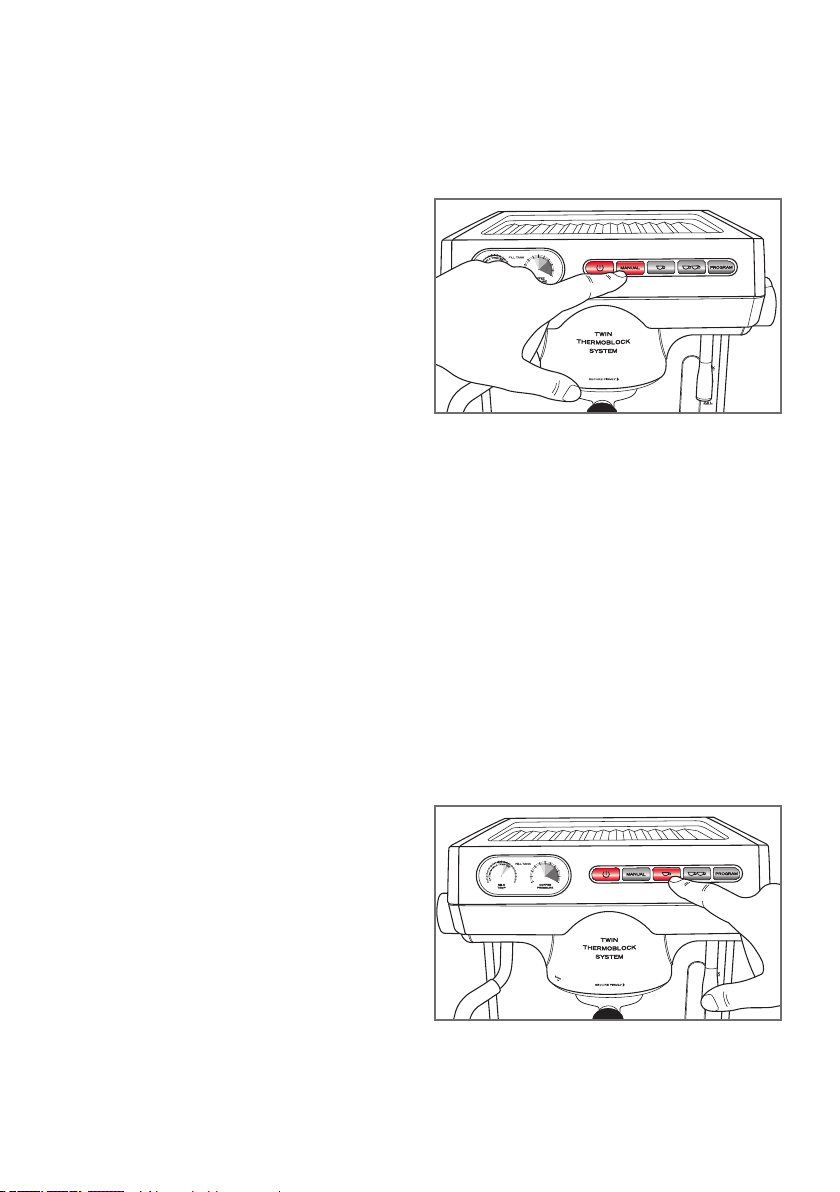
Power
PressthePOWERbuttononcetoturnthe
espressomachineon.Themachinewillbeep
onceandthepowerbuttonwillflashred,this
istoindicatethatyourmachineisonandis
heatingup.
Note:Beforeturningontheespressomachine
ensurethatthesteamandhotwatercontrol
dialsareintheOFFposition.
WhenthemachinehasreachedREADY
MODE,thepowerbuttonwillstopflashing
andthePOWER,MANUAL,1&2CUP
buttonswillilluminatered.Theespresso
machineisnowreadytouse.
Power Saving Mode
After1hourofnon-usetheespressomachine
willautomaticallyswitchtoPOWERSAVING
MODE.Oncetheespressomachineisin
POWERSAVINGMODEallthelightsonthe
buttonswilldim.WhileinPOWERSAVING
MODEtheespressomachinepowersdown
to75%ofpower.Afterafurther4hoursof
non-usetheespressomachinewillbeeponce
andthenturnoff.
TobringtheespressomachineoutofPOWER
SAVINGMODEyousimplyneedtopressany
ofthebuttonsonthecontrolboard.
Using Manual Operation
TheMANUALbuttongivesthecoffeemaker
completecontroloverthelengthofthe
espressopour.
TousethisoperationpresstheMANUAL
buttononcetostarttheespressopour.The
pourwillstartwiththepre-infusionandthen
theespressopourwillfollow.
PresstheMANUALbuttonagaintostopthe
espressopour.
Note:WhenusingtheMANUALoperation,the
lightsonthe1&2cupbuttonswillgooff
andthelightsonthePOWERandMANUAL
buttonswillremainon.
1 Cup Espresso Pour
The1CUPfunctionremovestheguess
workandisprogrammedtopour30mlsof
espresso.
Tip:Werecommendusingthe1CUPbasket
whenusingtheprogrammed1CUPfunction.
Tousethisoperationpressthe1CUPbutton
oncetostarttheespressopour.Thepour
willstartwiththepre-infusionandthenthe
espressopourwillfollow.
Theespressopourwillstopafterthe1CUP
volumehasbeenextracted.
Note:Whenusingthe1CUPfunction,the
lightsontheMANUALand2CUPbuttons
willgooffandthelightsonthePOWERand
1CUPbuttonswillremainon.
Note:Whenusingthe1CUPfunctionthe
coffeemakercanstoptheespressopourat
anytimebypressingtheMANUAL,1or2
CUPbuttons.
Figure1
Figure2
Using your espresso machine continued
2 Cup Espresso Pour
The2CUPfunctionremovestheguess
workandisprogrammedtopour60mlsof
espresso.
Tip:Werecommendusingthe2CUPbasket
whenusingtheprogrammed2CUPfunction.
Tousethisoperationpressthe2CUPbutton
oncetostarttheespressopour.Thepour
willstartwiththepre-infusionandthenthe
espressopourwillfollow.
Theespressopourwillstopafterthe2CUP
volumehasbeenextracted.
Note:Whenusingthe2CUPfunction,the
lightsontheMANUALand1CUPbuttons
willgooffandthelightsonthePOWERand
2CUPbuttonswillremainon.
Note:Whenusingthe2CUPfunctionthe
coffeemakercanstoptheespressopourat
anytimebypressingtheMANUAL,1or2
CUPbuttons.
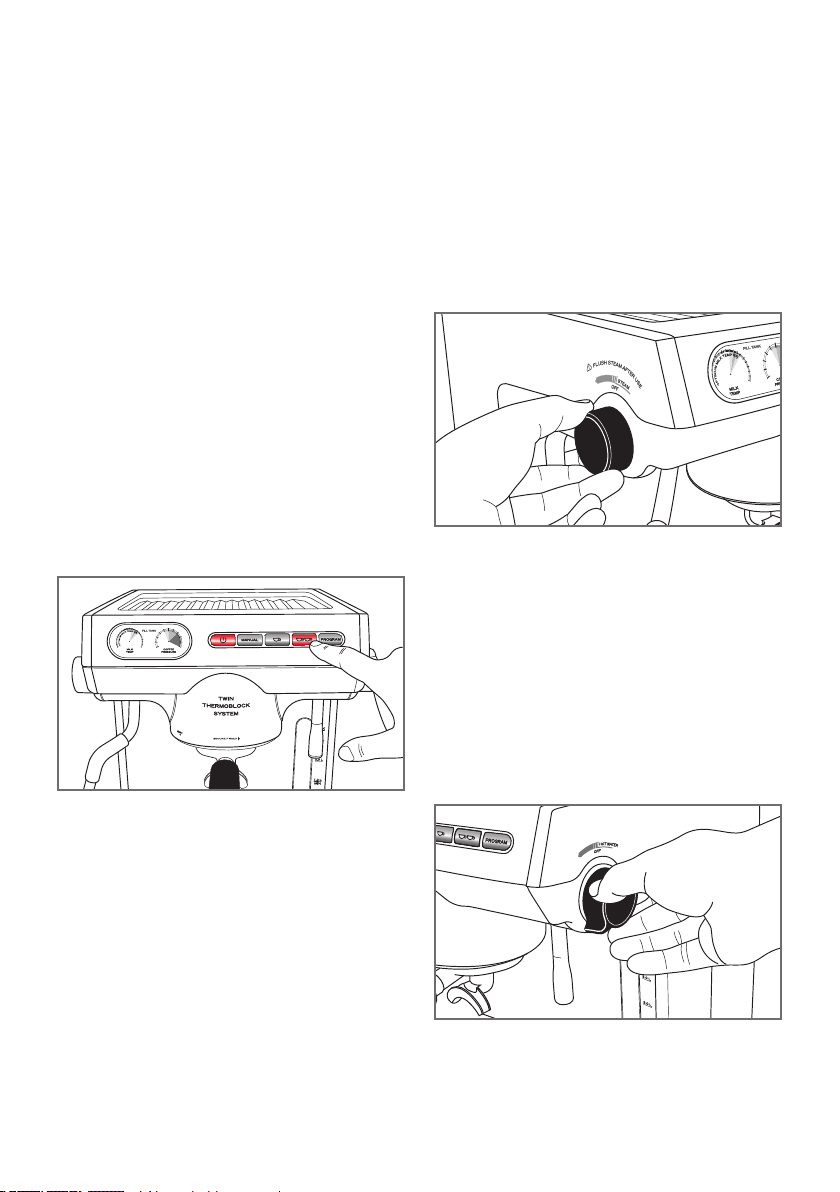
Steam
Toactivatethesteam,turnthesteamdial
totheONposition.Thiswillopenthesteam
functionwithaninstantandconstantsupply
ofpowerfulsteamfortexturingmilk.
Toturnthesteamoff,turnthesteamdialto
theOFFposition.
Tip:Toensureoptimumsteamperformance
werecommendthatattheendoftexturing
milk,thecoffeemakerwipesthetipofthe
steamwandcleanofanymilkresidue.
Hot Water
Toactivatethehotwaterfunction,turnthe
hotwaterdialtotheONposition.Thiswill
dispenseaninstantflowofhotwater.
Tip:Thisfeatureisidealforpre-warming
cups/glassesorformakingaLongBlack.
8
Figure3
Figure4
Figure5

9
Programming
1 Cup Volume
PREPAREthe1cupfilterwithcoffeeand
tamp.
PLACEacupundertheespressopourspouts.
PRESSthePROGRAMbutton.
PRESSthe1CUPbuttontostartthe
espressopour.Pressthe1CUPbuttonagain
oncethedesiredvolumeofespressohas
beenextracted.
Theespressomachinewillbeeptwiceto
indicatethenewprogramforthe1CUP
operationhasbeenset.
2 Cup Volume
PREPAREthe2cupfilterwithcoffeeand
tamp.
PLACE2cupsundertheespressopour
spouts.
PRESSthePROGRAMbutton.
PRESSthe2CUPbuttontostartthe
espressopour.Pressthe2CUPbuttonagain
oncethedesiredvolumeofespressohas
beenextracted.
Theespressomachinewillbeeptwice
toindicatethenewprogramfor2CUP
operationhasbeenset.
Resetting the Factory Settings
Torevertbacktotheespressomachines
factorysettings;
1.Ensuretheespressomachineispluggedin
andswitchedonatthepoweroutlet.
Note:DONOTpressthePOWERbuttonon
theespressomachine.
2.PRESSandHOLDDOWNtheMANUAL
button.
3.WhilestillholdingdowntheMANUAL
button,brieflyPRESSthePOWERbutton
andthenreleasetheMANUALbutton.
4.4beepswillsoundandthemachinewill
poweron.
Using your espresso machine continued
10
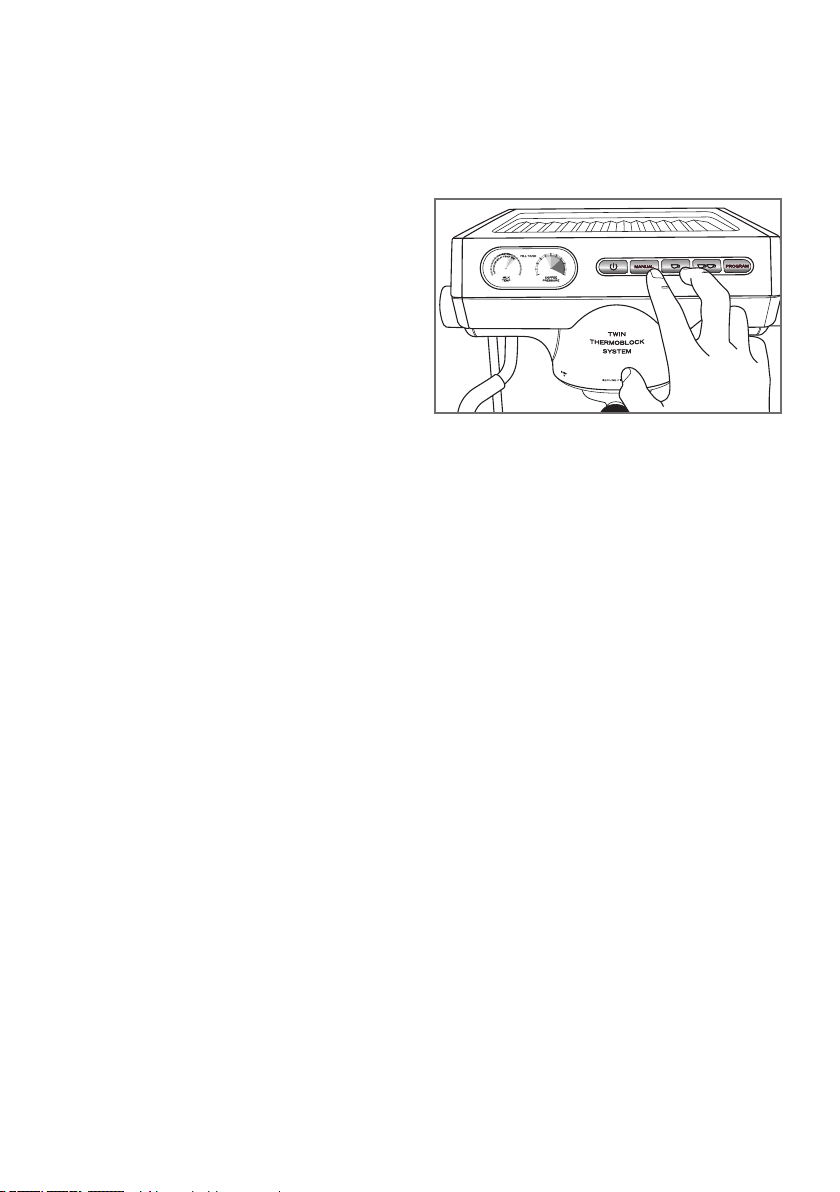
Pre-infusion Programming
Thereare3programmablepre-infusion
settingstohelpachievetheperfect
extraction;
Infusion;asmallamountofwaterisreleased
ontothetampedcoffee,andthenthereis
ashortinfusiontimebeforeasteadyflow
ofwaterisreleased.Yourespressomachine
comeswiththisselectionasafactorysetting.
Constant;deliversaconstantwaterflowfrom
starttofinish.
Progressive; smallamountsofwaterare
releasedontothetampedcoffeepriortoa
steadywaterflow.
1.Ensuretheespressomachineispluggedin
andswitchonatthepoweroutlet.
Note:DONOTpressthePOWERbuttonon
theespressomachine.
2.PRESSandholddownboththeMANUAL
and1CUPbuttons.
3.WhilestillholdingdowntheMANUALand
1CUPbuttonsbrieflyPRESSthePOWER
buttonandthenreleaseboththeMANUAL
and1CUPbuttons.
Toindicateyouhaveactivatedthe
programmabilityofthepre-infusion
selections,alightononeofthebuttonswill
illuminate;
1CUP=Infusion(Factorysetting)
2CUP=ProgressivePre-infusion
MANUAL=ConstantPre-infusion
Thislightwillremainonforupto5seconds
beforeautomaticallyreturningtofactory
settingsifnoactionistaken.Theespresso
machinewillthenpoweron.
4.PRESSandRELEASEoneofthebuttons
belowdependingontherequired
temperatureadjustment;
Constant=PRESStheMANUALbutton
Infusion=PRESSthe1CUPbutton
Progressive=PRESSthe2CUPbutton
Whenthenewpre-infusionprogramhas
beenselectedtheespressomachinewill
beeptwice.
5.Theespressomachinewillthen
automaticallypoweron.
Advanced Programming
Figure6

11
Advanced Programming continued
Espresso Thermoblock Temperature
Thetemperatureofthethermoblockhasbeen
calibratedto92°C.Howeverthecoffeemaker
canadjustthetemperatureoftheespresso
thermoblockinincrementsof2°Cupand
down,shoulditbedesired.
1.Ensuretheespressomachineispluggedin
andswitchonatthepoweroutlet.
Note:DONOTpressthePOWERbuttonon
theespressomachine.
2.PRESSandholddownthe1CUPbutton.
3.Whilestillholdingdownthe1CUPbutton
brieflyPRESSthePOWERbuttonandthen
releasethe1CUPbutton.
Toindicateyouhaveactivatedthe
programmabilityoftheespressothermoblock
temperature,alightononeofthebuttons
willilluminate;
1CUP=Factorysetting
2CUP=+2°C
PROGRAM=+4°C
MANUAL=-2°C
POWER=-4°C
Thislightwillremainonforupto5seconds
beforeautomaticallyreturningtofactory
settingsifnoactionistaken.Theespresso
machinewillthenpoweron.
4.PRESSandRELEASEoneofthebuttons
belowdependingontherequired
temperatureadjustment;
+2°C=PRESSthe2CUPbutton
+4°C=PRESSthePROGRAMbutton
-2°C=PRESStheMANUALbutton
-4°C=PRESSthePOWERbutton
Whenthenewtemperaturesettinghasbeen
selectedtheespressomachinewillbeep
twice.
5.Theespressomachinewillthen
automaticallypoweron.
Steam Thermoblock Temperature
Thetemperatureofthesteamthermoblock
hasbeencalibratedtodeliverapowerful,
constantsupplyofdrysteamfortexturing
milk.Thetemperatureofthesteamcanbe
modifiedinincrements.of5°Cupanddown
shoulditbedesired.
1.Ensuretheespressomachineispluggedin
andswitchonatthepoweroutlet.
Note:DONOTpressthePOWERbuttonon
theespressomachine.
2.PRESSandholddownthe2CUPbutton.
3.Whilestillholdingdownthe2CUPbutton
brieflyPRESSthePOWERbuttonandthen
releasethe2CUPbutton.
Toindicateyouhaveactivatedthe
programmabilityofthesteamthermoblock
temperature,alightononeofthebuttons
willilluminate;
1CUP=Factorysetting
2CUP=+5°C
PROGRAM=+10°C
MANUAL=-5°C
POWER=-10°C
-4ºC -2ºC
Factory
Setting
+2ºC +4ºC

12
Thislightwillremainonforupto5seconds
beforeautomaticallyreturningtofactory
settingsifnoactionistaken.Theespresso
machinewillthenpoweron.
4.PRESSandRELEASEoneofthebuttons
belowdependingontherequired
temperatureadjustment;
+5°C=PRESSthe2CUPbutton
+10°C=PRESSthePROGRAMbutton
-5°C=PRESStheMANUALbutton
-10°C=PRESSthePOWERbutton
Whenthenewtemperaturesettinghasbeen
selectedtheespressomachinewillbeep
twice.
5.Theespressomachinewillthen
automaticallypoweron.
Steam Pump Rate
Thesteampumprateofthisespressohas
beensetat0.3secondsonand0.5seconds
off.Modifyingthesteampumprateenables
youtomakethesteamwetterordryerand
aidsinthedeliveryofapowerful,constant,
drysteam–idealfortexturingmilk.The
steampumprate(offtime)canbemodified
inincrementsofplusorminus0.1seconds
shoulditbedesired.
1.Ensuretheespressomachineispluggedin
andswitchonatthepoweroutlet.
Note:DONOTpressthePOWERbuttonon
theespressomachine.
2.PRESSandholddownthePROGRAM
button.
3.WhilestillholdingdownthePROGRAM
buttonbrieflyPRESSthePOWERbutton
andthenreleasethePROGRAMbutton.
Toindicateyouhaveactivatedthe
programmabilityofthesteampumprate,a
lightononeofthebuttonswillilluminate;
1CUP=Factorysetting
2CUP=-0.1secoff
PROGRAM=-0.2secoff
MANUAL=+0.1secoff
POWER=+0.2secoff
Thislightwillremainonforupto5seconds
beforeautomaticallyreturningtofactory
settingsifnoactionistaken.Theespresso
machinewillthenpoweron.
4.PRESSandRELEASEoneofthebuttons
belowdependingontherequired
temperatureadjustment;
-0.1sec=PRESSthe2CUPbutton
(deliversawetsteam)
-0.2sec=PRESSthePROGRAMbutton
(deliversawettersteam)
+0.1sec=PRESStheMANUALbutton
(deliversadrysteam)
+0.2sec=PRESSthePOWERbutton
(deliversadryersteam)
Whenthenewpumpratesettinghasbeen
selectedtheespressomachinewillbeep
twice.
5.Theespressomachinewillthen
automaticallypoweron.
-10ºC -5ºC
Factory
Setting
+5ºC +10ºC
Advanced Programming continued
+0.2sec
off
+0.1sec
off
Factory
Setting
-0.1sec
off
-0.2sec
off
13
Resetting the Factory Settings
Torevertbacktotheespressomachines
factorysettings;
1.Ensuretheespressomachineispluggedin
andswitchonatthepoweroutlet.
Note:DONOTpressthePOWERbuttonon
theespressomachine.
2.PRESSandHOLDDOWNtheMANUAL
button.
3.WhilestillholdingdowntheMANUAL
button,brieflyPRESSthePOWERbutton
andthenreleasetheMANUALbutton.
4.4beepswillsoundandthemachinewill
poweron.
Power Saving Mode
After1hourofnon-usetheespressomachine
willautomaticallyswitchtopowersaving
mode.Oncetheespressomachineisin
powersavingmodeallthelightsonthe
buttonswilldim.Whileinpowersavingmode
theespressomachinepowersdownto75%
ofpower.Afterafurther4hoursofnon-use
theespressomachinewillbeeponceand
thenturnoff.
Thetimeofinactivitybeforetheespresso
machineentersintopowersavingmodecan
beadjustedifsodesired;
1.Ensuretheespressomachineispluggedin
andswitchonatthepoweroutlet.
Note:DONOTpressthePOWERbuttonon
theespressomachine.
2.PRESSandHOLDDOWNtheMANUAL
andPROGRAMbuttons.
3.WhilestillholdingdowntheMANUAL
andPROGRAMbuttonsbrieflyPRESSthe
POWERbuttonandthenreleaseboththe
MANUALandPROGRAMbuttons.
Toindicateyouhaveactivatedthe
programmabilityofthepowersavingmode,a
lightononeofthebuttonswillilluminate;
1CUP=Powerdownafter1hourof
inactivityandthenturnoffafterafurther
4hoursofinactivity(Factorysetting)
2CUP=Turnoffafter26hoursof
inactivity
PROGRAM=Doesnotturnoff
MANUAL=Turnoffafter8hoursof
inactivity
POWER=Turnoffafter30minutesof
inactivity
Thislightwillremainonforupto5seconds
beforeautomaticallyreturningtofactory
settingsifnoactionistaken.Theespresso
machinewillthenpoweron.
4.PRESSandRELEASEoneofthebuttons
belowdependingonthepowersavingmode
desired;
26hours=PRESSthe2CUPbutton
Doesnotturnoff=PRESSthePROGRAM
button
8hours=PRESStheMANUALbutton
30minutes=PRESSthePOWERbutton
Whenthenewpowersavingmodesettinghas
beenselectedtheespressomachinewillbeep
twice.
5.Theespressomachinewillthen
automaticallypoweron.
Advanced Programming continued
Figure7

14
HeadingPreparing your espresso machine
for the first time
• Ensuretheespressomachineisalways
positionedontoadry,stablebenchtop.
• Ensureallpackaginghasbeenremoved
fromtheespressomachineandthedrip
traywithgrillisinplace.
• Filltheespressomachinewithwater;
1.Simplyliftthelidofthewaterreservoirat
thetopoftheespressomachineandusing
ajug,fillwithfreshcoldwaterorfiltered
water.
2.Alternativelyslideoutthewaterreservoir
fromthebackoftheespressomachineand
fillwithfreshcoldwaterorfilteredwater.
Thenreplacethewaterreservoir,ensuring
itisfirmlyinplace.
• Insertthepowercordintoa230-240VAC
poweroutletandswitchthepoweron.
• PressthePOWERbuttonontheespresso
machine.ThePOWERbuttonwillstart
flashing,thisindicatesthatyourespresso
machineisonandisheatingup.
• WhentheredlightonthePOWERbutton
stopsflashingandturnstoaconstant
redlightthisindicatesthattheespresso
machineisnowattemperatureandisin
READYMODE.
• Atthispointglassesandcupscan
beplacedonthewarmingplatefor
pre-heating.
• Fitthegrouphandlewitheitherthesingle
ordoublefilterbasketandsecuretothe
groupheadontheespressomachine.
• Placeasufficientlylargecontainerunder
bothpourspoutsandpresstheMANUAL
button.Waterwillstarttorunthrough.
Note:Asasafetymechanismtheespresso
machineisprogrammedtoautomaticallystop
thewaterflowafter240mls,thereforeyou
willneedtopresstheMANUALbuttonagain
torestartthewaterflow.
• Continuetoallowthewatertorunthrough
untilthewaterreservoirisempty.

Heading
15
Guide to coffee making
PRE-HEATING
Glasses
Pre-heatglassesandcupsbyfillingthem
withhotwaterasthiswillassisttopreserve
thecremaoftheespressoandalsohelp
maintainthetemperatureoftheespresso.
Justpriortomakingyourespressoglasses
andcupscanbepre-heatedusingthehot
waterfeatureonyourespressomachine.
Otherwiseglassesandcupscanbestoredon
thewarmingtrayoftheespressomachine;
thiswillalsoassistinpre-heating.
Group Handle and Filter baskets
Thisisimportantespeciallyforthefirst
coffeebeingmade,asacoldgrouphandle
cansignificantlydecreasethetemperatureof
thewateratthepointofextraction.Thisin
turnwillalterthequalityandcharacteristics
oftheresultingespressoextraction.
Aneasywaytopre-heatthegrouphandle
andfilterbasketistofitthegrouphandle
withafilterbasket.Holdthegrouphandle
underthegrouphead,presstheMANUAL
buttonandallowthehotwatertoflowover
thegrouphandle.Rotatethegrouphandleso
boththeundersideofthegrouphandleand
thefilterbasketispreheated.Youmayneed
topresstheMANUALbuttonagaintoensure
thegrouphandleandfilterbasketisproperly
pre-heated.
Drythefilterbasketbeforefillingwithcoffee.
DOSING and TAMPING
• Drywipethebasket.
• Grindevenlyanddirectlyintothecentreof
thefilterbasket.
• Fillthefilterbasketwithgroundcoffeeto
therim.
• Usingthetamper,tampstraightdown,this
isgoingtocreatemorespaceforsome
morecoffee.
• Grindsomemorecoffeetoasimilarlevel
inthefilterbasketandusingthetamper
againtocreatesomemorespace.Onelast
timegrindsomemorecoffeeintothefilter
baskettotherim.
• Thistimelockthegrouphandleintothe
sideofthebenchandusingthetamper
applyfirmdownwardpressure.Brushany
loosecoffeeofftherimofthebasketinto
thecentreandtampdownagain,thistime
twistthetampertosealthetopofthe
coffee.
• Wipetherimofthefilterbasketfreeofany
loosecoffeegrindsanduseimmediately.

16
Heading
Guide to making coffee continued
The Espresso Pour
Greatcoffeesstartwithfreshlyroastedbeans
thatwilldeliverasweetespressothatwillbe
richintexture,bodyandaroma.Controlling
eachpartofthecoffeemakingprocessisthe
realsecret.
• Neverextractanymorethan30mlsof
espresso.
• Alwayspurgewaterfromthegrouphead
beforelockinginthegrouphandlewith
coffee,thiswilldislodgeanygroundcoffee
residuefromthegrouphead.
Thewaytheespressopourswilltellyou
everything.Whatyouarelookingforis;
1.Infusiontime;whenpressurisedwateris
beingforcedthroughthegroundcoffee.
2.Colouroftheespresso;shouldbedark
brown.
3.Resistance;lookingforathickness,ora
niceoozinesslikedrippinghoney,with
resistanceatabout2/3fromthespoutsto
thebottomofthecup.It’sgoingtofalland
pullbackup.
4.Evenextraction;notextremelytightatthe
beginningorpouringexcessivelyfastatthe
end.
5.Lookforcolourchange;whentheespresso
changesfromadarkbrowntoacreamy
orlightcolourthesweetestflavoursand
oilshavebeenextractedandthisusually
happensaroundthe25-30mlmark,after
whichtheespressopourisfinished.

Heading
17
Guide to milk texturing
Whatyouwanttoachieveissilkythick
richmilkthathasbeenheatedtobetween
60-65°C.
Thesteamcomingoutofthemachinewill
onlyheatthemilk,itisuptothecoffee
makertoaeratethemilkinawaythatallows
thecreationofbeautifullytexturedmicro
foamandit’sallaboutthepositioningofthe
steamtipandhowyoumovethejug.
Using the Temperature Sensing Steam Wand
1. Firstlyalwaysstartwithfreshcoldmilk
fromthefridgeandacleanjug.
2. ½fillthejugwithmilk(approx.
300-400mls).
Note:Thetemperaturesensingdeviceis
foundontherearofthesteamwandtip.
3. Purgethesteamwand.
4. Insertthetipofthesteamwandinto
themilkensuringthatthetemperature
sensingdeviceisimmersedinthemilk.
Please note:Ifthetemperaturesensing
deviceisnotimmersedinthemilk,the
temperaturereadingwillnotbeaccurate.
5. Activatethesteamfunctiononthe
espressomachine.
6. Restthespoutofthemilkjugupagainst
thesteamwand.Positionthesteamtip
justunderthesurfaceofthemilkand
justoffcentre.Rememberthetemperature
sensingdevicemustbeimmersedinthe
milktoreadthemilktemperature.
7. Continuetotexturethemilk.
8. Gentlylowerthejugslowlytocreatethe
amountofdesiredfoamforthestyleof
coffeeyouarecreating.Rememberingthat
ifyouareusingthetemperaturesensing
feature;ensurethetemperaturesensing
deviceisimmersedinthemilk.
9. Themorecontrolyouhaveduringthis
stageofthemilktexturingprocessthe
denserandsmootherthefoam.
10.Nowlistenforthehissingsound.Thisis
anindicatorthatyou'redrawingairinto
themilkinacontrolledfashion.
11.Afteryouhavecreatedtheamountof
foamyouneedforthestyleofdrink
you'remakingkeepthejugsteadyand
allowthemilktocomeuptotemperature.
12.Rememberthisprocessisaboutkeeping
themilkspinningandmaintainingthe
samepositionfromwhereyoustarted.
13.Whenthemilkreachesthedesired
temperature,turnthesteamoff.We
recommend65°Cforsweettastingmilk.
14.Removethejugfromthewand,wipethe
steamwandwithacleandampclothand
giveitaquickburstofsteamtoremove
anymilkthathasbeensuckedupthe
steamwand.
15.Ifyouhaveanylargesurfacebubbles,
gentlytapthejugonthebenchto
collapsethese.
16.Rollthejugtokeepthemilkandfoam
together.
17.Takeyourglassorcupofespressoand
restthepouringspoutagainsttherimof
thecupandpourinonesteadymotion.
Rememberpracticemakesperfect!
18
Espresso recipes
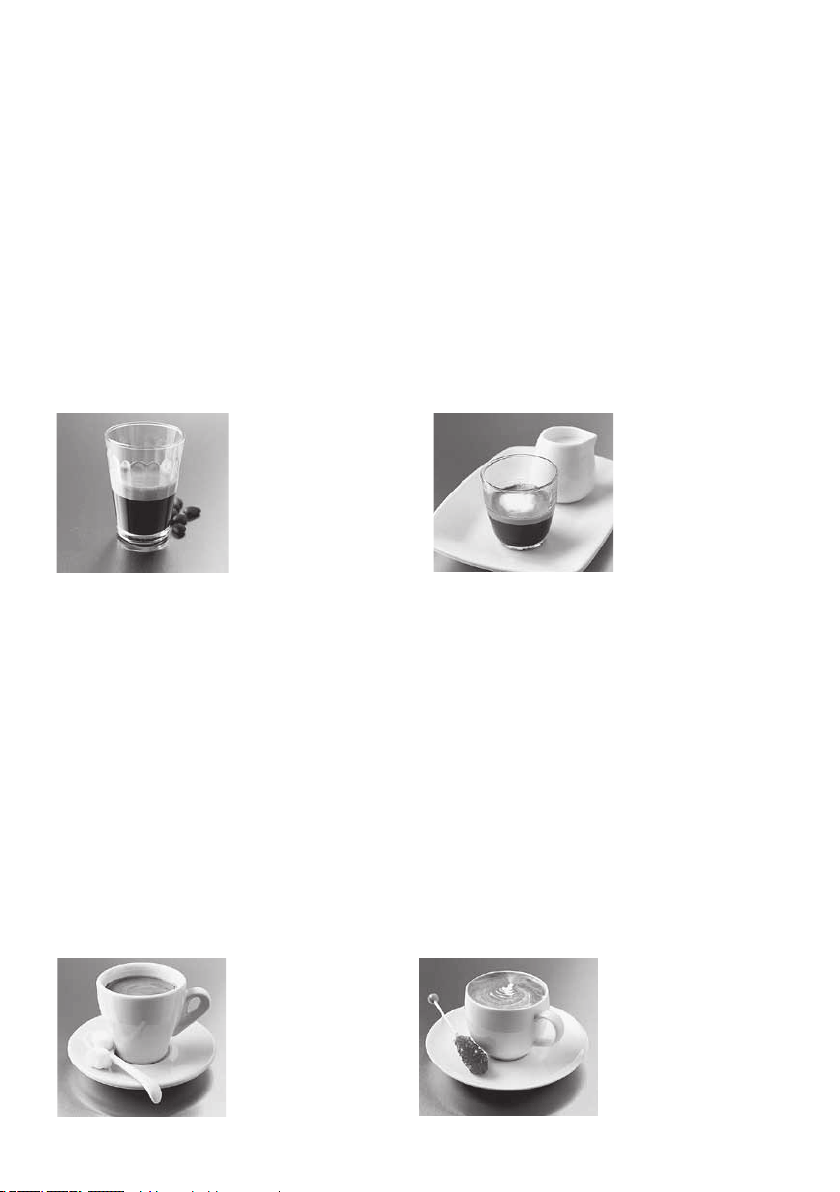
ESPRESSO (SHORT BLACK)
Espressoisaconcentrated,fullbodiedcoffee
withastablelayerofcreamontop–known
as‘crema’.Anespressoisthefoundationof
allcafécoffee.Variationsareachievedby
addingdifferentamountsofmilkandfroth.
•90mLespressoglassordemitassecup
•singleespresso(30-35mL)
LONG BLACK
Astandardespressowithhotwater,servedin
aregularcoffeecupormug.Thehotwateris
addedfirstsothatthe‘crema’ismaintained.
•190mLcup
•hotwater(totaste)
•singleordoubleespresso
MACCHIATO
Macchiato,Italianfor‘tostainormark’.
Traditionallyservedasastandardespresso
withadashofmilkandasmalldollopof
frothintothemiddleofthe‘crema’.
•90mLespressoglassordemitassecup
•singleordoubleespresso
•markedwithsteamedmilkfroth
FLAT WHITE
Anotheroldfavourite,theFlatWhiteis
anespressowithsteamedmilk,servedin
aregularcoffeecupormug.Thelayerof
frothedmilkontopshouldbe2mmtoseal
thecoffee.
•190mLcup
•singleordoubleespresso
•steamedmilk
19
Espresso recipes continued
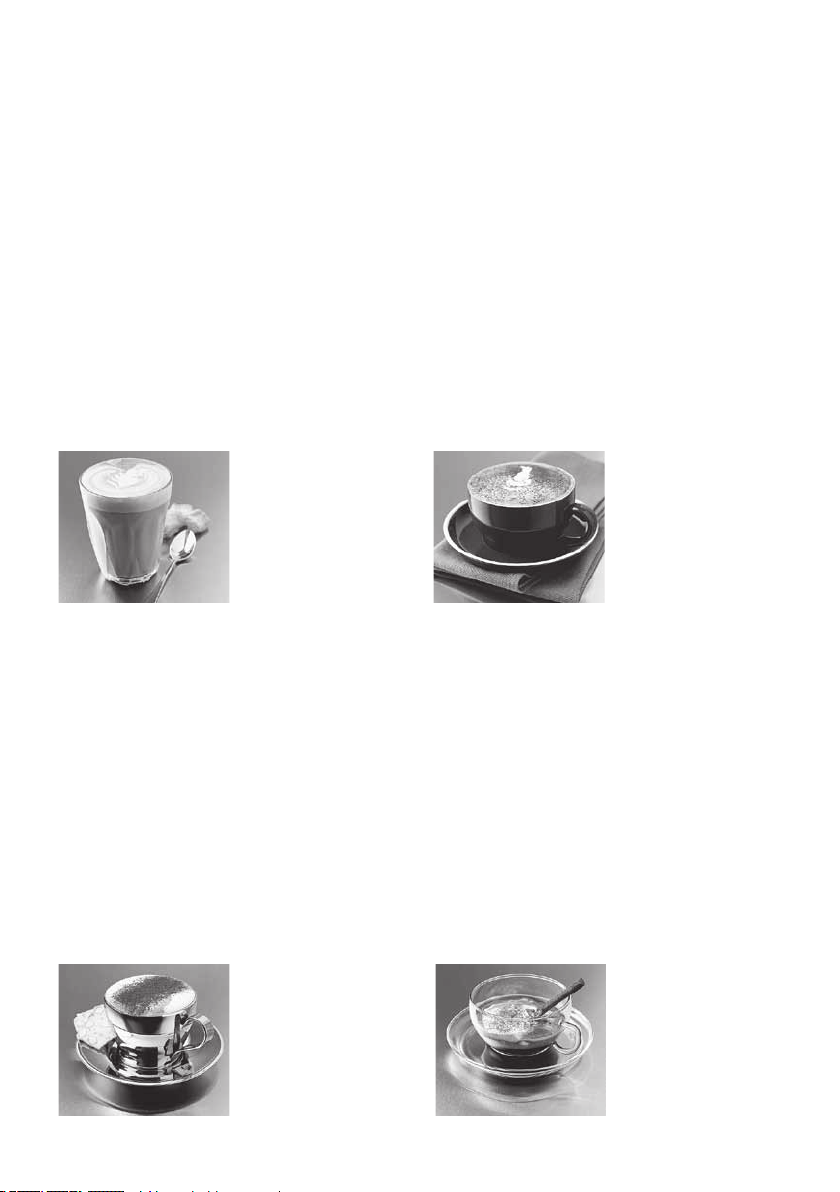
CAFFE LATTE
Anespressowithsteamedmilk,typically
servedinaglass.Thelayeroffrothedmilkon
topshouldbe10mmtosealthecoffee.
•220mLglassorcup
•singleordoubleespresso
•steamedmilk
CAPPUCCINO
Thisdeliciousdrinkisanespressowith
steamedmilk,toppedwithcreamyfrothand
adustingofchocolate.Theresultingdrinkis
approximatelytwo-thirdsmilkycoffee,one-
thirdfroth.
•190-240mLcup
•singleordoubleespresso
•two-thirdsmilkycoffee,one-thirdfroth
•dustedwithchocolate
CAFFE MOCHA
Madeinasimilarwaytoacappuccinobut
withtheadditionofdrinkingchocolate.
Simplystirthechocolateintotheespresso
priortoaddingthesteamedmilkandfroth.
•190-240mLcuportallglass
•singleordoubleespresso
•twoteaspoonsofdrinkingchocolate
•two-thirdsmilkycoffee,one-thirdfroth
CON PANNA
AvariationontheoriginalViennacoffee,this
deliciousdrinkismadeupofanespresso
toppedwithlightlywhippedcream.Itcan
alsobedustedwithcinnamonordrinking
chocolate.
•190mLcup
•singleordoubleespresso
•lightlywhippedcream
•dustedwithcinnamonorchocolate

20
Care and cleaning
Thecoffeemakingprocessinvolvesextracting
oilsoutofcoffeegrindstomakeespresso
coffee.Depositsoftheseoilsbuildupover
timeandaffectthetasteofthecoffeeand
operationoftheespressomachine.
Regularcleaningtoremovetheseoilsis
essentialandwillmaintainthequalityofthe
coffeetheespressomachineproducesand
resultinlessmaintenancebeingrequired.
Thisiseasytodobyfollowingafewquick
andeasycleaningstepsaftereachcoffee
makingsession;
Cyclewaterthroughthegrouphead,
Purgesteamthroughthesteamwand,
Wipethesteamwandcleanwithadamp
clothimmediatelyafteruse,
Removethefilterbasketfromthefilter
handleandcleanawayanyoldcoffeeoils,
and
Emptythedriptrayandrinse.
Important:Neverwashanyoftheespresso
machinepartsoraccessoriesinthe
dishwasher.
Drip tray and grill
Removethegrillanddriptrayatregular
intervalstoempty.Cleanwithwateranda
littlenon-abrasivewashingupliquid,rinse
anddry.
Group head, group handle & filter baskets
Thefilterbasketsandgrouphandleshould
berinsedwithwarmwateraftereachuseand
thendriedthoroughly.
Tocleanthegroupheadofanyoldcoffee
grindscyclewaterthroughandwipethe
groupheadandaroundtheinsiderimwitha
dampcloth.
Shouldtheholesinthefilterbasketsbecome
cloggedwithcoffeegrindsuseafinebristled
brushtoremovethem.Alsoyoucanuse
thecleaningpinwhichissuppliedwith
theespressomachine.Thecleaningpinis
attachedtotheinsideofthetopfilllid,
locatedatthetopoftheespressomachine.
Thecleaningpinhastwopinsateitherend-
theshorterofthetwoisforcleaningoutthe
holesinthefilterbasket.
Group head rubber seal
Thegroupheadsealislocatedonthe
undersideofthegroupheadandcreates
asealagainstthefilterhandleduringthe
espressopour.
Note:Duringlongperiodsofnon-usewe
recommendthatthefilterhandlenotbe
leftattachedtothegroupheadasthiswill
reducethelifeoftheseal.
Overtimethesealwilllooseitselasticity
andrequirereplacement,dependingonuse
usuallyevery12months.Signsthattheseal
isdeterioratingarewhenthegrouphandle
cannotcreatethenecessarysealandsteam
andorwaterescapesfromaroundthegroup
headduringtheespressopour.
Note:ContactSunbeamon1300881861
shouldyouthinkthatthegroupheadseal
needsreplacing.Pleasedonotattemptto
changethesealwithoutfirstconsulting
Sunbeam.
Cup warming plate, hot water tap and exterior
Wipeovertheunitwithadampclothand
wipedry.Donotuseabrasivesormetal
scourersasthesewillscratchtheexterior
surface.

21
Care and cleaning continued
Steam wand
Keepingthesteamarmcleanisessential
toensuremaximumefficiencyofthesteam
function.Abuildupofcaramelised/dried
milkonthesteamwandwillimpairthe
steamingandtexturingabilityoftheespresso
machine.
Important:Wipethesteamwandcleanwitha
dampclothimmediatelyaftereachuseand
purgeasmallamountofsteam.
Shouldthemilkdry/carameliseonthe
steamwand,simplywrapthewandwith
acleandampcloth,turnthesteamwand
overthedriptrayandturnthesteamonfor
approximately10seconds.Withthecloth
stillonthesteamwandleavetosoakfor
about5minutesandyouwillfindthatafter
thistimethedry/caramelisedmilkwilleasily
wipeaway.Repeatprocessifstilldirty.
Important:Nevercleanthesteamwandwith
anabrasivepadasthiswilldamagethe
steamwand.
Shouldthesteamwandbecomeblocked,
suppliedwiththeespressomachineisa
cleaningpin.Thecleaningpinisattachedto
theinsideofthetopfilllid,locatedatthe
topoftheespressomachine.Thecleaning
pinhastwopinsateitherend-thelongerof
thetwoisforcleaningtheholeinthebase
ofthesteamnozzle.Shouldthesteamwand
remainblockedunscrewthesteamnozzle
fromthesteamwand.Cleanthesteamnozzle
byonceagainusingthecleaningpinthen
flushunderrunningwater.

22
Depositsofcoffeeoilsbuildupovertimeand
affectthetasteofthecoffeeandoperation
oftheespressomachine.Thereforethe
groupheadwillrequireregularcleaning.Itis
recommendedthatthegroupheadiscleaned
ataminimumevery3months,thiswillvary
dependingonthefrequencyofuse.
1. Removethewaterreservoirandrinse
clean.Withfreshwatercompletelyfill
andreplacethereservoir.
2. Removethecleaningdiscwhichisinside
ofthetopfilllid,locatedatthetopof
theespressomachine.
3. Fitthegrouphandlewiththedouble
filterbasket.
4. Positionthecleaningdiscintothedouble
filterbasket.
5. PlaceaSunbeamEspressoMachine
CleaningTablet(EM0020)intothe
filterbasketthatisnowalsofittedwith
thecleaningdiscandsecurethegroup
handletothegrouphead.
6. Placeasufficientlylargecontainerunder
bothpouringspouts.
Starting the cleaning cycle
7. Insertthepowercordintoa230-240V
ACpoweroutletandswitchthepower
‘ON’.
Note:DONOTpressthePOWERbuttonon
theespressomachine
8. Pressandholddownthe1CUPand2
CUPbuttons.Whilestillholdingdown
the1CUPand2CUPbuttonsbriefly
pressthePOWERbutton.Asthelightson
thecontrolpanelstarttochasefromleft
torightreleasethe1CUPand2CUP
buttons.
Note:Thelightsonthecontrolpanelwill
continuetochaseuntilthecleaningcycle
iscompleted,thiswilltakeapproximately7
minutes.
Note:Duringthecleaningcycleallother
espressomachineoperationswillbelocked
untilthecleaningcycleiscompleted.Should
thecleaningcyclebeaccidentallystarted
itcanbecancelledbyswitchingthepower
‘OFF’atthepoweroutlet,orbypressingthe
POWERbutton.
9. Whenthecleaningcycleiscompleted
thelightsonthecontrolpanelwillstop
chasingandtheespressomachinewill
beep4times.Followingthis,thelights
abovethePOWER,MANUAL,1CUPand
2CUPbuttonswillcomeon,signalling
thatthemachineisreadytouse.
10.Removethecontainerfromunderthe
pouringspoutsandempty.
11.Removethegrouphandlefromthegroup
head.
12.Removethecleaningdiscfromthe
grouphandleandreturntothestorage
compartment.
13.Removethedoublefilterbasketfromthe
grouphandleandwashinwarmsoapy
water.Rinsewellanddry.
14.Theespressomachineisnowready
foruse.
Coffee Thermoblock Cleaning Cycle

23
Descaling Cycle for both the Coffee
and Steam Thermoblocks
Scaleisasurfacebuildupofmineralsthat
naturallyoccurovertimeinallappliances
thatareinvolvedwiththeheatingofwater.
Thereforetheespressomachinewillrequire
occasionaldescaling.Itisrecommended
thattheespressomachineisdescaledevery
4-6months;thiswillvarydependingonthe
frequencyofuseandwaterhardness.
1. Removethewaterreservoirandrinse
clean.Fillwithfreshcoldwaterand
replacethereservoir.
2. Usingascrewdriverunscrewthefilter/
showerscreenfromtheundersideofthe
groupheadandcleanunderrunning
water.
3. Replacethefilter/showerscreenand
screwinposition.
4. Placealargecontainerunderthegroup
headandalsopositionthesteamwandso
waterfromboththegroupheadandthe
steamwandwillfallintothecontainer.
5. TurnthesteamdialtotheONposition.
Important:Thehotwaterdialmustbeclosed
duringdescaling.
6.Insertthepowercordintoa230-240VAC
poweroutletandswitchthepowerON.
Note: DONOTpressthePOWERbuttonon
theespressomachine.Thereforenolights
willbeilluminatedontheespressomachine.
7. PRESSandHOLDDOWNboththe1
CUPandPROGRAMbuttons.Thenbriefly
PRESSthePOWERbuttonandthen
releaseboththe1CUPandPROGRAM
buttons.Thelightsonthecontrolpanel
willstarttochasefromlefttoright.
Oneoftwothingswillhappen;
a) Iftheespressomachinehasbeen
recentlyused,thetemperatureofthe
steamthermoblockmayneedtobe
cooledbeforethedescalingcyclecan
startandsowaterwillflowthroughthe
steamwanduntilthesteamthermoblock
hascooledtotheappropriate
temperature.
b) ORiftheespressomachinestartstobeep
itmeansitisreadytostartthedescaling
cycleandyoushouldcontinuetostep8.
8. Useoneofthefollowing;
a) SunbeamEspressoMachineDescaling
Tablets(EM0010).Fillthewaterreservoir
with3litresofwarmwaterandplace3
descalingtabletsintothereservoir.Once
thetabletshavedissolvedreplacethe
reservoirintopositioninthemachine.
b) SunbeamLiquidDescaler.Fillthewater
reservoirwithapproximately3litresof
water,add2capfulsoftheSunbeam
LiquidDescalerandreplacethereservoir
intopositioninthemachine.
c) VinegarSolution.Fillthewaterreservoir
withapproximately3litresofwater,add
6tablespoonsofvinegarandreplacethe
reservoirintopositioninthemachine.
Important:EnsuretheSTEAMdialisstillin
theONposition.
9. Activatethedescalingcyclebypressing
the1CUPbuttononce.
10.ThepumpsforbothSTEAMand
ESPRESSOwillstarttopumpthrough
thedescalingsolutionforapproximately
15seconds.
11.Bothpumpswillstopandwaitfor
approximately1minutetoallowthe
descalingsolutiontotakeeffect.

24
12.Theespressomachinewillrepeat
thepumpingandrestcyclesfor
13timesforboththeSTEAMand
ESPRESSOthermoblocks.Thiswilltake
approximately17minutes.
13.Atthecompletionofthe14cyclesthe
espressomachinewillstarttobeepand
the1CUPbuttonwillflash.
14.Removethewaterreservoir,emptyand
rinsethoroughlywithcoldwater.Also
emptythecontainerunderthegroup
headandsteamwandandplaceback
intoposition.
15.Refillthewaterreservoirwithclean,
cold,freshwaterandplacebackintothe
espressomachine.
16.Activatethedescalingprocessby
pressingthe1CUPbuttononce.
17.ThepumpsforboththeSTEAMand
ESPRESSOwillstarttopumpcleanwater
throughforapproximately1-2minutes.
Onceagainthelightsonthecontrol
panelwillstarttochasefromlefttoright.
18.Atthecompletionofthecyclethe
espressomachinewillbeep4timesand
willgointoSTANDBYMODE.
Descaling Cycle for both the Coffee and Steam Thermoblocks

In the unlikely event that this appliance develops any malfunction
within 12 months of purchase due to faulty materials or
manufacture, we will REPAIR it for you free of charge.
12 Month Repair Guarantee
Shouldyouexperienceanydifficultieswith
yourappliance,pleasecontactourcustomer
servicelineforadviceon1300881861in
Australia,or0800786232inNewZealand.
Alternatively,youcansendawrittenclaimto
Sunbeamattheaddresslistedbelow.Upon
receiptofyourclaim,Sunbeamwillseekto
resolveyourdifficultiesor,iftheapplianceis
defective,adviseyouonhowtoarrangeforit
toberepaired.
YourSunbeam12MonthREPAIRGuarantee
naturallydoesnotcovermisuseorimproper
handling,andnormalwearandtear.Similarly,
your12MonthREPAIRGuaranteedoesnot
coverfreightoranyothercostsincurredin
makingaclaim.
ItwillbeatthediscretionofSunbeamwhether
torepairorreplaceanyappliancethatdevelops
amalfunctionduringtheREPAIRGuarantee
period.Sunbeamisbynomeansobligedto
replaceanyapplianceifitcanberepaired.
Iftheapplianceisirreparableduetoany
claimeddefectcausedbyfaultyworkmanship
ormaterial,thenSunbeamwillreplacethe
appliance.
Priortoanyrepairsbeingundertaken,a
purchasereceiptmustbeprovidedasproofof
purchase.Sunbeamwillnotberesponsiblefor
thecostoftransporttoandfromanySunbeam
authorizedservicecentre,oranyinsurance
costsassociatedwiththistransport.Similarly
Sunbeamwillnotberesponsibleforany
damageorlossthatoccursduringtransittoor
fromanySunbeamauthorizedservicecentre
forreasonsnotrelatedtothemalfunction.
Thebenefitsgiventoyoubythisguaranteeare
inadditiontoyourotherrightsandremedies
underanylawswhichrelatetotheappliance.
Ourgoodscomewithguaranteesthatcannot
beexcludedundertheAustralianConsumer
LawandundertheNewZealandConsumer
GuaranteesAct.
InAustraliayouareentitledtoareplacement
orrefundforamajorfailureandfor
compensationforanyotherreasonably
foreseeablelossordamage.Youarealso
entitledtohavethegoodsrepairedorreplaced
ifthegoodsfailtobeofacceptablequality
andthefailuredoesamount
toamajorfailure.
Shouldyourappliancerequirerepairorservice
aftertheguaranteeperiod,contactyour
nearestSunbeamservicecentre.
ForacompletelistofSunbeam’sauthorised
servicecentresvisitourwebsiteorcall:
Australia
www.sunbeam.com.au
1300881861
Units5&6,13LordStreet
BotanyNSW2019Australia
New Zealand
www.sunbeam.co.nz
0800786232
26VesteyDrive,MtWellington
Auckland,NewZealand

is a registered trademark.
Need help with your appliance?
Contactourcustomerserviceteamorvisit
ourwebsiteforinformationandtipson
gettingthemostfromyourappliance.
In Australia
Visit www.sunbeam.com.au
Or call 1300 881 861
In New Zealand
Visit www.sunbeam.co.nz
Or call 0800 786 232
‘Cafe Series’ is a registered trademark of Sunbeam Corporation.
Made in China.
Due to minor changes in design or otherwise,
the product may differ from the one shown in this leaflet.
© Copyright.
Sunbeam Corporation Limited 2012.
ABN 45 000 006 771
Units 5 & 6, 13 Lord Street
Botany NSW 2019 Australia
Unit 3, Building D
26 Vestey Drive
Mt Wellington Auckland
New Zealand
Sunbeam Corporation is a division of GUD Holdings Ltd.
12/12