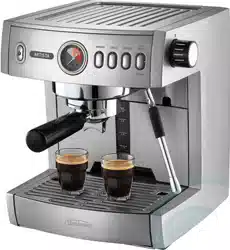
Waiting on Front
Cover from Energi
ESPRESSO MACHINE PLUS
MULTI-CAPSULE™ HANDLE

Important instructions – retain for
future use.
Contents
Sunbeam's Safety Precautions 1
Features of your Café Series
®
Espresso Machine 2
Preparing your espresso machine
for the first time 8
Using your espresso machine - Ground coffee 9
Inserting a capsule adaptor 12
Using your espresso machine - Capsule 13
Guide to milk texturing 14
Advanced Programming 15
Care and cleaning 20
Coffee thermoblock cleaning cycle 22
Descaling Cycle for both the Coffee
and Steam Thermoblocks 23
Disclaimer 24

Sunbeam’s Safety Precautions
SAFETY PRECAUTIONS FOR YOUR SUNBEAM
ESPRESSO MACHINE
• Alwaysplacetheunitonaflat,levelsurface.
• Donotoperatewithoutwaterinreservoir.
Fillreservoirwithonlycleanandcoldwater.
Observethemaximumfillingvolumeis3litres.
• Donotremovethefilterhandleduringtheespresso
pourorwaterflowastheunitisunderpressure.
Removingthefilterhandleduringeitherofthese
operationscanleadtoascaldingorinjury.
• Thesteamwandandhotwatertapbecomevery
hotduringtexturingmilkandwaterflow.Thismay
causeburnsincaseofcontact,thereforeavoidany
directcontactwiththesteamwandorhotwater
tap.
• Alwaysdisconnecttheplugfromthepoweroutlet
priortocleaningtheespressomachineorifthereis
anyproblemduringthecoffeemakingprocess.
• Donotallowthepowercordtocomeintocontact
withthehotpartsoftheespressomachine,
includingthecupwarmingplate,hotwatertapand
steamwand.
• Donotplacehandsdirectlyunderthesteam,hot
waterorcoffeepourasthiscanleadtoascalding
orinjury.
Sunbeam is very safety conscious when designing and
manufacturing consumer products, but it is essential
that the product user also exercise care when using
an electrical appliance. Listed below are precautions
which are essential for the safe use of an electrical
appliance:
• Readcarefullyandsavealltheinstructions
providedwithanappliance.
• Alwaysturnthepoweroffatthepoweroutletbefore
youinsertorremoveaplug.Removebygrasping
theplug-donotpullonthecord.
• Turnthepoweroffandremovetheplugwhenthe
applianceisnotinuseandbeforecleaning.
• Donotuseyourappliancewithanextensioncord
unlessthiscordhasbeencheckedandtestedbya
qualifiedtechnicianorserviceperson.
• Alwaysuseyourappliancefromapoweroutletof
thevoltage(A.C.only)markedontheappliance.
• Thisapplianceisnotintendedforusebypersons
(includingchildren)withreducedphysical,sensory
ormentalcapabilities,orlackofexperienceand
knowledge,unlesstheyhavebeengivensupervision
orinstructionconcerninguseoftheappliancebya
personresponsiblefortheirsafety.
• Childrenshouldbesupervisedtoensurethatthey
donotplaywiththeappliance.
• Thetemperatureofaccessiblesurfacesmaybe
highwhentheapplianceisoperating.
• Neverleaveanapplianceunattendedwhileinuse.
• Donotuseanapplianceforanypurposeotherthan
itsintendeduse.
• Donotplaceanapplianceonornearahotgas
flame,electricelementoronaheatedoven.
• Donotplaceontopofanyotherappliance.
• Donotletthepowercordofanappliancehangover
theedgeofatableorbenchtoportouchanyhot
surface.
• Donotoperateanyelectricalappliancewitha
damagedcordoraftertheappliancehasbeen
damagedinanymanner.Ifdamageissuspected,
returntheappliancetothenearestSunbeam
AppointedServiceCentreforexamination,repair
oradjustment.
• Foradditionalprotection,Sunbeamrecommend
theuseofaresidualcurrentdevice(RCD)
withatrippingcurrentnotexceeding30mAin
theelectricalcircuitsupplyingpowertoyour
appliances.
• Donotimmersetheapplianceinwateroranyother
liquidunlessrecommended.
•Appliancesarenotintendedtobeoperatedby
meansofanexternaltimerorseparateremote
controlsystem.
•Thisapplianceisintendedtobeusedinhousehold
andsimilarapplicationssuchas:staffkitchenareas
inshops,officesandotherworkingenvironments;
farmhouses;byclientsinhotels,motelsandother
residentialtypeenvironments;bedandbreakfast
typeenvironments.
Ifyouhaveanyconcernsregardingtheperformanceanduseofyourappliance,
pleasevisitwww.sunbeam.com.auorcontacttheSunbeamConsumerServiceLine.
Ensuretheabovesafetyprecautionsareunderstood.
1
2
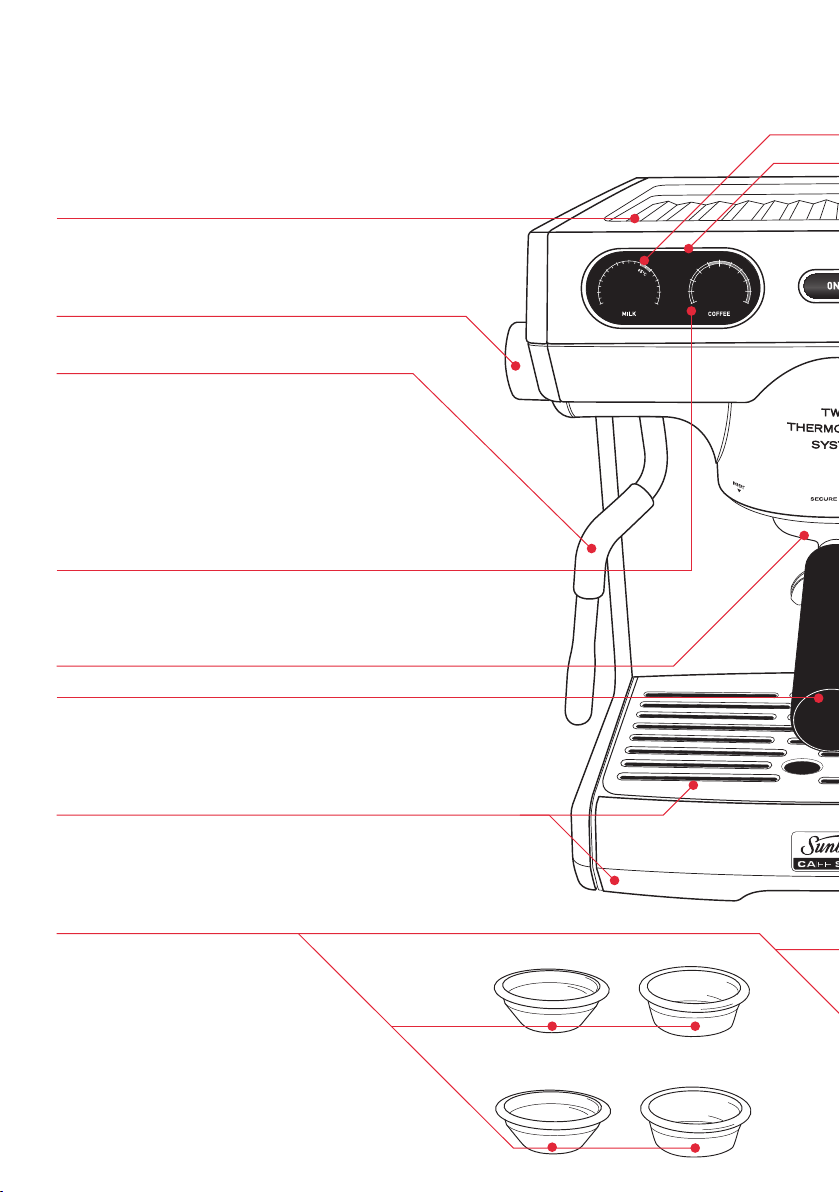
Warming plate
Thelargewarmingplateeffectivelypre-warmscups
helpingtoretaintheessentialcharacteristicstrueof
espresso-sweet,richtastingandaroma.
Steam control dial
Usedtoopenandclosethesteam.
Temperature sensing steam wand
Thetemperaturesensingsteamwand
ensuresmilkistexturedtothecorrecttemperature,
asmilkheatedtothecorrecttemperatureenhancesthe
sweetnessandtaste.Fittedwithadedicatedthermoblock
andpump,itprovidesaninstantandconstantsupplyof
powerfuldrysteamforachievingsilky,denseandrich
milk.Thecommercialballjointallowsthesteamwand
tobemovedintotheidealposition.
Espresso gauge
Thegaugemeasurestheresistancetotheespressopour
andataglance,thecoffeemakercangaugethequality
oftheespressopour.
Commercial size group head
Commercial size sloping group handle
with tamping pad
Theslopinghandleisdesignedforimprovedergonomic
useandwhenrestedonthebenchprovidesaneven
tampingsurface,resultinginabettertastingespresso.
Removable drip tray and grill
Thelargecapacitydriptrayislinedwithplastic,
preventingstainingfromespressooils,lightweightfor
easyremovalanddesignedwithnodirttrapsforsimple
wipedowncleaning.
Accessories
Alltheessentialaccessoriestomake
anauthenticcafé-qualityespresso.
Features of your Café Series
®
Espresso Machine
2
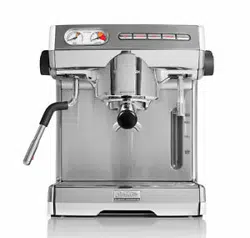
Single filter basket
Single dual
floor basket
Double filter basket
Double dual
floor basket
3
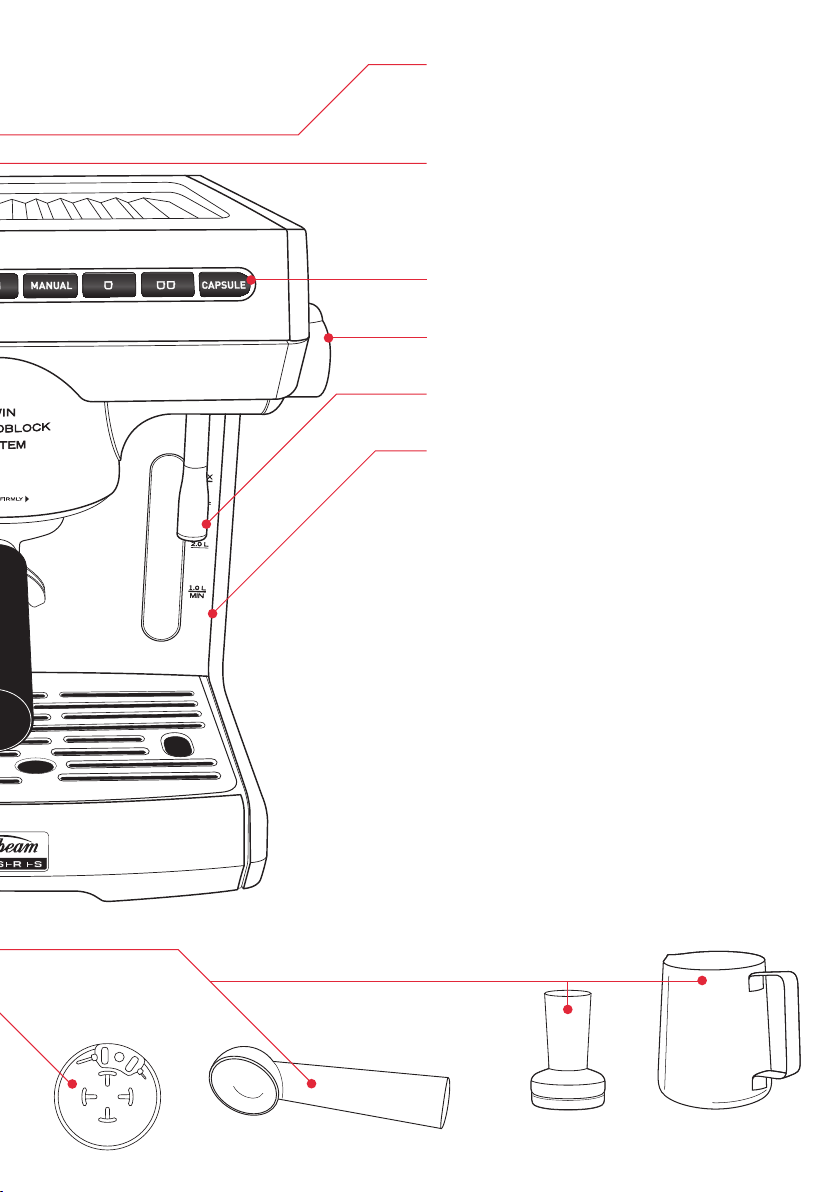
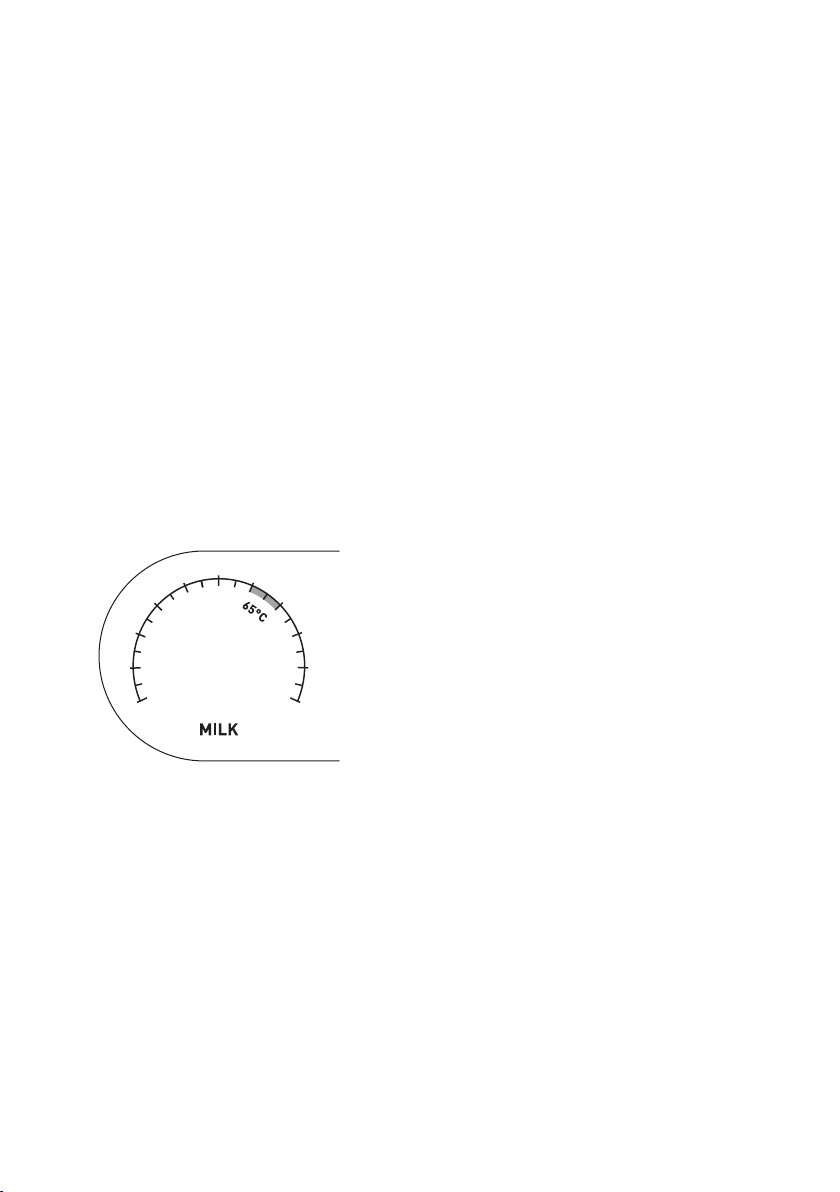
Milk temperature gauge
Thegaugedisplaysthetemperatureofthemilk
tohelptheespressomachineachievethedesired
temperatureeverytime.
Control board with dual gauges, low water indicator
& large buttons
Slightlyangledforeasyviewing,thecontrolboard
housesalltheinformationtheespressomachine
needstocreateagreattastingespresso.
Capsule Button
Useforsingleorlongcapsuleespressopours.
Hot water control dial
Usedtoopenandclosethehotwater.
Hot water wand
Dispensesacontrolledflowofhotwater.
3 litre water reservoir
Removable3litrewaterreservoirisfittedwithan
anti-calcfilterandcanbefilledfromthetoporis
removablefrombehind.
FEATURES YOU CAN'T SEE
Twin pumps and Twin thermoblocksallowyouto
texturemilkandbrewespressoatthesametime.
15 BAR Italian espresso pump fittedwithapressure
relief system.
Twin thermoblocks with stainless steel tubing.
PID technology controlswatertemperature
preciselyforbothespressoandsteamfunctions.
Pre-infusion; 3programstochoosefrom.
Brass collar isdurableandidealforfrequentuse.
Advanced Programming toadjustpumpand
temperaturesettingsforoptimalsteamand
brewingperformance.
Stainless steel and die-cast metal design
Power saving mode
3
Tamp
Measuring spoon
600ml jug
Cleaning disc

4
Features of your Café Series
®
Espresso Machine continued
Group Handle for Capsule Adaptors
DesignedtobeusedwithCapsuleAdaptors.
Capsule Adaptor Base
Controlsthepressurethroughthecapsule.
Capsule Adaptor Top
Holdsyourcapsuleinplace.
Freedom to choose from three Capsule Systems.
- Thegrouphandleforcapsuleadaptorsisdesigned
tobeusedwiththreedifferentcapsulesystems.
Colour Guide for Capsules
Nespresso* = Black Lavazza A Modo Mio * = Brown Caffitaly* = Red
IMPORTANT:Thecapsulebaseandtopmustbethesamecolour.
Ifyouusedifferentcoloursthemachinewillnotwork.
*Capsuletrademarksareownedbythirdparties&arenotrelatedtoSunbeam.
(Seepage26forfullTrademarksDisclaimer)
Required Espresso Pressure
The15BARItalianpumpproducesthe
requiredpressureforbrewingespresso
consistently.Fittedwithapressurerelief
systemwhichensuresthatanyremaining
pressureaftertheextraction,isreleasedinto
thedriptray;allowingforquick,successive
brews.
Espresso Temperature
Independentthermoblockheatingsystems
arelinedwithstainlesssteelandfitted
withPIDtechnology.ThePID(proportional
integralderivative)technologycontrols
thethermoblocktodeliverprecisewater
temperature,ensuringaconsistentbrew
everytime.
Twin Pumps & Twin Thermoblocks
Truetocommercialuse,theuniquetwin
pumpsandtwinthermoblocksallowthe
coffeemakertotexturemilkandpouran
espressosimultaneously.
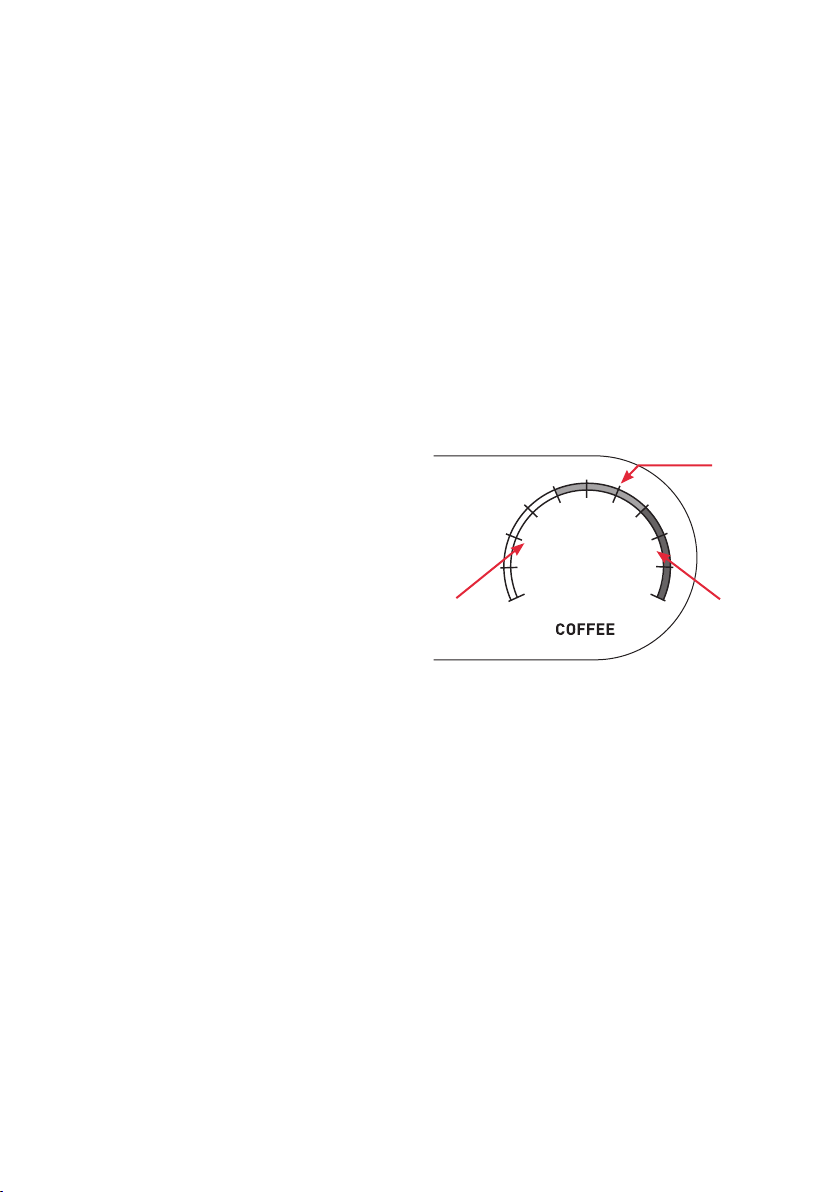
Espresso Gauge
Theespressogaugeisanindicatorofthe
qualityoftheespressopourandshouldbe
usedasaguide.
Itmeasuresthepressureorresistance
createdbywaterbeingpumpedthroughthe
tampedcoffeegrindsinthegrouphandle.
Whilsttheneedleiswithinthetargetareaon
thegaugeitindicatesthataqualityserveof
espressohasbeenmade.Thisisindicatedby
aslow,butflowingpourofespressowitha
consistencysimilartothatofdrippinghoney.
Thecremashouldbedarkgoldenincolour.
Shouldtheneedlefailtoreachthetarget
areathisisanindicationthattheserveof
espressois‘under-extracted’.Thisoccurs
whenwaterpassestooquicklythroughthe
tampedcoffeegrindsandisanindication
thateitherthegrindistoocoarse(sothe
waterflowsstraightthroughthegrinds)or
thefilterbaskethasbeenunder-dosed.The
pourisquickandlightincolourandthe
resultingcremaisthinwithacreamylight
browncolour.
Whentheneedlegoesbeyondthetargetarea
itisanindicationthattheserveofespresso
is‘over-extracted’.Thisoccurswhenthe
waterpassesveryslowlythroughthetamped
coffeegrindsandisanindicationthateither
thegrindistoofine(sothatitisdifficultfor
thewatertopassthrough)orthefilterbasket
hasbeenover-dosed.Inthissituationthe
hotwaterisincontactwiththecoffeegrinds
fortoolongthuscreatingaburntandbitter
tastingespresso.Thisischaracterisedby
theespressoonlyslowlydrippingduringthe
entirepourandthecremaisverydark.
5
Features of your Café Series
®
Espresso Machine continued
Over
Extracted
Pour
Optimum
Pour
Under
Extracted
Pour
6
Features of your Café Series
®
Espresso Machine continued
Milk Temperature Gauge
The4BARsteampumpproducesinstant,
constantsteampressurefortexturingmilk.
Animportantfactorwhencreatingmilkfoam
istemperature.Thesteamwandintegrates
atemperaturesensingdevicethatrelaysthe
temperatureofthemilkduringtexturingto
themilktemperaturegaugeonthecontrol
board.
Asmostcoffeesaremilkbased,this
highlightstheimportanceofgettingthemilk
right.Theendproductshouldbesmooth,
velvetywithnoneorbarelyvisiblebubbles.
Milktexturedtotheoptimumtemperature
improvesandsweetensthetaste.
Commercial Size Group Head & Group Handle
Thegrouphead,grouphandleandfiltersare
designedtocommercialspecificationsusing
brassandstainlesssteelcomponents.These
elementshelpcontributetothepreparation
ofanespressoserve,asitallowsthecoffee
makertopackthenecessaryamountof
coffeegrinds,whichthenexpandfirmlyand
evenlyontotheshowerscreen.
Theslopinggrouphandlegivesthecoffee
makeramoreergonomicactionwhen
attachingandremovingthehandlefromthe
grouphead.Alsowhenrestedonthebench
thefilterbasketsitslevel,thisresultsina
moreeventampensuringanevenextraction.
Theunder-sideofthebaskethasatamping
padsoyoucanpositionthegrouphandle
onthesideofthebenchwhichprevents
scratchesonyourbenchtopwhilstensuring
thebasketremainslevel.
Single Floor Filters
Thesearethemostcommonstyleoffilters.
Thesmallerfilterisusedforasinglecupof
coffee,andthelargerdoublefilterisused
fortwocupsofcoffee,oronesingle'double
strength'cupofcoffee.
Dual Floor Filters
Thesefiltershave2floors.Theyaredesigned
forusewithpregroundcoffee.Thiscoffee
istoocoarseforuseinthesinglefloor
baskets.Dualfloorbasketsaredesignedto
compensateforthisbyslowingtheflowof
espressocreatingasubtleaerationtoensure
agoldencrema.Althoughdesignedfor
usewithpregroundcoffee,dualfloorfilter
basketscanalsobeusedwithallground
coffee.

7
Control Board
Slightlyangledforeasyviewing,the
controlboardcommunicatestheessential
informationyouneedtocreateagreattasting
coffee.Usethe'CAPSULE'buttonforcapsule
basedcoffee.Usethe'single'or'double'cup
forgroundcoffeebeanbasedcoffee.
Pre-Infusion
Thereare3programmablepre-infusion
settingstohelpachievetheperfect
extraction.
Pre-infusionisprogrammedintothe
MANUAL,1CUPand2CUPespresso
operations.
1.Constant-deliversaconstantwaterflow
fromstarttofinish.
2.Progressive-smallamountsofwaterare
releasedontothetampedcoffeepriortoa
steadywaterflow.
2.Infusion-smallamountofwaterisreleased
ontothetampedcoffee,thenthereisa
shortinfusiontimebeforeasteadyflowof
waterisreleased.
Note:Pre-infusionisnotactivatedwhenthe
capsulebuttonispressed.
Anti-Calc Filter
AnAnti-Calcwaterfilterreducesimpurities
thattainttheflavourandodourofthe
water,improvingthetasteandaromaofthe
espressobrewed.Additionally,scalebuildup
isslowedreducingthefrequencyofcleaning
required.
TheAnti-Calcwaterfilterfittedinsidethe
3litrewaterreservoirhasa12monthlife
fordomesticuseanda3monthlifefor
commercialuse.
Note:ContactSunbeamon1300881
861forreplacementfilters(Partcode:
EM69101).
Note:Theespressomachinecanoperate
normallywithoutthefilterandiseasily
removedbygentlypullingitout.
Features of your Café Series
®
Espresso Machine continued

Preparing your espresso machine
for the first time
• Ensuretheespressomachineisalways
positionedontoadry,stablebenchtop.
• Ensureallpackaginghasbeenremoved
fromtheespressomachineandthedrip
traywithgrillisinplace.
• Filltheespressomachinewithwater;
1.Simplyliftthelidofthewaterreservoirat
thetopoftheespressomachineandusing
ajug,fillwithfreshcoldwaterorfiltered
water.
2.Alternativelyslideoutthewaterreservoir
fromthebackoftheespressomachineand
fillwithfreshcoldwaterorfilteredwater.
Thenreplacethewaterreservoir,ensuring
itisfirmlyinplace.
• Insertthepowercordintoa230-240VAC
poweroutletandswitchthepoweron.
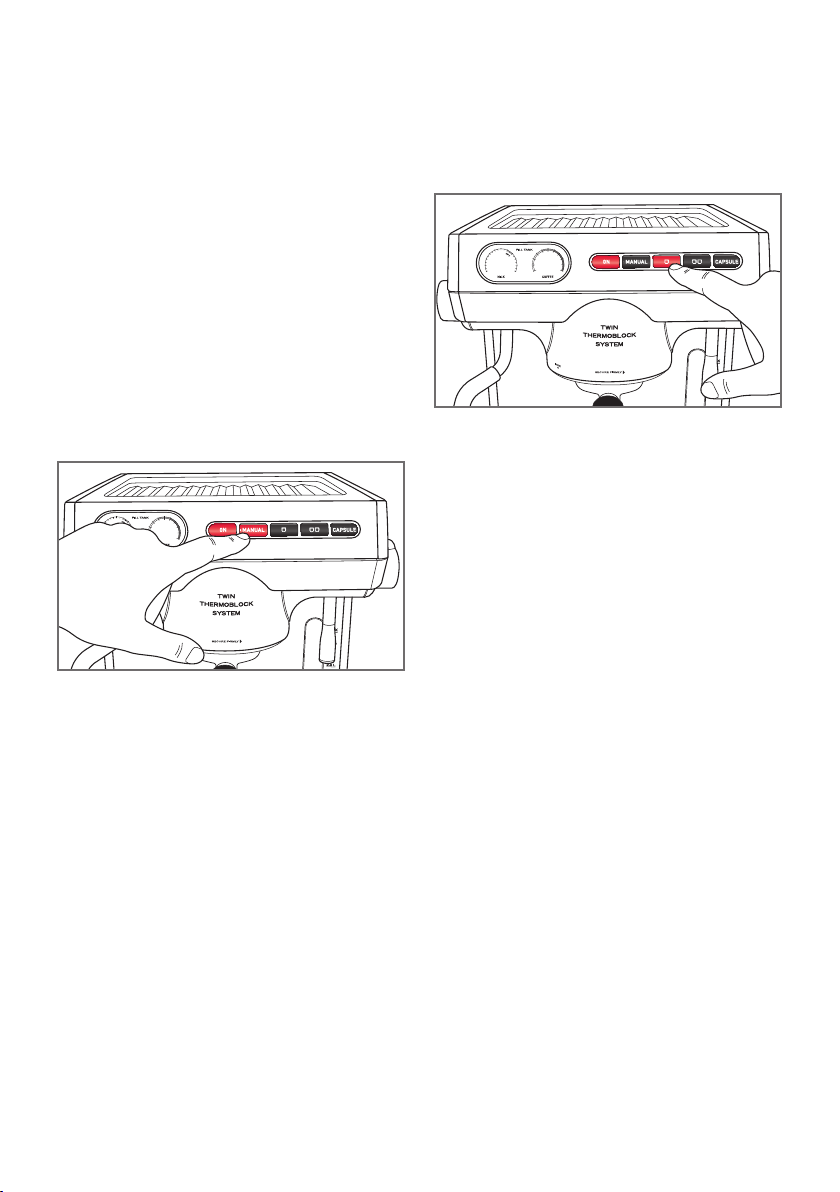
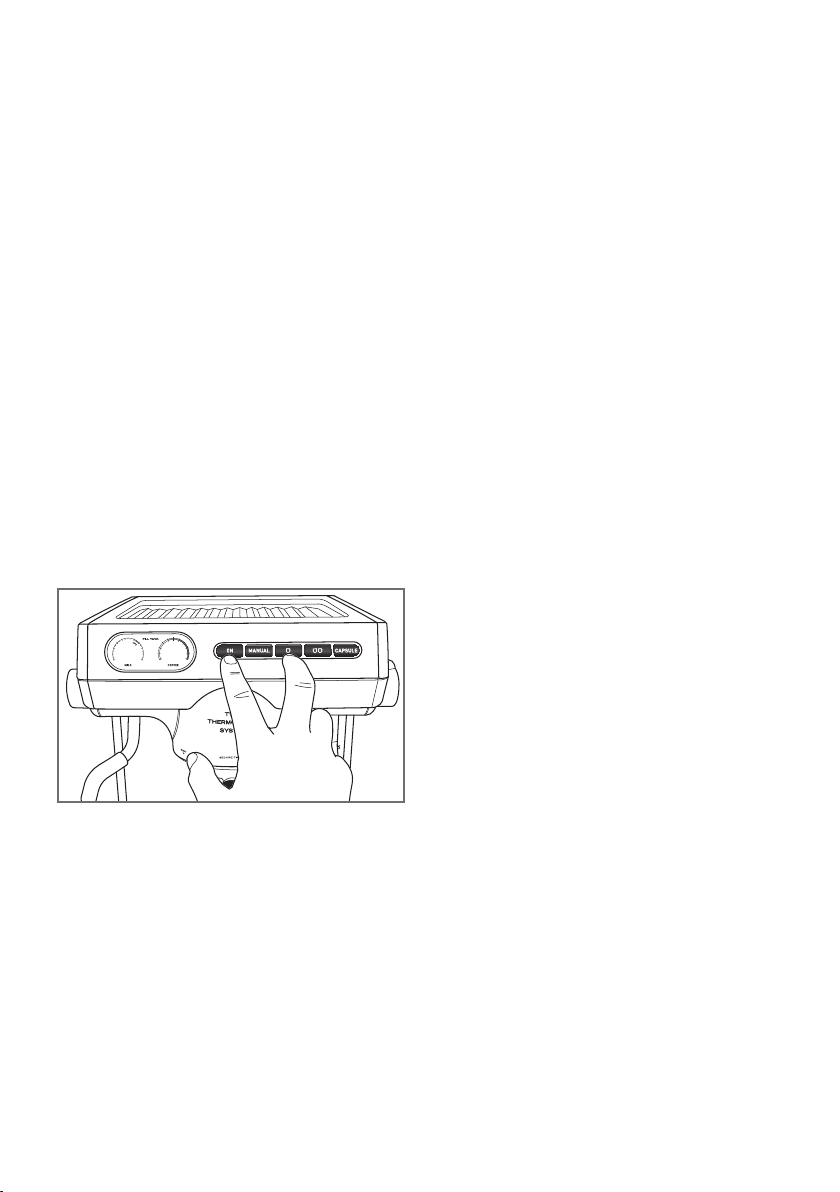
• Power
Note:Beforeturningontheespresso
machineensurethesteamandhotwater
controldialsareintheOFFposition.
•PressthePOWERbuttononcetoturnthe
espressomachineon.Themachinewill
beeponceandthepowerbuttonwillflash
toindicatethatyourmachineisonandis
heatingup.
• WhenthewhitelightonthePOWERbutton
stopsflashingandturnstoaconstant
whitelightthisindicatesthattheespresso
machineisnowattemperatureandisin
READYMODE.
• Atthispointglassesandcupscan
beplacedonthewarmingplatefor
pre-heating.
• Fitthegrouphandlewitheitherthesingle
ordoublefilterbasketandsecuretothe
groupheadontheespressomachine.
• Placeasufficientlylargecontainerunder
bothpourspoutsandpresstheMANUAL
button.Waterwillstarttorunthrough.
Note:Asasafetymechanismtheespresso
machineisprogrammedtoautomaticallystop
thewaterflowafter240mls,thereforeyou
willneedtopresstheMANUALbuttonagain
torestartthewaterflow.
• Continuetoallowthewatertorunthrough
untilthewaterreservoirisempty.Thiscan
alsobedonebyturningthehotwaterknob
toONposition.
8

9
Using your espresso machine -
Ground coffee
Power
Note:Beforeturningontheespressomachine
ensurethesteamandhotwatercontroldials
areintheOFFposition.
PressthePOWERbuttononcetoturnthe
espressomachineon.Themachinewill
beeponceandthepowerbuttonwillflash
toindicatethatyourmachineisonandis
heatingup.
WhenthemachinehasreachedREADY
MODE,thepowerbuttonwillstopflashing
andthePOWER,MANUAL,1&2CUP
buttonswillilluminatewhite.Theespresso
machineisnowreadytouse.
Power Saving Mode
After1hourofnon-usetheespressomachine
willautomaticallyswitchtoPOWERSAVING
MODE.Oncetheespressomachineisin
POWERSAVINGMODEallthelightsonthe
buttonswilldim.WhileinPOWERSAVING
MODEtheespressomachinepowersdown
to75%ofpower.Afterafurther4hoursof
non-usetheespressomachinewillbeeponce
andthenturnoff.
TobringtheespressomachineoutofPOWER
SAVINGMODEsimplypressanyofthe
buttonsonthecontrolboard.
Pre-heating Glasses
Pre-heatglassesandcupsbyfillingthem
withhotwaterasthiswillassisttopreserve
thecremaoftheespressoandalsohelp
maintainthetemperatureoftheespresso.
Justpriortomakingyourespresso,glasses
andcupscanbepre-heatedusingthehot
waterfeatureonyourespressomachine.
Otherwiseglassesandcupscanbestoredon
thewarmingtrayoftheespressomachine;
thiswillalsoassistinpre-heating.
Pre-heating the Group Handle and Filter baskets
Thisisimportantespeciallyforthefirst
coffeebeingmade,asacoldgrouphandle
cansignificantlydecreasethetemperatureof
thewateratthepointofextraction.Thisin
turnwillalterthequalityandcharacteristics
oftheresultingespressoextraction.
Aneasywaytopre-heatthegrouphandle
andfilterbasketistofitthegrouphandle
withafilterbasketandholdunderthe
grouphead.PresstheMANUALbuttonand
allowthehotwatertoflowoverthegroup
handle.Rotatethegrouphandlesoboth
theundersideofthegrouphandleandthe
filterbasketispreheated.Youmayneedto
presstheMANUALbuttonagaintoensure
thegrouphandleandfilterbasketisproperly
pre-heated.
Drythefilterbasketbeforefillingwithcoffee.
Dosing and Tamping
•Drywipethebasket.
•Grindevenlyanddirectlyintothecentreof
thefilterbasket.
•Fillthefilterbasketwithgroundcoffeeto
therim.
•Usingthetamper,tampstraightdown,this
isgoingtocreatemorespaceforsome
morecoffee.
•Grindmorecoffeetoasimilarlevelin
thefilterbasket.Usethetamp,andtamp
firmlystraightdownwardsuntilthere
isabouta5-10mmspacebetweenthe
tampedgroundsandthetopofthefilter
basket.
•Brushanyloosecoffeeofftherimofthe
basketintothecentreandtampdown
again,thistimetwistthetampertosealthe
topofthecoffee.
•Wipetherimofthefilterbasketfreeofany
loosecoffeegrindsanduseimmediately.
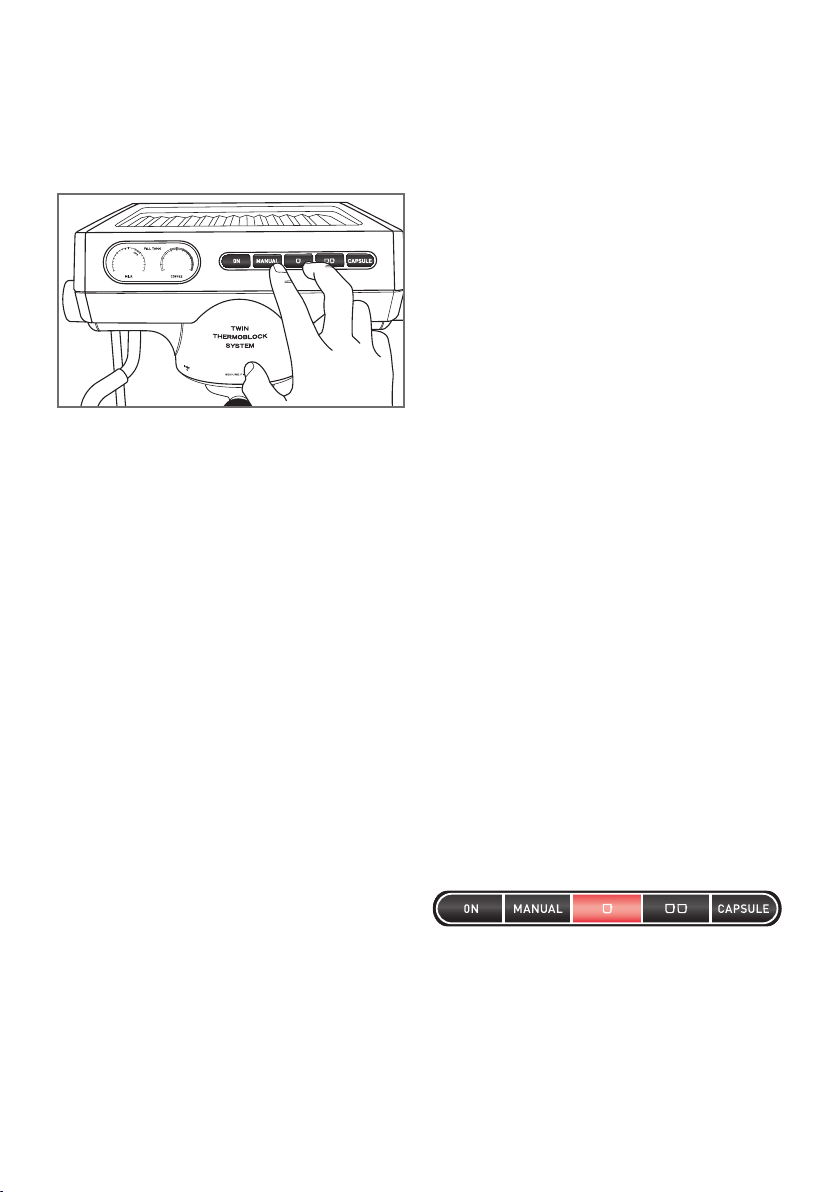
Using Manual Operation
UseMANUALwithgroundcoffee,notwith
capsules.TheMANUALbuttongivesthe
10
Using your espresso machine continued
usercompletecontroloverthelengthofthe
espressopour.
TousethisoperationpresstheMANUAL
buttononcetostarttheespressopour.The
pourwillstartwiththepre-infusionandthen
theespressopourwillfollow.
PresstheMANUALbuttonagaintostopthe
espressopour.
Note:WhenusingtheMANUALoperation,the
lightsonthe1&2cupbuttonswillgooff
andthelightsonthePOWERandMANUAL
buttonswillremainon.
1 Cup Espresso Pour
Usewithgroundcoffee,notwithcapsules.
The1CUPfunctionremovestheguess
workandisprogrammedtopour30mlsof
espresso.
Tip:Werecommendusingthe1CUPbasket
whenusingtheprogrammed1CUPfunction.
Tousethisoperationpressthe1CUPbutton
oncetostarttheespressopour.Thepour
willstartwiththepre-infusionandthenthe
espressopourwillfollow.
Theespressopourwillstopafterthe1CUP
volumehasbeenextracted.
Note:Whenusingthe1CUPfunction,the
lightsontheMANUALand2CUPbuttons
willgooffandthelightsonthePOWERand
1CUPbuttonswillremainon.
Note:Whenusingthe1CUP
functionthecoffeemakercanstopthe
espressopouratanytimebypressingthe
MANUAL,1or2CUPbuttons.
2 Cup Espresso Pour
Usewithgroundcoffee,notwithcapsules.
The2CUPfunctionremovestheguess
workandisprogrammedtopour60mlsof
espresso.Thiscanbeusedfor2cupsof
coffee(place2cupsunderthegrouphandle)
orforonestrong(double)cupofcoffee.
Tip:Werecommendusingthe2CUPbasket
whenusingtheprogrammed2CUPfunction.
Tousethisoperationpressthe2CUPbutton
oncetostarttheespressopour.Thepour
willstartwiththepre-infusionandthenthe
espressopourwillfollow.
Theespressopourwillstopafterthe2CUP
volumehasbeenextracted.
Note:Whenusingthe2CUPfunction,the
lightsontheMANUALand1CUPbuttons
willgooffandthelightsonthePOWERand
2CUPbuttonswillremainon.
Note:Whenusingthe2CUPfunction,you
canstoptheespressopouratanytimeby
pressingtheMANUAL,1or2CUPbuttons.
Figure2
Figure1
11
The Espresso Pour Tips
Greatcoffeesstartwithfreshlyroastedbeans
thatwilldeliverasweetespressothatwillbe
richintexture,bodyandaroma.Controlling
eachpartofthecoffeemakingprocessisthe
realsecret.
•Neverextractanymorethan30mlsof
espresso.
•Alwayspurgewaterfromthegrouphead
beforelockinginthegrouphandlewith
coffee,thiswilldislodgeanygroundcoffee
residuefromthegrouphead.
Thewaytheespressopourswilltellyou
everything.Whatyouarelookingforis;
1.Infusiontime;whenpressurisedwateris
beingforcedthroughthegroundcoffee.
2.Colouroftheespresso;shouldbedark
brown.
3.Resistance;lookingforathickness,ora
niceoozinesslikedrippinghoney,with
resistanceatabout2/3fromthespouts
tothebottomofthecup.It’sgoingtofall
andpullbackup.
4.Evenextraction;notextremelytightatthe
beginningorpouringexcessivelyfastat
theend.
5.Lookforcolourchange;whentheespresso
changesfromadarkbrowntoacreamy
orlightcolourthesweetestflavoursand
oilshavebeenextractedandthisusually
happensaroundthe25-30mlmark,after
whichtheespressopourisfinished.
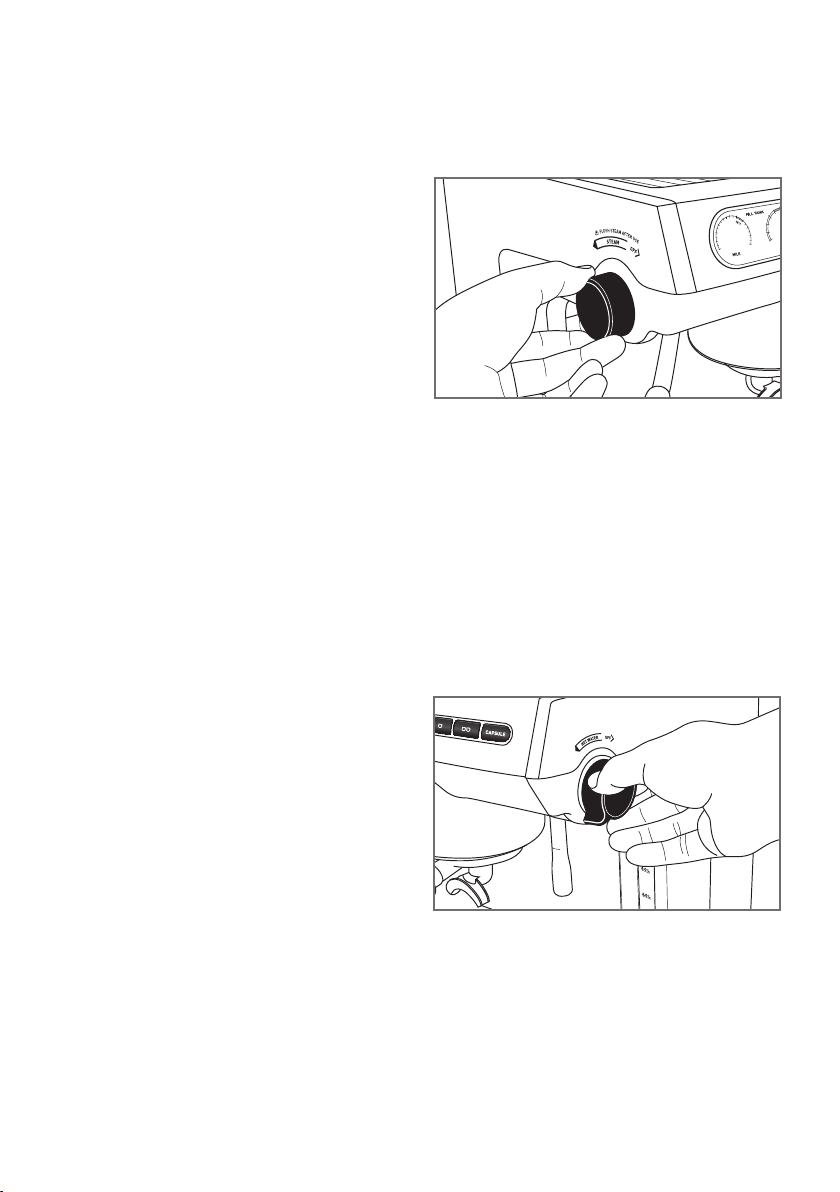
Steam
Toactivatethesteam,turnthesteamdialon
byturninganti-clockwise.Thiswillopenthe
steamfunctionwithaninstantandconstant
supplyofpowerfulsteamfortexturingmilk.
Toturnthesteamoff,turnthesteamdialto
theOFFposition.
Tip:Toensureoptimumsteamperformance
werecommendthatattheendoftexturing
milk,wipethetipofthesteamwandcleanof
anymilkresidue.
Hot Water
Toactivatethehotwaterfunction,turnthe
hotwaterdialonbyturninganti-clockwise.
Thiswilldispenseaninstantflowofhotwater.
Tip:Thisfeatureisidealforpre-warming
cups/glassesorformakingaLongBlack.
Figure4
Figure3
12
Inserting a capsule adaptor
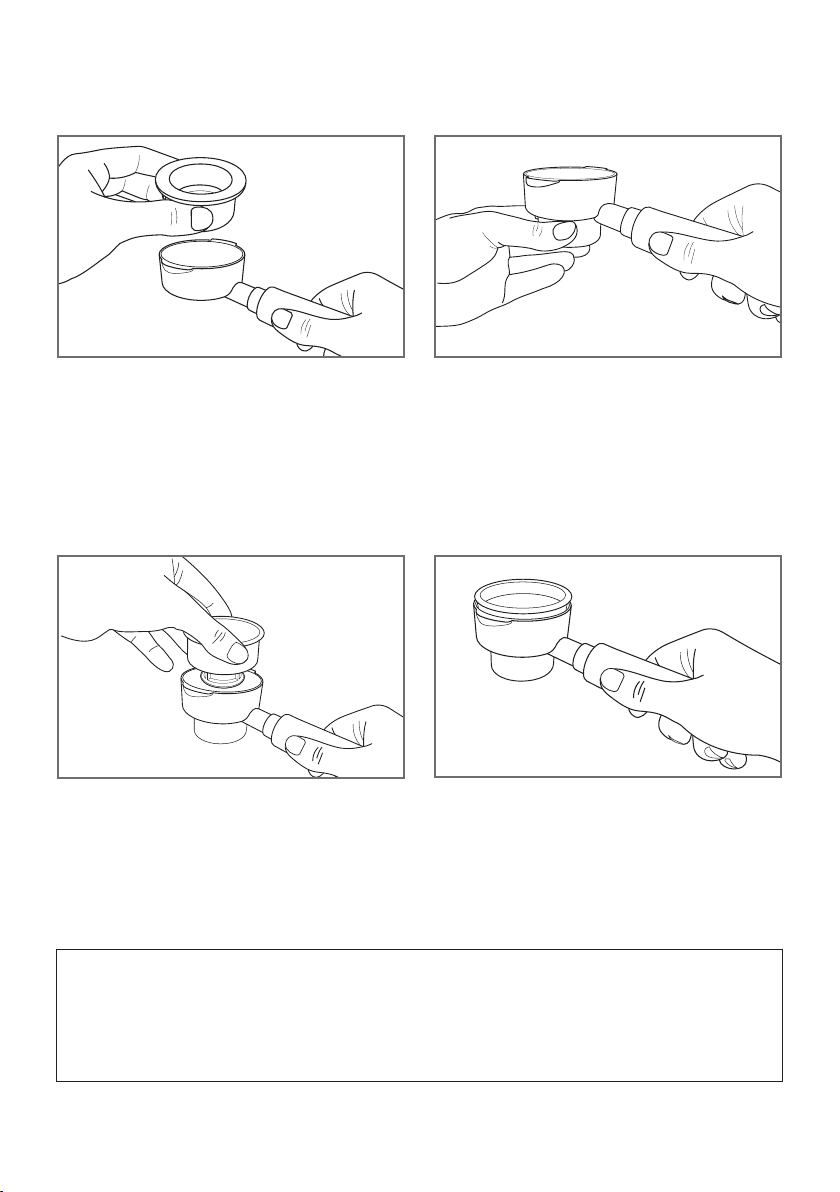
1.ChooseaCapsuleadaptorbasewhich
matchesyourcapsulebrand,
eg.Black=Nespresso.
Insertthebaseintothegrouphandle.
Ensurethebayonetsontheundersideof
thebase,areinsertedintotheslotsonthe
handle.Ensuretheadaptorbasesitsflush
inthegrouphandle.
3.Insertyourcorrespondingcoffeecapsuleinto
Capsulebase.Thentakecapsuletopand
placeontop.Usingboththumbs,pressdown
oncapsuleadaptortopuntilitpiercesthe
capsule.The capsule must be pierced prior to
inserting into the espresso machine.
2.Whenthebaseisflushinthegroup
handle,turncapsuleadaptorbaseabout
30°soitdoesnotfallout.Thiswillmake
iteasierwhenyou'reknockingouttheused
capsules,afteryou'vemadeyourcoffee.
4.Yourcapsulehandleisnowreadytobe
insertedintothemachinegrouphandle.
Figure1 Figure2
Figure3
Figure4
IMPORTANT: •Thecapsuleadaptorbaseandtopmustbethesamecolour.Ifyouusedifferent
coloursthemachinewillnotwork.
•Itisimportantthetopspike/spikespuncturethesurfaceofthecapsule,
otherwisetherewillbenocoffeepour.
Note:Thespikesintheadaptorsaresharp.
*Capsuletrademarksareownedbythirdparties&arenotrelatedtoSunbeam.
(Seepage26forfullTrademarksDisclaimer)
13
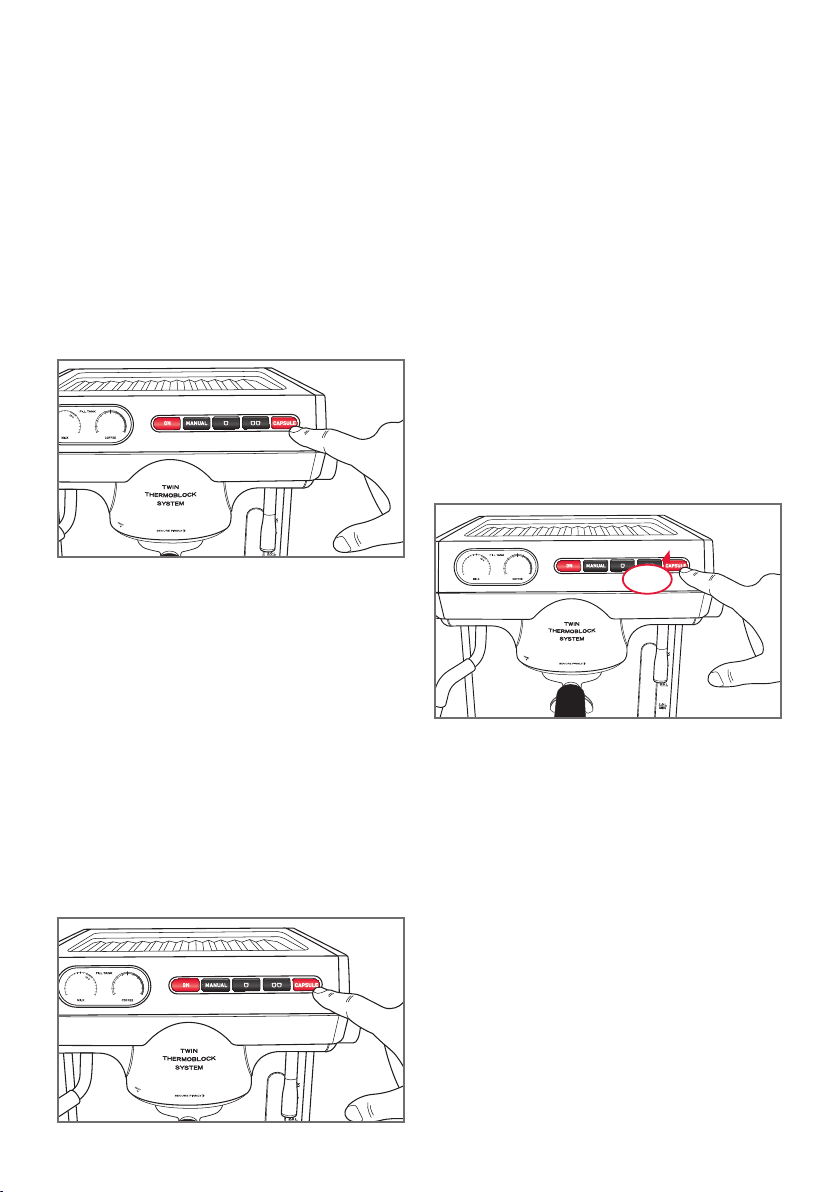
Using your espresso machine
- Capsule
Single Capsule Espresso Pour
Thecapsulefunctionremovestheguess
workandisprogrammedtopourabout30to
40mlsofcoffeedependingonwhichcapsule
isused.
Tip:WerecommendusingtheCapsulebutton
forallcapsules.
PresstheCapsulebuttonONCEtostartthe
capsuleespressopour.Thepourwillstart
andthentheespressopourwillfollow.
Theespressopourwillstopafter
approximately30mlvolumehasbeen
extracted.
Note:Whenusingthecapsulefunction,the
lightsontheMANUALand2CUPbuttons
willgooffandthelightsonthePOWERand
1CUPbuttonswillremainon.
Note:Whenusingthecapsulefunction,you
canstoptheespressopouratanytimeby
pressingtheCapsulebuttonagain.
Long Capsule Espresso Pour
Thelongcapsuleespressofunctionremoves
theguessworkandisprogrammedtopour
about110mlsofcoffee.Thisfunctionis
currentlyrecommendedforNespressoLungo.
TousethisfunctionpresstheCAPSULE
buttonTWICEwithin0.5seconds.
Theespressopourwillstopafter110mlshas
beenextracted.
Note:WhenusingtheLongCapsulefunction,
youcanstoptheespressopouratanytime
bypressingtheMANUAL,1or2CUP
buttons.
Note:LongCapsulefunctionshouldonly
beusedwithcapsulesdesignedforalong
extraction.Usingthisfunctionwithstandard
capsuleswillresultinaweakandbitter
coffee.
Figure1
Figure2
Figure3
Double
touch

14
Guide to milk texturing
Whatyouwanttoachieveissilkythick
richmilkthathasbeenheatedtobetween
60-65°C.
Thesteamcomingoutofthemachinewill
onlyheatthemilk,itisuptothecoffee
makertoaeratethemilkinawaythatallows
thecreationofbeautifullytexturedmicro
foamandit’sallaboutthepositioningofthe
steamtipandhowyoumovethejug.
Using the Temperature Sensing Steam Wand
1. Firstlyalwaysstartwithfreshcoldmilk
fromthefridgeandacleanjug.
2. ½fillthejugwithmilk.Youneedtouse
aminimumof200mlforbestusewith
thewand.
Note:Thetemperaturesensingdeviceis
foundontherearofthesteamwandtip.
3. Purgethesteamwand.
4. Insertthetipofthesteamwandinto
themilkensuringthatthetemperature
sensingdeviceisimmersedinthemilk.
Please note:Ifthetemperaturesensing
deviceisnotimmersedinthemilk,the
temperaturereadingwillnotbeaccurate.
5. Activatethesteamfunctiononthe
espressomachine.
6. Restthespoutofthemilkjugupagainst
thesteamwand.Positionthesteamtip
justunderthesurfaceofthemilkand
justoffcentre.Rememberthetemperature
sensingdevicemustbeimmersedinthe
milktoreadthemilktemperature.
7. Continuetotexturethemilk.
8. Gentlylowerthejugslowlytocreatethe
amountofdesiredfoamforthestyleof
coffeeyouarecreating.Rememberingthat
ifyouareusingthetemperaturesensing
feature;ensurethetemperaturesensing
deviceisimmersedinthemilk.
9. Themorecontrolyouhaveduringthis
stageofthemilktexturingprocessthe
denserandsmootherthefoam.
10.Nowlistenforthehissingsound.Thisis
anindicatorthatyou'redrawingairinto
themilkinacontrolledfashion.
11.Afteryouhavecreatedtheamountof
foamyouneedforthestyleofdrink
you'remakingkeepthejugsteadyand
allowthemilktocomeuptotemperature.
12.Rememberthisprocessisaboutkeeping
themilkspinningandmaintainingthe
samepositionfromwhereyoustarted.
13.Whenthemilkreachesthedesired
temperature,turnthesteamoff.We
recommend65°Cforsweettastingmilk.
14.Removethejugfromthewand,wipethe
steamwandwithacleandampclothand
giveitaquickburstofsteamtoremove
anymilkthathasbeensuckedupthe
steamwand.
15.Ifyouhaveanylargesurfacebubbles,
gentlytapthejugonthebenchto
collapsethese.
16.Rollthejugtokeepthemilkandfoam
together.
17.Takeyourglassorcupofespressoand
restthepouringspoutagainsttherimof
thecupandpourinonesteadymotion.
Rememberpracticemakesperfect!

15
Programming
1 Cup Volume
PREPAREthe1cupfilterwithcoffeeand
tamp.
PLACEacupundertheespressopourspouts.
PRESSandHOLDthe1CUPbuttonforover
1.5seconds.
Pressthe1CUPbuttonagainoncethe
desiredvolumeofespressohasbeen
extracted.
Theespressomachinewillbeeptwiceto
indicatethenewprogramforthe1CUP
operationhasbeenset.
2 Cup Volume
PREPAREthe2cupfilterwithcoffeeand
tamp.
PLACE2cupsundertheespressopour
spouts.
PRESSandHOLDthe2CUPbuttonforover
1.5seconds.
TheLEDwillflashandthepourwillstart
immediately.
Pressthe2CUPbuttonagainoncethe
desiredvolumeofespressohasbeen
extracted.
Theespressomachinewillbeeptwice
toindicatethenewprogramfor2CUP
operationhasbeenset.
Pre-infusion Programming
Thereare3programmablepre-infusion
settingstohelpachievetheperfect
extraction;
Infusion;asmallamountofwaterisreleased
ontothetampedcoffee,andthenthereis
ashortinfusiontimebeforeasteadyflow
ofwaterisreleased.Yourespressomachine
comeswiththisselectionasafactorysetting.
Constant;deliversaconstantwaterflowfrom
starttofinish.
Progressive; smallamountsofwaterare
releasedontothetampedcoffeepriortoa
steadywaterflow.
1.Ensuretheespressomachineispluggedin
andswitchedonatthepoweroutlet.
Note:DONOTpressthePOWERbuttonon
theespressomachine.
2.PRESSandholddownboththeMANUAL
and1CUPbuttons.
3.WhilestillholdingdowntheMANUAL
and1CUPbuttonsbrieflyPRESSand
RELEASEthePOWERbuttonandthen
releaseboththeMANUALand1CUP
buttons.
Toindicateyouhaveactivatedthe
programmabilityofthepre-infusion
selections,alightononeofthebuttonswill
illuminate;
1CUP=Infusion(Factorysetting)
2CUP=ProgressivePre-infusion
MANUAL=ConstantPre-infusion
Thislightwillremainonforupto5seconds
beforeautomaticallyreturningtofactory
settingsifnoactionistaken.Theespresso
machinewillthenpoweron.
Advanced Programming
16
-4ºC -2ºC
Factory
Setting
+2ºC +4ºC
4.PRESSandRELEASEoneofthebuttons
belowdependingontherequired
Pre-infusionsetting;
Constant=PRESStheMANUALbutton
Infusion=PRESSthe1CUPbutton
Progressive=PRESSthe2CUPbutton
Whenthenewpre-infusionprogramhas
beenselectedtheespressomachinewill
beeptwice.
5.Theespressomachinewillthen
automaticallypoweron.
Espresso Thermoblock Temperature
Thetemperatureofthethermoblockhasbeen
calibratedto92°C.Howeverthecoffeemaker
canadjustthetemperatureoftheespresso
thermoblockinincrementsof2°Cupand
down,shoulditbedesired.
1.Ensuretheespressomachineispluggedin
andswitchedonatthepoweroutlet.
Note:DONOTpressthePOWERbuttonon
theespressomachine.
2.PRESSandholddownthe1CUPbutton.
3.Whilestillholdingdownthe1CUPbutton
brieflyPRESSandRELEASEthePOWER
buttonandthenreleasethe1CUPbutton.
Toindicateyouhaveactivatedthe
programmabilityoftheespressothermoblock
temperature,alightononeofthebuttons
willilluminate;
1CUP=Factorysetting
2CUP=+2°C
CAPSULE=+4°C
MANUAL=-2°C
POWER=-4°C
Thislightwillremainonforupto5seconds
beforeautomaticallyreturningtofactory
settingsifnoactionistaken.Theespresso
machinewillthenpoweron.
Advanced Programming continued
Figure1

Advanced Programming continued
4.PRESSandRELEASEoneofthebuttons
belowdependingontherequiredsteam
pumprate;
+2°C=PRESSthe2CUPbutton
+4°C=PRESStheCAPSULEbutton
-2°C=PRESStheMANUALbutton
-4°C=PRESSthePOWERbutton
Whenthenewtemperaturesettinghasbeen
selectedtheespressomachinewillbeep
twice.
5.Theespressomachinewillthen
automaticallypoweron.
Steam Thermoblock Temperature
Thetemperatureofthesteamthermoblock
hasbeencalibratedtodeliverapowerful,
constantsupplyofdrysteamfortexturing
milk.Thetemperatureofthesteamcanbe
modifiedinincrementsof5°Cupanddown
shoulditbedesired.
1.Ensuretheespressomachineispluggedin
andswitchedonatthepoweroutlet.
Note:DONOTpressthePOWERbuttonon
theespressomachine.
2.PRESSandholddownthe2CUPbutton.
3.Whilestillholdingdownthe2CUPbutton
brieflyPRESSandRELEASEthePOWER
buttonandthenreleasethe2CUPbutton.
Toindicateyouhaveactivatedthe
programmabilityofthesteamthermoblock
temperature,alightononeofthebuttons
willilluminate;
1CUP=0°C
2CUP=+5°C
CAPSULE=+10°C(Factorysetting)
MANUAL=-5°C
POWER=-10°C
Thislightwillremainonforupto5
secondsbeforeautomaticallyreturningto
factorysettingsifnoactionistaken.The
espressomachinewillthenpoweron.
4.PRESSandRELEASEoneofthebuttons
belowdependingontherequired
temperatureadjustment;
+5°C=PRESSthe2CUPbutton
+10°C=PRESStheCAPSULEbutton
-5°C=PRESStheMANUALbutton
-10°C=PRESSthePOWERbutton
Whenthenewtemperaturesettinghasbeen
selectedtheespressomachinewillbeep
twice.
5.Theespressomachinewillthen
automaticallypoweron.
Steam Pump Rate
Thesteampumprateofthisespressohas
beensetat0.3secondsonand0.5seconds
off.Modifyingthesteampumprateenables
youtomakethesteamwetterordryerand
aidsinthedeliveryofapowerful,constant,
drysteam–idealfortexturingmilk.The
steampumprate(offtime)canbemodified
inincrementsofplusorminus0.1seconds
shoulditbedesired.
1.Ensuretheespressomachineispluggedin
andswitchedonatthepoweroutlet.
Note:DONOTpressthePOWERbuttonon
theespressomachine.
2.PRESSandholddowntheCAPSULE
button.
3.WhilestillholdingdowntheCAPSULE
buttonbrieflyPRESSandRELEASEthe
POWERbuttonandthenreleasethe
17
-10ºC -5ºC
Factory
Setting
+5ºC +10ºC

CAPSULEbutton.
Toindicateyouhaveactivatedthe
programmabilityofthesteampumprate,a
lightononeofthebuttonswillilluminate;
1CUP=Factorysetting
2CUP=-0.1secoff
CAPSULE=-0.2secoff
MANUAL=+0.1secoff
POWER=+0.2secoff
Thislightwillremainonforupto5seconds
beforeautomaticallyreturningtofactory
settingsifnoactionistaken.Theespresso
machinewillthenpoweron.
4.PRESSandRELEASEoneofthebuttons
belowdependingontherequiredsteam
pumprate;
-0.1sec=PRESSthe2CUPbutton
(deliversawetsteam)
-0.2sec=PRESStheCAPSULEbutton
(deliversawettersteam)
+0.1sec=PRESStheMANUALbutton
(deliversadrysteam)
+0.2sec=PRESSthePOWERbutton
(deliversadryersteam)
Whenthenewpumpratesettinghasbeen
selectedtheespressomachinewillbeep
twice.
5.Theespressomachinewillthen
automaticallypoweron.
Resetting the Factory Settings
Torevertbacktotheespressomachines
factorysettings;
1.Ensuretheespressomachineispluggedin
andswitchedonatthepoweroutlet.
Note:DONOTpressthePOWERbuttonon
theespressomachine.
2.PRESSandHOLDDOWNtheMANUAL
button.
3.WhilestillholdingdowntheMANUAL
button,brieflyPRESSandRELEASE
thePOWERbuttonandthenreleasethe
MANUALbutton.
4.4beepswillsoundandthemachinewill
poweron.
Power Saving Mode
After1hourofnon-usetheespressomachine
willautomaticallyswitchtopowersaving
mode.Oncetheespressomachineisin
powersavingmodeallthelightsonthe
buttonswilldim.Whileinpowersavingmode
theespressomachinepowersdownto75%
ofpower.Afterafurther4hoursofnon-use
theespressomachinewillbeeponceand
thenturnoff.
Thetimeofinactivitybeforetheespresso
machineentersintopowersavingmodecan
beadjustedifsodesired;
1.Ensuretheespressomachineispluggedin
andswitchedonatthepoweroutlet.
Note:DONOTpressthePOWERbuttonon
theespressomachine.
2.PRESSandHOLDDOWNtheMANUAL
andCAPSULEbuttons.
3.WhilestillholdingdowntheMANUAL
andCAPSULEbuttonsbrieflyPRESSand
RELEASEthePOWERbuttonandthen
releaseboththeMANUALandCAPSULE
buttons.
Advanced Programming continued
+0.2sec
off
+0.1sec
off
Factory
Setting
-0.1sec
off
-0.2sec
off
18
Toindicateyouhaveactivatedthe
programmabilityofthepowersavingmode,
alightononeofthebuttonswillilluminate;
1CUP=Powerdownafter1hourof
inactivityandthenturnoffafterafurther
4hoursofinactivity(Factorysetting)
2CUP=Turnoffafter26hoursof
inactivity
CAPSULE=Doesnotturnoff
MANUAL=Turnoffafter8hoursof
inactivity
POWER=Turnoffafter30minutesof
inactivity
Thislightwillremainonforupto5seconds
beforeautomaticallyreturningtofactory
settingsifnoactionistaken.Theespresso
machinewillthenpoweron.
4.PRESSandRELEASEoneofthebuttons
belowdependingonthepowersavingmode
desired;
26hours=PRESSthe2CUPbutton
Doesnotturnoff=PRESStheCAPSULE
button
8hours=PRESStheMANUALbutton
30minutes=PRESSthePOWERbutton
Whenthenewpowersavingmodesettinghas
beenselectedtheespressomachinewillbeep
twice.
5.Theespressomachinewillthen
automaticallypoweron.
Advanced Programming continued
Figure2
19

20
Care and cleaning
Thecoffeemakingprocessinvolvesextracting
oilsoutofcoffeegrindstomakeespresso
coffee.Depositsoftheseoilsbuildupover
timeandaffectthetasteofthecoffeeand
operationoftheespressomachine.
Regularcleaningtoremovetheseoilsis
essentialandwillmaintainthequalityofthe
coffeetheespressomachineproducesand
resultinlessmaintenancebeingrequired.
Thisiseasytodobyfollowingafewquick
andeasycleaningstepsaftereachcoffee
makingsession;
Cyclewaterthroughthegrouphead,
Purgesteamthroughthesteamwand,
Wipethesteamwandcleanwithadamp
clothimmediatelyafteruse,
Removethefilterbasketfromthefilter
handleandcleanawayanyoldcoffeeoils,
and
Emptythedriptrayandrinse.
Important:Neverwashanyoftheespresso
machinepartsoraccessoriesinthe
dishwasher.
Drip tray and grill
Removethegrillanddriptrayatregular
intervalstoempty.Cleanwithwateranda
littlenon-abrasivewashingupliquid,rinse
anddry.
Group head, group handle & filter baskets
Thefilterbasketsandgrouphandleshould
berinsedwithwarmwateraftereachuseand
thendriedthoroughly.
Tocleanthegroupheadofanyoldcoffee
grindscyclewaterthroughandwipethe
groupheadandaroundtheinsiderimwitha
dampcloth.
Shouldtheholesinthefilterbasketsbecome
cloggedwithcoffeegrindsuseafinebristled
brushtoremovethem.Alsoyoucanuse
thecleaningpinwhichissuppliedwith
theespressomachine.Thecleaningpinis
attachedtotheinsideofthetopfilllid,
locatedatthetopoftheespressomachine.
Thecleaningpinhastwopinsateitherend-
theshorterofthetwoisforcleaningoutthe
holesinthefilterbasket.
Group head rubber seal
Thegroupheadsealislocatedonthe
undersideofthegroupheadandcreates
asealagainstthefilterhandleduringthe
espressopour.
Note:Duringlongperiodsofnon-usewe
recommendthatthefilterhandlenotbe
leftattachedtothegroupheadasthiswill
reducethelifeoftheseal.
Overtimethesealwilllooseitselasticity
andrequirereplacement,dependingonuse
usuallyevery12months.Signsthattheseal
isdeterioratingarewhenthegrouphandle
cannotcreatethenecessarysealandsteam
andorwaterescapesfromaroundthegroup
headduringtheespressopour.
Note:ContactSunbeamon1300881861
shouldyouthinkthatthegroupheadseal
needsreplacing.Pleasedonotattemptto
changethesealwithoutfirstconsulting
Sunbeam.
Cup warming plate, hot water tap and exterior
Wipeovertheunitwithadampclothand
wipedry.Donotuseabrasivesormetal
scourersasthesewillscratchtheexterior
surface.

21
Care and cleaning continued
Steam wand
Keepingthesteamarmcleanisessential
toensuremaximumefficiencyofthesteam
function.Abuildupofcaramelised/dried
milkonthesteamwandwillimpairthe
steamingandtexturingabilityoftheespresso
machine.
Important:Wipethesteamwandcleanwitha
dampclothimmediatelyaftereachuseand
purgeasmallamountofsteam.
Shouldthemilkdry/carameliseonthe
steamwand,simplywrapthewandwith
acleandampcloth,turnthesteamwand
overthedriptrayandturnthesteamonfor
approximately10seconds.Withthecloth
stillonthesteamwandleavetosoakfor
about5minutesandyouwillfindthatafter
thistimethedry/caramelisedmilkwilleasily
wipeaway.Repeatprocessifstilldirty.
Important:Nevercleanthesteamwandwith
anabrasivepadasthiswilldamagethe
steamwand.
Shouldthesteamwandbecomeblocked,
suppliedwiththeespressomachineisa
cleaningpin.Thecleaningpinisattachedto
theinsideofthetopfilllid,locatedatthe
topoftheespressomachine.Thecleaning
pinhastwopinsateitherend-thelongerof
thetwoisforcleaningtheholeinthebase
ofthesteamnozzle.Shouldthesteamwand
remainblockedunscrewthesteamnozzle
fromthesteamwand.Cleanthesteamnozzle
byonceagainusingthecleaningpinthen
flushunderrunningwater.
Cleaning the Capsule Adaptors
Takecarewhencleaningtheadaptorsas
thecapsulespikesaresharp.Rinsewithtap
waterandairdry.

22
Depositsofcoffeeoilsbuildupovertimeand
affectthetasteofthecoffeeandoperation
oftheespressomachine.Thereforethe
groupheadwillrequireregularcleaning.Itis
recommendedthatthegroupheadiscleaned
ataminimumevery3months,thiswillvary
dependingonthefrequencyofuse.
1. Removethewaterreservoirandrinse
clean.Withfreshwatercompletelyfill
andreplacethereservoir.
2. Removethecleaningdiscwhichisinside
ofthetopfilllid,locatedatthetopof
theespressomachine.
3. Fitthegrouphandlewiththedouble
filterbasket.
4. Positionthecleaningdiscintothedouble
filterbasket.
5. PlaceaSunbeamEspressoMachine
CleaningTablet(EM0020)intothe
filterbasketthatisnowalsofittedwith
thecleaningdiscandsecurethegroup
handletothegrouphead.
6. Placeasufficientlylargecontainerunder
bothpouringspouts.
Starting the cleaning cycle
7. Insertthepowercordintoa230-240V
ACpoweroutletandswitchthepower
‘ON’.
Note:DONOTpressthePOWERbuttonon
theespressomachine
8. Pressandholddownthe1CUPand2
CUPbuttons.Whilestillholdingdown
the1CUPand2CUPbuttonsbriefly
pressandreleasethePOWERbutton,
thenreleasethe1CUPand2CUP
buttons.Thelightsonthecontrolpanel
willstarttochasefromlefttoright,
indicatingthemachineisundercleaning
mode.
Note:Thelightsonthecontrolpanelwill
continuetochaseuntilthecleaningcycle
iscompleted,thiswilltakeapproximately7
minutes.
Note:Duringthecleaningcycleallother
espressomachineoperationswillbelocked
untilthecleaningcycleiscompleted.Should
thecleaningcyclebeaccidentallystarted
itcanbecancelledbyswitchingthepower
‘OFF’atthepoweroutlet,orbypressingthe
POWERbutton.
9. Whenthecleaningcycleiscompleted
thelightsonthecontrolpanelwillstop
chasingandtheespressomachinewill
beep4times.Followingthis,thelights
abovethePOWER,MANUAL,1CUP,2
CUPandCAPSULEbuttonswillcomeon,
signallingthatthemachineisreadyto
use.
10.Removethecontainerfromunderthe
pouringspoutsandempty.
11.Removethegrouphandlefromthegroup
head.
12.Removethecleaningdiscfromthe
grouphandleandreturntothestorage
compartment.
13.Removethedoublefilterbasketfromthe
grouphandleandwashinwarmsoapy
water.Rinsewellanddry.
14.Theespressomachineisnowready
foruse.
Coffee thermoblock cleaning cycle

23
Descaling Cycle for both the Coffee
and Steam Thermoblocks
Scaleisasurfacebuildupofmineralsthat
naturallyoccurovertimeinallappliances
thatareinvolvedwiththeheatingofwater.
Thereforetheespressomachinewillrequire
occasionaldescaling.Itisrecommended
thattheespressomachineisdescaledevery
4-6months;thiswillvarydependingonthe
frequencyofuseandwaterhardness.
1. Removethewaterreservoirandrinse
clean.Fillwithfreshcoldwaterand
replacethereservoir.
2. Usingascrewdriverunscrewthefilter/
showerscreenfromtheundersideofthe
groupheadandcleanunderrunningwater.
3. Replacethefilter/showerscreenand
screwinposition.
4. Placealargecontainerunderthegroup
headandalsopositionthesteamwandso
waterfromboththegroupheadandthe
steamwandwillfallintothecontainer.
5. TurnthesteamdialtotheONposition.
Important:Thehotwaterdialmustbeclosed
duringdescaling.
6.Insertthepowercordintoa230-240VAC
poweroutletandswitchthepowerON.
Note: DONOTpressthePOWERbuttonon
theespressomachine.Thereforenolights
willbeilluminatedontheespressomachine.
7. PRESSandHOLDDOWNboththe1
CUPandCAPSULEbuttons.Thenbriefly
PRESSandRELEASEthePOWERbutton
andthenreleaseboththe1CUPand
CAPSULEbuttons.Thelightsonthe
controlpanelwillstarttochasefromleft
toright.
Oneoftwothingswillhappen;
a) Iftheespressomachinehasbeen
recentlyused,thetemperatureofthe
steamthermoblockmayneedtobe
cooledbeforethedescalingcyclecan
startandsowaterwillflowthroughthe
steamwanduntilthesteamthermoblock
hascooledtotheappropriate
temperature.
b) ORiftheespressomachinestartstobeep
andthe1CUPLEDisflashingitmeans
itisreadytostartthedescalingcycle
andyoushouldcontinuetostep8.
8. Useoneofthefollowing;
a) SunbeamEspressoMachineDescaling
Tablets(EM0010).Fillthewaterreservoir
with3litresofwarmwaterandplace3
descalingtabletsintothereservoir.Once
thetabletshavedissolvedreplacethe
reservoirintopositioninthemachine.
b) SunbeamLiquidDescaler.Fillthewater
reservoirwithapproximately3litresof
water,add2capfulsoftheSunbeam
LiquidDescalerandreplacethereservoir
intopositioninthemachine.
c) VinegarSolution.Fillthewaterreservoir
withapproximately3litresofwater,add
6tablespoonsofvinegarandreplacethe
reservoirintopositioninthemachine.
Important:EnsuretheSTEAMdialisstillin
theONposition.
9. Activatethedescalingcyclebypressing
theflashing1CUPbuttononce.
10.ThepumpsforbothSTEAMand
ESPRESSOwillstarttopumpthrough
thedescalingsolutionforapproximately
15seconds.
11.Bothpumpswillstopandwaitfor
approximately1minutetoallowthe
descalingsolutiontotakeeffect.

24
12.Theespressomachinewillrepeat
thepumpingandrestcyclesfor
13timesforboththeSTEAMand
ESPRESSOthermoblocks.Thiswilltake
approximately17minutes.
13.Atthecompletionofthe14cyclesthe
espressomachinewillstarttobeepand
the1CUPbuttonwillflash.
14.Removethewaterreservoir,emptyand
rinsethoroughlywithcoldwater.Also
emptythecontainerunderthegroup
headandsteamwandandplaceback
intoposition.
15.Refillthewaterreservoirwithclean,
cold,freshwaterandplacebackintothe
espressomachine.
16.Activatethedescalingprocessby
pressingtheflashing1CUPbuttononce.
17.ThepumpsforboththeSTEAMand
ESPRESSOwillstarttopumpcleanwater
throughforapproximately1-2minutes.
Onceagainthelightsonthecontrol
panelwillstarttochasefromlefttoright.
18.Atthecompletionofthecyclethe
espressomachinewillbeep4timesand
willheatuptillStandbyMode.
19.Ensurethesteamknobisclosedafter
thede-scalingcycleiscompleted,
otherwisethemachinewillstartsteaming
onceitispowereduptoreadymode.
Descaling Cycle for both the Coffee and Steam Thermoblocks
Disclaimer
*Capsuletrademarksareownedbythirdparties
&arenotrelatedtoSunbeam
*TradeMarksDisclaimer:
Nespresso
®
isaregisteredtrademark
ofSocietéDesProduitsNestleSA.
Caffitaly
®
isaregisteredtrademark
ofCaffitalySystemS.p.A.
LavazzaAModoMio
®
isaregisteredtrademark
ofLuigiLavazzaS.p.A.
Productscarryingthesetrademarkshaveno
connectionwithSunbeamCorporationLimited.
Noneofthesetrademarkownershaveendorsed
thisSunbeammachine,oritsaccessories,for
usewiththeircoffeecapsules.
MULTI-CAPSULEisatrademarkofSunbeam
CorporationLimited.

In the unlikely event that this appliance develops any malfunction
within 12 months of purchase due to faulty materials or
manufacture, we will REPAIR it for you free of charge.
12 Month Repair Guarantee
Shouldyouexperienceanydifficultieswith
yourappliance,pleasecontactourcustomer
servicelineforadviceon1300881861in
Australia,or0800786232inNewZealand.
Alternatively,youcansendawrittenclaimto
Sunbeamattheaddresslistedbelow.Upon
receiptofyourclaim,Sunbeamwillseekto
resolveyourdifficultiesor,iftheapplianceis
defective,adviseyouonhowtoarrangeforit
toberepaired.
YourSunbeam12MonthREPAIRGuarantee
naturallydoesnotcovermisuseorimproper
handling,andnormalwearandtear.Similarly,
your12MonthREPAIRGuaranteedoesnot
coverfreightoranyothercostsincurredin
makingaclaim.
ItwillbeatthediscretionofSunbeamwhether
torepairorreplaceanyappliancethatdevelops
amalfunctionduringtheREPAIRGuarantee
period.Sunbeamisbynomeansobligedto
replaceanyapplianceifitcanberepaired.
Iftheapplianceisirreparableduetoany
claimeddefectcausedbyfaultyworkmanship
ormaterial,thenSunbeamwillreplacethe
appliance.
Priortoanyrepairsbeingundertaken,a
purchasereceiptmustbeprovidedasproofof
purchase.Sunbeamwillnotberesponsiblefor
thecostoftransporttoandfromanySunbeam
authorizedservicecentre,oranyinsurance
costsassociatedwiththistransport.Similarly
Sunbeamwillnotberesponsibleforany
damageorlossthatoccursduringtransittoor
fromanySunbeamauthorizedservicecentre
forreasonsnotrelatedtothemalfunction.
Thebenefitsgiventoyoubythisguaranteeare
inadditiontoyourotherrightsandremedies
underanylawswhichrelatetotheappliance.
Ourgoodscomewithguaranteesthatcannot
beexcludedundertheAustralianConsumer
LawandundertheNewZealandConsumer
GuaranteesAct.
InAustraliayouareentitledtoareplacement
orrefundforamajorfailureandfor
compensationforanyotherreasonably
foreseeablelossordamage.Youarealso
entitledtohavethegoodsrepairedorreplaced
ifthegoodsfailtobeofacceptablequality
andthefailuredoesamount
toamajorfailure.
Shouldyourappliancerequirerepairorservice
aftertheguaranteeperiod,contactyour
nearestSunbeamservicecentre.
ForacompletelistofSunbeam’sauthorised
servicecentresvisitourwebsiteorcall:
Australia
www.sunbeam.com.au
1300881861
Units5&6,13LordStreet
BotanyNSW2019Australia
New Zealand
www.sunbeam.co.nz
0800786232
Level6,Building5,CentralPark
660-670GreatSouthRoad
Greenlane,Auckland

is a registered trade mark.
Need help with your appliance?
Contactourcustomerserviceteamorvisit
ourwebsiteforinformationandtipson
gettingthemostfromyourappliance.
In Australia
Visit www.sunbeam.com.au
Or call 1300 881 861
In New Zealand
Visit www.sunbeam.co.nz
Or call 0800 786 232
‘Cafe Series’ is a registered trade mark of Sunbeam Corporation.
Made in China.
Due to minor changes in design or otherwise,
the product may differ from the one shown in this leaflet.
© Copyright. Sunbeam Corporation Limited 2015.
ABN 45 000 006 771
Units 5 & 6, 13 Lord Street
Botany NSW 2019 Australia
Level 6, Building 5, Central Park
660-670 Great South Road
Greenlane, Auckland
New Zealand
Sunbeam Corporation is a division of GUD Holdings Ltd.
04/16