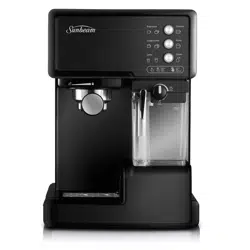
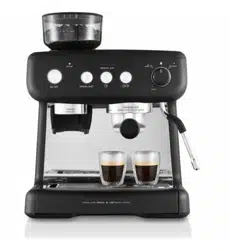
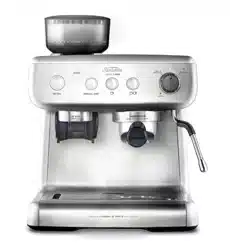
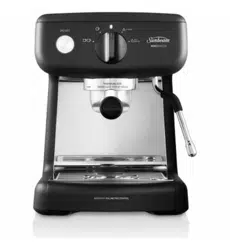
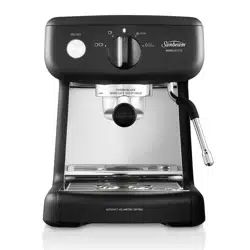
CAFE BARISTA - User Guide
FEATURES OF YOUR SUNBEAM CAFE BARISTA
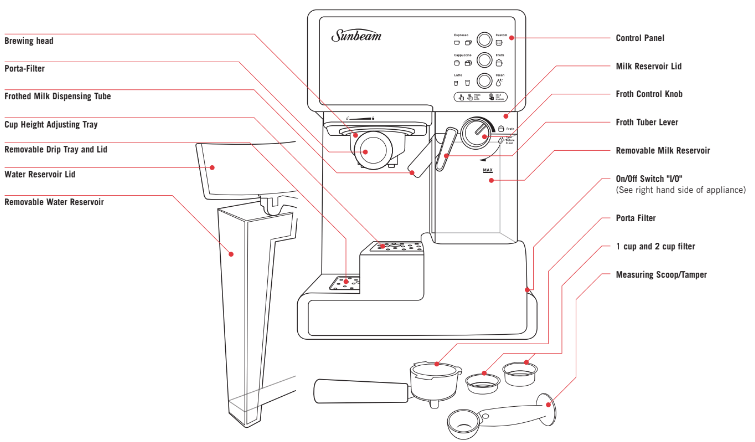
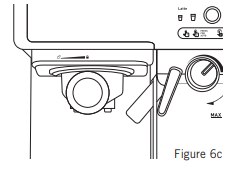
Control Panel
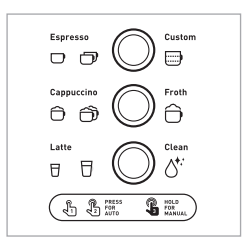
Espresso (Button A):
- Automatic: Select espresso size.
- Manual: Customize the amount of espresso in your beverage.
Cappuccino (Button B):
- Automatic: Select cappuccino size.
- Manual: Customize the amount of frothed milk in your beverage.
Latte (Button C):
- Automatic: Select latte size.
- Manual: The manual function of this button controls the cleaning cycle for the frothed milk dispensing tube.
Understanding the Controls
Your control panel is divided into 2 parts.
The left side of each button indicates the automatic brewing functions. The right side indicates the manual function of each button.
Lights Indicate:
- Button Light Pulses
- Unit is heating up
- Unit is brewing/frothing/cleaning
- Button Light Remains Illuminated
- Unit is ready for use
- Cappuccino and Latte Button Lights do not illuminate
- Milk Reservoir not fully inserted in unit. Firmly push Milk Reservoir into unit until lights illuminate.
- Icon Lights illuminate
- Indicates your brew selection
- Button Light Flashes
- Water Reservoir is empty
- Function selected before unit is ready.
Before using your appliance for the first time
Step 1 - Clean the appliance
1.Make sure unit is unplugged and the On/Off switch is in the Off position “O”.
2.Remove stickers and labels from the unit.
NOTE: REMOVE THE RED PLUG FOUND AT THE BASE OF THE WATER RESERVOIR.
3.Remove and wash the water reservoir, milk reservoir, porta-filter, 2 filters and measuring scoop in a mixture of mild detergent and water. Rinse each thoroughly and place back onto appliance.
NOTE: Porta-filter and water reservoir are NOT dishwasher safe.
Step 2 - Prime the unit (must be completed prior to first use)
1.Plug unit in and turn unit ON (“l”) using the On/Off switch.
2.Fill water reservoir up to the “MAX” level with water and place back on unit.
3.Fill milk reservoir up to the “MAX” level with water and place back on unit. Be sure to firmly push the milk reservoir into place until Cappuccino and Latte buttons illuminate.
4.Place porta-filter in the unit ensuring it is properly locked. For more instructions, refer to the “Placing the Porta-Filter” section on page 10 of this manual.
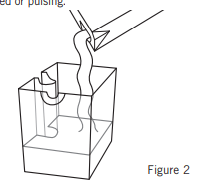
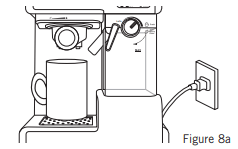
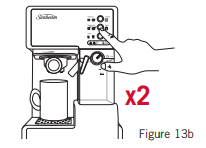
5. Place a large cup under porta-filter.
6.Aim the tip of the frothed milk dispensing tube inside the cup.
7.Once all 3 lights on the control panel stop pulsing and illuminated, press the Latte " " button twice brew double latte, the unit stops automatically.
8.Once step 7 is complete, the 3 control panel lights will remain illuminated indicating that the unit is ready for use.
OPERATING INSTRUCTIONS
IMPORTANT: Unit must be primed prior to first use. See page 7.
Filling the Water Reservoir
A.Lift the removable water reservoir from the unit and fill with fresh water up to the “MAX” line. Do not fill past the “MAX” line. Never use warm or hot water to fill the water reservoir.
B.Close the water reservoir lid and place it back in the unit ensuring it fits tightly.
Filling the Milk Reservoir
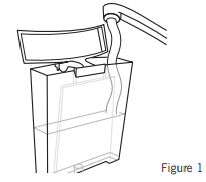
If you plan to prepare cappuccino or latte, remove the milk reservoir from the unit.
Lift the lid and pour the quantity of cold milk you estimate you will need. Do not fill past the “MAX” line. When done, place the milk reservoir back in the unit ensuring it fits tightly and the Cappuccino and Latte buttons are illuminated or pulsing.
NOTE: Be sure to firmly push Milk Reservoir into unit until Cappuccino and Latte buttons light illuminate/pulse.
NOTE: You can use any type of milk, i.e. whole milk, low fat milk, organic or soy milk.
Choosing the Filter
Select the filter to be used as follows:
A.FOR A SINGLE SHOT – use the filter for a single shot of espresso if using ground coffee.
B.FOR A DOUBLE SHOT OR TWO SINGLE SHOTS – use filter for a double shot.
Inserting the Filter
A.To insert the selected filter in the porta-filter
Filling with Coffee
a. Fill the filter with fresh, fine ground espresso coffee (do not overfill).
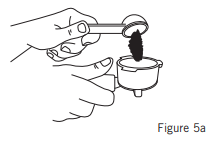
b. Tamp and compress the ground coffee firmly and evenly. Coffee should be 3mm below top of filter after tamping.
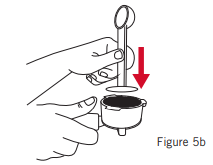
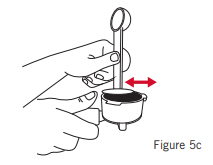
c. Clean any excess coffee from the rim to ensure proper fit under brew head and avoid leaks.
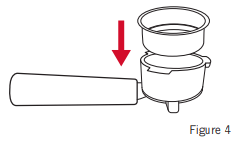
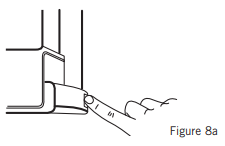
Placing the Porta-Filter
a. Position porta-filter underneath the brew head.
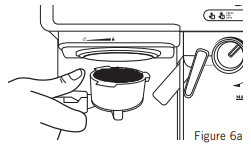
b.Position handle so that the handle lines up with the open lock icon “ ” on the unit and fits into the groove.
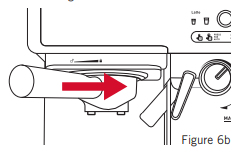
c. Then, slowly turn it to the right until the retention clip is aligned with the closed lock symbol “ ” on the unit.
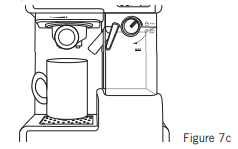
Placing the Cup(s)
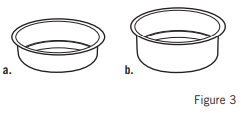
a. Pull out the height adjustment tray if you are using a small “demitasse” cup to brew espresso.
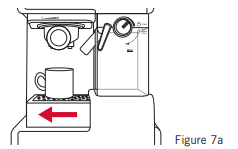
b.Keep the height adjustment tray inside its compartment if you are using a larger cup to brew cappuccino.
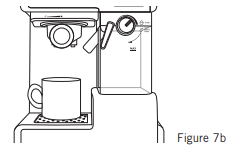
c. Keep the height adjustment tray inside its compartment if you are brewing into a larger cup.
Caution: When brewing cappuccino or latte, make sure to adjust the frothing tube lever to aim the frothed milk dispensing tube inside your cup
Turning the Unit on
a. Make sure unit is plugged in.
b. Turn unit on “I”.
The 3 control panel lights will start pulsing during heating until the brew and steam heaters reach the perfect temperature. Once these lights become solid, the unit is ready to use.
NOTE: It is normal for the Espresso function to be ready before the Cappuccino and Latte functions.
NOTE: If you leave your unit on for 15 minutes without using, your unit will go into sleep mode. Press any button to reactivate.
SELECT THE FUNCTION
Preparing Espresso
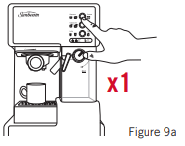
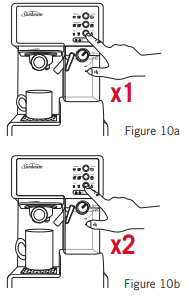
a. Press the Espresso Button " " once to brew one single shot.
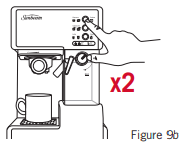
b.Press the Espresso Button "" twice to brew a double shot.
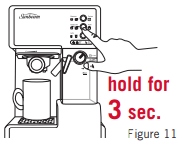
c. Press and hold the Espresso Button "" for 3 seconds to customize the brewing to your preference. When done, press the Espresso Button "" once again to stop brewing. For safety, unit will automatically stop after brewing 150ml.

The unit will start brewing the espresso according to your selection. The unit will turn off automatically and the lights will become solid indicating that the cycle has been completed. Your delicious espresso is ready to be enjoyed.
Note: For a small cup, use the single shot filter. For a large cup, use the double shot filter.
IMPORTANT: Make sure to clean the Frothed Milk Dispensing Tube after use. See Cleaning instructions on page 15 for instructions.
To add additional Frothed Milk/ Froth Milk separately
The Café Barista also allows you to manually add more frothed milk to your beverage or froth milk separately. To add more frothed milk to your beverage, place your beverage on the unit and ensure the Frothed Milk Dispensing Tube is aimed towards the center of your cup. Next, Press and Hold the Cappuccino Button for 3 seconds and the unit will begin to add more frothed milk. When done, press the Cappuccino Button once again to stop the unit. For frothing milk separately, follow the same instructions but place an empty cup on the unit instead. The frothed milk can be used for macchiato, hot chocolate, chai latte, etc.
Preparing Cappuccino
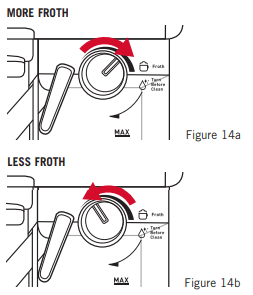
Prior to preparing your cappuccino, adjust the amount of froth milk according to your preference by turning the Froth Control Knob to the right for more froth and to the left for less froth.
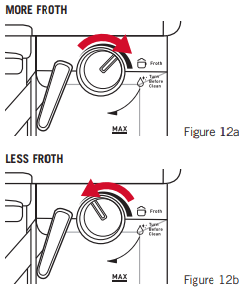
Note: The froth intensity can be adjusted during the brewing cycle.
CARE AND CLEANING
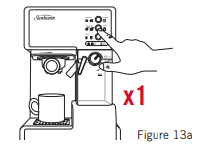
a. Press the Cappuccino Button once to brew a small cup of cappuccino.
b.Press the Cappuccino Button twice to brew a large cup of cappuccino.
Note: For a small cup, use the single shot filter. For a large cup, use the double shot filter.
Important: Make sure to clean the Frothed Milk Dispensing Tube after use. See Cleaning instructions on page 15 for instructions.
Preparing Latte
Prior to preparing your latte, adjust the amount of froth according to your preference by turning the Froth Control Knob to the right for more froth and to the left for less froth.
a. Press the Latte Button "" once to brew a small cup of latte.
b.Press the Latte Button "" twice to brew a large cup of latte.
Note: For a small cup, use the single shot filter. For a large cup, use the double shot filter.
IMPORTANT: Make sure to clean the Frothed Milk Dispensing Tube after use. See Cleaning instructions on page 15 for instructions.
Cleaning the Milk Reservoir and Frothed Milk
Dispensing Tube Once you are done preparing your beverage with milk, you can either store the unit’s milk reservoir with milk directly in the refrigerator OR completely clean the milk reservoir.
If storing your milk reservoir with milk in refrigerator, follow these cleaning instructions:
1.Place a large empty cup under the frothing tube and make sure there is water in the water reservoir.
2.Aim the Frothed Milk Dispensing Tube into the empty cup.
3.Adjust the Froth Control Knob to Clean 
4.Press and hold the Latte/Clean button "" until pump starts, then release it. The clean function will run for 30 seconds and then stop automatically. To stop the process yourself, press the Latte/Clean button again.
5.Once completed, throw the contents in the cup away.
6.The Frothed Milk Dispensing Tube is now clean and the milk reservoir with milk can now be stored in the refrigerator.
If completely cleaning milk reservoir, follow these cleaning instructions:
1.Place a large empty cup under the frothing tube and make sure there is water in the water reservoir.
2.Aim the Frothed Milk Dispensing Tube into the empty cup.
3.Adjust the Froth Control Knob to Clean
4.Press and hold the Latte/Clean button until pump starts, then release it. The clean function will run for 30 seconds and then stop automatically. To stop the process yourself, press the Latte/Clean button again.
5.Once completed, throw the contents in the cup away.
6.Remove milk reservoir from appliance and discard any remaining milk.
7.Rinse and wash all parts of the milk reservoir container and lid thoroughly with warm soapy water. Rinse and dry well.
Do not use abrasive cleaners and scouring pads, as they will scratch the finish. The milk reservoir and lid is also dishwasher safe (top rack).
Cleaning the Porta-Filter, Filter and Brew Head
WARNING: Some of the metal parts might still be hot. Do not touch them with your hands until they have cooled.
1.Turn unit Off (“O”) using the On/Off switch and unplug the power cord from the electrical outlet.
2.Remove the porta-filter and discard the espresso grounds. Wash both the porta-filter and filter with warm soapy water and rinse them well. Note: The porta-filter and filters are not dishwasher safe.
3.Wipe the lower part of the brew head where the porta-filter is attached to the unit with a damp cloth or paper towel. This will remove any espresso grounds that might remain.
4.Attach the porta-filter (without any filter) back onto the unit.
5.Make sure there is water in the water reservoir.
6.Place a large empty cup under the portafilter.
7.Plug unit in and turn unit ON (“l”) using the On/Off switch.
8.Once the Espresso button stops pulsing and remains illuminated, press and hold the Espresso button until pump starts, then release it. The unit will dispense water for about 50 seconds and then stop automatically. To stop the process yourself, press the Espresso button again.
Note: When completed, do not store the porta-filter by leaving attached to the unit. This can adversely affect the seal between the brew head and the porta-filter when brewing espresso.
Cleaning the Water Reservoir
Discard the remaining water by removing the reservoir and turning it upside down over the sink. It is recommended to empty the water reservoir between uses. Wash the water reservoir with soapy water, rinse it well and wipe it dry. Do not wash the water reservoir in the dishwasher.
Cleaning the Unit
1.Wipe housing with a soft wet cloth. Do not use abrasive cleaners or scouring pads, as they will scratch the finish.
2.Do not store the porta-filter in the brew head. This can adversely affect the seal between the brew head and the porta-filter while brewing espresso.
CAUTION: Do not immerse appliance in water.
Descaling
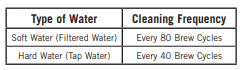
Mineral deposits built-up in the unit will affect the operation of the appliance. Your appliance must be descaled when you begin to notice an increase in the time required to brew espresso, or when there is excessive steaming. Also, you may notice a build-up of white deposits on the surface of the brew head. The frequency of cleaning depends upon the hardness of the water used. The following table gives the suggested cleaning intervals.
Suggested Cleaning Intervals
To Descale Water Reservoir Use Sunbeam Liquid Descaler, a simple to use, non toxic cleaner available from Sunbeam appointed Service Agents.
1.Fill the reservoir with fresh, undiluted white household vinegar.
2.Allow appliance to sit overnight with the vinegar solution in the water reservoir.
3.Discard vinegar by removing the reservoir and turning it upside down over the sink.
4.Rinse the water reservoir thoroughly with tap water by filling tank half full with water and then pouring the water back out into the sink, repeating this step twice.
To Descale Internal Parts
1.Make sure you descale the inside of the water reservoir first by following the “descaling” steps above.
2.Make sure to switch the on/off button to the off “O” position and the power cord is disconnected from the electrical outlet. Fill the reservoir half way with white vinegar.
3.Insert the porta-filter (with filter and no coffee) and place jar/carafe or regular cup on top of the drip tray and under the porta-filter.
4.Plug the power cord into the electrical outlet.
5.Press the on/off button to switch the unit on “I”, once the 3 control panel illuminates solidly, press the Espresso/ Custom Button twice. The vinegar will start flowing through the unit and it will stop automatically.
6.Place a pitcher or large cup (with at least 325 mL/11-ounce capacity) under the tube. Fill the milk reservoir with water and place it back on the unit. Turn the Froth Control Knob clockwise to the clean position then press the latte/clean button for 3 seconds to activate the clean function. The unit will start releasing steam through the frothing tube for 30 seconds. When done, throw the contents of the cup away.
7.Repeat Steps 1 – 6 as necessary using only tap water to rinse any remaining traces of vinegar out of the machine.
TROUBLESHOOTING
| Problem |
Possible Cause |
Solution |
| Coffee does not come out. |
• No water in reservoir.
• Coffee grind is too fine.
• Too much coffee in the filter.
• Appliance was not turned on or plugged in.
• Coffee has been tamped/ compressed too much.
|
• Add water.
• Grind medium ground coffee.
• Fill filter with less coffee.
• Plug unit into electrical outlet and turn it on.
• Refill filter basket with coffee DO NOT TAMP too much.
|
| Coffee comes out around the edge of the porta-filter. |
• Porta-filter not rotated to full lock position.
• Coffee grounds around the filter basket rim.
• Too much coffee in the filter.
|
• Rotate filter holder to full lock position.
• Wipe off rim and shower head seal.
• Fill with less coffee.
|
| Milk is not foamy after frothing or it is not coming out of the frothing tube. |
• Ran out of steam.
• Milk is not cold enough.
• Frothing tube is blocked.
|
• Ensure there is enough water in the water reservoir.
• Chill milk prior to making cappuccino or latte.
• Follow the instructions to clean the milk reservoir & frothing tube.
|
| Coffee comes out too quickly |
• Ground coffee is too coarse.
• Not enough coffee in filter.
|
• Use a finer grind.
• Use more coffee.
|
| Coffee is too weak. |
Using small filter for double shot of espresso.
• Ground coffee is too coarse.
|
• Use large filter for double shot of espresso.
• Use a finer grind.
|
| The three control panel lights are flashing alternatively |
• Water tank is out of water. |
• Add water to reservoir |
| Cappuccino and/ or Latte control button lights do not illuminate. |
• Milk Reservoir not inserted.
• Milk Reservoir not fully inserted.
|
• Place Milk Reservoir on unit.
• If Milk Reservoir is on unit, push in firmly until Cappuccino and Latte control button lights illuminate.
|
| Water is not being pulled in from the water reservoir. |
• Red plug was not removed from base of water reservoir tank.
• Water reservoir tank not placed correctly on unit.
|
• Remove red plug from base of water reservoir tank. Red plug may also be found in hole on unit where water reservoir attaches at its base.
• Place water reservoir correctly.
|