Loading ...
Loading ...
Loading ...
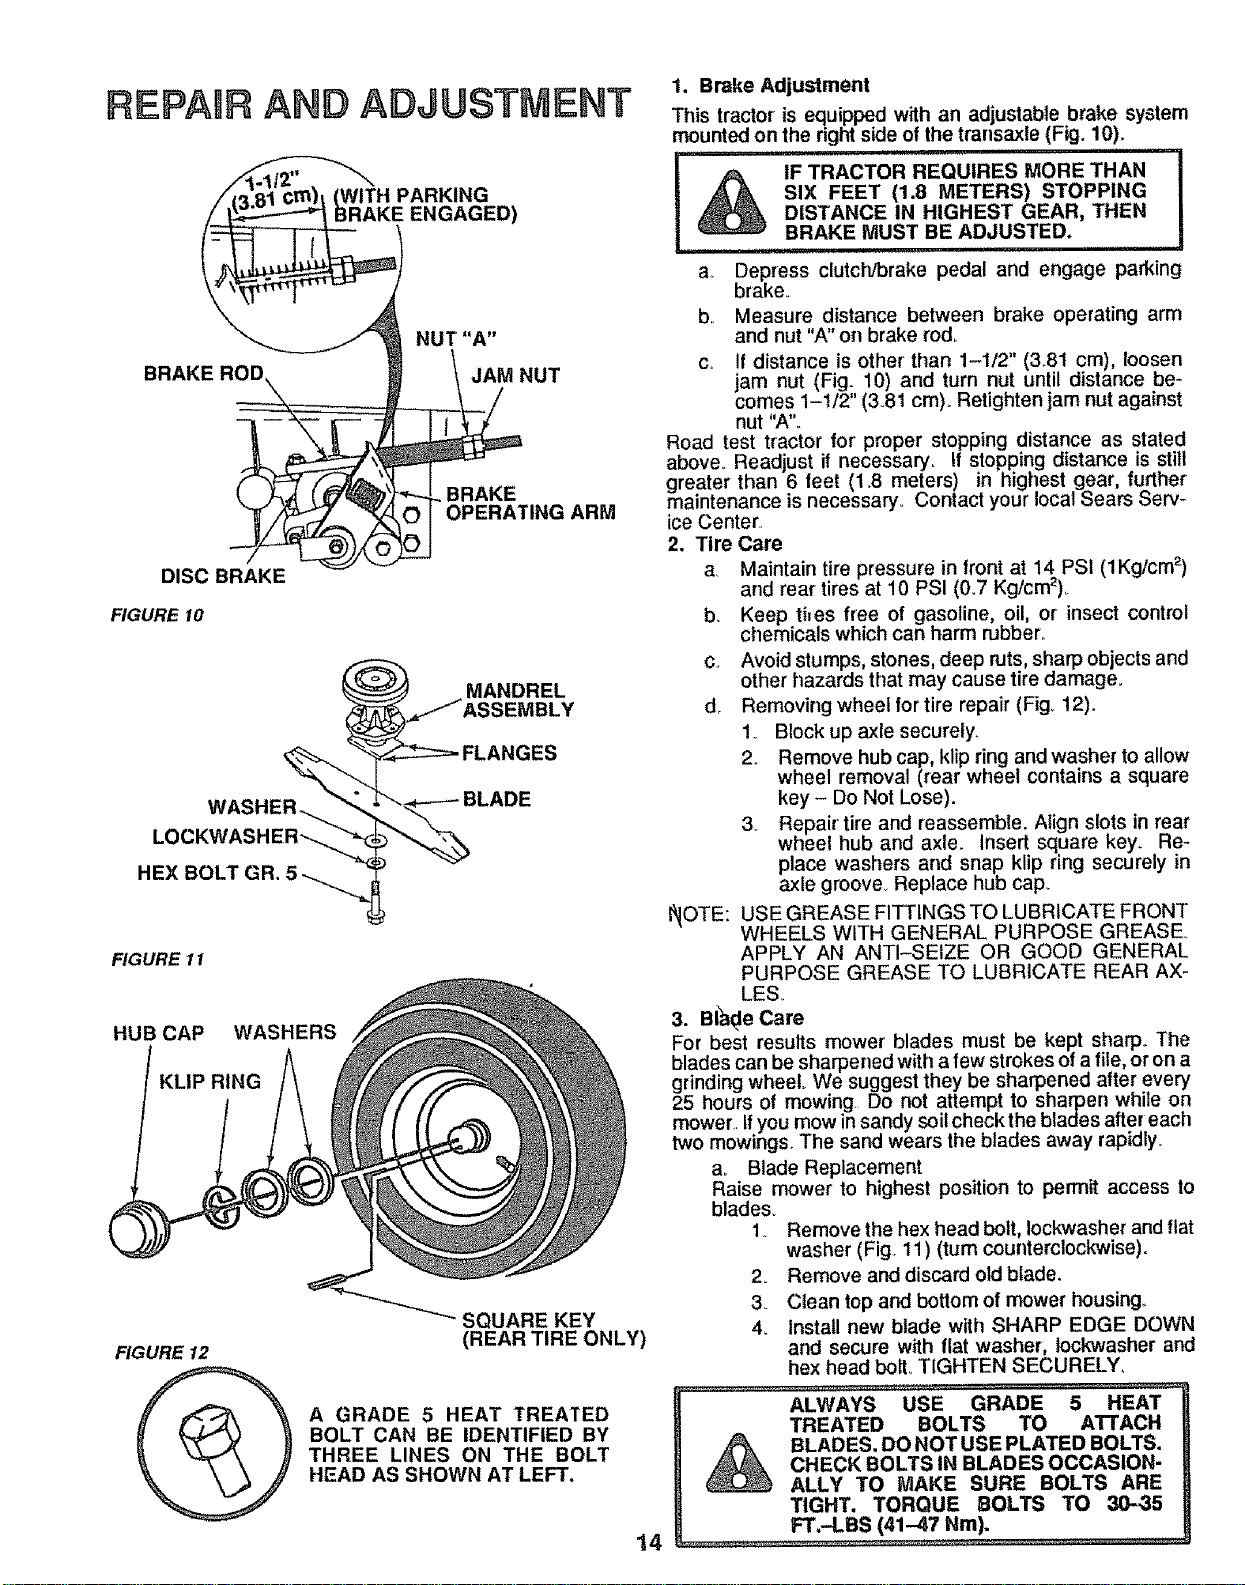
REPAIR AND ADJUSTMENT
TH PARKING
ENGAGED)
BRAKE ROD
DISC BRAKE
FIGURE 10
NUT "A"
_T NUT
ING ARM
;EMBLY
LC
HEX BOLT GR.
FIGURE 11
HUB CAP WASHERS
KLIP RING
FIGURE 12
SQUARE KEY
(REAR TIRE ONLY)
A GRADE 5 HEAT TREATED
BOLT CAN BE IDENTIFIED BY
THREE LINES ON THE BOLT
HEAD AS SHOWN AT LEFT.
14
1. Brake Adjustment
This tractor is equipped with an adjustable brake system
mounted on the rightside of the transaxle (Fig. 10).
IF TRACTOR REQUIRES MORE THAN
SIX FEET (1.8 METERS) STOPPING
DISTANCE IN HIGHEST GEAR, THEN
BRAKE MUST BE ADJUSTED.
a. Depress clutch/brake pedal and engage parking
brake,.
b_ Measure distance between brake operating arm
and nut "A" on brake rod,.
c. If distance is other' than 1-1/2" (3.8t cm), loosen
jam nut (Fig. 10) and turn nut until distance be-
comes 1-1/2" (3,,8t cm). Retighten jam nut against
nut "A",
Road test tractor for' proper stopping distance as stated
above_ Readjust if necessary= If stopping distance is still
greater than 6 feet (1,8 meters) in highest gear, further
maintenance is necessary, Contact your local Sears Sew-
ice Center
2. Tire Care
a Maintain tire pressure in front at 14 PSI (1Kg/cm 2)
and rear tires at 10 PSI (0.7 Kg/cm_),.
b. Keep thes free of gasoline, oil, or insect control
chemicals which can harm rubber,
c. Avoid stumps, stones, deep ruts,sharp objects and
other hazards that may cause tire damage.
d Removing wheel for tire repair (Fig, 12),
1_ Block up axle securely.
2. Remove hub cap, klip ring and washer to allow
wheel removal (rear wheel contains a square
key- Do Not Lose).
3 Repair' tire and reassemble. Atign slots in rear
wheel hub and axle. Insert square key_ Re-
place washers and snap klip ring securely in
axle groove Replace hub cap.
f_OTE: USE GREASE FITTINGS TO LUBRICATE FRONT
WHEELS WITH GENERAL PURPOSE GREASE.
APPLY AN ANTI-SEIZE OR GOOD GENERAL
PURPOSE GREASE TO LUBRICATE REAR AX-
LES_
3. B_le Care
For best results mower blades must be kept sharp° The
blades can be sharpened with a few strokes of a file, or on a
grinding wheel We suggest they be sharpened after every
25 hours of mowing Do not attempt to sharpen while on
mower if you mow in sandy soil check the blades after each
two mowings The sand wears the blades away rapidly,
a_ Blade Replacement
Raise mower to highest position to permit access to
blades_
1 Remove the hex head bolt, Iockwasher and flat
washer (Fig 11) (tum counterclockwise).
2o Remove and discard old blade.
3_ Clean top and bottom of mower housing
4_ Install new blade with SHARP EDGE DOWN
and secure with fiat washer, lockwasher and
hex head boIL TIGHTEN SECURELY,
ALWAYS USE GRADE 5 HEAT
TREATED BOLTS TO ATTACH
BLADES. DO NOT USE PLATED BOLTS.
CHECK BOLTS IN BLADES OCCASION-
ALLY TO MAKE SURE BOLTS ARE
TIGHT. TORQUE BOLTS TO 30-35
FT.-LBS (41-47 Nm).
Loading ...
Loading ...
Loading ...