Loading ...
Loading ...
Loading ...
21
EN
20
If your appliances fitted with our Claris - Aqua Filter System F088 cartridge, please remove the cartridge during the
descaling operation.
Only use KRUPS scale removal products. You can obtain scale removal products from KRUPS Service Centres.
We cannot be held responsible for any damage that may result from the use of tablets from other brands.
Make certain to protect your work surface during cleaning and scale removal cycles, especially if it is
made of marble, stone or wood.
Start the descaling program by pressing the button. The ‘CALC’ light becomes constant and the indicator lights
and flash.
Remove and clean the drip tray.
Place a container with a minimum capacity of 0.6 l under the coffee outlets as well as under the steam nozzle - Fig. 24.
Empty the tank and refill it with warm water up to the line ‘CALC’ - Fig. 33.
Dissolve a sachet of Krups (40 g) F054 descaler in the tank - Fig. 33.
Replace the water tank. The indicator light switches off.
Press the button after carrying out all of these operations.
The first phase (approximately 8 min) begins.
The descaling cycle will start automatically.
At the end of this phase, the sound signal beeps every 10 seconds and the indicator light ’ flashes.
Empty the used water container and put it back in place.
Empty and rinse the water tank - Fig. 34.
Refill the tank with water and put it back into place. The warning light goes out.
Press the button again to start the second phase. The sound signal stops.
The second phase (about 6 min) begins.
The program continues. It rinses the appliance and removes any traces of the descaler.
At the end of this phase, the sound signal beeps every 10 seconds
Remove and empty your used water container and put it back in place.
Press the button again to start the final phase. The sound signal stops.
The final phase (approximately 6 min) begins.
The program continues. It removes the last particles of descaler.
When the descaling cycle is finished, the indicator light ‘CALC’ goes out.
Refill your water tank.
Your appliance is ready for the next use.
If there is not enough water in the water tank, you will be warned by the light.
Add the appropriate amount of water to the tank and scale removal will continue automatically.
If you unplug the appliance during cleaning, press the button, or there is an electrical power cut, the cleaning program
will start again from the beginning. In this case, another cleaning tablet may be necessary. Make sure to carry out the full
cleaning cycle to ensure good maintenance of your appliance.
The cleaning cycle is intermittent: do not put your hands under the water outlets ‘E’ and ‘W’ while the cycle is in
progress.
Long rinsing program – total duration: about 2 minutes
When it is necessary to make a long rinsing program, the appliance warns you of this by flashing the ‘CLEAN’ and
‘CALC’ lights.
Remove, fill and replace the water tank.
Place a container with a minimum capacity of 0.6 l under the coffee outlets and the steam nozzle.
Start the long rinsing program by pressing the button. The lights ‘CLEAN’ and ‘CALC’ become constant and the
indicator light starts flashing.
When the long rinse is finished, the lights ‘CLEAN’ and ‘CALC’ go out and the indicator light becomes constant.
Your appliance is ready for the next use.
The appliance can ask you to empty the coffee ground collector.
OTHER FUNCTIONS
To switch the appliance off
You can switch off your appliance at any time. As the appliance is switching off, a double beep is emitted and all of the
red lights flash, one after the other. The appliance has registered your request and will stop as soon as possible.
Installation of the filter cartridge - total duration: around 2 min
To get the best taste from your coffee and extend your appliance’s service life, we advise you to use only the Claris -
Aqua Filter System cartridge sold as an accessory.
Fig. 30 : Mechanism to indicate the month the cartridge was fitted and when to replace it (after 2 months at most).
Installing the cartridge in the appliance. On first use, screw the filter cartridge into the bottom of the water tank - Fig. 31.
Place a 0.6 l container under the steam nozzle.
Press the button for more than 3 seconds (unless the appliance requires a ‘CLEAN’ and/or ‘CALC’ maintenance).
The indicator light flashes.
When the installation of the filter cartridge is finished, the indicator light becomes constant.
Your appliance is ready for the next use.
The Claris cartridge needs to be replaced after about every 50 litres of water or every two months at least. If you are
using the Claris – Aqua Filter System cartridge, set the water hardness to level 0.
Coffee temperature display
Appliances are pre-set in the factory to level 2.
Connect the appliance to the mains supply but do not switch it on.
Press the and buttons together, - Fig. 27.
The LED flashes during the setting phase.
Twist the knob to 20 ml to set the coffee temperature - Fig. 28.
Press the button to increase or touch the button to decrease the setting - Fig. 32.
Select the coffee temperature level: 1 LED lit = temperature 1, 2 LEDs lit = temperature 2, 3 LEDs lit = temperature 3,
the hottest setting.
To exit settings mode, press .
Water Hardness Setting
Appliances are pre-set in the factory to hardness level 4.
Before using the appliance for the first time or after a change to the water hardness, it is advisable to set the appliance
to the correct water hardness. Contact your water supplier to find out the water hardness for your area.
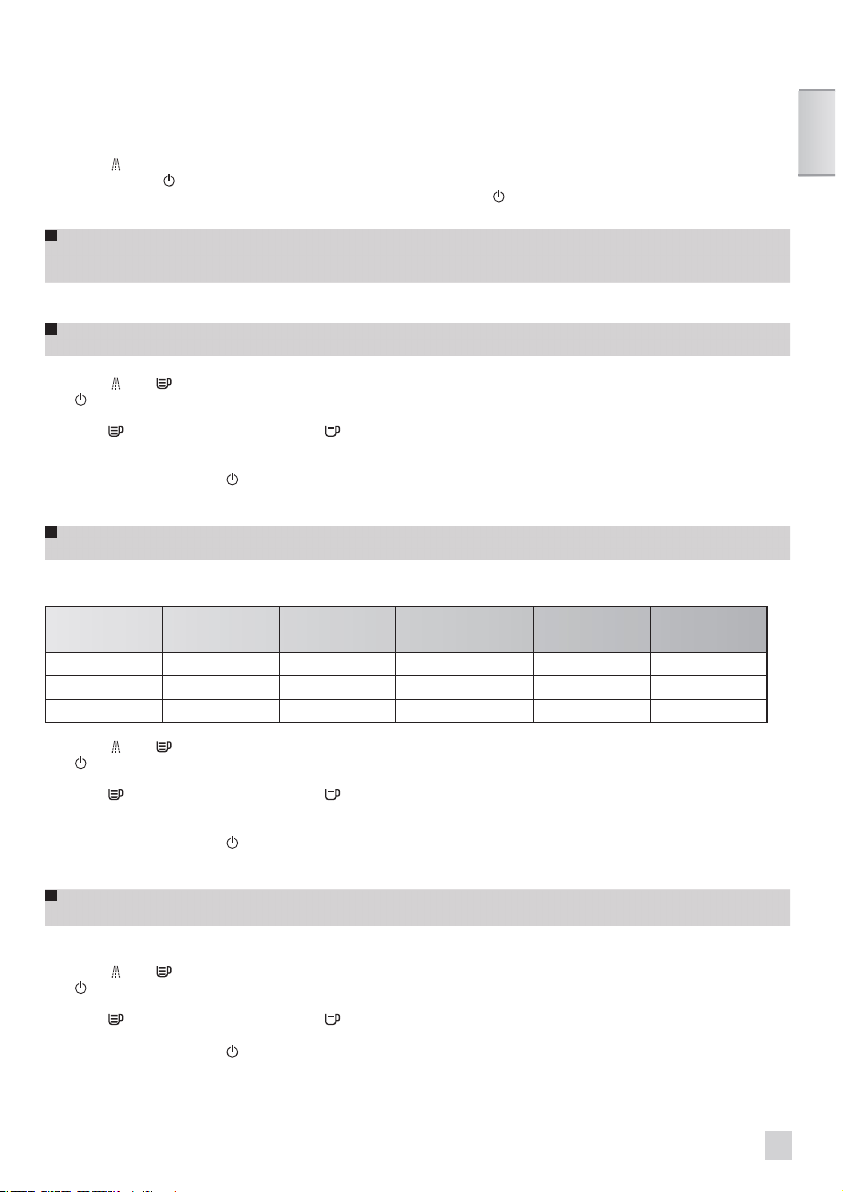
Degree of
hardness
0
Verv soft
1
soft
2
moderately hard
3
hard
4
extremely hard
° f < 5,4° > 7,2° > 12,6° > 25,2° > 37,8°
°dH < 3° > 4° > 7° > 14° > 21°
°e < 3,75° > 5° > 8,75° > 17,5° > 26,25°
Connect the appliance to the mains supply but do not switch it on.
Press the and buttons together, - Fig. 27.
The LED flashes during the setting phase.
Twist the knob to 120 ml to set the water hardness - Fig. 28.
Press the button to increase or touch the button to decrease the setting - Fig. 32.
Select the level of water hardness to be used: 0 LEDs lit = very soft, 1 LED lit = soft, 2 LEDs lit = average hardness, 3
LEDs lit = hard, 4 LEDs lit = very hard - Fig. 29.
To exit settings mode, press .
Setting the electrical supply cut-off mechanism
Appliances are pre-set in the factory to 1 hour.
You can program your machine’s automatic shut-off following a pre-programmed number of hours.
Connect the appliance to the mains supply but do not switch it on.
Press the and buttons together, - Fig. 27.
The LED flashes during the setting phase.
Twist the knob to 220 ml to set the automatic cut-off duration - Fig. 28.
Press the button to increase or touch the button to decrease the setting - Fig. 32.
Select the desired hardness: 1 LED lit = 1hour, 2 LEDs lit = 2hours, 3 LEDs lit = 3hours, 4 LEDs lit = 4hours - Fig. 29.
To exit settings mode, press .
Loading ...
Loading ...
Loading ...