Loading ...
Loading ...
Loading ...
17
EN
16
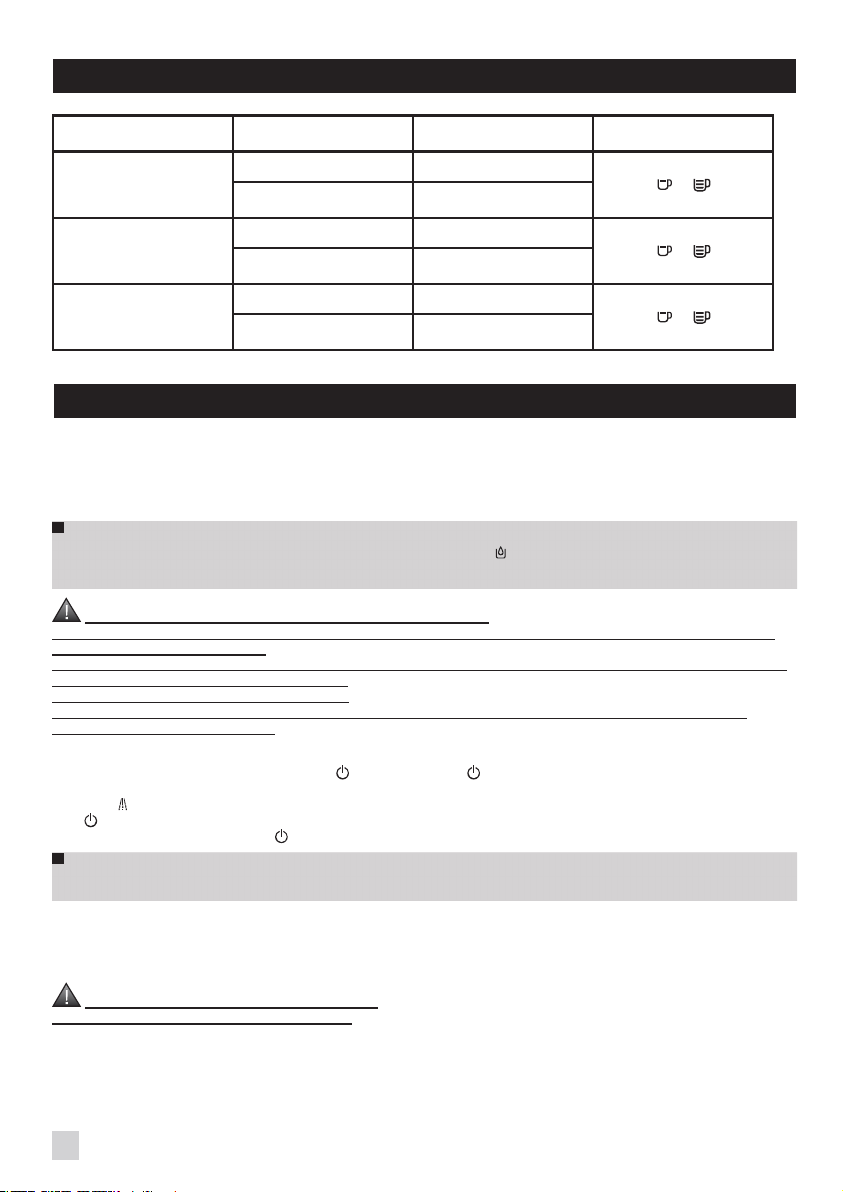
BEVERAGE PREPARATION
TYPES OF
COFFEE
Number of cups
possible
Possible volume
settings (ml)
Possible strength
settings
RISTRETTO
1 20 to 30 ml
or
2 x 1
2 x 20 to 30 ml
in two cycles
ESPRESSO
1 30 to 70 ml
or
2 x 1
2 x 30 to 70 ml
in two cycles
COFFEE or LUNGO
1 80 to 220 ml
or
2 x 1
2 x 80 to 220 ml
in two cycles
BEFORE FIRST USE
Preparing the appliance
Pull out and fill the water tank - Fig. 1 and 2.
Put it back in place by pressing firmly and close the lid again - Fig. 3.
Open the coffee bean container lid. Add the coffee beans - Fig. 4.
Close the coffee bean container lid again.
Do not fill the water tank with hot water, milk or any other liquid. If you turn on the appliance when the water
tank is not in place or not correctly filled (under the “min.” level,), the light will come on and making an espresso
or a cup of coffee will be made impossible.
NEVER PUT GROUND COFFEE IN THE COFFEE CONTAINER.
It is recommended that you do not use oily, caramelised or flavoured coffee beans for this appliance. These kinds of
beans may damage the appliance.
Check that the coffee beans do not contain any foreign particles such as grit, as any damage caused by the presence
of foreign particles will invalidate the guarantee.
Do not put water into the coffee bean container.
Remember to fit the drip tray to avoid waste water flowing onto the work surface and staining it or scalding you.
Check that your water tank is clean.
Initialisation cycle - total duration: around 3 minutes
Turn on the appliance by pressing the button - Fig. 5. The light is constant.
Put a container with a minimum capacity of 0.6 litres underneath the two coffee outlets and steam nozzle.
Press the - Fig. 6 button: the appliance starts the initialisation cycle for rinsing of the steam and coffee circuits. The
light flashes.
The cycle is finished when the light becomes constant. The appliance is now ready to use.
It is preferable to rinse the 2 circuits out at least once after the appliance has not been used for several days. Each
time you plug your appliance in, it will carry out an initialisation cycle.
Preparing the grinder
You can choose the strength of your coffee by setting the coffee bean grinding fineness. The finer the grinding setting,
the stronger and creamier the coffee should be. Set the desired fineness for grinding by turning the ‘Grinding fineness
setting’ knob.Turn to the left for finer grind. Turn to the right for coarser grind.
CHANGE THE SETTING DURING GRINDING.
Never force the grinding fineness setting button.
PREPARING ESPRESSO AND LONG COFFEES
YOUR APPLIANCE IS DESIGNED TO MAKE COFFEE FROM COFFEE BEANS ONLY.
When you first make coffee with the appliance or after a long period of absence or a cleaning or scale removal
procedure, a little steam and hot water will come out of the steam nozzle (priming).
Splashing or scalding may occur if the coffee outlets are set too high in relation to the size of the cups.
Note:
The amount of water needed to make an espresso is between 30 and 70 ml.
The amount of water needed to make a coffee is between 80 and 220 ml.
Production of an espresso or coffee
Plug in your appliance.
Press the button . The light will flash during the pre-heating and initialisation cycle.
The light becomes constant.
Put a cup under the coffee outlets. You can lower or raise the coffee outlets to suit the size of your cups - Fig. 7.
Select the key to get a strong espresso or the key to get a standard espresso - Fig. 8.
You can change the volume of water at any time - Fig. 9.
To stop coffee flowing into the cup, you can either again press one of the or , keys or turn the knob to the min.
position.
The ground coffee is moistened with a little hot water after the grinding stage. A few moments later, percolation as
such starts. Beyond a certain amount of coffee in the cup, we recommend - in order to obtain a stronger coffee - to
divide your preparation into two separate cycles. Example 2 x 70 ml cycles for a cup of 140 ml.
2 cup function
You can prepare 2 cups of coffee or espresso with your appliance.
Press the button the light flashes during the pre-heating of the appliance
The light becomes constant.
Place 2 cups under the coffee outlets. You can lower or raise the coffee outlets to suit the size of your cup - Fig. 10.
Select the button or according to your choice, by quickly pressing the button twice. The light comes on with a
double flash to inform you that you have requested two cups of coffee.
The appliance will automatically sequence 2 complete coffee-making cycles.
Make sure that you don’t remove the cups after the first cycle.
If you press the button once and the button a second time (or the other way round), the second one isn’t taken
into account.
PREPARING STEAM
Steam froths up the milk to make a cappuccino or a caffe latte, for example, and also heats up liquids. As you need a
higher temperature to produce steam than to make an espresso, the appliance runs an additional pre-heating phase for
steam.
Plug in your appliance.
Press the button: the light flashes during the pre-heating of the appliance.
The light becomes constant.
Press the button - Fig. 11.
The light flashes during the pre-heating.
Once the pre-heating is finished, the light stays constant and you can start the steam production by pressing the
button again.
Press the button again to stop the cycle.
The appliance goes back to its initial position if the steam control is not used after 2 mins.
BE CAREFUL, BECAUSE THE CYCLE DOES NOT STOP IMMEDIATELY.
Loading ...
Loading ...
Loading ...