
MADE IN CHINA
02-06-2020
TT-AD004_V1.7
www.taotronics.com
Learn more about the EU Declaration of Conformity:
https://www.taotronics.com/pages/user-manual
EUROPE
E-mail:
support.uk@taotronics.com(UK)
support.de@taotronics.com(DE)
support.fr@taotronics.com(FR)
support.es@taotronics.com(ES)
support.it@taotronics.com(IT)
EU Importer: ZBT International Trading GmbH
Address: Halstenbeker Weg 98C, 25462 Rellingen, Deutschland
NORTH AMERICA
E-mail:
support@taotronics.com(US)
support.ca@taotronics.com(CA)
Tel: 1-888-456-8468 (Monday-Friday: 9:00 – 17:00 PST)
Manufacturer: Shenzhen NearbyExpress Technology Development Co.,Ltd.
Address: 333 Bulong Road, Shenzhen, China, 518129
MANUFACTURER
ASIA PACIFIC
E-mail: support.jp@taotronics.com(JP)
JP Importer: 株式会社SUNVALLEY JAPAN
Address: 〒104-0032東京都中央区八丁堀3丁目18-6PMO京橋東9F
Model: TT-AD004
TaoTronics Ultrasonic Aroma Diffuser
User Guide

CONTENTS
English
Deutsch
Français
Español
Italiano
日本語
01/06
07/13
14/20
21/27
28/34
35/41

Thank you for choosing the TaoTronics Ultrasonic Aroma Diffuser. Please read
this manual carefully and store it in a safe place for future reference.If you have
any questions or concerns, please contact our customer support team by email
US UK CA
01/02
Features
• Contemporary home décor design
• Ultrasonic diffuser
• Timer mode
• Adjustable mist output
• Soft multi-color LED ambience lighting
• Control button with LED status indicator
• Low water protection
• Alarm beeper
Package Contents
• 1 x TaoTronics Aroma Diffuser (Model: TT-AD004)
• 1 x Power Adapter
• 1 x Cup
• 1 x User Guide
Specications
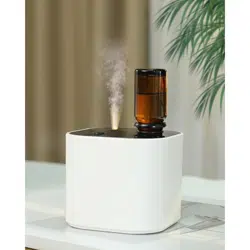
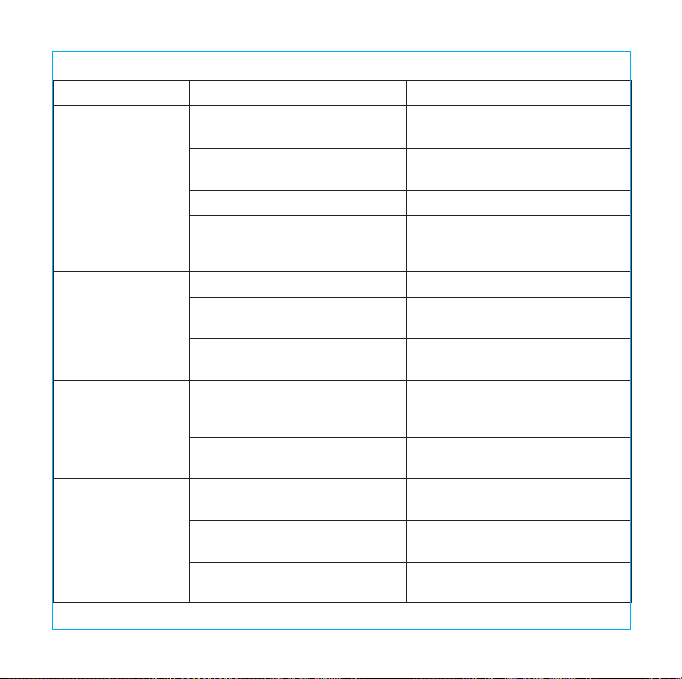
Model
Power Source
Power
Water Tank Volume
Working Time
Humidity Increase
Ultrasonic Frequency
TT-AD004
DC 24V 650mA
13W max
400mL / 14 oz.
14 hours max
About 25– 60mL / 1-2 oz. per hour
2.45MHz

Thank you for choosing the TaoTronics Ultrasonic Aroma Diffuser. Please read
this manual carefully and store it in a safe place for future reference.If you have
any questions or concerns, please contact our customer support team by email
at support@taotronics.com.
US UK CA
01/02
Features
• Contemporary home décor design
• Ultrasonic diffuser
• Timer mode
• Adjustable mist output
• Soft multi-color LED ambience lighting
• Control button with LED status indicator
• Low water protection
• Alarm beeper
Package Contents
• 1 x TaoTronics Aroma Diffuser (Model: TT-AD004)
• 1 x Power Adapter
• 1 x Cup
• 1 x User Guide
Specications
Model
Power Source
Power
Water Tank Volume
Working Time
Humidity Increase
Ultrasonic Frequency
TT-AD004
DC 24V 650mA
13W max
400mL / 14 oz.
14 hours max
About 25– 60mL / 1-2 oz. per hour
2.45MHz

03/04
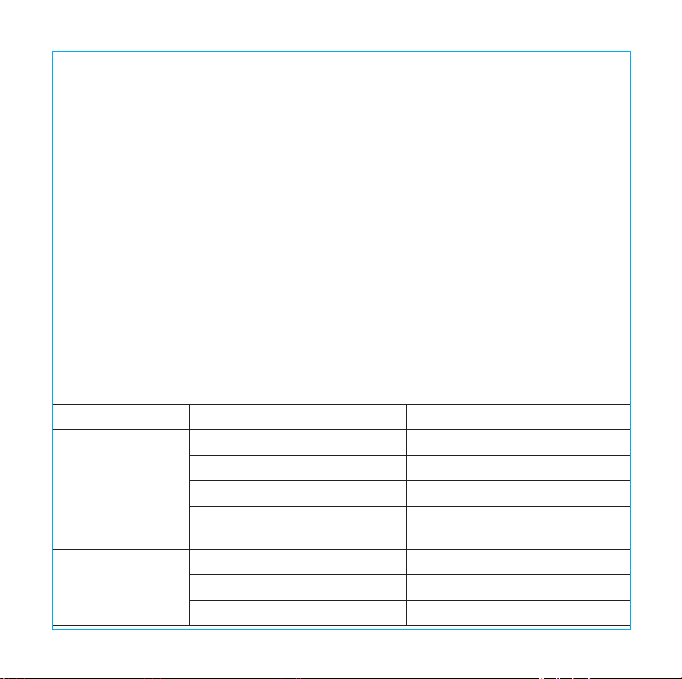
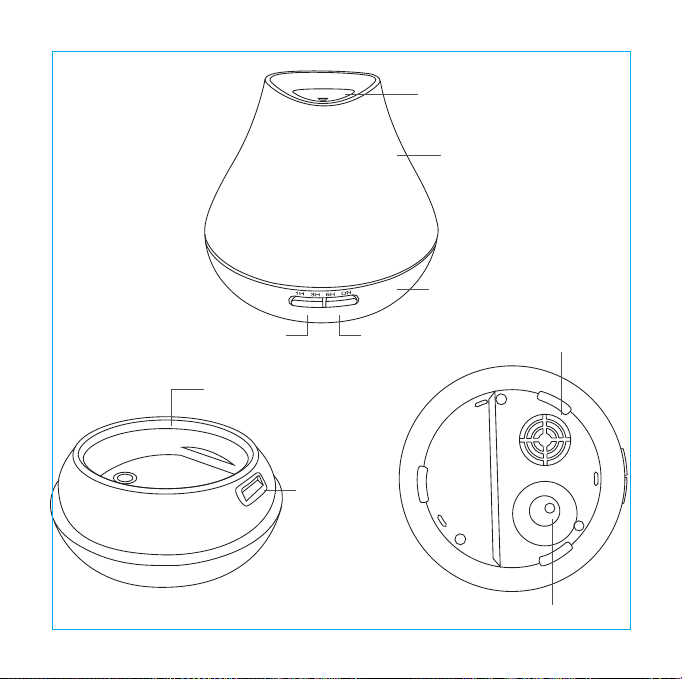
Product Diagram
Air Outlet
Maximum Water Level
Mist Outlet
Cover
Base
Mist Button
Light Button
Air Inlet
DC Socket
Adding Water
- Remove the cover and the tank lid.
- Add up to 400mL water into the water tank.
- Add 2 – 3 drops (0.1 – 0.15mL) of essential oil into the water.
- Put the cover back on.
How to Use
Connect the power adapter. The diffuser is now in standby status. Make sure there is enough water
inside the tank.Use the Light Button to control the color of the light. Use the Mist Button to set the
mist timer, turn misting on/off, and adjust between high and low mist mode.
Light Button
• Press the Light Button once to automatically cycle through different colors. Press again to stay on
the current color. If you keep pressing the Light Button, it will manually cycle through all of the
colors. Press one more time and the light will turn off.
• Press and hold the Light Button for 2 - 3 seconds until two beeps are heard to turn the light off.
Mist Button
• Press the Mist Button once to turn on the 1H mist timer (the corresponding LED indicator will light
up). Keep pressing to cycle through the 3H timer, 6H timer, and ON. When set to “ON”mode,the
unit will stay on until all water has been depleted. You can also press the Mist Button one more
time to manually shut it off.
• When the unit is turned on, press and hold the Mist Button for 2 – 3 seconds to adjust between
high and low mist mode. One beep sound indicates high mist mode is on, and two beep sounds
indicate low mist mode is on.
Important
- Do not exceed the max level when adding water.
- Stop using when water in the water tank is depleted.
- Do not power on when the lid is not properly covered.
- Use with essential oil and water together. Never use with essential oil only.
- Only use with natural essential oil. Synthesized essential oil may damage the product.
Cleaning the Water Tank
- Unplug the power cord and take off the lid.
- Drain any remaining water from the tank.
- Add some warm water into the tank and mix with detergent, wash with a cleaning cloth.
- Do not use corrosive detergent for cleaning.
Caution
- Please do not repair the product by yourself, always ask a professional electrician or authorized
technician for repairs.
- If you smell a bad odor or anything unusual, please turn off the unit immediately.
- Please do not remove the power plug with wet hands as it may cause electrical shock.
- Do not place this unit on a slope or uneven surface to avoid water leaking or component damage.
- Do not put this unit near any heat source or under direct sunlight.
- Keep away from other electric appliances that are prone to humidity damage.
- Regularly clean the unit if it won’t be used for a long period; store in a dry and shady place.
- When plugged in, do not leave the diffuser unattended when there are children around.
Troubleshooting Guide

03/04
Product Diagram
Air Outlet
Maximum Water Level
Mist Outlet
Cover
Base
Mist Button
Light Button
Air Inlet
DC Socket
Adding Water
- Remove the cover and the tank lid.
- Add up to 400mL water into the water tank.
- Add 2 – 3 drops (0.1 – 0.15mL) of essential oil into the water.
- Put the cover back on.
How to Use
Connect the power adapter. The diffuser is now in standby status. Make sure there is enough water
inside the tank.Use the Light Button to control the color of the light. Use the Mist Button to set the
mist timer, turn misting on/off, and adjust between high and low mist mode.
Light Button
• Press the Light Button once to automatically cycle through different colors. Press again to stay on
the current color. If you keep pressing the Light Button, it will manually cycle through all of the
colors. Press one more time and the light will turn off.
• Press and hold the Light Button for 2 - 3 seconds until two beeps are heard to turn the light off.
Mist Button
• Press the Mist Button once to turn on the 1H mist timer (the corresponding LED indicator will light
up). Keep pressing to cycle through the 3H timer, 6H timer, and ON. When set to “ON”mode,the
unit will stay on until all water has been depleted. You can also press the Mist Button one more
time to manually shut it off.
• When the unit is turned on, press and hold the Mist Button for 2 – 3 seconds to adjust between
high and low mist mode. One beep sound indicates high mist mode is on, and two beep sounds
indicate low mist mode is on.
Important
- Do not exceed the max level when adding water.
- Stop using when water in the water tank is depleted.
- Do not power on when the lid is not properly covered.
- Use with essential oil and water together. Never use with essential oil only.
- Only use with natural essential oil. Synthesized essential oil may damage the product.
Cleaning the Water Tank
- Unplug the power cord and take off the lid.
- Drain any remaining water from the tank.
- Add some warm water into the tank and mix with detergent, wash with a cleaning cloth.
- Do not use corrosive detergent for cleaning.
Caution
- Please do not repair the product by yourself, always ask a professional electrician or authorized
technician for repairs.
- If you smell a bad odor or anything unusual, please turn off the unit immediately.
- Please do not remove the power plug with wet hands as it may cause electrical shock.
- Do not place this unit on a slope or uneven surface to avoid water leaking or component damage.
- Do not put this unit near any heat source or under direct sunlight.
- Keep away from other electric appliances that are prone to humidity damage.
- Regularly clean the unit if it won’t be used for a long period; store in a dry and shady place.
- When plugged in, do not leave the diffuser unattended when there are children around.
Troubleshooting Guide
Adding Water
- Remove the cover and the tank lid.
- Add up to 400mL water into the water tank.
- Add 2 – 3 drops (0.1 – 0.15mL) of essential oil into the water.
- Put the cover back on.
How to Use
Connect the power adapter. The diffuser is now in standby status. Make sure there is enough water
inside the tank.Use the Light Button to control the color of the light. Use the Mist Button to set the
mist timer, turn misting on/off, and adjust between high and low mist mode.
Light Button
• Press the Light Button once to automatically cycle through different colors. Press again to stay on
the current color. If you keep pressing the Light Button, it will manually cycle through all of the
colors. Press one more time and the light will turn off.
• Press and hold the Light Button for 2 - 3 seconds until two beeps are heard to turn the light off.
Mist Button
• Press the Mist Button once to turn on the 1H mist timer (the corresponding LED indicator will light
up). Keep pressing to cycle through the 3H timer, 6H timer, and ON. When set to “ON”mode,the
unit will stay on until all water has been depleted. You can also press the Mist Button one more
time to manually shut it off.
• When the unit is turned on, press and hold the Mist Button for 2 – 3 seconds to adjust between
high and low mist mode. One beep sound indicates high mist mode is on, and two beep sounds
indicate low mist mode is on.
Important
- Do not exceed the max level when adding water.
- Stop using when water in the water tank is depleted.
- Do not power on when the lid is not properly covered.
- Use with essential oil and water together. Never use with essential oil only.
- Only use with natural essential oil. Synthesized essential oil may damage the product.
05/06
Cleaning the Water Tank
- Unplug the power cord and take off the lid.
- Drain any remaining water from the tank.
- Add some warm water into the tank and mix with detergent, wash with a cleaning cloth.
- Do not use corrosive detergent for cleaning.
Caution
- Please do not repair the product by yourself, always ask a professional electrician or authorized
technician for repairs.
- If you smell a bad odor or anything unusual, please turn off the unit immediately.
- Please do not remove the power plug with wet hands as it may cause electrical shock.
- Do not place this unit on a slope or uneven surface to avoid water leaking or component damage.
- Do not put this unit near any heat source or under direct sunlight.
- Keep away from other electric appliances that are prone to humidity damage.
- Regularly clean the unit if it won’t be used for a long period; store in a dry and shady place.
- When plugged in, do not leave the diffuser unattended when there are children around.
Troubleshooting Guide
Warranty
This product is covered by the TaoTronics Product and Labor Warranty for 12 months from the date
of its original purchase. If manufacturing defects occur, please contact TaoTronics support
(support@taotronics.com) immediately to launch a warranty claim. We will instruct you on how to
return the defective unit back to us for repair or replacement. No return will be accepted without
seller authorization
Contact
Email: support@taotronics.com
Tel: 1-888-456-8468 ext: 4 (Mon to Fri, 8 am to 5 pm, PST)
Website: www.taotronics.com
Statement
We can only provide after sale service for products that are sold by TaoTronics or TaoTronics
authorized retailer and distributors. If you have purchased your unit from a different place, please
contact your seller for return and warranty issues.
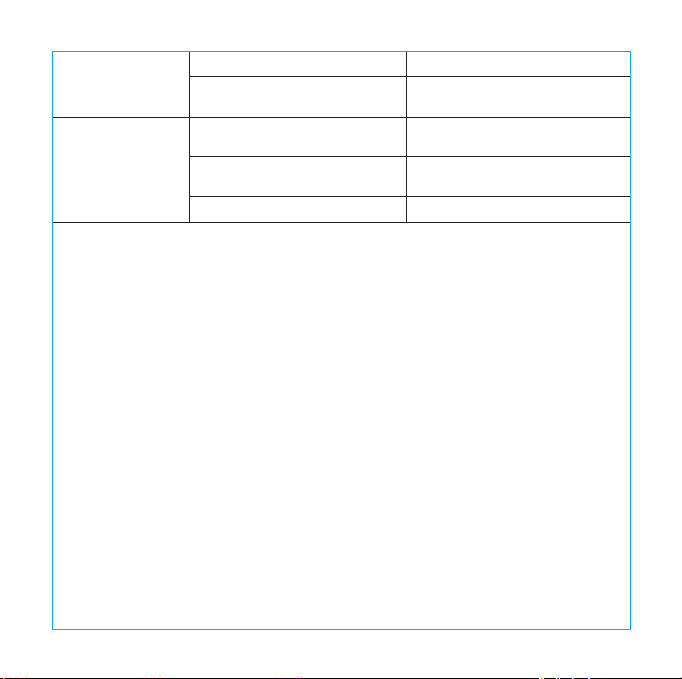
Solution
Connect power adapter
Refer to the instructions
Add water into water tank
Power off and place in a well
ventilated area for 10 minutes
Get rid of some water
Clean the water tank as instructed
Clean air inlet
Cause
No power
Did not press the Mist Button
No water in water tank
The diffuser is getting too hot
Water exceeding max level
Stain built up inside water tank
Air inlet blocked by dust
Problem
No mist coming out
Abnormal mist
Cap on the cover properly
Move the unit to a well
ventilated area
Clean water tank as instructed,
use after air drying
Clean water tank as instructed,
use clean water
Use natural essential oil
Cover not properly covered
Temperature and humidity of
environment is too high
Unit is new
Dirty water
Synthesized essential oil
Water leakage
Bad / strange smell
Adding Water
- Remove the cover and the tank lid.
- Add up to 400mL water into the water tank.
- Add 2 – 3 drops (0.1 – 0.15mL) of essential oil into the water.
- Put the cover back on.
How to Use
Connect the power adapter. The diffuser is now in standby status. Make sure there is enough water
inside the tank.Use the Light Button to control the color of the light. Use the Mist Button to set the
mist timer, turn misting on/off, and adjust between high and low mist mode.
Light Button
• Press the Light Button once to automatically cycle through different colors. Press again to stay on
the current color. If you keep pressing the Light Button, it will manually cycle through all of the
colors. Press one more time and the light will turn off.
• Press and hold the Light Button for 2 - 3 seconds until two beeps are heard to turn the light off.
Mist Button
• Press the Mist Button once to turn on the 1H mist timer (the corresponding LED indicator will light
up). Keep pressing to cycle through the 3H timer, 6H timer, and ON. When set to “ON”mode,the
unit will stay on until all water has been depleted. You can also press the Mist Button one more
time to manually shut it off.
• When the unit is turned on, press and hold the Mist Button for 2 – 3 seconds to adjust between
high and low mist mode. One beep sound indicates high mist mode is on, and two beep sounds
indicate low mist mode is on.
Important
- Do not exceed the max level when adding water.
- Stop using when water in the water tank is depleted.
- Do not power on when the lid is not properly covered.
- Use with essential oil and water together. Never use with essential oil only.
- Only use with natural essential oil. Synthesized essential oil may damage the product.
05/06
Cleaning the Water Tank
- Unplug the power cord and take off the lid.
- Drain any remaining water from the tank.
- Add some warm water into the tank and mix with detergent, wash with a cleaning cloth.
- Do not use corrosive detergent for cleaning.
Caution
- Please do not repair the product by yourself, always ask a professional electrician or authorized
technician for repairs.
- If you smell a bad odor or anything unusual, please turn off the unit immediately.
- Please do not remove the power plug with wet hands as it may cause electrical shock.
- Do not place this unit on a slope or uneven surface to avoid water leaking or component damage.
- Do not put this unit near any heat source or under direct sunlight.
- Keep away from other electric appliances that are prone to humidity damage.
- Regularly clean the unit if it won’t be used for a long period; store in a dry and shady place.
- When plugged in, do not leave the diffuser unattended when there are children around.
Troubleshooting Guide
Warranty
This product is covered by the TaoTronics Product and Labor Warranty for 12 months from the date
of its original purchase. If manufacturing defects occur, please contact TaoTronics support
([email protected]) immediately to launch a warranty claim. We will instruct you on how to
return the defective unit back to us for repair or replacement. No return will be accepted without
seller authorization
Contact
Email: support@taotronics.com
Tel: 1-888-456-8468 ext: 4 (Mon to Fri, 8 am to 5 pm, PST)
Website: www.taotronics.com
Statement
We can only provide after sale service for products that are sold by TaoTronics or TaoTronics
authorized retailer and distributors. If you have purchased your unit from a different place, please
contact your seller for return and warranty issues.
Solution
Connect power adapter
Refer to the instructions
Add water into water tank
Power off and place in a well
ventilated area for 10 minutes
Get rid of some water
Clean the water tank as instructed
Clean air inlet
Cause
No power
Did not press the Mist Button
No water in water tank
The diffuser is getting too hot
Water exceeding max level
Stain built up inside water tank
Air inlet blocked by dust
Problem
No mist coming out
Abnormal mist
Cap on the cover properly
Move the unit to a well
ventilated area
Clean water tank as instructed,
use after air drying
Clean water tank as instructed,
use clean water
Use natural essential oil
Cover not properly covered
Temperature and humidity of
environment is too high
Unit is new
Dirty water
Synthesized essential oil
Water leakage
Bad / strange smell

Vielen Dank, dass Sie sich für den TaoTronics Ultraschall Aroma Luftbefeuchter
entschieden haben. Bitte lesen Sie diese Anleitung sorgfältig durch und bewahren Sie sie
zum späteren Nachlesen an einen sicheren Ort auf. Wenn Sie Fragen haben und Hilfe
benötigen, kontaktieren Sie bitte unseren Kundendienst per Email unter:
DE
07/08
Eigenschaften
• Zeitgemäßes Heim Decor Design
• Ultraschall Luftbefeuchter
• Zeitschaltuhr
• Einstellbarer Nebelausstoß
• Sanftes mehrfarbiges LED Stimmungslicht
• Bedienelement mit LED Statusanzeige
• Schutz vor niedrigem Wasserstand
• Alarmsignal
Lieferumfang
• 1 x TaoTronics Aroma Luftbefeuchter (Modell: TT-AD004)
• 1 x Netzteil
• 1 x Behälter
• 1 x Bedienungsanleitung
Spezikationen
Modell
Stromanschluss
Leistung
Wassertankvolumen
Betriebszeit
Feuchtigkeitsausstoß
Ultraschallfrequenz
TT-AD004
DC 24V 650mA
13W max
400 mL
14 Stunden max.
ca. 25 – 60 ml pro Stunde
2.45MHz

Vielen Dank, dass Sie sich für den TaoTronics Ultraschall Aroma Luftbefeuchter
entschieden haben. Bitte lesen Sie diese Anleitung sorgfältig durch und bewahren Sie sie
zum späteren Nachlesen an einen sicheren Ort auf. Wenn Sie Fragen haben und Hilfe
benötigen, kontaktieren Sie bitte unseren Kundendienst per Email unter:
support.de@taotronics.com.
DE
07/08
Eigenschaften
• Zeitgemäßes Heim Decor Design
• Ultraschall Luftbefeuchter
• Zeitschaltuhr
• Einstellbarer Nebelausstoß
• Sanftes mehrfarbiges LED Stimmungslicht
• Bedienelement mit LED Statusanzeige
• Schutz vor niedrigem Wasserstand
• Alarmsignal
Lieferumfang
• 1 x TaoTronics Aroma Luftbefeuchter (Modell: TT-AD004)
• 1 x Netzteil
• 1 x Behälter
• 1 x Bedienungsanleitung
Spezikationen
Modell
Stromanschluss
Leistung
Wassertankvolumen
Betriebszeit
Feuchtigkeitsausstoß
Ultraschallfrequenz
TT-AD004
DC 24V 650mA
13W max
400 mL
14 Stunden max.
ca. 25 – 60 ml pro Stunde
2.45MHz

09/10
Produktdiagramm
Luftausgang
Maximaler Wasserstand
Nebelausgang
Deckel
Basis
Nebelschalter
Lichtschalter
Lufteinzug
Netzanschluss
Wasser Nachfüllung
- Entfernen Sie den Deckel und den Tankverschluss.
- Füllen Sie den Tank mit bis zu 400 ml Wasser.
- Geben Sie 2- 3 Tropfen (0.1 – 0.15 ml) ätherisches Öl ins Wasser.
- Setzen Sie die Abdeckung zurück auf die Basis
Benutzungshinweise
Schließen Sie das Netzteil an. Der Luftbefeuchter bendet sich jetzt im Bereitschaftsmodus.
Versichern Sie sich, das sich ausreichend Wasser im Tank bendet. Betätigen Sie den Lichtschalter
um die Lichtfarbe einzustellen. Betätigen Sie den Nebelschalter um den Nebel ein- und
auszuschalten, die Nebelzeitschaltuhr zu aktivieren und zwischen starken und schwachen
Nebelausstoß zu wechseln.
Lichtschalter
• Drücken Sie den Lichtschalter einmal um durch die verschiedenen Farben zu wechseln. Durch
erneutes drücken stoppen Sie die Farbrotation und behalten die gegenwärtige Farbe bei. Wenn
Sie den Lichtschalter gedrückt halten, rotiert das Gerät durch alle vorhandenen Farben. Durch
wiederholtes drücken auf den Schalter stellen Sie das Licht ab.
• Halten Sie den Lichtschalter für 2 – 3 Sekunden gedrückt bis Sie zwei Signaltöne hören und sich
das Gerät selbständig abschaltet.
Nebelschalter
• Drücken Sie den Nebelschalter einmal um die 1 Std. Nebelzeitschaltuhr zu aktivieren (die
entsprechende LED-Anzeige leuchtet). Halten Sie die Taste gedrückt um zwischen der 3 Std. und
6 Std. Zeitschaltuhr zu wechseln oder die Funktion auszuschalten. Wenn sich das Gerät im „ON“
Modus bendet arbeitet das Gerät solange, bis das Wasser verbraucht ist. Drücken Sie den
Nebelschalter nochmals um den Modus manuell auszuschalten.
• Halten Sie den Nebelschalter bei eingeschaltetem Gerät für 2 – 3 Sekunden gedrückt, um
zwischen dem starken und dem schwachen Nebelmodus zu wechseln. Ein Signalton steht für
starker Nebelmodus, zwei Signaltöne für schwachen Nebelmodus.

11/12
Lösung
Schließen Sie das Netzkabel an
Drücken Sie die Nebeltaste, wie in
der Anleitung beschrieben
Füllen Sie Wasser in den Tank
Stellen Sie das Gerät für 10 Min. an
einen gut belüfteten Ort
Gießen Sie Wasser ab
Reinigen Sie den Wassertank wie
beschrieben
Reinigen Sie den Lufteinzug
Verschließen Sie den Deckel korrekt
Stellen Sie das Gerät an einen gut
belüfteten Ort
Reinigen Sie den Wassertank wie
beschrieben und lassen ihn an
der Luft trocknen
Reinigen Sie den Wassertank wie
beschrieben, verwenden Sie
sauberes Wasser
Verwenden Sie natürliches
ätherisches Öl
Ursache
Kein Strom
Nebeltaste wurde nicht gedrückt
Kein Wasser im Tank
Der Luftbefeuchter wird zu heiß
Wasserstand überschreitet die
Begrenzung
Es bilden sich Flecken im
Wassertank
Lufteinzug ist verstaubt
Deckel nicht korrekt verschlossen
Temperatur und Luftfeuchtigkeit
zu hoch
Gerät ist neu
Verunreinigtes Wasser
Künstliches ätherisches Öl
Problem
Kein Nebelausstoß
Abnormaler Nebel
Wasseraustritt
Übler/Eigenartiger
Geruch
Wichtig
• Überschreiten Sie nicht die max Begrenzung, wenn Sie Wasser einfüllen.
• Verwenden Sie das Gerät nicht bei niedrigem Wasserstand
• Schalten Sie das Gerät nicht ein, wenn die Abdeckung nicht befestigt ist.
• Leeren Sie den Wassertank und bewahren Sie das Gerät an einem trockenem Ort auf, wenn Sie
das Gerät für längere Zeit nicht benutzen sollten.
• Verwenden Sie ätherisches Öl und Wasser gemeinsam, niemals ätherisches Öl allein verwenden.
• Nur mit natürlichem ätherischen Ölen verwenden. Chemische Zusammensetzungen können das
Gerät beschädigen.
• Stellen Sie das Gerät auf einer geraden Oberäche auf.
Reinigung des Wassertanks
• Entfernen sie den Netzstecker und öffnen Sie den Deckel.
• Gießen Sie das verbleibende Wasser aus dem Tank
• Geben Sie warmes Wasser und etwas Reinigungsmittel in den Tank und waschen Sie Ihn mit
einem Reinigungstuch aus.
• Verwenden Sie für die Säuberung keine ätzenden Reinigungsmittel.
Warnung
- Demontieren Sie das Gerät nicht selbst, wenden Sie sich für Reparaturen an professionelle
Elektriker oder autorisierte Techniker;
- Sollte Ihnen ein übler Geruch oder irgendetwas Ungewöhnliches auffallen, verwenden Sie
das Gerät nicht weiter.
- Berühren Sie den Netzstecker nicht mit nassen Händen, dies kann zu Stromschlägen führen.
- Stellen Sie das Gerät nicht auf rutschige oder unebene Flächen, um Wasseraustritt oder
Beschädigungen zu vermeiden.
- Halten Sie das Gerät vor Hitze oder direkter Sonnenbestrahlung fern.
- Halten Sie den Luftbefeuchter von anderen elektrischen Haushaltsgeräten fern die anfällig
gegen Feuchtigkeit sind.
- Reinigen Sie das Gerät wenn Sie es für längere Zeit nicht benutzen sollten und bewahren
Sie es an einem trockenen dunklen Ort auf.
- Lassen Sie das Gerät nicht unbeaufsichtigt in der Nähe von Kindern.
Problembehandlung

Merci d’avoir choisi TaoTronics Diffuseur Aromatique à Ultrasons. Veuillez lire ce manuel
attentivement et le conserver dans un endroit sûr pour toute future référence. En cas de
doute, veuillez contacter notre équipe d’assistance clientèle par courriel à
support.fr@taotronics.com
FR
Garantie
TaoTronics Produkte sind ab dem Kaufdatum durch die 12-monatige Garantie abgedeckt. Falls das
Produkt während dieser Zeit defekt sein sollte, kontaktieren Sie bitte unverzüglich den Kundendienst.
Wir bieten unseren Kundendienst nur für Produkte an, die bei TaoTronics oder einem von TaoTronics
autorisierten Händler und Vertriebsdienstleister gekauft wurden. Falls Sie Ihr Produkt bei einem anderen
Händler gekauft haben, wenden Sie sich bezüglich des Garantieanspruchs an den Verkäufer.
13/14

Merci d’avoir choisi TaoTronics Diffuseur Aromatique à Ultrasons. Veuillez lire ce manuel
attentivement et le conserver dans un endroit sûr pour toute future référence. En cas de
doute, veuillez contacter notre équipe d’assistance clientèle par courriel à
FR
Garantie
TaoTronics Produkte sind ab dem Kaufdatum durch die 12-monatige Garantie abgedeckt. Falls das
Produkt während dieser Zeit defekt sein sollte, kontaktieren Sie bitte unverzüglich den Kundendienst.
Wir bieten unseren Kundendienst nur für Produkte an, die bei TaoTronics oder einem von TaoTronics
autorisierten Händler und Vertriebsdienstleister gekauft wurden. Falls Sie Ihr Produkt bei einem anderen
Händler gekauft haben, wenden Sie sich bezüglich des Garantieanspruchs an den Verkäufer.
13/14
15/16
Caractéristiques
• Design contemporain de la décoration intérieure
• Diffuseur à Ultrasons
• Mode Minuterie
• Buse adjustable de Brumisation
• Éclairage d’Ambiance Doux à LED Multi-couleurs
• Bouton de contrôle avec LED Voyants d’État
• Protection Manque d’Eau
• Alerte bip
Contenu de la Boîte
• 1 x Diffuseur Aromatique à Ultrasons (Modèle : TT-AD004)
• 1 x Adaptateur Secteur
• 1 x Coupe
• 1 x Guide d’Utilisation
Spécications
Modèle
Tension d’Alimentation
Puissance
Volume du Réservoir d’Eau
Autonomie (mode brumisation par intervalles)
Augmentation d’Humidité Max
Fréquence Ultrasonique
TT-AD004
DC 24V 650mA
13W max
400 mL / 10 oz.
14 hours max
About 25 – 60 mL / 1- 2 oz. per hour
2.45MHz
Diagramme de produit
Sortie d’Air
Ligne de Niveau d’Eau Max
Buse de Brumisation
Couvercle
Socle
Bouton Brume
Bouton Lumière
Entrée d’Air
Prise Électrique

17/18
Remplissage
• Retirer le capot et le couvercle du réservoir.
• Ajouter jusqu’à 400mL d’eau dans le réservoir.
• Ajoutez 2 à 3 (0.1 – 0.15 mL)gouttes d’huile essentielle dans l’eau.
• Remettez le couvercle et le capot
Mode d’Emploi
Connectez l’adaptateur secteur. Le diffuseur est maintenant en veille. Assurez-vous qu’il y a assez
d’eau dans le réservoir. Utilisez la Bouton Lumière pour contrôler la couleur de l’éclairage. Utilisez le
Bouton Brume pour contrôler la sortie de brume.
Bouton Lumière
• Appuyez une fois sur le Bouton Lumière pour alterner automatiquement entre les différentes
couleurs. Appuyez de nouveau pour xer la couleur actuelle. Si vous maintenez appuyé le
Bouton Lumière, vous allez manuellement alterner entre toutes les couleurs. Appuyez une fois de
plus et la lumière s’éteindra.
• Appuyez et maintenez le Bouton Lumière pendant 2 à 3 secondes pour éteindre la lumière.
Bouton Brume
• Appuyez sur le Bouton Brume une fois pour activer la 1H minuterie de brume (le voyant
correspondant s'allumera). Continuez à appuyer pour alterner entre la 3H minuterie, 6H
minuterie, et ON. Lorsqu'il est réglé sur le mode "ON", l'appareil reste allumé jusqu'à ce que toute
l'eau a été épuisé. Vous pouvez également appuyer sur le Bouton Brume une fois de plus de le
fermer manuellement.
• Lorsque l'appareil est allumé, appuyez et maintenez le Bouton Brume pour 2 - 3 secondes pour
régler entre le mode de brume haute et basse. Un signal sonore indique que le mode haut de
brume est allumé et deux bips sonores indiquent que le mode peu de brume est allumé.
Important
- Ne pas dépasser le niveau MAX quand vous rajoutez de l’eau
- Ne pas utiliser le diffuseur lorsque le réservoir d’eau devient vide
- Ne pas allumer le diffuseur lorsque le couvercle supérieur et le réservoir ne sont pas
correctement couverts
- Videz le réservoir d'eau et réservez le diffuseur dans un endroit sec si vous ne l’utilisez pas
- Ajoutez de l'huile essentielle dans l'eau. Ne pas utiliser directement de l'huile essentielle sans diluer
- Utilisez uniquement l'huile essentielle naturelle avec le diffuseur; les huiles essentielles synthétisées
l’endommageront
- Placez le diffuseur sur une surface plane.
Nettoyage du réservoir d'eau
- Débranchez le cordon d’alimentation, dévisser le couvercle supérieur et le celui du réservoir
- Videz l'eau du réservoir
- Versez un peu d'eau tiède et de détergent dans le réservoir d’eau, le lavez avec une lavette
nettoyante
- Ne pas utiliser de détergent corrosif pour le nettoyage.
Prudence
• Veuillez ne pas démonter le produit par vous-même et demandez toujours un électricien
professionnel ou un technicien agréé pour la réparation
• Si vous sentez une mauvaise odeur ou remarquez quelque chose d’inhabituel, veuillez
immédiatement éteindre l'appareil
• Veuillez ne pas retirer la prise d'alimentation avec les mains mouillées car cela pourrait causer
un choc électrique
• Ne placez pas cet appareil sur une surface pentue ou irrégulière an d’éviter toute fuite d'eau
ou dommages à l’appareil
• Ne mettez pas cet appareil près d'une source de chaleur ou en plein soleil
• Tenir à l'écart des autres appareils électriques qui craignent l'humidité
• Nettoyez régulièrement le réservoir, si vous ne l’utilisez pas pendant une longue période, veuillez
le ranger dans un endroit sec et à l’abri de la lumière
• Lorsqu'il est branché, ne pas laisser le diffuseur sans surveillance quand il y a des enfants autour.
Garantie
TaoTronics fournit une garantie limitée de 12 mois pour ce produit, à compter de la date d’achat
initial. Si votre produit devenait défectueux, veuillez contacter l’équipe du Service Clients par email.
Nous ne pouvons fournir de service après-vente que pour les appareils vendus par TaoTronics ou
un de ses distributeurs ou revendeurs autorisés. Si vous avez acheté votre appareil depuis un autre
endroit, veuillez contacter le vendeur pour les questions de retour et de garantie.
19/20
Solutions
Branchez l'adaptateur
d'alimentation
Allumez l’appareil comme indiqué
Remplissez le réservoir d’eau
Éteignez le et placez le dans un
endroit bien ventilé pendant
10 minutes
Enlevez un peu d’eau
Nettoyez le réservoir d'eau comme
indiqué
Néttoyez l’entrée d’air
Placez le couvercle correctement
Déplacez l'appareil dans un
endroit bien ventilé
Nettoyez le réservoir d'eau comme
indiqué, et laissez sécher à l’air libre
Nettoyez le réservoir d'eau comme
indiqué
Utilisez une huile naturelle
aromatisée
Les causes
Pas d'alimentation
L’intérupteur “BRUME“ n’est pas
allumé
Pas d’eau dans le réservoir
Protection contre le chauffage
après une utilisation de longue
durée
Eau dépassant le niveau Max
Saleté accumulée à l’intérieur du
réservoir à eau
L'entrée d’air obstruée par la
poussière
Couvercle supérieur ou le
couvercle du réservoir ne sont
pas correctement fermés
Température et humidité
d’ambiance trop élevées
Nouvel appareil
Eau sale
Huile essentielle synthétisée
Problem
Pas de brume
Brumisation anormale
Fuite d’eau
odeur
mauvaise/étrange
Guide de dépannage

Gracias por elegir Difusor ultrasónico de aroma de TaoTronics. Por favor, lea
atentamente este manual y guárdelo en un lugar seguro para futuras consultas. Si usted
tiene alguna pregunta, por favor, póngase en contacto con nuestro equipo de atención
al cliente por correo electrónico a [email protected].
ES
21/22
Características
• Diseño para la decoración de un hogar contemporáneo
• Difusor ultrasónico
• Modo de temporizador
• Salida de vapor ajustable
• Iluminación ambiente suave de LED multicolor
• Botón de control con indicador de estado LED
• Protección de nivel bajo de agua
• Con zumbador de alarma.
Contenido del paquete
• 1 x Difusor de aroma de TaoTronics (Modelo: TT-AD004)
• 1 x Adaptador de corriente
• 1 x Copa
• 1 x Guía del usuario
Características Técnicas
Modelo
Fuente de alimentación
Potencia
Volumen del tanque de agua
Tiempo de trabajo
La humedad máxima
Frecuencia ultrasónica
TT-AD004
DC 24V 650mA
13W max
400 mL / 14 oz.
14 horas máx
Alrededor de 25 - 60 ml / 1- 2 oz. por hora
2.45MHz
Gracias por elegir Difusor ultrasónico de aroma de TaoTronics. Por favor, lea
atentamente este manual y guárdelo en un lugar seguro para futuras consultas. Si usted
tiene alguna pregunta, por favor, póngase en contacto con nuestro equipo de atención
al cliente por correo electrónico a support.es@taotronics.com.
ES
21/22
Características
• Diseño para la decoración de un hogar contemporáneo
• Difusor ultrasónico
• Modo de temporizador
• Salida de vapor ajustable
• Iluminación ambiente suave de LED multicolor
• Botón de control con indicador de estado LED
• Protección de nivel bajo de agua
• Con zumbador de alarma.
Contenido del paquete
• 1 x Difusor de aroma de TaoTronics (Modelo: TT-AD004)
• 1 x Adaptador de corriente
• 1 x Copa
• 1 x Guía del usuario
Características Técnicas
Modelo
Fuente de alimentación
Potencia
Volumen del tanque de agua
Tiempo de trabajo
La humedad máxima
Frecuencia ultrasónica
TT-AD004
DC 24V 650mA
13W max
400 mL / 14 oz.
14 horas máx
Alrededor de 25 - 60 ml / 1- 2 oz. por hora
2.45MHz

23/24
Diagrama de producto
Salida de aire
Nivel máximo de agua
Salida de Vapor
Cubierta
Base
Botón del Vapor
Botón de Luz
Entrada de aire
Entrada DC
Cómo añadir agua?
- Retirar la tapa y la tapa del depósito.
- Añadir hasta 400 ml de agua en el depósito de agua.
- Añadir 2 - 3 gotas (0,1-0,15 ml) de aceite esencial en el agua.
- Colocar de nuevo la tapa.
Cómo utilizarlo?
Conecte el adaptador de corriente. El difusor se encuentra ahora en estado de espera. Asegúrese
de que haya suciente agua en el interior del depósito. Utilice el botón de luz para controlar el
color de la luz. Use el botón de vapor para ajustar el temporizador de el mismo, gire a la
nebulización de encendido / apagado y ajuste entre el modo de alto y bajo vapor.
Botón de luz
• Pulsar el botón de luz una vez para recorrer automáticamente diferentes colores. Pulse de nuevo
para permanecer en el color actual. Si se mantiene presionado el botón de la luz, se hará un
ciclo de forma manual a través de todos los colores. Presione una vez más y la luz se apagará.
• Mantenga pulsado el botón de la luz por 2 - 3 segundos hasta que se oigan dos pitidos para
apagar la luz.
Importante
- No exceda el nivel máximo de agua al agregarla.
- No usar cuando el nivel del agua es bajo.
- No encienda el difusor cuando la cubierta no esté puesta.
- Vaciar el depósito de agua y guardar en un lugar seco cuando no se utilice.
- Utilizar siempre con aceite esencial y agua. Nunca lo utilice sólo con aceite esencial.
- Utilice sólo con aceite esencial natural.Los productos químicos podría dañar el difusor.
- Colocar el difusor sobre una supercie plana.

25/26
Solución
Conectar el adaptador a la
corriente
Consulte las instrucciones
Añadir el agua en el tanque
de agua
Apagar y colocar en un lugar
bien ventilado durante 10 minutos
Deshacerse de un poco de agua
Limpiar el deposito de agua de
acuerdo con las instrucciones
Limpiar la entrada de aire
Ponga el casquillo de la tapa
correctamente
Mueva la unidad a un área bien
ventilada
Limpie el tanque de agua según
las instrucciones, úselo después
de secarlo al aire
Limpie el tanque de agua según
las instrucciones, úselo después
de secarlo al aire
Utilice aceites esenciales naturales
Causa
Ninguna energía
No ha pulsado el botón Vapor
No hay agua en el depósito
de agua
El difusor está demasiado
caliente
Agua superior al nivel máximo
Manchado construido en el
interior del tanque de agua
Entrada de aire bloqueada por
el polvo
Cierre la tapa adecuadamente
La temperatura y la humedad del
ambiente es demasiado alta
La unidad es nueva
Agua sucia
Añadir aceite esencial
Problema
El vapor no sale
Vapor anormal
Fuga de agua
Olor Malo /extraño
Guía para resolver problemas
Limpieza del depósito de agua:
1. Desconecte el cable de alimentación y retire la cubierta.
2. Vacíe el agua que pueda quedar en el depósito.
3. Agregue un poco de agua caliente en el depósito y mezclar con el detergente, lavar con un
paño de limpieza.
4. No utilice detergentes corrosivos para su limpieza.
Precaución
- Por favor, no desmonte el producto usted mismo, siempre pida ayuda a un electricista
profesional o a un técnico autorizado para su reparación.
- Si huele mal o enuentra algo inusual, por favor apague la unidad de inmediato.
- Por favor, no retire el enchufe de alimentación con las manos mojadas, ya que podría causar
una descarga eléctrica.
- No coloque esta unidad en pendiente o supercie irregular para evitar fugas de agua o daños
en los componentes.
- No coloque la unidad cerca de fuentes de calor o bajo la luz solar directa.
- Mantener alejado de otros aparatos eléctricos que son propensos a daños de humedad.
- Regularmente limpiar la unidad si no va a ser utilizado durante un largo período; almacenar en
un lugar seco y oscuro.
- Al conectar el difusor, no lo deje desatendido cuando hay niños alrededor.

Grazie per aver scelto il Diffusore di Aromi a Ultrasuoni di TaoTronics. Vi invitiamo a
leggere il seguente manuale con attenzione e a conservarlo per future consultazioni. Per
ulteriore assistenza, contattare il nostro servizio clienti inviando una email al seguente
indirizzo di posta elettronica support.it@taotronics.com.
I T
27/28
Garantía
TaoTronics ofrece una garantía limitada de 12 meses para este producto desde la fecha de
compra original. Si su producto resulta defectuoso, póngase en contacto con nuestro equipo de
atención al cliente por correo electrónico.
Sólo podemos ofrecer servicios de postventa de los productos que se venden por TaoTronics o
TaoTronics autorizados minoristas y distribuidores. Si usted ha comprado su unidad desde un lugar
diferente, por favor póngase en contacto con el vendedor directamente para cuestiones de
retorno y de garantía.

Grazie per aver scelto il Diffusore di Aromi a Ultrasuoni di TaoTronics. Vi invitiamo a
leggere il seguente manuale con attenzione e a conservarlo per future consultazioni. Per
ulteriore assistenza, contattare il nostro servizio clienti inviando una email al seguente
indirizzo di posta elettronica [email protected].
I T
27/28
Garantía
TaoTronics ofrece una garantía limitada de 12 meses para este producto desde la fecha de
compra original. Si su producto resulta defectuoso, póngase en contacto con nuestro equipo de
atención al cliente por correo electrónico.
Sólo podemos ofrecer servicios de postventa de los productos que se venden por TaoTronics o
TaoTronics autorizados minoristas y distribuidores. Si usted ha comprado su unidad desde un lugar
diferente, por favor póngase en contacto con el vendedor directamente para cuestiones de
retorno y de garantía.
29/30
Caratteristiche
• Design decorativo contemporaneo per la casa
• Diffusore ad ultrasuoni
• Modalità timer
• Getto di vaporizzazione regolabile
• LED delicato e multicolore
• Tasto di controllo con indicatore LED dello stato
• Protezione basso livello dell’acqua
• Allarme
Contenuto della Confezione
• 1 x Diffusore di Aromi ad Ultrasuoni di TaoTronics (Modello: TT-AD004)
• 1 x Adattatore
• 1 x Misurino
• 1 x Guida Utente
Speciche Tecniche
Modello
Alimentazione
Corrente
Capacità Tanica dell’Acqua
Autonomia
Aumento Umidità
Frequenza Ultrasuoni
TT-AD004
DC 24V 650mA
13W max
400mL / 14oz.
14 ore max
Circa 25 – 60mL / 1 - 2oz per ora
2.45MHz
Schema del Prodotto
Uscita Aria
Livello dell’Acqua Massimo
Uscita Getto Vaporizzazione
Custodia Protettiva
Base
Tasto Vaporizzazione
Tasto Luce
Entrata Aria
Presa DC

31/32
Aggiungere dell’Acqua
- Rimuovere la custodia protettiva e il coperchio della tanica.
- Aggiungere 400mL di acqua nella tanica.
- Aggiungere 2-3 gocce (0.1 - 0.15mL) di olio essenziale nell’acqua.
- Rimettere coperchio e custodia.
Funzionamento
Connettere l’adattatore. Il diffusore è in stato standby. Assicurarsi che vi sia abbastanza acqua
nella tanica. Utilizzare il Tasto Luce per controllare la luce LED. Utilizzare il tasto vaporizzazione per
impostare il timer, accendere o spegnere la vaporizzazione e passare da una vaporizzazione
elevata a una ridotta.
Tasto Luce
• Premere il tasto luce una volta per scorrere i differenti colori del LED automaticamente. Premere
nuovamente per impostare il colore corrente. Premere più volte per scorrere a traverso le luci LED
manualmente, e premere un’ultima volta perché la luce si spenga.
• Premere e tenere premuto il Tasto Luce per 2-3 secondi no a sentire 2 bip e la luce si spegnerà.
Tasto Vaporizzazione
• Premere il tasto vaporizzazione una volta per attivare il timer da 1 ora (l’indicatore LED
corrispondente si accenderà). Premere nuovamente per passare alle modalità timer da 3 ore, 6
ore e ON. In modalità “ON” il dispositivo resterà acceso no a che la tanica non si sia svuotata.
• Quando il dispositivo è acceso, premere e tenere premuto il tasto Vaporizzazione per 2-3 secondi
per passare da una vaporizzazione elevata a una ridotta. Si sentirà un bip quando la modalità a
vaporizzazione elevata è attiva e un bip passando alla vaporizzazione ridotta.
Importante
- Non eccedere il livello massimo di acqua nel serbatoio.
- Interrompere l'uso quando il livello di acqua nel serbatoio è basso.
- Non accendere il diffusore senza custodia protettiva.
- Svuotare il serbatoio e conservare in un luogo asciutto quando non si utilizza.
- Utilizzare con oli essenziali e acqua. Non aggiungere solamente oli essenziali senza acqua.
- Utilizzare solo oli essenziali naturali. Prodotti sintetici potrebbero danneggiare il prodotto.
- Collocare il diffusore su una supercie piana.
Come Pulire l'Acqua del Serbatoio
- Staccare il cavo di alimentazione e rimuovere la custodia protettiva.
- Drenare ogni traccia di acqua residua dal serbatoio.
- Aggiungere acqua nel serbatoio mista a detergente, pulire con un panno.
- Non utilizzare detergenti corrosivi per la pulizia.
Avvertenze
• Si prega di non smontare il prodotto in maniera autonoma. Per la riparazione dell'umidicatore,
rivolgersi sempre a personale qualicato.
• In caso di cattivo odore o funzionamento inusuale, spegnere immediatamente l'umidicatore.
• Al ne di evitare shock elettrici, si prega di non toccare la presa di alimentazione
con le mani bagnate.
• Per evitare perdite d'acqua o danni ai componenti, non collocare l'umidicatore su superci
inclinate o irregolari.
• Non collocare vicino sorgenti di estremo calore o esporre ai raggi diretti del sole.
• Tenere lontano da altri apparecchi elettronici soggetti a rischio di danni dovuti ad umidità.
• Pulire regolarmente l'unità se non si utilizza per un lungo periodo e conservare in un luogo
asciutto e riparato.
• Non lasciare il dispositivo incustodito quando collegato se in presenza di bambini.

Garanzia
TaoTronics fornisce per questo prodotto, una garanzia limitata di 12 mesi dalla sua data d'acquisto.
In caso di difetti del prodotto, si prega di contattare via email il nostro team di supporto clienti.
Forniamo servizio di post vendita esclusivamente per prodotti venduti da TaoTronics o da
distributori e rivenditori autorizzati TaoTronics. Se acquistati da terzi, vi invitiamo a rivolgervi al vostro
venditore per casi attinenti alla restituzione del prodotto e questioni sulla garanzia.
33/34
Soluzione
Connettere l’adattatore
Fare riferimento alle istruzioni
Aggiungere acqua nella tanica
Spegnere e posizionare in una
zona ventilata per 10 minuti
Rimuovere l’acqua in eccesso
Pulire la tanica
Pulire il foro di uscita dell’aria
Posizionare la custodia
correttamente
Posizionare il dispositivo in una
zona ventilata
Pulire la tanica come indicato e
lasciare asciugare all’aria aperta
Pulire la tanica come indicato e
utilizzare dell’acqua pulita
Usare oli essenziali di origine
naturale
Causa
Mancanza di alimentazione
Il tasto vaporizzazione non è stato
premuto
Mancanza di acqua nella tanica
Eccessivo surriscaldamento del
dispositivo
Acqua in eccesso
Presenza di sporcizia/residui nella
tanica dell’acqua
Uscita aria ostruita dalla polvere
Custodia mal posizionata
Temperature e umidità
dell’ambiente circostante
eccessivamente elevate
Dispositivo nuovo
Acqua sporca
Olio Essenziale Sintetico
Problema
Getto vaporizzazione
assente
Vaporizzazione
anormale
Perdita d’acqua
Cattivo/strano odore
Risoluzione dei Problemi

この度はTaoTronics超音波アロマディフューザーをお買い上げ頂きまして誠にありがとうございます。
こちらの取扱説明書をよくお読みになり、正しく安全にお使いください。何かありましたら、弊社カスタマ
JP
35/36
特徴
• 現代的な家に合う目立たないデザイン
• 超音波ディフューザ
• タイマーモード
• 調整可能なミスト出力
• 優しい多色LEDアンビエンス照明
• LEDインジケータ搭載コントロールボタン
• 水量不足の保護
• アラーム
セ ット 内 容
• 1xTaoTronicsアロマディフューザー(型番:TT-AD004)
• 1 x 電源アダプター
• 1 x カップ
• 1 x 取扱説明書
仕様
モデル
電源入力
パワー
水タンク容 量
駆動時間
湿度を高める
超音波周波数
TT-AD004
DC24V650mA
最大13W
400mL/14oz.
最大14時間
およそ25‒60mL/1-2oz.毎時間
2.45MHz

37/38
製品図
空気出口
最大水量レベル
ミスト 出口
カバー
ベース
ライトボタン
ミスト ボタン
空気入口
DCソケット
水を入れる
- カバ ーを取り、タンクキャップをとります。
-400mLの水をタンクの中に入れます。
-エッセンシャルオイルを2−3滴(0.1to0.15mL)入れます。
-キャップとカバーを元にもどします。
使い方
電源アダプターを繋げる。ディフューザはスタンバイ状態になります。タンクの中に十分な水があることを確認し
てください。ライトボタンを 押して光 の 色を選 びます。ミストボタンでミストタイマ ーを設定し、ミストのオン/オフ
切り替え、ミストの強さを調整します。
ライトボタン
•ライトボタンを押すと、光の色が変わります。もう一度押すと、現在の色が維持されます。ライトボタンを押し続け
ると、手動ですべての色が繰り返されます。もう一度押すと、ライトが消灯します。
•2回のビープ音が鳴って消灯するまでライトボタンを2〜3秒間押し続けます。
ミストボタン
-ミストボタンを1回押して1時間ミストタイマーをオンにします(LEDインジケーターが点灯します)。押し続ける
ことで、3時間タイマー、6時間タイマー、およびONモードの操作を行うことができます。「ON」モードに設定する
と、水がなくなるまで稼働し続けます。ミストボタンを押して手動で電源を切ることもできます。
-本機の電源がついたら、ミストボタンを2〜3秒間押し続け、高ミスト・モードと低ミスト・モードの調整ができ
ます。1回鳴るビープ音は高ミストモードであることを示し、2回鳴るビープ音は低ミストモードであることを
示します。
重要
-水を入れる時は最大レベルを超えないようにしてください。
-水タンクが空になった場合は、使用を中止してください。
-フタがちゃんと覆われていない時は、電源を入れないでください。
-エッセンシャルオイルだけで使うのは絶対にお止めください。必ず水に数滴入れて使うようにしてください。
-エッセンシャルオイルは天然のものをお使いください。合成されたエッセンシャルオイルは機械に影響が出る
場合があります。

39/40
解決策
電源を確認し、しっかりと差し込みます。
ミストボタンの説明を参照
水を入れます
電源を切って、10分ほど通気の
よい場所に放置します。
少し減らしてください
説明書を参照して清掃します。
原因
電源が入っていない
ミストボタンを押してない
タンクに水がない
ディフューザーが高温になっている
水が多すぎる
水タンクの中が汚れている
問題
ミスト が 出 ま せ ん
ミストがおかしい
カバーをキチンと閉めます。
風通しのいい場所に移動します。
水タンクを説 明どおりに清 掃し、
乾かしてから、お使いください。
水タンクを説 明どおりに清 掃し、
キレイな水を入れてください。
天然のエッセンシャルオイルを
使用してください。
カバーがちゃんと閉まってない
環境的に温度と湿度が高い
ユニットが新しい
水が汚い
使用したエッセンシャルオイルは
合成のものである
水漏れ
異臭がでる
水タンクの清掃
-電源コードを抜いてタンクカバーとタンクキャップを外します。
-タンクの中に残った水を総て捨てます。
-タンクの中に温かいお湯を入れて少し洗剤を入れてクロスで洗います。
-腐食性の洗剤は使用しないようにしてください。
注意
-自分で修理しないでください。必ず資格のある技術者か、プロの電技技術者に依頼してください。
-異臭など異常を感じた場合は、すぐに電源を切ってください。
-濡れた手で電源に触れないでください、電気ショックが起こるかもしれません。
-傾斜がある場所や、凸凹した場所で使わないでください。水がこぼれたり、機械が壊れることがあります。
-直射日光の当たる場所など熱の高くなる場所に放置しないようにしてください。
-湿気によりダメージを受ける電気機器等の側で使わないようにしてください。
-長期にわかって使わない時は内部を清掃し、乾燥した状態にして涼しい場所に保管します。
-子どもの近くで使う場合は、目を離さないでください。
トラブ ル シュー ティング

41
安心保証
本製品はご購入日から12カ月の安心保障をご提供いたします。万が一、商品不具合のようでしたら、ぜひ弊社まで
ご連絡ください。商品状況に応じて返品、交換、修理及び返金と対応させていただきます。
TaoTronicsに販売の権限を授けられた販売業者から購入された場合のみTaoTronicsアフターサービスをご提供
いたします。
FCC Compliance
This device complies with Part 15 of the FCC Rules. Operation is subject to the following two
conditions: (1) this device may not cause harmful interference, and (2) this device must accept
any interference received, including interference that may cause undesired operation.
WEEE Compliance
Correct Disposal of This Product (Waste Electrical & Electronic Equipment)
(Applicable in countries with separate collection systems)
This marking on the product, accessories or literature indicates that the product and its
electronic accessories should not be disposed of with other household waste at the end of
their working life. To prevent possible harm to the environment or human health from
uncontrolled waste disposal, please separate these items from other types of waste and recycle
them responsibly to promote the sustainable reuse of material resources. Household users
should contact either the retailer where they purchased this product, or their local government
office, for details of where and how they can take these items for environmentally safe
recycling. Business users should contact their supplier and check the terms and conditions of
the purchase contract. This product and its electronic accessories should not be mixed with
other commercial wastes for disposal.

TECHNOLOGY ENHANCES LIFE
MADE IN CHINA
02-06-2020
TT-AD004_V1.7
www.taotronics.com
Learn more about the EU Declaration of Conformity:
https://www.taotronics.com/pages/user-manual
EUROPE
E-mail:
EU Importer: ZBT International Trading GmbH
Address: Halstenbeker Weg 98C, 25462 Rellingen, Deutschland
NORTH AMERICA
E-mail:
Tel: 1-888-456-8468 (Monday-Friday: 9:00 – 17:00 PST)
Manufacturer: Shenzhen NearbyExpress Technology Development Co.,Ltd.
Address: 333 Bulong Road, Shenzhen, China, 518129
MANUFACTURER
ASIA PACIFIC
E-mail: [email protected](JP)
JP Importer: 株式会社SUNVALLEY JAPAN
Address: 〒104-0032東京都中央区八丁堀3丁目18-6PMO京橋東9F
Model: TT-AD004
TaoTronics Ultrasonic Aroma Diffuser
User Guide