VIDEO CONFERENCE SYSTEM
CS-500
EN
User Guide

CS-500 User Guide
2
Introduction ..........................................................................................................................................4
Features/functions...............................................................................................................................................................4
Available manuals ...............................................................................................................................................................5
About this manual ...............................................................................................................................................................5
Included items .....................................................................................................................................................................6
Separately sold items ..........................................................................................................................................................6
Available utility software ......................................................................................................................................................7
Updating the device firmware..............................................................................................................................................7
Controls and connectors.....................................................................................................................8
Front panel ..........................................................................................................................................................................8
Rear panel...........................................................................................................................................................................9
Remote control ..................................................................................................................................................................10
Procedures preparing for use ...........................................................................................................12
Procedure from installation to completed connection ........................................................................................................12
Procedure for holding a meeting........................................................................................................................................12
Setup and connections......................................................................................................................13
Installing the device...........................................................................................................................................................13
When installing on a TV ...............................................................................................................................................13
When mounting to a TV ...............................................................................................................................................14
When mounting on a wall.............................................................................................................................................17
Connecting devices ...........................................................................................................................................................18
Sample setups .............................................................................................................................................................18
When used as webcam................................................................................................................................................19
Connecting the power supply ............................................................................................................................................20
Inserting/replacing the remote control batteries ................................................................................................................21
Pairing the device and remote control ...............................................................................................................................22
Making necessary initial settings.......................................................................................................................................23
Activating HDMI connection/DisplayLink function/Bluetooth/USB audio ......................................................................23
Installing the DisplayLink® driver onto your computer .................................................................................................23
Selecting the device on the computer ..........................................................................................................................24
Contents

CS-500 User Guide
3
Contents
Using smart devices in meetings ......................................................................................................................................25
What can be done with a Bluetooth connection ...........................................................................................................25
Making a Bluetooth connection ....................................................................................................................................25
Configuring the device from a TV screen (on-screen display menu)............................................26
Displaying the device’s settings menu ...............................................................................................................................26
Using Yamaha CS Manager to specify detailed settings................................................................27
About Yamaha CS Manager..............................................................................................................................................27
Recommended environment .............................................................................................................................................28
Installing ............................................................................................................................................................................28
Specifying a password/Logging in .....................................................................................................................................29
For the first time: Specifying the password...................................................................................................................29
Logging in.....................................................................................................................................................................30
Home (status information).................................................................................................................................................31
Admin settings...................................................................................................................................................................33
Audio settings....................................................................................................................................................................35
Bluetooth settings..............................................................................................................................................................37
Making a Bluetooth connection by using Yamaha CS Manager...................................................................................39
Camera settings ................................................................................................................................................................40
Smart framing settings ......................................................................................................................................................42
Display settings .................................................................................................................................................................43
Network settings................................................................................................................................................................44
Connecting to a network ..............................................................................................................................................46
Time settings .....................................................................................................................................................................49
Updating the firmware .......................................................................................................................................................50
Configuration .....................................................................................................................................................................51
Logs ..................................................................................................................................................................................52
Appendix.............................................................................................................................................53
Main specifications ............................................................................................................................................................53
Returning to factory default settings (factory reset) ...........................................................................................................56
Initializing by using the device......................................................................................................................................56
Initializing by using Yamaha CS Manager ....................................................................................................................56

CS-500 User Guide
4
Thank you for purchasing the Yamaha CS-500. This product is a video conferencing device equipped with a camera and
microphones. It can be set up for use in huddle spaces and meeting rooms. Combine it with a TV, speakers and video
conferencing software (computer) for comfortable teleconferencing.
Features/functions
Yamaha’s own high-quality audio processing
This device features audio processing functions required for video conferencing, including adaptive echo canceller (AEC),
noise reduction (NR) and automatic gain control (AGC). Camera framing area settings and beamforming microphones
focus on the speaker’s voice and suppress ambient sounds.
“SoundCap Eye” achieves more comfortable remote communication
“SoundCap Eye” is a function that allows for comfortable remote communication, even in noisy environments. By using the
camera to automatically identify the surrounding conditions and conference participants, more optimal sound pickup and
output can be achieved.
- Face focus beamforming:
This technology picks up only the voice of the participant whose face is detected by the camera.
- Self-silence:
This technology automatically mutes the microphone when there is no human voice in the captured sound. This
prevents unwanted noise from reaching the remote party.
- Self-volume balancer:
This feature constantly adjusts the speaker volume to an appropriate volume depending on the surrounding noise.
Smart framing
With this function, the camera follows the subject according to the mode. The angle of view and zoom are automatically
adjusted onto the face detected by the camera. (Smart framing Page 11)
- Group: Mode that frames all conference participants
- Speaker tracking: Mode that frames the person who is speaking
- Individual: Mode that frames the designated person
Easy connections via USB
This device and the computer can be connected with one USB cable. This makes it easy to set up and prepare for
meetings. (Sample setup Page 18)
Automatically turning on/off the device
When the camera built into this device detects a person, the device automatically switches on from standby. (Auto wakeup)
Easy setup using the remote control and a display
You can display the menu on a TV and specify device settings by using the remote control. (On-screen display menu
Page 26)
With the application software on the computer, more detailed settings can be specified. (Yamaha CS Manager Page 27)
Introduction
CS-500 User Guide
5
Introduction
Available manuals
The manuals for this product can be downloaded in the PDF format from the following website.
About this manual
This manual uses the following signal words for important information.
• The illustrations as shown in this manual are for instructional purposes only.
• The company names and product names in this manual are the trademarks or registered trademarks of their respective
companies.
• Yamaha continuously makes improvements and updates to the software included in this product. You can download the
latest software from the Yamaha website.
• The contents of this manual apply to the latest specifications as of the publishing date. To obtain the latest manual,
access the Yamaha website then download the manual file.
Read This First (included) This describes what to do first after purchasing the product.
CS-500 Safety Guide (included) This contains the precautions for using this product safely.
CS-500 User Guide (this manual/PDF) This provides details on using this device. It also explains how to use
the Yamaha CS Manager application on your computer to configure
and operate the device.
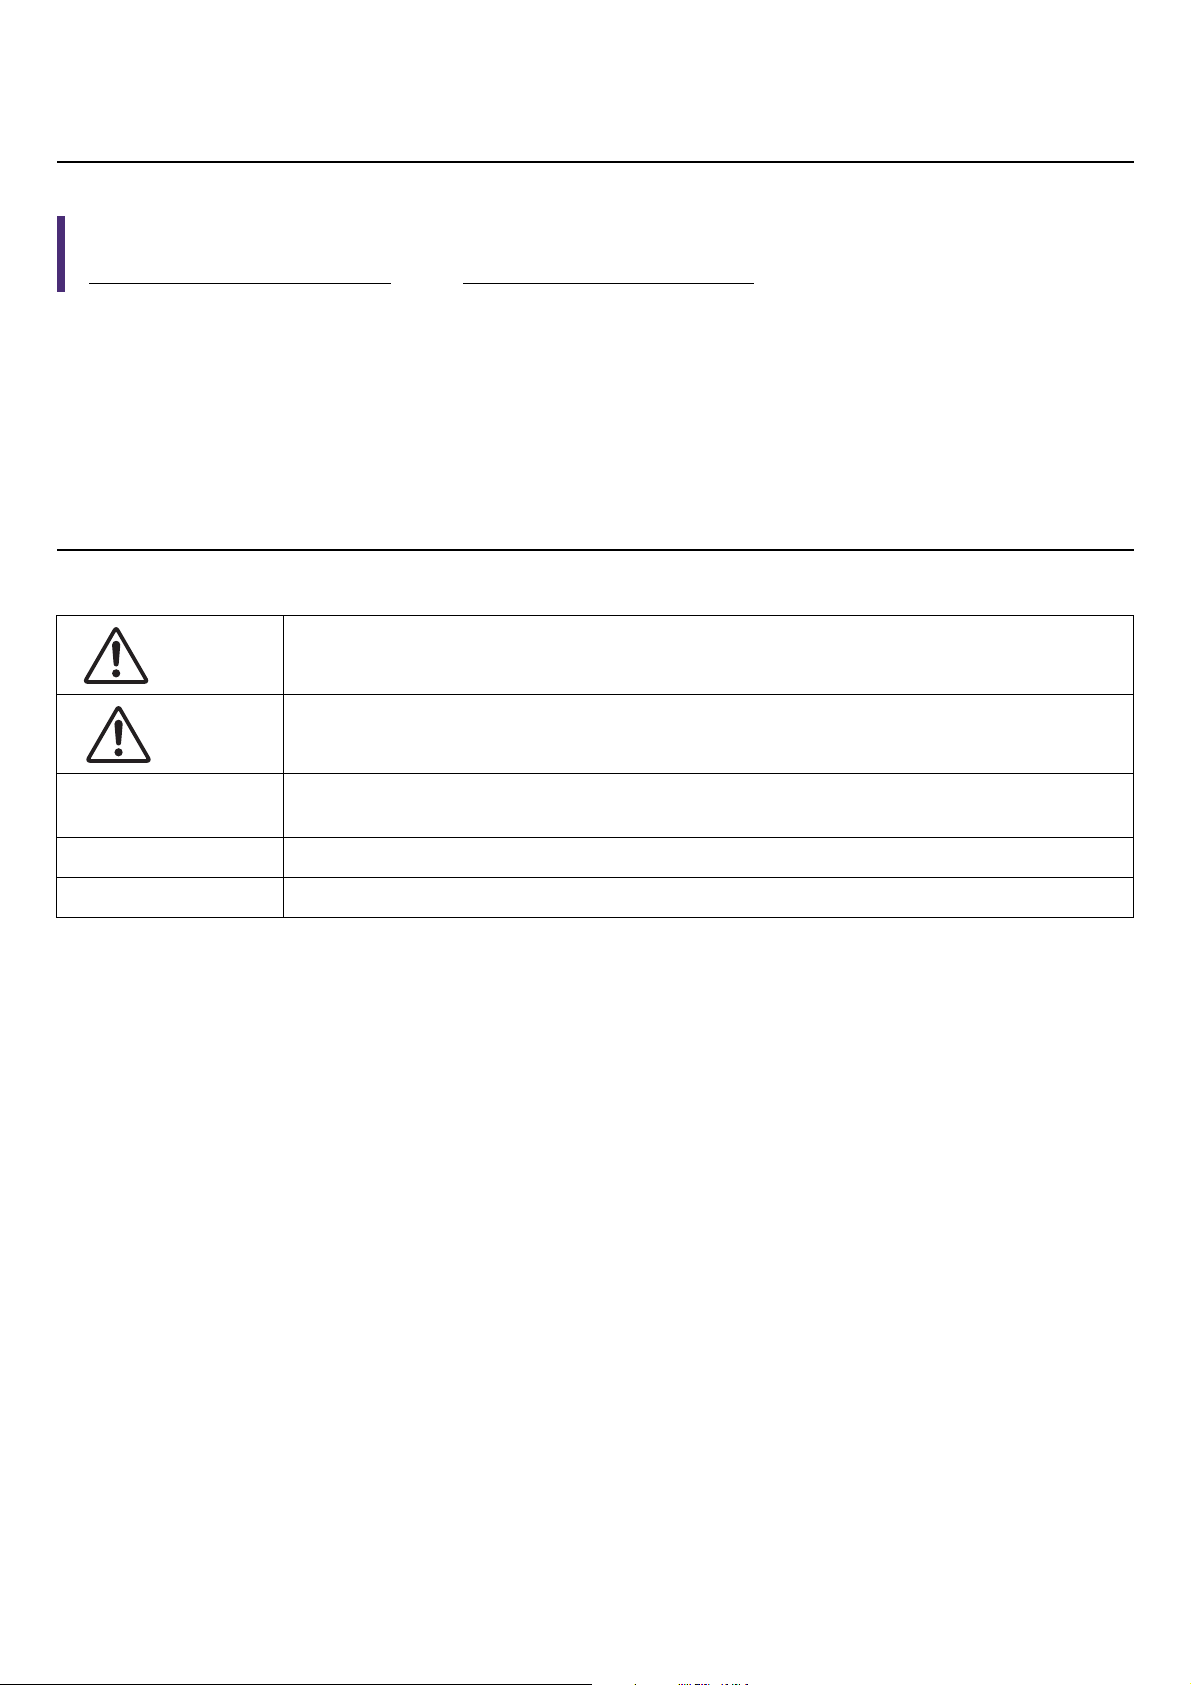
WARNING
This content indicates “risk of serious injury or death.”
CAUTION
This content indicates “risk of injury.”
NOTICE
Indicates content that you must observe in order to prevent the product from malfunctioning,
being damaged, or operating incorrectly, and to avoid data loss.
IMPORTANT Indicates content that you must know in order to operate and use the product correctly.
NOTE Indicates information that is related to operation and use. Read this for your reference.
Yamaha website
U.S.A. and Canada:
https://uc.yamaha.com/support/
Other Countries:
https://download.yamaha.com/

CS-500 User Guide
6
Introduction
Included items
• CS-500 device
• Read This First
• Safety Guide
• USB 2.0 cable (Type-C to Type-A, 5 m)
• HDMI cable (2 m)
• Lens cap
• Remote control
• Coin battery (CR2032) × 2
• AC adaptor with power cord (CW2002100)
• Cable tie
Separately sold items
• Wall mounting bracket (mounting accessory) BRK-WL1
This is required for installing the device onto a wall. It is also used in combination with monitor mounting bracket
BRK-TV1 when installing the device onto a TV.
• Monitor mounting bracket (mounting accessory) BRK-TV1
This is used in combination with wall mounting bracket BRK-WL1 when installing the device onto the VESA mount of a
TV.
• USB cables: CBL-L10AC (10 meters), CBL-L25AC (25 meters)
These are fiber optic USB cables. They are used when the device and computer are far apart. These support USB 3.2
Gen2 (Super Speed Plus) and can communicate at high speeds up to 10 Gbps.
NOTE
The VESA standards are international and define the spacing between screw holes used when attaching video equipment,
such as TVs, to wall mounts and TV stands.

CS-500 User Guide
7
Introduction
Available utility software
This utility software can be used to set up the device according to its use and environment. The software can be
downloaded from the following website.
Updating the device firmware
This product is designed to allow the firmware of the device to be updated in order to improve operability, add functions and
fix problems. We recommend updating the device firmware to the latest version.
1. Download from the website.
Download the CS-500 firmware file from the following website.
2. Update using Yamaha CS Manager.
Update from the [Update] screen in the [Tools] menu of Yamaha CS Manager. (Page 50)
Related links
• Yamaha CS Manager (Page 27)
• Yamaha CS Manager > Updating the firmware (Page 50)
Yamaha CS Manager This is software that allows you to configure and operate the device
from your computer. For details, refer to “Using Yamaha CS Manager
to specify detailed settings” in this manual. (Page 27)
Yamaha website
U.S.A. and Canada:
https://uc.yamaha.com/support/
Other Countries:
https://download.yamaha.com/
Yamaha website
U.S.A. and Canada:
https://uc.yamaha.com/support/
Other Countries:
https://download.yamaha.com/
CS-500 User Guide
8
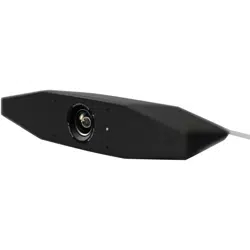
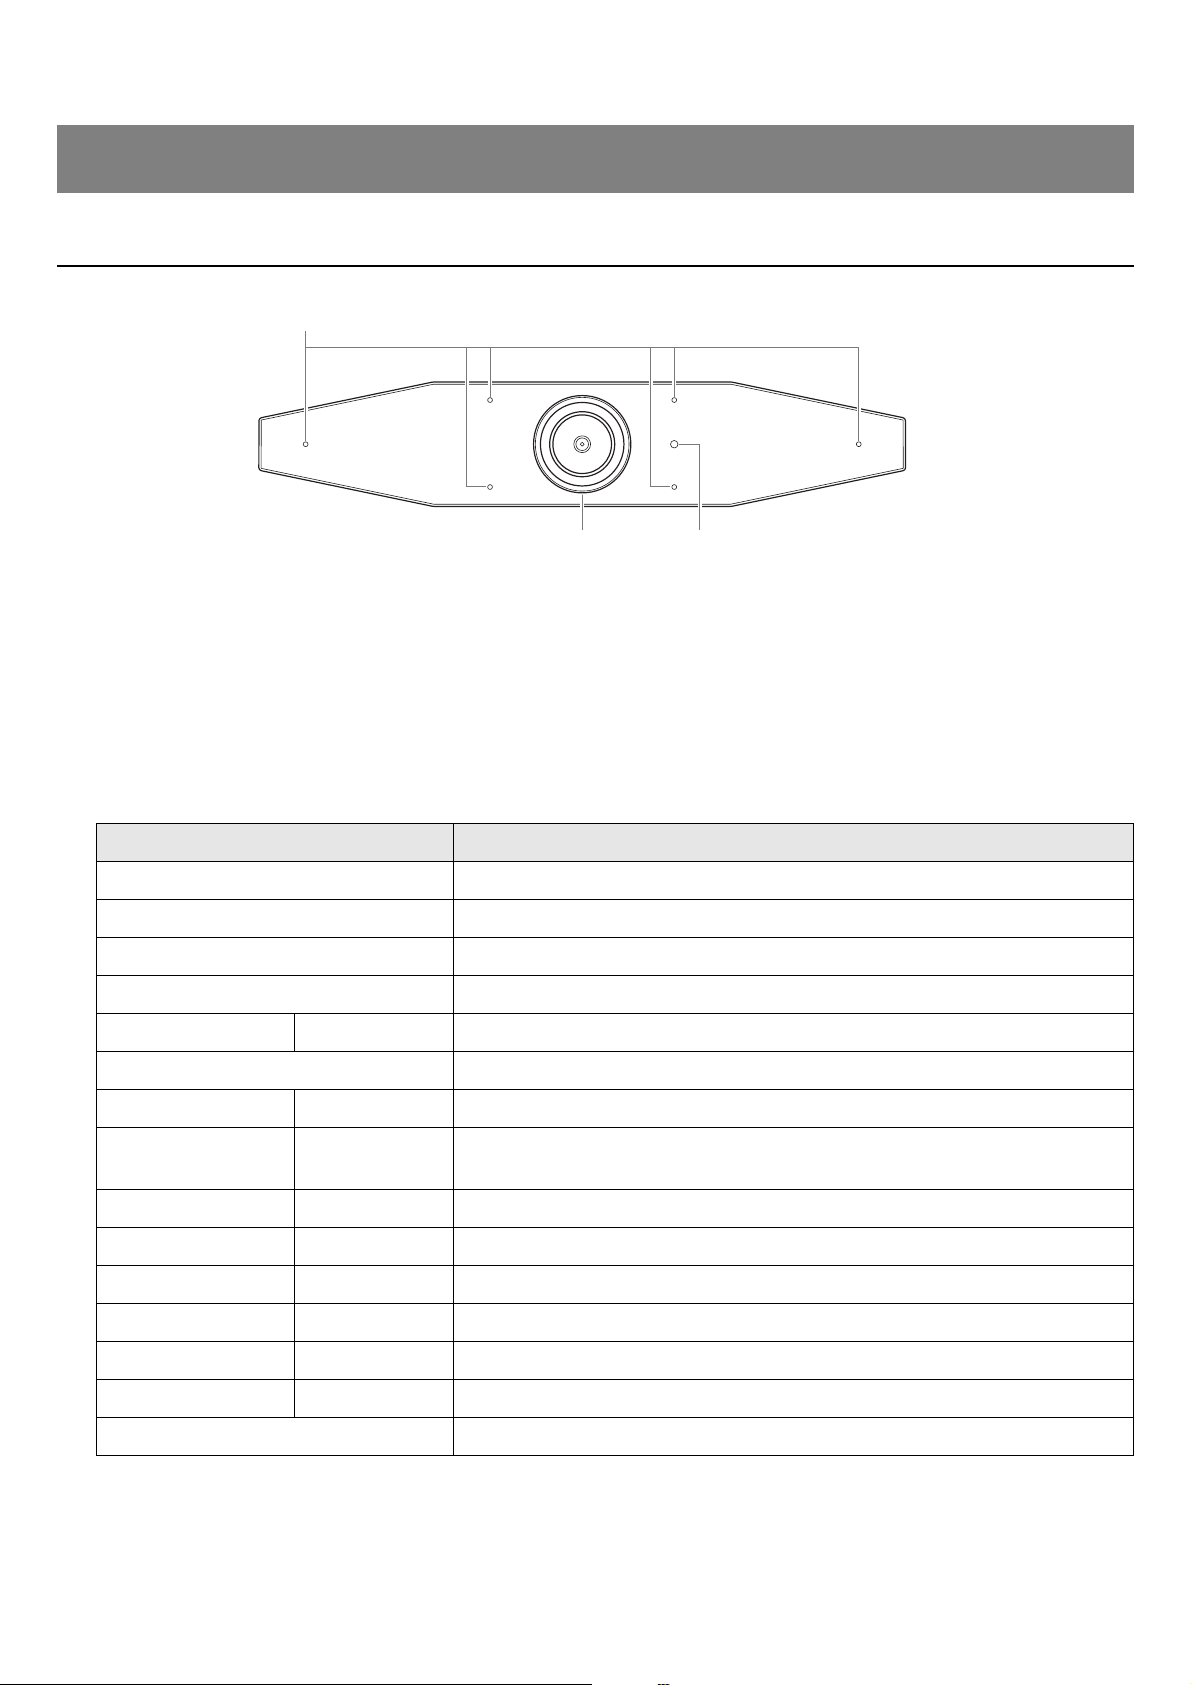
Front panel
1 Microphone
The audio captured by this microphone is delivered to the remote party of the connection.
2 Camera
The video captured by this camera is delivered to the remote party of the connection.
3 Status indicator
Indicates the status of the device. The lower the item in the following list, the higher the priority for indication.
Controls and connectors
Indicator state Device status
White (lit) Standby
Light blue (lit) Camera operating
Green (lit) During a call
Red (lit) Microphone muted
White (flashing) 0.361 time/sec Starting
Unlit Turned off; power-saving standby
White (flashing) 0.3 time/sec Monitoring off
Orange (flashing) 1 time/sec
Factory reset; activation of HDMI connection/DisplayLink function/
Bluetooth/USB audio
Blue (flashing) 1 time/sec Pairing with the remote control or smart device
Blue (lit) 3 seconds Completion notification of remote control pairing
Green (flashing) 2 times/sec Receiving a call
Red (flashing) 2.5 times/sec Hardware error
Orange (flashing) 2 times/sec Receiving firmware data
Orange (flashing) 10 times/sec Updating firmware
Orange Red (flashing alternately) Firmware update failed
23
1
CS-500 User Guide
9
Controls and connectors
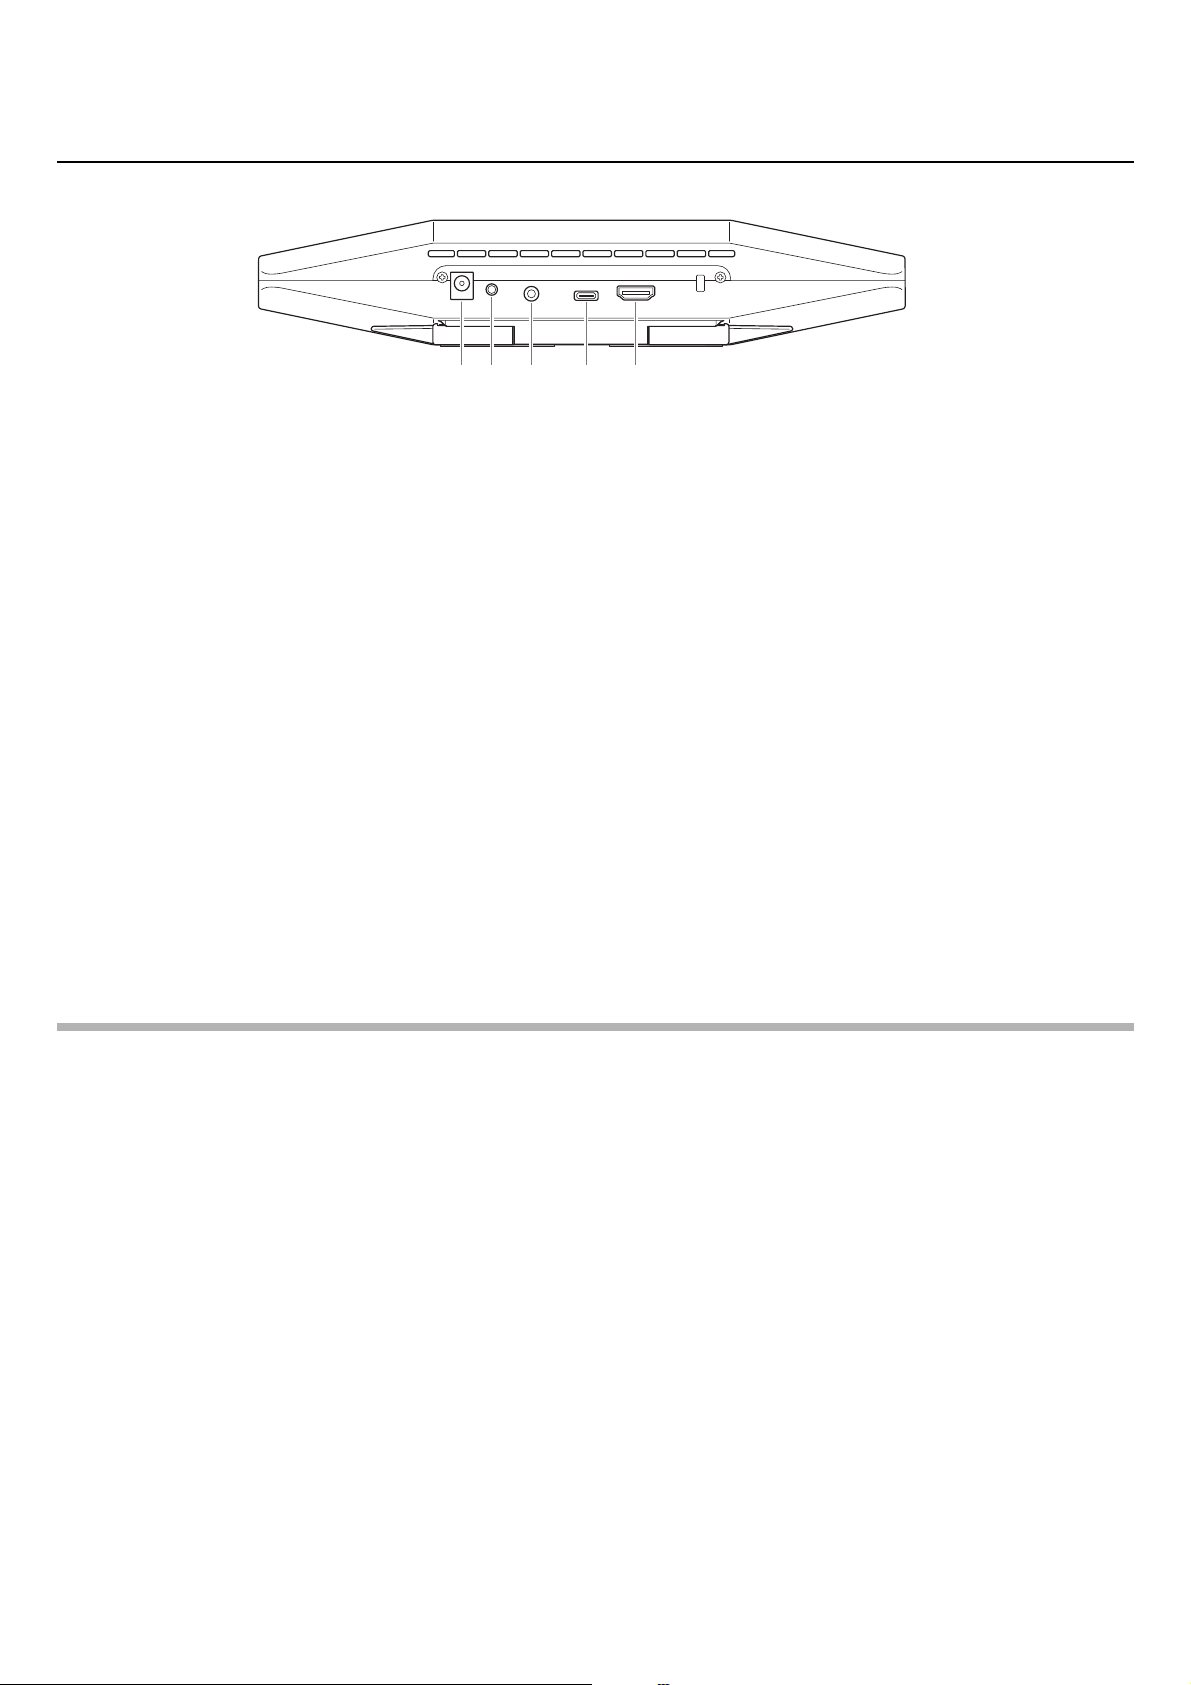
Rear panel
1 [DC-IN] jack
This jack is for connecting the AC adaptor. After connecting the AC adaptor to the [DC-IN] jack on the rear panel, insert
the power plug into an electrical outlet. Connecting the AC adaptor automatically turns on the device. (Page 20)
2 [FUNCTION] button
Can be used to pair the device with the remote control (Page 22) or to return the device to its factory default settings
(Page 56).
3 3.5 mm audio output jack
This jack is for connecting this device to speakers, headphones, etc. (Page 18)
4 [USB] port (Type-C)
This port is for connecting the device to a computer.
This enables displaying the computer screen and configuring the device. Use the included USB 2.0 cable (Type-C to
Type-A) or the separately sold USB cables CBL-L10AC (10 meters) or CBL-L25AC (25 meters) for this connection. For
details on connecting this device, refer to “Connecting devices” (page 18) in this manual.
5 [HDMI] port
This port is for connecting the device to a TV. This allows the TV to display the screen of the computer connected to
the [USB] port and the device’s on-screen display menu (Page 26).
Related links
• Returning to factory default settings (factory reset) (Page 56)
• Connecting devices (Page 18)
1 2 3 4 5
CS-500 User Guide
10
Controls and connectors
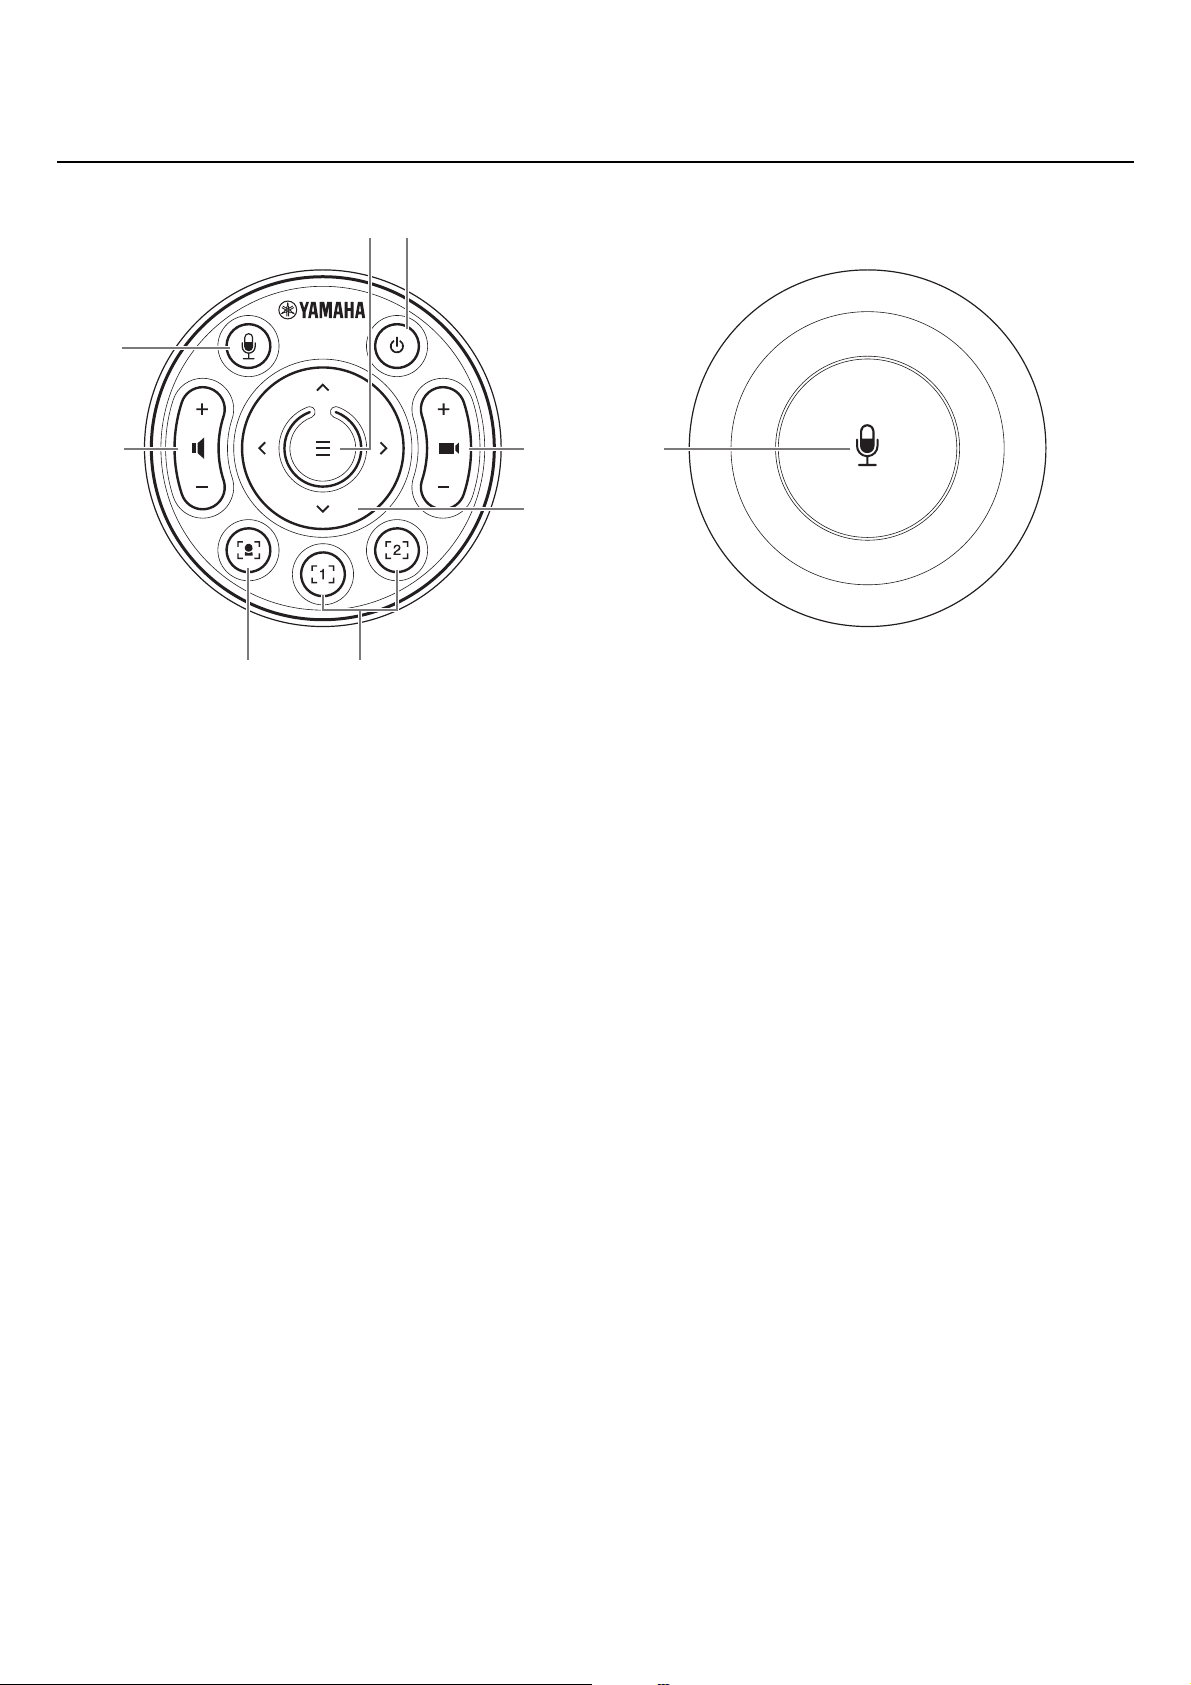
Remote control
1 Menu button
Can be used to display the on-screen display menu (Page 26) on the TV or pair the device with the remote control
(Page 22).
2 Power button
Used to turn on/off the CS-500.
3 Camera zoom button
Used to enlarge/reduce (zoom in/out) the video being captured.
4 Pan/tilt button
Used to adjust the camera angle horizontally/vertically. It can also be used for Smart framing operations or moving the
cursor in the on-screen display menu displayed on the TV.
5 Camera preset
i
1 & 2 buttons
Two sets of PTZ (pan, tilt and zoom) settings can be saved and recalled. Long-press (for 2 seconds) this button to save
the settings adjusted with buttons 3 and 4. To recall, simply press the button.
6 Smart framing button
Used to turn on/off Smart framing
ii
.
7 Speaker volume buttons
Used to turn up/down the volume of the speakers.
89 Microphone mute button
Used to turn on/off the microphone.
1
3
9
7
8
4
2
5
6
Top Bottom

CS-500 User Guide
11
Controls and connectors
i
Camera preset
Up to five PTZ (pan, tilt and zoom) camera presets can be saved for this device.
To save/change the PTZ settings, use the remote control, on-screen display menu or Yamaha CS Manager.
Up to two presets can be saved using the remote control or on-screen display menu. [PTZ preset 1] and [PTZ preset 2]
(saved using Yamaha CS Manager) can be saved and recalled as camera presets 1 and 2 by using the remote control
and on-screen display menu.
Remote control
Refer to Page 10.
On-screen display menu
Follow the instructions in the on-screen display menu. (Page 26)
Yamaha CS Manager
• In the [Camera] screen, specify the PTZ settings with [Pan], [Tilt] and [Zoom] while viewing the preview.
• Select the desired preset name from the [PTZ preset 1 to 5] drop-down menu.
• Click the [Save Current PTZ Settings as Preset] button to save the settings. (Page 41)
ii
Smart framing
With this function, the camera follows the subject according to the mode. Select the appropriate mode according to the use.
[Group]: Frames all persons in the group
[Speaker tracking]: Frames the person who is speaking
[Individual]: Frames a specific person
To change the Smart framing mode, use the remote control, on-screen display menu or Yamaha CS Manager.
Remote control
• Use button 6 to turn on Smart framing.
• Use the tilt (up/down) buttons of 4 to change the Smart framing mode.
• With the [Individual] mode, use the pan (left/right) buttons of 4 to select the person to be focused on.
• With the [Group] mode, the camera zoom button (3) is deactivated.
On-screen display menu
Follow the instructions in the on-screen display menu. (Page 26)
Yamaha CS Manager
Select the [Enable Smart Framing] check box in the [Smart Framing] screen to activate Smart framing, and then change
the mode. (Page 42)

CS-500 User Guide
12
Procedure from installation to completed
connection
Before starting work, determine the installation method and connection method for this device.
1 Installing the device. > Page 13 to 17
2 Connecting devices. > Page 18 to 19
3 Connecting the power supply (turning on the device). > Page 20
4 Preparing to use the remote control.
4.1 Inserting batteries into the remote control. > Page 21
4.2 Pairing the device and remote control. > Page 22
5 Making necessary initial settings. > Page 23 to 25
6 Displaying the computer screen on a TV.
6.1 If the computer screen does not appear on the TV. > Page 23
Procedure for holding a meeting
Before the first time a computer connected to this device is used to hold a meeting, follow the steps below to check that the
computer screen is displayed on the TV and the audio is output.
1 Turning on the computer.
2 Turning on this device with the remote control (or automatically starting it with auto wakeup).
3 Displaying the standby image on the TV.
4 Connecting the computer to this device with a USB cable.
5 Displaying the computer screen on a TV.
5.1 If the computer screen does not appear on the TV. > Page 23
6 Holding a meeting by using the video conferencing software.
6.1 Selecting this device on the computer if sound is not output. > Page 24
* When this device is used as a webcam, steps
3, 4 and 5.1 are not necessary.
Specifying device settings
• On-screen display menu: Specifying device settings on a TV by using the remote control (For all users) > Page 26
• Yamaha CS Manager: Specifying detailed settings for the device by using the application software (For installers/
administrators) > Page 27
Procedures preparing for use
Installers of this device should read this.
Users of this device should read this.
CS-500 User Guide
13
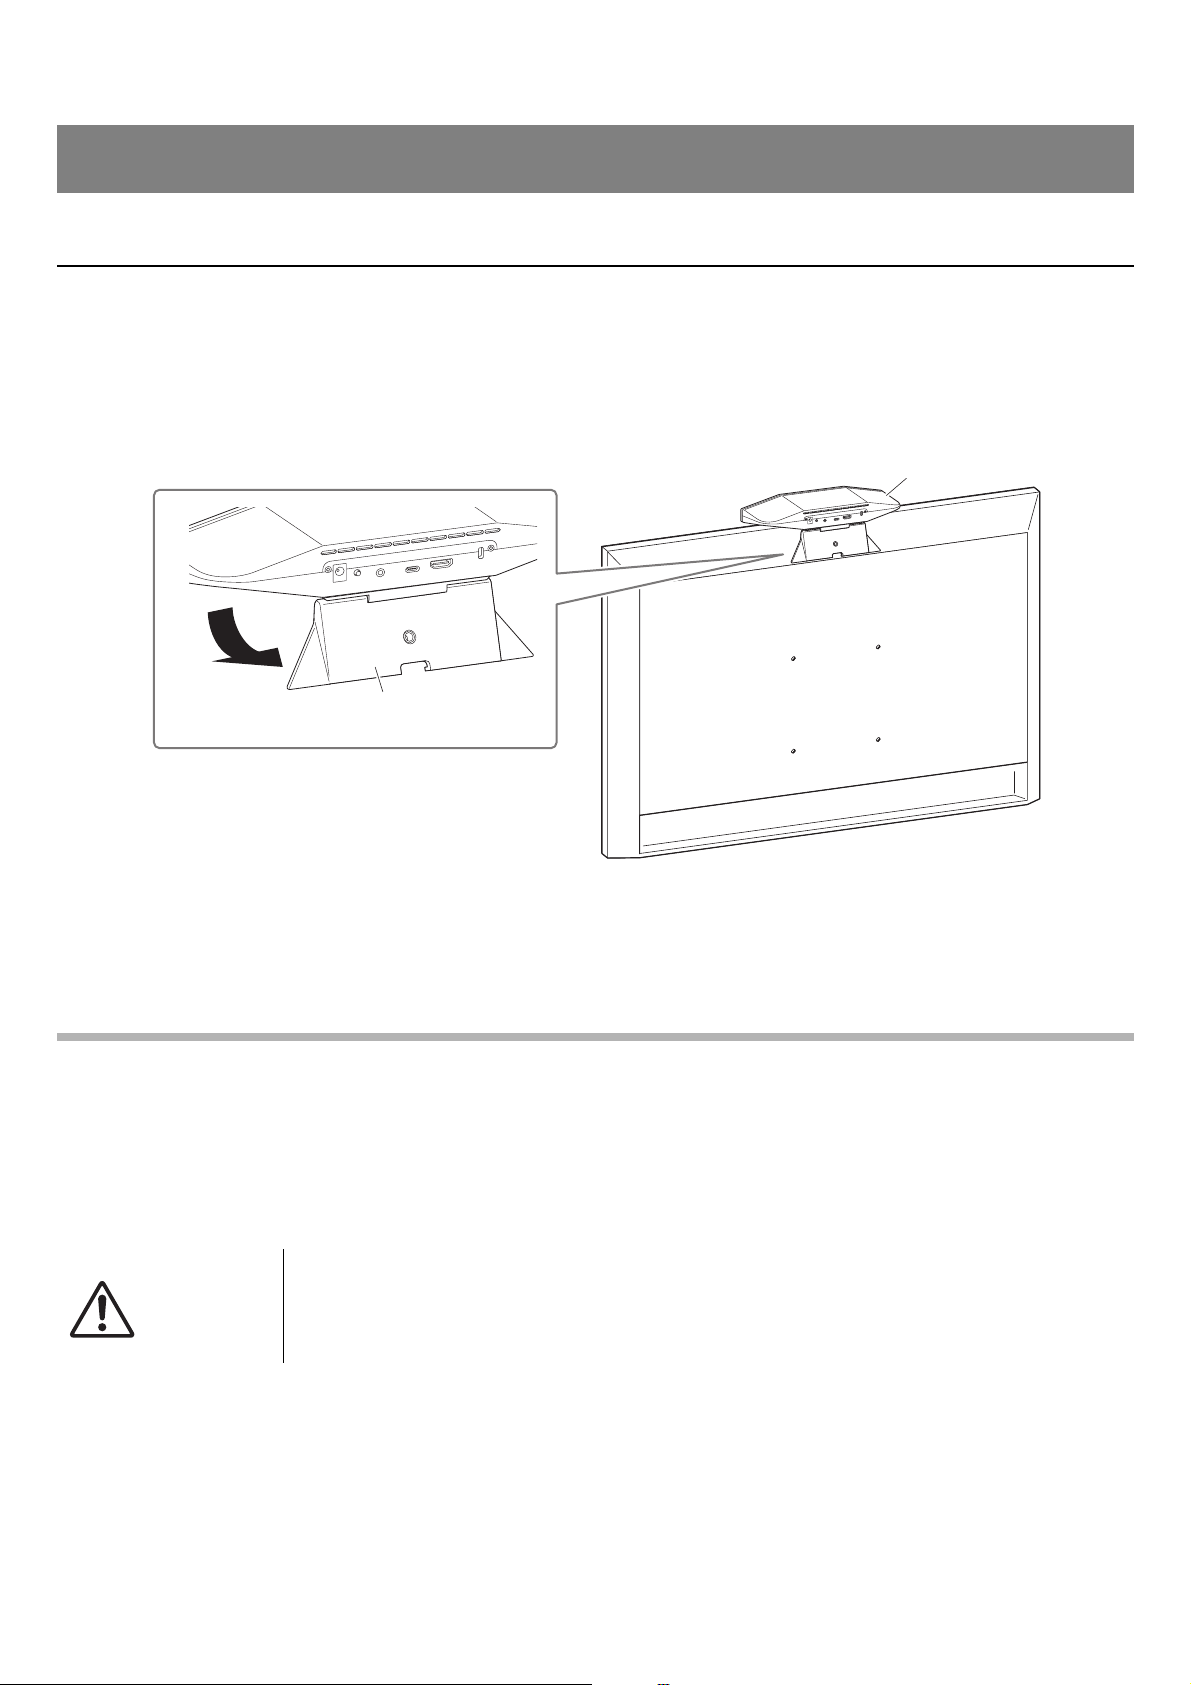
Installing the device
When installing on a TV
This device can be placed directly on top of a TV.
1. Flip open the stand on the bottom of the device, and then hook it on the top of the TV.
2. Adjust the camera orientation (up or down) by changing the camera’s angle to the stand.
NOTE
When installing this device in the following situations, use the brackets to mount it to a TV. (Page 14)
• When installing more than 2 meters from the ground.
• When the TV thickness is 51 mm or more.
• When the stand of this device must be opened more than 90 degrees to place it on a TV.
• When the bottom of this device and the rubber part of the stand are not in close contact with the TV.
• When a stable installation of this device is not possible.
Setup and connections
CAUTION
• When installing on a TV, make sure that the device is no more than 2 meters from the ground.
When installing the device at a location more than 2 meters from the ground, be sure to use a
bracket to secure it to the TV. (Page 14)
• If the device falls, injuries or damage may result.
TV
(back)
CS-500
Stand

CS-500 User Guide
14
Setup and connections
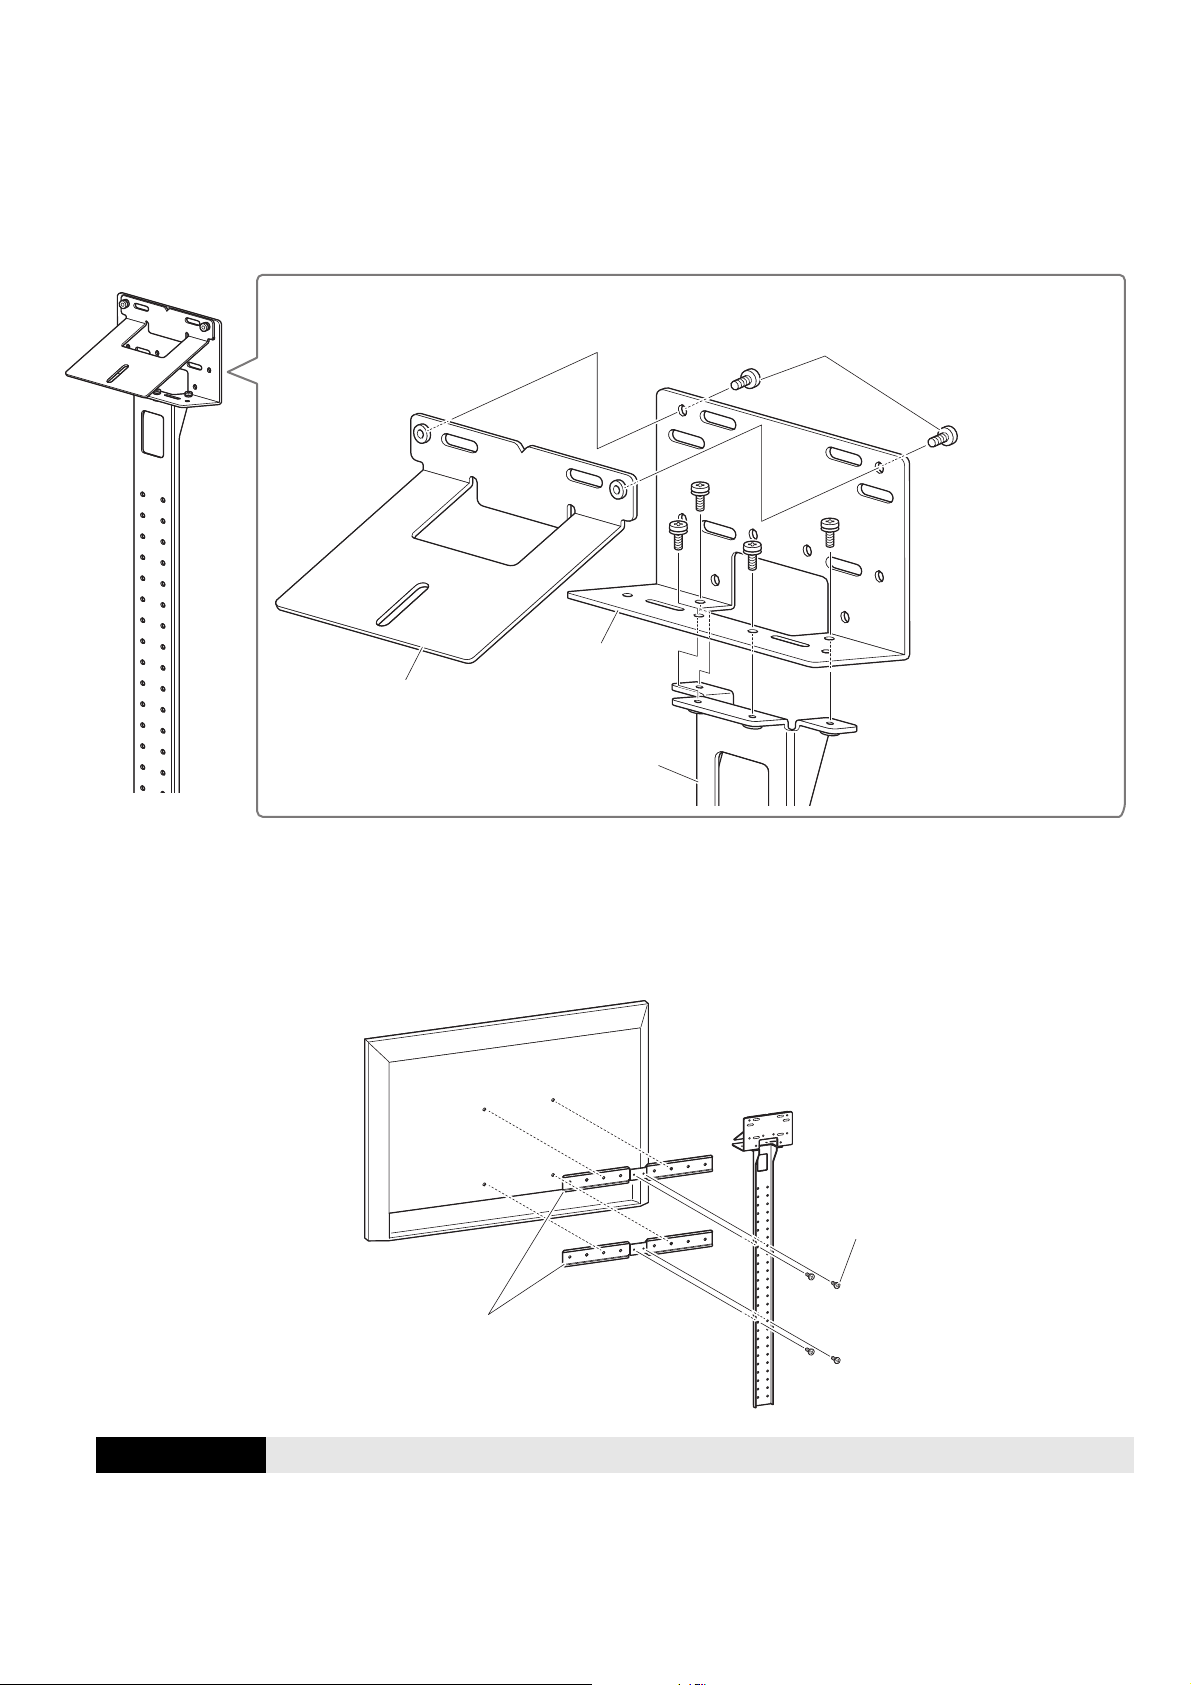
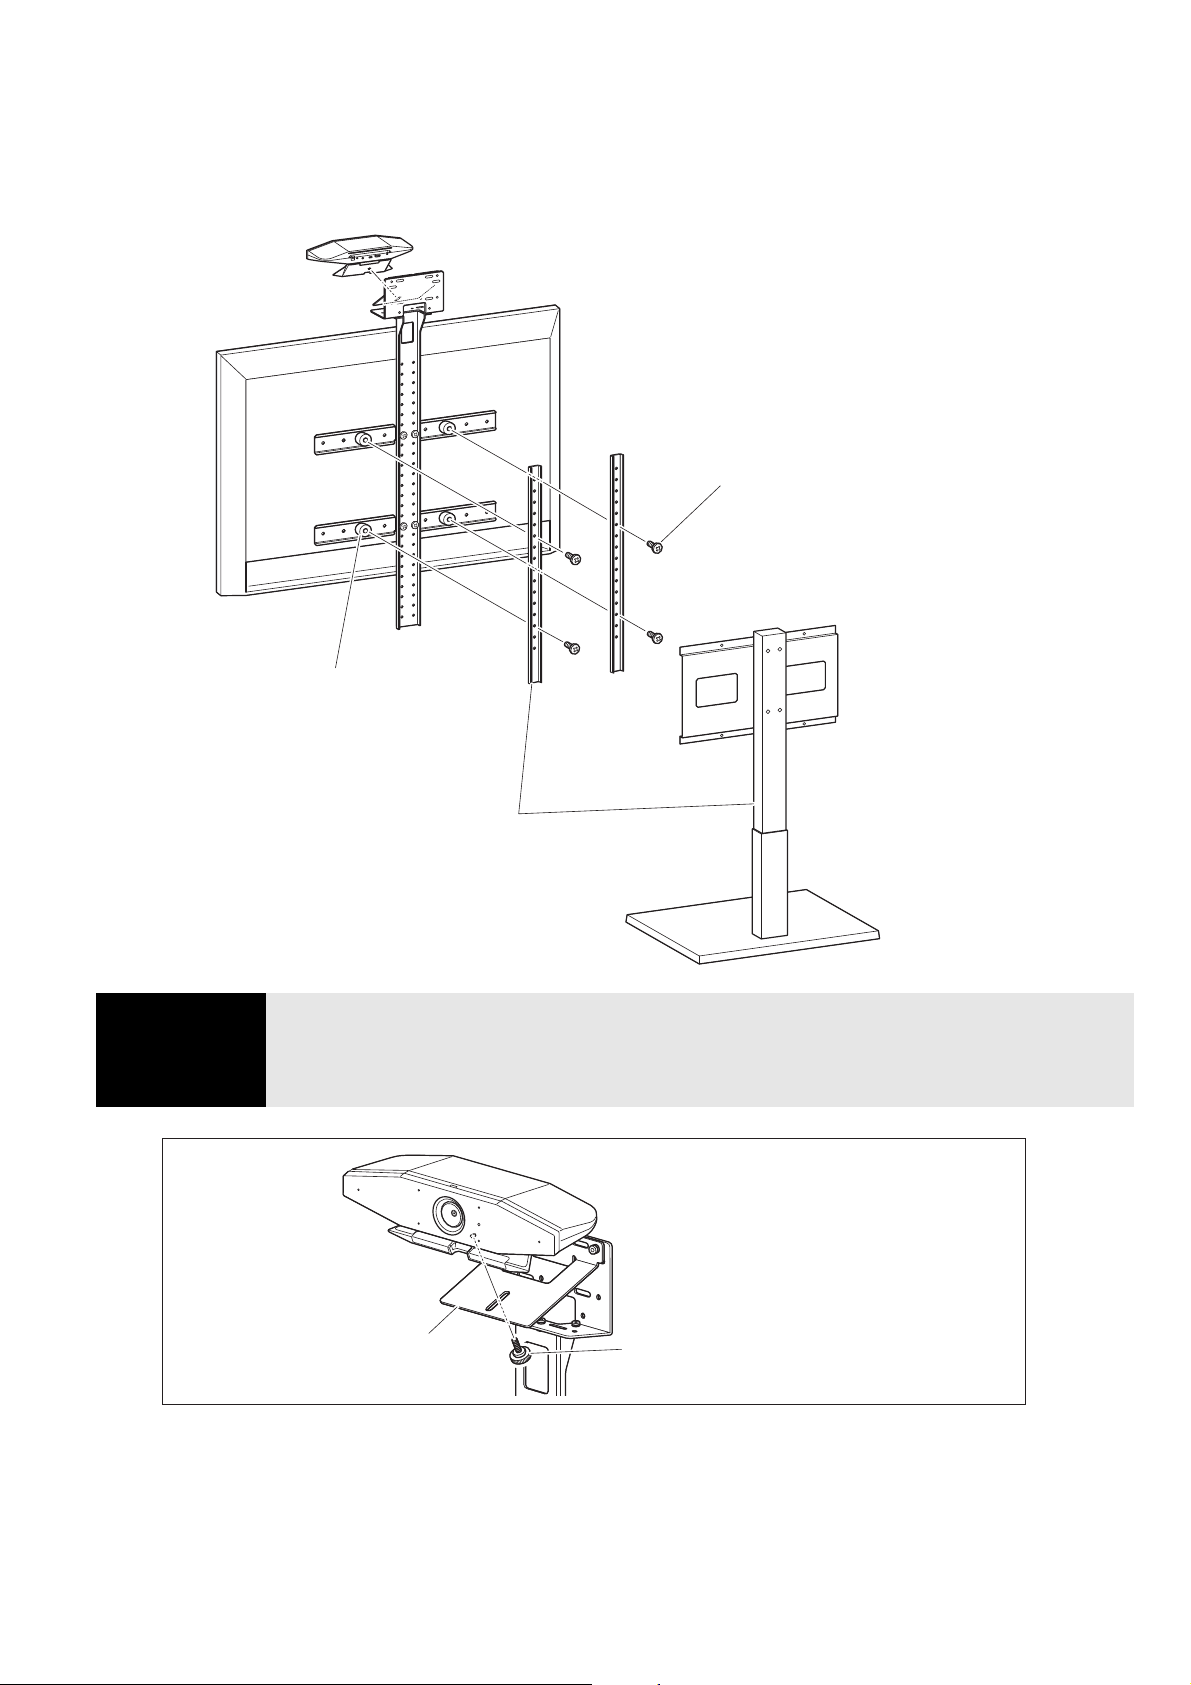
When mounting to a TV
This device can be mounted to a TV by using monitor mounting bracket BRK-TV1 and wall mounting bracket BRK-WL1
(both sold separately). When mounting this device to the top of the TV stand, prepare the following.
Items to prepare
1 Wall mounting bracket BRK-WL1 (sold separately)
• Wall mounting bracket
• Device fixing screw (1/4 inch) for wall mounting bracket × 1
2 Monitor mounting bracket BRK-TV1 (sold separately)
Compatible TV sizes: 48 to 60 inches (When mounting below the display: 48 to 70 inches)
• Monitor mounting brackets (for mounting onto wall mounting bracket, horizontal, and vertical)
•Spacer × 4
• Screw (M4 × 10 mm with washer) for bracket assembly × 12 (2 spare)
• Screws for mounting TV (M6 × 12 mm) × 4 and (M6 × 30 mm) × 4
• Spring washer and flat washer for screws (M6) for mounting TV × 4 each
• Screws for mounting TV (M8 × 15 mm) × 4 and (M8 × 35 mm) × 4
• Spring washer and flat washer for screws (M8) for mounting TV × 4 each
* Use only four of the above-listed screws for mounting TV.
3 TV stand (user provided)
4 Screwdriver (user provided)
IMPORTANT • For details on assembling the TV stand and mounting the TV to it, follow the instructions in the
manual for the TV stand.
• The TV should be mounted to the TV stand by two or more people.
WARNING
• Be sure to have the mounting bracket installed by the dealer where you purchased the
product or a professional contractor.
• After installation, make sure that the CS-500 is firmly secured. Also, regularly check that there
is no possibility of the device falling or tipping over. We cannot be held responsible for
accidents caused by incorrect installation.
• After installation, do not lean against the CS-500 or apply a strong force to it from above. If the
device falls, injuries or damage may result.
CS-500 User Guide
15
Setup and connections
The following is an example of an installation that uses the screw holes in the TV and a standard TV stand.
1. Attach the monitor mounting bracket (vertical), monitor mounting bracket (for mounting
onto wall mounting bracket) and the wall mounting bracket using the screws included with
them.
2. Using the included screws, attach the monitor mounting brackets (horizontal) and the
brackets assembled in step 1.
Align the monitor mounting brackets (horizontal) with the screw holes in the TV to determine the mounting position.
After determining the mounting position, mount the brackets from step
1 at the appropriate height.
IMPORTANT At this point, do not install the TV yet.
2
1
Monitor mounting
bracket (vertical)
Monitor mounting
bracket
Wall mounting
bracket
[Included with monitor mounting bracket]
Screw for bracket assembly
(M4 × 10 mm with washer) × 6
TV
(back)
[Included with monitor mounting
bracket]
Screw for bracket assembly
(M4 × 10 mm with washer) × 4
Monitor mounting bracket (horizontal)
CS-500 User Guide
16
Setup and connections
3. Attach the brackets assembled in step 2 to the TV stand, TV and device.
1 Attach the brackets from step 2 to the TV stand.
2 From the underside of the wall mounting bracket, secure the device by using the included screw.
4. Adjust the camera orientation (up or down) by changing the camera’s angle to the stand.
IMPORTANT • Depending on the configuration of the TV stand, also tightly secure the spacers included with
monitor mounting bracket BRK-TV1.
• For details on assembling the TV stand and mounting the TV to it, follow the instructions in the
manual for the TV stand.
1
2
Spacer
TV stand
[Included with monitor mounting bracket]
Screws for mounting TV × 4
(M6 × 12 mm or 30 mm)
(M8 × 15 mm or 35 mm)
* Use screws matching the screw holes in the TV.
* When using spacers, use longer screws.
Device
2
Device
Wall mounting bracket
[Included with wall mounting bracket]
Device fixing screw (1/4 inch) for wall
mounting bracket

CS-500 User Guide
17
Setup and connections
When mounting on a wall
This device can be mounted to a wall by using the wall mounting bracket (sold separately).
When mounting the device to a wall, prepare the following.
1 Wall mounting bracket BRK-WL1 (sold separately)
• Wall mounting bracket
• Device fixing screw (1/4 inch) for wall mounting bracket
2 Wall-mounting screws (user provided)
3 Screwdriver (user provided)
1. Attach the wall mounting bracket to the wall.
2. Secure the device to the bracket from step 1.
Place the device on the bracket from step 1. From the underside, secure the device to the wall mounting bracket by
using the included screw.
3. Adjust the camera orientation (up or down) by changing the camera’s angle to the stand.
WARNING
• Be sure to have the mounting bracket installed by the dealer where you purchased the product
or a professional contractor.
• After installation, make sure that the CS-500 is firmly secured. Also, regularly check that there
is no possibility of the device falling or tipping over. We cannot be held responsible for
accidents caused by incorrect installation.
• After installation, do not lean against the CS-500 or apply a strong force to it from above. If the
device falls, injuries or damage may result.
IMPORTANT • Screws for attaching the wall mounting bracket to the wall are not included. Prepare screws that
are strong enough.
• For details on screws and the installation, be sure to contact the dealer where you purchased
the product or a professional contractor.
Wall mounting
bracket
[Included with wall mounting bracket]
Device fixing screw (1/4 inch) for wall
mounting bracket
CS-500 User Guide
18
Setup and connections
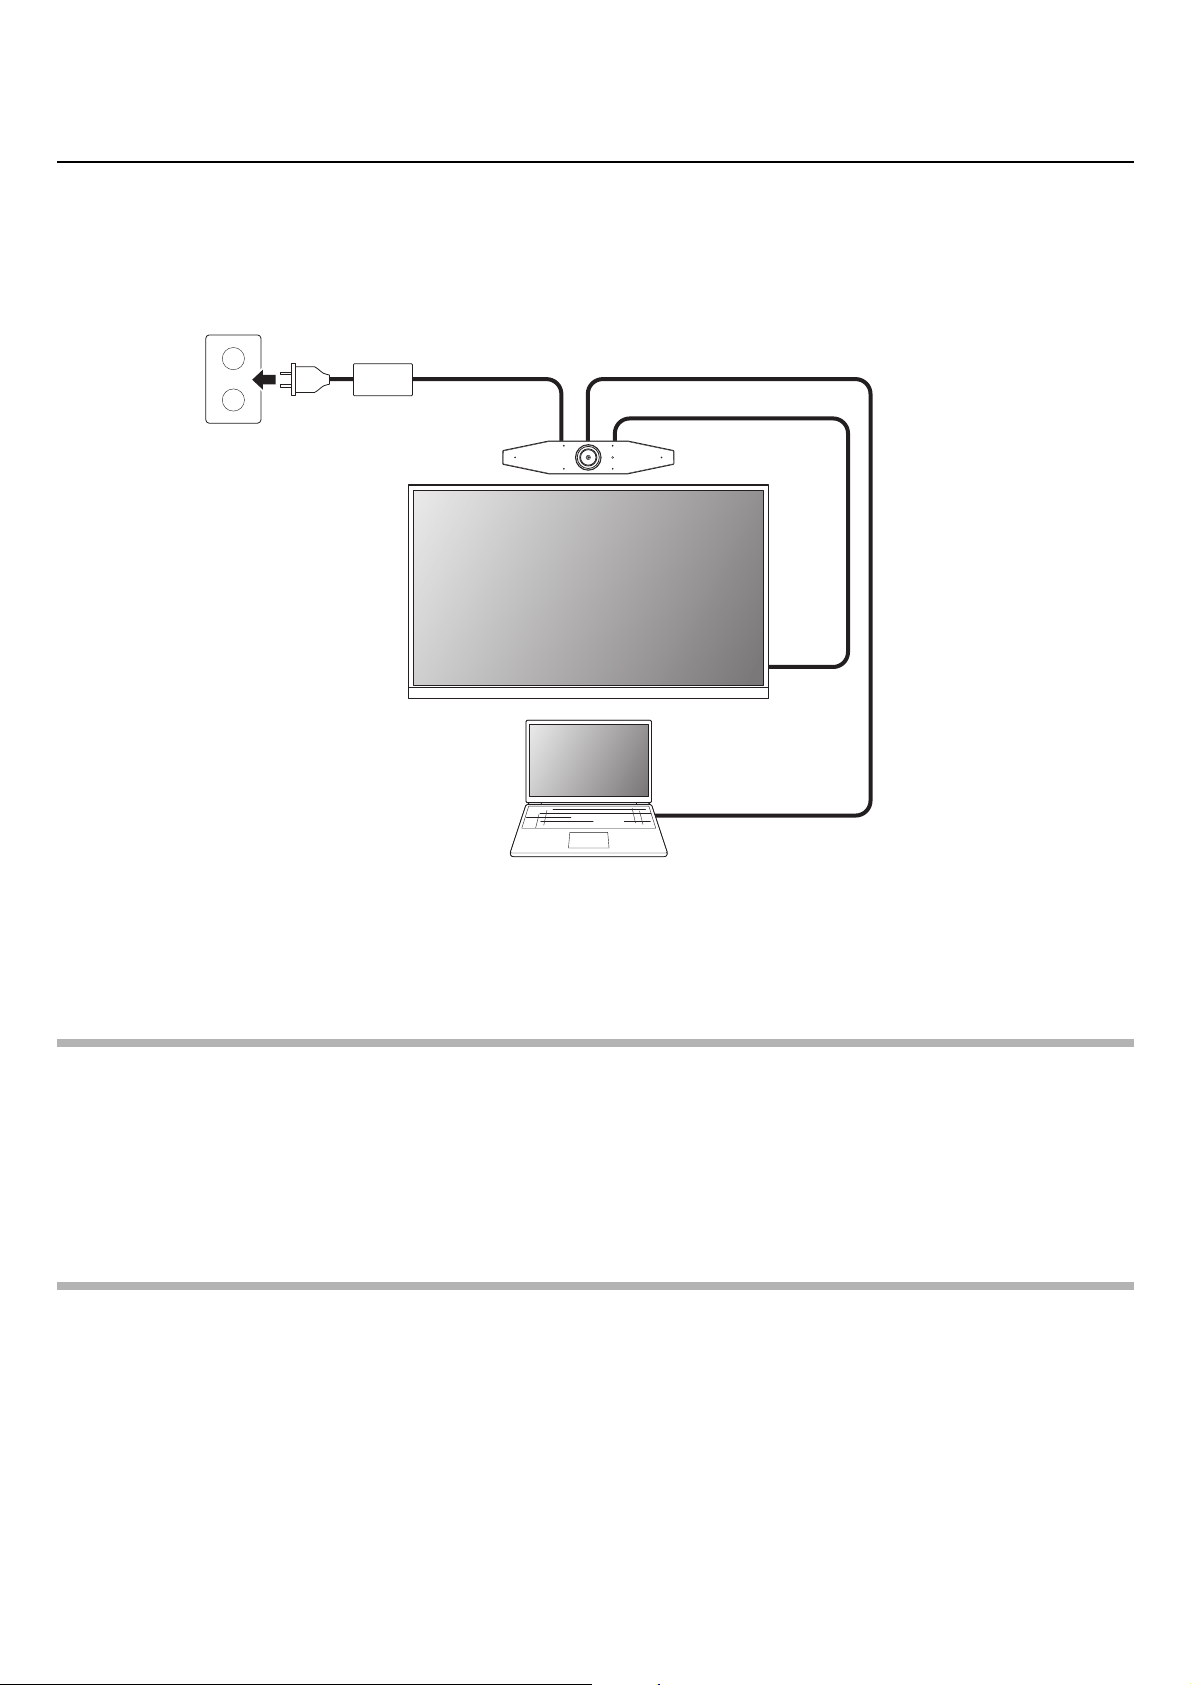
Connecting devices
Sample setups
Use this connection method to output audio from the TV speakers. For video conferences, a computer connected to the
Internet can be used simply by connecting it to the device with a USB cable.
1 Connect one end of the included HDMI cable to the [HDMI] port on the device, and connect the other end to the TV.
2 Connect the Type-C plug of the included USB cable to the [USB] port on the device, and connect the Type-A plug to the
computer.
NOTE
• Be sure to first follow the procedure in “Activating HDMI connection/DisplayLink function/Bluetooth/USB audio” (Page 23).
• In order to display the computer screen on a TV, it may be necessary to install the DisplayLink
®
driver (Page 23).
Outputting audio through analog audio speakers/headphones
This device is equipped with a 3.5 mm audio output jack. Connect either headphones or speakers with a built-in amplifier to
output the audio of the remote party in a video conference.
NOTE
When connecting analog audio, select the [Enable 3.5mm analog audio connector] check box on the [Audio] screen in
Yamaha CS Manager, and then select either speakers or headphones. (Page 36)
1
2
Device (CS-500)
USB cable
HDMI cable
AC adaptor
Computer
TV
CS-500 User Guide
19
Setup and connections
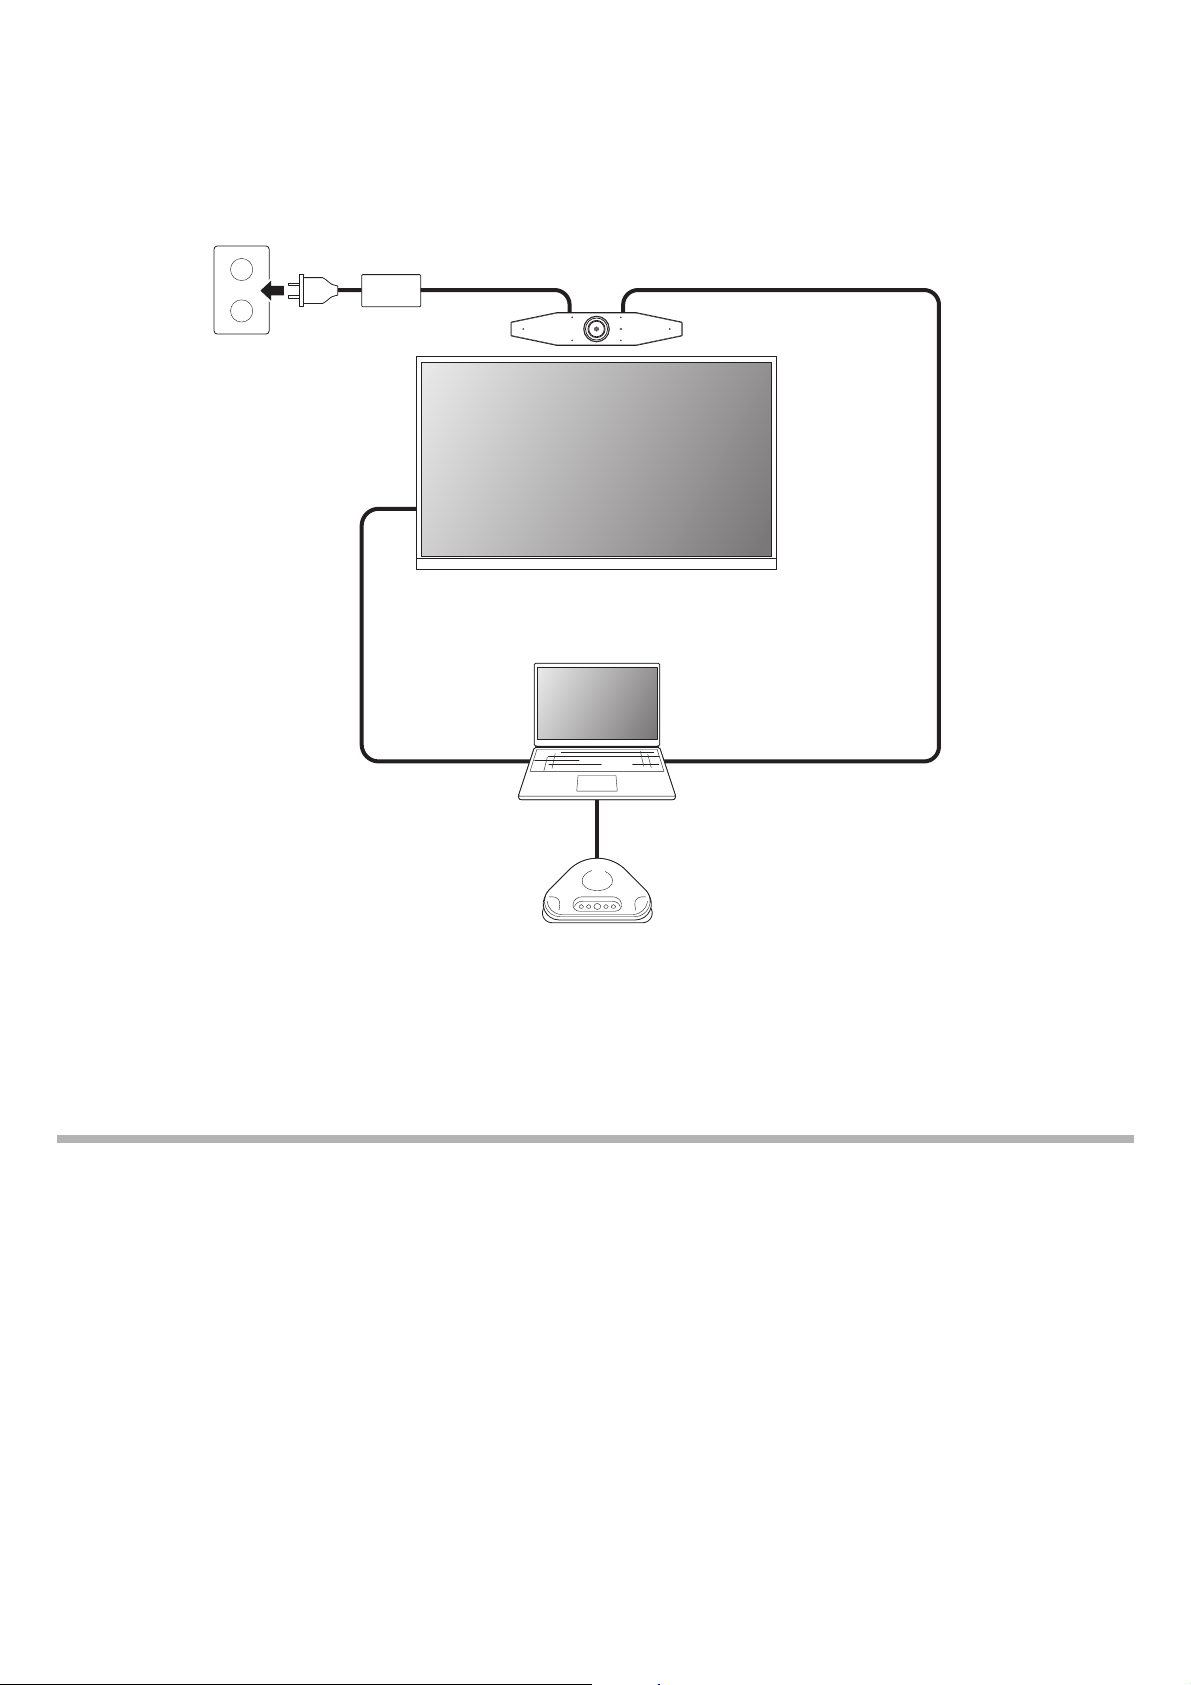
When used as webcam
In order to be used only as a webcam for a video conferencing system, this device can be connected as shown in the
example below.
1 Connect the Type-C plug of the included USB cable to the [USB] port on the device, and connect the Type-A plug to the
computer.
2 Connect one end of the included HDMI cable to the computer, and connect the other end to the TV.
3 Connect the speakerphone to the computer.
NOTE
When used only as a webcam, the following device features are not used.
• On-screen display menu (Page 26)
• USB audio
• DisplayLink
•Bluetooth
•Wi-Fi
12
3
Device (CS-500)
USB cable
HDMI cable
AC adaptor
Computer/touchpanel console
TV
USB cable
Speakerphone
CS-500 User Guide
20
Setup and connections
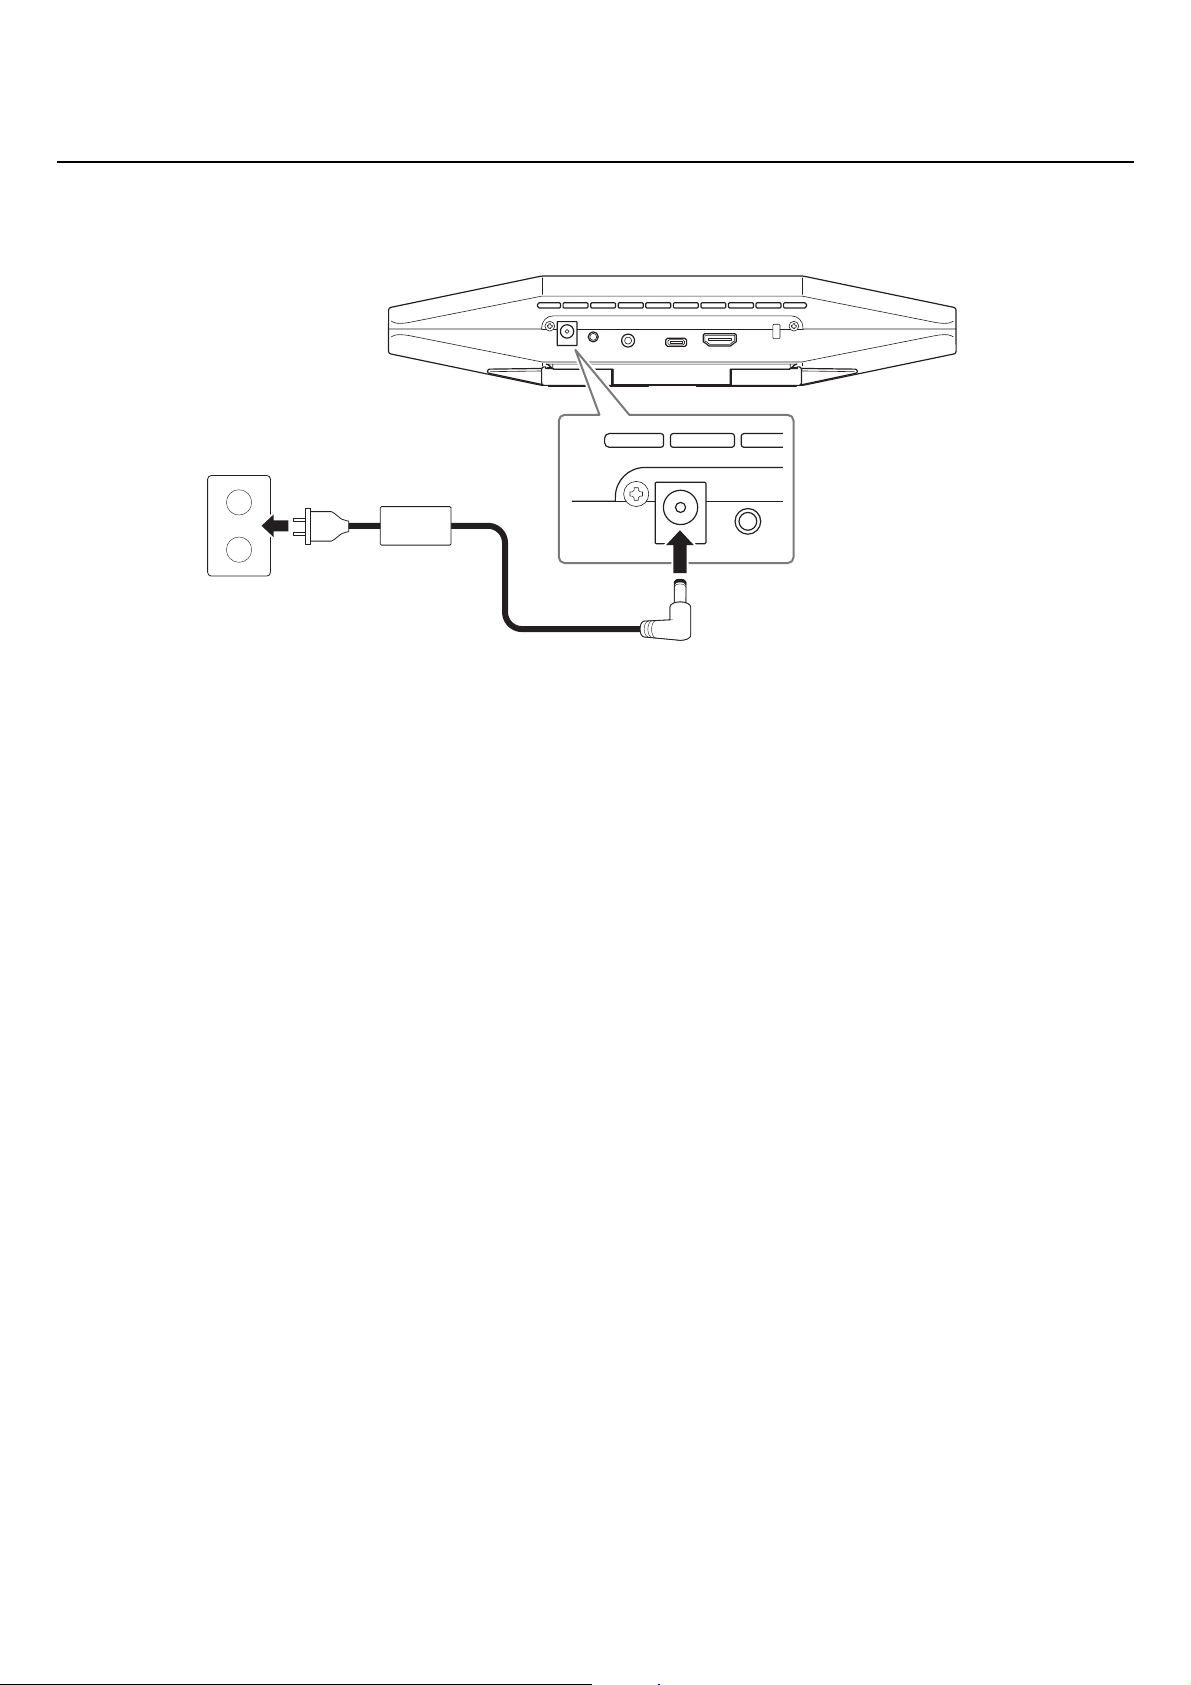
Connecting the power supply
Connect one end of the included AC adaptor to the [DC-IN] jack on the device, and connect the other end to an electrical
outlet.
Connecting the AC adaptor automatically turns on the device.
After the power supply has been connected, the device can be turned on or set to standby with the remote control.
AC adaptor
CS-500 User Guide
21
Setup and connections
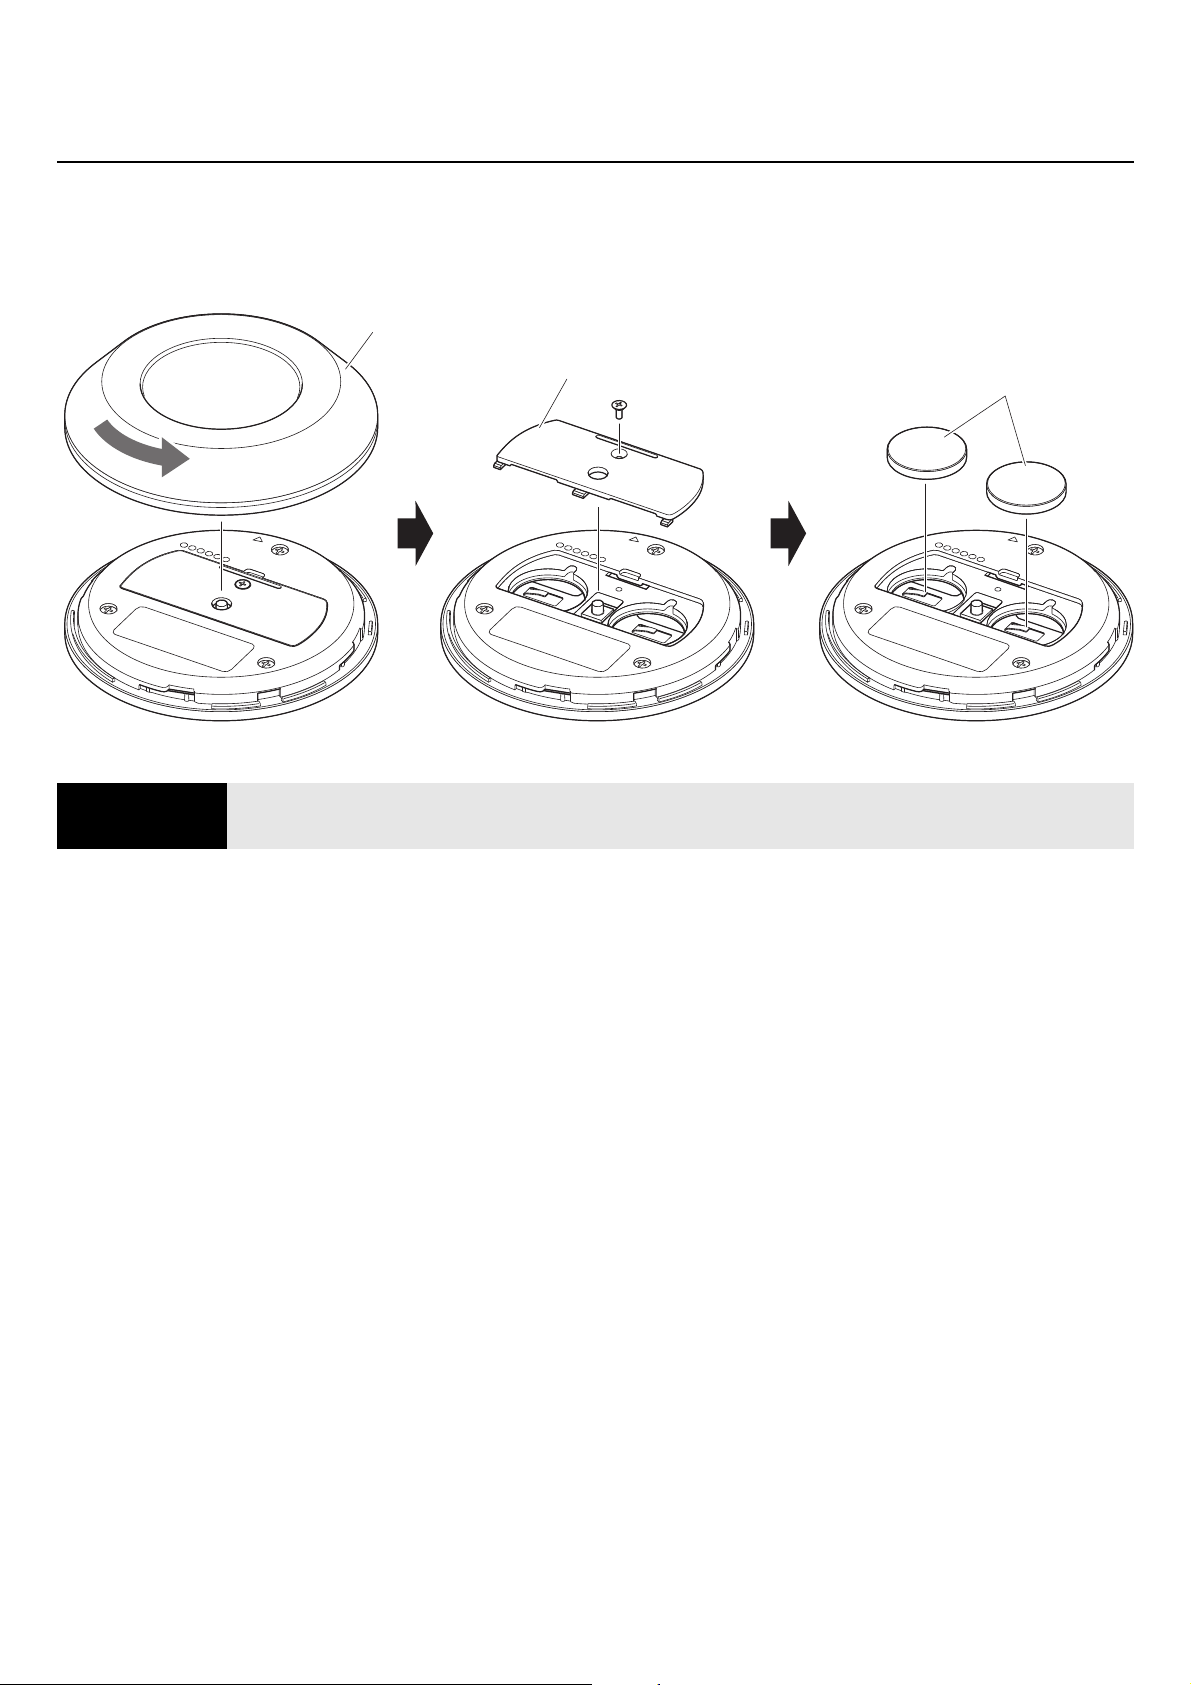
Inserting/replacing the remote control batteries
Remove the bottom panel and battery cover from the remote control, and then insert the included batteries (CR2032 × 2)
correctly according to the polarity markings. To replace the batteries, remove all old ones and install new ones (sold
separately). Do not mix old and new batteries.
IMPORTANT • When replacing the batteries, be sure to use the specified type (CR-2032).
• Dispose of used batteries according to the local regulations.
Battery cover
Bottom panel
Batteries
CS-500 User Guide
22
Setup and connections
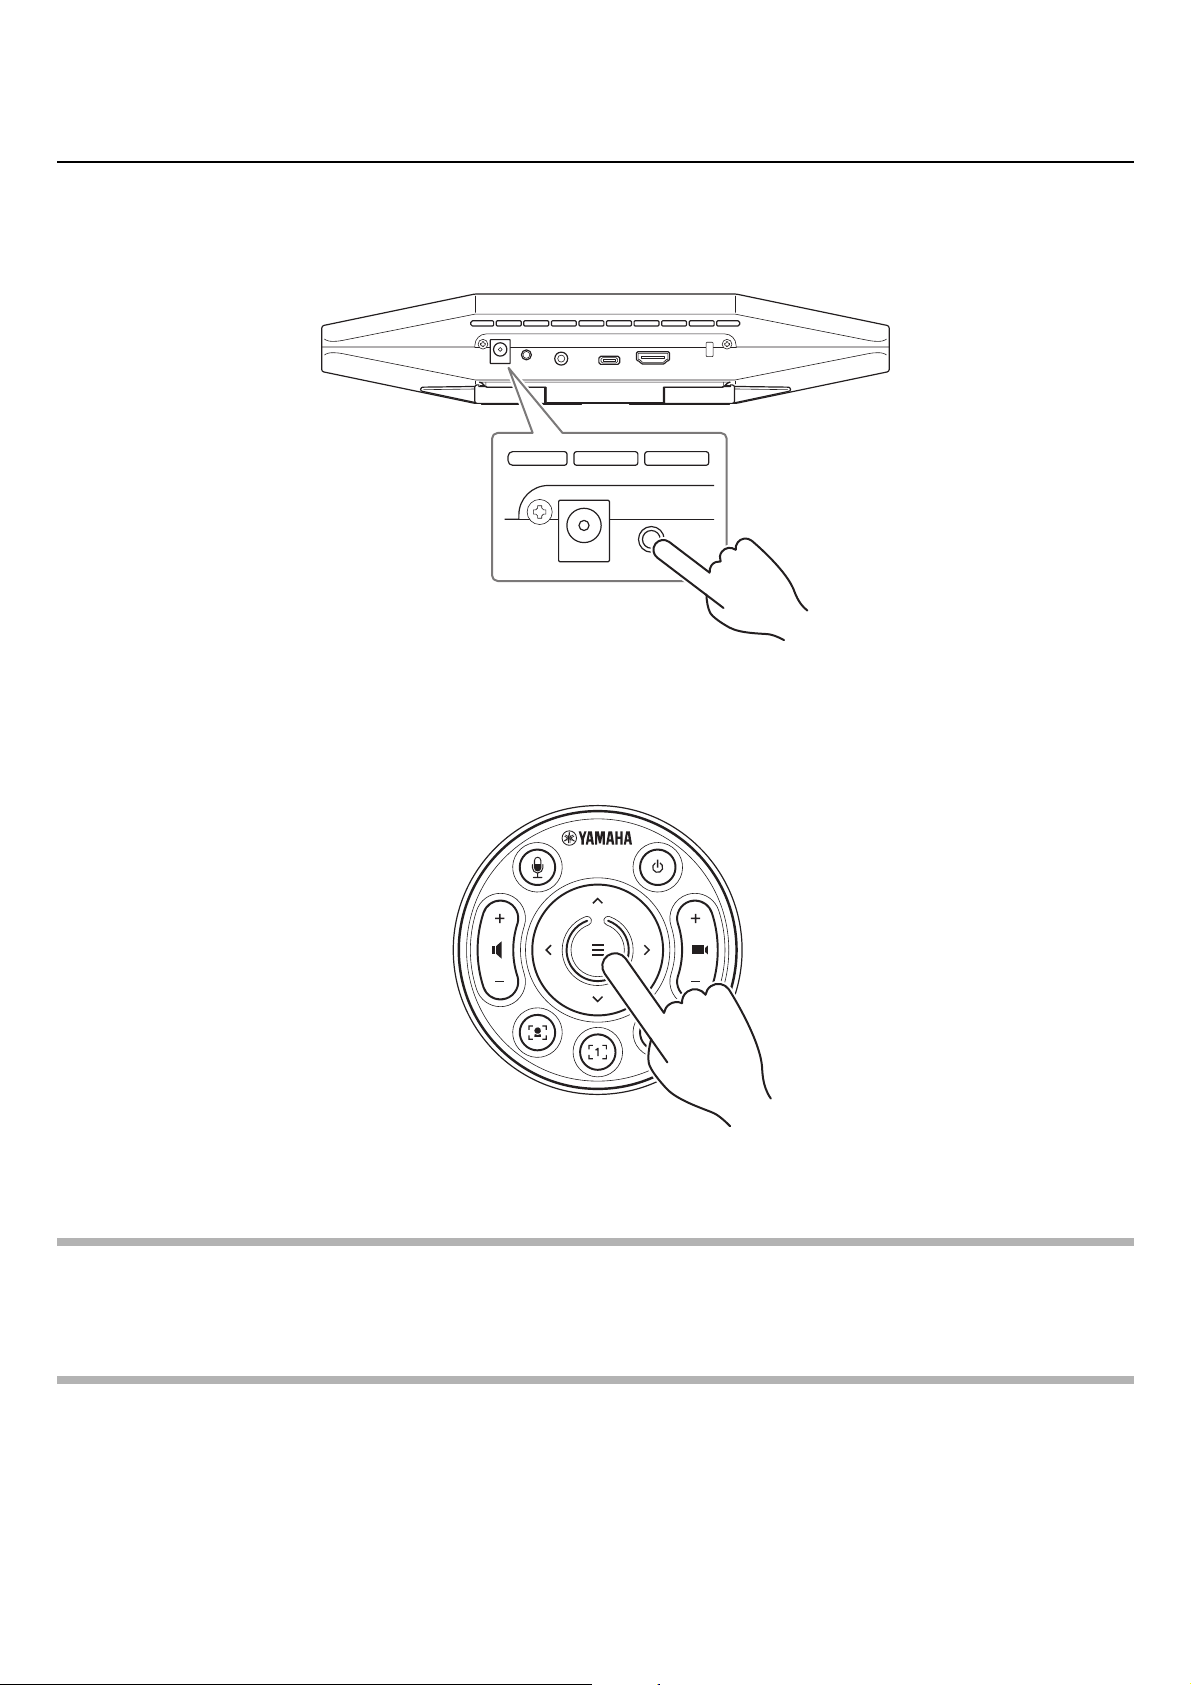
Pairing the device and remote control
In order to operate the device with the remote control, follow the procedure below to pair them.
1. Long-press the [FUNCTION] button (on the rear panel of the device) for at least 2 seconds.
The status indicator on the front panel of the device flashes in blue.
2. Long-press the menu button on the remote control for at least 2 seconds.
Pairing is finished after the status indicator on the front panel of the device lights up in blue for 3 seconds.
NOTE
Long-pressing the [FUNCTION] button on the rear panel of the device will unpair the paired remote control.
To pair the remote control again, follow the pairing procedure above.
Related links
• Remote control (Page 10)
• Activating HDMI connection/DisplayLink function/Bluetooth/USB audio (Page 23)
• Configuring the device from a TV screen (on-screen display menu) (Page 26)
Device (rear panel)
CS-500 User Guide
23
Setup and connections
Making necessary initial settings
Activating HDMI connection/DisplayLink function/Bluetooth/USB audio
In order to use this device, activate the functions as described below. Be sure to follow the procedure below before using
this device.
NOTE
• Before performing the following operation, pair the device and remote control (Page 22).
• When this device is used as a webcam (Page 19), this operation is not necessary.
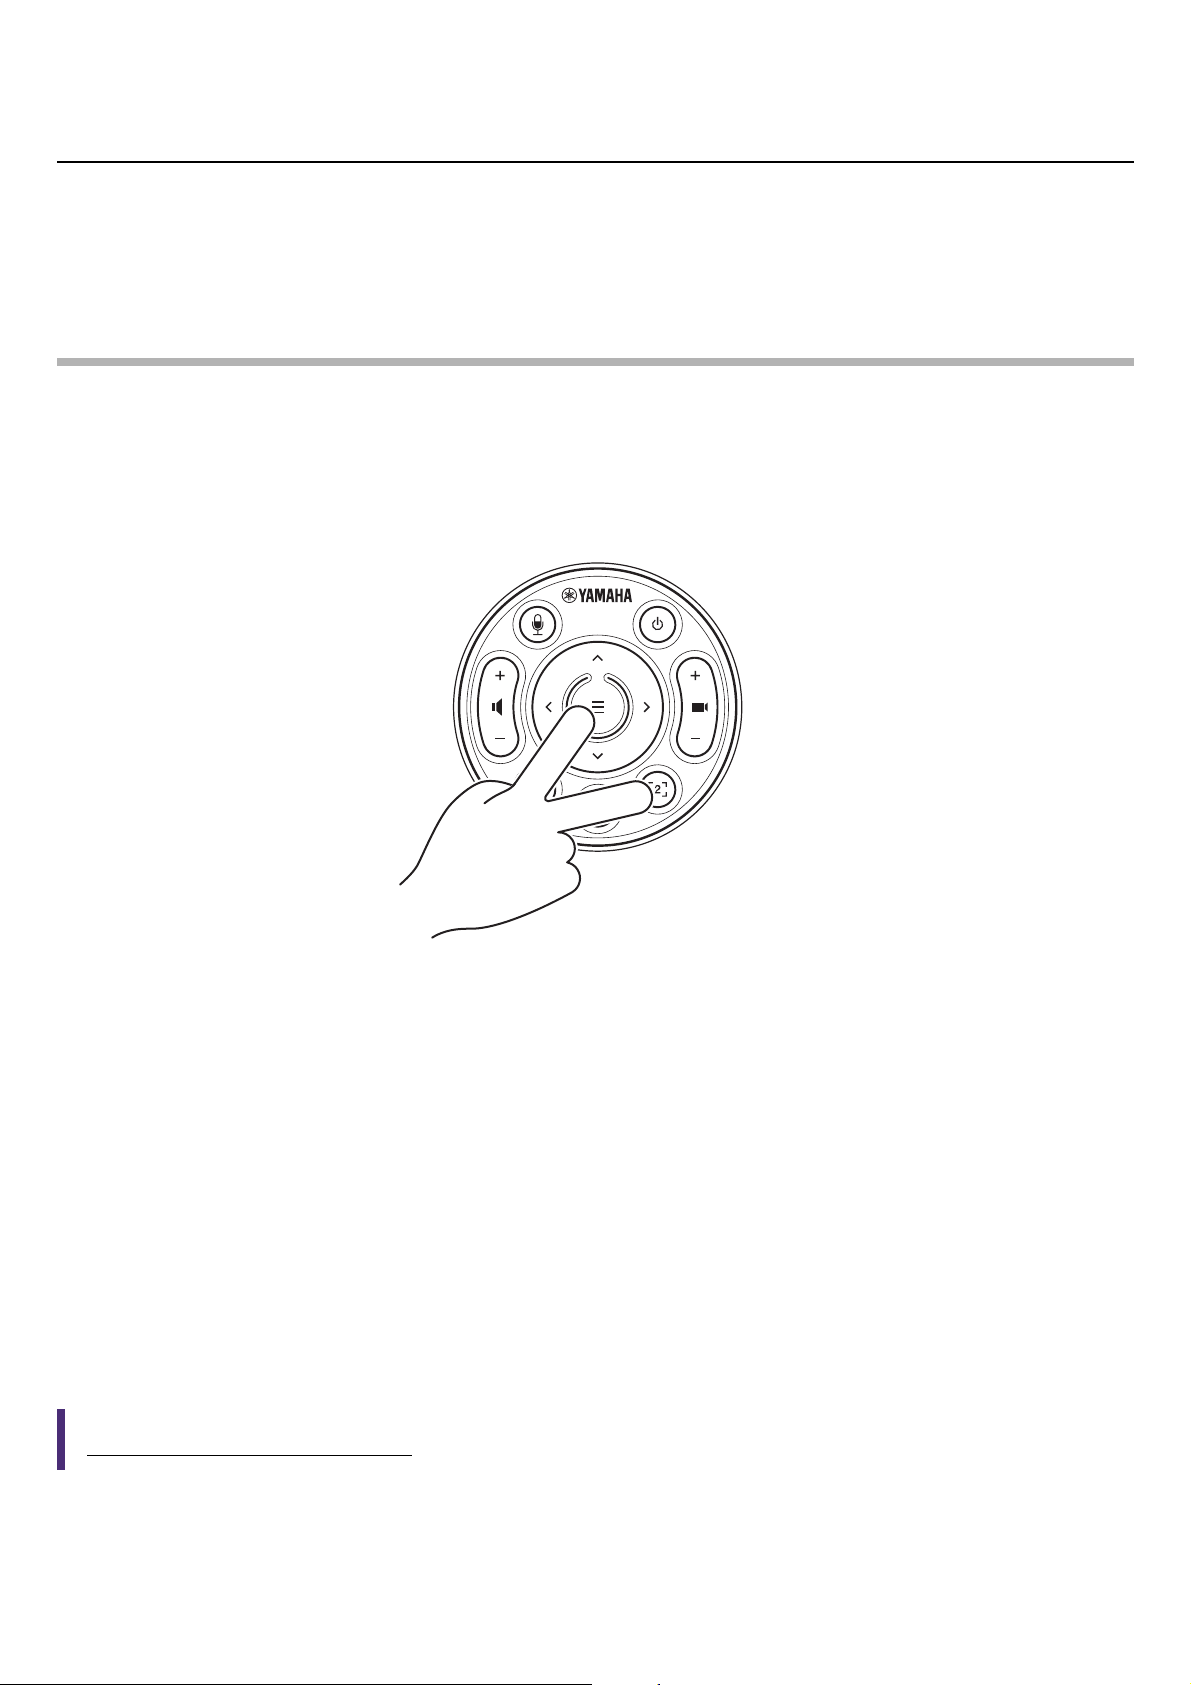
1. Long-press the menu button and camera preset 2 button on the remote control for at least 3
seconds.
Configuration is finished after the status indicator on the front panel of the device flashes in orange five times at a
0.5-second interval.
Installing the DisplayLink
®
driver onto your computer
In order to display the computer screen on a TV, it may be necessary to install the DisplayLink driver (DisplayLink Manager
on a Mac). If the computer screen is not displayed on the TV, even after checking the following, install the DisplayLink driver.
• The device and TV are connected with an HDMI cable.
• The TV input is correctly set.
• The display settings of the computer are set to “duplicate” or “extend” the display.
• The operation described in “Making necessary initial settings” (Page 23) has been performed.
• DisplayLink has been activated in Yamaha CS Manager. (Page 43)
Download the latest DisplayLink driver from the following website.
(The following website is not operated by Yamaha Corporation.)
DisplayLink driver download page
https://displaylink.com/downloads

CS-500 User Guide
24
Setup and connections
Selecting the device on the computer
On your computer, select “Yamaha CS-500” as both the default audio playback device and recording device. Also, in the
video conferencing software, select CS-500 as both the video device and audio device.
1. Select “Yamaha CS-500” as both the default playback device and recording device.
For Windows
1 Right-click the speaker icon on the taskbar, and then select “Open Sound settings”.
2 Select “Sound Control Panel” under “Related Settings”.
3 From the list of devices on the [Playback] tab, select “Yamaha CS-500”, and then right-click it.
4 Select “Set as Default Device”.
5 From the list of devices on the [Recording] tab, select “Yamaha CS-500”, and then right-click it.
6 Select “Set as Default Device”.
For macOS
1 Select the Apple menu in the menu bar.
2 Select “Sound” in “System Preferences”.
3 Select [Sound].
4 Select “Yamaha CS-500” on the [Output] tab.
5 Select “Yamaha CS-500” on the [Input] tab.
2. In the video conferencing software, select CS-500 as both the video device and audio
device.
Perform the appropriate operation in the video conferencing software to select CS-500 as both the video device and
audio device.
NOTE
When used only as a webcam (Page 19), specify settings as described below.
1. In the sound settings of your computer, select the speakerphone as both the default
playback device and recording device.
2. In the video conferencing software, select CS-500 as the video device, and select the
speakerphone as the audio device.

CS-500 User Guide
25
Setup and connections
Using smart devices in meetings
By connecting a smart device (mobile phone or tablet) to this device via Bluetooth, you can hold a remote conference with
someone on their smart device. (Audio only)
What can be done with a Bluetooth connection
Holding a conference call
Through the CS-500, you can hold a conference call with a remote person on their smart device.
From the smart device connected to this device via Bluetooth, call the smart device of the person to be included in the
conference call.
Allowing someone on their smart device to remotely join a video conference
While a video conference is being held through the CS-500, a remote person on their smart device can participate in the
conference by audio only. The participating remote person can talk to any other participants in the video conference.
From the smart device connected to this device via Bluetooth, call the smart device of the person to join the conference.
Making a Bluetooth connection
1. When connecting for the first time: Pairing
When connecting a Bluetooth-enabled smart device to this device for the first time, the devices must be paired.
1 Preparation: Activate Bluetooth on this device and the smart device.
• Activate Bluetooth on the CS-500. (“Making necessary initial settings” on Page 23)
• Turn on Bluetooth on the smart device.
2 Pairing: Pair using any of the following methods.
• With the remote control, use the on-screen display menu (Page 26) to pair.
• Use Yamaha CS Manager on the computer to pair. (Page 39)
2. When connecting for the second and subsequent times: Making a Bluetooth connection
A paired smart device can be connected by using the on-screen display menu or the smart device.
NOTE
• The camera (video) of the CS-500 cannot be used in meetings.
• A computer connected via USB and a smart device connected via Bluetooth can be connected at the same time.
• Multiple smart devices cannot be used in a call at the same time.
• If Yamaha CS Manager is used to delete pairing information (Page 37), or if Yamaha CS Manager is set to delete pairing
information when a connection is cut, perform pairing again.
• The Bluetooth connection can be cut by using any of the following methods.
- Disconnect by using the smart device.
- Disconnect by using the on-screen display menu or Yamaha CS Manager.
- Move the connected smart device out of the range of the Bluetooth signal.
Related links
• Activating HDMI connection/DisplayLink function/Bluetooth/USB audio (Page 23)
• Configuring the device from a TV screen (on-screen display menu) (Page 26)
• Yamaha CS Manager (Page 27) > Bluetooth settings (Page 37)
• Making a Bluetooth connection by using Yamaha CS Manager (Page 39)
CS-500 User Guide
26
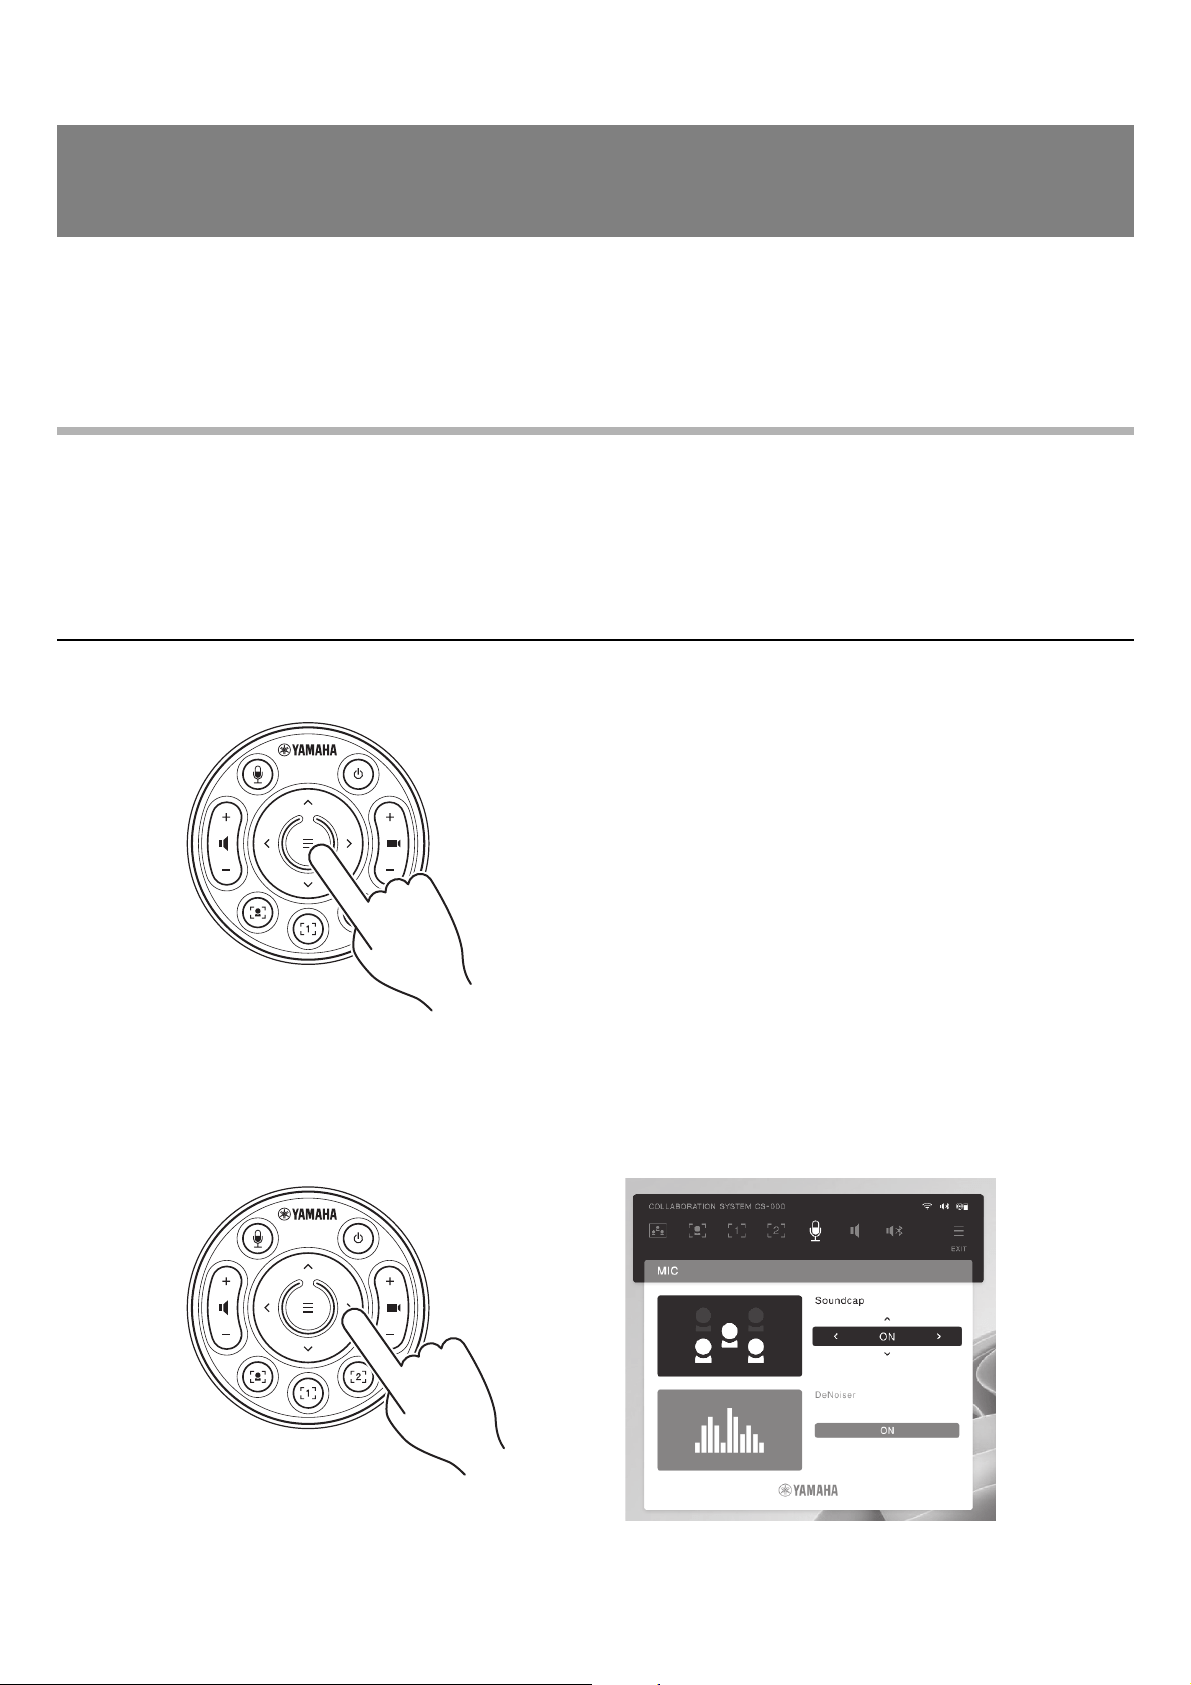
The on-screen display menu is a feature that displays the device’s settings menu on a TV screen. It can be operated with
the remote control.
With the on-screen display menu, settings can be specified for the meeting area, Smart framing mode, camera presets,
microphone, speaker and Bluetooth.
NOTE
• This function cannot be used When used as webcam (Page 19).
• In order to use this function, first follow the procedure in “Pairing the device and remote control” (page 22).
• In order to use this function, first follow the procedure in “Activating HDMI connection/DisplayLink function/Bluetooth/USB
audio” (page 23).
Displaying the device’s settings menu
1. Press the menu button on the remote control.
The on-screen display menu appears on the TV.
2. Navigate with the pan/tilt button on the remote control.
Use the pan/tilt button (arrow button) to move the cursor up/down/left/right.
Configuring the device from a TV screen (on-screen
display menu)
CS-500 User Guide
27
About Yamaha CS Manager
Yamaha CS Manager is application software for specifying detailed settings for the device. In order to use Yamaha CS
Manager, connect a computer installed with it to the CS-500 device by using a USB cable.
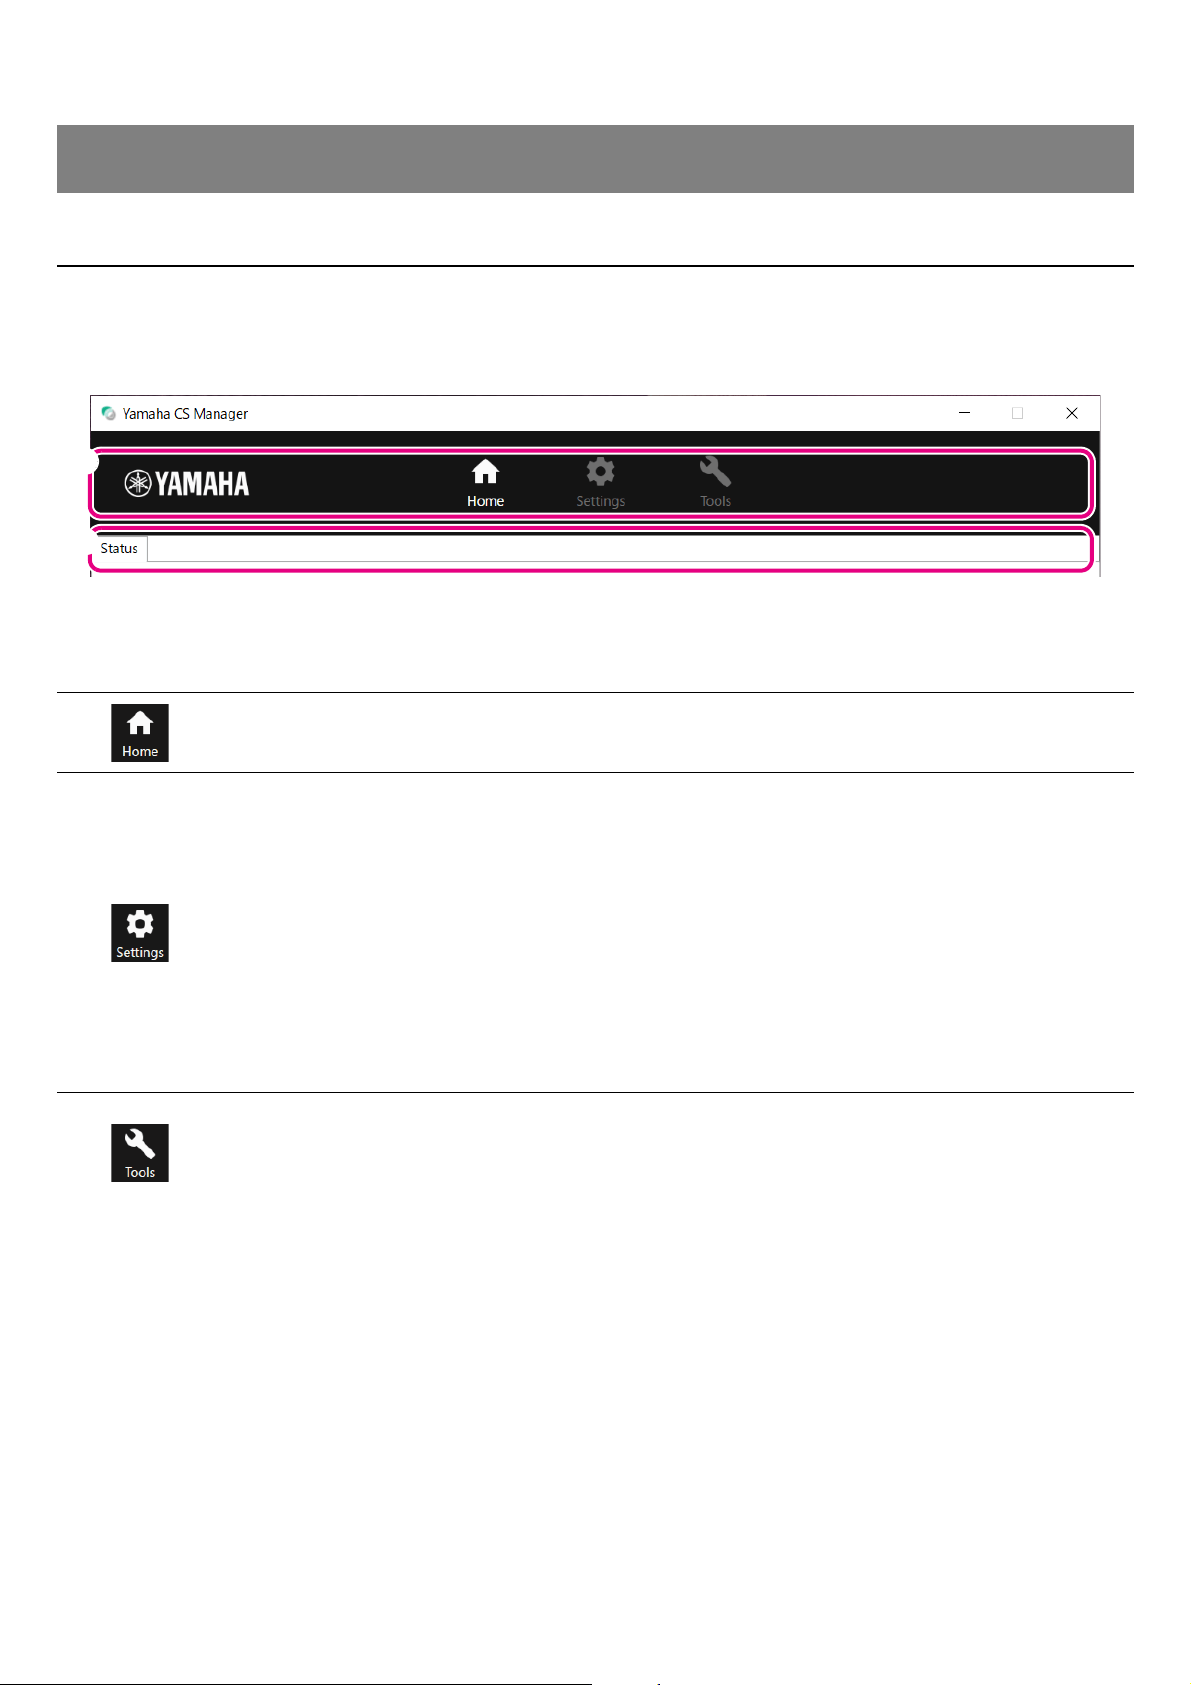
Navigating Yamaha CS Manager
Menus and functions
Using Yamaha CS Manager to specify detailed settings
1 Menus
2 What can be done (functions)
• Home (status information) Page 31
• Admin settings Page 33
• Audio settings Page 35
• Bluetooth settings Page 37
• Camera settings Page 40
• Smart framing settings Page 42
• Display settings Page 43
• Network settings Page 44
• Time settings Page 49
• Updating the firmware Page 50
• Configuration Page 51
• Logs Page 52
1
2

CS-500 User Guide
28
Using Yamaha CS Manager to specify detailed settings
Recommended environment
The recommended operating environment for Yamaha CS Manager is as follows.
Installing
In order to use Yamaha CS Manager, the application file must be downloaded.
1. Download the latest application file from the Yamaha website.
2. Extract the compressed file, and then open the application file.
For Windows
Extract the ZIP file to any location. Double-click “CSManager.exe” in the folder to start.
For Mac
Extract the DMG file to any location. Double-click “CSManager” in the folder to start.
NOTE
If the Yamaha CS Manager login window does not appear, even after opening the application file, check that the computer
and CS-500 are connected with a USB cable.
Windows 11, Windows 10 (64 bit)
macOS 12, macOS 11, macOS 10.15
Yamaha website
U.S.A. and Canada:
https://uc.yamaha.com/support/
Other Countries:
https://download.yamaha.com/

CS-500 User Guide
29
Using Yamaha CS Manager to specify detailed settings
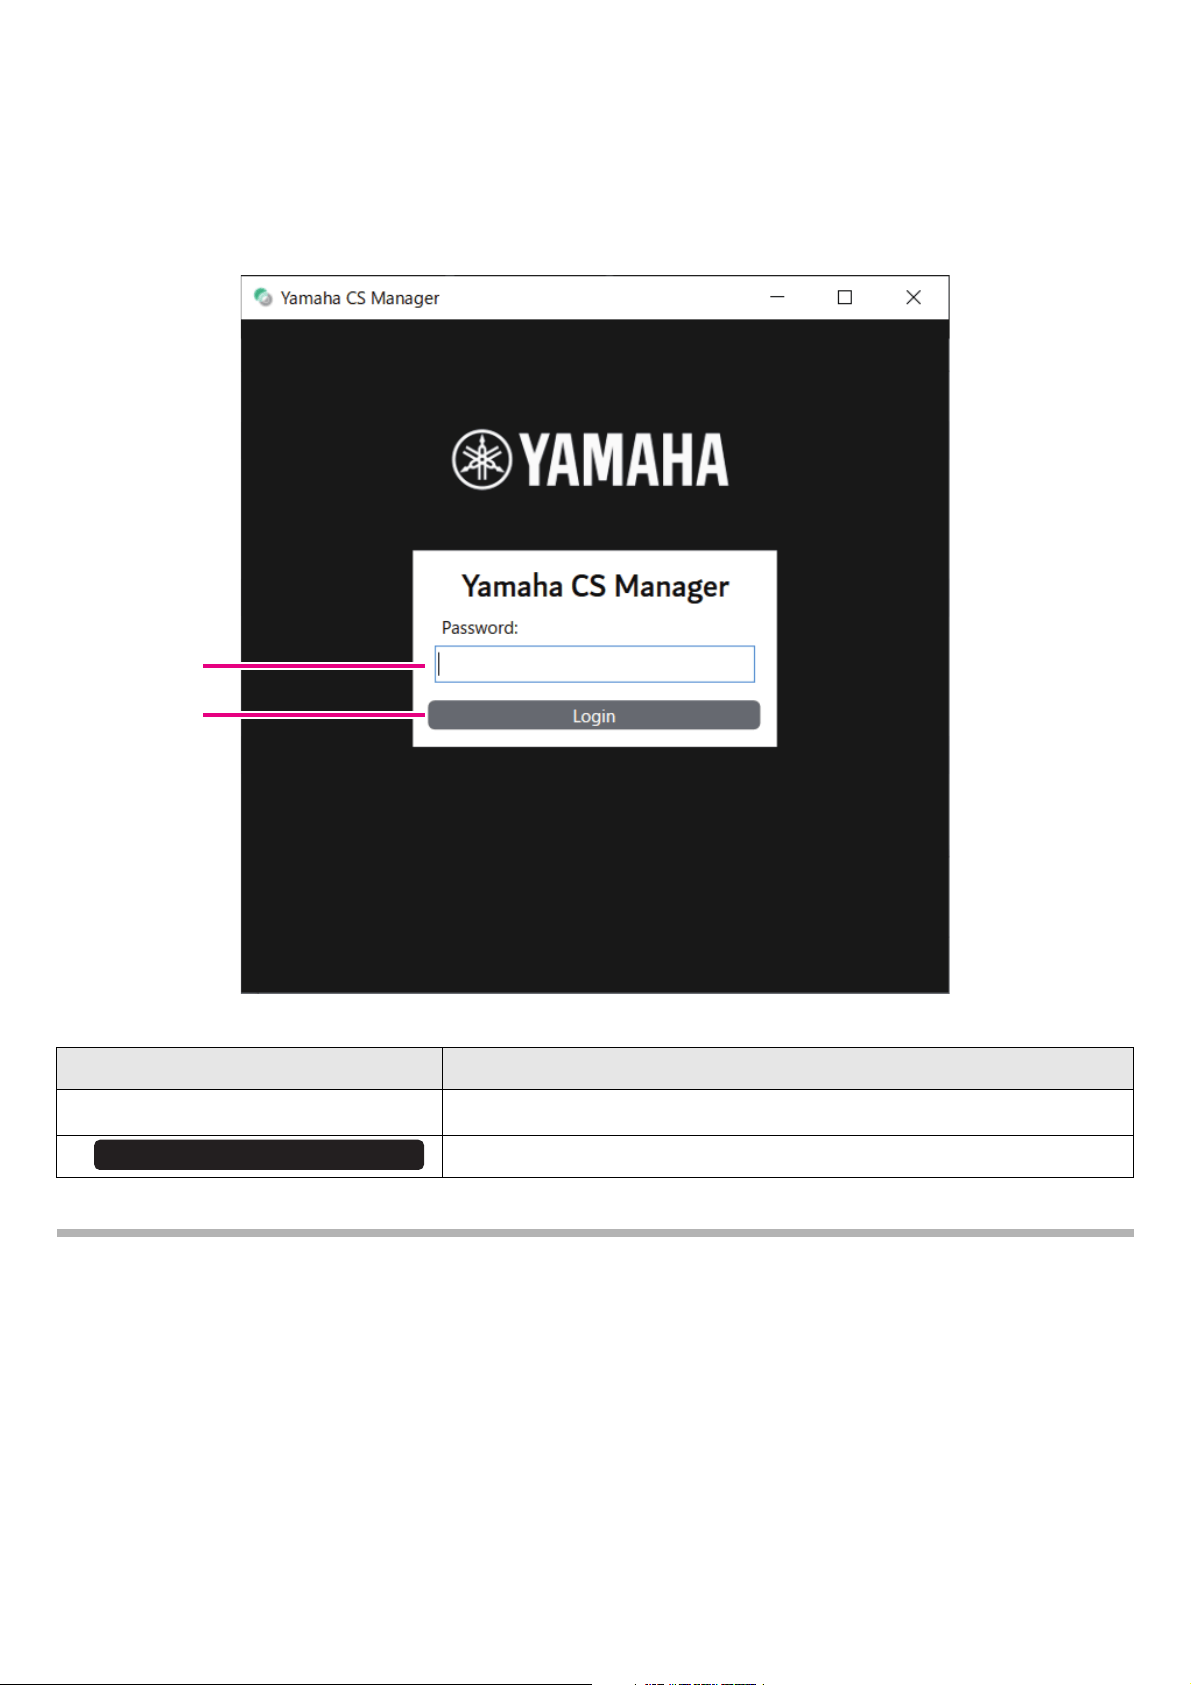
Specifying a password/Logging in
In order use Yamaha CS Manager, you must log in. When the application starts, the login window appears.
For the first time: Specifying the password
It is necessary to specify a password at the first startup. Specify any password.
Initial Password Setting
Item Description
1 Password:
Type in a password to be specified as the login password for Yamaha CS
Manager. (4 to 16 alphanumeric characters)
2 Confirm Password:
Re-enter the password typed above.
3 Click to apply the password.
1
2
3
Submit
CS-500 User Guide
30
Using Yamaha CS Manager to specify detailed settings
Logging in
When Yamaha CS Manager is started after the password has been specified, the login window appears. Type in the
specified password to log in.
Login
NOTE
If the specified password has been forgotten, refer to “Returning to factory default settings (factory reset)” (page 56) to
return the device to its factory default settings.
Item Description
1 Password:
Type in the specified password.
2 Click to apply the password.
1
2
Login
CS-500 User Guide
31
Using Yamaha CS Manager to specify detailed settings
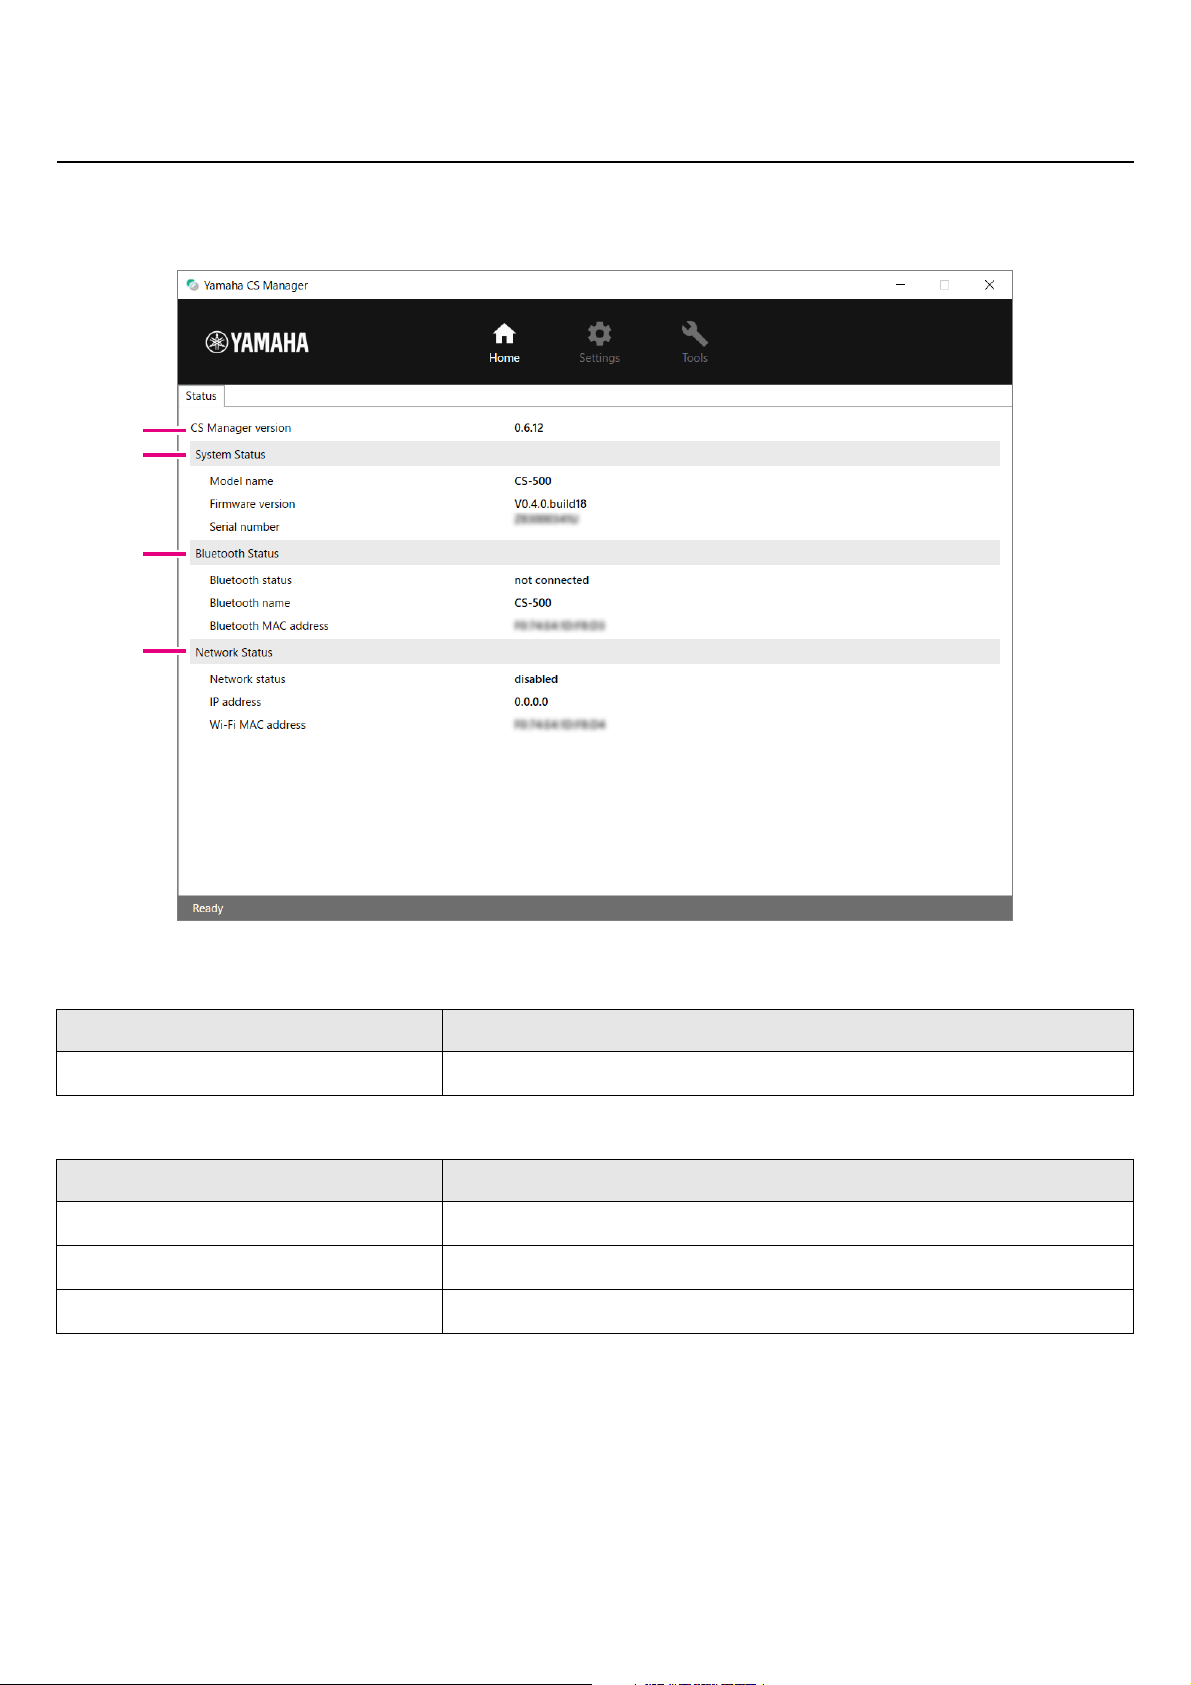
Home (status information)
After logging in to Yamaha CS Manager, status information appears in the [Home] screen.
[Home] menu > [Status] screen
1 Version
2 System Status
Item Description
CS Manager version
Displays the version of Yamaha CS Manager.
Item Description
Model name
Displays the model name.
Firmware version
Displays the device firmware version.
Serial number
Displays the serial number of the device.
1
2
3
4
CS-500 User Guide
32
Using Yamaha CS Manager to specify detailed settings
3 Bluetooth Status
4 Network Status
Related links
• Updating the firmware (Page 50)
• Bluetooth settings (Page 37)
• Network settings (Page 44)
Item Description
Bluetooth status
Displays the Bluetooth connection status.
• disable
Bluetooth is deactivated.
• not connected
There is no Bluetooth connection.
• connected to XXXX
Displays the name of the device currently connected to this device via
Bluetooth.
Bluetooth name
Displays the name of this device when it is connecting via Bluetooth.
If a device name has been specified in the [Bluetooth] screen, the specified
device name will be displayed.
Bluetooth MAC address
Displays the Bluetooth MAC address.
Item Description
Network status
Displays the network (Wi-Fi) connection status.
• disabled
Wi-Fi is deactivated.
• not connected
There is no Wi-Fi connection.
• connected to <SSID>
Displays the SSID name of the Wi-Fi network that the device is currently
connected to.
(Example: “connected to yamaha_wifi”)
IP address
Displays the IP address of this device.
Wi-Fi MAC address
Displays the MAC address of this device.
CS-500 User Guide
33
Using Yamaha CS Manager to specify detailed settings
Admin settings
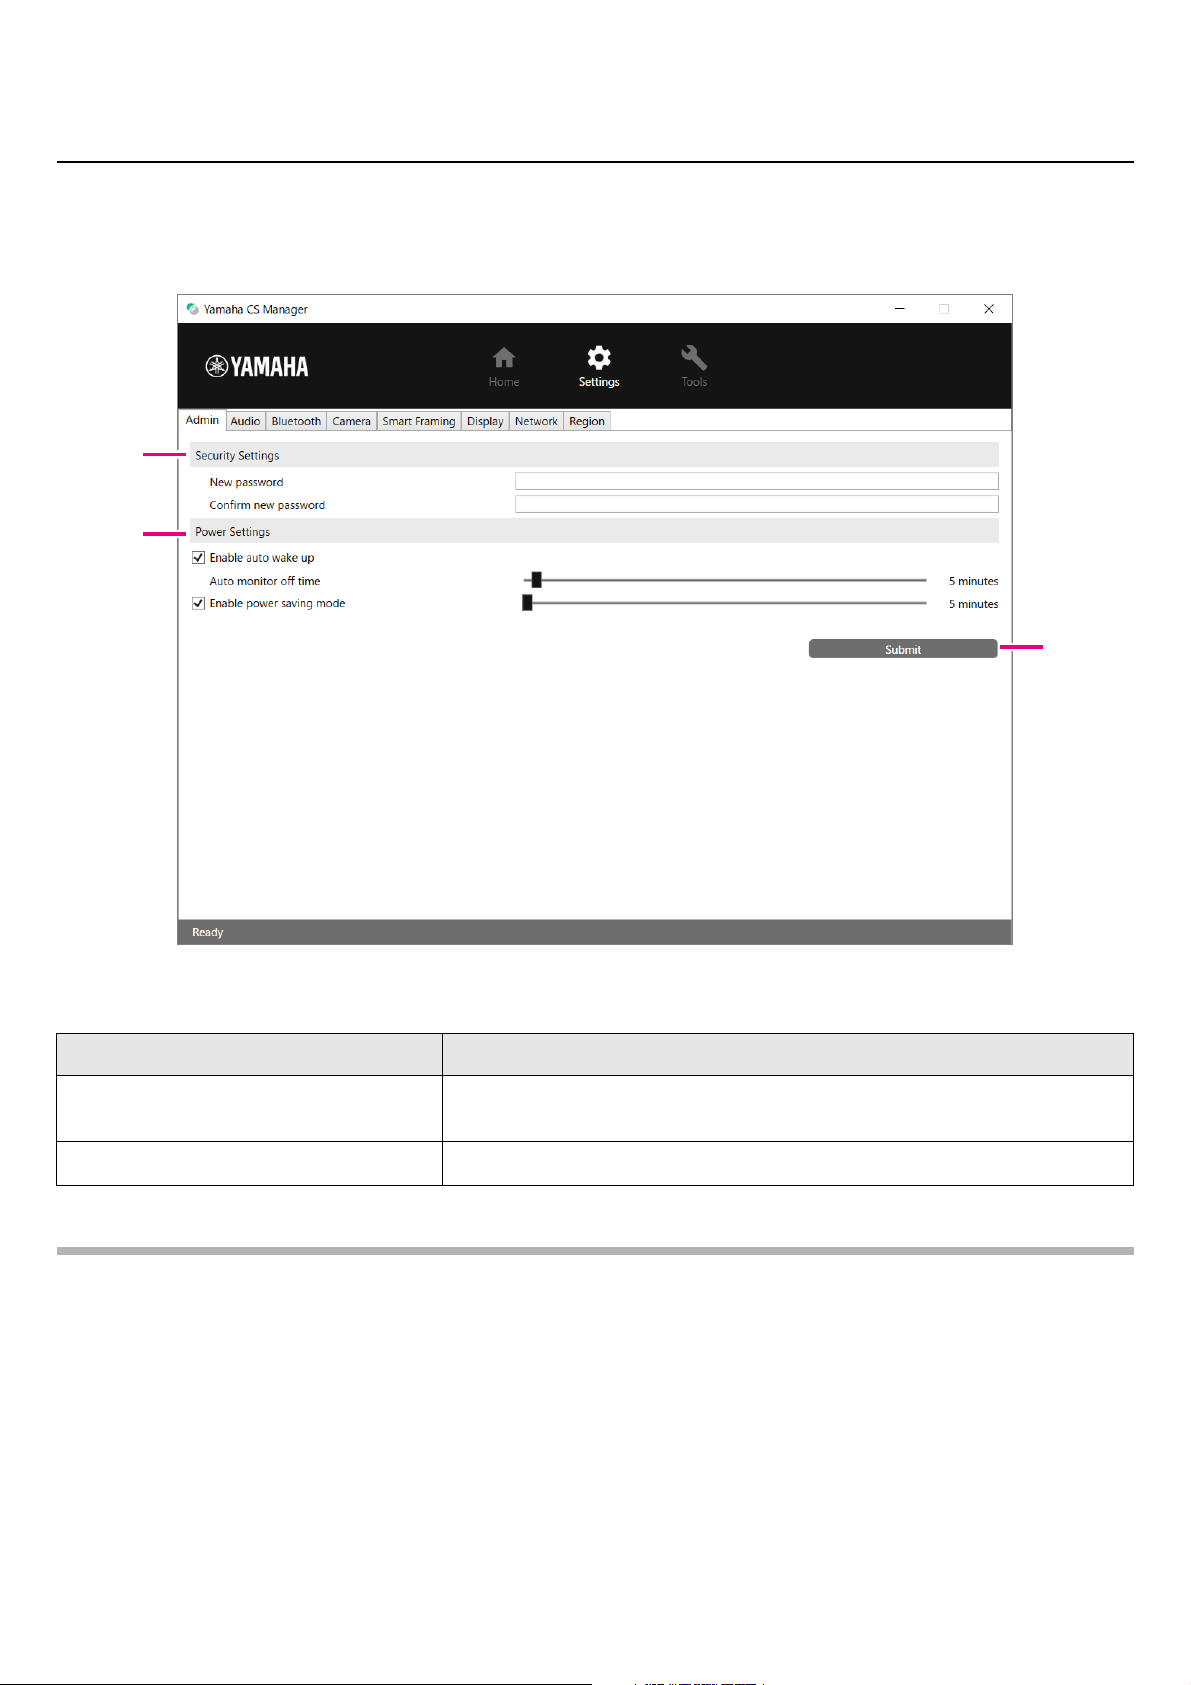
In the [Admin] screen, various system settings, such as the connection mode, password settings and power management
settings, can be specified.
[Settings] menu > [Admin] screen
1 Security Settings
NOTE
The password will not be updated if the [Submit] button is clicked while either the [New password] or [Confirm new
password] box is left blank.
Item Description
New password
Type in a password to be specified as the login password for Yamaha CS
Manager. (4 to 16 alphanumeric characters)
Confirm new password
Re-enter the password typed above.
1
2
3
CS-500 User Guide
34
Using Yamaha CS Manager to specify detailed settings
2 Power Settings
3 Submit
Item Description
Enable auto wake up
Allows you to select whether to activate/deactivate the automatic power-on
function (auto wakeup), which operates by detecting persons.
When the device is in power-saving standby as a result of [Enable power
saving mode] being activated, auto wakeup will be deactivated.
Auto monitor off time
Allows you to specify (by using the slider) the length of time until the monitor
automatically turns off in order to prevent screen burn-in. (Units: Minutes)
Enable power saving mode
Allows you to select whether to activate/deactivate the power saving mode.
Only when this is activated, a setting can be specified for the following.
• [Power saving timeout]
Allows you to specify (by using the slider) the length of time until the device
automatically turns off. (Units: Minutes)
Item Description
Click to apply all settings specified in the [Admin] screen.
Submit
CS-500 User Guide
35
Using Yamaha CS Manager to specify detailed settings
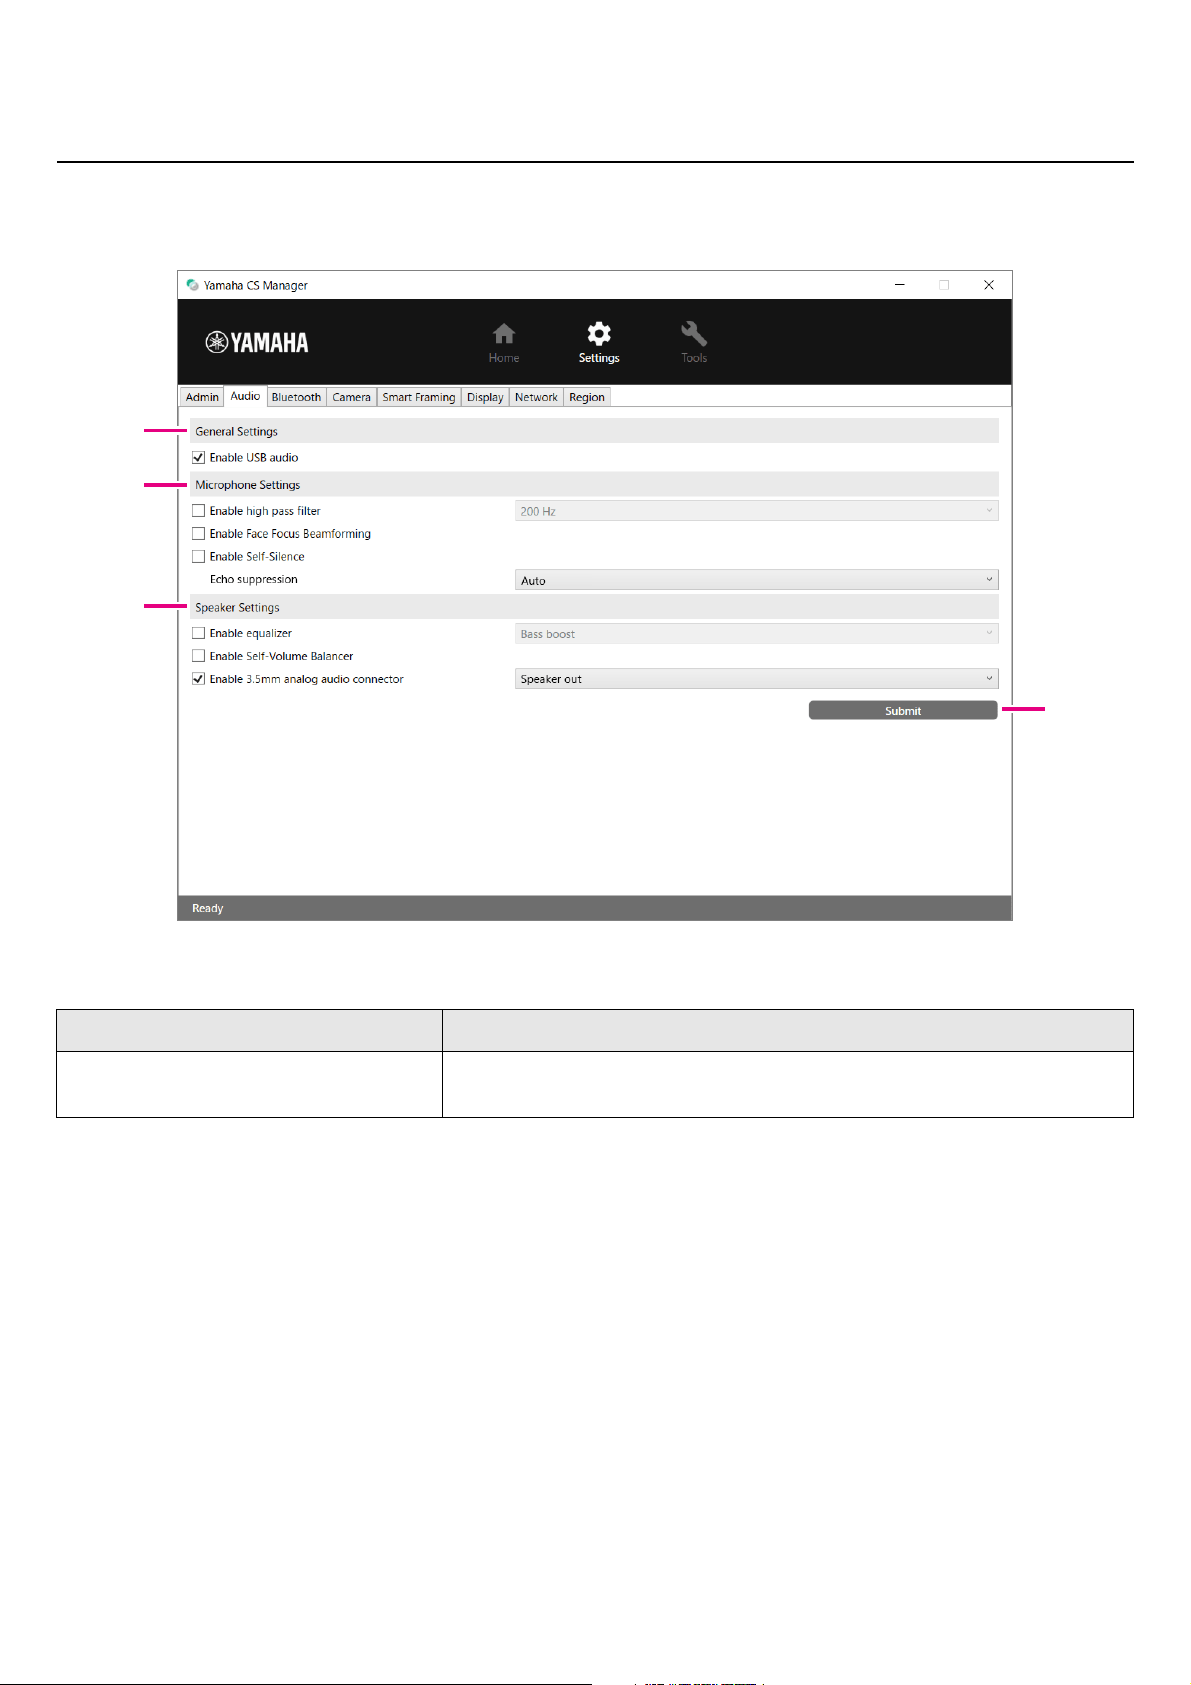
Audio settings
In the [Audio] screen, microphone and speaker settings can be specified.
[Settings] menu > [Audio] screen
1 General Settings
Item Description
Enable USB audio
Allows you to select whether to activate/deactivate USB audio. Activate this
when connecting USB audio.
1
2
4
3
CS-500 User Guide
36
Using Yamaha CS Manager to specify detailed settings
2 Microphone Settings
3 Speaker Settings
4 Submit
Item Description
Enable high pass filter
Allows you to select whether to activate/deactivate the high pass filter for the
microphone.
Only when this is activated, the microphone equalizer can be selected.
[200 Hz/315 Hz/500 Hz]
Enable Face Focus Beamforming
Allows you to select whether to activate/deactivate the function that detects
the position of the participant by using the camera image and reduces noise
other than the participant’s voice.
When activated
• In order to detect participants, remove the lens cap.
• The target area can be specified under “
2 Meeting Area Settings” in the
[Smart Framing] screen. (Page 42)
Enable Self-Silence
Allows you to select whether to activate/deactivate the function that
automatically differentiates noise and human voices and reduces noise other
than human voices.
Echo suppression
Allows you to select the strength of the echo canceller. [Auto/Strong]
When [Enable 3.5mm analog audio connector] under “
3 Speaker Settings”
has been set to [Headphone out] (when using headphones or earphones),
the echo canceller is deactivated.
Item Description
Enable equalizer
Allows you to select whether to activate/deactivate the speaker equalizer.
Only when this is activated, the speaker equalizer can be selected.
[Bass boost/Treble boost]
Enable Self-Volume Balancer
Allows you to select whether to activate/deactivate the function that
automatically adjusts the speaker volume.
Enable 3.5mm analog audio
connector
Allows you to select whether to activate/deactivate the analog audio jack.
When connecting speakers, select [Speaker out]; when connecting
headphones or earphones, select [Headphone out].
Item Description
Click to apply all settings specified in the [Audio] screen.
Submit
CS-500 User Guide
37
Using Yamaha CS Manager to specify detailed settings
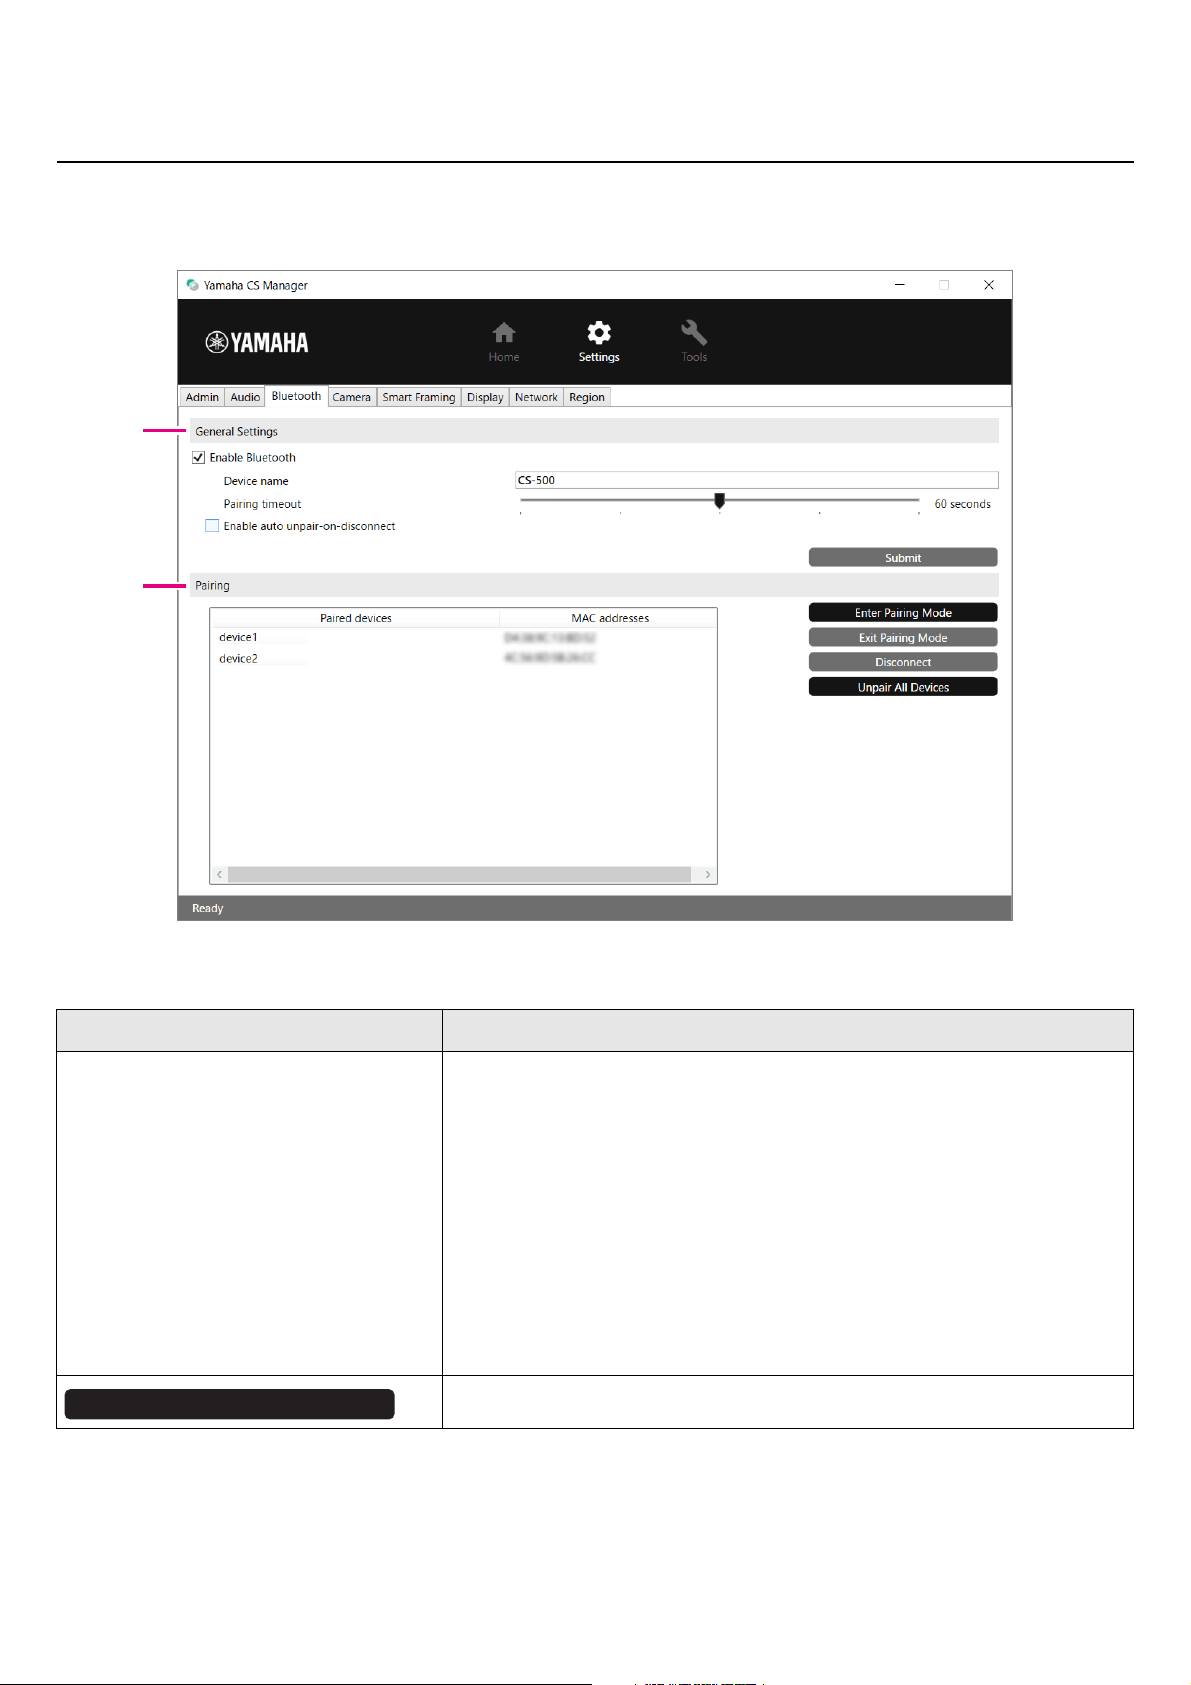
Bluetooth settings
In the [Bluetooth] screen, Bluetooth settings can be specified and this device can be paired with a Bluetooth device.
[Settings] menu > [Bluetooth] screen
1 General Settings
Item Description
Enable Bluetooth
Allows you to select whether to activate/deactivate Bluetooth. Only when this
is activated, settings can be specified for the following.
•[Device name]
Allows you to change the name (of this device) that is displayed when this
device is connected to a Bluetooth device.
• [Pairing timeout]
Allows you to specify (by using the slider) the length of time until pairing
mode times out. (Units: Seconds)
• [Enable auto unpair-on-disconnect]
Allows you to select whether to erase the pairing information at the same
time that a connection with the Bluetooth device is cut. In order to be able
to connect automatically, deactivate this.
Click to apply the settings specified under “General Settings”.
1
2
Submit
CS-500 User Guide
38
Using Yamaha CS Manager to specify detailed settings
2 Pairing
This appears when Bluetooth has been activated.
Related links
• Using smart devices in meetings (Page 25)
Item Description
Paired devices
Displays the Bluetooth device name of the paired device. The name of the
currently connected device appears in bold.
MAC addresses
Displays the MAC address of the paired Bluetooth device. The MAC address
of the currently connected device appears in bold.
Click to start pairing mode. For details, refer to “Making a Bluetooth
connection by using Yamaha CS Manager” (page 39).
Click to stop pairing mode.
Click to disconnect the device currently connected via Bluetooth.
Click to erase all pairing information.
Enter Pairing Mode
Exit Pairing Mode
Disconnect
Unpair All Devices
CS-500 User Guide
39
Using Yamaha CS Manager to specify detailed settings
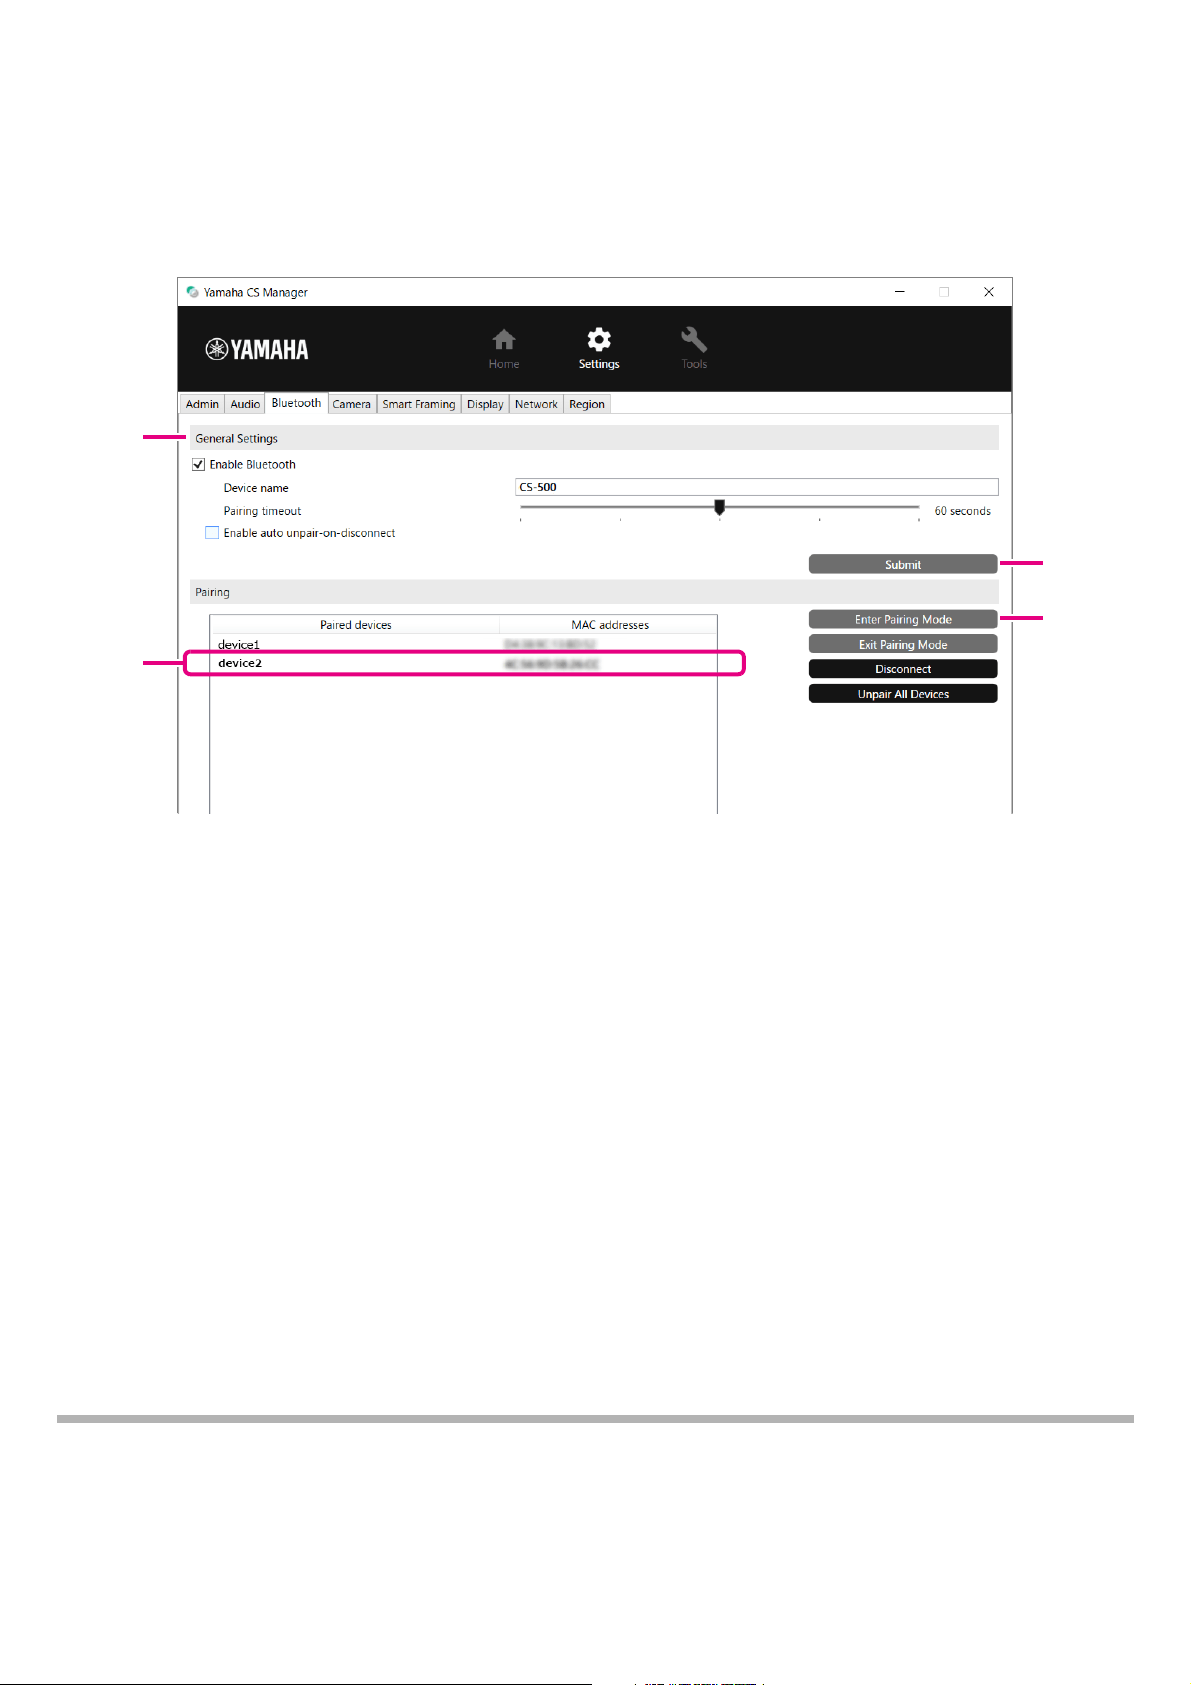
Making a Bluetooth connection by using Yamaha CS Manager
In order to be able to connect this device and a Bluetooth device, they first need to be paired. Follow the procedure below to
pair and make a Bluetooth connection.
[Settings] menu > [Bluetooth] screen
1. Activate Bluetooth.
1 Select the [Enable Bluetooth] check box.
2 Click the [Submit] button to apply the setting.
Make sure that Bluetooth on the Bluetooth device has been turned on.
2. Start pairing.
3 Click the [Enter Paring Mode] button to start pairing mode.
If a device is already connected, the [Enter Paring Mode] button cannot be clicked. Click the [Disconnect] button to
disconnect.
3. On the Bluetooth device, accept the pairing request.
The Bluetooth pairing PIN (numbers) appears in the screen of the Bluetooth device. Make sure that the numbers match
those displayed in Yamaha CS Manager, and then accept on the Bluetooth device.
4. Confirm that pairing is finished.
4 Pairing is finished when the paired device is added under “Paired devices”.
The Bluetooth connection is made at the same time as pairing. The name of the device currently connected via
Bluetooth appears in bold.
Related links
• Using smart devices in meetings (Page 25)
• Bluetooth settings (Page 37)
1
4
3
2
CS-500 User Guide
40
Using Yamaha CS Manager to specify detailed settings
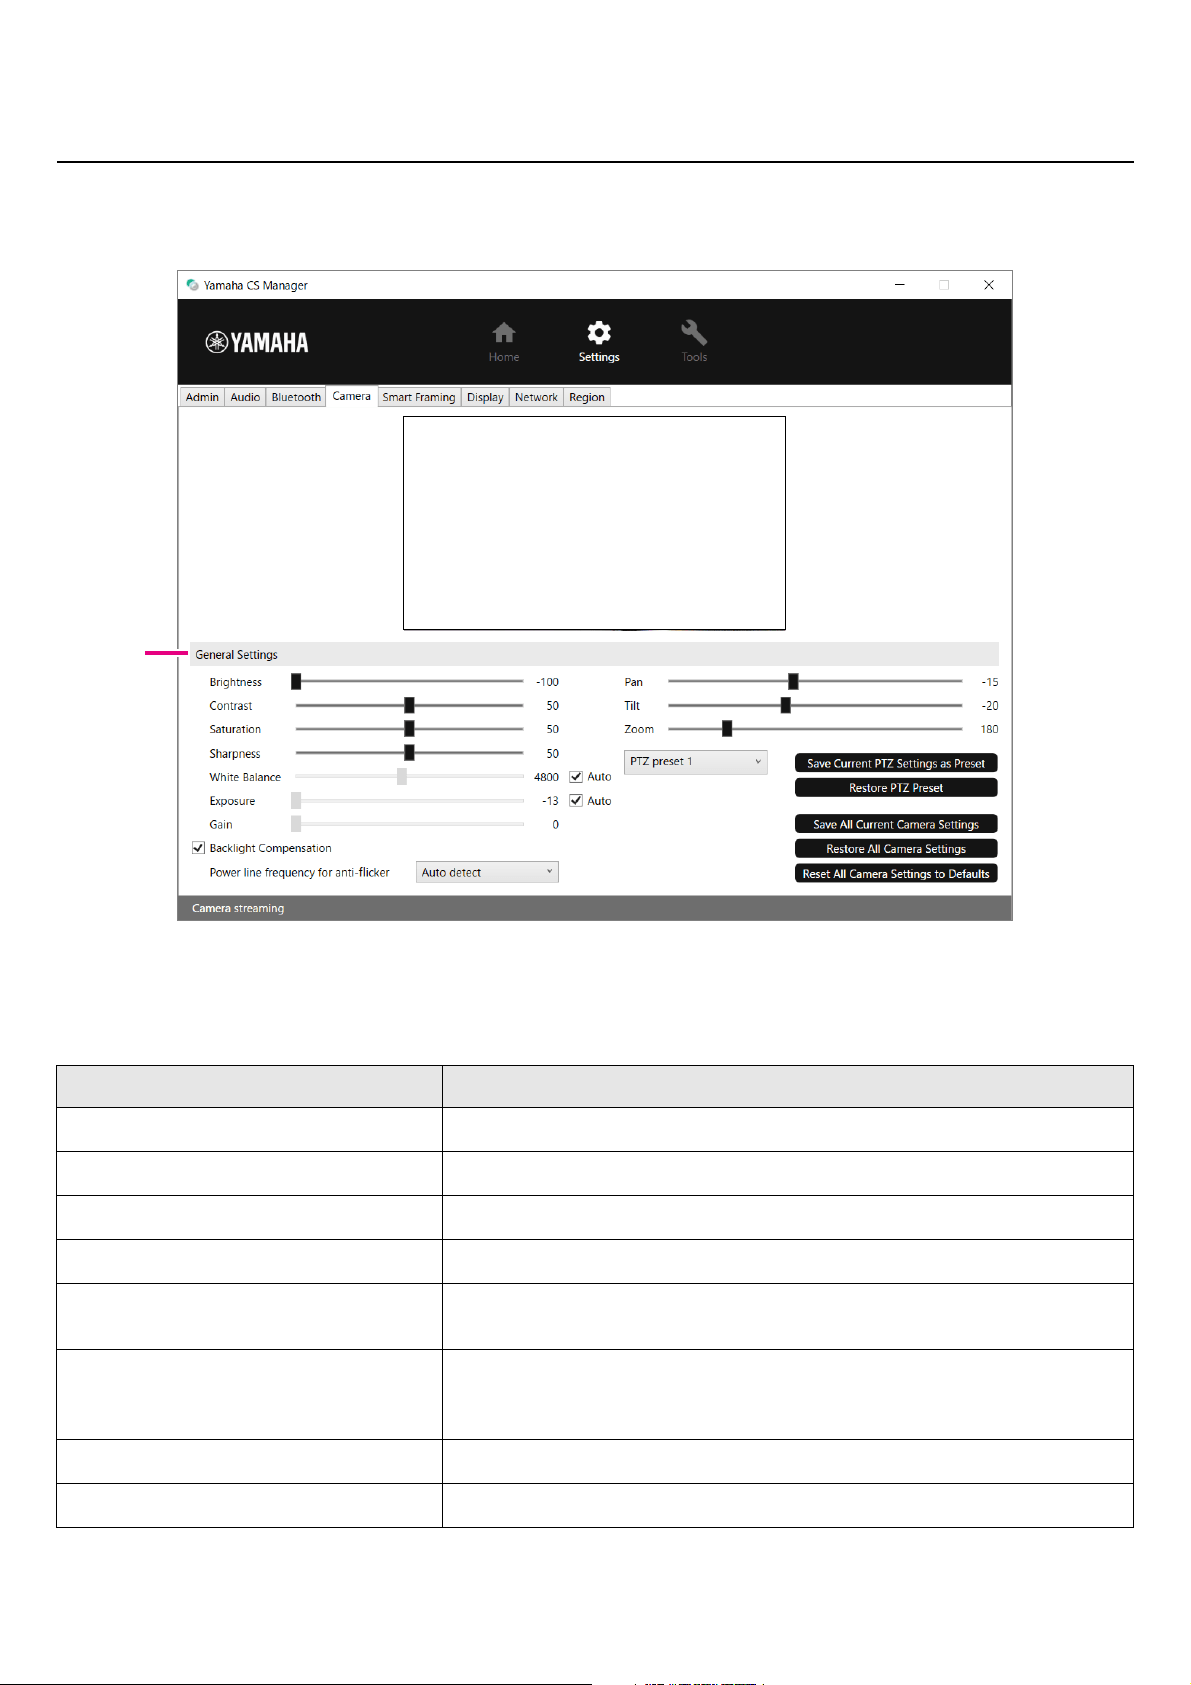
Camera settings
In the [Camera] screen, detailed settings for the camera built into this device can be specified.
[Settings] menu > [Camera] screen
1 General Settings
This allows you to adjust the camera settings. Setting adjustments made by using the slider, check box, etc., are applied in
real time and reflected in the camera preview.
Item Description
Brightness
Allows you to adjust (by using the slider) the brightness.
Contrast
Allows you to adjust (by using the slider) the contrast.
Saturation
Allows you to adjust (by using the slider) the saturation.
Sharpness
Allows you to adjust (by using the slider) the sharpness.
White Balance
Allows you to adjust (by using the slider) the white balance. To activate
automatic adjustment, select the [Auto] check box.
Exposure
Allows you to adjust (by using the slider) the exposure. To activate automatic
adjustment, select the [Auto] check box. Note that [Exposure] and [Gain] will
no longer be adjustable.
Gain
Allows you to adjust (by using the slider) the gain.
Backlight Compensation
Allows you to select whether to activate/deactivate backlight correction.
1
Camera preview
CS-500 User Guide
41
Using Yamaha CS Manager to specify detailed settings
* If a button is not available, clear the [Enable Smart Framing] check box (Page 42) in the [Smart Framing] screen
or press the Smart framing button on the remote control to turn off Smart framing. (Page 10)
Power line frequency for anti-flicker
Allows you to select the power line frequency in order to reduce flickering. If
flickering cannot be reduced, even after selecting “Auto detect”, select the
frequency for your area. [Auto detect/50 Hz/60 Hz]
Pan
This can be specified only when Zoom is set to a value other than the default
(100).
Allows you to adjust (by using the slider) the horizontal camera orientation.
Tilt
This can be specified only when Zoom is set to a value other than the default
(100).
Allows you to adjust (by using the slider) the vertical camera orientation.
Zoom
Allows you to adjust (by using the slider) the zoom ratio.
PTZ preset 1 to 5
Allows you to specify a set of camera PTZ (pan, tilt and zoom) settings. (up to
5)
Select a preset name from [PTZ preset 1 to 5], and then click this button* to
save the current combination of PTZ values under that name.
Select a preset name from [PTZ preset 1 to 5], and then click this button* to
recall the saved combination of PTZ values.
Click to save all camera settings, including the PTZ values.
Click to recall the settings that were saved by clicking the [Save All Current
Camera Settings] button.
Click to reset all camera settings, including the current PTZ values, to their
defaults.
Item Description
Save Current PTZ Settings as Preset
Restore PTZ Preset
Save All Current Camera Settings
Restore All Camera Settings
Reset All Camera Settings to Defaults
CS-500 User Guide
42
Using Yamaha CS Manager to specify detailed settings
Smart framing settings
In the [Smart Framing] screen, the camera framing area for recognizing persons can be specified.
[Settings] menu > [Smart Framing] screen
1 Smart Framing Settings
2 Meeting Area Settings
This allows you to specify the target area for Smart framing and face focus beamforming*.
* Face focus beamforming: [Enable Face Focus Beamforming] in Audio settings (Page 35)
Item Description
Enable Smart Framing
Allows you to select whether to activate/deactivate Smart framing.
Framing mode
This can be specified only when Smart framing is activated.
Allows you to select the appropriate mode for following the subject according
to the use.
• [Group]: Frames all persons in the group
• [Speaker tracking]: Frames the person who is speaking
• [Individual]: Frames a specific person
Item Description
Horizontal angle
Allows you to specify (by using the slider) the target area in the horizontal
direction. (20° to 110°)
Max distance
Allows you to specify (by using the slider) the target range in meters.
(1 to 4.5 m; up to 3.0 m if face focus beamforming* is activated)
1
2
Camera preview
CS-500 User Guide
43
Using Yamaha CS Manager to specify detailed settings
Display settings
In the [Display] screen, an image can be selected to be displayed on the TV screen when the device is idle.
[Settings] menu > [Display] screen
1 General Settings
* DisplayLink
This is a function to display the computer on the TV screen when the computer and TV are connected through this device.
(This device is connected to the computer via USB and to the TV via HDMI. Example: Page 18)
Item Description
Enable HDMI
Allows you to select whether to activate/deactivate HDMI.
Enable DisplayLink
This can be specified only when HDMI is activated. Allows you to select
whether to activate/deactivate DisplayLink*.
Stand-by screen image selection
This can be specified only when the [Enable HDMI] check box has been
selected.
Allows you to select the standby image displayed on the TV (connected to
this device via HDMI) when this device is not connected to a computer.
• [User provided image file]
To select a new image, browse to and upload it. (Extensions of uploadable
files: JPG, JPEG, PNG; Match the resolution of the image to that of your
TV.)
Click to apply the specified settings.
1
Submit
CS-500 User Guide
44
Using Yamaha CS Manager to specify detailed settings
Network settings
In the [Network] screen, settings for connecting this device to a Wi-Fi network can be specified. Specifying Wi-Fi settings
allows the time on the device to be set.
[Settings] menu > [Network] screen
1 General Settings
* This product is designed for use in different countries/regions with different legal regulatory standards. Select
the country code according to your country/region. In some countries/regions, this setting cannot be changed
from the factory default.
Item Description
Enable Wi-Fi
Allows you to select whether to activate/deactivate Wi-Fi.
Only when this is activated, settings can be specified for the following.
•Country code
Allows you to select the country code (country name) for Wi-Fi.
This can be selected only when the string for [Serial Number] in the [Home]
screen (Page 31) ends in anything other than “J”, “U” or “A”. *
• Enable network auto-connect
Allows you to select whether to activate/deactivate the function that
automatically connects this device to a network that it was previously
connected to.
1
4
5
3
2
6
7
8

CS-500 User Guide
45
Using Yamaha CS Manager to specify detailed settings
2 IP Settings (IPv4)
4 Network Status
Item Description
Enable DHCP
This can be specified only when the [Enable Wi-Fi] check box has been
selected.
Allows you to select whether to activate/deactivate DHCP.
To assign a static IP address, clear the [Enable DHCP] check box, and then
specify the static IP address with the following. (Enter using the
“XXX.XXX.XXX.XXX” format.)
• IP address
• Subnet mask
• Default gateway
• Primary DNS
• Secondary DNS
Item Description
3
Click to apply the settings specified under “General Settings” and “IP
Settings”.
Item Description
Network status
Displays the network (Wi-Fi) connection status.
• disabled
Wi-Fi is deactivated.
• not connected
There is no Wi-Fi connection.
• connected to <SSID>
Displays the SSID name of the Wi-Fi network that the device is currently
connected to.
Item Description
5
Click to connect to the network. For detailed instructions, refer to
“Connecting to a network” (page 46).
6
Click to display a list of known networks.
7
Click to install a client certificate file.
8
Click to view or delete from the list of installed credentials (CA/user
certificates).
Submit
Connect to Network
Saved Networks
Install Certificate
Installed Credentials
CS-500 User Guide
46
Using Yamaha CS Manager to specify detailed settings
Connecting to a network
Wi-Fi settings can be specified in order to connect to a network. In order for the CS-500 to accurately keep time, connect it
to a Wi-Fi network and specify the time settings.
1. Click the [Connect to Network] button in the [Network] screen.
The [Connect to Network] pop-up screen appears.
[Settings] menu > [Network] screen > [Connect to Network] screen
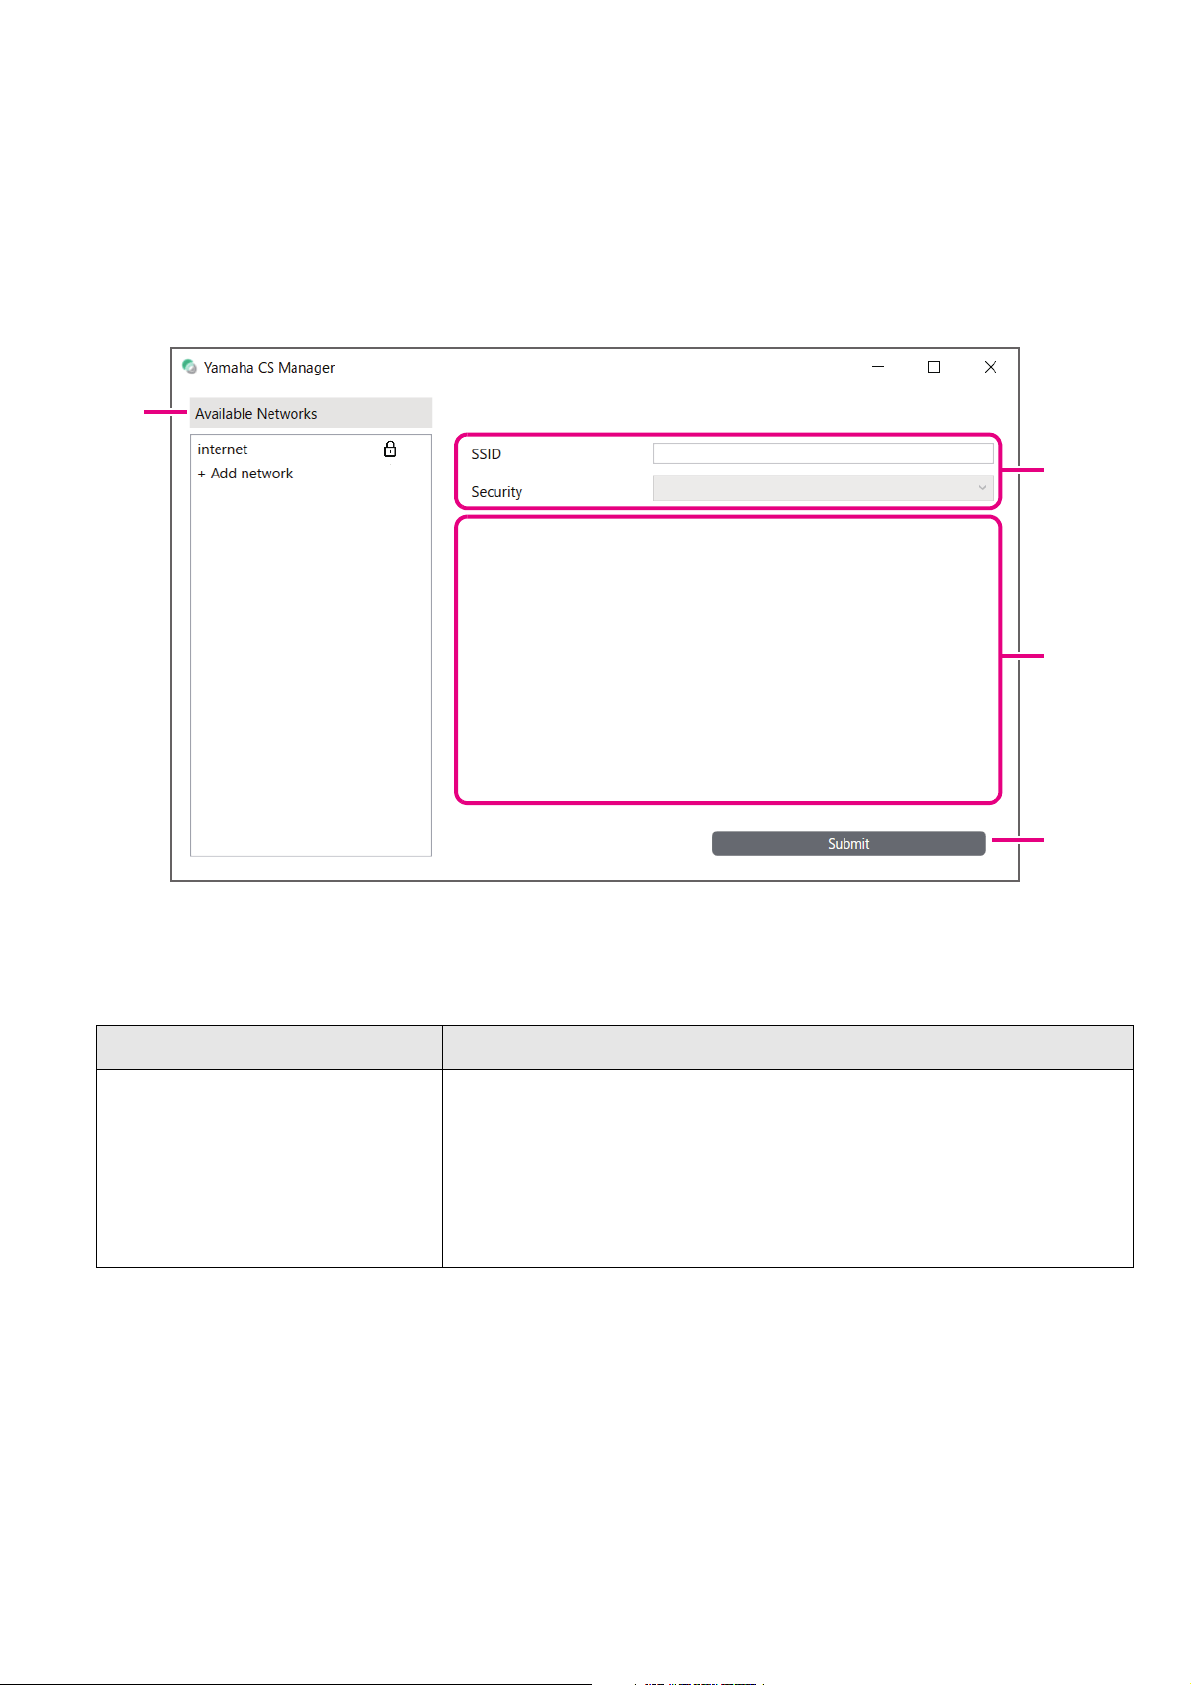
2. From the list of access points (1), select the one to connect to.
1 Available Networks
Item Description
Available Networks
Displays a list (provided by the device) of connectable wireless access
points. Encrypted connections have a lock icon to the right of their SSID
name.
If an encrypted connection is selected, the items that appear in
2 differ
depending on the encryption method.
• [+ Add network]
Selecting this allows you to manually specify all of the items below [SSID].
1
3
2
4

CS-500 User Guide
47
Using Yamaha CS Manager to specify detailed settings
3. The SSID name and encryption method of the selected access point appear.
The items and screens that appear differ depending on the encryption method of the selected access point.
If [+ Add network] was selected in
1, specify all settings manually.
2 SSID name and encryption method
3 When [Security] is set to [WPA/WPA2/WPA3-Enterprise]
Item Description
SSID
Displays the SSID name. (Maximum number of characters: 32)
Security
The items that appear differ depending on the encryption method.
1) With the following, there is no need to specify other settings. Continue with
step
4.
•[None]
• [Enhanced Open]
2) With the following, only [Password] appears in
3. Type in the password.
Then, continue with step
4.
•[WEP]
• [WPA/WPA2-Personal]
• [WPA3-Personal]
3) With the following, various items appear in
3.
• [WPA/WPA2/WPA3-Enterprise]
Item Description
EAP method
The items that appear differ depending on the selected encryption method.
•[PEAP]
Phase 2 authentication, CA certificate, Identity, Anonymous identity,
Password
•[TLS]
CA certificate, User certificate, Identity
•[TTLS]
Phase 2 authentication, CA certificate, Identity, Anonymous identity,
Password
•[PWD]
Identity, Password
Phase 2 authentication
This can be specified only when [EAP method] is set to [PEAP/TTLS]. [None/
PAP/MSCHAP/MSCHAPV2/GTC]
CA certificate
Allows you to select a CA certificate.
A credential that includes a CA certificate is added to those displayed in the
[Installed credentials] screen (displayed from the [Network] screen).
Domain
Allows you to type in the domain name authenticated by the CA certificate.
This can be specified only when [CA certificate] is set to [Use system
certificates].
User certificate
Allows you to select a user certificate.
A credential that includes a user certificate is added to those displayed in the
[Installed credentials] screen (displayed from the [Network] screen).

CS-500 User Guide
48
Using Yamaha CS Manager to specify detailed settings
4. Click the [Submit] button to start the Wi-Fi connection.
When “Connected to network” appears in the lower left of the screen, the connection to the network is established.
NOTE
Each time a setting is selected from a drop-down menu, the settings entered for other items return to their defaults.
Identity
Allows you to type in the user ID.
Anonymous identity
Allows you to type in an anonymous user name.
Password
Allows you to type in the authentication password.
Item Description
4
Click to start the Wi-Fi connection.
Item Description
Submit
CS-500 User Guide
49
Using Yamaha CS Manager to specify detailed settings
Time settings
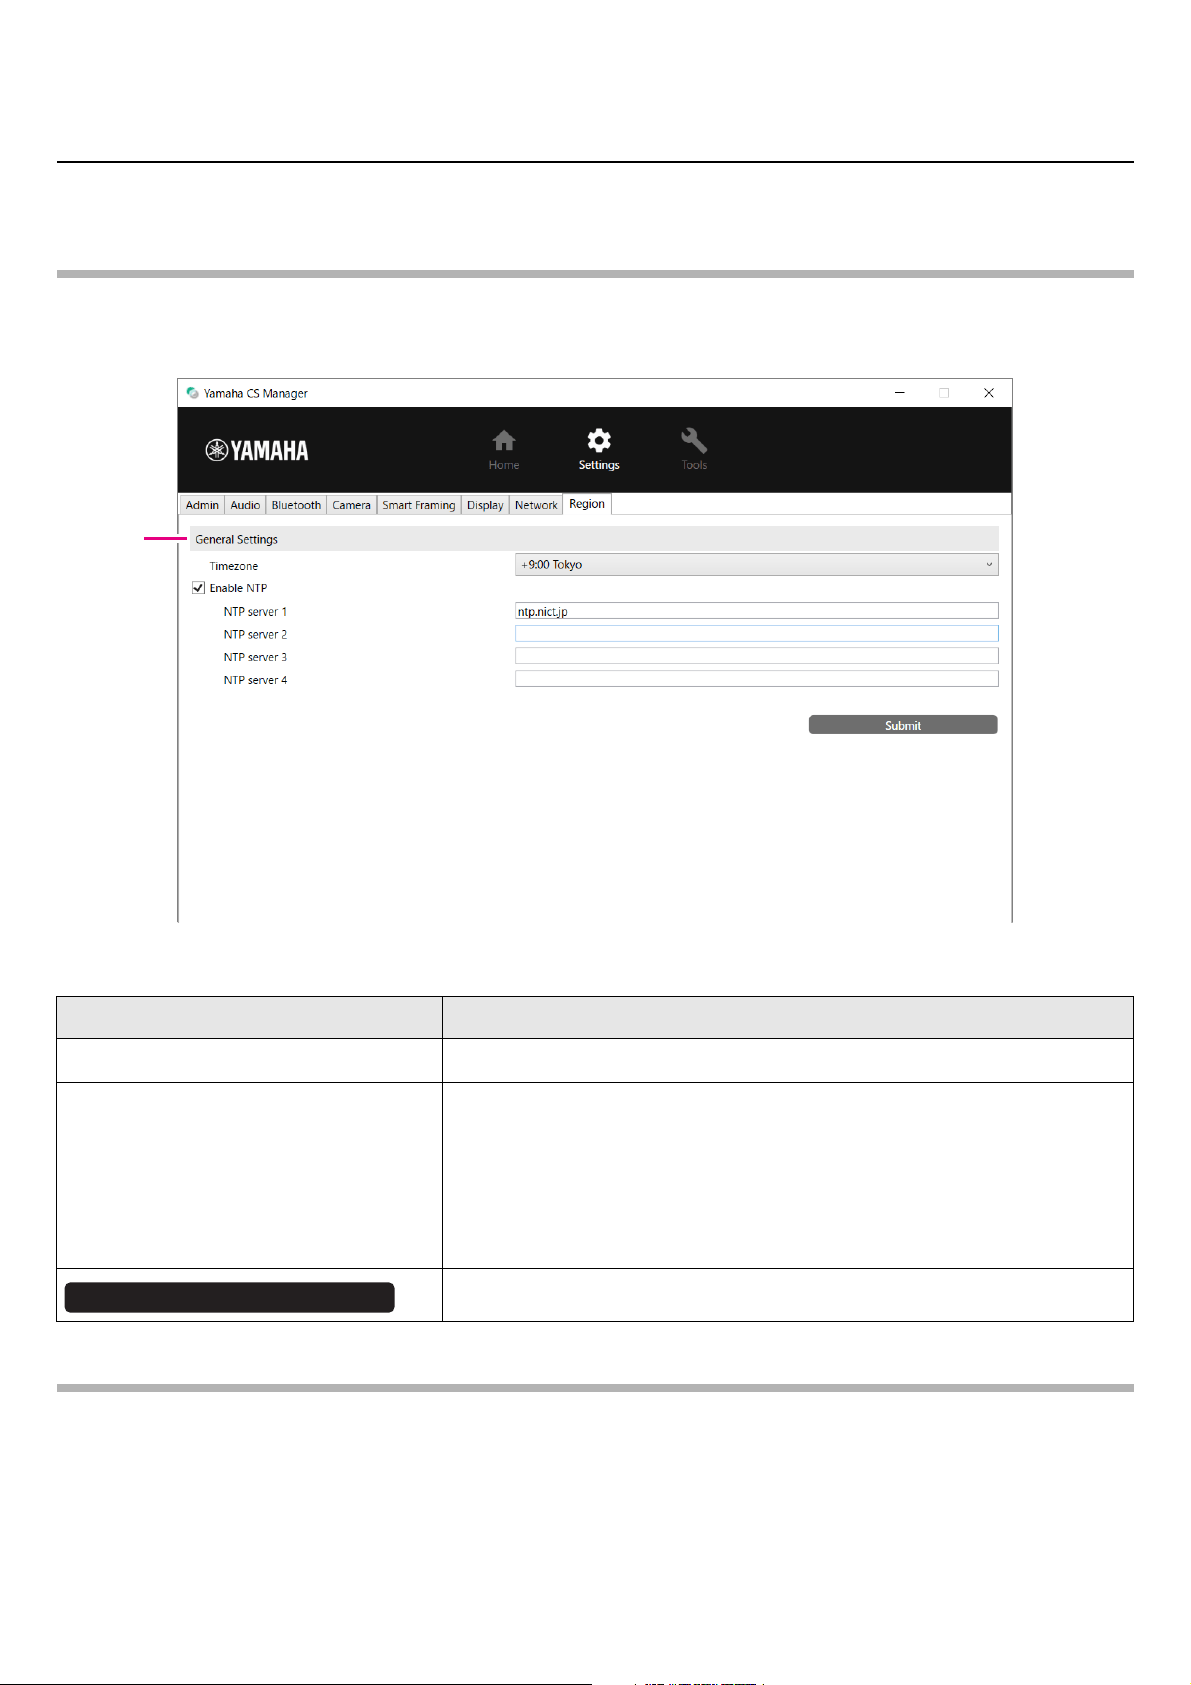
In the [Region] screen, settings can be specified to automatically adjust the time on this device.
NOTE
In order to set the time, a Wi-Fi connection must be made by using the network settings. (Page 46)
[Settings] menu > [Region] screen
1 General Settings
Related links
• Connecting to a network (Page 46)
Item Description
Timezone
Allows you to select the time zone.
Enable NTP
Allows you to select whether to activate/deactivate NTP. When this is
activated, the NTP server address can be specified.
• [NTP server 1]
• [NTP server 2]
• [NTP server 3]
• [NTP server 4]
Click to apply the settings specified under “General Settings”.
1
Submit
CS-500 User Guide
50
Using Yamaha CS Manager to specify detailed settings
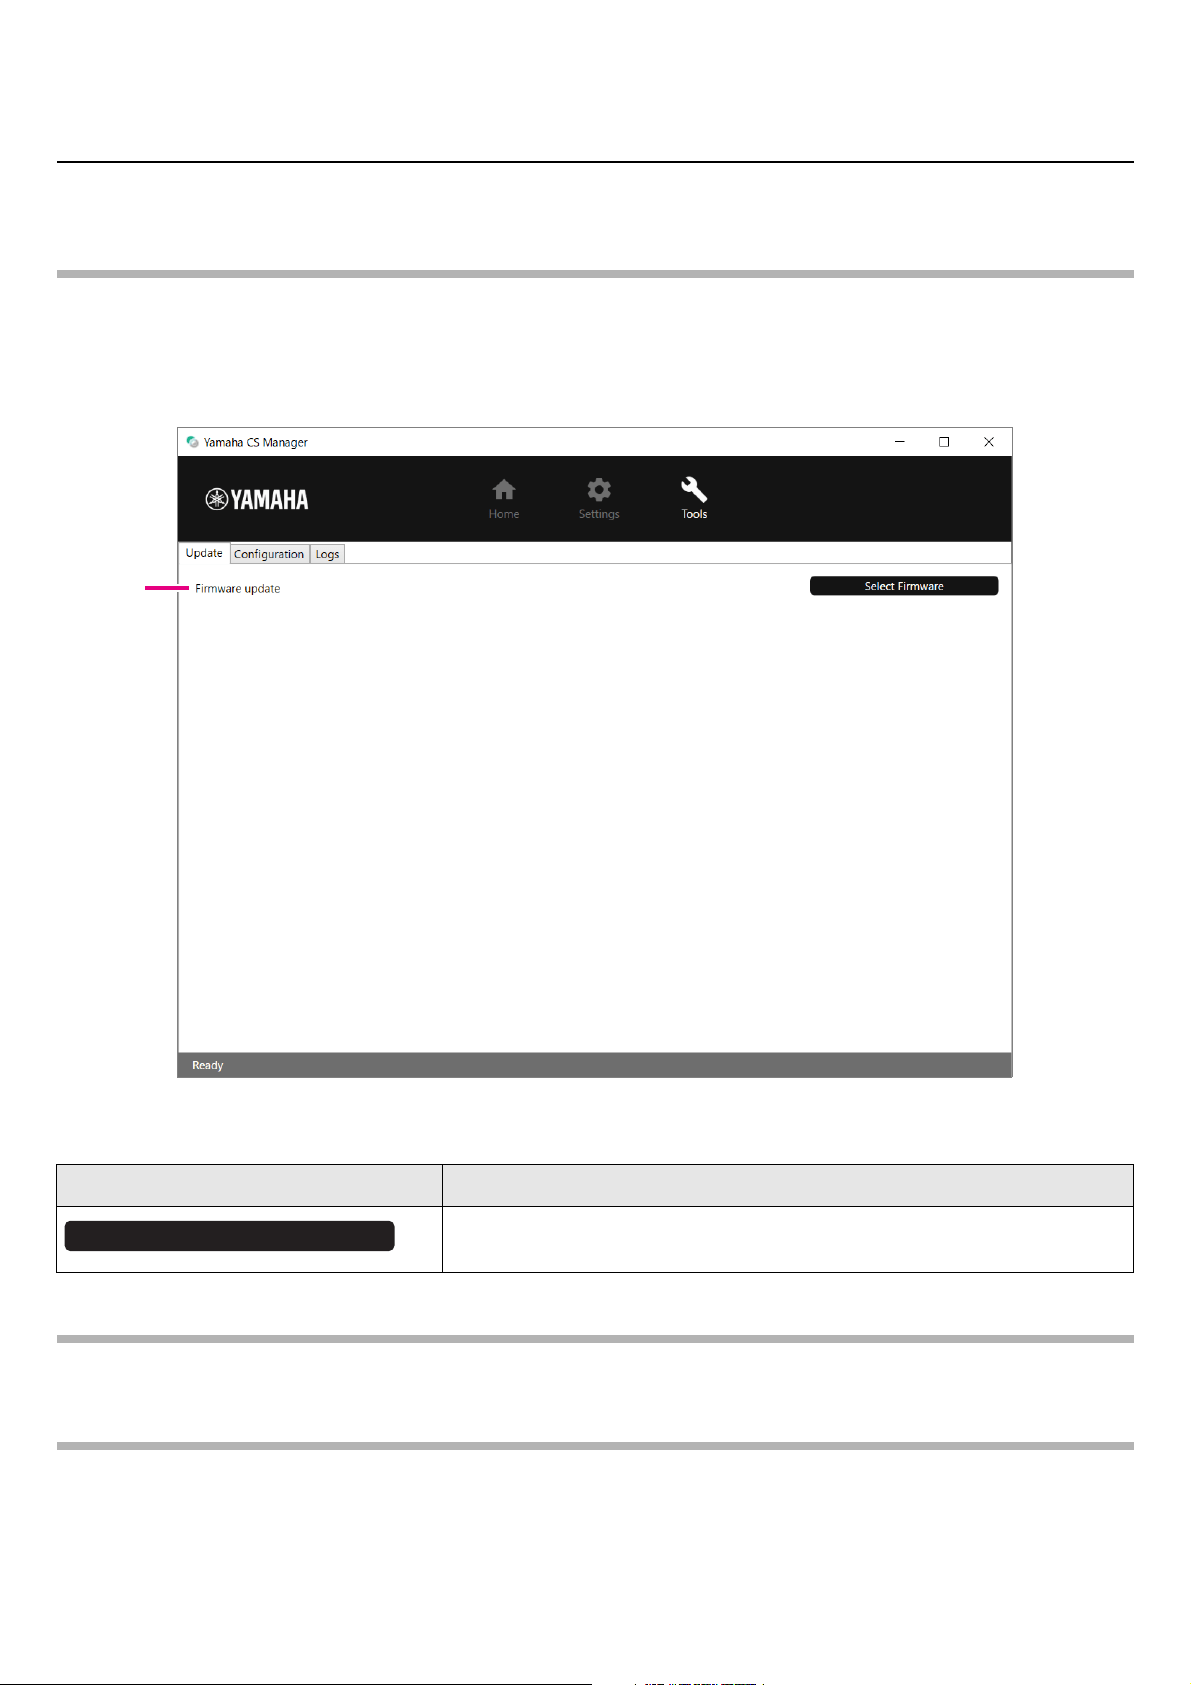
Updating the firmware
In the [Update] screen, the firmware can be updated.
NOTE
This product is designed to allow the firmware of the device to be updated in order to improve operability, add functions and
fix problems. We recommend updating the device firmware to the latest version. Prepare the file for the latest firmware
according to step 1 in “Updating the device firmware” (page 7).
[Tools] menu > [Update] screen
1 Firmware update
Related links
• Updating the device firmware (Page 7)
NOTE
Do not disconnect the AC adaptor or USB cable of the device while updating the firmware.
Item Description
Allows you to specify the firmware file and upload it. Extension of uploadable
files: “
.bundle”
1
Select Firmware
CS-500 User Guide
51
Using Yamaha CS Manager to specify detailed settings
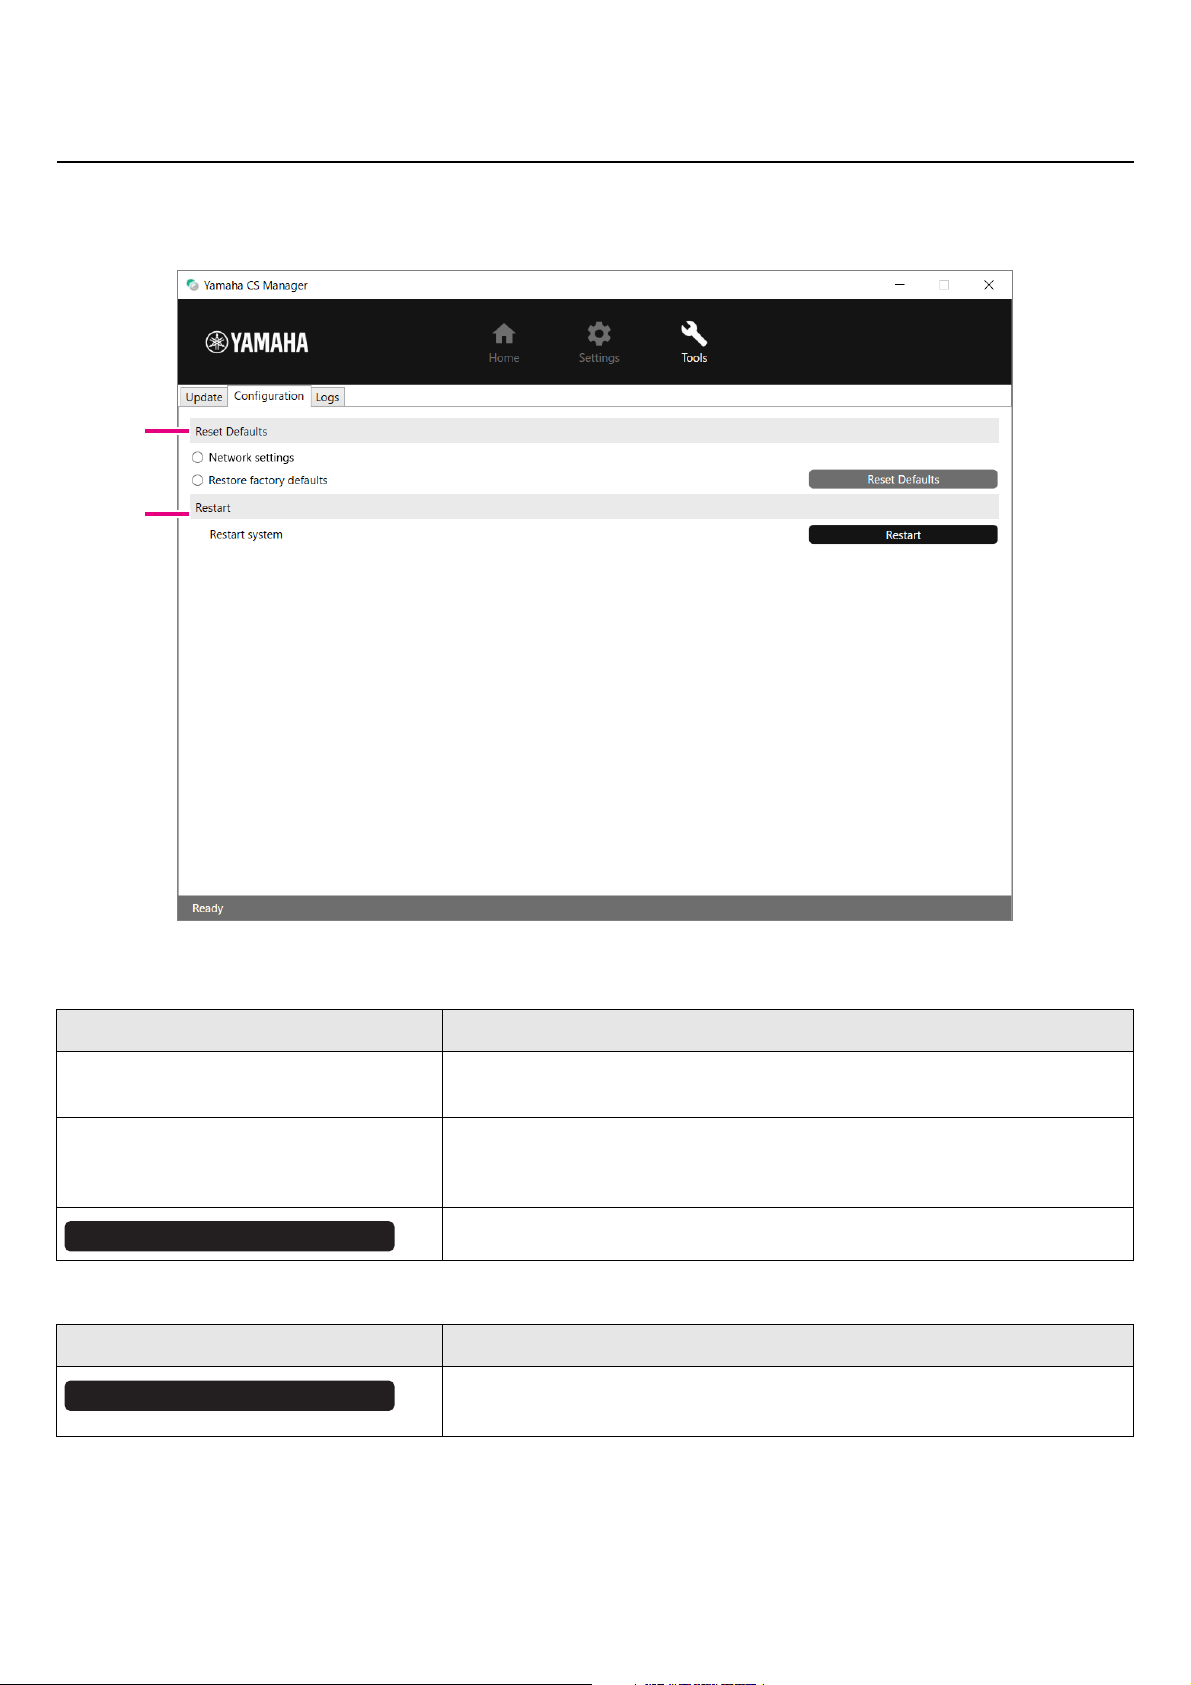
Configuration
In the [Configuration] screen, the device settings can be reset or the device can be restarted.
[Tools] menu > [Configuration] screen
1 Reset Defaults
2 Restart
Item Description
Network settings
To reset the network settings, select this, and then click the [Reset Defaults]
button.
Restore factory defaults
To return the device to its factory default settings (initialize), select this, and
then click the [Reset Defaults] button. After the reset is finished, the initial
password setting window appears.
Click to perform the reset selected above.
Item Description
Click to restart the device.
After the device is restarted, the login window appears.
1
2
Reset Defaults
Restart

CS-500 User Guide
52
Using Yamaha CS Manager to specify detailed settings
Logs
In the [Logs] screen, log information can be downloaded. If you contact our support desk with a problem that you have
encountered, you may be asked to download the log to be analyzed for the cause.
[Tools] menu > [Logs] screen
1 Logs
NOTE
The log information will be erased when the device is returned to its factory default settings (factory reset). We recommend
downloading the log information before performing a factory reset (Page 56) due to a problem.
Item Description
Click to save the log file. Browse to the location where the log file is to be
downloaded and saved.
1
Download Logs
CS-500 User Guide
53
Main specifications
General specifications
Appendix
Product type Video conference system
Dimensions 261 mm (W) × 76 mm (D) × 51 mm (H)
Weight 0.6 kg
Power supply
AC adaptor CW2002100
Input voltage: 100 V – 240 V
Input frequency: 50 Hz/60 Hz
Input current: 1.2 A
Output voltage: 20 V DC
Output current: 2.1 A
Maximum power
consumption
15.0 W
Safety CB/G, UL, CE, RCM, KC, CCC, BSMI, BIS
EMC FCC, IC, CE, RCM, KC, CCC, BSMI
Radio interference
standard
FCC, IC, CE, RCM, KC, SRRC, NCC, ANATEL
Operating environment
Temperature 0 °C – 40 °C
Humidity 20% – 85% (non-condensing)
Storage environment
Temperature –20 °C – 60 °C
Humidity 20% – 85% (non-condensing)
Indicators Status indicator
Included items
Read This First, Safety Guide, USB 2.0 cable (Type C-A, 5 m), HDMI cable (2 m), remote control
(RC-RBT1), lens cap, coin battery (CR2032) × 2, AC adaptor with power cord (CW2002100), cable tie
Separately sold items
Mounting accessory BRK-WL1
Mounting accessory BRK-TV1
USB 3.2 Gen 2 cable (Type C-A, 10 m) CBL-L10AC
USB 3.2 Gen 2 cable (Type C-A, 25 m) CBL-L25AC
Supported operating
systems
Windows 11, Windows 10, macOS 12, macOS 11, macOS 10.15, Chrome OS
Installation
Placed on top of display (up to 50 mm thick): Device stand
Mounted above display (fixed): BRK-WL1 and BRK-TV1 (sold separately)
Mounted below display: BRK-WL1 and BRK-TV1 (sold separately)
Mounted on wall: BRK-WL1 (sold separately)
Mounted on tripod: Device tripod thread
CS-500 User Guide
54
Appendix
Connectivity
Audio
Camera/video
USB Type-C USB 2.0/3.2 Gen 1, UAC 2.0, UVC 1.1, DisplayLink
HDMI
Version 1.4
Resolution: 720 × 480, 1280 × 720, 1366 × 768, 1920 × 1080
Frame rate: 30 fps
HDCP: Version 1.4
HDMI-CEC: Power control, Input selection
Bluetooth
Common
Version 5.0
Supported profiles: HFP(1.7), A2DP, AVRCP, BLE
Supported codec: CVSD, SBC, mSBC
Wireless output: Class 1
Maximum communication distance: 10m (32.8 ft) (no obstacles)
Radio frequency (operational frequency): 2,402 to 2,480 MHz
U.K./EU Maximum output power (EIRP): 7.0 dBm (5.0 mW)
USA/Canada Maximum output power: 7.79 dBm (6.0 mW)
Korea Maximum output power: 0.003 W
Wi-Fi network
Common
Wireless LAN standards: IEEE 802.11b/g/n
Radio frequency band: 2.4 GHz
Available security method: OPEN, WEP, WPA/WPA2-PSK, WPA3-SAE
U.K./EU
Radio frequency (operational frequency): 2,412 to 2,472 MHz
Maximum output power (EIRP): 18.7 dBm (74.1 mW)
USA/Canada
Radio frequency (operational frequency): 2,412 to 2,462 MHz
Maximum output power: 13.81 dBm (24.0 mW)
Korea
Radio frequency (operational frequency): 2,412 to 2,472 MHz
Maximum output power: 0.01 W/MHz
Microphone Hexa-microphone (MEMS × 6)
Microphone coverage
120° audio pickup;
Max. distance: 6.0 m (19.6 ft) (face focus beamforming off) / 3.0 m (9.8 ft) (face focus beamforming on)
Microphone frequency
response
100 Hz – 16 kHz
Audio signal processing
Adaptive echo canceller, Noise reduction, Automatic tracking, Automatic gain control, Automatic room EQ,
Dereverberation, SoundCap Eye (Face focus beamforming, Self-silence, Self-volume balancer)
Sensor CMOS 8M pixels (4K)
Diagonal angle of view 120°
Focal distance 0.5 m (1.6 ft) – ∞
Frame rate 6 fps, 7.5 fps, 10 fps, 15 fps, 30 fps
Supported video
resolutions
3840 × 2160, 2560 × 1440, 1920 × 1080, 1280 × 720, 640 × 360
Supported video codecs YUY2, MJPEG, NV12
Frame control
Smart framing (Group, Individual, Speaker tracking) or manual pan-tilt-zoom (PTZ), configurable preset × 2
Maximum zoom ratio: 5.0×
People detection max distance: 4.5 m
Video signal processing Automatic white balance, Automatic exposure control, Noise reduction

CS-500 User Guide
55
Appendix
User interface
Output features
Function button Factory default settings, Remote control pairing
Remote control
Power supply, Microphone mute × 2, Speaker volume, Camera ePTZ, Smart framing ON/OFF, Camera
preset × 2, On-screen display menu control
On-screen display menu Meeting area, Smart framing mode, Camera preset, Microphone, Speaker, Bluetooth
People presence
detection
Auto wakeup
Yamaha CS Manager
Supported OS: Windows11, Windows10 (64-bit), macOS 12, macOS 11, macOS 10.15
Functions: Device status monitor, Security setting, Power setting, Audio setting, Camera setting, Smart
framing setting, Bluetooth setting, HDMI screen setting, Network (Wi-Fi) setting, NTP setting, Firmware
upgrading, Factory default setting, Logs retrieving
Output connector Type Output impedance
Compatible
impedance
Output level Connector
3.5 mm mini jack
Headphones
20 Ω
16 – 32 Ω 25 mW (16 Ω)
3.5 mm stereo (TRS)
Line 100 Ω 0.8 dBV
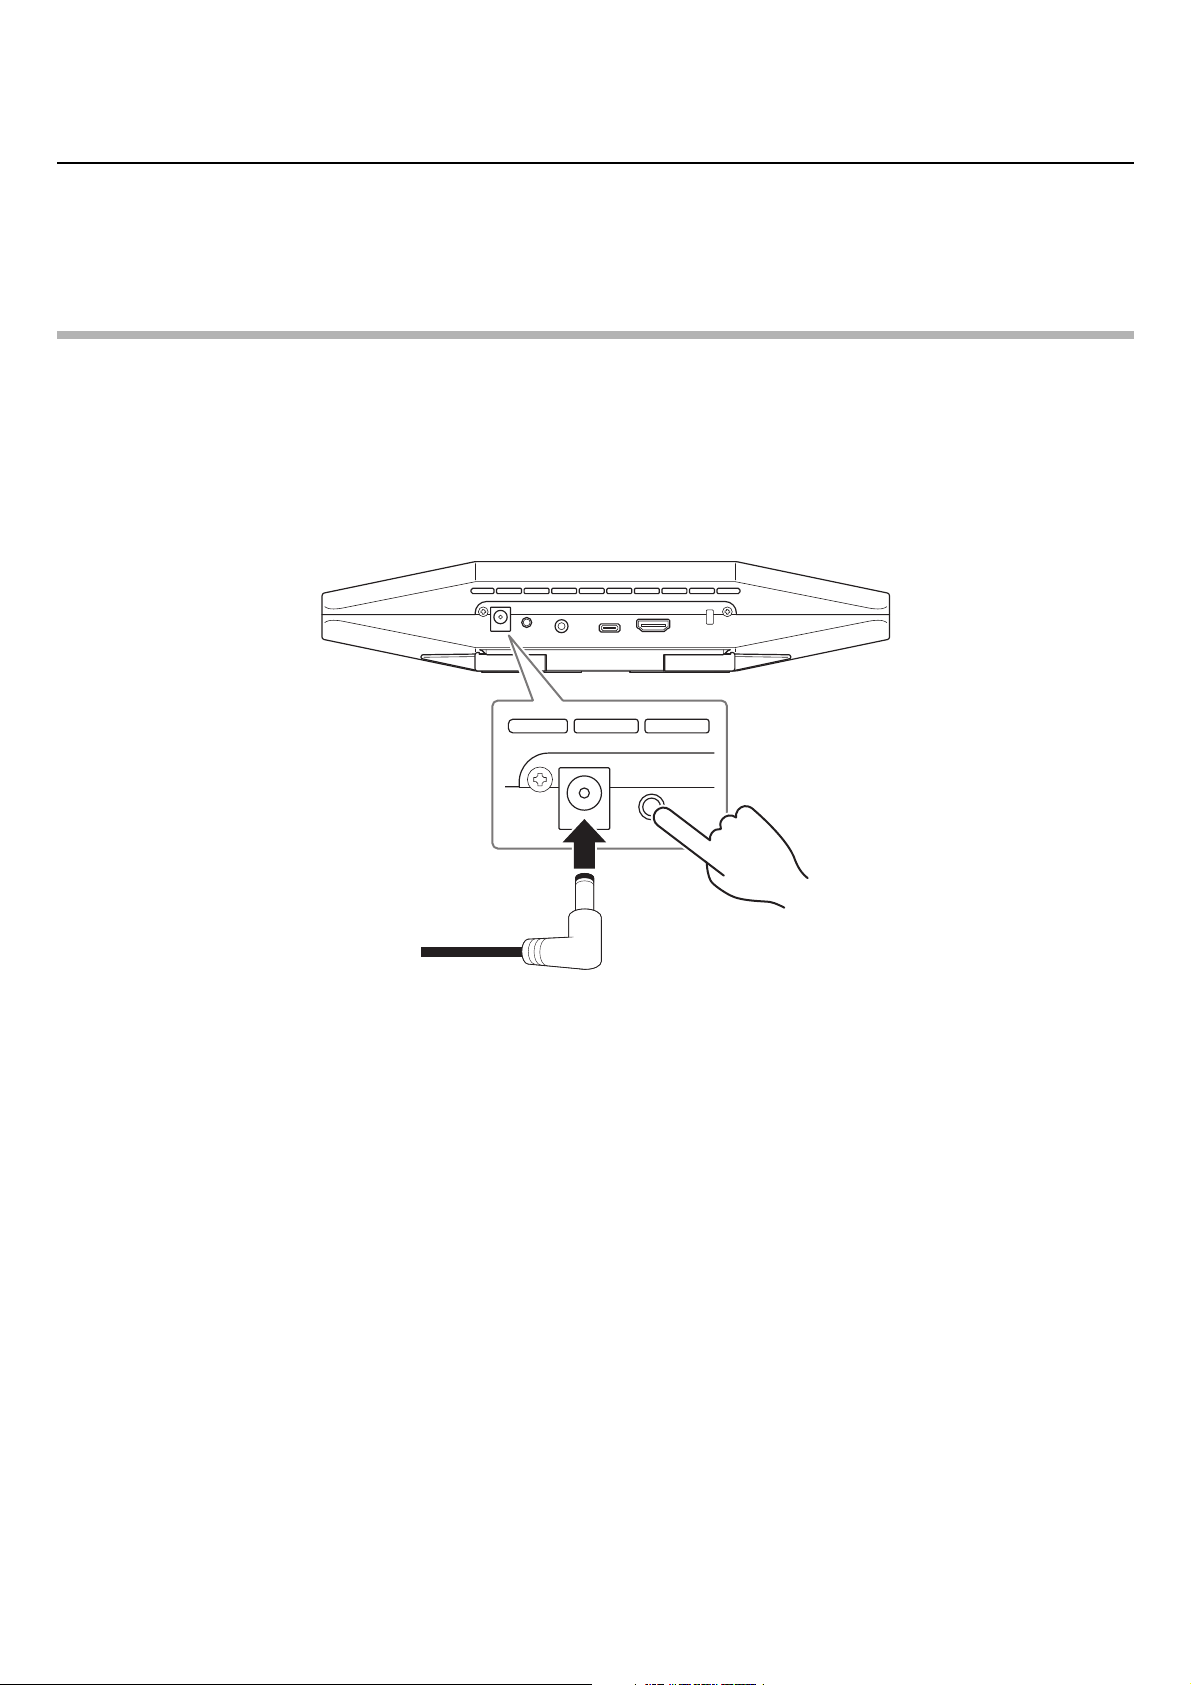
CS-500 User Guide
56
Appendix
Returning to factory default settings (factory reset)
This device can be returned to its factory default (initial settings) using either of the following methods.
• Initializing by using the device
• Initializing by using Yamaha CS Manager
NOTE
The log information will be erased when the device is returned to its factory default settings (factory reset). We recommend
downloading the log information before performing a factory reset due to a problem. (Page 52)
Initializing by using the device
1. Start the device by connecting the power cable while holding down the [FUNCTION] button
on the rear panel of the device.
Connecting the power cable automatically turns on the device.
2. After connecting the power cable, keep the [FUNCTION] button pressed for at least 5
seconds.
The status indicator on the front panel of the device flashes in orange five times at a 0.5-second interval.
Initialization is finished when the status indicator lights up in white.
Initializing by using Yamaha CS Manager
Initialize from the [Configuration] screen in the [Tools] menu of Yamaha CS Manager. (Page 51)
Device (rear panel)