
1
INSTRUCTION MANUAL
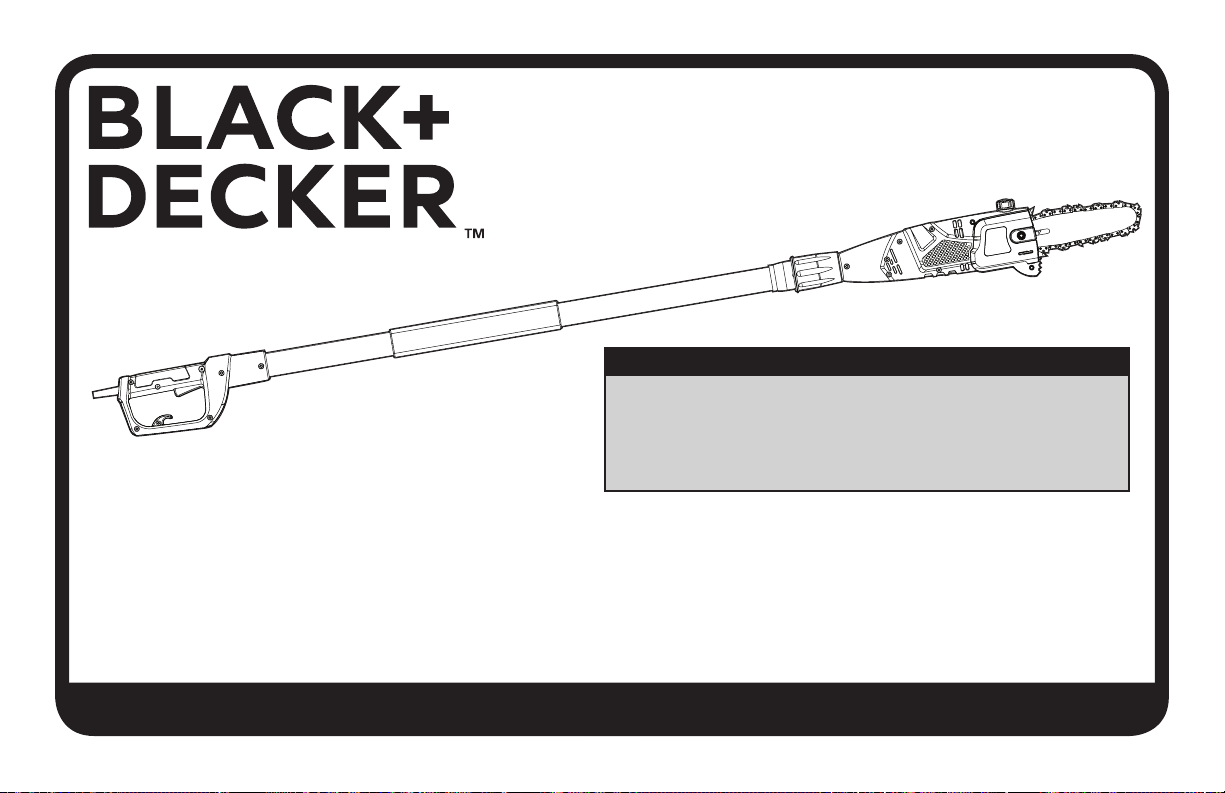
POLE SAW
Thank you for choosing BLACK+DECKER!
PLEASE READ BEFORE RETURNING THIS PRODUCT FOR ANY REASON.
If you have a question or experience a problem with your BLACK+DECKER purchase, go to http://www.blackanddecker.com/instantanswers
If you can’t find the answer or do not have access to the Internet, call 1-800-544-6986 from 8 a.m. to 5 p.m. EST Mon. - Fri. to speak with an
agent. Please have the catalog number available when you call.
SAVE THIS MANUAL FOR FUTURE REFERENCE.
VEA EL ESPANOL EN LA CONTRAPORTADA. INSTRUCTIVO DE OPERACIÓN, CENTROS DE SERVICIO Y PÓLIZA DE GARANTÍA. ADVERTENCIA: LÉASE ESTE INSTRUCTIVO ANTES DE USAR EL PRODUCTO.
CATALOG NUMBER
PP610
To register your new product, call 1-800-544-6986 or visit www.BlackandDecker.com/NewOwner
KEY INFORMATION YOU SHOULD KNOW:
READ INSTRUCTIONS THOROUGHLY
BEFORE OPERATING!
• DO NOT OVER-TENSION CHAIN. Refer to “Adjusting Chain
Tension” for proper method of tensioning chain.
• Retighten chain frequently during first two hours of use.
2
provided on the circuit(s) or outlet(s) to be used for the pole saw.
Receptacles are available having built-in GFCI protection and may be
used for this measure of safety.
WARNING: To reduce the risk of electric shock, use only with an
extension cord intended for outdoor use, such as an extension cord of
cord type SW-A, SOW-A, STW-A, STOW-A, SJW-A, SJOW-A,
SJTW-A. or SJTOW-A.
Extension Cord. Make sure your extension cord is in good condition.
When using an extension cord, be sure to use one heavy enough
to carry the current your product will draw. An undersized extension
cord will cause a drop in line voltage resulting in loss of power and
overheating. The following table, shows the correct size to use
depending on cord length and nameplate ampere rating. If in doubt,
use the next heavier gage. The smaller the gage number, the heavier
the cord.
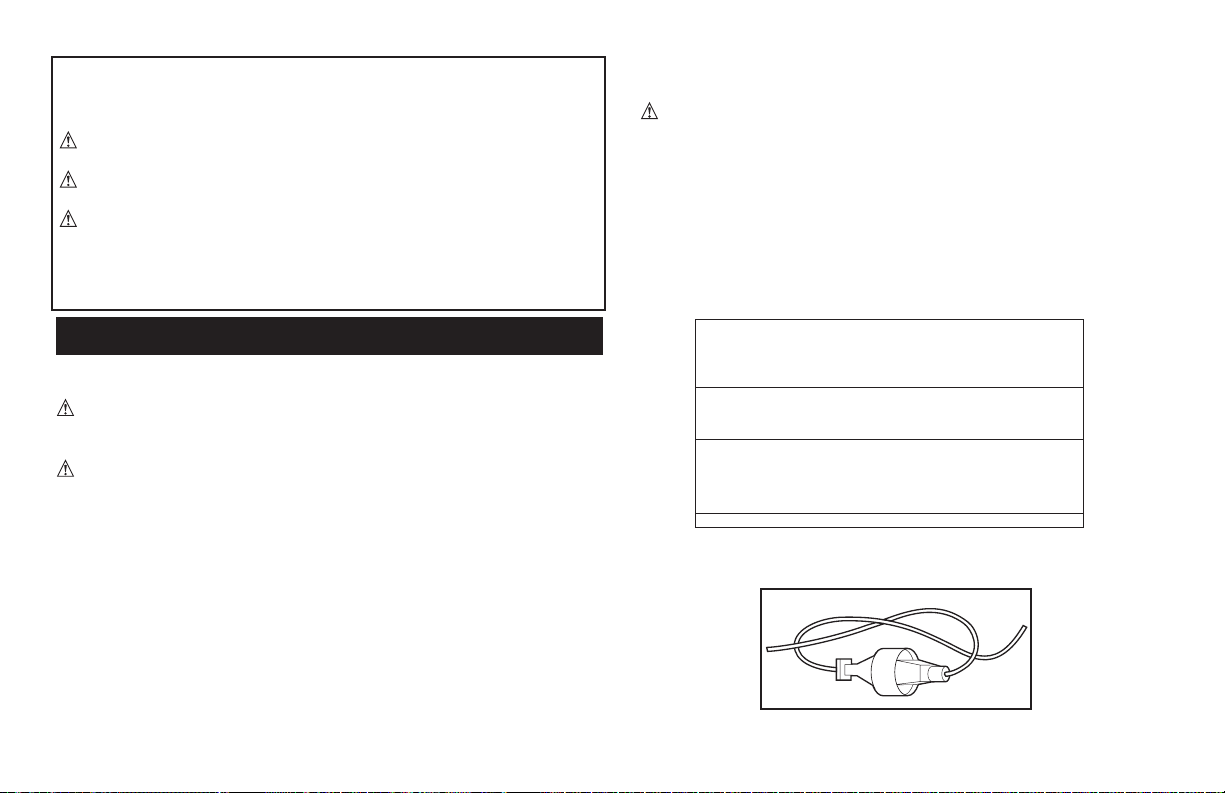
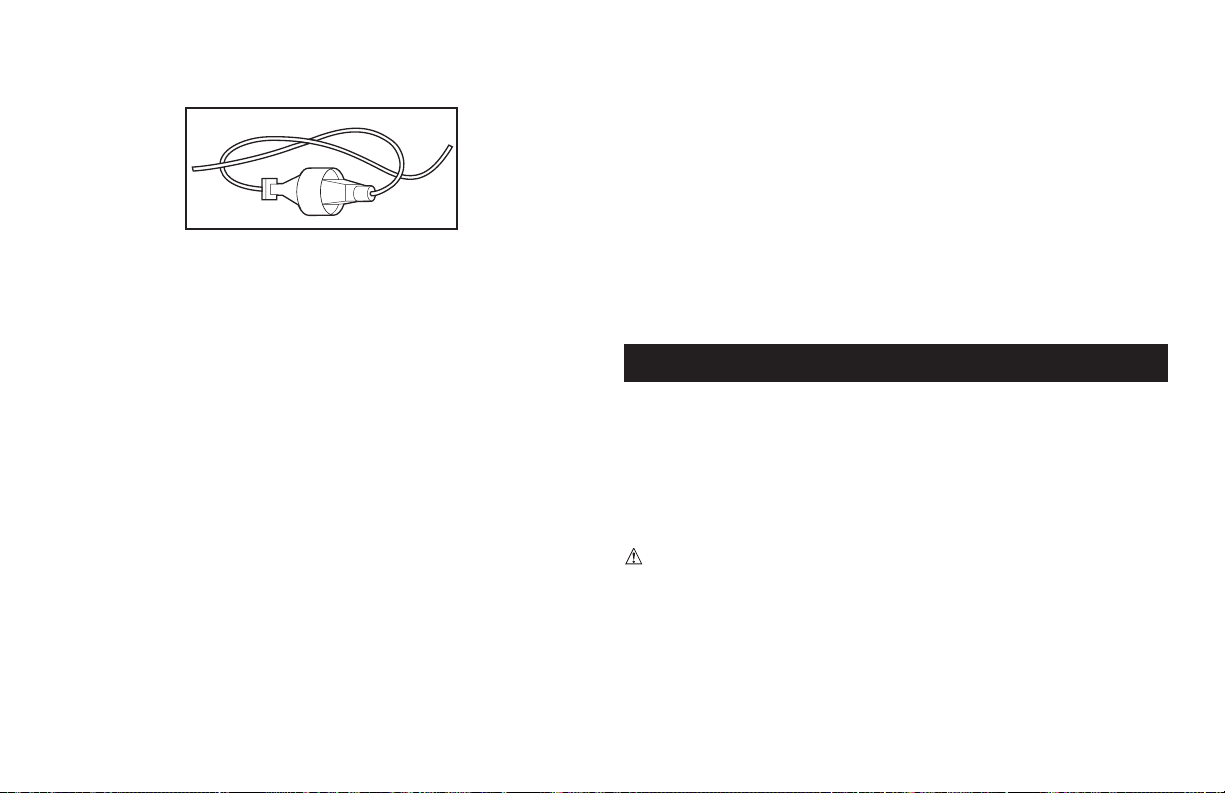
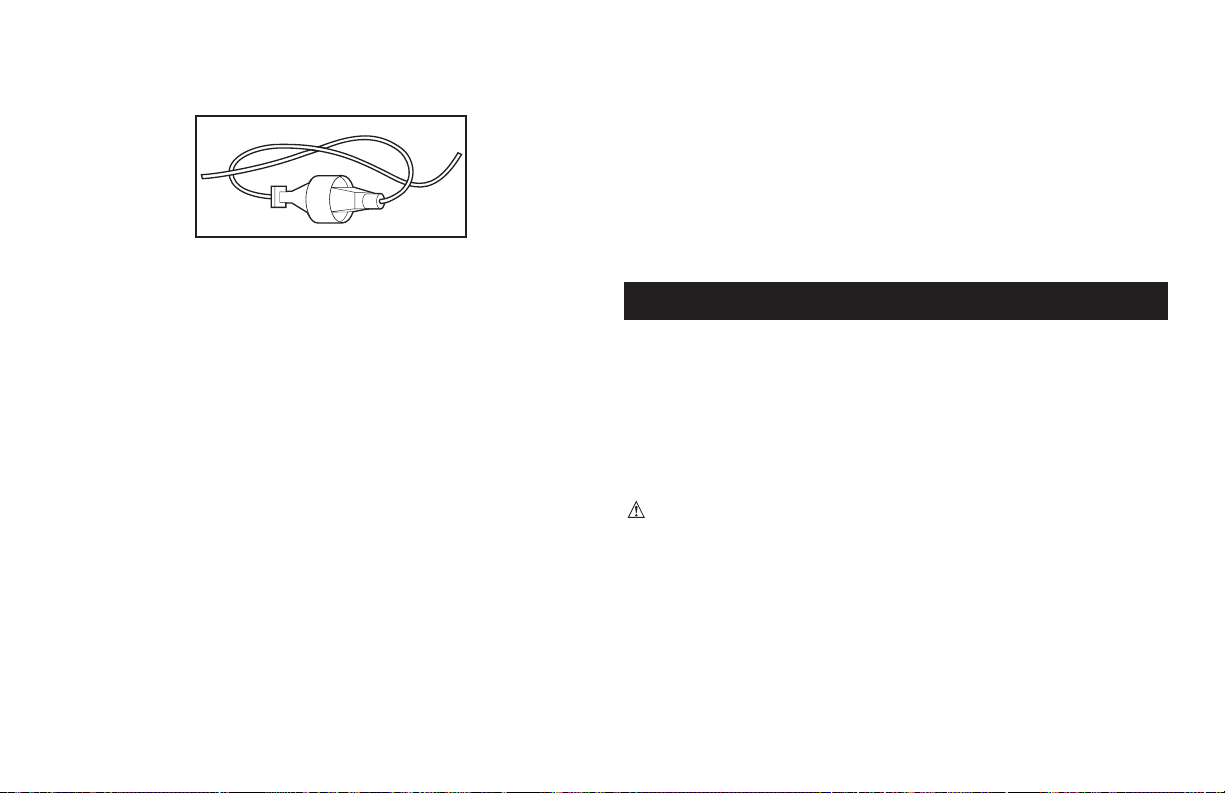
- To reduce the risk of disconnection of pole saw cord from the
extension cord during operating make a knot as shown in Figure
below.
SAFETY GUIDELINES - DEFINITIONS
It is important for you to read and understand this manual. The information it
contains relates to protecting YOUR SAFETY and PREVENTING PROBLEMS.
The symbols below are used to help you recognize this information.
DANGER: Indicates an imminently hazardous situation which, if
not avoided, will result in death or serious injury.
WARNING: Indicates a potentially hazardous situation which, if
not avoided, could result in death or serious injury.
CAUTION: Indicates a potentially hazardous situation which, if
not avoided, may result in minor or moderate injury.
CAUTION: Used without the safety alert symbol indicates a
potentially hazardous situation which, if not avoided, may result in
property damage.
IMPORTANT SAFETY RULES
SAVE THESE INSTRUCTIONS
READ AND UNDERSTAND ALL INSTRUCTIONS.
WARNING: When using electric gardening appliances, basic
safety precautions should always be followed to reduce the risk of fire,
electric shock, and personal injury, including the following:
WARNING:
For safe operation read and understand owner’s manual.
Avoid Dangerous Environment.
locations.
• Don’t Use In Rain.
Keep Children Away. All visitors should be kept at a distance from
work area.
Dress Properly. Do not wear loose clothing or jewelry. They can be
caught in moving parts. Use of rubber gloves and substantial footwear
is recommended when working outdoors. Wear protective hair
covering to contain long hair.
Use Safety Glasses. Always use face or dust mask if operation is
dusty.
Use Right Appliance. Do not use pole saw for any job except that for
which it is intended.
Ground Fault Circuit Interrupter (GFCI) protection should be
Minimum Gauge for Cord Sets
Volts Total Length of Cord in Feet
120V 0-25 26-50 51-100 101-150
240V 0-50 51-100 101-200 201-300
Ampere Rating
More Not more American Wire Gauge
Than Than
0 - 6 18 16 16 14
6 - 10 18 16 14 12
10 - 12 16 16 14 12
12 - 16 14 12 Not Recommended

3
Receptacles are available having built-in GFCI protection and may
be used for this measure of safety.
WARNING:
Some dust created by power sanding, sawing,
grinding, drilling, and other construction activities contains chemicals
known to cause cancer, birth defects or other reproductive harm.
Some examples of these chemicals are:
Your risk from these exposures varies, depending on how often you do this
type of work. To reduce your exposure to these chemicals: work in a well
ventilated area, and work with approved safety equipment, such as those
dust masks that are specially designed to filter out microscopic particles.
Avoid prolonged contact with dust from power sanding, sawing,
grinding, drilling, and other construction activities. Wear protective
clothing and wash exposed areas with soap and water. Allowing dust
to get into your mouth, eyes, or lay on the skin may promote absorption of
harmful chemicals.
WARNING:
Use of this tool can generate and/or disburse
dust, which may cause serious and permanent respiratory or
other injury. Always use NIOSH/OSHA approved respiratory
protection appropriate for the dust exposure. Direct particles away
from face and body.
CAUTION: Wear appropriate personal hearing protection during
use. Under some conditions and duration of use, noise from this
product may contribute to hearing loss.
Double Insulation
Double insulated tools are constructed throughout with two separate
layers of electrical insulation or one double thickness of insulation
between you and the tools electrical system. Tools built with this
insulation
system are not intended to be grounded. As a result, your tool
is equipped with a two prong plug which permits you to use extension
cords without concern for maintaining a ground connection. NOTE: Double
insulation does not take the place of normal safety precautions when
operating this tool. The insulation system is for added protection against
injury resulting from a possible electrical insulation failure within the tool.
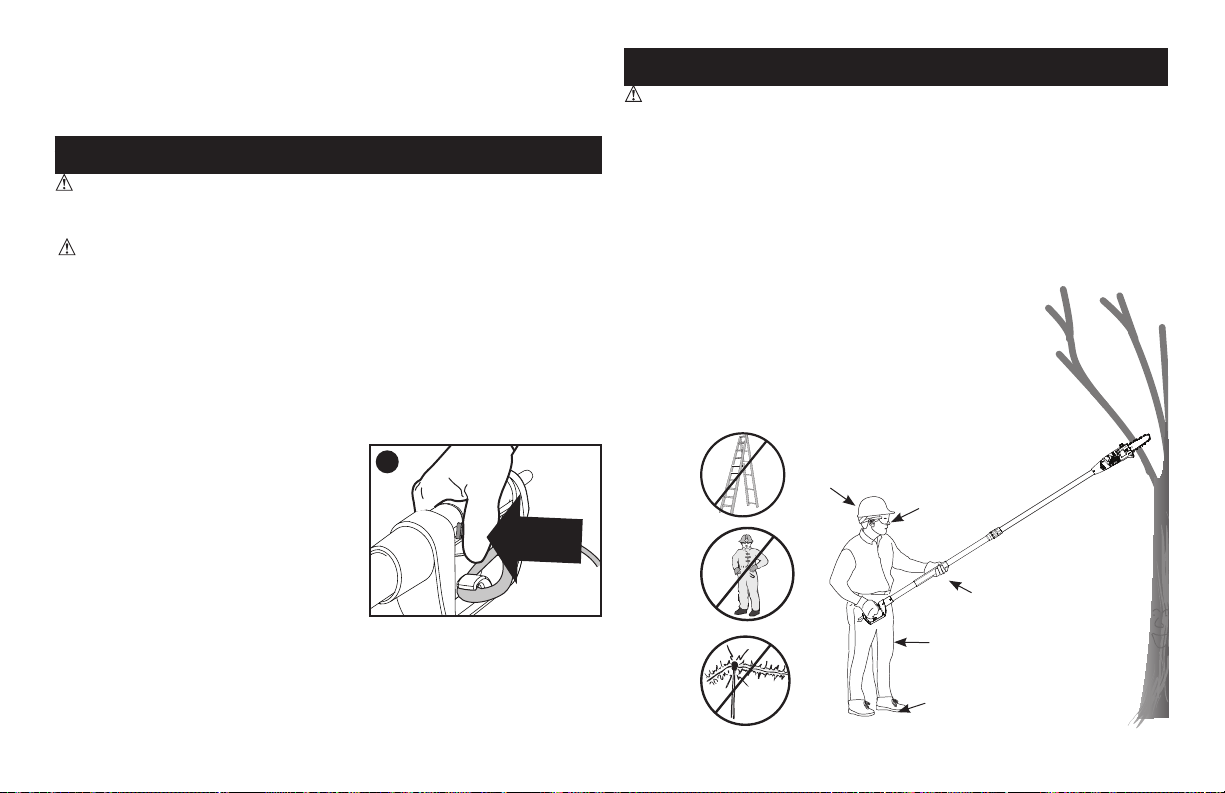
extension cord retainer
Avoid Unintentional Starting. Do not carry plugged-in pole saw with
finger on switch. Be sure switch is off when plugging in.
Do not Abuse Cord. Never carry pole saw by cord or yank it to
disconnect from receptacle. Keep cord from heat, oil, and sharp edges.
Do not grasp the exposed cutting blades or cutting edges when
picking up or holding the pole saw.
Do Not Force Pole Saw. It will do the job better and with less likelihood
of a risk of injury at the rate for which it was designed.
Do Not Overreach. Keep proper footing and balance at all times.
Stay Alert. Watch what you are doing. Use common sense. Do not
operate pole saw when you are tired.
Disconnect Pole saw. Disconnect the pole saw from the power supply
when not in use, before servicing, when changing accessories such as
chains, and the like.
Store Idle Pole saws Indoors. When not in use, pole saw should be stored
indoors in dry, and high or locked-up place out of reach of children.
Maintain Pole saw With Care. Keep cutting edge sharp and clean for
best performance and to reduce the risk of injury. Follow instructions
for lubricating and changing accessories. Inspect pole saw cord
periodically, and if damaged, have it repaired by an authorized service
facility. Inspect extension cords periodically and replace if damaged.
Keep handles dry, clean, and free from oil and grease.
Check Damaged Parts. Before further use of the pole saw, a guard or
other part that is damaged should be carefully checked to determine
that it will operate properly and perform its intended function. Check for
alignment of moving parts, binding of moving parts, breakage of parts,
mounting, and any other condition that may affect its operation. A guard
or other part that is damaged should be properly repaired or replaced by
an authorized service center unless indicated elsewhere in this manual.
SAVE THESE INSTRUCTIONS
SPECIFIC SAFETY RULES
Electrical safety
This tool is double insulated; therefore no grounding wire is required. Always
check that the power supply corresponds to the voltage on the rating plate.

4
- secure footing
- planned retreat path from falling limbs
freely to the ground.
While Operating Pole Saw
DANGER: To reduce the risk of electric shock do no use on
wet surfaces. Do not expose to rain. Store indoors.
DANGER: Avoid Unintentional Starting
appliance with finger on switch. Be sure switch is off when plugging in.
from Pole Saw. Only Pole Saw user should be in work area.
the pole saw.
job better and safer at the rate for which it was intended.
- with cord removed
- fingers off/away from trigger
- by holding pole at balance point
- with guide bar and chain to rear and with scabbard attached
may catch in the chain and be whipped toward you. This could also
pull you off balance.
result in loss of balance or exposure to hot surfaces.
this product, which was not provided with the product, or identified as
appropriate for use with this product in this Instruction Manual.
REPLACEMENT PARTS: When servicing all tools, USE IDENTICAL
REPLACEMENT PARTS. Repair or replace damaged cords.
Polarized Plugs
To reduce the risk of electric shock, this appliance has a polarized
polarized extension cord. The pole saw plug will fit into a polarized
extension cord only one way. If the plug does not fit fully into the
extension cord, reverse the plug. If the plug still does not fit, obtain a
correct polarized extension cord. A polarized extension cord will require
the use of a polarized wall outlet. This plug will fit into the polarized
wall outlet only one way. If the plug does not fit fully into the wall
outlet, reverse the plug. If the plug still does not fit, contact a qualified
electrician to install the proper wall outlet. Do not change the equipment
plug, extension cord receptacle, or extension cord plug in any way.
Before Operating Pole Saw
• For safe operation, read and understand all instructions before using
the Pole Saw. Follow all safety instructions. Failure to follow all safety
instructions listed below, can result in serious personal injury.
Saw when you are tired.
purposes not intended. Do not use for cutting other items.
• Only well-instructed adults should operate Pole Saw. Never allow
children to operate.
• Do not allow children or untrained individuals to use this unit.
- heavy-duty gloves
- steel-toed safety footwear with non-skid soles
- safety glasses, goggles or face screen that are marked to
comply with ANSI Z87
- safety hard hat
- ear mufflers or ear plug
Do not wear loose fitting
clothing, short pants, jewelry of any kind, or go barefoot.
in any moving parts.
- clear work area

5
impacts. Ensure there are no significant defects or damage.
Do not operate Pole Saw
- while under the influence of alcohol, medication, or drugs.
- in rain or in damp or wet areas.
- where highly flammable liquids or gases are present
- if Pole Saw is damaged, adjusted incorrectly, or not fully and
securely assembled.
- if trigger does not turn Pole Saw on and off. Chain must stop
moving when you release trigger. Have faulty switch replaced by
authorized service center. See “Service Information”.
- while in a hurry.
- while in tree or on a ladder.
- while on aerial booms, buckets or platforms.
- during high wind or storming weather.
GENERAL SAFETY RULES
DANGER: Shock Hazard. Serious Injury Or Death From
Electrocution If Power Lines Are Contacted. Never Use Near Any
Electrical Source, Wires, Or Power Lines.
WARNING: For Safe Operation Read And Understand Owner’s
Manual.
Protect Against Falling Debris. Always Have A Clear Work Area, Retreat
Path, And Be Aware Of Limb/Branch Location To Avoid Falling Limbs
To Reduce The Risk Of Electric Shock Do No Use On Wet Surfaces. Do
No Expose To Rain. Store Indoors.
the branch or limb being cut. This unit should not be held at an angle
over 60 degrees from ground level.
Service
Tool service must be performed only by qualified repair
personnel. Service or maintenance performed by unqualified
personnel could result in a risk of injury. See “Service Information”.
When servicing a tool, use only identical replacement parts.
Follow instructions in the Maintenance section of this manual.
Use of unauthorized parts or failure to follow Maintenance Instructions
may create a risk of electric shock or injury.
Guard Against Kickback
WARNING: KICKBACK
may occur when the nose or tip of the
guide bar touches an object, or when the wood closes in and pinches
the saw chain in the cut. Tip contact in some cases may cause a lightning
fast reverse reaction, kicking the guide bar up and back towards the operator.
Pinching the saw chain along the top of the guide bar may push the guide bar
rapidly back towards the operator. Either of these reactions may cause you to
lose control of the saw which could result in serious injury to user.
The following precautions should be followed to minimize kickback:
is running. Use a firm grip with thumbs and fingers encircling the saw
handle and pole.
other obstruction.
special guide bars that reduce the risks associated with kickback.
or the equivalent.
branches, rocks, fences, stumps, etc. Eliminate or avoid any
obstruction that your saw chain could hit while you are cutting through
a particular log or branch.
chain can increase the chance of kickback. Check tension at regular
intervals with the motor stopped and extension cord unplugged.
If the chain is moving at a slower speed, there is a greater chance for
kickback to occur.
Use extreme caution when re-entering a previous cut. Engage
spiked bumpers into wood and allow chain to reach full speed
before proceeding with cut.
pinch or fall into chain.
KICKBACK SAFETY FEATURES
WARNING: The following features are included on your Pole
Saw to help reduce the hazard of kickback; however such features will
not totally eliminate this dangerous reaction. As a pole saw user do not
rely only on safety devices. You must follow all safety precautions,
instructions, and maintenance in this manual to help avoid kickback and
other forces which can result in serious injury.
Reduced-Kickback Guide Bar, designed with a small radius tip which
reduces the size of the kickback danger zone on bar tip. A reduced-
kickback guide bar is one which has been demonstrated to significantly
reduce the number and seriousness of kickbacks when tested in
accordance with safety requirements for electric chain saws.
Low-Kickback Chain, designed with a contoured depth gauge and
guard link which deflect kickback force and allow wood to gradually
ride into the cutter. A low-kickback chain is a chain which has met
kickback performance requirements of ANSI B175.1 when tested on the
representative sample of chain saws.
Symbols
The label on your tool may include the following symbols. The symbols and
their definitions are as follows:
V ................ volts A .......... amperes
Hz .............. hertz W ......... watts
min ................ minutes
JULY 31,2007CAN/CSA-C22.2NO. 60745-1-07 ♦ UL 60745-1
or AC
alternating
current
JULY 31,2007CAN/CSA-C22.2NO. 60745-1-07 ♦ UL 60745-1
or DC . direct current
n
o ........ no load speed
.............. Class I Construction ......... earthing terminal
....... safety alert symbol
.............. Class II Construction .../min or rpm...revolutions or
........ ................Read instruction manual before use
.............. ................Use proper respiratory protection
.............. ................Use proper eye protection
.............. ................Use proper hearing protection
6
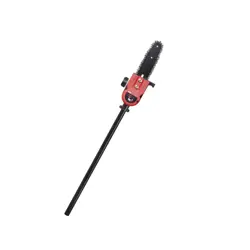
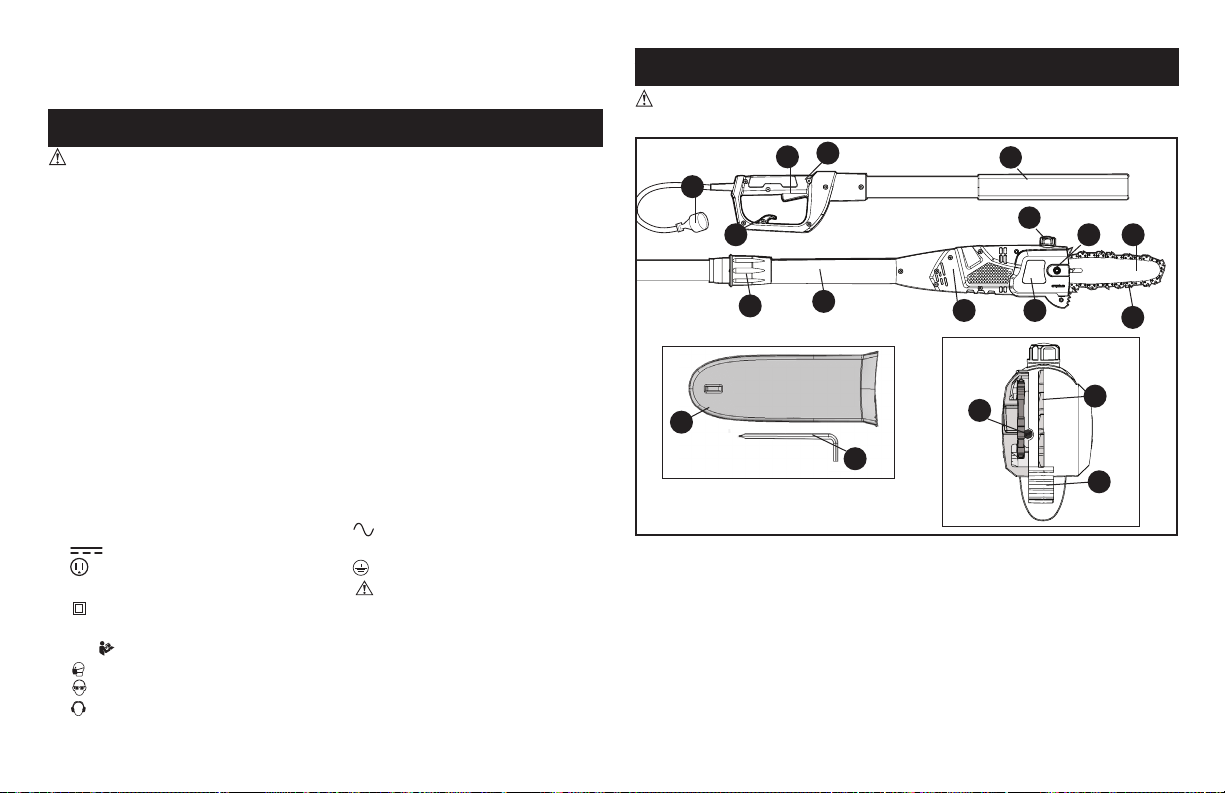
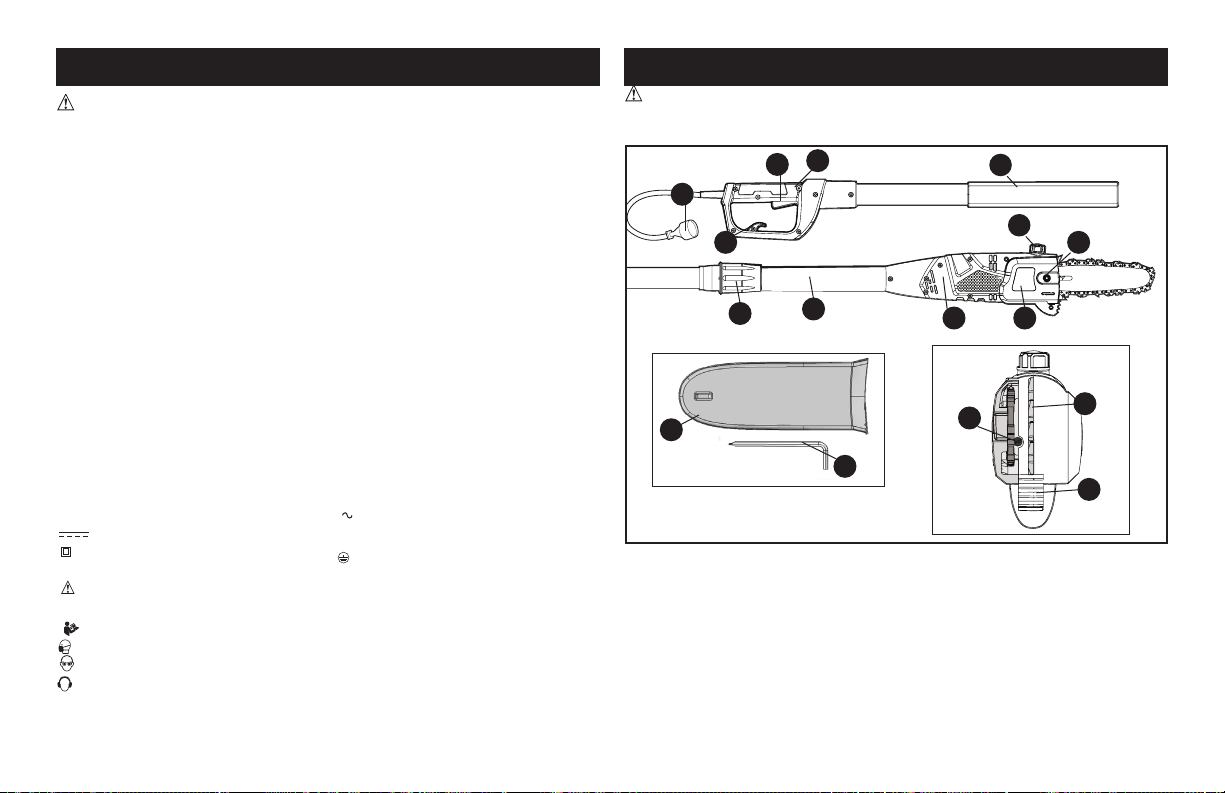
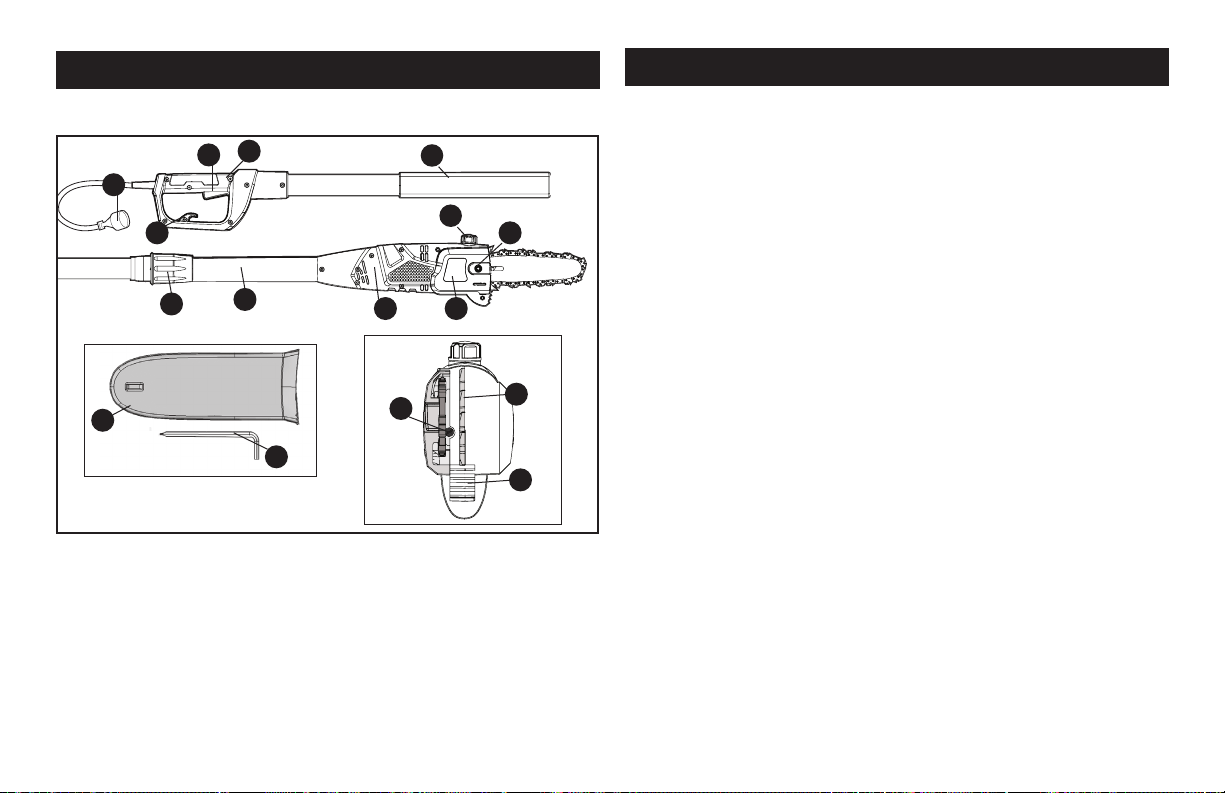
FUNCTIONAL DESCRIPTION
WARNING:
Before using your Pole Saw familiarize yourself with
all operating and safety features.
1. Saw Head
2. Trigger Switch
3. Lock Off Button
4. Foam Gripper
5. Extension Pole
6. Extension Coupling
7. Sprocket Cover
8. Allen Head Screw
9. Guide Bar
10. Saw Chain
11. Oil Reservoir Cap
12. Scabbard
13. Allen Wrench
14. Chain Tension Adjustment
Screw Front Chain Tensioner
15. Extension Cord Retainer
16.
Bumper Spikes
17.
Bottom Bump Spike
18.
Power Cord
1
2
3
4
5
8
12
13
6
7
9
10
11
16
14
17
15
19
7
STORAGE RECOMMENDATIONS
1. Store indoors. The best storage place is one that is cool and dry away
from direct sunlight, excess heat or cold and out of the reach of children.
2. Always reduce the tension off the chain again after finishing work.
The chain contracts as it cools down. If tension is not reduced, it can
damage the saw.
Transporting Pole Saw
chain with the scabbard when transporting the Pole Saw.
PREPARING YOUR POLE TRIMMER FOR USE
WARNING: Read and understand all instructions. Failure to
follow all instructions listed below may result in electric shock, fire
and/or serious personal injury.
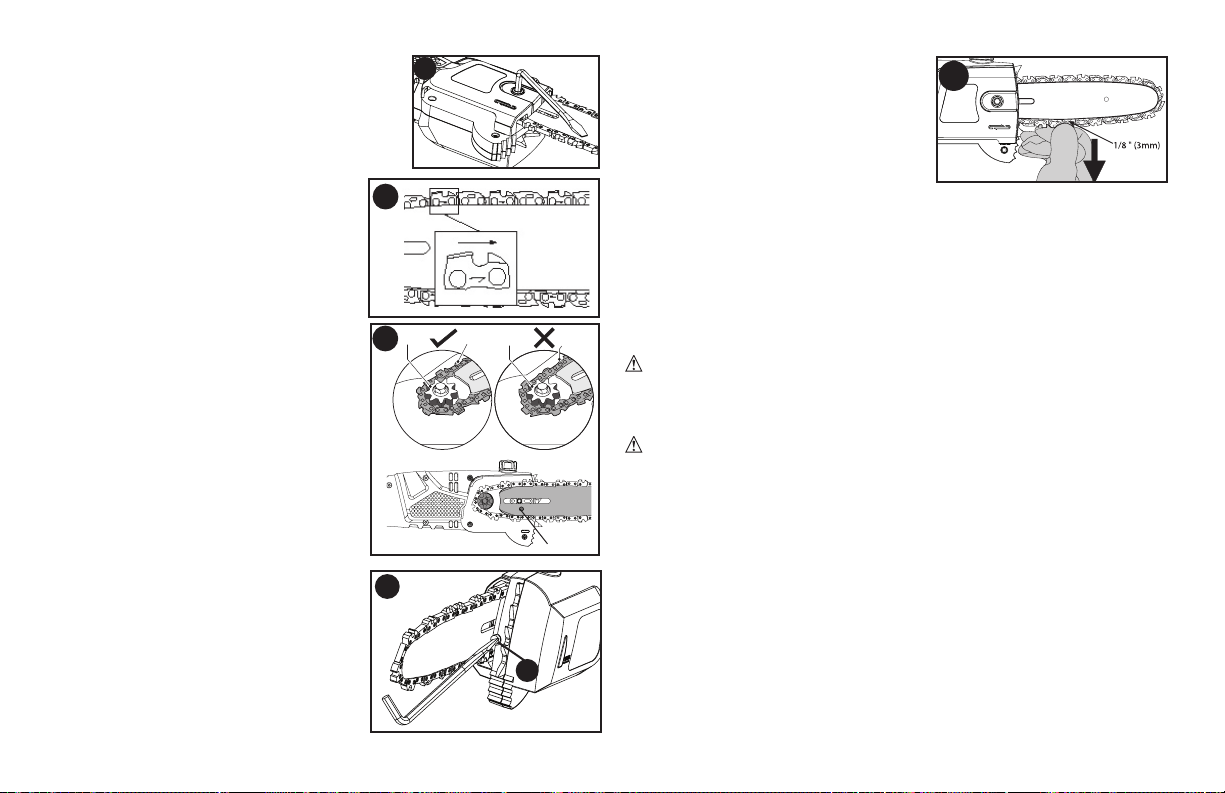
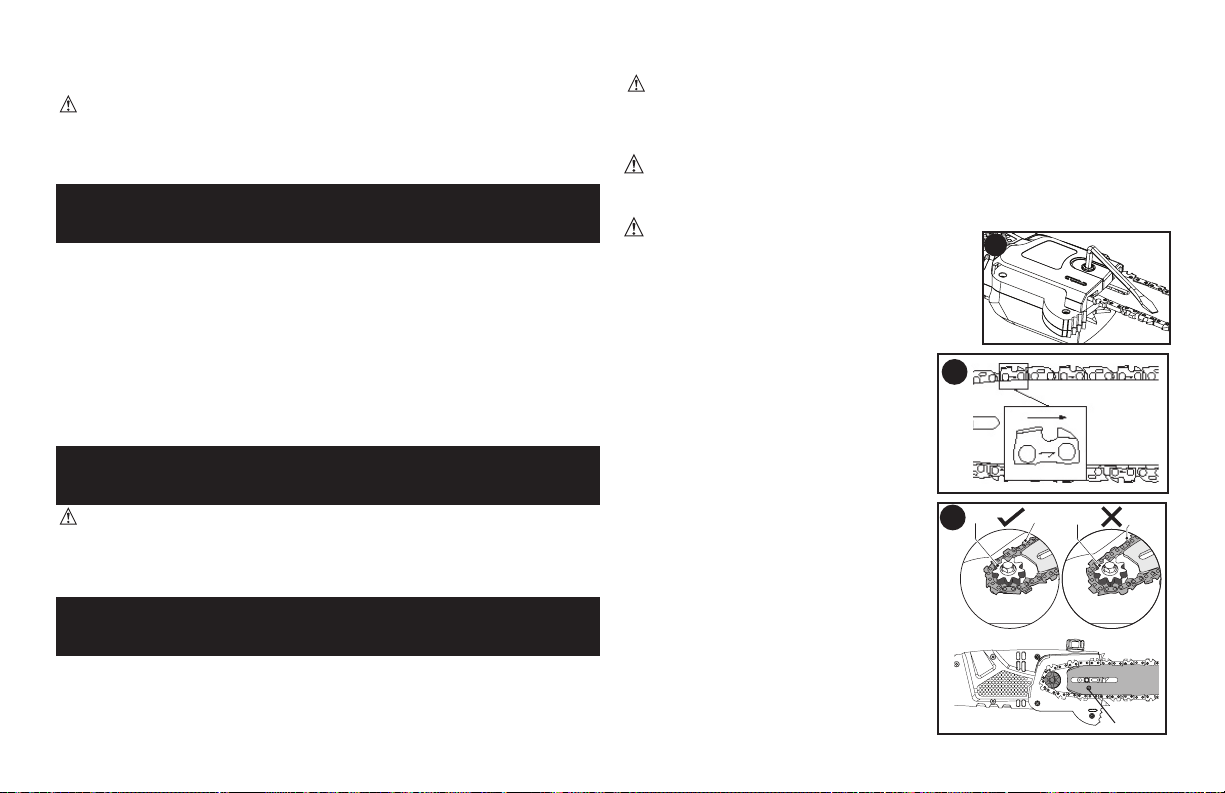
INSTALLING AND REMOVING BAR AND SAW CHAIN
carton. The chain has to be attached to the bar, and both must be
attached to the body of the tool.
To Install:
WARNING:
Sharp moving chain. To prevent accidental operation,
ensure that tool is unplugged before performing the following
operations. Failure to do this could result in serious personal injury.
CAUTION: Sharp chain. Always wear protective gloves
when installing or removing the chain. The chain is sharp and can
cut you when it is not running.
CAUTION:
A new saw chain must be re-tensioned more
frequently than one that has been in use
already for an extended period.
of the
sprocket cover counterclockwise with
the wrench provided as shown in figure A
POLE SAW NAMES AND TERMS
Drive Sprocket or Sprocket - The toothed part that drives the
saw chain.
Guide Bar - A solid railed structure that supports and guides the
saw chain.
Guide Bar Scabbard - Enclosure fitted over guide bar to prevent
tooth contact when saw is not in use.
Kickback - The backward or upward motion, or both of the guide
bar occurring when the saw chain near the nose of the top area of
the guide bar contacts any object such as a log or branch, or when
the wood closes in and pinches the saw chain in the cut.
Low-Kickback Chain - A chain that complies with the kickback
a representative sample of chain saws.
Reduced Kickback Guide Bar - A guide bar which has been
demonstrated to reduce kickback significantly.
Replacement Saw Chain - A chain that complies with kickback
performance requirements of ANSI B175.1-1991 when tested
with specific chain saws. It may not meet the ANSI performance
requirements when used with other saws.
Saw Chain -
A loop of chain having cutting teeth, that cut the wood,
and that is driven by the motor and is supported by the guide bar.
Spiked Bumper (Spike) - The pointed tooth or teeth for use when
pruning to pivot the saw and maintain position while sawing.
Switch - A device that when operated will complete or interrupt an
electrical power circuit to the motor of the chain saw.
Switch Lockout - A movable stop that prevents the unintentional
operation of the switch until manually actuated.
Trimming (Pruning) - Process of cutting limbs from a tree.
Undercut - An upward cut from underside of a log or limb. This is
done while in normal cutting position and cutting with top of guide
bar.
A
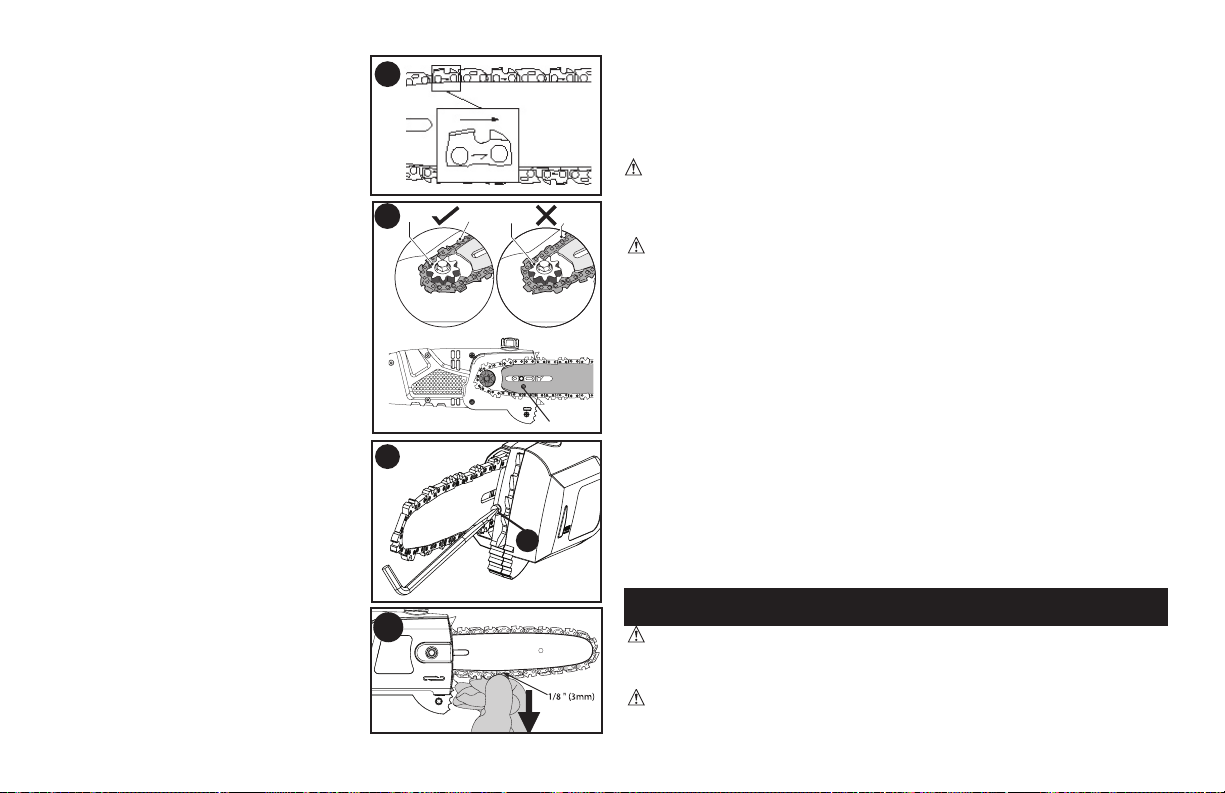
88
sprocket cover.
NOTE:
unplug
chain stretches slightly.
To Remove:
WARNING: Sharp moving chain. To prevent accidental
operation, ensure that tool is unplugged before performing the
following operations. Failure to do this could result in serious
personal injury.
CAUTION: Sharp chain. Always wear protective gloves
when installing or removing the chain. The chain is sharp and can
cut you when it is not running.
the flat screwdriver end of the wrench as shown in figure D. Turning the
screw counterclockwise allows the guide bar to recede and reduces the
tension on the chain so that it may be removed.
by rotating it
counterclockwise with the wrench provided as shown in figure A
Wearing protective gloves, grasp the saw chain and lift the worn
chain out of the groove in the guide bar.
and sprocket using a soft brush.
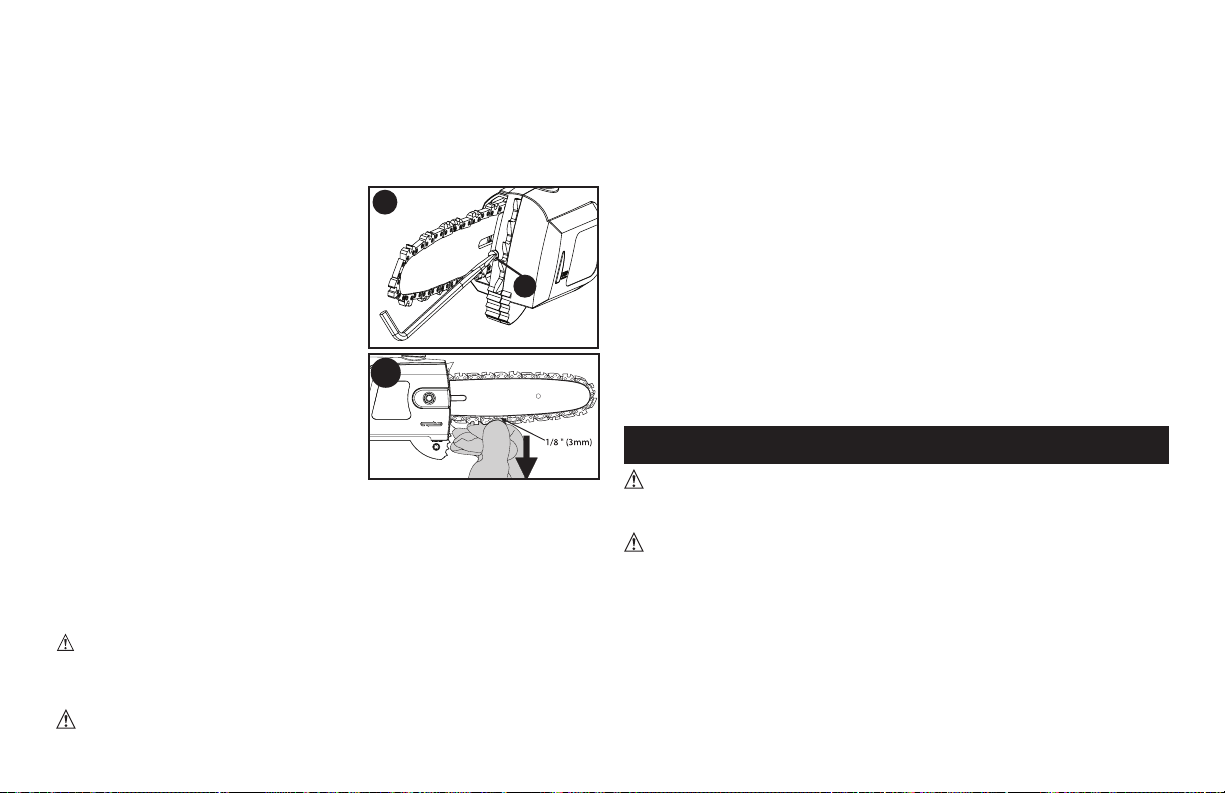
ADJUSTING CHAIN TENSION
CAUTION: Always reduce the tension off the chain again after
finishing work. The chain contracts as it cools down. If it is not
slackened off, it can damage the saw.
CAUTION: A new saw chain must be re-tensioned more frequently
than one that has been in use already for an extended period.
head screw.
cutting teeth are facing in the correct
direction by matching the arrow on
the chain with the graphic on the
figure B
the hole on the guide bar with the chain
the base of the tool as shown in figure
C.
sprocket cover. Tighten the screw by
rotating it clockwise with the wrench.
Do not fully tighten the allen head
screw into the sprocket cover until
the chain has proper tension.
the front of the housing using the flat
screwdriver end of the wrench as shown
in figure D. Turning the screw clockwise
increases the tension on the chain. The
tension is correct when the chain snaps
away from the chain bar with light force
from the index finger and thumb as
shown in figure E.
will lead to excessive wear and will
reduce the life of the bar and chain.
• Once chain tension is correct,
securely tighten allen head screw to
E
2
B
C
10
10
19
19
20
D
15
9
ASSEMBLY
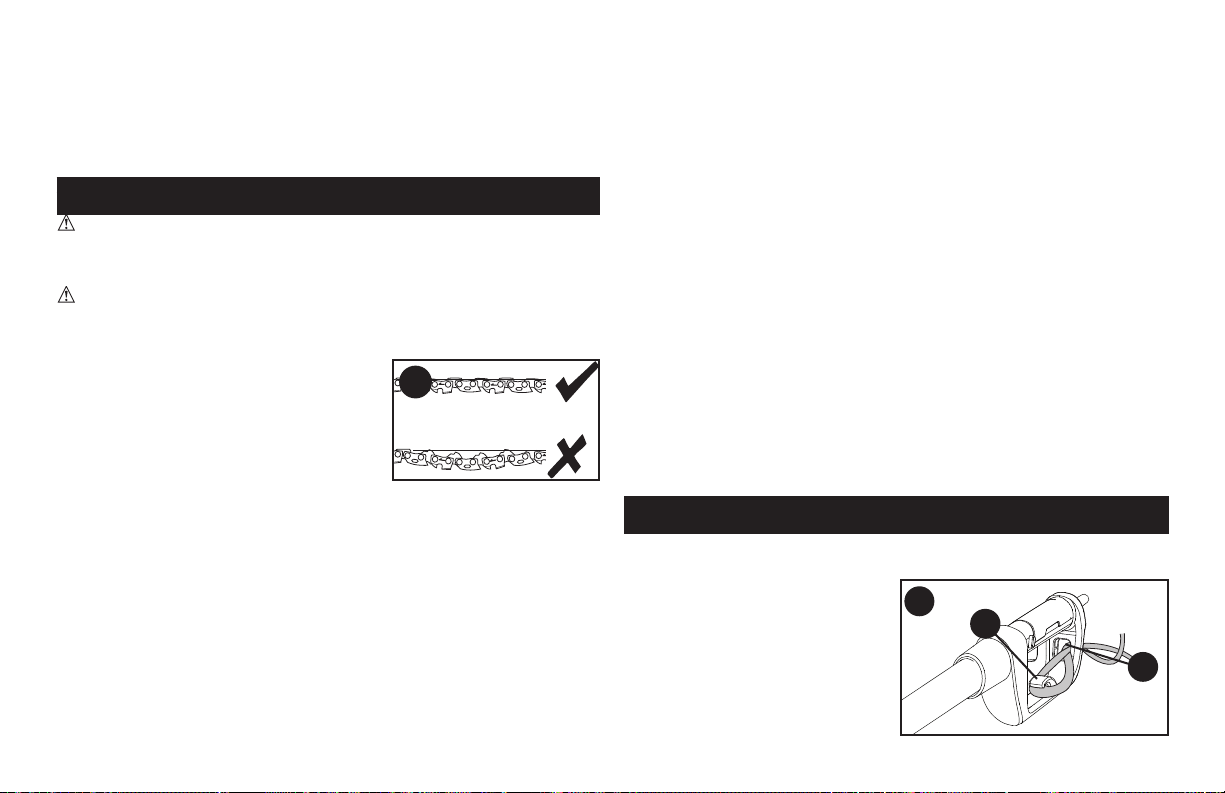
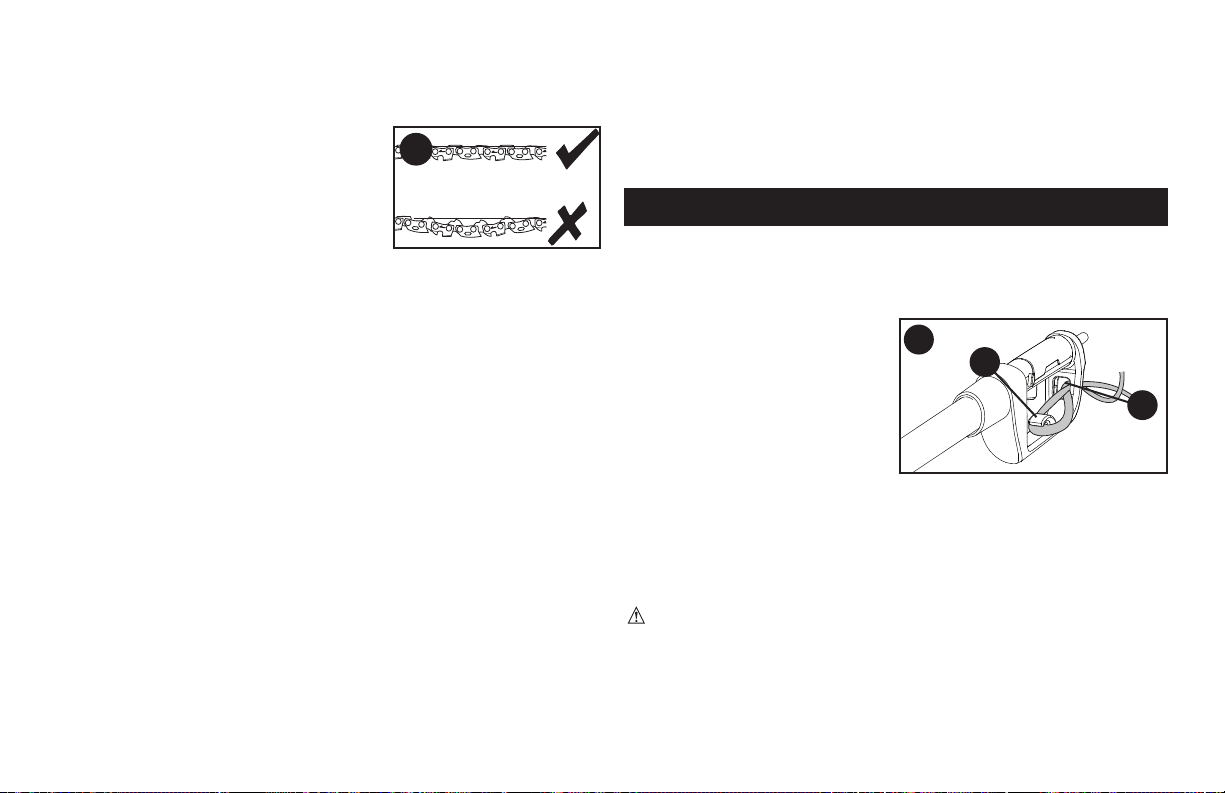
Attaching extension cord
is built into the switch handle. It
prevents the extension cord from
coming unplugged.
the end of the handle area as
shown in figure G. Hook the
loop formed by doubling the
that it is firmly retained in the handle. Plug the receptacle end of the
NOTE: Always keep the cord away from the cutting area and position the cord
so that it will not be caught on branches, and other material, during cutting.
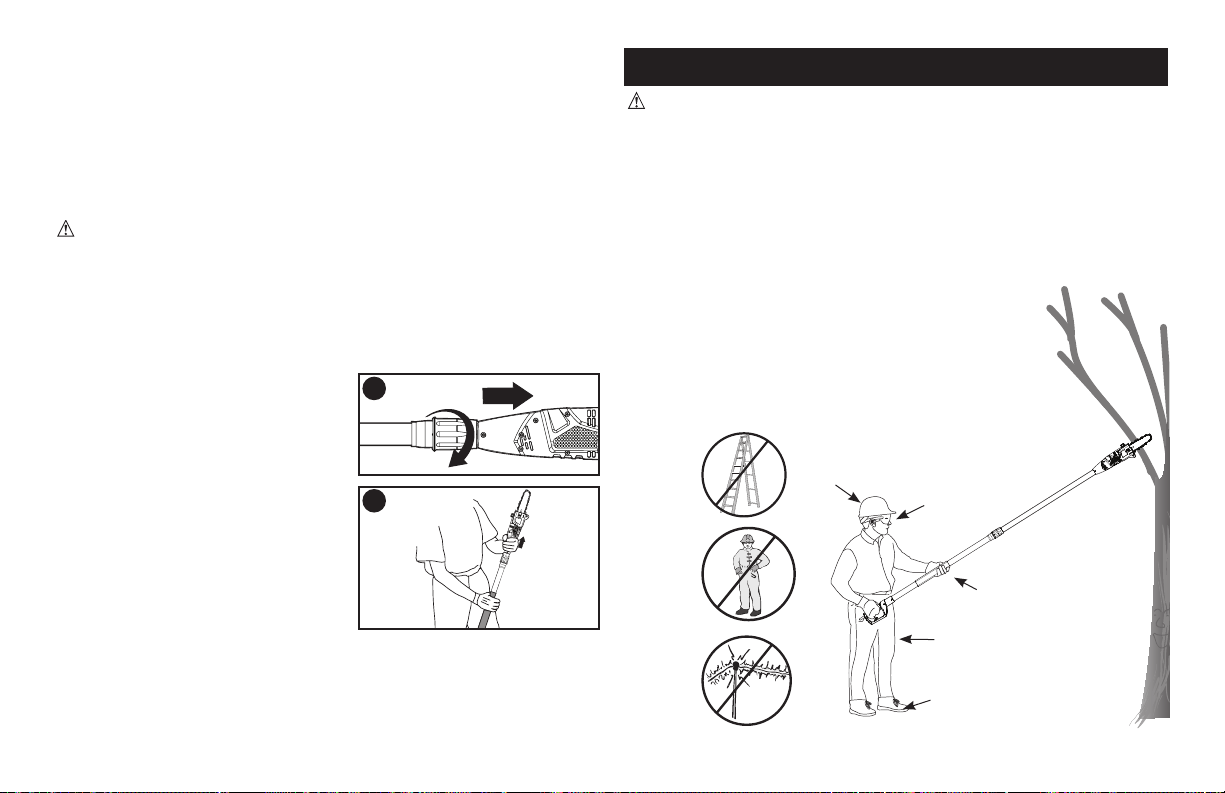
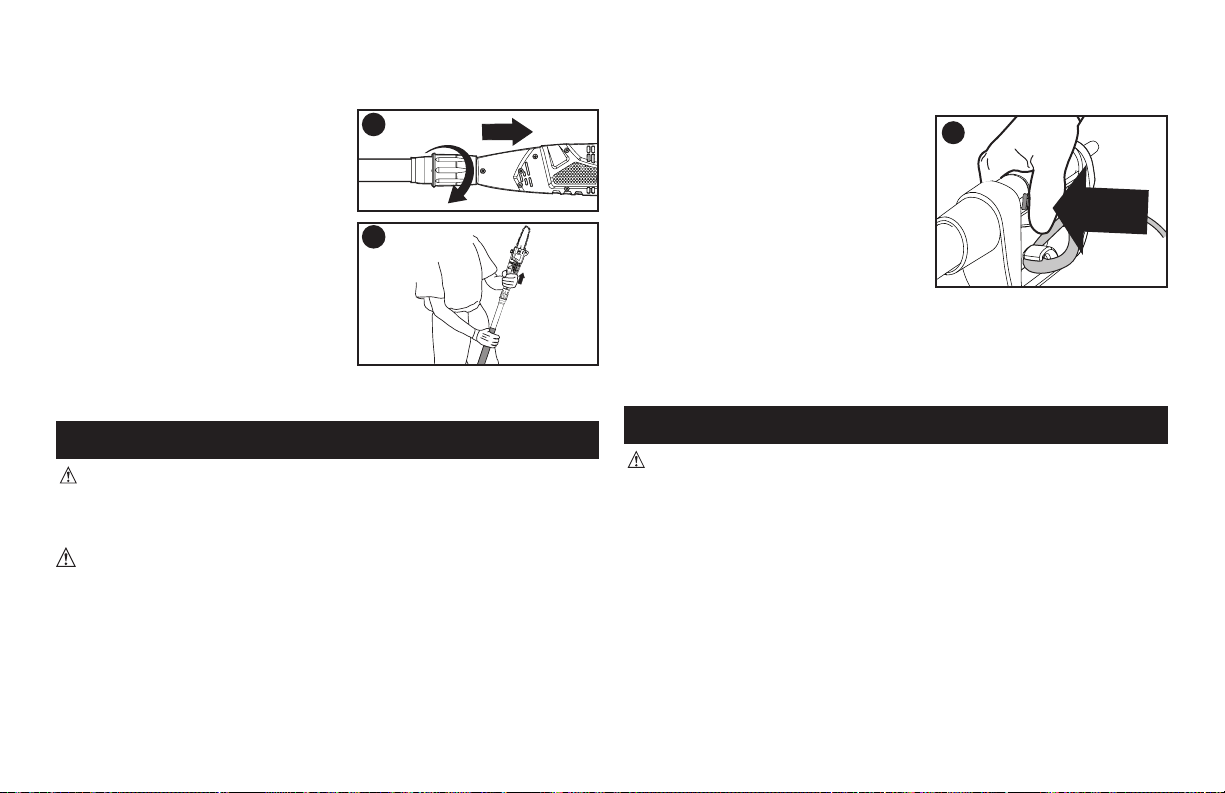
Extending extension pole
WARNING:
Always check to make sure that the extension
coupling is completely tightened and that the extension pole does not
retract. Not tightening the coupling completely could result in the saw
head unexpectedly moving, creating a hazardous condition. Periodically
check the connection to ensure that the coupling is fully tightened.
Always be sure of your footing and
grip the Pole Saw firmly with both
hands with the thumb and fingers
encircling the pole.
1. Rotate the
counterclockwise until it stops as
shown in figure H.
2. While holding the foam gripper
extension
coupling. This will reveal the
as shown in
figure I. The pole saw can be
tension is correct when the chain snaps back after being pulled 1/8
finger and thumb as shown in figure E. There should be no “sag”
between the guide bar and the chain on
the underside as shown in figure F.
head screw on sprocket cover.
the front of the housing using the flat
screwdriver end of the wrench as shown in
figure D.
and will reduce the life of the bar and chain.
chain stretches slightly.
Auto oiling system
This pole saw is equipped with an auto oiling system that keeps the
saw chain and guide bar constantly lubricated.
NOTE: Use a high quality bar and chain oil for proper chain
and bar lubrication. As a temporary substitute, a non-detergent
SAE30 weight motor oil can be used.The use of a vegetable based
bar and chain oil is recommended when pruning trees. Mineral oil is
not recommended because it may harm trees. Never use waste oil or
very thick oil. These may damage your pole saw.
Filling the oil reservoir
recommended bar and chain oil until the oil level has reached the
top of the oil fill reservoir opening. Using a funnel will prevent spills.
check the oil level. Fill as needed. Also check the bar and chain to
ensure they are being properly oiled.
H
G
21
15
F
I
10
POLE SAW TRIMMING / PRUNING
WARNINGS:
Never stand directly under the limb you are cutting. Always
position yourself out of the path of falling debris.
Always wear head, eye, foot and body protection. Wearing body
protection helps reduce the risk of injury when operating this unit.
Never stand on a ladder or other unstable support while using
the Pole Saw. Always avoid any position which can cause you to
lose your balance and cause severe injury.
Keep other persons at least 50 feet (15m) from the work area.
Distractions can cause you to lose control.
Electrocution Hazard. To prevent shock, do
not operate within 50 feet (15m) of overhead
electrical lines. Always check surrounding area
for hidden electrical lines.
Do not extend Pole Saw switch handle above
shoulder height.
operated at any length of the extension pole.
3.
Once desired extension length is acquired, rotate the extension
clockwise until it stops and fully secures the extension pole
in place.
OPERATING THE POLE SAW
WARNING: Read and understand all instructions. Failure to
follow all instructions listed below may result in electric shock, fire
and/or serious personal injury.
CAUTION: Always reduce the tension off the chain again after
finishing work. The chain contracts as it cools down. If it is not
slackened off, it can damage the Pole Saw.
IMPORTANT: Never operate a Pole Saw that is damaged
or improperly adjusted or that is not completely and securely
assembled. Be sure that the saw chain stops moving when the
trigger switch is released. Never adjust the guide bar or saw chain
when the motor is operating.
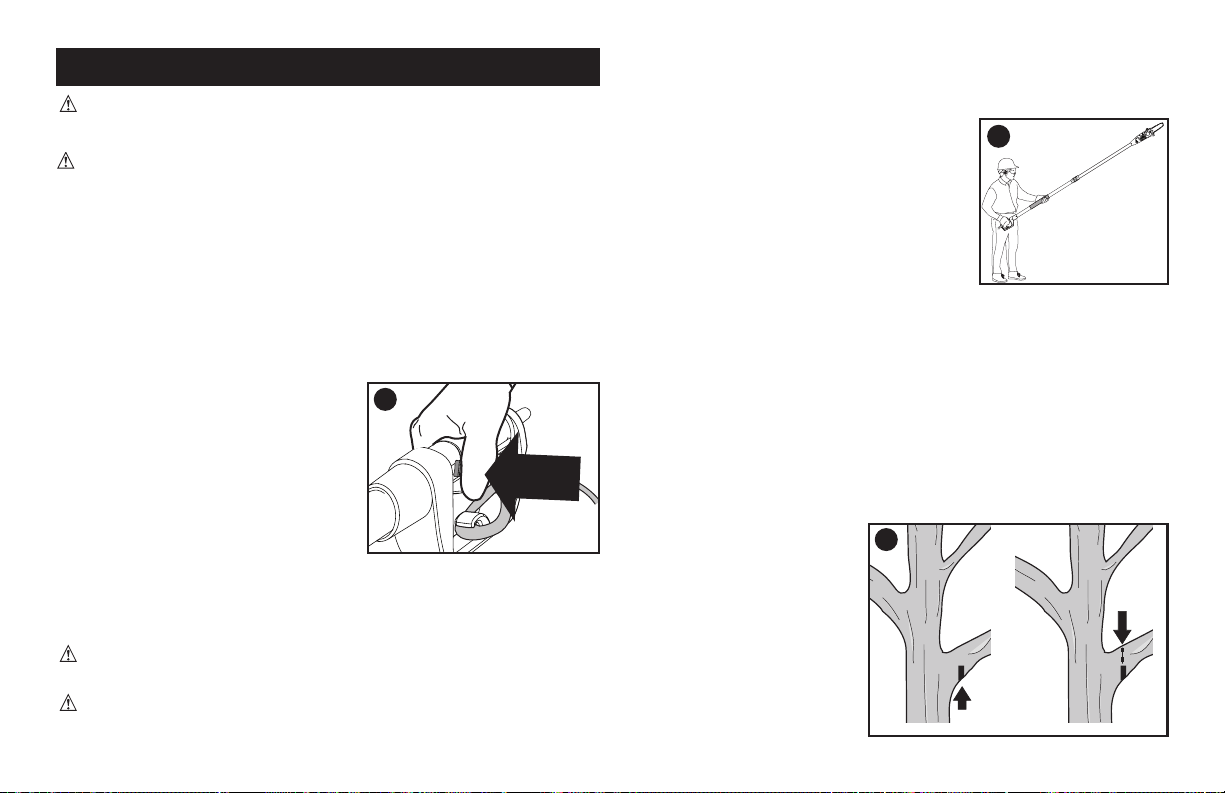
On/Off Switch
Always be sure of your footing and grip the Pole Saw firmly with
both hands with the thumb and fingers
encircling the handle.
ON squeeze the lock
fingers as shown in figure J
the tool is running you can release the
OFF, release the
trigger.
Auto-Stop chain braking system
Your pole saw is fitted with an auto-stop chain braking system which
will stop the chain quickly each time you release the trigger switch.
This system should be tested before every use.
Always Wear:
Head Protection
Eye Protection
Work Gloves
Long Pants
Steel Toed Shoes
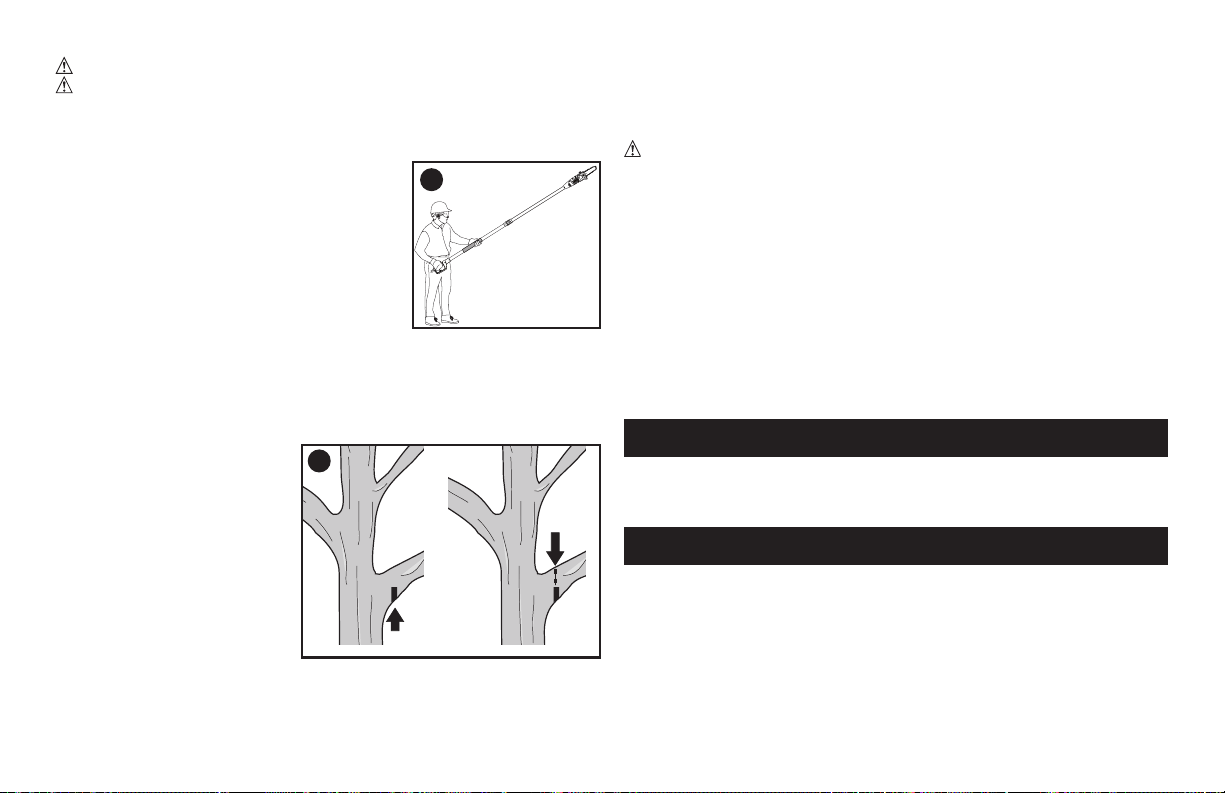
Operating Position
J
11
3. Remove Pole Saw from cut while it is running at full speed. Stop
Pole Saw by releasing trigger. Make sure chain has stopped
before setting Pole Saw down.
Saw chain sharpness
CAUTION: Sharp chain. Always wear protective gloves when
handling the chain. The chain is sharp and can cut you when it is
not running.
IMPORTANT: The chain cutters will dull immediately if they touch the
ground, stones, masonry or a nail while cutting.
To get the best possible performance from your chain saw it is
important to keep the teeth of the chain sharp. Chain sharpening
services are available from your nearest Black+Decker service
center.
NOTE: Each time the chain is sharpened, it loses some of the
low kickback qualities and extra caution should be used. It is
recommended that a chain be sharpened no more than four times.
Saw chain tension
This should be checked regularly. Refer to “Adjusting Chain Tension”.
ACCESSORIES
Replacement chain and bar are available from your nearest
Black+Decker service center. Replacement chain # RC1000. The use
of accessories not recommended in this manual may be hazardous.
POLE SAW MAINTENANCE SECTION
Regular maintenance ensures a long effective life for the tool.
After every 10 minutes of use be sure to unplug the extension cord
for correct tension and lubricate per pole saw instruction manual.
you replace the chain this helps avoid one-sided wear, especially at
the nose and underside of the bar.
reduce the risk of injury.
WARNING:
Let the tool work at its own pace. Do not overload.
WARNING: When pruning trees:
Guard Against Kickback which can result in severe injury or
death. See “KICKBACK”, section to avoid the risk of kickback.
Do not overreach. Make sure your footing is firm. Keep feet apart.
Divide your weight evenly on both feet.
Use both hands to grip Pole Saw as shown
in figure K. Use a firm grip. Thumbs and
fingers must wrap around Pole Saw handle
and pole.
Never operate while in a tree, in any
awkward position, on a ladder or any other
unstable surface. You may lose control of
the Pole Saw causing severe injury.
Follow directions below to trim a tree.
1. Make sure Pole Saw is running at full speed before making a
cut. When starting a cut, place moving chain against limb. Hold
Pole Saw firmly in place to avoid possible bouncing or skating
2.
Make the first cut six inches away from tree trunk on underside of a
limb or branch. Use the top
of the guide bar to make this
cut. Guide the Pole Saw using
light pressure to make a cut
that is 1/3 of the diameter of
limb. Then make the finishing
cut from the top as shown in
figure L. Do not force Pole
Saw. The motor will overload
and can burn out. It will do the
job better and safer at the rate
for which it was intended.
NOTE: If you try to cut off thick branches from the bottom, the branch
will close in and pinch the saw chain in the cut. If you try to cut off
thick branches from the top, without a shallow undercut, the branch
will splinter and pull bark from the tree.
K
L
12
TROUBLESHOOTING
If your Pole Saw does not operate correctly check the following:
Problem Possible Cause Possible Solution
repaired by an authorized service facility.
Use only mild soap and damp cloth to clean the tool. Never let any
liquid get inside the tool; never immerse any part of the tool into a liquid.
IMPORTANT: To assure product SAFETY and RELIABILITY,
repairs, maintenance and adjustment should be performed by
authorized service centers or other qualified service organizations,
always using identical replacement parts.
SERVICE INFORMATION
All Black+Decker Service Centers are staffed with trained personnel
to provide customers with efficient and reliable power tool service.
Whether you need technical advice, repair, or genuine factory
replacement parts, contact the Black+Decker location nearest you.
To find your local service location, refer to the yellow page directory
under “Tools—Electric” or call: 1-800-544-6986 or visit www.
blackanddecker.com.
This Class B digital apparatus complies with Canadian ICES-003.
This device complies with part 15 of the FCC rules. Operation
any interference received, including interference that may cause
undesired operation.
NOTE: This equipment has been tested and found to comply with
the limits for a Class B digital device, pursuant to Part 15 of the FCC
Rules. These limits are designed to provide reasonable protection
against harmful interference in a residential installation. This
equipment generates, uses and can radiate radio frequency energy
and, if not installed and used in accordance with the instructions,
may cause harmful interference to radio communications. However,
there is no guarantee that interference will not occur in a particular
installation.
If this equipment does cause harmful interference to radio or
For assistance with your product, visit our website
www.blackanddecker.com for the location of the service center
nearest you or call the BLACK+DECKER help line at 1-800-544-6986
Tool will not
start.
breaker tripped.
plugged in.
extension cord is plugged
into a working outlet.
Chain is loose.
Poor cut quality
Chain tension set
incorrectly.
Chain tension set
incorrectly.
Chain needs
replacement.
Refer to section for chain
tensioning.
Refer to section on
adjusting chain tension.
Note: Excessive tension
leads to excessive wear
and reduction in life of bar
& chain.
Refer to section for
installation of chain.
Bar / chain
overheated.
Chain too tight.
Lubrication
needed.
Refer to section on
adjusting chain tension.
Refer to sections for chain
oiling application.
Unit runs but
does not cut.
Chain installed
backwards. See
illustration B.
Chain installed?
Refer to sections for
installing and removing
chain.

13
television reception, which can be determined by turning the
equipment off and on, the user is encouraged to try to correct the
interference by one or more of the following measures:
to which the receiver is connected.
Changes or modifications to this unit not expressly approved by the
operate the equipment. This Class B digital apparatus complies with
Canadian ICES-003.
TWO-YEAR LIMITED WARRANTY
following the date of purchase, provided that the product is used in
a home environment. This limited warranty does not cover failures
due to abuse, accidental damage or when repairs have been made
or attempted by anyone other than Black+Decker and its Authorized
Service Centers. A defective product meeting the warranty
conditions set forth herein will be replaced or repaired at no charge
in either of two ways:
The first, which will result in exchanges only, is to return the product
be required. Please check with the retailer for its specific return
policy regarding time limits for returns or exchanges. The second
owned or authorized Service Center for repair or replacement
Black+Decker owned and authorized service centers are listed
under “Tools–Electric” in the yellow pages of the phone directory or
online at www.blackanddecker.com.
This warranty does not apply to accessories. This warranty gives
you specific legal rights and you may have other rights which
vary from state to state. Should you have any questions, contact
the manager of your nearest Black+Decker Service Center. This
product is not intended for commercial use, and accordingly, such
commercial use of this product will void this warranty. All other
guarantees, express or implied, are hereby disclaimed.
LATIN AMERICA: This warranty does not apply to products sold in
Latin America. For products sold in Latin America, check country
specific warranty information contained in the packaging, call the
local company or see the website for such information.
Imported by
701 E. Joppa Rd.
Towson, MD 21286 U.S.A.
14
MANUEL D’INSTRUCTIONS
LA SCIE À LONG MANCHE
MERCI D’AVOIR CHOISI BLACK + DECKER!
ÀLIRE AVANT DE RETOURNER CE PRODUIT POUR QUELQUE RAISON QUE CE SOIT:
Si des questions ou des problèmes surgissent après l’achat d’un produit Black + Decker, consulter le site Web www.blackanddecker.
com/instantanswers pour obtenir des réponses instantanément 24 heures par jour. Si la réponse est introuvable ou en l’absence d’accès
à l’Internet, composer le 1 800 544-6986 de 8 h à 17 h HNE, du lundi au vendredi, pour parler avec un agent. Prière d’avoir le numéro de
catalogue sous la main lors de l’appel.
CONSERVER CE MODE D’EMPLOI POUR UN USAGE ULTÉRIEUR.
NUMÉRO DE MODÈLE
PP610
Consulter le site web www.BlackandDecker.com/NewOwner pour enregistrer votre nouveau produit.
RENSEIGNEMENTS IMPORTANTS
LIRE LES INSTRUCTIONS AVANT D’UTILISER!
• NE PAS SUR TENDRE LA CHAÎNE. Se reporter à la section
« RÉGLAGE DE LA TENSION DE LA CHAÎNE » pour savoir
comment tendre correctement la chaîne.
• Retendre la chaîne fréquemment pendant les deux premières
heures d’utilisation.
15
distance de la zone de travail.
de
AVERTISSEMENT :
STW-A, STOW-A, SJW-A, SJOW-A, SJTW-A ou SJTOW-A.
tension de ligne et donc une perte de puissance et une surchauffe. Le
est petit, plus le cordon est lourd.
CONSIGNES DE SECURITE IMPORTANTES
CONSERVER CES DIRECTIVES
LIRE ET ASSIMILER TOUTES LES DIRECTIVES.
AVERTISSEMENT :
de blessure corporelle, notamment les suivantes :
AVERTISSEMENT :
Pour assurer une utilisation sécuritaire, lire
et comprendre le mode d’emploi.
LIGNES DIRECTRICES EN MATIÈRE DE
SÉCURITÉ - DÉFINITIONS
DANGER : Indique une situation dangereuse imminente
blessures.
AVERTISSEMENT : Indique une situation potentiellement
mort ou de graves blessures.
MISE EN GARDE : Indique une situation potentiellement
MISE EN GARDE :
Calibre minimum pour cordon amovible
Volts Longueur totale du cordon en pieds
120 V 0-25 26-50 51-100 101-150
240 V 0-50 51-100 101-200 201-300
Intensité nominale
Plus Pas plus Calibrage américain normalisé des fils
de de (AWG)
0 - 6 18 16 16 14
6 - 10 18 16 14 12
10 - 12 16 16 14 12
16
manuel.
et des bords tranchants.
CONSERVER CES CONSIGNES
SPECIFIC SAFETY RULES
Sécurité en matière d’électricité
AVERTISSEMENT :
sableuses, les scies, les meules, les perceuses ou certains autres
reproductif. Parmi ces produits chimiques, on retrouve :

17
Avant toute utilisation de la scie à long manche
long manche en cas de fatigue.
sont pas en bois.
cet outil.
- lunettes ou masque de protection conformes aux normes
ANSI Z87
- casque de protection
Éviter tout contact prolongé avec la poussière soulevée par
cet outil ou autres outils électriques. Porter des vêtements de
protection et nettoyer les parties exposées du corps à l’eau
savonneuse.
par la bouche, les yeux ou la peau des produits chimiques nocifs.
AVERTISSEMENT : Cet outil peut produire et répandre
de la poussière susceptible de causer des dommages sérieux
et permanents au système respiratoire. Toujours utiliser un
visage et du corps.
Double isolation
REMARQUE :
PIÈCES DE RECHANGE :
Fiches polarisées
18
- sans le cordon;
bras. En effet, trop tendre les bras risque de provoquer une perte
dommage important.
Ne pas utiliser la scie à long manche :
- sur un promontoire, un seau ou une plate-forme
RÈGLES DE SÉCURITÉ GÉNÉRALES
DANGER: Risque de choc électrique.
Blessure grave ou mort
marcher pieds nus.
la chute des branches.
Durant l’utilisation de la scie à long manche
DANGER:
DANGER:
les blessures.
manche doit se trouver dans la zone de travail.
ne touche rien.
manche fonctionne.

19
19
WARNING: Pour assurer une utilisation sécuritaire, lire et
comprendre le mode d’emploi. Porter un écran facial, des lunettes
de sécurité ou les deux et un casque de sécurité pour se protéger
de la chute de débris. Toujours garder la zone de travail et la voie de
contact avec aucun objet.
Entretien
• L’outil doit être entretenu par du personnel qualifié seulement;
• Lors de l’entretien, n’utiliser que des pièces de rechange
identiques et suivre les directives précisées à la section «
Entretien » du présent manuel
Dispositif de protection contre les rebonds
AVERTISSEMENT : Le fait que le nez ou le bout du guide-
coupante dans la coupe peut provoquer des REBONDS. Un contact
Les précautions suivantes doivent être observées pour
minimiser tout rebond :
et le manche.
tronc, une branche, le sol ou toute autre obstruction.
complet du moteur et retrait de la pile.
augmentent.
20
DISPOSITIFS DE SÉCURITÉ ANTI-REBONDS
AVERTISSEMENT :
grave.
L’étiquette apposée sur votre outil peut comprendre les
symboles suivants.
V ...............volts A ....................ampères
Hz .............hertz W ...................watts
min ............minutes
ou AC ........courant alternatif
o DC ..courant continu non ................. vitesse à vide
..............
Assemblage de
....................
borne de terre
classe II
............. symbole d’alerte à .../min .............rotations
la sécurité par minute
............ Lire le mode d’emploi avant l’utilisation
.............. Utiliser une protection respiratoire adéquate.
..............Utiliser une protection oculaire adéquate.
.............. Utiliser une protection auditive adéquate.
DESCRIPTION FONCTIONNELLE
AVERTISSEMENT :
3. Bouton de verrouillage
4. Prise en mousse
5. Manche-rallonge
6. Accouplement de rallonge
7. Couvercle du pignon
8. Vis Allen
12. Fourreau
14.
15. Dispositif de retenue de rallonge
16. Griffes
1
2
3
4
5
8
12
13
6
7
11
16
14
17
15
19

21
GLOSSAIRE TERMINOLOGIQUE DE LA
SCIE À LONG MANCHE
Frein de chaîne -
Pignon d’entraînement ou dent de pignon –
Guide-chaîne – Une structure de rail supportant et guidant la
Enveloppe du guide-chaîne –
Rebonds –
objet comme une branche ou un tronc, or lorsque le bois pince et
Chaîne anti-rebond -
Guide-chaîne anti-rebonds –
Chaîne coupante de rechange -
Chaîne coupante –
Griffe d’abattage (Picot) –
Interrupteur –
Dispositif de verrouillage –
mise en marche inv
Élagage (Ébranchage) –
Trait de scie par en dessous –
RECOMMANDATIONS EN MATIÈRE DE RANGEMENT
Transport de la scie à long manche
PRÉPARATION DE LA SCIE À LONG MANCHE
POUR SON UTILISATION
AVERTISSEMENT : Lire, comprendre et suivre toutes
les directives. Tout manquement aux directives suivantes pose des
INSTALLATION ET RETRAIT DE LA CHAÎNE COUPANTE
Pose :
AVERTISSEMENT :
Chaîne affûtée en mouvement. Pour
prévenir tout fonctionnement accidentel, s’assurer de débrancher
l’outil avant d’effectuer les opérations suivantes. Le non-respect
MISE EN GARDE :
Chaîne affûtée. Toujours porter des gants
repos.
MISE EN GARDE :
22
figure A.
Allen.
pointent dans la bonne direction
(voir la
figure B).
la figure C.
du pignon. Serrer la vis en la tournant
Ne
pas serrer complètement la vis
Allen dans le couvercle du pignon
avant que la chaîne ait la bonne
tension.
figure D.
dans le sens horaire, la tension de
comme le montre la figure E.
Une fois la tension bien réglée, bien serrer la vis Allen sur le
couvercle du pignon.
REMARQUE :
Enlèvement :
AVERTISSEMENT : Chaîne affûtée en mouvement. Pour
MISE EN GARDE :
Chaîne affûtée. Toujours porter des gants
la figure D. Tourner la vis en sens antihoraire pour permettre au
figure A.
2222
E
2
B
C
10
10
19
19
20
D
15
A
23
brosse douce.
RÉGLAGE DE LA TENSION DE LA CHAÎNE.
MISE EN GARDE :
MISE EN GARDE :
pouce, comme le montre la figure E.
Observer la figure F
sur le couvercle du pignon.
figure D.
Système de graissage automatique
REMARQUE :
long manche.
Remplissage du réservoir d’huile
ASSEMBLAGE
Fixation de la rallonge
Un dispositif de retenue de
figure G.
G
21
15
F
24
REMARQUE :Toujours garder la rallonge à l’écart de la zone
de coupe et la positionner de façon à ce qu’elle ne se prenne
pas dans les branches ou autre matière pendant la coupe.
Extension du manche-rallonge
AVERTISSEMENT :
encerclant le manche.
comme le montre la figure H.
2. En tenant la prise en mousse
figure I.
bloque et tienne solidement le manche-rallonge en place.
ÉLAGAGE /ÉBRANCHAGE AVEC LA SCIE À LONG MANCHE
AVERTISSEMENTS :
Ne jamais se tenir directement sous la branche à découper. Toujours se
Toujours porter un dispositif de protection pour la tête, les yeux, les pieds
et le corps.
Ne jamais utiliser une
échelle ou tout autre support instable pendant l’utilisation d’une scie
à long manche.
Maintenir toute tierce personne à au moins 15 m (50 pi) de l’aire de
travail.
Risques d’électrocution. Pour prévenir tout choc
électrique, ne pas utiliser à moins de 15 m (50 pi) de
lignes électriques aériennes.
Ne pas utiliser la scie à long manche si son manche
se trouve au-dessus des
épaules.
H
I
Toujours porter :
Casque de protection
Lunettes de
protection
Gants de travail
Pantalons longs
Position d’utilisation
UTILISATION DE LA SCIE À LONG MANCHE
AVERTISSEMENT : Lire, comprendre et suivre toutes
les directives. Tout manquement aux directives suivantes pose des
MISE EN GARDE :
IMPORTANT :
Interrupteur marche/arrêt
figure J.
Système de freinage
automatique de la chaîne
chaque utilisation.
AVERTISSEMENT :
rythme. Ne pas le surcharger.
AVERTISSEMENT :
25
EFFET
DE REBOND »
• Ne pas trop tendre les bras. S’assurer de maintenir un bon
équilibre. Maintenir les pieds écartés.
Diviser également votre poids sur les
deux pieds.
figure K. Saisir
fermement. Les pouces et les doigts
trouve dans un arbre, dans une position
Suivre les instructions ci-dessous pour tailler un arbre.
une entaille mesurant le tiers
Terminer ensuite par une
coupe par le dessus, comme
le montre la figure L. Ne pas
de surchauffer. Le travail sera
mieux accompli et sera moins
J
K
L

26
REMARQUE :
le dessus, sans petite entaille en dessous, la branche se fend et tire
Affûtage de la chaîne
MISE EN GARDE :
IMPORTANT :
REMARQUE :
quatre fois.
Tension de la chaîne de la scie
ACCESSOIRES
SECTION DE DÉPANNAGE
points suivants :
Problème Cause possible Solution possible
de la coupe
fonctionne
mais ne coupe
pas.
B.
disjoncteur.
prise qui fonctionne.
concernant la lubrification
concernant la tension de la
Remarque : Une tension
plus grande usure et
Lubrifier toutes les dix

27
NMB-003 du Canada.
Cet appareil est conforme aux dispositions du paragraphe 15
fonctionnement.
REMARQUE :
limites en vigueur
une protection raisonnable contre tout brouillage nuisible dans une
lui faudra essayer de corriger ce brouillage en prenant une ou
plusieurs des mesures ci-dessous :
norme NMB-003 du Canada.
ENTRETIEN DE LA SCIE À LONG MANCHE
la pointe et en dessous.
IMPORTANT :
INFORMATION SUR LES RÉPARATIONS
1 800 544-6986 ou
consulter le site www.blackanddecker.com

28
GARANTIE LIMITÉE DE DEUX ANS
toute autre personne que le personnel de Black+Decker et de ses
sur www.blackanddecker.com.
habite. Pour toute question, communiquer avec le directeur du
obtenir le remplacement gratuit.
Black+Decker Canada Inc.
100 Central Ave.
29
MANUAL DE INSTRUCCIONES
LA MOTOSIERRA DE ASTA
GRACIAS POR ELEGIR BLACK & DECKER!
LEA EL MANUAL ANTES DE DEVOLVER ESTE PRODUCTO POR CUALQUIER MOTIVO:
Si tiene una consulta o algún inconveniente con su producto Black & Decker, visite http://www.blackanddecker.com/instantanswers
para obtener respuestas instantáneas las 24 horas del día. Si no encuentra la respuesta o no tiene acceso a Internet, lame al 1-800-544-6986
de lunes a viernes de 8 a. m. a 5 p. m. hora del Este para hablar con un agente. Cuando lame, tenga a mano el número de catálogo.
CONSERVE ESTE MANUAL PARA FUTURAS CONSULTAS. SÓLO PARA USO DOMÉSTICO.
MODELO N° LPP120
PP610
Visite www.BlackandDecker.com/NewOwner para registrar su nuevo producto.
INFORMACIÓN CLAVE QUE USTED DEBE CONOCER:
LIRE LES INSTRUCTIONS AVANT D’UTILISER!
• NO TENSIONE
EN EXCESO LA CADENA. Consulte “AJUSTE de la tensión de
la cadena” a fin de conocer el método adecuado para tensionar la cadena.
• Vuelva a ajustar la cadena con frecuencia durante las dos
primeras horas de uso a medida que ésta se acciona.

30
REGLAS IMPORTANTES DE SEGURIDAD
CONSERVE ESTAS INSTRUCCIONES
LEA Y COMPRENDA TODAS LAS
INSTRUCCIONES.
ADVERTENCIA:
siempre deben respetarse las precauciones básicas de seguridad
personales, incluidas las siguientes:
ADVERTENCIA:
Para un funcionamiento seguro, lea y comprenda
el manual del propietario
lugares húmedos o mojados.
cierta distancia del área de trabajo.
quedar atrapadas en las piezas móviles. Al trabajar al aire libre, se
recomienda usar guantes de goma y calzado resistente. Recójase y
cubra el cabello largo.
polvo si la operación produce polvillo.
otra tarea que no sea aquella para la que fue creada.
tomacorrientes que se utilizarán para la motosierra de asta. Existen
receptáculos disponibles con protección GFCI incorporada y pueden
utilizarse para esta medida de seguridad.
ADVERTENCIA:
utilice únicamente un cable prolongador para uso en exteriores, como
los del tipo SW-A, SOW-A, STW-A, STOW-A, SJW-A, SJOW-A,
SJTW-A o SJTOW-A.
buenas condiciones. Cuando utilice un cable prolongador, asegúrese
de que tenga la capacidad suficiente para conducir la corriente que su
sobrecalentamiento. La tabla siguiente muestra la capacidad correcta
que debe utilizarse según la longitud del cable y el amperaje indicado
en la placa de identificación. En caso de duda, utilice el calibre
inmediatamente superior. Cuanto menor sea el número de calibre,
mayor será la capacidad del cable.
PAUTAS DE SEGURIDAD/DEFINICIONES
Es importante que lea y comprenda este manual. La información
que contiene se relaciona con la protección de SU SEGURIDAD
se utilizan para ayudarlo a reconocer esta información.
PELIGRO: indica una situación de peligro inminente que, si
no se evita, provocará la muerte o lesiones graves.
ADVERTENCIA: indica una situación de peligro potencial
que, si no se evita, provocará la muerte o lesiones graves.
PRECAUCIÓN: indica una situación de peligro potencial
que, si no se evita, provocará lesiones leves o moderadas.
PRECAUCIÓN:
indica una situación de peligro potencial que, si no se evita, puede
Calibre mínimo para cables prolongadores
Voltios Largo total del cable en pies
120 V 0-25 26-50 51-100 101-150
240 V 0-50 51-100 101-200 201-300
Capacidad nominal en amperios
Más de No más AWG
que de que
0 - 6 18 16 16 14
6 - 10 18 16 14 12
10 - 12 16 16 14 12
12 - 16 14 12 No recomendado
- Para reducir el riesgo de desconectar el cable de la motosierra de
asta del cable prolongador durante el funcionamiento, realice un
nudo como se muestra en la Figura a continuación.
manual.
enchufada con el dedo en el interruptor. Asegúrese de que el
cable ni lo jale para desconectarla del tomacorriente. Mantenga el
cable alejado del calor, el aceite y los bordes afilados.
levante o sostenga la motosierra de asta.
No fuerce la motosierra de asta. Funcionará mejor y con menos
todo momento.
realizarle mantenimiento, al cambiar accesorios como cadenas y en
otros casos similares.
afilado el borde cortante para obtener el mejor rendimiento y reducir el
riesgo de lesiones. Siga las instrucciones para lubricar y cambiar los
accesorios. Inspeccione periódicamente el cable de la motosierra de
autorizado. Inspeccione periódicamente los cables prolongadores y
31
y sin restos de aceite ni grasa.
motosierra de asta, se debe revisar cuidadosamente un protector u
la rotura de piezas, el montaje y cualquier otra condición que pueda
debe repararse correctamente o ser reemplazada en un centro de
mantenimiento autorizado, a menos que este manual indique otra cosa.
CONSERVE ESTAS INSTRUCCIONES
NORMAS ESPECÍFICAS DE SEGURIDAD
Seguridad eléctrica
Esta herramienta posee un doble aislamiento; por lo tanto, no se necesita
Existen receptáculos disponibles con protección GFCI incorporada
y pueden utilizarse para esta medida de seguridad.
ADVERTENCIA: Algunos tipos de polvo, como aquellos
generados por el lijado, serruchado, pulido y taladrado mecánico y
función de la frecuencia con que se realice este tipo de trabajo.

bien ventilada y llevando equipos de seguridad aprobados, como
microscópicas.
Evite el contacto prolongado con polvo generado por el lijado,
serruchado, pulido y taladrado mecánico y otras actividades
de construcción. Vista ropas protectoras y lave las áreas de
la piel expuestas con agua y jabón. Si permite que el polvo se
introduzca en su boca o sus ojos, o que quede sobre la piel, puede
ADVERTENCIA: La utilización de esta herramienta puede
generar polvo o dispersarlo, lo que podría causar lesiones
graves y permanentes al sistema respiratorio, así como otros
problemas. Siempre use protección respiratoria aprobada por
dirección contraria a la cara y el cuerpo.
Doble aislamiento
Las herramientas de doble aislamiento están fabricadas en su
totalidad con dos capas separadas o con una capa de doble
Las herramientas fabricadas con este sistema de aislamiento no
requieren conexión a tierra. En consecuencia, esta herramienta
está equipada con un enchufe de dos conectores que le permite
utilizar cables prolongadores sin tener que preocuparse por
mantener la conexión a tierra. NOTA: El doble aislamiento no
sustituye las precauciones normales de seguridad que se deben
tomar al utilizar la herramienta. El sistema de aislamiento es una
medida de protección adicional contra cualquier lesión resultante de
herramienta.
PIEZAS DE REPUESTO: Al realizar el mantenimiento de todas
Enchufes polarizados
Este equipo debe utilizarse con un cable prolongador polarizado
adecuado de 2 ó 3 conductores. Las conexiones polarizadas
el extremo del receptáculo del cable prolongador posea ranuras
se ajusta totalmente en el tomacorriente, invierta el enchufe. Si
tomacorriente adecuado. No modifique el enchufe de la herramienta
o el cable prolongador de ninguna manera.
Antes de operar la motosierra de asta
instrucciones antes de usar la motosierra de asta. Siga todas las
instrucciones de seguridad. El incumplimiento con alguna de las
instrucciones de seguridad enumeradas más abajo puede resultar
en lesiones corporales serias.
use para cortar un material que no sea madera.
esta unidad.
seguridad:
- guantes altamente resistentes
- calzado de seguridad con puntas reforzadas de acero y suelas
anti-deslizantes.
- anteojos, gafas o máscara de seguridad, que cumplan con
ANSI Z87
- casco de seguridad
32

33
pantalones cortos, joyas de ningún tipo, ni ande descalzo.
de los hombros para evitar que se enrede con cualquier pieza en
movimiento.
- un lugar de trabajo despejado
- un lugar seguro donde pararse
- un trayecto planificado para salir del camino de ramas que caigan
las ramas caigan sin problemas al suelo.
Durante el uso de la motosierra de asta
PELIGRO: Para reducir el riesgo de descarga eléctrica, no
utilice la unidad sobre superficies mojadas. No exponer a la lluvia.
Guárdela bajo techo.
PELIGRO: Evite un arranque accidental: No transporte el
aparato enchufado con el dedo en el interruptor. Asegúrese de que el
propicios a las heridas.
cuando la deje sin vigilancia.
usuario de la motosierra de asta.
sostenga la motosierra de asta.
otra en el mango.
partes del cuerpo alejadas de la cadena.
suave. Funcionará mejor y será más segura si la utiliza a la velocidad
- con los dedos fuera/lejos del gatillo
- sosteniendo el tubo por su punto de equilibrio
asta. El material delgado puede quedar atrapado en la cadena y dar un
latigazo hacia usted. Además, esto puede hacerle perder el equilibrio.
accesorio en este producto, que no haya sido provisto con el producto
o identificado en este manual de instrucciones como adecuado para
utilizarlo con este producto.
No opere la motosierra de asta:
parcial o incorrectamente
debe detenerse cuando suelte el gatillo. Haga cambiar el
conmutador averiado en un centro de servicio autorizado. Vea
“Información de servicio”.

34
NORMAS GENERALES DE SEGURIDAD
PELIGRO: Riesgo de descarga eléctrica. Si se entra en contacto
PELIGRO: Para un funcionamiento seguro, lea y comprenda el
manual del propietario.
distancia cuando utilice la motosierra. Para reducir el riesgo de
exponga la unidad a la lluvia. Guárdela bajo techo.
un ángulo mayor a 60 grados del suelo.
contacto con ningún objeto.
poner a un lado la unidad.
Servicio
de reparación calificado. Si el servicio o mantenimiento es
lesión. Vea “Información de servicio”.
originales. Siga las instrucciones en la sección de mantenimiento
de este manual. El uso de repuestos no autorizados o el
incumplimiento con las Instrucciones de mantenimiento pueden
Protector contra rebote
ADVERTENCIA: Puede ocurrir REBOTE cuando la punta de
se cierra sobre la cadena durante el corte. El contacto de la punta en
algunos casos puede causar una reacción inversa rápida, haciendo
está el operador. Cualquiera de estas reacciones puede hacer que
graves al usuario.
Para minimizar las posibilidades de rebote, siga las siguientes
precauciones:
del mango y de la garrocha.
tronco, una rama, el suelo u otro obstáculo.
asta de los hombros.
los riesgos asociados al rebote.
fabricante, o su equivalente.
otros árboles, ramas, rocas, cercos, tocones, etc. Elimine o evite
contactar cuando corte un tronco o rama en particular.
herramienta. Una cadena suelta o roma puede aumentar las
posibilidades de rebote. Revise la tensión frecuentemente, con el
35
moviendo a su velocidad máxima. Si la cadena se está moviendo a una
velocidad menor, existe una mayor posibilidad de que ocurra rebote.
corte previamente iniciado. Haga penetrar las puntas del soporte
en la madera y permita que la cadena alcance su velocidad
máxima antes de empezar a cortar.
cerrar el corte y pinchar o caer sobre la cadena.
Características de seguridad contra rebote
ADVERTENCIA: Su garrocha podadora viene equipada con
las siguientes funciones para ayudarle a reducir el peligro de rebote;
sin embargo, estas funciones no eliminarán totalmente la posibilidad
de que ocurra esta peligrosa reacción. Como usuario de la sierra de
seguir todas las precauciones de seguridad, instrucciones y
mantenimiento de este manual para ayudarle a evitar rebote y otras
demostrado que reduce significativamente la cantidad y seriedad
de rebotes cuando ha sido probada, según los requisitos de
seguridad para motosierras de cadena.
de rebote y permiten que la madera se deje penetrar gradualmente
por el cortador. Una cadena de rebote reducido es una cadena
B175.1, durante pruebas a una muestra representativa de sierras
de cadena.
Simbolos
La etiqueta de su herramienta puede incluir los siguientes símbolos.
V ...............voltios A ....................amperios
Hz .............hertz W ...................vatios
min ............minutos
o AC .........corriente alterna
o DC . corriente directa
n
o ................... velocidad sin
carga
..............
Construcción Class II
.....................
terminal a tierra
............. símbolo de alerta de .../min ...........revoluciones
seguridad por minuto
...... Lea el manual de instrucciones antes del uso
............Use protección adecuada para las vías respiratorias
...........Use protección adecuada para los ojos
............Use protección adecuada para los oídos
36
REGLAS IMPORTANT
Nombres y terminología para la motosierra de asta
Freno de cadena - Un dispositivo utilizado para detener la
motosierra de asta.
Rueda dentada o piñón - La parte con dientes que impulsa la
cadena de la sierra.
Barra guía -
la cadena de la sierra.
Funda de la barra guía -
Rebote - El movimiento hacia atrás, hacia arriba o ambos, de la
contacto con algún objeto, como un tronco o rama, o cuando la
madera se cierra en el corte y pincha la cadena de la sierra.
Cadena de rebote reducido - Una cadena que cumple con los
pruebas a una muestra representativa de sierras de cadena.
Barra guía de rebote reducido -
demostrado que reduce significativamente las posibilidades de rebote.
Cadena de repuesto para la sierra - Una cadena que cumple con los
Cadena de la sierra - Un bucle de cadena con dientes de corte que
Soporte con puntas -
para poder girar la sierra manteniendo su posición, mientras se corta.
Conmutador - Un dispositivo que completa o interrumpe un
cuando es activado.
Seguro del conmutador - Un seguro desplazable que previene
la activación no intencionada del conmutador, hasta ser
manualmente activado.
Poda - El proceso de cortar ramas en un árbol.
Corte inferior - Un corte ascendente iniciado en la parte inferior
de un tronco o una rama. Este se realiza en una posición de corte
1. Cabezal de la motosierra
2. Interruptor de gatillo
3. Botón de bloqueo en apagado
4. Agarradera de espuma
5. Tubo de extensión
6. Acoplamiento de extensión
7. Cubierta de la rueda dentada
8. Tornillo de cabeza Allen
10. Cadena de la motosierra
11. Tapa del depósito de aceite
12. Funda
13. Llave Allen
14. Tornillo de ajuste de tensión
de la cadena/tensor frontal de la
cadena
15. Sujetador para el cable
prolongador
16. Púas parachoques
17. Púa parachoques inferior
18. Cable de alimentación
COMPONENTES
1
2
3
4
5
8
12
13
6
7
11
16
14
17
15
19
37
Para instalar:
ADVERTENCIA: Cadena móvil filosa. Para evitar el
desenchufada antes de realizar las siguientes operaciones. El
resultado de no hacerlo pueden ser lesiones personales graves.
PRECAUCIÓN: Cadena filosa. Siempre utilice guantes de
protección al instalar o retirar la cadena. La cadena es filosa y puede
cortarle cuando no está funcionando.
PRECAUCIÓN: Una cadena de
motosierra nueva debe volver a tensarse con
mayor frecuencia que una que ya ha estado
firme.
hacia la izquierda con la llave provista
como se muestra en la Figura A.
y el tornillo de cabeza Allen.
sujete la cadena de la motosierra
los dientes de corte apunten en la
dirección correcta haciendo coincidir
la flecha de la cadena con el gráfico
Figura B
en la base de la herramienta como se
muestra en la Figura C.
uso de su garrocha podadora
ADVERTENCIA: Lea todas las instrucciones hasta
comprenderlas. El incumplimiento con alguna de las instrucciones
incendio y/o lesiones corporales serias.
RECOMENDACIONES CON RESPECTO AL
ALMACENAMIENTO
1. Guárdela bajo techo. El mejor lugar de almacenamiento es uno que
sea fresco y seco, fuera de la luz solar directa y de un exceso de calor o
Transporte de la motosierra de asta
cable prolongador de esta y cubra la cadena con la funda.
PREPARACIÓN DE LA MOTOSIERRA DE ASTA
PARA SU USO
ADVERTENCIA: Lea y comprenda todas las
instrucciones. El incumplimiento de cualquiera de las instrucciones
un incendio y/o lesiones personales graves.
INSTALACIÓN Y EXTRACCIÓN DE LA BARRA Y LA
CADENA DE LA MOTOSIERRA
por separado en la caja. La cadena debe instalarse en la barra y
ambas deben instalarse en el cuerpo de la herramienta.
2
B
C
10
10
19
19
20
A
38
dentada. Ajuste el tornillo girándolo hacia la derecha con la
llave. No ajuste el tornillo de cabeza Allen por completo en
la cubierta de la rueda dentada hasta que la cadena tenga la
tensión adecuada.
carcasa utilizando el extremo de
destornillador plano de la llave como
se muestra en la Figura D. Girar el
tornillo hacia la derecha aumenta la
tensión de la cadena. La tensión es
la correcta cuando la cadena vuelve
el pulgar como se muestra en la
Figura E.
• No sobretense la cadena ya que
esto provocará un desgaste
excesivo y reducirá la vida útil de
la barra y la cadena.
firmeza el tornillo de cabeza Allen en la cubierta de la rueda dentada.
NOTA: Si la cadena es nueva, verifique la tensión con frecuencia
2 horas de uso ya que una cadena nueva se estira levemente.
Para quitarla:
ADVERTENCIA: Cadena móvil filosa. Para evitar el
desenchufada antes de realizar las siguientes operaciones. El
resultado de no hacerlo pueden ser lesiones personales graves.
PRECAUCIÓN : Cadena filosa. Siempre utilice guantes de
protección al instalar o retirar la cadena. La cadena es filosa y puede
cortarle cuando no está funcionando.
carcasa utilizando el extremo de destornillador plano de la llave
como se muestra en la Figura D. Girar el tornillo hacia la izquierda
cadena para poder quitarla.
muestra en la Figura A.
sistema de autolubricación y de la rueda dentada utilizando un
cepillo suave.
cadena.
AJUSTE DE TENSIÓN DE LA CADENA
PRECAUCIÓN :
Siempre vuelva a reducir la tensión de la
PRECAUCIÓN :
Una cadena de motosierra nueva debe volver
a tensarse con mayor frecuencia que una que ya ha estado en uso
E
D
15
de la cadena. La tensión es la correcta cuando la cadena vuelve
la Figura E. No debe existir “pandeo”
encuentra en la parte inferior como se
muestra en la Figura F.
la motosierra, afloje el tornillo de cabeza
Allen en la cubierta de la rueda dentada.
carcasa utilizando el extremo de destornillador plano de la llave
como se muestra en la Figura D.
excesivo y reducirá la vida útil de la barra y la cadena.
tornillo de cabeza Allen en la barra de sujeción.
primeras 2 horas de uso ya que una cadena nueva se estira
levemente.
Sistema de autolubricación
Esta motosierra de asta está equipada con un sistema de
autolubricación que mantiene la cadena de la motosierra y la barra
NOTA: Para la lubricación de la cadena y la barra, utilice un
aceite de calidad alta para barra y cadena. Como sustituto
temporal, puede utilizarse un aceite de motor no detergente
grado SAE30. Al podar árboles, se recomienda el uso de un aceite
de base vegetal para barra y cadena. No se recomienda el aceite
Llenado del depósito de aceite
el aceite para barra y cadena recomendado hasta que el nivel de
39
aceite haya alcanzado la parte superior de la abertura del depósito
de aceite. El uso de un embudo evitará los derrames.
cable prolongador y verifique el nivel de aceite. Rellene según sea
necesario. Además, verifique la barra y la cadena para asegurarse
ENSAMBLAJE
Colocación del cable prolongador
El mango del interruptor tiene incorporado un sujetador para el
desenchufe.
Doble el cable prolongador e
el extremo del área del mango
como se muestra en la Figura G.
Enganche el lazo formado al doblar
el cable sobre el sujetador para
del cable para asegurarse de que
quede firmemente retenido en el
mango.
Enchufe el extremo del
de la motosierra de asta.
NOTA: Siempre mantenga el cable lejos del área de corte y coloque
el cable de modo que no pueda quedar atrapado en las ramas y
otros materiales durante el corte.
PROLONGACIÓN DEL TUBO DE EXTENSIÓN
ADVERTENCIA: Siempre verifique para asegurarse de que
el acoplamiento de extensión esté completamente ajustado y de
que el tubo de extensión no se retraiga. Si no ajusta el
acoplamiento por completo el resultado puede ser que el cabezal
de la motosierra se mueva de manera imprevista, provocando una
condición peligrosa. Verifique periódicamente la conexión para
G
21
15
F
40
Interruptor de encendido/apagado
Siempre asegúrese de su estabilidad y sujete la motosierra de asta
firmemente con ambas manos, con el pulgar y los dedos alrededor del mango.
oprima el botón de bloqueo en
como se muestra en la Figura J.
funcionando usted puede soltar el
gatillo.
Sistema para frenado de la cadena con detención automática
Su motosierra de altura está equipada con un sistema para frenado
de la cadena con detención automática que detendrá la cadena
rápidamente cada vez que suelte el interruptor de gatillo. Este
sistema se puede probar antes de cada uso.
PODA CON LA GARROCHA LA MOTOSIERRA
ADVERTENCIA:
Nunca se pare directamente debajo de la rama a cortar. Siempre
Use siempre protección en la cabeza, para los ojos, en los pies y para
el cuerpo. El usar protección para el cuerpo ayuda a reducir el riesgo de
lesiones cuando opere esta unidad.
Nunca se pare sobre una escalera u otro soporte poco estable cuando
use la motosierra de asta. Siempre evite cualquier posición que pudiera
hacerle perder el equilibrio y lesionarse seriamente.
Mantenga a otras personas a al menos 15 m (50 pies) del área de
trabajo. Las distracciones pueden hacerle perder el control.
Peligro de electrocución. Para evitar descargas eléctricas, no opere
esta herramienta a menos de 15 m (50 pies) de distancia de cables de
electricidad. Siempre revise el área buscando cables de electricidad.
No extienda el mango del conmutador de la motosierra de asta más
arriba de la asta de los hombros.
Siempre asegúrese de su estabilidad y sujete la motosierra de
asta firmemente con ambas manos, con el pulgar y los dedos
alrededor del tubo.
1. Gire el acoplamiento de extensión
detenga como se muestra en la
Figura H.
2. Mientras sujeta la agarradera de
alejándolo del acoplamiento de
extensión. Esto dejará al descubierto
muestra en la Figura I. La motosierra
de asta puede utilizarse con cualquier
longitud del tubo de extensión.
3. Una vez obtenida la longitud
de extensión deseada, gire el
asegure por completo el tubo de extensión en su lugar.
USO DE LA MOTOSIERRA DE ASTA
ADVERTENCIA: Lea y comprenda todas las
instrucciones. El incumplimiento de cualquiera de las instrucciones
un incendio y/o lesiones personales.
PRECAUCIÓN: Siempre vuelva a reducir la tensión de la
motosierra de asta.
IMPORTANTE:
completa y firmemente. Asegúrese de que la cadena de la motosierra
.
H
I
J

41
ADVERTENCIA:
Permita que la herramienta trabaje a su
propio ritmo. No la sobrecargue.
ADVERTENCIA:
Al podar árboles:
Protéjase del retroceso; este puede provocar lesiones graves o
la muerte. Consulte la sección “RETROCESO”, para evitar el
riesgo del retroceso.
No se estire. Asegúrese de estar parado
correctamente. Mantenga sus pies
separados. Distribuya su peso en forma
uniforme sobre ambos pies.
Utilice ambas manos para sujetar la
motosierra de altura como se muestra
en la Figura K. Agárrela con firmeza. Los
pulgares y los dedos debe rodear el mango
y el tubo de la motosierra de altura.
Nunca la utilice mientras está en un árbol, en alguna posición
complicada o en una escalera u otra superficie inestable.
Puede perder el control de la motosierra de altura, la que le
provocará lesiones graves
.
Siga las instrucciones a continuación para recortar un árbol.
velocidad antes de realizar un corte. Al iniciar un corte, aplique la
cadena en movimiento contra la rama. Sostenga firmemente en su
lugar la motosierra de altura para evitar un posible rebote o que patine
árbol en la parte inferior de una rama.
Utilice la parte superior de la barra
motosierra de altura aplicando una
leve presión para hacer un corte que
corresponda a 1/3 del diámetro de
la rama. Luego, realice el corte de
finalización desde la parte superior
como se muestra en la Figura L.
No fuerce la motosierra de altura. El
motor se sobrecargará y puede quemarse. Funcionará mejor y será más
NOTA: Si intenta cortar ramas gruesas desde la parte inferior, la
rama se cerrará y atrapará la cadena de la motosierra en el corte. Si
intenta cortar ramas gruesas desde la parte superior, sin un corte poco
profundo por abajo, la rama se astillará y arrancará corteza del árbol.
máxima velocidad. Detenga la motosierra de altura soltando el gatillo.
Asegúrese de que la cadena se haya detenido antes de dejar la
motosierra de altura en el suelo.
Filo de la cadena de la motosierra
PRECAUCIÓN: Cadena filosa. Siempre use guantes de
protección cuando manipule la cadena. La cadena es filosa y
puede cortarle cuando no está funcionando.
Siempre vista:
Protección para la cabeza
Protección ocular
Guantes de trabajo
Pantalones largos
Zapatos con
puntas de acero
Posición de operación
K
L

42
Si la sierra no funciona correctamente, verifique lo siguiente:
Problema Causa posible Solución posible
disyuntor.
enchufado en un tomacorriente
que funcione.
el ajuste de la tensión de la
cadena.
la lubricación de la cadena.
tensión de la cadena.
el ajuste de la tensión de la
cadena.
Nota: La tensión excesiva
produce un desgaste excesivo
y una reducción en la vida
útil de la barra y la cadena.
minutos de uso.
Consulte la sección sobre la
instalación de la cadena.
la instalación y el retiro de la
cadena.
no enciende.
sobrecalentada.
está suelta.
de corte.
funciona pero
no corta.
o disyuntor activado.
Cable prolongador
desenchufado.
está demasiado
ajustada.
lubricación.
cadena no es la
correcta.
cadena no es la
correcta.
reemplazarse.
está instalada al
ilustración B.
cadena?
SECCIÓN DE DETECCIÓN DE PROBLEMAS

43
IMPORTANTE: Los cortadores de la cadena perderán el filo
mientras cortan.
Para obtener el mejor rendimiento posible de la cadena de la
motosierra es importante mantener los dientes de la cadena filosos.
Existen servicios de afilado de cadena disponibles en el centro de
mantenimiento de Black+Decker más cercano.
NOTA: Cada vez que se afila la cadena, pierde algo de sus
cualidades de bajo retroceso y se debe tener extremo cuidado. No
se recomienda afilar la cadena más de cuatro veces.
Tensión de la cadena de la motosierra
Esto debe verificarse con regularidad. Consulte “Ajuste de tensión de la cadena”.
ACCESORIOS
La cadena y la barra de repuesto están disponibles en el centro de
mantenimiento de Black+Decker más cercano. Cadena de repuesto
puede ser peligroso.
SECCIÓN DE MANTENIMIENTO DE LA MOTOSIERRA DE ASTA
El mantenimiento regular asegura una vida útil prolongada y eficaz
para la herramienta.
lubrique según el manual de instrucciones de la motosierra de altura.
reemplace la cadena. Esto ayuda a evitar el desgaste en un solo
lado, especialmente en la punta y la parte inferior de la barra.
rendimiento y reducir el riesgo de lesiones.
hágalo reparar en un centro de mantenimiento autorizado.
Mantenga los mangos secos, limpios y sin restos de aceite ni grasa.
IMPORTANTE: Para garantizar la SEGURIDAD y la
CONFIABILIDAD del producto, las reparaciones, el mantenimiento
y el ajuste deben realizarse en los centros de mantenimiento
autorizados o en otras organizaciones de mantenimiento calificadas,
INFORMACIÓN DE MANTENIMIENTO
Todos los Centros de servicio de Black+Decker cuentan con
personal altamente capacitado dispuesto a brindar a todos los
clientes un servicio eficiente y confiable en la reparación de
piezas de repuesto originales de fábrica, póngase en contacto con el
centro de servicio de

44
Black+Decker más cercano a su domicilio. Para ubicar su centro de
1-800-544-6986 o visite
nuestro sitio www.blackanddecker.com.
Este aparato digital Clase B cumple con la norma canadiense ICES-003.
Este mecanismo cumple con la parte 15 de las normas de la
este mecanismo puede aceptar cualquier interferencia recibida,
deseada.
NOTA: Este equipo ha sido probado y se encontró que cumple
brindar protección razonable contra interferencia perjudicial en
una instalación residencial. Este equipo genera, usa y puede
de acuerdo con las instrucciones, puede provocar interferencia
perjudicial en las comunicaciones de radio. Sin embargo, no hay
particular. Si este equipo provoca interferencia perjudicial en la
recepción de radio o televisión, lo que se puede determinar al
apagar y encender el equipo, el usuario debe tratar de corregir la
interferencia mediante una o más de las siguientes medidas:
Cambiar la orientación o la ubicación de la antena de recepción.
Aumentar la separación entre el equipo y el receptor.
Conectar el equipo a un tomacorriente sobre un circuito diferente
de aquel al que está conectado el receptor.
televisión con
experiencia.
Los cambios o las modificaciones que se le realicen a esta unidad
sin aprobación expresa del tercero responsable del cumplimiento
pueden anular la autorización del usuario para operar el equipo.
Este aparato digital de la clase B se conforma con
ICES-003 canadiense.
GARANTÍA LIMITADA DE DOS AÑOS
realizado o intentado reparaciones por parte de cualquier otra
persona ajena a Black & Decker y sus centros de mantenimiento
autorizados. Un producto defectuoso que cumple con las
será remplazado o reparado sin costo de una dos maneras:
La primera, que únicamente dará lugar a intercambios, consiste
en devolver el producto al comerciante minorista donde fue
minorista. Es posible que se requiera el comprobante de compra.
o intercambios.
el producto a un centro de mantenimiento de propiedad o con
autorización de Black & Decker para su reparación o remplazo
a discreción de Black & Decker. Es posible que se requiera un
comprobante de compra. Los centros de mantenimiento de
propiedad o con autorización de Black & Decker se indican bajo
www.blackanddecker.com.
de Black & Decker más cercano a usted. Este producto no está
presente documento, se declina la responsabilidad de todas las

45
AMÉRICA LATINA:
sitio web para obtener dicha información.
2 AÑOS DE GARANTIA
cualquier falla debido a materiales empleados para su fabricación ó
mano de obra defectuosa.
componentes sin cargo alguno para el cliente incluyendo la mano
de obra, esta incluye los gastos de trasportación erogados para
y esta póliza sellada por el establecimiento comercial donde se
adquirió el producto.
Nos comprometemos a entregar el producto en un lapso no mayor
mismo en nuestros talleres de servicio autorizados.
ESTA GARANTIA NO APLICA CUANDO:
El producto se hubiese utilizado en condiciones distintas a las
normales.
El producto no hubiese sido operado de acuerdo con el instructivo de
El producto hubiese sido alterado o reparado por personas no
autorizadas por nosotros.
Importador: Black+Decker S.A. de .C.V
Bosque de Cidros Acceso Radiatas No.42
3ra.Seccion de Bosques de las lomas

46

47

48
BLACK+DECKER S.A. DE C.V.
01 800 847 2309/01 800 847 2312
Grupo Realsa en herramientas,
S.A. de C.V.
Súper Manzana 69 MZ.01 Lote 30
Col. Puerto Juárez
Tel. 01 998 884 72 27
Ferre Pat de Puebla, S.A. de C.V.
16 de Septiembre No. 6149
Col. El Cerrito
Puebla, Puebla
Tel. 01 222 264 12 12
Ferre Pat de Puebla, S.A. de C.V.
Col. Ejido 1ro. de Mayo
Boca del Rio, Veracruz
Tel. 01 229 167 89 89
Servicio de Fabrica Black+Decker,
S.A. de C.V.
Lázaro Cardenas No. 18
Col. Obrera
Distrito Federal
Tel. 55 88 95 02
Representaciones Industriales Robles,
S.A. de C.V.
Tezozomoc No. 89
Col. La Preciosa
Distrito Federal
Tel. 55 61 86 82
Gpo. Comercial de Htas. y Refacciones
de Occidente, S.A. de C.V.
Av. La Paz No. 1779
Guadalajara, Jalisco
Tel. 01 33 38 25 69 78
Herramientas y Equipos Profesionales
Av. Colón 2915 Ote.
Col. Francisco I. Madero
Monterrey, Nvo. León
Tel. 01 81 83 54 60 06
Htas. Portátiles de Chihuahua,
S.A. de C.V.
Av. Universidad No. 2903
Col. Fracc. Universidad
Chihuahua, Chihuahua
Tel. 01 614 413 64 04
SOLAMENTE PARA PROPOSITOS DE MEXICO
PARA OTRAS LOCALIDADES laME AL 01 800 847 2309 o 01 800 847 2312.
Fernando González Armenta
Bolivia No. 605
Col. Felipe Carrillo Puerto
Cd. Madero, Tampico
Tel. 01 833 221 34 50
Perfiles y Herramientas de Morelia
Gertrudis Bocanegra No. 898
Col. Ventura Puente
Morelia, Michoacán
Tel. 01 443 313 85 50
Enrique Robles
Av. de la Solidaridad No. 12713
Col. La Pradera
Irapuato, Guanajuato
Tel. 01 462 626 67 39
Hernández Martinez Jeanette
Prolongación Corregidora Nte. No. 1104
Col. Arboledas
Tel. 01 442 245 25 80
Cat No. PP610 Form No. 90611257 May 2014
Copyright © 2014 Black+Decker Printed in China