Loading ...

3. For higher powers, rotate the nosepiece
(3) to change the objective lens (4)
to 10x or 40x. This will yield a greater
magnification. Gradually turn the focus
knob (11) to refocus on the specimen.
NOTE: You should first turn the focus knob
to lower the stage, before turning the
objective carriage.
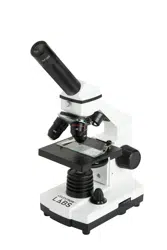
ADJUSTING THE
ILLUMINATION
Specimens of different sizes, thickness
and color variations will require different
levels of illumination. In order to adjust
illumination, turn the illuminator adjustment
wheel (14) to either increase or decrease
the illumination. The illuminator adjustment
wheel (14) has three illumination settings
(I being the lowest and III the highest).
Optimal lighting is found by making
adjustments and experimenting.
DIAPHRAGM
The disc diaphragm (12) has six diameter
openings. These openings allow you to
adjust the amount of light passing through
the specimen. Adjusting the light can help
you maximize brightness, contrast, etc.
CARE, MAINTENANCE AND
WARRANTY
Your Celestron Labs microscope is a
precision optical instrument and should be
treated with care at all times. Follow these
care and maintenance suggestions and your
microscope will need very little maintenance
throughout its lifetime.
• When you are done using your
microscope, remove any specimens left
on the stage.
• Turn off the power and unplug the power
cord (if applicable).
• Always place the plastic bag or dust cover
over the microscope when not in use to
help keep it clean.
• Store the microscope in a dry, clean place.
• Be very careful if using your microscope
in direct sunlight to prevent damage to
the microscope or your eyes.
• To carry your microscope, place one hand
on the “arm” of the microscope and the
other hand under the base for support. Do
not grasp your microscope by the focuser
knob or head.
• Clean the outside surfaces (metal and
plastic) with a moist cloth.
• Always unplug any cords before cleaning.
• Never clean optical surfaces with cloth or
paper towels as they can scratch optical
surfaces easily. Instead, use an air blower
or camel hair brush.
• To clean fingerprints off of optical
surfaces, use a lens cleaning agent
and lens tissue available at most photo
supply stores. When cleaning, do not rub
in circles as this may cause streaks or
scratches.
• Never disassemble your microscope or
clean internal optical surfaces. Only
qualified technicians at the factory or an
authorized repair facility should attempt
these repairs.
• When handling glass specimen slides, use
care, as the edges can be sharp.
YOUR MICROSCOPE HAS A
TWO YEAR LIMITED WARRANTY.
FOR MORE DETAILED INFORMATION,
PLEASE VISIT
CelestronLabs.com
Torrance, CA 90503
celestron.com/pages/technical-support
CelestronLabs.com
© 2020 Celestron
All rights reserved.
(Products or instructions may change without
notice or obligation. Designed and intended
for those 14 years of age and older.
Français
Félicitations pour l’acquisition de votre
microscope Celestron Labs. Votre microscope
est un instrument optique de précision,
fabriqué avec des matériaux de la plus
grande qualité afin d’assurer sa durabilité et
sa longue durée d’utilisation. Il est conçu pour
vous offrir une vie entière de découvertes
avec un niveau d’entretien minimal.
Le microscope CM400 offre des puissances
d’agrandissement de 40x à 400x. Il convient
parfaitement à l’observation d’échantillons
de levures et de moisissures, de cultures,
d’éléments végétaux et animaux, de fibres,
de bactéries et autres.
Avant de commencer à utiliser votre
microscope Celestron Labs, lisez ces
instructions pour vous familiariser avec les
composants et les fonctions du microscope.
Référez-vous au schémas du microscope
pour repérer les pièces mentionnées dans
le présent manuel. La dernière section du
mode d’emploi donne des conseils d’entretien
et de maintenance faciles à appliquer.
DANS LA BOÎTE
- Microscope CM400
- Oculaire à angle large : 10x
- Adaptateur secteur universel avec
4 fiches internationales
- 10 lamelles préparées
- 3 piles AA
COMPOSANTS
1. Oculaire
2. Tube d’oculaire
3. Tourelle
4. Lentille de l’objectif
5. Pinces de platine porte-échantillons
6. Platine porte-échantillons
7. Éclairage
8. Base
9. Tête
10. Bras
11. Bouton de mise au point
12. Disque diaphragme
13. Interrupteur marche/arrêt
14. Molette de réglage de l’illuminateur
FICHE TECHNIQUE
PLATINE PORTE-ÉCHANTILLONS :
Platine porte-échantillons simple avec valets
– 88 mm x 88 mm (3,5 po x 3,5 po)
TÊTE : monoculaire inclinable à 45°
PLAGE DE GROSSISSEMENT :
40x à 400x
TUBE DE MISE AU POINT :
mise au point grossière
OBJECTIFS : 4x, 10x, 40x
OCULAIRE : WF 10x
TOURELLE : triple avec butée à déclic
ILLUMINATEUR : DEL réglable
CONDENSEUR : N/D 0,65
DIAPHRAGME : disque diaphragme avec 6
dimensions d’ouverture
DIMENSIONS : 127 mm x 152 mm x 279 mm
(5 po x 6 po x 11 po)
POIDS : 1,108 kg (2,7 lbs )
TABLEAU DE
GROSSISSEMENT
Utilisez le tableau suivant pour déterminer
le grossissement offert par les différentes
combinaisons d’oculaires et de lentilles.
LENTILLE DE L’OBJECTIF :
4x 10x 40x
OCULAIRE WF 10X :
40x 100x 400x
INSTALLATION DE VOTRE
MICROSCOPE
1. Retirez l’emballage de polystyrène
du carton.
2. Retirez le microscope et ses accessoires
avec soin de l’emballage et déposez-les
sur une table, bureau ou autre surface plate.
3. Sortez le microscope de son sachet.
4. Retirez le capuchon du tube de l’oculaire (2).
5. Retirez les oculaires de leurs sachets.
6. Insérez l’oculaire WF 10x dans le barillet
d’oculaire (2).
7. Branchez l’adaptateur secteur dans la
prise située à l’arrière de la base (8).
8. Insérez la prise du cordon d’alimentation
dans une source d’alimentation compatible.
Le microscope peut également fonctionner
avec trois piles AA.
- Ouvrez le compartiment des piles situé à
la base (8) du produit.
- Installez les trois piles AA (fournies) et
fermez le compartiment.
FONCTIONNEMENT DU
MICROSCOPE
Avant de commencer l’observation, veuillez
lire ces sections avec attention pour
comprendre comment effectuer la mise au
point, changer la puissance (grossissement),
utiliser la platine porte-échantillons et
ajuster la luminosité.
OBSERVER UN ÉCHANTILLON
Placez l’échantillon sous les pinces de la
platine (5) et centrez-le. Les images seront
observées à l’envers et inversées sur le plan
horizontal. Votre microscope est livré avec
des lamelles préparées pour vous aider à
bien commencer.
Vous êtes maintenant prêt à faire la
mise au point et observer un spécimen.
Faites attention de ne pas endommager
l’échantillon observé. Lorsque vous passez
sur des puissances plus élevées pour faire
la mise au point, veillez à ne pas toucher la
lamelle ni l’échantillon avec les objectifs (4).
MISE AU POINT
ET CHANGEMENT
DE PUISSANCE
(GROSSISSEMENT)
1. Commencez toujours par la plus petite
puissance (lentille 4x et oculaire WF 10x).
Cette combinaison offre la plus faible
puissance de grossissement.
2. Placez une lamelle (ou un objet) sur la
platine (6) directement sous la lentille
de l’objectif (4). Faites tourner la molette
de mise au point (11) jusqu’à la mise au
point sur l’échantillon.
3. Pour obtenir un grossissement plus élevé,
faite pivoter la tourelle (3) pour changer
la lentille d’objectif utilisée (4) sur 10x,
40x. Cela vous offrira une puissance
de grossissement plus élevée. Faites
doucement tourner la molette de mise au
point (11) pour effectuer la mise au point
de nouveau.
REMARQUE : Par sécurité pour le matériel,
nous vous conseillons de
d’abaisser la platine avant de
faire pivoter la tourelle.
RÉGLER L’ILLUMINATION
Les spécimens de différentes tailles,
épaisseur ou couleur nécessiteront autant
de niveaux de luminosité différents. Pour
Loading ...
Loading ...
Loading ...