Loading ...
Loading ...
Loading ...

Using the Front Control Panel
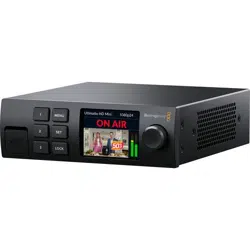
On the control panel’s LCD you can view the program output plus monitor useful information
such as audio levels, the video format and frame rate, and the name of your Ultimatte unit.
When you press the menu button the settings menu will appear where you can change settings
and check the connection status on all inputs. The three numbered buttons let you instantly
recall presets.
This section provides a brief overview of the features included on the front panel.
1 MENU
2 SET
3 LOCK
LCD Display
Depending on the Ultimatte 12 model you are using, the LCD displays the program output and
the following information.
1 MENU
2 SET
3 LOCK
Format Indicator
Displays the current
video format.
Program Output
Displays the
program output.
Name
Displays the name
ofyour Ultimatte. If you
have set acustom name
it will appear here.
On Air Status
A red on air indicator will be
displayed when your Ultimatte
is switched to air. When the unit
is connected and ready to go on
air ‘standby’ will be displayed.
‘No Cam’ will be displayed if a
camera is not connected to the
foreground input.
Audio Meters
Displays the
foreground source
audio levels.
NOTE Ultimatte 12 HD Mini receives on air tally status from an ATEM switcher
connected via the HDMI PGM or SDI Return connectors. Refer to the ‘CameraControl
via Ultimatte 12 HD Mini’ for more information.
Larger Ultimatte models detect tally via the GPIO connector on the rear panel when
connected to a third party GPI interface. For more information, refer to the ‘GPI and
Tally Settings’ section.
16Using the Front Control Panel
Loading ...
Loading ...
Loading ...