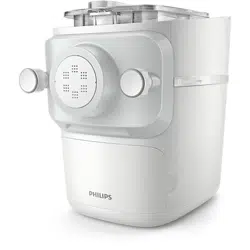

HR2660
User Manual
www.philips.com/myPastaMaker

3
ENGLISH
1
2
Add min. 200 grams
1
5 4
3
2
1
4
5
3
2
10
8
7
15 11
6
17 16 14 13 12
9
4
ENGLISH
18
3
4
5
5
4
3
2
1
6
7
8
9
10
16
17
22
25
2
1
24
23
20
21
12
14
15
19
13
11
20
5
ENGLISH
26
28
29
30
27
< 60˚C / 140˚F

6
ENGLISH
Table of Contents
Important 7
Danger 7
Warning 7
Caution 8
Electromagneticelds(EMF) 8
Recycling 8
Guaranteeandsupport 9
Shapingdiscoverview 9
Recipe 9
Introduction 10
Productoverview(Fig.1) 10
Controlpaneloverview(Fig.2) 10
Disassemblingandcleaningbeforerstuse 10
Assembling 10
UsingthePastamaker 11
Preparingtheingredientsandstartingthepastamakingprogram 11
Important! 12
Cleaning 13
Storage 13
Troubleshooting 13

7
ENGLISH
Important
Readthisimportantinformationcarefullybeforeyouusetheapplianceandsaveitforfuture
reference.
Danger
• Neverimmersethemotorunitinwateroranyotherliquidanddonotrinseitunderthe
tap.Useonlyamoistclothtocleanthemotorunit.
Warning
• Donotusetheapplianceiftheplug,themainscordorotherpartsaredamagedorhave
visiblecracks.
• Unplugtheappliancewhennotinuse.
• Beforeyouconnecttheappliancetothepower,makesurethatthevoltageindicatedon
thebottomoftheappliancecorrespondstothelocalpowervoltage.
• Beforeyouinserttheplugintothepoweroutlet,makesurethattheapplianceis
assembledcorrectly.
• Ifthesupplycordisdamaged,itmustbereplacedbyPhilips,itsserviceagentorsimilarly
qualiedpersonsinordertoavoidahazard.
• Thisapplianceisnotintendedforusebypersons(includingchildren)withreduced
physical,mentalorsensoryabilities,orlimitedexperienceandknowledge,unless
supervisedorinstructedintheuseoftheappliancebyapersonresponsibleforitssafety.
• Childrenshouldbesupervisedtoensurethattheydonotplaywiththeappliance.
• Cleaningandusermaintenanceshallnotbemademychildrenwithoutsupervision.
• Inordertoavoidahazardduetoinadvertentresettingofthethermalcut-out,this
appliancemustnotbesuppliedthroughanexternalswitchingdevice,suchasatimer,or
connectedtoacircuitthatisregularlyswitchedonandobytheutility.
• Donotputheavyobjectsontheappliance.
• Donotmovetheappliancewhileitisoperating.
• Donotuseadishwashertocleantheappliance.
• Makesuretotightenthefrontpanelknobsduringassembly.
• Makesuretheapplianceisnotpluggedinwhenassemblingtheappliance.
• Pourintheliquidslowlythroughthewaterslotaftertheappliancestartsmixing.
• Donotputanyingredientsthatare60°C/140°Foraboveintothepastamaker,norplace
thepastamakerinsurroundingswithhightemperature(60°C/140°F),forinstanceina
hightemperaturesterilization.Thiswilldamagetheappliance.
• Neverpourwaterintothemixingchamberbeforeyouplacethechamberlidontothe
chamber.
• Donotpouranyliquidsintothesafetyswitchhole.
• Donotselecttheextrusiononlyprogrambeforethedoughismixingcomplete.Otherwise,
thiswilldamagethepastamaker.
• Donotuseascourer,causticcleaner,orcleaners(forexample,gasoline,alcohol,and
propanol)tocleantheappliance.
• Cleantheapplianceaftereachuseortheappliancemightnotoperateproperly.

8
ENGLISH
• Donotinsertanyobjectsintotheappliance.
• Takeextracautionwhencleaningtheappliancetoavoidgettingcutbyanysharpedges.
• Switchotheapplianceanddisconnectfromsupplybeforechangingaccessoriesor
approachingpartsthatmoveinuse.
• Neverreachintothemixingchamberwhentheapplianceispluggedin.
• Topreventashortcircuitoranelectricshock,donotpourwateroranyliquidontothe
display.
Caution
• Alwaysdisconnecttheappliancefromthesupplyifitisleftunattendedandbeforeyou
assemble,disassemble,storeorcleanit.
• Thisapplianceisintendedfornormalhouseholduseonly.Itisnotintendedforusein
environmentssuchasstakitchensofshops,oces,farmsorotherworkenvironments.
Norisitintendedtobeusedbyclientsinhotels,motels,bedandbreakfastsandother
residentialenvironments.
• Thoroughlycleanthepartsthatcomeintocontactwithfoodbeforeyouusetheappliance
forthersttime.Refertotheinstructionsinthemanual.
• NeveruseanyaccessoriesorpartsfromothermanufacturersorthatPhilipsdoesnot
specicallyrecommend.Ifyouusesuchaccessoriesorparts,yourguaranteebecomes
invalid.
• Donotusetheapplianceonanunstableorunevensurface.
• Onlyusethisapplianceforitsintendedpurposeasshownintheusermanual.
• Donotexceedthequantitiesandprocessingtimesindicatedinthetable.
• Tobetterprotectthelifetimeoftheappliance,werecommendtostopthedevicefor15
minutes,ifitwasusedfor45minutescontinuously.
• Ifyouintendtousetheappliancecontinuously,cleantheshapingdiscwiththesupplied
cleaningtooleachtimeafteruse.Forcleaningease,donotsoaktheshapingdiscintothe
waterdirectly.
• Neverusescouringpads,abrasivecleaningagentsoraggressiveliquidssuchaspetrolor
acetonetocleantheappliance.
• Donotputlessthan200gormorethan500gofourinthechamber.
Electromagneticelds(EMF)
ThisPhilipsappliancecomplieswithallapplicablestandardsandregulationsregarding
exposuretoelectromagneticelds.
Recycling
• Donotthrowawaytheproductwiththenormalhouseholdwasteattheendofitslife,but
handitinatanocialcollectionpointforrecycling.Bydoingthis,youhelptopreservethe
environment.
• Followyourcountry’srulesfortheseparatecollectionofelectricalandelectronicproducts.
Correctdisposalhelpspreventnegativeconsequencesfortheenvironmentandhuman
health.
9
ENGLISH
Guarantee and support
Ifyouneedserviceorinformationorifyouhaveaproblem,visitthePhilipswebsiteat
www.philips.com/supportorcontactthePhilipsConsumerCareCenterinyourcountry.You
cannditsphonenumberintheworldwideguaranteeleaet.IfthereisnoConsumerCare
Centerinyourcountry,gotoyourlocalPhilipsdealer.
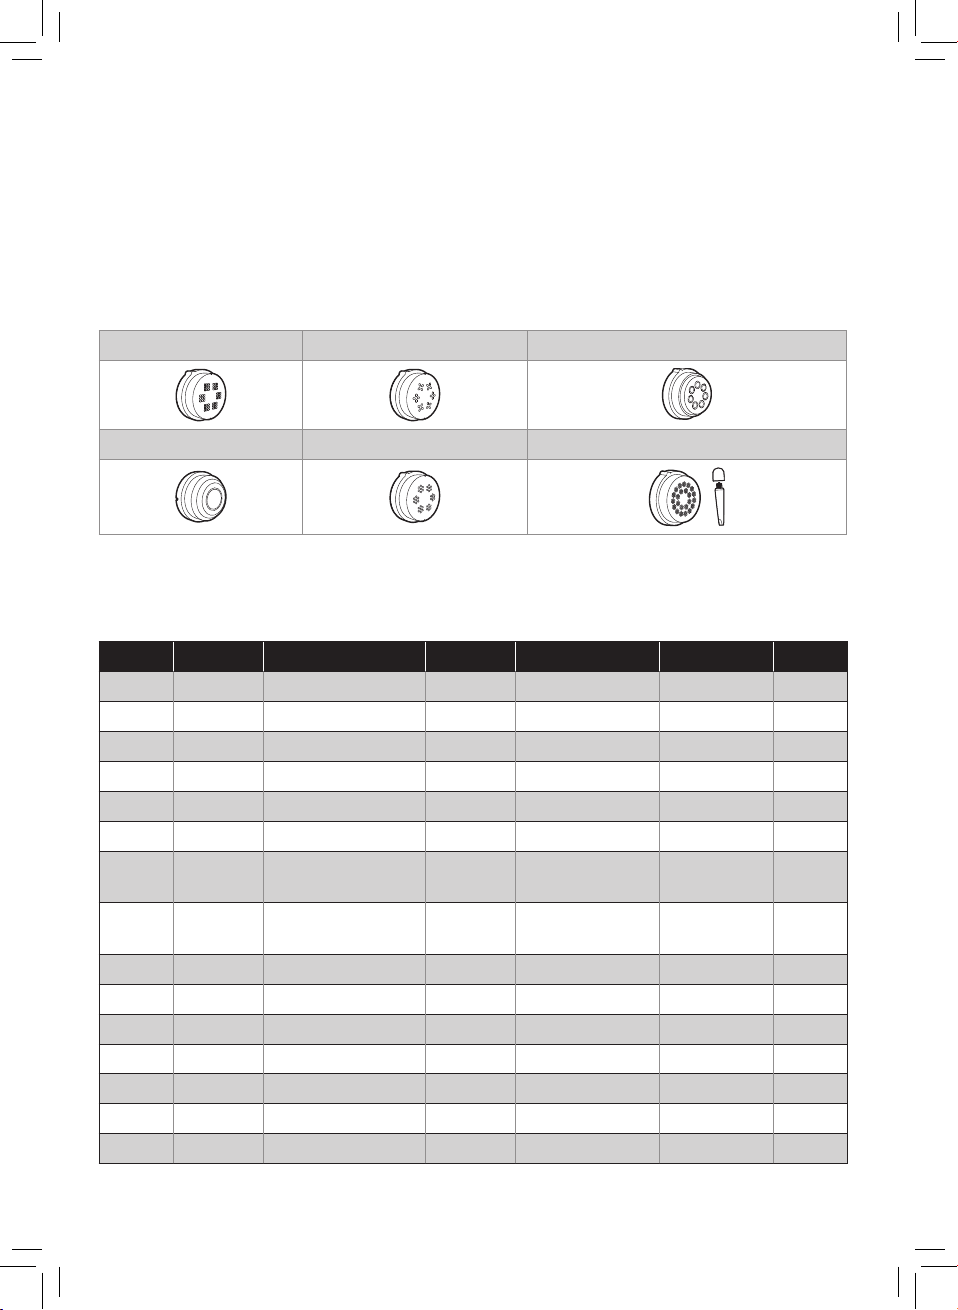
Shaping disc overview
Spaghetti Fettuccine Penne
Lasagna Thick Spaghetti Angel hair (withcleaningtool)
Recipe
Thefollowingrecipetableshowstheoptimalwater/ourratiofordierentourtypes.
Type Amount Flour Liquid Binder Gluten free Vegan
Pasta 250g Lentilour 75ml 1tbspXanthan x x
Pasta 250g Lentilour 75ml / x x
Pasta 250g Peaour 75ml 1tbspXanthan x x
Pasta 250g Peaour 75ml / x x
Pasta 250g Chickpeaour 75ml 1tbspXanthan x x
Pasta 250g Chickpeaour 75ml / x x
Pasta 250g
Buckwheat150g
Riceour100g
130ml 1egg x
Pasta 250g
Corn50g
Rice200g
120ml 1tbspXanthan x x
Pasta 250g Riceour 120ml 1tbspXanthan x x
Pasta 250g Wheatour 95ml / x
Pasta 250g Wheatour 95ml 1egg
Pasta 250g Speltour 85-90ml / x
Pasta 250g Wholegrainour 115ml / x
Pasta 250g Semola 105ml / x
Pasta 250g Semola 110ml 1egg

10
ENGLISH
Introduction
Congratulationsonyourpurchase,andwelcometoPhilips!
TofullybenetfromthesupportthatPhilipsoers,registeryourproductat
www.philips.com/welcome.
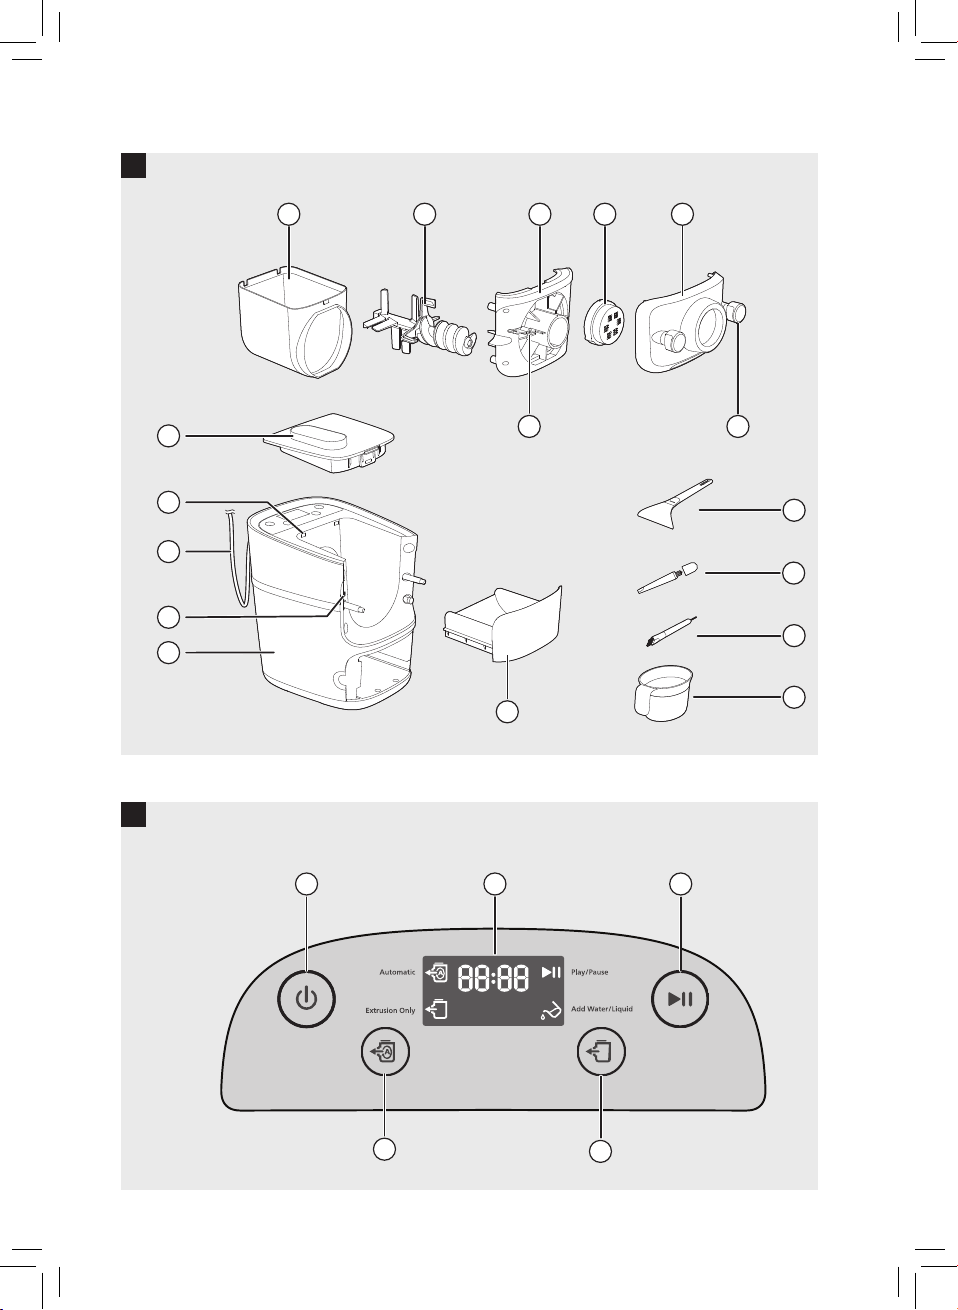
Product overview (Fig.1)
a
Mixingchamberlid
j
Pastacutter
b
Safetyswitchholeofthemixing
chamberlid
k
Frontpanelknobs
c
Powercord
l
Frontpanel
d
Discholdersafetyswitch
m
Shapingdisc
e
Mainunit
n
Discholder
f
Shapingdiscstorage
o
Discholdersafetyswitchlever
g
Water/ourcup
p
Mixingpaddle
h
Cleaningbrush
q
Mixingchamber
i
Anglehairshapingdisccleaningbrush
Control panel overview (Fig.2)
a
On/obutton
d
Start/pausebutton
b
Automaticbutton
e
Display
c
Extrusiononlybutton
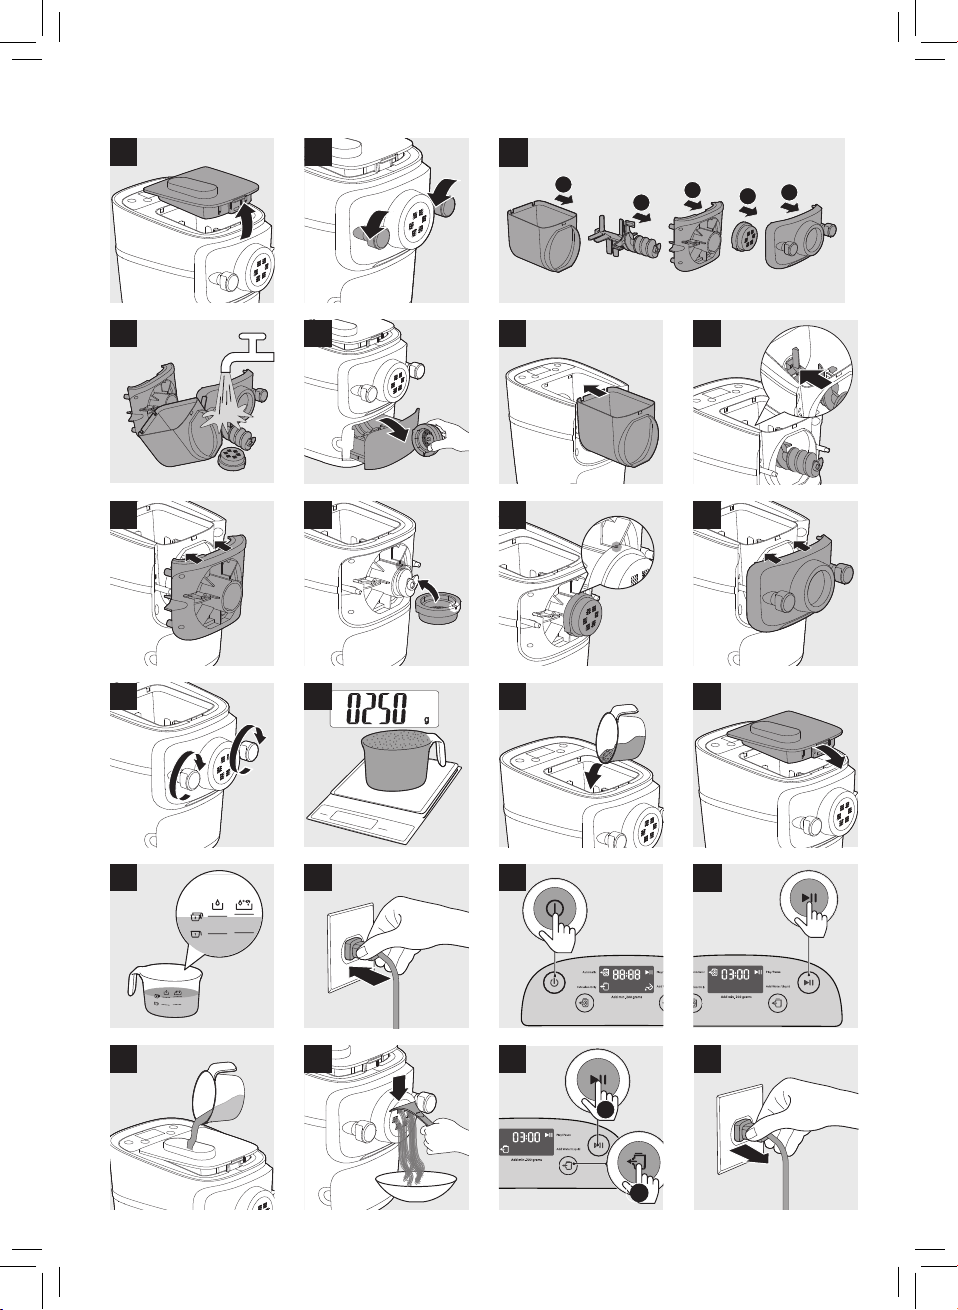
Disassembling and cleaning before rstuse
1 Removethemixingchamberlid.(Fig.3)
2 Loosenthefrontpanelcontrolknobs.(Fig.4)
Note:Thefrontpanelisheavy.Takeextracautionwhenremovingit.
3 Disassemblethefrontpanel,theshapingdisc,theshapingdischolder,themixingpaddle,
andthemixingchamberinorder.(Fig.5)
4 Cleanalldetachableparts,andwipethemdry.(Fig.6)
5 Pullouttheshapingdiscstoragedrawer,andcleanalldiscsandcleaningtools.(Fig.7)
Assembling
1 Pushthemixingchamberintotheappliance.(Fig.8)
2 Pointthemixingpaddletotheholeinthemainunit.Insertthemixingpaddlealltheway
intothemainunit.(Fig.9)
3 Attachthedischolderontotheappliance.(Fig.10)
4 Puttheshapingdiscontothedischolder,andmakesureitisrmlyxedonthedisc
holder.(Fig.11)

11
ENGLISH
Note:Makesuretheinnercavityoftheshapingdiscanddischolderisproperlytted.(Fig.12)
5 Attachthefrontpaneltothemainunit.(Fig.13)
Note:
y Thefrontpanelisheavy.Takeextracautionwhenassemblingit.
6 Fastenthefrontpanelcontrolknobs.(Fig.14)
Note:
y Ifthefrontpanelortheshapingdiscisnotproperlyassembled,asafetyswitchwill
preventtheappliancefromworking.
y Makesurethefrontpaneliscompletelyfastenedbeforeusingtheappliance.
7 Closethemixingchamberlid.(Fig.17)
Using the Pasta maker
Preparing the ingredients and starting the pasta making
program
Note:Usethesuppliedour/watercuptomeasureourandliquid.
Flour Water Water + Egg
1cupofour(~250g)
2cupsofour(~500g)
1 Useakitchenscaleforthecorrectamountofourandliquid.(Fig.15)
Note:Refertochapter“Recipe”forthecorrectratios.
2 Removethemixingchamberlid.(Fig.3)
3 Pourtheourintothechamber.(Fig.16)
Note: Refertochapter“Recipe”forthecorrectratios.
4 Closethemixingchamberlid.(Fig.17)
Note:Ifthemixingchamberlidisnotproperlyinstalled,thesafetyswitchwillpreventthe
appliancefromworking.
5 Measuretherequiredamountofliquidaccordingtotheouryouhaveused.(Fig.18)
Note:Refertochapter“Recipe”forthecorrectratios.
6 Putthepluginthepowersocket.Theappliancesoundsonce,andallindicatorsashonce.
(Fig.19)
7 PresstheOn/obuttontoswitchontheappliance.(Fig.20)
8 PresstheStart/pausebuttontostarttheautomaticpastamakingprogram.(Fig.21)

12
ENGLISH
Note:Iftheapplianceisnotintheautomaticmode,presstheAutomaticbuttonbefore
pressingtheStart/pausebutton.
9 Afterthemixingstarts,slowlypourintheliquidalongtheentirelengthoftheslotinthe
lid.(Fig.22)
Note:Duringdoughmixing,donotaddotheringredientsafteryouhavepouredinthe
liquid.Otherwise,itwillaecttheresultofthepastatexture.
10 Afterthepastamakernishesmixing,itwillbeeponceandstartextrudingpastaaftera
fewseconds.Usethepastacuttertocutthepastaintothelengthyouneed.(Fig.23)
Note: Iftheratioofliquidandourisnotcorrect,theextrusionwillnotsucceed.Inthis
case,preparetheingredientsagain.
11 Afterthepastamakingiscomplete,ifyounoticesomeleftoverdoughinsidethechamber,
youcanpresstheExtrusion onlybutton,andthentheStart/pausebuttontostartextra
extrusion.(Fig.24)
Note
y Theextraextrusionlastsfor3minutes.
y Thecookingtimeofthepastavariesdependingonpersonalpreferences,pastashapes,
andnumberofservings.
y Duringthepastamakingprocessandwhentheprocessisnished,theappliancewill
makeasoundfeedback.
Important!
Thepastarecipesprovidedinthechapter“Recipe”havebeentestedforsuccess.Ifyou
experimentwithoruseotherpastarecipes,theourandwater/eggratioswillneedtobe
adjusted.Thepastamakerwillnotoperatesuccessfullyifyoudonotadjustthenewrecipe
accordingly.
Note
y Forgoodresults,itisessentialthatthedoughlookscrumblyinthekneadingchamber.
Ifthedoughlookscrumbly,therecipewillwork.Therecipewillnotworkifthedough
istoowet(lookslikewell-knowndoughconsistency)ortoodry(whenthedoughlooks
likeouronly).
y Seasonalchangesandusingingredientsfromdierentregionsmayaecttheour/
waterratio.Youmayadjustbasedontherecommendedproportion.
y Whenmakingglutenfreepastaorlegumepasta,lessliquidisneededthanthe
recommendation.Youmayuseabout10-20mllessliquidfortheserecipes.Adjustthe
amountofliquiddependingonthetypeofour.
y “Gluten”isabinderwhichensuresthepastadoesnotbreakeasily,Glutenfreeour
doesnotcontainabinder,thereforeitneedsathickenertoactasa“binder”eg.eggs
orXanthan.Variouskindsofglutenfreeourperformdierentlywhenmakingpasta.
Someoursarenotsuitableformakingpastasuchascoconutour,someourtypes
workwell,suchasquinoaandbuckwheat.
y Whenmakingeggpastaorvegetablepasta,makesureyouwhisktheeggmixtureor
vegetablejuiceevenlywiththewaterbeforepouringintothechamberthroughtheslot
inthelid.Whenaddingingredients,makesuretheingredientisinaliquidform.

13
ENGLISH
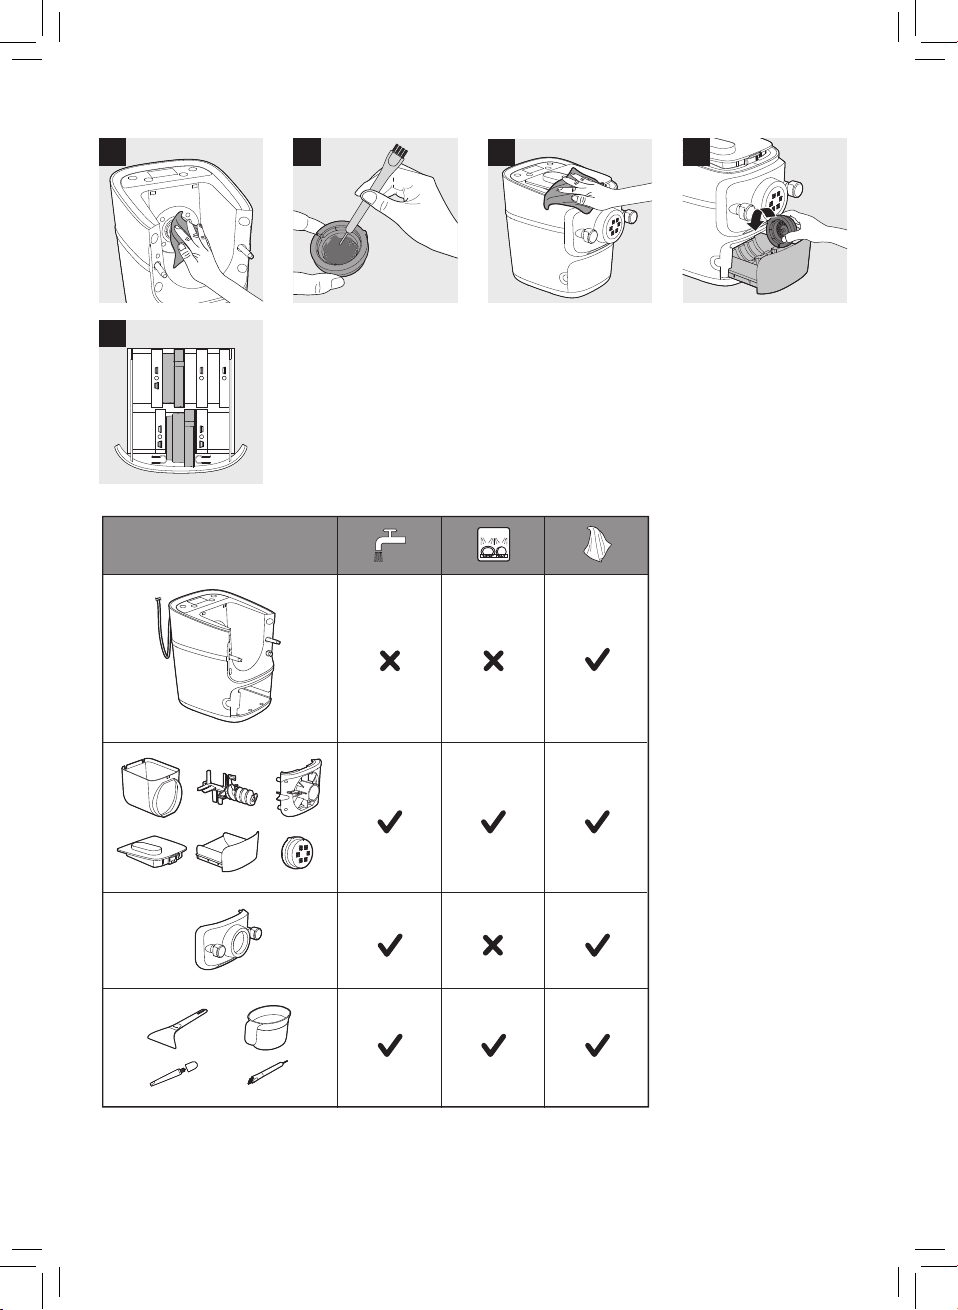
Cleaning
1 Disconnecttheplugfromthepoweroutlet.(Fig.25)
2 Removethemixingchamberlid.(Fig.3)
3 Loosenthefrontpanelcontrolknobs.(Fig.4)
Note:Thefrontpanelisheavy.Takeextracautionwhenremovingit.
4 Disassemblethefrontpanel,theshapingdisc,theshapingdischolder,themixingpaddle,
andthemixingchamberinorder.(Fig.5)
5 Useadryclothtocleanourresidueonthemainunit.(Fig.26)
6 Cleantheshapingdiscwiththesuppliedcleaningtooltoremovethedoughresidues.
Afterthat,youcancleanitwithwater.(Fig.27)
Note:Letthediscsair-dryfor2to4hours,thenusethecorrespondingcleaningtoolto
pokeoutthedoughintheholes.
7 Cleanalldetachableparts,andwipethemdry.(Fig.6)
8 Useadryclothtocleanthecontrolpanel,andtheexteriorofthepastamaker.(Fig.28)
Storage
1 Unplugtheapplianceandletitcooldown.(Fig.25)
Note:Makesureallpartsarecleananddrybeforestoring.
2 Youcanstoretheshapingdiscsinthestoragedrawer.(Fig.29)
Note:Putthethickershapingdiscsinslotswithicons and ,andputthethinnershaping
discsintheslotswithicon .(Fig.30)

14
ENGLISH
Troubleshooting
Thischaptersummarisesthemostcommonproblemsyoucouldencounterwiththe
appliance.Ifyouareunabletosolvetheproblemwiththeinformationbelow,visit
www.philips.com/supportforalistoffrequentlyaskedquestionsorcontacttheConsumer
CareCenterinyourcountry.
Problem Cause Solution
Theindicatorsdonot
lightup.
Thepowerplugisnot
connectedcorrectly.
Checkwhetherthepowerplugis
pluggedcorrectlyandtheoutletis
workingproperly.
Afterpressingthe
On/obuttonthe
appliancesoundsbut
doesnotwork.
Themixingchamber,
theshapingdisc,orthe
frontpanelisassembled
incorrectly.
Makesureyoufollowtheusermanual
toassembleallpartscorrectly.
Thesafetyswitchis
triggeredandthe
appliancesuddenly
stoppedorsuddenly
restartsduringthe
processing.
Thefrontpanelknobis
loose.
Makesurethefrontpanelissecurely
assembled.
Excessiveingredientsin
thepastamaker.
Themaximumamountofourused
foreachbatchis500g.Ifmorethan
500gisadded,reducetheamountof
ourbeforenextbatch.
Duringprocessing,
theappliancestops
workingwhenyou
openthelid.
Forsafetyreasons,the
appliancealwaysstops
workingwhenthe
lidisopenedduring
processing.
Ifyouneedtoresumetheprevious
operation,closethelidproperly,and
presstheStart/pausebutton.
Duringprocessing,the
appliancestops.There
isnoalarmsoundor
ashes.
Thepastamakerhas
overheatedduetolong
continuousworking
time.
Disconnectfromthepowersource,
andallowthepastamakertocool
down.Tobetterprotectthelifetimeof
theappliance,thecontinuousworking
timeshouldbelessthan45minutes.
Youcanrestartusingtheappliance
after15minutesofrest.
Smallamountofwater
isleakingoutfromthe
appliance.
Waterisaddedbefore
theprogramstarts.
Followtheusermanualinstructions
toaddwaterrightaftertheprogram
starts.
E1displaysonthe
screen.
Theshapingdiscisnot
attached.
Attachthedischoldertothemain
unit,attachtheshapingdiscproperly
andxthefrontpanelproperlytothe
device.
Thelidisnotinplaceor
notproperlyattached.
Attachthelidproperly.

Problem Cause Solution
Theappliancestops
duringprocessing,E2
displaysonthescreen,
theindicatorsare
ashingquickly,and
thealarmsounds.
Themixingpaddlemay
beblockedbysome
foreignobjects.
Disconnectfromthepowersource,
cleanthepastamaker,andfollowthe
usermanualagaintorestartthepasta
making.
Thedoughmaybetoo
dry.
Thewrongprogramis
selected.
E4displaysonthe
screen.
Theappliance
malfunctions.
1 SwitchoandunplugyourPasta
Maker.Pluginandrestartthe
device.
2 Iftheapplianceisstillnotworking,
contacttheservicecenter.

©2022PhilipsDomesticAppliancesHoldingB.V.
Allrightsreserved.
3000.088.2934.1B(10/08/2022)