P0803385-00
P0803385-00
80V地钻
3702902
技术要求:
2.28P, 内容见电子档;
3.单色印刷,要求无色差、无污点;
4.骑马钉,裁切均匀、无连页;
5.以封样为准;
6.料件需符合格力博HSF文件(编号:GLB-CGR-146) 里关于环保和有害物质的具体要求。
1.材质要求:60g双胶纸
常州格力博集团
说明书
张君
杨媛
周艳
王小妮
李海平
21.02.26
版本号
B
B
重要度等级
日 期
工艺
审核
校对
设计
标记
处数
签名
日期
阶段标记
视角标记
重量 比例
批准
审定
标准化
日期
更改文件号
SCALE: A5
210mm
145mm
EAB401
EA80L00
EA80L410
www.greenworkstools.com
ES MANUAL DEL OPERADORAHOYADOR
EN OPERATOR MANUALEARTH AUGER
FR MANUEL D’OPÉRATEURTARIÈRE
P0803385-00 Rev B

EAB401
EA80L00
EA80L410
www.greenworkstools.com
ES MANUAL DEL OPERADORAHOYADOR
EN OPERATOR MANUALEARTH AUGER
FR MANUEL D’OPÉRATEURTARIÈRE
P0803385-00 Rev B


1 Description.........................................4
1.1 Purpose.............................................................. 4
1.2 Overview........................................................... 4
2 General power tool safety
warnings.............................................4
2.1 Work area safety................................................ 4
2.2 Electrical safety................................................. 4
2.3 Personal safety...................................................4
2.4 Power tool use and care.....................................5
2.5 Battery tool use and care................................... 5
2.6 Service............................................................... 5
3 Proposition 65....................................5
4 Child safety........................................ 6
5 Symbols on the product.................... 6
6 Risk levels...........................................6
7 Environmentally safe battery
disposal...............................................6
8 Installation......................................... 7
8.1 Unpack the machine.......................................... 7
9 Operation........................................... 8
9.1 Start the machine............................................... 8
9.2 Stop the machine............................................... 8
9.3 Operation tips.................................................... 8
10 Maintenance.......................................9
10.1 Clean the machine............................................. 9
11 Store the machine..............................9
12 Troubleshooting.................................9
13 Technical data..................................10
14 Limited warranty............................ 10
15 Exploded view..................................10
3
English
EN
1 DESCRIPTION
1.1 PURPOSE
This machine is intended for drilling into dirt and soil to
create holes in the ground.
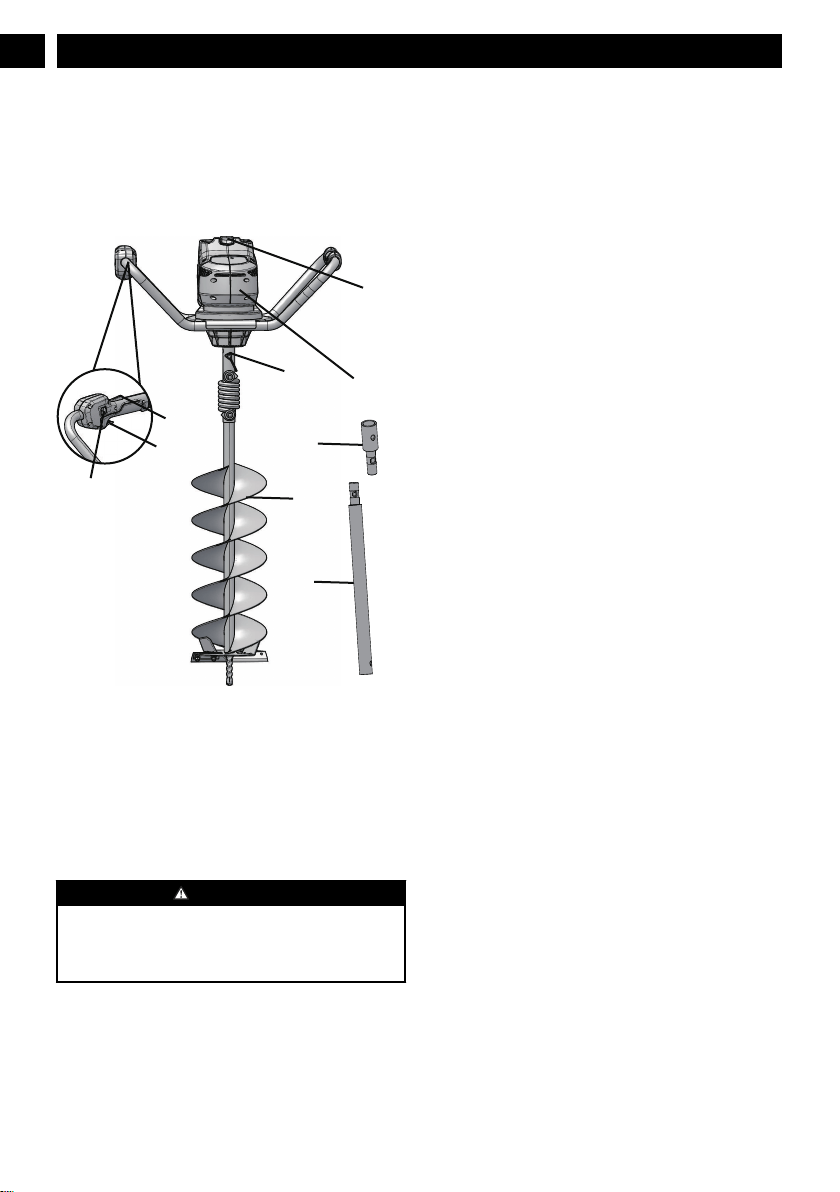
1.2 OVERVIEW
4
7
8
5
6
1
2
3
9
1
Trigger
2
Safety lock button
3
Forward/Reverse
switch
4
Battery release button
5
Power head
6
Ring pin
7
Bit (sold separately)
8
Adaptor (sold
separately)
9
Extender (sold
separately)
2 GENERAL POWER TOOL
SAFETY WARNINGS
WARNING
Read all safety warnings, instructions, illustrations and
specifications provided with this power tool. Failure to
follow all instructions listed below may result in electric
shock, fire and/or serious injury.
Save all warnings and instructions for future reference.
The term “power tool” in the warnings refers to your battery-
operated (cordless) power tool.
2.1 WORK AREA SAFETY
• Keep work area clean and well lit. Cluttered or dark
areas invite accidents.
• Do not operate power tools in explosive atmospheres,
such as in the presence of flammable liquids, gases or
dust. Power tools create sparks which may ignite the dust
or fumes.
• Keep children and bystanders away while operating a
power tool. Distractions can cause you to lose control.
2.2 ELECTRICAL SAFETY
• Power tool plugs must match the outlet. Never modify
the plug in any way. Do not use any adapter plugs
with earthed (grounded) power tools. Unmodified plugs
and matching outlets will reduce risk of electric shock.
• Avoid body contact with earthed or grounded
surfaces, such as pipes, radiators, ranges and
refrigerators. There is an increased risk of electric shock
if your body is earthed or grounded.
• Do not expose power tools to rain or wet conditions.
Water entering a power tool will increase the risk of
electric shock.
• Do not abuse the cord. Never use the cord for
carrying, pulling or unplugging the power tool. Keep
cord away from heat, oil, sharp edges or moving parts.
Damaged or entangled cords increase the risk of electric
shock.
• When operating a power tool outdoors, use an
extension cord suitable for outdoor use. Use of a cord
suitable for outdoor use reduces the risk of electric shock.
• If operating a power tool in a damp location is
unavoidable, use a RESIDUAL CURRENT DEVICE
(RCD) protected supply. Use of an RCD reduces the risk
of electric shock.
2.3 PERSONAL SAFETY
• Stay alert, watch what you are doing and use common
sense when operating a power tool. Do not use a
power tool while you are tired or under the influence
of drugs, alcohol or medication. A moment of
inattention while operating power tools may result in
serious personal injury.
• Use personal protective equipment. Always wear eye
protection. Protective equipment such as a dust mask,
non-skid safety shoes, hard hat or hearing protection used
appropriately will reduce personal injuries.
• Prevent unintentional starting. Ensure the switch is in
the off position before connecting to power source
and/or battery pack and when picking up or carrying
the tool. Carrying power tools with your finger on the
switch or energizing power tools that have the switch on
invites accidents.
• Remove any adjusting key or wrench before turning
the power tool on. A wrench or a key left attached to a
rotating part of the power tool may result in personal
injury.
4
English
EN
• Do not over-reach. Keep proper footing and balance
at all times. This enables better control of the power tool
in unexpected situations.
• Dress properly. Do not wear loose clothing or jewelry.
Keep your hair, clothing and gloves away from
moving parts. Loose clothes, jewelry or long hair can be
caught in moving parts.
• If devices are provided for the connection of dust
extraction and collection facilities, ensure these are
connected and properly used. Use of dust collection can
reduce dust related hazards.
• Do not let familiarity gained from frequent use of tools
allow you to become complacent and ignore tool safety
principles. A careless action can cause severe injury
within a fraction of a second.
2.4 POWER TOOL USE AND CARE
• Do not force the power tool. Use the correct power
tool for your application. The correct power tool will do
the job better and safer at the rate for which it was
designed.
• Do not use the power tool if the switch does not turn it
on and off. Any power tool that cannot be controlled with
the switch is dangerous and must be repaired.
• Disconnect the plug from the power source and/or
remove the battery pack, from the power tool before
making any adjustments, changing accessories, or
storing power tools. Such preventive safety measures
reduce the risk of starting the power tool accidentally.
• Store idle power tools out of the reach of children and
do not allow persons unfamiliar with the power tool or
these instructions to operate the power tool. Power
tools are dangerous in the hands of untrained users.
• Maintain power tools and accessories. Check for
misalignment or binding of moving parts, breakage of
parts and any other condition that may affect the
power tool's operation. If damaged, have the power
tool repaired before use. Many accidents are caused by
poorly maintained power tools.
• Keep cutting tools sharp and clean. Properly
maintained cutting tools with sharp cutting edges are less
likely to bind and are easier to control.
• Use the power tool, accessories and tool bits etc. in
accordance with these instructions, taking into
account the working conditions and the work to be
performed. Use of the power tool for operations different
from those intended could result in a hazardous situation.
• Keep handles and grasping surfaces dry, clean and
free from oil and grease. Slippery handles and grasping
surfaces do not allow for safe handling and control of the
tool in unexpected situations.
2.5 BATTERY TOOL USE AND CARE
• Recharge only with the charger specified by the
manufacturer. A charger that is suitable for one type of
battery pack may create a risk of fire when used with
another battery pack.
•
Use power tools only with specifically designated
battery packs. Use of any other battery packs may create
a risk of injury and fire.
• When battery pack is not in use, keep it away from
other metal objects like paper clips, coins, keys, nails,
screws, or other small metal objects that can make a
connection from one terminal to another. Shorting the
battery terminals together may cause burns or fire.
• Under abusive conditions, liquid may be ejected from
the battery; avoid contact. If contact accidentally
occurs, flush with water. If liquid contacts eyes,
additionally seek medical help. Liquid ejected from the
battery may cause irritation or burns.
• Do not use a battery pack or tool that is damaged or
modified. Damaged or modified batteries may exhibit
unpredictable behavior resulting in fire, explosion or risk
of injury.
• Do not expose a battery pack or tool to fire or
excessive temperature. Exposure to fire or temperature
above 130°C may cause explosion.
• Follow all charging instructions and do not charge the
battery pack or tool outside the temperature range
specified in the instructions. Charging improperly or at
temperatures outside the specified range may damage the
battery and increase the risk of fire.
2.6 SERVICE
• Have your power tool serviced by a qualified repair
person using only identical replacement parts. This
will ensure that the safety of the power tool is maintained.
• Never service damaged battery packs. Service of
battery packs should only be performed by the
manufacturer or authorized service providers.
3 PROPOSITION 65
WARNING
This product contains a chemical known to the state of
California to cause cancer, birth defects or other
reproductive harm. Some dust created by power sanding,
sawing, grinding, drilling, and other construction activities
contains chemicals known to cause cancer, birth defects or
other reproductive harm. Some examples of these chemicals
are:
• Lead from lead-based paints;
• Crystalline silica from bricks and cement and other
masonry products;
• Arsenic and chromium from chemically treated lumber.
Your risk of exposure to these chemicals varies depending
on how often you do this type of work. To reduce your
exposure to these chemicals, work in a well-ventilated area,
and work with approved safety equipment, such as dust
masks that are specially designed to filter out microscopic
particles.
Save these instructions.
5
English
EN
4 CHILD SAFETY
Tragic accidents can occur if the operator is not aware of the
presence of children.
• Keep children out of the working area and under the
watchful care of a responsible adult.
• Do not allow children under the age of 14 to operate this
machine. Children who are 14 years of age and older
must read and understand the operating instructions and
safety rules in this manual and must be trained and
supervised by a parent.
• Stay alert, and turn the machine off if a child or any other
person enters the working area.
• Use extreme care when approaching blind corners,
doorways, shrubs, trees, or other objects that may obscure
your view of a child who may run into the path of the
machine.
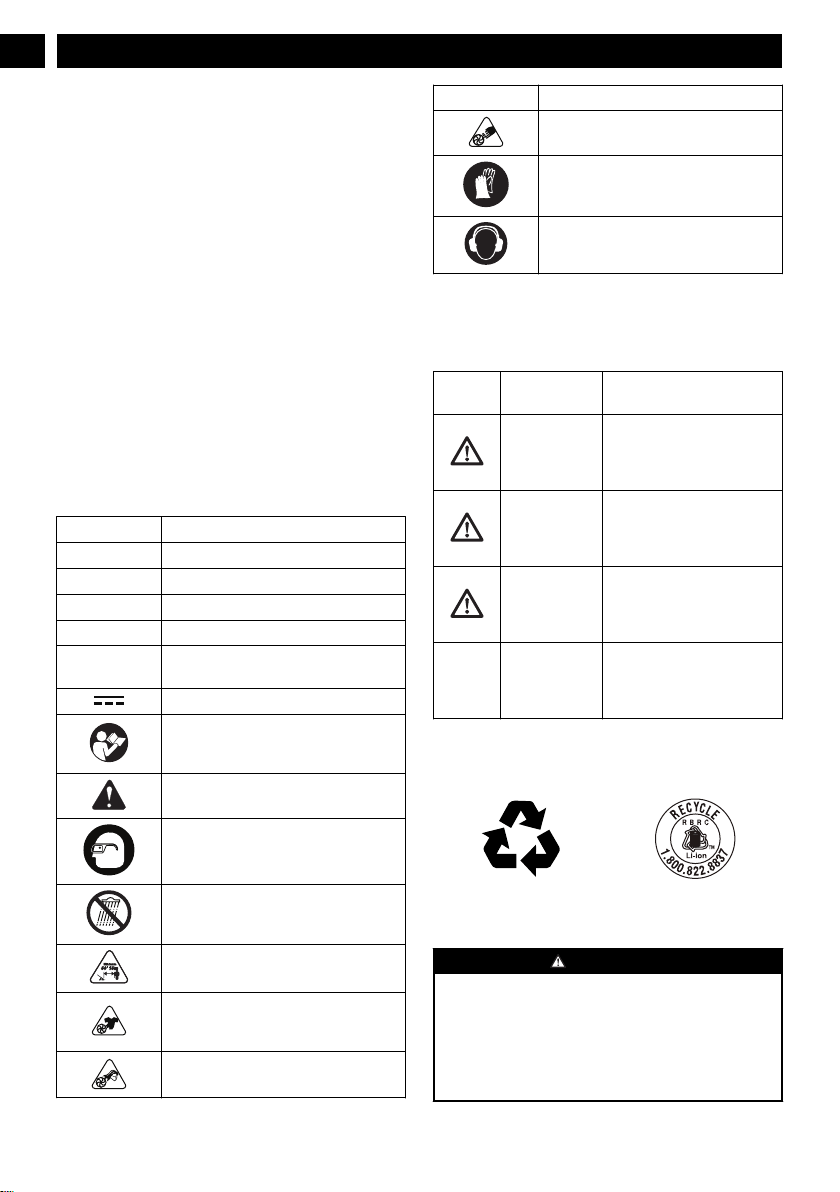
5 SYMBOLS ON THE PRODUCT
Some of the following symbols may be used on this tool.
Please study them and learn their meaning. Proper
interpretation of these symbols will allow you to operate the
tool better and safer.
Symbol Explanation
V Voltage
A Current
W Power
min Time
min
-1
Revolutions, strokes, surface speed, or-
bits etc., per minute
Direct current
Read and understand all instructions be-
fore operating the product, and follow all
warnings and safety instructions.
Precautions that involve your safety.
Always wear eye protection with side
shields marked to comply with ANSI
Z87.1 when operating this equipment.
Do not expose the product to rain or
moist conditions.
Keep all bystanders at least 15 m (50 ft.)
away.
Failure to keep loose clothing from being
drawn into air intake could result in per-
sonal injury.
Failure to keep long hair away from the
air inlet could result in personal injury.
Symbol Explanation
Rotating impeller blades can cause severe
injury.
Wear non-slip, heavy-duty gloves.
Wear ear protection.
6 RISK LEVELS
The following signal words and meanings are intended to
explain the levels of risk associated with this product.
SYM-
BOL
SIGNAL MEANING
DANGER Indicates an imminently haz-
ardous situation, which, if not
avoided, will result in death
or serious injury.
WARNING Indicates a potentially hazard-
ous situation, which, if not
avoided, could result in death
or serious injury.
CAUTION Indicates a potentially hazard-
ous situation, which, if not
avoided, may result in minor
or moderate injury.
CAUTION (Without Safety Alert Sym-
bol) Indicates a situation that
may result in property dam-
age.
7 ENVIRONMENTALLY SAFE
BATTERY DISPOSAL
The toxic and corrosive materials below are in the batteries
used in this machine: Lithium-Ion, a toxic material.
WARNING
Discard all toxic materials in a specified manner to prevent
contamination of the environment. Before discarding
damaged or worn out Li-ion battery, contact your local
waste disposal agency, or the local Environmental
Protection Agency for information and specific instructions.
Take the batteries to a local recycling and/or disposal center,
certified for lithium-ion disposal.
6
English
EN
WARNING
If the battery pack cracks or breaks, with or without leaks,
do not recharge it and do not use. Discard it and replace
with a new battery pack. DO NOT TRY TO REPAIR IT! To
prevent injury and risk of fire, explosion, or electric shock,
and to avoid damage to the environment:
• Cover the terminals of the battery with heavy-duty
adhesive tape.
• DO NOT try to remove or destroy any of the battery
pack components.
• DO NOT try to open the battery pack.
• If a leak develops, the released electrolytes are
corrosive and toxic. DO NOT get the solution in the
eyes or on skin, and do not swallow it.
• DO NOT put these batteries in your regular household
trash.
• DO NOT incinerate.
• DO NOT put them where they will become part of any
waste landfill or municipal solid waste stream.
• Take them to a certified recycling or disposal center.
8 INSTALLATION
8.1 UNPACK THE MACHINE
WARNING
It is not necessary to assemble the machine.
• If parts are damaged, do not use the machine.
• If you do not have all the parts, do not operate the
machine.
• If the parts are damaged or missing, speak to the service
center.
1. Open the package.
2. Read the documentation in the box.
3. Remove the machine from the box.
4. Discard the box and packaging material in compliance
with local regulations.
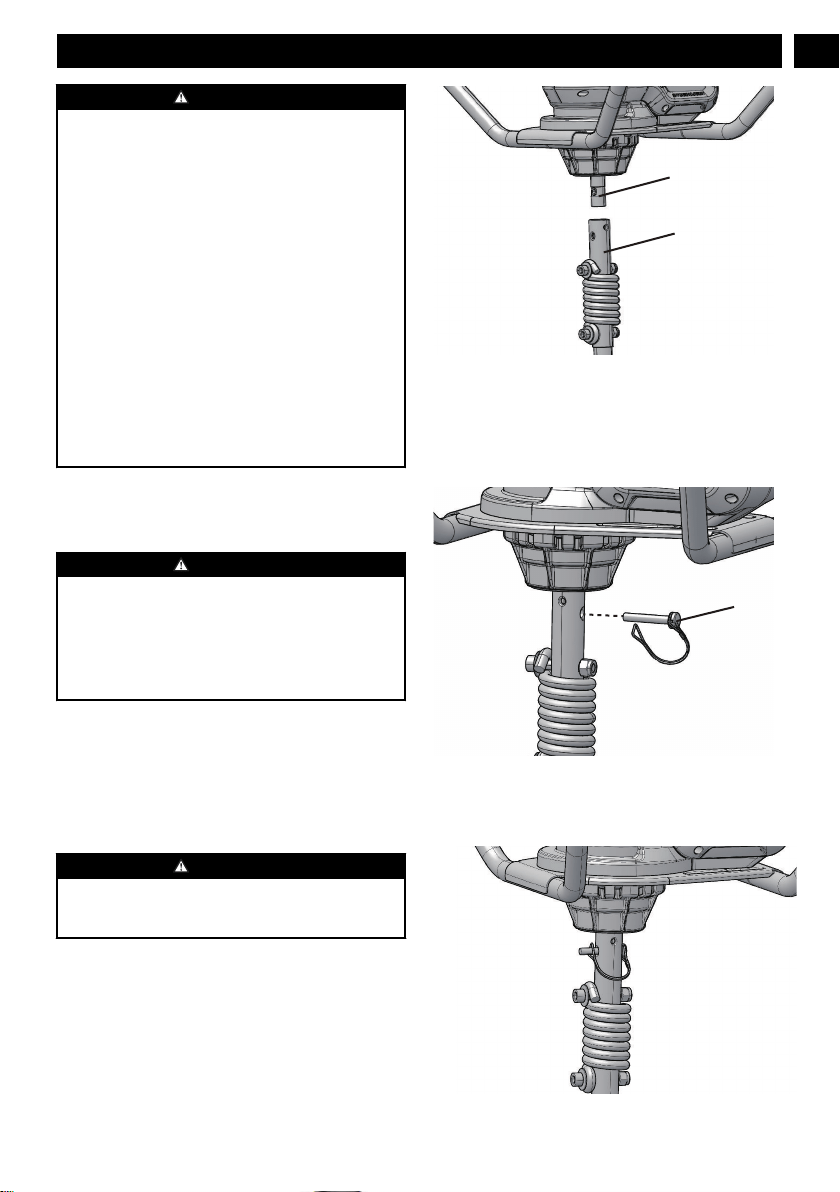
8.1.1 ATTACH THE AUGER BIT
WARNING
To prevent accidental starting that could cause serious
personal injury, always remove the battery pack from the
tool when assembling parts.
9
7
This auger shaft measures 7/8" in diameter. It will work with
most universal sized bits designed for this size of shaft.
1. Make sure you are using the correct bit (7) for the
material you want to drill into.
2. Align the holes in the auger shaft (9) with the holes in the
bit.
6
3. Open the ring pin (6).
4. Insert the ring pin through the holes.
5. Close and lock the ring pin to secure the bit to the auger
shaft.
7
English
EN
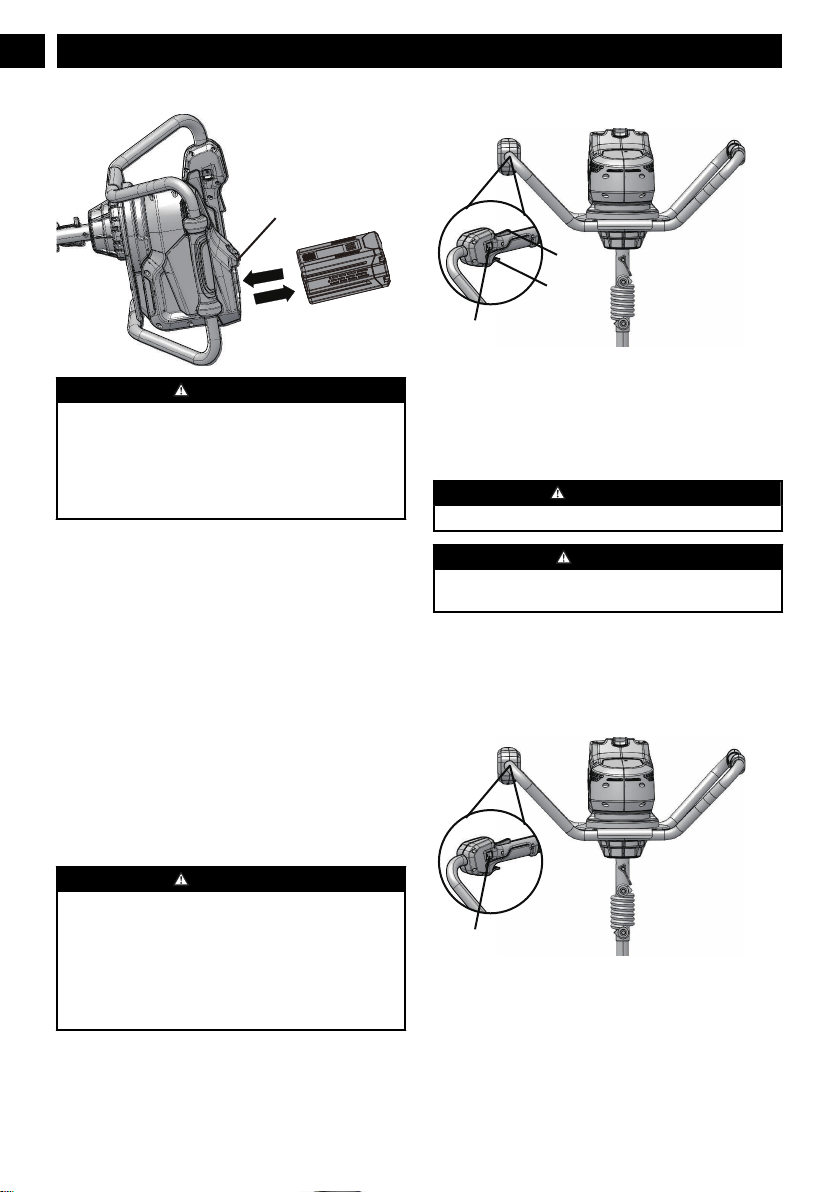
8.1.2 INSTALL THE BATTERY PACK
4
WARNING
• If the battery pack or charger is damaged, replace the
battery pack or the charger.
• Stop the machine and wait until the motor stops before
you install or remove the battery pack.
• Read, know, and follow the instructions in the battery
and charger manual.
1. Align the lift ribs on the battery pack with the grooves in
the battery compartment.
2. Push the battery pack into the battery compartment until
the battery pack locks into place.
3. When you hear a click, the battery pack is installed.
8.1.3 REMOVE THE BATTERY PACK
1. Push and hold the battery release button.
2. Remove the battery pack from the machine.
9 OPERATION
• Touch the bit carefully.
• Do not touch the bit unless you remove the battery pack.
• Do not use the machine if the bit is damaged or bent.
• Remove all objects such as cords, lights, wire, or string
which can become entangled in the bit and create a risk of
personal injury.
WARNING
If the bit jams on an electrical cord or line, DO NOT
TOUCH THE BIT! IT CAN BE LIVE AND
DANGEROUS. Do the steps below:
1. Hold the insulated rear handle or put the machine down
and away from you.
2. Disconnect the electrically service to the damaged line
or cord before you try to free the bit.
9.1 START THE MACHINE
1
2
3
This machine has three lights along the bottom of the power
head around the shaft. When the trigger is pressed, the lights
turn on. If you release the trigger fully, the lights will turn off
after 30 seconds.
1. Press the safety lock-out switch (2).
2. Squeeze the trigger (1) to start the machine.
WARNING
Keep the machine clear of water.
DANGER
Do not touch the cap of the gear box after operating the
machine, the high temperature may cause the injury.
9.2 STOP THE MACHINE
1. Release the trigger to stop the machine.
9.3 OPERATION TIPS
3
Before drilling a hole, always look to see what position the
forward/reverse switch is in.
• Push the forward/reverse switch (3) to "F" for forward.
The machine will rotate clockwise and drill down into the
ground. Shift your body weight above the bit to help it
drill.
8
English
EN
• Push the forward/reverse switch (3) to "R" for reverse.
The machine will rotate counterclockwise and attempt to
rotate out of the ground. Pull up on the handles when
drilling into the ground, this will allow the bit to go into
the ground and out of the ground easier. The reverse
function can also be used to help the bit unbind from a
root or other obstruction.
• When drilling a deeper hole, clear dirt/ material from the
auger bit occasionally by pulling the unit up 4 inches after
drilling down every 6 inches. This will make the auger
easier to remove once the hole has been completely
drilled.
• In thick clay or rocky soils the hole may need to be
drilled more slowly and the earth removed more often.
• If using in very cold conditions, the battery may need to
be warmed up for the auger to work. This can be done by
placing the battery in a warmer area (indoors, in a coat
pocket, etc.) for a couple of minutes.
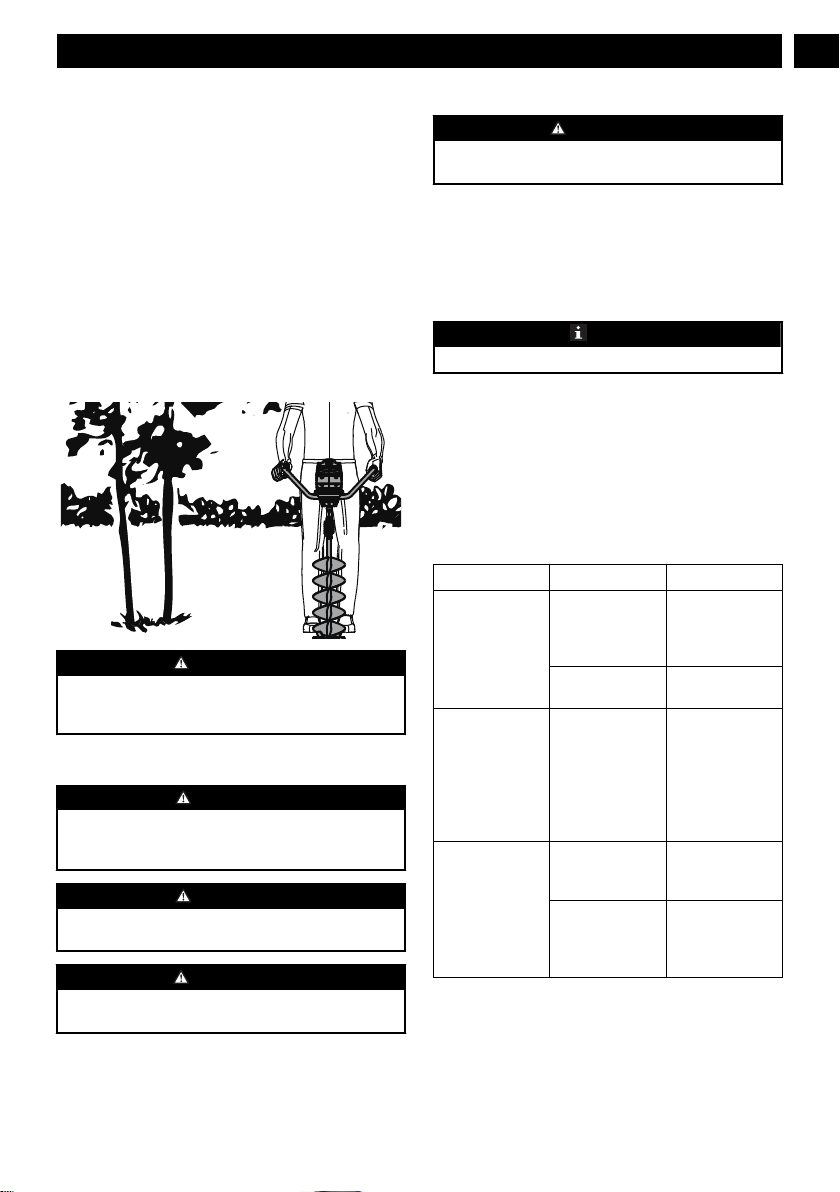
WARNING
Hold the machine firmly with two hands at the same time
and do not loosen your grip before the machine stops.
Operate the machine in pairs if necessary.
10 MAINTENANCE
CAUTION
Do not let brake fluids, gasoline, petroleum-based materials
touch the plastic parts. Chemicals can cause damage to the
plastic, and make the plastic unserviceable.
CAUTION
Do not use strong solvents or detergents on the plastic
housing or components.
WARNING
Remove the battery pack from the machine before
maintenance.
10.1 CLEAN THE MACHINE
WARNING
Keep the machine and the motor free of leaves, branches or
excessive oil to prevent fire risks.
• Use a moist cloth with a mild detergent to clean the
machine.
• Clean all moisture with a soft dry cloth.
• Use a small brush to clean the air vents.
11 STORE THE MACHINE
NOTE
Clean the machine before storage.
1. Remove the battery pack.
2. Let the motor cool.
3. Check that there are no loose or damaged components. If
it is necessary, replace the damaged components, tighten
screws and bolts, or speak to a person of an approved
service center.
4. Store the machine in a cool and dry location.
12 TROUBLESHOOTING
Problem Possible cause Solution
The motor does
not start when you
pull the trigger.
The battery pack is
not installed tight-
ly.
Make sure that
you tighlty install
the battery pack in
the machine.
The battery pack is
out of power.
Charge the battery
pack.
The machine
smokes during op-
eration.
The machine has
damage.
1. Immediately
stop the ma-
chine.
2. Remove the
battery pack.
3. Contact the
service center.
The motor is on,
the bit do not
move.
The machine has
damage.
Do not use the ma-
chine and contact
the service center.
The bit are
blocked.
Remove battery
pack then clear
blockage from the
bit.
9
English
EN