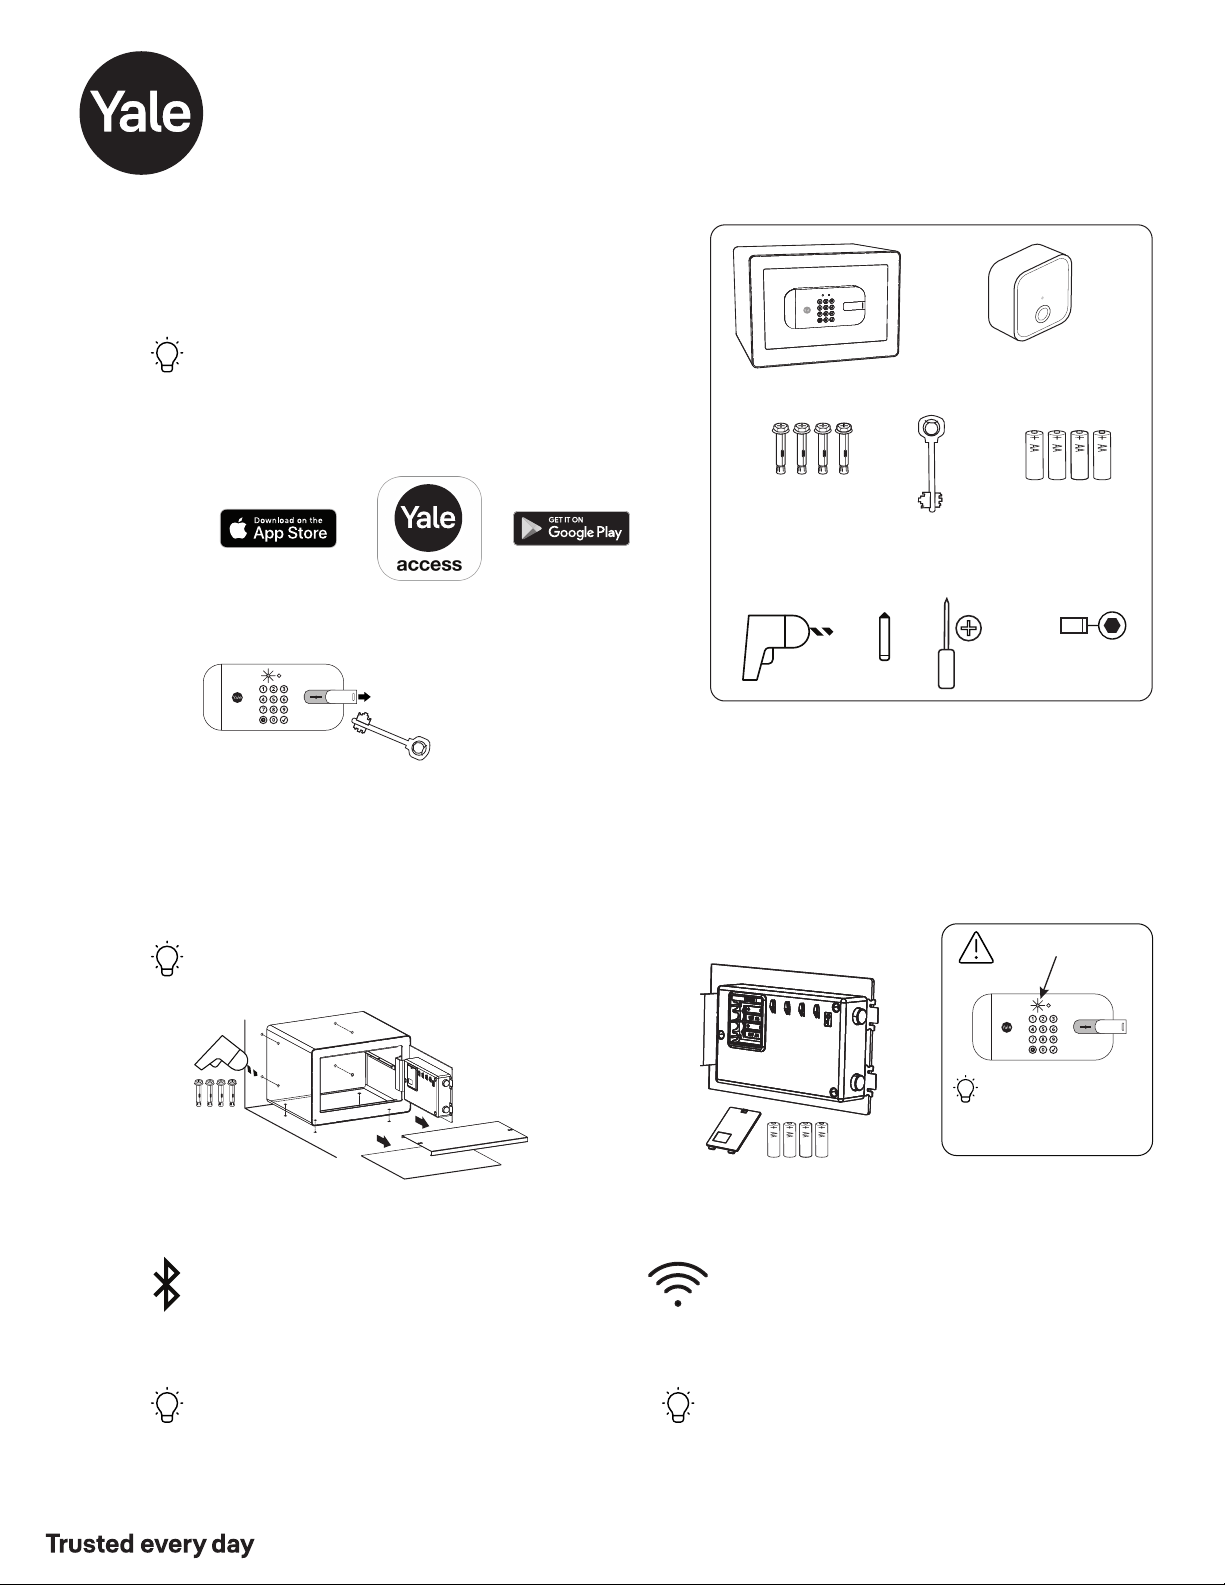
Yale Smart Safe
Installation Instructions
If you have any questions while installing, call our 24/7 tech support team! Call 1-855-213-5841 or email Support@YaleLock.com
Key
x4
Mounting
Hardware
Tools Needed for Optional Installation
Drill Pencil
13mm
Socket
Yale Smart Safe
Insert Batteries
Set up Smart Safe
Tap "Set up a device" from the app menu. When
asked, scan the Yale QR code on the inside of
your safe door.
Tip: Once batteries are inserted, you have 10
minutes to complete this step. If your app
doesn't find the safe, press and hold (5 secs)
the reset button on the inside of the safe door.
x4
AA Batteries
Connect Wi-Fi Bridge
(Included with Select Models)
Tip: If you already use the August App, use the same username
and password.
Set Up Your Yale Smart Safe
Tap “Set up a device” from the menu.
You’ll need your QR code, located on the inside of the safe door.
Set up Connect*
Note serial number located on back of Connect. Plug
Connect into an INDOOR outlet within 10 feet of the
Smart Safe.
Tip: For best connectivity, make sure that the Connect
bridge is in the line of sight of the front of the safe.
Add the Safe to the Yale Access App
*Connect WiFi Bridge included with select models
YRSF-MD-MNL-0020 Rev A
Part of ASSA ABLOY
1
3
5
Mount Safe For Added Security
There are 8 mounting hole locations on the Smart
Safe. Use included mounting template for guidance
to secure the safe to the wall, shelf or floor.
Tip: Use Phillips #2 screwdriver to tighten screws.
Download the Yale Access App
Create an account and home
Open the battery compartment and insert 4x AA batteries.
Reinstall the cover.
Low Battery Warning
Safe can always be
opened with the key or
with a battery* and
valid code.
* See “Using Your Smart
Safe” on other side.
optional
2
Unlock Safe Using Included Key
Open door of safe and leave
door open until completion
of Step 5.
4
Phillips #2
Screwdriver
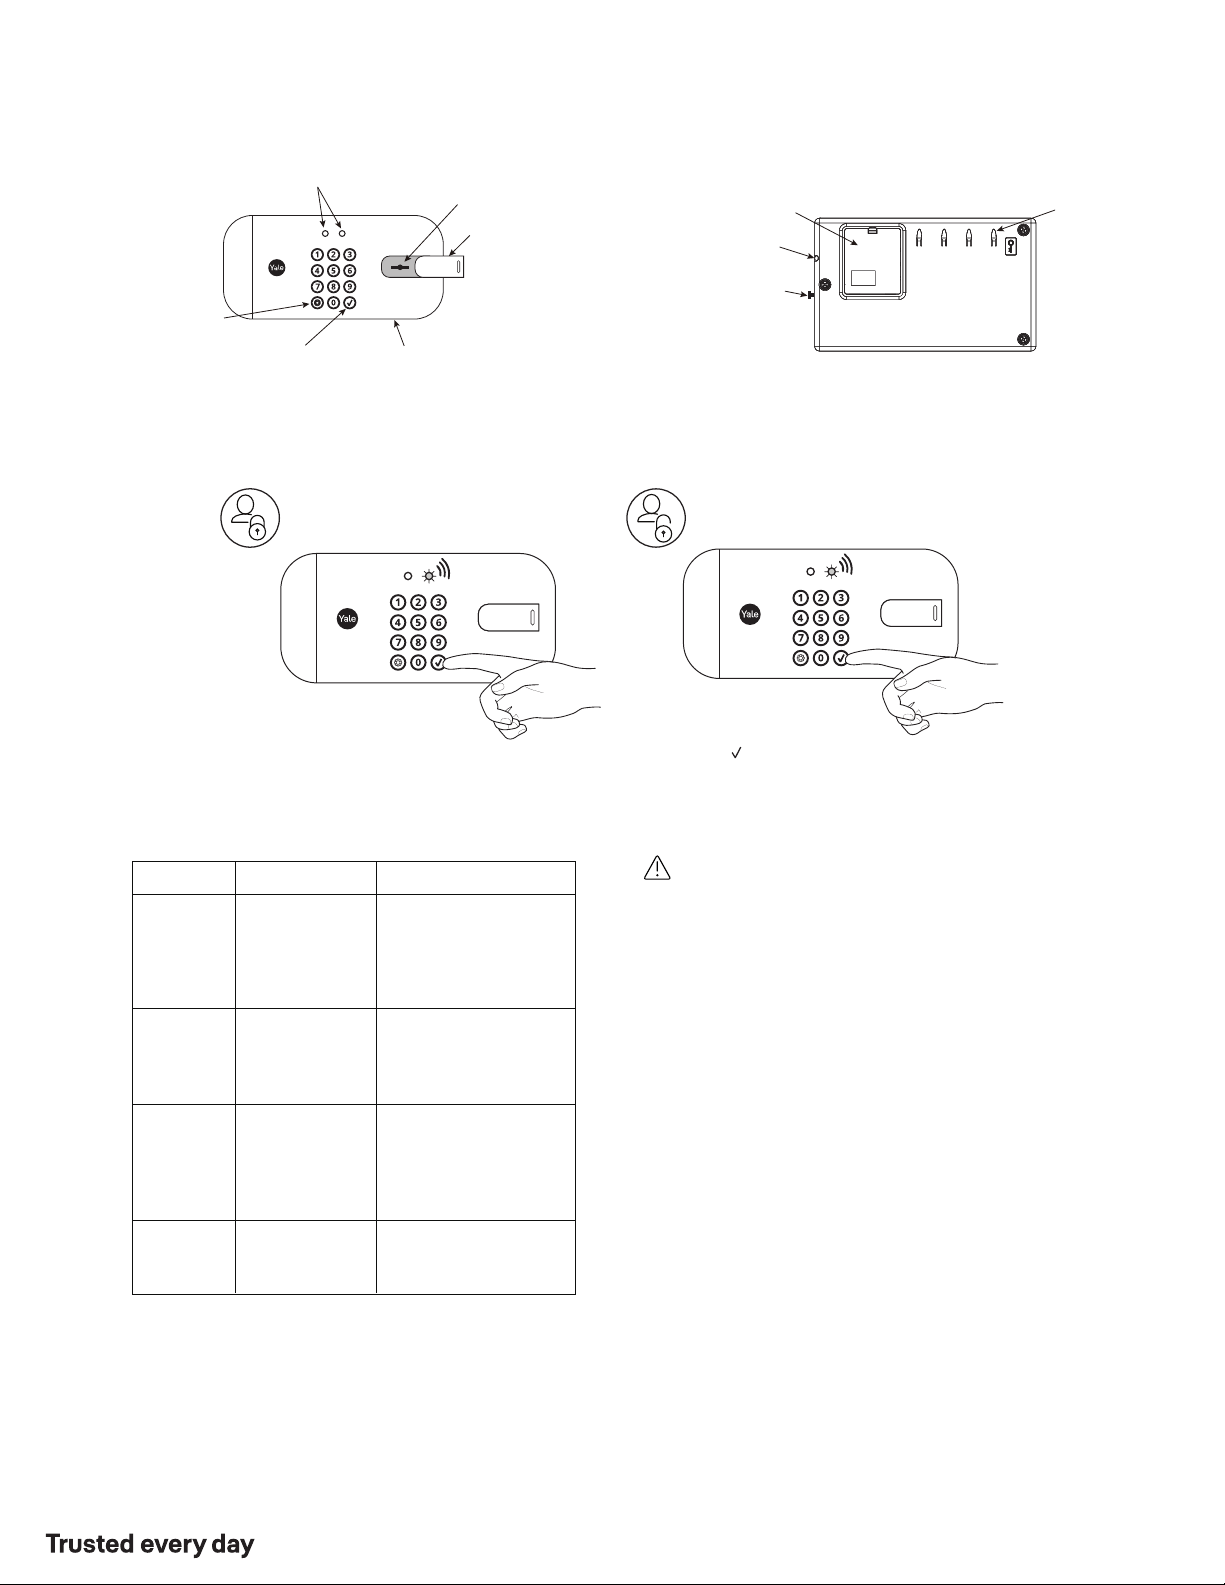
Using Your Smart Safe
9 Volt Battery Back-up
(Use Alkaline battery)
Hold battery to quickly
recharge.
LED
Keyhole
Cover
Outside Inside
LEDs
Battery
Compartment
Keyhole
Enter/Unlock
(Set/Continue)
Safe Wake Up
/ Settings
Settings Definitions
Key
Hooks
Locking Safe
Unlocking Safe
Close Safe Door
Press any key to lock safe
Press any key to wake safe
Enter valid 4-6 digit code
Press
YRSF-MD-MNL-0020 Rev A
Part of ASSA ABLOY
Warning: Changes or modifications to this device, not expressly approved by
Yale Home could void the user's authority to operate the equipment.
Yale® is a registered trademark of Yale Home. Use of the Works with Apple badge means that an accessory has been designed to work specifically with the technology identified in the badge and has been
certified by the developer to meet Apple performance standards. Apple is not responsible for the operation of this device or its compliance with safety and regulatory standards. Other products' brand names
may be trademarks or registered trademarks of their respective owners and are mentioned for reference purposes only. © Copyright 2021. All rights reserved. Reproduction in whole or in part without the
express written permission of Yale Home is prohibited.
24/7 Support 1-855-213-5841 • US.YaleHome.com
Yale Home
FCC:
Contain FCC ID: 2ABFGYRIZW2USTS1
Model: YRSFMDBLEBLK
This equipment has been tested and found to comply with
the limits for a Class B digital device, pursuant to Part 15 of
the FCC Rules. These limits are designed to provide
reasonable protection against harmful interference in a
residential installation This equipment generates, uses,
and can radiate radio frequency energy and, if not installed
and used in accordance with the instructions, may cause
harmful interference to radio communications. However,
there is no guarantee that interference will not occur in a
particular installation. If this equipment does cause
harmful interference to radio or television reception, which
can be determined by turning the equipment off and on,
the user is encouraged to try to correct the interference by
one or more of the following measures:
• Reorient or relocate the receiving antenna.
• Increase the separation between the equipment and
receiver.
• Connect the equipment into an outlet on a circuit
different from that to which the receiver is connected.
• Consult the dealer or an experienced radio/TV technician
for help.
THIS DEVICE COMPLIES WITH PART 15 OF THE FCC
RULES. OPERATION IS SUBJECT TO THE FOLLOWING
TWO CONDITIONS.
(1) THIS DEVICE MAY NOT CAUSE HARMFUL
INTERFERENCE, AND
(2) THIS DEVICE MUST ACCEPT ANY INTERFERENCE
RECEIVED, INCLUDING INTERFERENCE THAT MAY
CAUSE UNDESIRED OPERATION.
Industry Canada:
Contain 11626AYRIZW2USTS1
Model: RYRSFMDCB1BLK
Section 7.1.2 of RSSGEN Under Industry Canada
regulations, this radio transmitter may only operate using
an antenna of a type and maximum (or lesser) gain
approved for the transmitter by Industry Canada. To reduce
potential radio interference to other users, the antenna type
and its gain should be so chosen that the equivalent
isotropically radiated power (e.i.r.p.) is not more than that
necessary for successful communication.
En vertu des règlements d’Industrie Canada, cet émetteur
radio ne peut fonctionner avec une antenne d’un type et un
maximum (ou moins) approuves pour gagner de l’émetteur
par Industrie Canada. Pour réduire le risque d’interférence
aux autres utilisateurs, le type d’antenne et son gain doivent
être choisies de façon que la puissance isotrope rayonnée
équivalente (PIRE) ne dépasse pas ce qui est nécessaire
pour une communication réussie.
Section 7.1.3 or RSSGEN This Device complies with Industry
Canada License-exempt RSS standard(s). Operation is
subject to the following two conditions: 1) this device may
not cause interference, and 2) this device must accept any
interference, including interference that may cause undesired
operation of the device.
Cet appareil est conforme avec Industrie Canada RSS
standard exemptes de licence(s). Son fonctionnement est
soumis aux deux conditions suivantes: 1) ce dispositif ne
peut causer des interférences, et 2) cet appareil doit
accepter toute interférence, y compris les interférences qui
peuvent causer un mauvais fonctionnement du dispositif.
This radio transmitter 6982AYRHCPZW0FM has been
approved by Industry Canada to operate with the antenna
types listed below with the maximum permissible gain
indicated. Antenna types not included in this list, having a
gain greater than the maximum gain indicated for that type,
are strictly prohibited for use with this device.
Le présent émetteur radio 6982AYRHCPXW0FM a été
approuve par Industrie Canada pour fonctionner avec les
types d’antenne énumérés ci-dessous et ayant un gain
admissible maximal. Les types d’antenne non inclus dans
cette liste, et dont le gain est supérieur au gain maximal
indique, sont strictement interdits pour l’exploitation de
l’émetteur.
CAN ICES3B/NMB3B
While in Privacy Mode, the
safe will not open even
when a valid Entry Code is
entered. This setting can
be changed from the Yale
Access App.
The inside light will
automatically turn on and
stay on for 10 seconds
when the safe door is
opened.
Setting
Default Setting Definition
Privacy
Mode
Inside Light
One Touch
Locking
Sound
On
On
This setting cannot
be turned off.
On
This feature cannot
be turned off.
Off
The sound setting for entry
code verification can be set
from the Yale Access App.
Reset Button*
(Factory Settings)
* When safe is paired to app, Factory Reset must be done from app.
During a factory reset the safe will be unlocked.
Touching any key on
keypad will lock the safe.