
INSTRUCTION MANUAL
GEBRAUCHSANWEISUNG
MANUAL DE INSTRUCCIONES
MANUEL D’INSTRUCTION
MANUALE DI ISTRUZIONI
РУКОВОДСТВО ПО ЭКСПЛУАТАЦИИ
cube Robot Vacuum and Mop
่�ือการใ
้
งาน
BUKU PETUNJUK
產品使用說明書
MANUAL ARAHAN

2
EN
Important Safety Instructions
IMPORTANT SAFETY INSTRUCTIONS
When using an electrical Appliance, basic
precautions should always be followed, including
the following:
READ ALL INSTRUCTIONS BEFORE
USING THIS APPLIANCE
SAVE THESE INSTRUCTIONS
1. This Appliance can be used by children
aged from 8 years and above and persons
with reduced physical, sensory or mental
capabilities or lack of experience and
knowledge if they have been given supervision
or instruction concerning use of the Appliance
in a safe way and understand the hazards
involved. Children shall not play with the
Appliance. Cleaning and user maintenance
shall not be made by children without
supervision.
2. Clear the area to be cleaned. Remove power
cords and small objects from the oor that
could entangle the Appliance. Tuck rug fringe
under the rug base, and lift items such as
curtains and tablecloths off the oor.
3. If there is a drop off in the cleaning area due
to a step or stairs, you should operate the
Appliance to ensure that it can detect the step
without falling over the edge. It may become
necessary to place a physical barrier at the
edge to keep the unit from falling. Make sure
the physical barrier is not a trip hazard.
4. Only use as described in this manual. Only
use attachments recommended or sold by
the manufacturer.
5. Please make sure your power supply source
voltage matches the power voltage marked
on the OMNI Station.
6. For INDOOR household use ONLY. Do not
use the Appliance in outdoor, commercial or
industrial environments.
7. Use only the original rechargeable battery
and OMNI Station provided with the
Appliance from the manufacturer. Non-
rechargeable batteries are prohibited.
8. Do not use without dust bin and/or lters in place.
9. Do not operate the Appliance in an area
where there are lit candles or fragile objects.
10. Do not use in extremely hot or cold environments

3
EN
(below -5˚C/23˚F or above 40˚C/104˚F).
11. Keep hair, loose clothing, ngers, and all
parts of body away from any openings and
moving parts.
12. Do not operate the Appliance in a room
where an infant or child is sleeping.
13. Do not use Appliance on wet surfaces or
surfaces with standing water.
14. Do not allow the Appliance to pick up large
objects like stones, large pieces of paper or
any item that may clog the Appliance.
15. Do not use Appliance to pick up ammable
or combustible materials such as gasoline,
printer or copier toner, or use in areas where
they may be present.
16. Do not use Appliance to pick up anything that
is burning or smoking, such as cigarettes,
matches, hot ashes, or anything that could
cause a re.
17. Do not put objects into the suction intake.
Do not use if the suction intake is blocked.
Keep the intake clear of dust, lint, hair, or
anything that may reduce air ow.
18. Take care not to damage the power cord. Do
not pull on or carry the Appliance or OMNI
Station by the power cord, use the power
cord as a handle, close a door on the power
cord, or pull power cord around sharp edges
or corners. Do not run Appliance over the
power cord. Keep power cord away from hot
surfaces.
19. If the power cord is damaged, it must be
replaced by the manufacturer or its service
agent in order to avoid a hazard.
20. Do not use the OMNI Station if it is
damaged. The power supply is not to be
repaired and not to be used any longer if it is
damaged or defective.
21. Do not use with a damaged power cord or
receptacle. Do not use the Appliance or
OMNI Station if it is not working properly,
has been dropped, damaged, left outdoors,
or come in contact with water. It must be
repaired by the manufacturer or its service
agent in order to avoid a hazard.
22. Turn OFF the power switch before cleaning
or maintaining the Appliance.
23. The plug must be removed from the
receptacle before cleaning or maintaining
the OMNI Station.

4
EN
plug the OMNI Station.
32. WARNING: For the purposes of recharging
the battery, only use the detachable supply
unit CH2251 provided with the Appliance.
To satisfy RF exposure requirements, a separation distance
of 20 cm or more should be maintained between this
device and persons during device operation.
To ensure compliance, operations at closer than this
distance is not recommended. The antenna used for this
transmitter must not be co-located in conjunction with any
other antenna or transmitter.
To disable Wi-Fi module on Robot, power the Robot ON.
Place the Robot on the Charging Station making sure the
Charging Contacts on Robot and the Charging Station
Pins make a connection.
Press and hold the SPOT Button on the Robot for 20
seconds until Robot emits 1 beep.
To enable Wi-Fi module on Robot, power the Robot OFF
and then power ON. The Wi- Fi module is turned on when
Robot is restarted.
24. Remove the Appliance from the OMNI
Station, and turn OFF the power switch to
the Appliance before removing the battery
for disposal of the Appliance.
25. The battery must be removed and discarded
according to local laws and regulations before
disposal of the Appliance.
26. Please dispose of used batteries according
to local laws and regulations.
27. Do not incinerate the Appliance even if it
is severely damaged. The batteries can
explode in a re.
28. When not using the OMNI Station for a long
period of time, please unplug it.
29. The Appliance must be used in accordance
with the directions in this Instruction Manual.
The manufacturer cannot be held liable or
responsible for any damages or injuries
caused by improper use.
30. The Robot contains batteries that are only
replaceable by skilled persons. To replace
the Robot’s battery, please contact Customer
Service.
31. If the Robot will not be used for a long time,
power OFF the Robot for storage and un-
5
EN
Correct Disposal of this Product
This marking indicates that this product should
not be disposed of with other household waste
throughout the EU. To prevent possible harm to the
environment or human health from uncontrolled
waste disposal, recycle it responsibly to promote
the sustainable reuse of material resources. To
recycle your used device, please use the return and
collection systems or contact the retailer where the
product was purchased. They can safely recycle this
product.
The remote surveillance is for the absolute private
use of non-public, private owned places for the pure
self-protection and single control intended only.
Please be aware of the local data protection based
legal obligations in case of use. No surveillance of
public places, especially with clandestine intent
and/or on the part of the employer without justied
reasons. Such not justified use is in the risk and
responsibility of the user only.
For EU Countries
For UK
For EU Declaration of Conformity information, visit
https://service.yeedi.com/pages/user-manuals
.
For UK Declaration of Conformity information, visit
https://service.yeedi.com/pages/user-manuals.
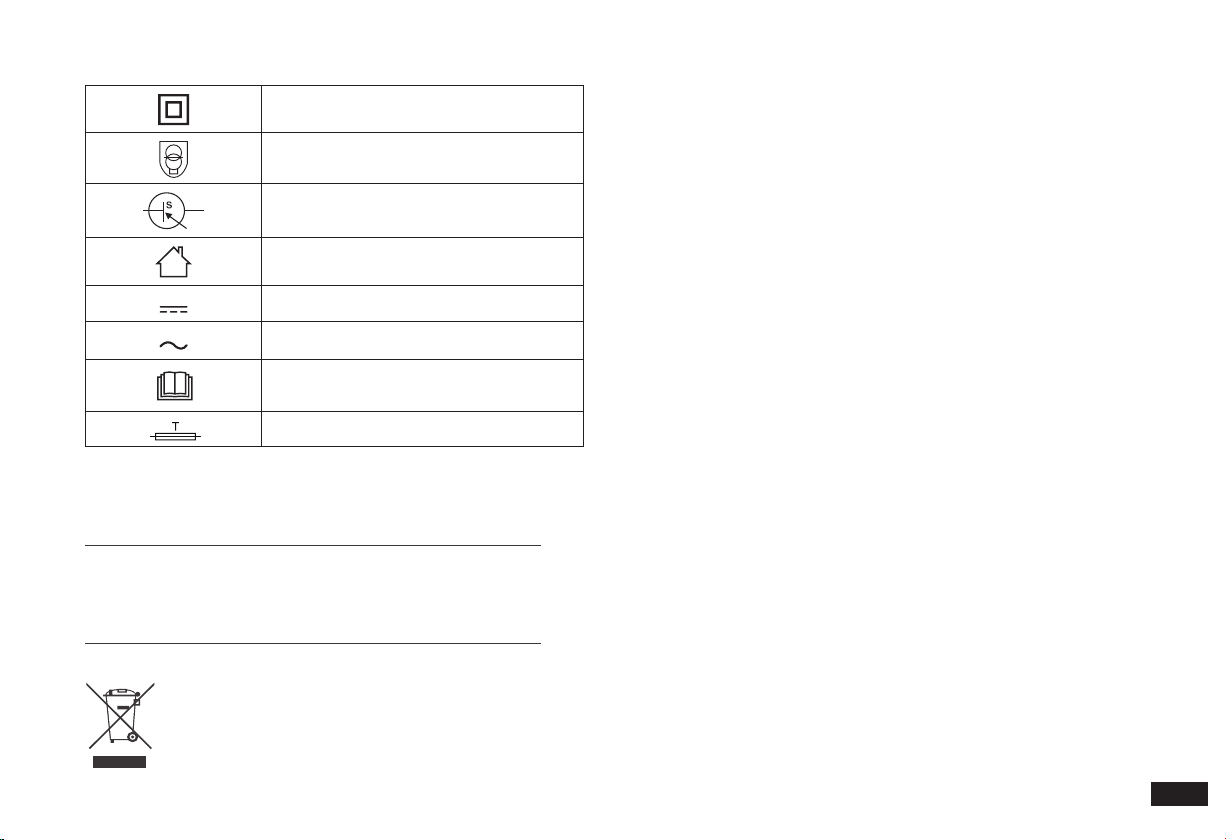
Class II
Short-circuit-proof safety isolating
transformer
Switch mode power supply
For indoor use only
Direct current
Alternating current
Read all instructions before using
(this appliance)
Time-lag miniature fuse-link
6
EN
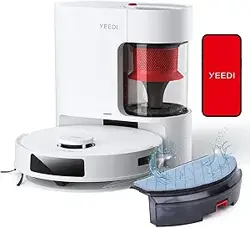
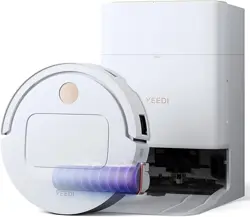
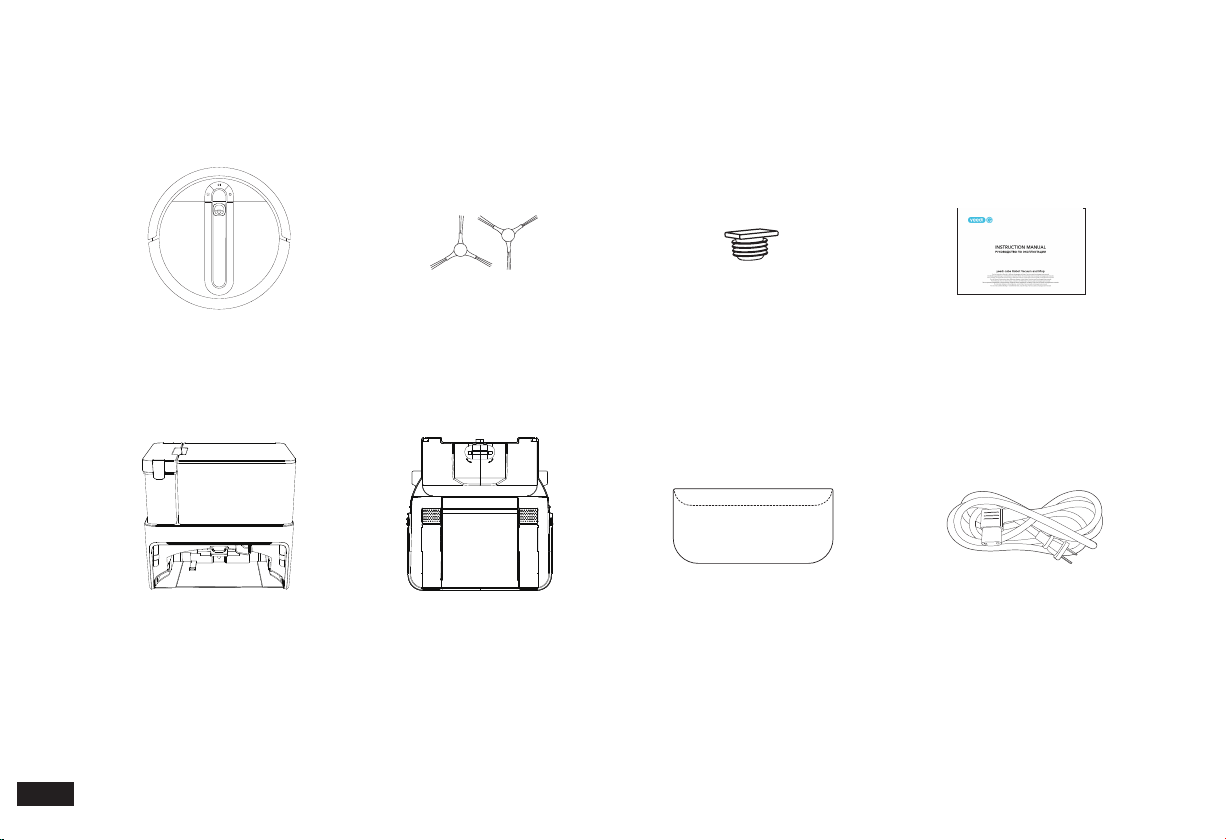
1. Package Contents/1.1 Package Contents
Robot
(Pre-installed with UFO Water Tank, Dustbin,
Multi-Surface Main Brush,Washable Filter and Easy-
to-Clean Mopping Pad)
Cube Station
(Pre-installed with Dirty Water Tank and Dust Bag)
Detachable Base Station Extension Pad Power Cord
Instruction Manual
Note:
1. All gures and illustrations are for reference only and may present differences in appearance from the actual product.
2. The “Edge Brushes”, ”Water Tank Plug” , “Detachable Base” ,”Station Extension Pad” and “Power Cord” need to be installed by the user prior to use.
3. Accessories from different countries shall be subject to the actual product conguration at the time of purchase, and the patterns are for reference only.
Edge Brushes Water Tank Plug
7
EN
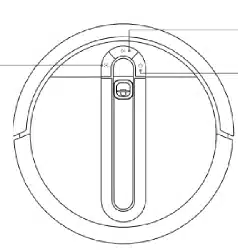
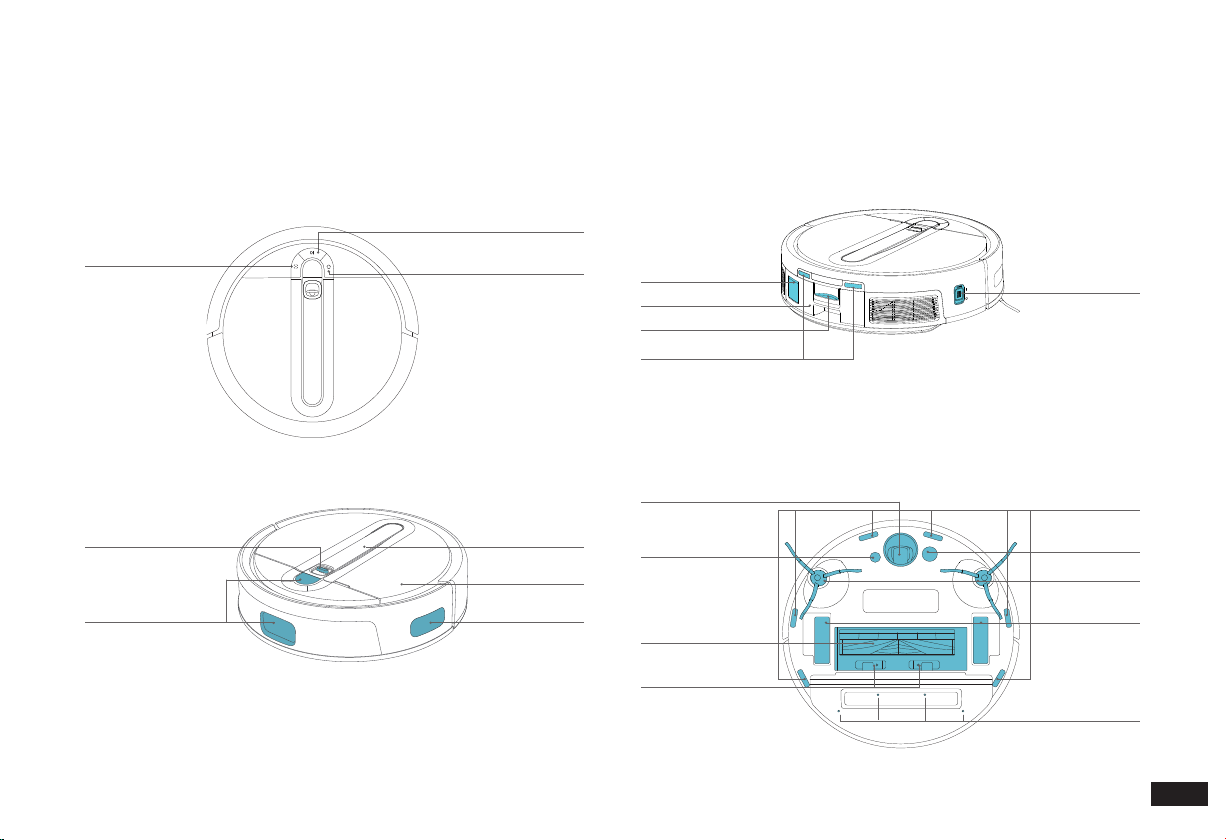
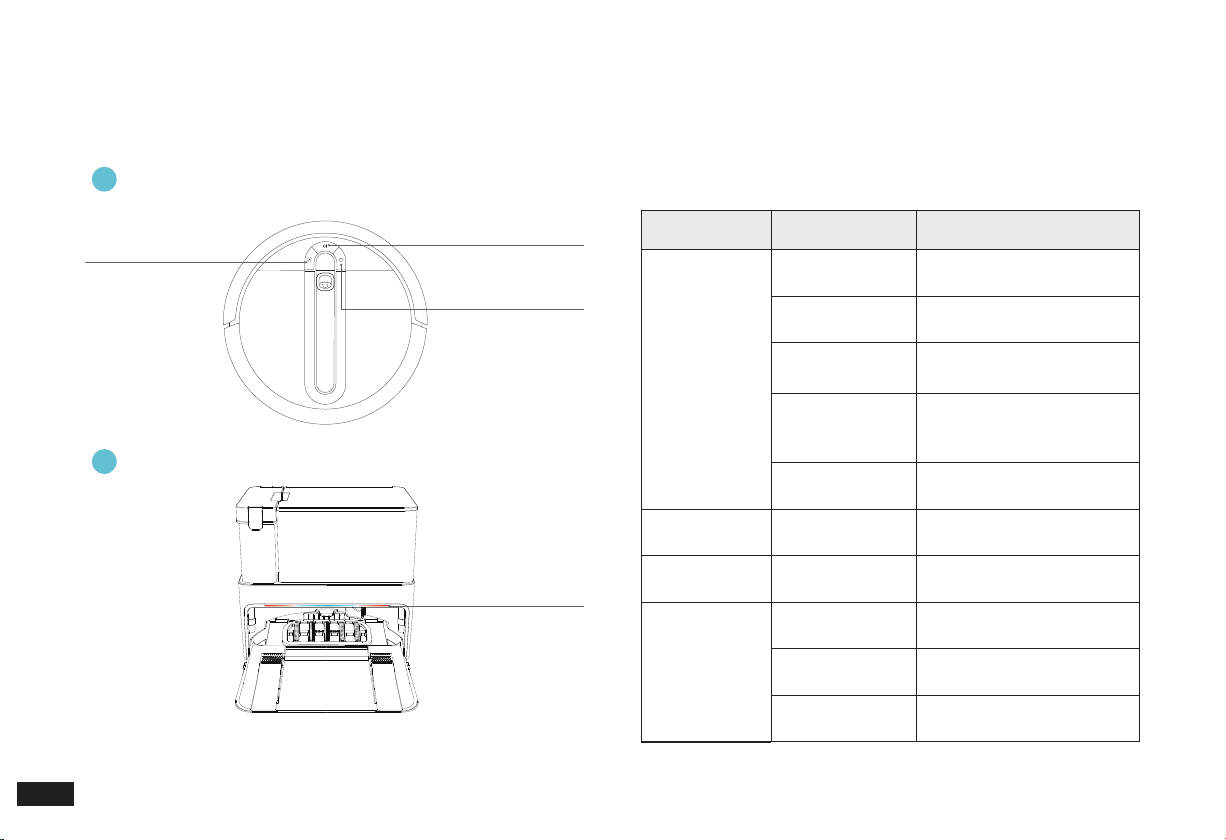
1. Package Contents/1.2 Product Diagram
Robot Top View
Robot Side View
Robot Bottom View
Vision and Laser
Fusion Navigation
System
Water Tank Lock
Pick-up Handle
Charging Contacts
Edge Brushes
Universal Wheel
Ultrasonic Carpet
Detection Sensor
Multi-Surface Main
Brush
Multi-Surface Main
Brush Release Buttons
Driving Wheels
Water Outlet
Anti-Drop Sensors
Dust Disposal Port
Dustbin Release Button
1L UFO Water
Tank
Power Switch
"I"=ON,
"O"=OFF.
Edge Detection
Sensors
Dustbin
Note:
Make sure that the Water Tank Lock is securely locked before lifting the Robot.
CLEAN Button
(Auto Clean Button)
HOME Button
(Return to Station Button)
SPOT Button
(Spot Cleaning
Button)
Floor Tracking
Sensor
8
EN
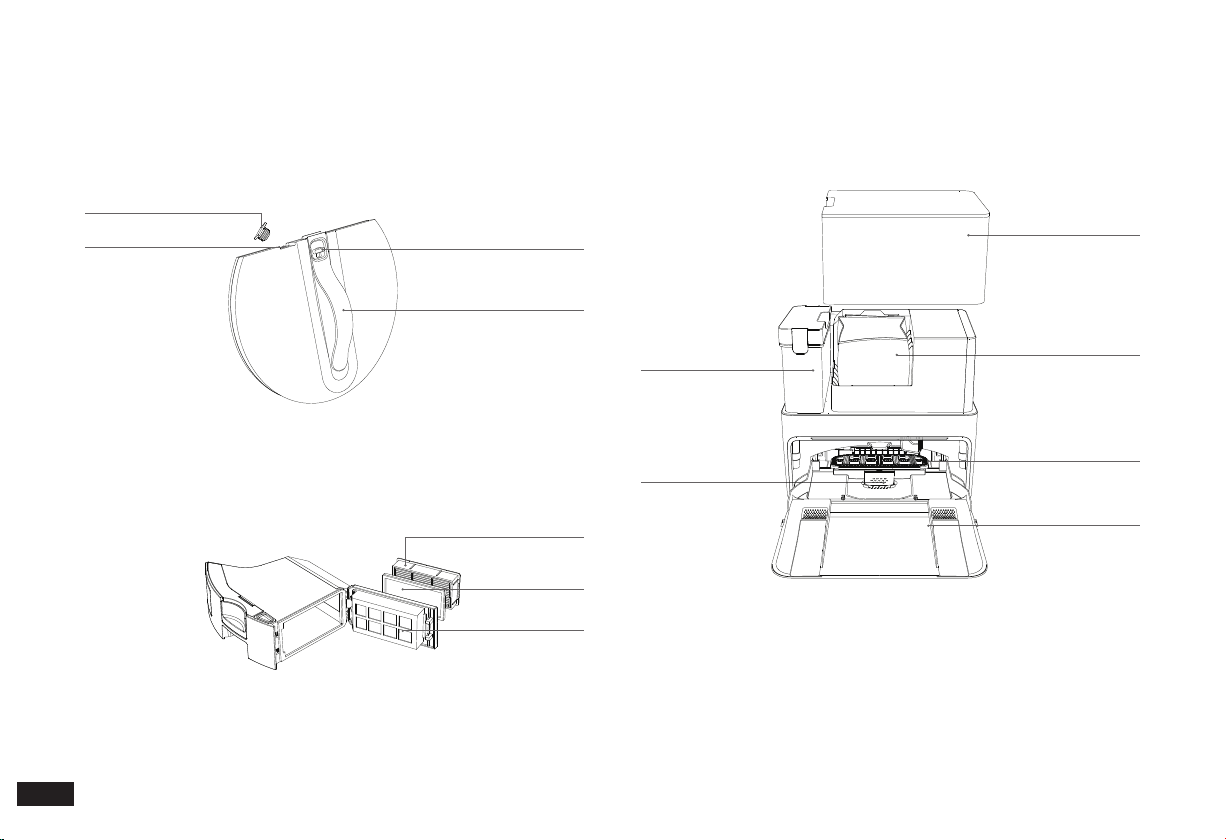
UFO Water Tank Cube Station
Dustbin
Dirty Water Tank
Dustbin Cover
Dust Bag
Built-in Electric Scrubber
Detachable Base
Filter
Pick-up Handle
Filter Net
Sponge Filter
High-Efciency Filter
Water Tank LockWater Inlet
Water Tank Plug
1. Package Contents/1.2 Product Diagram
Note:
1. The Detachable Base needs to be installed by the user before use.
2. Lift the mop Built-in Electric Scrubber before installation and put it
down after installation. Otherwise, the Robot's operations will be
affected.
3. The Filter is removable and needs to be cleaned regularly.
Note:
Keep the Water Tank Plug properly. Each time, after you have lled it,
cover the Plug before installing the UFO Water Tank in the Robot.

9
EN
2. Mapping and Cleaning/2.1 Notes before Cleaning
Tidy up the area to be cleaned
Put furniture, such as chairs and oor fans, in
their proper place. Put away low items such
as scales to ensure the maximum cleaning
space.
Open the door to help the Robot explore
During the rst use, make sure each room door
is open to help the Robot fully explore your
house.
Stop the Robot from falling
It may be necessary to place a physical
barrier at the edge of a drop to stop the
Robot from falling over it.
Put away objects such as wires, cloths, or slippers
that may be on the oor to improve the mapping
and cleaning ef ciency.
Before using the Robot on a rug with tasseled
edges, please fold the edges under the rug.
Note: Do not use the mopping function on the
carpet.
Please do not stand in narrow spaces such as
hallways so as to avoid preventing the Robot from
identifying the area to be cleaned.
Please make sure that the Robot has created
a home map in the yeedi App before it starts
cleaning.
10
EN
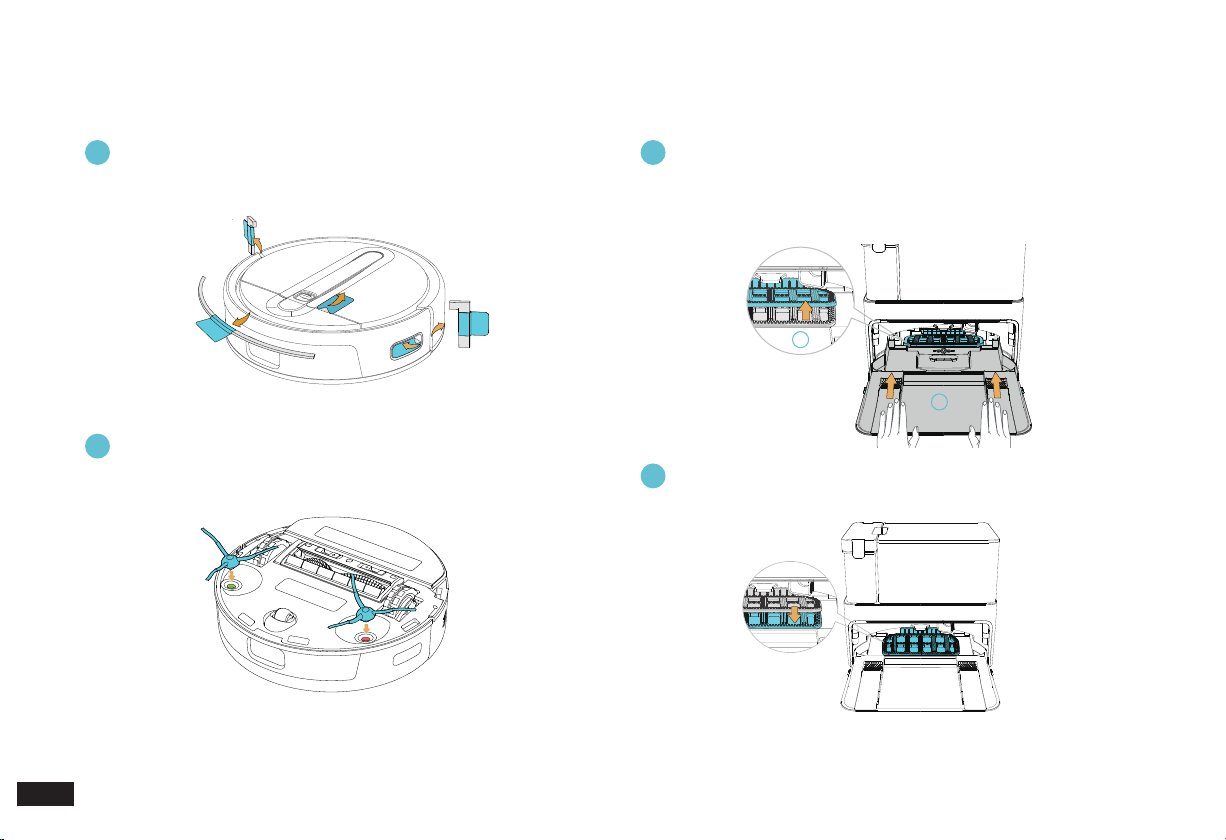
Please remove all protection materials on the Robot before use.
Install Edge Brushes
Remove all protection materials Lift the Scrubber and install the Detachable Base.
Reset the Scrubber once it has been successfully installed.
Make sure the color of the Edge Brushes is consistent with that of
mounting slot. The "click" sound indicates a successful connection.
Step 1: Lift the Scrubber and a "click" sound will be heard;
Step 2: Push the Detachable Base into the Station on a at surface.
The "click" sound indicates a successful connection.
2. Mapping and Cleaning/2.2 Notes before Using
2
1 3
4
1
2
Note:
The Robot experience may be affected if protection materials are not
removed.
Note:
The Robot experience may be affected if the Scrubber is not lowered in
time after installing the "Detachable Base".
Lower the Scrubber to nish installation.
11
EN
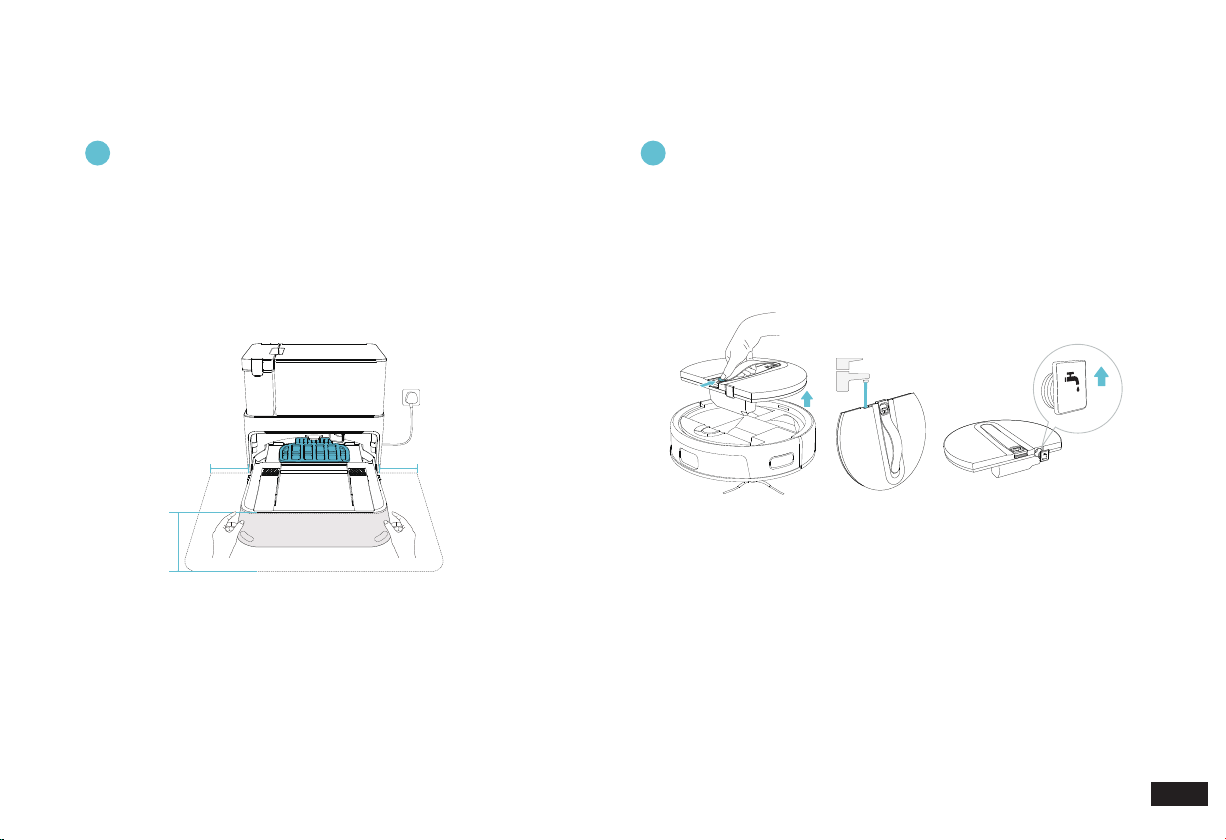
Put the Cube Station in place and connect it to the power
supply. Install the Station Extension Pad.
Remove the UFO Water Tank.
Step 1: Place the Cube Station against the wall in a large space and
do not place items within a radius of about 0.5 m or 1.5 m in front
of it.
Step 2: Align the dashed line with the edge of the base, with the
rough side facing up, and place it under the base. After putting it
in place,peel off the transparent tape from the smooth bottom and
stick the extension pad onto the hard, non-carpeted oor.
Step 1: Hold the handle on the Water Tank with one hand and slide
down the lock with your thumb to lift the Tank upward.
Step 2: Fill the Tank with clean water and put it back into the Robot
after installing the Plug.
2. Mapping and Cleaning/2.2 Notes before Using
5 6
Note:
1. Cover an area of at least 5 cm height from the bottom of any
reective objects such as mirrors.
2. Do not place the Cube Station in direct sunlight.
3. Periodically wipe off any accumulated water on the Extension Pad
to maintain its anti-slip effect.
4. Please do not move it frequently to avoid affecting the xation of
the extension pad.
>0.5m(1.64’)>0.5m(1.64’)
>1.5m(4.92’)
Note:
1. Please make sure the Tank Plug is installed.
2. To prolong the service life of the Water Tank, it is recommended to
use puried water or softened water.
3. Do not add any cleaning solution from any other brands; excessive
solution could cause the Robot to slip or be damaged.
4. Keep the UFO Water Tank Plug properly.
5. Do not put any foreign objects in the Tank.
facing
upwards
Clean Water

12
EN
Turn on the power switch, put the Robot near the Cube
Station and press the HOME Button. The Robot will
automatically return to the Station to charge.
Download the yeedi App to experience more functions:
7
Note:
1. "I"=ON, "O"=OFF
2. The Robot cannot be charged when being powered OFF.
3. When the Robot completes the cleaning or when the battery gets
low, it automatically returns to the Cube Station to recharge.
4. Please make sure that the Robot starts cleaning from the Station.
Do not move the Station while it is cleaning.
2. Mapping and Cleaning/2.3 yeedi
App
After downloading, please complete registration, login, and
the network setup according to the guide in the mobile App
page
.
Method 1
:
Open "Scan" in your mobile phone to scan the QR code on the
Robot, download and install the yeedi App according to the
prompts.
Method 2:
Open the mobile App store, search "yeedi", download and
install the yeedi App.
iOS Android
yeedi
Lower side of the UFO
Water Tank
2. Mapping and Cleaning/2.2 Notes
before Using
①
Turn on the power
switch.
②
The Robot will
automatically return to
Station to charge by
pressing the HOME
Button.
③
It will charge for about 6.5 hours until fully
charged.
1
2
13
EN
2. Mapping and Cleaning/2.4 Connect the Robot to the Mobile Phone
Network setup steps:
1. Please turn on your mobile phone Bluetooth and Wi-Fi;
2. Make sure that yeedi cube Robot Vacuum and Mop is on;
3. Open the yeedi App;
4.
Scan the QR code on the Robot using the yeedi App, complete
"Conrm access to the setup mode", "conrm the device and
Wi-Fi to be connected", and "enter the Wi-Fi password"
respectively according to the prompts in the App, and then wait
for the setup result;
5. If the network setup fails, it is recommended that you try again
according to the above steps, or choose other network setup
methods according to the prompts in the App.
Note:
If you have any problems during the Wi-Fi setup process, refer to the
Troubleshooting section in this manual.
Slowly ashing white light
Disconnected from Wi-Fi
or waiting for home Wi-Fi
connection
Rapidly ashing white light Connecting to home Wi-Fi
Solid white Connected to home Wi-Fi
14
EN
2
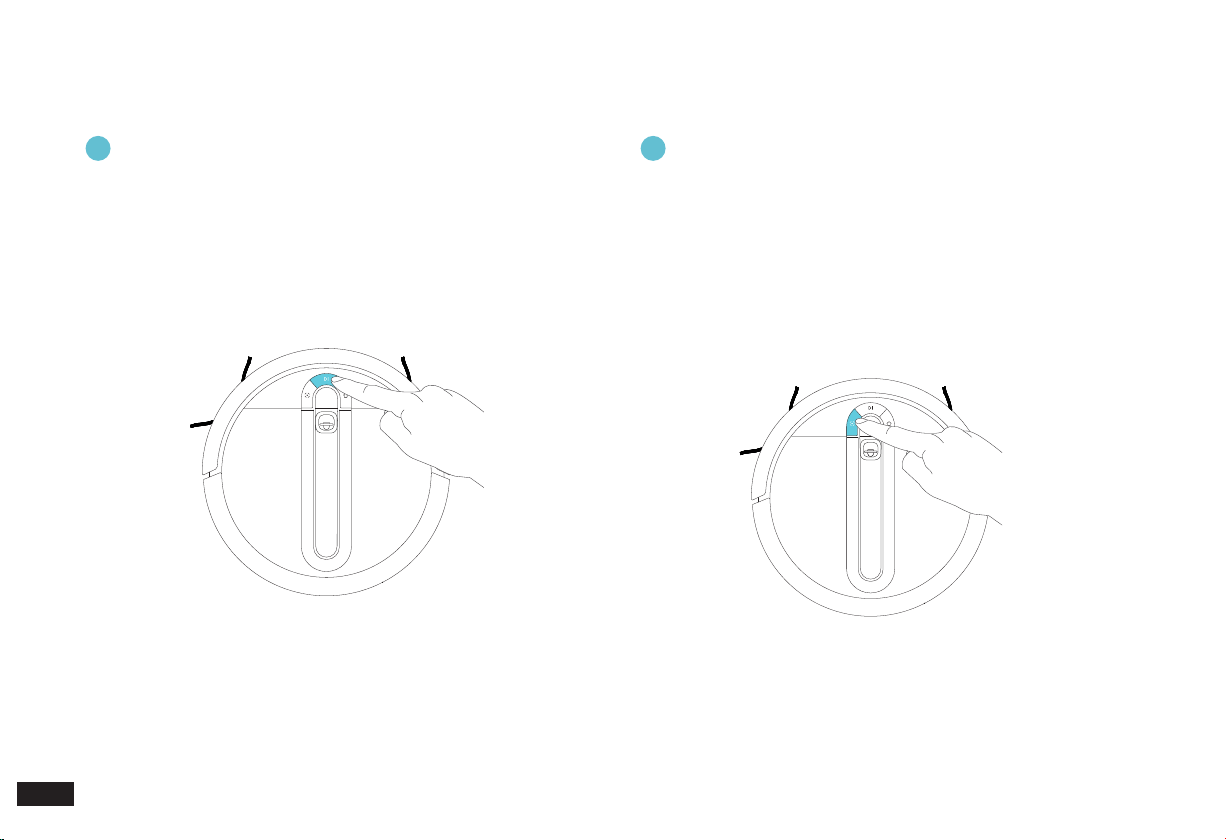
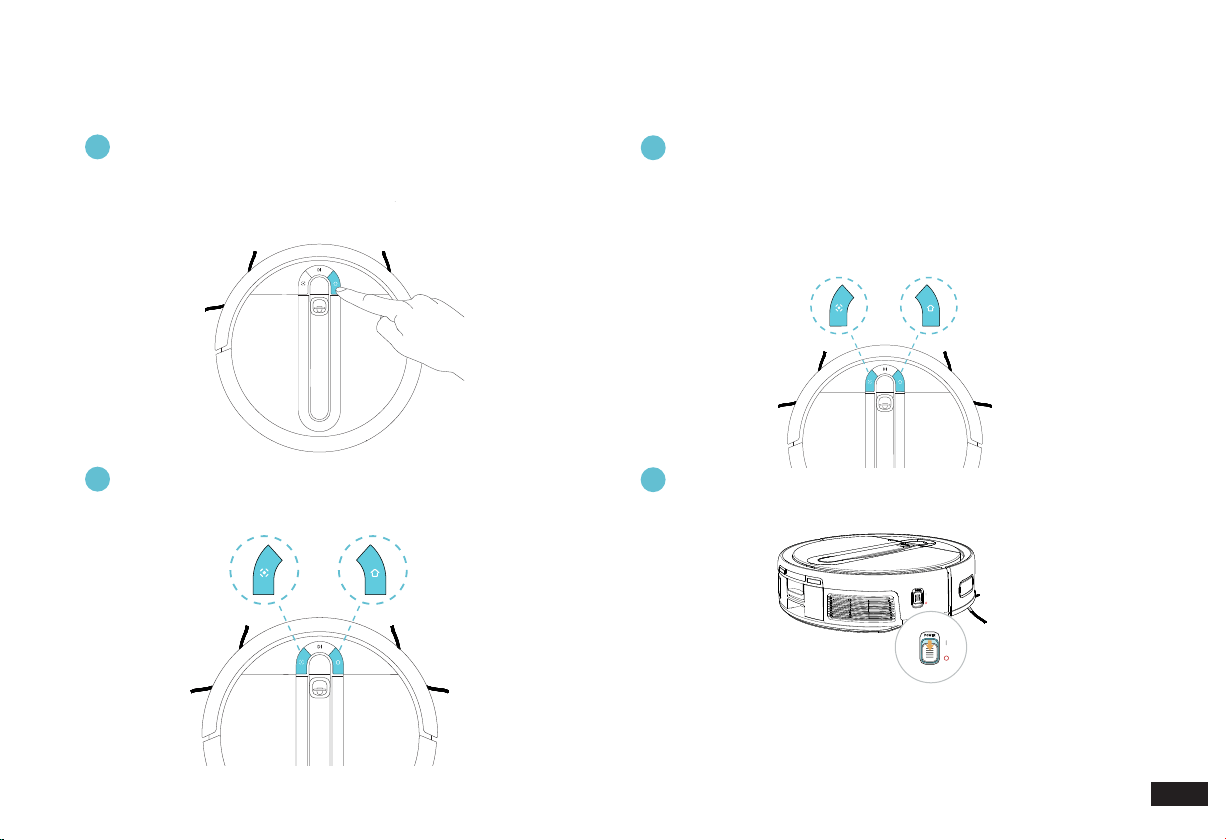
Function of the SPOT Button (Spot Cleaning Button)
2. Mapping and Cleaning/2.5 Robot Operation Buttons
1
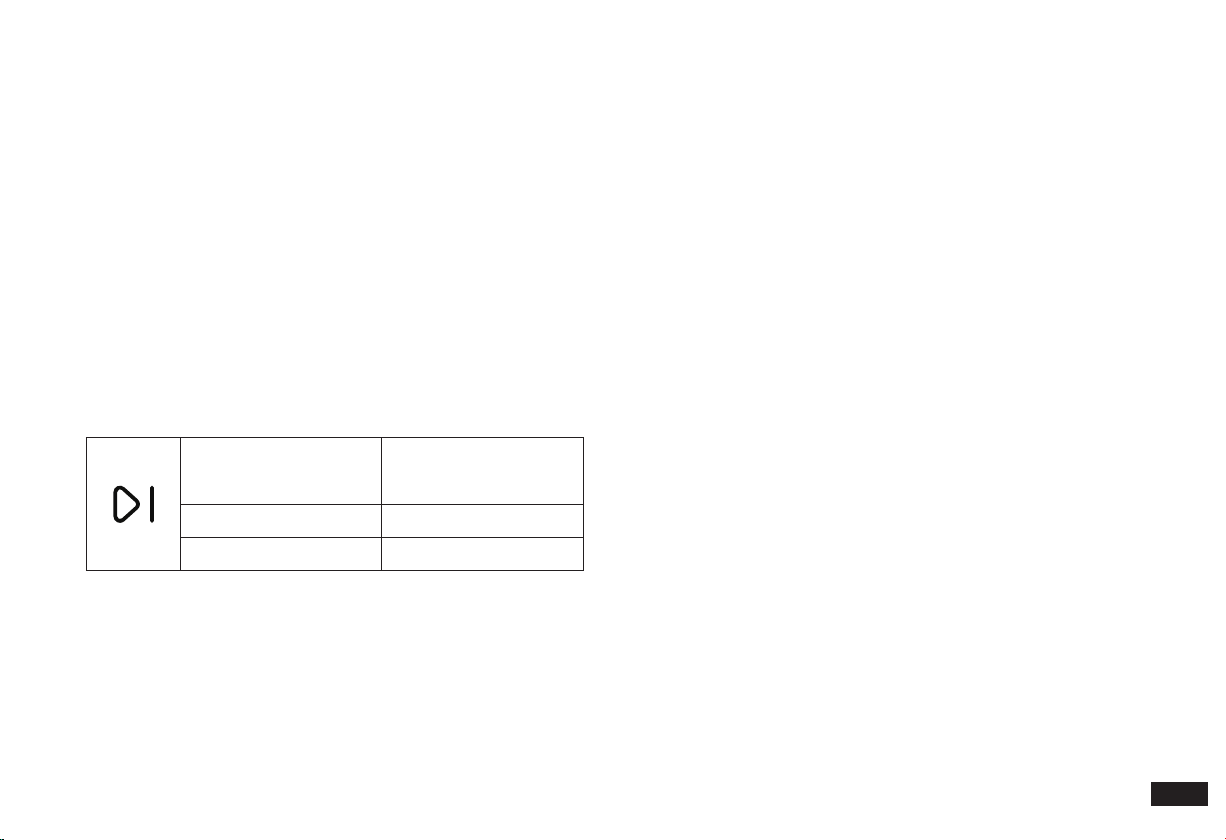
Function of the CLEAN Button (Auto Clean Button)
• Please ensure that the Robot is on the Cube Station and is fully
charged before starting.
• Press the CLEAN Button to start the rst mapping and Auto Clean.
• When the Robot is working, press the CLEAN Button to stop
cleaning and press again to continue.
• Press and hold for 2 seconds to end the current cleaning task.
• Please place the Robot in the area to be cleaned before starting.
• Press the SPOT Button to start the Spot Cleaning task, which
will focus on the 1.5*1.5 meters area centered on the Robot (the
Cleaning Settings can be modied in the App).
• When the Robot is working, press the SPOT Button to pause
cleaning and press again to continue.
• Move the Robot to end the current Spot Cleaning and start the
next one by pressing the SPOT Mode Button again.
15
EN
+
+
3
Function of the HOME Button (Return to Station Button)
2. Mapping and Cleaning/2.5 Robot Operation Buttons
• When the Robot is outside the Cube Station, press the HOME Button
to return.
• Press the HOME Button to pause the returning; and press again to
continue.
4
Button combination for network setup of the Wi-Fi Model
6
ON and OFF Button
5
Button combination for restoring default setting
• Press the SPOT and HOME Buttons at the same time for 2 seconds.
When you hear the prompt tone, the Robot enters the network setup
mode.
• If you are not going to use the Robot for a long time, turn the power
switch to "o" to shut it down.
• Press the SPOT and HOME Buttons at the same time for 5 seconds.
When the startup music sounds, the Robot has successfully restored
default setting.
Note:
1. Do not turn the Robot off and keep it in charging state after working
completed so as to facilitate control by the App and all forthcoming
work.
2.
If you are not going to use the Robot for a long time, please charge it
every three months.
Note:
Use this button combination with caution as all of the Robot's usage data
will be deleted after the default setting has been restored.
2 seconds
5 seconds
16
EN
2.
Mapping and Cleaning/2.6 Instructions for Robot and Station
Indicator Lights
CLEAN Indicator Light
Ambient Light of the
Station
HOME Indicator Light
SPOT Indicator Light
Indicator Light Display Status Robot Status
CLEAN
Indicator Light
The light blue
light is solid on
Have a cleaning task
The red light is
solid on
Low power/power off
charging
The red light
ashes
Robot alarm status
The white light is
solid on
Standby/network setup
succeeded/Base Station
docking successful
The white light is
ashing
Charging/Start up/Robot
loading/Firmware update
HOME Indicator
Light
The white light is
solid on
Return to Station
SPOT Indicator
Light
The light blue
light is solid on
Spot Cleaning
Ambient Light
of the Station
The light blue
light is solid on
Working/Charging
The left red light
is solid on
Dirty water bucket out of
place/full of water
The right red light
is solid on
Dust Bag out of place
Robot lighting effect
1
Cube Station lighting effect
2
17
EN
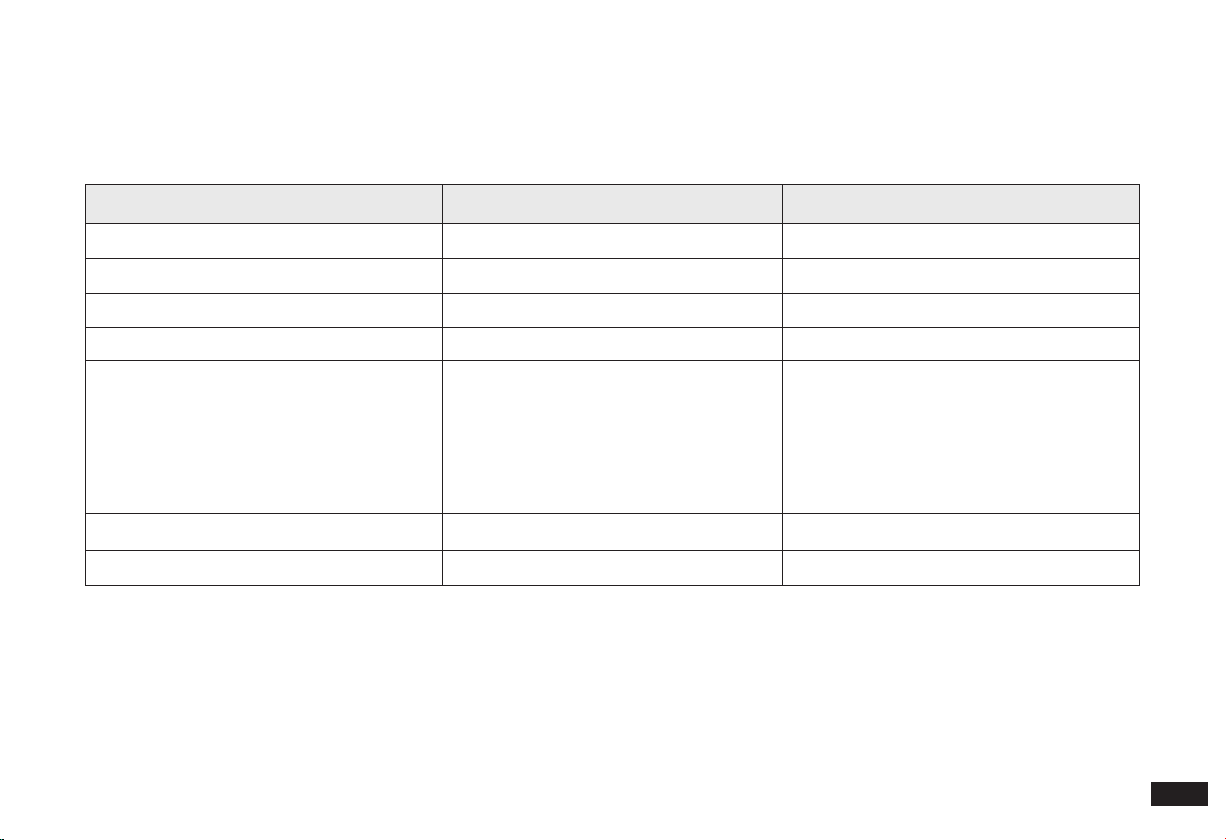
3. Maintenance/3.1 Regular Maintenance
To keep the Robot cleaning at peak performance, perform maintenance tasks and replace parts with the following frequencies:
Note:
yeedi manufactures various replacement parts and ttings. Please contact Customer Service for more information on replacement parts.
Robot Parts Maintenance Frequency Replacement Frequency
Easy-to-Clean Mopping Pad
/ Every 3-6 months
Edge Brushes Once every 2 weeks Every 3-6 months
Multi-Surface Main Brush Once per week Every 6-12 months
Washable Filter Once per week
Every 3-6 months
Edge Detection Sensors
Vision and Laser Fusion Navigation System
Universal Wheel
Anti-Drop Sensors
Robot Charging Contacts
Station Charging Contacts Pins
Once per week /
Detachable Base and Filter Once every 2 weeks /
Dirty Water Tank After each mopping /

18
EN
3. Maintenance/3.2 Dustbin and Washable Filter
1
Press the Dustbin Release Button to remove the Dustbin
3
Open the Filter Net, remove the ne Washable Filter and the
High-Efciency Filter Assembly
2
Press the Dustbin Cover Release Button to empty the
Dustbin
4
Clean the dust on both sides of the Filter Net with the Multi-
Function Cleaning Tool
PUSH

19
EN
3. Maintenance/3.2 Dustbin and
Washable Filter
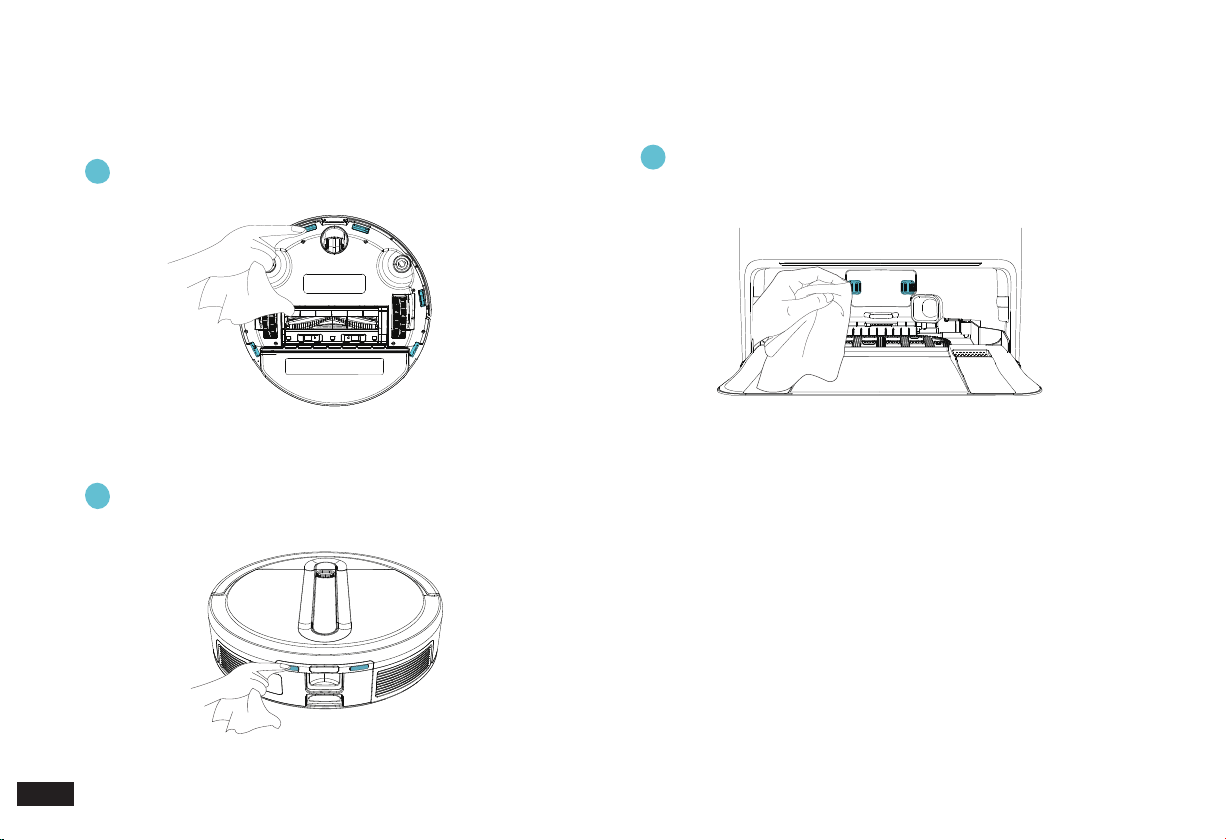
1
2
Wipe Vision and Laser Fusion Navigation System
Wipe Edge Detection Sensors
Please wipe with a clean soft cloth, and do not use detergent.
Note: Please avoid direct sunlight and exposure to high
temperatures.
3. Maintenance/3.3 Vision and
Laser Fusion Navigation System
and Edge Detection Sensors
5
Wash High-Efficiency Filter Assembly, Sponge Filter and
Dustbin with water
6
Air-dry High-Efficiency Filter Assembly, Sponge Filter and
Dustbin
20
EN
2
Wipe Robot Charging Contacts
Wipe Anti-Drop Sensors
1
Wipe Station Charging Contacts Pins
3
Note:
1. Sensitive electronic components are contained in the Charging
Contacts. Please use dry cloth when cleaning. Do not use wet cloth
to prevent damage.
2. Before cleaning the Robot Charging Contacts and Station Charging
Contacts Pins, turn the Robot OFF and unplug the Cube Station.
3. Maintenance/3.4 Anti-Drop Sensors and Charging Contacts Pins
Please wipe with a clean soft cloth, and do not use detergent.
21
EN
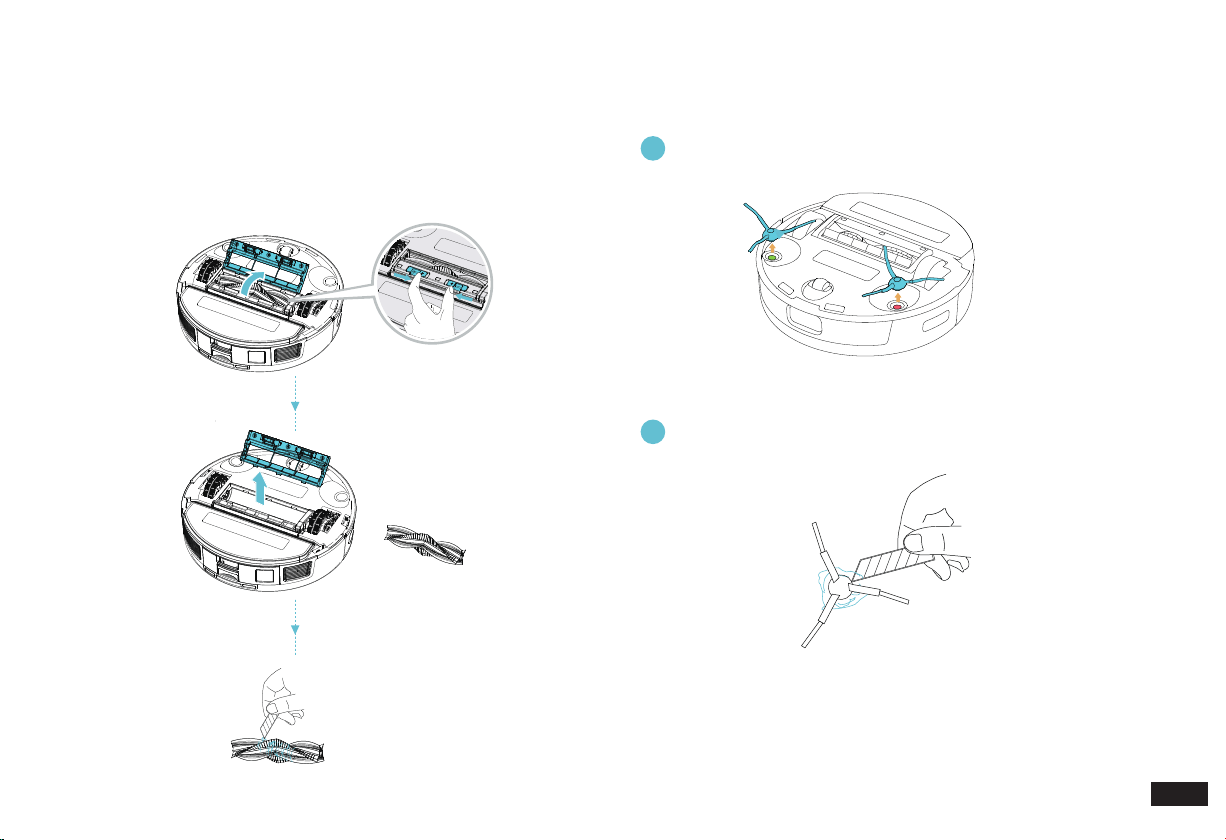
Clean Multi-Surface Main Brush
3. Maintenance/3.5 Multi-Surface
Main Brush
Remove any foreign objects caught in the Multi-Surface Main Brush
with the Multi-Function Cleaning Tool.
Remove Edge Brushes
Clean Edge Brushes with the Multi-Function Cleaning Tool
1
2
3. Maintenance/3.6 Edge Brushes
Note:
Before cleaning the Robot, turn it OFF.
22
EN
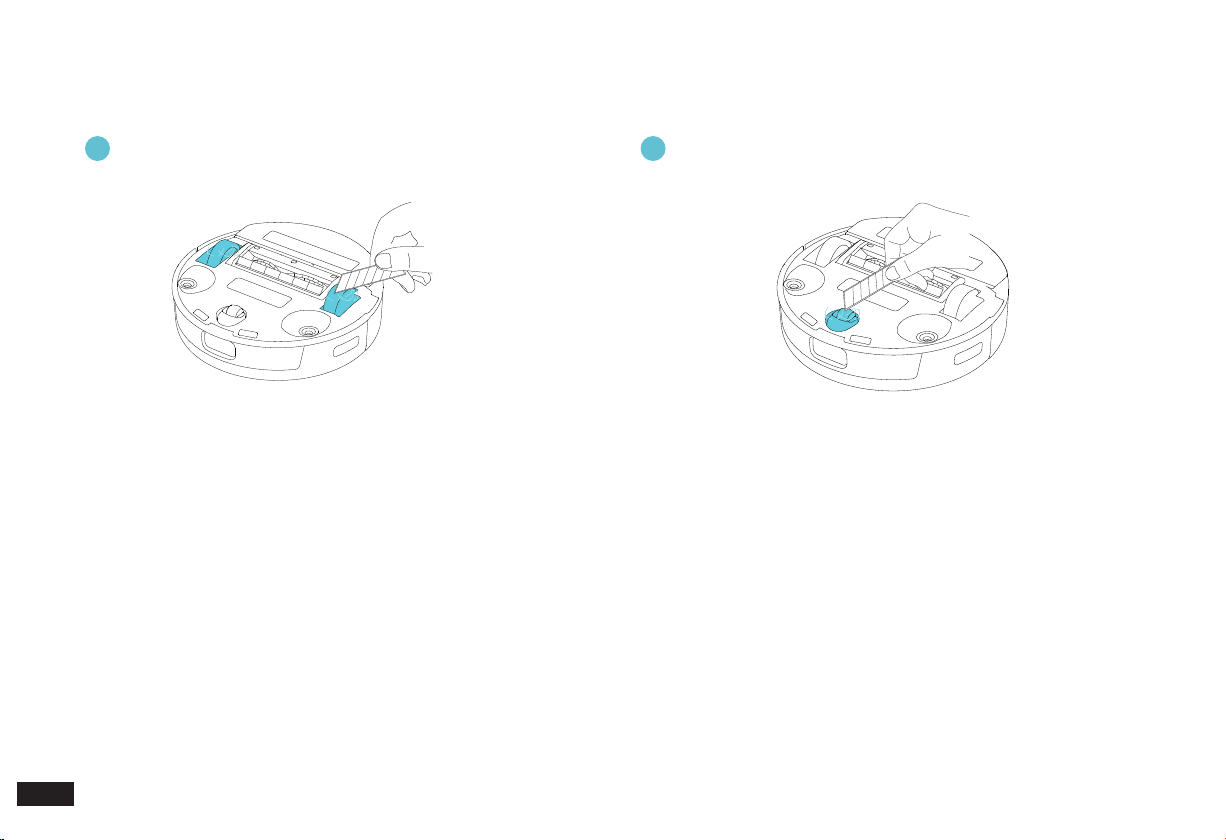
3. Maintenance/3.7 Driving Wheels and Universal Wheel
Clean Driving Wheels Clean Universal Wheel
1 2
Note:
Please check regularly whether the Edge Brushes, Main Brush, Driving Wheels and Universal Wheel have picked up excessive amounts of hair or
trapped foreign objects to avoid abnormal sound during cleaning.
23
EN
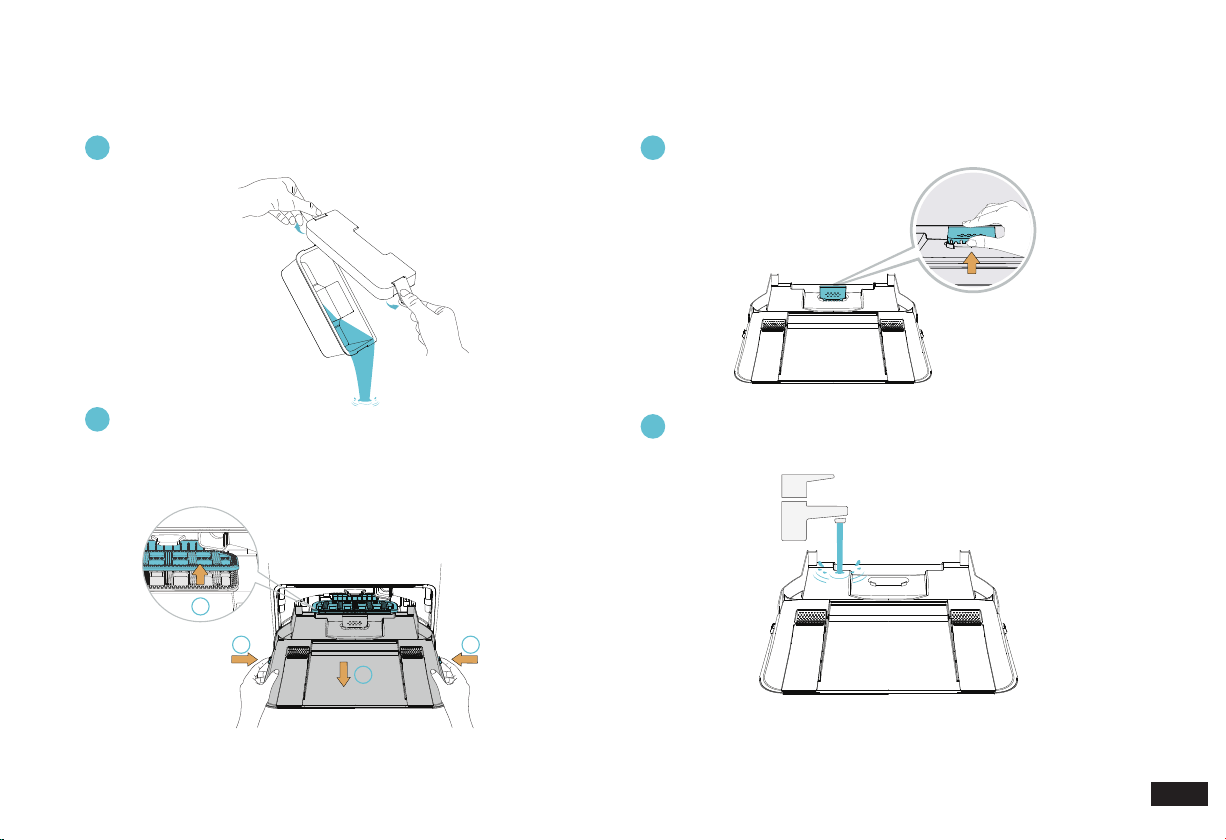
1
3
22
Remove the Detachable Base regularly.
(Lift the Scrubber, press the buttons on both sides of the Detachable
Base and pull it out in parallel.)
Pull up and remove Filter
Detachable Base
Clean Detachable Base
3
2
4
Empty Dirty Water Tank
1
Note: After rinsing, please dry the Detachable Base and Filter with a soft cloth or put in a cool place. Do not expose to direct sunlight to avoid
deformation of the Detachable Base or Base Filter.
3. Maintenance/3.8 Dirty Water Tank, Detachable Base and Filter
24
EN
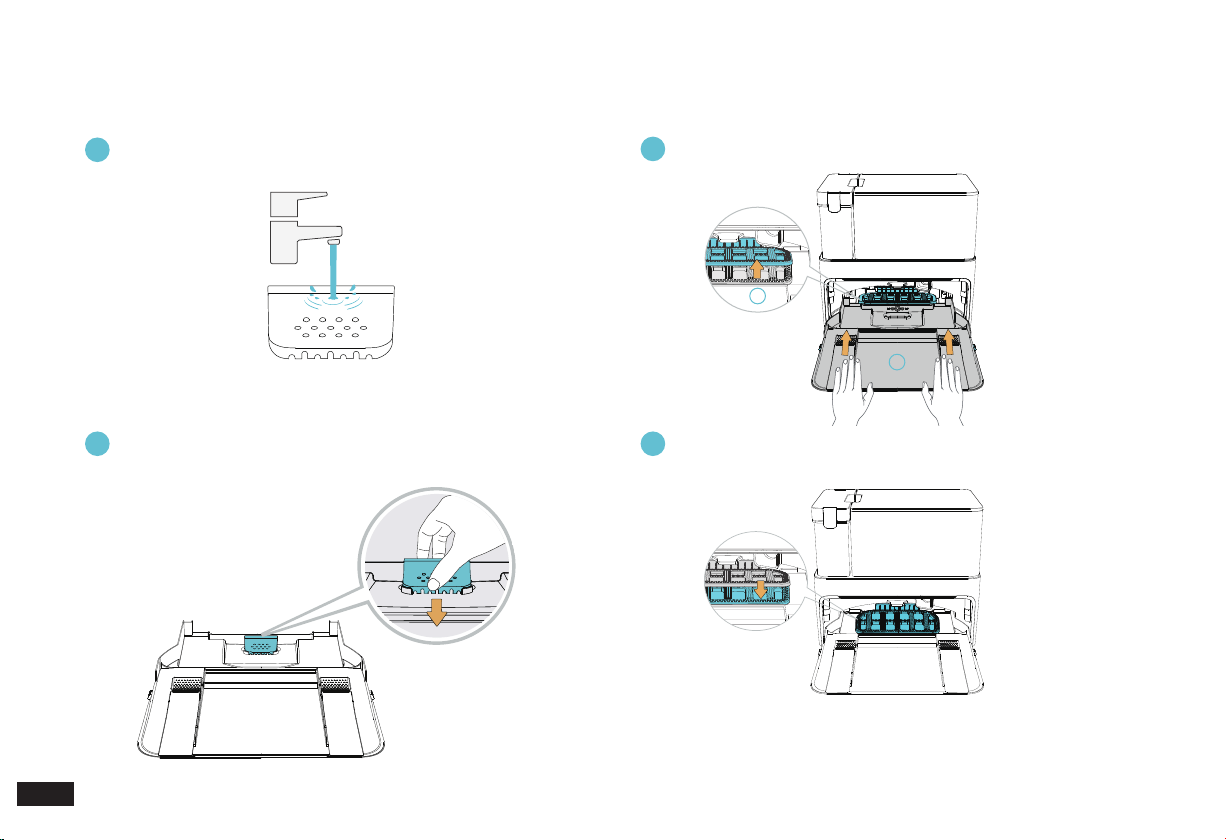
Press down and when you hear a "click", the Filter is in place.
Wipe Filter
Install Detachable Base
Install Filter
5
7
6
3. Maintenance/3.8 Dirty Water Tank, Detachable Base and Filter
8
Note: Be sure to lower the Scrubber.
1
2
Lower Scrubber
25
EN
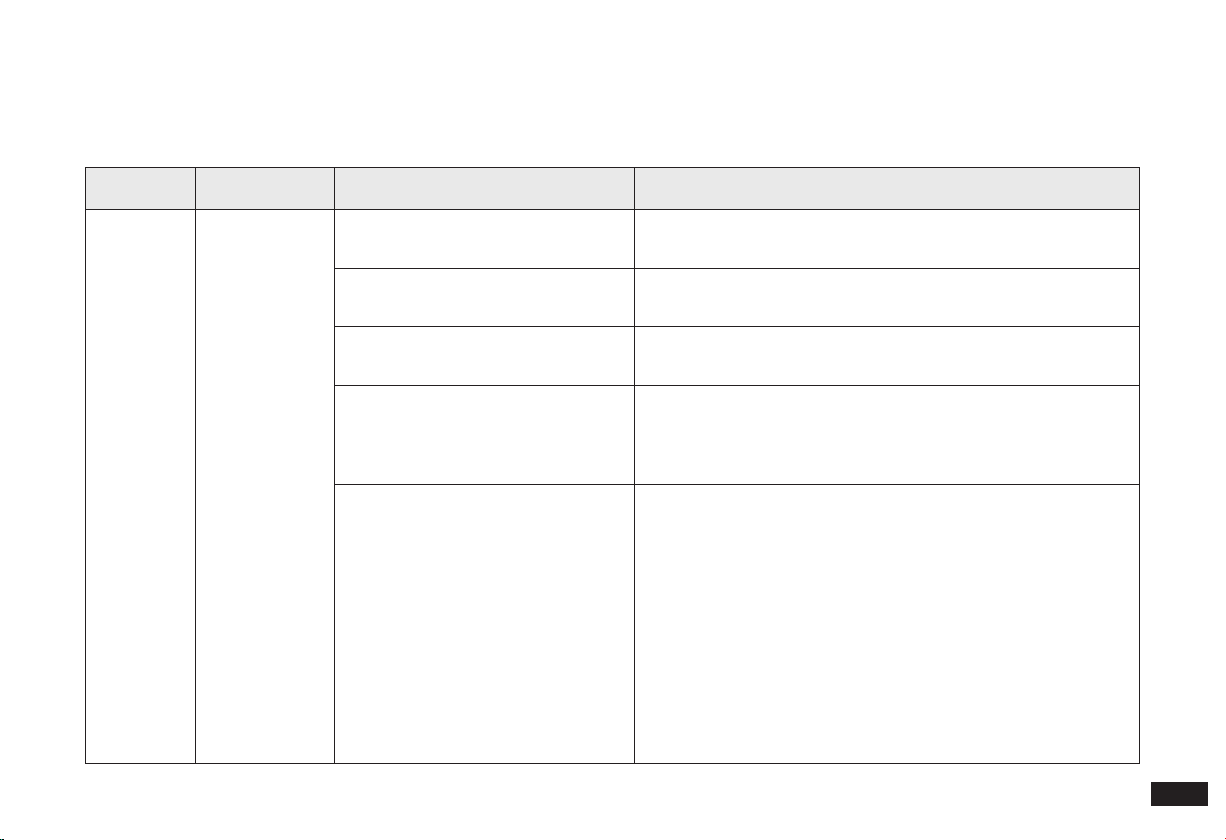
4. Troubleshooting
Problems encountered during use can refer to the following solutions.
No. Malfunction Possible Causes Solutions
1
Unable to
connect the
Robot to the
App
(Wi-Fi Model)
The maximum number of devices con-
nected to the router has been reached.
1. Delete devices connected to the router.
2. Connect the Robot to a new router.
Incorrect Wi-Fi username or password
entered.
Connect to the Wi-Fi and enter the correct username and
password.
The Robot is not within range of your
home Wi-Fi signal.
Make sure the Robot is within range of your home Wi-Fi signal.
Network setup started before the
Robot was ready.
Network setup can only be performed when the Robot is ready.
Press the SPOT and HOME Buttons at the same time for 2 seconds.
When you hear the voice prompt, the Robot is ready for network
setup.
No 2.4GHz network.
The Robot does not yet support 5GHz networks. Enable the 2.4GHz
network during network connection.
Wi-Fi network requirements:
• You are using a 2.4GHz or 2.4/5 GHz mixed network.
• Your router supports 802.11b/g/n and IPv4 protocol.
• Do not use a VPN (Virtual Private Network) or Proxy Server.
• Do not use a hidden network.
• WPA and WPA2 using TKIP, PSK, AES/CCMP encryption.
• WEP EAP (Enterprise Authentication Protocol) is not supported.
• Use Wi-Fi channels 1-11 in North America and channels 1-13
outside North America (refer to local regulatory agency).
• If you are using a network extender/repeater, the network name
(SSID) and password are the same as your primary network.
26
EN
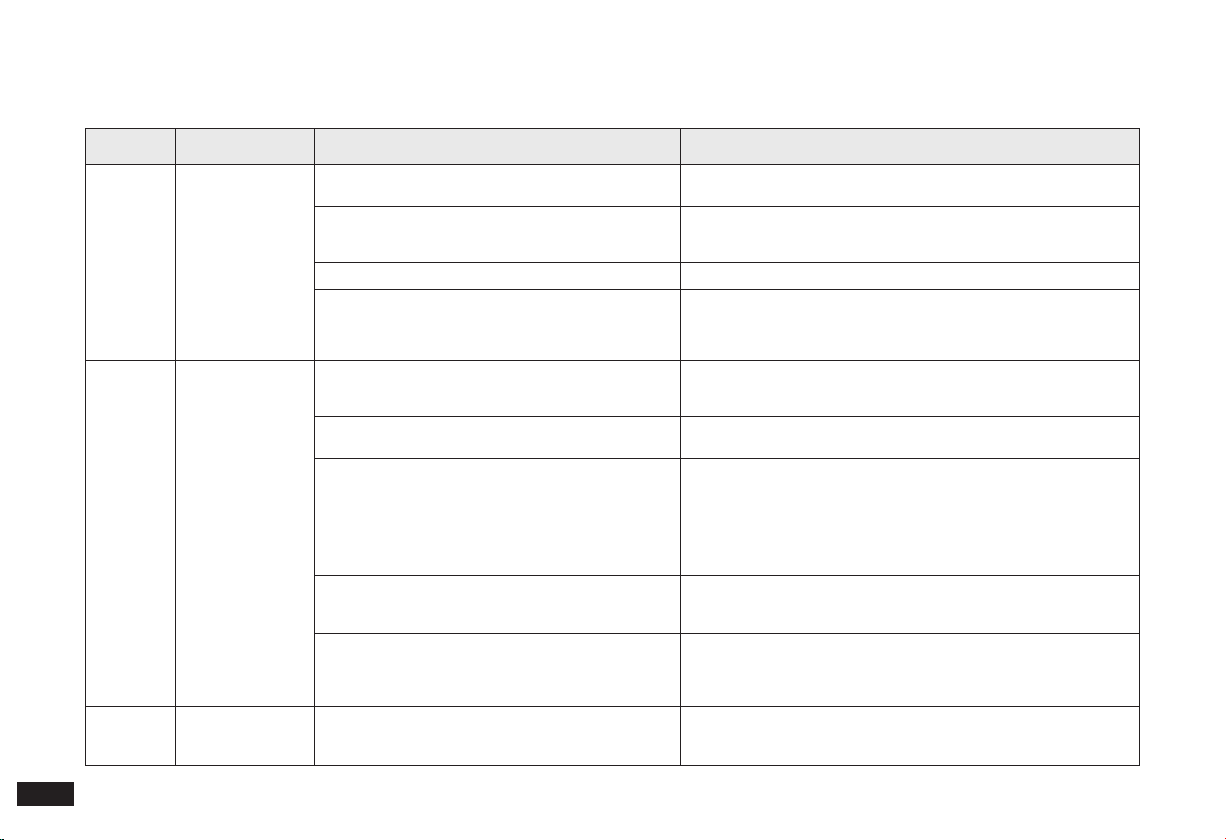
No. Malfunction Possible Causes Solutions
2
The Robot is unable
to charge.
The Robot is not turned ON.
Turn ON the Robot. CLEAN white light ashing indicates that the
Robot has started charging.
Charging Contacts are dirty.
Please check whether the Charging Contacts of the Cube Station and
the Robot are dirty or clean by referring to the "Maintenance" section
of the manual.
The Cube Station is not connected to the power supply. Make sure that the Cube Station is connected to the power supply.
The battery is completely discharged.
1. If you are not going to use the Robot for a long time, please charge
it every three months.
2. Please contact the after-sales service if the Robot cannot be charged
after not having been used for a long time.
3
Situations such as
disorderly routes,
deviation, repeated
cleaning and small
area leakage may
occur when the
Robot is working.
The Robot will make a back-and-forth exploration for
the whole home environment during initial mapping.
1. The Robot will complete the cleaning task according to the self-
planned route when it is used for the rst time.
2. After generating the map, the Robot will clean the rooms in order.
Dust accumulates on the sensor surface.
Please wipe the Laser Sensor in front of the Robot and the Visual
Sensor at the top of the Robot regularly with a dry cloth.
Power cords, slippers and other objects placed on the
ground will affect the normal operation of the Robot.
1. Before the Robot starts work, please tidy up the scattered power
cords, slippers and other objects on the ground, and reduce the
number of objects on the oor as much as possible to prevent areas
containing many obstacles from being uncleanable.
2. The Robot will automatically remedy any leakage in the cleaning
process, please do not interfere (for example: move the Robot or block
its path).
Working on freshly waxed and polished oors, resulting
in reduced friction between the Driving Wheels and the
oor.
Please have the Robot clean the oor after the wax has dried.
The Robot may not be able to enter narrow areas to
clean due to the layout of your house and the location
of the furniture.
1. Tidy up the home environment and free up the space that can be
cleaned by the Robot to the maximum extent.
2. Due to the limitation of the Robot in height/diameter terms, it
cannot enter spaces less than 10 cm in height and 40 cm in width.
4
The Robot gets
stuck while working
and stops.
The Robot is tangled with something on the oor
(electrical wires, curtains, carpet fringing, etc.).
1. The Robot will try various ways to free itself.
2. If it is unsuccessful, manually remove the obstacles and restart.
4. Troubleshooting
27
EN
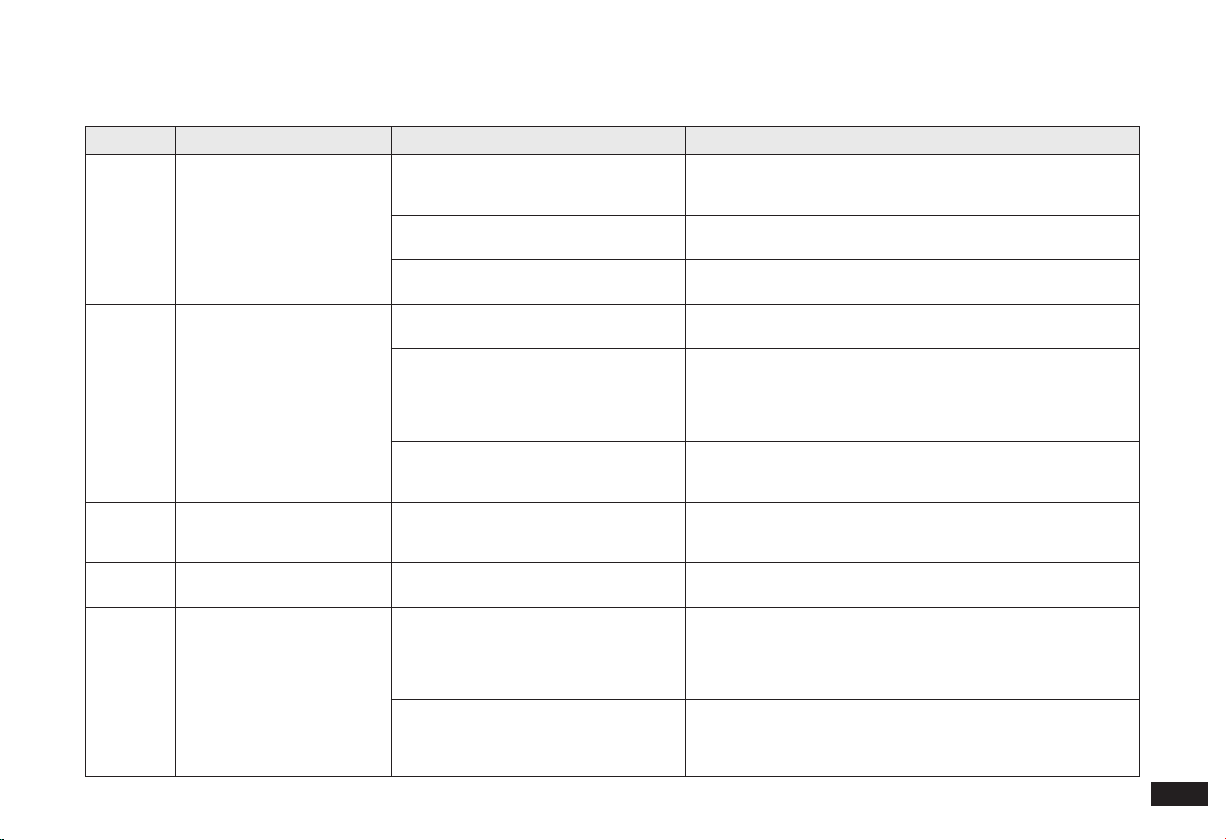
No. Malfunction Possible Causes Solutions
5
The Robot makes a lot of noise
when cleaning.
The Edge Brushes and Multi-Surface Main
Brush may be tangled, or the Dustbin and
Filter may be stuck.
Clear out any stuck debris regularly. Please refer to the
"Maintenance" section of this manual.
The Robot's Driving Wheels or Universal
Wheel are/is stuck.
Clear the wheels. Please refer to the "Maintenance" section of
the manual.
The Robot is in Max and Max+ Mode.
1. Disable the Auto-Boost Suction function in the App.
2. Use "standard" Vacuum Power for daily oor cleaning.
6
The Easy-to-Clean Mopping
Pad is installed, but no water is
coming out of the Robot while
it mops.
The UFO Water Tank is short of water.
Make sure the UFO Water Tank is lled with water before each
cleaning task.
The Robot did not start cleaning from the
Station.
1. The Robot will clean the Mopping Pad rst to ensure that the Pad
is wet if it starts cleaning from the Station.
2. Please move the Robot to a location near the Cube Station. Press
the HOME Button to return the Robot to the Cube Station; press the
CLEAN Button / "Start" Button in the App for it to start cleaning.
The water outlets on the bottom of the
Robot are clogged.
Clean the water outlets on the bottom of the Robot with a clean
cloth and start it to check whether water is coming out normally.
If water is still not coming out, please contact after-sales service.
7
There will be a voice prompt
stating "Please install the UFO
Water Tank".
The UFO Water Tank is not installed
properly.
Please press hard when installing until you hear a "click", to
ensure that the UFO Water Tank is installed correctly.
8
The Robot leaves behind dust
or debris while cleaning.
The blocking plate of the Dustbin or the
Dust Disposal Port is stuck by debris.
Please clear the debris.
9
The Robot returns to charge
before it has nished cleaning.
The room is so large that the Robot needs
to return to recharge.
1. Before starting the cleaning task, ensure that the Robot is fully
charged;
2. "Standard" Vacuum Power is recommended;
3. Please enable Resumed Clean. For more details, please follow
the instructions in the App.
In the case of a very complex home
environment, cleaning time may be
prolonged and the Robot may return to
charge before the work has been nished.
1. Tidy up any obstacles on the oor before the Robot starts
cleaning;
2. If repeated cleaning occurs several times, please delete the
existing map and create a new one.
4. Troubleshooting

28
EN
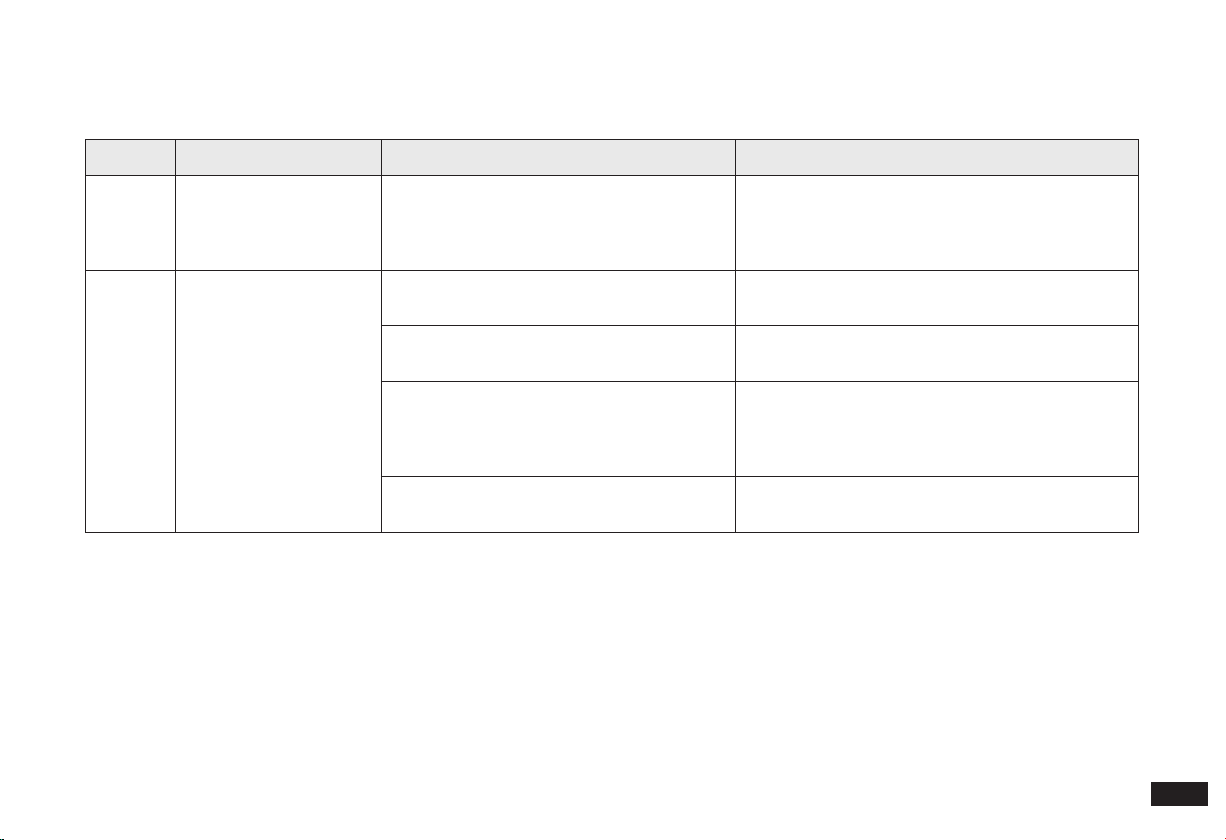
No. Malfunction Possible Causes Solutions
10
The Robot could not nd
the Cube Station signal
and is unable to return to
the Station.
The Cube Station is not positioned correctly.
Please position the Cube Station correctly by following the instructions
in the
Mapping and Cleaning section of the manual.
The Cube Station is powered off.
1. Please check whether the Cube Station is connected to the power
supply;
2. Please check whether the socket is powered on.
The Cube Station was moved manually while the
Robot was cleaning.
Do not manually move the Cube Station while the Robot is cleaning.
The Robot did not start from the Cube Station.
Have the Robot start from the Cube Station in the Auto Clean and
Area Clean modes.
The recharge route is blocked, for example:
(1) The door of the room where the Cube Station
is located is closed;
(2) There is an obstacle that is preventing
recharging, for which reason the Robot cannot
enter the room where the Cube Station is located.
Please open the door of the room where the Cube Station is located
and keep the way to the recharge point clear.
11
The Robot cannot return
to the Cube Station.
The Robot has slipped.
1. Remove the Detachable Base, clean and dry it before installing.
2. Wipe any water or oil stains at the front of the Cube Station and on
the Driving Wheels.
Detachable Base is not installed properly.
1. Please install the Detachable Base properly by following the
instructions in the "Notes before Using" section of the manual.
2. Ensure that the Scrubber is put down after installing the Detachable
Base.
The Robot positioning has failed and it cannot nd
the Cube Station.
1. Move the Robot to the nearby of the Cube Station and press the
HOME Button;
2. If the Station still cannot be found during the next cleaning, please
restore and use the backup map.
3. If the Cube Station cannot be found several times, please delete
the current map to create a new one.
4. Troubleshooting
29
EN
No. Malfunction Possible Causes Solutions
12
Warnings relating to the
Driving Wheels
The Driving Wheels are tangled or stuck by
foreign objects.
Please rotate and press the Driving Wheels to check
whether any foreign objects have become tangled
with or stuck to them. If yes, please clean them up
promptly.
13
The Cleaning Sink of the
Cube Station is full of wa-
ter that cannot be sucked
out. There is a voice alarm
stating that the sink is full
of water.
The Dirty Water Tank is not installed properly.
Press the Dirty Water Tank down to ensure proper
installation and the indicator light shall be solid blue.
The Dirty Water Tank is full.
Please clean up the dirty water in the Dirty Water
Tank and reset.
There are foreign objects at the water inlet of
the Cleaning Sink.
Ensure that there are no foreign objects blocking the
Cleaning Sink water inlet. Remove the Filter from
the Base and reinstall it after removing any foreign
objects.
The above has been performed but the voice
alarm remains.
Unplug the power socket of the Cube Station and re-
plug in.
4. Troubleshooting
30
EN
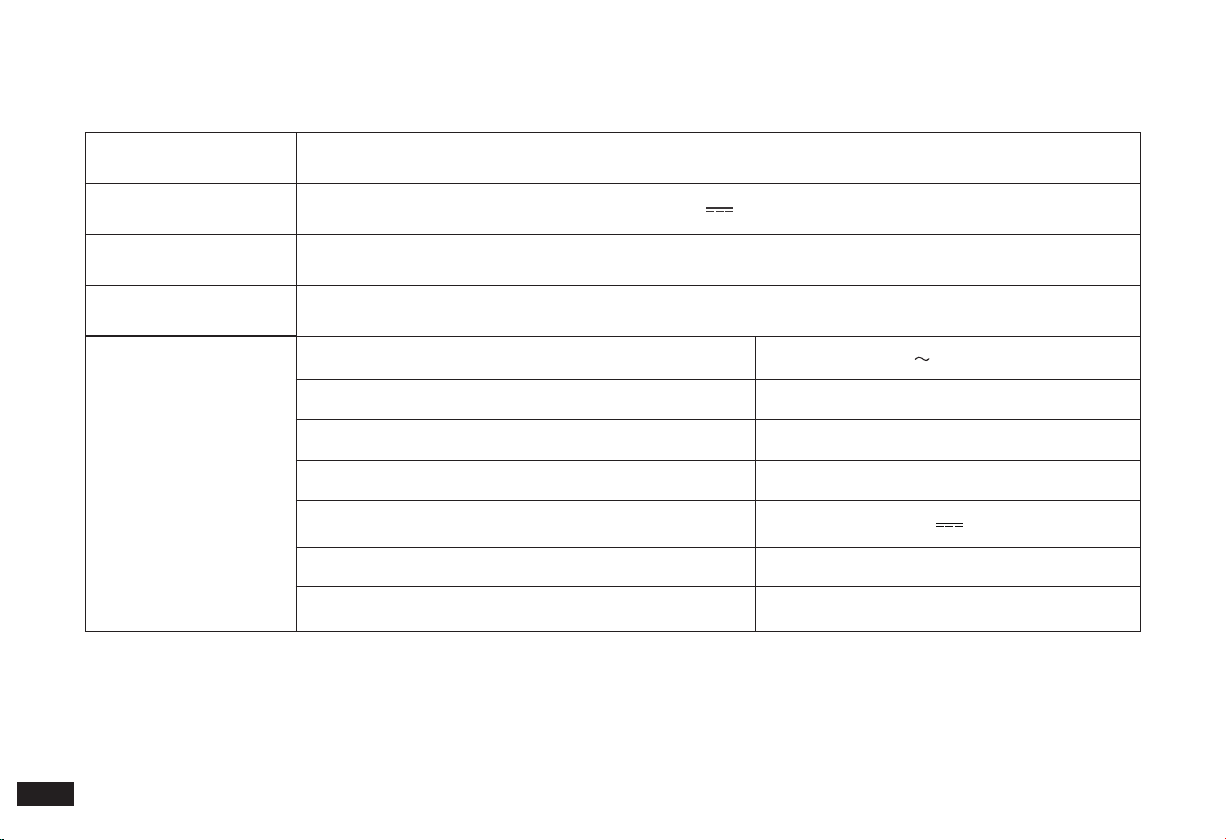
5. Product Specications
Model YDAX11
Rated Input 20V
2A
Charging Time About 6.5 h
OMNI Station Model CH2251
Rated Input (Charging) 220-240 V
50-60 Hz 0.3 A
Power(Washing Mopping Pads) 35W
Power(Drying) 90W
Power (Emptying) 1000 W
Rated Output 20 V
2 A
Frequency bands
2400-2483.5MHz
Networked Standby Power Less than 2.00W
Note:
1. Output power of the Wi-Fi module is less than 100mW.
2. Technical and design specications may be changed for continuous product improvement.
3. Explore more accessories at https://www.yeedi.com.

Shenzhen Reecoo Electronic Co., Ltd.
Building 5-6, ShangLiLang Science and Technology Park,
ShangLiLang Community, NanWan Street, LongGang District,
ShenZhen City, Guangdong Province, P. R. China