Instruction Manual
Bedienungsanleitung
Manual de instrucciones
Manuel d'instructions
Manuale d'uso
Руководство по эксплуатации
K700
Model/Modell/Modelo/
Modèle/Modello/Mодель:K701G

Instruction Manual
�������������������������������������������������������������������������������������������������������������3
EN
Bedienungsanleitung
������������������������������������������������������������������������������������������������������27
DE
Manual de instrucciones
������������������������������������������������������������������������������������������������ 52
ES
Manuel d'instructions
�����������������������������������������������������������������������������������������������������76
FR
Manuale d'uso
����������������������������������������������������������������������������������������������������������������100
IT
Руководство по эксплуатации
����������������������������������������������������������������������������������124
RU
Congratulations on the purchase of your yeedi robot! We hope it brings you many years of satisfaction� We believe
that your new robot will help keep your home clean and give you more quality time to do other things�
Hereby, Shenzhen Reecoo Electronic Co�, Ltd�, declares that this vacuum robot cleaner is in compliance with the
essential requirements and other relevant provisions of RE Directive2014/53/EU�pdf�
The declaration of conformity may be consulted at www�reecoo-robot�com/DoC�pdf�
Thank you for choosing yeedi!

3
EN
1. Important Safety Instructions ..........................................................................................................................................4
2. Package Contents .............................................................................................................................................................8
3. Operating and Programming ..........................................................................................................................................11
4. Maintenance ....................................................................................................................................................................17
5. Status Indicator Light and Alarm Sounds .....................................................................................................................23
6. Troubleshooting ...............................................................................................................................................................24
7. Technical Specifications .................................................................................................................................................26
Contents

4
EN
1� This Appliance can be used by children aged from 8
years and above and persons with reduced physical,
sensory or mental capabilities or lack of experience
and knowledge if they have been given supervision or
instruction concerning use of the Appliance in a safe
way and understand the hazards involved� Children
shall not play with the Appliance� Cleaning and user
maintenance shall not be made by children without
supervision�
2� Clear the area to be cleaned� Remove power cords
and small objects from the floor that could entangle
the Appliance� Tuck rug fringe under the rug base, and
lift items such as curtains and tablecloths off the floor�
3� If there is a drop off in the cleaning area due to a step
or stairs, you should operate the Appliance to ensure
that it can detect the step without falling over the
edge� It may become necessary to place a physical
barrier at the edge to keep the unit from falling� Make
sure the physical barrier is not a trip hazard�
4� Only use as described in this manual� Only
use attachments recommended or sold by the
manufacturer�
5� Please make sure your power supply voltage matches
the power voltage marked on the Docking Station�
6� For INDOOR household use ONLY� Do not use
the Appliance in outdoor, commercial or industrial
environments�
7� Non-rechargeable batteries are prohibited�
8� Do not use without dust bin and/or filters in place�
9� Do not operate the Appliance in an area where there
are lit candles or fragile objects�
10� Do not use in extremely hot or cold environments
(below -5˚C/23˚F or above 40˚C/104˚F)�
11� Keep hair, loose clothing, fingers, and all parts of body
away from any openings and moving parts�
12� Do not operate the Appliance in a room where an
infant or child is sleeping�
13� Do not use Appliance on wet surfaces or surfaces
with standing water�
14� Do not allow the Appliance to pick up large objects
like stones, large pieces of paper or any item that may
clog the Appliance�
When using an electrical appliance, basic precautions
should always be followed, including the following:
READ ALL INSTRUCTIONS BEFORE
USING THIS APPLIANCE.
1. Important Safety Instructions

5
EN
15� Do not use Appliance to pick up flammable or
combustible materials such as gasoline, printer or
copier toner, or use in areas where they may be
present�
16� Do not use Appliance to pick up anything that is
burning or smoking, such as cigarettes, matches, hot
ashes, or anything that could cause a fire�
17� Do not put objects into the suction intake� Do not use
if the suction intake is blocked� Keep the intake clear
of dust, lint, hair, or anything that may reduce air flow�
18� Take care not to damage the power cord� Do not pull
on or carry the Appliance or Docking Station by the
power cord, use the power cord as a handle, close a
door on the power cord, or pull power cord around
sharp edges or corners� Do not run Appliance over
the power cord� Keep power cord away from hot
surfaces�
19� If the power cord is damaged, it must be replaced by
the manufacturer or its service agent in order to avoid
a hazard�
20� Do not use the Docking Station if it is damaged�
21� Do not use with a damaged power cord or receptacle�
Do not use the Appliance or Docking Station if it is
not working properly, has been dropped, damaged,
left outdoors, or come in contact with water� It must
be repaired by the manufacturer or its service agent in
order to avoid a hazard�
22� Turn OFF the power switch before cleaning or
maintaining the Appliance�
23� The plug must be removed from the receptacle before
cleaning or maintaining the Docking Station�
24� Remove the Appliance from the Docking Station, and
turn OFF the power switch to the Appliance before
removing the battery for disposal of the Appliance�
25� The battery must be removed and discarded
according to local laws and regulations before
disposal of the Appliance�
26� Please dispose of used batteries according to local
laws and regulations�
27� Do not incinerate the Appliance even if it is severely
damaged� The batteries can explode in a fire�
28� When not using the Docking Station for a long period
of time, please unplug it�
29� The Appliance must be used in accordance with the
directions in this Instruction Manual� REECOO cannot
be held liable or responsible for any damages or
injuries caused by improper use�
1. Important Safety Instructions

6
EN
30� The robot contains batteries that are only replaceable
by skilled persons� To replace or remove the battery,
please contact Customer Service�
31� If the robot will not be used for a long time, fully charge
the robot and power OFF for storage and unplug the
Docking Station�
32. WARNING: For the purposes of recharging the battery,
only use the detachable supply unit CH1630RC
provided with this appliance�
33� The Remote Control requires two nonrechargeable
AAA batteries�
To replace the battery of the Remote
Control, please turn over the Remote Control, press
and remove its Battery Cover� Remove the batteries,
and insert the new batteries with the correct polarity�
Reassemble the Battery Cover�
34� Non-rechargeable batteries are not to be recharged�
35� Different types of batteries or new and used batteries
are not to be mixed�
36� Batteries of the Remote Control are to be inserted with
the correct polarity�
37� Exhausted batteries are to be removed from the
Appliance and safely disposed of�
38� If the Remote Control is to be stored unused for a long
period, the batteries should be removed�
1. Important Safety Instructions
39� The supply terminals are not to be short- circuited�
SAVE THESE INSTRUCTIONS
7
EN
Correct Disposal of this Product
This marking indicates that this product should not be
disposed of with other household waste throughout
the EU� To prevent possible harm to the environment
or human health from uncontrolled waste disposal,
recycle it responsibly to promote the sustainable reuse
of material resources� To recycle your used device,
please use the return and collection systems or contact
the retailer where the product was purchased� They can
safely recycle this product�
1. Important Safety Instructions
Class II
Short-circuit-proof safety isolating
transformer
Switch mode power supply
For indoor use only
8
EN
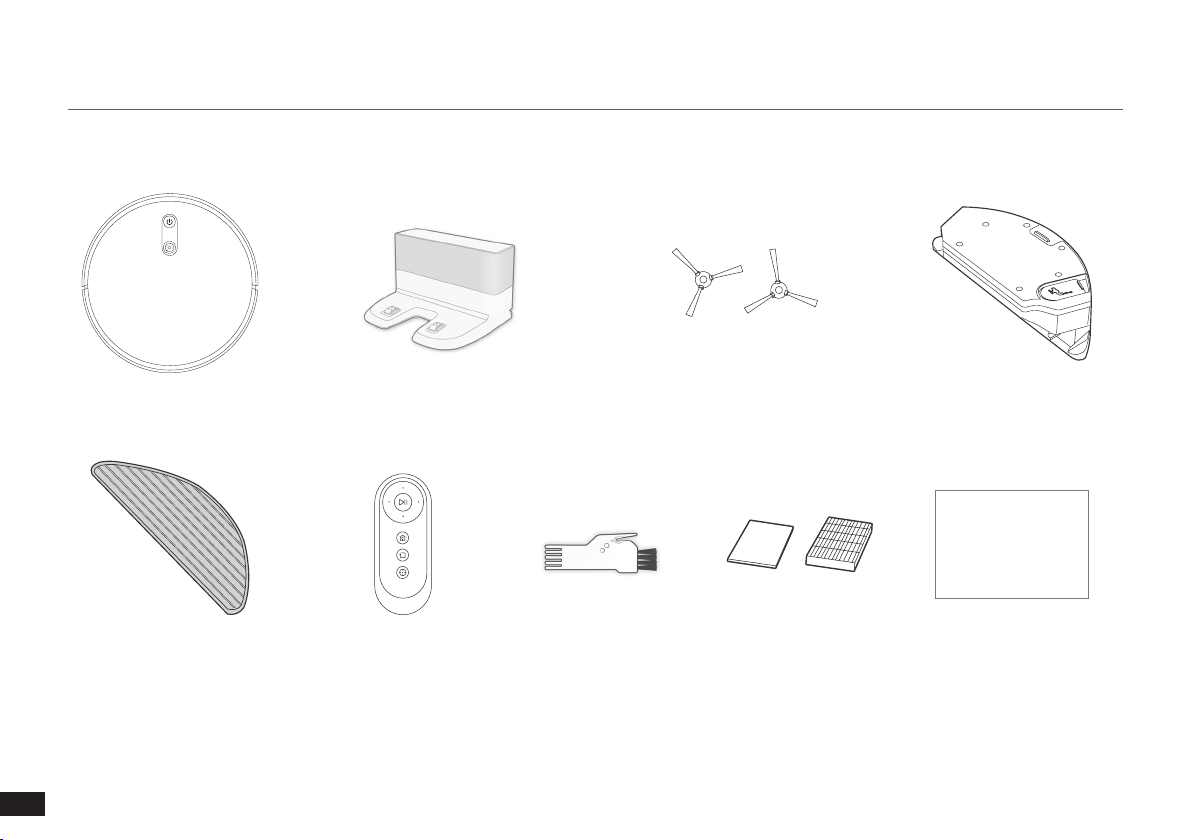
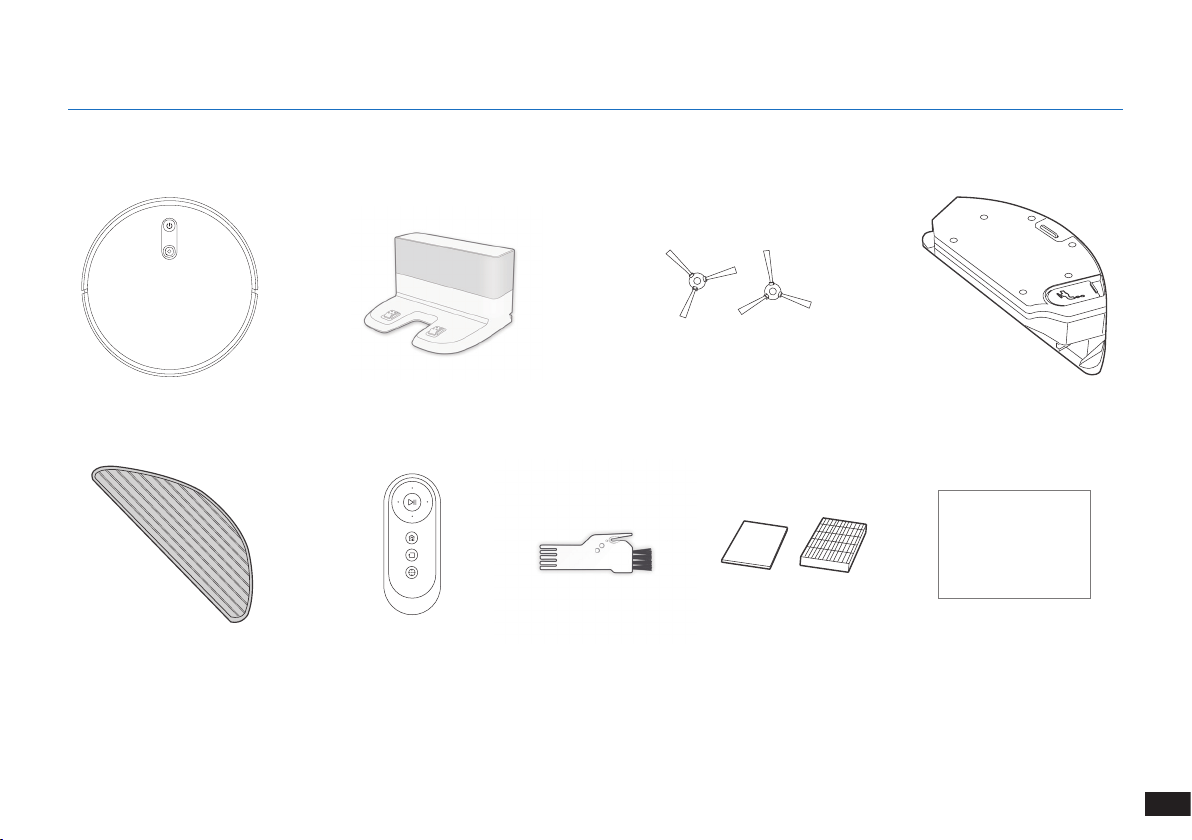
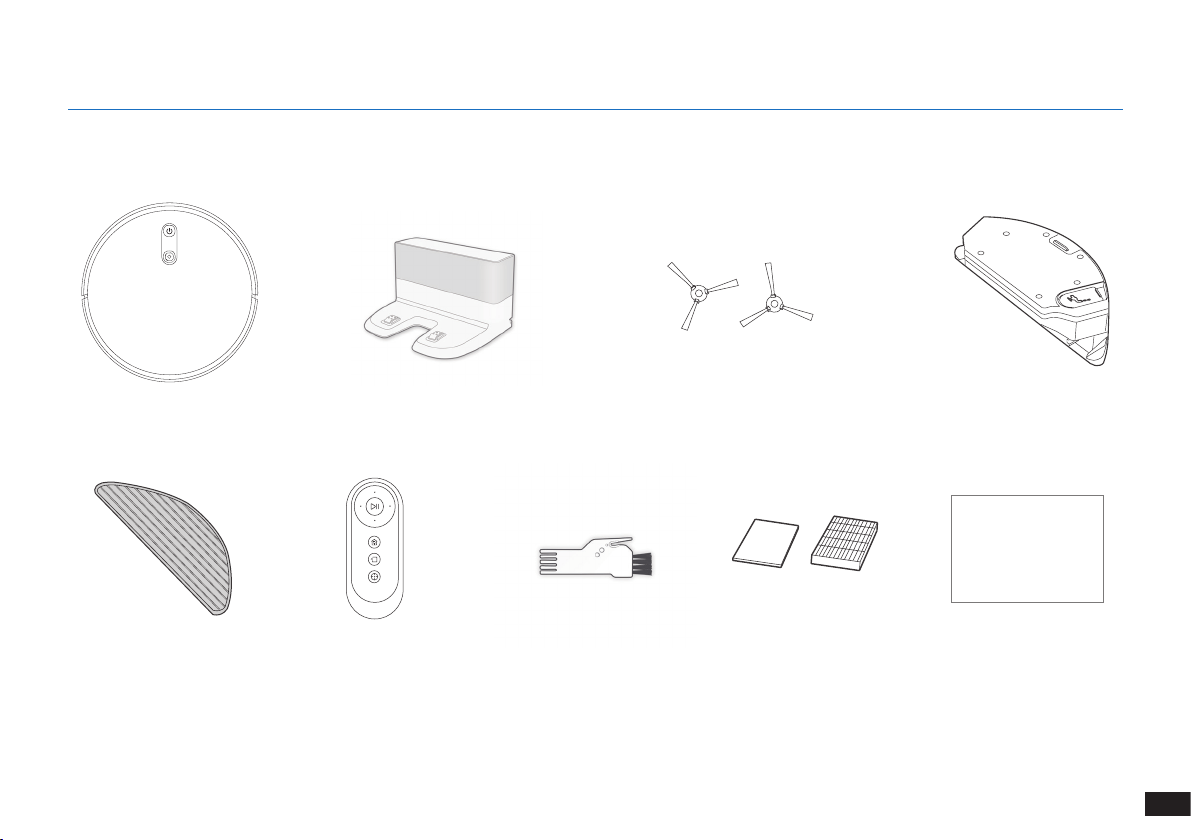
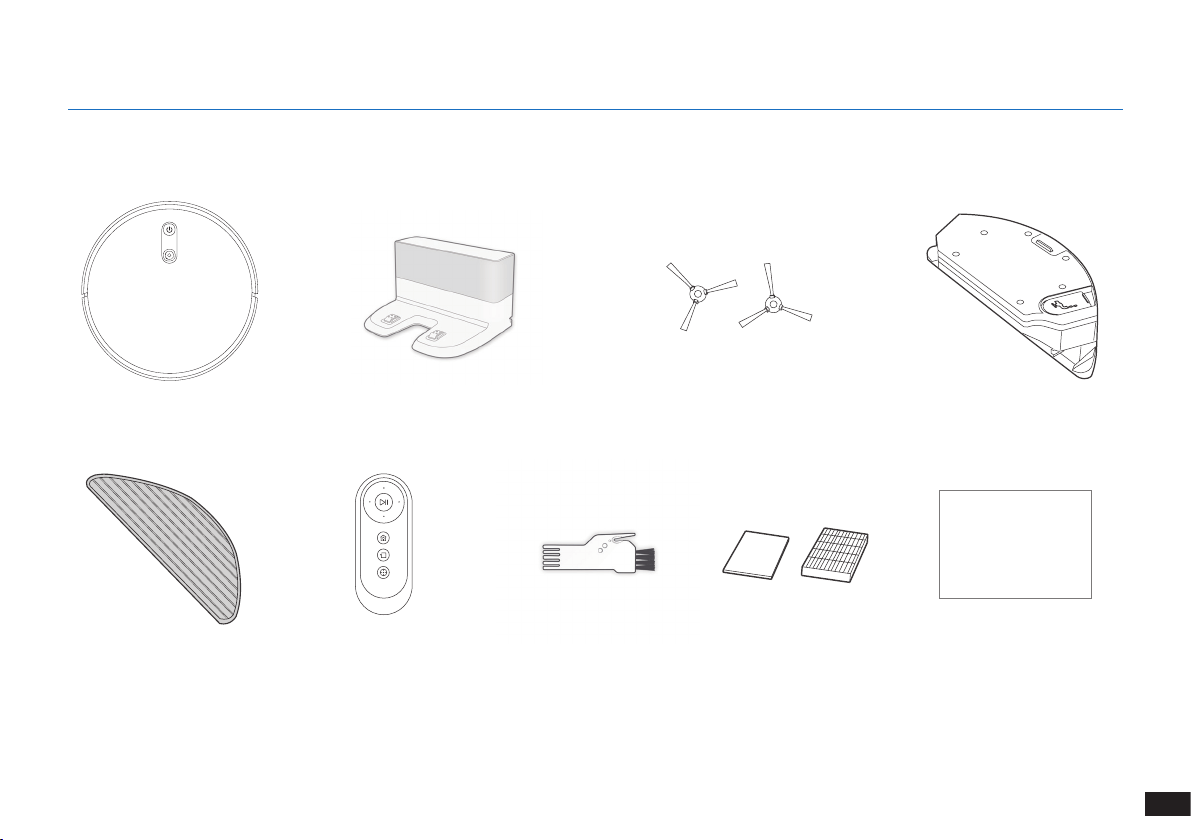
2.1 Package Contents
Robot
Remote Control with
Batteries
Side BrushesDocking Station
Multi-Function Cleaning
Tool
Instruction Manual
Note: Figures and illustrations are for reference only and may differ from actual product appearance�
Product design and specications are subject to changes without notice�
2. Package Contents
Reservoir
Washable/Reusable
Microfiber Cleaning Cloth
Instruction Manual
Sponge Filter and High
Efficiency Filer
9
EN
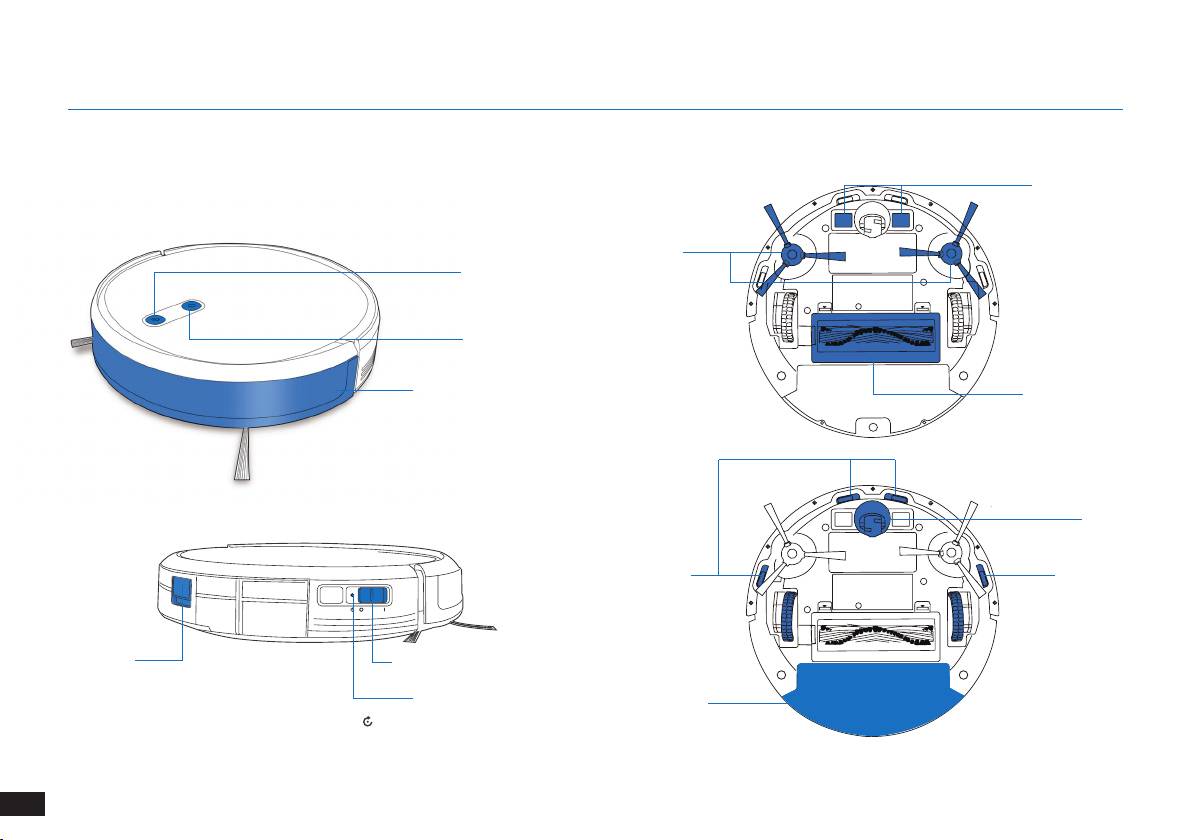
2. Package Contents
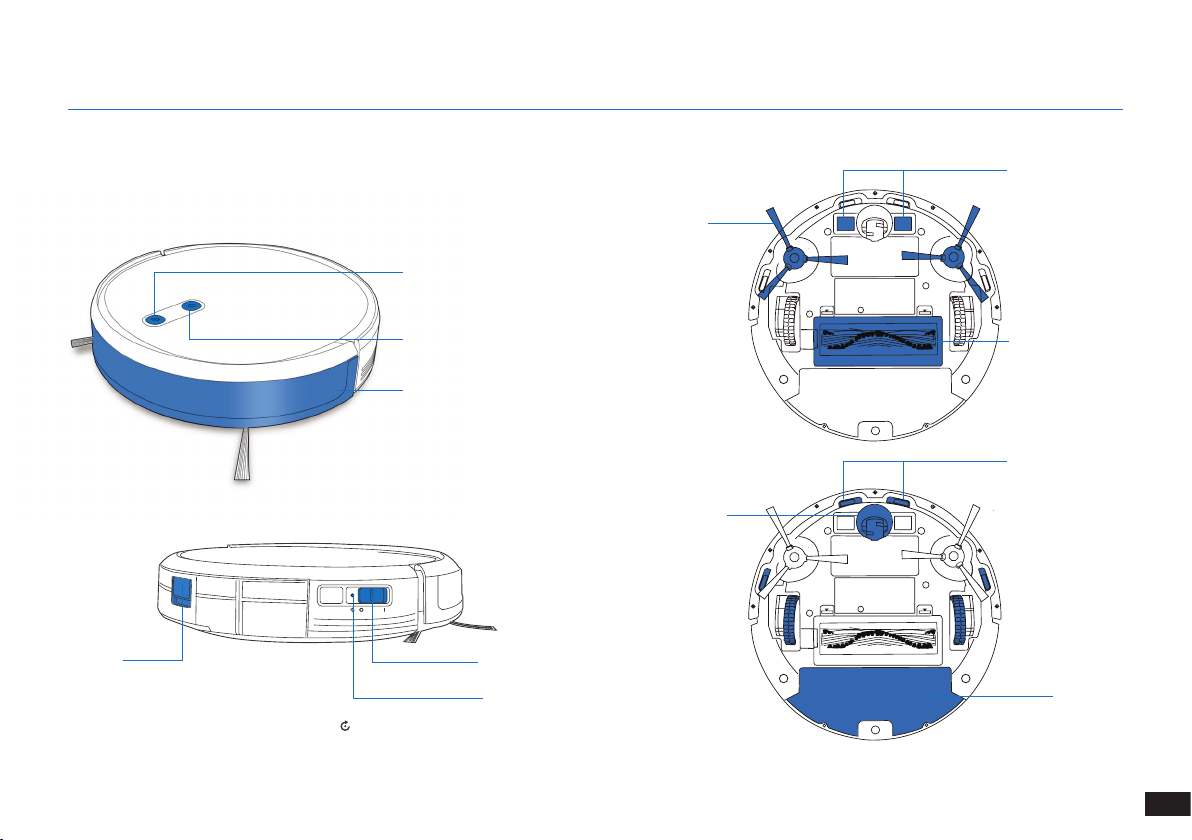
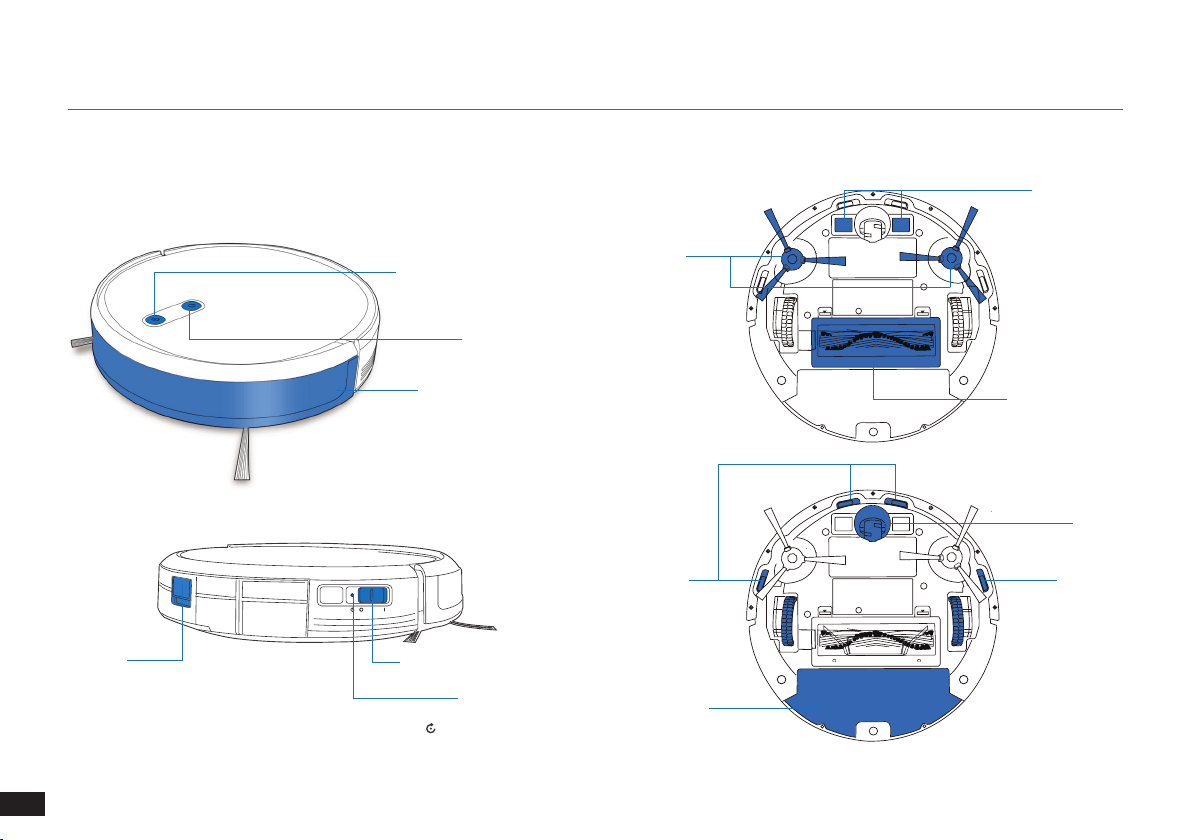
Anti-collision Sensors and
Bumper
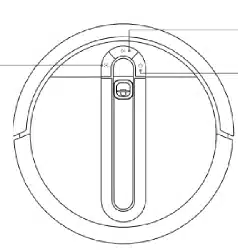
2.2 Product Diagram
Robot
AUTO Mode Button
VSLAM Camera
Power Switch
Reset Button
Dust Bin
Release Button
Anti-drop Sensors
Main Brush Option
Charging Contacts
Universal Wheel
Side Brushes
Bottom View
Dust Bin/
Reservoir
(Press and hold for 5 seconds� The robot will revert
to the factory settings� Use this button with caution�)
10
EN
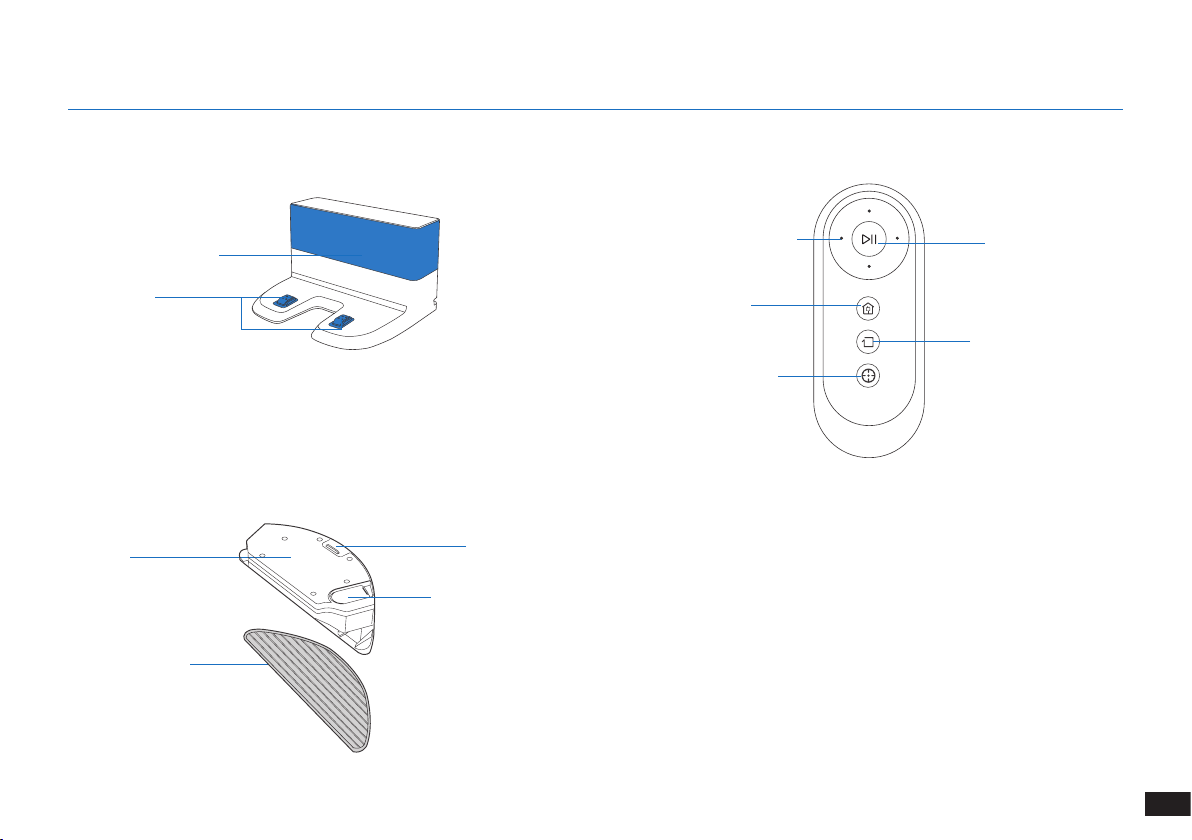
2. Package Contents
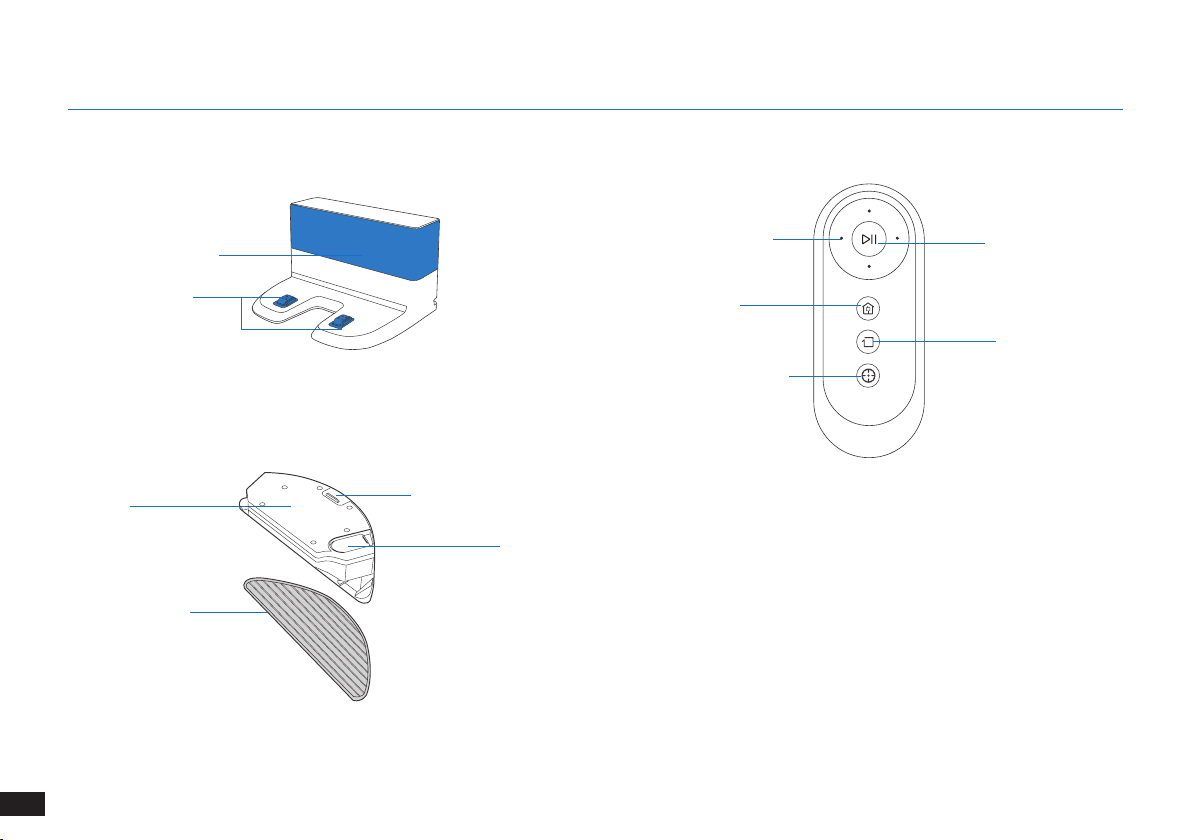
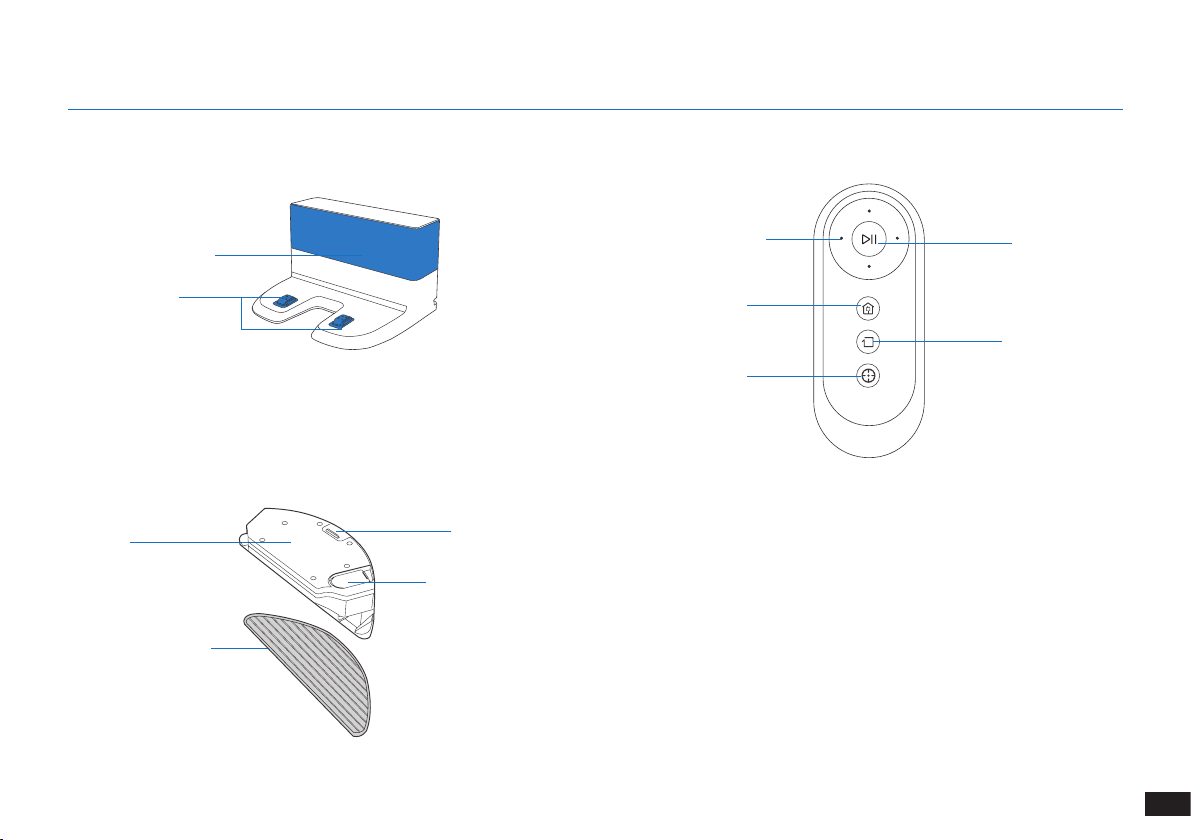
Docking Station Remote Control
START/PAUSE Button
Edge Cleaning Mode
Button
Direction Control Buttons
Spot Cleaning Mode Button
Return to Charger
Mode Button
Infrared Signal Generator
Docking Station Pins
Advanced Mopping System
Reservoir
Washable/Reusable
Microber Cleaning Cloth
Water Inlet
Reservoir Release Button
11
EN
3. Operating and Programming
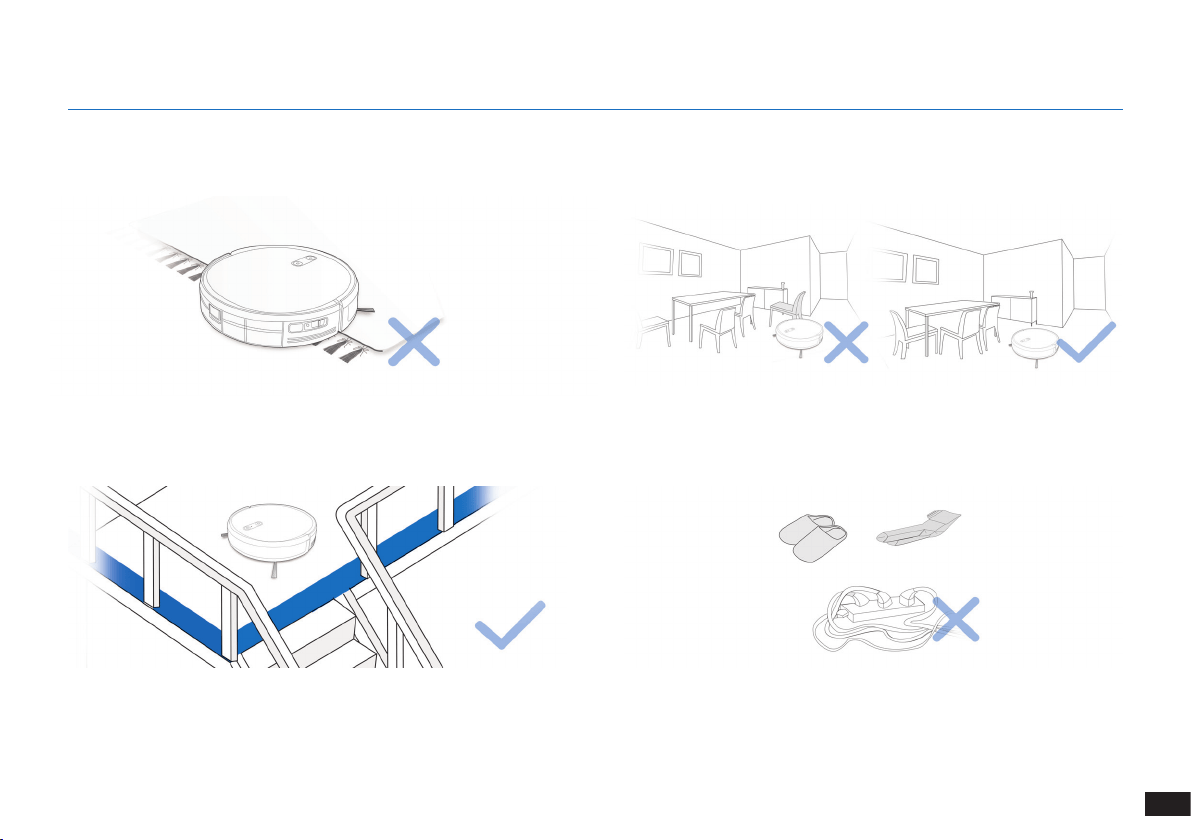
Before using the product on a rug with tasseled edges, please fold the
rug edges under�
WARNING: Do not use The robot on wet surfaces or surfaces with standing water.
It may be necessary to place a physical barrier at the edge of a drop to
stop the unit from falling over the edge�
Remove power cords and small objects from the oor that the robot
could be obstructed by�
3.1 Notes Before Cleaning
Tidy up the area to be cleaned by putting furniture, such as chairs, in
their proper place�

12
EN
3. Operating and Programming
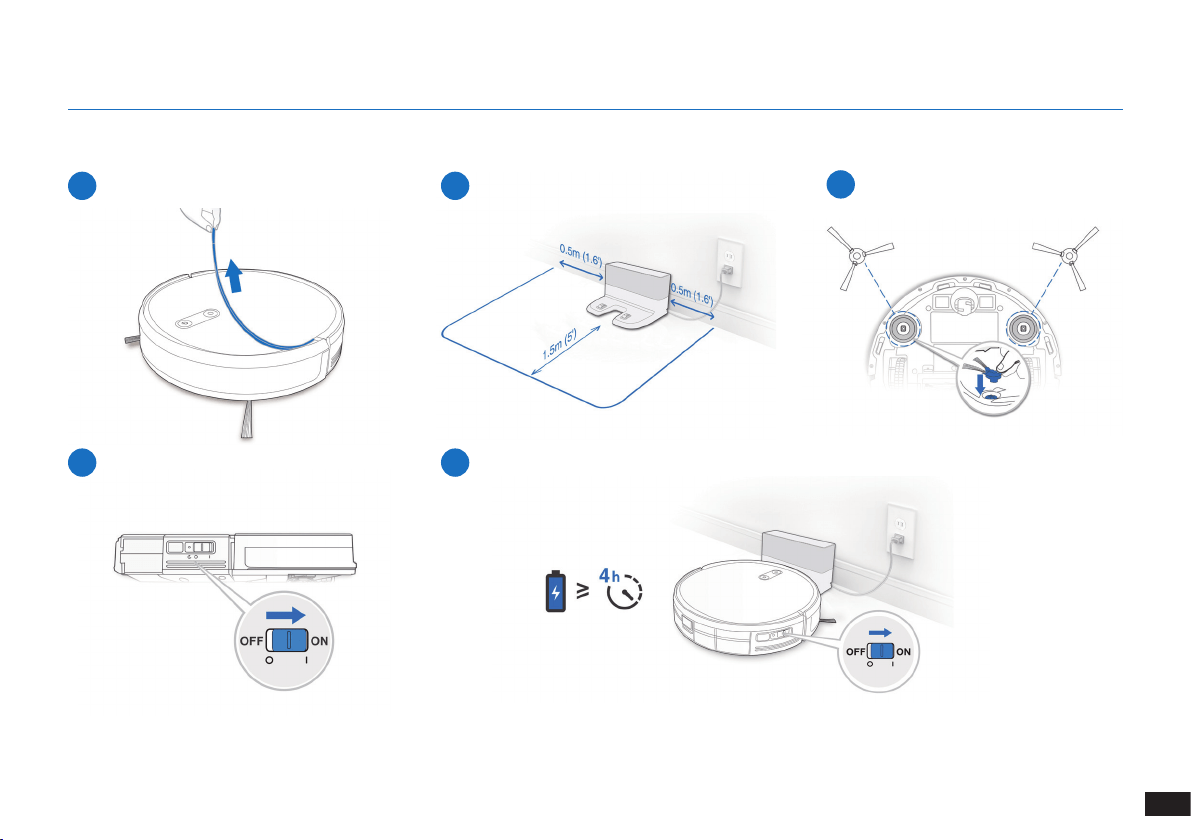
1
Remove Protective Strip
2
Docking Station Placement
3
Install Side Brushes
4
Power ON
3.2 Preparation
Note: When the robot completes the cleaning cycle or when battery power gets low, The robot
automatically returns to the Docking Station to recharge itself�
5
Charge The robot
13
EN
3. Operating and Programming
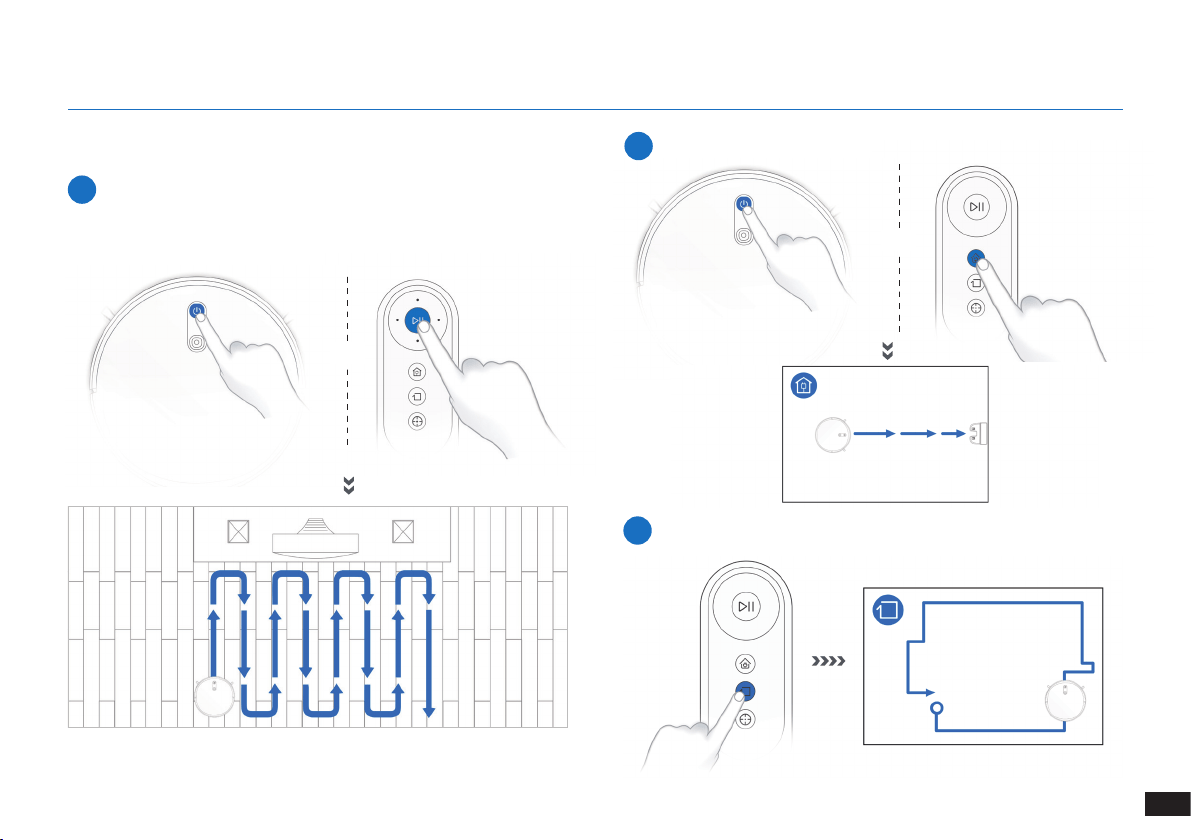
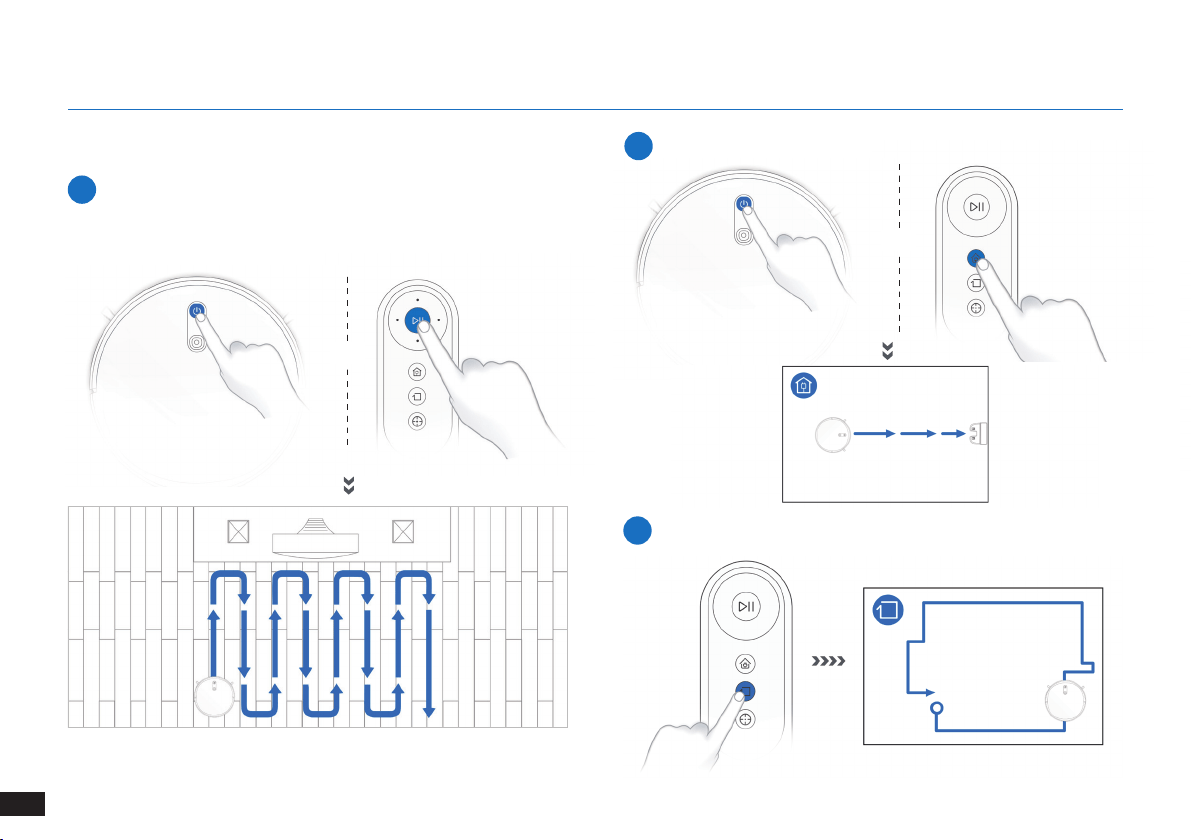
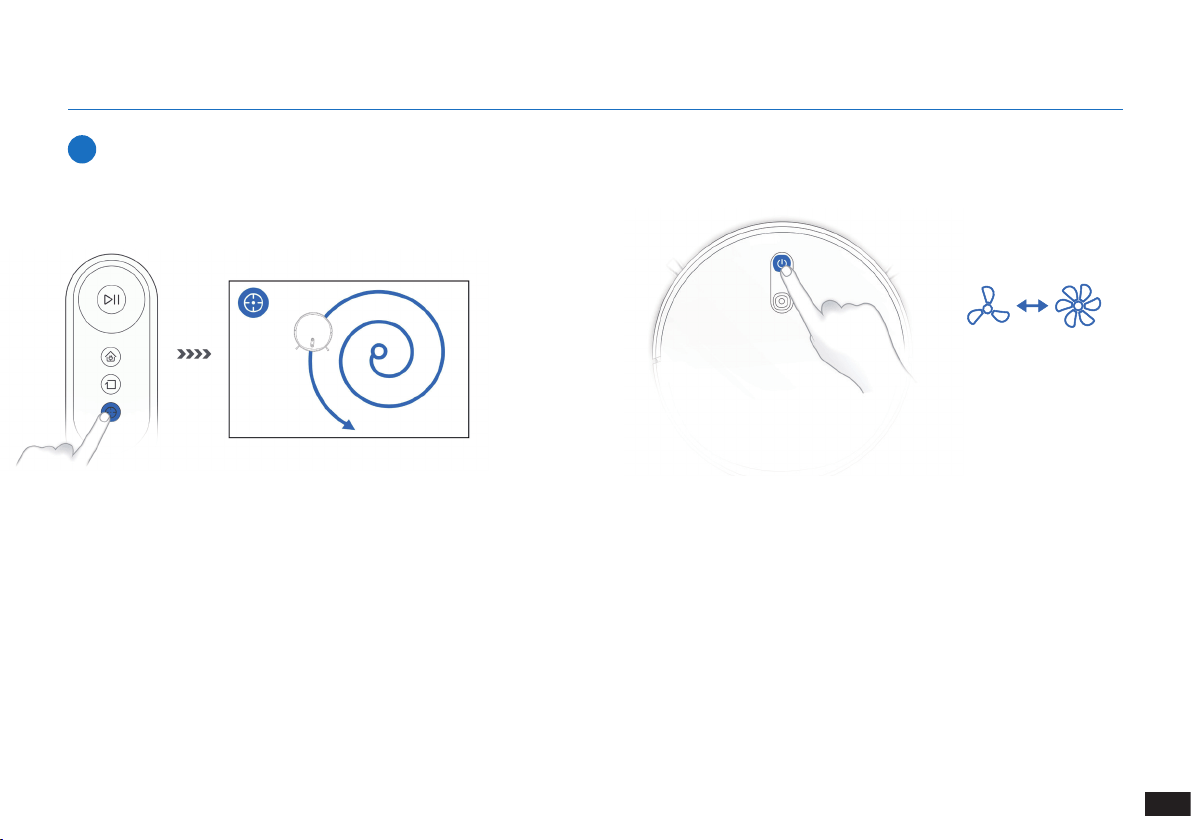
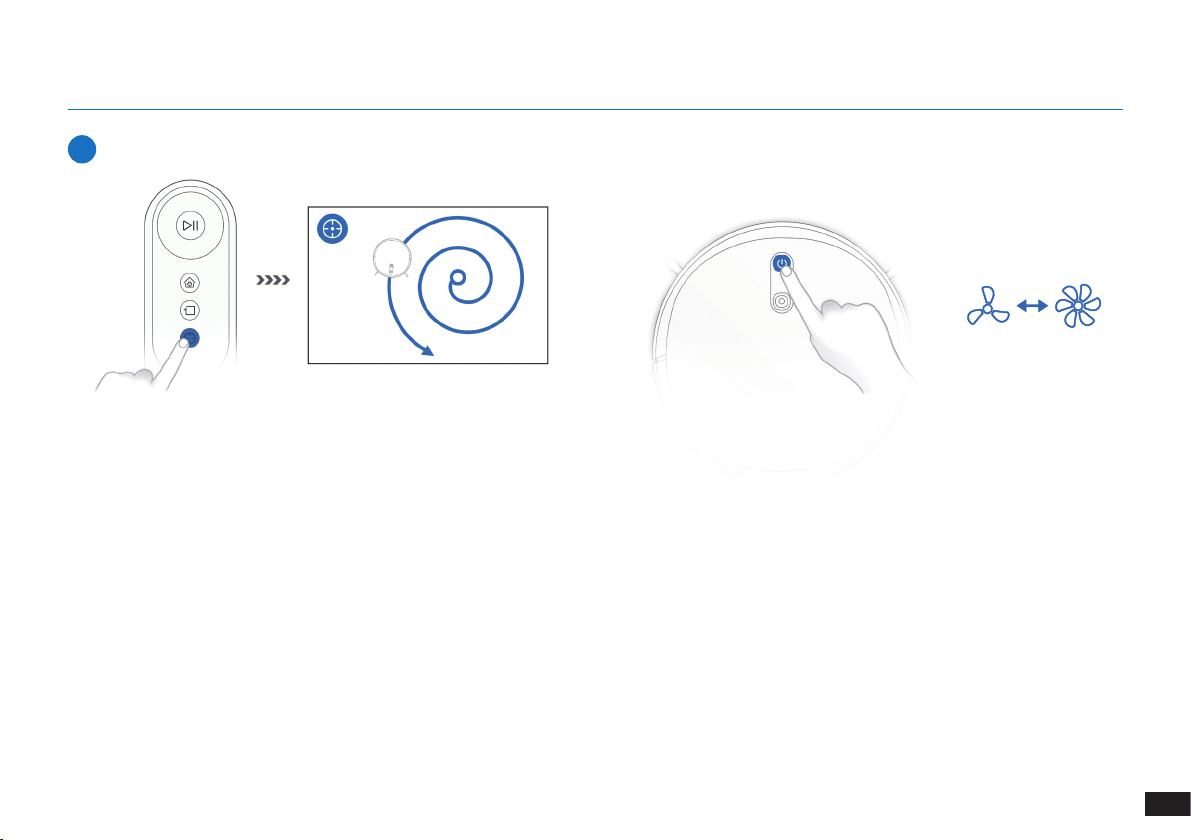
3.3 Selecting Cleaning Mode
1
AUTO Cleaning Mode
A Programmed Cleaning Pattern (optimized for hard oors) will be
selected by default�
OR
OR
2
Return to Docking Station
≥3s
3
Edge Cleaning Mode
14
EN
3. Operating and Programming
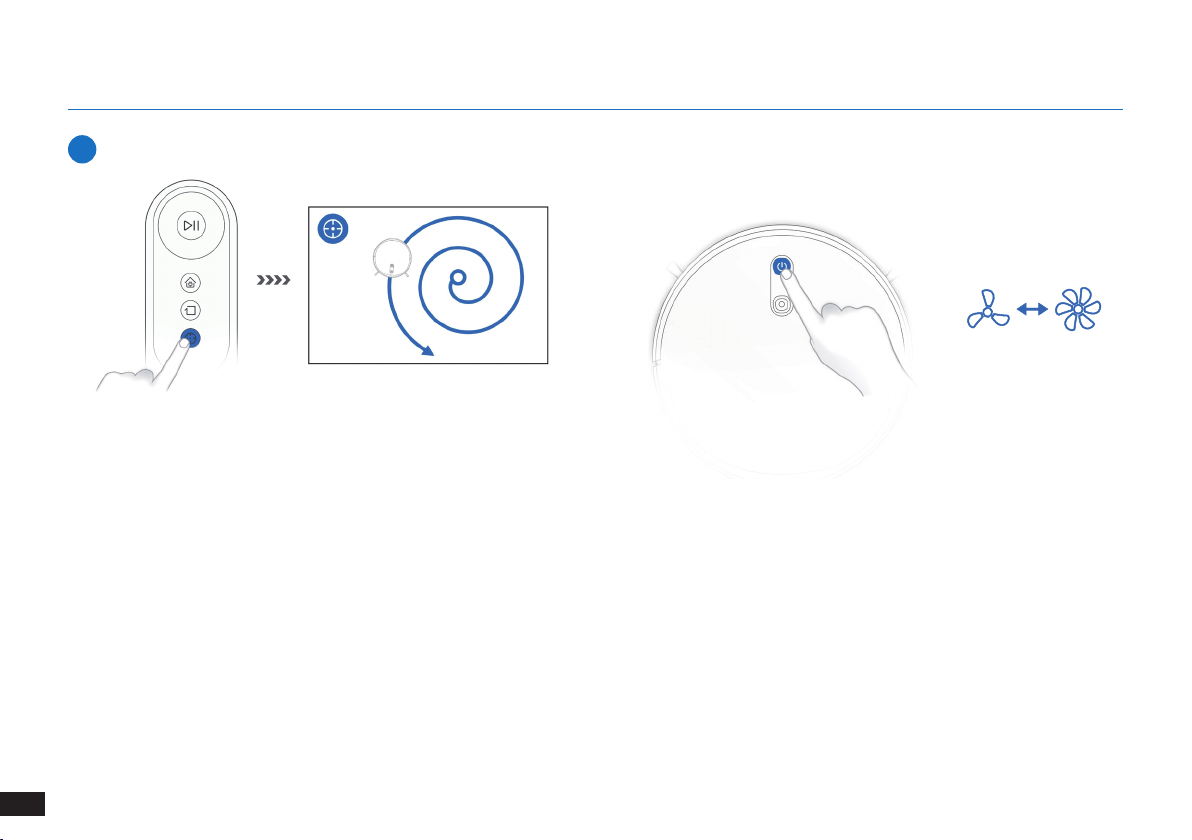
4
Spot Cleaning Mode (Less than 3 minutes)
3.4 Switch vacuum power
X 2
15
EN
3. Operating and Programming
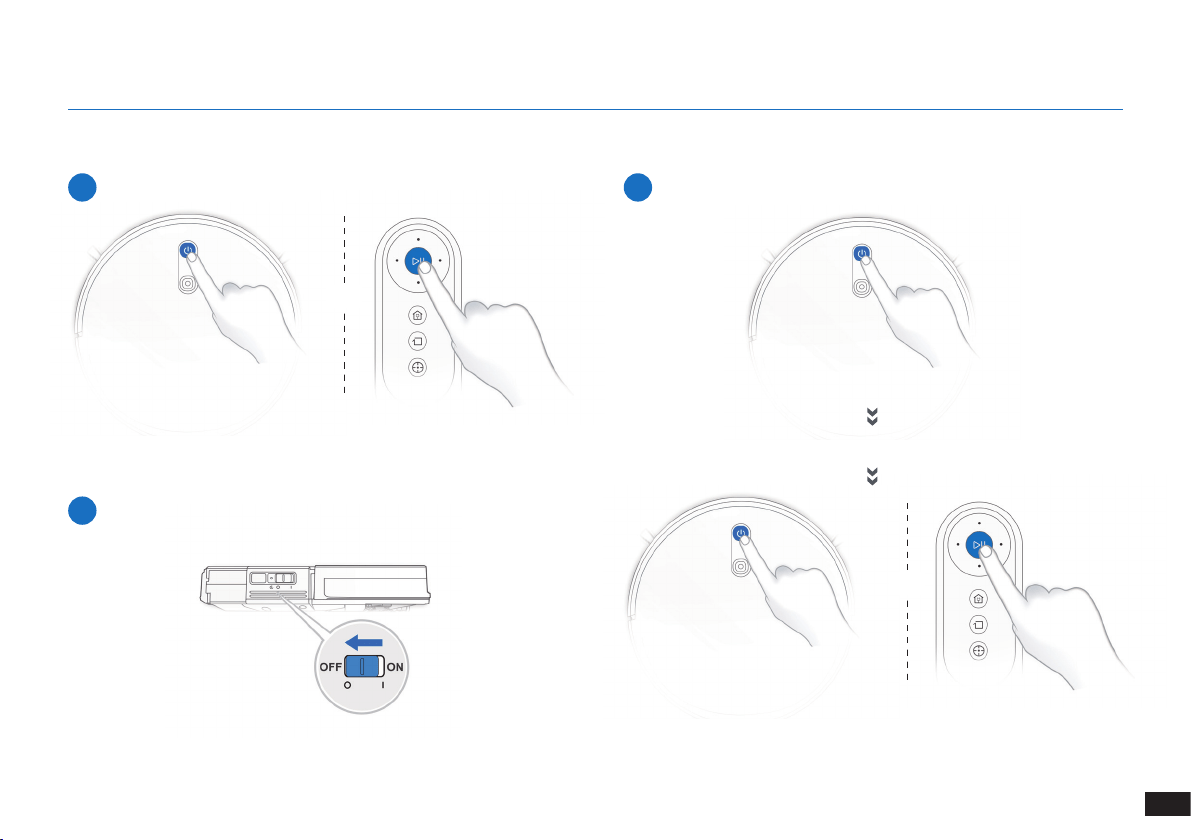
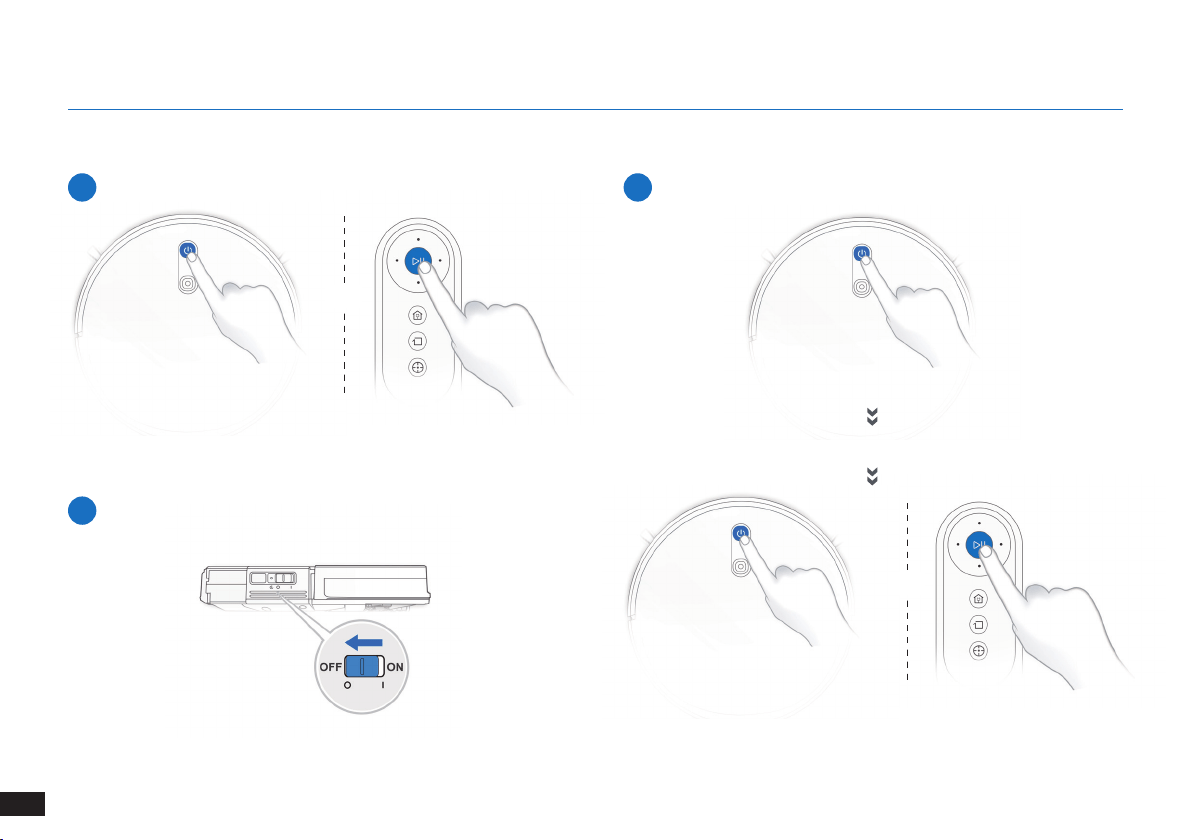
3.5 Pause, Wake Up, Power Off
1
Pause
2
Wake Up
Note: The robot’s Control Panel stops glowing after the robot is
paused for a few minutes� Press the AUTO Mode Button on the robot
to wake up the robot�
Press the AUTO button on the robot to wake it up
3
Power OFF
Note: When the robot is not working, it is recommended to keep it
switched ON and charging�
OR
OR
16
EN
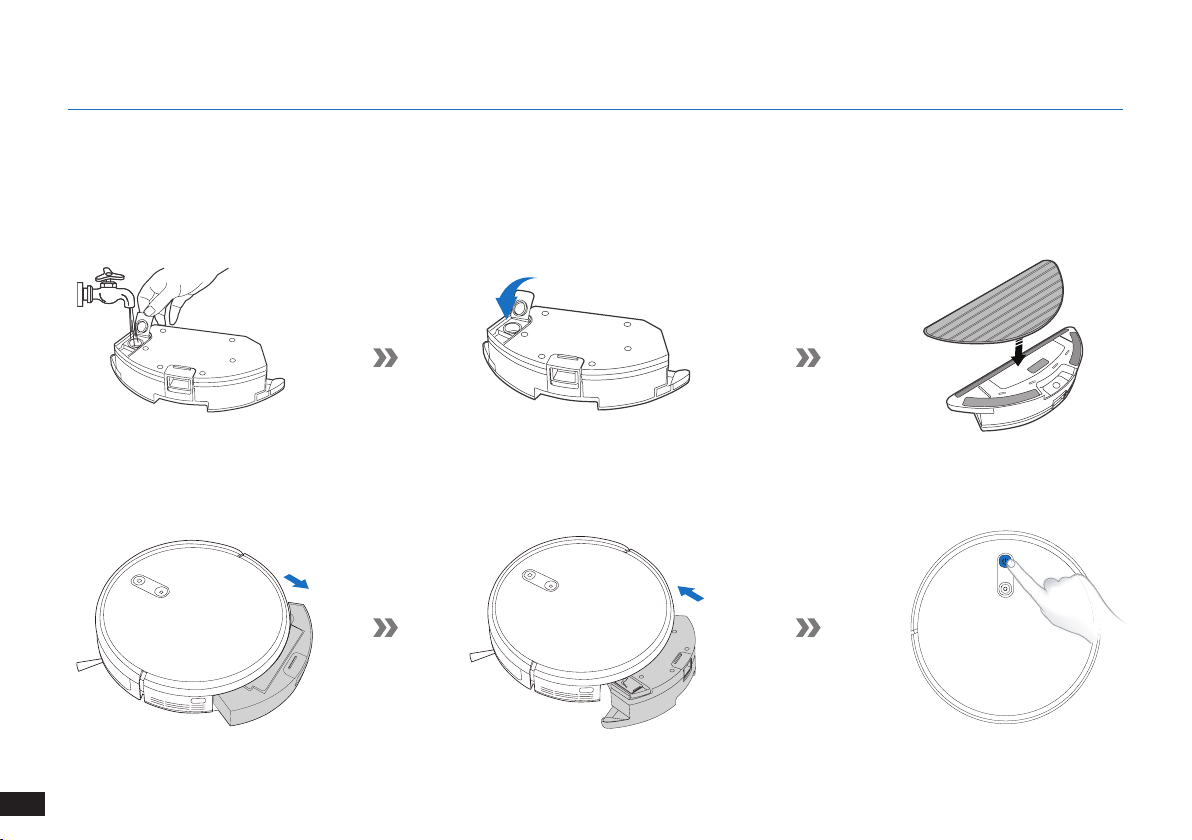
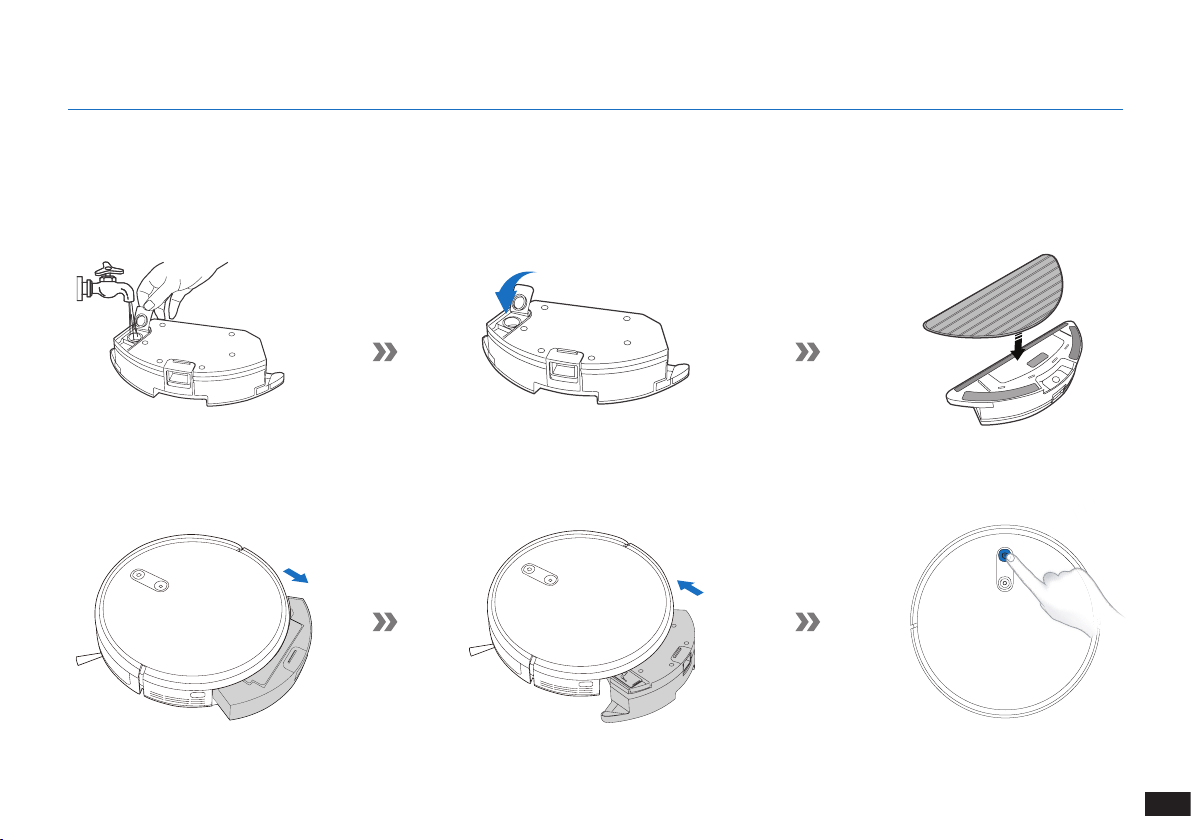
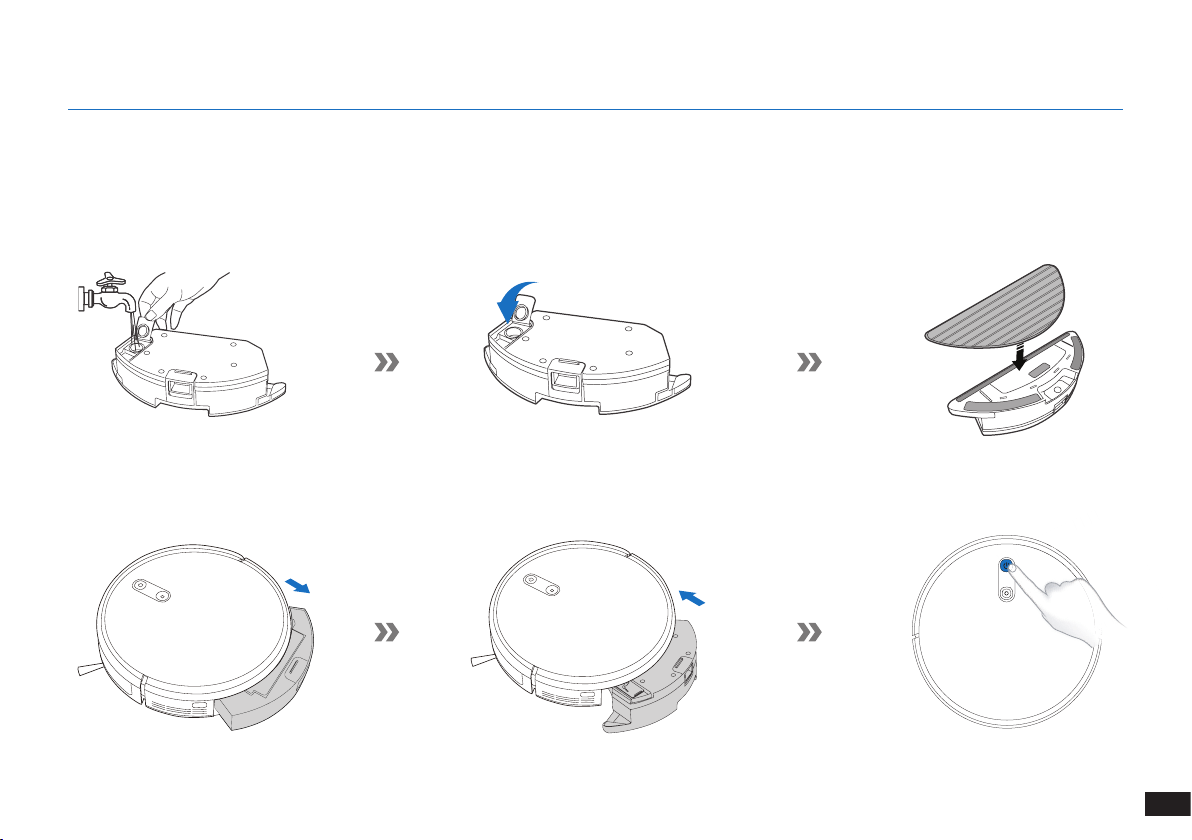
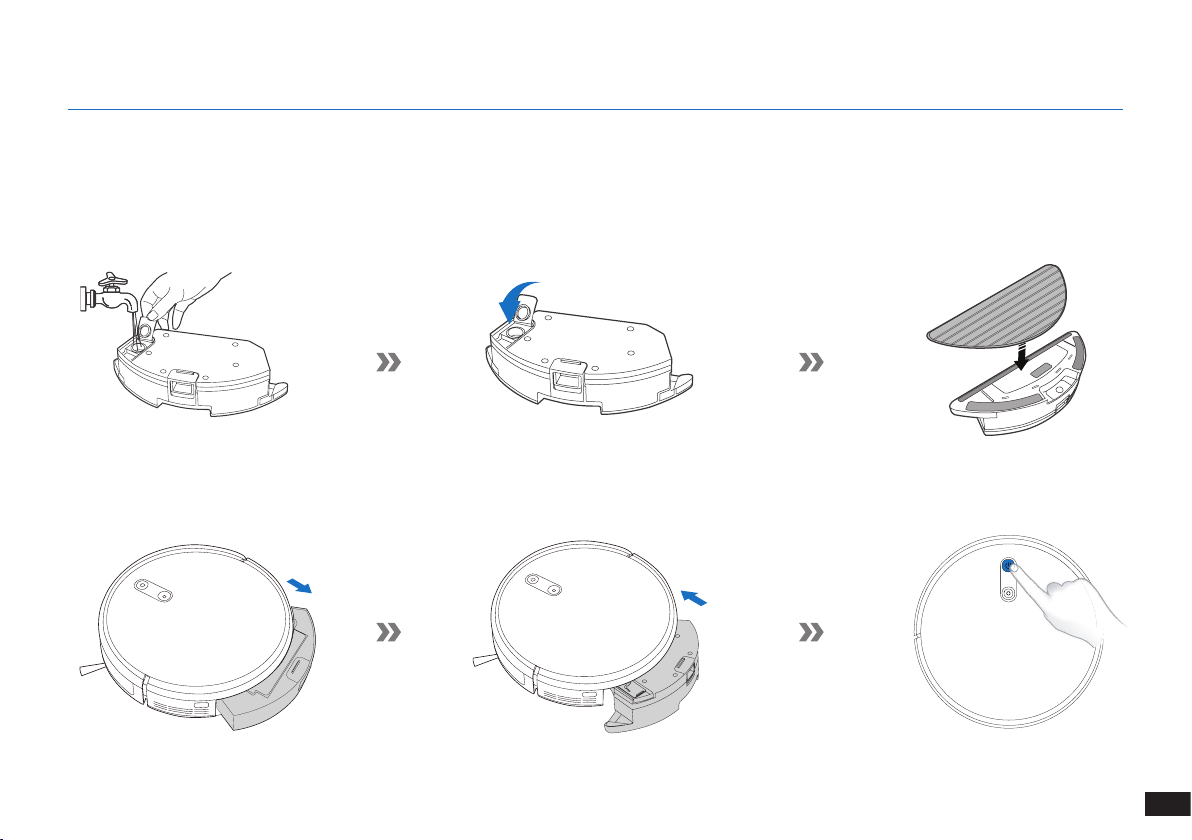
3.6 Optional Mopping System
Note: Empty the Reservoir and remove the Cleaning Cloth Plate before cleaning on carpet�
When using the mopping system, fold area rug edges under themselves so The robot will avoid the rug�
Be sure to use only water, and do not put washer uid or any other cleaning solution in the Reservoir�
Note: After The robot nishes mopping, empty any remaining water from the Reservoir�
3. Operating and Programming

17
EN
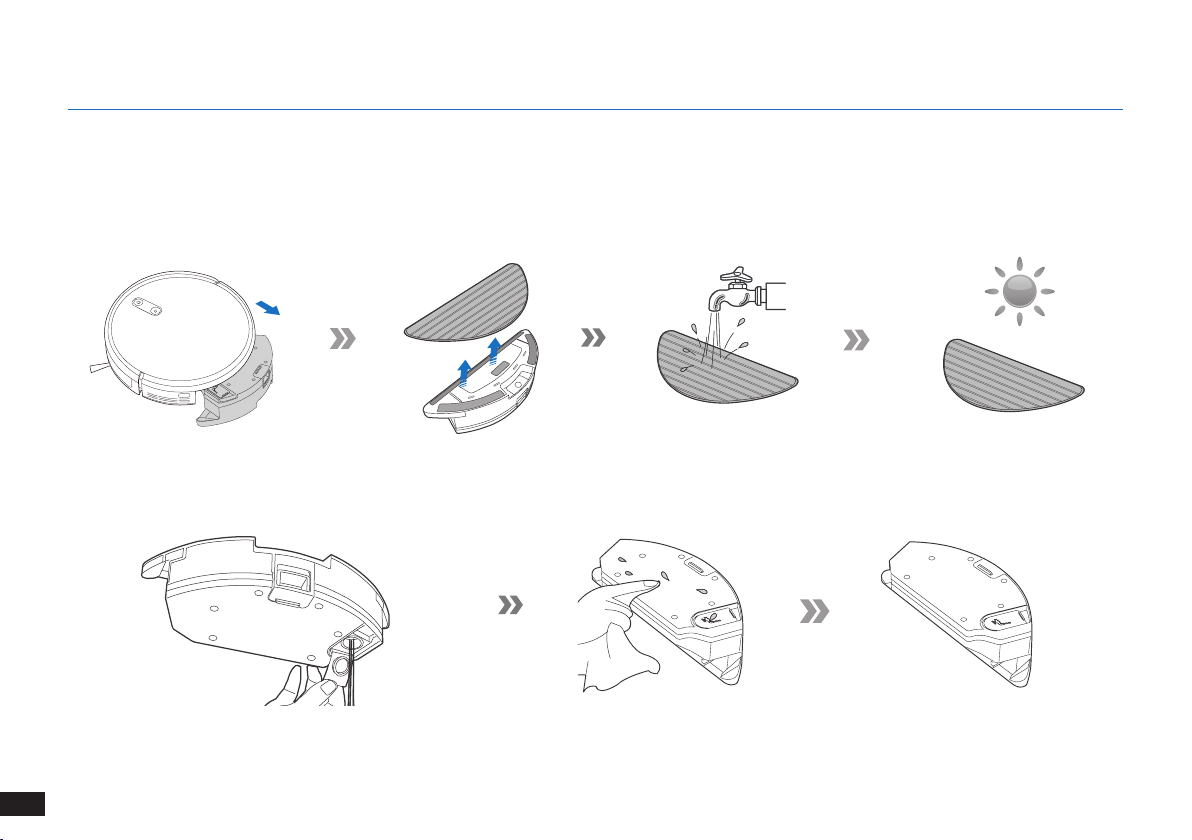
4. Maintenance
Before performing cleaning and maintenance tasks on The robot, turn the robot OFF and unplug the Charging Dock.
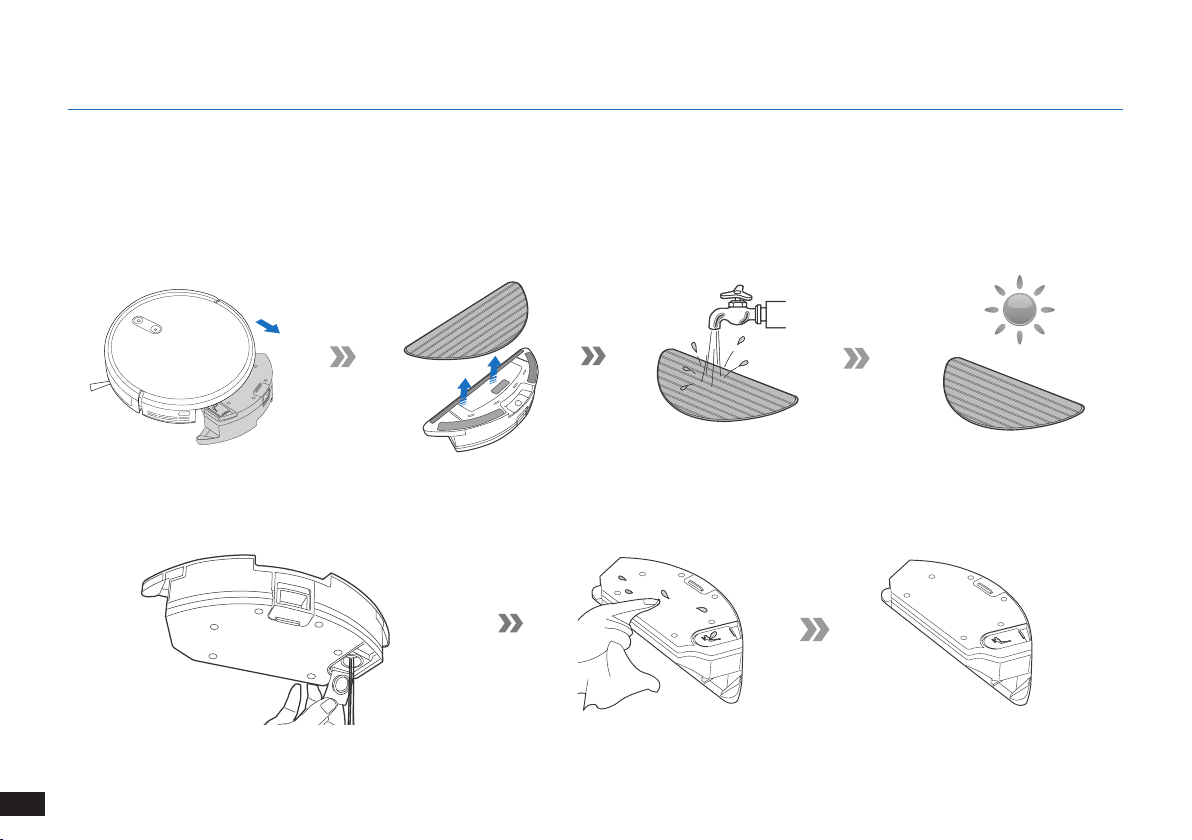
4.1 Optional Mopping System
18
EN
4. Maintenance
Before performing cleaning and maintenance tasks on The robot, turn the robot OFF and unplug the Docking Station.
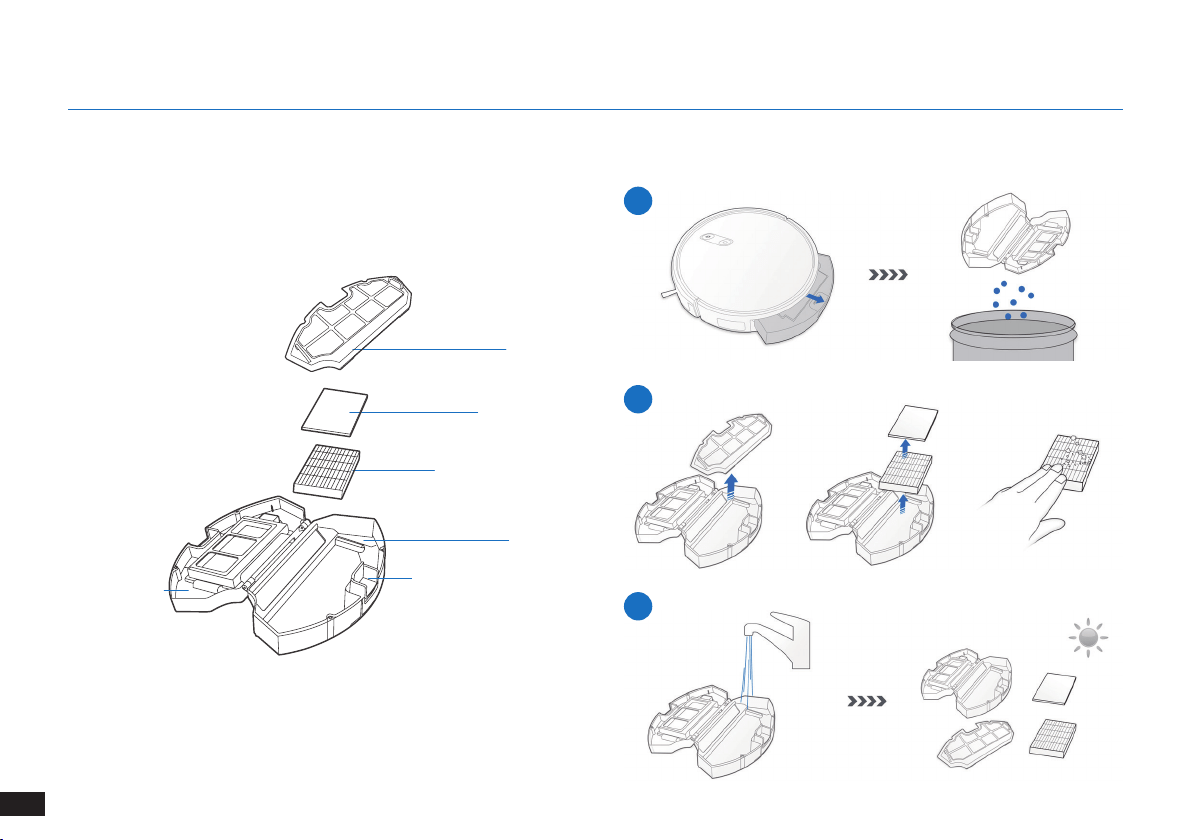
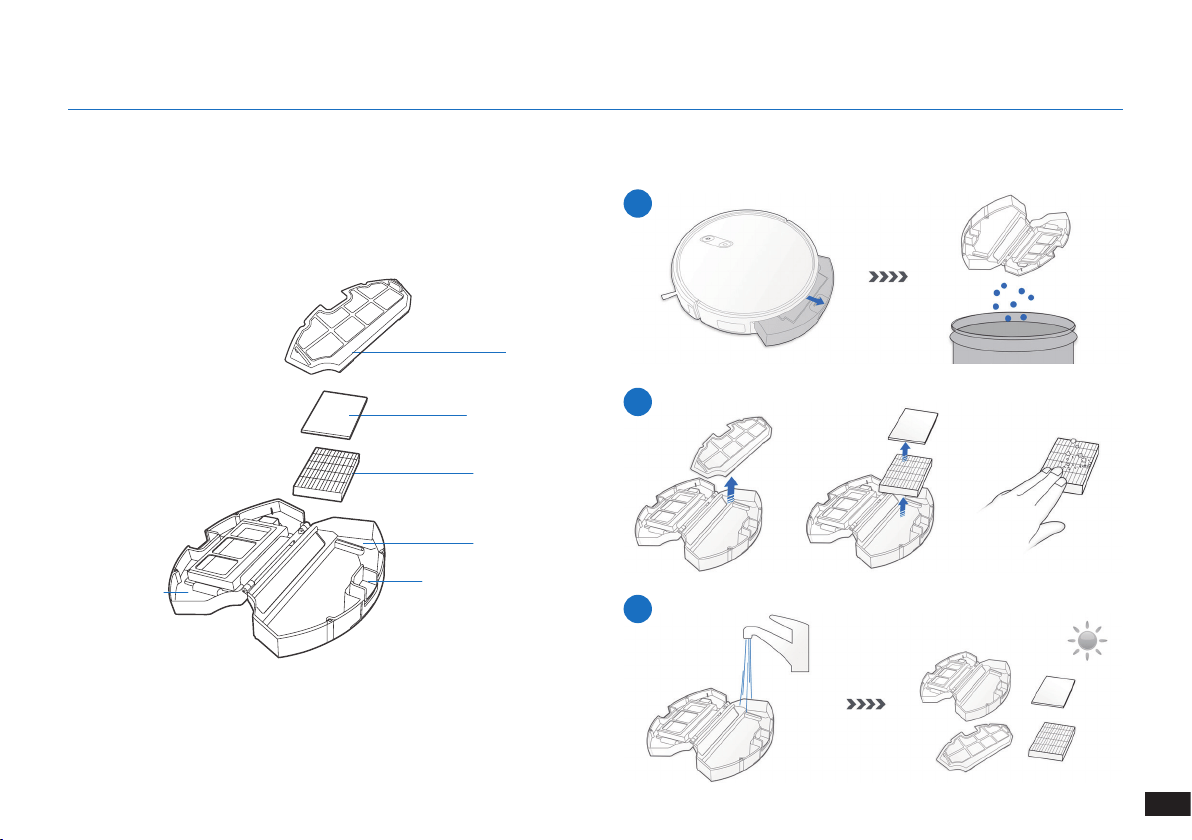
Dust Bin
4.2 Dust Bin and Filters
1
2
3
Filter Net
Sponge Filter
High Efciency Filter
Dust Bin
Dust Bin Release Button
Dust Bin Cover
19
EN
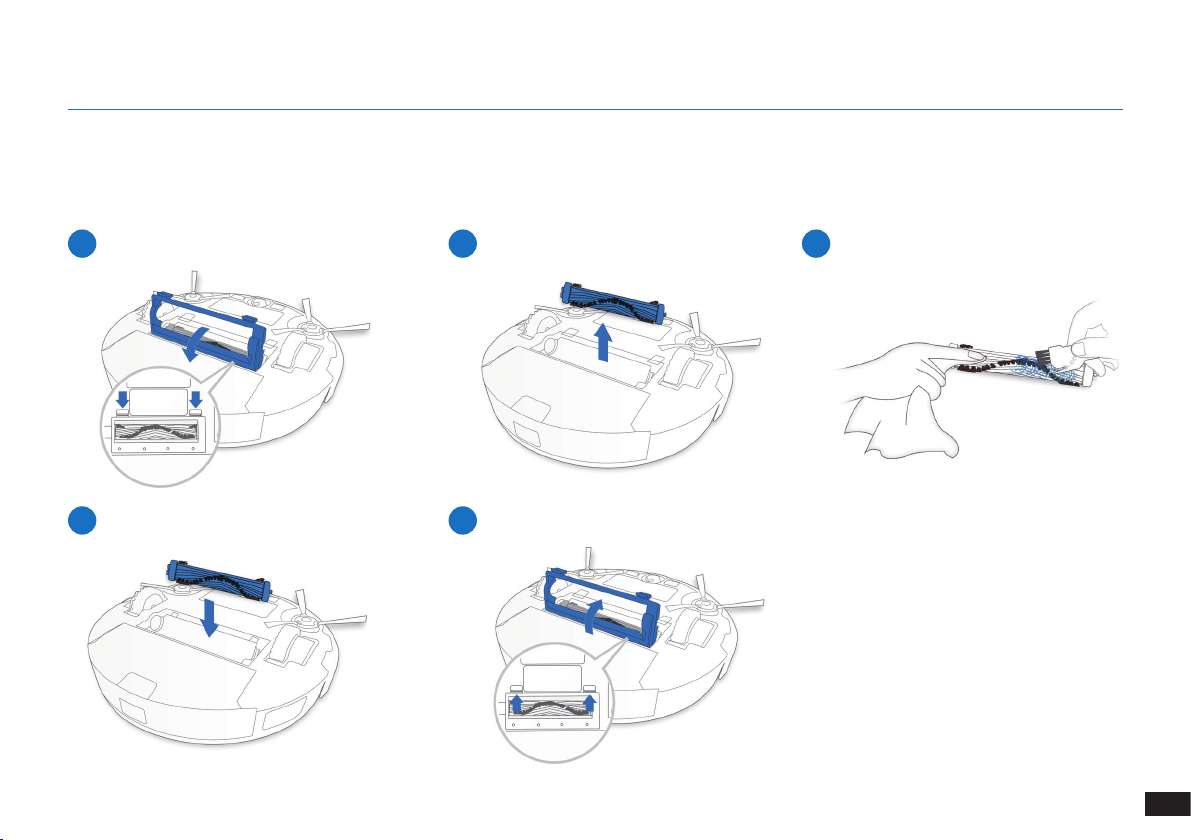
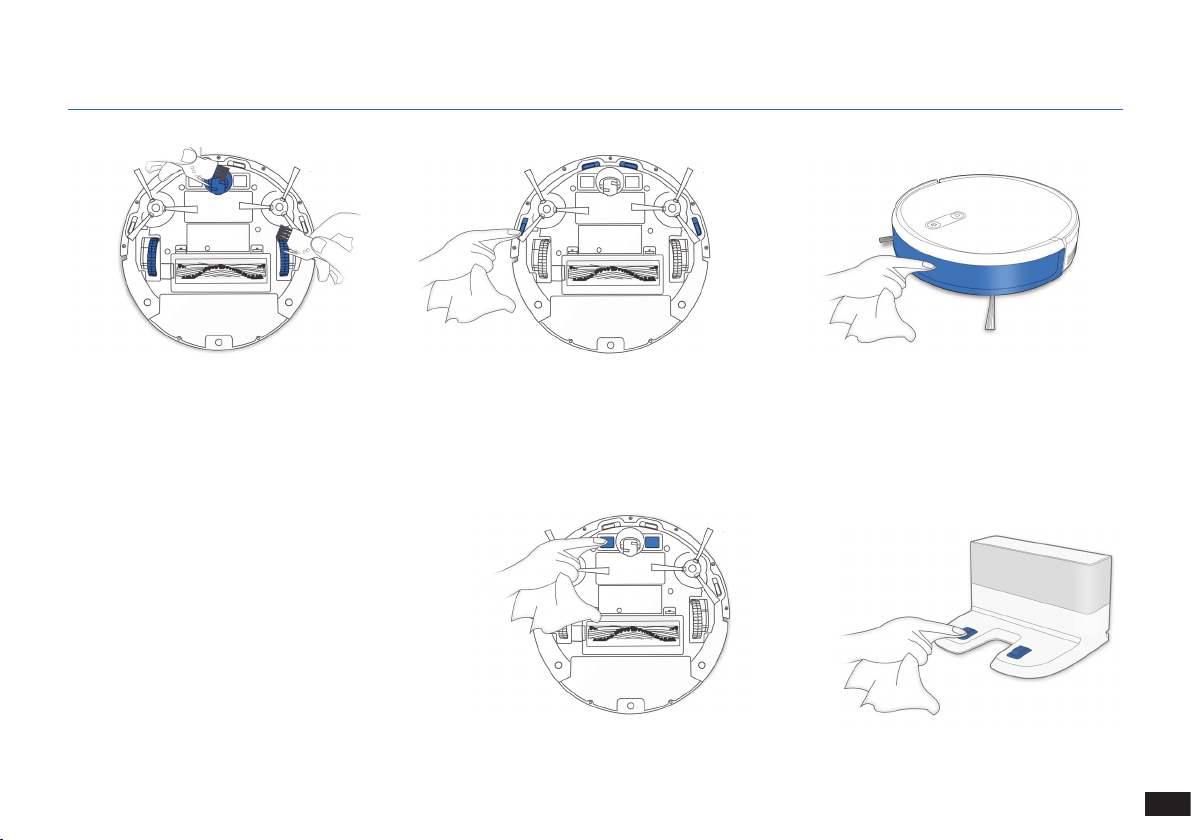
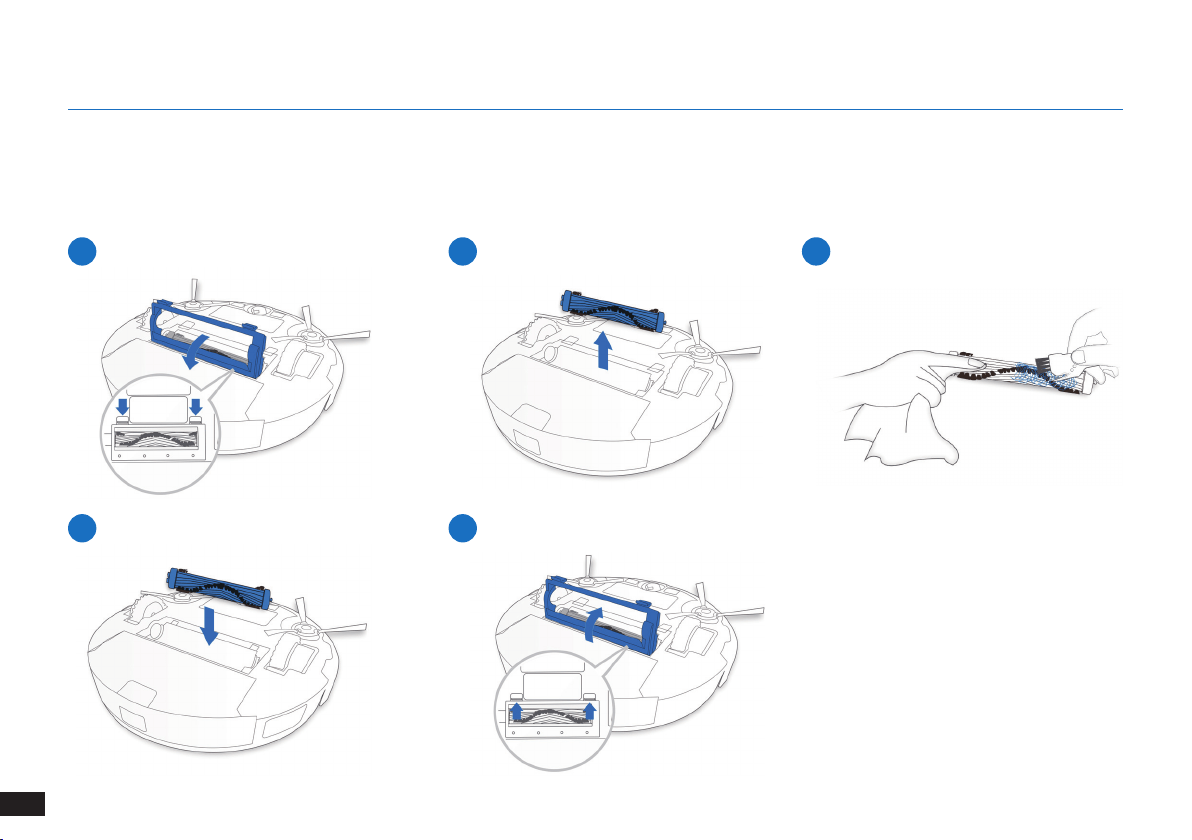
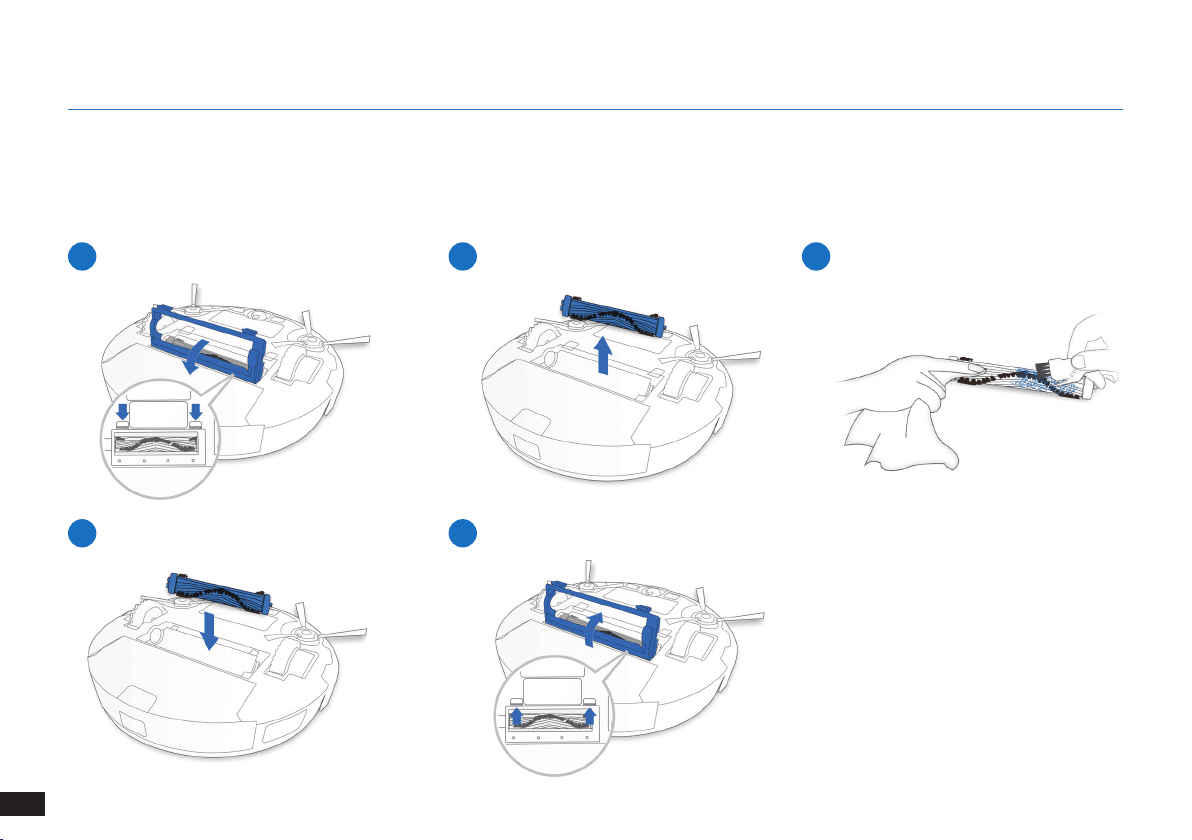
Main Brush
4.3 Main Brush and Side Brushes
Note: A Multi-Function Cleaning Tool is provided for easy maintenance. Handle with care, this cleaning tool has sharp edges.
1
4
2
5
3
4. Maintenance
20
EN
4. Maintenance
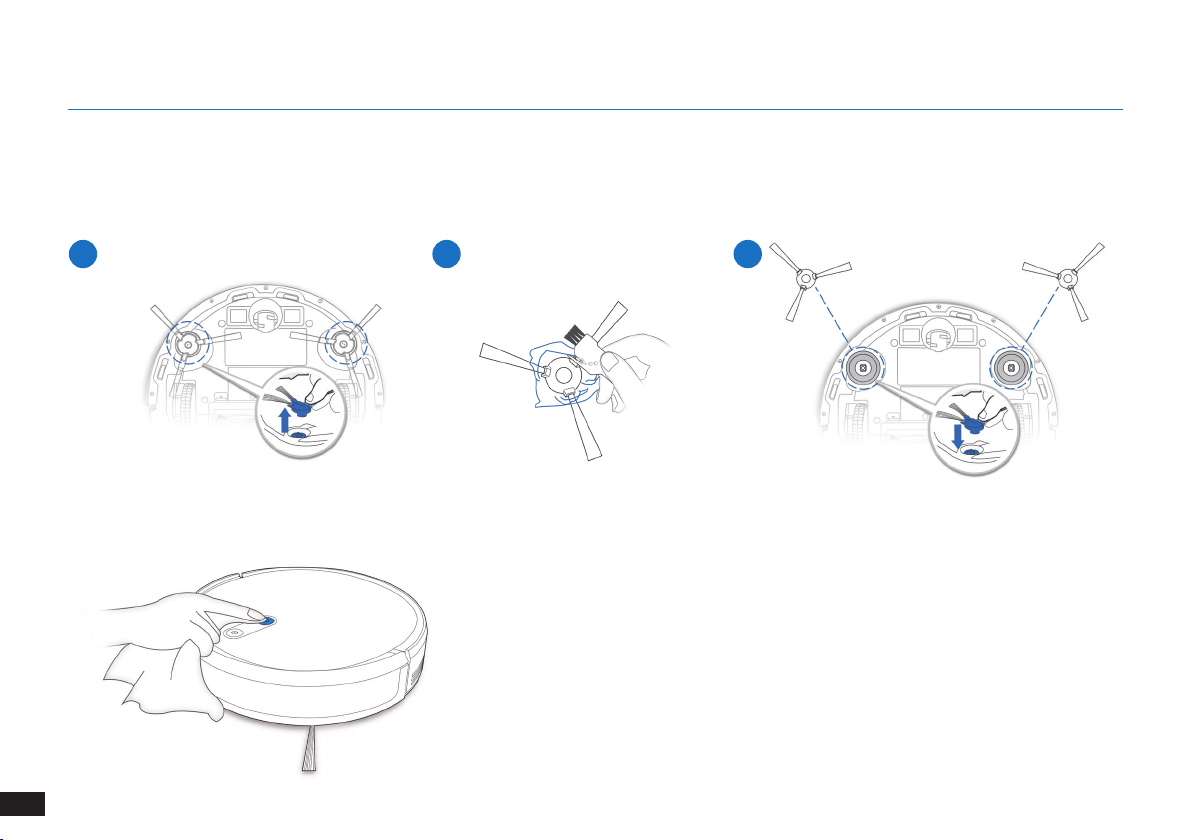
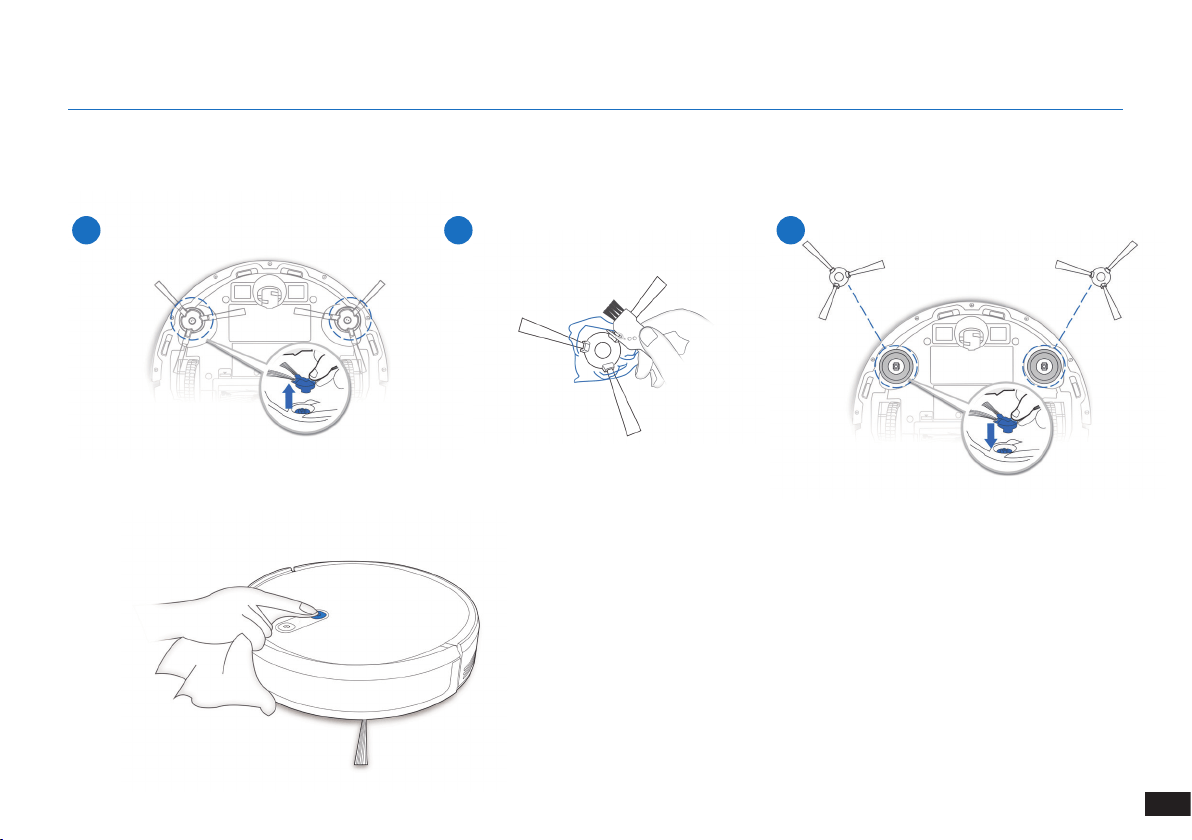
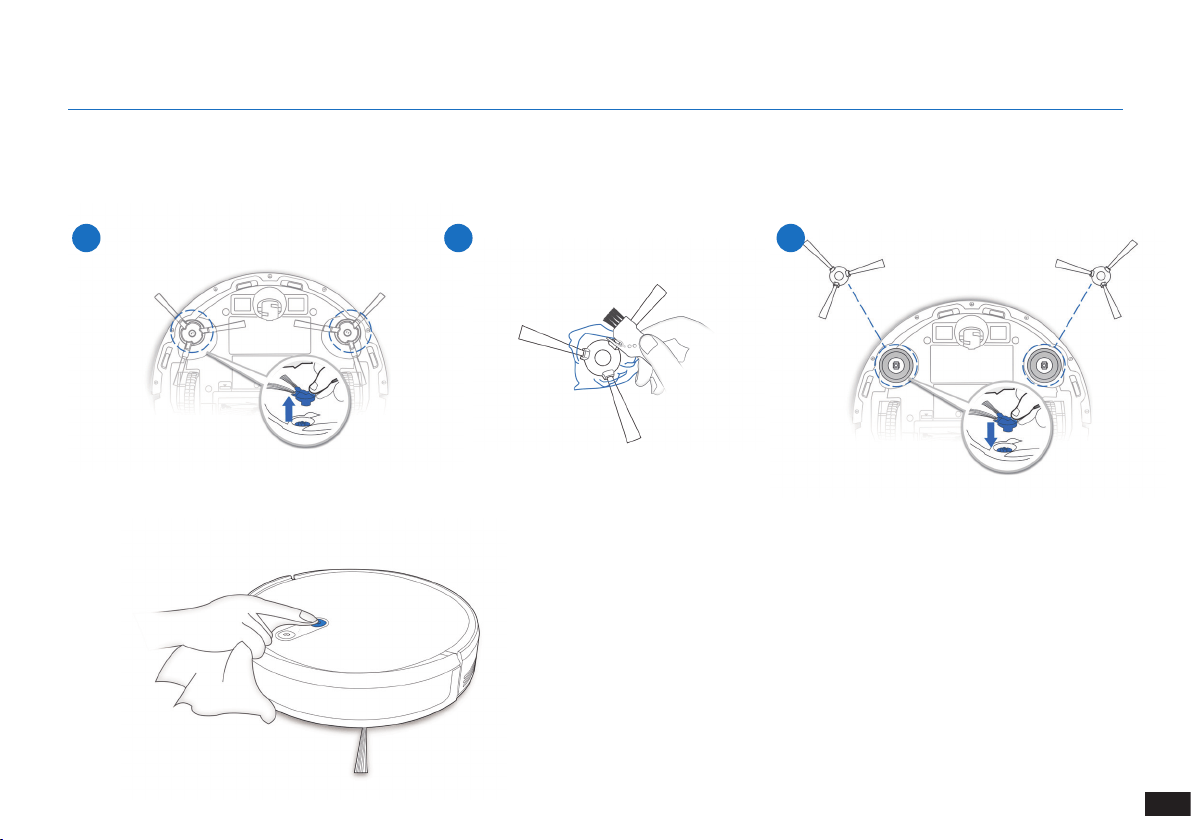
4.4 Side Brushes
Note: A Multi-Function Cleaning Tool is provided for easy maintenance. Handle with care, this cleaning tool has sharp edges.
1 2 3
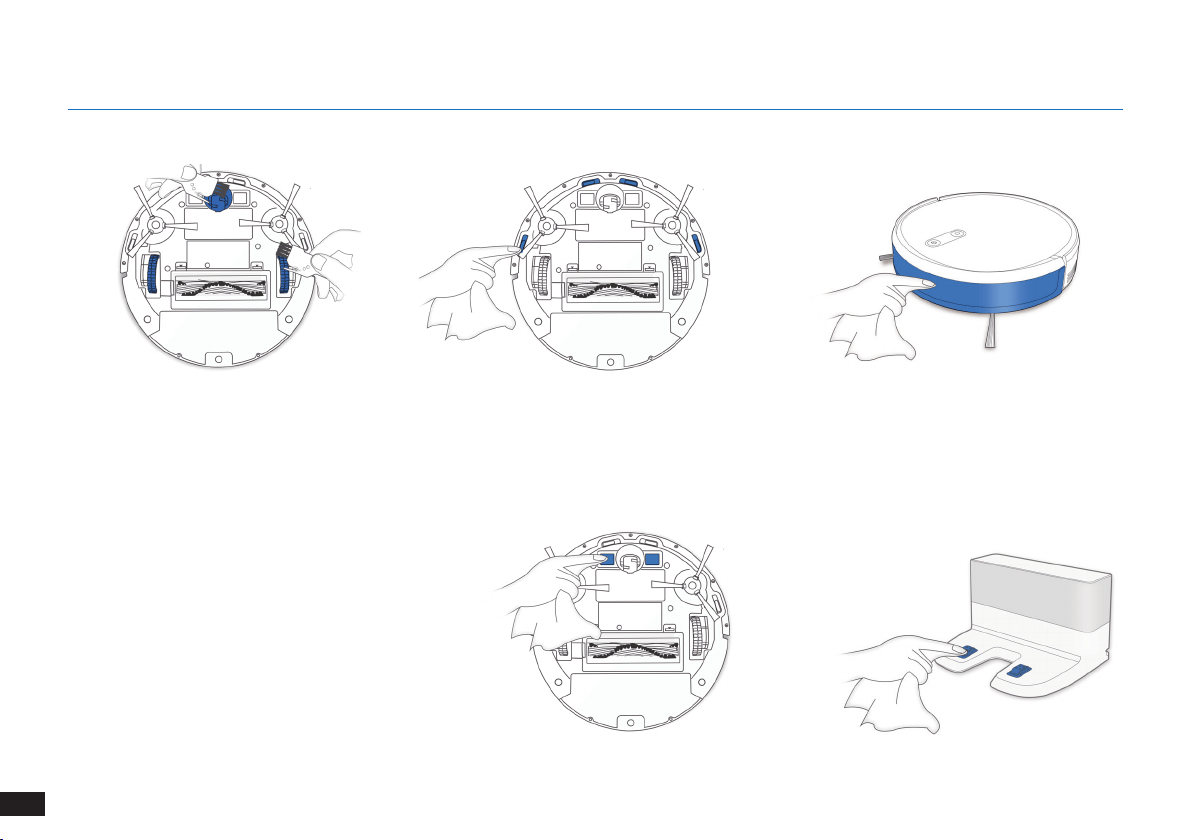
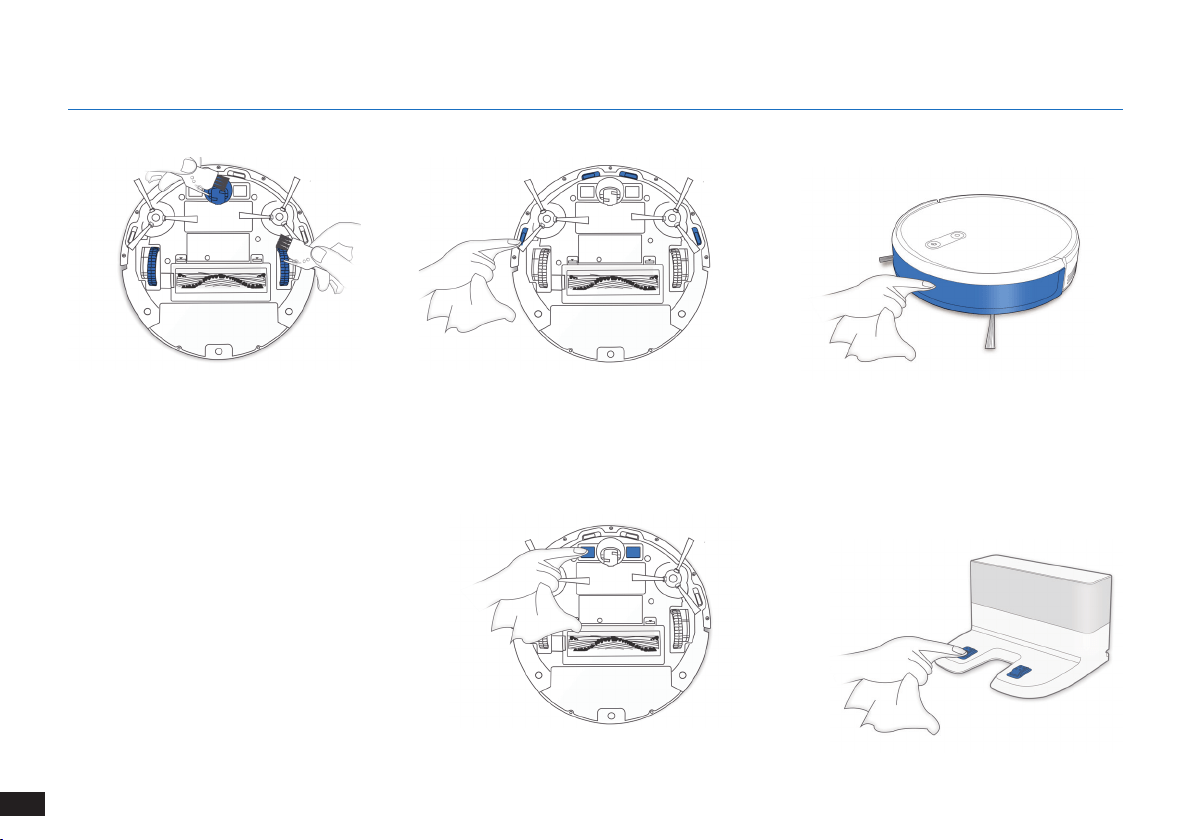
4.5 Other Components
21
EN
4. Maintenance
Note: Before cleaning the robot’s Charging
Contacts and Docking Station Pins, turn the robot
OFF and unplug the Docking Station�

22
EN
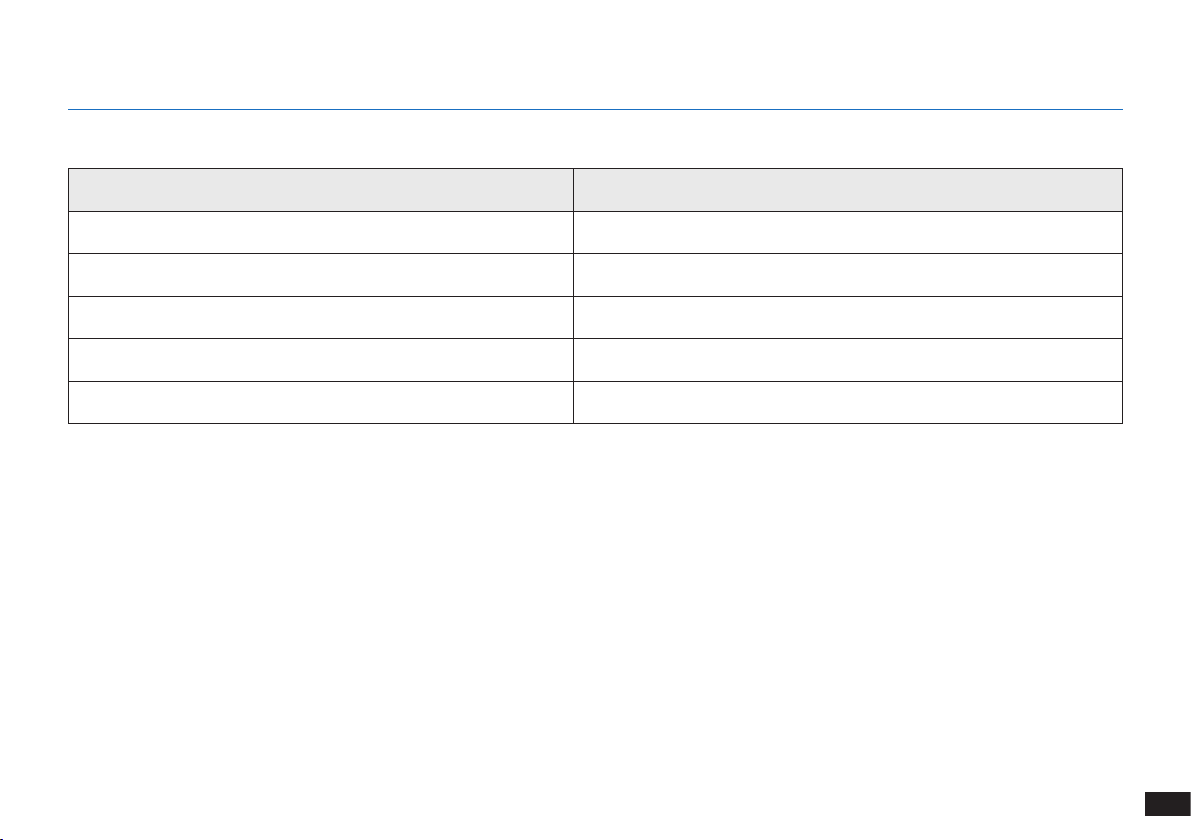
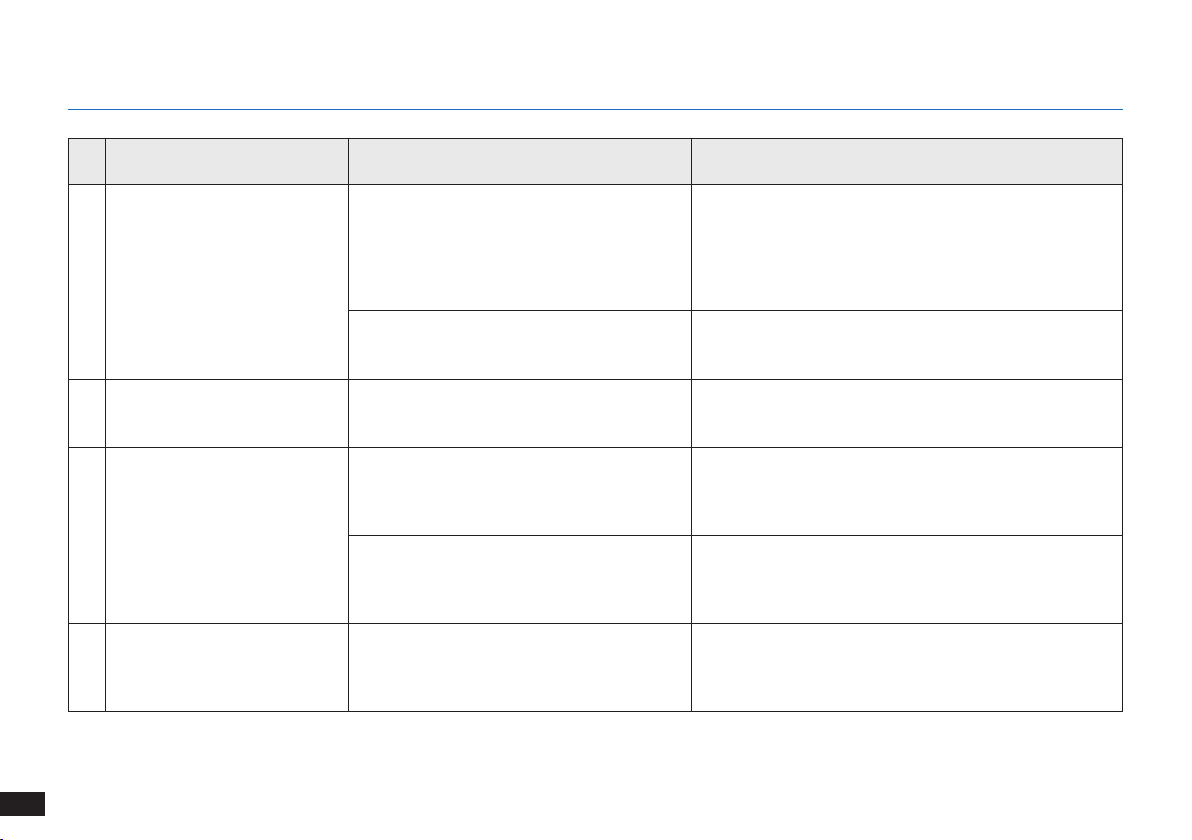
4.6 Regular Maintenance
To keep The robot running at peak performance, perform maintenance tasks and replace parts with the following frequencies:
A multi-function Cleaning Tool is provided for easy maintenance. Handle with care, this cleaning tool has sharp edges.
Note: YEEDI manufactures various replacement parts and ttings� Please contact Customer Service for more information on replacement parts�
4. Maintenance
Robot Part Maintenance Frequency Replacement Frequency
Side Brush Once every 2 weeks Every 3-6 months
Main Brush Once per week Every 6-12 months
Sponge Filter/ High Efciency Filter Once per week Every 3-6 months
Universal Wheel
Anti-Drop Sensors
Bumper
Charging Contacts
Docking Station Pins
Once per week /
23
EN
5. Indicator Light
Indicator Light
Scenario Indicator Light
The robot is cleaning AUTO Mode Button glows a solid WHITE
The robot is charging AUTO Mode Button ashes WHITE
The robot has low battery AUTO Mode Button glows a solid RED
The robot has a problem AUTO Mode Button ashes RED
Programmed Cleaning Pattern is enabled Cleaning Mode Switch Indicator lights up
24
EN
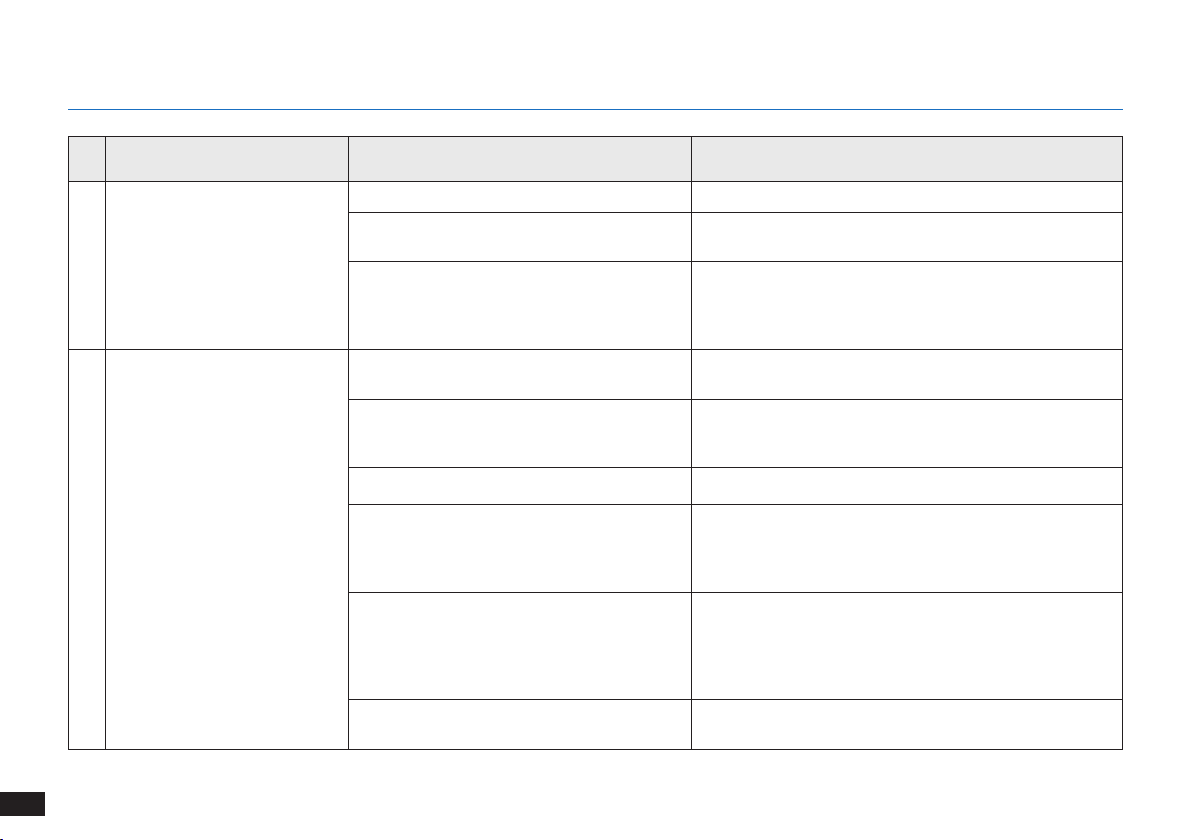
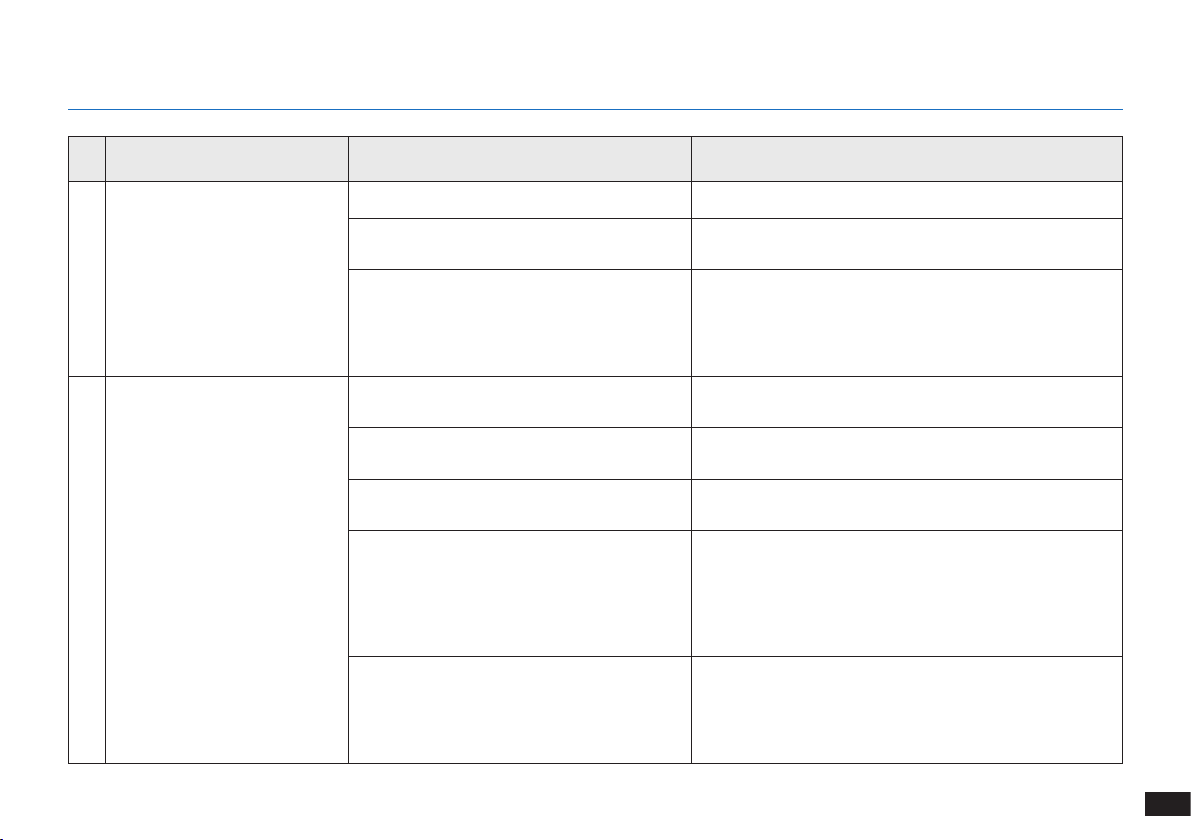
6. Troubleshooting
No. Malfunction Possible Causes Solutions
1 The robot is not charging�
The robot is not switched ON� Switch ON the robot�
The robot has not connected to the Docking
Station�
Be sure that the robot’s Charging Contacts have
connected to the Docking Station Pins�
The battery is completely discharged�
Re-activate the battery� Switch ON the robot� Place the
robot on the Docking Station by hand, remove after
charging for 3 minutes, repeat 3 times; then charge
normally�
2
The robot cannot return to the
Docking Station�
The Docking Station is not correctly placed�
Please refer to Section “Preparation” to place the
Docking Station correctly�
The Docking Station is unplugged or moved
manually during the cleaning�
Please make sure the Docking Station is plugged in and
avoid move the Docking Station manually when the robot
is cleaning�
The robot is working in a dark environment� Make sure the rooms to be cleaned are well illuminated�
The robot is stuck by obstacles (including
wires, carpet tassels, or electric fan bases,
etc� ), or the door of the room where the
Docking Station is placed is closed�
Please refer to Section “Notes Before Cleaning” to tidy up
the space before using the robot�
The robot is paused for more than 60
minutes, or manually moved out of 1-meter
radius of the original position during the
cleaning�
It is suggested to pause the robot for no more than 60
minutes� When moving the robot, keep the robot within
1-meter radius of the original position� To ensure the
cleaning efciency, please try to avoid pausing or moving
the robot during the cleaning�
The robot did not start cleaning from the
Docking Station�
It is suggested to start the robot from the Docking
Station�
25
EN
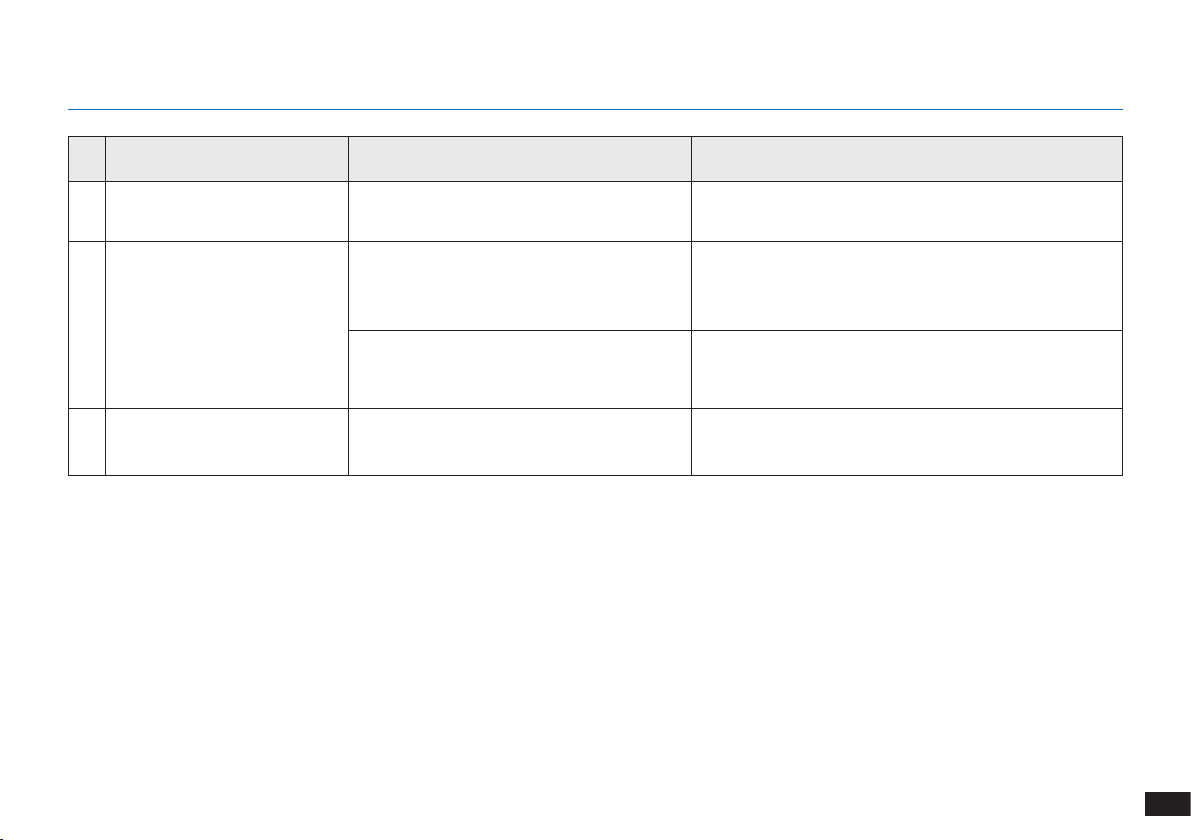
No. Malfunction Possible Causes Solutions
3
The robot gets stuck while
working and stops�
The robot is tangled with something on the oor
(electrical wires, curtains, carpet fringing, etc�)�
The robot will try various ways to free itself� If it is
unsuccessful, manually remove the obstacles and restart�
4
The robot returns to the
Docking Station before it has
nished cleaning�
When the battery gets low, The robot
automatically switches to Return to Charger
Mode and returns to the Docking Station to
recharge itself�
This is normal� No solution necessary�
Working time varies according to oor
surface, room complexity and the Cleaning
Mode selected�
This is normal� No solution necessary�
5
The robot does not clean the
whole area�
The cleaning area is not tidy�
Remove small objects from the oor and tidy up the
cleaning area before The robot starts cleaning�
6. Troubleshooting
26
EN
7. Technical Specifications
Model K701G
Working Voltage 14�4V DC
Docking Station Model CH1630RC
Rated Input
100-240 V AC,
50-60 Hz, 25 W
Rated Output 20 V DC, 0�8 A
Remote Control Model RC1633 Working Voltage 3 V DC
Remote Control Battery Type AAA Nominal Voltage 1�5 V DC
Off/Standby Mode Power Less than 0�50 W
Networked Standby Power Less than 2�00 W
Note: Technical and design specications may be changed for continuous product improvement�
This equipment should be operated with a minimum distance of 20cm between the radiator and your body�

27
DE
1. Wichtige Sicherheitshinweise ........................................................................................................................................28
2. Lieferumfang ....................................................................................................................................................................33
3. Bedienung und Programmierung ...................................................................................................................................36
4. Wartung ............................................................................................................................................................................42
5. Statusanzeige und Alarmtöne ........................................................................................................................................48
6. Fehlerbehandlung ............................................................................................................................................................49
7. Technische Daten ............................................................................................................................................................51
Inhalt

28
DE
1� Dieses Gerät ist zur Verwendung durch
Kinder ab 8Jahren oder durch Personen mit
eingeschränkten physischen, sensorischen
oder geistigen Fähigkeiten bzw� fehlenden
Erfahrungen und Kenntnissen geeignet, sofern sie
dabei beaufsichtigt oder bezüglich der sicheren
Handhabung des Gerätes angeleitet werden und
die damit verbundenen Gefahren verstanden
haben� Kinder dürfen nicht mit dem Gerät spielen�
Reinigung und anwenderseitige Wartung dürfen
nicht durch unbeaufsichtigte Kinder erfolgen�
2� Räumen Sie den zu reinigenden Bereich frei�
Entfernen Sie Netzkabel und kleine Gegenstände,
in denen sich das Gerät verfangen könnte,
vom Boden� Legen Sie Teppichfransen unter
den Teppich und achten Sie darauf, dass
Vorhänge, Tischdecken u�ä� nicht bis zum Boden
herunterhängen�
3� Wenn sich im zu reinigenden Bereich Absätze in
Form von Stufen oder Treppen befinden, ist das
Gerät so zu bedienen, dass die Stufe erkannt
wird, ohne dass das Gerät über die Kante fällt� Es
kann erforderlich sein, eine physische Barriere an
der Kante anzubringen, um ein Herunterfallen des
Gerätes zu verhindern� Stellen Sie sicher, dass die
physische Barriere keine Stolperfalle darstellt�
4� Verwenden Sie das Gerät nur gemäß der
Beschreibung in dieser Bedienungsanleitung�
Verwenden Sie nur empfohlene bzw� vom Hersteller
angebotene Zubehörteile�
5� Stellen Sie sicher, dass die Netzspannung mit
der auf dem Typenschild der Dockingstation
angegebenen Netzspannung übereinstimmt�
6� Verwenden Sie das Gerät AUSSCHLIESSLICH für
INNENRÄUME im Haushalt� Verwenden Sie das Gerät
nicht im Freien oder für kommerzielle oder industrielle
Anwendungen�
7� Nicht wiederaufladbare Akkus sind verboten�
8� Verwenden Sie das Gerät nicht ohne Staubbehälter
bzw� Filter�
9� Verwenden Sie das Gerät nicht in Bereichen, in
denen sich brennende Kerzen oder zerbrechliche
Beim Gebrauch eines elektrischen Gerätes sind einige
grundlegende Sicherheitshinweise zu beachten� Dazu
gehören auch die folgenden Hinweise:
LESEN SIE ALLE ANWEISUNGEN VOR
GEBRAUCH DIESES GERÄTES.
1. Wichtige Sicherheitshinweise

29
DE
Gegenstände befinden�
10� Verwenden Sie das Gerät nicht bei extrem heißen
bzw� kalten Umgebungstemperaturen (d�h�
unterhalb von -5°C bzw� oberhalb von 40°C)�
11� Halten Sie Haare, lose Kleidung, Finger und
sonstige Körperteile von jeder Öffnung und sich
bewegenden Teilen fern�
12� Verwenden Sie das Gerät nicht in Räumen, in
denen Babys oder Kinder schlafen�
13� Verwenden Sie das Gerät nicht auf nassen Flächen
oder auf Flächen, auf denen Wasser steht�
14� Achten Sie darauf, dass das Gerät keine größeren
Gegenstände wie Steine, große Papierstückchen
oder sonstige Gegenstände, die das Gerät
verstopfen könnten, aufnimmt�
15� Verwenden Sie das Gerät nicht, um entzündliche
oder brennbare Materialien wie Benzin, Drucker-
oder Kopierertoner aufzunehmen, und meiden
Sie beim Gebrauch Bereiche, in denen diese
Materialien anzutreffen sind�
16� Verwenden Sie das Gerät nicht, um Zigaretten,
Streichhölzer, heiße Asche oder sonstige
brennende, qualmende oder brandauslösende
Gegenstände aufzunehmen�
17� Stecken Sie die genannten Gegenstände nicht in
die Staubeinsaugöffnung� Lassen Sie das Gerät
nicht mit verstopfter Einsaugöffnung arbeiten�
Halten Sie die Einsaugöffnung frei von Staub,
Flusen, Haaren oder sonstigen den Luftstrom
behindernden Materialien�
18� Achten Sie darauf, dass das Netzkabel nicht
beschädigt wird� Ziehen oder tragen Sie das Gerät
bzw� die Dockingstation nicht am Netzkabel,
verwenden Sie das Netzkabel nicht als Haltegriff,
klemmen Sie das Netzkabel nicht in einer
geschlossenen Tür ein, und ziehen Sie es nicht über
scharfe Kanten oder Ecken� Achten Sie darauf, dass
das Gerät nicht über das Netzkabel fährt� Halten Sie
das Netzkabel von heißen Flächen fern�
19� Wenn das Netzkabel beschädigt ist, muss es
durch den Hersteller oder dessen Kundendienst
ausgewechselt werden, damit keine Gefahren
davon ausgehen�
20� Verwenden Sie die Dockingstation nicht, wenn sie
beschädigt ist�
21� Verwenden Sie das Gerät nicht, wenn das
Netzkabel oder die Steckdose beschädigt sind�
Verwenden Sie das Gerät oder die Dockingstation
1. Wichtige Sicherheitshinweise

30
DE
nicht, wenn es bzw� sie nicht einwandfrei
funktioniert, heruntergefallen ist, beschädigt wurde,
im Freien gelassen wurde oder mit Wasser in
Berührung gekommen ist� Wenn das Netzkabel
beschädigt ist, muss es durch den Hersteller oder
dessen Kundendienst ausgewechselt werden,
damit keine Gefahr davon ausgeht�
22� Schalten Sie das Gerät vor dem Reinigen oder
Warten aus (Betriebsschalter auf AUS)�
23� Vor dem Reinigen oder Warten der Dockingstation
muss der Stecker aus der Steckdose gezogen
werden�
24� Entfernen Sie vor dem Entsorgen des Gerätes
den Akku� Nehmen Sie hierzu das Gerät aus
der Dockingstation, und schalten Sie es aus
(Betriebsschalter auf AUS)�
25� Vor dem Entsorgen des Gerätes ist der Akku
entsprechend den örtlichen Gesetzen und
Vorschriften zu entfernen und zu entsorgen�
26� Gebrauchte Akkus sind entsprechend den örtlichen
Gesetzen und Vorschriften zu entsorgen�
27� Verbrennen Sie das Gerät nicht, auch wenn es
stark beschädigt ist� Die Akkus können im Feuer
explodieren�
1. Wichtige Sicherheitshinweise
28� Wenn die Dockingstation längere Zeit nicht benutzt
wird, ist sie vom Stromnetz zu trennen�
29� Verwenden Sie das Gerät immer gemäß den
Anweisungen in dieser Bedienungsanleitung�
REECOO übernimmt keine Haftung für Verletzungen
und Schäden, die durch unsachgemäße Nutzung
entstehen�
30� Der Roboter enthält Akkus, die nur durch
geschultes Personal ausgewechselt werden dürfen�
Zum Auswechseln oder Entfernen des Akkus
wenden Sie sich bitte an den Kundendienst�
31� Wenn der Roboter längere Zeit nicht benutzt wird,
laden Sie ihn zur Aufbewahrung vollständig auf,
und schalten Sie ihn aus� Trennen Sie außerdem
die Dockingstation vom Netz�
32. WARNUNG: Verwenden Sie zum Wiederaufladen
des Akkus ausschließlich das mit dem Gerät
mitgelieferte abnehmbare Netzteil CH1630RC�
33� Für die Fernbedienung werden zwei nicht aufladbare
Batterien des Typs AAA benötigt� Um die Batterien
der Fernbedienung auszutauschen, drehen Sie die
Fernbedienung um und drücken auf die Abdeckung
des Batteriefachs, um diese zu entfernen� Nehmen
Sie die Batterien heraus, und setzen Sie neue

31
DE
1. Wichtige Sicherheitshinweise
Batterien mit der richtigen Polzuordnung ein� Setzen
Sie dann die Batteriefachabdeckung wieder auf�
34� Nicht wiederaufladbare Akkus dürfen nicht
aufgeladen werden�
35� Verschiedene Batterietypen oder neue und
gebrauchte Batterien dürfen nicht gemeinsam
verwendet werden�
36� Die Batterien der Fernbedienung müssen mit der
richtigen Polarität eingesetzt werden�
37� Leere Batterien müssen aus dem Gerät entfernt
und sicher entsorgt werden�
38� Wird die Fernbedienung längere Zeit
nicht verwendet, so sollten die Batterien
herausgenommen werden�
39� Die Anschlussklemmen dürfen nicht
kurzgeschlossen werden�
BEWAHREN SIE DIESE ANWEISUNGEN
AUF.

32
DE
Klasse II
Kurzschlussfester
Sicherheitstransformator
Schaltnetzteil
Nur zur Verwendung in Innenräumen
vorgesehen
Ordnungsgemäße Entsorgung dieses
Produkts
Diese Kennzeichnung gibt an, dass das Produkt EU-
weit nicht mit dem Hausmüll entsorgt werden darf�
Recyceln Sie das Gerät verantwortungsvoll, um
die nachhaltige Wiederverwendung der Materialien
zu unterstützen und mögliche Umwelt- oder
Gesundheitsschäden durch eine unkontrollierte
Abfallentsorgung zu vermeiden� Verwenden Sie zum
Recyceln Ihres gebrauchten Gerätes entsprechende
Rückgabe- und Sammelsysteme, oder wenden Sie sich
an den Händler, bei dem Sie das Gerät gekauft haben�
Er kann das Produkt sicher entsorgen�
1. Wichtige Sicherheitshinweise
33
DE
2.1 Lieferumfang
Roboter
Fernbedienung
mitBatterien
SeitenbürstenDockingstation
Multifunktions-
Reinigungswerkzeug
Bedienungsanleitung
Behälter
Wasch- und
wiederverwendbares
Mikrofaser-Reinigungstuch
Hinweis:
Abbildungen dienen nur als Referenz und können vom tatsächlichen Erscheinungsbild des Produkts abweichen�
Produktdesign und technische Daten können ohne Vorankündigung geändert werden�
2. Lieferumfang
Instruction Manual
Filterschwamm und
Feinstaubfilter

34
DE
Hauptbürstenoption
(vorinstalliert)
Staubbehälter/
Behälter
2. Lieferumfang
Anti-Kollisionssensoren
und Stoßschiene
2.2 Produktzeichnung
Roboter
AUTO-Modus-Taste
VSLAM-Kamera
Betriebsschalter
Reset-Taste
Entriegelungstaste
für Staubbehälter
Ansicht von unten
Absturzsensoren
Absturzsensoren
Ladekontakte
Universalrad
Seitenbürsten
( 5 Sekunden lang gedrückt halten� Der Roboter wird
auf die Werkseinstellungen zurückgesetzt� Verwenden
Sie diese Taste mit Vorsicht�)
35
DE
2. Lieferumfang
Dockingstation Fernbedienung
START-/PAUSE-Taste
Taste für Randreinigung
Richtungssteuerungstasten
Taste für Punktreinigung
Taste für Rückkehr
zur Ladestation
Infrarot-Signalerzeuger
Kontakte der
Dockingstation
Erweitertes Wischsystem
Behälter
Wasch- und
wiederverwendbares
Mikrofaser-Reinigungstuch
Entriegelungsknopf für
den Behälter
Wassereinlass

36
DE
Schlagen Sie vor dem Gebrauch des Gerätes auf einem Vorleger mit
Fransen die Kanten des Vorlegers um�
WARNUNG: Verwenden Sie den The robot nicht auf nassen Flächen oder auf Flächen, auf denen Wasser steht.
Es kann erforderlich sein, eine physische Barriere an der Kante einer
Stufe anzubringen, um ein Herunterfallen des Gerätes zu verhindern�
Entfernen Sie Stromkabel und kleine Gegenstände, die den Roboter
behindern könnten, vom Boden�
3.1 Vor der Reinigung
Stellen Sie Möbel wie Stühle in dem zu reinigenden Bereich an den
dafür vorgesehenen Platz�
3. Bedienung und Programmierung

37
DE
1
Entfernen des Schutzstreifens
2
Aufstellen der Ladestation
3
Einsetzen der Seitenbürsten
4
Einschalten des Geräts
3.2 Vorbereitung
Hinweis: Nach Beendigung des Reinigungsvorgangs oder bei niedrigem Akkuladestand fährt
der The robot selbständig zum Auaden die Ladestation an�
5
Aufladen des The robot
3. Bedienung und Programmierung
38
DE
3. Bedienung und Programmierung
3.3Wahl des Reinigungsmodus
1
Reinigung im AUTO-Modus
Ein programmiertes Reinigungsmuster (optimiert für harte Böden)
ist standardmäßig ausgewählt�
ODER
ODER
2
Rückkehr zur Ladestation
≥ 3 s
3
Randreinigungsmodus
39
DE
3. Bedienung und Programmierung
4
Punktreinigungsmodus (weniger als 3Minuten)
3.4 Switch vacuum power
X 2

40
DE
3. Bedienung und Programmierung
3.5 Pausieren, Beenden des Ruhemodus, Ausschalten
1
Pause
2
Beenden des Ruhemodus
Hinweis: Das Bedienfeld des Roboters hört auf zu leuchten, wenn
der Roboter mehrere Minuten pausiert� Drücken Sie die Taste AUTO-
Modus am The robot, um den Ruhemodus des Roboters zu beenden�
Drücken Sie die AUTO-Taste am The robot, um den Ruhemodus
zu beenden.
3
Ausschalten
Hinweis: Wir empfehlen, den The robot eingeschaltet zu lassen
(Betriebsschalter EIN) und ihn aufzuladen, wenn er gerade keine
Reinigung durchführt�
ODER
ODER
41
DE
3.6 Optionales Wischsystem
Hinweis:
*
Leeren Sie den Behälter, und entfernen Sie die Reinigungstuchplatte vor der Reinigung von Teppichböden�
Schlagen Sie vor dem Gebrauch des Wischsystems in der Nähe eines Vorlegers mit Fransen die Kanten des Vorlegers um, sodass der The robot die
Kanten meidet�
Verwenden Sie nur Wasser, und geben Sie keine Reinigungsüssigkeit oder anderen Reinigungsmittel in den Behälter�
3. Bedienung und Programmierung
Hinweis: Wenn der The robot den Wischvorgang abgeschlossen hat, leeren Sie das Restwasser aus dem Behälter�
42
DE
Schalten Sie vor dem Durchführen von Reinigungs- und Wartungsaufgaben am The robot den Roboter AUS, und trennen Sie die Ladestation
vom Netz.
4.1 Optionales Wischsystem
4. Wartung
43
DE
Schalten Sie vor dem Durchführen von Reinigungs- und Wartungsaufgaben am The robot den Roboter AUS, und trennen Sie die Ladestation
vom Netz.
Staubbehälter
4.2 Staubbehälter und Filter
1
2
3
Filternetz
Filterschwamm
Feinstaublter
Staubbehälter
Entriegelungstaste für
Staubbehälter
Abdeckung des
Staubbehälters
4. Wartung
44
DE
Hauptbürste
4.3 Hauptbürste und Seitenbürsten
Hinweis: Das mitgelieferte Multifunktions-Reinigungswerkzeug gewährleistet eine problemlose Wartung. Bitte gehen Sie vorsichtig mit
diesem Werkzeug um, da es scharfe Kanten hat.
4. Wartung
1
4
2
5
3
45
DE
4.5 Sonstige Teile
1 2 3
4. Wartung
4.4 Seitenbürsten
Hinweis: Das mitgelieferte Multifunktions-Reinigungswerkzeug gewährleistet eine problemlose Wartung. Bitte gehen Sie vorsichtig mit
diesem Werkzeug um, da es scharfe Kanten hat.
46
DE
4. Wartung
Hinweis: Schalten Sie vor der Reinigung der
Ladekontakte und der Steckkontakte der
Ladestation den Roboter AUS, und trennen Sie die
Ladestation vom Netz�

47
DE
4.6Regelmäßige Wartung
Um die maximale Leistung des The robot dauerhaft zu gewährleisten, führen Sie Wartungsaufgaben und den Austausch der Komponenten
gemäß der nachfolgend angegebenen Häufigkeit aus.
Für die einfache Wartung wird ein Multifunktions-Reinigungswerkzeug bereitgestellt. Bitte gehen Sie vorsichtig mit diesem Werkzeug um,
da es scharfe Kanten hat.
Hinweis: YEEDI stellt verschiedene Ersatz- und Zubehörteile her� Wenden Sie sich an den Kundendienst, um weitere Informationen zu Ersatzteilen
zu erhalten�
4. Wartung
Roboterkomponente Wartungshäufigkeit Austauschhäufigkeit
Seitenbürste Einmal alle zwei Wochen Alle drei bis sechs Monate
Hauptbürste Einmal wöchentlich Alle sechs bis zwölf Monate
Filterschwamm/Feinstaublter Einmal wöchentlich Alle drei bis sechs Monate
Universalrad
Absturzsensoren
Stoßschiene
Ladekontakte
Kontakte der Ladestation
Einmal wöchentlich /

48
DE
5. Anzeige und Alarmtöne
Anzeige
Szenario Anzeige
Der Roboter bendet sich im Reinigungsmodus� Die AUTO-Modus-Taste leuchtet durchgehend WEISS�
Der Roboter wird geladen� Die AUTO-Modus-Taste blinkt WEISS�
Der Akku des Roboters ist fast leer� Die AUTO-Modus-Taste leuchtet durchgehend ROT�
Es liegt ein Problem vor� Die AUTO-Modus-Taste blinkt ROT�
Das programmierte Reinigungsmuster ist aktiviert� Die Reinigungsmodus-Umschaltanzeige leuchtet auf�

49
DE
Nr. Funktionsstörung Mögliche Ursachen Fehlerbehebung
1 Der The robot lädt nicht�
Der The robot ist nicht eingeschaltet
(Betriebsschalter EIN)�
Schalten Sie den The robot EIN�
Der The robot hat keinen Kontakt zur
Dockingstation�
Stellen Sie sicher, dass die Ladekontakte des Roboters
die Kontakte der Dockingstation berühren�
Der Akku ist vollständig entladen�
Reaktivieren Sie den Akku� Schalten Sie den The
robot EIN� Setzen Sie den The robot manuell in die
Dockingstation, entnehmen Sie ihn nach einer Ladezeit
von 3 Minuten, und wiederholen Sie diesen Vorgang
dreimal� Laden Sie das Gerät anschließend normal auf�
2
Der Roboter kann nicht zur
Dockingstation zurückkehren�
Die Dockingstation wurde nicht
ordnungsgemäß aufgestellt�
Weitere Informationen zum ordnungsgemäßen Aufstellen
der Dockingstation nden Sie in Abschnitt „Vorbereitung“�
Die Dockingstation wurde vom Stromnetz
getrennt oder wurde während der Reinigung
manuell bewegt�
Vergewissern Sie sich, dass die Dockingstation am
Stromnetz angeschlossen ist, und vermeiden Sie es,
die Dockingstation während des Reinigungsvorgangs
manuell zu bewegen�
Der Roboter arbeitet in einer dunklen
Umgebung�
Bitte achten Sie darauf, dass die zu reinigenden Bereiche
gut beleuchtet sind�
Der Roboter wird von Hindernissen (z� B�
Kabeln, Teppichfransen oder elektrischen
Ventilatorsockeln usw�) aufgehalten
oder die Tür des Raums, in dem sich die
Dockingstation bendet, ist geschlossen�
Bitte beachten Sie die Hinweise im Abschnitt „Vor der
Reinigung“, um die Bereiche vor der Verwendung des
Roboters aufzuräumen�
6. Fehlerbehandlung
50
DE
Nr. Funktionsstörung Mögliche Ursachen Fehlerbehebung
2
Der Roboter kann nicht zur
Dockingstation zurückkehren�
Der Roboter pausiert länger als 60 Minuten
oder wurde während der Reinigung manuell
1 Meter von der ursprünglichen Position
wegbewegt�
Es wird empfohlen, den Roboter nicht länger als
60 Minuten zu pausieren� Lassen Sie den Roboter
beim Bewegen in einem 1-Meter-Radius von der
ursprünglichen Position� Um die Reinigungsefzienz zu
gewährleisten, versuchen Sie bitte nicht den Roboter
während der Reinigung anzuhalten oder zu bewegen�
Der Roboter hat die Reinigung nicht bei der
Dockingstation begonnen�
Es wird empfohlen, den Roboter von der Dockingstation
aus zu starten�
3
Der The robot bleibt während
des Betriebs hängen und hält
an�
Auf dem Boden liegende Gegenstände
(Stromkabel, Vorhänge, Teppichfransen o� Ä�)
haben sich im The robot verfangen�
Der The robot unternimmt mehrere Versuche, um sich
zu befreien� Wenn dies nicht gelingt, entfernen Sie die
Hindernisse von Hand und starten Sie das Gerät neu�
4
Der The robot kehrt zur
Dockingstation zurück, bevor
er den Reinigungsvorgang
beendet hat�
Bei niedrigem Akkuladestand wechselt
der The robot automatisch in den Modus
„Rückkehr zur Ladestation“ und kehrt zum
Auaden zur Dockingstation zurück�
Dies ist normal� Keine Lösung erforderlich�
Die Arbeitszeit schwankt je nach
Oberächenbeschaffenheit des Bodens, der
Komplexität der Raumaufteilung und dem
gewählten Reinigungsmodus�
Dies ist normal� Keine Lösung erforderlich�
5
Der The robot reinigt nicht den
gesamten Bereich�
Der Reinigungsbereich wurde nicht
aufgeräumt�
Entfernen Sie kleine Gegenstände vom Boden, und
räumen Sie den zu reinigenden Bereich auf, bevor der
The robot mit dem Reinigungsvorgang beginnt�
6. Fehlerbehandlung

51
DE
7. Technische Daten
Modell K701G
Betriebsspannung 14,4 V (Gleichstrom)
Modell der Dockingstation CH1630RC
Nenneingangsstrom
100–240 V
(Wechselstrom),
50-60 Hz, 25 W
Nennausgangsstrom
20 V (Gleichstrom),
0,8 A
Modell mit Fernbedienung RC1633 Betriebsspannung 3 V (Gleichstrom)
Batterietyp für
Fernbedienung
AAA Nennspannung 1,5 V (Gleichstrom)
Stromverbrauch im
ausgeschalteten Zustand/
Standby-Modus
Weniger als 0,50 W
Stromverbrauch im vernetzten
Standby-Modus
Weniger als 2,00 W
Hinweis:
Technische Daten und Konstruktionsspezikationen können zum Zweck der kontinuierlichen Produktverbesserung geändert werden�
Dieses Gerät sollte mit einem Mindestabstand von 20 cm zwischen Heizung und Ihrem Körper betrieben werden�

52
ES
1. Instrucciones importantes de seguridad ......................................................................................................................53
2. Contenido de la caja .......................................................................................................................................................57
3. Funcionamiento y programación ...................................................................................................................................60
4. Mantenimiento .................................................................................................................................................................66
5. Indicador luminoso de estado y sonidos de alarma ....................................................................................................72
6. Solución de problemas ...................................................................................................................................................73
7. Especificaciones técnicas ..............................................................................................................................................75
Índice

53
ES
1� Este aparato puede ser utilizado por niños mayores
de 8 años y personas con capacidades físicas,
sensoriales o mentales reducidas, o cualquier persona
sin experiencia ni conocimiento sobre este tipo de
dispositivos, siempre que se les supervise o se les
haya instruido sobre su uso seguro y comprendan los
peligros potenciales� Este dispositivo no es un juguete�
Los niños no deben limpiar o realizar mantenimiento en
este aparato sin supervisión�
2� Despeje el área que desea limpiar� Retire del suelo los
cables de suministro y los pequeños objetos que se
puedan enredar en el dispositivo� Pliegue los flecos
de las alfombras bajo estas y levante las cortinas o
manteles que pudieran estar a nivel del suelo�
3� Si en el área de limpieza existe un desnivel debido a la
presencia de un escalón o escaleras, le recomendamos
que controle el dispositivo para cerciorarse de que sea
capaz de detectar el escalón sin caerse� Para evitar
la caída del aparato, puede ser necesario colocar una
barrera física en el borde� Asegúrese de que la barrera
física no suponga un riesgo de tropiezo�
4� Use el dispositivo únicamente como se describe en
este manual� Emplee solo accesorios recomendados o
vendidos por el fabricante�
5� Cerciórese de que su suministro eléctrico coincide con
el voltaje de tensión que figura en la estación de carga�
6� Diseñado para USO EXCLUSIVO EN ESPACIOS
INTERIORES� No utilice el dispositivo al aire libre ni en
espacios comerciales o industriales�
7� Este dispositivo no permite el uso de baterías no
recargables�
8� No utilice el dispositivo sin el recipiente para polvo ni
los filtros instalados en la posición correcta�
9� No ponga en marcha el dispositivo en un lugar donde
haya velas encendidas u objetos frágiles�
10� No use el dispositivo en entornos extremadamente
fríos o calientes (temperatura inferior a -5°C [23°F] o
superior a 40°C [104°F])�
11� Mantenga el pelo, la ropa suelta, los dedos y las partes
del cuerpo alejados de las aberturas y de las piezas
móviles�
Al usar un dispositivo eléctrico, observe siempre las
precauciones básicas de seguridad, incluidas las que
se indican a continuación:
ANTES DE USAR ESTE DISPOSITIVO,
LEA ATENTAMENTE TODAS LAS
INSTRUCCIONES.
1. Instrucciones importantes de seguridad

54
ES
12� No ponga en marcha el dispositivo en una habitación
donde se encuentren durmiendo bebés o niños�
13� No use el dispositivo sobre superficies mojadas ni con
agua estancada�
14� No permita que el dispositivo aspire objetos de gran
tamaño, como piedras, trozos grandes de papel o
cualquier otro objeto que pueda causar obstrucciones�
15� No use el dispositivo para recoger materiales
inflamables ni combustibles, como gasolina o tóner de
impresoras o fotocopiadoras� No lo utilice en lugares
donde puedan existir esta clase de materiales�
16� No use el dispositivo para recoger objetos que estén
ardiendo o que emitan humo, como por ejemplo,
cigarros, cerillas, cenizas calientes o cualquier otro
objeto que pueda provocar un incendio�
17� No introduzca objetos en la abertura para la entrada
de polvo� No use el dispositivo si la entrada de polvo
está obstruida� Mantenga la abertura libre de polvo,
pelusa, pelo o cualquier partícula que pueda reducir el
flujo de aire�
18� Tenga cuidado de no dañar el cable de alimentación�
No emplee el cable de alimentación para tirar o
transportar el dispositivo ni la estación de carga� No
lo use tampoco a modo de asa� No cierre la puerta si
el cable de alimentación queda atrapado ni coloque
el cable sobre bordes afilados o esquinas� No permita
que el dispositivo pase por encima del cable de
alimentación� Mantenga el cable de alimentación
alejado de superficies calientes�
19� Si el cable de alimentación eléctrico está dañado,
deberá ser reemplazado por el fabricante o por un
técnico de servicio para evitar posibles riesgos�
20� No utilice la estación de carga si presenta daños�
21� No use el dispositivo en caso de daños en el cable de
alimentación o en el enchufe� No use el dispositivo ni
la estación de carga si no funcionan correctamente,
si han sufrido una caída, si están dañados, si se
han dejado olvidados en el exterior o si han entrado
en contacto con agua� En este caso, deberán ser
reparados por el fabricante o por un técnico de
servicio, a fin de evitar posibles riesgos�
22� Antes de realizar trabajos de limpieza y mantenimiento
en el dispositivo, apáguelo�
23� Desconecte el enchufe de la toma de corriente antes
de llevar a cabo la limpieza y el mantenimiento de la
estación de carga�
24� Antes del extraer la batería del dispositivo para
desecharla, retire el dispositivo de la estación de
1. Instrucciones importantes de seguridad

55
ES
carga y apague el interruptor principal�
25� Antes de desechar el dispositivo, extraiga la batería
y deséchela de acuerdo con las leyes y normativas
locales�
26� Tire las baterías usadas de acuerdo con las leyes y
normativas locales�
27� No arroje el dispositivo al fuego, incluso aunque
presente daños graves� ya que las baterías pueden
explotar�
28� Si no prevé usar la estación de carga durante un
tiempo prolongado, desenchúfela�
29� El dispositivo se debe usar respetando lo establecido
en este manual de usuario� REECOO no asume
ninguna responsabilidad por los daños o lesiones
causados por un uso inadecuado�
30� El robot contiene baterías que solo puede sustituir
personal cualificado� Para sustituir o extraer la batería,
póngase en contacto con Atención al cliente�
31� Si no se va a utilizar el robot durante un periodo
prolongado de tiempo, cargue por completo el robot,
apáguelo para guardarlo y desenchufe la estación de
carga�
32. AVISO: Para cargar la batería, utilice únicamente la
unidad de alimentación desmontable CH1630RC
1. Instrucciones importantes de seguridad
proporcionada con este dispositivo�
33� El mando a distancia requiere dos pilas AAA no
recargables� Para sustituir las pilas del mando a
distancia, dele la vuelta y presione y retire la cubierta
de las pilas� Extraiga las pilas e introduzca las pilas
nuevas respetando la polaridad� Vuelva a colocar la
cubierta de las pilas�
34� No intente nunca recargar una pila no recargable�
35� No mezcle pilas distintas ni nuevas con usadas�
36� Asegúrese de que inserta la pila del mando a distancia
con la polaridad correcta�
37� Cuando se agoten la pilas o la batería, extráigalas
del dispositivo y deséchela en un punto de recogida
adecuado�
38� Si va a dejar de usar el mando a distancia durante un
periodo prolongado, extraiga las pilas�
39� Procure no cortocircuitar las terminales de la fuente
de alimentación�
CONSERVE ESTAS INSTRUCCIONES
56
ES
1. Instrucciones importantes de seguridad
Clase II
Transformador de aislamiento de
seguridad a prueba de cortocircuitos
Fuente de alimentación conmutada
Solo para uso en espacios interiores
Eliminación correcta de este producto
Esta marca indica que este producto no se debe
desechar con otros residuos domésticos en la UE� Para
evitar posibles daños al medio ambiente o para la salud
derivados del vertido incontrolado de residuos, recicle
el producto de manera responsable para impulsar la
reutilización sostenible de los recursos materiales�
Para desechar el dispositivo usado, utilice los sistemas
de recogida y reciclado o consulte con el proveedor
a quien compró el producto� Allí pueden llevar este
producto para su reciclado protegiendo el medio
ambiente�
57
ES
Instruction Manual
2.1 Contenido de la caja
Robot
Mando a distancia con
pilas
Cepillos lateralesEstación de carga
Herramienta de limpieza
multifunción
Manual de instrucciones
Depósito
Paño de limpieza de
microfibra lavable y
reutilizable
Nota:
Las guras e ilustraciones se muestran solo como referencia y pueden ser diferentes del aspecto real del producto�
El diseño y las especicaciones de producto están sujetos a cambios sin previo aviso�
2. Contenido de la caja
Filtro de esponja y
filtro de alta eficiencia
58
ES
Sensores anticolisión y
parachoques
2.3 Esquema del producto
Robot
Botón del modo automático
Cámara VSLAM
Interruptor de alimentación
Botón de reinicio
Botón de
liberación del
recipiente para
polvo
Vista inferior
2. Contenido de la caja
Sensores
anticaída
Sensores
anticaída
Opción de cepillo
principal
Contactos de
carga
Rueda
universal
Cepillos
laterales
Recipiente
para polvo/
Depósito
(Mantenga pulsado durante 5 segundos�
El robot volverá a la conguración de fábrica�
Use este botón con cuidado�)
59
ES
2. Contenido de la caja
Estación de carga Mando a distancia
Botón de INICIO/
PAUSA
Botón del modo de
limpieza de rincones
Botones del control
de dirección
Botón del modo de
limpieza localizada
Botón del modo de
retorno al cargador
Generador de señal de
infrarrojos
Conectores de la
estación de carga
Sistema de fregado avanzado
Depósito
Paño de limpieza de
microbra lavable y
reutilizable
Botón de liberación del
depósito
Entrada de agua

60
ES
Antes de utilizar este producto en una alfombra de pelo corto con
ecos, doble los bordes hacia dentro�
AVISO: No use el The robot sobre superficies mojadas ni con agua estancada.
Tal vez sea necesario colocar una barrera física en el borde de cualquier
desnivel para evitar la caída del robot�
Retire del suelo los cables de suministro y los pequeños objetos que
puedan obstruir el recorrido del dispositivo�
3.1 Observaciones antes de limpiar
Ordene la zona que se va a limpiar colocando los muebles, como
sillas, en su sitio�
3. Funcionamiento y programación
61
ES
3. Funcionamiento y programación
1
Retirada de la tira protectora
2
Colocación de la estación de carga
3
Colocación de los cepillos laterales
4
Encendido
3.2 Preparación
Nota: Una vez completado el ciclo de limpieza o cuando el nivel de la batería es bajo, el The
robot regresa automáticamente a la estación de carga para recargarse por sí solo�
5
Carga del The robot

62
ES
3.3 Selección del modo de limpieza
1
Modo de limpieza automático
Se seleccionará un patrón de limpieza programada (optimizado para
suelos duros) de forma predeterminada�
O
O
2
Volver a la estación de carga
≥3 s
3
Modo de limpieza de rincones
3. Funcionamiento y programación

63
ES
3. Funcionamiento y programación
4
Modo de limpieza localizada (menos de 3 minutos)
3.4 Switch vacuum power
X 2
64
ES
3. Funcionamiento y programación
3.5 Pausa, reactivación, apagado
1
Pausa
2
Reactivación
Nota: El panel de control del robot se apaga tras dejarlo en pausa
durante unos minutos� Pulse el botón de modo automático del The
robot para reactivar el robot�
Pulse el botón de modo automático para reactivar el The robot.
3
Apagado
Nota: Cuando el The robot no esté en funcionamiento, se recomienda
dejarlo encendido y cargando�
O
O
65
ES
3. Funcionamiento y programación
3.6 Sistema de fregado opcional
Nota: Vacíe el depósito y retire la bandeja del paño de limpieza antes de limpiar alfombras�
Cuando use el sistema de fregado, pliegue los bordes de las alfombras para que el The robot los evite�
Asegúrese de usar solo agua y no ponga ningún líquido limpiador ni otras soluciones de limpieza en el depósito�
Nota: Cuando el The robot termine de fregar, vacíe el agua que quede en el depósito�
66
ES
4. Mantenimiento
Antes de realizar cualquier tarea de limpieza y mantenimiento en el The robot, apague el robot y desenchufe la estación de carga.
4.1 Sistema de fregado opcional

67
ES
Antes de realizar cualquier tarea de limpieza y mantenimiento en el The robot, apague el robot y desenchufe la estación de carga.
Recipiente para polvo
4.2 Recipiente para el polvo y filtros
1
2
3
Malla del ltro
Filtro de esponja
Filtro de alta eciencia
Recipiente para polvo
Botón de liberación del
recipiente para polvo
Tapa
4. Mantenimiento
68
ES
4. Mantenimiento
1
4
2
5
3
Cepillo principal
4.3 Cepillo principal y laterales
Nota: A fin de facilitar el trabajo de mantenimiento, el dispositivo se suministra con una herramienta de limpieza multifunción. Utilice la
herramienta con cuidado, ya que sus bordes están afilados.
69
ES
1 2 3
4.4 Cepillos laterales
Nota: A fin de facilitar el trabajo de mantenimiento, el dispositivo se suministra con una herramienta de limpieza multifunción. Utilice la
herramienta con cuidado, ya que sus bordes están afilados.
4. Mantenimiento
4.5 Otros componentes
70
ES
4. Mantenimiento
Nota: Antes de limpiar los contactos de carga y
los conectores de la estación de carga del robot,
apáguelo y desenchufe la estación de carga�
71
ES
4.6 Mantenimiento habitual
Para mantener el rendimiento óptimo del The robot, realice las tareas de mantenimiento y las sustituciones con las siguientes frecuencias:
A fin de facilitar el trabajo de mantenimiento, el dispositivo se suministra con una herramienta de limpieza multifunción. Utilice la herramienta
con cuidado, ya que sus bordes están afilados.
Nota: YEEDI fabrica diversas piezas de sustitución y montaje� Póngase en contacto con Atención al cliente para obtener más información sobre las
piezas de sustitución�
4. Mantenimiento
Pieza del robot Frecuencia de mantenimiento Frecuencia de sustitución
Cepillo lateral Una vez cada 2 semanas Cada 3-6 meses
Cepillo principal Una vez a la semana Cada 6-12 meses
Filtro de esponja/Filtro de alta
eciencia
Una vez a la semana Cada 3-6 meses
Rueda universal
Sensores anticaída
Parachoques
Contactos de carga
Conectores de la estación de carga
Una vez a la semana /

72
ES
5. Indicador luminoso y sonidos de alarma
Indicador luminoso
Situación Indicador luminoso
El robot está limpiando� El botón de modo automático tiene una luz BLANCA ja�
El robot se está cargando� El botón de modo automático parpadea en BLANCO�
El nivel de la batería del robot es bajo� El botón de modo automático tiene una luz ROJA ja�
El robot tiene un problema� El botón de modo automático parpadea en ROJO�
El patrón de limpieza programada está activado� El indicador de cambio de modo de limpieza se ilumina�
73
ES
N.º Problema Posibles causas Soluciones
1 El The robot no se carga�
El The robot no está encendido� Encienda el The robot�
El The robot no se ha conectado a la
estación de carga�
Asegúrese de que los conectores del robot se hayan
conectado a los contactos de la estación de carga�
La batería está totalmente descargada�
Vuelva a activar la batería� Encienda el The robot�
Coloque el The robot manualmente en la estación de
carga, retírelo una vez transcurridos tres minutos de
carga� Repita esta acción tres veces� A continuación,
cargue el robot de la forma habitual�
2
El robot no puede regresar a la
estación de carga�
La estación de carga no se ha colocado
correctamente�
Consulte la sección "Preparación" para colocar la
estación de carga correctamente�
La estación de carga se ha desconectado o
movido manualmente durante la limpieza�
Asegúrese de que la estación de carga está conectada y
no mueva manualmente el robot mientras limpia�
El robot está funcionando en un entorno
oscuro�
Asegúrese de que las habitaciones que se van a limpiar
estén bien iluminadas�
El robot se atasca con obstáculos (como
cables, borlas de alfombras o bases de
ventiladores eléctricos, entre otros) o con
la puerta de la habitación en la que se
encuentra la estación de carga en caso de
que esté cerrada�
Consulte la sección "Observaciones antes de limpiar"
para ordenar la zona antes de usar el robot�
El robot ha estado pausado durante más de
60 minutos o se ha sacado manualmente
del radio de 1 metro de la posición original
durante la limpieza�
Se recomienda no dejar en pausa el robot durante más
de 60 minutos� Si mueve el robot, manténgalo dentro del
radio de 1 metro de la posición original� Para garantizar
una limpieza eciente, no deje en pausa ni mueva el robot
durante la limpieza�
6. Solución de problemas

74
ES
N.º Problema Posibles causas Soluciones
2
El robot no puede regresar a la
estación de carga�
El robot no ha empezado a limpiar desde la
estación de carga�
Se recomienza que el robot empiece a limpiar desde la
estación de carga�
3
El The robot se atasca cuando
está en funcionamiento y se
detiene�
El The robot se ha enredado con algún objeto
en el suelo (cables eléctricos, cortinas, ecos
de alfombra, etc�)�
El The robot probará varias formas de desenredarse�
Si no lo consigue, retire los obstáculos manualmente y
reinicie el dispositivo�
4
El The robot regresa a la
estación de carga antes de
concluir la limpieza�
Cuando el nivel de la batería es bajo, el The
robot pasa automáticamente al modo de
retorno al cargador y regresa a la estación de
carga para recargarse por sí solo�
Este comportamiento es normal� No se requiere realizar
ninguna acción�
El tiempo de funcionamiento varía en función
de la supercie del suelo, la complejidad
de la estancia y el modo de limpieza
seleccionado�
Este comportamiento es normal� No se requiere realizar
ninguna acción�
5
El The robot no limpia toda la
zona�
La zona de limpieza no está ordenada�
Retire del suelo los objetos pequeños y ordene la zona de
limpieza antes de que el The robot comience a limpiar�
6. Solución de problemas

75
ES
7. Especificaciones técnicas
Modelo K701G
Voltaje de funcionamiento 14,4 V CC
Modelo de estación de carga CH1630RC
Corriente nominal de entrada
100-240 V CA,
50-60 Hz, 25 W
Corriente nominal de salida 20 V CC, 0,8 A
Modelo del mando a
distancia
RC1633 Voltaje de funcionamiento 3 V CC
Tipo de pila del mando a
distancia
AAA Tensión nominal 1,5 V CC
Consumo en modo apagado/en
espera
Menos de 0,50 W
Consumo en modo de espera
en red
Menos de 2,00 W
Nota:
Los datos técnicos y el diseño podrán verse modicados debido al continuo desarrollo del producto�
Este equipo debe utilizarse con una distancia mínima de 20 cm entre el radiador y el cuerpo del usuario�

76
FR
1. Consignes de sécurité importantes...............................................................................................................................77
2. Contenu de l'emballage ..................................................................................................................................................81
3. Fonctionnement et programmation ...............................................................................................................................84
4. Entretien ...........................................................................................................................................................................90
5. Voyant et sons d'alarme .................................................................................................................................................96
6. Dépannage .......................................................................................................................................................................97
7. Spécifications techniques ..............................................................................................................................................99
Table des matières

77
FR
1� Cet appareil peut être utilisé par des enfants à partir
de 8ans, ainsi que par des personnes dont les
facultés physiques, sensorielles ou mentales sont
diminuées, ou bien qui manquent d'expérience et de
connaissances, à la condition qu’ils aient été informés
sur la façon de se servir de l'appareil de manière
sûre et qu’ils aient compris les risques éventuels�
Les enfants ne doivent pas jouer avec l'appareil� Les
processus de nettoyage et d'entretien de routine ne
doivent pas être effectués par des enfants sans la
surveillance d’un adulte�
2� Débarrasser la zone à nettoyer� Retirer les cordons
d'alimentation et les petits objets présents sur le sol
et susceptibles de se prendre dans l'appareil� Replier
les franges sous les tapis et relever les rideaux et les
nappes pour qu'ils ne traînent pas sur le sol�
3� Si le sol présente une déclivité dans la zone à nettoyer
(une marche ou un escalier, par exemple), veiller à ce
que l'appareil puisse détecter la marche sans tomber�
Il peut s'avérer nécessaire de placer une barrière
physique aux abords de la déclivité pour empêcher
l'appareil de tomber� S'assurer que la barrière
physique ne présente pas de risque de chute�
4� Utiliser l'appareil uniquement comme indiqué dans le
présent manuel� Utiliser uniquement des accessoires
recommandés ou vendus par le fabricant�
5� S'assurer que la tension d'alimentation correspond à
celle indiquée sur la station d'accueil�
6� UNIQUEMENT destiné à un usage domestique en
INTÉRIEUR� Ne pas utiliser l'appareil à l'extérieur ni
dans des environnements industriels ou commerciaux�
7� Les batteries non rechargeables sont interdites�
8� Ne pas utiliser l'appareil sans réservoir à poussière et/
ou sans filtre�
9� Ne pas faire fonctionner l'appareil en présence de
bougies allumées ou d'objets fragiles�
10� Ne pas utiliser l'appareil dans des environnements
très chauds ou très froids (température inférieure à
-5°C/23°F ou supérieure à 40°C/104°F)�
11� Éloigner les cheveux, les vêtements amples, les doigts
et toutes les parties du corps des orifices et des
pièces mobiles�
Lors de l'utilisation d'un appareil électrique, des
précautions de base doivent toujours être respectées,
dont les suivantes:
LIRE TOUTES LES INSTRUCTIONS
AVANT D'UTILISER CET APPAREIL.
1. Consignes de sécurité importantes

78
FR
1. Consignes de sécurité importantes
12� Ne pas faire fonctionner l'appareil dans une pièce dans
laquelle un nourrisson ou un enfant dort�
13� Ne pas utiliser l'appareil sur des surfaces humides ou
recouvertes d'eau�
14� Ne pas laisser l'appareil ramasser des objets
volumineux comme des pierres, de gros morceaux de
papier ou tout élément susceptible de l'obstruer�
15� Ne pas utiliser l'appareil pour ramasser des matériaux
inflammables ou combustibles (essence et toners
d'imprimante ou de photocopieur, par exemple) ni dans
des endroits où ces produits sont susceptibles d'être
présents�
16� Ne pas utiliser l'appareil pour ramasser des objets en
train de brûler ou de fumer (comme des cigarettes,
des allumettes, des cendres chaudes) ou tout ce qui
pourrait provoquer un incendie�
17� Ne pas placer d'objet dans la tête d'aspiration� Ne pas
utiliser l'appareil si la tête d'aspiration est bloquée�
Retirer de la tête d'aspiration la poussière, les peluches,
les cheveux ou tout ce qui peut réduire le débit d'air�
18� Veiller à ne pas endommager le cordon d'alimentation�
Ne pas déplacer l'appareil ou la station d'accueil en
tirant sur le cordon d'alimentation, ne pas utiliser le
cordon d'alimentation comme une poignée, ne pas le
coincer dans une porte et ne pas tirer le cordon sur des
bords ou coins tranchants� Ne pas faire rouler l'appareil
sur le cordon d'alimentation� Maintenir le cordon
d'alimentation à l'écart des surfaces chaudes�
19� Si le cordon d'alimentation est endommagé, il doit
être remplacé par le fabricant ou son intermédiaire de
service afin d'éviter tout accident�
20� Ne pas utiliser la station d'accueil si elle est
endommagée�
21� Ne pas utiliser l'appareil si le cordon d'alimentation
ou le réservoir est endommagé� Ne pas utiliser
l'appareil ou la station d'accueil s'ils ne fonctionnent
pas correctement, ont subi une chute, ont été
endommagés, sont restés à l'extérieur ou sont entrés
en contact avec de l'eau� Il doit être réparé par le
fabricant ou son intermédiaire de service afin d'éviter
tout accident�
22� Couper l'alimentation avant le nettoyage ou l'entretien
de l'appareil�
23� Le bouchon doit être retiré du réservoir avant le
nettoyage ou l'entretien de la station d'accueil�
24� Pour la mise au rebut de l'appareil, retirer l'appareil de
la station d'accueil, couper l'alimentation et retirer la
batterie�

79
FR
25� La batterie doit être déposée et mise au rebut
conformément aux lois et réglementations locales
avant la mise au rebut de l'appareil�
26� Mettre au rebut les batteries usagées conformément
aux lois et réglementations locales�
27� Ne pas incinérer l'appareil, même s'il est gravement
endommagé� Les batteries peuvent exploser sous
l'effet du feu�
28� Si la station d'accueil n'est pas utilisée pendant une
longue période, la débrancher�
29� L'appareil doit être utilisé conformément aux
instructions figurant dans ce manuel d'instructions�
REECOO ne peut être tenu responsable de tout
dommage ou préjudice causé par une utilisation
incorrecte�
30� Le robot contient des batteries que seules des
personnes qualifiées peuvent remplacer� Pour
remplacer ou retirer la batterie, contacter le service
clientèle�
31� Si le robot n'est pas utilisé pendant une longue
période, le recharger complètement et le mettre hors
tension pour le ranger� Débrancher la station d'accueil�
32. AVERTISSEMENT: Pour recharger la batterie, seule
l'unité d'alimentation amovible CH1630RC fournie
avec l'appareil doit être utilisée�
33� La télécommande nécessite deux batteries
AAA non-rechargeables� Pour remplacer la pile
de la télécommande, il convient de retourner la
télécommande, d'appuyer sur le bouton et de retirer
le couvercle du logement des piles� Retirer les piles,
et insérer les nouvelles piles en respectant la polarité�
Replacer le couvercle du logement des piles�
34� Les piles non rechargeables ne doivent pas être
rechargées�
35� Il ne faut pas mélanger différents types de piles, ou
des piles neuves et usagées�
36� Les piles de la télécommande doivent être insérées en
respectant la polarité�
37� Les piles usagées doivent être retirées de l'appareil et
mises au rebut de manière adéquate�
38� Si la télécommande va être inutilisée pendant une
longue période, les piles doivent être retirées�
39� Les bornes d'alimentation ne doivent jamais être
court-circuitées�
CONSERVER CES INSTRUCTIONS
1. Consignes de sécurité importantes

80
FR
1. Consignes de sécurité importantes
Classe II
Transformateur d'isolement résistant
aux courts-circuits
Alimentation à découpage
Utiliser uniquement à l'intérieur
Mise au rebut correcte de ce produit
Ce marquage indique que ce produit ne doit pas
être jeté avec les autres déchets ménagers dans
toute l'Union européenne� Pour prévenir d'éventuels
dommages à l'environnement ou la santé humaine suite
au rejet non contrôlé des déchets, recycler l'appareil de
façon responsable afin d'assurer la réutilisation durable
de ses ressources matérielles� Pour recycler votre
appareil usagé, merci d'utiliser le système de retour
et de collecte ou de contacter le détaillant qui vous l'a
vendu� Il peut recycler ce produit en toute sécurité�
81
FR
2.1 Contenu de l'emballage
Robot
Télécommande
(avec piles)
Brosses latéralesStation d'accueil
Outil de nettoyage
multifonction
Manuel d'instructions
Réservoir d'eau
Chiffon de nettoyage
en microfibre lavable/
réutilisable
Remarque :
Les gures et illustrations sont fournies uniquement à titre de référence, et peuvent ne pas représenter l'apparence du produit�
La conception et les spécications du produit peuvent être modiées sans préavis�
2. Contenu de l'emballage
Instruction Manual
Filtre éponge
et filtre haute efficacité
82
FR
2. Contenu de l'emballage
Capteurs anticollision et
pare-chocs
2.3 Schéma du produit
Robot
Bouton du mode
automatique
Caméra VSLAM
Commutateur d'alimentation
Bouton de réinitialisation
Bouton de
déverrouillage
du réservoir à
poussière
Vue de dessous
Capteurs
antichute
Capteurs
antichute
Option Brosse
principale
Contacts de
charge
Roue
universelle
Brosses
latérales
Réservoir à
poussière/
Réservoir d'eau
(Maintenez la touche enfoncée pendant 5 secondes�
Le robot va reprendre ses paramètres d'usine� Faites
attention en utilisant ce bouton�)

83
FR
2. Contenu de l'emballage
Station d'accueil Télécommande
Bouton MARCHE/
PAUSE
Bouton de mode de
nettoyage des bords
Boutons de commande
de direction
Bouton de mode de
nettoyage localisé
Bouton de mode de
retour au chargeur
Générateur de signaux
infrarouges
Broches de la station
d'accueil
Système de lavage avancé
Réservoir d'eau
Chiffon de nettoyage
en microbre lavable/
réutilisable
Bouton de déverrouillage
du réservoir d'eau
Entrée d'eau

84
FR
Avant d'utiliser l’appareil sur un tapis à poil ras avec des bords à gland,
replier les bords sur eux-mêmes�
AVERTISSEMENT : ne pas utiliser le The robot sur des surfaces humides ou recouvertes d'eau.
Il peut s'avérer nécessaire de placer une barrière physique aux abords
de la déclivité pour empêcher l'appareil de tomber�
Retirer les cordons d'alimentation et les petits objets présents sur le
sol susceptibles d'obstruer le passage du robot�
3.1 Remarques avant le nettoyage
Ranger la zone à nettoyer en mettant les meubles, par exemple les
chaises, à leur place exacte�
3. Fonctionnement et programmation

85
FR
1
Enlèvement de la bande de protection
2
Positionnement de la station de charge
3
Installation des brosses latérales
4
Mise sous tension
3.2 Préparation
Remarque : Quand le robot The robot a ni son cycle de nettoyage ou quand la batterie est
faible, il retourne automatiquement à la station de charge pour se recharger lui-même�
5
Charge du robot The robot
3. Fonctionnement et programmation

86
FR
3. Fonctionnement et programmation
3.3 Sélection du mode de nettoyage
1
Mode de nettoyage automatique
Un schéma de nettoyage programmé (optimisé pour les moquettes)
sera sélectionné par défaut�
OU
OU
2
Retour à la station de charge
≥3s
3
Mode de nettoyage des bords
87
FR
3. Fonctionnement et programmation
4
Mode de nettoyage localisé (moins de 3minutes)
3.4 Switch vacuum power
X 2

88
FR
3. Fonctionnement et programmation
3.5 Mise en pause, réactivation et mise hors tension
1
Mise en pause
2
Réactivation
Remarque : Le panneau de commande du robot s'arrête de clignoter
si celui-ci est en pause depuis quelques minutes� Appuyer sur le
bouton du mode automatique pour réactiver le robot The robot�
Appuyer sur le bouton de mode automatique pour réactiver le The
robot.
3
Mise hors tension
Remarque : Lorsque le robot The robot ne nettoie pas, il est
recommandé de le laisser sous tension et en charge�
OU
OU
89
FR
3. Fonctionnement et programmation
3.6 Système de lavage en option
Remarque : Vider le réservoir d'eau et retirer la plaque du chiffon de nettoyage avant de nettoyer des tapis/la moquette�
Lors de l'utilisation de cette fonction de lavage, replier les bords du tapis sous celui-ci an que le robot The robot l'évite�
Veillez à utiliser uniquement de l'eau, et à ne pas mettre de liquide lave-glace ou toute autre solution de nettoyage dans le réservoir�
Remarque : Lorsque le robot The robot a terminé de laver, vider l'eau éventuellement présente dans le réservoir�

90
FR
4. Entretien
Pour procéder aux tâches de nettoyage et d'entretien du robot The robot, le mettre hors tension et débrancher la station de charge.
4.1 Système de lavage en option
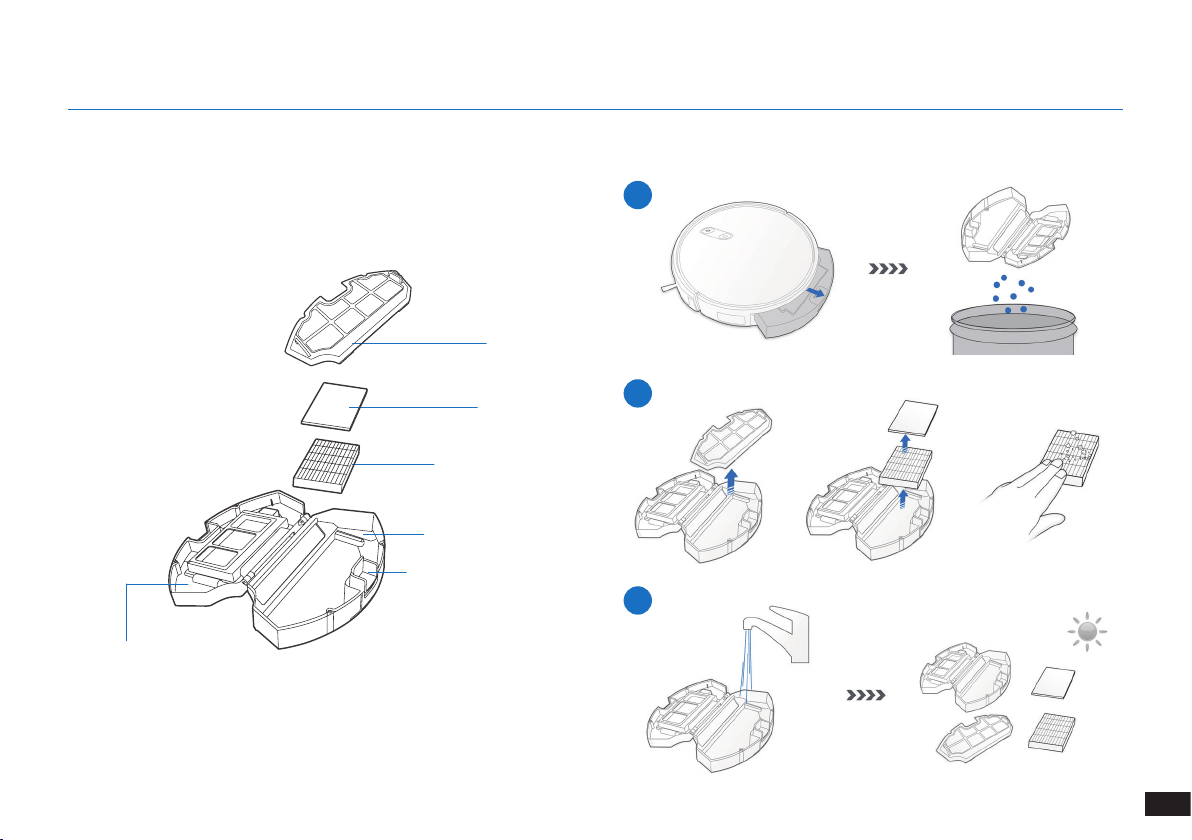
91
FR
Pour procéder aux tâches de nettoyage et d'entretien du robot The robot, le mettre hors tension et débrancher la station de charge.
Réservoir à poussière
4.2 Réservoir à poussière et filtres
1
2
3
Filet du ltre
Filtre éponge
Filtre haute efcacité
Réservoir à poussière
Bouton de déverrouillage
du réservoir à poussière
Capot du réservoir
à poussière
4. Entretien
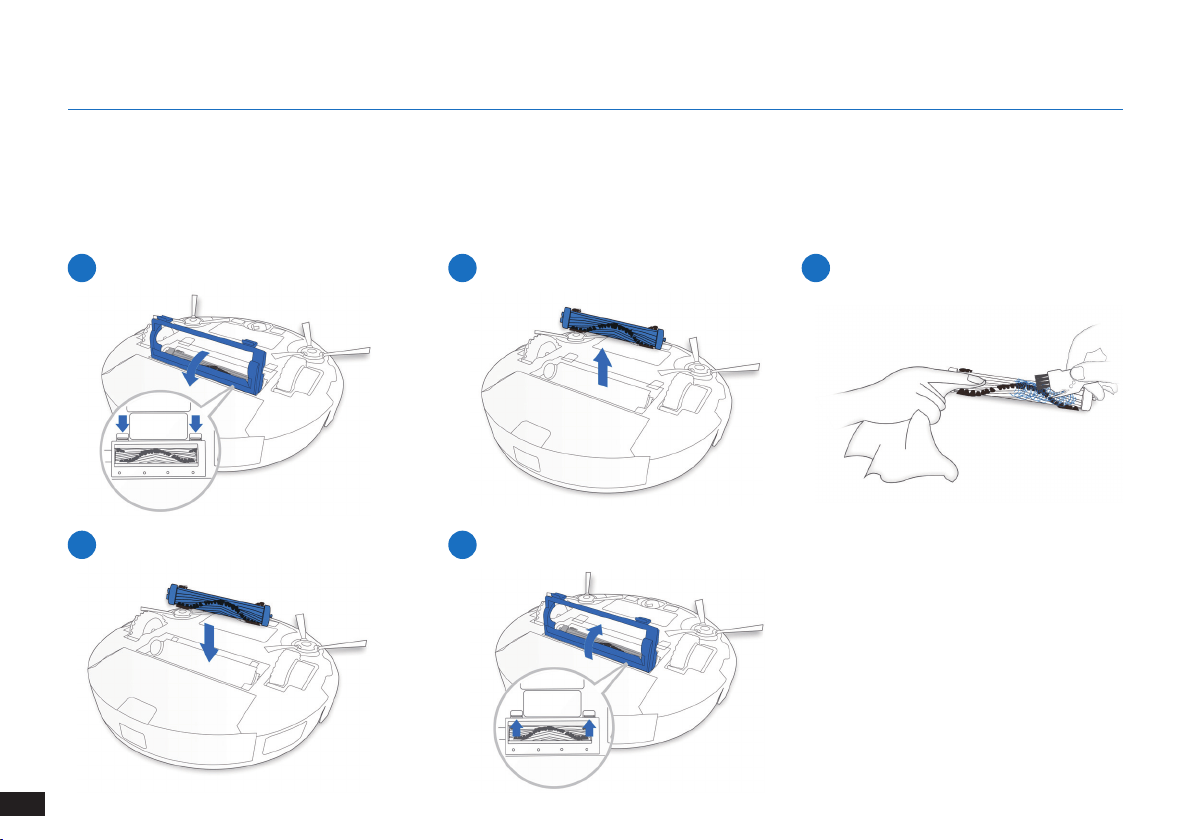
92
FR
4. Entretien
1
4
2
5
3
Brosse principale
4.3 Brosse principale et brosses latérales
Remarque : Un outil de nettoyage multifonction est fourni pour faciliter l'entretien. Manipuler cet outil avec soin, car ses bords sont
tranchants.
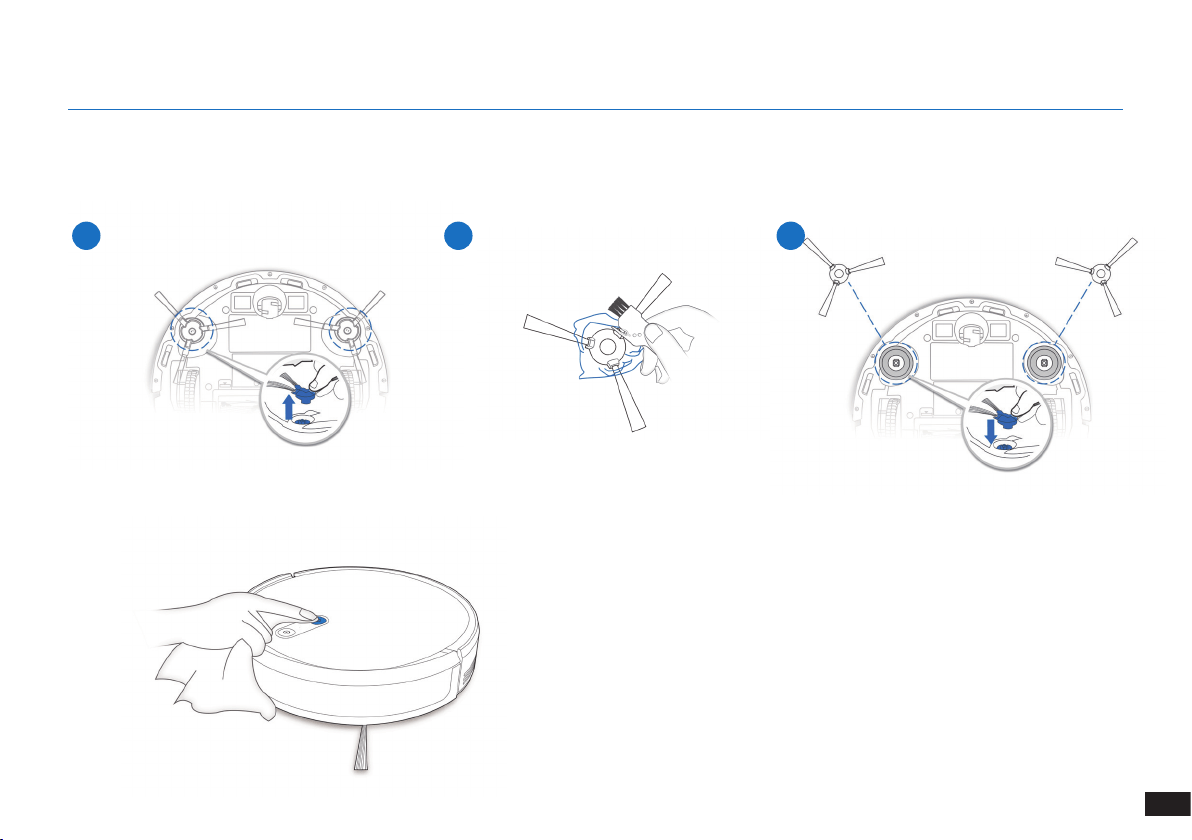
93
FR
1 2 3
4. Entretien
4.4 Brosses latérales
Remarque : Un outil de nettoyage multifonction est fourni pour faciliter l'entretien. Manipuler cet outil avec soin, car ses bords sont
tranchants.
4.5 Autres composants
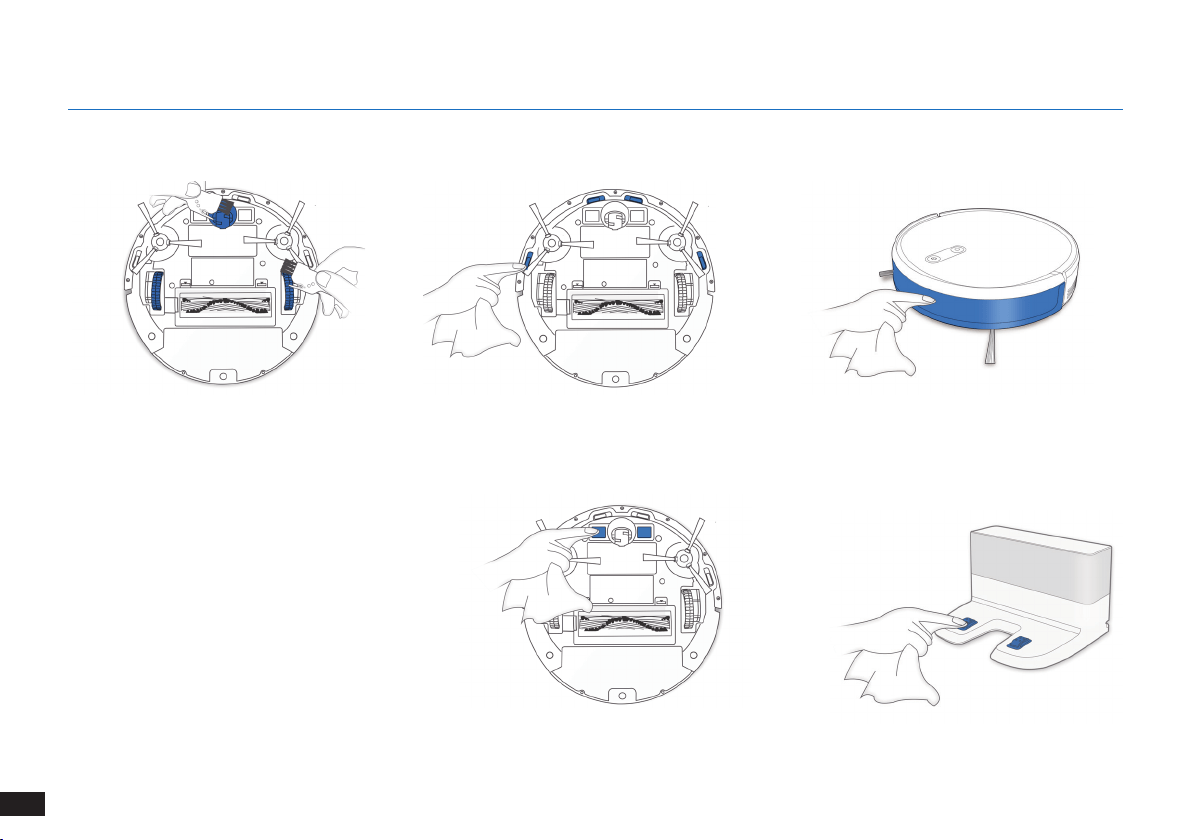
94
FR
4. Entretien
Remarque : Avant de nettoyer les contacts de
charge du robot ainsi que les broches de recharge
de la station de charge, mettre le robot hors
tension et débrancher la station de charge�
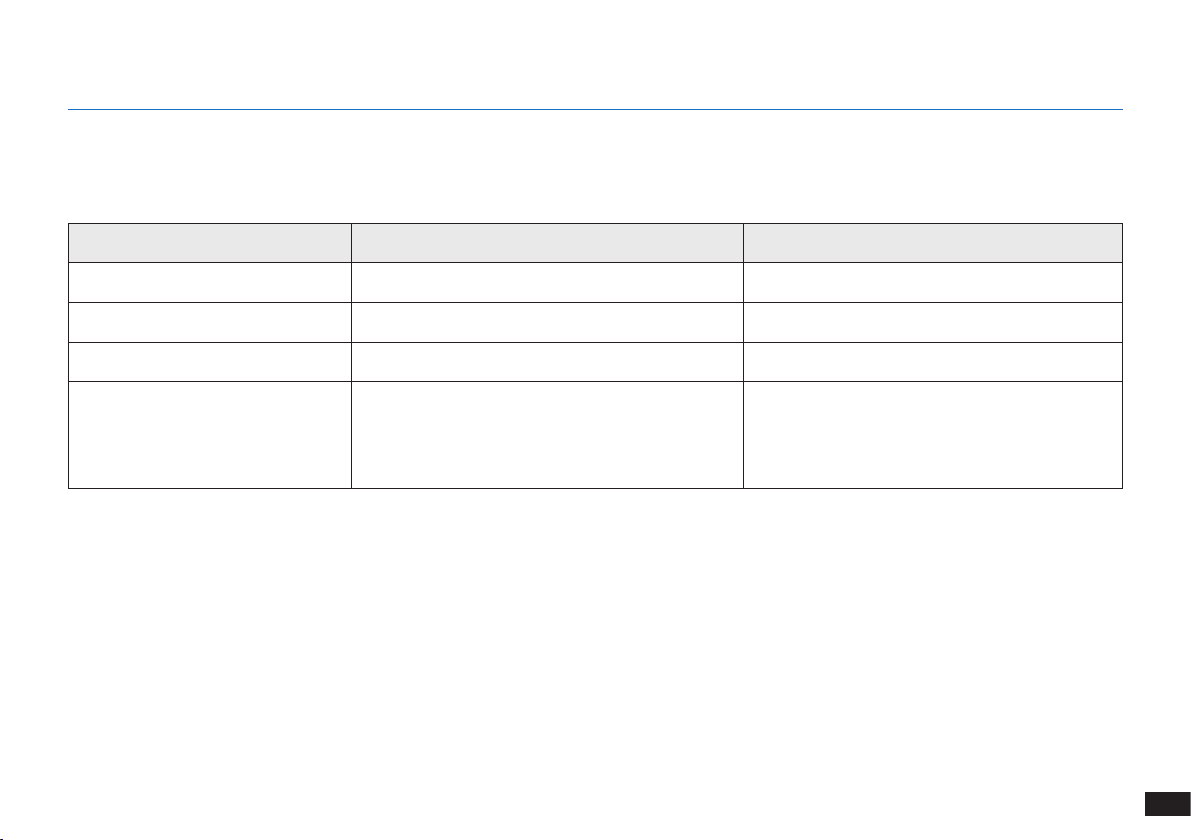
95
FR
4.6 Entretien régulier
Pour maintenir les performances optimales du robot The robot, réaliser les tâches d'entretien et remplacer les pièces à la fréquence
suivante :
Un outil de nettoyage multifonction est fourni pour faciliter l'entretien. Manipuler cet outil avec soin, car ses bords sont tranchants.
Remarque : YEEDI fabrique divers assemblages et pièces de remplacement� Veuillez contacter le service clientèle pour plus d'informations sur les
pièces de remplacement�
4. Entretien
Pièce du robot Fréquence d'entretien Fréquence de remplacement
Brosse latérale Une fois toutes les 2 semaines Tous les 3 à 6 mois
Brosse principale Une fois par semaine Tous les 6 à 12 mois
Filtre éponge/Filtre haute efcacité Une fois par semaine Tous les 3 à 6 mois
Roue universelle
Capteurs antichute
Pare-chocs
Contacts de charge
Broches de recharge
Une fois par semaine /

96
FR
5. Voyant et sons d'alarme
Voyant
Scénario Voyant
Le robot est en cours de nettoyage Le bouton de mode automatique clignote en BLANC xe
Le robot est en charge Le bouton de mode automatique clignote en BLANC
La batterie du robot est faible Le bouton de mode automatique clignote en ROUGE xe
Le robot a rencontré un problème Le bouton de mode automatique clignote en ROUGE
Le schéma de nettoyage programmé est activé Le témoin de passage au mode de nettoyage s'allume

97
FR
N°. Dysfonctionnement Causes possibles Solutions
1 Le The robot ne se charge pas�
Le robot The robot n'est pas sous tension� Mettre le robot The robot sous tension�
Le robot The robot ne s'est pas connecté à la
station d'accueil�
S'assurer que les contacts de charge du robot sont
connectés aux broches de recharge�
La batterie est complètement déchargée�
Réactiver la batterie� Mettre le robot The robot sous
tension� Placer le robot The robot sur la station d'accueil
manuellement, le retirer après l'avoir laissé en charge
pendant 3 minutes, répéter 3 fois cette opération, puis
charger normalement�
2
Le robot ne retourne pas à la
station d'accueil�
La station d'accueil n'est pas placée
correctement�
Veuillez vous reporter à la section « Préparation »
pour savoir comment positionner la station d'accueil
correctement�
La station d'accueil a été débranchée
ou déplacée manuellement pendant le
nettoyage�
Assurez-vous que la station d'accueil est branchée et
évitez de la déplacer manuellement lorsque le robot est
en cours de nettoyage�
Le robot fonctionne dans un environnement
sombre�
Assurez-vous que les chambres à nettoyer sont bien
éclairées�
Le robot est bloqué par des obstacles
(notamment des ls, glands de tapis ou
bases de ventilateur électrique, etc�), ou la
porte de la pièce où la station d'accueil est
placée est fermée�
Veuillez vous reporter au paragraphe « Remarques avant
le nettoyage » pour ranger l'espace avant d'utiliser le
robot�
Le robot a été mis en pause pendant plus de
60 minutes, ou manuellement déplacé hors
d'un rayon d'un mètre autour de sa position
d'origine pendant le nettoyage�
Il est recommandé de ne pas mettre le robot en pause
pendant plus de 60 minutes� Si vous déplacez le robot,
il faut le laisser dans un rayon d'un mètre autour de sa
position d'origine� Pour assurer l'efcacité du nettoyage,
veuillez éviter de mettre en pause ou de déplacer le robot
pendant le nettoyage�
6. Dépannage
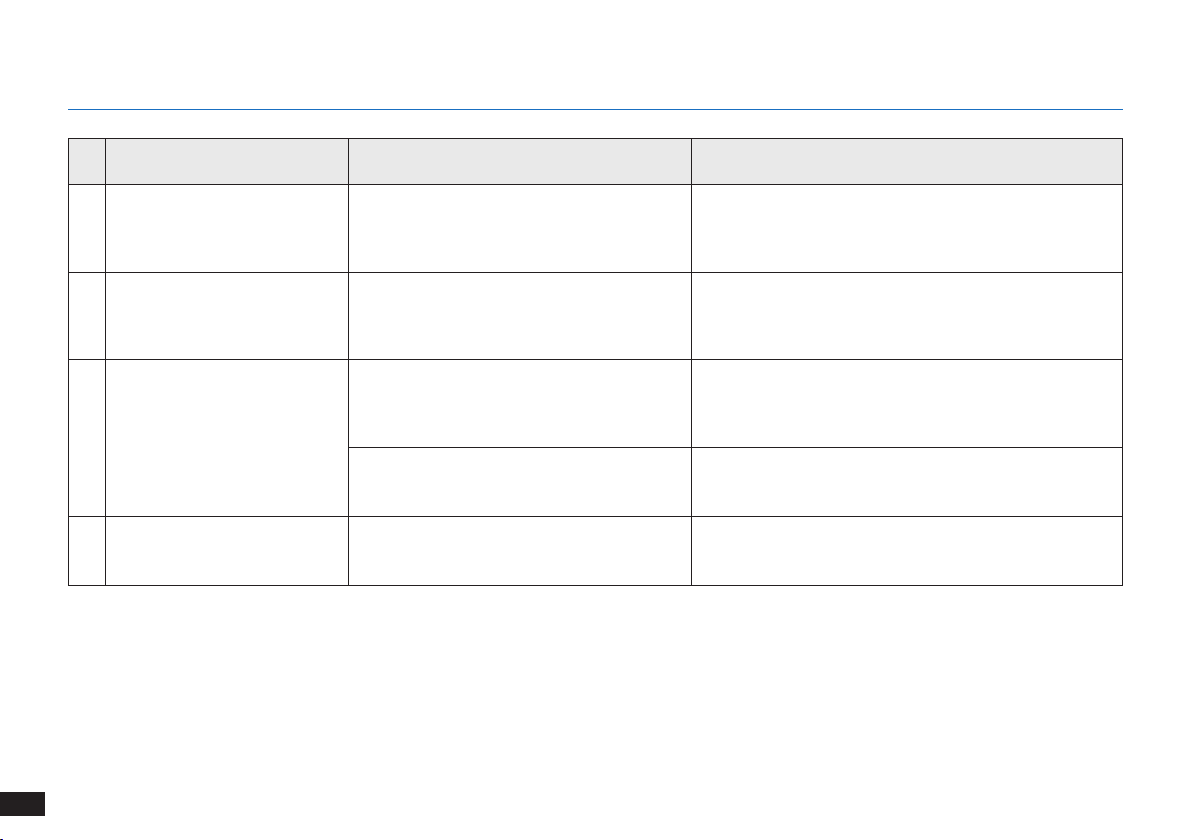
98
FR
N°. Dysfonctionnement Causes possibles Solutions
2
Le robot ne retourne pas à la
station d'accueil�
Le robot n'a pas commencé le nettoyage à
partir de la station d'accueil�
Il est suggéré de démarrer le robot à partir de la station
d'accueil�
3
Le robot The robot est
confronté à un problème
pendant le nettoyage et
s'arrête�
Le robot The robot est bloqué par quelque
chose au sol (cordons électriques, rideaux
tombant au sol, frange de tapis, etc�)�
Le robot The robot va tenter de résoudre le problème de
diverses manières� En cas d'échec, retirer à la main les
obstacles et faire redémarrer le robot�
4
Le robot The robot revient à la
station d'accueil avant d'avoir
terminé le nettoyage�
Lorsque la batterie devient faible, le robot
The robot bascule automatiquement en mode
de retour au chargeur et retourne à la station
d'accueil pour se recharger tout seul�
C'est normal� Il n’est pas nécessaire d’intervenir�
Le temps de travail varie selon la surface du
sol, la complexité de la pièce et le mode de
nettoyage sélectionné�
C'est normal� Il n’est pas nécessaire d’intervenir�
6
Le robot The robot ne nettoie pas
l'ensemble de la zone�
La zone de nettoyage n'est pas rangée�
Retirer les petits objets présents sur le sol et ranger la zone à
nettoyer avant le début du nettoyage�
6. Dépannage

99
FR
7. Spécifications techniques
Modèle K701G
Tension fonctionnelle 14,4V CC
Modèle de la station
d'accueil
CH1630RC
Courant nominal d'entrée
100-240 V CA
50-60 Hz, 25 W
Courant de sortie nominal 20 V CC, 0,8 A
Modèle de télécommande RC1633 Tension fonctionnelle 3 V CC
Type des piles de la
télécommande
AAA Tension nominale 1,5 V CC
Puissance en mode désactivé/
veille
Moins de 0,50 W
Puissance en veille réseau Moins de 2,00 W
Remarque :
Ces spécications techniques peuvent être modiées à des ns d'amélioration continue�
Cet équipement doit être utilisé en gardant une distance minimale de 20 cm entre le radiateur et votre corps�

100
IT
1. Importanti istruzioni sulla sicurezza ............................................................................................................................101
2. Contenuto della confezione .........................................................................................................................................105
3. Funzionamento e programmazione .............................................................................................................................108
4. Manutenzione ................................................................................................................................................................114
5. Spia di stato e segnali acustici di allarme ...................................................................................................................120
6. Risoluzione dei problemi ..............................................................................................................................................121
7. Specifiche tecniche .......................................................................................................................................................123
Indice

101
IT
1� Questo apparecchio può essere usato da bambini
di almeno 8 anni e da persone con capacità fisiche,
sensoriali o mentali ridotte o da persone che non ne
conoscano il corretto utilizzo purché supervisionate o
formate sull'uso sicuro dell'apparecchio e in grado di
comprenderne gli eventuali rischi correlati� I bambini
non devono giocare con l'apparecchio� La pulizia e
la manutenzione non devono essere effettuate da
bambini non supervisionati�
2� Sgombrare l'area da pulire� Togliere dal pavimento
cavi di alimentazione e piccoli oggetti che potrebbero
intralciare l'apparecchio� Piegare le frange dei tappeti
sotto agli stessi e sollevare dal pavimento oggetti
come tende e tovaglie�
3� In caso di possibilità di caduta nell'area da pulire, ad
esempio a causa di scalini, è necessario impostare
l'apparecchio in modo che possa rilevare i gradini
senza cadere� Potrebbe essere necessario posizionare
delle barriere sul bordo per evitare la caduta del robot�
Assicurarsi che la barriera fisica non rappresenti un
rischio di inciampo per le persone�
4� Utilizzare l'apparecchio solo come previsto da questo
manuale� Utilizzare solo accessori consigliati o venduti
dal produttore�
5� Assicurarsi che la tensione dell'alimentazione
corrisponda a quella indicata sulla Docking Station�
6� Solo per uso in INTERNI� Non utilizzare l'apparecchio
in esterni o in ambienti commerciali o industriali�
7� Non è consentito l'utilizzo di batterie non ricaricabili�
8� Non utilizzare senza aver installato la cassetta di
raccolta e i filtri�
9� Non utilizzare l'apparecchio in un'area con candele
accese o oggetti fragili�
10� Non utilizzare in condizioni climatiche estremamente
calde o fredde (sotto i 5 °C o sopra i 40 °C)�
11� Tenere capelli, vestiti, dita e qualsiasi parte del
corpo lontano dalle aperture e dalle parti mobili
dell'apparecchio�
12� Non utilizzare l'apparecchio in una stanza in cui sta
dormendo un neonato o un bambino�
13� Non utilizzare l'apparecchio su superfici bagnate o
con acqua stagnante�
14� Non consentire all'apparecchio di raccogliere oggetti
Quando si usa un elettrodomestico, è necessario seguire
delle precauzioni di base:
LEGGERE TUTTE LE ISTRUZIONI PRIMA
DI UTILIZZARE L'APPARECCHIO.
1. Importanti istruzioni sulla sicurezza

102
IT
grandi come pietre, grossi pezzi di carta o oggetti che
potrebbero ostruire l'apparecchio�
15� Non utilizzare l'apparecchio per raccogliere materiali
infiammabili o combustibili come benzina, toner per
stampanti o fotocopiatrici, né utilizzarlo in aree dove
questi potrebbero essere presenti�
16� Non utilizzare l'apparecchio per raccogliere materiali
incandescenti o che emettono fumo, come sigarette,
fiammiferi, cenere ardente, o qualsiasi cosa che
potrebbe provocare un incendio�
17� Non infilare oggetti nella presa di aspirazione� Non
utilizzare l'apparecchio se la presa di aspirazione è
ostruita� Mantenere la presa libera da polvere, garze,
capelli, o qualsiasi cosa che potrebbe ridurre il flusso
d'aria�
18� Fare attenzione a non danneggiare il cavo di
alimentazione� Non tirare o trascinare l'apparecchio
o la Docking Station dal cavo di alimentazione, non
utilizzare il cavo di alimentazione come maniglia, non
chiudere il cavo di alimentazione in una porta e non
strusciare il cavo di alimentazione su bordi o spigoli
affilati� Non far passare l'apparecchio sopra il cavo di
alimentazione� Tenere il cavo di alimentazione lontano
da superfici calde�
19� In caso di danneggiamento del cavo di alimentazione,
sarà necessario sostituirlo presso il produttore o
tramite il servizio clienti per evitare rischi�
20� Non utilizzare la Docking Station, se danneggiata�
21� Non utilizzare l'apparecchio con prese o cavi di
alimentazione danneggiati� Non utilizzare l'apparecchio
o la Docking Station se non funzionano correttamente,
in caso di caduta, se sono stati lasciati all'esterno o se
sono venuti a contatto con acqua� In questi casi, sarà
necessaria la riparazione da parte del produttore o
tramite il servizio clienti per evitare rischi�
22� Spegnere l'apparecchio prima di pulirlo o di effettuare
operazioni di manutenzione�
23� È necessario rimuovere la spina dalla presa di corrente
prima di pulire o effettuare operazioni di manutenzione
sulla Docking Station�
24� Rimuovere l'apparecchio dalla Docking Station
e posizionare su OFF l'interruttore di accensione
prima di rimuovere la batteria per lo smaltimento
dell'apparecchio�
25� È necessario rimuovere e gettare la batteria secondo
le leggi e le normative vigenti, prima dello smaltimento
dell'apparecchio�
26� Gettare le batterie usate secondo le leggi e le
1. Importanti istruzioni sulla sicurezza

103
IT
normative vigenti�
27� Non incenerire l'apparecchio anche nel caso in cui sia
molto danneggiato� Le batterie potrebbero esplodere
e provocare un incendio�
28� Scollegare dalla presa di corrente la Docking Station
in caso di mancato utilizzo prolungato�
29� L'apparecchio dev'essere utilizzato secondo le
indicazioni di questo Manuale d'uso� REECOO non
potrà essere ritenuta responsabile per eventuali danni
o infortuni causati da un utilizzo inappropriato�
30� Il robot contiene batterie sostituibili solo da persone
competenti� Per sostituire o rimuovere la batteria,
contattare l'assistenza clienti�
31� Se il robot non verrà utilizzato per lungo tempo,
ricaricarlo completamente, spegnerlo e scollegare la
Docking Station�
32. AVVISO: ai fini della ricarica della batteria, utilizzare
solo l'unità di alimentazione rimovibile CH1630RC
fornita con questo apparecchio�
33� Il telecomando richiede due batterie AAA non
ricaricabili� Per sostituire la batteria del telecomando,
capovolgere il telecomando, premere e rimuovere
il coperchio del vano delle batterie� Rimuovere le
batterie e inserire le nuove batterie con la polarità
1. Importanti istruzioni sulla sicurezza
corretta� Rimontare il coperchio del vano delle batterie�
34� Le batterie non ricaricabili non possono essere
ricaricate�
35� Non è possibile utilizzare simultaneamente batterie
nuove e vecchie�
36� Le batterie del telecomando devono essere inserite
correttamente secondo le indicazioni della polarità�
37� Le batterie esaurite devono essere rimosse
dall'apparecchio e smaltite in modo sicuro�
38� Se il telecomando rimane inutilizzato per un periodo di
tempo prolungato, rimuovere le batterie�
39� I terminali dell'alimentazione non devono essere in
corto circuito�
CONSERVARE QUESTE ISTRUZIONI
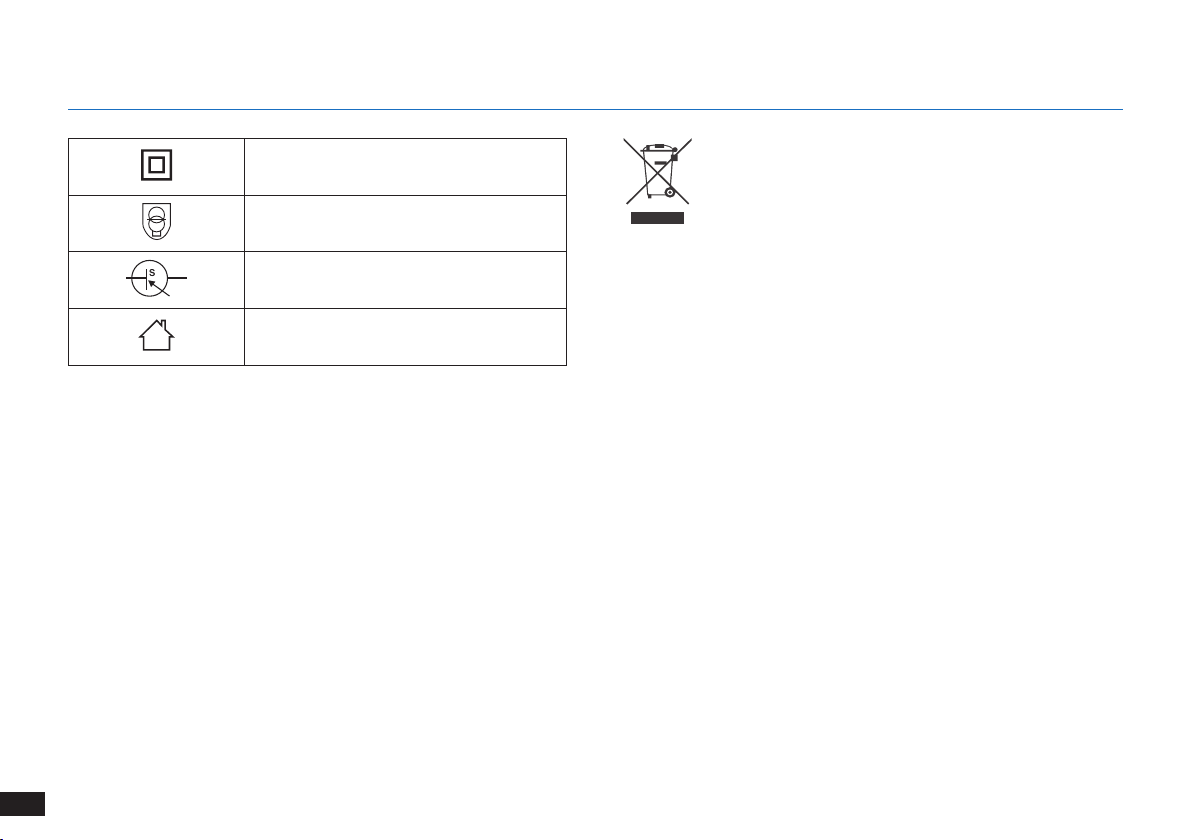
104
IT
1. Importanti istruzioni sulla sicurezza
Classe II
Trasformatore isolante di sicurezza anti
cortocircuito
Alimentatore a commutazione
Solo per uso in interni
Istruzioni per il corretto smaltimento del
prodotto
Questo simbolo indica che il prodotto non dovrebbe
essere smaltito insieme ad altri rifiuti domestici in
tutta l'Unione europea� Per evitare danni all'ambiente
o alla salute provocati da uno smaltimento di rifiuti
non controllato, riciclare in maniera responsabile per
promuovere il riutilizzo sostenibile delle risorse materiali�
Per riciclare l'apparecchio usato, usare i servizi di
ritiro e raccolta o contattare il rivenditore dove è stato
acquistato il prodotto, che sarà in grado di smaltirlo
correttamente�
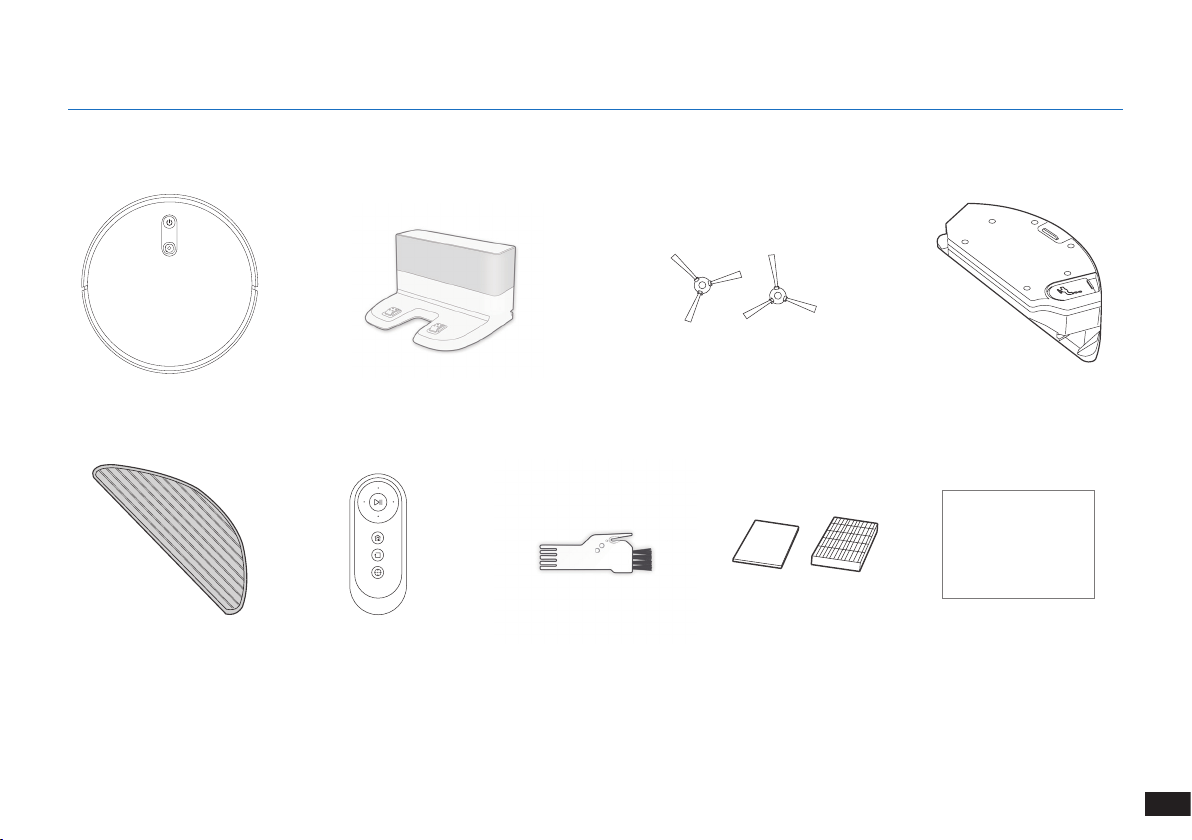
105
IT
2.1 Contenuto della confezione
Robot
Telecomando con batterie
Spazzole lateraliDocking Station
Strumento di pulizia
multi-funzione
Manuale d'uso
Nota:
le gure e le illustrazioni sono solo per riferimento e potrebbero differire dal reale aspetto del prodotto�
Il design e le speciche del prodotto sono soggetti a modiche senza preavviso�
2. Contenuto della confezione
Panno di pulizia in
microfibra lavabile/
riutilizzabile
Serbatoio
Instruction Manual
Filtro di spugna e filtro
ad elevata efficienza
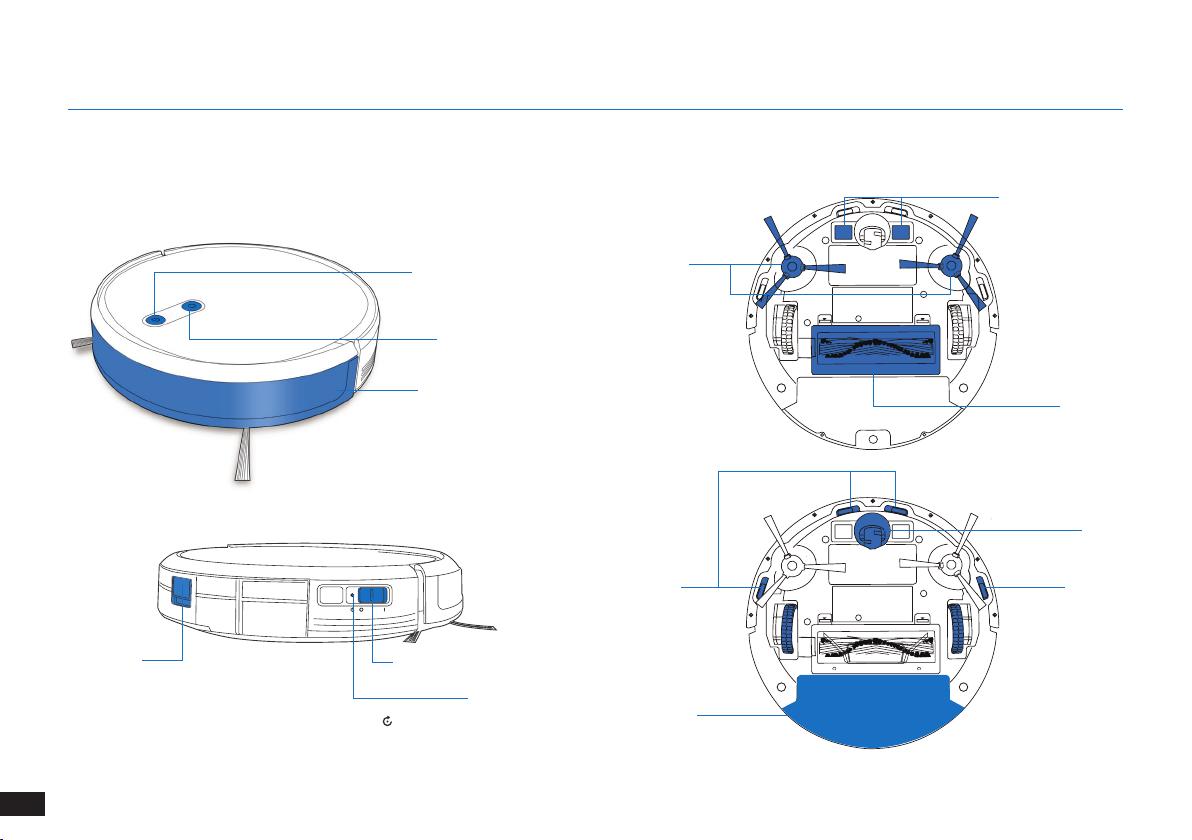
106
IT
2. Contenuto della confezione
Sensori anticollisione e
paraurti
2.3 Diagramma del prodotto
Robot
Pulsante Modalità AUTO
Fotocamera VSLAM
Interruttore di alimentazione
Pulsante Reset
Pulsante di
rilascio della
cassetta di
raccolta
Vista inferiore
Sensori
anticaduta
Sensori
anticaduta
Opzione
spazzola
principale
Contatti di ricarica
Ruota
universale
Spazzole
laterali
Cassetta di raccolta/
Serbatoio
(Tenere premuto per 5 secondi� Il robot verrà
ripristinato alle impostazioni di fabbrica� Utilizzare
questo tasto con cautela)�
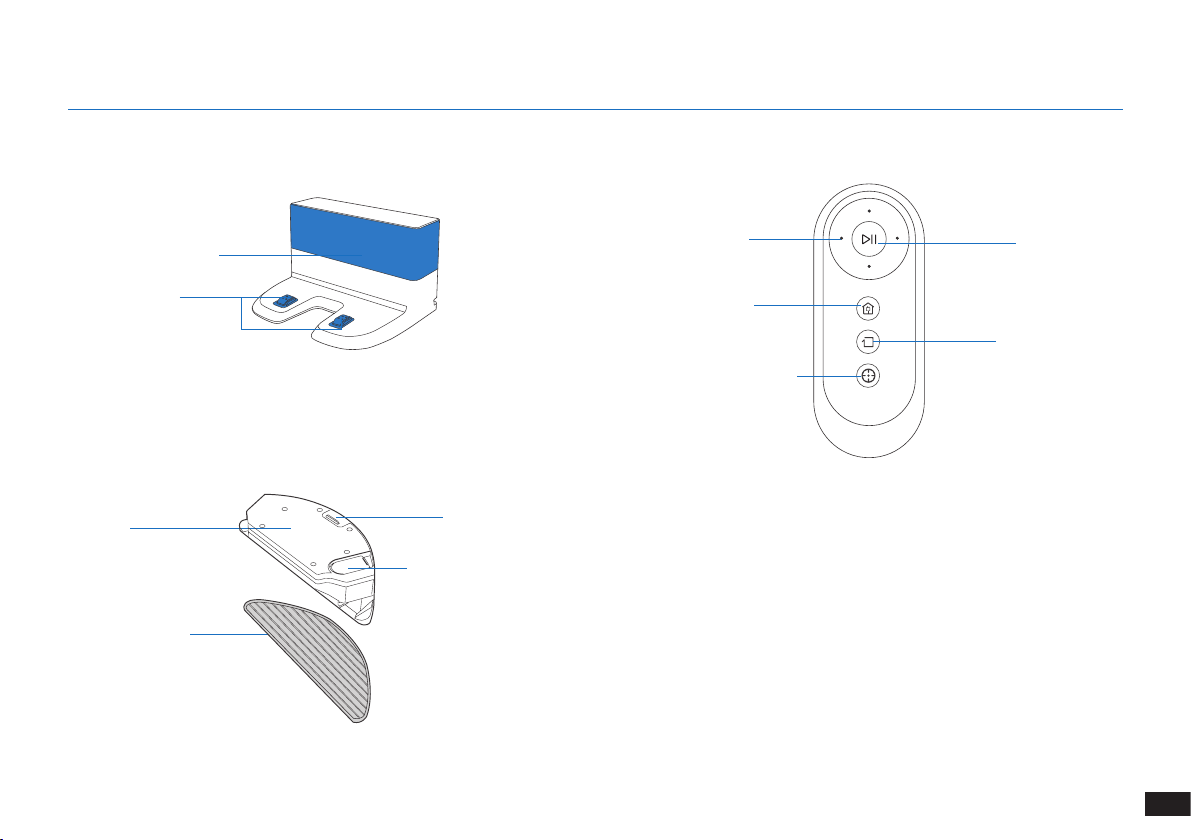
107
IT
2. Contenuto della confezione
Docking Station Telecomando
Pulsante AVVIO/
PAUSA
Pulsante Modalità di
pulizia bordi
Pulsanti di controllo
direzionali
Pulsante Modalità di pulizia
circoscritta
Pulsante Modalità
di ritorno in carica
Generatore di segnale a
infrarossi
Pin della Docking
Station
Sistema di lavaggio avanzato
Serbatoio
Panno di pulizia in
microbra lavabile/
riutilizzabile
Pulsante rilascio serbatoio
Inserimento acqua
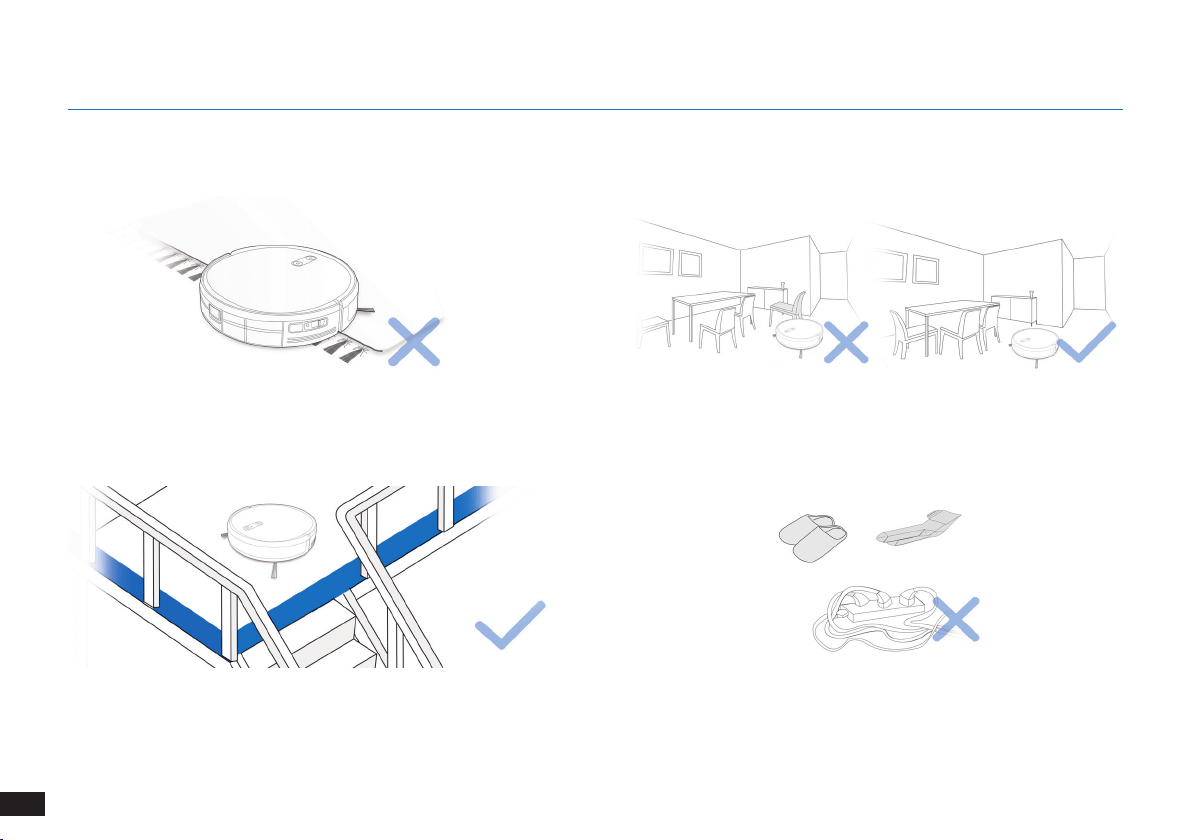
108
IT
Ripiegare i bordi dei tappeti con nappe prima di utilizzare il prodotto
in loro prossimità�
AVVISO: non utilizzare The robot su superfici bagnate o con acqua stagnante.
Potrebbe essere necessario posizionare delle barriere sul bordo del
dislivello per evitare la caduta del robot�
Togliere dal pavimento cavi di alimentazione e piccoli oggetti che
potrebbero intralciare il robot�
3.1 Note prima della pulizia
Mettere gli arredi, come le sedie, al loro posto prima di pulire la zona
desiderata�
3. Funzionamento e programmazione

109
IT
3. Funzionamento e programmazione
1
Rimuovere la fascia protettiva
2
Posizionamento del dock di ricarica
3
Installazione delle spazzole laterali
4
Accensione (ON)
3.2 Preparazione
Nota: Quando The robot termina il ciclo di pulizia o quando la carica della batteria comincia a
esaurirsi, The robot torna automaticamente al dock di ricarica per ricaricarsi�
5
Ricarica di The robot

110
IT
3. Funzionamento e programmazione
3.3 Seleziona delle modalità di pulizia
1
Modalità di pulizia AUTO
Verrà selezionato uno Schema di pulizia programmata (ottimizzato
per i pavimenti duri)�
OPPURE
OPPURE
2
Ritorno sul dock di ricarica
≥3s
3
Modalità di pulizia bordi

111
IT
3. Funzionamento e programmazione
4
Modalità di pulizia circoscritta (meno di 3 minuti)
3.4 Switch vacuum power
X 2
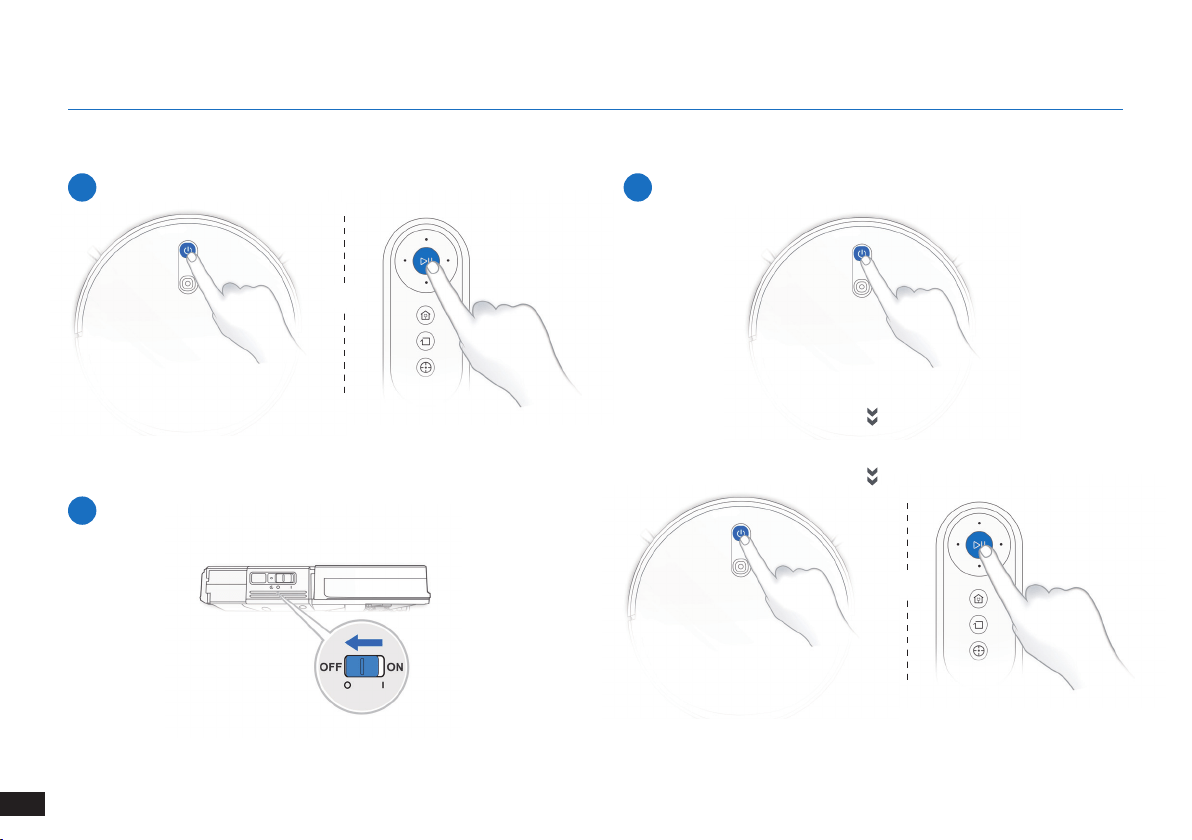
112
IT
3. Funzionamento e programmazione
3.5 Pausa, riattivazione, spegnimento
1
Pausa
2
Riattivazione
Nota: Il pannello di controllo del robot smette di lampeggiare se il
robot è in pausa da alcuni minuti� Premere il pulsante della modalità
AUTO su The robot per riattivare il robot�
Premere il pulsante AUTO di The robot per riattivarlo
3
Spegnimento (OFF)
Nota: Quando The robot non sta pulendo, è consigliabile tenerlo
acceso e in carica�
OPPURE
OPPURE

113
IT
3. Funzionamento e programmazione
3.6 Sistema di lavaggio opzionale
Nota: svuotare il serbatoio e rimuovere il piatto per panno di pulizia prima di pulire la moquette�
Quando si utilizza il sistema di lavaggio, ripiegare i bordi dei tappeti in modo che The robot eviti il tappeto�
Assicuratevi di usare solo acqua e di non versare nel serbatoio liquido lavavetri o qualsiasi altra soluzione di pulizia�
Nota: Al termine del lavaggio con The robot, svuotare l'acqua rimanente dal serbatoio�

114
IT
4. Manutenzione
Prima di eseguire operazioni di pulizia e manutenzione su The robot, spegnere il robot e scollegare il dock di ricarica.
4.1 Sistema di lavaggio opzionale

115
IT
Prima di eseguire operazioni di pulizia e manutenzione su The robot, spegnere il robot e scollegare il dock di ricarica.
Cassetta di raccolta
4.2 Cassetta di raccolta e filtri
1
2
3
Rete del ltro
Filtro di spugna
Filtro ad alta efcienza
Cassetta di raccolta
Pulsante di rilascio della
cassetta di raccolta
Coperchio della
cassetta di raccolta
4. Manutenzione
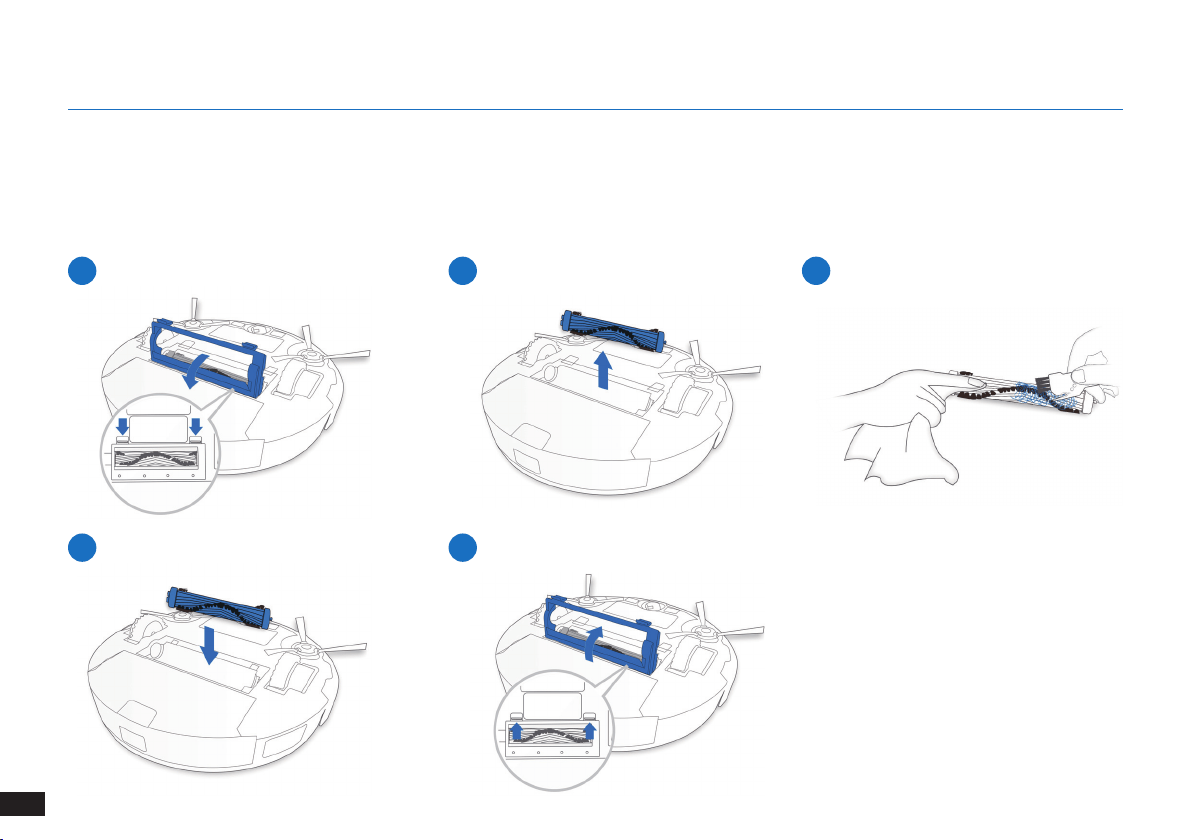
116
IT
4. Manutenzione
1
4
2
5
3
Spazzola principale
4.3 Spazzola principale e spazzole laterali
Nota: È fornito uno strumento di pulizia multi-funzione per semplificare le operazioni di manutenzione. Maneggiare con cura: lo strumento
di pulizia ha bordi taglienti.
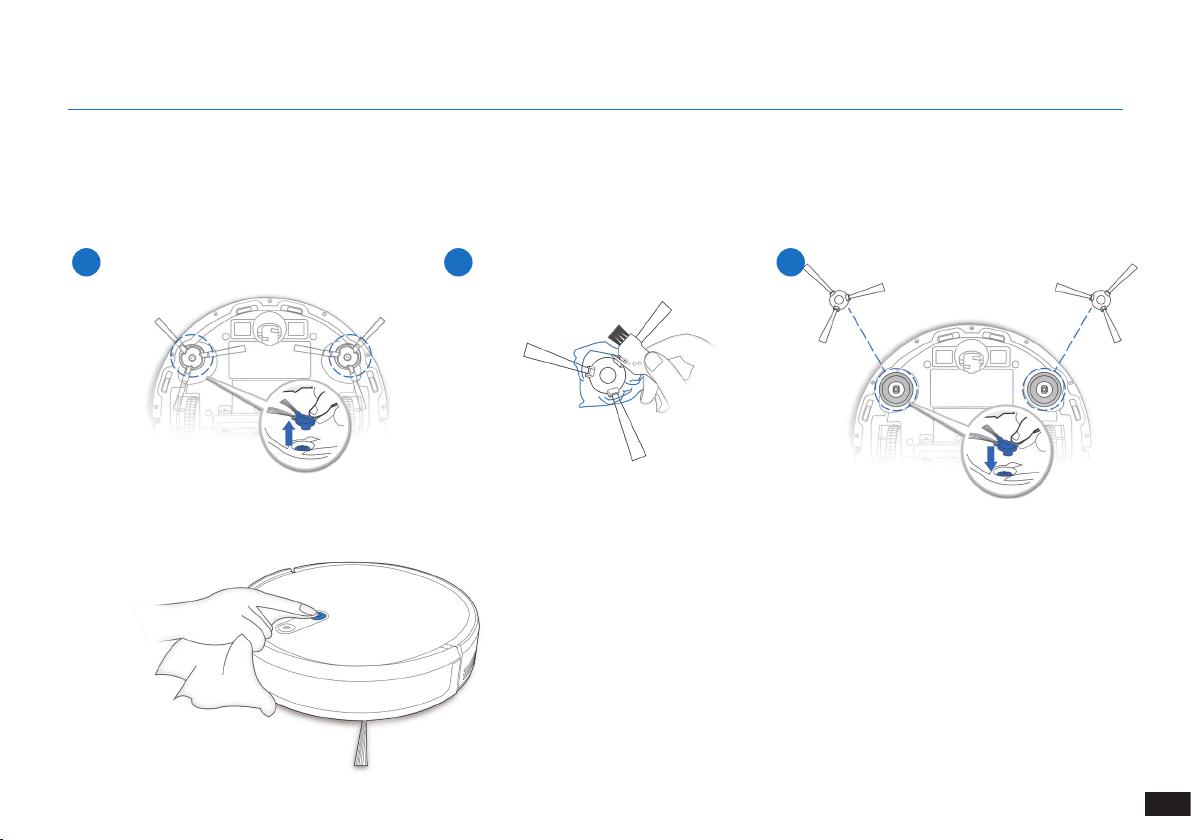
117
IT
1 2 3
4. Manutenzione
Spazzola principale
4.4 Spazzole laterali
Nota: È fornito uno strumento di pulizia multi-funzione per semplificare le operazioni di manutenzione. Maneggiare con cura: lo strumento
di pulizia ha bordi taglienti.
4.5 Altri componenti
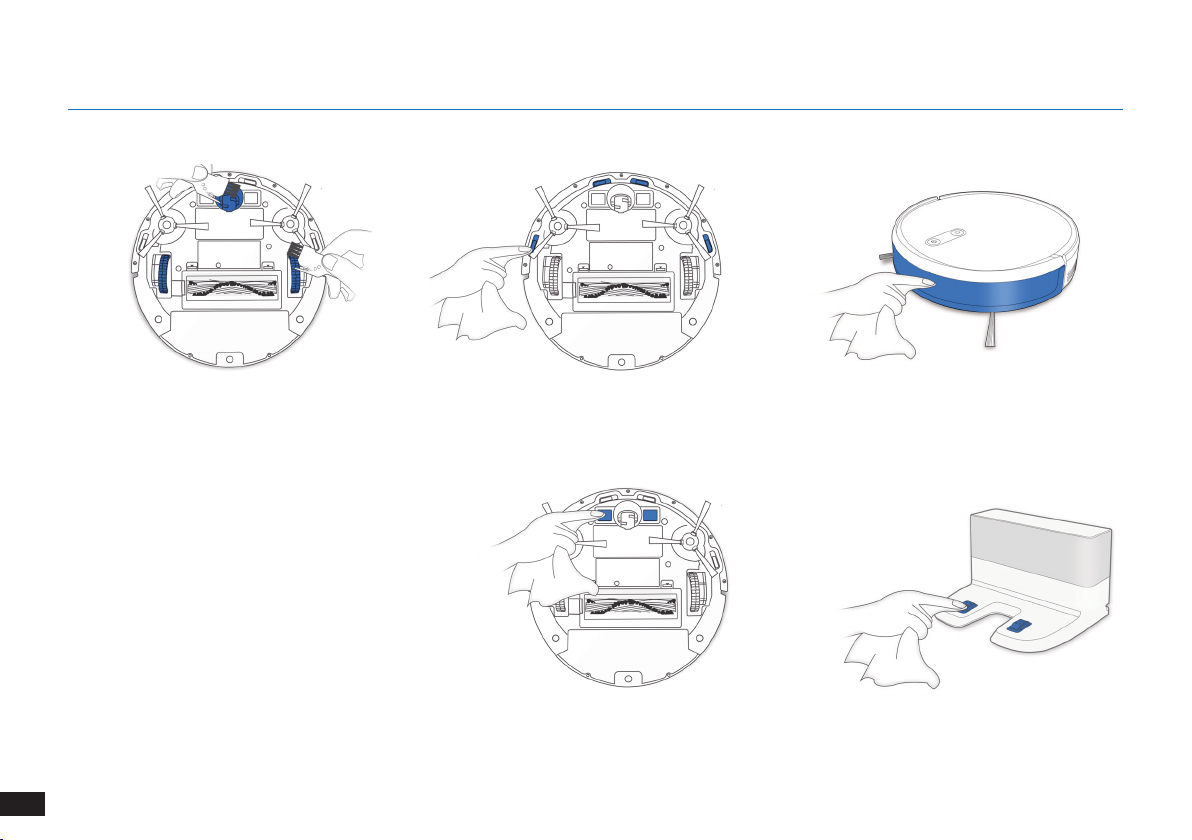
118
IT
4. Manutenzione
Nota: Prima di pulire i contatti e i pin del dock di
ricarica del robot, spegnerlo e scollegare il dock
di ricarica�

119
IT
4.6 Manutenzione regolare
Per mantenere The robot in esecuzione con prestazioni ottimali, eseguire le operazioni di manutenzione e sostituzione dei componenti con
le seguenti frequenze:
Per semplificare le operazioni di manutenzione, viene fornito uno strumento di pulizia multifunzione. Maneggiare con cura: lo strumento di
pulizia ha bordi taglienti.
Nota: YEEDI produce diverse parti e accessori di ricambio� Contattare l'assistenza clienti per ulteriori informazioni sulle parti di sostituzione�
4. Manutenzione
Parte robot Frequenza di manutenzione Frequenza di sostituzione
Spazzola laterale Ogni 2 settimane Ogni 3-6 mesi
Spazzola principale Una volta a settimana Ogni 6-12 mesi
Filtro di spugna / Filtro ad alta
efcienza
Una volta a settimana Ogni 3-6 mesi
Ruota universale
Sensori anticaduta
Paraurti
Contatti di ricarica
Pin del dock di ricarica
Una volta a settimana /
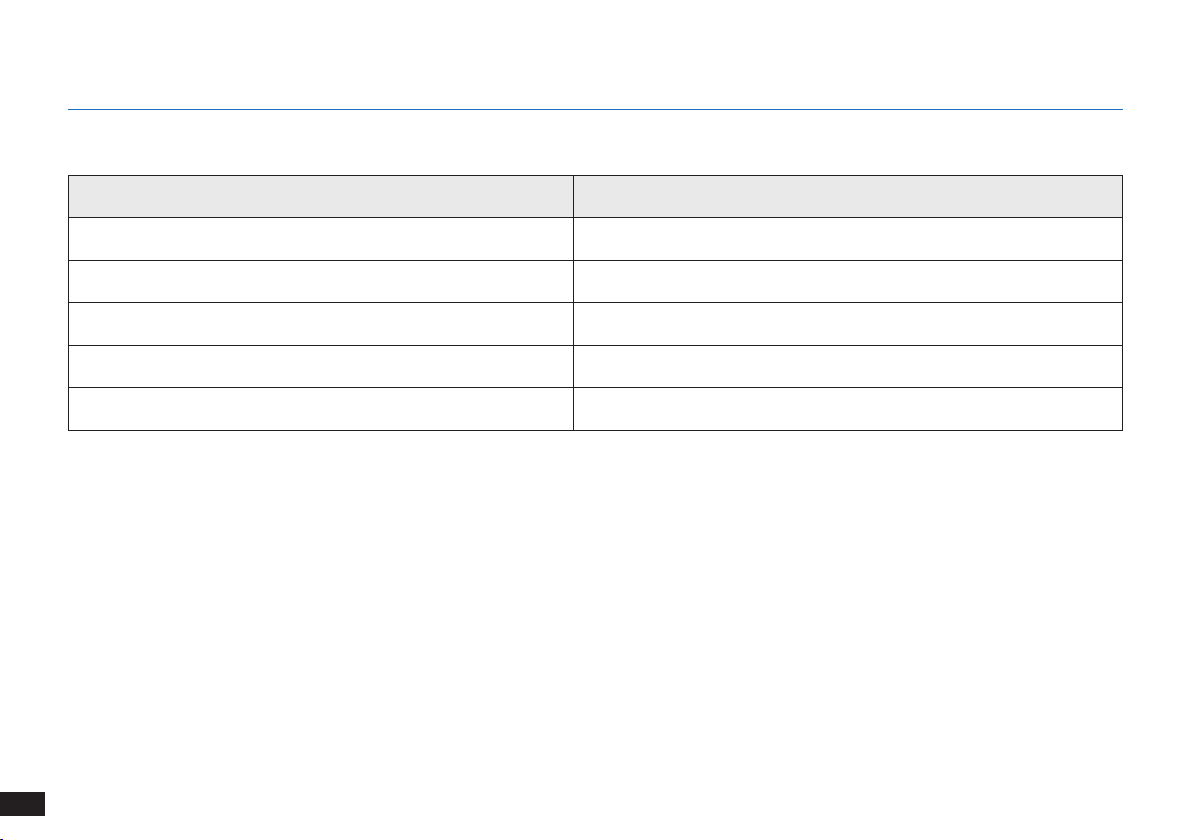
120
IT
5. Spia e segnali acustici di allarme
Spia
Situazione Spia
Il robot è in fase di pulizia Il pulsante della modalità AUTO emette una luce BIANCA ssa
Il robot è in fase di ricarica Il pulsante della modalità AUTO lampeggia in BIANCO
La batteria del robot è scarica Il pulsante della modalità AUTO emette una luce ROSSA ssa
Il robot rileva un problema Il pulsante della modalità AUTO lampeggia in ROSSO
È abilitato lo schema di pulizia programmata L'indicatore della modalità di pulizia si accende

121
IT
N° Malfunzionamento Possibili cause Soluzioni
1 The robot non si ricarica�
The robot non è acceso� Accendere The robot�
The robot non è collegato alla Docking
Station�
Assicurarsi che i contatti di ricarica del robot siano
collegati ai pin della Docking Station�
La batteria è completamente scarica�
Riattivare la batteria� Accendere The robot� Posizionare
manualmente The robot sulla Docking Station e
rimuoverlo dopo averlo caricato per 3 minuti; ripetere 3
volte, quindi caricare normalmente�
2
Il robot non può tornare alla
Docking Station�
La Docking Station non è posizionata
correttamente�
Consultare la sezione "Preparazione" per posizionare la
Docking Station correttamente�
La Docking Station è scollegata o è stata
spostata manualmente durante la pulizia�
Assicurarsi che la Docking Station sia collegata ed evitare
di spostarla manualmente mentre il robot è in fase di
pulizia�
Il robot sta eseguendo la pulizia in un
ambiente buio�
Assicurarsi che le stanze da pulire siano ben illuminate�
Il robot è bloccato da ostacoli (compresi li,
nappe di tappeti, basi per ventole elettriche,
ecc�) oppure la porta della stanza in cui è
collocata la Docking Station è chiusa�
Fare riferimento alla sezione "Note prima della pulizia" per
riordinare lo spazio prima di utilizzare il robot�
Il robot è stato in pausa per più di 60 minuti
o è stato spostato manualmente fuori dal
raggio di 1 metro dalla posizione originale
durante la pulizia�
Si consiglia di mettere in pausa il robot per non più di
60 minuti� Quando si sposta il robot, assicurarsi che sia
sempre entro il raggio di 1 metro dalla posizione originale�
Per garantire una pulizia efciente, evitare di mettere in
pausa o spostare il robot durante la pulizia�
Il robot non ha iniziato la pulizia dalla Docking
Station�
Si consiglia di avviare il robot dalla Docking Station�
6. Risoluzione dei problemi
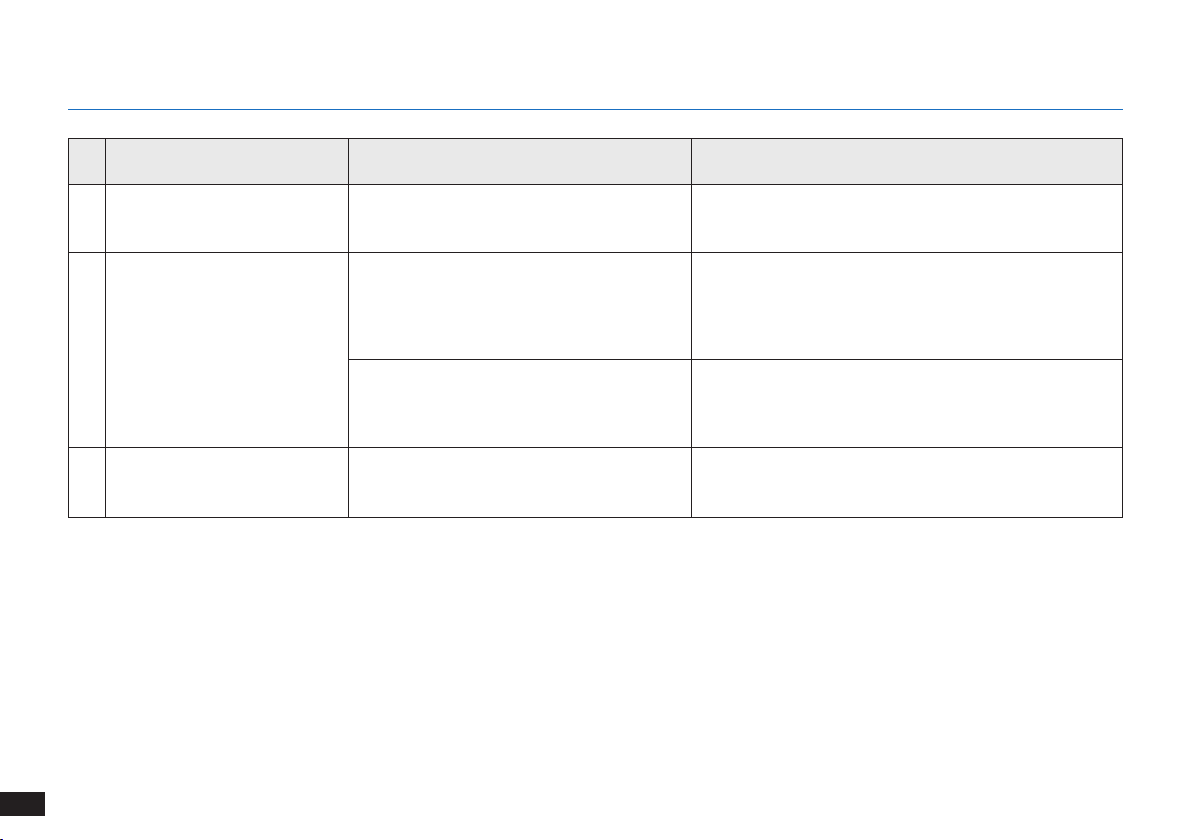
122
IT
N° Malfunzionamento Possibili cause Soluzioni
3
The robot si blocca durante il
funzionamento e si ferma�
The robot è incastrato su un oggetto sul
pavimento (cavi elettrici, tende, frange di
tappeti, ecc�)�
The robot proverà a districarsi in vari modi� Qualora non
dovesse riuscirci, rimuovere manualmente gli ostacoli e
riavviarlo�
4
The robot torna alla Docking
Station prima di aver
completato la pulizia�
Quando il livello di carica della batteria
diventa insufciente, The robot passa
automaticamente alla modalità di ritorno
in carica e torna alla Docking Station per
ricaricarsi�
Questo comportamento è normale� Non è necessario
intervenire�
Il tempo di funzionamento varia in base alla
supercie del pavimento, alla complessità
della stanza e alla modalità di pulizia
selezionata�
Questo comportamento è normale� Non è necessario
intervenire�
6
The robot non pulisce l'intera area� L'area da pulire non è priva di ostacoli�
Rimuovere dal pavimento i piccoli oggetti e sistemare l'area da
pulire prima che The robot inizi la fase di pulizia�
6. Risoluzione dei problemi
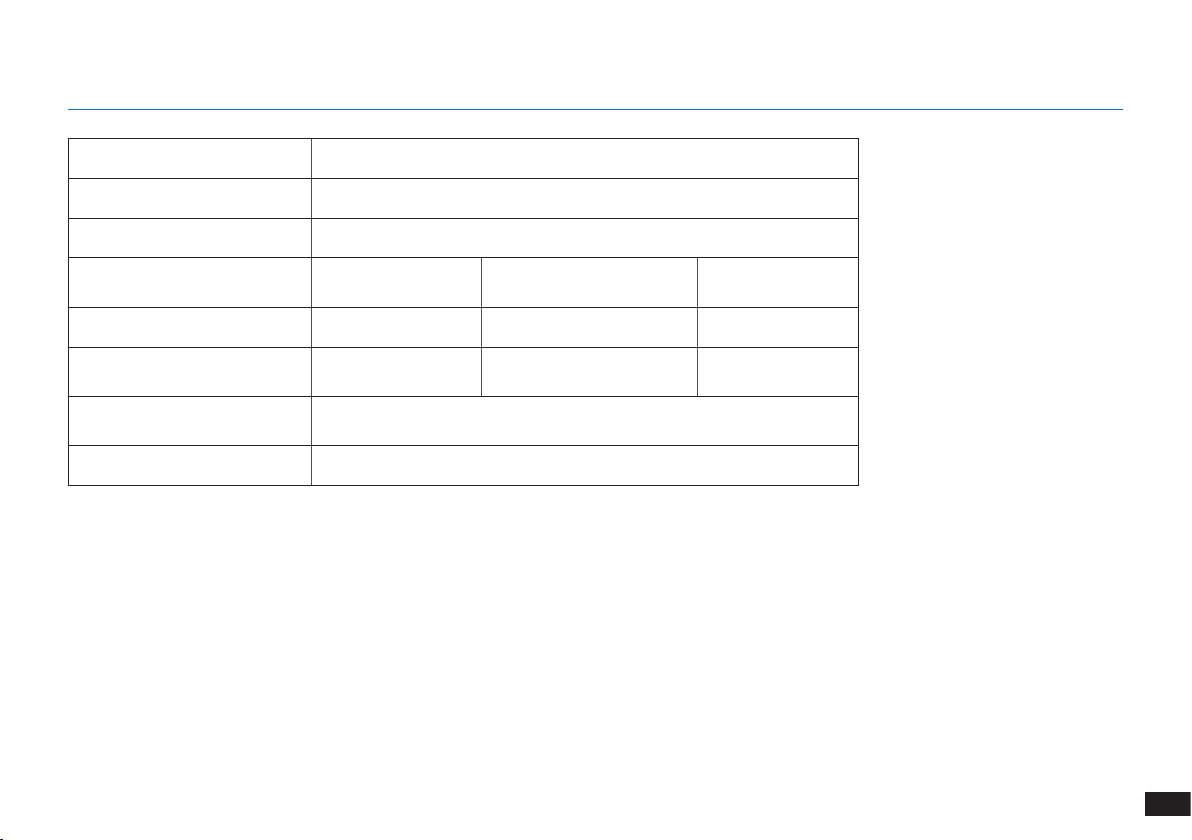
123
IT
7. Specifiche tecniche
Modello K701G
Voltaggio di funzionamento 14,4V CC
Modello di Docking Station CH1630RC
Ingresso nominale
100-240 V CA,
50-60 Hz, 25 W
Uscita nominale 20 V CC, 0,8 A
Modello del telecomando RC1633 Voltaggio di funzionamento 3 V CC
Tipo di batteria del
telecomando
AAA Tensione nominale 1,5 V CC
Alimentazione - Modalità Off/
Standby
Meno di 0,50 W
Standby rete Meno di 2,00 W
Nota:
le speciche tecniche e di progettazione potrebbero variare a seguito dei miglioramenti continui sul prodotto�
L'apparecchio deve essere utilizzato a una distanza minima di 20 cm tra il radiatore e il corpo�

124
RU
1. Инструкции по технике безопасности......................................................................................................................125
2. Комплектация ...............................................................................................................................................................130
3. Эксплуатация и программирование .........................................................................................................................133
4. Техническое обслуживание .......................................................................................................................................139
5. Световой индикатор и звуковые сигналы состояния ..........................................................................................145
6. Устранение неисправностей ......................................................................................................................................146
7. Технические характеристики .....................................................................................................................................148
Содержание

125
RU
1� Данный прибор могут использовать дети
старше 8 лет и лица с ограниченными
физическими, сенсорными или
умственными способностями, а также
лица, не обладающие достаточным
опытом и знаниями, в случае, если они
находятся под надлежащим присмотром,
либо были проинструктированы о
правильном использовании данного
прибора и осознают возможные риски�
Дети не должны играть с прибором�
Очистка и пользовательское техническое
обслуживание не должны выполняться
детьми без присмотра�
2� Освободите поверхность, подлежащую
очистке� Уберите с пола провода и
небольшие предметы, которые могут
помешать передвижению прибора�
Заправьте бахрому ковра под ковер и
поднимите занавески и скатерти над
полом�
3� Если поверхность для очистки имеет
перепады высот, например ступени,
управляйте прибором, чтобы убедиться,
что он распознает их и не падает с
края� Возможно, необходимо будет
установить физическое препятствие,
чтобы предотвратить падение прибора�
Физическое препятствие не должно
представлять опасность падения для
человека�
4� Используйте прибор только в соответствии
с данным руководством� Используйте
только те комплектующие, которые
рекомендованы или поставляются
изготовителем�
При использовании электрических приборов
необходимо всегда соблюдать следующие
меры предосторожности:
ПЕРЕД ЭКСПЛУАТАЦИЕЙ ДАННОГО
ПРИБОРА ОЗНАКОМЬТЕСЬ СО
ВСЕМИ ИНСТРУКЦИЯМИ.
СОХРАНИТЕ ДАННУЮ
ИНФОРМАЦИЮ
1. Инструкции по технике безопасности

126
RU
1. Инструкции по технике безопасности
5� Напряжение источника питания должно
соответствовать напряжению, указанному
на док-станции�
6� Прибор предназначен ТОЛЬКО для
домашнего использования ВНУТРИ
помещений� Не используйте его на улице,
в промышленных или производственных
помещениях�
7� Запрещено использовать неперезаряжаемые
аккумуляторы�
8� Не используйте прибор без установленного
пылесборочного контейнера и/или
фильтров�
9� Не используйте прибор в помещении
с зажженными свечами или хрупкими
объектами�
10� Не используйте прибор при очень высокой
или очень низкой температуре (ниже
-5˚C/23˚F или выше 40˚C/104˚F)�
11� Держите волосы, свободную одежду,
пальцы и другие части тела подальше от
отверстий и подвижных частей прибора�
12� Не используйте прибор в комнате, в
которой спит ребенок�
13� Не используйте прибор на мокрых
поверхностях или на поверхностях со
стоячей водой�
14� Не допускайте попадания в прибор
крупных объектов, например камней,
больших клочков бумаги или других
предметов, которые могут привести к
засорению прибора�
15� Не используйте прибор для сбора
легковоспламеняющихся или горючих
материалов, например бензина, тонера
для принтера или копировального
аппарата, и не используйте его в местах,
где могут присутствовать такие вещества�
16� Не используйте прибор для сбора горящих
или дымящихся объектов, например
сигарет, спичек, горячего пепла или любых
других предметов, которые могут вызвать
возгорание�
17� Не помещайте предметы во всасывающее
отверстие� Не используйте прибор, если
всасывающее отверстие заблокировано�
Во всасывающем отверстии не должно
быть пыли, ворса, волос или других

127
RU
1. Инструкции по технике безопасности
объектов, которые могут препятствовать
потоку воздуха�
18� Соблюдайте осторожность, чтобы не
повредить кабель питания� Не тяните и
не переносите прибор или док-станцию за
кабель питания, не пользуйтесь кабелем
питания как ручкой, не зажимайте его
створками дверей и не тяните провод по
острым краям или углам� Не запускайте
прибор на кабель� Держите кабель питания
вдали от горячих поверхностей�
19� В целях обеспечения безопасности
при повреждении кабеля питания его
замену должен выполнять представитель
изготовителя или авторизованного
сервисного центра�
20� Не пользуйтесь док-станцией, если она
повреждена�
21� Не пользуйтесь поврежденным кабелем
питания или розеткой� Не пользуйтесь
прибором или док-станцией при
нарушении их функционирования, а также
после падения, повреждения, пребывания
на открытом воздухе или попадания в
воду� В целях обеспечения безопасности
ремонт прибора должен выполняться
представителем изготовителя или
авторизованного сервисного центра�
22� Отключайте прибор перед его очисткой
или обслуживанием�
23� Перед очисткой или проведением
процедур техобслуживания док-станции
необходимо извлечь вилку из розетки�
24� Снимите прибор с док-станции и отключите
питание на приборе, прежде чем извлечь
аккумулятор для утилизации прибора�
25� Перед утилизацией прибора аккумулятор
необходимо извлечь и утилизировать в
соответствии с местными законодательными
и нормативными актами�
26� Утилизация аккумуляторов должна
проводиться в соответствии с местными
законодательными и нормативными актами�
27� Не сжигайте прибор даже в случае его
серьезного повреждения� При попадании в
огонь аккумулятор может взорваться�
28� Если вы долгое время не используете док-
станцию, извлеките вилку из розетки�

128
RU
1. Инструкции по технике безопасности
29� Прибор должен эксплуатироваться с
соблюдением инструкций, изложенных
в руководстве пользователя� Компания
REECOO не несет какой-либо
ответственности за повреждения или
неисправности, вызванные ненадлежащей
эксплуатацией прибора�
30� Замена аккумулятора данного робота
должна выполняться только специалистом�
Для замены или извлечения аккумулятора
обратитесь в сервисный центр�
31� Если вы не планируете использовать
робота в течение продолжительного
времени, полностью зарядите робота,
отключите его питание и отсоедините док-
станцию�
32. ПРЕДУПРЕЖДЕНИЕ. Для зарядки
аккумулятора используйте только
отсоединяемый блок питания CH1630RC,
входящий в комплект поставки�
33� Для пульта дистанционного управления
требуются две неперезаряжаемые
батарейки AAA� Чтобы заменить батарейки
в пульте дистанционного управления,
переверните его, надавите на крышку
отсека аккумулятора и снимите ее�
Извлеките батарейки и вставьте новые,
соблюдая полярность� Установите крышку
отсека аккумулятора на место�
34� Не пытайтесь заряжать неперезаряжаемые
батарейки�
35� Не используйте одновременно батарейки
разных типов, а также новые и старые
батарейки�
36� Устанавливайте батарейка в отсек пульта
дистанционного управления, соблюдая
полярность�
37� Старые батарейки необходимо
извлечь из прибора и утилизировать
соответствующим образом�
38� Если пульт дистанционного управления
не будет использоваться в течение
длительного времени, необходимо извлечь
батарейки�
39� Не допускайте короткого замыкания
зажимов питания�
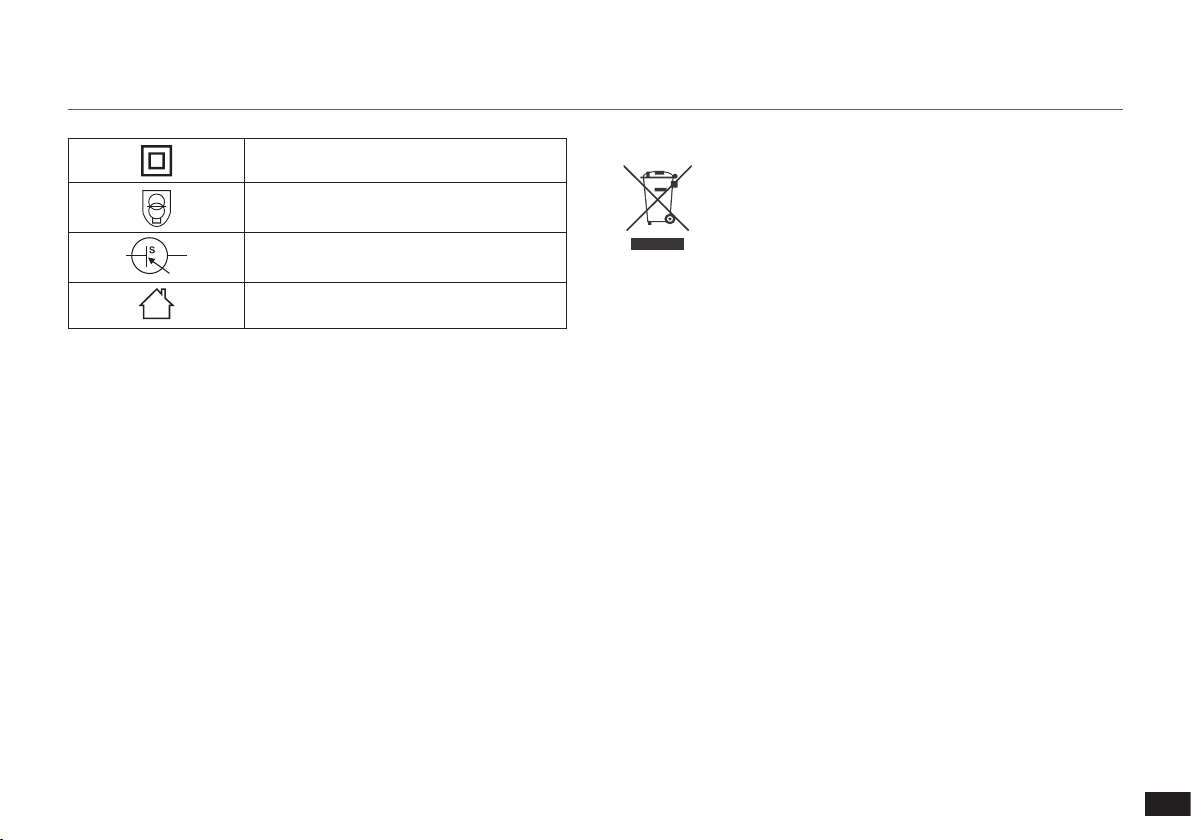
129
RU
Правила утилизации данного
прибора
Данный знак означает, что настоящий
продукт не следует утилизировать вместе
с бытовыми отходами на территории стран
ЕС� Для предотвращения нанесения вреда
окружающей среде и здоровью людей в
результате неконтролируемой утилизации
отходов приборы следует утилизировать с
должной ответственностью, обеспечивая
экологически устойчивое повторное
использование материалов� Чтобы
утилизировать прибор, воспользуйтесь
системой сбора и возврата или обратитесь
в магазин, в котором он был приобретен�
Это позволит обеспечить безопасность
утилизации�
Для стран Европейского Союза
Класс II
Разделительный трансформатор с
защитой от короткого замыкания
Переключаемый источник питания
Прибор предназначен только для
использования внутри помещений
1. Инструкции по технике безопасности
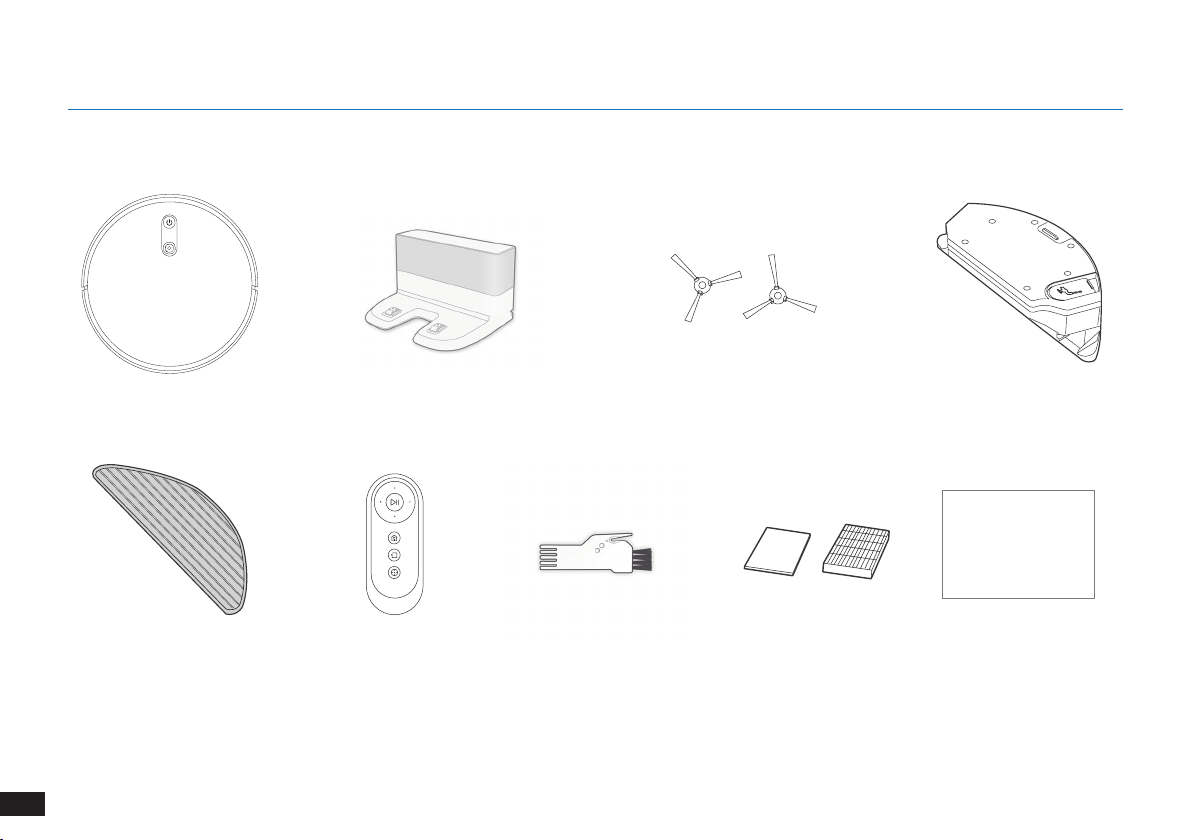
130
RU
2.1
Комплектация
Робот
Пульт дистанционного
управления с
батарейками
БоковыещеткиДок-станция
Многофункциональный
инструмент очистки
Руководство по
эксплуатации
Примечание.
Рисунки и иллюстрации приведены в ознакомительных целях и могут отличаться от фактического внешнего вида изделия�
Конструкция и технические характеристики изделия могут быть изменены без предварительного уведомления�
2. Комплектация
Моющаяся/многоразовая
чистящая салфетка из
микрофибры
для улучшенной
влажной/сухой уборки
Instruction Manual
Губчатый и
высокоэффективный
фильтры
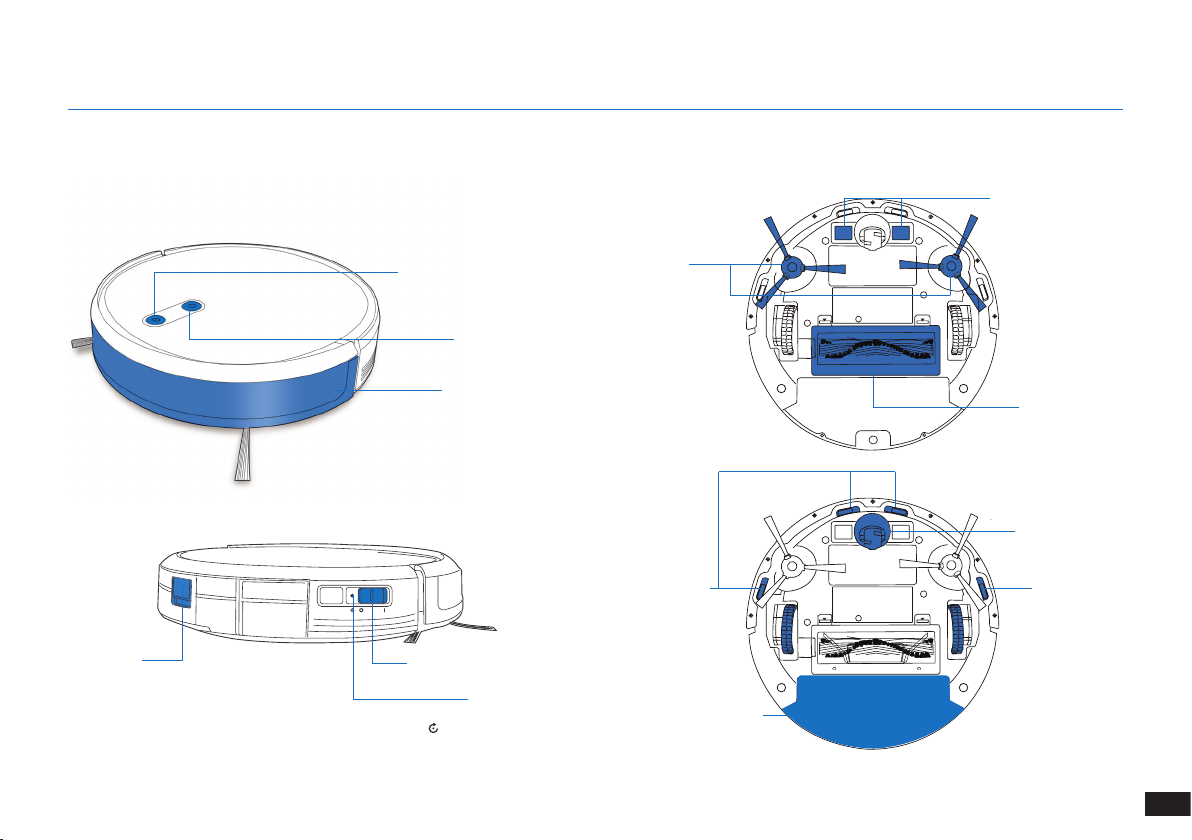
131
RU
2. Комплектация
Бампер и датчики
для предотвращения
столкновений
2.3
Схема изделия
Робот
Кнопка автоматического
режима AUTO
Камера VSLAM
Переключатель питания
Кнопка сброса
Кнопка для
извлечения
пылесборочного
контейнера
Вид снизу
Датчики для
предотвращения
падения
Датчики для
предотвращения
падения
Главная щетка
Зарядные контакты
Универсальное
колесо
Боковые
щетки
Пылесборочный
контейнер/резервуар
(Нажмите и удерживайте в течение 5 секунд�
Настройки робота вернутся к значениям по умолчанию�
Используйте эту кнопку с осторожностью�)
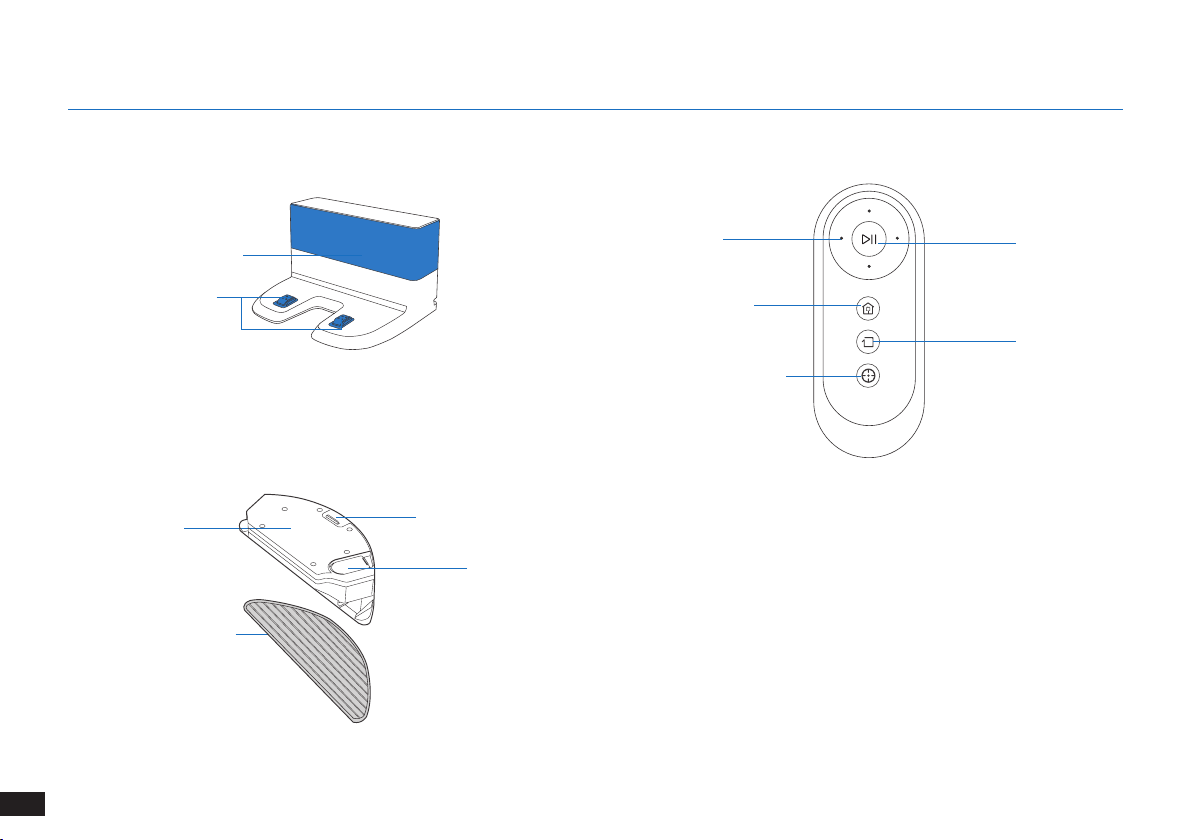
132
RU
2. Комплектация
Док-станция Пульт дистанционного управления
Кнопка запуска/
приостановки работы
Кнопка режима
уборки по краям
Кнопки смены
направления движения
Кнопка режима очистки
пятен
Кнопка возврата на
зарядную станцию
Генератор инфракрасного
сигнала
Контакты док-станции
Улучшенная система мытья полов
для улучшенной
влажной/сухой
уборки
Моющаяся/многоразовая
чистящая салфетка из
микрофибры
Отверстие для
наливания воды
Кнопка разблокировки
резервуара

133
RU
Перед использованием прибора на ковре с бахромой по краям
необходимо подвернуть края ковра�
ПРЕДУПРЕЖДЕНИЕ. Не используйте робота на мокрых поверхностях или на поверхностях, залитых водой.
Возможно, потребуется установить физическое препятствие на
границе перепада высоты, чтобы предотвратить падение прибора�
Уберите с пола провода и небольшие предметы, которые могут
помешать передвижению прибора�
3.1 Подготовка к очистке
Приведите в порядок зону уборки, расставив мебель, например
стулья, на свое обычное место�
3. Эксплуатация и программирование
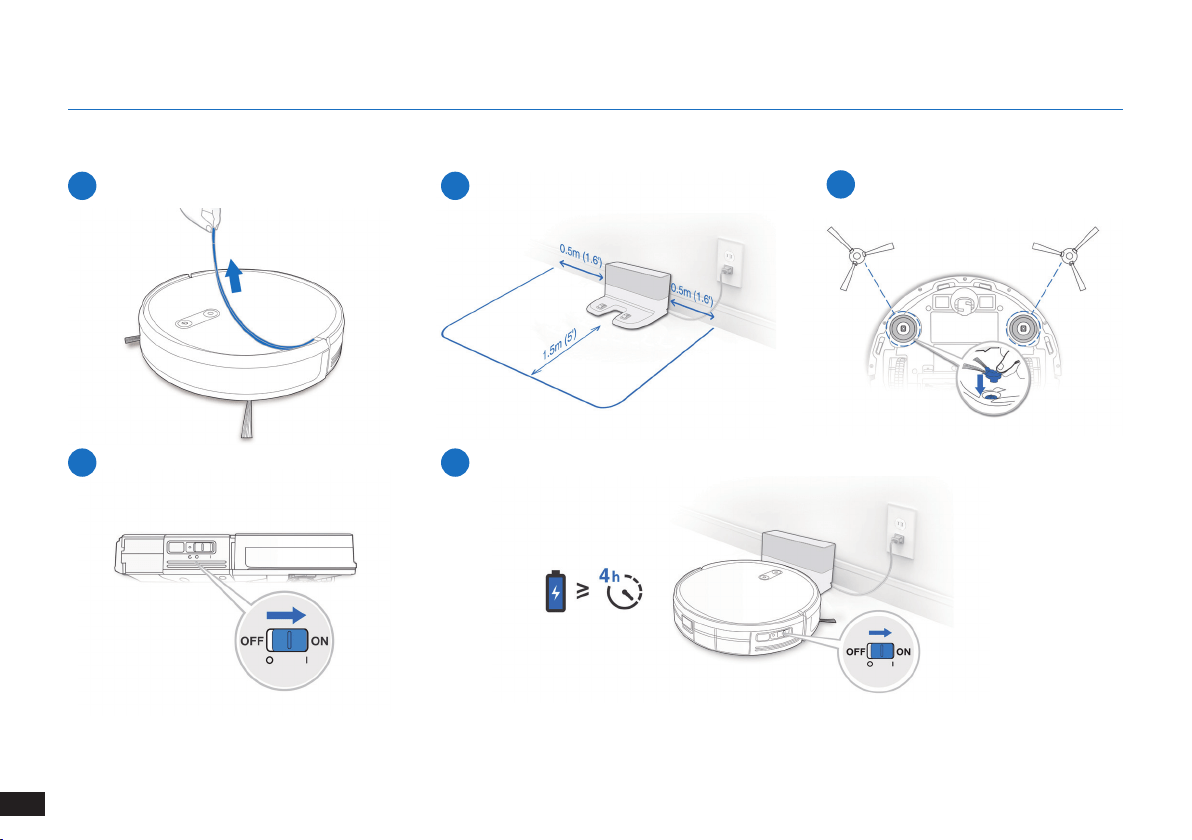
134
RU
3. Эксплуатация и программирование
1
Снятие защитной полоски
2
Установка док-станции
3
Установка боковых щеток
4
Включение питания
3.2 Подготовка
Примечание. Когда робот завершает цикл уборки или снижается заряд аккумулятора, он
автоматически возвращается на док-станцию для зарядки�
5
Зарядка робота
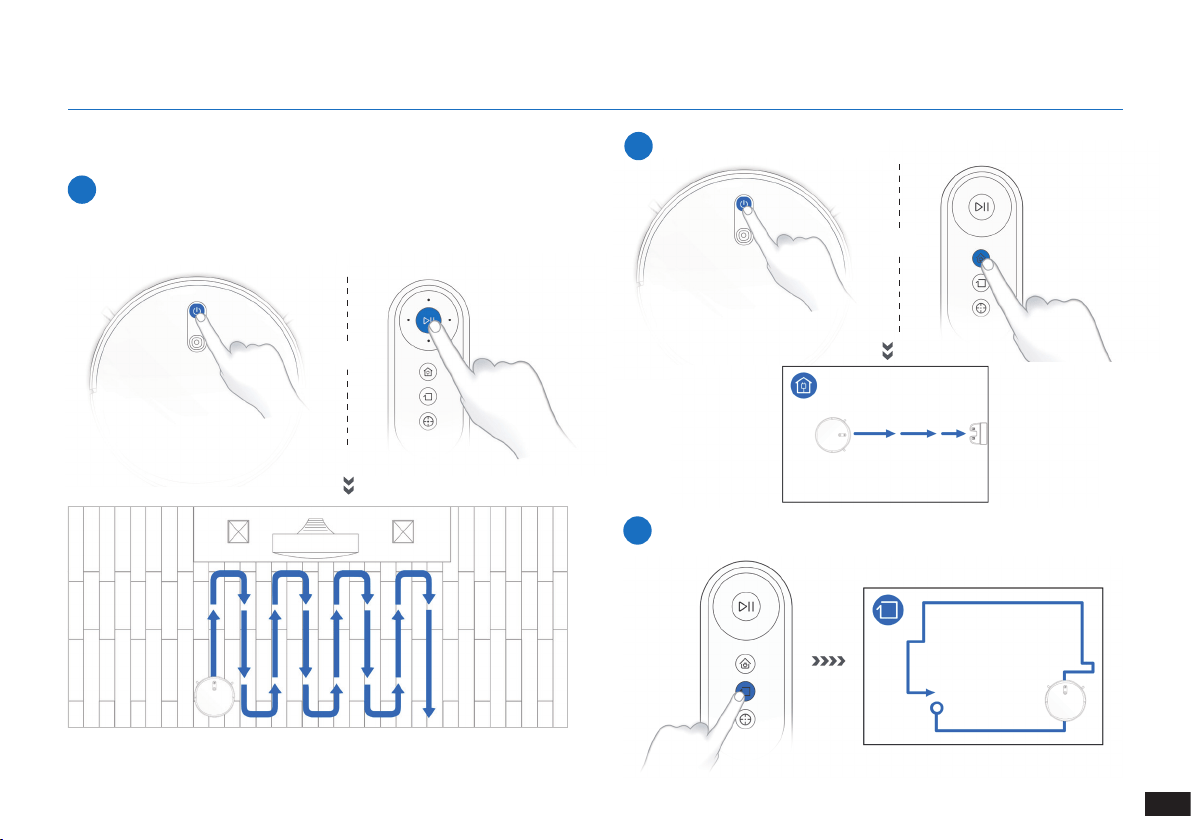
135
RU
3. Эксплуатация и программирование
3.3 Выбор режима уборки
1
Автоматический режим уборки AUTO
По умолчанию будет выбрана Запрограммированная траектория
уборки (оптимизирована для уборки пола с твердым покрытием)�
ИЛИ
ИЛИ
2
Возвращение на зарядную станцию
≥3сек.
3
Режим уборки по краям
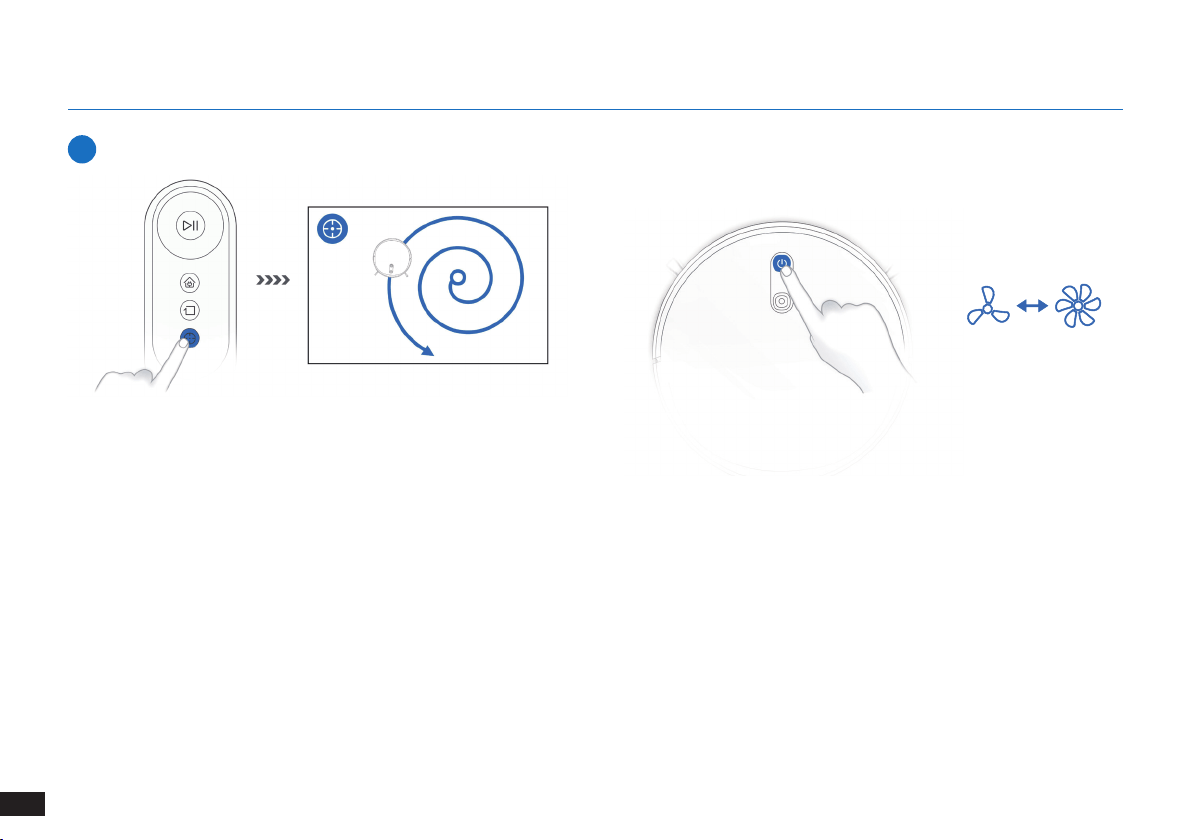
136
RU
3. Эксплуатация и программирование
4
Режим очистки пятен (менее 3 минут)
3.4 Переключение мощности всасывания
X 2
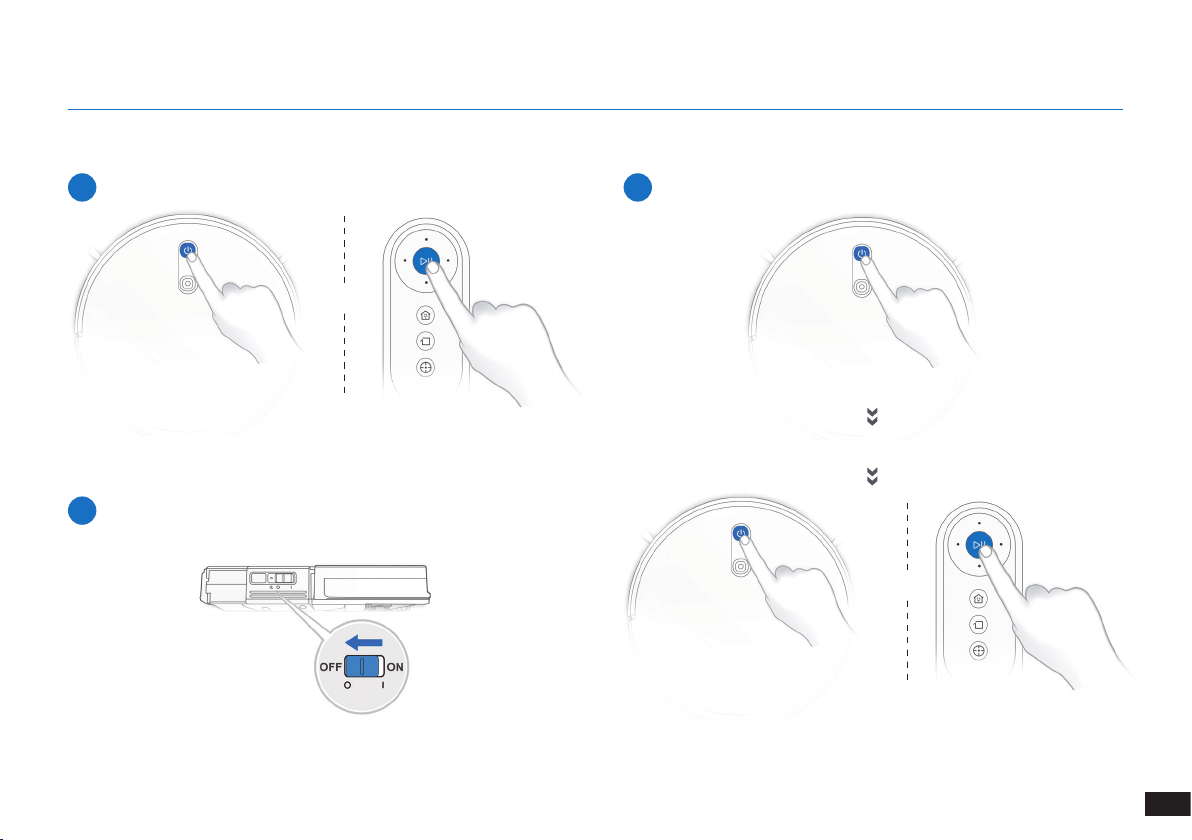
137
RU
3. Эксплуатация и программирование
3.5 Приостановка работы, выход из спящего режима, выключение питания
1
Приостановка работы
2
Выход из спящего режима
Примечание. Панель управления робота перестает светиться по
прошествии нескольких минут после приостановки работы робота�
Нажмите кнопку автоматического режима AUTO на роботе для
вывода устройства из спящего режима�
3
Выключение питания
Примечание. Когда робот не используется, рекомендуется
оставить его включенным на зарядной станции�
ИЛИ
ИЛИ
Нажмите кнопку автоматического режима AUTO на роботе
для вывода устройства из спящего режима
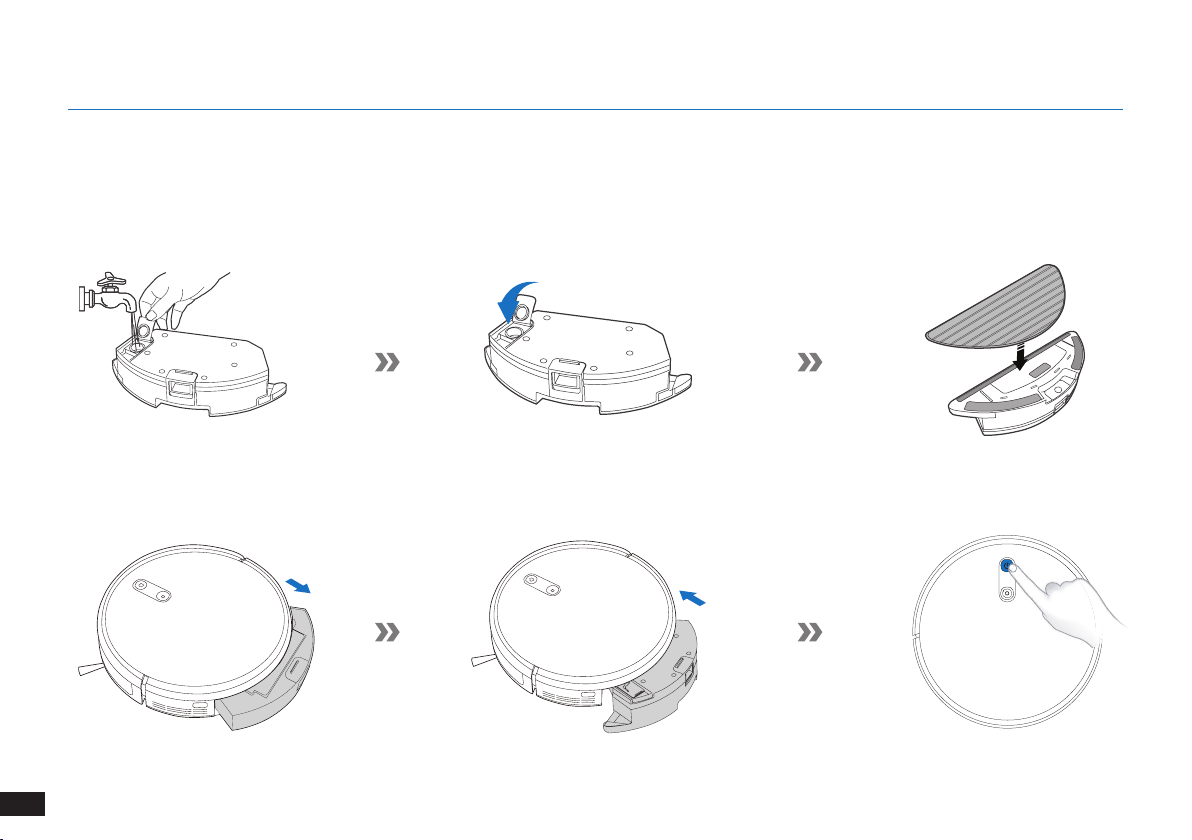
138
RU
3. Эксплуатация и программирование
3.6
Дополнительная система мытья полов
Примечание. Опорожните резервуар и снимите пластину для чистящей салфетки, прежде чем приступить к чистке ковра�
При использовании системы мытья полов подверните края ковра, чтобы робот его избегал�
Используйте только воду и не добавляйте в резервуар моющие жидкости или другие чистящие средства�
Примечание. Когда робот закончит мыть пол, вылейте оставшуюся воду из резервуара�
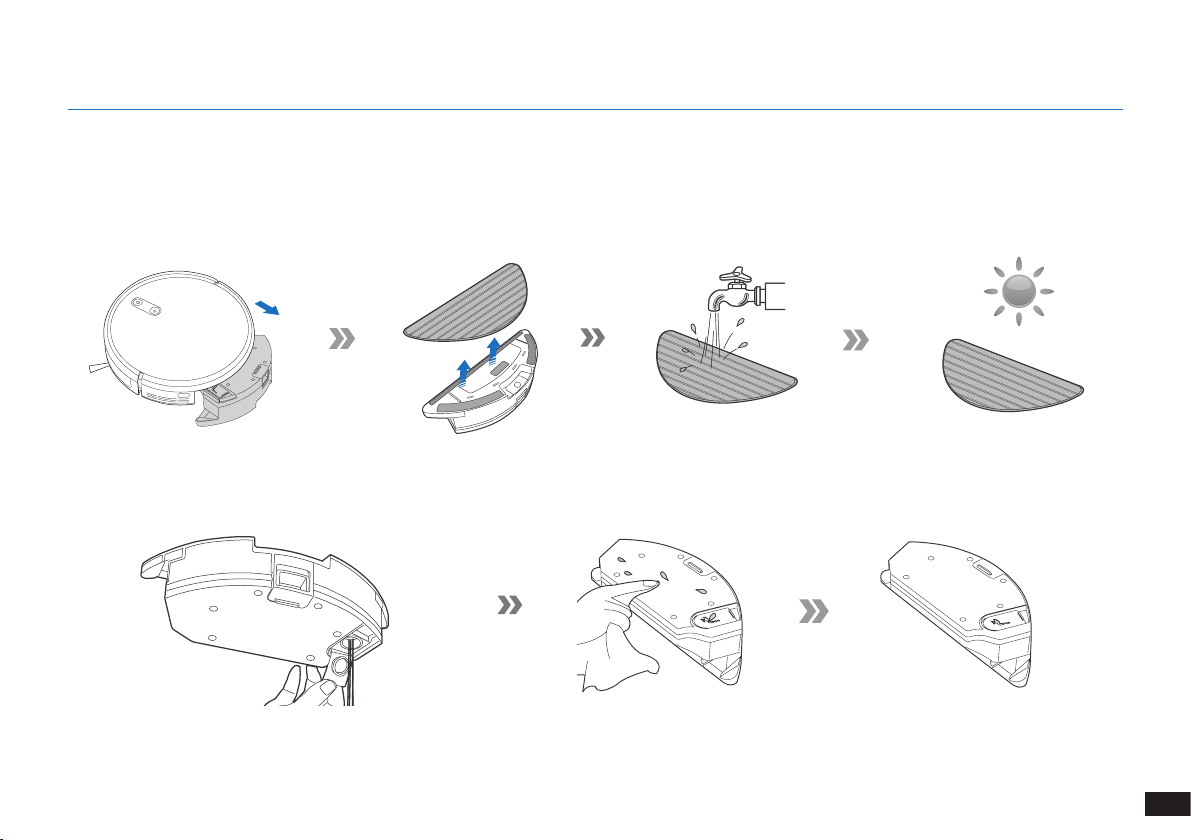
139
RU
4.
Техническое обслуживание
Прежде чем приступить к очистке и техническому обслуживанию робота, отключите его и извлеките вилку зарядной станции
из розетки.
4.1 Дополнительная система мытья полов
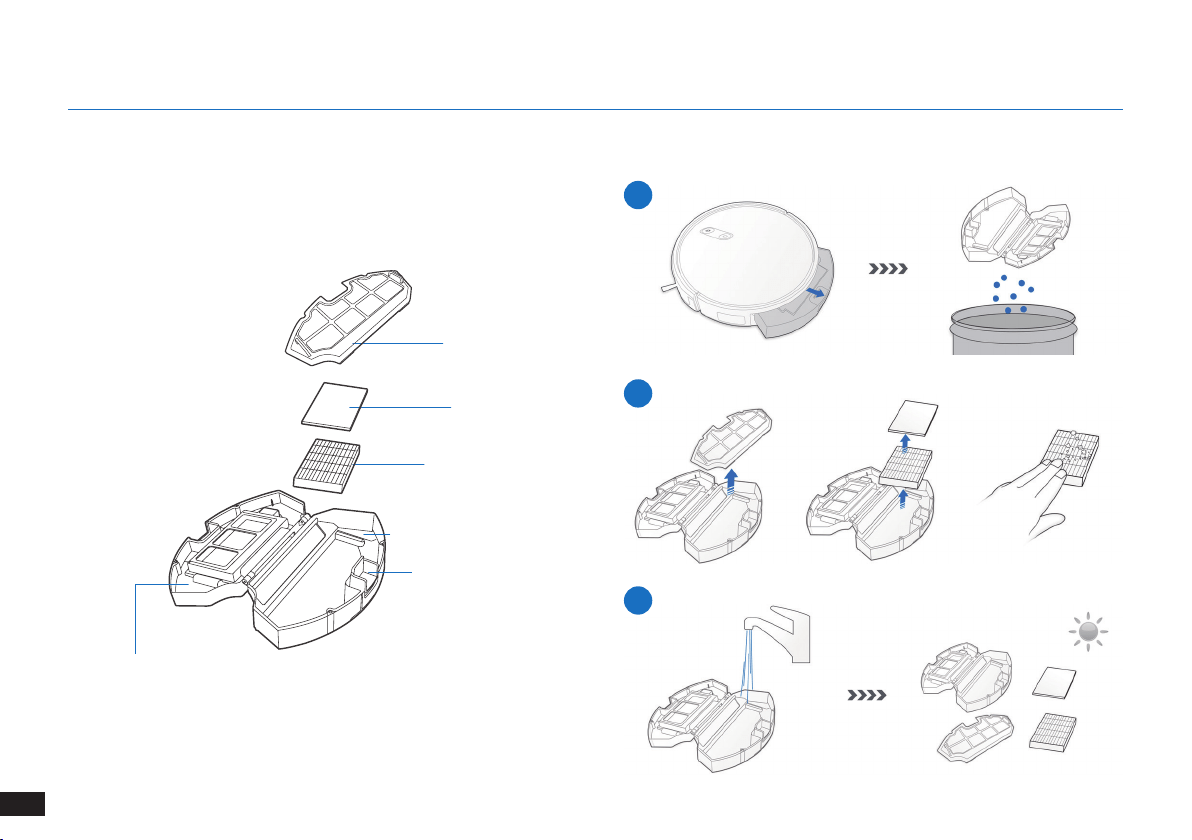
140
RU
Прежде чем приступить к очистке и техническому обслуживанию робота, отключите его и извлеките вилку док-станции из розетки.c
Пылесборочныйконтейнер
4.2 Пылесборочный контейнер и фильтры
1
2
3
Крышка
пылесборочного
контейнера
4. Техническое обслуживание
Решетка фильтра
Губчатый фильтр
Высокоэффективный
фильтр
Пылесборочныйконтейнер
Кнопка для извлечения
пылесборочного
контейнера

141
RU
4. Техническое обслуживание
1
4
2
5
3
Главная щетка
4.3 Главная щетка и боковые щетки
Примечание. В комплект входит многофункциональный инструмент очистки для удобства обслуживания. Чистящий инструмент
имеет острые края, поэтому используйте его с осторожностью.
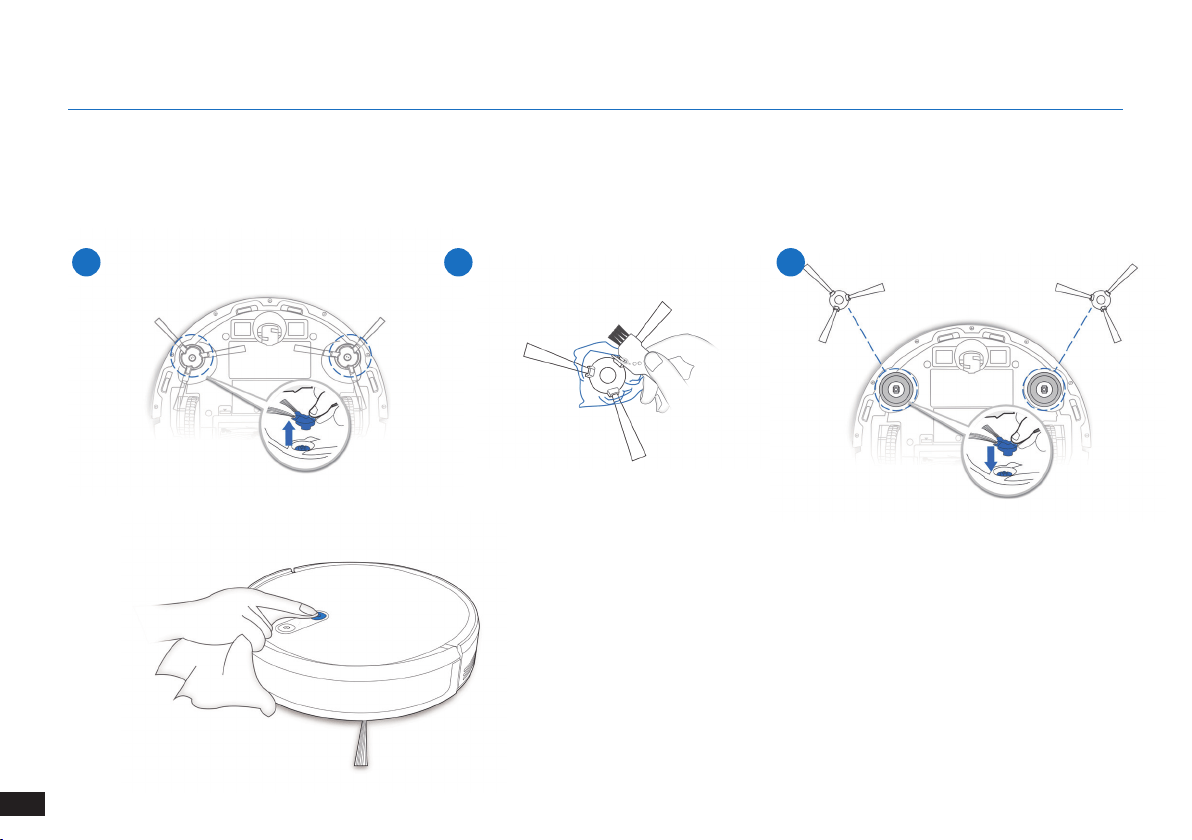
142
RU
1 2 3
4. Техническое обслуживание
Боковыещетки
4.4 Spazzole laterali
Примечание. В комплект входит многофункциональный инструмент очистки для удобства обслуживания. Чистящий инструмент
имеет острые края, поэтому используйте его с осторожностью.
4.5
Другие компоненты
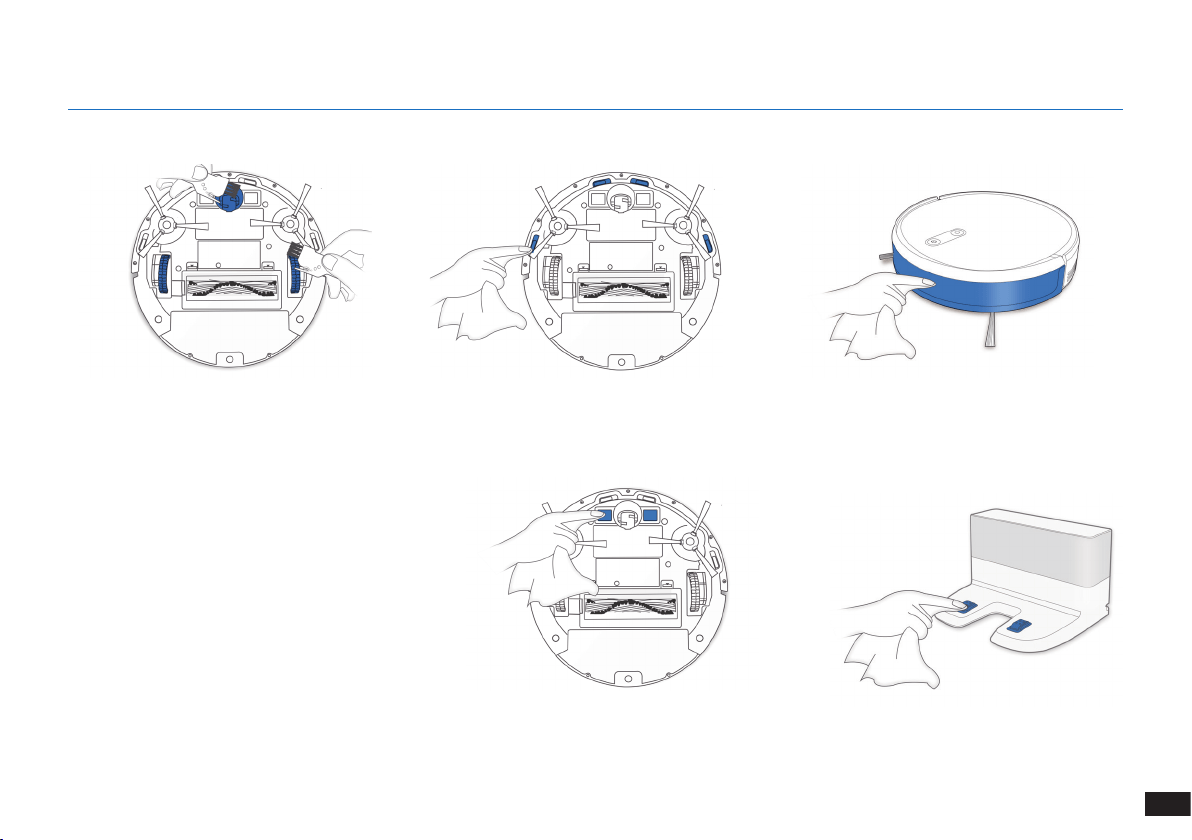
143
RU
4.
Техническое обслуживание
Примечание. Прежде чем приступить к очистке
зарядных контактов робота и док-станции,
отключите робота и извлеките вилку док-
станции из розетки�
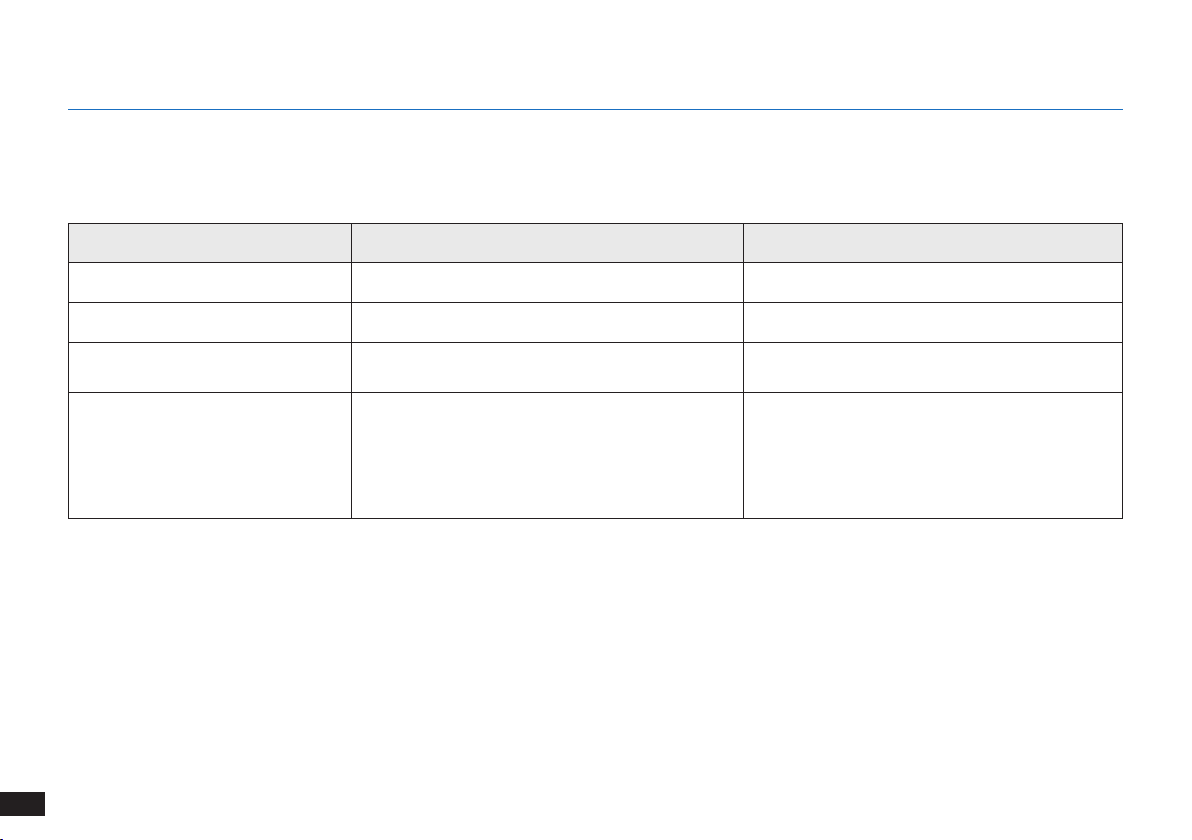
144
RU
4.6
Регулярное обслуживание
Чтобы робот продолжал обеспечивать наилучшее качество уборки, выполняйте обслуживание и замену расходников в соответствии
со следующими инструкциями.
В комплект входит многофункциональный инструмент очистки для удобства обслуживания. Чистящий инструмент имеет острые
края, поэтому используйте его с осторожностью.
Примечание. YEEDI поставляет различные комплектующие и запасные детали� Для получения более подробной информации о запасных
деталях обратитесь в авторизованный сервисный центр�
4.
Техническое обслуживание
Детали робота Частота обслуживания Частота замены
Боковая щетка Раз в 2 недели Каждые 3–6 месяцев
Главнаящетка Еженедельно Каждые 6–12 месяцев
Губчатый/высокоэффективный
фильтры
Еженедельно Каждые 3-6 месяцев
Универсальное колесо
Датчики для предотвращения
падения
Бампер
Зарядные контакты
Контакты док-станции
Еженедельно /
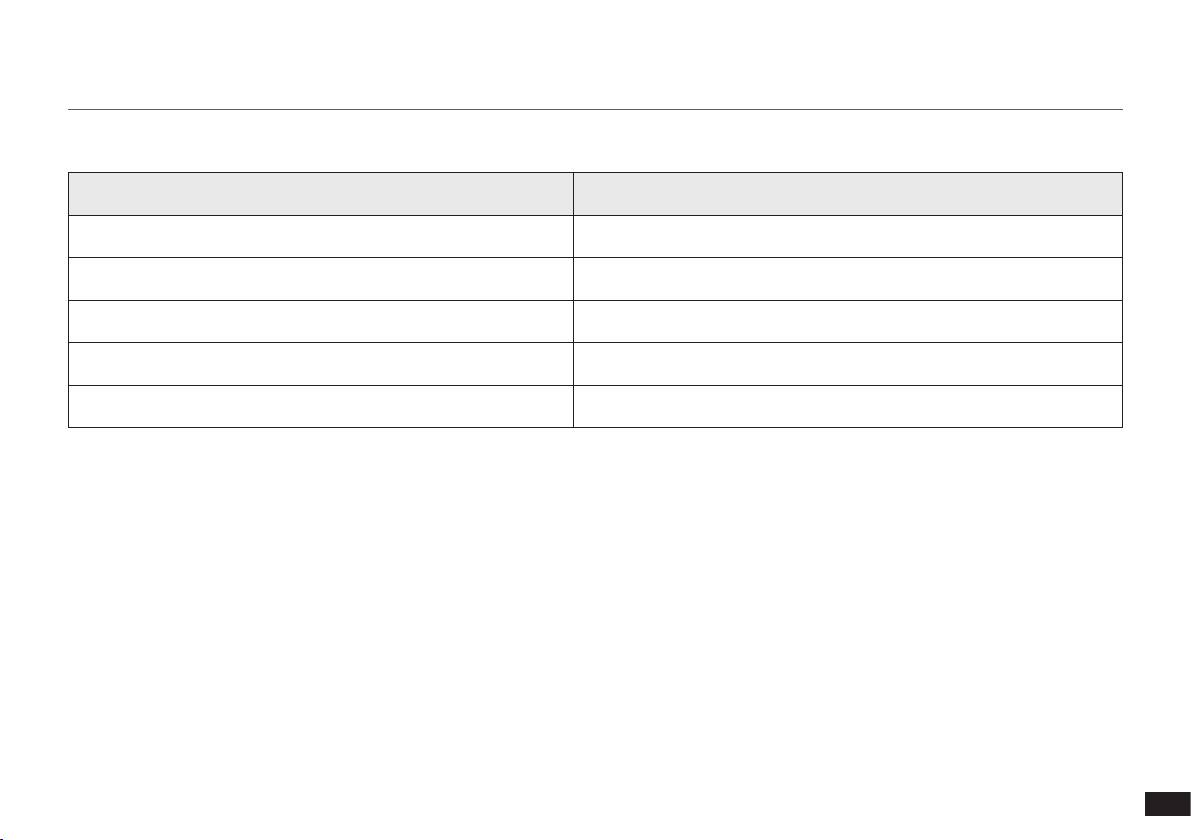
145
RU
5.
Индикатор
Индикатор
Состояние Индикатор
Робот выполняет уборку Кнопка автоматического режима AUTO непрерывно светится БЕЛЫМ
Робот заряжается Кнопка автоматического режима AUTO мигает БЕЛЫМ
Низкий заряд аккумулятора робота Кнопка автоматического режима AUTO непрерывно светится КРАСНЫМ
Нарушение функционирования робота Кнопка автоматического режима AUTO мигает КРАСНЫМ
Активирована запрограммированная траектория уборки Загорается индикатор переключения режима уборки

146
RU
№ Неисправность Возможные причины Решение
1 Робот не заряжается�
Робот не включен� Включите робота�
Робот не подключен к док-станции�
Убедитесь, что зарядные контакты робота соединены
с зарядными контактами док-станции�
Аккумулятор полностью разряжен�
Восстановите аккумулятор� Включите робота�
Установите робота на док-станцию вручную, снимите
через 3 минуты зарядки, повторите эту операцию три
раза, а затем заряжайте в обычном порядке�
2
Робот не может вернуться на
док-станцию�
Док-станция установлена неправильно�
Информацию о правильной установке док-станции см�
в разделе "Подготовка"�
Док-станция отключена от сети, или
пользователь переместил ее вручную во
время уборки�
Убедитесь, что док-станция подключена к сети, и не
перемещайте ее вручную во время уборки�
Робот работает в условиях низкой
освещенности�
Убедитесь, что комнаты, подлежащие уборке, хорошо
освещены�
Робот зацепился за препятствие (это
могут быть провода, кисточки от ковра,
основания электрических вентиляторов
и т� д�) или дверь комнаты, в которой
находится док-станция, закрыта�
Ознакомьтесь с разделом "Подготовка к очистке",
чтобы расчистить место перед использованием
робота�
Работа робота приостановлена более
60 минут назад, или пользователь
переместил его вручную на расстояние
более 1 м от исходного положения во
время уборки�
Рекомендуется приостанавливать работу робота не
более чем на 60 минут� Перемещать робот можно не
более чем на 1 м от его исходного положения� Для
обеспечения эффективной уборки старайтесь не
приостанавливать работу робота и не перемещать его
во время уборки�
Робот начал уборку не с док-станции� Рекомендуется запускать робота с док-станции�
6.
Устранение неисправностей
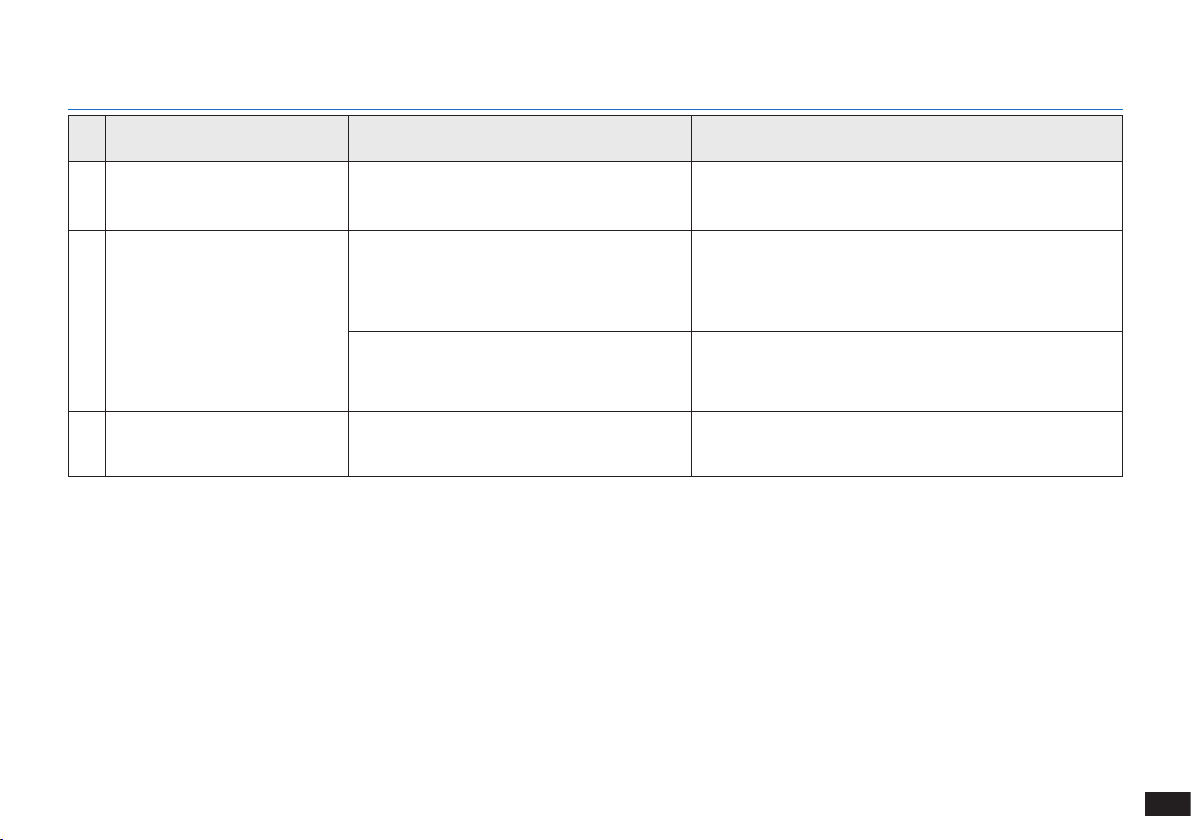
147
RU
6. Risoluzione dei problemi
№ Неисправность Возможные причины Решение
3
Робот застревает во время
работы и останавливается�
Робот запутался (в проводах, занавесках,
бахроме ковра и т� д�)�
Робот попытается освободиться различными
способами� Если ему это не удастся, устраните
препятствия вручную и перезапустите робота�
4
Робот возвращается на
док-станцию до окончания
уборки�
Когда заряд аккумулятора снижается,
робот автоматически переключается в
режим возврата на зарядную станцию и
возвращается на док-станцию для зарядки�
Это нормальное явление� Не нужно предпринимать
никаких действий�
Время работы зависит от поверхности
пола, сложности комнаты и выбранного
режима уборки�
Это нормальное явление� Не нужно предпринимать
никаких действий�
5
Робот не выполняет уборку
всей области�
Область уборки не расчищена�
Уберите мелкие предметы с пола и расчистите
область уборки, прежде чем робот приступит к работе�
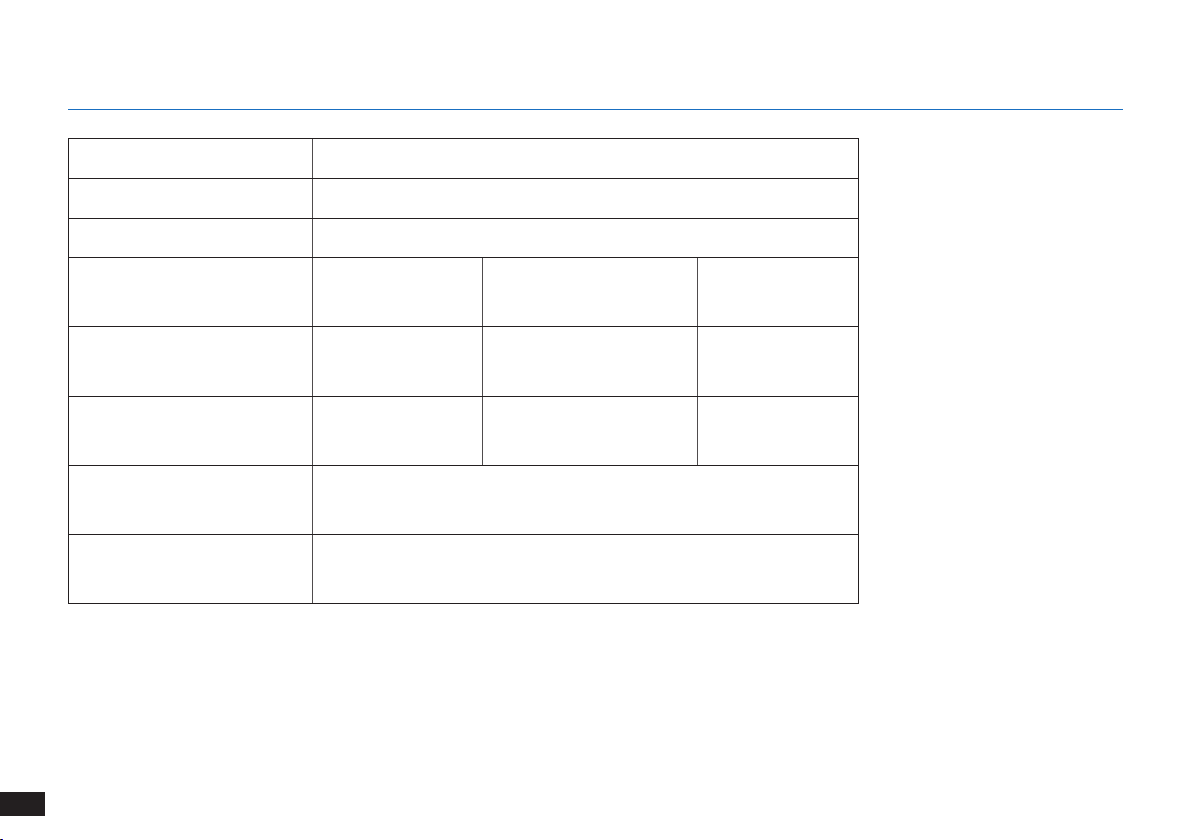
148
RU
7.
Технические характеристики
Примечание.
Технические характеристики и внешний вид могут быть изменены с целью усовершенствования прибора�
При эксплуатации данного оборудования расстояние между человеком и источником излучения должно быть не менее
20 см�
Модель K701G
Рабочее напряжение 14,4 В пост� тока
Модель док-станции CH1630RC
Номинальная потребляемая
мощность
100–240 В пер�
тока,
50–60 Гц, 25 Вт
Номинальная выходная
мощность
20 В пост� тока,
0,8 А
Модель пульта
дистанционного
управления
RC1633 Рабочее напряжение 3 В пост� тока
Тип батареек для
пульта дистанционного
управления
AAA Номинальное напряжение 1,5 В пост� тока
Энергопотребление в
выключенном состоянии/
режиме ожидания
Менее 0,50 Вт
Энергопотребление в режиме
ожидания при подключении к
сети
Менее 2,00 Вт

149
RU

Shenzhen Reecoo Electronic Co., Ltd.
Building 5-6, Shanglilang Technology Park, Longgang District, Shenzhen,
P�R�China
KA00029R1