VG4419D_A1 WWW.MEMPHISGRILLS.COM 888.883.2260 1
Memphis ITC 2.0 Slide‐In Kit Installation
For2016&LaterMemphisProandEliteCartModels
VG4419D_A1 WWW.MEMPHISGRILLS.COM 888.883.2260 2
Pleasereadthisenremanualbeforeinstallaonanduseofthiswoodpelletfuel‐burningappliance.Failuretofollowtheseinstruconscould
resultinpropertydamage,bodilyinjuryorevendeath.
Contactlocalbuildingorfireofficialsaboutrestriconsandinstallaoninspeconrequirementsinyourarea.
Savetheseinstrucons.
Foroutdooruseonly.Donotuseinanyenclosedarea.
Donotputanythingflammableinthestorageareaunderthegrill.
Keepthegrill’srearvenlaonslotsclearofobstrucons.
Accessiblepartsofthegrillareveryhot.Keepyoungchildrenawaywhileinuse.
ThegrillshouldbepluggedintoaGFCI(Ground‐FaultCircuitInterrupt)outlet.
Ifthepowercordbecomesdamaged,donotoperatethegrill.
Anymodificaons(holes,screws,sheetmetalchanges)tothegrillwillvoidwarranty.
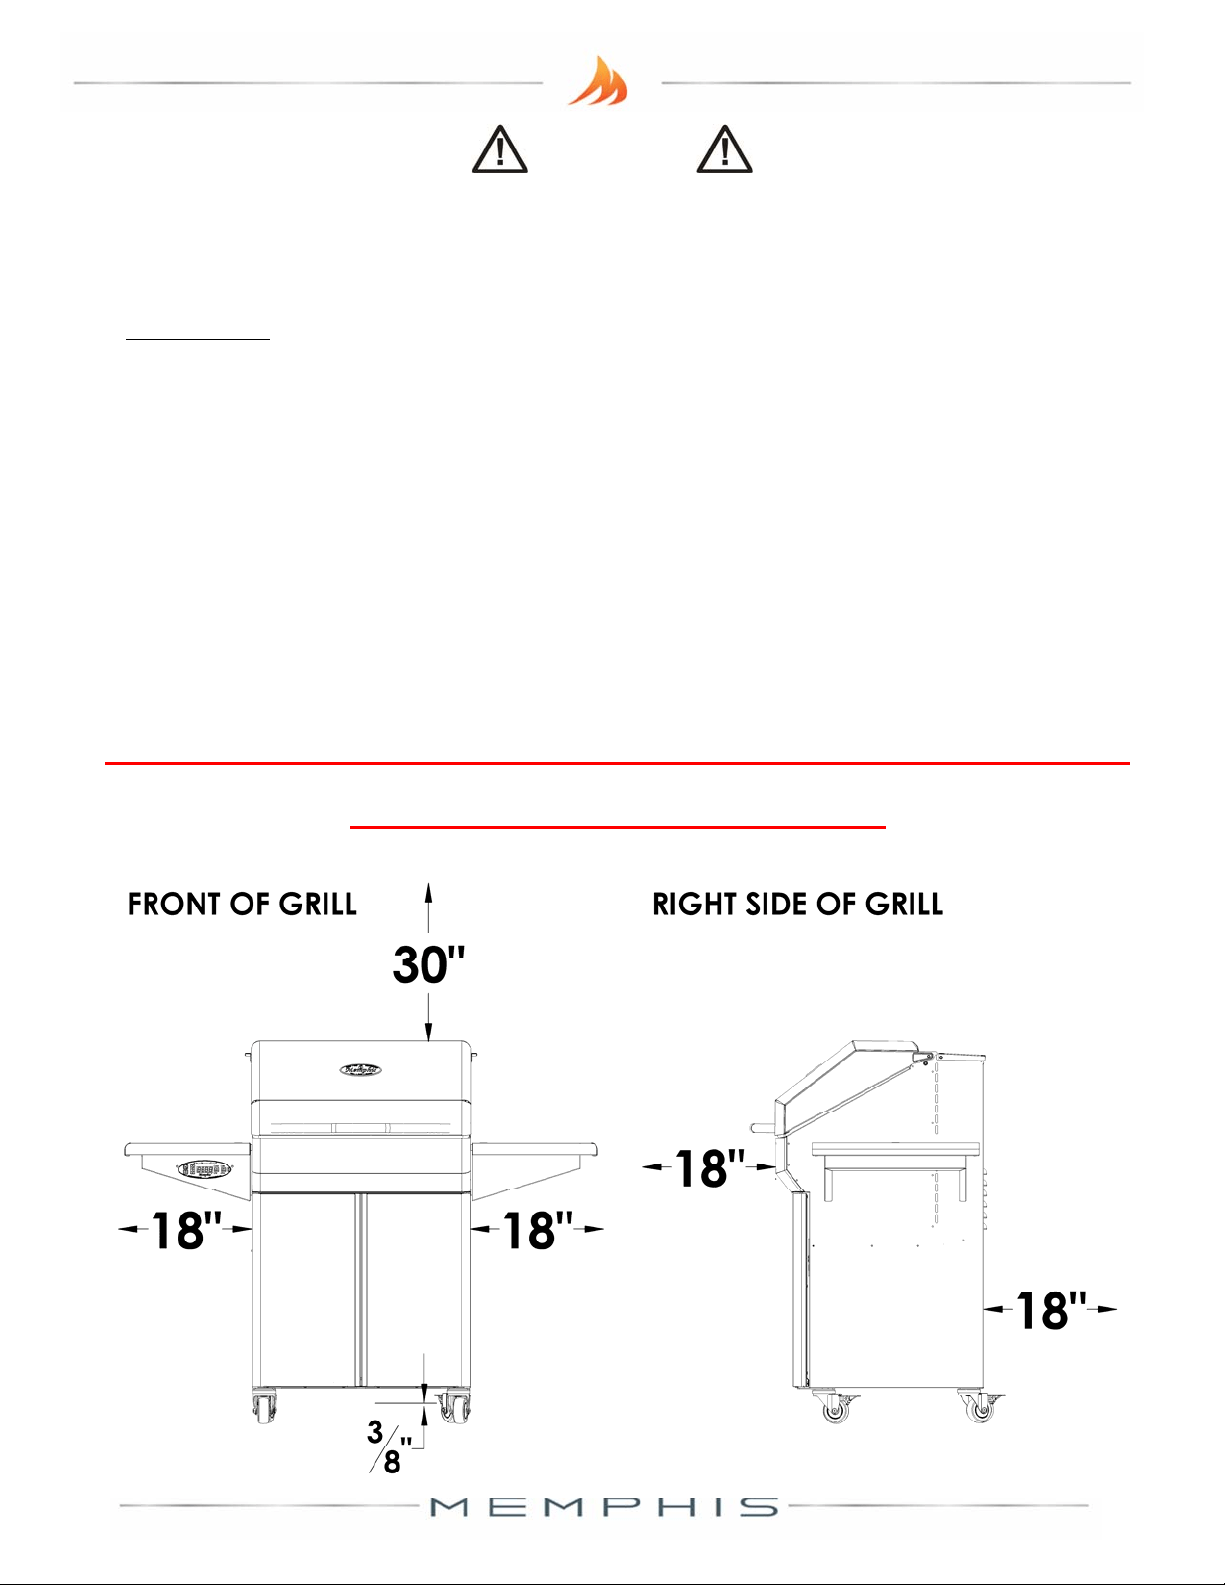
WARNING!
Any combusble material in the vicinity of the grill must be at least 30" (76cm) from the
top of the grill, at least 18" (46cm) from the sides of the grill, at least 18" (46cm) from
the front and back of the grill and at least 3/8" (1cm) from the boom of the grill.
ANY MATERIAL CLOSER THAN THESE CLEARANCES MUST
BE FULLY NON‐COMBUSTIBLE

VG4419D_A1 WWW.MEMPHISGRILLS.COM 888.883.2260 3
VG4419D_A1 WWW.MEMPHISGRILLS.COM 888.883.2260 4
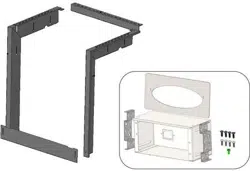
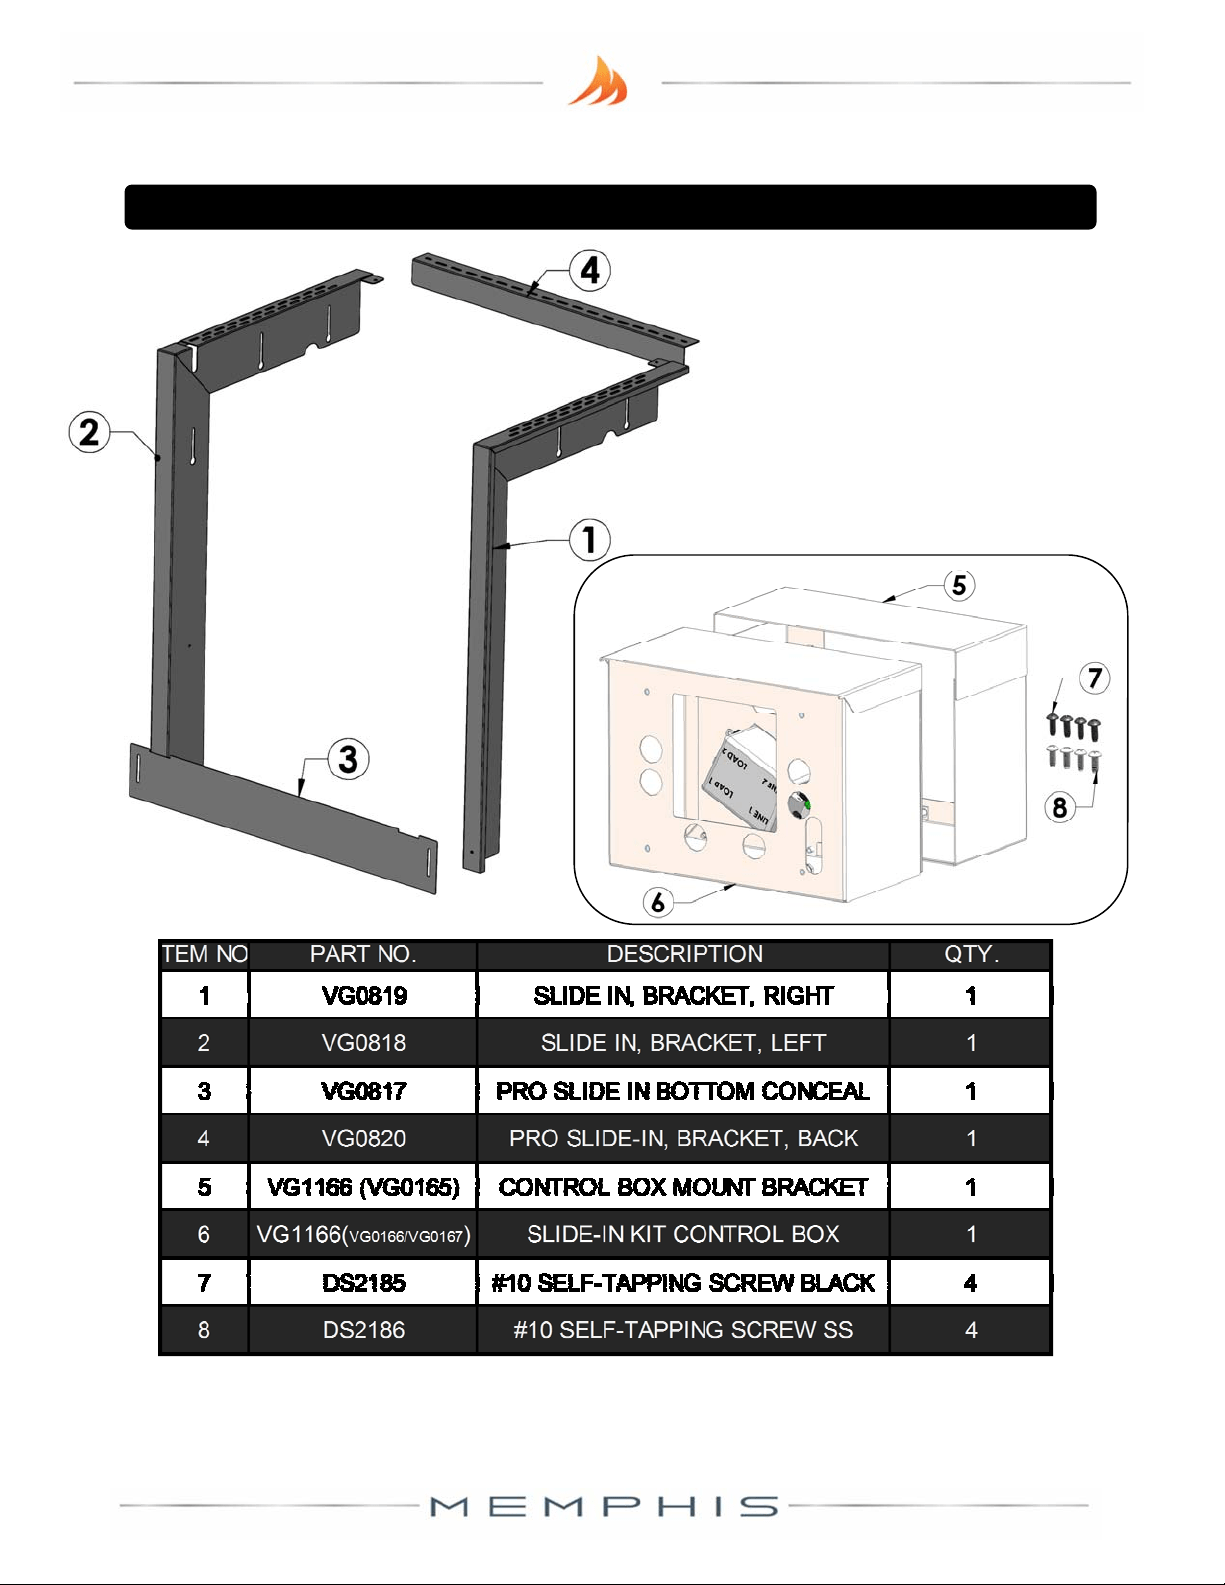
MemphisSlide‐InKitContents(BracketsandHardwareKit)
VG4419D_A1 WWW.MEMPHISGRILLS.COM 888.883.2260 5
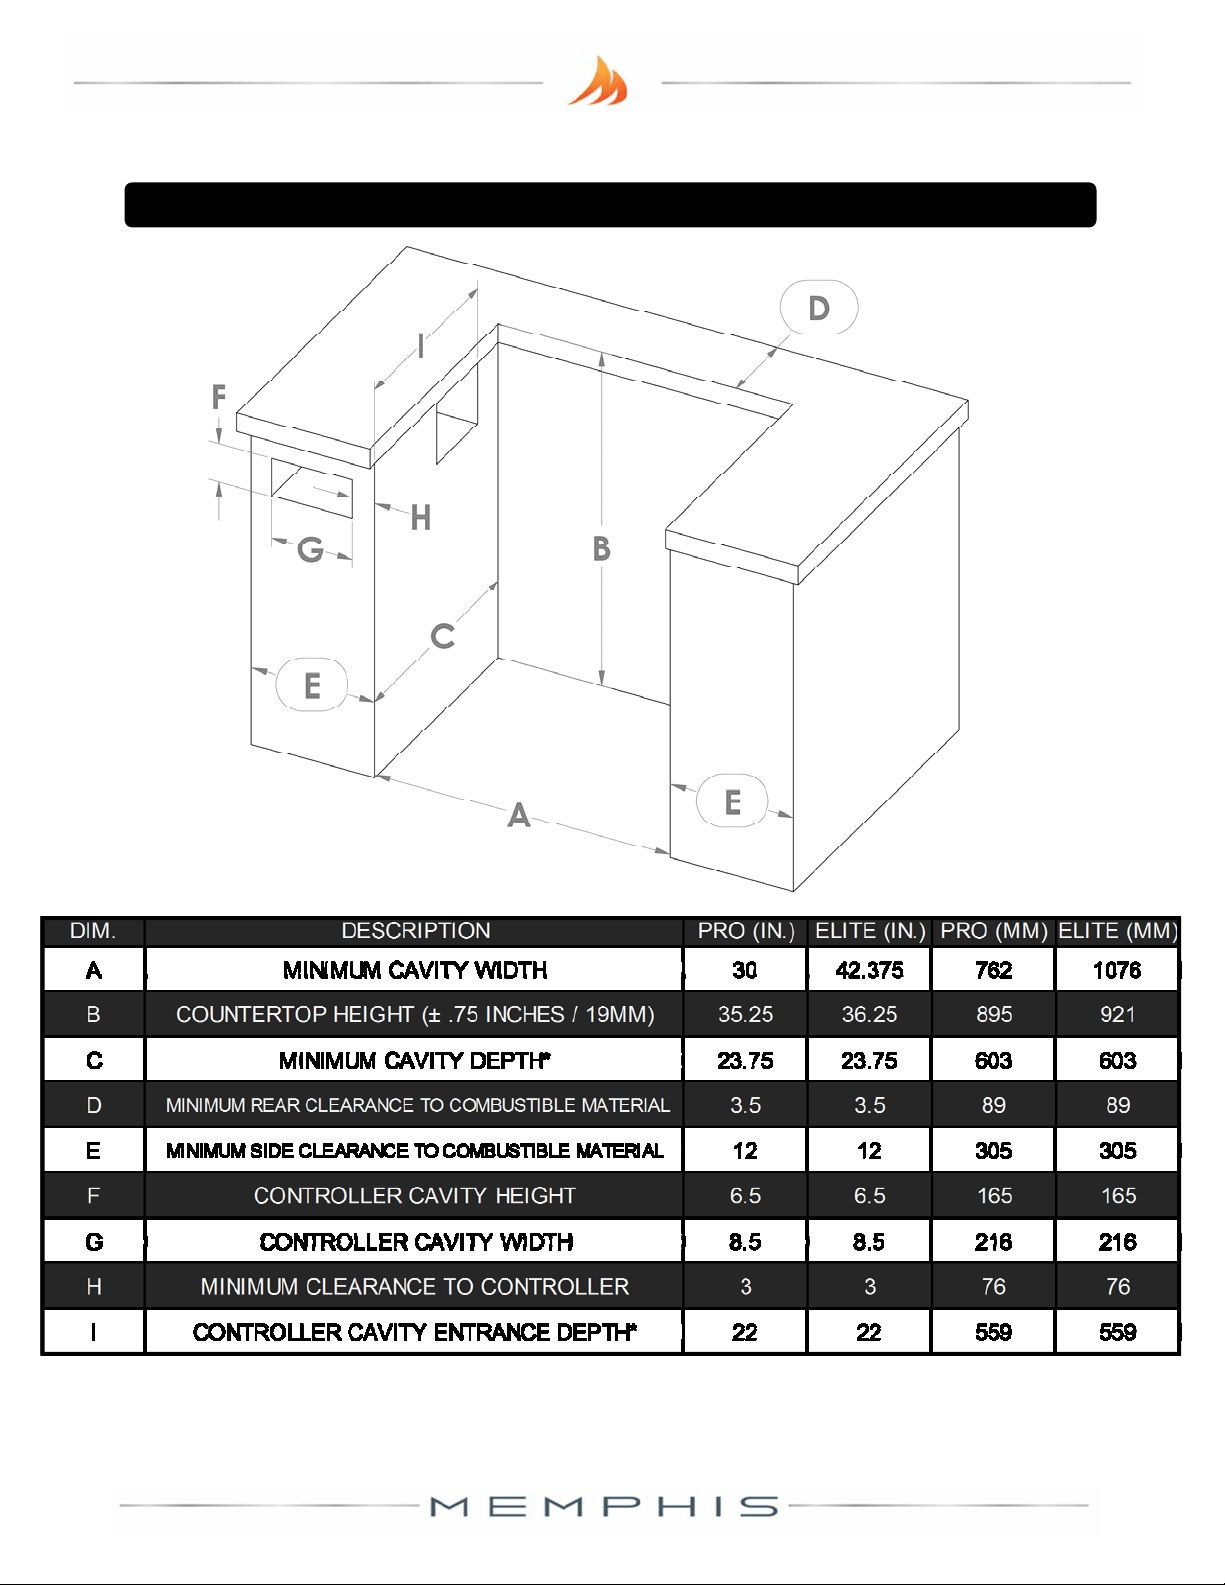
MemphisSlide‐InKitIslandDimensions
*Doesnotincludecountertopfrontoverhang.
VG4419D_A1 WWW.MEMPHISGRILLS.COM 888.883.2260 6
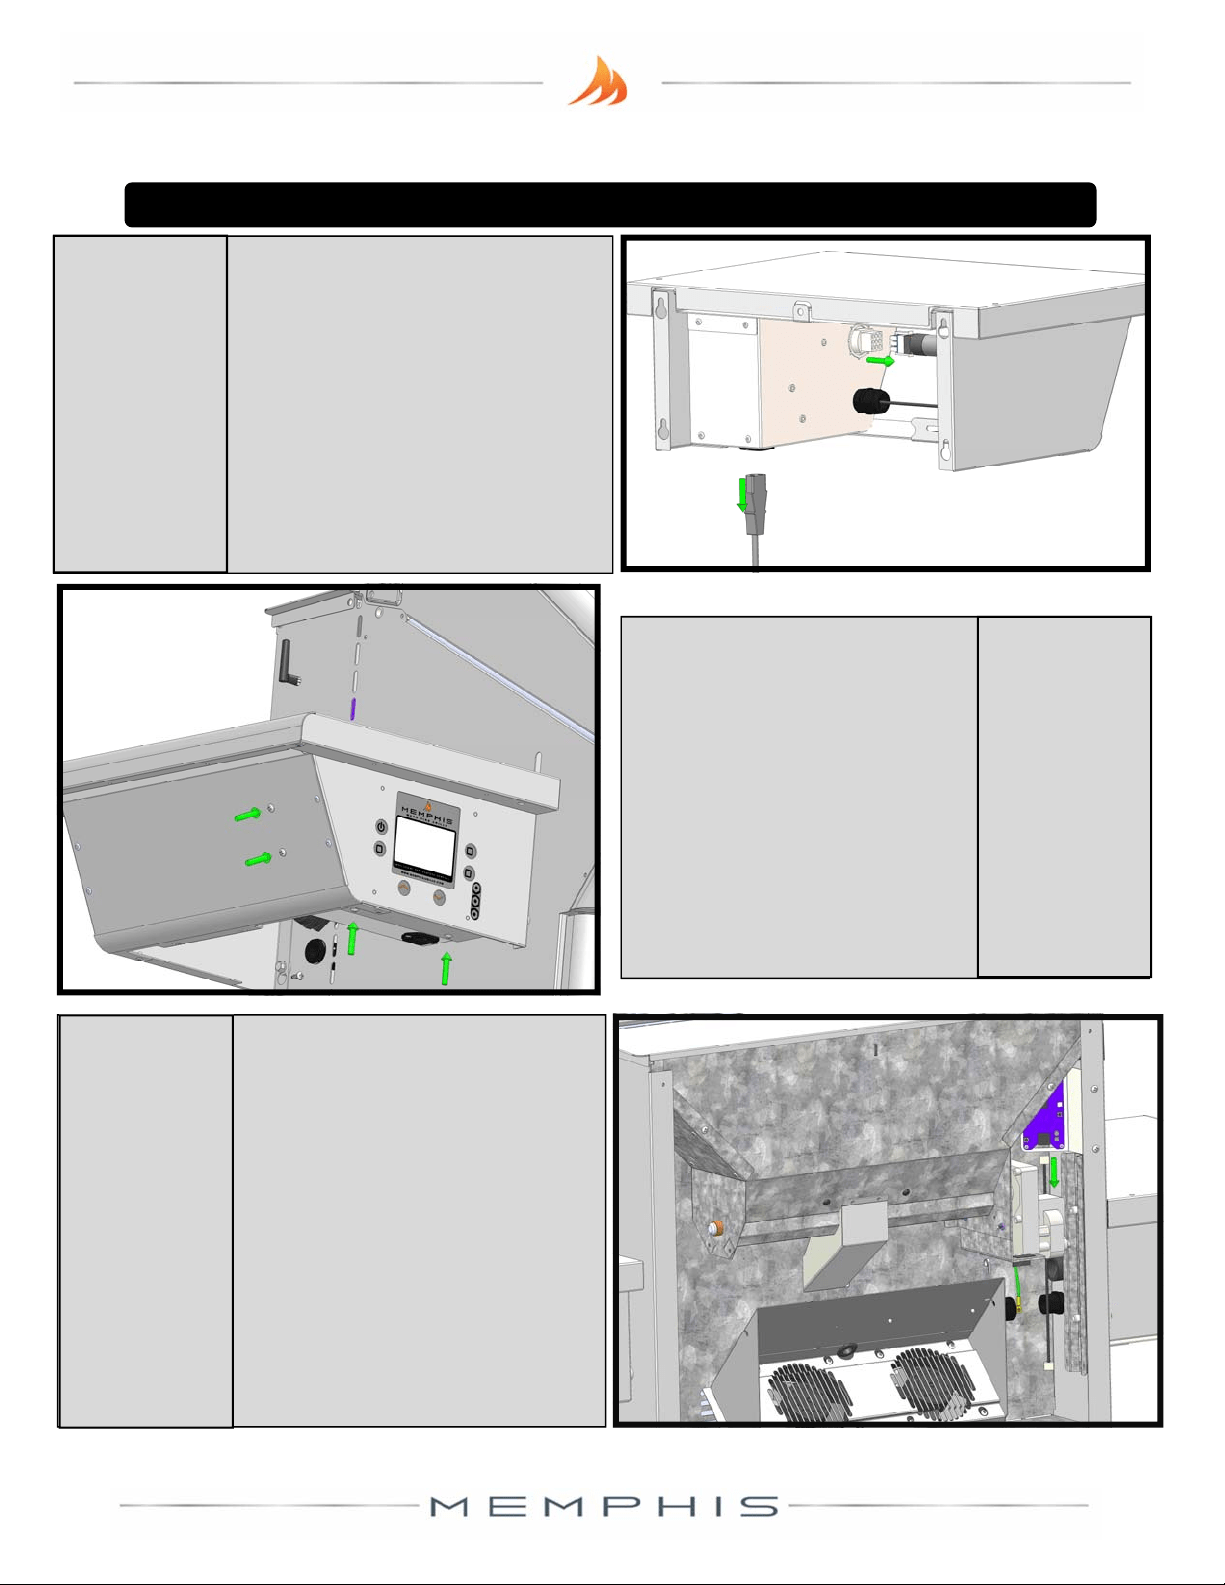
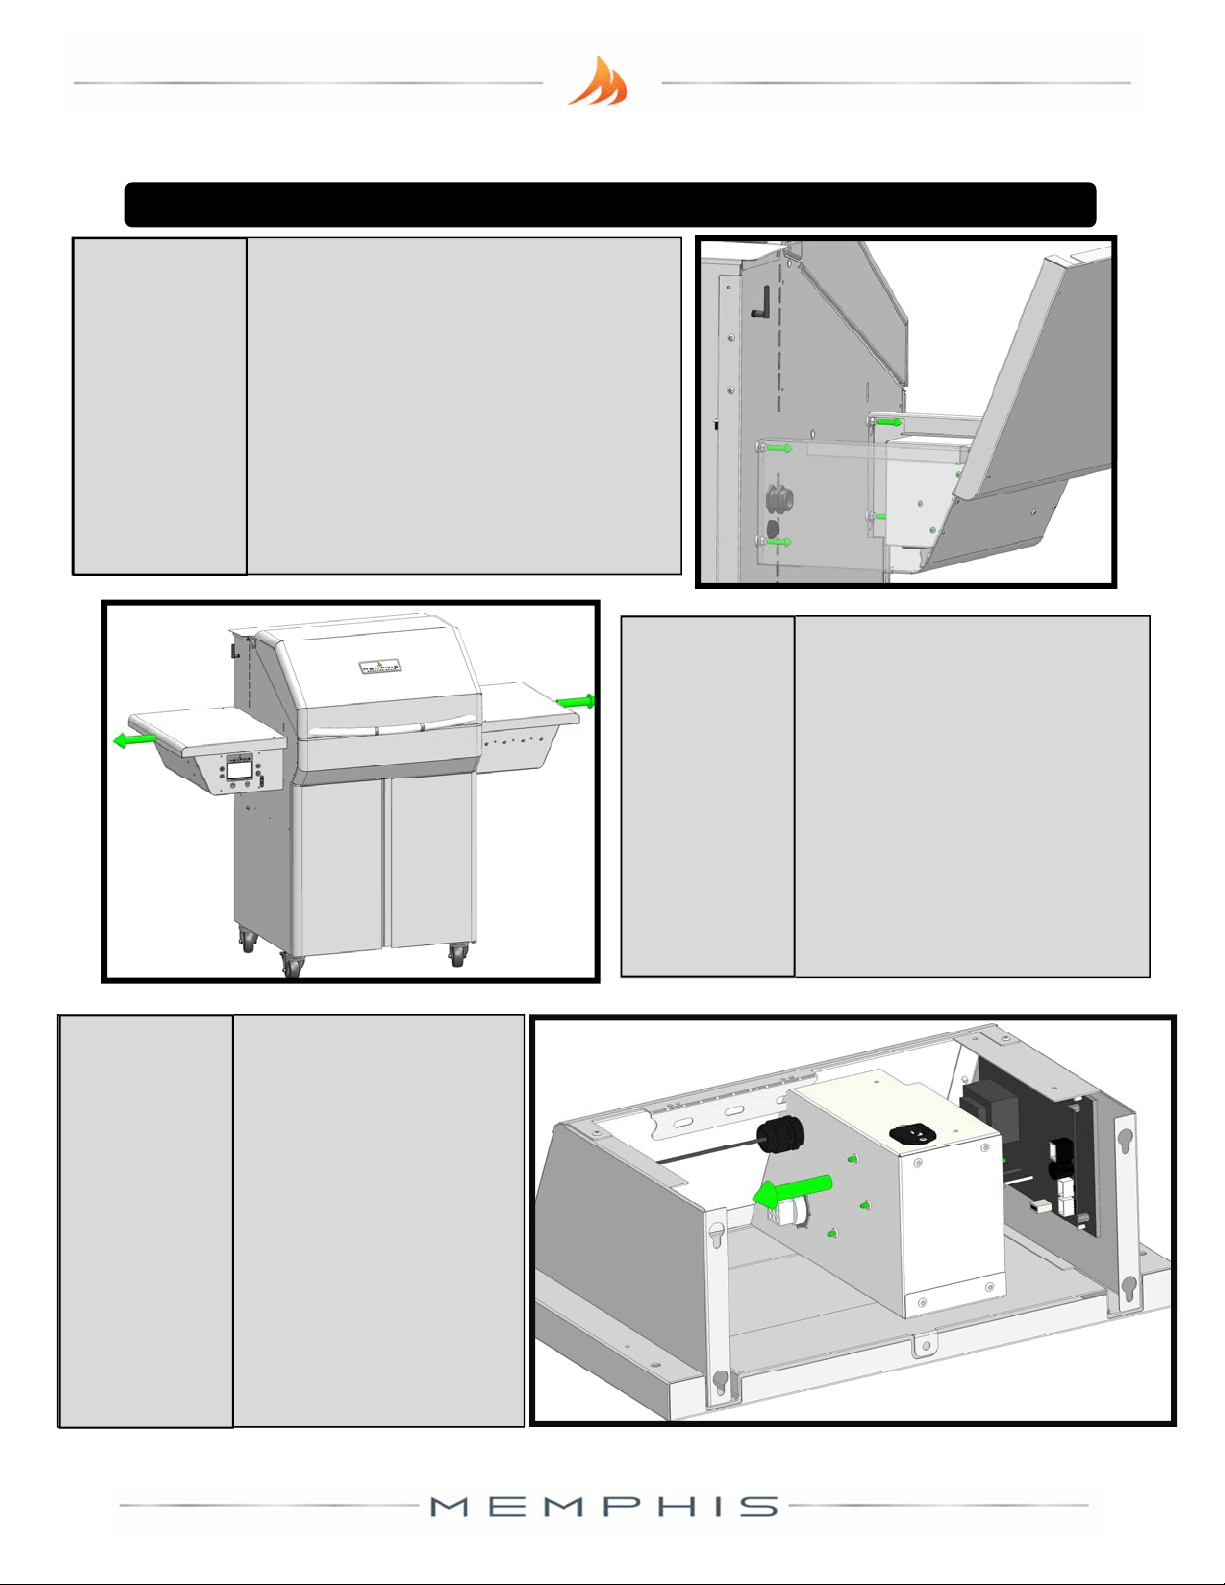
Beginbyopeningthele
sideshelf,andremoving
thestainlesspan.Unplug
thegrill’spow ercord,and
thecontrollercor dfrom
thebackofthecontrolbox
(alarge,whiteplug).
UsingaPhilips
screwdriver,removethe
twoscrewsholdingthe
grill’sbackcover,aswell
asthefourscrews
holdingthecontroller
box.
1
Remove
Cords
2
Remove
Screws
MemphisSlide‐InKitInstallation
Removethebackcoverof
thegrillbypulling
upwards.Intheupper‐
rightcorneroftheback
grillcompartment(nextto
theaugermotor),unplug
theEthernetcablefrom
theboomoftheWiFi
card.
3
Disconnect
WiFiCable
VG4419D_A1 WWW.MEMPHISGRILLS.COM 888.883.2260 7
TracetheEthernetcor dto
itsstrain‐reliefontheside
wallofthegrill,inthelower
‐rightofthecompartment.
Loosentheprotruding
poronofthestrain‐relief
unlitdisconnects(a
rubbergasketmaycomeoff
withit).RoutetheEthernet
cableoutofthegrill,
and
reservethelooseporon(s)
ofthestrainrelief.There
willbeaporonofthe
strainreliefthatremainson
thesideofthegrill.
4
RemoveWiFi
Cable
MemphisSlide‐InKitInstallation
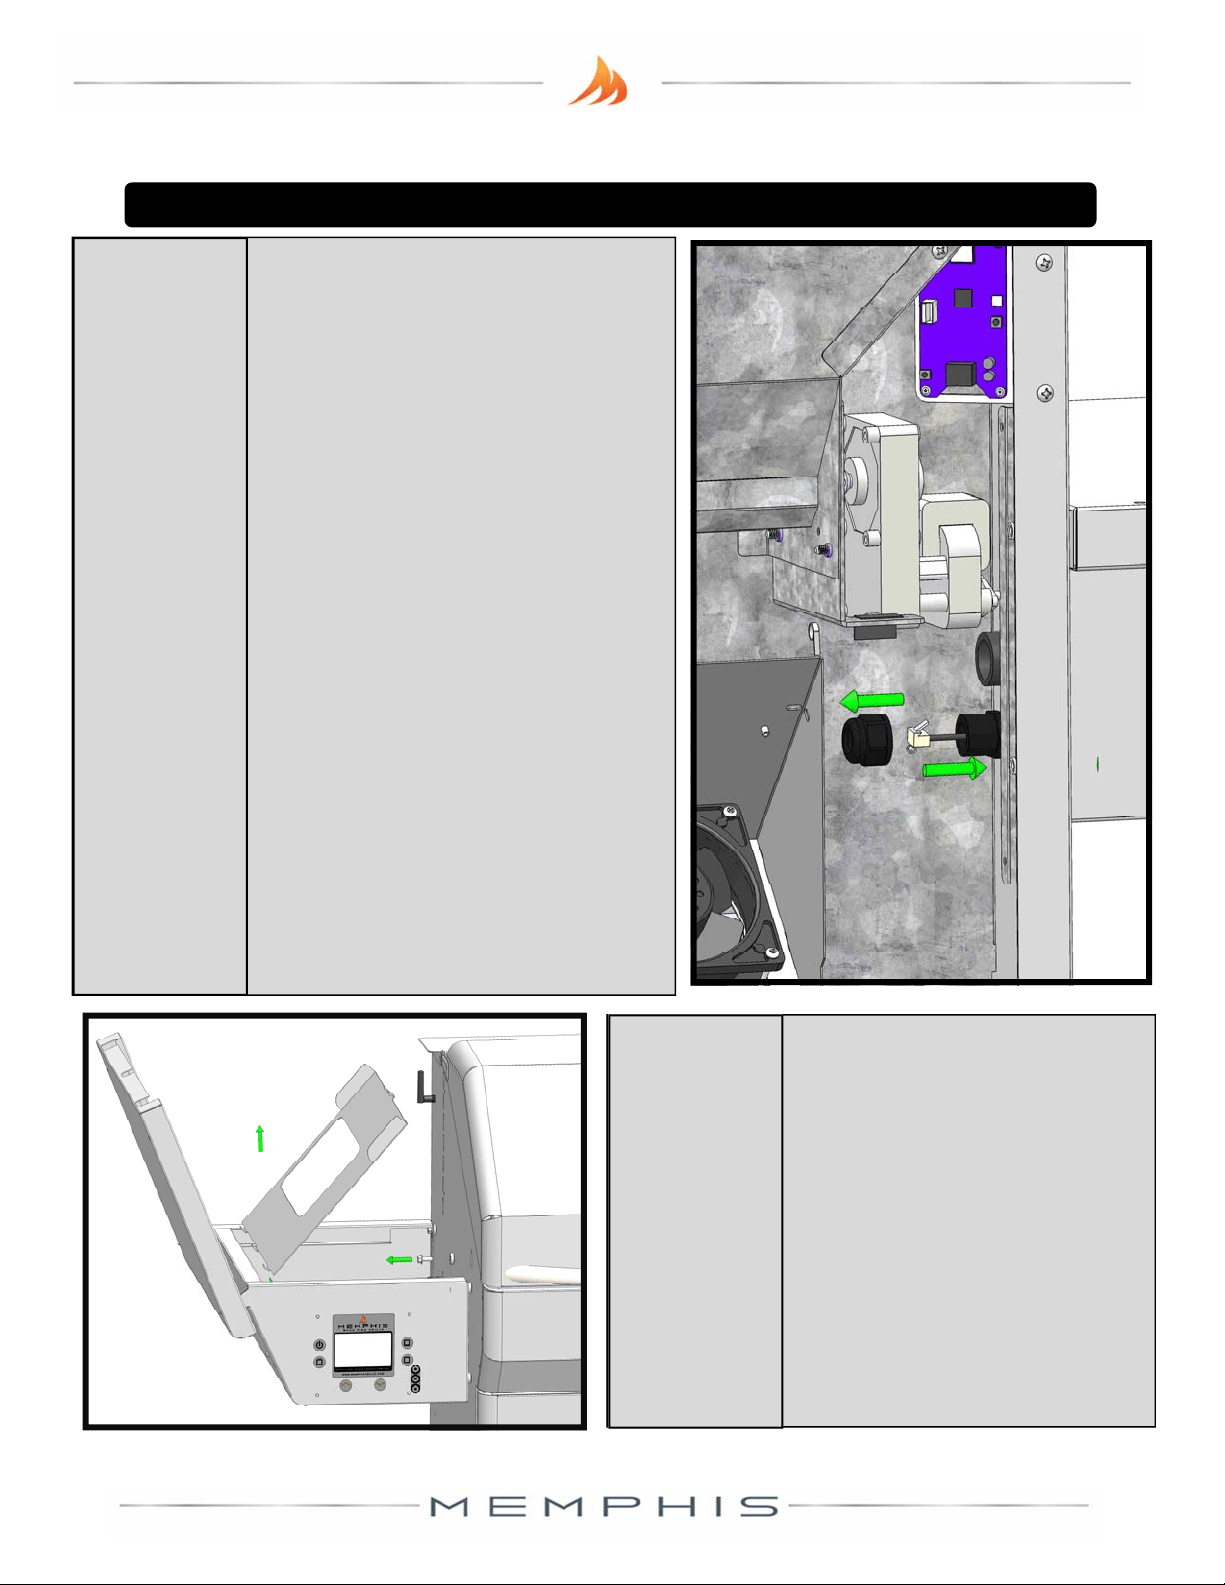
Usinga3/8”oradjustable
wrench,removethebolt
holdingthestainlesstrayin
place(it’sthetop‐middle
bolt),thenpthetray
upwar dsandliitout.
5
RemoveShelf
Tray
VG4419D_A1 WWW.MEMPHISGRILLS.COM 888.883.2260 8
Usingthesame3/8”wrench
fromthelaststeploosen(don’t
remove)thefourremaining
boltsthatholdtheleside
shelf.Opentherightside‐shelf
andloosenitsfiveboltsaswell.
Litheshelvesup,and
pullthemoutwardtofree
themfromthebolts.Unl
youconverttheunitback
intoastandardcart,you
willnotneedtheright
sideshelf.
6
LoosenShelf
Bolts
7
Remove
Shelves
MemphisSlide‐InKitInstallation
Setthelesideshelf
onadeskortable,
preferablyupside‐
down.Gentlypull
thecontrollerbox
backwardstoreveal
thebackofthe
controller.
8
Un‐box
Controller
VG4419D_A1 WWW.MEMPHISGRILLS.COM 888.883.2260 9
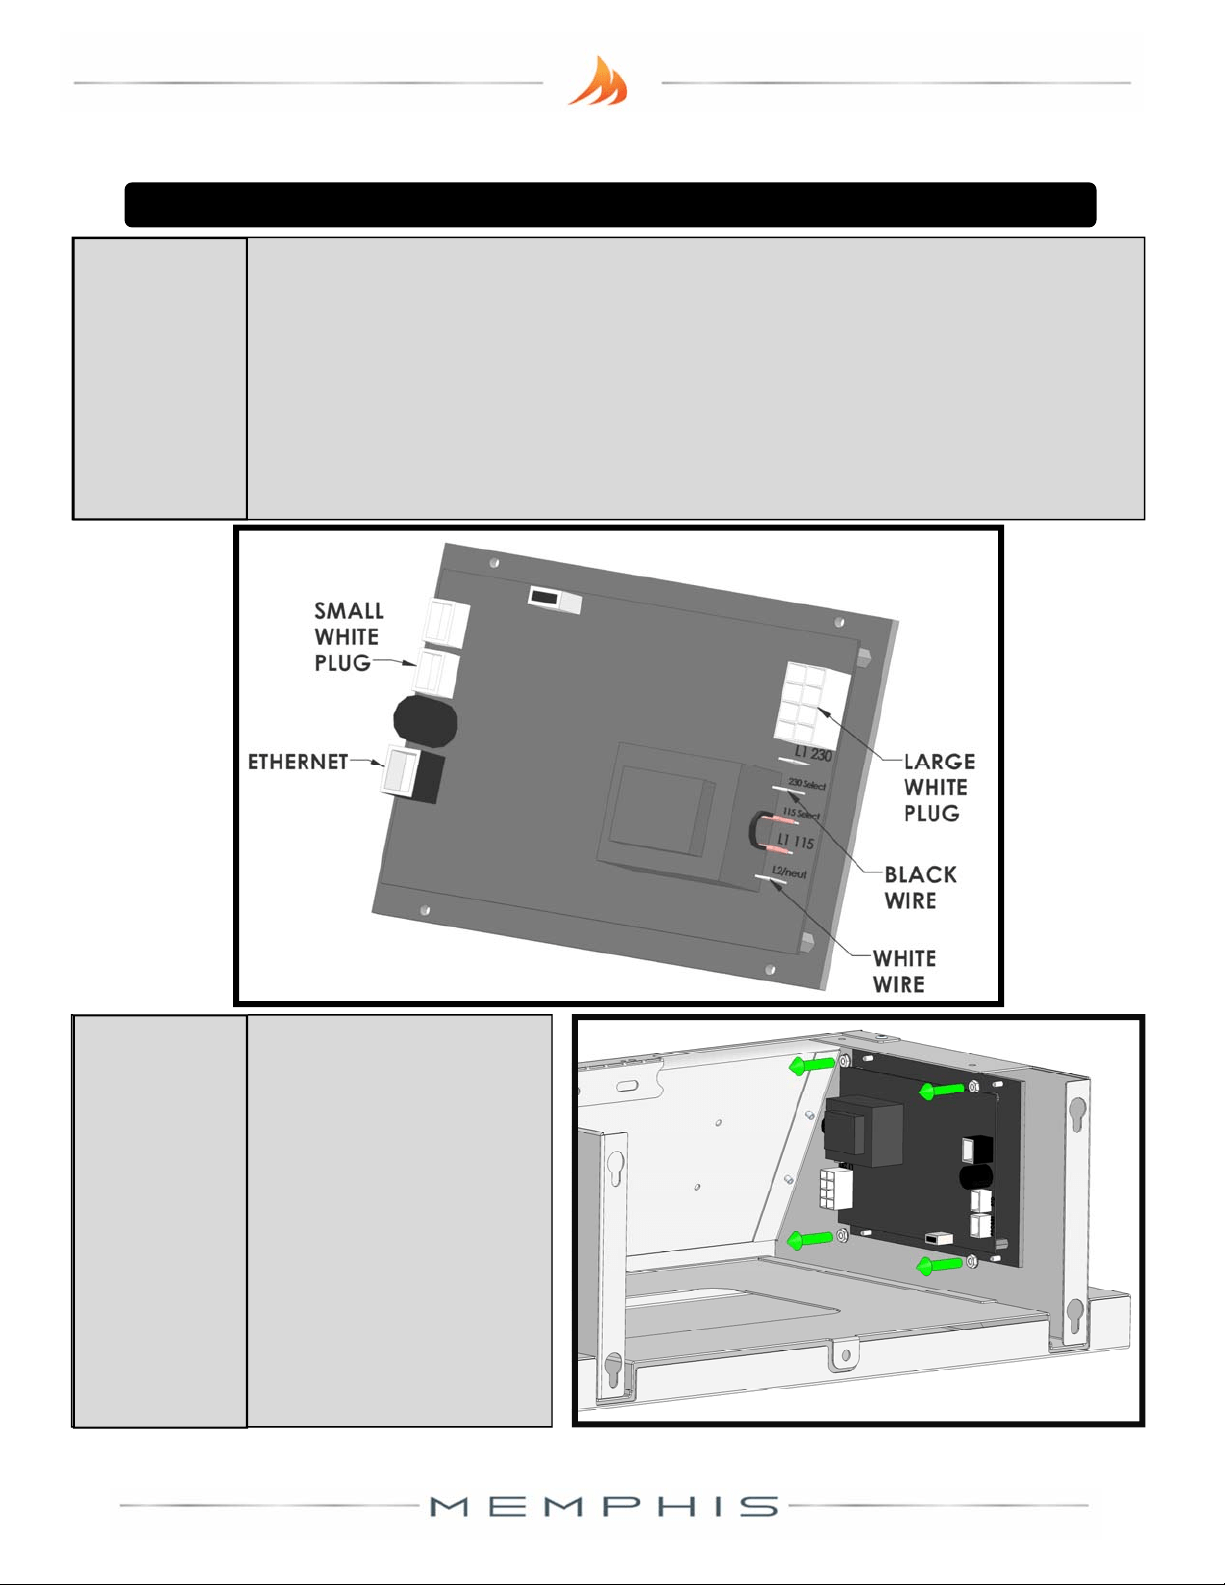
Unplugthelargewhiteplug,thesmallwhitepluglabelled“RTDs&
Switches”(NOT thesmallwhitepluglabeled“MeatProbes”),the
Ethernetcable,theblackwire,andthewhitewirefromthebackof
thecontroller(donotpullonthewiresthemselves,butontheir
plascconnectors.You
shouldnowbeabletopullthecontrolbox
completelyaway.
9
RemovePlugs
From
Controller
MemphisSlide‐InKitInstallation
Usinga5/16”nut‐
driverorratcheng
socket,removethe
fournutsholdingthe
controllertothefront
oftheshelf.Pullthe
controlleroffofthe
threadedstuds.
10
Remove
Controller
VG4419D_A1 WWW.MEMPHISGRILLS.COM 888.883.2260 10
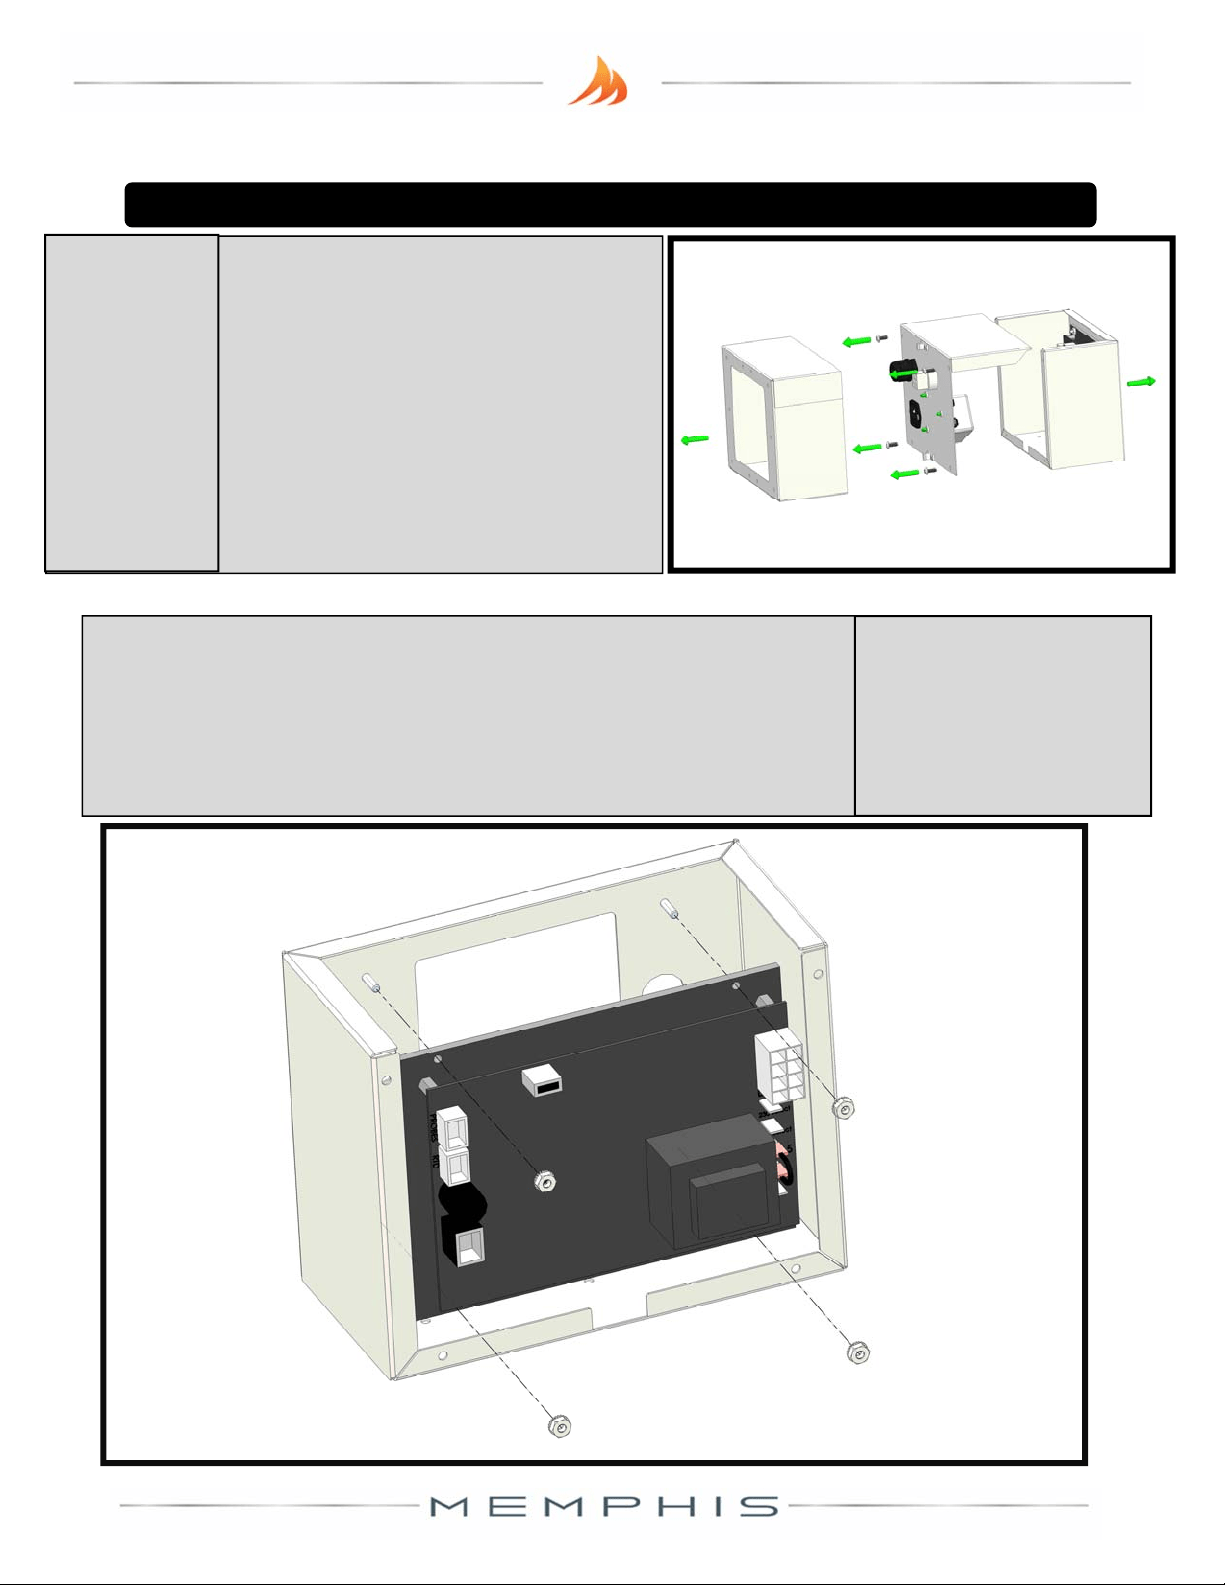
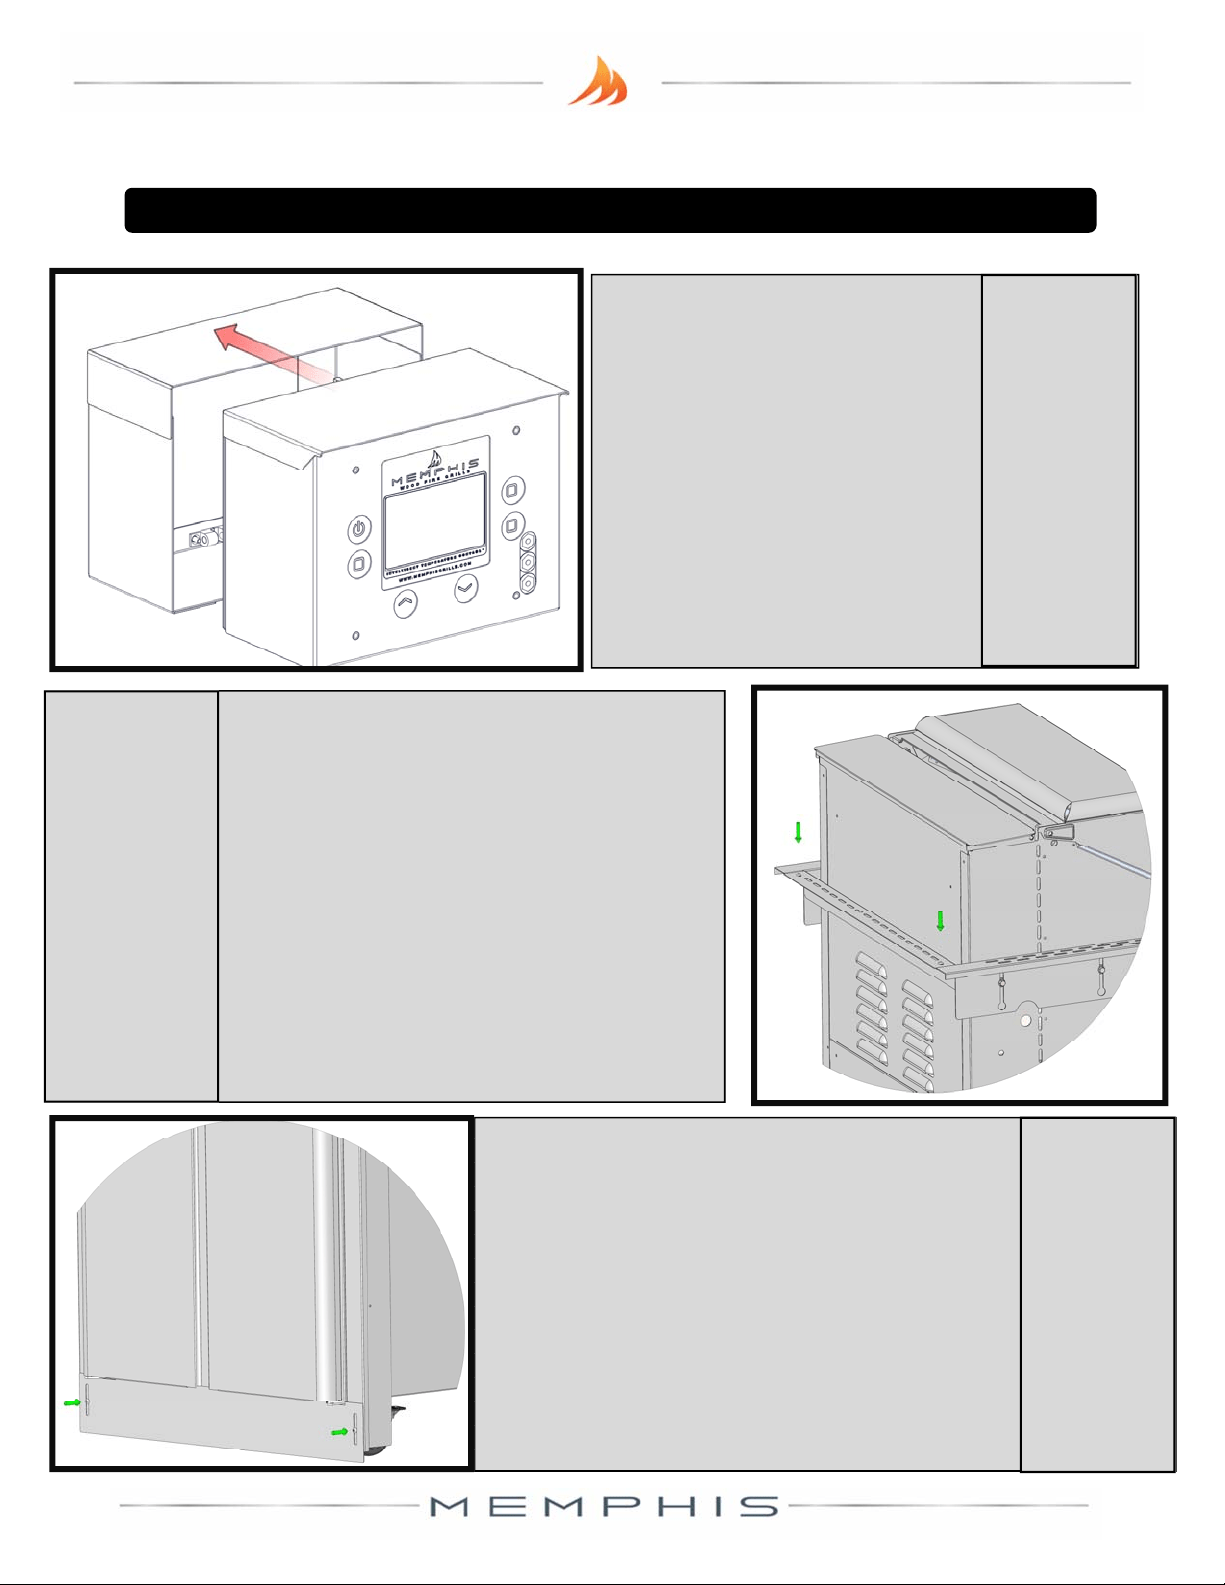
PulltheSlide‐inControlBoxawa y
fromtheControlBoxBracket.Usea
screwdrivertoremovethefour
screwsintheControlBoxBack,and
separateitfromtheControlBox
Front.ReservetheControlBox
Bracket,andthefourscrews.
Removethefournutsonthethreadedstudsofthe
ControlBoxFrontandreserve.Placethecontrolleron
thefourthreadedstuds.Fastenthecontrollerontoit
usingthe5/16”toolandnutsyoujustreserved.
11
OpenSlide‐In
KitControl
Box
12
PlaceControllerOnSlide
‐InKitControlBox
MemphisSlide‐InKitInstallation
VG4419D_A1 WWW.MEMPHISGRILLS.COM 888.883.2260 11
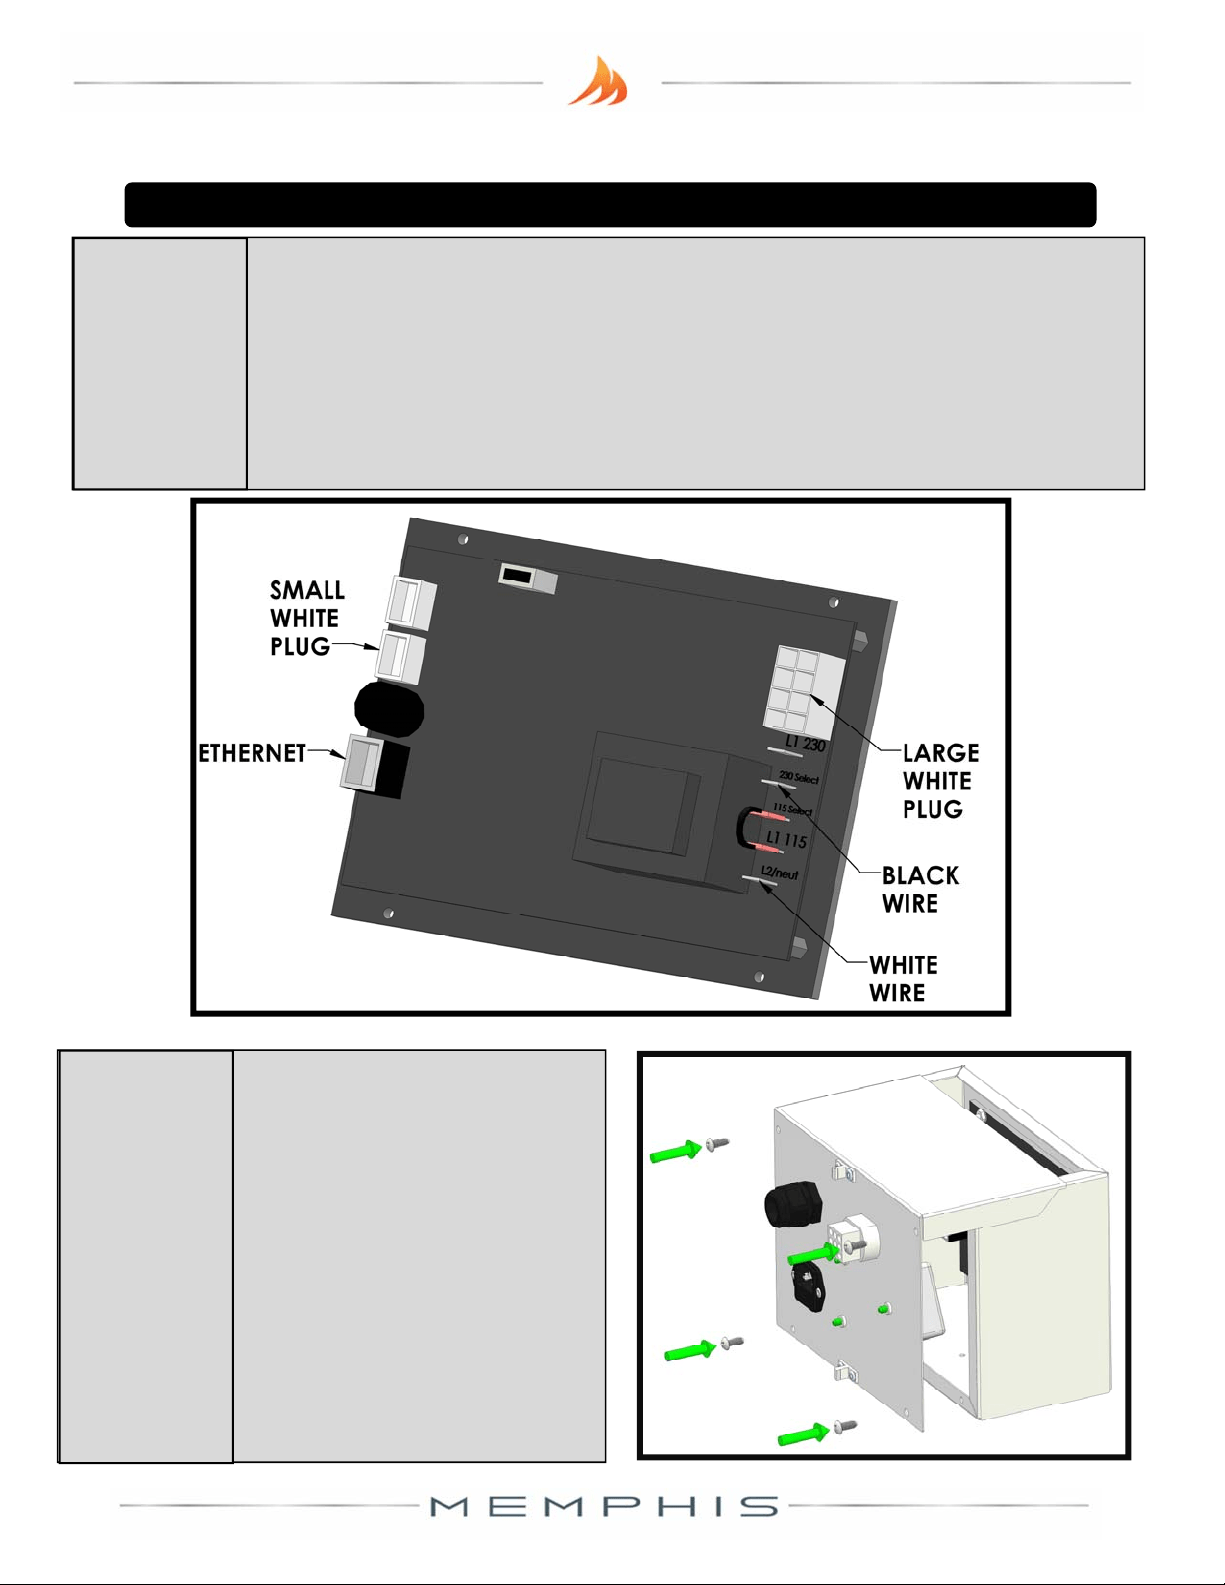
Plugthelooseconnector sintheControlBoxBackintothe
controller.Thelargewhiteconnectorgoesintothelargewhiteplug.
Thesmallwhiteconnectorgoesintothesmallwhiteplug.The
EthernetcablegoesintotheEthernetplug.Thewhitewiregoes
intotheJ2pin,andtheblack
wiregoesintotheJ8pin.
13
Connect
Controller
MemphisSlide‐InKitInstallation
Re‐fastentheControlBox
BacktotheControlBox
Frontwiththefourblack
screwsfromstep11,
makingsurenottopinch
anywiresintheprocess.
TheControlBoxisnow
readyforinstallaon.
14
CloseControl
Box
(J2)
(J8)
VG4419D_A1 WWW.MEMPHISGRILLS.COM 888.883.2260 12
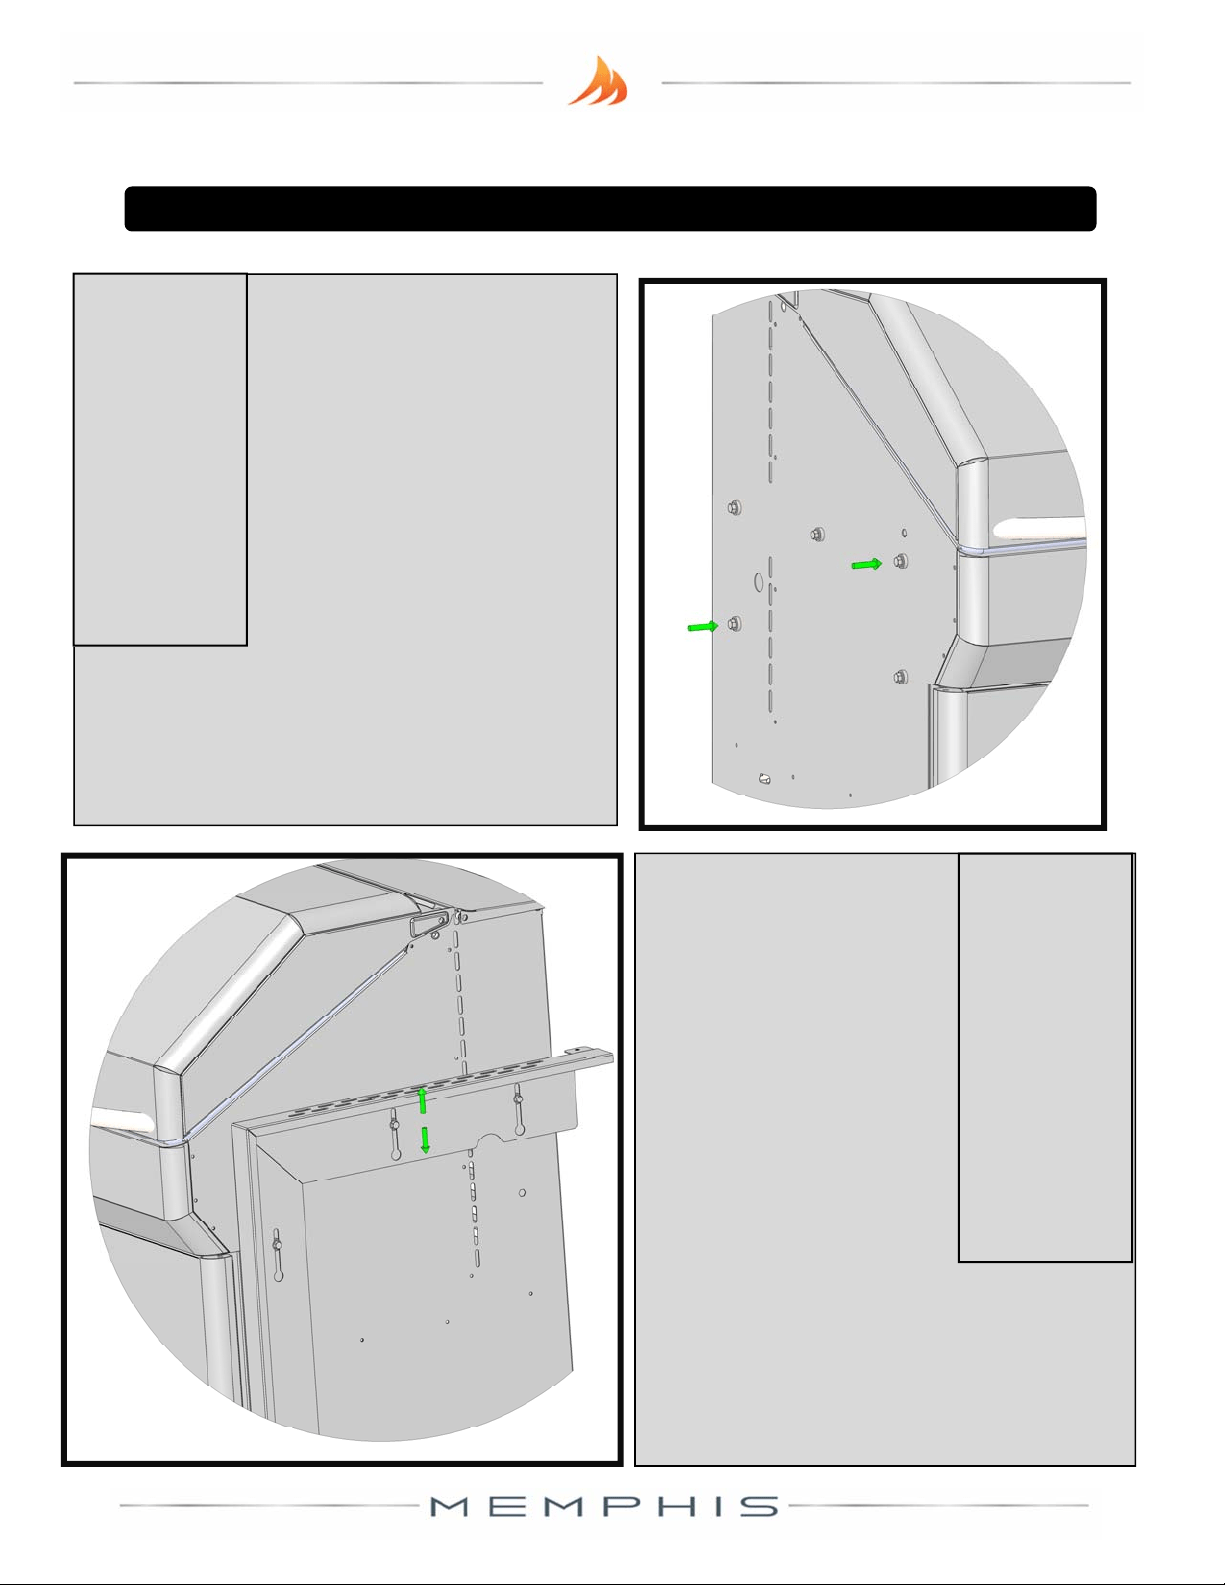
Therearetwoboltsand
washersoneachside
thatwillnotbeneeded.
Removethetwoshown,
andtheircounterparts
ontherightsideofthe
grill.Holdontothis
hardware,incasethe
grillisconvertedbackintoastandard
cart.Storingtheminoneoftheside
shelves
mightbeagoodidea.
15
Remove
Unnecessary
Hardware
Thesidebracketsmount
thesamewaythatthe
sideshelvesdo–through
key‐holeslots,
sandwichedbetweenthe
washerandthebolt‐
head.Theelongated
keyholesinthebrackets
allowthemtobe
adjustedtoyour
countertopheight.TheProcanbe
adjustedfrom34.5”to36”.TheElite
canbeadjustedfrom35.5”to37”.
16
Aachand
AdjustSide
Brackets
MemphisSlide‐InKitInstallation
VG4419D_A1 WWW.MEMPHISGRILLS.COM 888.883.2260 13
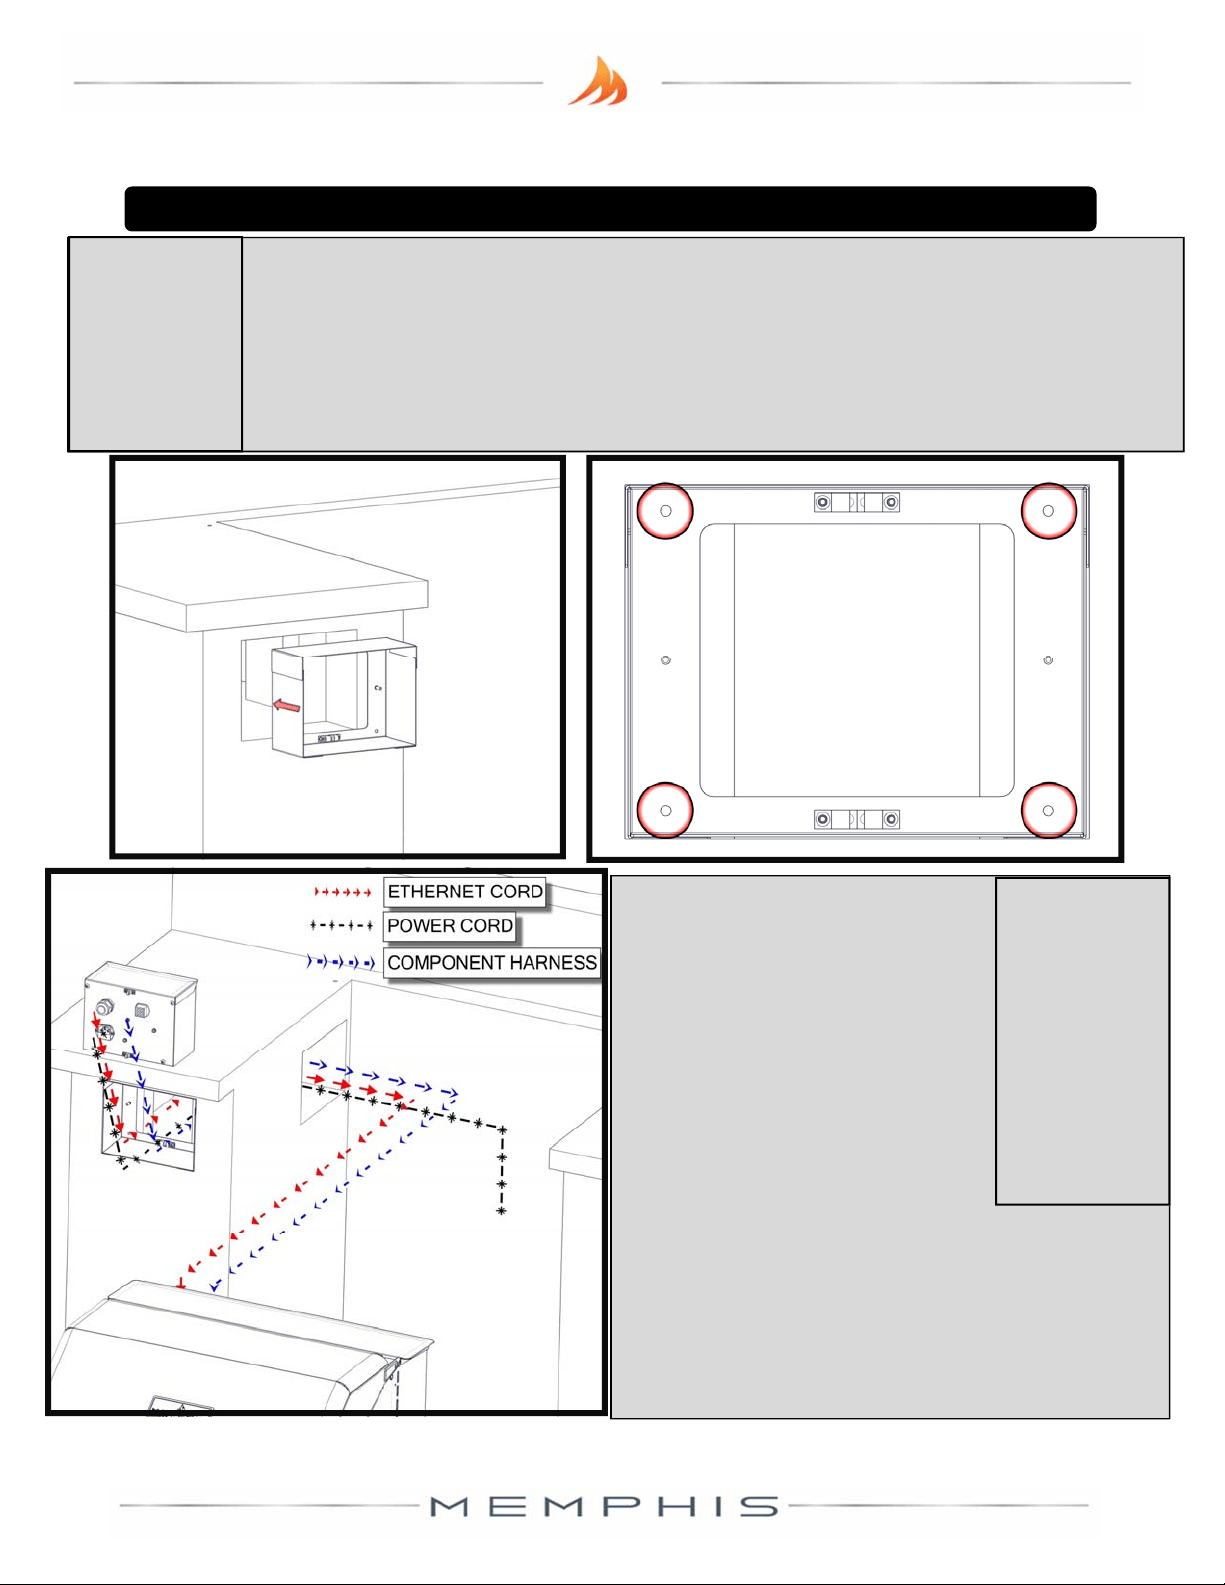
TaketheControlBoxBracketfromstep11,andplaceitinthecontr ollercavityof
yourslide ‐instructure.Thebracketwillrequireaminimumcavityopening of8
1/2”Width,61/2”Height,and33/4”Depth.Mountthebracketusingthefour
blackscrewsinthehardwarekit.
Fastenfromtheinsideofthebox,goinginto
thecavity,inthefourlocaonscircled.Thismayrequiredrillingofpilotholes.
17
PlaceControl
BoxBracket
Therearethreemajorconneconsto
bere‐established.TaketheEthernet
cablecomingoutofthebackofthe
controlboxandrouteitthroughthe
controllercavityintothebackofthe
grillthroughthestrainrelief,plugging
itintotheWiFicard.Notethatthisis
essenallytheoppositeofsteps3
and4.Makesuretore‐assembleand
ghtenthestrainrelieffromstep4.
Routethecontrollerharness(whichwasunpluggedin
step1)throughthecontrollercavity,andplugitinto
thebackofthecontrolbox.Finally,pluginyourgrill’s
powercordintothebackofthecontrolbox,thenintoa
powersource.
18
Reestablish
Connecons
From
Controllerto
Grill
MemphisSlide‐InKitInstallation
VG4419D_A1 WWW.MEMPHISGRILLS.COM 888.883.2260 14
Onceyou’vefinishedinstallingthecontroller,
lockthefrontcasters,andpushtheminward,
sothattheydon’tprotrudefromthefontof
thegrill.Usingtheothertwostainlessscrews
includedinthekit,fastentheboombracket
tocoverthecasters.Theelongatedslotson
thisbracket
aretoallowfortheup/down
adjustmentofthesidebrackets.
21
Install
Boom
Bracket
Re‐installthegrill’sbackcoverthathadbeen
removedinstep2.Usingtwoofthestainless
steelscrewsfromthehardwarekit,fastenthe
backL‐brackettothetwosidebrackets,
spanningbetweenthembehindthegrill.In
yourinstallaon,makesurethattheround
slotscut
intothispartarenotblocked–they
areforvenlaon.Pushthegrillintoplacein
theslide‐instructure,makingsurethatthe
cablesfromthecontrolleraren’tstretchedor
pinchedindoingso.
20
InstallBack
Bracket&
SlideGrillInto
Place
MemphisSlide‐InKitInstallation
Makingsurenottopinchthe
Ethernet,grill,orpowercables,
snapthecontrolboxintothe
mounngbracket.Ifyour
controllereverneedstobe
serviced,thecontr olboxcan
beremovedbysimplypulling
outward.
19
Snap
ControlBox
IntoPlace