Adult assembly required.
Small parts may present choking hazard prior to assembly.
b
quickly assemble your products. Before you begin we recommend
y.
2. Identify all parts and hardwares.
3. You will need the following tools
Philips head screw driver
Flat head screw driver
Hammer
Do Not Use Power Drills or Drivers
To protect your parts during assembly please place them on a soft
surface.
To clean surface use only water on a damp cloth. Do not use
window cleaners or cleaning abrasives as it will scratch the surface
and could damage the protective coating.
ASSEMBLY INSTRUCTIONS
ITEM NO: 624
NUMÉRO DU MODÈLE : 624
INSTRUCTIONS D'ASSEMBLAGE.
Notez s'il vous plaît que l'avertissement sur la table à langer
-
-
rait vous causer.
e
1
Dream On Me Inc.
1532 S WASHINGTON AVE
PISCATAWAY TWP NJ 08854
Tournevis cruciforme
Tournevis plat
Marteau
surface souple.
2
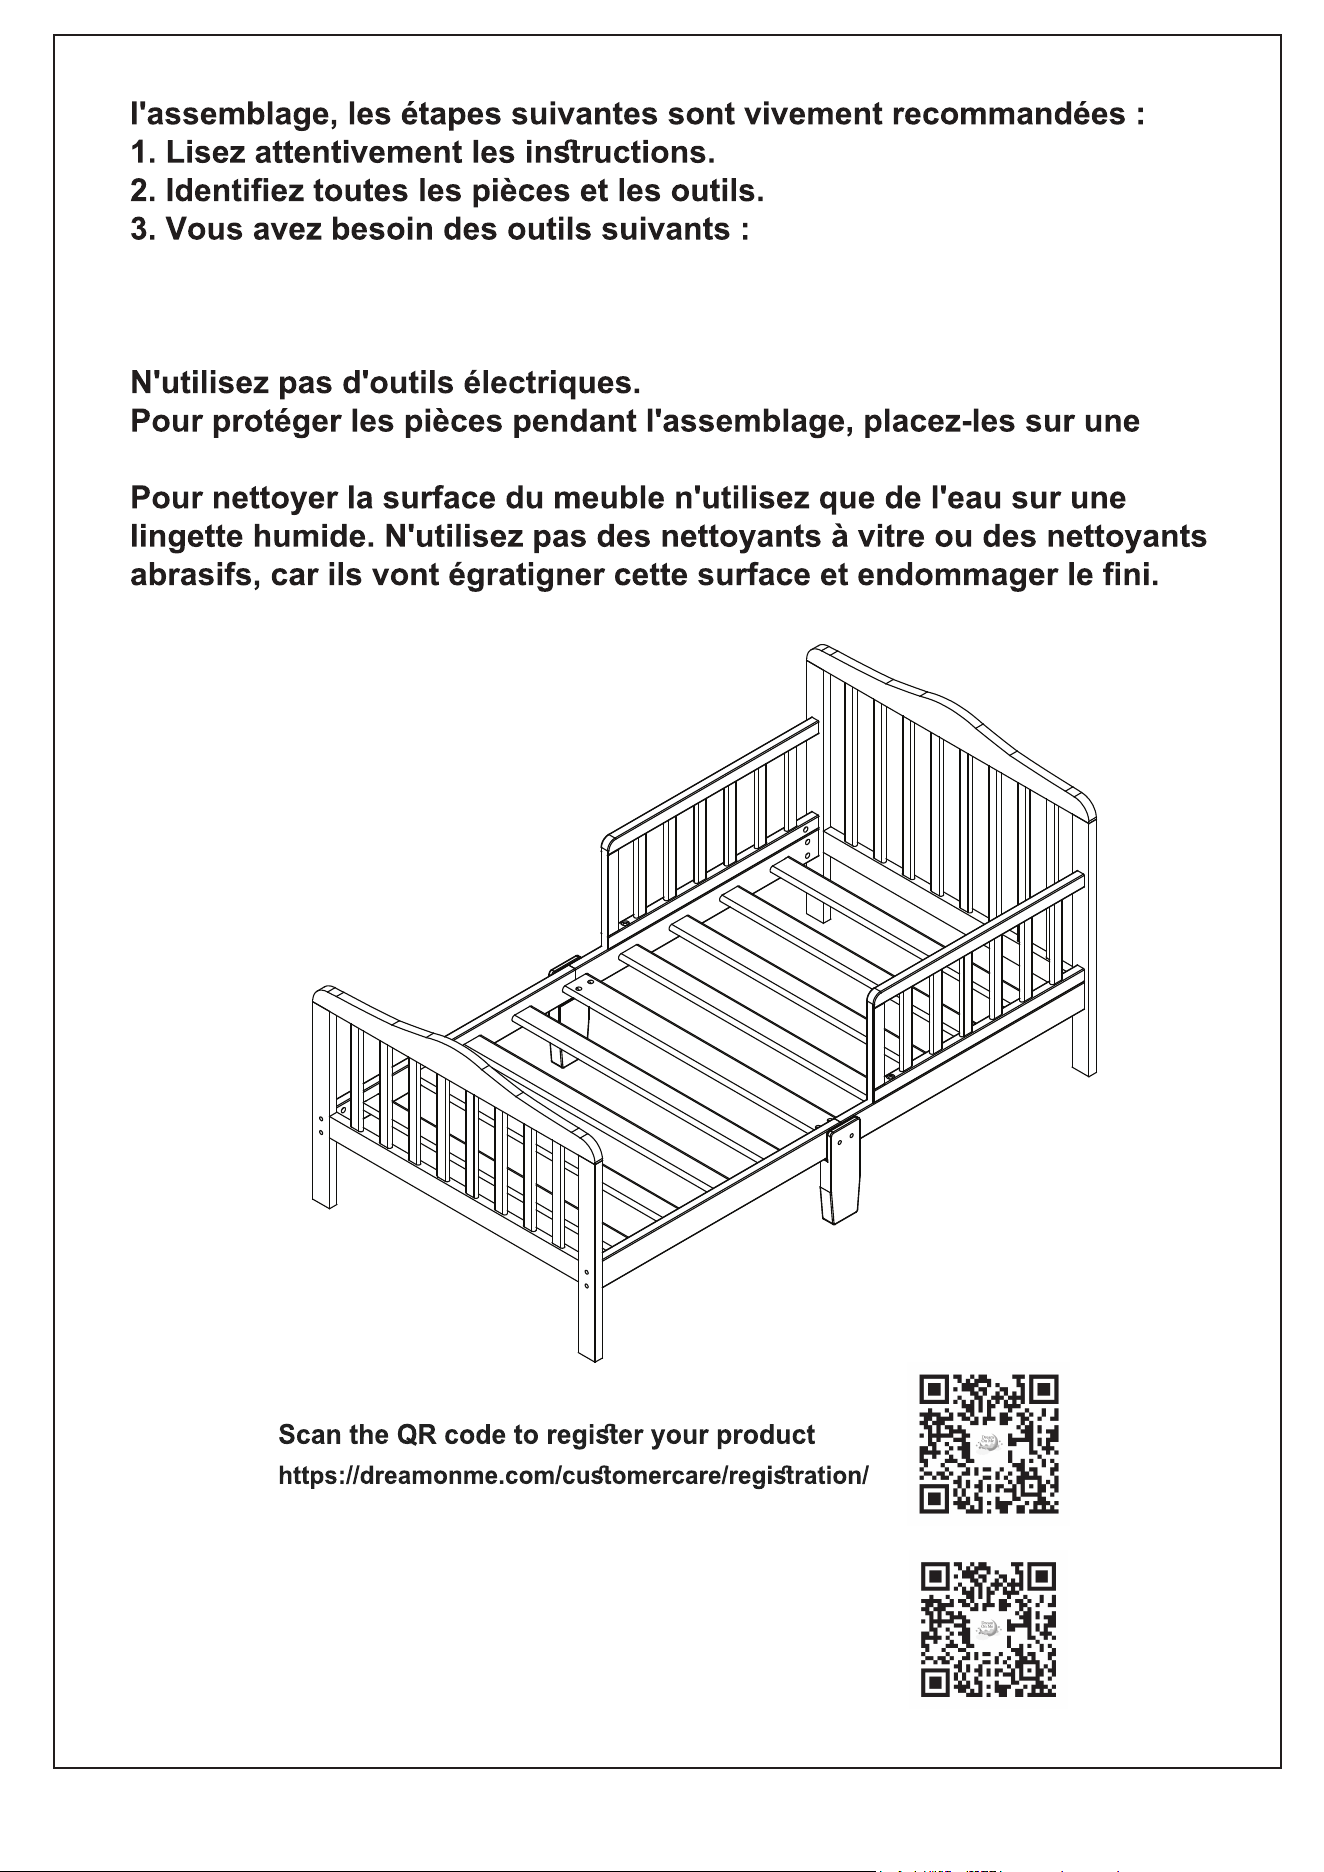
Scannez le code QR pour enregistrer votre produit
https://dreamonme.com/customercare/registration/
3
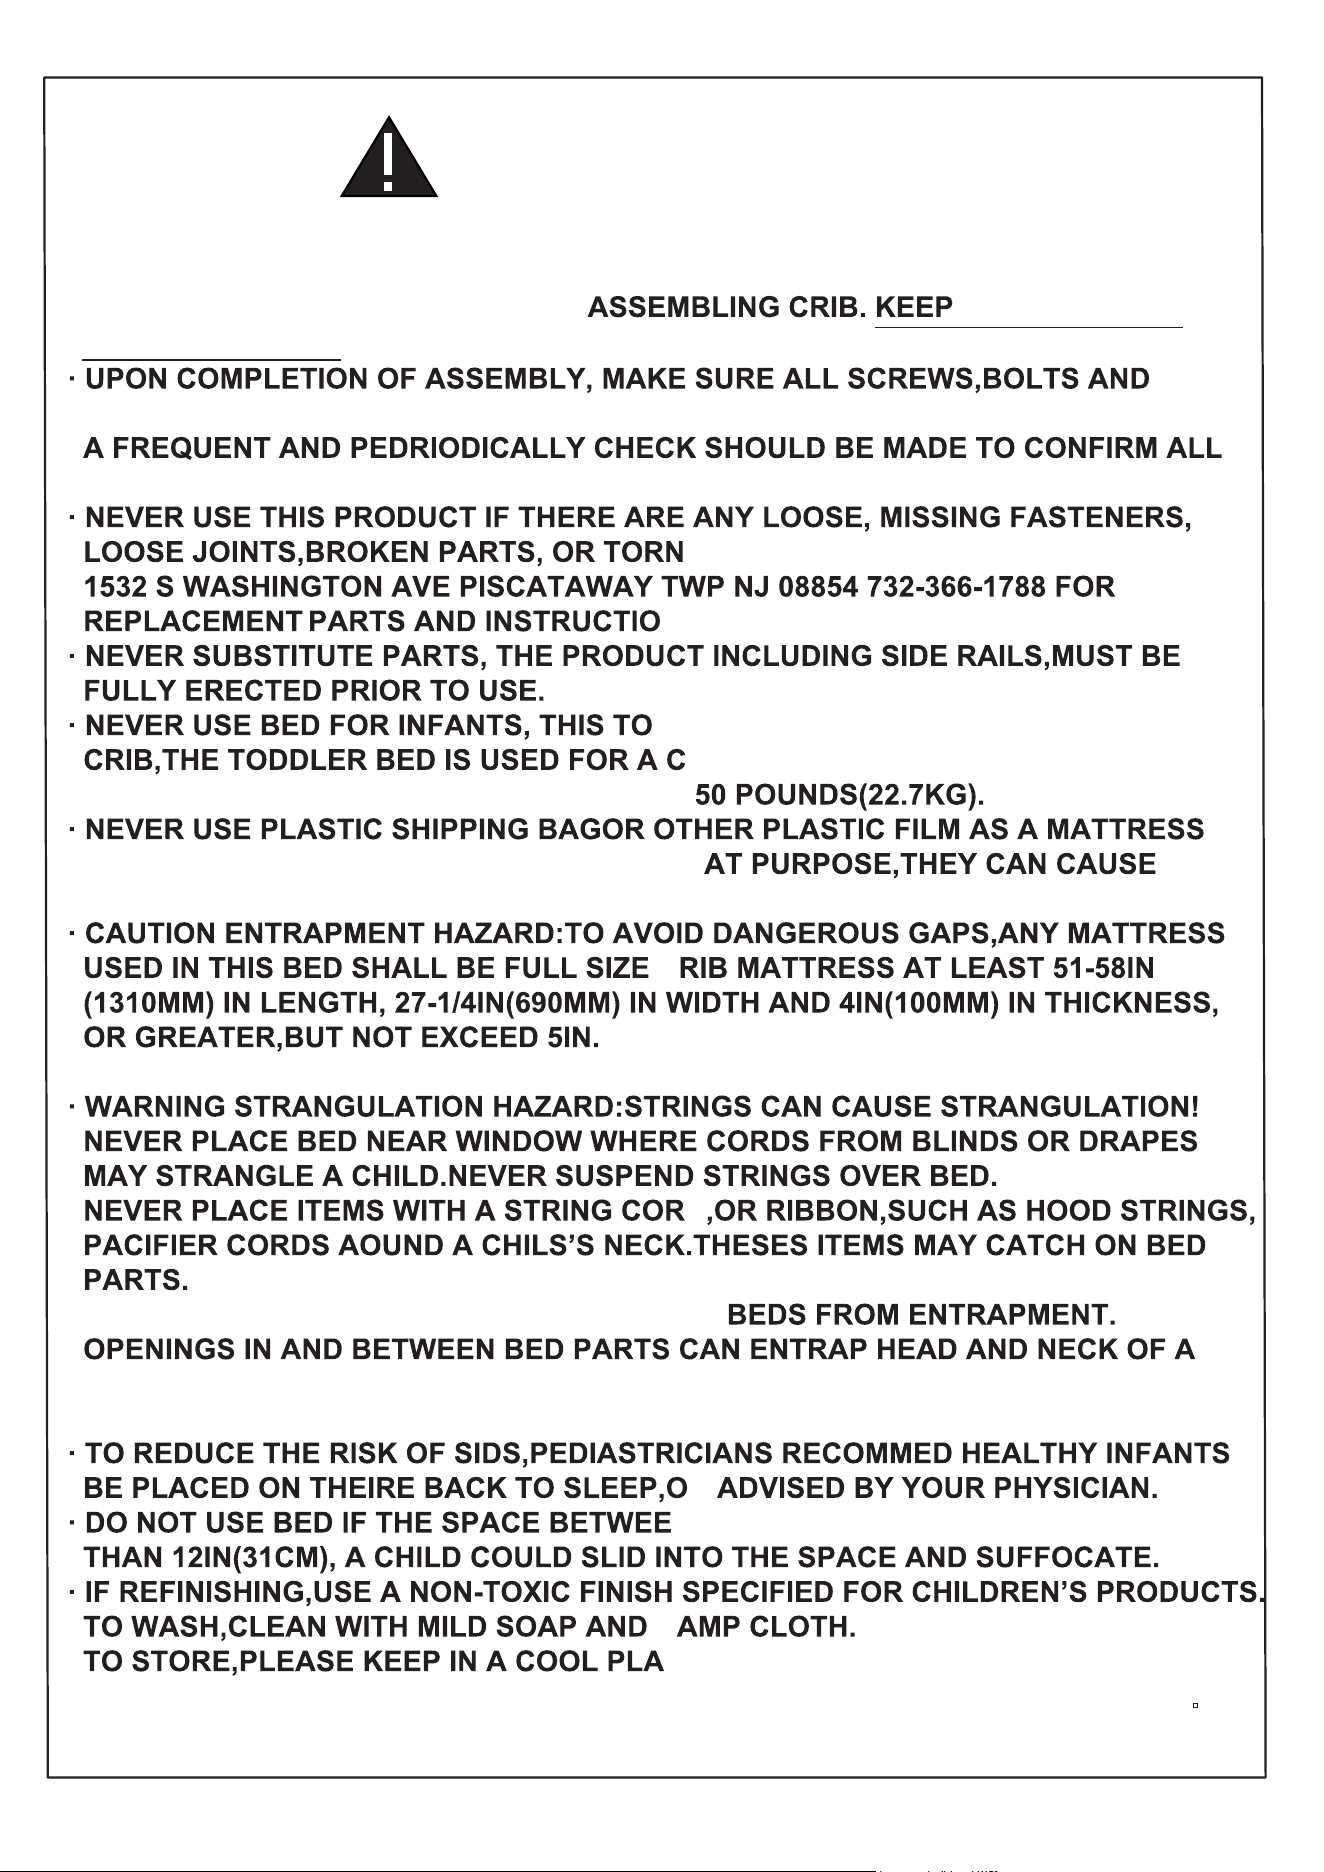
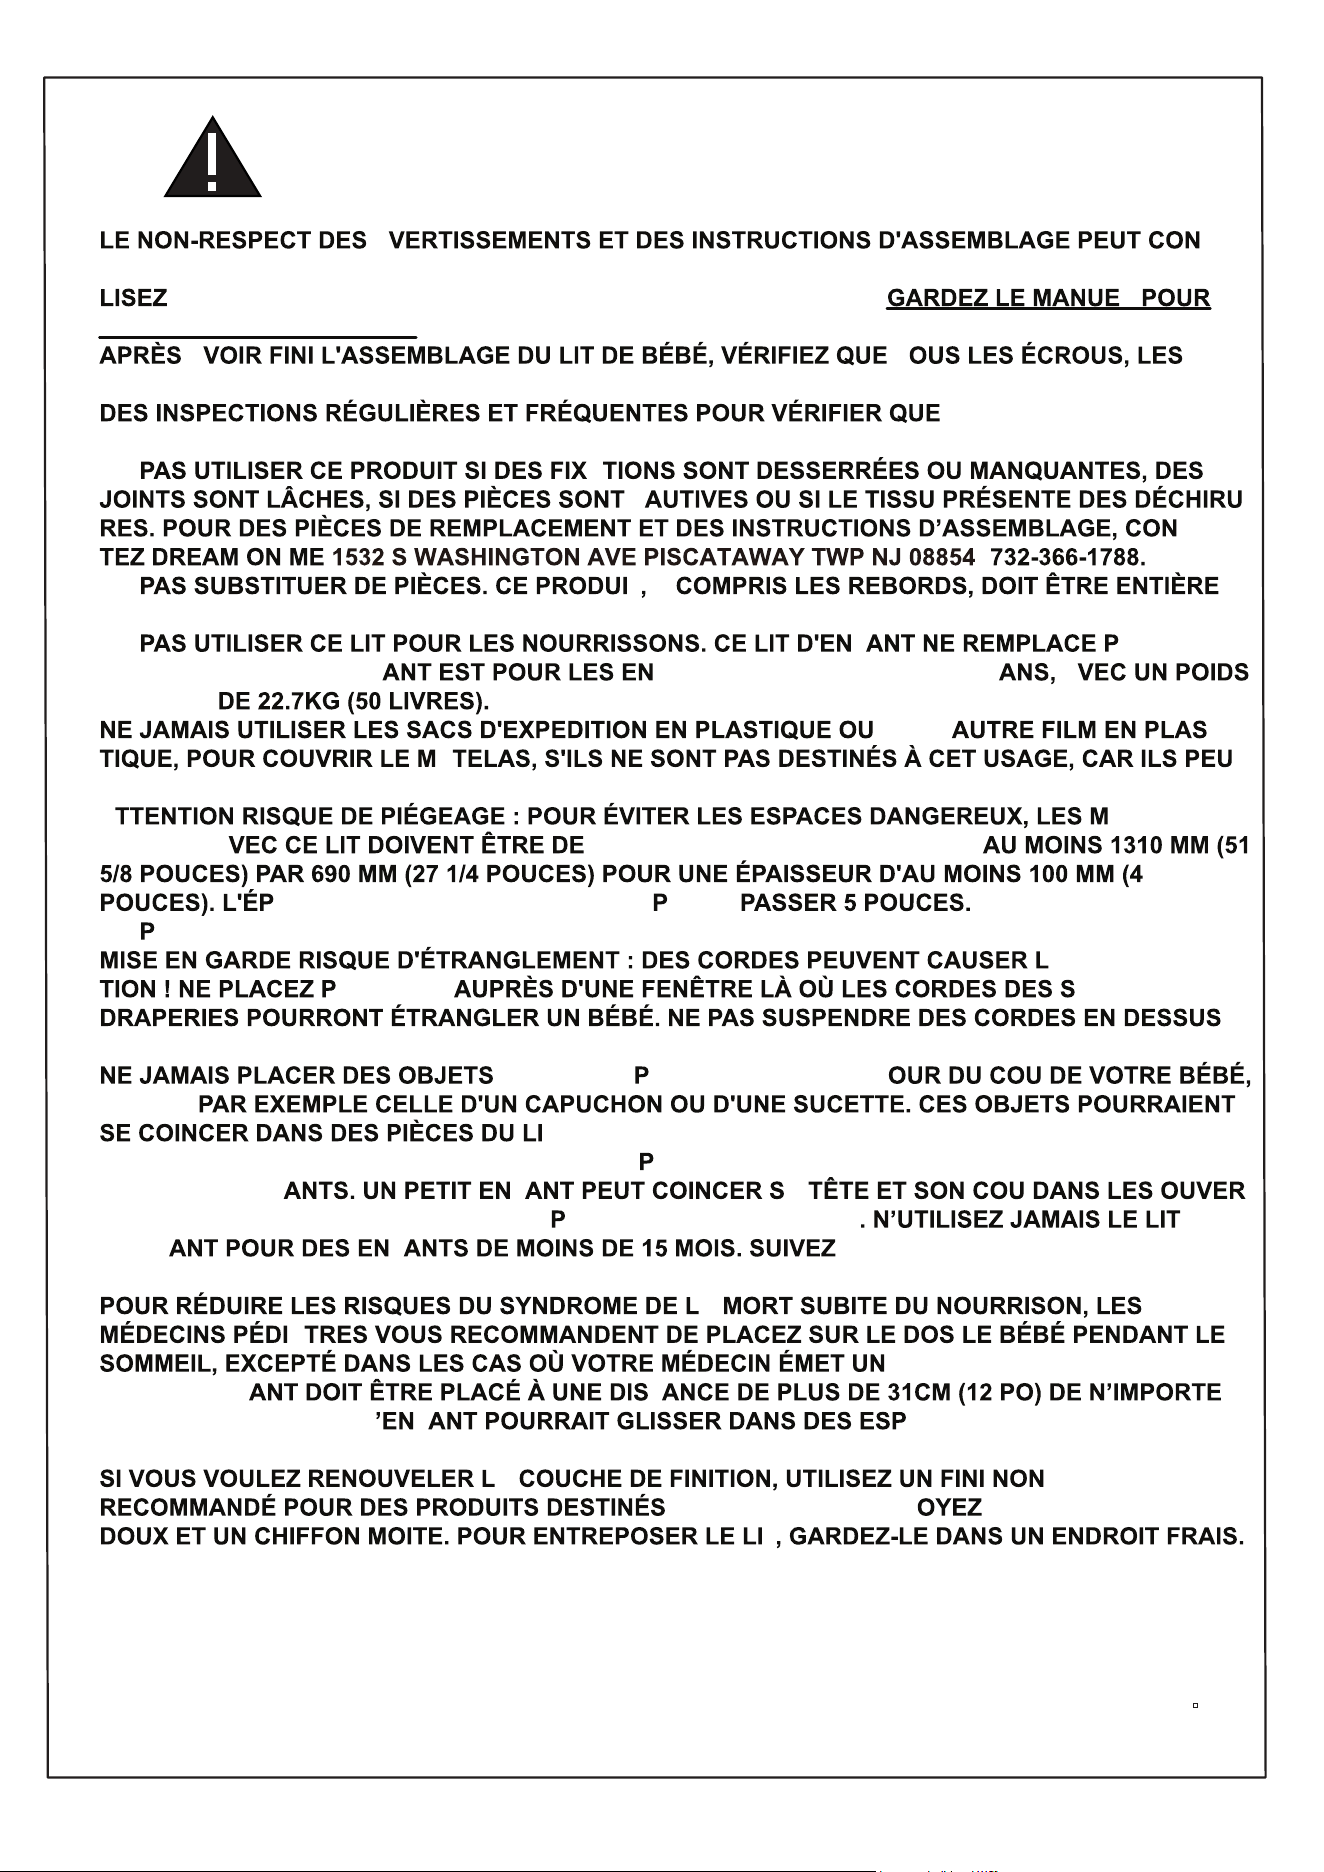
WARNING !
· FAILURE TO FOLLOW THESE WARNINGS AND THE ASSEMBLY INSTRUCTIONS
COULD RESULT IN SERIOUS INJURY OR DEATH.
· READ ALL INSTRUCTIONS BEFORE
INSTRUCTIONS
FOR FUTURE USE.
FASTENERS HAVE BEEN SECURELY TIGHTENED.
THE SCREWS AND NUTS REMAIN TIGHT.
MESH/FABRIC.CONTACT DREAM ON ME
NAL LITERATURE IF NEEDED.
DDLER BED IS NOT A SUBSITITUTE FOR A
HILD BETWEEN THE AGE OF 15MONTHS
TO 5 YEARS WITH A MAXIMUM WEIGHT OF
COVERS NOT SOLD AND INTENDED FOR TH
SUFFOCATION.
C
· NEVER USE A WATER MATTRESS WITH THIS TODDLER BED.
D
· WARNING: INFANTS HAVE DIED IN TODDLER
SMALL CHILD. NEVER USE BED WITH CHILDREN UNDER 15MONTHS.ALWAYS
FOLLOW THE ASSEMBLY INSTRUCTIONS.
R
N BED AND SOLID OBJECTS IS LESS
D
CE.
MADE IN CHINA
4
MISE EN GARDE !
FABRIQUÉ EN CHINE
A -
DUIRE À DES BLESSURES GRAVES OU À LA MORT.
TOUTES LES INSTRUCTIONS AVANT L'ASSEMBLAGE DU LIT. L
UNE UTILISATION FUTURE.
A T
BOULONS ET LES VIS SONT FERMEMENT SERRÉS.
TOUTES LES VIS ET
ÉCROUS SONT SERRÉES SERONT NÉCESSAIRES.
NE
A
F -
TAC-
NE T Y -
MENT ASSEMBLÉ AVANT DE L'UTILISATION.
NE F AS UN
BERCEAU; LE LIT D'ENF
FANTS ÂGÉS DE 15 MOIS À 5 A
MAXIMAL
TOUT -
A -
VENT CAUSER LA SUFFOCATION.
A
ATELAS
UTILISÉS A TAILLE STANDARD ET MESURER
AISSEUR DU MATELAS NE DOIT AS DÉ
NE AS UTILISER UN MATELAS À EAU AVEC CE LIT.
A STRANGULA-
AS LE LIT TORES OU
DU LIT.
ATTACHÉS AR UNE CORDE AUT
COMME
T.
MISE EN GARDE : DES ACCIDENTS MORTELS
AR COINCEMENT SONT DÉJÀ SURVENUS DANS
DES LITS D'ENF F A -
TURES SITUÉES DANS ET ENTRE LES ARTIES DU LIT D'ENFANT
D'ENF F TOUJOURS LES INSTRUCTIONS DE
MONTAGE.
A
A
AVIS DIFFÉRENT.
LE LIT D'ENF
T
QUEL OBJET SOLIDE. L F ACES ÉTROITS ET SUFFO-
QUER.
A TOXIQUE
AUX ENFANTS. NETT AVEC UN SAVON
T
•
•
•
•
•
•
•
•
•
•
•
•
•
•
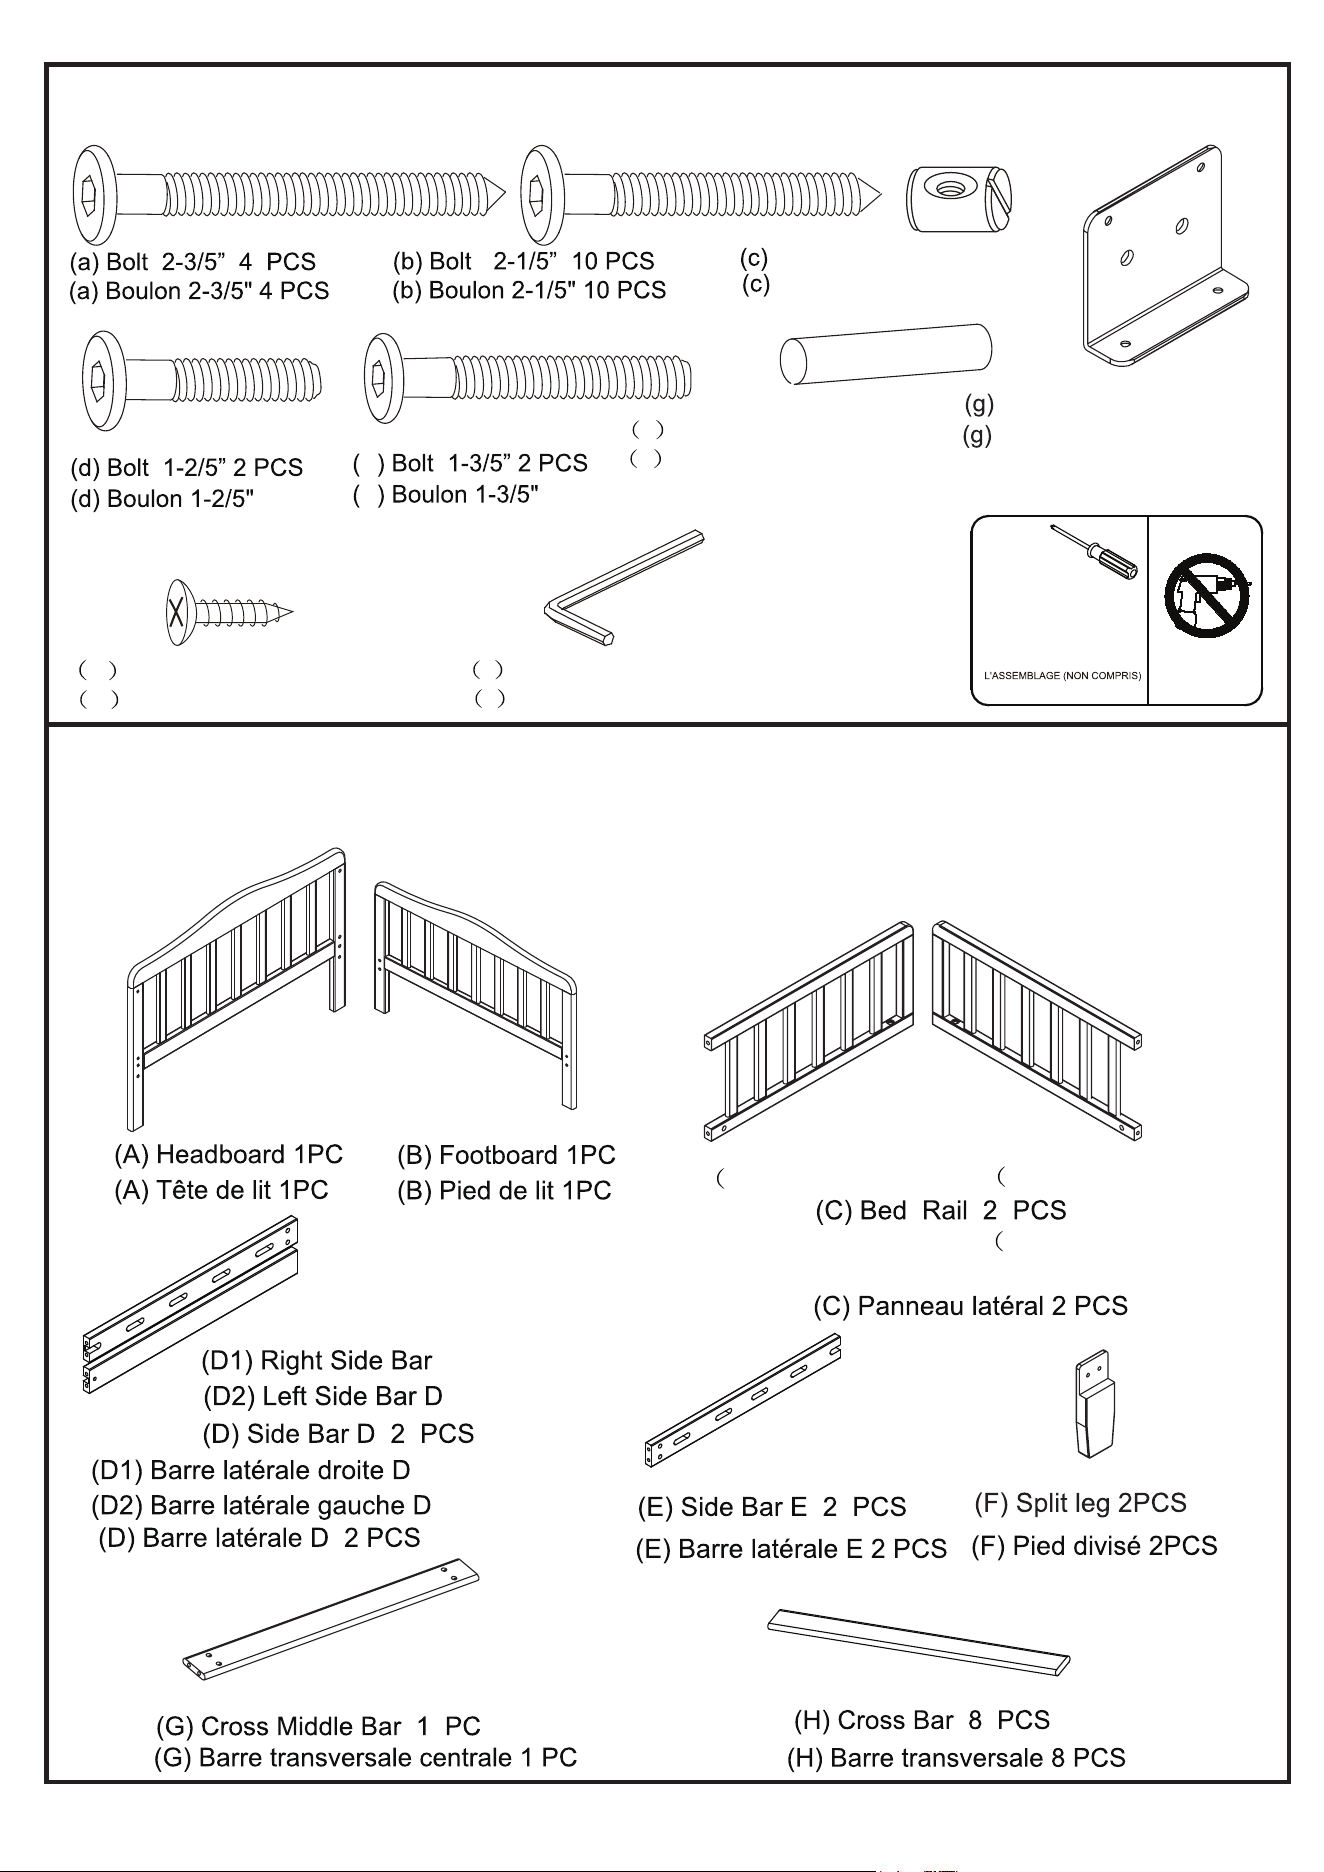
COMPONENT PARTS
5
j Allen Wrench 1 PC
Barrel Nut 14 PCS
HARDWARE AND TOOL DIAGRAM
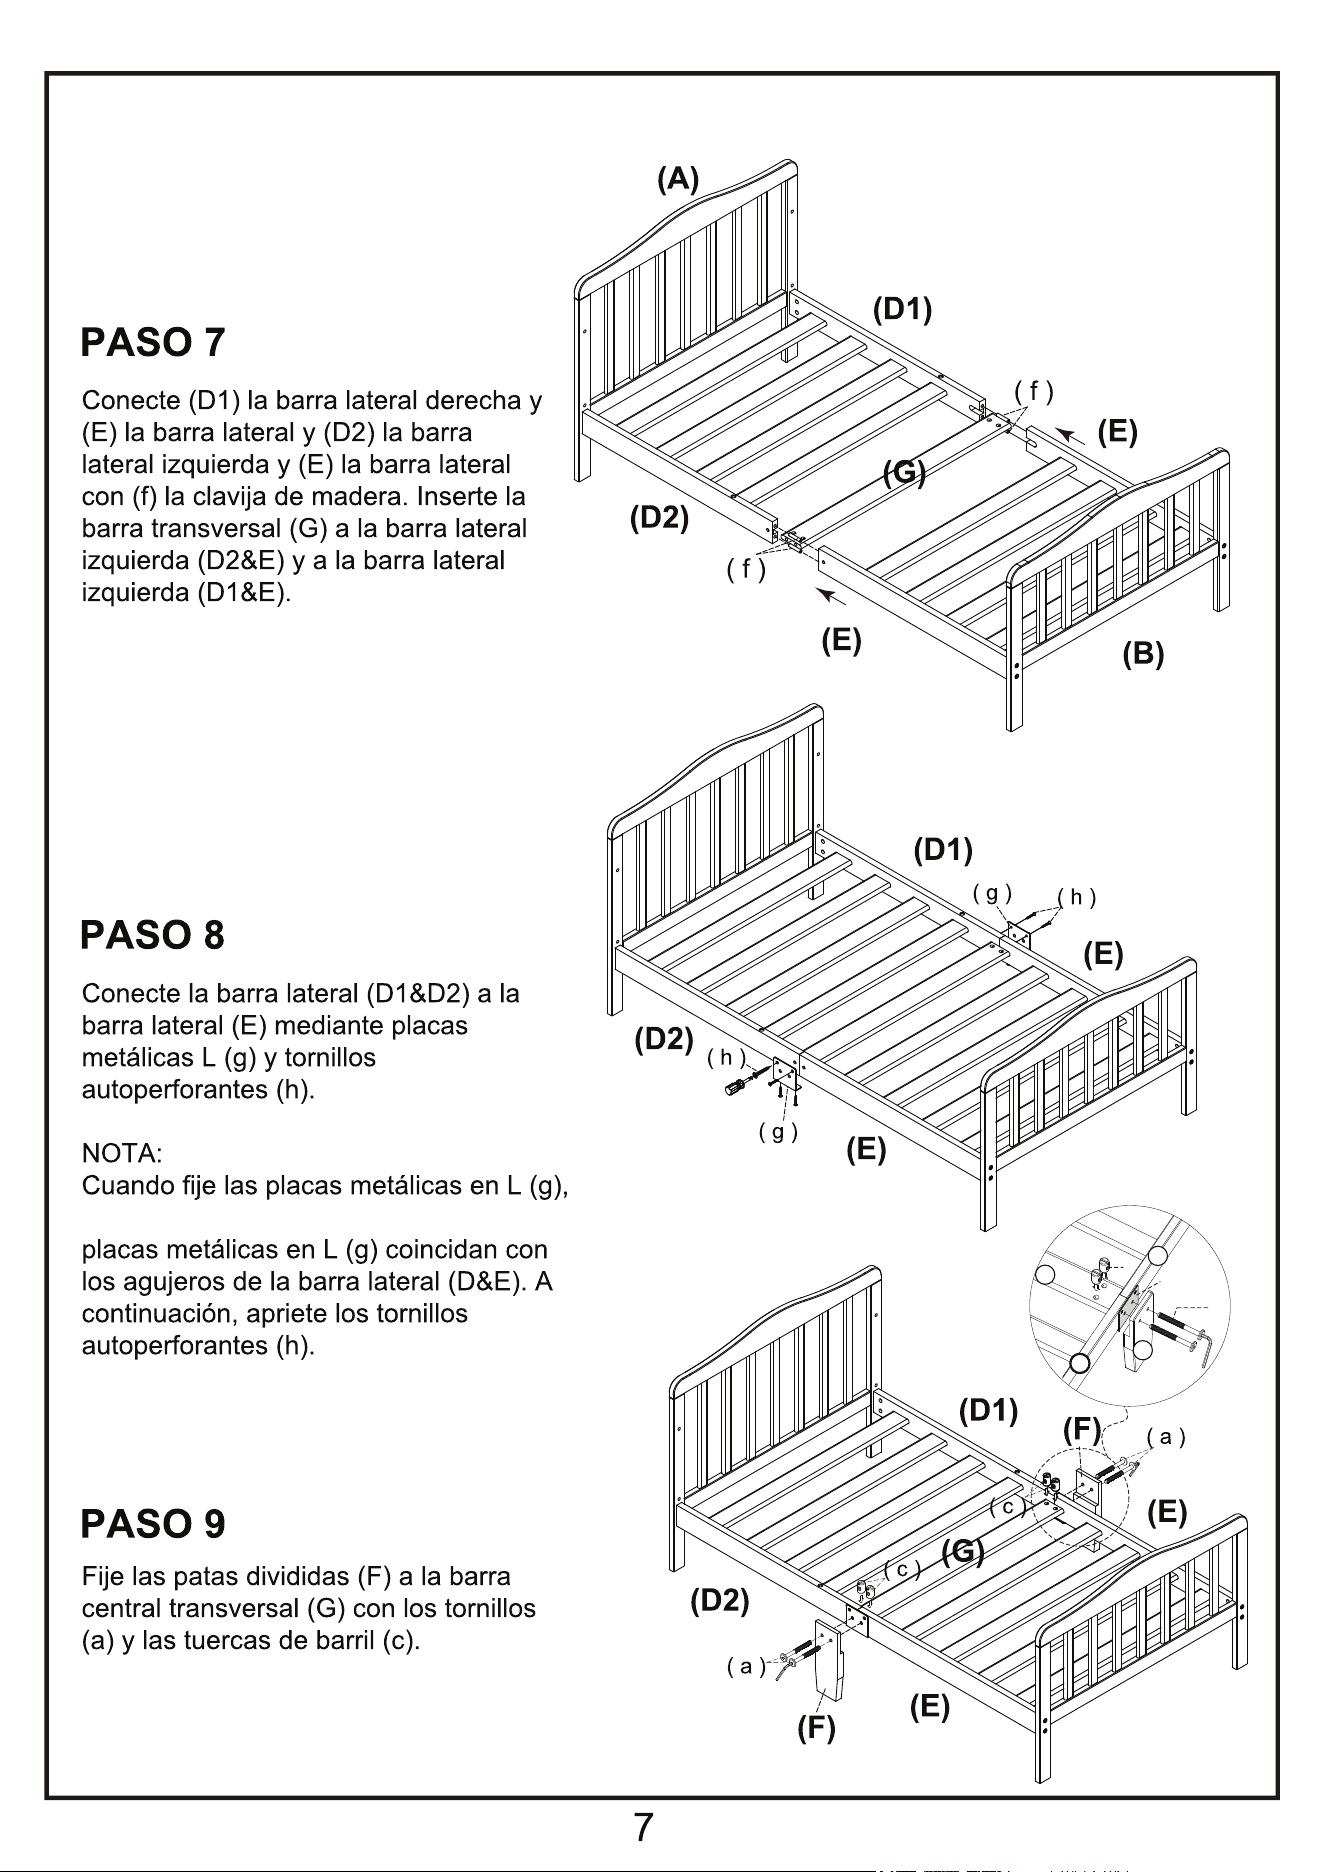
f Wood Dowel 4 PCS
h Selfdrilling screw 8 PCS
L ME TAL PL ATE 2PCS
C1)Right Bed Rail
C2)Left Bed Rail
D
e
Do Not Use Power
Drills or Drivers
PIÈCES COMPOSANTES
j Clé allen 1 PC
Écrou manchon
14 PCS
DIAGRAMME D'OUTILS ET DE QUINCAILLERIE
2 PCS
f Goujon en bois
4 PCS
h Vis autoperceuse 8 PCS
PLAQUE MÉTTALIQUE
en L 2PCS
C1)Panneau latéral
droit
C2)Panneau latéral
gauche
e
2 PCS
PHILLIPS--HEAD SCREWDRIVER
REQUIRED FOR ASSEMBLY
----NOT INCLUDE
CLÉ À MOLETTE ET TOURNEVIS
À TËTE PLATE REQUIS POUR
l
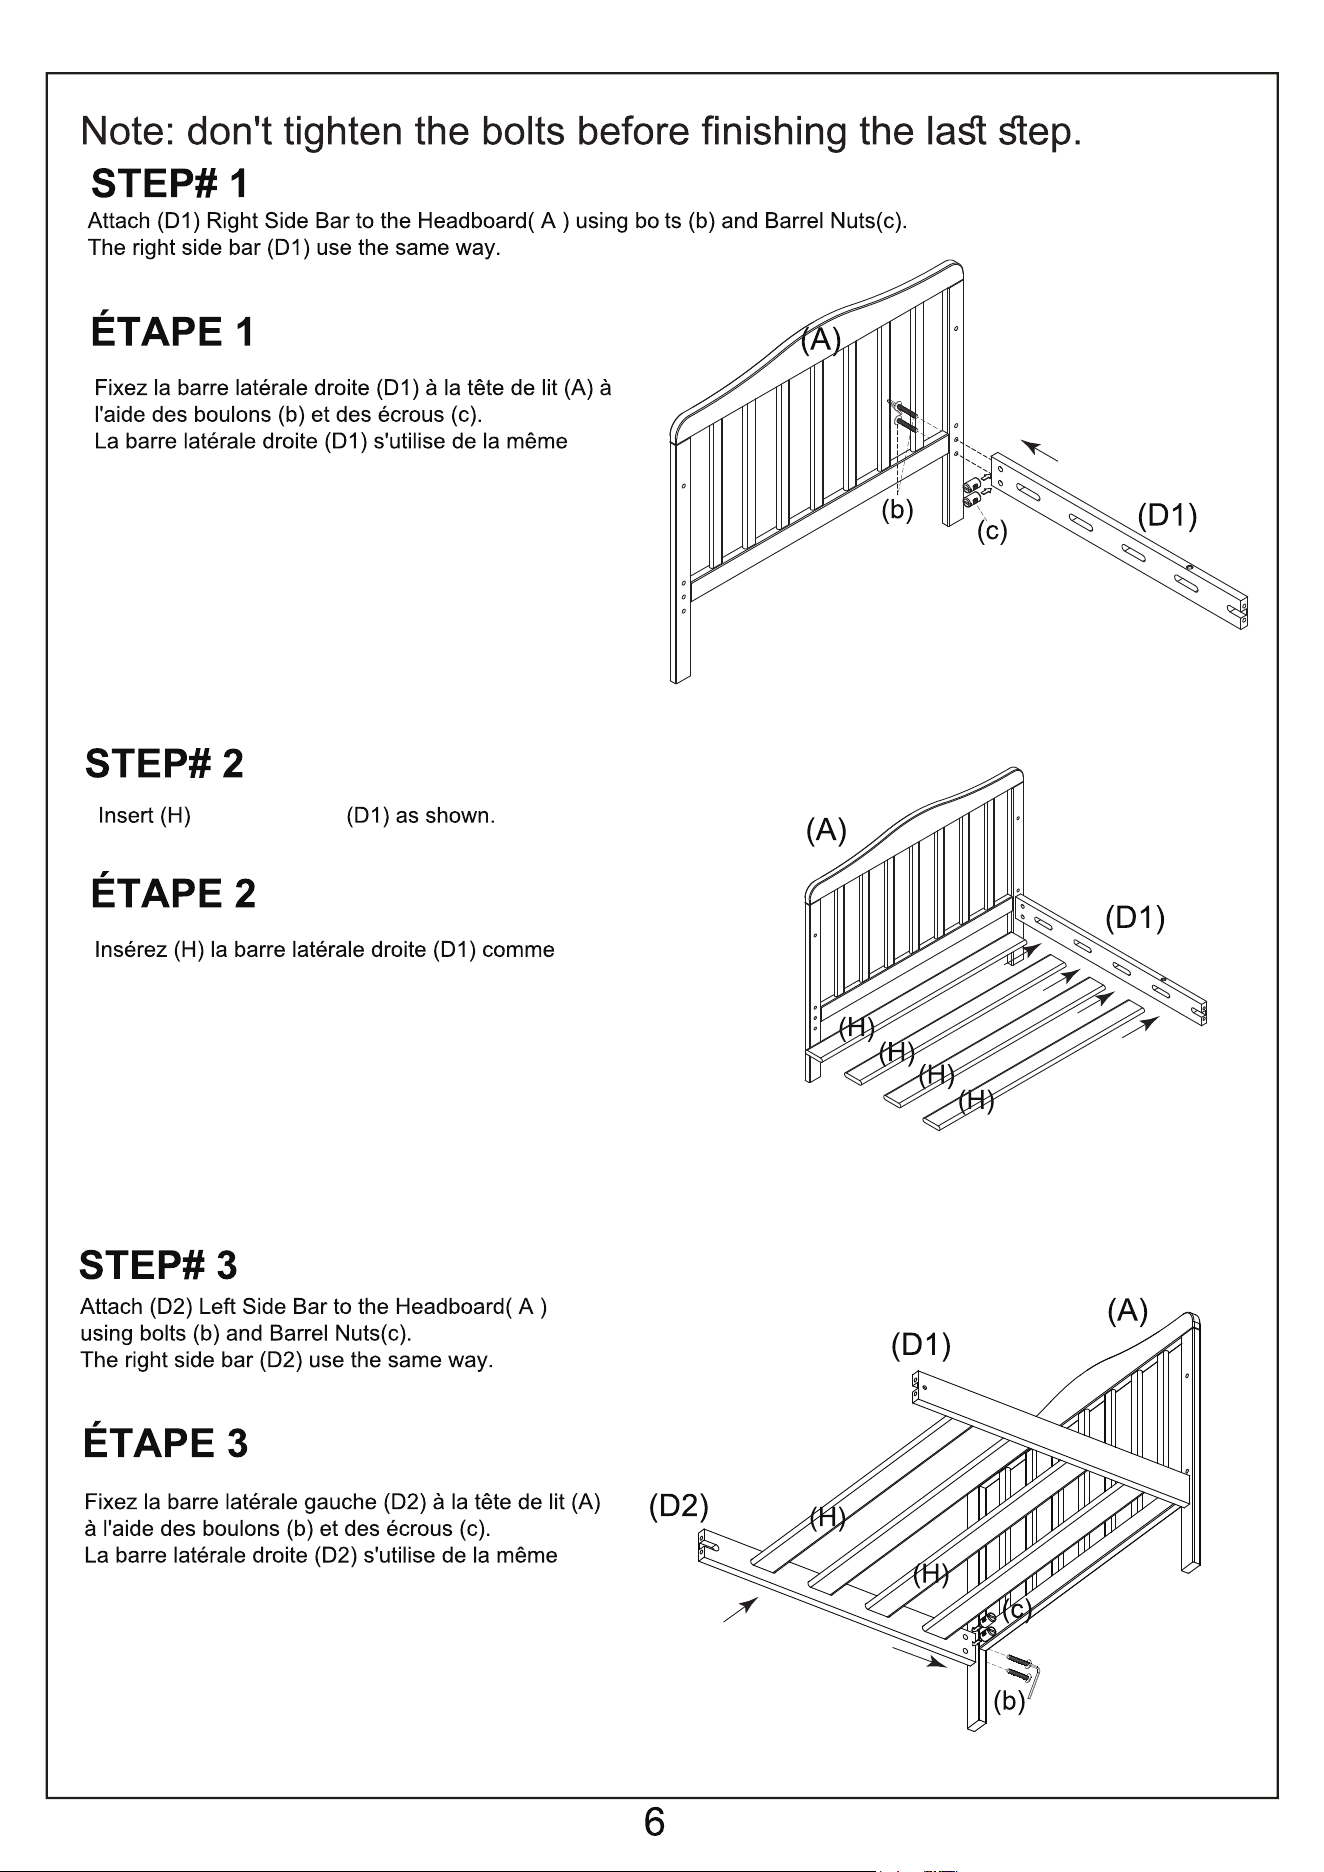
Right Side Bar
façon.
indiqué.
façon.
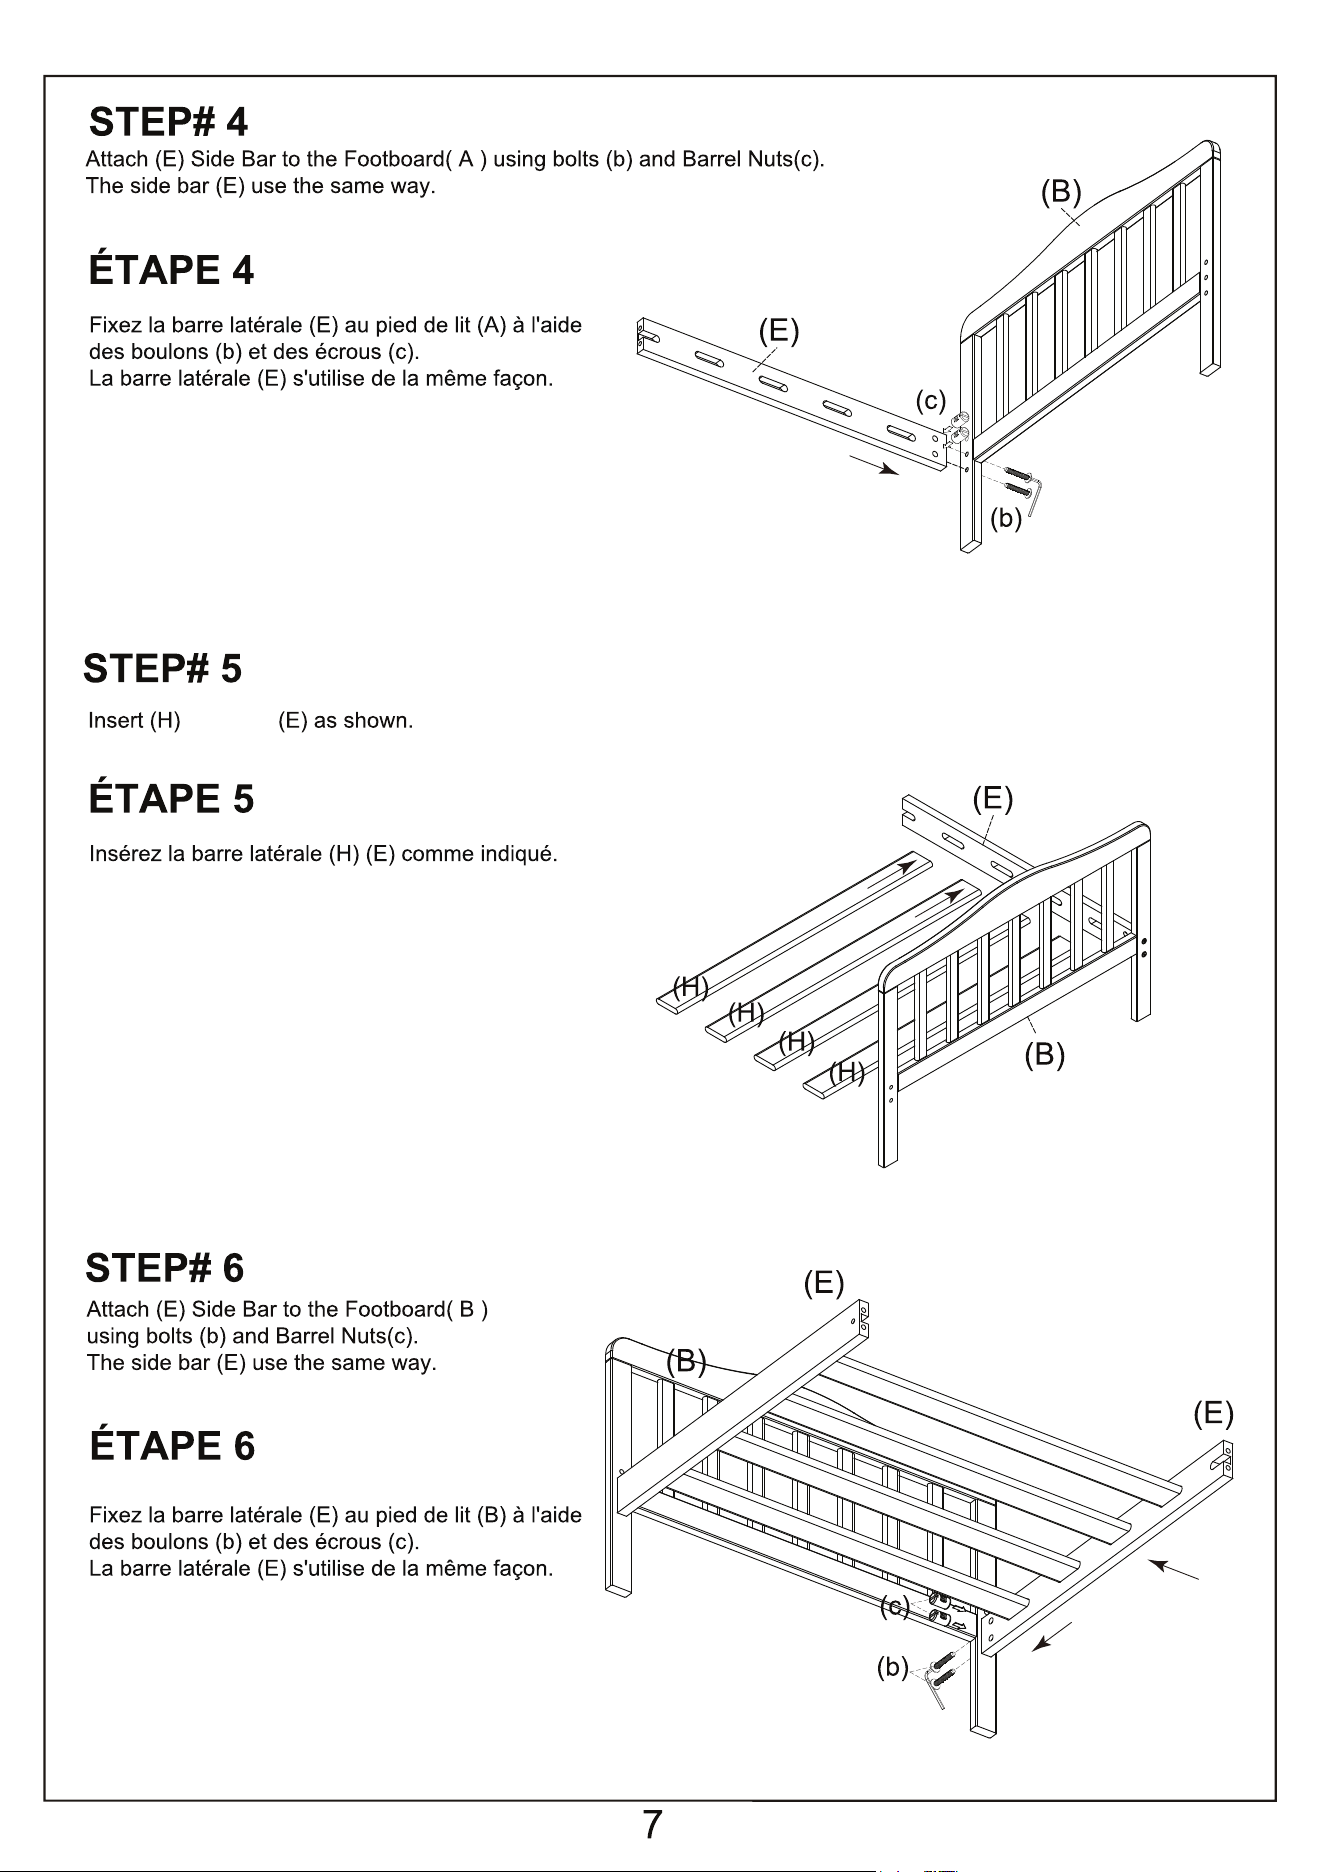
Side Bar
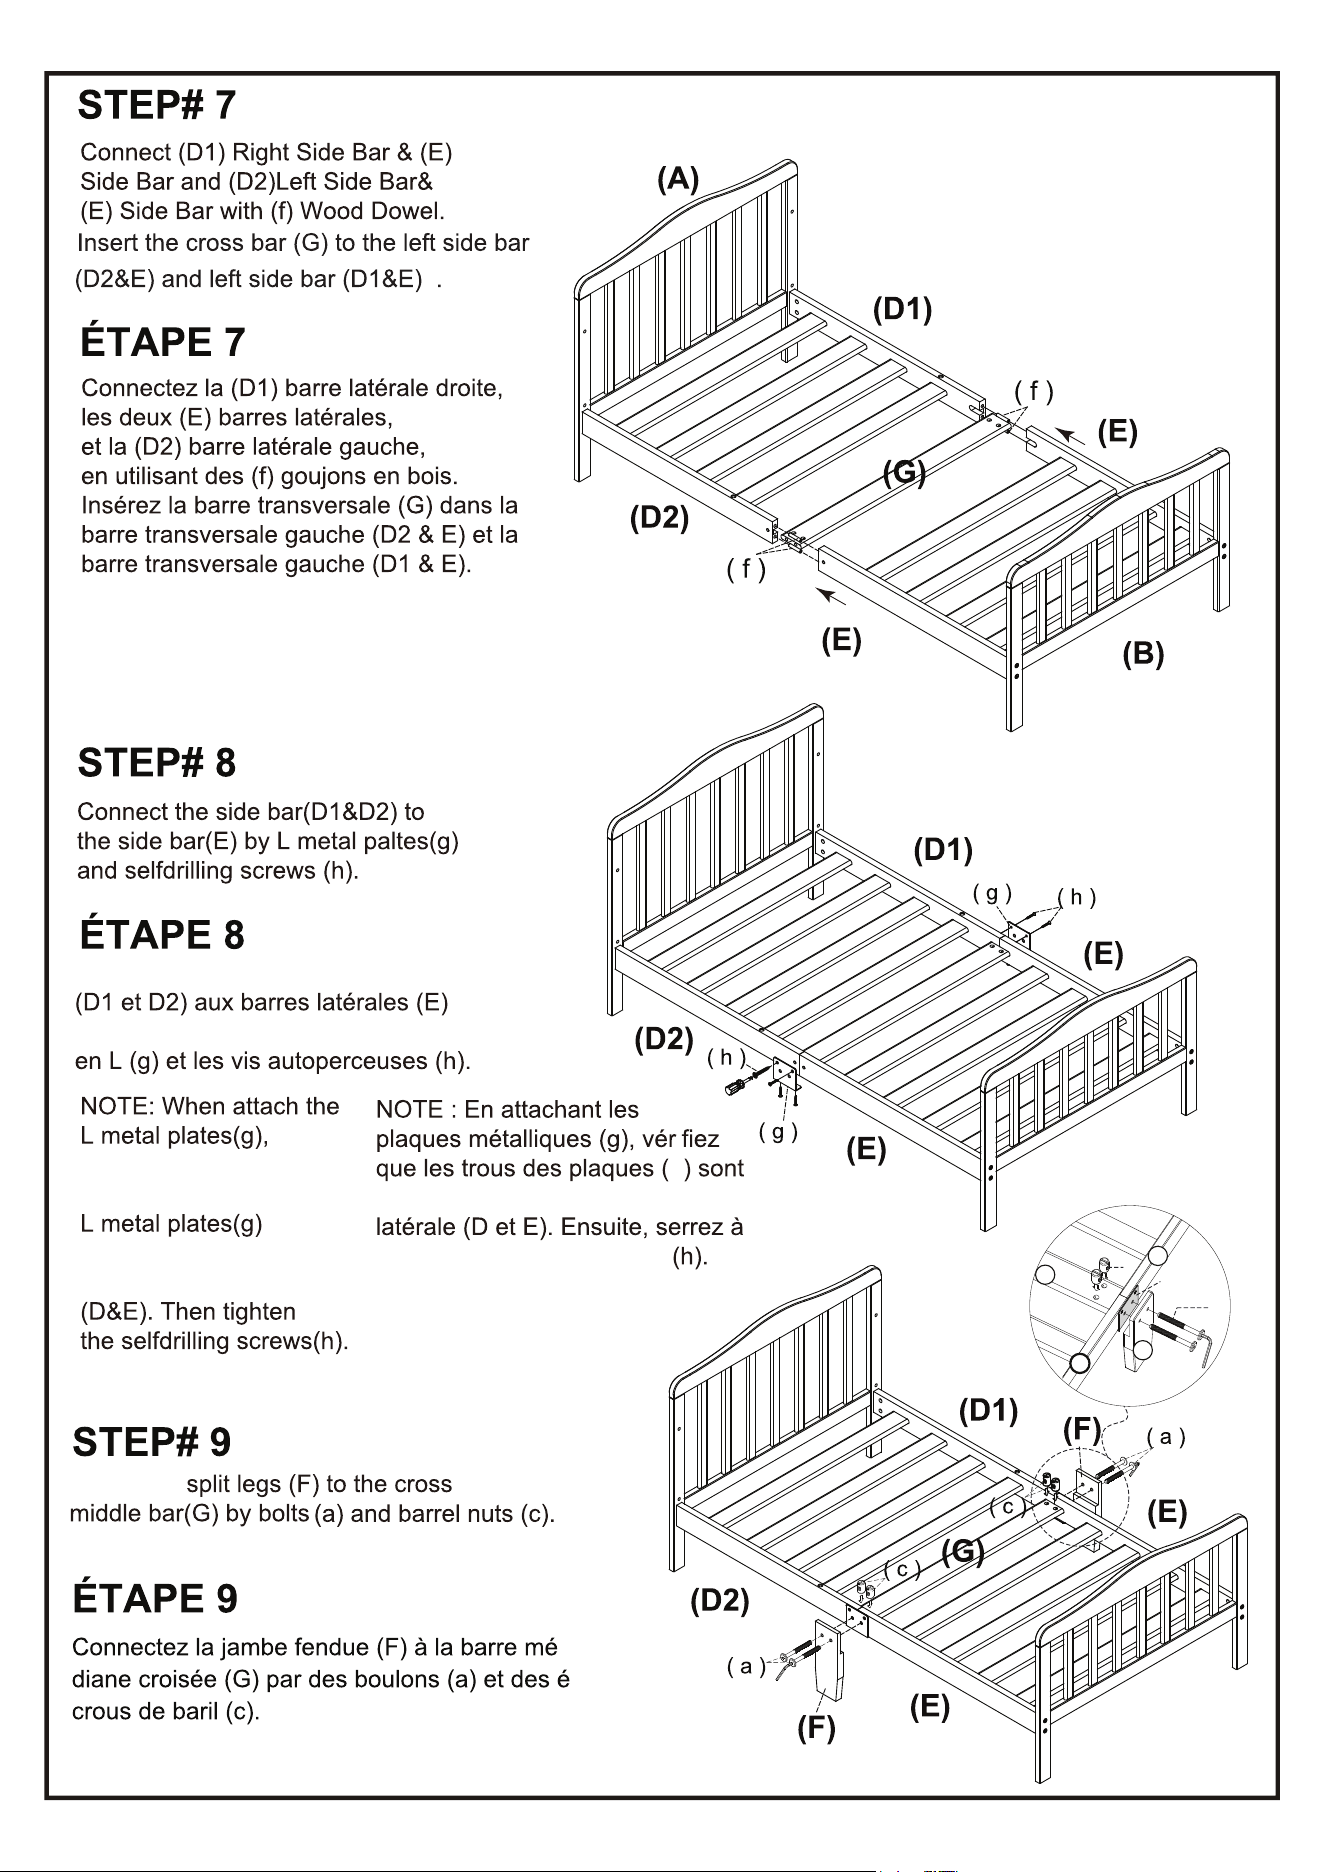
8
Connectez les barres latérales
en utilisant les plaques métalliques
make sure the
holes on the
match to the holes
on the side bar
i
g
alignés avec les trous de la barre
fond les vis autoperceuses
Attach the
D1
F
E
G
a X 4
g
c
9
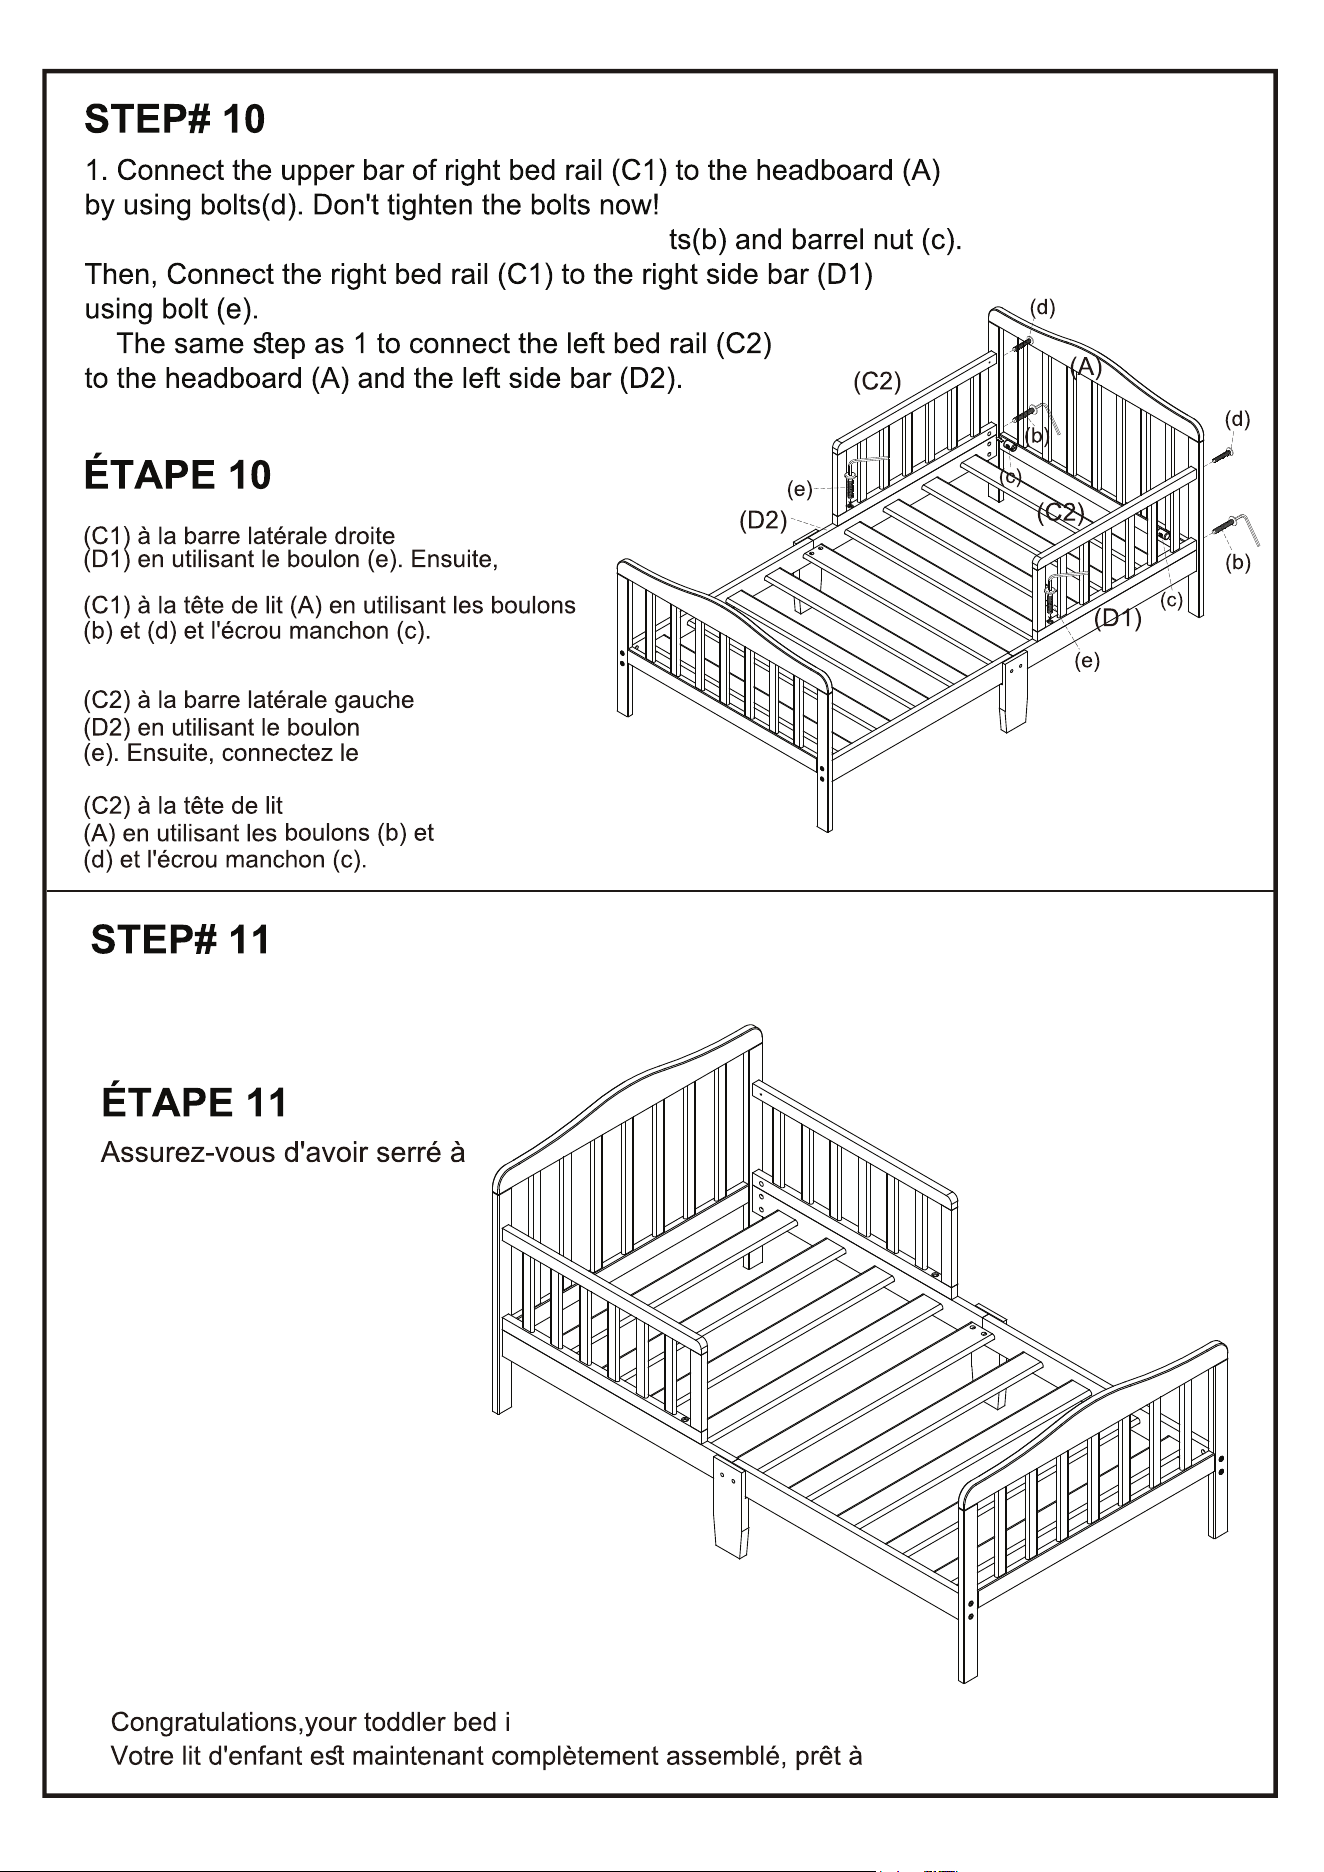
s ready to use.
Now you can tighten all the bolts and
make sure all of them are tightened.
fond tous les boulons.
l'utilisation. Félicitations !
1. Connectez le panneau latéral droit
connectez le panneau latéral droit
2. Connectez le panneau latéral gauche
panneau latéral gauche
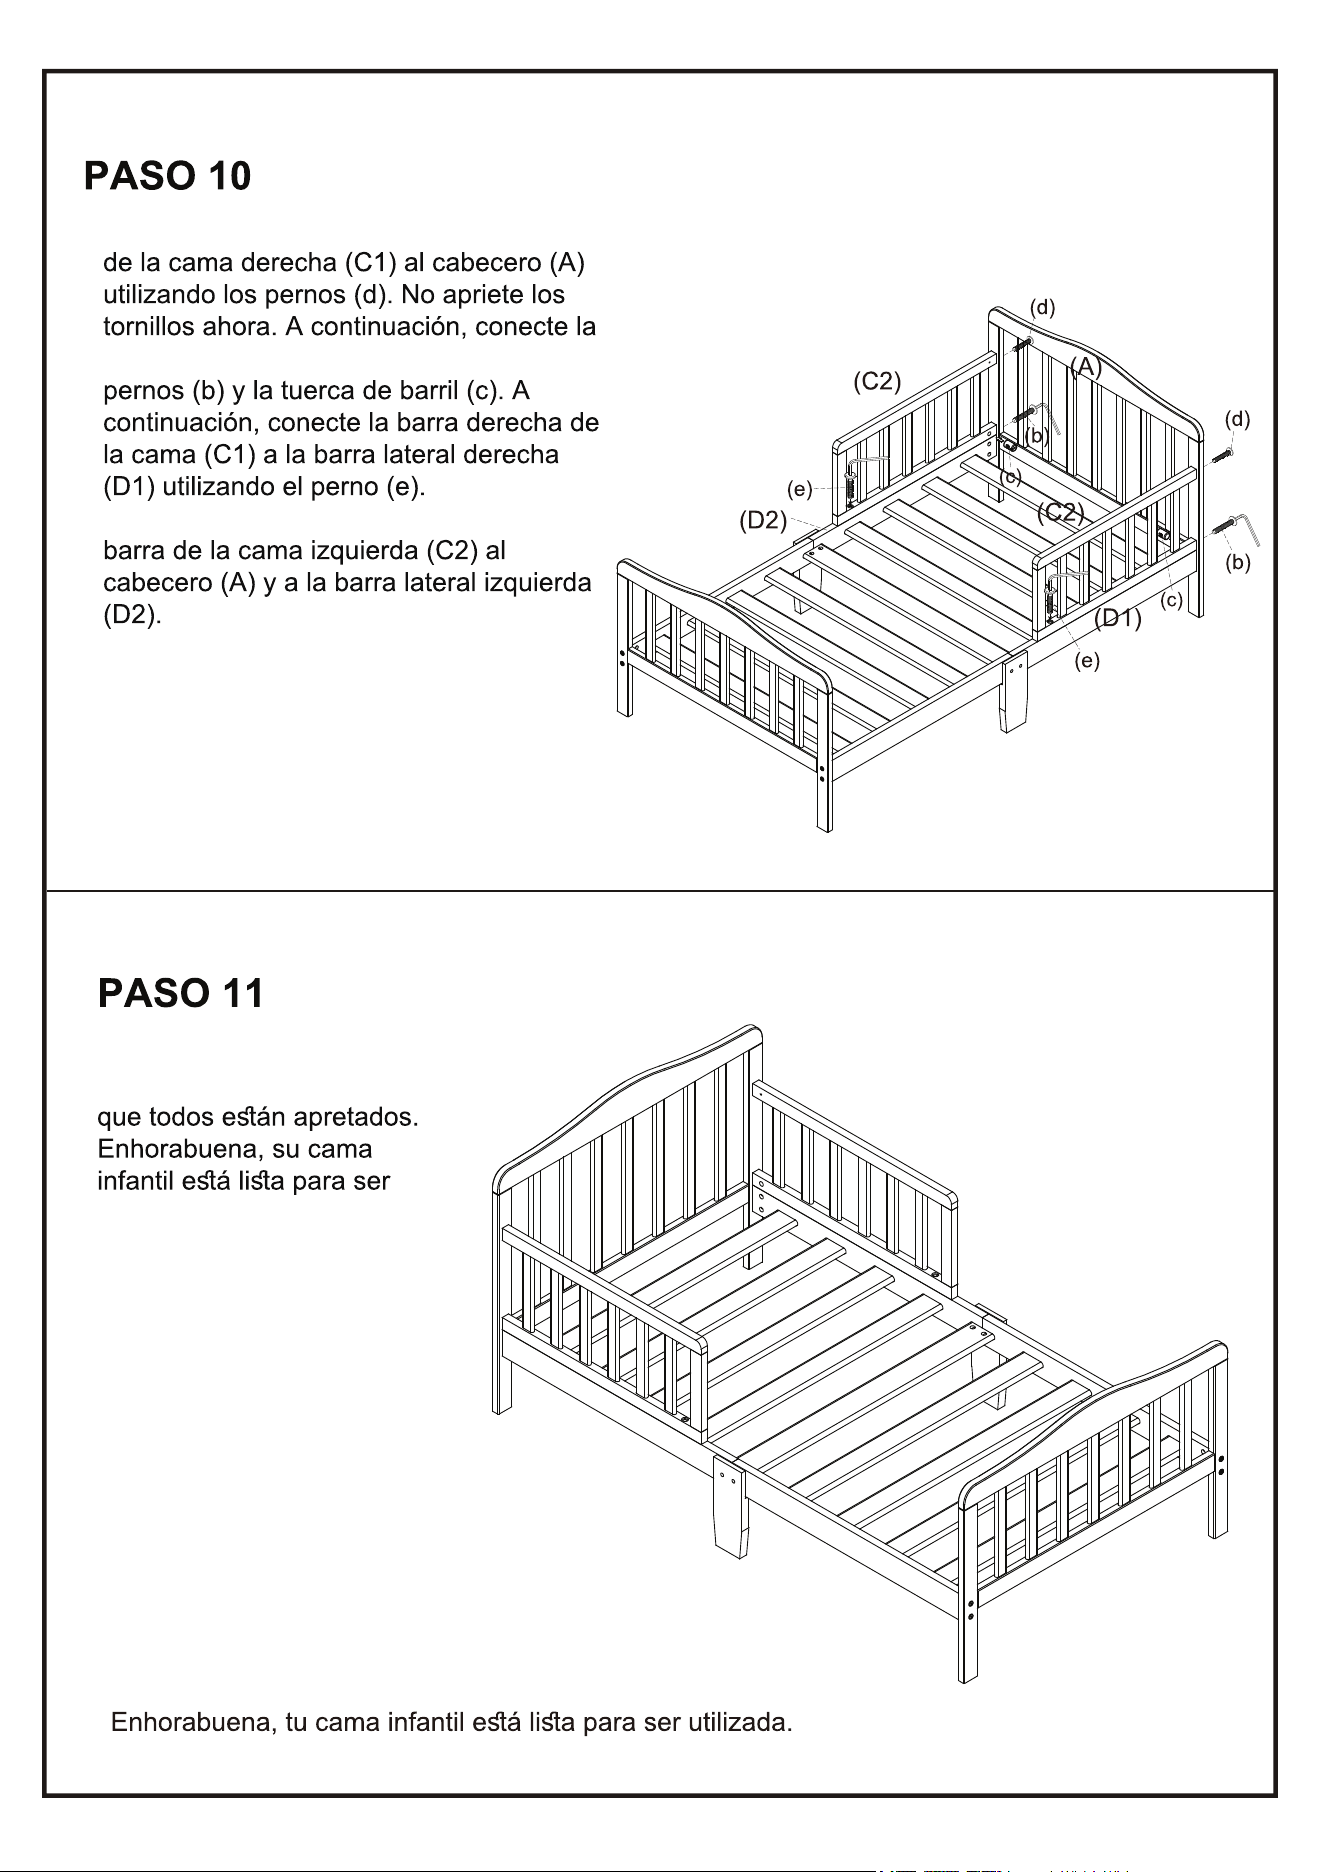
Then connect
the bottom bar to the heardboard by using bol
2.
10
LIMITED WARRANTY
workmanship and agrees to remedy any such defect.
This is solely limited to the repair or replacement of defective furniture
components and no assembly labor is included.
repaired in any way.
rights which vary from State to State.
W
T USE
NE PAS UTILISER
GARANTIE LIMITÉE :
• Dream On Me garantit que son produit est exempt de tout défaut de
matériel et de fabrication et s'engage à remédier à tout défaut de ce type.
• Cette garantie couvre 1 an à partir de la date d'achat originale.
• Cette garantie n'est valable que sur présentation d'une preuve d'achat.
• Elle est uniquement limitée à la réparation ou au remplacement des
composants défectueux du meuble et aucune main d'œuvre de montage
n'est incluse.
• Cette garantie ne s'applique pas à un produit qui a été mal assemblé,
soumis à une mauvaise utilisation ou à un abus ou qui a été modifié ou
réparé de quelque façon que ce soit.
• Cette garantie vous donne des droits légaux spécifiques et vous pouvez
également avoir d'autres droits qui varient d'un État à l'autre. droits qui
varient d'un État à l'autre.
1532 S. WASHINGTON AVE STE1
PISCATAWAY, NJ 08854-9908
www.dreamonme.com
Follow Us @dreamonmeinc
to get your nursery featured on our social media.
Enter our monthly giveaway!
Scan the QR code to register.
Chat with us!
Scan the QR code to Live Chat.
E-mail: [email protected]
1532 S. WASHINGTON AVENUE
PISCATAWAY, NJ 08854
www.dreamonme.com
Courriel : [email protected]
Suivez-nous @dreamonmeinc
pour que votre crèche soit présentée sur nos médias sociaux.
Participez à notre concours mensuel !
Scannez le code QR pour vous inscrire.
Chattez avec nous !
Scannez le code QR pour accéder au
Live Chat.
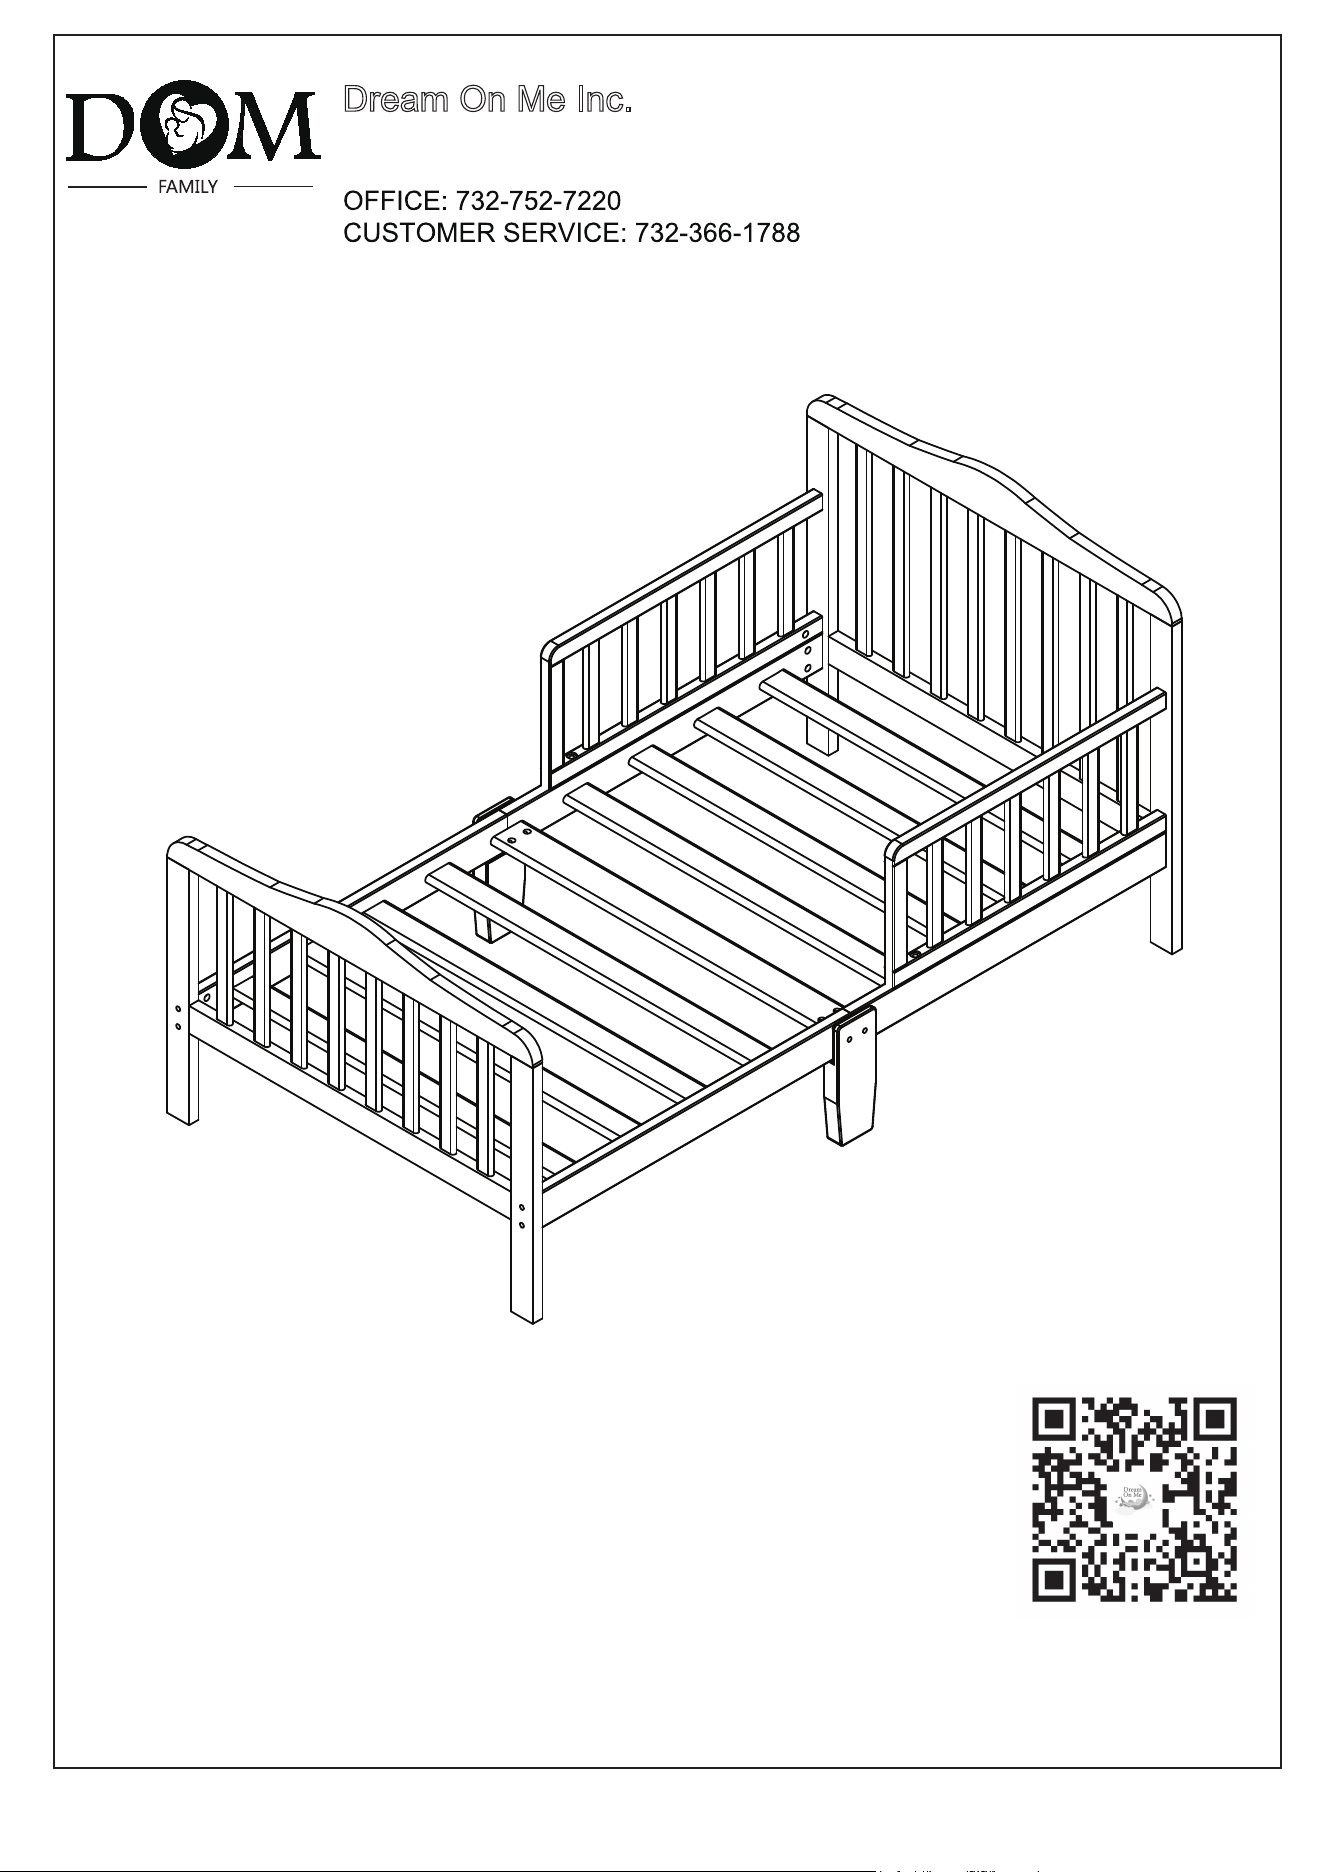
Dream On Me Inc.
1532 S WASHINGTON AVE
PISCATAWAY TWP NJ 08854
1
Escanee el código QR para registrar su producto
https://dreamonme.com/customercare/registration/
ARTÍCULO Nº: 624
INSTRUCCIONES DE MONTAJE

2
Por favor, tenga en cuenta que la pegatina de advertencia se coloca en la cama
para niños pequeños para mantener a los padres y cuidadores informados de
que es un requisito por ley bajo CPSC y ASTM. Nos disculpamos por cualquier
inconveniente que esto pueda causarle.
Se requiere el montaje por parte de un adulto.
Las piezas pequeñas pueden presentar peligro de asfixia antes del montaje.
Adjunto encontrará unas sencillas instrucciones paso a paso que le ayudarán a
montar rápidamente sus productos. Antes de comenzar, le recomendamos que
siga los siguientes pasos:
1. Lea detenidamente las instrucciones.
2. Identifique todas las piezas y herrajes.
3. Necesitará las siguientes herramientas:
Destornillador de cabeza Philips
Destornillador de cabeza plana
Martillo
No utilice taladros o destornilladores eléctricos
Para proteger las piezas durante el montaje, colóquelas en una superficie
blanda. suave.
Para limpiar la superficie utilice sólo agua en un paño húmedo.
No utilice No utilice limpiacristales ni productos abrasivos de limpieza, ya que
rayarán la superficie y podría dañar el revestimiento protector.

3
¡ADVERTENCIA !
FABRICADO EN CHINA
• EL INCUMPLIMIENTO DE ESTAS ADVERTENCIAS Y DE LAS INSTRUCCIONES DE
MONTAJE PUEDE PROVOCAR LESIONES GRAVES O LA MUERTE.
• LEA TODAS LAS INSTRUCCIONES ANTES DE MONTAR LA CUNA. CONSERVE LAS
INSTRUCCIONES PARA SU USO FUTURO.
• AL TERMINAR EL MONTAJE, ASEGÚRESE DE QUE TODOS LOS TORNILLOS, PERNOS Y
ELEMENTOS DE FIJACIÓN HAN SIDO APRETADOS CON SEGURIDAD.
• SE DEBE REALIZAR UNA COMPROBACIÓN FRECUENTE Y PEDRIODICA PARA
CONFIRMAR QUE TODOS LOS TORNILLOS Y TUERCAS PERMANECEN APRETADOS.
• NUNCA UTILICE ESTE PRODUCTO SI HAY SUJETADORES SUELTOS, FALTANTES,
UNIONES SUELTAS, PARTES ROTAS O MALLA/TELA RASGADA. PÓNGASE EN CONTACTO
CON DREAM ON ME, 1532 S WASHINGTON AVE PISCATAWAY NJ 08854 PARA OBTENER
LAS PIEZAS DE REPUESTO Y LOS FOLLETOS DE INSTRUCCIONES SI LOS NECESITA.
• NUNCA SUSTITUYA LAS PIEZAS. EL PRODUCTO, INCLUIDAS LAS BARANDILLAS
LATERALES, DEBE ESTAR COMPLETAMENTE MONTADO ANTES DE SU USO.
• NUNCA USE LA CAMA PARA BEBES, ESTA CAMA INFANTIL NO ES UN SUSTITUTO DE
UNA CUNA. LA CAMA INFANTIL SE UTILIZA PARA UN NIÑO DE ENTRE 15 MESES Y 5
AÑOS CON UN PESO MÁXIMO DE 50 LIBRAS (22,7 KG).
• NO UTILICE NUNCA UNA BOLSA DE TRANSPORTE DE PLÁSTICO U OTRA LÁMINA DE
PLÁSTICO COMO CUBIERTA DEL COLCHÓN QUE NO SE VENDA Y ESTÉ DESTINADA A
ESE FIN, YA QUE PUEDE PROVOCAR ASFIXIA.
• PRECAUCIÓN RIESGO DE ATRAPAMIENTO: PARA EVITAR HUECOS PELIGROSOS,
CUALQUIER COLCHÓN QUE SE UTILICE EN ESTA CAMA DEBE SER UN COLCHÓN DE
CUNA DE TAMAÑO COMPLETO DE AL MENOS 51-58 PULGADAS (1310MM) DE
LONGITUD, 27-1/4 PULGADAS (690MM) DE ANCHURA Y 4 PULGADAS (100M) DE
GROSOR, O SUPERIOR PERO SIN EXCEDER LAS 5 PULGADAS.
• NUNCA UTILICE UN COLCHÓN DE AGUA CON ESTA CAMA PARA NIÑOS.
• ADVERTENCIA PELIGRO DE ESTRANGULAMIENTO: ¡LAS CUERDAS PUEDEN CAUSAR
ESTRANGULAMIENTO! NUNCA COLOQUE LA CAMA CERCA DE UNA VENTANA DONDE
LAS CUERDAS DE LAS PERSIANAS O CORTINAS PUEDAN ESTRANGULAR AL NIÑO.
• NO COLOQUE NUNCA OBJETOS CON CORDÓN O CINTA, COMO CORDONES DE
CAPUCHA O DE CHUPETE, ALREDEDOR DEL CUELLO DEL NIÑO.
• ADVERTENCIA: LOS NIÑOS HAN MUERTO EN LAS CAMAS PARA NIÑOS PEQUEÑOS POR
ATRAPAMIENTO. LAS ABERTURAS EN Y ENTRE LAS PARTES DE LA CAMA PUEDEN
ATRAPAR LA CABEZA Y EL CUELLO DE UN
• NUNCA UTILICE LA CAMA CON NIÑOS MENORES DE 15 MESES. SIEMPRE
• SIGA LAS INSTRUCCIONES DE MONTAJE.
• PARA REDUCIR EL RIESGO DE SIDA, LOS PEDIATRAS RECOMIENDAN QUE LOS BEBÉS
SANOS
• QUE SE LES COLOQUE DE ESPALDAS PARA DORMIR, O QUE LO ACONSEJE SU MÉDICO.
• NO UTILICE LA CAMA SI EL ESPACIO ENTRE LA CAMA Y LOS OBJETOS SÓLIDOS ES
INFERIOR A 31 CM. UN NIÑO PODRÍA DESLIZARSE EN EL ESPACIO Y ASFIXIARSE.
• SI SE VA A RENOVAR, UTILICE UN ACABADO NO TÓXICO ESPECIFICADO PARA
PRODUCTOS INFANTILES.
• PARA LAVAR, LIMPIE CON UN JABÓN SUAVE Y UN PAÑO HÚMEDO.
• PARA GUARDAR, POR FAVOR, MANTÉNGALO EN UN LUGAR FRESCO.
4
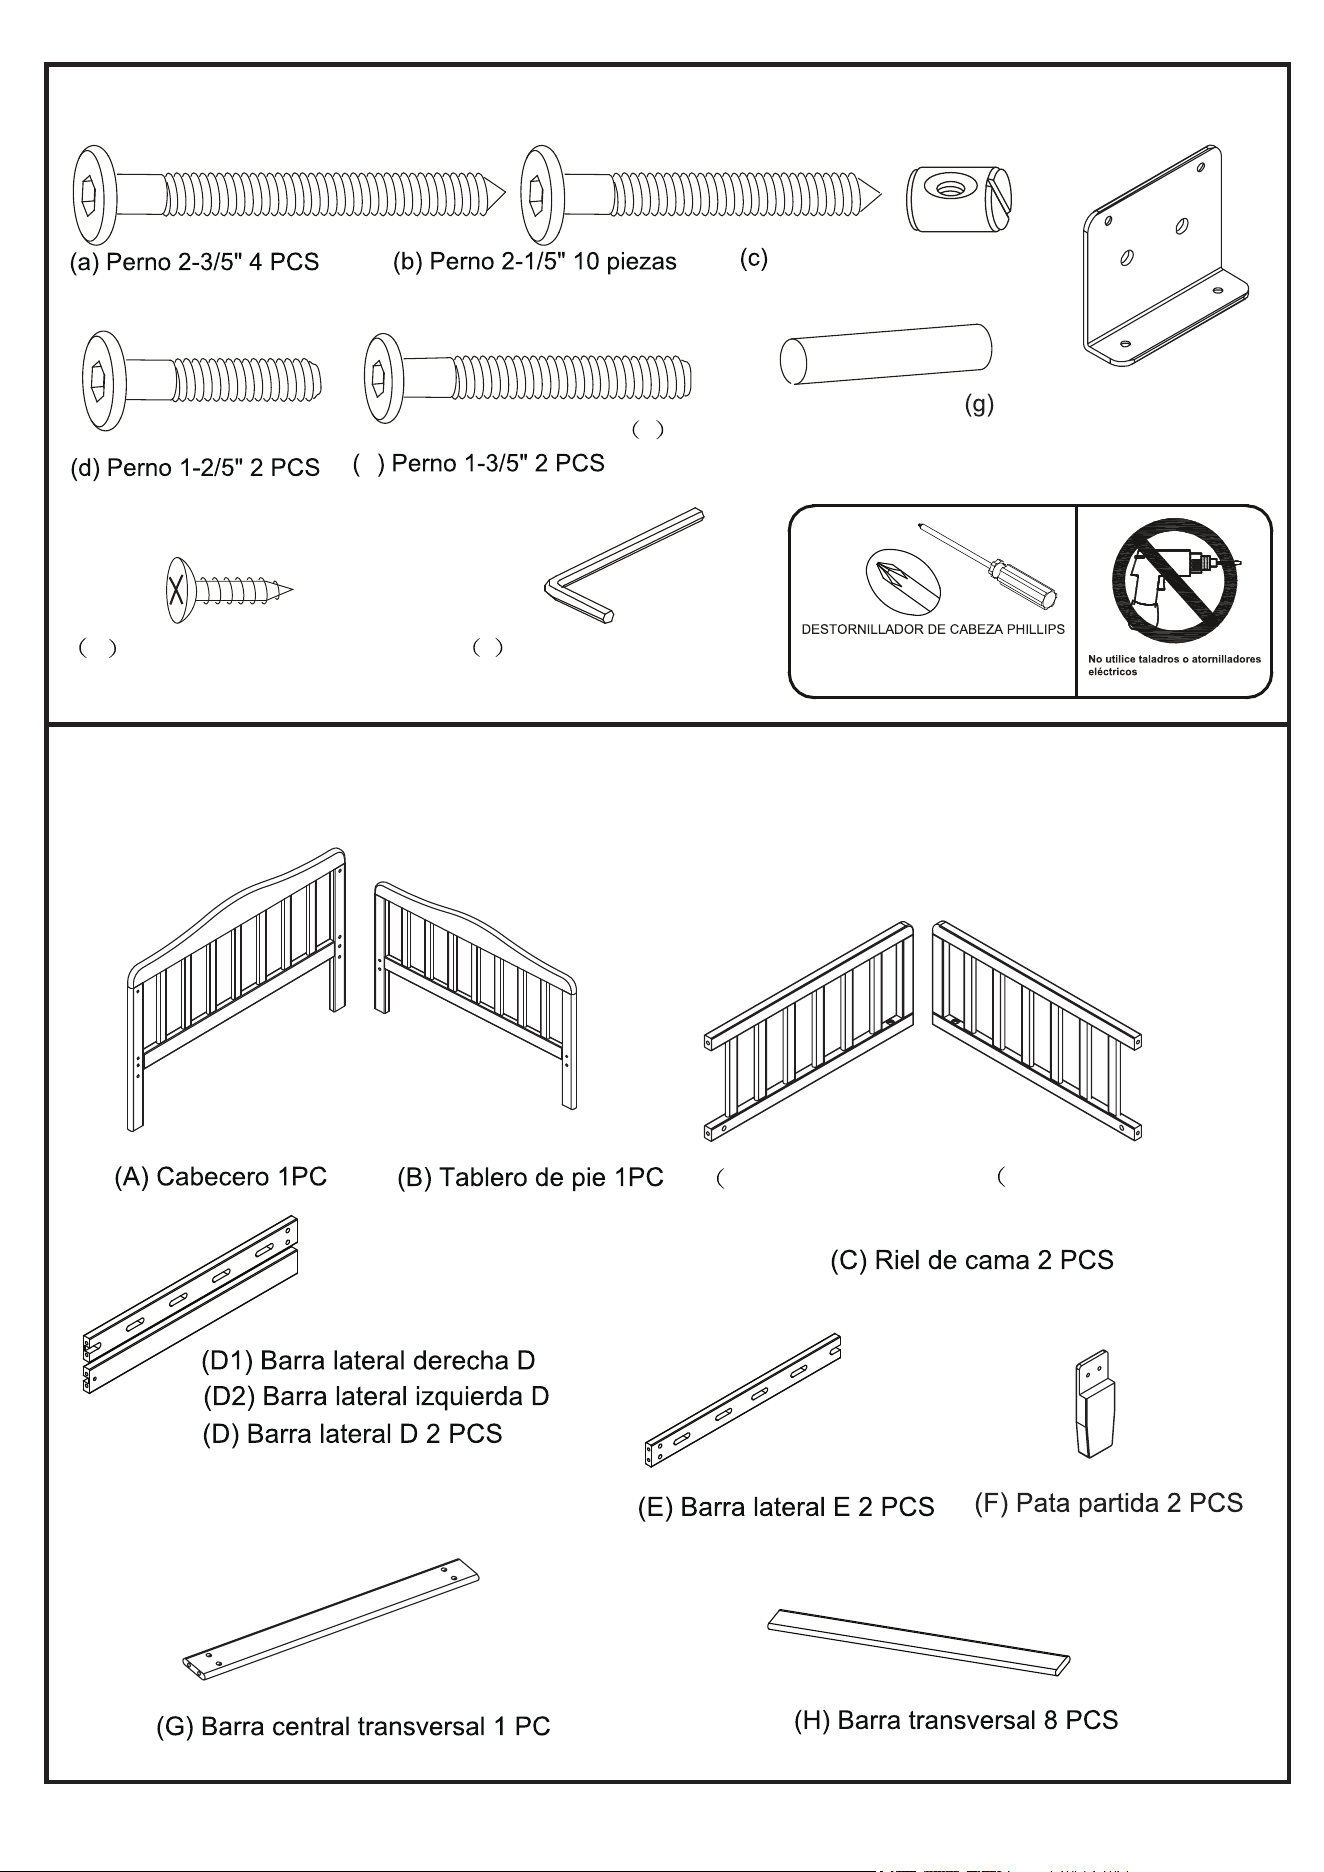
j Llave Allen 1 PC
Tuerca de barril 14 PCS
f Clavija de madera 4 PCS
h Tornillo autoperforante
8 piezas
Placa de metal L 2PCS
C1)Barra de la cama
derecha
C2)Barra de la cama
izquierda
e
COMPONENTES
DIAGRAMA DE HARDWARE Y HERRAMIENTAS
NECESARIO PARA EL MONTAJE
NO SE INCLUYE
----
5
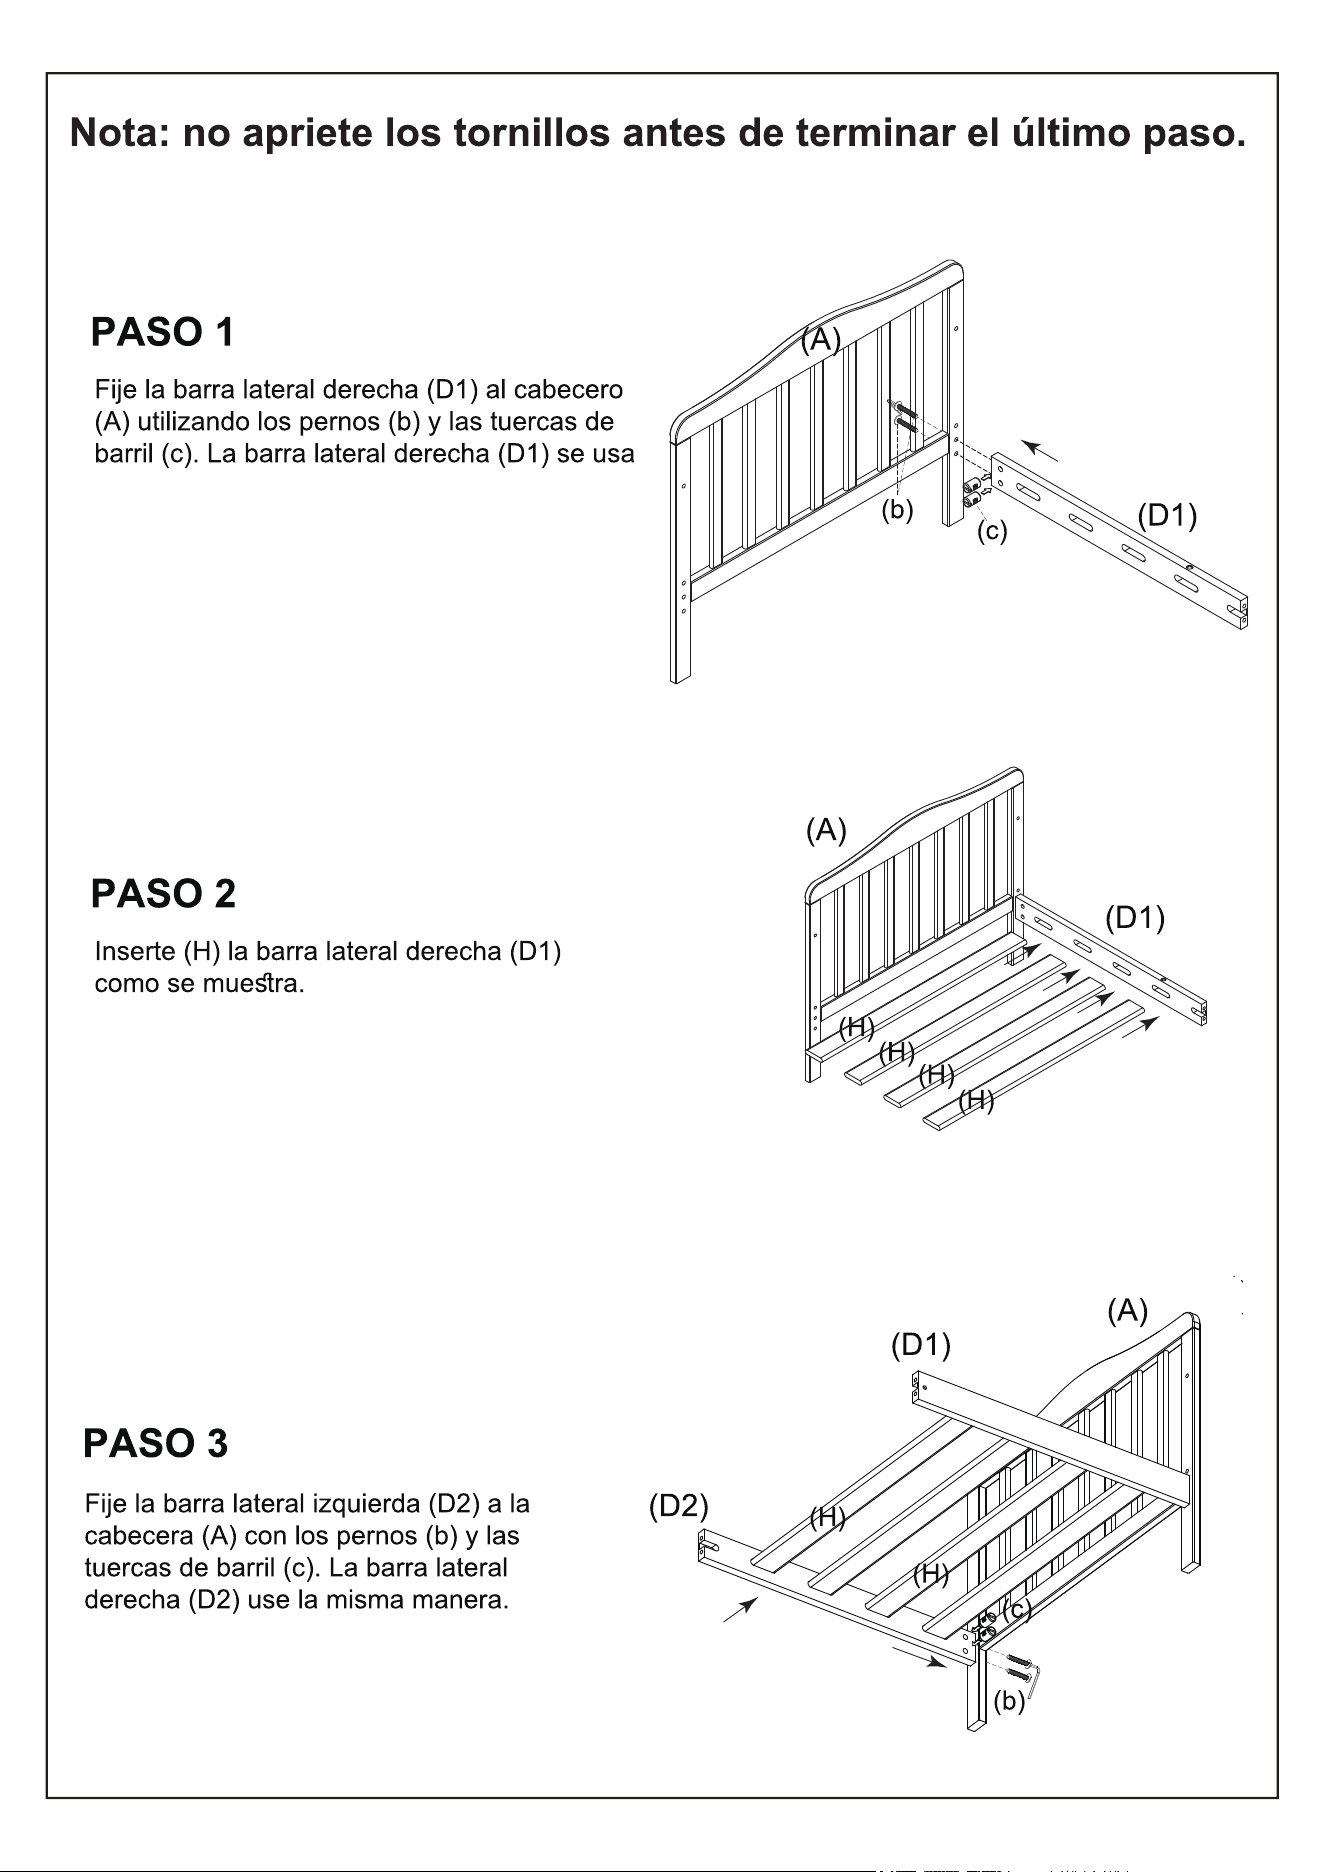
de la misma manera.
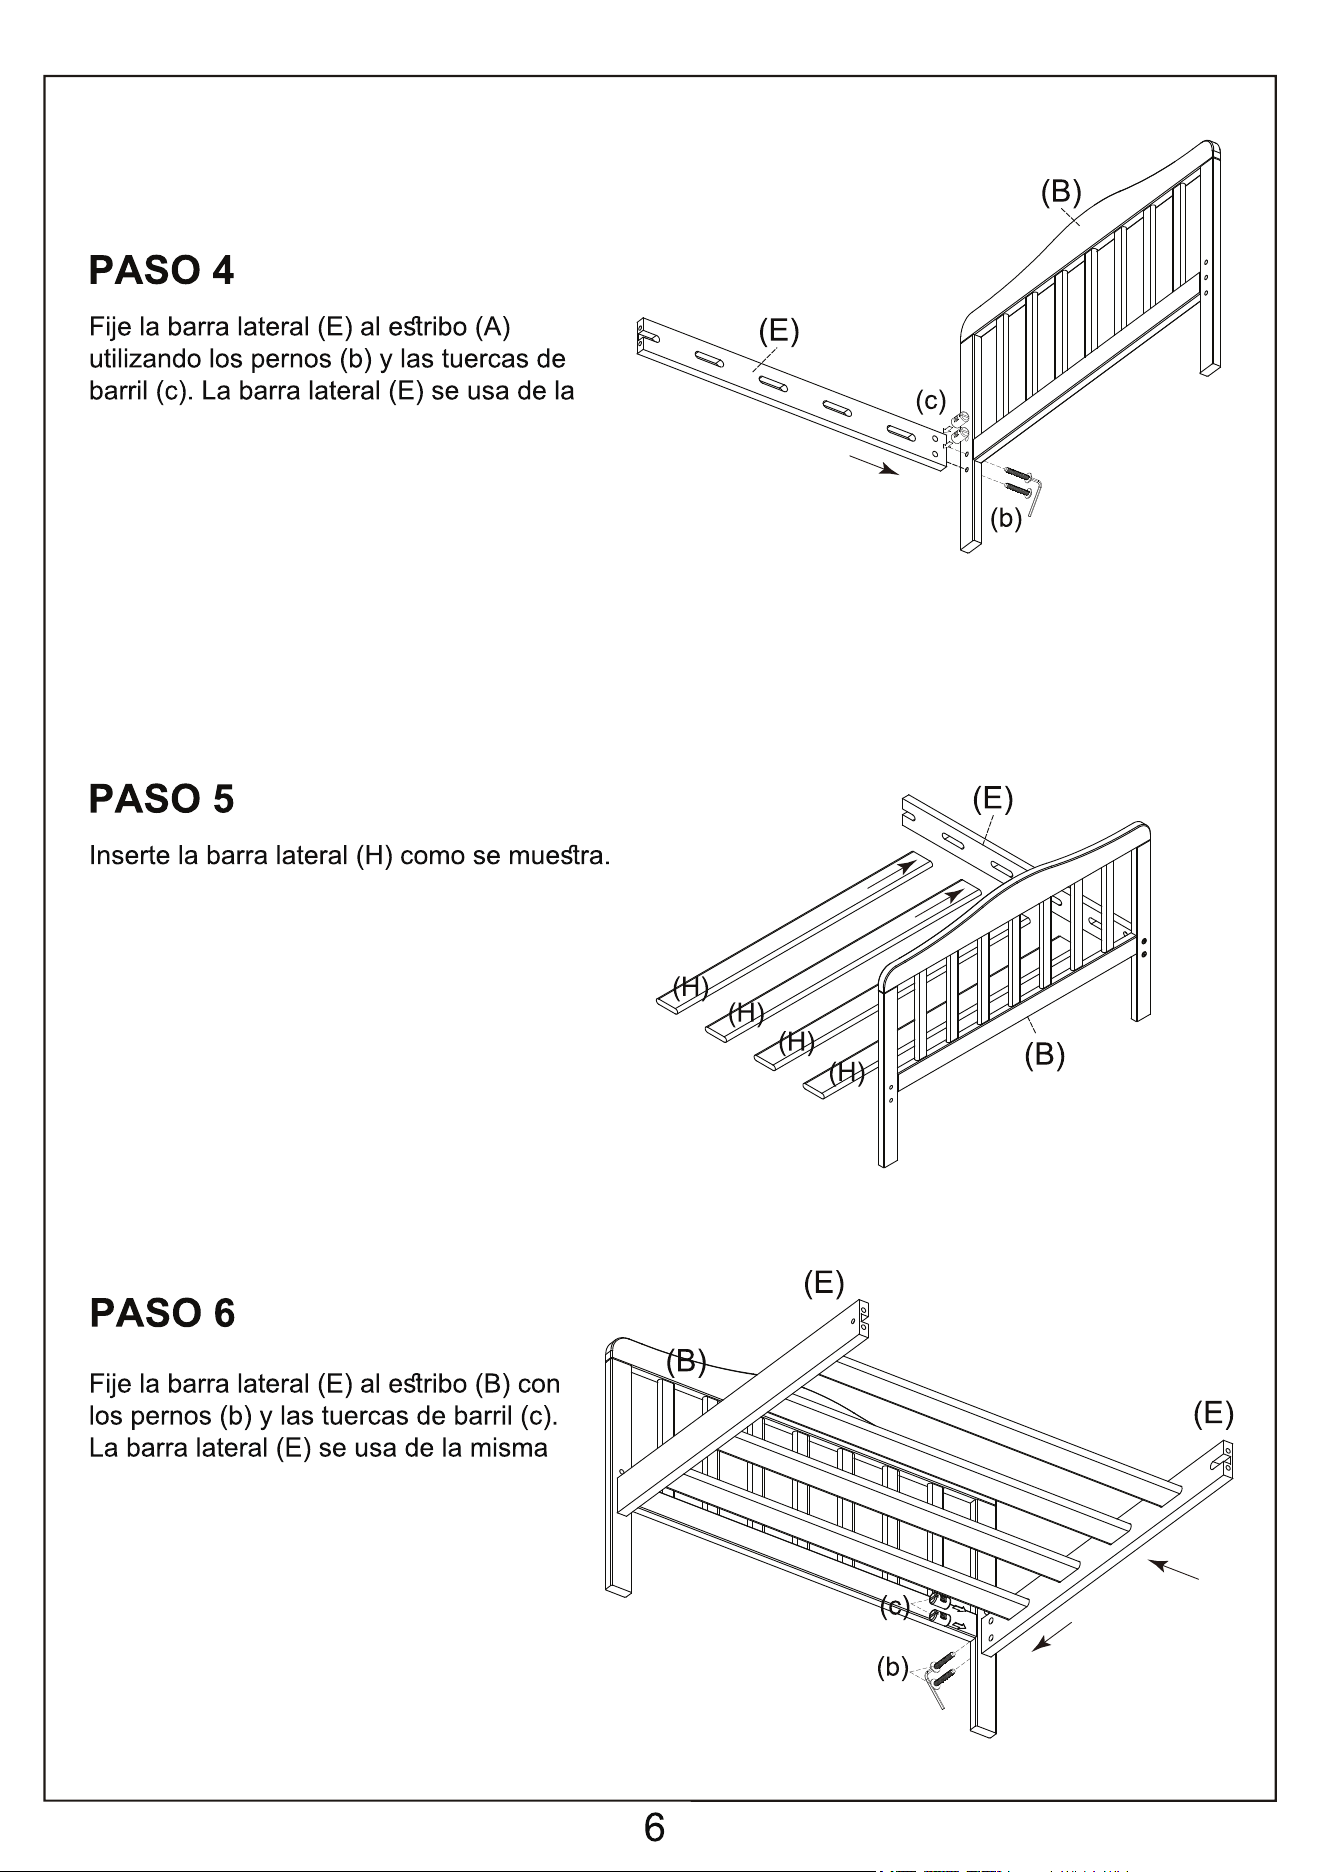
misma manera.
manera.
D1
F
E
G
a X 4
g
c
asegúrese de que los agujeros de las
8
Ahora puede apretar todos
los tornillos y asegurarse de
utilizada.
1.Conecte la barra superior de la barandilla
barra inferior al cabecero utilizando los
2.El mismo paso que el 1 para conectar la
9
GARANTIE LIMITÉE :
• Dream On Me garantit que son produit est exempt de tout défaut de
matériel et de fabrication et s'engage à remédier à tout défaut de ce type.
• Cette garantie couvre 1 an à partir de la date d'achat originale.
• Cette garantie n'est valable que sur présentation d'une preuve d'achat.
• Elle est uniquement limitée à la réparation ou au remplacement des
composants défectueux du meuble et aucune main d'œuvre de montage
n'est incluse.
• Cette garantie ne s'applique pas à un produit qui a été mal assemblé,
soumis à une mauvaise utilisation ou à un abus ou qui a été modifié ou
réparé de quelque façon que ce soit.
• Cette garantie vous donne des droits légaux spécifiques et vous pouvez
également avoir d'autres droits qui varient d'un État à l'autre. droits qui
varient d'un État à l'autre.
1532 S. WASHINGTON AVENUE
PISCATAWAY, NJ 08854
www.dreamonme.com
Siga con nosotros @dreamonmeinc
para que su guardería aparezca en nuestras redes sociales.
Participa en nuestro sorteo mensual.
Escanee el código QR para registrarse.
Chatea con nosotros.
Escanee el código QR para el chat en vivo.
Correo electrónico: [email protected]