
Baby Monitor
Secure875
User Guide
KEEP THIS USER GUIDE FOR FUTURE REFERENCE
Always retain your proof of purchase in case of warranty service.
www.oricom.com.au

TABLE OF CONTENTS
Need Help?
If you need assistance setting up or using your Oricom product now or in the future, call Oricom Support.
Australia 02 4574 8888
www.oricom.com.au
Mon-Fri 8am – 6pm AEST
New Zealand 0800 67 42 66
www.oricom.co.nz
Mon-Fri 10am – 8pm NZST
WhAT’S INCLudEd
Package Contents ........................................................................3
GETTING STArTEd
Functional Description .................................................................3
Powering your monitor ............................................................. 3
Operating the System ...............................................................3
VIEWING MOdE dISpLAy
Indicator Description ...................................................................6
How to use the indicator ..........................................................6
Menu Operation............................................................................7
How to use the function tools .................................................. 7
How to use the setup icon .......................................................7
OVErVIEW
Getting to Know Your Baby Monitor ............................................ 9
Parent Unit ................................................................................9
Camera Unit ............................................................................ 10
INSTALLATION
How to Install ............................................................................. 11
Parent Unit .............................................................................. 11
Camera Unit ............................................................................ 11
SpECIFICATIONS ...................................................... 12
TrOuBLEShOOTING................................................ 13
ExprESS WArrANTy .............................................. 15

1SAFETy INFOrMATION
1 Important Safety Information
• ItisveryimportantthatyoureadtheUserGuidecarefully
as it contains detailed information you will need to get
the most from your Oricom baby monitor. If you have any
issues setting up or using your Oricom baby monitor,
please call our Customer Support team.
• YourOricombabymonitorisdesignedtobeanaidand
should not be used as a substitute for responsible and
proper adult supervision of a child.
• Thebabymonitorhasbeendesignedtoprovidesome
added reassurance in the form of sound transmission
for those times when you are not in the same room as
your baby provided you always stay within hearing range
ofthebabymonitorduringuse.Yourbabymonitoris
not a medical device, nor a device to prevent cases of
Sudden Infant Death Syndrome (SIDS) or "cot death",
and you should not rely on it for your baby's wellbeing.
It is important that you regularly check on your baby
personally.
• Makesurethebabyunit,parentunitandmainsadaptor
cables are kept out of reach of your baby and other
young children at all times, at least one metre away.
• Neverplacethebabyunitorparentunitinsideyour
baby’s cot, bed or playpen.
• Nevercovertheparentorbabyunitswithclothes,towels
or blankets or any other item. Never use or place your
parent or baby unit in or near moisture or water (e.g.
near bath or pool). Immersing in water could cause
electric shock and even death.
• Theinstallationlocationplaysanimportantrolein
ensuring proper operation. Therefore, maintain a
distance of at least one metre from other electronic
equipment,suchasmicrowaveovensorhi−fidevices,
otherwise they could cause interference. During continual
use the baby unit power adaptors may become warm to
the touch. This is normal and should not be a concern.
Risk of suffocation!
Keep all packaging materials and protective foils out of
reach of children.
!
Warning

2 SAFETy INFOrMATION
Do not place the AC Adaptor cable in a high "wear and
tear" location. Never use a frayed or compromised cord.
!
Warning
Battery safety
• Batteriesrepresentahazardtohealthandthe
environment!
• Theycontaintoxic,ecologicallyhazardousheavymetals.
Donotdisposeofbatteriesinareastheymayexplode.
Dispose of batteries according to local regulations, never
in your household rubbish.
• Donotdismantle,cut,open,crush,bend,puncture,
or shred cells or batteries. If a battery leaks, do not let
the battery liquid touch skin or eyes. If this happens,
immediately flush the affected areas with water, and
seek medical assistance.
• Donotmodify,remanufacture,attempttoinsertforeign
objectsintothebattery,orimmerseorexposeittowater
orotherliquids.Batteriesmayexplodeifdamaged.
• Useonlythebatterysuppliedwiththeproduct.Improper
use, or use of unapproved batteries, may present a risk
offire,explosion,orotherhazard,andmayinvalidate
any approval or warranty.
• Ifyoubelievethebatteryisdamaged,removeproduct
from the charger and stop using the product. Contact
Oricom for assistance. Never use a damaged battery.
Disposal
Always dispose of your products at the end of their life in
accordance with your local waste disposal requirements.
Packaging materials all cardboard and paper packaging
should be recycled in accordance with your local council
waste regulations.
3
WhAT’S INCLudEd
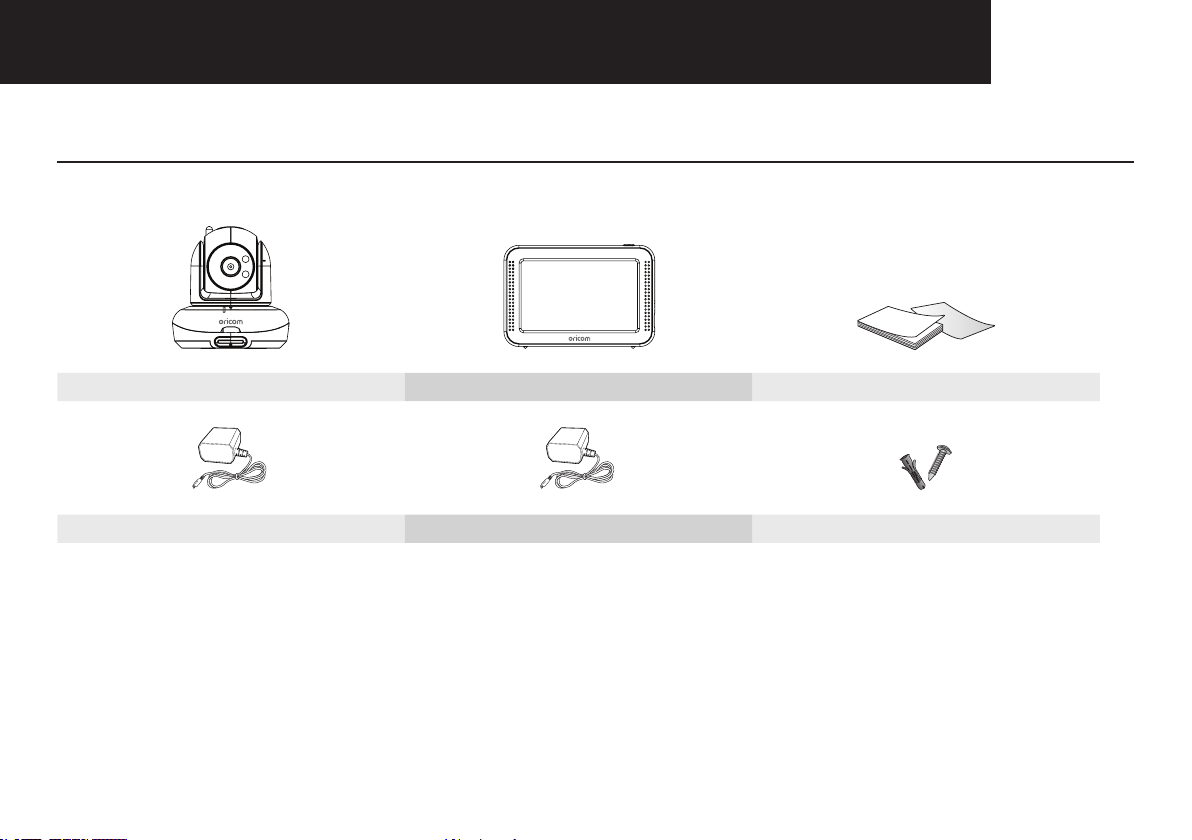
2 Package Contents
The Secure875 comes with the following:
Camera Unit Parent Unit User Manual
Camera Unit Power Adaptor Parent Unit Power Adaptor Plastic anchor (1EA) & Screw (1EA)
Checkyourpackagetoconrmthatyouhavereceivedthecompletesystem,includingallcomponentsshownabove.
4 GETTING STArTEd
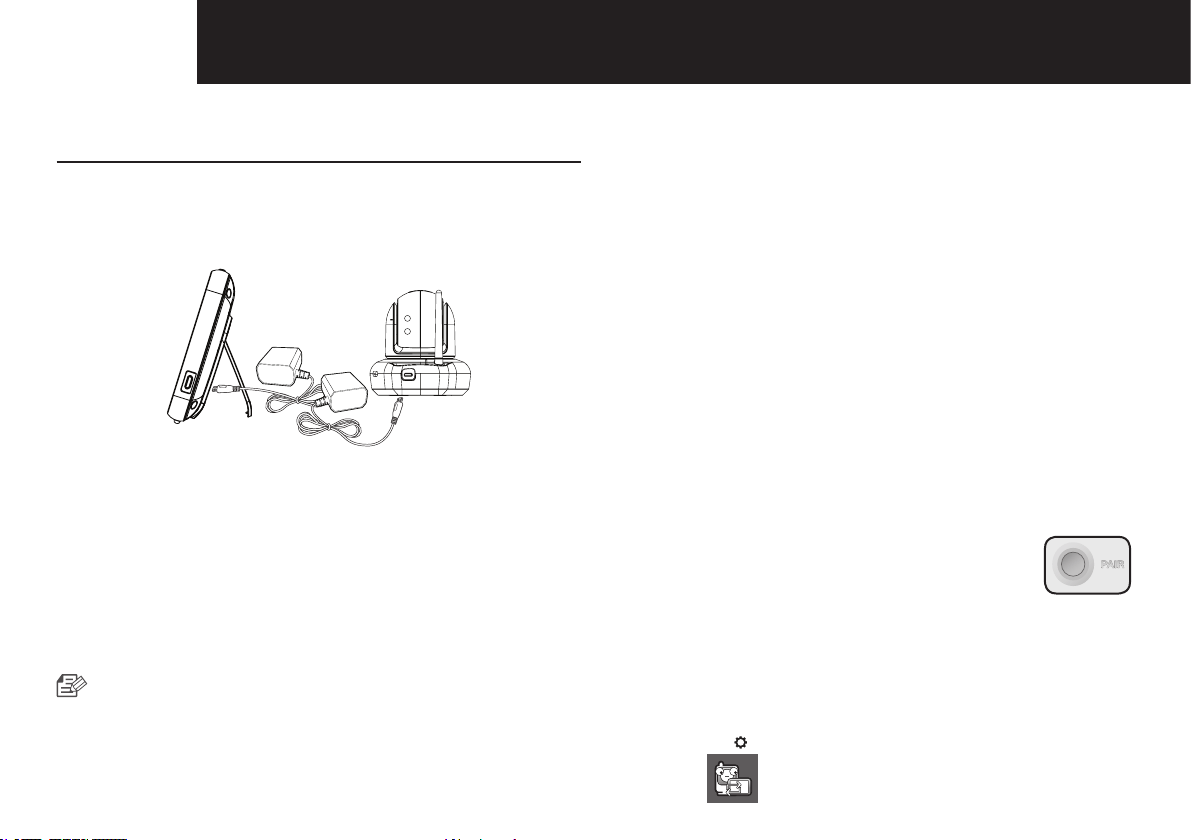
3 Functional Description
Powering your monitor
Fully charge the monitor before use. After initial charge,
recharge as required.
DC IN 5V
DC IN 5V
Warning: Only use the AC power adaptor supplied with
the product as other power adaptors could damage the
product. This product is designed for indoor use only.
Parent Unit
Youcanusethedevicewhilecharging.
Camera Unit
The camera unit must be plugged in at all times in order to
operate.
■
ConrmtheparentunitpowerLEDison.
Important:
TheparentunitispoweredbyarechargeableLithium
BatteryPack.TheredpowerLEDlightsupontheparent
unit when it is charging, to indicate power is being supplied
totheunit.InthecaseofalowbatterytheredpowerLED
willash.Theparentunitbatteryshouldberecharged.
Battery Life
The rechargeable battery pack (supplied) can be charged
and discharged hundreds of times, however it will
eventually wear out and lose its ability to hold a full charge.
When the in use time becomes noticeably shorter than
normal, it is time to purchase a new battery pack.
How to purchase spare parts
Youcanpurchasebatteriesandextracameraunitsfrom
Oricom www.oricom.com.au
Operating your baby monitor
The basic operation is as follows:
Pairing
The units already come paired for your
convenience. This button on the base of the
camera is used to put the camera into pair
mode.Youcanselectthecameranumber
when pairing. Up to 4 Cameras may be paired.
1. Power on parent unit and camera unit.
ThepowerLEDfortheparentunitshouldbeON.
2. Touch the live view screen on the parent unit, this will
activate the settings, volume, pan tilt and lullabies icons.
3. Press the [
] button on the monitor.
4. Select [
] icon.
5GETTING STArTEd
5. The display will show the camera slots, this includes
pairedcamerasandunusedslots.Youcanremove
paired cameras or add a camera to an unused slot.
When you select the slot, you will be prompted to press
the pair button on the camera, you have a 30 second
countdown to do this.
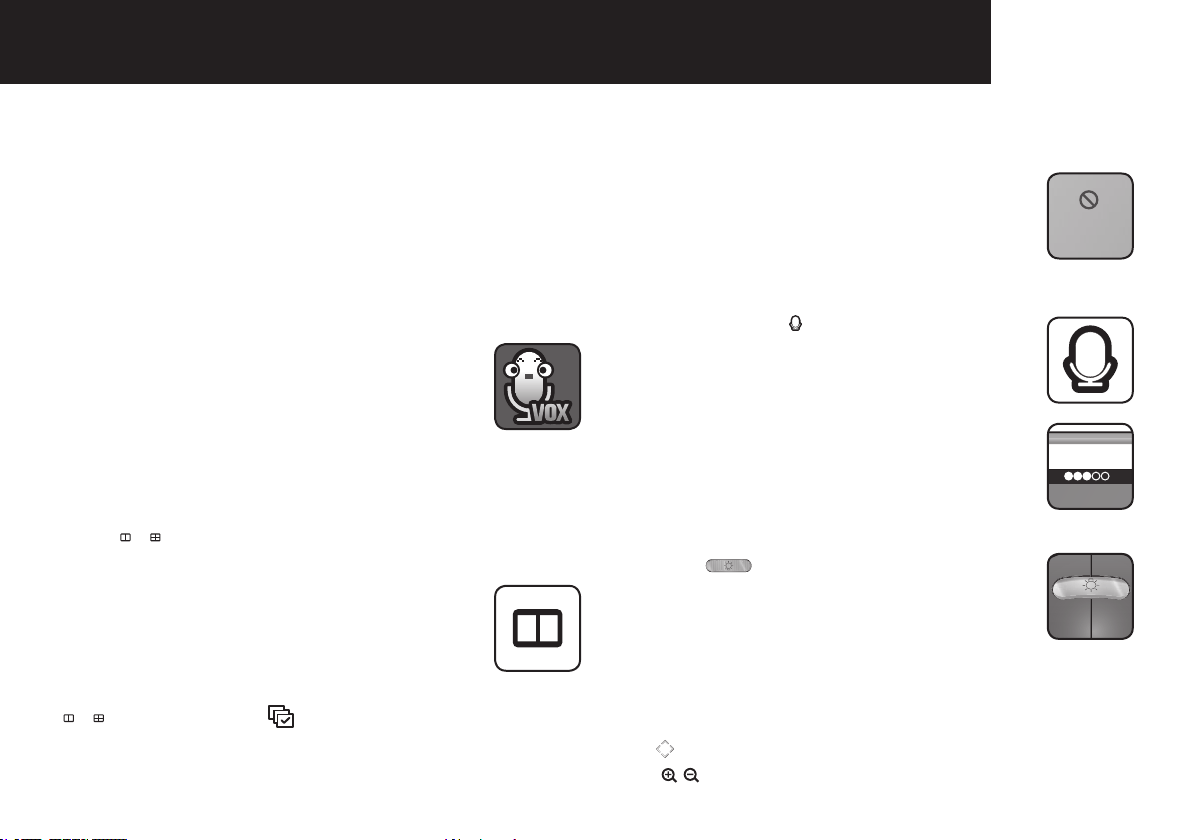
Voice activated (VOX)
VOX can be set for each camera unit.
Depending on the setting, VOX will operate
at different audio levels or can be set to
continuous video or audio only. When set
to audio detect, the video will turn off after
approximately30secondsifaudioislower
than preset level and will turn on when audio is
detected above preset level.
Multi camera mode
Press [
/ ] to switch between cameras.
The displayed view differs depending on how
many cameras are paired, if 2 cameras are
paired then the screen is split in 2, if more than
2 cameras are paired the screen is split into 4.
In split screen mode there is no audio from any
of the camera units.
To scan between paired cameras, press the
[
/ ] option, then the [
] button.
In Scan mode all VOX functions are deactivated.
Up to 4 cameras can be paired.
Lost Link
If the camera and monitor are not paired or
if the parent unit is outside of transmission
rangewiththepairedcamera,the“LostLink”
message appears with warning beeps at
regular intervals.
Two-way talk
Press and hold the [
] icon and talk into the
microphone, your audio will be transmitted to
the selected camera unit.
Sound level
The louder the sound around the camera, the
moreLEDsturnon.
Night Light
Press the [
] button on the camera to
activate or deactivate the night light on the
camera.
[Camera]
Remote Pan, Tilt and Zoom
Youcanremotelycontrolthecameratopan,tiltanddigitalzoom.
Use [
] icons on the parent unit to control the camera.
Use [
] icon to zoom in and out.
Lost Link
6 VIEWING MOdE dISpLAy
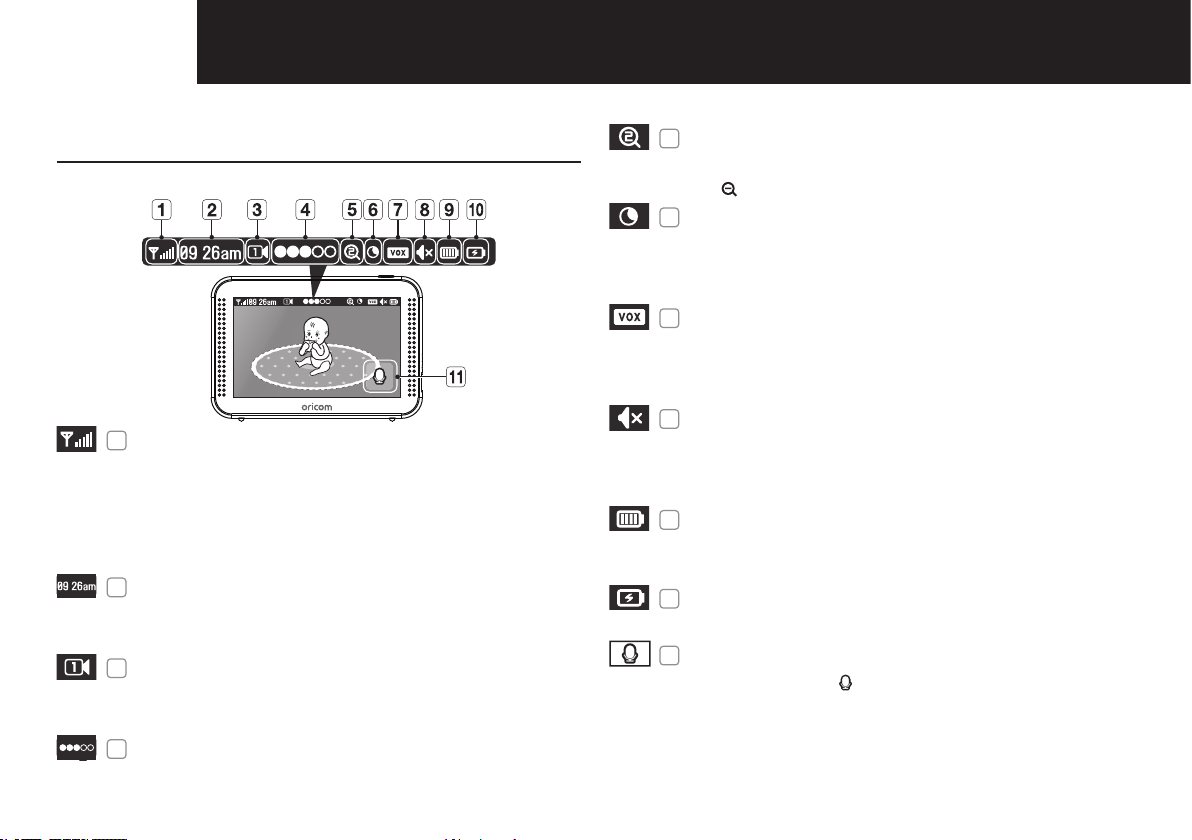
4 Indicator Description
How to use the indicator
1
Signal Indicator
The signal indicator shows the strength of the signal
being received from the camera.
The number of bars in the signal indicator shows the
strength of the signal – One or no bars indicate the
signal is poor, and 5 bars indicate a strong signal.
2
Digital Clock
Displays the time in 12 hour AM/PM format only. The
time can be set in the settings menu.
3
Camera Number
Indicates which camera is being displayed on the
current screen.
4
Sound level Indicator
Indicates the sound level of the active camera.
5
x1/x1.5/x2 Zoom mode
Indicates the zoom status of the viewed camera.
Press [ ] icon on the parent unit to zoom back out.
6
Night Vision Indicator
Indicates night vision is activated on the viewed
camera.
Note: night vision mode is in black and white only.
7
VOX On
Indicates VOX mode is on, there are two VOX
options, high sound level detection and low sound
level detection.
8
Parent Unit Speaker Mute
Indicates the parent unit speaker is muted. Once the
parent unit's speaker is muted, no sound from the
camera is heard.
9
Battery Capacity Level
Indicates remaining battery charge. Indicated in 4
levels,andonelowbatterywarning(iconashingred).
10
Charging
Indicates the battery is charging by DC input power.
11
Two-way talk
Press and hold the [ ] icon while talking.
No Signal Warnings
The "Lost Link" message means the parent unit cannot
access the camera.
Please reposition the camera, or check the camera power.
7VIEWING MOdE dISpLAy
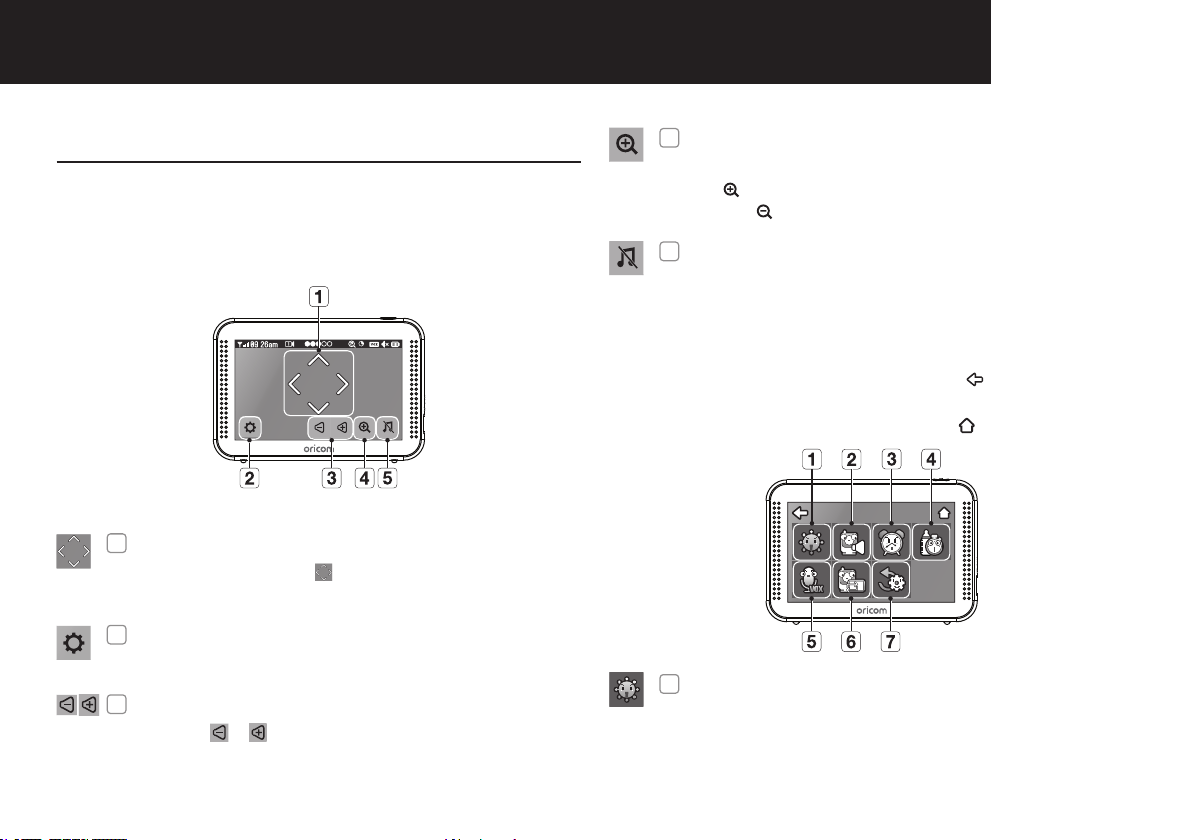
5 Menu Operation
How to use the function tools
Touch the screen of the parent unit to display the menu
screen.
1
Navigation Controls
Select the navigation [
] icons to pan and tilt (up /
down / left / right) the camera remotely.
2
Menu Setting
Select to modify your baby monitors settings.
3
Monitor Volume
Using the [
/ ] icons, you can adjust the monitor
volume.
4
Zoom In / Zoom Out
Select to digitally Zoom in and out, Zoom icon will
show [
]wheninx1andx1.5Zoom,Zoomouticon
will show [ ]wheninx2Zoom.
5
Lullaby
Press the icon to turn on and turn off lullabies.
Youcanselectfrom4soundsorplayall.
How to use the setup icon
Afterconguringthesettings,pressthe[ ] icon to save the
changes.
ToreturntotheLivescreen,pressthe[
] icon.
Settings
1
Brightness
Adjusts the brightness of the image shown. If you are
using multiple cameras, you can adjust the brightness
of each individual camera.

8 VIEWING MOdE dISpLAy
2
Set Camera Speaker Volume
Adjust the volume of the speaker on the camera in
this menu. The volume can be adjusted from 0 to 5,
with 5 being the loudest setting and 0 is mute.
3
Time Setting
Set the time shown on the parent unit. Use the [
] or
[ ]icontochangethenumbersintheselectedeld.
4
Feed Timer
Set the feed time shown on the parent unit. Use the
[
] or [ ] icon to change the numbers in the
selectedeld.
5
Camera VOX Sensitivity
When not in “VOX”mode,[
] icon is not displayed.
In VOX mode, you can select “Low Sound Level
Detection”or“High Sound Level Detection”.When
“Low Sound Level Detection”isselected,the
monitor will be triggered by lower audio levels than
when “High Sound Level Detection”isselected.
•AudioOnlyMode:Videowilltimeoutafter30
seconds, audio will remain on.
•ContinuousVideoandAudioMode:Videoand
audio contantly on.
When you press the power button the parent
unit will automatically switch to low sound level
detection mode.
•LowSoundLevelDetection:Softbabycrylevel
can trigger screen on for 30 seconds, then back to
stand-by.
•HighSoundLevelDetection:Loudbabycrylevel
can trigger screen on for 30 seconds, then back to
stand-by.
6
Pairing
Youcanregisteracameraunitwiththeparentunit
using the registration menu.
7
Reset
Choose <YES> to reset the parent unit to factory
defaults.
Allsettingsexceptfortimeinformationwillberesetto
the factory defaults.
9OVErVIEW
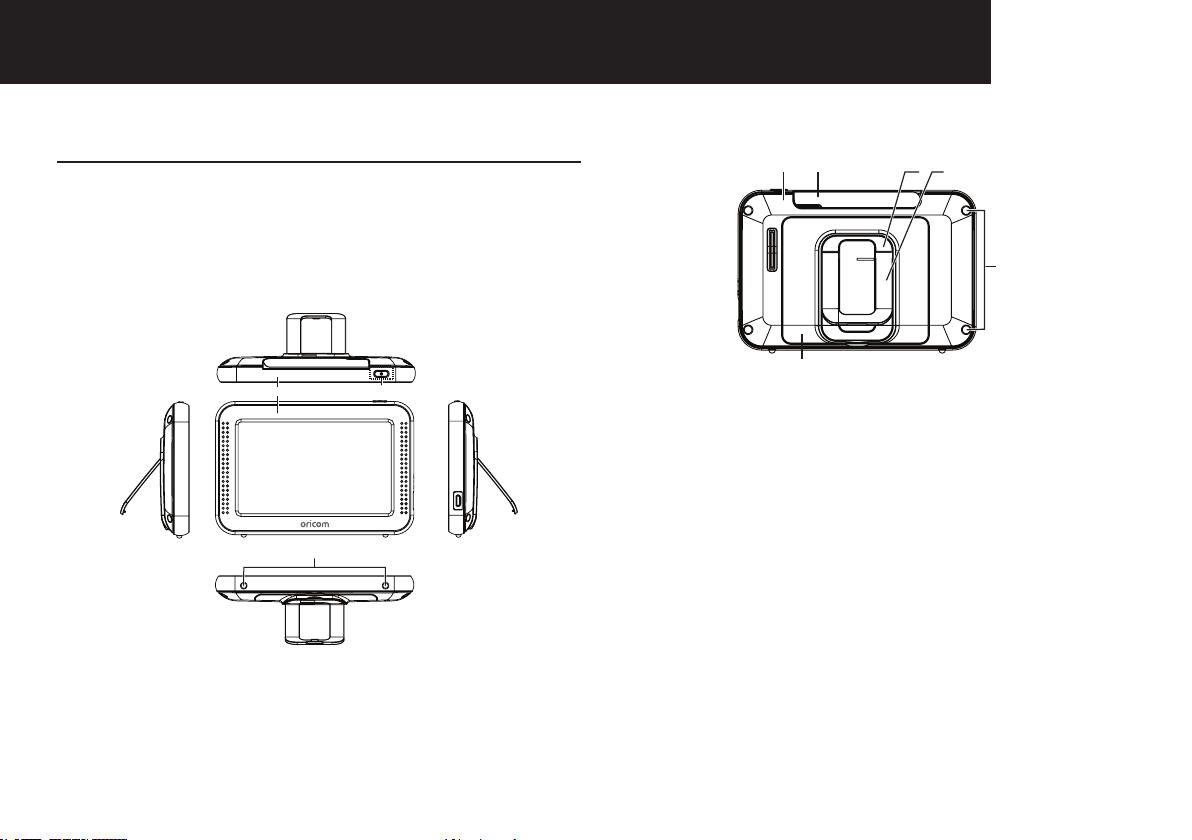
6 Getting to Know Your Baby Monitor
Parent Unit
Afteropeningthebox,fullychargetheparentunitbefore
use. After initial charge, recharge as required.
Front Controls
DC IN 5V
1 2
3
1 Front Cover
2 Button
3 Rubber Feet
Back Controls
4 5
7 8
9
6
4 Rear Cover
5 Antenna
6 BatteryCover
7 StandDeco
8 Stand
9 Rear screw Caps
10 OVErVIEW
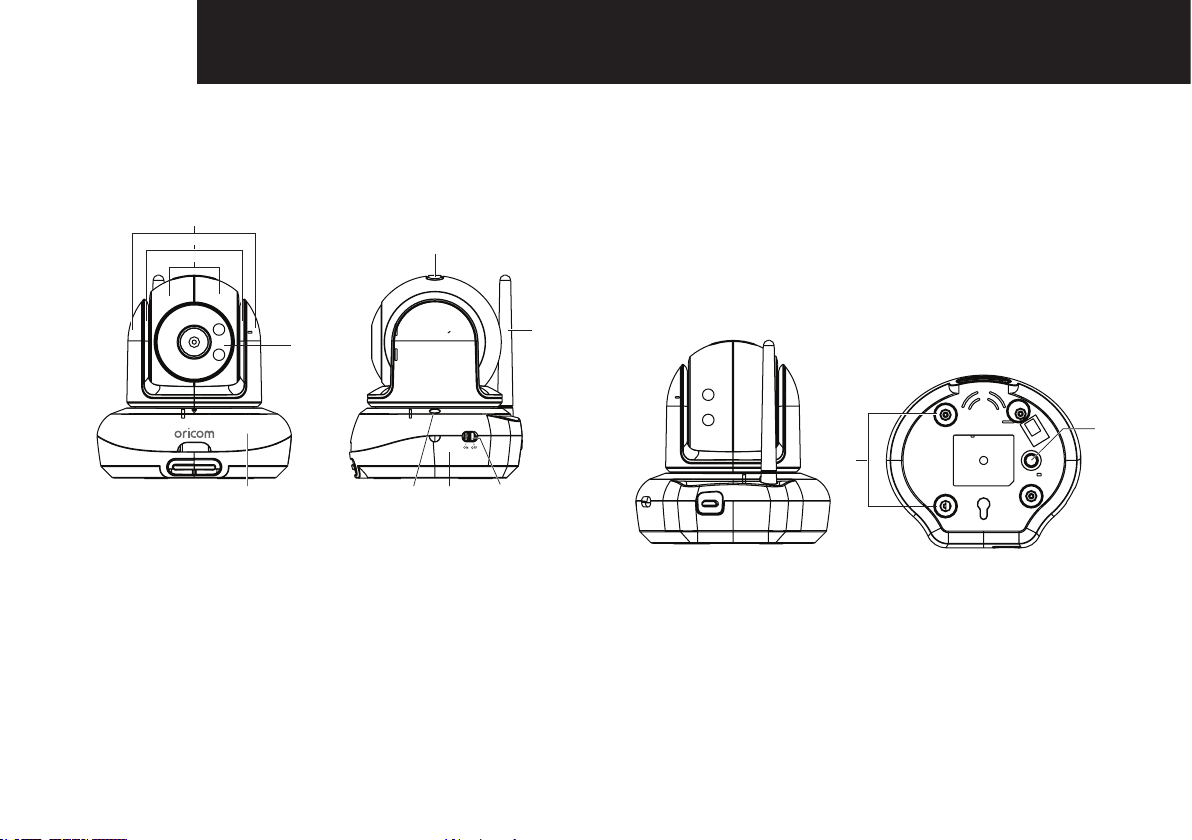
Camera Unit
Front & Back Controls
1
3
2
4
5
9
7
8
10
6
1 Top Cover
2 Deco part
3 Camera Cover
4 IR Window
5 Middle Cover
6 Night light, push to turn on / off
7 Antenna
8 Power Switch
9 BottomCover
10 CDS Sensor
Side & Bottom Controls
DC IN 5V
PAIR
12
11
11 Rubber Feet
12 PairButton
11OVErVIEW
7 How to Install
CAUTION: keep out of reach of children.
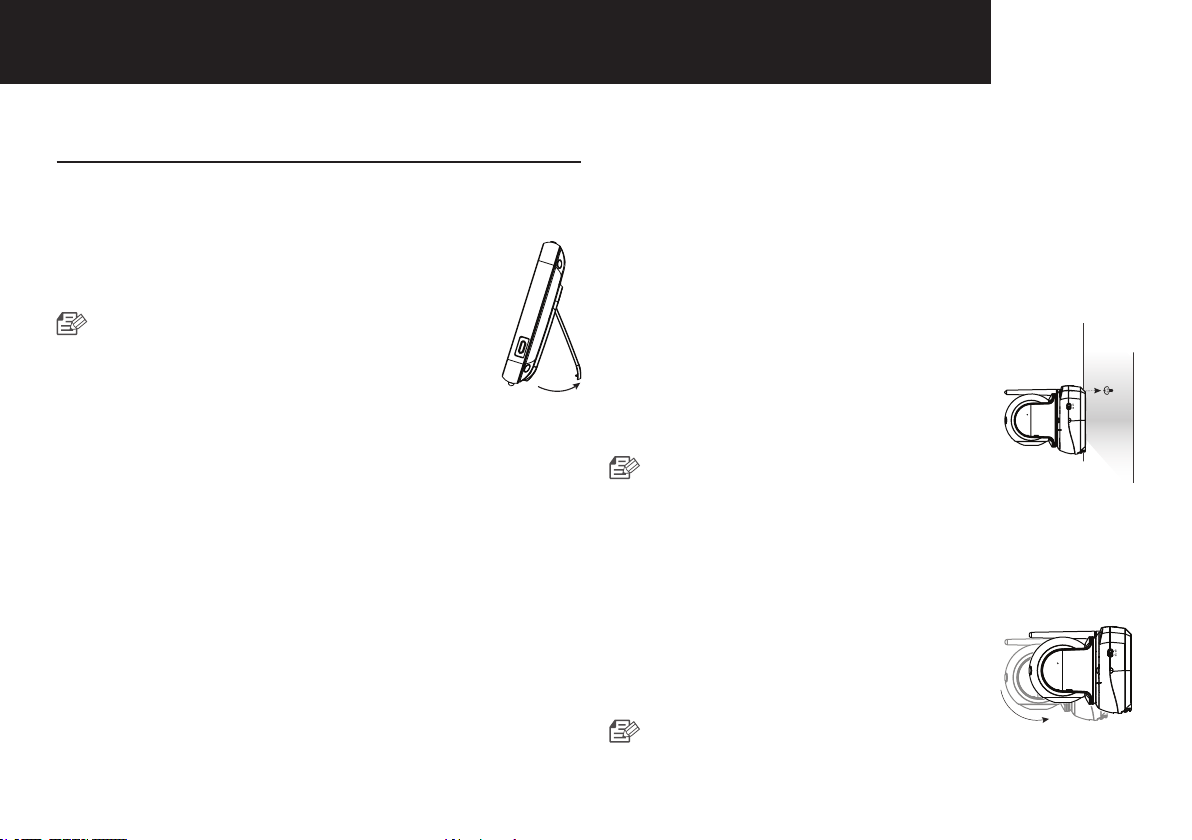
Parent Unit
1. Place the parent unit in a place that will have
clear reception with your camera(s).
2. Extendthestand.
■
Donotuseexcessiveforcewhen
extendingstand.
DC IN 5V
Camera Unit
Beforeyouinstallthecamera,carefullyplanwhereand
how it will be positioned, and where you will route the cable
that connects the camera to the power adaptor.
Beforestartingpermanentinstallation,verifyitsperformance
by observing the image on the parent unit when camera
is positioned in the same location/position where it will be
permanently installed and the parent unit is placed in the
location where it will be used most of the time.
Installation Warnings
Aim the camera(s) to best optimize the viewing area: Select
a location for the camera that provides a clear view of the
area you want to monitor, which is free from dust, and is
not in line-of-sight to a strong light source or direct sunlight.
Avoid installing the camera where there are thick walls or
obstructions between the camera and the parent unit.
STRANGULATIONHAZARD-Keepcordoutofchild's
reach. NEVER place camera or cords within 1 meter of cot
orplaypen.NeveruseextensioncordswithACAdaptors.
Only use the AC Adaptors provided.
1. Carefully unpack the camera.
If you are installing additional, please see the pairing
camera section of this manual for details on installation.
2. Wall mounting the camera.
Mark the position of the screw hole
on the wall, and drill hole and insert 1
screw,thenrmlyattachthecamerato
the wall by placing the stand over the
installed screw and pushing the base
downwards.
■
To install on a concrete wall, drill
aholeanduseplasticanchortox.
■
Use the drilling template to drill holes on the wall
for camera installation. (Page 18)
■
Thecameracanalsobeplacedonaatsurface,
such as a table or shelf with no mounting hardware
required.
3. Adjust the viewing angle of the camera.
Use the pan and tilt controls on the
parent unit to adjust the viewing angle
of the camera.
■
Adjustingthecamerawithexcessive
force may damage the unit.
12 SpECIFICATIONS
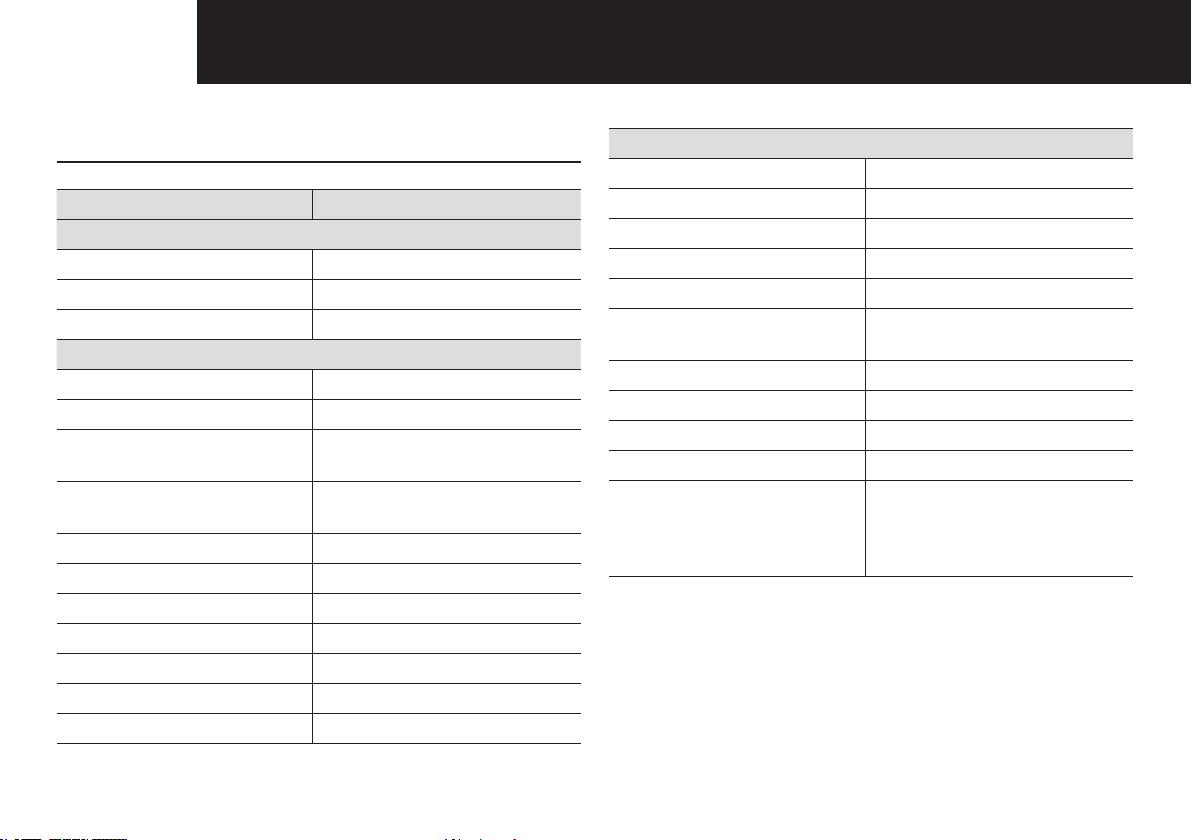
8 Specications
Item Details
System General
Operating Frequency Range 2400 MHz~2483.5 MHz
Type of Spread Spectrum TX FHSS
Transmission range Outdoor300m(LineofSight)
Camera Unit
Resolution 1280x720
IRLEDType/NightVision 8pcsIRLED–940nm/5m
Lullabies 4 songs (Monitor Remote
On / Off)
NightLight Yes(ManualOn/Offbuttonon
camera)
Power Requirement DC 5V ± 10%
Power Consumption 5.1Watt(max)
Operating Temperature Range 0°C~+40°C
Operating Humidity Range 85% RH
Environment Rating Indoor use only
Pan Angle 300°
Tilt Angle 110°
Parent Unit
Display Type/Size ColourTFT5”
Resolution 800X480
Digital Zoom x1,x1.5,x2
Feed Timer Alert Yes(beepsound)
Number of Camera Support Up to 4 cameras
Power Requirement Adaptor : DC 5V ± 10%,
Battery:3.8Li-ion
Operating Temperature Range 0°C~+40°C
Operating Humidity Range 85% RH
Environment Rating Indoor use only
BatterySpecications Li-on2500mAhreplaceable
Batteryperformance Up to 6 hours of continuous
operation when new battery is
fully charged, with VOX turned
on.

13TrOuBLEShOOTING
9 Troubleshooting
Problem Solution
No picture from
camera
1. Check all connections to the camera.
Make sure the adaptor is plugged in.
2. Make sure that the cameras and
monitor are both ON.
3. Make sure that the camera is in
range of the parent unit.
4. Make sure the camera and parent
unit are paired.
5. Adjust the parent unit antenna to
vertical position.
The picture is
or has become
choppy
The picture may become choppy when
experiencingalowerframerate(i.e.
10 frames per second vs. a higher 20
frames per second).
1. Try moving the camera closer to the
parent unit.
2. Remove obstructions between the
parent unit and camera.
3. Adjust the parent unit antenna to
vertical position.
No sounds (even
with both units
turned on)
1. Make sure that the power adaptor is
connected to the camera.
2. The battery on the parent unit may
need charging, be sure to charge it
using the adaptor included.
3. The parent unit may be out of range
of the camera; be sure to check if
theRangeLEDisoncontinuously.
Parent unit is
emitting a high
pitched noise/
feedback.
This sound is normal feedback which
occurs if the parent unit and camera
are too close together. Move them
further apart.
■
Lowbatterieswillcausethesupplycurrentto
become unstable and will affect the quality of the
video/audio. Please charge the battery fully for use
for superior video performance.

14 ExprESS WArrANTy
receipt.Youarerequiredtoprovideproofofpurchaseasa
conditionofreceivingExpressWarrantyservices.
Youareentitledtoareplacementproductorrepairof
the product at our discretion according to the terms and
conditions of this document if your product is found to be
faultywithintheExpressWarrantyPeriod.ThisExpress
Warrantyextendstotheoriginalpurchaseronlyandisnot
transferable.
Products distributed by Oricom are manufactured using
new materials or new and used materials equivalent to
new in performance and reliability. Spare parts may be
new or equivalent to new. Spare parts are warranted to
be free from defects in material or workmanship for thirty
(30)daysorfortheremainderoftheExpressWarranty
Period of the Oricom branded product in which they are
installed,whicheverislonger.DuringtheExpressWarranty
Period, Oricom will where possible repair and if not replace
the faulty product or part thereof. All component parts
removedunderthisExpressWarrantybecometheproperty
of Oricom. In the unlikely event that your Oricom product
has a recurring failure, Oricom may always, subject to the
Competition and Consumer Act 2010, at its discretion, elect
to provide you with a replacement product of its choosing
that is at least equivalent to your product in performance.
NochangetotheconditionsofthisExpressWarranty
is valid unless it is made in writing and signed by an
authorised representative of Oricom.
Express Warranty (Australia)
ThisExpressWarrantyisprovidedbyOricomInternational
PtyLtdABN46086116369,Unit1,4SovereignPlace,
South Windsor NSW 2756, herein after referred to as
“Oricom”.
Oricom products come with guarantees that cannot be
excludedundertheAustralianConsumerLaw.Youare
entitled to a replacement or refund for a major failure and
compensation for any other reasonably foreseeable loss or
damage.Youarealsoentitledtohavethegoodsrepaired
or replaced if the goods fail to be of acceptable quality and
the failure does not amount to a major failure.
Oricom warrants that the product is free from defects in
materialsorworkmanshipduringtheExpressWarranty
Period.ThisExpressWarrantydoesnotextendtoany
product from which the serial number has been removed or
was purchased outside of Australia.
NothinginthisExpressWarrantyexcludes,restrictsor
modiesanycondition,warranty,guarantee,impliedterm,
rightorremedypursuanttotheAustralianConsumerLaw
andwhichmaynotbesoexcluded,restrictedormodied.
For such conditions, terms, guarantees and warranties that
cannotbeexcluded,restrictedormodified,Oricomlimits
theremediesavailabletoextentpermittedintherelevant
legislation.
TheExpressWarrantyPeriodwillbe3yearsfromthedate
of purchase of the product evidenced by your dated sales

15ExprESS WArrANTy
OricomwillnotbeliableunderthisExpressWarranty,and
totheextentpermittedbylawwillnotbeliableforany
defect, loss, damage or injury arising out of or in connection
with a:
1. f ailure by you to adhere to the warnings and follow the
instructions set out in this user guide for the proper
installation and use of the product;
2. wilful misconduct or deliberate misuse by you of the
product;
3.anyexternalcausebeyondourcontrol,includingbutnot
limited to power failure, lightning or over voltage; or
4. modification to the product or services carried out on
the product by anyone other than Oricom or Oricom’s
authorised service provider.
How to make a claim under your Express Warranty
in Australia
Oricom has a simple warranty process for you to follow:
• PleasecalloremailourCustomerSupportTeam,
02 4574 8888 or [email protected].
• ACustomerSupportTeammemberwillverifyafter
troubleshootingwithyouifyourproductqualiesunder
warranty. If so, they will give you a Product Return
Authorisation number.
• WewillthenemailorfaxaReturnAuthorisationform
and a Repair Notice (if necessary), together with
instructions on how to return the goods for warranty
service.
Please note that if a Customer Support Team member
advises that your product does not qualify for return, this
warranty does not apply to your product. Products that
are authorised to be returned to Oricom in Australia must
include all of the following:
• AcompletedReturnAuthorisationform
• AcopyofyourProofofPurchase(pleasekeepyour
original copy)
• Thefaultyproduct,includingallaccessories.
Send the approved returns to:
OricomInternationalPtyLtd
LockedBag658
South Windsor NSW 2756 Australia
PleasenotethatthisExpressWarrantyexcludesexpenses
incurredbyyouinreturninganyfaultyproducttous.You
mustarrangeandpayanyexpensesincurred(including
postage, delivery, freight, transportation or insurance of the
product) to return the faulty product to us, however, we will
arrange delivery of the repaired or replaced faulty product
to you.

16 ExprESS WArrANTy
Important Information
Repair Notice
Please be aware that the repair of your goods may
result in the loss of any user-generated data (such as
storedtelephonenumbers,textmessagesandcontact
information). Please ensure that you have made a copy of
any data saved on your goods before sending for repair.
Please also be aware that goods presented for repair may
be replaced by refurbished goods or parts of the same type
rather than being repaired.

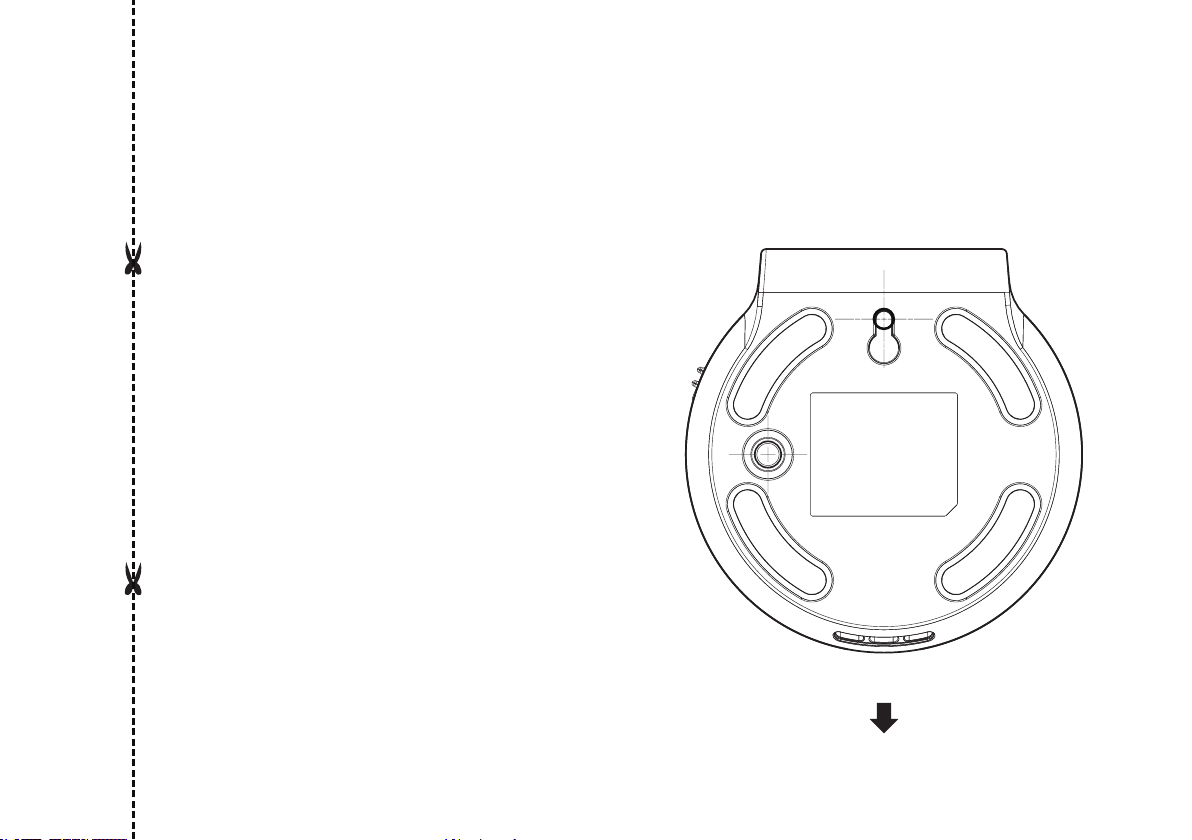
CAMERA FRONT
Screw holes for
the Camera
installation
TEMPLATE
This template is used to
install the camera on the wall.

Ref: 22012020
ORICOM CUSTOMER SUPPORT
Oricom have a trained and dedicated team of Customer Support Representatives, each with the knowledge and resources
toassistinansweringyourquestionsquicklyandefciently.
Oricom Support - Australia
For all product enquiries, troubleshooting or to discuss the range of Oricom products, feel free to contact Oricom or visit
our website for answers to frequently asked questions.
02 4574 8888
Monday - Friday 8am – 6pm AEST
Email: [email protected]
www.oricom.com.au
Oricom Support - New Zealand
0800 674 266
Monday - Friday 10am - 8pm NZST
Email: [email protected]
