Loading ...
Loading ...
2
Scrub the stain in a back and forth motion.
3
Apply downward pressure on the front of the
cleaning tool and pull toward you to extract.
4
Repeat as needed to lift the stain and suction
up the dirt.
TO AVOID SATURATING CARPET
Do not use more than 4 wet strokes
over any one area. Always end with
dry strokes.
If additional cleaning is necessary,
wait until the carpet is completely
dry before using the tool again.
1
2
TIP
HOW TO REMOVE HOSE AND TOOL
1
To dry the system, run the unit for a few
seconds without pressing the trigger.
Turn o unit before removing attachments.
Press trigger on tool to ensure all fluid has
been discharged from the hose. Using your
thumb, push forward and up on the latch to
remove tool.
2
Press button on end of hose and pull to remove
hose from unit. Replace the nozzle cover.
MAINTENANCE
This product contains no serviceable parts.
If appliance is not working as it should, has
been dropped, damaged, left outdoors, or
dropped into water, call customer service at
1-800-944-9200 prior to continuing use.
HOW TO REMOVE & CLEAN THE
BRUSHROLL AND REMOVE THE
BELT
CAUTION:
To reduce the risk of injury
from moving parts, unplug before servicing.
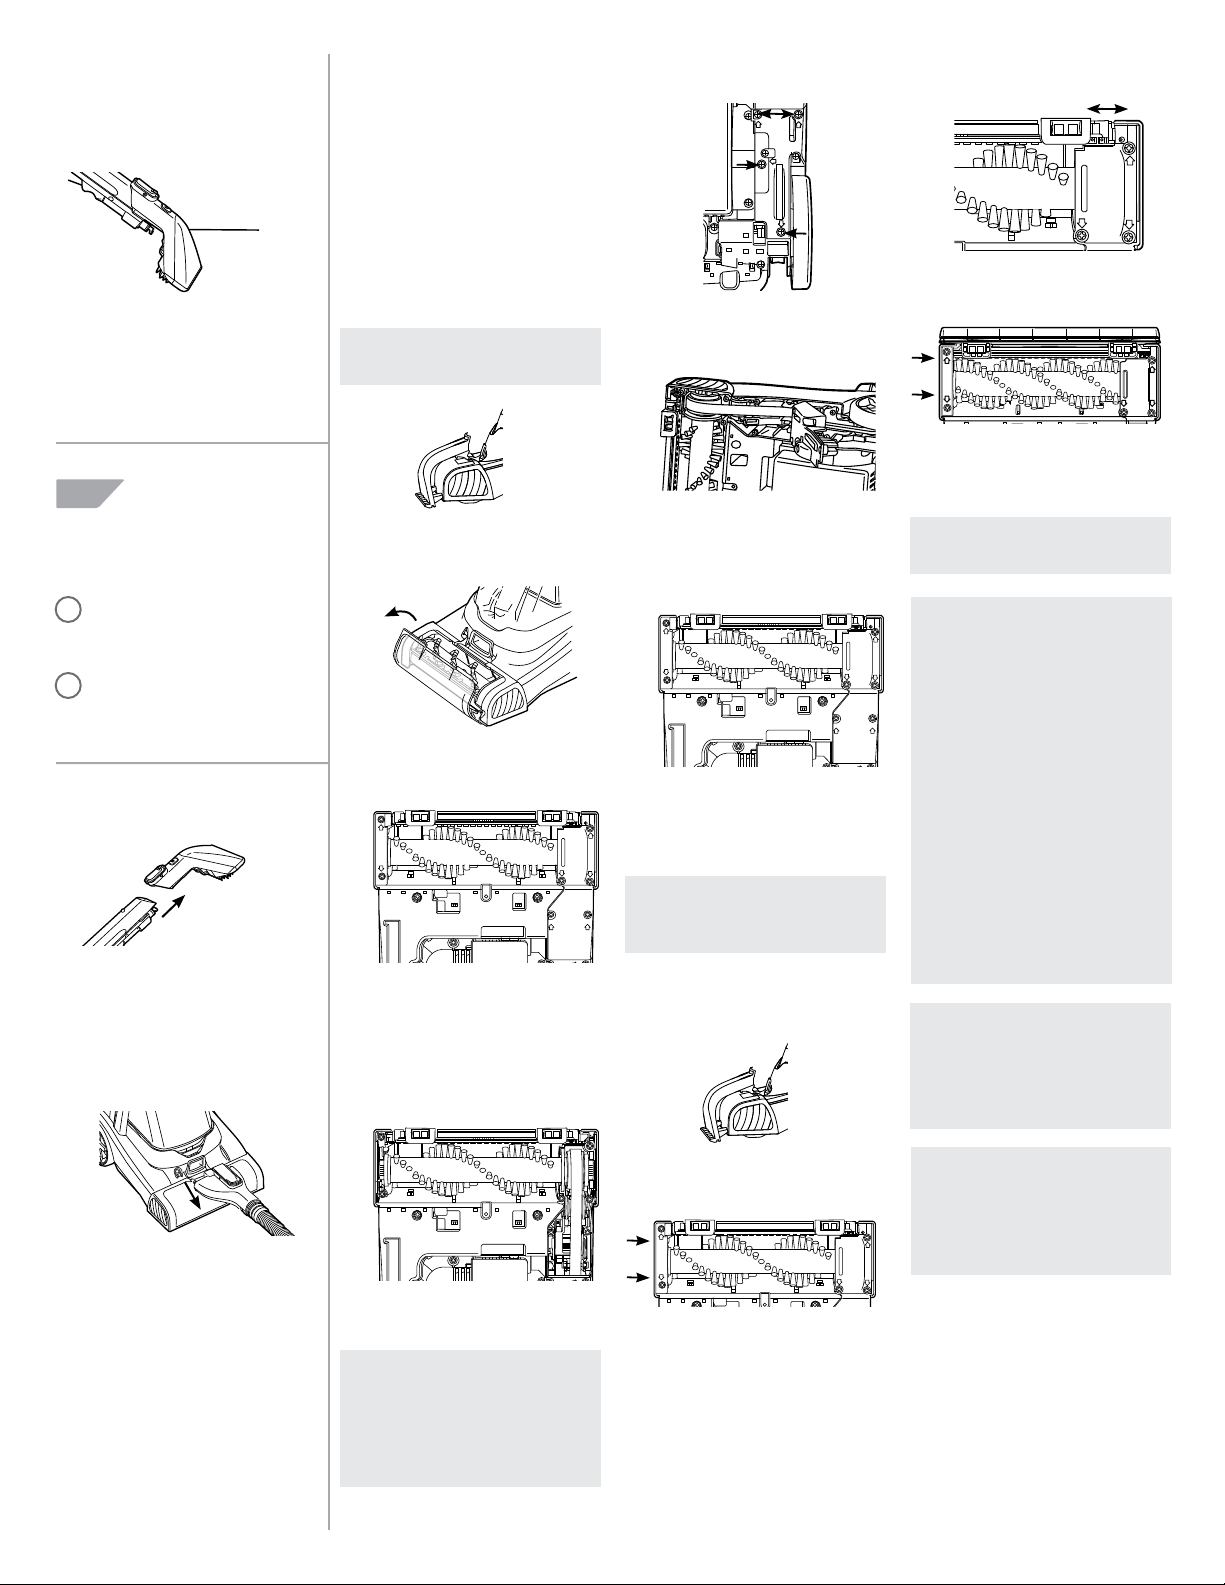
1
Remove the nozzle cover by pulling up and
forward on the latch. Rinse nozzle cover and
allow to air dry.
2
Gently grab the finger ledge and flip brushroll
cover open. Wipe away any debris. Flip closed
when finished.
3
Press down right foot pedal to recline the
machine. Lay product down to access the
underside. Use a Philips screwdriver to remove
12 screws. Screws 1-2 are on the left of the
brushroll. Screws 3-7 are on the top belt
access cover. Screws 8-11 are on the bottom
belt access cover.
4
Once screws 1-2 and 3-7 are removed, the
brushroll and front end of the belt can be
taken out.
NOTE:
The window will be loose at this
point since the components that hold it in
place are now disassembled. The window is
a replaceable part. See window replacement
instructions following the belt replacement
instructions.
5
Screws 8 – 11 on the bottom belt access cover
need to be removed. Remove Philips head
screws only.
6
Now that the screws are removed, press the
small white lever that is located underneath
the belt. Then the rear belt access can pivot
outwards as shown. The belt can now be
completely removed and replaced.
7
To reassemble, just pivot the rear belt access
cover back into place and fasten the screws.
Reassemble the brushroll on the belt. Add the
front belt access cover and brushroll endcap
as they were before.
NOTE:
Screws for 2 and 3 are much
longer than the other screws. All other
screws are the same.
HOW TO REPLACE BRUSHROLL
WINDOW
1
Remove the nozzle cover by pulling up and
forward on the latch.
2
Remove screws 1-2 and the brushroll end cap.
3
Slide out brushroll window and replace with
new window
4
Replace brushroll end cap and screws. Return
nozzle cover back to original location.
NOTE:
Rotate brushrolls manually to
make sure belt is not twisted or pinched.
LUBRICATION: The motor and
brushroll are equipped with bearings which
contain sufficient lubrication for their
lifetime. The addition of lubricant could
cause damage. Do not add lubricant to
motor or brushroll.
STORAGE: Wrap the power cord around
the cord hooks for convenient storage.
Attach the plug end to the cord. Allow
brushes and underside of carpet cleaner
to air dry thoroughly before storing carpet
cleaner on a carpeted or wood surface.
THERMAL PROTECTOR*
A thermal protector has been designed into
your cleaner to protect it from overheating.
When the thermal protector activates the
cleaner will stop running.
If this happens proceed as follows:
1. Turn cleaner OFF.
2. Empty dirty water tank.
3. Inspect the nozzle for any obstructions.
Clear obstructions if present.
4. When cleaner is de-energized and motor
cools for 30 minutes, the thermal protector
will deactivate and cleaning may continue.
If the thermal protector continues to activate
after following the above steps, your cleaner
needs servicing.
*Available on select models.
Loading ...
Loading ...
Loading ...