
Mi Smart Standing Fan 2 User Manual

1
Read this manual carefully before use, and retain it for future reference.Safety Instructions
WARNINGS
Improper use may lead to electric shocks, fire, personal injury, or
other damage.
Do not use this fan in a place where it will easily fall over or
where there are other unstable objects nearby.
Do not use this fan in hot and humid environments such as a
bathroom.
Do not use this fan if its power cord is damaged or its power plug
is loose.
Do not use this fan if its front grille is not installed, or its rear grille
is loose or fell off.
Do not allow children or adults who are incapable of operating
this fan to use this product.
Do not aempt to disassemble or repair this fan by yourself.
Do not excessively pinch, bend, or twist the power cord to
prevent from exposing or breaking its core.
Do not insert your fingers or any object into the front grille, rear
grille, or the fan blades when the fan is in use.
Keep hair and fabrics away from the fan to avoid geing them
caught in the fan.
Do not use any improper power outlet.
Do not use the power cord provided with this fan for any other
device.
Make sure the fan is disconnected from the electrical outlet
before removing the grille.
This appliance can be used by children aged from 8 years and
above and persons with reduced physical, sensory or mental
capabilities or lack of experience and knowledge if they have
been given supervision or instruction concerning use of the
appliance in a safe way and understand the hazards involved.
Children shall not play with the appliance. Cleaning and user
maintenance shall not be made by children without supervision.
(For European countries or regions)
This appliance is not intended for use by persons (including
children) with reduced physical, sensory or mental capabilities,
or lack of experience and knowledge, unless they have been
given supervision or instruction concerning use of the appliance
by a person responsible for their safety.
Children should be supervised to ensure that they do not play
with the appliance. (For no European countries or regions)
Children should be supervised to ensure that they do not play
with the appliance.
2
Read this manual carefully before use, and retain it for future reference.Safety Instructions
PRECAUTIONS
To avoid electric shocks, fire, personal injury, or other damage,
please strictly follow the installation steps instructed by the user
manual, and make sure the fan base is assembled in the last step.
Do not connect the fan to the electrical outlet until it is fully assembled.
Transportation
Installation
Firmly hold the fan stand to avoid it from falling down and causing
personal injury.
Turn off and unplug the fan before moving it.
Using the Fan
Do not lean on or tilt the fan while it is running.
Do not shake the fan's head repeatedly so as to avoid damage to the
internal mechanism.
Immediately stop using the fan if it makes unusual sounds, gives
off bad odors, overheats, or rotates irregularly.
Power Cord
Always unplug the fan by pulling the power plug rather than the cord.
Disconnect the fan from the electrical outlet before doing
maintenance or moving it.
When the power cord is damaged, it must be replaced with a genuine
one purchased from the manufacturer or aer-sales service department.
Ensure that the fan is switched off from the supply mains
before removing the guard.
Under normal use of condition, this equipment should be kept a
separation distance of at least 20cm between the antenna and
the body of the user.
When maintaining and cleaning, disassemble the fan base before
removing other parts. Make sure you install the fan base last
when assembling the fan.
Do not strike, crush, and drop the product, or expose it to pressure.
If the supply cord is damaged, it must be replaced by a
special cord or assembly available from the manufacturer or
its service agent.
Keep the product away from water and heat sources.
Do not use this product in environments where the temperatures
and humidity are extremely high. Avoid direct sunlight.
3
Note: Illustrations of the product, accessories, and user interface in the user manual are for reference purposes only. The actual product and
functions may vary due to product enhancements.
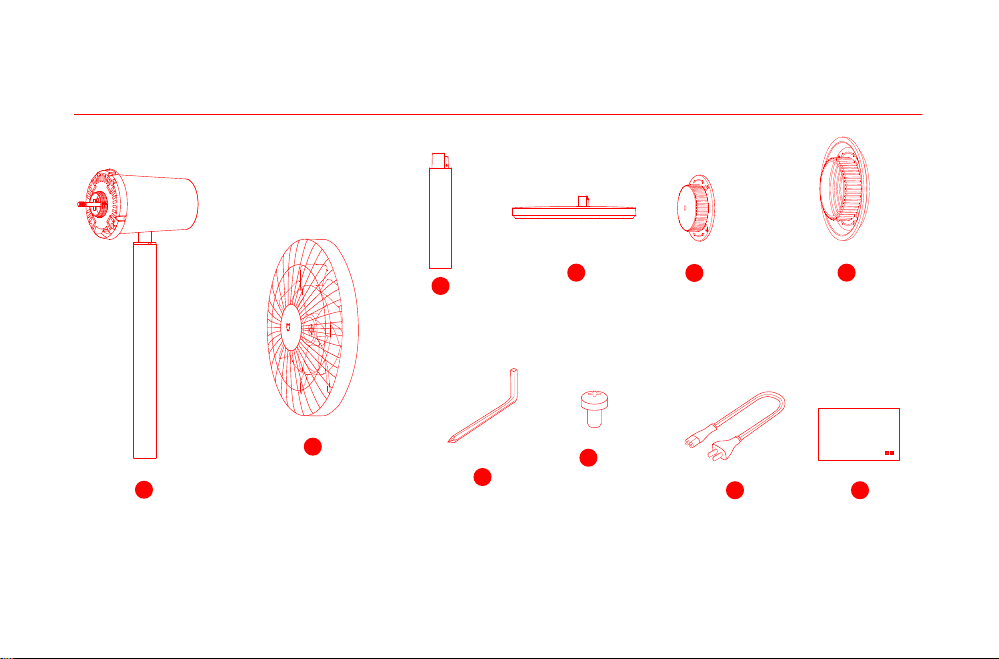
Package Contents
Fan Assembly
(front grille, fan blade assembly, rear grille)
2
4
Power Cord
9
Motor & Upper Stand
1
Base
Hex Key
7
User Manual
10
3
Lower Stand
Fan Blade Assembly Knob Rear Grille Knob
5
6
Fan Grille Screw × 1
8
Mi Smart Standing Fan 2 User Manual
1
Mi Intelligenter Standventilator 2 Benutzerhandbuch
12
Mi Smart Staande Ventilator 2 Gebruikershandleiding
66
Manual do usuário do Ventilador Inteligente de Coluna Mi 2
77
Manuel d'utilisation de Mi Smart Standing Fan 2
34
Manuale utente Mi Smart Standing Fan 2
23
Manual de usuario de Mi Smart Standing Fan 2
45
Руководство пользователя Напольного смарт-вентилятора Mi 2
56
WARRANTY NOTICE
88
AVISO DE GARANTÍA
97
ГАРАНТИЙНОЕ УВЕДОМЛЕНИЕ
99
GARANTIE
95
GARANTIEERKLÄRUNG
90
GARANTIE
102
AVISO DE GARANTIA
104
AVVISO SULLA GARANZIA
93
4
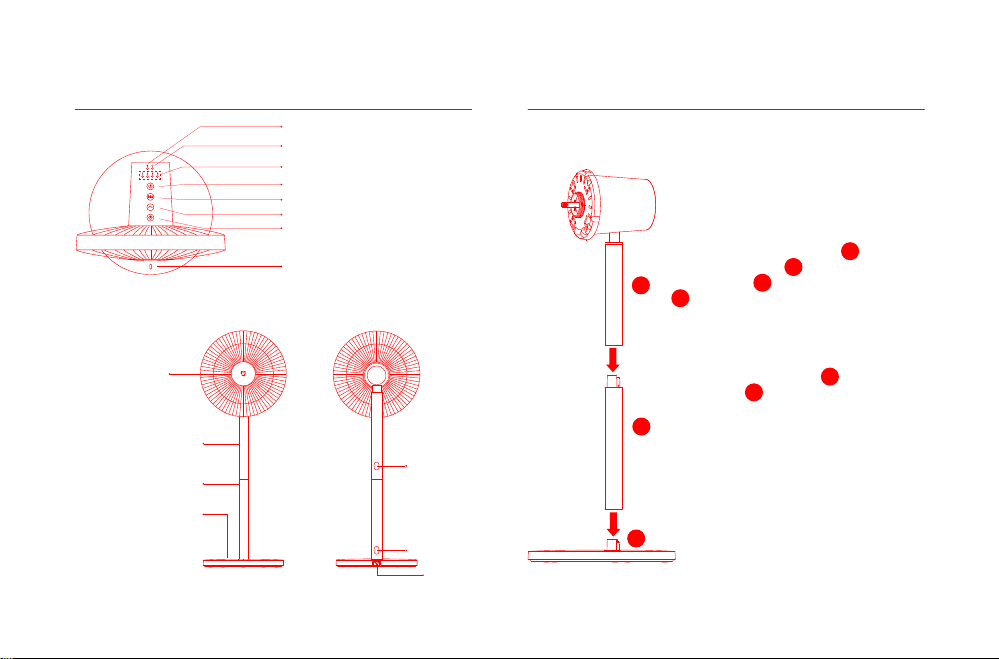
Product Overview
Motor & Upper Stand
Base
Installation
Step 1: Install the fan base
Lower Stand
Fan Assembly
Standing fan mode: Connect motor &
upper stand to the lower stand, and
then connect lower stand to the
base, as illustrated. Once you hear a
click, the parts have been installed
successfully.
4
3
1
3
1
3
4
Power Port
Release Buon
Release Buon
Note: Press the release buon to remove
the lower stand.
Table fan mode: Connect motor & upper
stand to the base. Once you hear a click,
the parts have been installed successfully.
1
4
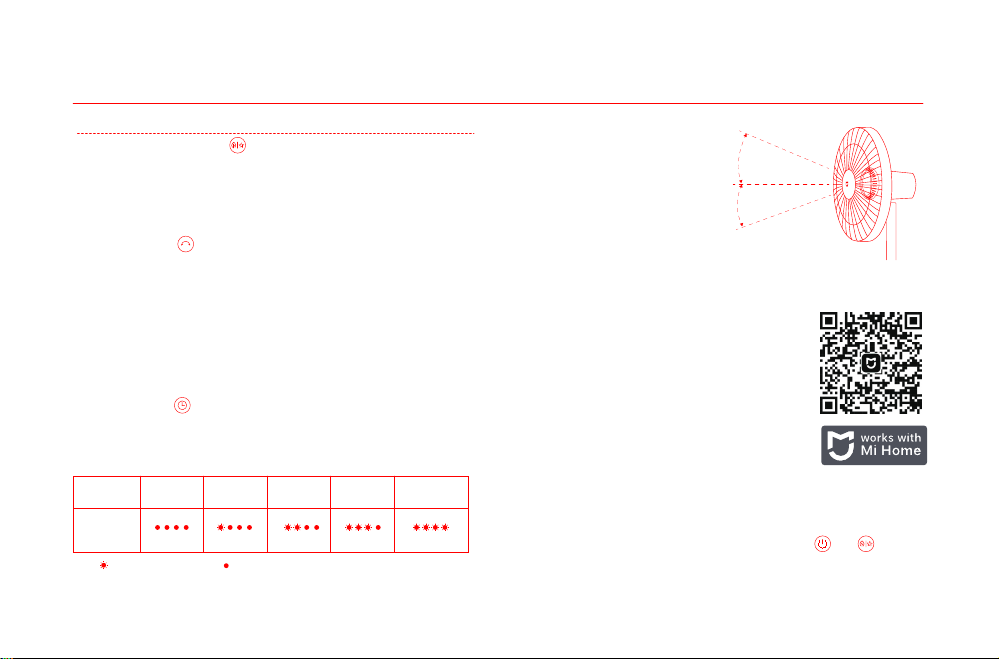
Top View
Center Point Indicator (no light effect):
Center point of the oscillation range of the fan.
On/Off Buon
Speed/Scheduled Turn-off Indicator
Wi-Fi Indicator
Natural Breeze Indicator
Speed Adjustment/Mode Switch Buon
Oscillation Buon
Scheduled Turn-off Buon
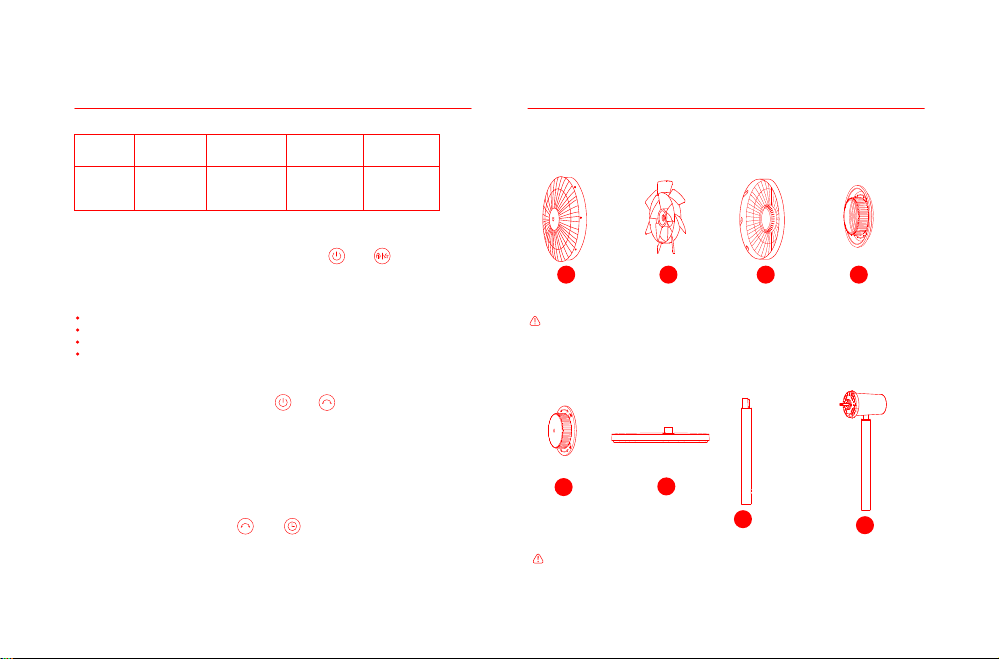
5
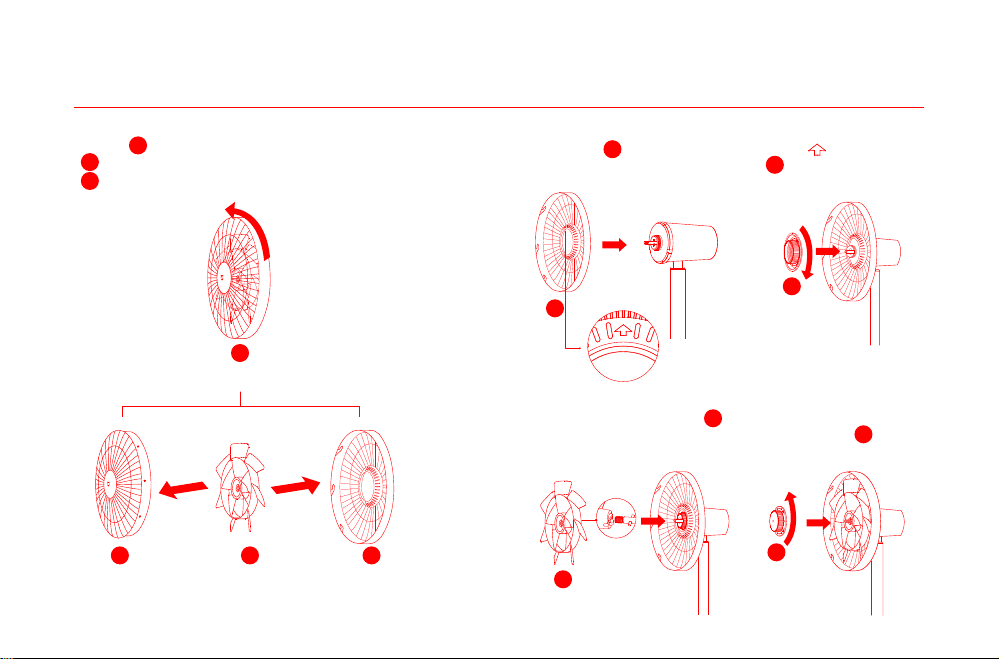
Turn the front grille counterclockwise until it separates from the
rear grille. Remove the front and rear grille, then take out the
fan blade assembly.
Installation
Step 2: Open the fan assembly
Fan Assembly
Front Grille Fan Blade Assembly
Rear Grille
2
Step 3: Install the rear grille
Step 4: Install the fan blade assembly
11
11
12
12
13
13
Install the rear grille onto the motor with " " facing
upwards, and then install and turn the rear grille knob
clockwise to firmly fix the rear grille to the sha of the motor.
6
6
13
13
Align the center hole of the fan blade assembly with the
motor's sha to install it into position, then install the fan blade
assembly knob onto the motor's sha. Turn the knob counter-
clockwise to fix the fan blade assembly to the motor's sha.
12
12
5
5
6
Insert fan grille screw into the hole at the
boom of the fan grille. Turn the screw clockwise
by using the included hex key to tighten it.
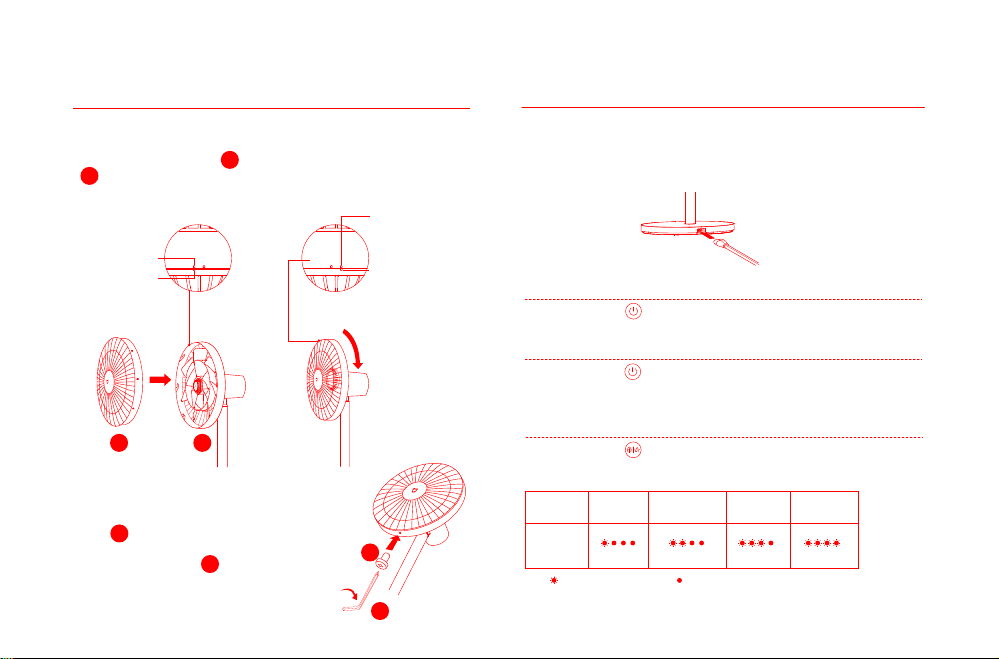
Step 6: Fasten the front grille
8
8
7
7
Installation
Step 5: Install the front grille
Connect the power cord to the power port on the base and then
plug it into an electrical outlet. When you hear a beep, the fan is
successfully connected to the power supply.
Connecting to an electrical outlet
How to Use
Press the buon to start the fan. When turned on for the first time,
the default speed is slow (1) and the mode is direct breeze.
Press the buon to stop the fan while it is running.
Turning On/Off
Turning On
Turning Off
Press the buon to adjust the speed, and the corresponding
indicators will light up (see table below). Aer the fan is turned off
and turned back on again, the speed will be the last used one.
Note: means the indicator is on; means the indicator is off.
Switching Speed/Mode
Switching Speed
Indicator
Speed Slow (1) Medium (2) Fast (3)
Turbo (4)
Align the front grille alignment mark with the rear grille le alignment
mark, and make sure the front grille is properly embedded into the
rear grille. Turn the front grille clockwise until the front grille
alignment mark aligns the rear grille right alignment mark. Make sure
the grilles are securely fastened.
Top View before
Fastening the
Front & Rear Grille
Front Grille
Alignment Mark
Front Grille Alignment Mark
Rear Grille Right
Alignment Mark
Rear Grille Le
Alignment Mark
Top View aer Fastening the Front & Rear Grille
11
11
13
13
7
How to Use
Press and hold the buon to switch between direct breeze and
natural breeze. The indicator is off while in direct breeze mode and is
on while in natural breeze mode. Aer the fan is turned off and turned
back on again, the mode will be the last used one.
Switching Mode
This product works with Mi Home/Xiaomi Home app*. Control
your device with Mi Home/Xiaomi Home app.
Scan the QR code to download and install the app.
You will be directed to the connection setup page if
the app is installed already. Or search "Mi
Home/Xiaomi Home" in the app store to download
and install it. Open Mi Home/Xiaomi Home app,
tap"+"on the upper right, and then follow prompts
to add your device.
* The app is referred to as Xiaomi Home app in
Europe (except for Russia). The name of the app
displayed on your device should be taken as the
default.
Note: The version of the app might have been updated,
please follow the instructions based on the current app
version.
Connect with the Mi Home App
Simultaneously press and hold the buons and . Once
you hear a long beep, the fan is awaiting a connection, then
you can pair it with a device via the app.
Connecting to Wi-Fi
Adjust the Airflow Direction
Gently li or push down the
fan's head or fan grille to
adjust the airflow upwards
or downwards.
23° upwards
16 °downwards
Press the buon to enable or disable oscillation. You can set the
oscillation angle range in the app. Aer the fan is turned off and turned
back on again, the oscillation seing will be the last used one. Unplug
then plug the fan in or reset the Wi-Fi connection, then turn on the fan.
It will automatically oscillate its angle if enabling the oscillation
function. The oscillation time varies depending on different angles,
please wait with patience.
Enable/Disable Oscillation
Press the buon to cycle through the scheduled turn-off times: 1
hour, 2 hours, 3 hours, 4 hours, and disabled, and the corresponding
indicator(s) will light up (see table below). Five seconds aer using the
scheduled turn-off function, the indicator(s) resume to indicate the
corresponding status of the current speed.
Scheduled Turn-off
Note: means the indicator is on; means the indicator is off.
Scheduled
Indicator
Disabled 1 hour 2 hours 3 hours 4 hours
Note: For more scheduled turn-off options (up to 8 hours), please go to the Mi Home/Xiaomi Home app.
Note: When the Wi-Fi connection is reset, the oscillation angle range will change to the default
angle of 90°.
8
To disable the function of child lock, go to the page of Mi Smart
Standing Fan 2 in the Mi Home/Xiaomi Home app, or simultaneously
press and hold the buons and until you hear a long beep.
How to Use Care & Maintenance
Washable Parts
The parts listed below can be cleaned with a so cloth or sponge
using water or neutral detergent.
Note: Stop and unplug the fan, then disassemble it and clean its parts. Aer cleaning,
make sure all parts are completely dry before installing them and using the fan again.
Avoid direct sunlight.
Front Grille Fan Blade Assembly Rear Grille
11 12
13
Not Washable Parts
The parts listed below can be wiped clean with a so, dry cloth.
Motor & Upper Stand
1
Base
4
Note: Do not rinse the parts listed above with water.
Do not use thinner, gasoline, detergent or alkaline detergent to clean any parts.
Lower Stand
3
Wi-Fi Status & Indicator Description
Wi-Fi Status
Indicator
Blinking
orange
Blinking blue Blue Orange
Awaiting
Connection
Connecting Connected Fail to Connect
Simultaneously press and hold the buons and . Once you
hear a long beep, the Wi-Fi connection has been reset successfully
and then the fan is awaiting a connection. The Wi-Fi connection
needs to be reset on the circumstances listed below:
Reseing Wi-Fi Connection
Simultaneously press the buons and when the fan is working,
then the Wi-Fi connection is disabled and the fan is turned off.
When the fan is turned on, the Wi-Fi connection is enabled automatically.
Enabling/Disabling Wi-Fi Connection
Note: Reseing the Wi-Fi connection or unplugging and plugging in the fan again can also
disable this function.
Child Lock Function
Rear Grille Knob
6
Fan Blade
Assembly Knob
5
The Mi account that the fan is paired with has been changed.
The router that the fan is connected to has been changed.
The account or password of the router that the fan is connected to has been changed.
The Mi Home/Xiaomi Home app is unable to control the fan.
9
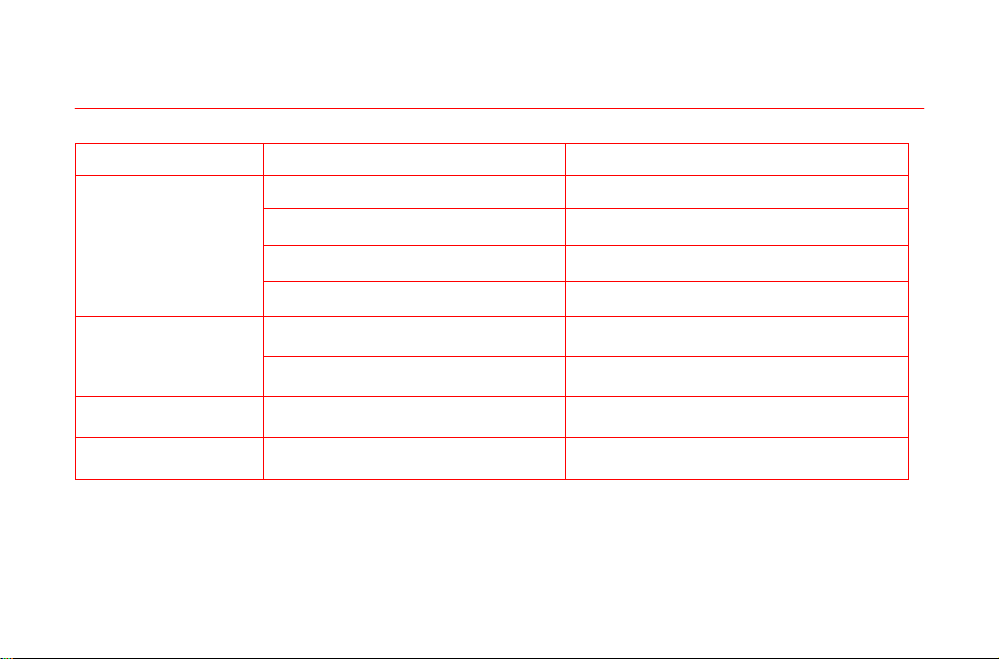
Troubleshooting
Fault
The fan doesn't work
Unable to connect
to Wi-Fi
Fan blades are stuck
The fan is not connected to the power.
The power cord is not properly
connected to the power port.
Make sure the power cord is plugged in
properly.
Connect the fan to an electrical outlet
that meets the fan's requirements.
Possible Cause Solution
The stand does not properly
connect to the fan base.
Child lock is enabled.
The fan has been offline for
more than half an hour.
Fan blades are stuck by a foreign
object.
Unplug the fan and remove the foreign
object.
The oscillation
function does not work.
The fan is under the
auto-oscillation state.
Wait for the auto-oscillation completes. It will
last for 14 seconds at most.
Reset the Wi-Fi connection.
Install the fan base with the stand correctly.
Disable the child lock function.
The Wi-Fi connection is 5 GHz.
Connect to a 2.4 GHz Wi-Fi network.
10
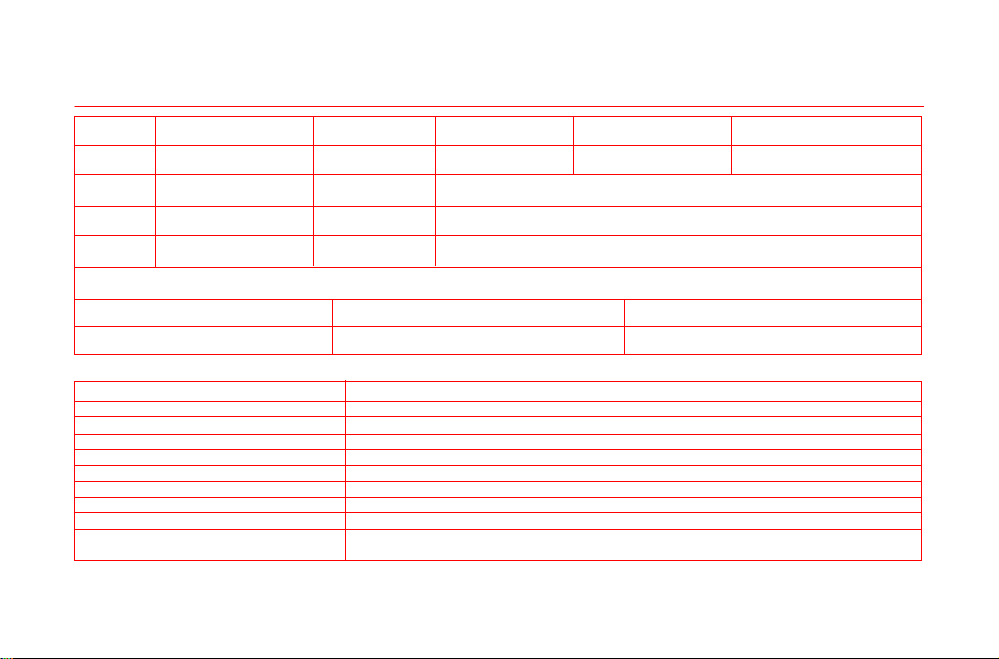
Specifications
Name
Model
Type
Color
Net Weight
Mi Smart Standing Fan 2 100-240 V~
50/60 Hz
15 W
Rated Voltage Power Cord Length
Wireless ConnectivityRated Frequency
Rated Power
Item Dimensions
Noise Emission
White 343 × 330 × 1000 mm
≤58 dB(A)
Wi-Fi IEEE 802.11 b/g/n 2.4 GHz
1.5 m
3 kg
Standing Fan
BPLDS02DM
*Radio frequency and radio transmission power
RF Specification Operation Frequency Maximum Output Power
2.4 G Wi-Fi 2412-2472 MHz <20 dBm
Product Information Requirements
Maximum fan flow rate (F)
Fan power input (P)
Service value (SV)
Maximum air velocity(c)
Measurement standard for service value
Standby power consumption (PSB)
Fan sound power level (LWA)
Seasonal electricity consumption (Q)
Contact details for obtaining more information
Test data
23.88 m³/min
13.1 W
1.82 (m³/min)/W
3.56 meters/sec
EN IEC 60879:2019
0.247 W
57.1 dB(A)
4.469 kWh/a
Zhejiang Xingyue Electric Equipment Co., Ltd.
South Side, 24th Floor, Jinpin Building, Headquarters Center, Yongkang City, Zhejiang Province, China
11
Regulatory Compliance Information
Manufactured for: Xiaomi Communications Co., Ltd. Manufactured by: Zhejiang Xingyue Electric Equipment Co., Ltd. (a Mi Ecosystem company)
Address: South Side, 24th Floor, Jinpin Building, Headquarters Center, Yongkang City, Zhejiang Province, China
For further information, please go to www.mi.com
V1.0
Hereby, Zhejiang Xingyue Electric Equipment Co., Ltd. declares that the radio equipment type BPLDS02DM is in compliance with
Directive 2014/53/EU. The full text of the EU declaration of conformity is available at the following internet
address: hp://www.mi.com/global/service/support/declaration.html
All products bearing this symbol are waste electrical and electronic equipment (WEEE as in directive 2012/19/EU) which should not
be mixed with unsorted household waste. Instead, you should protect human health and the environment by handing over your
waste equipment to a designated collection point for the recycling of waste electrical and electronic equipment, appointed by the
government or local authorities. Correct disposal and recycling will help prevent potential negative consequences to the environ-
ment and human health. Please contact the installer or local authorities for more information about the location as well as terms
and conditions of such collection points.
For detailed e-manual, please go to www.mi.com/global/service/userguide