Loading ...
Loading ...
Loading ...
Installation instructions
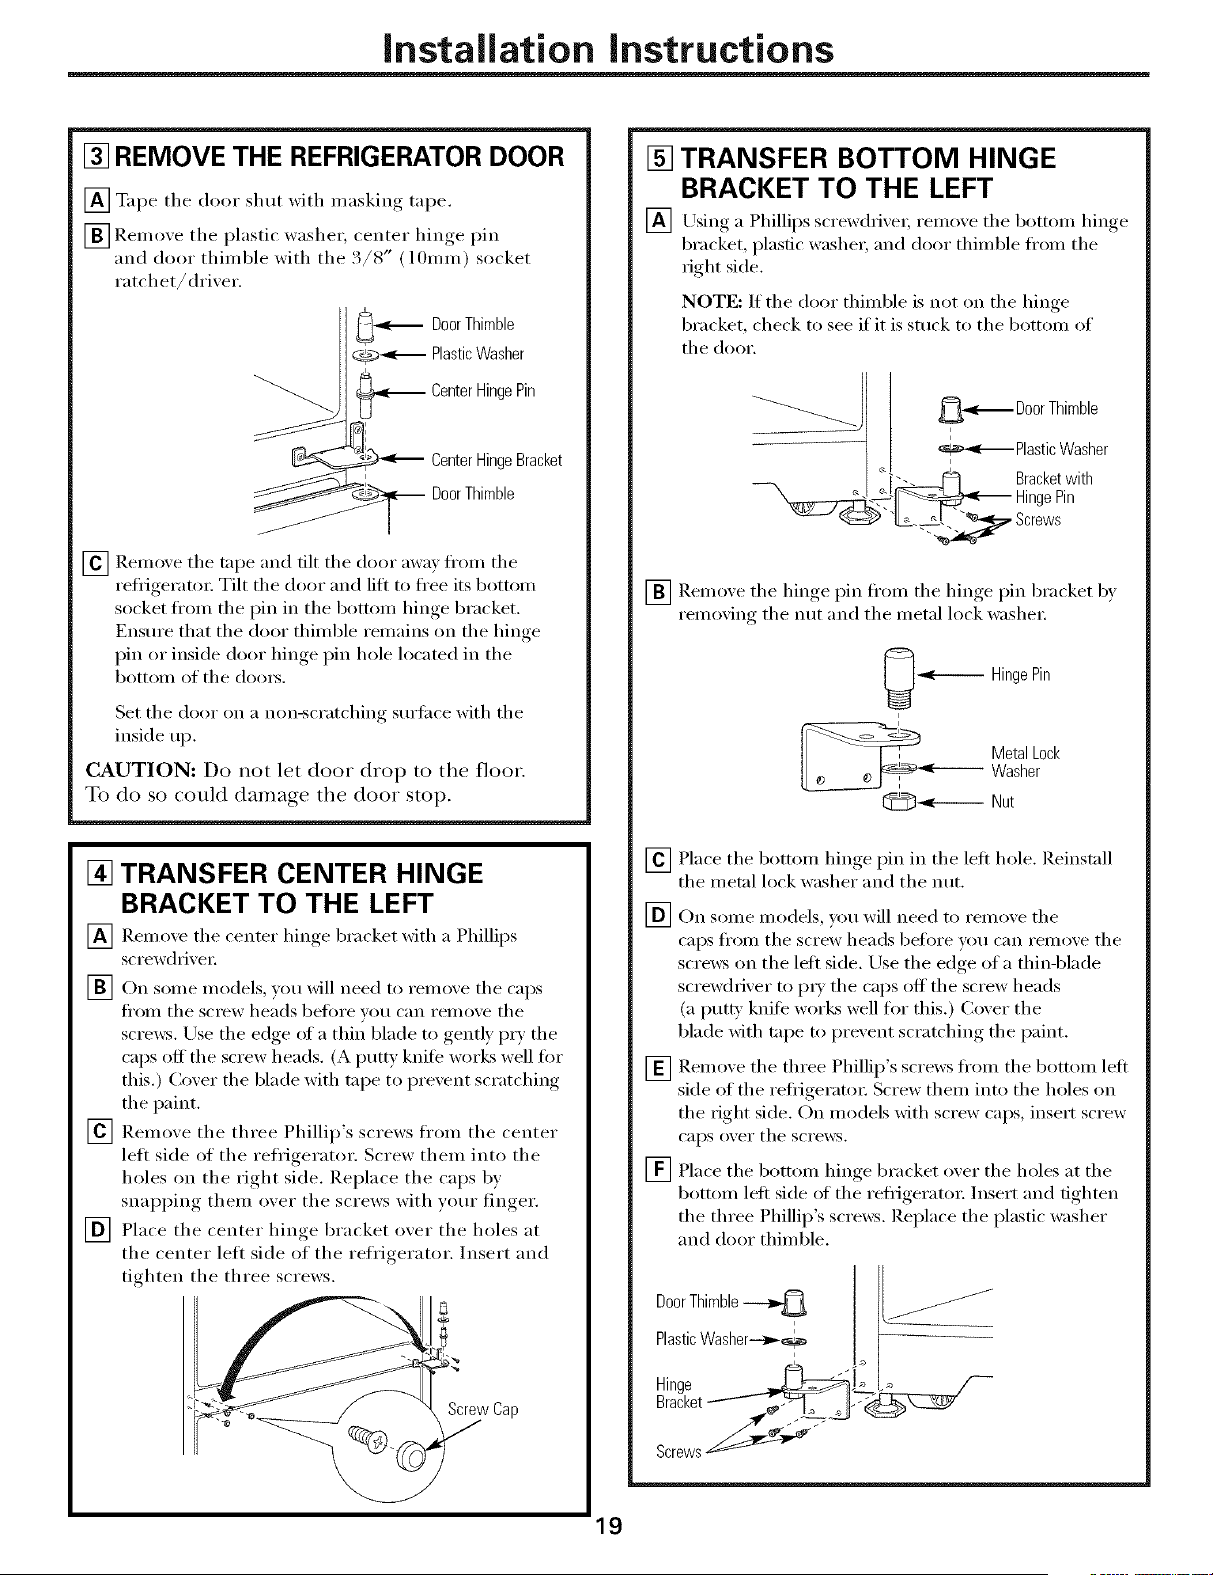
[] REMOVE THE REFRIGERATOR DOOR
[] Tape the door shut with i//asking tape.
[] Remoxe the plastic washer, center hinge pin
tt
and door thimble with tile ./8 (l(hmn) socket
ratchet/drixer.
._ DoorThimble
@_-_ PlasticWasher
_ CenterHingePin
>_'_ CenterHingeBracket
DoorThimble
[] Remove tile tape and tilt tile door away fl'om tile
reflJgeratot: Tilt the door and lift to flee its bottotn
socket ti'om the pin in the bottom hinge bracket.
Ensure that the door thimble remains on the hinge
pin or inside door hinge pin hole located in the
bottom of the (loot_.
Set tile door on a non-scratching surii_ce with tile
inside up.
CAUTION: Do not let door drop to the floor.
To do so could damage the door stop.
[] TRANSFER CENTER HINGE
BRACKET TO THE LEFT
[] Remove tile center hinge bracket with a Phillips
screwdriver:
[] On some models, you will need to remove tile caps
ti'om the screw heads bet0re wm can remove the
screws. Use tile edge of a thin blade to gently pry tile
caps offthe screw heads. (A putty knife works well fin"
this,) Cover the blade with tape to prevent scratching
tile paint.
[] Remove the three Phillip's screws from the center
left side of tile refrigerator. Screw them into tile
holes on the right side, Replace the caps by
snapping them over the screws with yore" finger,
[] Place the center hinge bracket over the holes at
tile center left side of tile refl'igerator. Insert and
tighten the three screws.
Screw Cap
[] TRANSFER BOTTOM HINGE
BRACKET TO THE LEFT
[] Using a Phillips screw(hirer; remove tile bottom hinge
bracket, plastic washer, and door thimble fl'om tile
right side.
NOTE: If the door thimble is not on the hinge
bracket, check to see if it is stuck to tile bottom of
tile door.
_. _-_ PlasticWasher
_-_ DoorThimble
___ !_ _ri_Cg_inWith
Screws
[] Remove tile hinge pin fl'om tile hinge pin bracket bx
remo'dw* tile nttt and tile metal lock washer:
[_------- HingePin
Metal Lock' Washer
@_e----- Nut
[]
[]
[]
[]
Place tile bottom hinge pin in tile left hole. Reinstall
the metal lock washer and the nut.
On some models, you will need to remove tile
caps fl'om tile screw heads before wm can remove tile
scre_:s on the left side. Use the edge of a thin-blade
screwdriver to i)ty the caps off the screw heads
(a put_' knifi _works well fin" this.) Cover tile
blade with tape to prevent scratching tile paint.
Remove the three Phillip's screws fl'om the bottom left
side of the refl_igerator Screw them into the holes on
the right side. On models with screw caps, insert screw
caps over" tile sct'ews.
Place tile bottom hinge bracket over tile holes at tile
bottom left side ot the refl_igeratot: Insert and tighten
the three Phillip's scre_:s. Replace the plastic washer
and door thimble.
DoorThimble-_._
PlasticWasher_,_,
Screws_2;_ .j"
Loading ...
Loading ...
Loading ...