SMP ATV2
EN User Manual Android TV box
CZ
Uživatelská příručka Android TV box
SK
Používateľská príručka Android TV box
HU
Felhasználói kézikönyv Android TV box
PL
Podręcznik użytkownika Android TV box


EN 1
EN
Table of contents
Copyright © 2022, Fast ČR, a. s. Revision 06/2022
Table of contents
Safety Instructions ................................................................................2
Introduction.............................................................................................4
Declaration .............................................................................................. 4
Supply content ......................................................................................4
1. General instructions ..................................................................5
2. Device description .....................................................................6
3. Input peripheral devices ...........................................................8
4. Remote control ...........................................................................8
5. Wiring diagram ......................................................................... 10
6. Putting into operation and using ..........................................13
6.1 Putting into operation ...................................................13
6.2 Advanced settings ........................................................ 16
6.3 Turning the unit on and off .........................................17
6.4 Applications .....................................................................17
6.5 Kodi ..................................................................................18
6.6 Bluetooth ....................................................................... 20
6.7 HDMI CEC ..................................................................... 20
6.8 Voice control ...................................................................21
6.9 Customizing the home screen channels
and sorting the applications .......................................21
7. Factory settings ........................................................................22
8. Troubleshooting ........................................................................23
9. Specifications ............................................................................25

2 EN
EN
Copyright © 2022, Fast ČR, a. s. Revision 06/2022
Safety Instructions
Safety Instructions
This product has been designed with the utmost safety in mind.
However, incorrect use may lead to electric shock or fire. This is
why users should observe the following instructions when using
this device.
This device uses asemiconductor unit and contains no user
serviceable parts. Do not disassemble this device, otherwise you
are exposed to the risk of electric shock. If any damage to this
product occurs, please have this product repaired by aqualified
service technician.
Power source
Power supply of this unit must be match the serial plate data.
Heat source
Keep this unit out of heat sources like stove or direct sunlight.
Cleaning
Prior to cleaning, please disconnect power first. For cleaning, don’t
use liquid detergents or caustic liquids - just clean the unit with
asoft cloth.
Heavy objects
Do not place heavy objects on the unit, otherwise damage might
occur.
Connecting other devices
Before connecting other devices to this unit, please make sure to
disconnect power. Otherwise damage to the unit or personal injury
might occur.

EN 3
EN
Safety Instructions
Copyright © 2022, Fast ČR, a. s. Revision 06/2022
Faults to be repaired
If any of the following problems occurs, please disconnect power to
the unit and contact aqualified service technician.
A. Power cord or plug is damaged.
B. Liquids or other foreign objects have penetrated inside the
product.
C. If the unit does not work even if it’sbeing operated according
to the instructions, don’t press any buttons other than those
described in these instructions. Otherwise, damage to this unit
may occur along with amore demanding repair.
D. This unit has fallen on the ground from abig height.
E. Burns can be smelled from the product inside.
Maintenance
If you don’t have enough technical knowledge necessary to
maintain this unit, don’t attempt to repair it by yourself. By
removing the cover, you are exposed to arisk of electric shock.
If needed, please contact aqualified service technician.
Replacement of parts
If you need to replace any part of this unit, ask your service
technician to make areplacement for equal spare part models.
If other spare part models are used for replacement, serious
damage, electric shock or shortening the unit’slifetime may occur.
Safety check
When done with the maintenance, ask your service technician
to perform an on-site safety check to make sure that the
unit’soperation is safe.
Note:
Before using this product, read these instructions carefully and
keep it well for future use.
4 EN
EN
Copyright © 2022, Fast ČR, a. s. Revision 06/2022
Introduction
Introduction
Thank you for choosing our product. In this user’smanual you will
find the information necessary to operate your unit easily. Please
read it carefully before first use and save for future reference.
Declaration
We have tried to obtain the most up-to-date information regarding
this product. No warranty of this user’smanual content is provided
and we do not assume any implied warranties. The information
provided in this manual are mere instructions to operate the unit.
We reserve the right to make corrections, changes and translations
in this user'smanual without prior notice. For this reason, we
recommend that you regularly visit our website and acquire the
latest information.
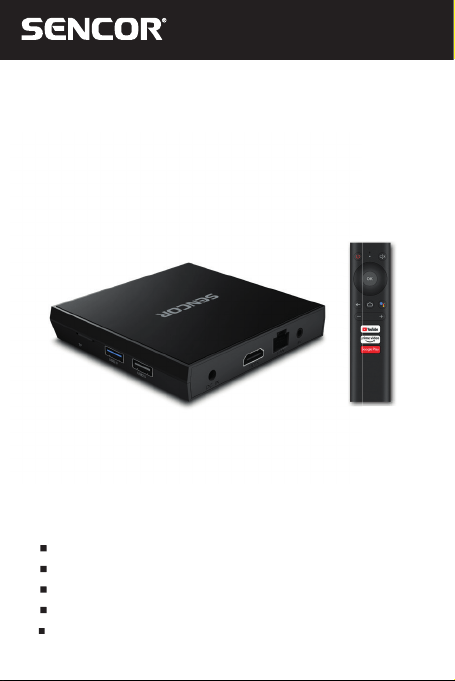
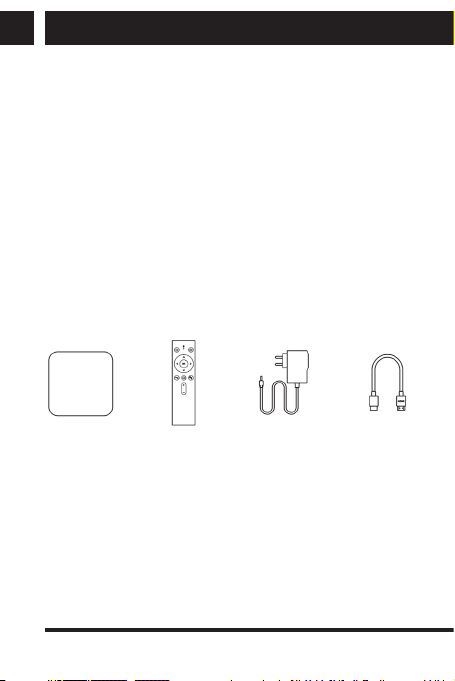
Supply content
Box
1 pc - TV Box
1 pc - Remote control
1 pc - Power adapter
1 pc - HDMI cable
1 pc - User’smanual

EN 5
EN
General instructions
Copyright © 2022, Fast ČR, a. s. Revision 06/2022
1. General instructions
USB connector, notes on using the unit
USB memory device must be inserted directly into the unit.
To prevent data transmission failure or interference, do not use
USB extension cables. If you want to use external hard discs or
other portable storage device, please connect them before turning
the unit on. Connecting when the unit is powered on may lead
to restarting the unit and losing unsaved data or cause playback
interruption.
Electrostatic discharges may cause the unit to malfunction. In such
an event, the user must restart the unit.
Before using aUSB memory device, test its ability to communicate
with the unit, its data reading and writing speed.
To achieve maximum reading speed we recommend that you
keep disk space defragmented. Use FAT32 or NTFS file system,
single partition and without protection. If reading and writing on
the USB flash disk is discontinuous, undesirable effects may occur
such as partial image loss (block noise) or complete image loss,
audio defects, and in extreme cases the operation will be stopped.
Unexpected behaviour of the connected memory device, or the
presence of viruses or other damaging software may cause the
functions of the appliance to stop working, necessitating arestart.
The USB connector is the standard type and is not able to power
aUSB device with ahigh power usage (e.g. hard disk drives HDD).
Use devices with independent power supplies and power them
from their own power supplies.
The unit has been designed to achieve maximum compatibility
with memory devices. With respect to the variety of devices on
the market, it is not possible to guarantee compatibility with every
USB device. In the event of difficulties, try formatting the memory
device directly in the appliance. If problems persist, use adifferent
memory device.

6 EN
EN
Copyright © 2022, Fast ČR, a. s. Revision 06/2022
Device description
2. Device description
EN 7
EN
Device description
Copyright © 2022, Fast ČR, a. s. Revision 06/2022
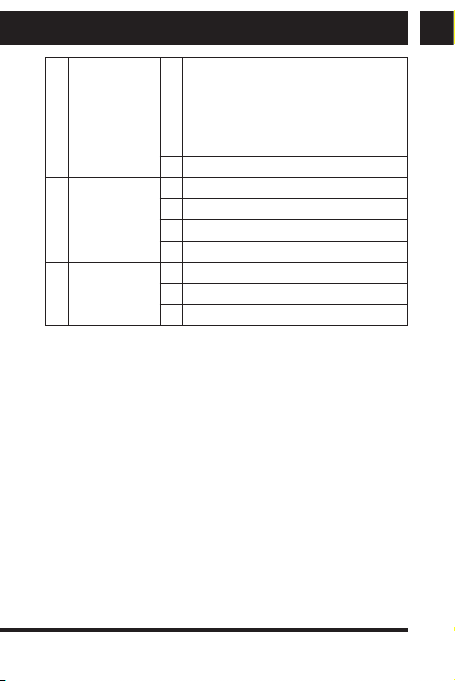
A Front side 1 Status LED
- red indication (sleep)
- blue indication (power on)
- multi-colour indication (active voice
control, changes in the device
settings)
2 IR remote control receiver
B Rear side 3 5V DC power socket
4 HDMI port
5 Ethernet RJ 45
6 Audio and analogue output
C Right side 7 Memory card slot
8 USB A3.0
9 USB A2.0
8 EN
EN
Copyright © 2022, Fast ČR, a. s. Revision 06/2022
Input peripheral devices
3. Input peripheral devices
USB
The device supports portable hard drives and USB storages which
can be connected via USB 2.0 or USB 3.0. To facilitate the device
control, you can use PC keyboards and mice without advanced
functions such as special game button, sound control keys etc.
Micro SD card
Next to the USB ports, there is aslot to insert amicro SD card of
up to 64 GB. Insert the card into the unit with the contacts pointing
up.
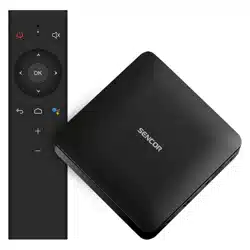
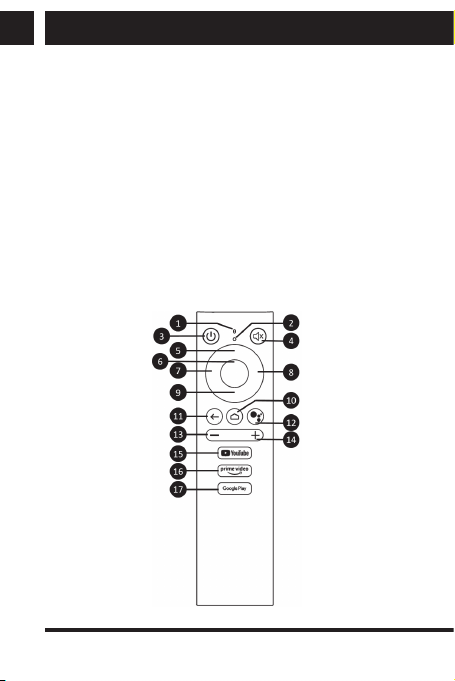
4. Remote control
Buttons and their functions
EN 9
EN
Remote control
Copyright © 2022, Fast ČR, a. s. Revision 06/2022
1 Microphone
2 LED indicator
3 Power on/off button (sleep)
4 Mute
5 Directional navigation key - up
6 Central confirmation “OK” button or playback,
Play/Pause button
7 Directional navigation key - left
8 Directional navigation key - right
9 Directional navigation key - down
10 Return to the home screen
11 Back
12 Voice control
13 Decrease volume
14 Increase volume
15 Quick Youtube selection
16 Prime video quick selection
17 Google Play quick selection
Inserting the batteries: the remote control requires 2 AAA type
batteries. Insert the batteries as shown on the drawing under the
remote control cover.
10 EN
EN
Copyright © 2022, Fast ČR, a. s. Revision 06/2022
Wiring diagram
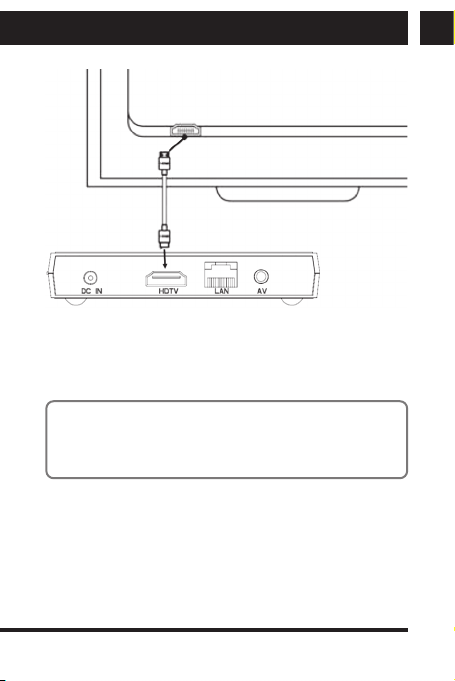
5. Wiring diagram
Using the HDMI connection
HDMI is aversatile digital connection standard for awide range
of picture resolutions in both interlaced and non-interlaced mode,
combined with audio transmission, all in asingle connector.
1) Connect your HDMI cable to the unit output your TV input.
2) Set the unit’sTV output to the highest resolution your TV
supports. This will allow you to make the most of the picture
display.
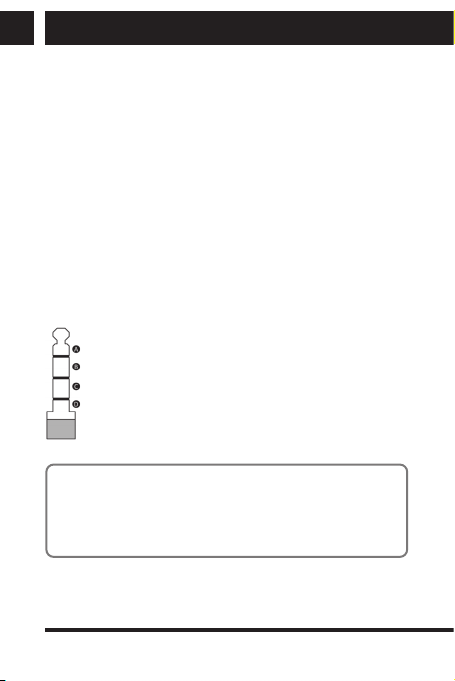
Using the A/V(CVBS) connection
If your TV is not equipped with aHDMI output, you can connect
your TV via an AV cable. Connect the AV cable to the unit’soutput
(both audio and video) and your TV input. This output allows
amaximum resolution of 576p to be transmitted.
A– audio R; B – audio L; C – video; D- common ground
Note:
The CVBS video output is only active if no HDMI cable is
connected. The connection cable is not supplied. To ensure
proper function, please follow the connection according to the
drawing.
EN 11
EN
Wiring diagram
Copyright © 2022, Fast ČR, a. s. Revision 06/2022
HDMI
HDMI
cable
Connecting to alocal network
You can connect the unit to alocal router using the UTP cable. By
default, the unit is set to obtain IP addresses automatically using
DHCP.
Note:
It is required that both devices should be “linked together” to
the highest speed available. This will guarantee stable data
transmission.

12 EN
EN
Copyright © 2022, Fast ČR, a. s. Revision 06/2022
Wiring diagram
Router
Power cord

EN 13
EN
Putting into operation and using
Copyright © 2022, Fast ČR, a. s. Revision 06/2022
6. Putting into operation and using
The supplied remote control is designed to operate the unit.
To confirm the selection, the remote controller central “OK” button
is usually used.
In some applications, you can also use connected mouse and
keyboard. However, using them for basic unit operation is not
recommended.
6.1 Putting into operation
1) Leave the unit turned off and make connections as needed -
especially connecting to your TV and internet.
2) On the connected TV, select the input to which your unit’soutput
is connected. Note: The HDMI output takes priority over the
Video output (CVBS). If the HDMI output is connected to
your TV, the Video output (CVBS) is disabled. To enable,
it’snecessary to unplug the HDMI cable from the unit’soutput.
3) Connect the unit to apower outlet using apower supply adapter.
The unit will turn on automatically.
4) After initial connection, basic function setup wizard will launch.
The wizard start-up may take several minutes.
5) Browse through the setup wizard and set each of your device.
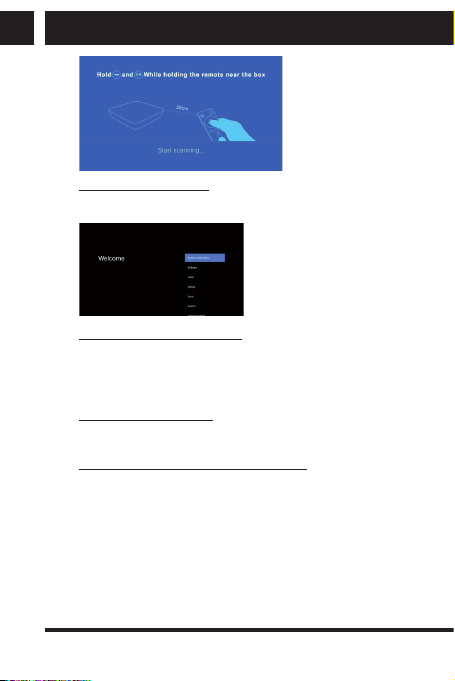
a. Pairing the remote control to adevice: The device screen will
show pairing the remote control to adevice. It’snecessary to
observe amaximum distance of 20cm between the device
and the remote control in the direct line of sight. Then,
hold down the volume down button (“-”) and the central
“OK” button simultaneously for about 10 seconds. Once
successfully paired, the menu will proceed to the next step
- language selection.
14 EN
EN
Copyright © 2022, Fast ČR, a. s. Revision 06/2022
Putting into operation and using
b. User interface language: Using the remote control
arrows, select the required language and confirm
the selection by pressing the central “OK” button
.
c. Setup using an Android phone: If you have amobile phone
running Android system with an active Google user account
connected to the same LAN network, you can perform
asimplified setting of your device using your mobile phone.
You can skip this selection.
d. Selecting aWiFi network: If no Ethernet cable is connected
to your device, please select and connect to arequired WiFi
network.
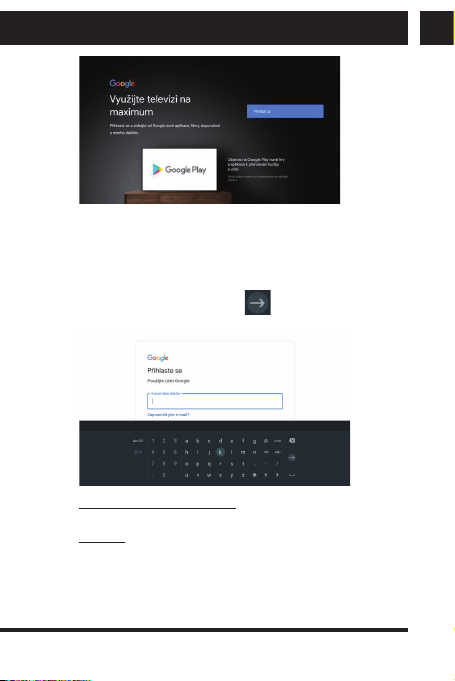
e. Logging in the device to aGoogle account: The device
must be logged in to an existing or new Google
account. You can perform the setup in several different
ways (using yout phone, PC or remote control).
EN 15
EN
Putting into operation and using
Copyright © 2022, Fast ČR, a. s. Revision 06/2022
The option of logging in with aremote control allows you
to enter your Google account login and password via the
onscreen keyboard, navigating with the remote control
arrows (up, down, right, left). Always confirm the selected
character by pressing “OK”. To confirm the entered login (or
password), press the keyboard
character.
f. Google Terms and Conditions: Read and confirm your
acceptance of the Google Terms and Conditions.
g. Position: You can enable the collection of your device
position data on your device.
16 EN
EN
Copyright © 2022, Fast ČR, a. s. Revision 06/2022
Putting into operation and using
6) When the setup wizard is finished, the user interface main
screen will appear (Android system) with available applications.
You can manage and add more applications using the Android
(Play) store.
Caution:
The device is designed to play media and only applications
supported by AndroidTV can be installed. Therefore, not all
applications commonly supported by mobile phones can be
installed in this device.
Tip:
When paired to/sharing with another devices, this unit is
displayed as “KM6”.
6.2 Advanced settings
In addition to the basic setting made in the Setup wizard, you can
also make detailed setup of Android properties in Android’sown
settings. This is available under the Settings option. Android system
setting is available on the “More Settings” tab. All the setup wizard
options are also available in the advanced settings.
Caution:
Some device setting options are available only in devices that
are equipped with the relevant functions. The AndroidTV system
is aglobal system for awide range of devices. Before using
afunction, make sure that agiven option is available in this
device.
EN 17
EN
Putting into operation and using
Copyright © 2022, Fast ČR, a. s. Revision 06/2022
6.3 Turning the unit on and off
We recommend to define the “Setting the off button” in Settings as
the function to turn the unit completely off. All the applications will
be properly stopped and it will be necessary to launch them again
following the start-up.
On each start-up, the unit’ssystem will boot from the very start,
thus being more time demanding but providing asmoother unit
operation.
Hold down the power button on the remote control to display
aselection of functions - Shutdown, Restart and Screenshot.
6.4 Applications
Installing applications
Download the third-party FX app from Google Play and follow the
steps below. Insert your USB/SD storage from which you want to
install your applications in the .apk format in the device. In the
device menu, select the preinstalled FX application and confirm
the source (such as Media card when amemory media is inserted).
Select arequired application and confirm the selection by pressing
“OK”on the remote control.
Caution:
Due to the wide range of applications on the market, the
compatibility of all applications with this unit is not guaranteed.
It may happen that your application will malfunction and/or be
invisible or unstable once installed.
Uninstalling applications
To simply uninstall your installed applications, go to Settings/
Application in the Show all applications section. Select the required
application and press Uninstall.
18 EN
EN
Copyright © 2022, Fast ČR, a. s. Revision 06/2022
Putting into operation and using
Caution:
System applications are firmly preset in the system and cannot
be removed/uninstalled.
Third party applications
The unit is equipped with third-party applications such as Stream.
cz, Fairy tales, FX, Kodi etc.
Caution:
Operating these applications may differ according to an
application version. We recommend to control with standard
keyboard and mouse. Online videos that can be played back
using third-party applications don’t have to meet the playback
video resolution requirements.
6.5 Kodi
The Kodi application offering many multimedia features is pre-
installed in the unit you purchased. The Kodi player can work with
the internal memory as well as network hard drives. We have
prepared aclean Kodi environment for you that you can enhance
to your taste.
Before launching the Kodi player, please make sure that your
device is connected to alocal network with the internet.
First launching will be in English, then you can change the
language settings as needed in: Kodi->
System/Interface/
Regional/Language
During each launching, the IP TV transmissions and libraries you
have preset in the application are verified first. During this process,
the application may temporarily slow down or even pause in some
cases. Should the application be stopped, this is no malfunction.
Once the application has stopped, launch it again and wait until
completely uploaded.
EN 19
EN
Putting into operation and using
Copyright © 2022, Fast ČR, a. s. Revision 06/2022
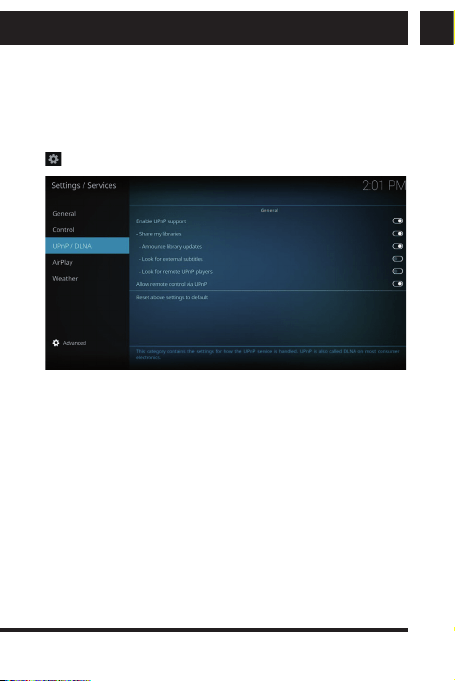
Setting the DLNA server
In order to fully use the DLNA server, it’srequired that your local
network should be setup and the function parameters in the
application should be completed correctly. To perform the DLNA
configuration in the Kodi application, please go to:
System/ Settings/ Services/ UPnP/DLNA //Share my libraries
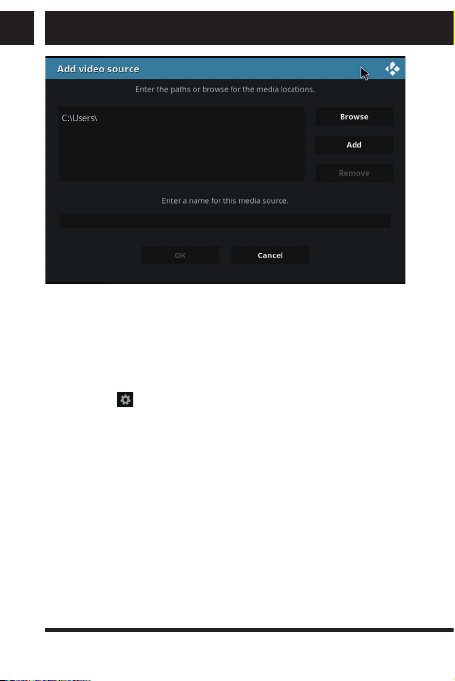
To add multimedia records, go to the main menu: Music videos/
Files/Add videos. If you have any records on the USB/SD storage,
select <None> Browse / Root filesystem/Storage (select your
connected storage here). You storage may be indicated by alabel
such as C0E1-4F85. Once the folder with records is selected, just
confirm your selection by pressing OK.
20 EN
EN
Copyright © 2022, Fast ČR, a. s. Revision 06/2022
Putting into operation and using
To add multimedia records from network storages, use similar
method as for the USB/SD storages. It’simportant that correct path
to multimedia records should always be set and astable network
connection should be provided.
Installing the plugins
First, install your Repository (it contains links to plugins). To import,
please go to:
System/Settings/Add-ons/Install from zip file. Or,
install individual plugins supplied by you.
6.6 Bluetooth
In the Device menu under “Remote control and accessories”, you
can connect accessories the use Bluetooth transmission (such as
headphones). While searching for available Bluetooth devices,
Mediabox will be shown with the following name: “KM6”.
6.7 HDMI CEC
The device can be connected to aTV set to use the advanced
features for simultaneous turning the units on/off with one common
remote.
EN 21
EN
Putting into operation and using
Copyright © 2022, Fast ČR, a. s. Revision 06/2022
Caution:
Due to the wide range of TV sets on the market, the
compatibility of all TV sets with this unit is not guaranteed.
6.8 Voice control
For some commands and searching, you can use voice control to
quickly check weather in your city (command: “Tábor weather”)
of find videos (command: “video Sencor”). Press the Voice control
key on the remote, then say avoice command in remote control
microphone.
Tip:
To ensure correct function, please speak clearly and slowly,
ideally at ashort and direct distance from the microphone.
6.9 Customizing the home screen channels
and sorting the applications
The top of the home screen is reserved for installed applications. To
adjust the list of applications, use the “+” icon in the icon row end.
To customize the bottom of the home screen, use the “Customize
channels” selection located under the displayed video tips. Using
this selection, you can enable/disable the display of each channel
on the desktop to your taste.
Application sorting
To open, move, delete from Favorites, Information, or uninstall
applications, follow these steps. From the main screen, enter the
application menu, select the application you want to work with, then
hold down OK on the remote control. Amenu of available options
appears.

22 EN
EN
Copyright © 2022, Fast ČR, a. s. Revision 06/2022
Factory settings
7. Factory settings
If your unit has been set to an undesired state which prevents
normal use, the easiest way to restore the operation is to reset the
unit to its factory settings.
First, make sure you have all your required files backed up outside
the unit. This function will reset all content including the unit setup
to the default state and this action cannot be undone. Select
Settings in menu, then select “Device preferences” tab and press
“Restore”.
EN 23
EN
Troubleshooting
Copyright © 2022, Fast ČR, a. s. Revision 06/2022
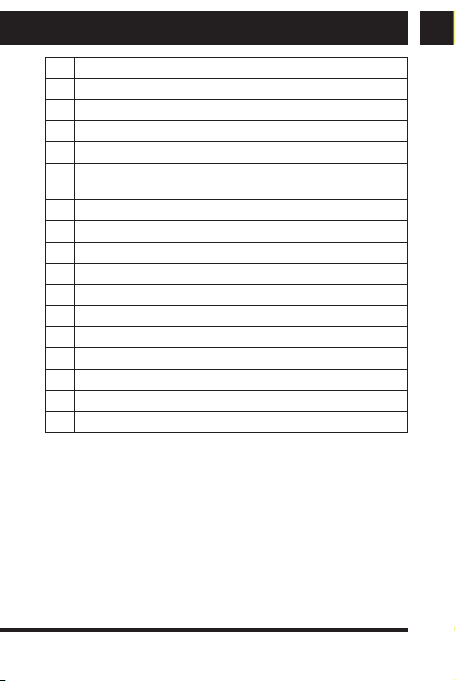
8. Troubleshooting
Caution:
Under no circumstances attempt to repair the device yourself –
this will constitute abreach of warranty conditions. Do not open
the device as there is arisk of injury by electric shock. If the
device malfunctions, first check the following list of problems
and their solutions. If you are not able to remedy the fault with
the help of the following tips, contact your vendor.
Problem Solution
No signal in the
TV set
1) Check if the HDMI or AV cable is
connected correctly.
2) Check if correct input source has been
selected for your TV.
Device cannot be
turned on
1) Check if the power plug is fully connected
to your unit’sDC socket.
2) Check if the power supply is stable.
The unit cannot
be connected to
network
1) Make sure that the network cable is
connected and the Ethernet connection
works correctly.
2) Make sure that the Wi-Fi network is
connected and the encrypted network
safety key is correct.
3) Make sure you have selected correct IP
address settings.
4) If the Wi-Fi network is unavailable, check
it the Ethernet function is disabled.

24 EN
EN
Copyright © 2022, Fast ČR, a. s. Revision 06/2022
Troubleshooting
Problem Solution
The remote
control doesn't
respond
1) Make sure the batteries are charged and
correctly inserted.
2) Make sure the distance between the
remote controller and the unit does not
exceed 8 meters.
Some TVs cannot
display full image
1) Set the display image position on your
device. Settings -> Advanced settings ->
Display -> Display position

EN 25
EN
Specifications
Copyright © 2022, Fast ČR, a. s. Revision 06/2022
9. Specifications
Android certified TV box - Android 10
Popular KODI multimedia player
4K movies playback
Remote control with voice control
HDR 10+, HDR 10, HLG HDR support
Connectivity:
Dual-band WiFi 2.4/5GHz (802.11 a/b/g/n/ac)
DLNA Entertainment Sharing/DLNA server
Chromecast
Bluetooth 4.2
Chipset and memory:
CPU: AmlogicS905X4 Quad Core ARM A55
GPU: Penta Core ARM-G31 MP2
RAM: 2 GB DDRIII
Flash memory: EMMC 16 GB
Integrated applications:
Youtube, Spotify, Kodi Player, HBO MAX and more applications in
the Google Play Store
Google Play Store, file manager, movie player, music, games and
more...
Televize Seznam, Lepší.TV, SledováníTV, Kuki, Voyo, Mall TV,
T-Mobile TV GO, DVTV, Skylink
Supported audio-video formats:
Decoding
HD MPEG1/2/4, H.265/H.264/HEVC, WMV, AV1 MP-10, VP9
Profile-2, HD AVC/VC-1, RM/RMVB, Xvid, RealVideo8/9/10
Supported video formats:
MKV/WMC/MPG/MPEG/DAT/AVI/MOV/ISO/MP4/RM
Supported audio files:
MP3/AAC/WMA/RM/FLAC/OGG
26 EN
EN
Copyright © 2022, Fast ČR, a. s. Revision 06/2022
Specifications
Supported image files:
HD JPEG/BMP/GIF/PNG/TIFF
Subtitle editing options (size, colour, position, synchronization,
background colour)
Supported file systems:
NTFS, FAT32, exFAT
Connection:
1x HDMI 2.1 (resolution up to 2160P 60fps HDR)
2x USB (1x USB 3.0 High Speed a1x USB 2.0, UDisk or USB
HDD support)
1 × Micro SDHC slot (support up to 64GB)
1x 3.5mm Jack AV output
1x RJ45 Ethernet port (10/100Mbit)
Others:
Power supply: 5V DC power supply / 2A
Dimensions: 100 × 98 × 20mm
Weight: 110 g
Accessories: Voice and IR remote control, battery, power adapter,
HDMI cable, user’smanual
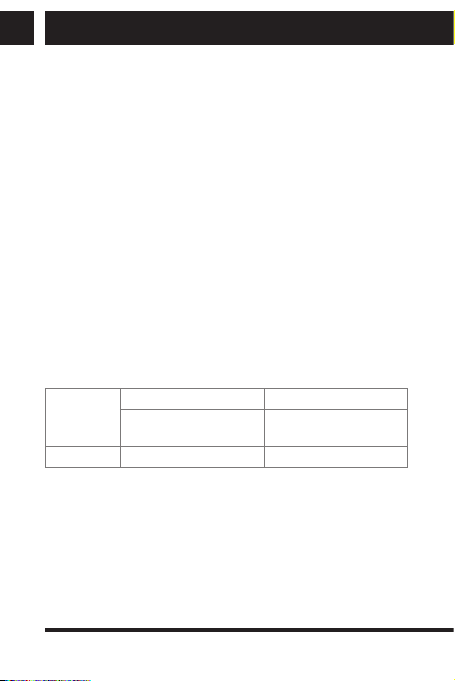
Bluetooth
Version 4.2
Maximum Transmitter
Power
2.4835GHz
WiFi Broadcast band 2.4GHz, 5GHz
EN 27
EN
Specifications
Copyright © 2022, Fast ČR, a. s. Revision 06/2022
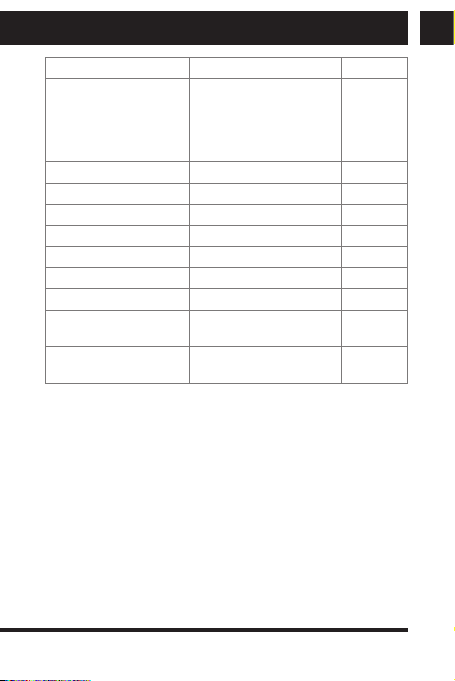
Value and precision Unit
Manufacturer’sname or
trade mark, commercial
registration number and
address
SHENZHEN TEKA
TECHNOLOGY CO., LTD.
Add:No,21 XiFu
Road,SongGang,Baoan
District,ShenZen,China
-
Model identifier TEKA012-0502000EU -
Input voltage 100-240 V
Input AC frequency 50/60 Hz
Output voltage 5.0 V
Output current 2.0 A
Output power 10 W
Average active efficiency 78 %
Efficiency at low load
(10 %)
80 %
No-load power
consumption
0.08 W
28 EN
EN
Copyright © 2022, Fast ČR, a. s. Revision 06/2022
INSTRUCTIONS AND INFORMATION ABOUT THE DISPOSAL
OF DISCARDED PACKAGE
Return the packaging to acollection centre for disposal.
DISPOSAL OF DISCARDED ELECTRICAL AND ELECTRONIC
EQUIPMENT
This symbol placed on the product, accessories or package
notifies that the product must not be treated as household
waste. Please dispose of this product in acollection centre
designed for recycling electric and electronic equipment. In
some EU or European countries, you can return your
products to your local dealer when buying anew equivalent
product. Proper disposal of this product helps save valuable natural
resources and prevents possible adverse impacts on the environment and
human health that might be caused by improper waste disposal. For
further information, please contact your local authorities or the nearest
waste disposal collection centre. Wrong disposal of this type of waste
may be subject to alegal penalty.
For EU companies
If you need to dispose of an electric or electronic device, ask your dealer
your supplier for necessary information.
Disposal in countries outside the European Union
To dispose of this product, please ask the ministry or your dealer for the
necessary information on correct disposal.
The product meets the respective EU requirements.
FAST ČR, a.s. hereby declares that the radio device type SMP ATV2
conforms to the 2014/53/EU directive.
For full version of the EU declaration of conformity, please refer to
www.sencor.eu website
Changes in the text, design and technical specifications may be made
without prior notice and we reserve the right to make such changes.
The original version is in Czech.
Manufacturer’saddress: FAST ČR, a.s., USanitasu 1621, Říčany CZ-251 01

EN
Warranty conditions
Warranty card is not apart of the device packaging.
This product is warranted for the period of 24 months from the date of purchase to the end-user. Warranty is limited
to the following conditions. Warranty is referred only to the customer goods using for common domestic use. The
claim for service can be applied either at dealer’sshop where the product was bought, or at below mentioned
authorized service shops. The end-user is obligated to set up aclaim immediately when the defects appeared but
only till the end of warranty period. The end user is obligated to cooperate to certify the claiming defects. Only
completed and clean (according to hygienic standards) product will be accepted. In case of eligible warranty claim
the warranty period will be prolonged by the period from the date of claim application till the date of taking over
the product by end-user, or the date the end-user is obligated to take it over. To obtain the service under this
warranty, end-user is obligated to certify his claim with duly completed following documents: receipt, certificate of
warranty, certificate of installation.
This warranty is void especially if apply as follows:
Defects which were put on sale.
Wear-out or damage caused by common use.
The product was damaged by unprofessional or wrong installation, used in contrary to the applicable instruction
manual, used in contrary to legal enactment and common process of use or used for another purpose which
has been designed for.
The product was damaged by uncared-for or insufficient maintenance.
The product was damaged by dirt, accident of force majeure (natural disaster, fire, and flood).
Defects on functionality caused by low duality of signal, electromagnetic field interference etc.
The product was mechanically damaged (e.g. broken button, fall).
Damage caused by use of unsuitable media, fillings, expendable supplies (batteries) or by unsuitable working
conditions (e.g. high temperatures, high humidity, quakes).
Repair, modification or other failure action to the product by unauthorized person.
End-user did not prove enough his right to claim (time and place of purchase).
Data on presented documents differs from data on products.
Cases when the claiming product cannot be indentified according to the presented documents (e.g. the serial
number or the warranty seal has been damaged).
Authorized service centers
Visit www.sencor. for detailed information about authorized service centers. com

FAST ČR, a.s., USanitasu 1621, Říčany CZ-251 01