User's Operation Manual Refrigerator
Parts and Features
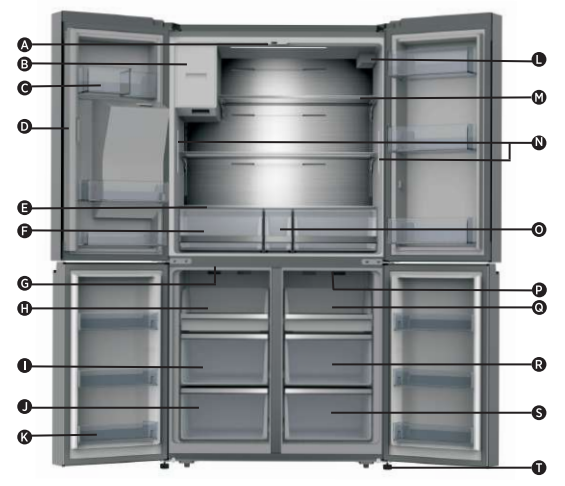
A. Refrigerator LED Light
B. Ice-Maker
C. Refrigerator Door Bin
D. Rotary Separator
E. Cover
F. Storage Drawer
G. Freezer LED Light
H. Freezer Tray
I. Freezer Middle Drawer
J. Freezer Lower Drawer
K. Freezer Door Bin
L. Water Filter
M. Glass Shelf
N. Refrigerator side lights
O. Middle Storage Drawer
P. Convertible Compartment LED light
Q. Convertible Compartment Tray
R. Convertible Compartment Middle Drawer
S. Convertible Compartment Lower Drawer
T. Leveling Leg
Installation Requirements
Location Requirements
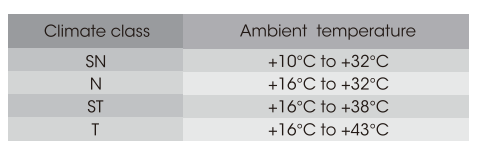
Temperature
This refrigerator is intended for use in a location where the temperature ranges from a minimum of 16°C to a maximum of 43°C. The preferred room temperature range for optimum performance. which reduces electricity usage and provides superior cooling. is between 16°C and 32°C. It is recommended that you do not install the refrigerator near a heat source, such as an oven or radiator.
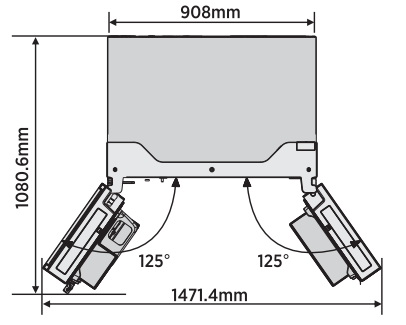
Exterior and Dimensions

Ventilation
Adequate air circulation around the refrigerator is required for efficient operation.
To ensure proper ventilation. maintain the recommended clearances.
Recommended Clearances
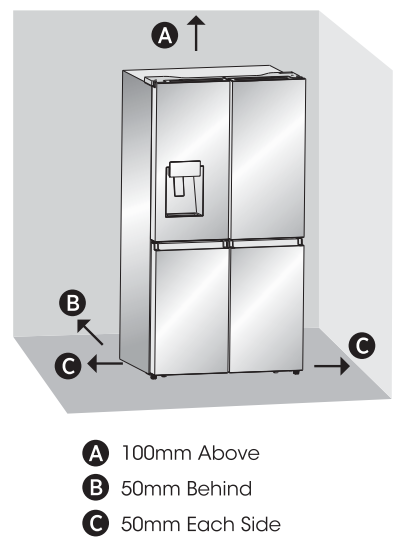
NOTE: If you place the refrigerator next to a fixed wall. leave 1471,4mm minimum space to allow the door to swing open.
Electrical Requirements
Recommended Grounding Method:
- AC 220-240 volt, 50 Hz, AC only 15- or 20-amp fused, grounded electrical supply is required. It is recommended that a separate circuit serving only your refrigerator is provided. Use an outlet that cannot be turned off by a switch. Do not use an extension cord.
NOTE: Before performing any type of installation or cleaning, disconnect the refrigerator from the electrical source. When you have finished, reconnect the refrigerator to the electrical source and reset the temperature controls to the desired setting.
Installation Instructions
Unpack the Refrigerator
Remove the Packaging
- Remove tape and glue residue from surfaces before turning on the refrigerator. Rub a small amount of liquid dish soap over the adhesive with your fingers. Wipe with warm water and dry. NOTE: Do not use sharp instruments. rubbing alcohol. flammable fluids. or abrasive cleaners to remove tape or glue. These products can damage the surface of your refrigerator.
- Dispose of/recycle all packaging materials.
- If the refrigerator has been placed in a horizontal or tilted position for any period of time. wait 4 hours before plugging it in to allow the oil to settle into the compressor.
When Moving Your Refrigerator:
- Your refrigerator is heavy. When moving the refrigerator for cleaning or service. be sure to cover the floor with cardboard or hardboard to avoid floor damage. Always pull the refrigerator straight out when moving it.
- Do not wiggle or “walk” the refrigerator when trying to move it. as floor damage could occur.
Clean Before Using
- After you remove all of the packaging materials. clean the inside of the refrigerator before using it.
Installation Positioning
This application perform well from SN to ST. The Appliance may not work properly if it is left for a longer period at a temperature above or below the indicated range.
Door Removal (only if needed)
Measure the refrigerator to make sure it will fit through the doorway. If the refrigerator cannot pass easily through the doorway. follow the instructions to remove the two refrigerator compartment doors and the front panel of the freezer drawer.
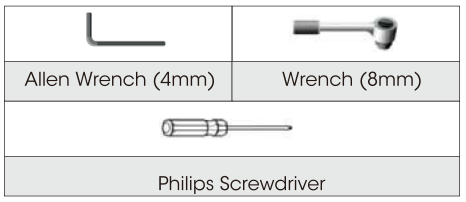
Tools you will need (Not provided)
Remove the Doors: Keep the refrigerator doors closed until you are ready to lift them from the cabinet.
1. Unplug refrigerator or disconnect power.
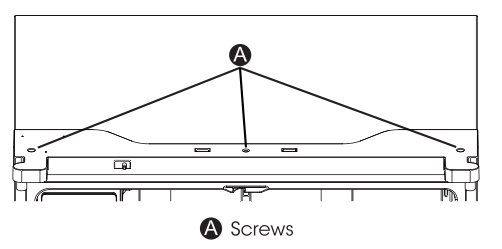
2. Using a Phillips screwdriver. remove the three screws attaching the hinge cover, and then remove the hinge cover with the entire harnesses attached.
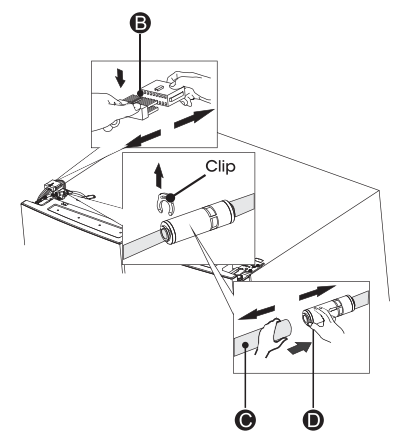
3. Separate the two connectors on the left side door. To remove the wire connector. press the top of the connector (B) and separate it from the other one. To remove the water coupler from the hinge, twist and pull the clips from the coupler. Remove the water line (C) while pressing the movable part (D) of the water line coupler.
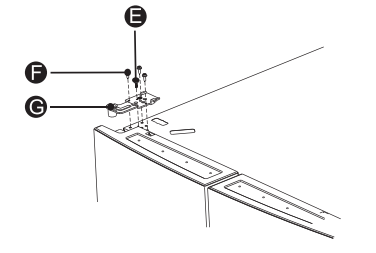
4. Remove the 3 screws (E) fixed on the hinges. with a Wrench (8mm) and 1 ground screws (F) attached to the hinge with Philips (+) screwdriver. Remove the upper left door hinge (G).
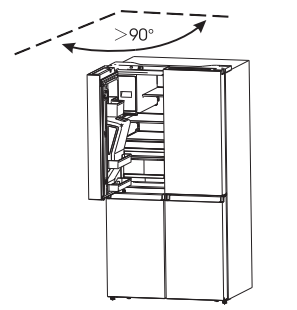
5. Use your both hands to open the door more than 90°. Lift it up and take it off.
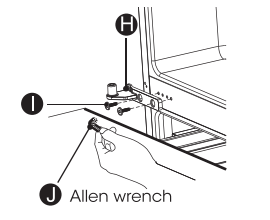
6. If necessary. remove the 2 hex head bolts hinges (l) with an Allen wrench (5 mm). Remove the lower left door hinge (H).
Replace the Doors
- If removed. reinstall the bottom hinge.
- Using two or more people. set the refrigerator door onto the bottom hinge.
- Insert the top hinge into the top of the door.
- Using the three screws removed earlier. fasten the top hinge to the top of the cabinet. NOTE: Left-hand door only. replace the ground screw into the top hinge. reattach the wire harness. reconnect the water line. make sure the clips are properly connected to the coupler.
- Repeat steps 1 through 4 to replace the opposite door.
- Using the three screws removed earlier. reinstall the top hinge cover and control panel to the top of the cabinet.
Move Near Water Supply
IMPORTANT: The refrigerator must be located on a solid. level surface that is strong enough to support the refrigerator fully loaded.
- Before moving. retract the leveling legs to avoid scraping the floor.
- The refrigerator has wheels. which should be used for only forward and backward movement.
NOTE: Trying to move the refrigerator sideways may damage your floor.
Connect the Water Supply
A water dispenser with a filter is one of the helpful features on your new appliance. To help promote better health. the water filter removes unwanted particles from your water. However. it does not sterilize or destroy microorganisms. You may need to purchase a water purifying system to do that.
In order for the ice maker to operate properly. a water pressure of 30~125psi is required.
Under normal conditions. a 200cc (5.75 oz.) cup can be filled in about 10 seconds.
If the refrigerator is installed in an area with low water pressure (blow 30 psi). ou can install a booster pump to compensate for the low pressure.
After you have connected the water line. make sure the water storage tank inside the refrigerator is properly filled. To do this. press the water dispenser lever until the water runs from the water outlet.
Parts for water line installation - The tools you will need:
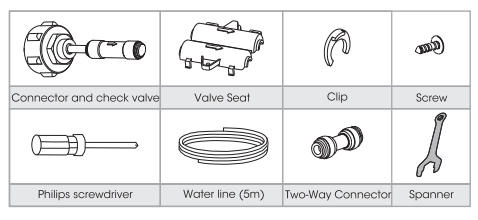
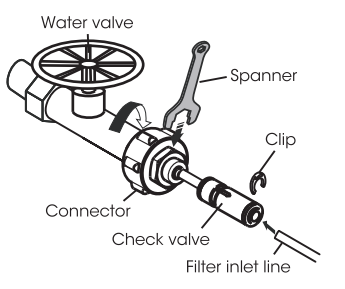
Connecting to the water supply line
The connector and the check valve are provided as one part. You should use the new connector incidentally but not the old one you have.
First. turn off the main water supply line. Screw the adaptor onto a suitable 3/4”BSP connector water outlet and use the spanner to tighten it. Fully insert the water line into the check valve. Then insert the clip in the install pack as the figure shown below.
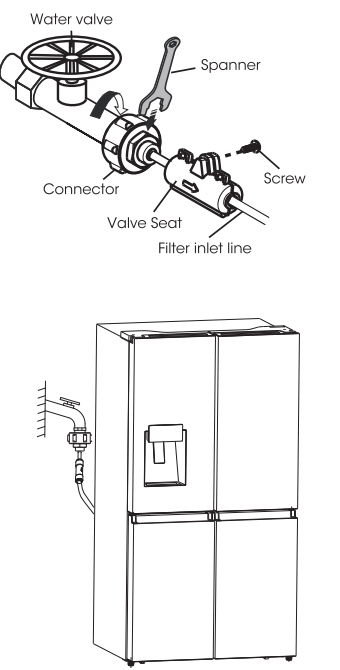
To prevent the clips loose. use the valve seat to. hold it. Then use the screw to hold the valve seat with Philips(+) screwdriver.
Complete the Installation
- Plug into a grounded 3 prong outlet. NOTE: This refrigerator begins operating as soon as it is connected to the power supply.
- Move the refrigerator into its final location. making sure to maintain the recommended clearance.
Level Refrigerator if needed
The refrigerator must be level to maintain optimal performance and appearance.
- Turn the leveling feet on the bottom. front of the cabinet to raise or lower that side of the refrigerator until the refrigerator is level side to-side.
- Turn both feet by the same amount. to slightly raise the front of the refrigerator. This will make it easier for the doors to close.
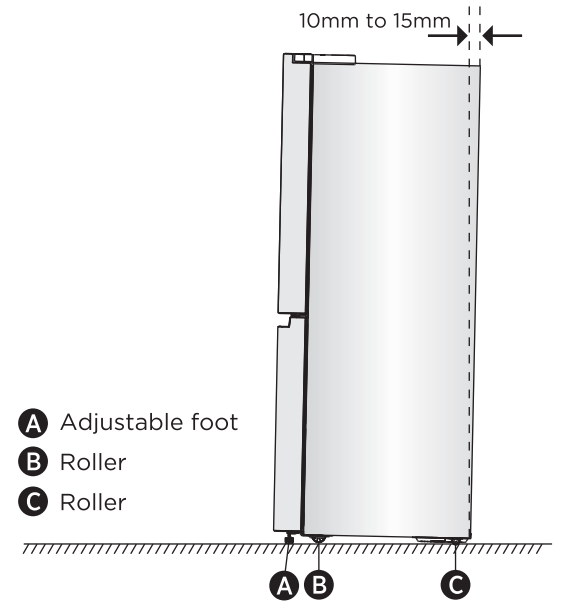
NOTE: Having someone push against the top of the refrigerator takes some weight off the leveling feet. This makes it easier to turn the feet. Rotate the adjustable feet clockwise to raise or counter-clockwise to lower your refrigerator. To make sure that the doors close automatically. tilt the top of your refrigerator backward about
10mm to 15mm. If necessary. use a spanner wrench to adjust the feet.
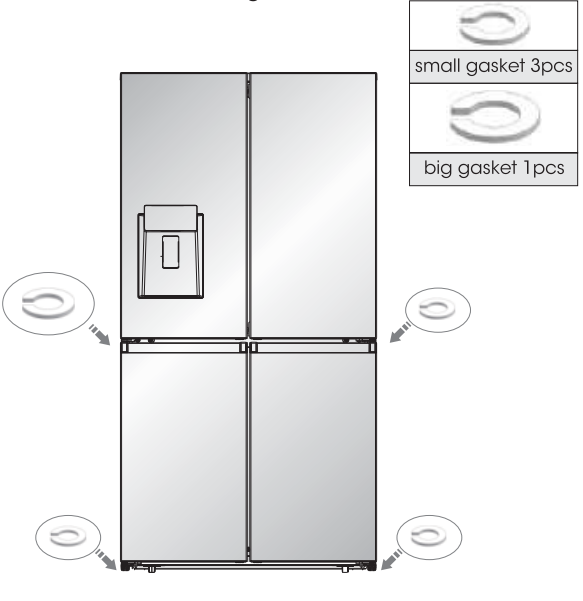
Align Doors (if needed)
The gaskets are used to align doors. you can find them in the manual bag.
Refrigerator Use
Opening and Closing Doors
Providing room for doors to open
Make sure that you have enough room in front of your refrigerator to swing the doors open.
The four doors can be opened and closed either separately or together.
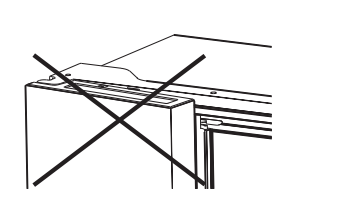
- There is a mullion on the left-hand side refrigerator compartment door.
- When closing the left-hand door. the mullion folds behind the right-hand door joining the two doors.
- The temperature of the door frame is controlled to help prevent moisture from developing on the mullion. The temperature of the surface may be warm. which is normal. and will not affect the performance of the refrigerator.
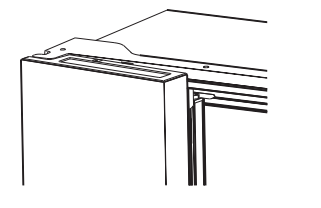
NOTE: Before closing the left-hand door. make sure the mullion is folded inward. If the mullion is pulled outward it may become damaged when you try to close the door.
Using the Controls
Your product has one control panel which is on the fridge door. Use your appliance according to the following control guidelines.
Control Panel: The control panel is shown in the diagram below.
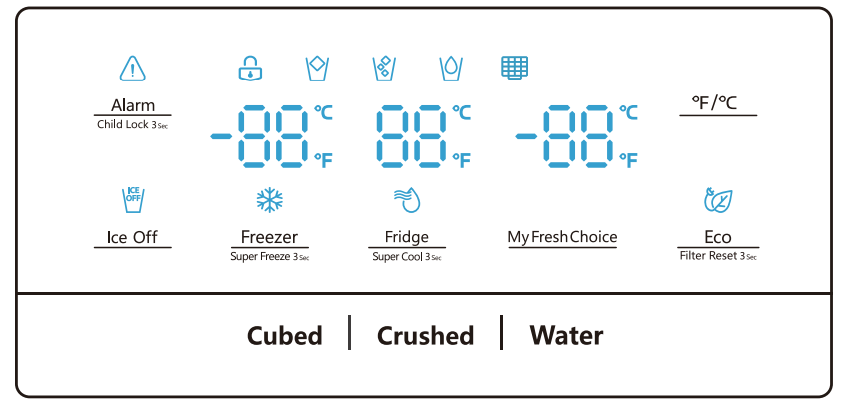
The display will illuminate when the refrigerator is first plugged in. However the lights will automatically turn off after 60 seconds.
 Child Lock and Door Alarm Alarm
This button serves two purposes:
1. Child Lock: Press and hold "Alarm" for 3 seconds to lock the whole Control Panel including dispenser function. If Control panel is locked. the icon " " will be on. and none of the buttons on the Control panel work. To unlock the Control panel. please press and hold “Alarm” for 3 seconds again.
2. Door Alarm: Leaving any door open for over 2 minutes will activate door alarm. The " " icon will flicker. the control panel will display “dr”. and you will hear a buzzer sound. The buzzer will sound 3 times per minute and will stop after 8 minutes. In case of alarm, you can touch the Alarm button to cancel door alarm, then the "
 " icon stops flickering and keeps on, the buzzer sound will stop at the same time. Also door alarm can be stopped by closing all the doors. To save energy. please avoid keeping doors open for a long time when using refrigerator.
 Ice Off
You can touch “Ice Off” button to control the ice maker. When the Child Lock is off, you can touch the “Ice Off” icon to lock the ice maker, and the icon “ ” will be illuminated. If you want to unlock the ice maker, please touch the “Ice Off” icon again, and the icon “
 ” will be off.
NOTE: When the “Ice Off” is on, it only locks the ice maker not the dispenser.
 Fridge Fridge Temperature Control
When you touch the button continuously. the temperature will be set in the following sequence.

If you want to decrease the time needed to cool items in the Fridge. please touch and hold this button for 3 seconds, the Super Cool icon " " will be illuminated, the fridge temperature setting will display 2°C. Super Cool automatically switches off after 3 hours. and the refrigerator temperature setting will revert back to the previous setting.
When Super Cool function is on. you can touch the “Fridge” to switch it off.
NOTE: On the Super Cool Function. when you touch the “Eco” button. Eco function will be activated. and “Super Cool” mode will be off.
 Freezer Temperature Control
You can touch the “Freezer” button to activate the mode to control the freezer temperature. When you press the button continuously, the temperature will be set in the following sequence.

Press and hold the button for 3 seconds, the icon " " will be illuminated., the freezer temperature setting will display -24°C.
Super Freeze can quickly lower the temperature and freeze your food faster than usual. This can retain more of the vitamins and nutrition in fresh food and keep your food longer.
Super Freeze automatically switches off after 52 hours, and the freezer temperature setting will revert back to the previous setting.
When the Super Freeze function is on. you can touch “Freezer” to switch off the Super Freeze function.
The Super Freeze is used to perform pre-freezing and fast freezing in sequence of Freezer compartment. This function accelerates the freezing of fresh food and, at the same time. protects foodstuffs already stored from undesirable warming.
 MyFreshChoice Temperature Control
You can touch the “My Fresh Choice” button to activate the mode to control the convertible compartment temperature.
When you press the button continuously. the temperature will be set in the following sequence.

 Dispense Control
When the Child Lock is on, the dispenser will not work. When the Child Lock is off. ou can press the “Cubed’or “Crushed” option to choose the type of ice to be dispensed, and press the “Water” button will activate the water mode. If you choose the function of Cubed, the " " icon will be illuminated. choose the function of Crushed the "
 " icon will be illuminated, and the "
 " icon will be illuminated when Water function is chosen.

In the unlocked state. press °F /°C button to switch between Celsius and Fahrenheit units. The default state is Celsius display.
 Energy Save
You can touch this button to turn Energy Save mode on and off. When you turn Energy Save on, the Eco icon “ ” lights.
The temperature of the fridge is automatically switched to 6°C and the freezer to -17°C.
If Energy Save is off, the icon “ ” will go off and the temperature setting will revert back to the previous setting.
 Water Filter
- The state of the water filter is calculated by the main control board and transmitted to the display panel. The first time the power is switched on and the water enters the filter, the filter state is calculated at 99%. When the water filter state drops to 15%, the icon “
 ” is lit. When the filter state reaches 10%, the icon “
 ” will flash, The user needs to replace the filter and long press the Energy Save Button for 3 seconds to reset the water filter state. The filter state will then be re-calculated to 99%.
Demo mode
- Demo mode is for store display, and it prevents the refrigerator from generating cool air. In this Cooling off Mode, the refrigerator may seem like it is working but it will not make cool air. The indicators on the control panel will show “OFF”. To cancel this mode, press and hold “Alarm” and “°F/°C” keys at the same time for 3 seconds and the buzzer will make a long sound.
General Use Information
- When first turning on refrigerator after a period of non-use. allow the refrigerator to cool at least 2 hours before adding food.
- Do not block air circulation vents with stored items
- Store items so that the air can circulate freely around them.
- Cover or wrap stored food well to avoid transfer of odors.
- Once defrosted. food quality will deteriorate rapidly. Defrosted food should not be refrozen.
- Neither bottled nor canned drinks should be stored in the freezer compartment. Bottles and cans may explode.
To avoid contamination of food, please respect the following instructions:
- Opening the door for long periods can cause a significant increase of the temperature in the compartments of the appliance.
- Clean regularly the surfaces that can come in contact with food and accessible drainage systems.
- Store raw meat and fish in suitable containers in the refrigerator. so that it is not in contact with or drip onto other food.
- Two-star frozen-food compartments are suitable for storing pre-frozen food. storing or making ice cream and making ice cubes.
- Two-star compartments are not suitable for the freezing of fresh food.
Refrigerator Care
Cleaning
Both the refrigerator and freezer sections defrost automatically. However. clean both sections about once a month to avoid buildup of odors. Wipe up spills immediately. To avoid odor transfer and drying out of food. wrap or cover foods tightly.
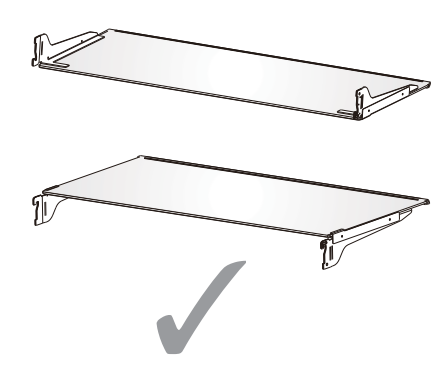
Shelf parts clean
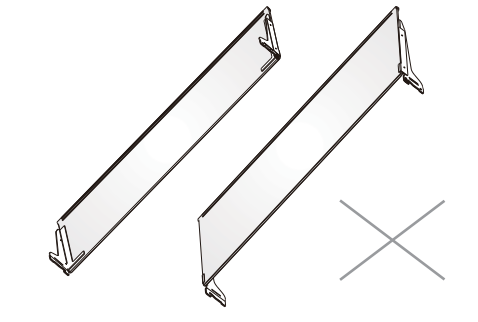
- When cleaning the shelf parts. remove the lower shelf parts and place them horizontally. Either front or back. to prevent the shelf support from falling off.
- If the shelf parts are placed at an angle. heir sides will touch the ground.When the force applied for cleaning is not proper. he shelf bracket will easily fall off.
- Unplug refrigerator or disconnect power.
- Clean the interior. Hand wash, rinse, and dry removable parts and interior surfaces thoroughly. Use a clean sponge or soft cloth and a mild detergent in warm water.
- Clean the door seals (gaskets). A dirty or sticky door seal may adhere to the cabinet and tear when you open the door. Using a soft cloth and a solution of mild detergent and warm water. hand wash the door seals. Rinse with clear water and dry thoroughly.
- Clean the exterior surfaces. Wash exterior surfaces with a clean. soft cloth or sponge and a mild detergent in warm water. Rinse surfaces with clean. warm water and dry immediately to avoid water spots.
- Plug in refrigerator or reconnect power.
Lights
IMPORTANT: Your refrigerator is equipped with LED lighting. These lights are designed to last for the life of your refrigerator. However. if the lights stop operating. please contact a qualified technician for replacement.
Vacation and Moving Care
Vacation
If You Choose to Leave the Refrigerator On While You're Away:
- Use up any perishables and freeze other items
If You Choose to Turn Off the Refrigerator Before You Leave:
- Remove all food from the refrigerator and freezer.
- Unplug refrigerator or disconnect power.
- Clean refrigerator. wipe it. and dry well.
- Tape rubber or wooden blocks to the tops of the two doors. and let them open a sufficient distance to let air in. This stops odor and mold from building up.
Moving - When you are moving your refrigerator to a new home. follow these steps to prepare it for the move.
- Remove all food from the refrigerator and pack all frozen food in dry ice.
- Unplug refrigerator.
- Clean. wipe. and dry thoroughly.
- Take out all removable parts. wrap them well. and tape them together so they don’t shift and rattle during the move.
- Raise the leveling legs so they don’t scrape the floor.
- Seal the doors with tape and tape the power cord to the back of the refrigerator. When you get to your new home, put everything back and refer to the “Installation Instructions” section for preparation instructions.
Reinstalling/Using Refrigerator Again
If the refrigerator has been placed in a horizontal or tilted position for any period of time. wait 4 hours before plugging it in to allow the oil to settle into the compressor.
- Clean refrigerator.
- Place refrigerator in desired location and level.
- Plug into grounded 3 prong outlet.
Troubleshooting
Refrigerator does not run
- Refrigerator is unplugged.
- Plug refrigerator into a grounded 3 prong outlet.
- Breaker is tripped or turned off, or fuse is blown
- Reset/Turn on breaker or replace fuse.
- Refrigerator is in defrost mode.
- Wait for defrost cycle to end and cooling system to restart.
Refrigerator compressor runs frequently or for long periods of time. Note: This refrigerator is designed to run for longer periods of time at a lower energy usage.
- Refrigerator is first plugged in.
- This is normal. Allow 24 hours for the refrigerator to cool down.
- Warm or large amounts of food added
- Door is left open. or refrigerator is not level.
- Check that an item is not preventing door from closing. Level the refrigerator.
- Hot weather or frequent openings.
- Temperature control set to coldest setting.
- Adjust temperature to a warmer setting.
Refrigerator has an odor
- Food is not sealed or packaged properly.
- Reseal packaging. Place an opened box of baking soda in the refrigerator, replace every 3 months.
- Interior needs to be cleaned.
- Clean the interior. See “Cleaning.”
- Food stored too long.
Light does not come on
- Refrigerator is unplugged.
- Plug refrigerator into a grounded 3 prong outlet.
- LED light is burned out.
- Contact a qualified technician to replace the burned out LED.
Doors do not close properly
- Refrigerator is not level.
- Something is obstructing door closure.
- Check for and remove obstructions.
Vibration or rattling
- Refrigerator is not resting firmly on floor.
Normal Sounds
- It sounds like water is flowing from the refrigerator.
- Humming or buzzing sounds
- The compressor and fans used for cold air circulation can make this sound. If the refrigerator is not level, the sound will be louder.
- Cracking or clicking sounds
- The interior parts will make this sound as they contract and expand in response to temperature changes.
- Popping noise
- May occur during automatic defrosting.