Loading ...
Loading ...
Loading ...
damageinotherwisehealthypeople.If
symptomsoccursuchasnumbness,pain.
lossofstrength,changeinskincolorortexture.
orlossoffeelinginthefingers,hands,orjoints,
discontinuetheuseofthistoolandseek
medicalattention.Ananti-vibrationsystem
doesnotguaranteetheavoidanceofthese
problems.Userswhooperatepowertoolson
acontinualandregaiarbasismustmonitor
closelytheirphysicalconditionandthe
conditionofthistool.
SPECIALNOTICE:Yoursawisequipped
withatemperaturelimitingmufflerandspark
arrestingscreenwhichmeetsthe
requirementsofCaliforniaCodes4442and
4443.AllU.S.forestlandandthestatesof
California,Idaho,Maine,Minnesota,New
Jersey,Oregon,andWashingtonrequireby
lawthatmanyinternalcombustionengines
tobeequippedwithasparkarrestingscreen.
IfyouoperateachainsawinastateorIocale
wheresuchregulationsexist,youarelegally
responsibleformaintainingtheoperating
conditionoftheseparts.Failuretodosois
aviolationofthelaw.RefertotheSERVlCE
sectionformaintenanceofthespark
arrestingscreen.
FailuretofollowallSafetyRulesandPrecau-
tionscanresultinseriousinjury.Ifsituations
occurwhicharenotcoveredinthismanual,
usecareandgoodjudgement.Ifyouneed
assistance,contactyourauthorizedservice
dealerorcall1-800-554-6723.
STANDARDS:ThissawislistedbyUnder-
writer'sLaboratories,Inc.,andtheCanadian
StandardsAssociationinaccordancewith:
ANSIB175.1-2000AmericanNational
StandardforPoweredTools- Gasoline
PoweredChainSaw-SafetyRequirements
CSAZ62.1-03ChainSaws-Occupational
HealthandSafety
CSAZ62.3-96ChainSawKickbackOccu-
pationaiHealthandSafety
Protectivegloves(notprovided)shouldbe
wornduringassembly.
ATTACHINGTHE BAR & CHAIN (If not
already attached)
WARNING: If received assembled,
repeat all steps to ensure your saw is properly
assembled and all fasteners are secure. At-
ways wear gloves when handling the chain.
The chain is sharp and can cut you even when
it is not moving!
1. Loosen and remove the chain brake nuts
and the chain brake from the saw.
2. Remove the plastic shipping spacer (if
present).
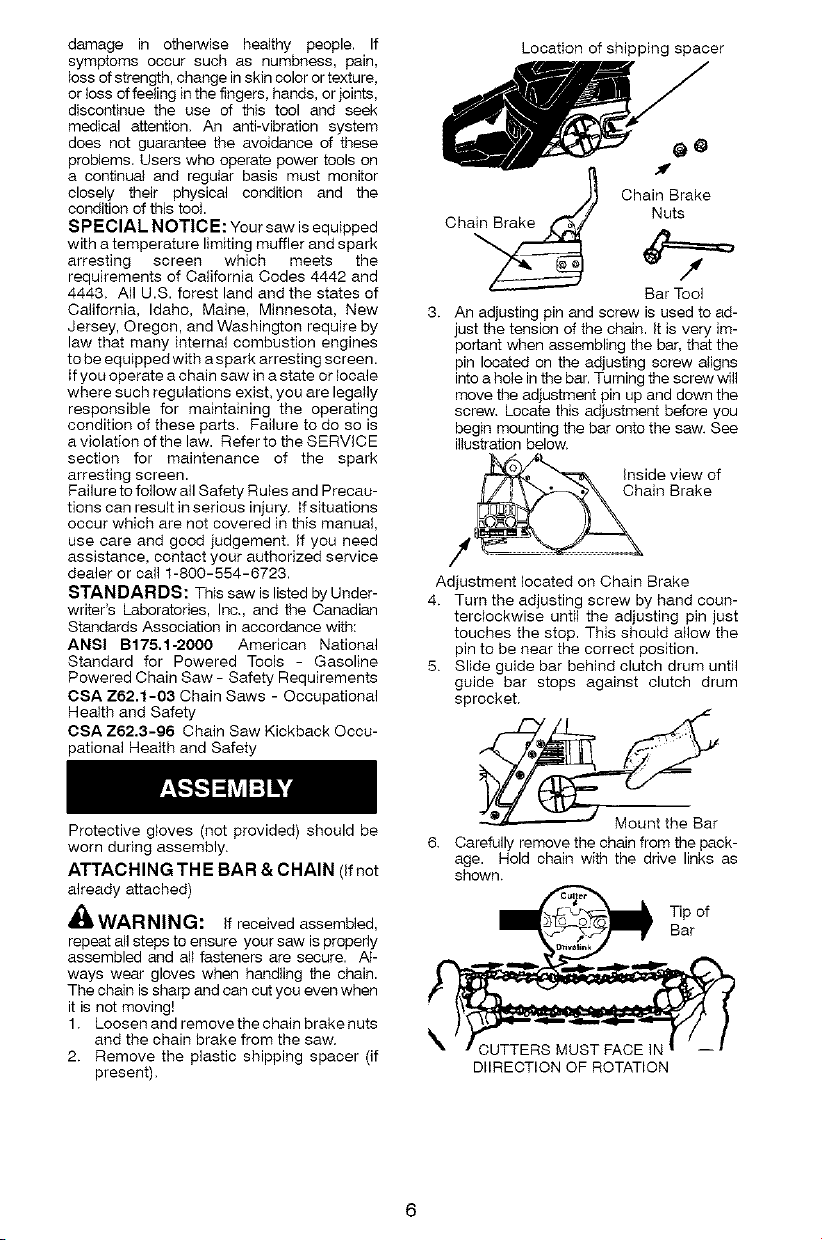
Location of shipping spacer
a_ Chain Brak_e
Ch Nuts
Bar Tool
3. An adjusting pin and screw is used to ad-
just the tension of the chain. It is very im-
portant when assembling the bar. that the
pin located on the adjusting screw aligns
into a hole in the bar. Turning the screw will
move the adjustment pin up and down the
screw. Locate this adjustment before you
begin mounting the bar onto the saw. See
illustration below.
Inside view of
_C_ _hain Brake
/
Adjustment located on Chain Brake
4. Turn the adjusting screw by hand coun-
terclockwise until the adjusting pin just
touches the stop. This should allow the
pin to be near the correct position.
5. Slide guide bar behind clutch drum until
guide bar stops against clutch drum
sprocket.
6. Carefully remove the chain from the pack-
age. Hold chain with the drive links as
shown.
_ ip of
Bar
DIIREOTION OF ROTATION
Loading ...
Loading ...
Loading ...