Loading ...
Loading ...
Loading ...
8 9
ninjakitchen.co.uk
ninjakitchen.co.uk
USING THE CONTROL PANELACCESSORY ASSEMBLY INSTRUCTIONS
OPERATING BUTTONS
SMARTLID SLIDER: As you move the
slider, the available functions for each
mode will illuminate.
DIAL: Once you've chosen a mode, use
the dial to scroll through the available
functions until your desired function is
highlighted.
LEFT ARROWS: Press these to choose
a cook temperature. Use the left arrows
as well to set the internal outcome when
using PRESET, and MANUAL buttons.
RIGHT ARROWS: Press these to choose a
cook time. Use these arrows to set the food
START/STOP button: Press to start
cooking. Pressing the button while the
unit is cooking will stop the current
cooking function.
REHEAT
SOUS VIDE
SLOW COOK
YOGURT
(POWER): The Power button shuts the
unit o and stops all cooking modes.
COOKING FUNCTIONS
PRESSURE: Cook food quickly while
maintaining tenderness.
STEAM MEALS: Create complete meals
with the push of a button.
STEAM AIR FRY: Crisp vegetables and
proteins with little to no oil.
STEAM BAKE: Bake fluy cakes and sweet
treats.
STEAM BREAD: Prove and bake in one pot.
Crusty on the outside, chewy on the inside.
AIR FRY: Give food crispness and crunch
with little to no oil.
GRILL: Use high temperature to caramelise
and brown your food.
BAKE: Use the unit like an oven for baked
treats and more.
DEHYDRATE: Dehydrate meats, fruits and
vegetables for healthy snacks.
PROVE: Create an environment for dough
to rest and rise.
SEAR/SAUTÉ: Use the unit as a hob for
browning meats, sautéing vegetables,
simmering sauces and more.
STEAM: Gently cook delicate foods
at a high temperature.
SLOW COOK: Cook your food at a lower
temperature for a longer period of time.
YOGURT: Pasteurise and ferment milk for
creamy homemade yogurt.
KEEP WARM: When using steam, slow
cook and pressure the unit will switch to
KEEP WARM at the end of the cycle. Press
the KEEP WARM button after the function
has started to disable this automatic
transition.
NOTE: If running for 1 hour or less, the
clock will count down by minutes and
seconds. If running for more than
1 hour, the clock will count down by
minutes only. This function will time out
after 12 hours.
USING THE SMARTLID SLIDER
The slider allows you to switch between
cook modes and notifies the lid which
function you are using.
• Pressure
• Combi-Steam mode
• Air Fry/Hob
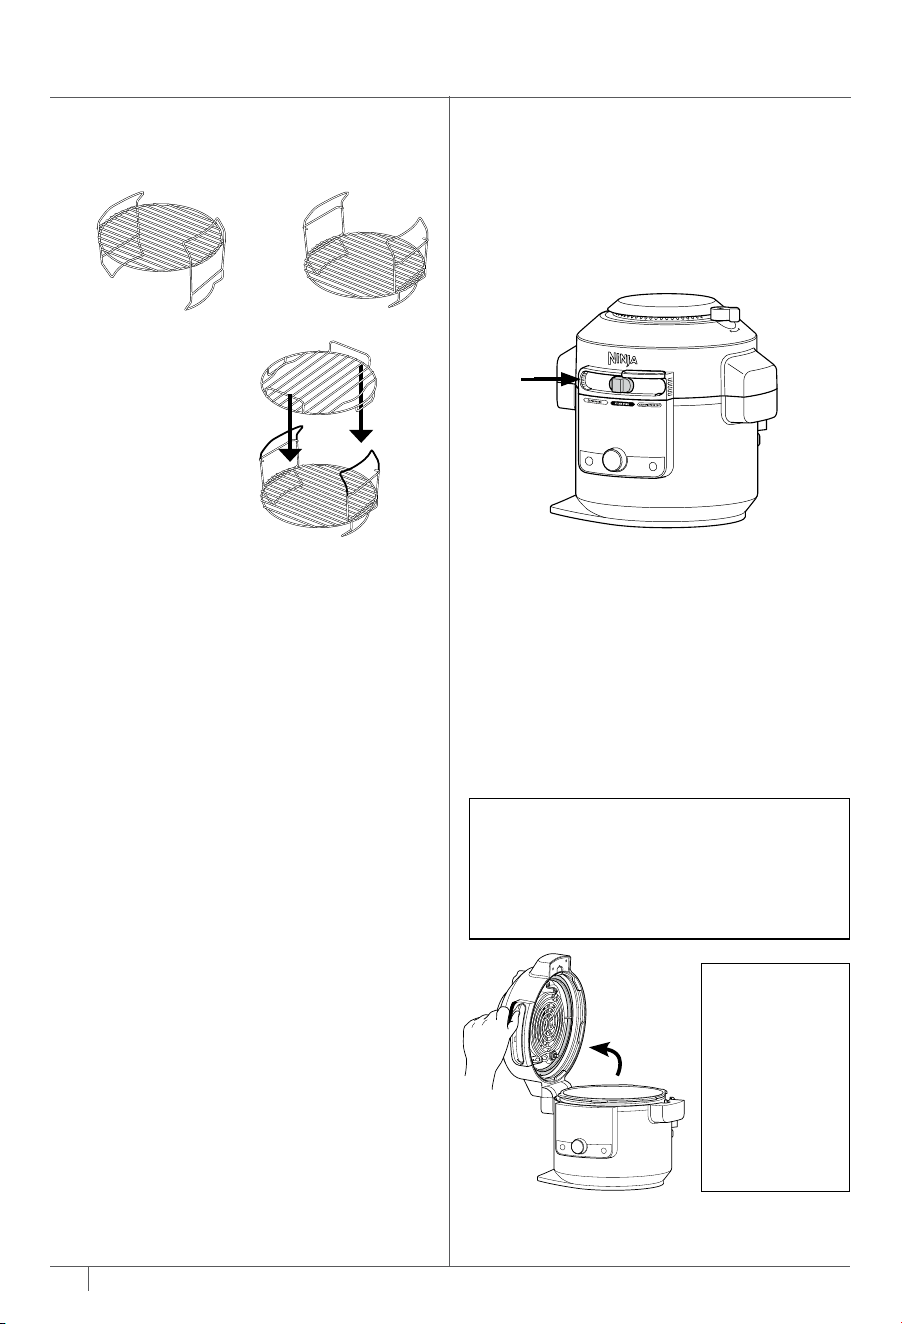
HOW TO OPEN AND CLOSE THE LID
Use the handle that is located above the
slider to open and close the lid at all times.
You can open and close the lid when the
slider is in the COMBI-STEAM mode and
AIR FRY/HOB position. When the slider is in
the PRESSURE position, the lid cannot be
opened. If there is no pressure in the unit,
move the slider to the COMBI-STEAM mode
or AIR FRY/HOB position to open the lid.
NOTE: The lid will not unlock until
the unit is completely depressurised.
The smart slider will not slide to
the right until the unit is completely
depressurised. The unit will display
"OPN LID" when unit is depressurised.
2-TIER REVERSIBLE RACK
1 With the reversible rack in the lower
position, (shown above) place it in the
cooking pot. Then place ingredients on
the bottom layer.
2 If needing an extra layer, add the top
rack by sliding it over the handles of
the bottom rack as shown above. Place
remaining ingredients on the top layer.
Higher Position
Grill chicken, steak, fish and more.
Lower Position
Steam vegetables.
2-Tier Assembly
Increase cooking capacity
by cooking on both levels.
ONLY lift the
lid from the
handle on the
front of the
unit. DO NOT
lift lid from
side area
as scalding
steam will
release.
Loading ...
Loading ...
Loading ...