Loading ...
Loading ...
Loading ...
Before using for the first time en
15
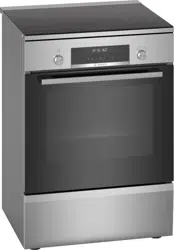
Wire rack
or baking
tray
Position the accessory so that its
edge is behind the lug on the pull-
out rail.
Note:The pull-out rails lock in place when they are
fully pulled out. Gently push the pull-out rails back
into the cooking compartment.
4.
Slide the accessory all the way in, making sure that
the accessory does not touch the appliance door.
Note:Take any accessories that you will not be using
out of the cooking compartment while the appliance is
in operation.
7.2 Other accessories
You can purchase other accessories from our after-
sales service, specialist retailers or online.
You will find a comprehensive range of products for
your appliance in our brochures and online:
www.bosch-home.com
Accessories vary from one appliance to another. When
purchasing accessories, always quote the exact
product number (E no.) of your appliance.
You can find out which accessories are available for
your appliance in our online shop or from our after-
sales service.
8 Before using for the first time
Configure the settings for initial start-up. Clean the ap-
pliance and accessories.
8.1 Initial configuration
You have to implement settings for the initial configura-
tion before you can use your appliance.
Setting the time
Once the appliance has been connected to the mains
or after a power cut, the time flashes in the display. The
time starts at "12:00". Set the current time.
Requirement:The function selector must be set to the
off position.
1.
Use or to set the time.
2.
Press .
a The time that is set appears in the display.
Tip:You can define whether the time is shown in the
display in the basic settings →Page18.
8.2 Cleaning the appliance before using it
for the first time
Clean the cooking compartment and accessories be-
fore using the appliance to prepare food for the first
time.
1.
Remove the accessory and the leftover packaging,
such as polystyrene pellets, from the cooking com-
partment.
2.
Before heating, wipe the smooth surfaces in the
cooking compartment with a soft, damp cloth.
3.
Ventilate the room while the appliance is heating.
4.
Set the type of heating and the temperature.
→"Basic operation", Page19
Type of heat-
ing
3D hot air
Temperature Maximum
Cooking time 1hour
5.
Switch off the appliance after the specified cooking
time.
6.
Wait until the cooking compartment has cooled
down.
7.
Clean the smooth surfaces with soapy water and a
dish cloth.
8.
Clean the accessory with soapy water and a dish
cloth or a soft brush.
9 Operating the hotplate
You can find out everything you need to know about
operating your hotplate here.
9.1 Switching the hob on and off
▶
Switch the hob on and off using the main switch .
If all of the cooking zones are switched off for
longer than 20seconds, the hob is automatically
switched off.
ReStart
▶
If you switch the appliance on within four seconds of
switching it off, the hob operates with the settings
that were previously set.
9.2 Setting the cooking zones
To choose the required selectable power level, touch
or .
Each power level has an intermediate level. This is
marked with a dot.
Loading ...
Loading ...
Loading ...