Before beginning assembly, installation or operation of product, make sure all parts are present. Compare parts with package contents list and exploded view (p.20). If any part is missing or damaged, do not attempt to assemble, install or operate the product. Contact customer service for replacement parts.
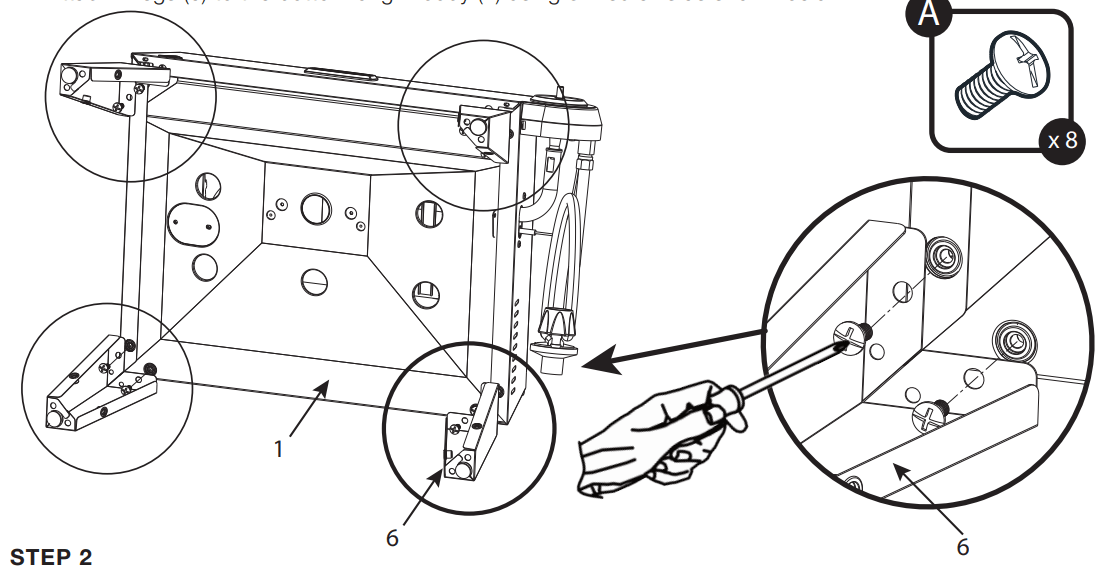
STEP 1
Flip the unit on its back before assembling legs
Attach 4 legs (6) to the bottom of grill body (1) using 8 A screws as shown below.
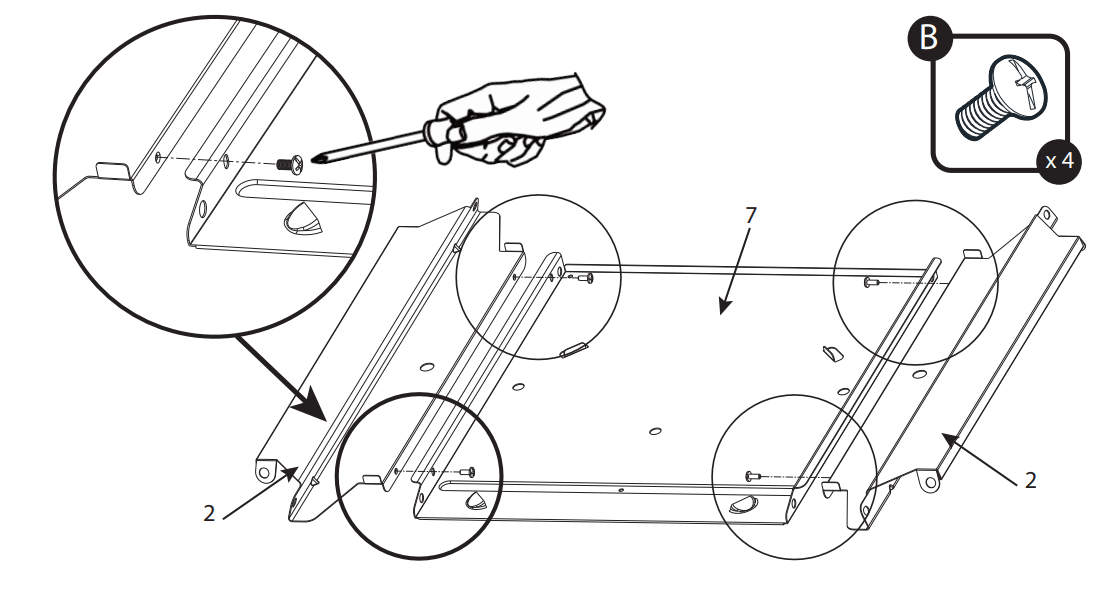
Attach the storage shelf (7) to the storage shelf supports (2) using 4 B screws as shown below.
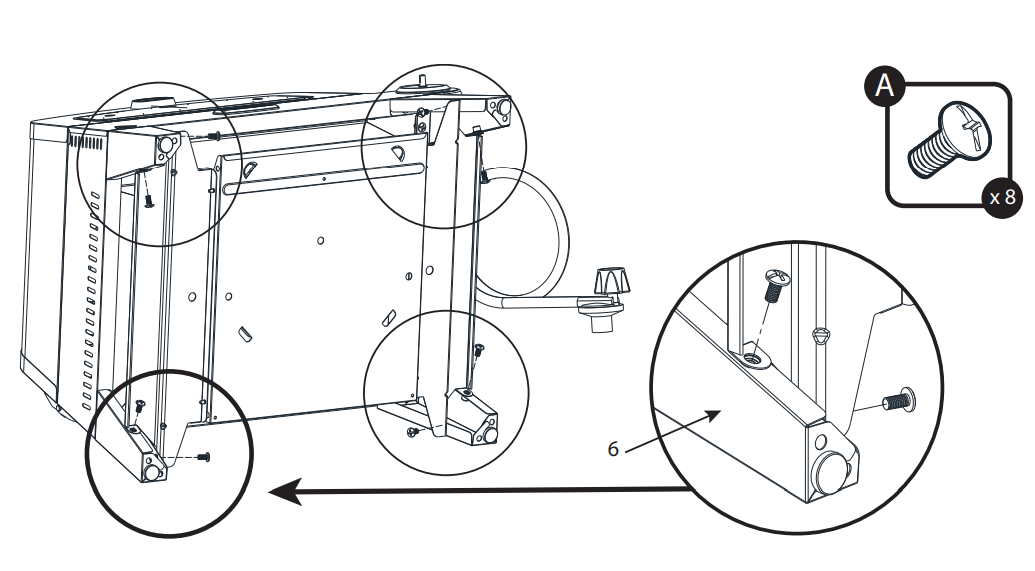
STEP 3
Attach the whole storage shelf assembly to the legs (6) using 8 A screws as shown below.
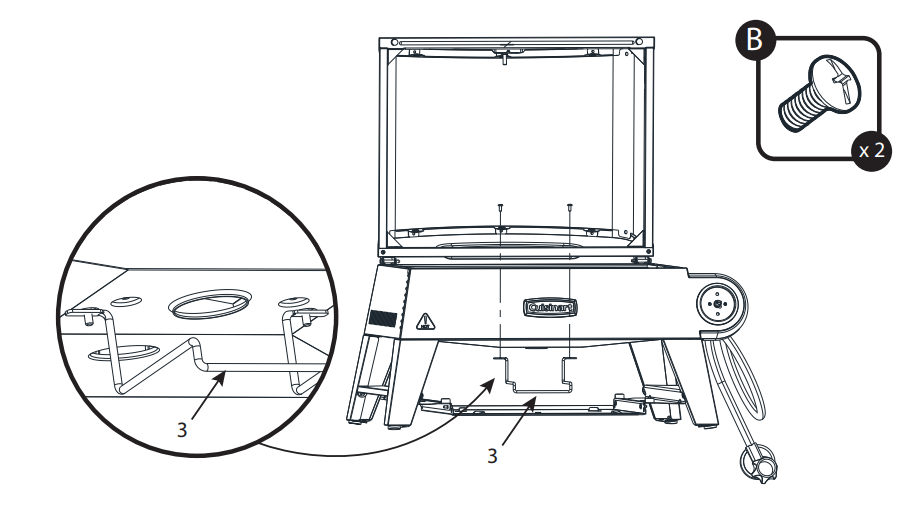
STEP 4
Attach the grease cup holder (3) to the bottom of the grill body by inserting 2 B screws through the top of the grill body as shown below.
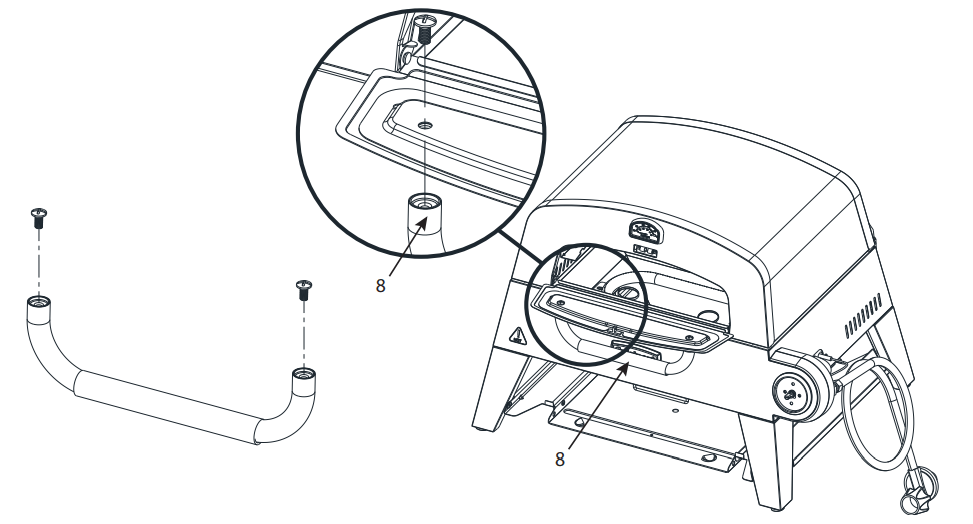
STEP 5
Remove screws from the lid handle (8) before assembling to the front door.
Flip the front door open and attach the lid handle (8) to the front of the door by inserting 2 BB screws through the back of the door as shown below.
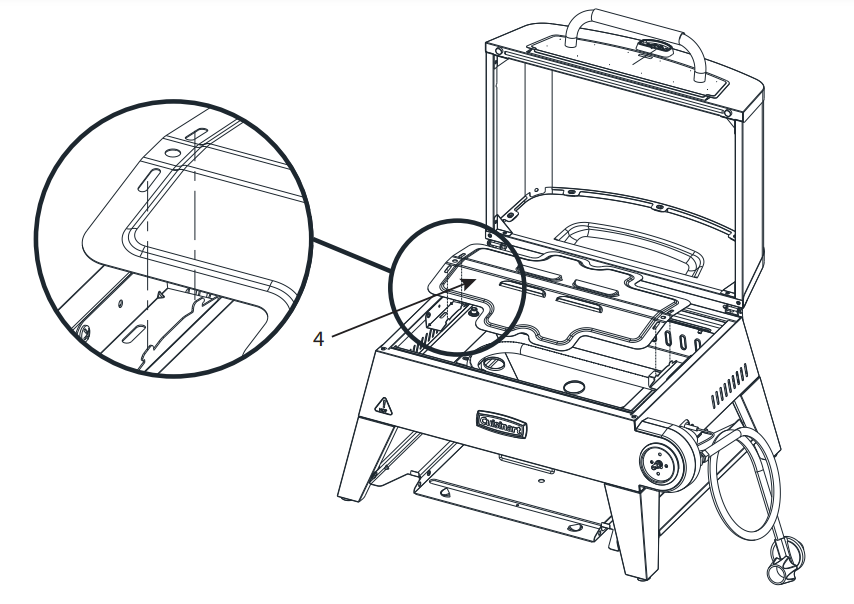
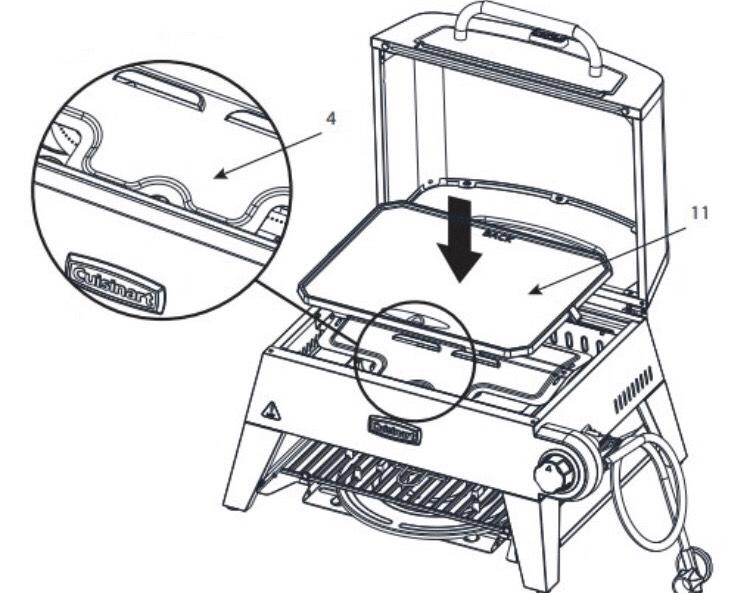
STEP 6
Place the flame tamer (4) on to the flame tamer support brackets inside the body of the grill. The 2 oval shaped holes on either end of the flame tamer (4) will fit on to the pegs on the flame tamer support brackets. See image below.
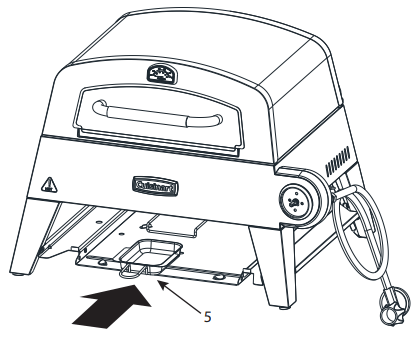
STEP 7
Insert the grease cup (5) in to the grease cup holder.
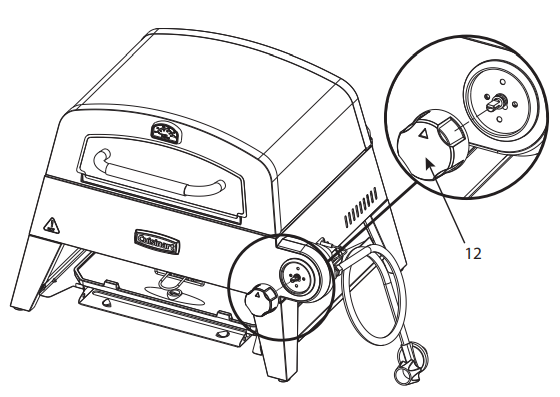
STEP 8
Place the control knob (12) on to the regulator stem as shown below. Push until the gap between the knob and bezel is gone.
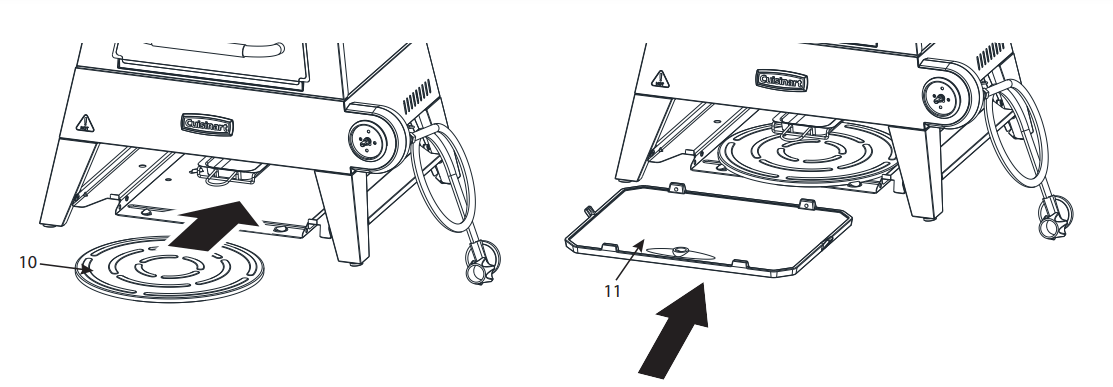
STEP 9
Insert the pizza stone in to storage shelf positioning it between the 4 pegs.
Insert the griddle plate face down on to the storage shelf supports positioning it between the 2 tabs on the front and back.
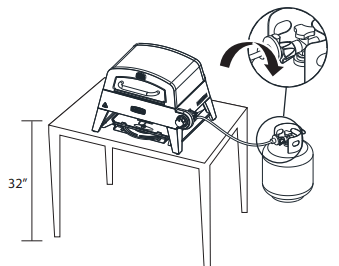
STEP 10
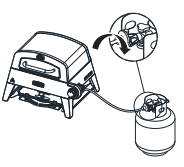
Attach the regulator with hose to the propane cylinder by turning the regulator handle clockwise as shown below. If the unit is not in use, the gas must be turned “OFF” at the propane cylinder.
Check all gas supply fitting for leaks before each use. Do not use the grill until all connections have been checked and do not leak (see “Leak Testing” instructions on page 14)
Place the grill on table as shown below. We recommend using this grill on a 32” high table.
OPERATING THE GRILL
PIZZA OVEN MODE
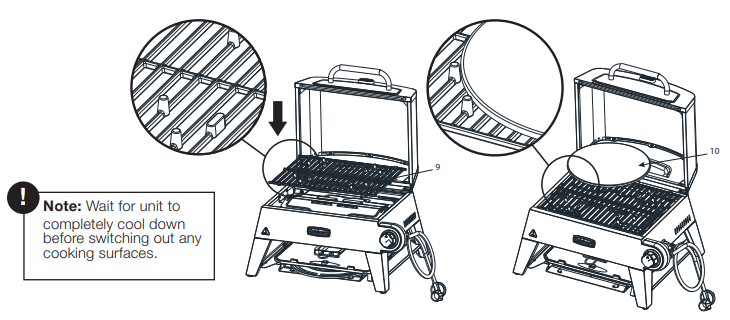
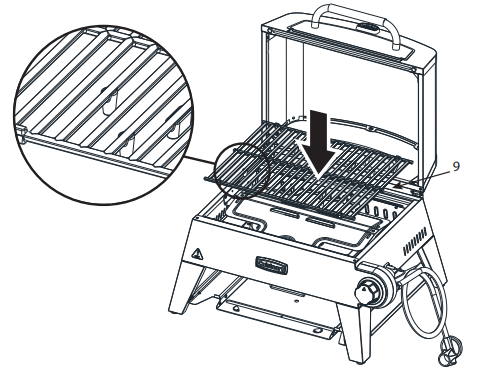
Insert the grill grate (9) into the unit upside down so the riser pegs are facing up.
Position the pizza stone (10) into the indentation in the center of the grill grate. The riser pegs will secure the pizza stone in place. See image below.
Shut the lid, close the pizza door, and preheat the stone on high for 15 minutes.
Before placing your pizza in, turn the control knob to the “PIZZA” setting on the dial.
Open the front pizza door and use a pizza peel to place the pizza in to the oven and center it on the stone. NOTE: Dust your pizza peel with flour or cornmeal to prevent sticking when transferring pizzas to and from the stone.
Keep pizza door and lid closed while pizza is cooking.
Cook for 6-8 minutes or until desired doneness is reached.
Turn your pizza once 180 degrees half way through cook time (at 3-4 minutes) to ensure even cooking.
HOW TO CLEAN YOUR PIZZA STONE
Let the stone cool completely before attempting to clean.
Scrub the pizza stone thoroughly with a stone brush and flat edge scraper. (We recommend the Cuisinart CCB-399 pizza stone brush)
If needed, use a damp wash cloth with hot water to help break up any burnt-on debris before brushing again.
If using water, let the stone air dry or dry it with a clean towel before storing
Note: Water will help to loosen debris on the stone, but is not necessary if you can remove debris with the brush first. The less water you use on your stone the better.
ADDITIONAL TIPS AND TRICKS
Water should be the only moisture that your stone is exposed to. Do not use any soap, cleaning chemicals, or oils on your pizza stone. The pizza stone is made from cordierite stone which is a very porous material. It will absorb liquids that are applied to it and will damage your stone over time. If you allow your stone to get too wet it will not produce a crispy pizza crust. Liquids that are absorbed into your stone will affect the taste of your pizza as well. When heating your stone for the first time you may experience an odor coming from the stone. This smell is from the cordierite and is non-toxic. To help rid your stone of this smell, before the first use, heat your stone in your oven for 30 minutes at 400+ degrees F. Keep windows and doors open for this process. On second use, most of the smell will have dissipated.
GRIDDLE MODE
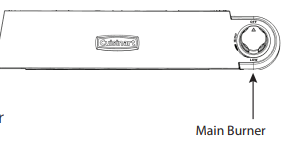
Make sure flame tamer has notch facing forward (see image below)
Position the griddle plate into place with drain hole in the front.
NOTE: Drain hole should be over the notch in the flame tamer.
Preheat griddle on high setting for 10 minutes
Note: Wait for unit to 4 completely cool down before switching out any cooking surfaces.
GRIDDLE PLATE SEASONING
Seasoning your griddle will help create a non-stick surface for cooking while also protecting from any rust. Seasoning your griddle plate is essential for optimal performance and longevity.
When you receive your griddle it will already have a thin layer of oil applied. This is to protect from rust in shipping and storing.
FIRST SEASONING
Start by using some soapy water to wash off the shipping oil. This gives you a fresh and clean start.
Next, you’ll want to select your oil. Any oils you have around your kitchen will work fine for this process. (E.g. Sunflower Oil, Vegetable Oil, Soy Oil, Peanut Oil, Avocado Oil)
Now we can season. In this process you’ll be using high heat to bond the oil to the surface. Using a paper towel rub a thin coat of oil on the entire surface of the griddle. Then turn your griddle on high. The oil will eventually begin to smoke which is good. Leave it on high until the smoke stops. That means you passed the smoke point.
Finally, you’ll want to cool the surface and repeat the process above 2 – 3 times until you get a smooth black surface on the griddle. If the griddle surface is hot you can use tongs or other protective gear to protect your hands while oiling.
Once you’ve completed this process you’ll have the perfect griddling surface to get cooking on!
GRIDDLE PLATE CLEANING AND CARE
Griddles are remarkably easy to keep clean. After you’ve completed your first cook you’ll want to spray down the hot surface with water and scrape debris away. The steam from the water on the hot surface will help release tough debris. Scrape the residue down into the grease trap.
Turn the griddle off and let the surface cool. While it cools you’ll want to remove and clean out the grease trap. Doing this each time will ensure you have no spill over the next time.
When the surface is cool, apply a thin layer of oil over the surface to maintain your seasoning. Then you’ll want to store in a cool, dry place. If you’re storing outside cover the griddle to prevent water collecting on the surface. Even if your surface does start to rust all hope is not lost. Griddles are very resilient and with a little work you can get it back to new. Simple use a steel scouring pad to remove all rust from the surface. Then go through the seasoning steps again. This will recondition the griddle and you’ll be back to cooking again in no time.
GRILL MODE
Position the grill grate (9) into place with the riser pegs facing down.
Note: Wait for unit to completely cool down before switching out any cooking surfaces.
USING THE GRILL
Find a level surface to grill on.
Allow the grill to warm up with the lid closed for 5 minutes prior to cooking.
You may cook on the grill in any weather. If the temperature is extremely cold or hot, the cooking times will be slightly increased or decreased. Keep the grill out of excessive winds when operating.
INSTALLATION INSTRUCTIONS
GAS HOOK-UP
Only the pressure regulator and hose assembly supplied with the grill should be used. Any replacement pressure regulator and hose assembly must be specified by the grill manufacturer. This grill is configured for Liquid Propane. Do not use a Natural Gas supply
Total gas consumption (per hour) with all burners set on “HI”:
Main burners
15,000 BTU/Hr.
Total
15,000 BTU/Hr.
The installation of this appliance must conform with local codes or, in the absence of local codes, with either the National Fuel Gas Code, ANSI Z223.1/NFPA 54, National Gas Propane Installation Code, CSA B149.1, or Propane Storage and Handling Code, B149.2.
A dented or rusty Liquid Propane cylinder may be hazardous and should be checked by your supplier. Never use a cylinder with a damaged valve. The Liquid Propane cylinder must be constructed and marked in accordance with the specifications for Liquid Propane cylinders by the United States Department of Transportation (DOT) or the National Standard of Canada, CAN/CSA-B339, Cylinders, Spheres and Tubes for Transportation of Dangerous Goods Commission.
The 20-lb cylinder must have a shut off valve terminating in a valve outlet specified, as applicable, for connection type QCC1 in the standard for compressed gas cylinder valve outlet and inlet connection ANSI/CGA-V-1.
Storage of an outdoor cooking gas appliance indoor is permissible only if the cylinder is disconnected and removed from the outdoor cooking gas appliance. The cylinder system must be arranged for vapor withdrawal. The cylinder must include a collar to protect the cylinder valve.
Manifold pressure: (operating) 11 inches water column (W.C.), (non-operating) 11.2 inches water column (W.C.).
The Liquid Propane cylinder must be fitted with an Overfill Protection Device (OPD). Remove the plastic valve cover from the Liquid Propane cylinder. Make sure the grill gas hoses do not contact the grease pan or grill firebox when the Liquid Propane cylinder is placed into the cart.
CONNECTING THE LIQUID PROPANE CYLINDER
To connect the Liquid Propane gas supply cylinder:
The cylinder valve should be in the “OFF” position. If not, turn the valve clockwise until it stops.
Make sure the cylinder valve has the proper type-1 external male thread connections per ANSI Z21.81.
Make sure the burner valves are in the “OFF” position.
Inspect the valve connections, port and regulator assembly. Remove debris and inspect the hose for damage.
When connecting the regulator assembly to the valve, use your hand to tighten the nut clockwise until it stops. Use of a wrench could damage the quick coupling nut and result in a hazardous situation
Open the cylinder valve fully by turning the valve counterclockwise.
Before lighting the grill, use a soap and water solution to check all the connections for leaks.
If a leak is found, turn the cylinder valve “OFF” and do not use the grill until a local Liquid Propane dealer can make repairs.
Note: Do not over extend the hose to reach the propane tank. The hose should have some slack in it to ensure it does not tip.
DISCONNECTING THE LIQUID PROPANE CYLINDER
Turn the grill burner valves “OFF” and make sure the grill is cool.
Turn the Liquid Propane cylinder valve “OFF” by turning clockwise until it stops.
Detach the regulator assembly from the cylinder valve by turning the quick coupling nut counterclockwise.
Place dust cap on cylinder valve outlet whenever the cylinder is not in use. Only install the type of dust cap on the cylinder valve outlet that is provided with the cylinder valve. Other types of caps or plugs may result in leakage of propane.
LEAK TESTING – GENERAL
Although gas connections on the grill are leak tested prior to shipment, a complete leak test must be performed at the installation site. Before each use, check all gas connections for leaks using the procedures listed below.
If the smell of gas is detected at any time, you should immediately check the entire system for leaks.
BEFORE TESTING
Make sure all packing materials have been removed from the grill, including the burner tie-down straps.
WARNING Check all gas supply fittings for leaks before each use. Do not use the grill until all connections have been checked and do not leak. Do not smoke while leak testing. Never leak test with an open flame.
Make a solution of one part liquid detergent and one part water. You will need a spray bottle, brush, or rag to apply the solution to the fittings. For the initial leak test, make sure the Liquid Propane cylinder is full.
TO TEST
Turn the burner valves off.
Turn the Liquid Propane cylinder valve counterclockwise to open the valve.
Apply the soap solution to all gas fittings. Soap bubbles will appear where a leak is present.
If a leak is present, immediately turn the gas supply “OFF” and tighten leaky fittings.
Turn the gas back “ON” and recheck.
Should the gas continue to leak from any of the fittings, turn the gas supply “OFF” and contact customer service at 866-994-6390 or email [email protected]
If there is evidence of excessive abrasion or wear, or the hose is cut, it must be replaced prior to the outdoor cooking gas appliance being put into operation.
Only those parts recommended by the manufacturer should be used on the grill. Substitutions will void the warranty.
WARNING Do not store grill indoors unless the cylinder is disconnected. Do not store cylinder in a building, garage, or any other enclosed area, and keep area, and keep out of reach of children at all times.
INSTALLER FINAL CHECK
Maintain specified clearance of 36 inches from combustible materials and construction.
All internal packaging has been removed.
The hose and regulator are properly connected to the Liquid Propane cylinder
The unit has been tested and is free of leaks.
The gas supply shutoff valve has been located.
All burners are installed.
Keep the instruction manual for future reference
WARNING
The grill and its individual shutoff valve must be disconnected from the gas supply piping system during any pressure testing of that system at test pressure in excess of 1/2-in.PSI (3.5kpa).
The outdoor cooking gas appliance must be isolated from the gas supply piping system by closing its individual manual shutoff valve during any pressure testing of the gas supply piping system at test pressure equal to or less than 1/2-in.PSI (3.5kpa).
WARNING
Do not store spare Liquid Propane cylinders under or near this appliance.
Never fill the cylinder beyond 80 percent capacity.
If the information in item 1&2 is not followed exactly, a fire causing death or serious injury may occur.
OPERATING INSTRUCTIONS
LIGHTING THE GRILL
Make sure the propane cylinder is tightly threaded into the regulator (hand tighten only).
Open lid. Always open lid when lighting
Push and turn Main burner knob slowly to IGNITE/HI as shown, burner should light immediately.
If ignition does not occur in 3-5 seconds, turn the control knob “OFF”. Wait 5 minutes before attempting to re-light the grill. If the grill fails to ignite after the second attempt, call customer service at 866-994-6390 for assistance. With burner lit, gently close the lid and allow the grill to warm up for 5 minuets prior to use.
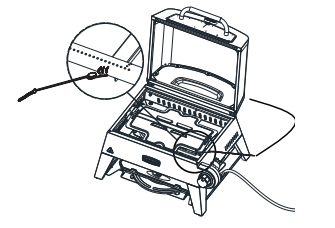
Note: If the knob can’t spark insert the match into the lighting rod as show below. Ignite the match and insert though the cooking grids to the burner.
Push
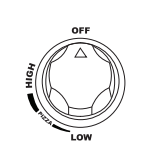
Turn knob to Ignite/Hi
Adjust flame
TURNING THE GRILL OFF
Turn knob to “OFF” position.
Turn the propane cylinder control knob to the “OFF” position. Caution: Do not attempt to re-light the grill without following all the lighting instructions.
Allow the grill body to cool at least 30 minutes before attempting to move or transport.
Remove and clean grease tray prior to transporting, then reinstall.
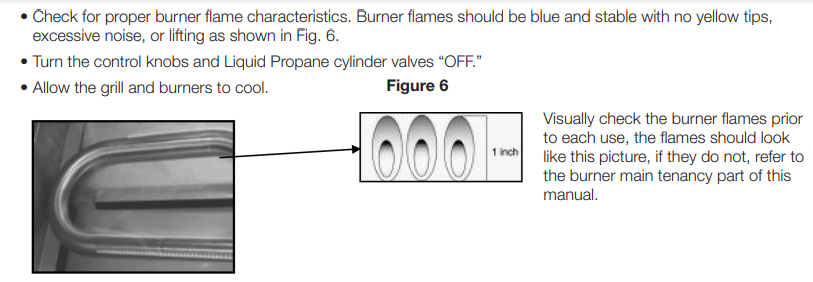
FLAME CHARACTERISTICS
CARE AND MAINTENANCE
There is very little care and maintenance needed. The 3-in-1 Pizza Oven Plus is designed and made of materials that will last many years with normal use. Following these instructions will improve the longevity and quality of cooking. To ensure safe operation of your grill, the area of cooking should always be kept free of combustible materials of any type, such as gasoline or other flammable vapors or liquids.
Outside Grill Parts - This is stainless steel. It can be cleaned easily with warm soapy water or any stainless steel cleaner.
Cooking Grid and Grease Tray – The cooking grid is made of cast iron. The cooking grid should be brushed with a steel brush immediately after cooking, while the grill is still warm. The grease tray can be cleaned with a flat scraper such as a putty knife.
Caution: The grease tray must be kept clean and free of heavy buildup for the grill to perform properly and to eliminate flareups
Firebox - Use warm soapy water to clean this area. Do not allow grease to build up.
Drain Hole – The drain hole must be kept clear of grease and food particles to allow drippings to drain properly into the grease tray. This must be done to maintain proper operation of your grill.
General - This grill, like all equipment, will look better and last longer if kept out of the weather when not in use.
Caution: Do not store propane cylinders in enclosed areas. When using a cover or moving the grill, always wait until the grill has cooled for at least 30 minutes
Not obstruct the flow of combustion and ventilation air.
A clogged tube can lead to a fire beneath the appliance.
This unit must be kept in an area free from combustible materials, gasoline and other flammable vapors and liquids.
Make sure all openings into the grill body are free of blockages or debris and there are no objects or materials blocking the flow of combustion or ventilation.
Check burner air inlet openings (behind the inlet guard on the right end of the grill body) for insect nests or blockages. Make sure the slots in the burner tube are clear.
When the grill is not in use, turn the control knob to the “OFF” position and remove the propane cylinder from the regulator. Remove the regulator from the burner.
For outdoor use only, if stored indoors, detach propane cylinder and store outdoors. Propane cylinders must be stored out of reach of children.
IMPORTANT
First-time use: It is important that the grill be lit and allowed to heat up for at least 30 minutes before any food is placed on the cooking grid. It is normal for some smoke to appear during the initial operation of the grill. After initial heating, the grill is ready for use. A cooking spray can be used on the cooking grids to allow easier clean up.
THIS COOKING APPLIANCE IS FOR OUTDOOR USE ONLY AND SHALL NOT BE USED IN A BUILDING, GARAGE OR ANY OTHER ENCLOSED AREA.
MOVING INSTRUCTIONS
Caution: Never move the grill with burner lit.
Make sure control knob is in the “OFF” position. Disconnect the propane cylinder from the regulator.
Be sure the grill has completely cooled for at least 30 minutes.
Close the lid and secure the latch. Remove and clean grease tray, then reinstall. Place the legs in the down position. Use the handle to carry the grill.
Note: It is best to leave the grease tray in place attached to the bottom of the grill-some grease may continue to drip from drain hole during transport.
DOOR ADJUSTMENT
The 3-in-1 Pizza Oven Plus is designed for optimal performance right out of the box. After repeated use and heating of the unit, your pizza oven door may require a slight adjustment. If while using your 3-in-1 Pizza Oven Plus you feel that the pizza oven door latch is too tight or too loose, follow the instructions below to tune the latch to your own personal preference. There is also a short instructional video on our YouTube channel (@CuisinartBBQ) to assist with this adjustment. If you require further assistance, please contact our consumer care department Monday-Friday, 9am-5pm EST by phone at 1-866-994- 6390 or by email at [email protected].
STEP 1
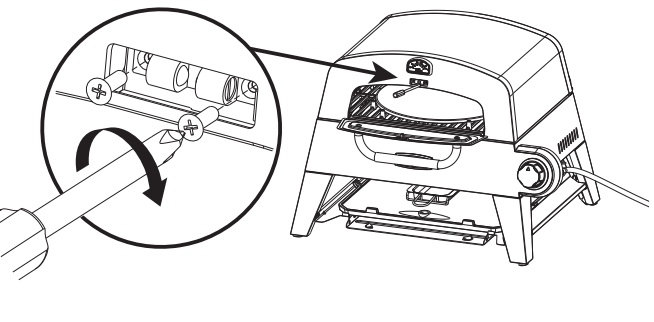
Remove the latch holder from the front of the lid using a Phillips head screwdriver
STEP 2
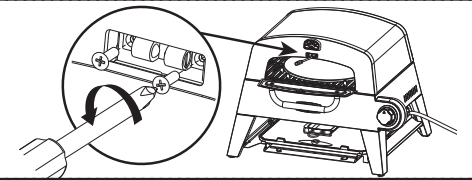
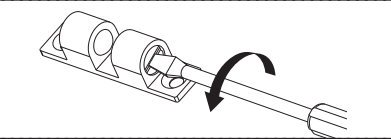
Using a flat-head screw driver, rotate the screws on both sides of the latch holder a ¼ turn counter-clockwise or clockwise to either loosen or tighten the latch holder according to your personal preference.
STEP 3
Re-install the latch holder to the front of the lid using a Phillips head screwdriver.
TROUBLE SHOOTING
WARNING Spiders and insects can nest inside the burners of the grill and disrupt gas flow. This very dangerous condition could cause a fire behind the valve panel, thereby damaging the grill and making it unsafe for operation. Inspect the grill at least twice a year.
When to Look for Spiders
You should inspect the burner at least twice a year or immediately after any of the following conditions occur:
The smell of gas in conjunction with burner flames appearing yellow.
The grill does not reach temperature.
The grill heats unevenly.
The burner make popping noises.
BEFORE CALLING FOR SERVICE
If the grill does not function properly, use the following checklist before contacting customer service.
Problems
What To Do
Grill will not light.
Check to see if the liquid propane cylinder is empty.
Check burner ports for any blockage. Use a soft wire brush to clear plugged ports.
Check the gas orifice on the burner for an obstruction. If orifice is blocked, clean with a needle or thin wire. NEVER USE A WOODEN TOOTHPICK.
Burner flame is yellow or orange in conjunction with gas odor.