
user manual
\
100 % )
Recycled Paper
with 100 % recycled pap_
the possibilities
Thank you for purchasing this Samsuncj product.
Congratulations on your new Samsung
microwave oven, This manual contains important
information on the installation, use and care of
your appliance, Please take time to read this
manual to take full advantage of your microwave
oven's many benefits and features,
WHATYOUNEEDTOKNOW
ABOUTSAFETYINSTRUCTIONS
Warnings and Important Safety Instructions in this manual
do not cover all possible conditions and situations that
may occur. It is your responsibility to use common sense,
caution, and care when installing, maintaining, and
operating your microwave oven.
PRECAUTIONSTOAVOID
POSSIBLEEXPOSURETO
EXCESSIVEMICROWAVE
ENERGY
A. Do not attempt to operate this oven with the door
open since open-door operation can result in harmful
exposure to microwave energy. It is important not to
defeat or tamper with the safety interlocks.
B. Do not place any object between the oven front
face and the door or allow soil or cleaner residue to
accumulate on the sealing surface.
C. Do not operate the oven if it is damaged. It is
particularly important that the oven door closes
properly and that:
1. The door is not bent or damaged
2. The hinges and latches are not broken or loosened
3. The door seals and sealing surface are clean and
operative.
D. The oven should not be adjusted or repaired by
anyone except properly qualified service personnel.
IMPORTANTSAFETYSYMBOLS
AND PRECAUTIONS
What the icons and signs in this user
manual mean:
CAUTION
CAUTION
Hazards or unsafe practices that
may result in severe personal
injury or death.
Hazards or unsafe practices that
may result in minor personal
injury or property damage.
To reduce the risk of fire,
explosion, electric shock, or
personal injury when using your
microwave oven, follow these
basic safety precautions.
Do NOT attempt.
Do NOT disassemble.
Do NOT touch.
Follow directions explicitly.
Unplug the power plug from the wall
socket.
Make sure the machine is grounded to
prevent electric shock.
Call the service center for help.
[_ Note
These warning signs are here to prevent
injury to you and others. Please follow them
explicitly. After reading this section, keep it
in a safe place for future reference.
SAVETHESEINSTRUCTIONS
English - 2

iMPORTANTSAFETY
iNSTRUCTiONS
When using any electrical appliance, basic safety
precautions should be followed, including the following:
i'k WARNING
WARNING
To reduce risk of burns, electric shock, fire, personal
injury or exposure to excessive microwave energy:
1. Read all safety instructions before using the appliance.
2. Read and follow the specific "Precautions to avoid
possible exposure to excessive microwave energy" on
this page.
3. This appliance must be grounded. Connect only to
properly grounded outlets. See Important "Grounding
instructions" on page 4 of this manual.
4. Install or locate this appliance only in accordance with
the provided installation instructions.
5. Some products such as whole eggs and sealed
containers (for example, sealed glass jars), can
explode if heated rapidly. Never heat them in a
microwave oven.
6. Use this appliance only for its intended use as
described in the manual. Do not put corrosive
chemicals or vapors in or on this appliance. This type
of oven is specifically designed to heat, cook, or dry
food. It is not designed for industrial or laboratory use.
7. As with any appliance, close supervision is necessary
when it is used by children.
8. Do not operate this appliance if it has a damaged
power cord or plug, if it is not working properly, or if it
has been damaged or dropped.
9. This appliance should be repaired or serviced only
by qualified service personnel. Contact the nearest
authorized service facility for examination, repair, or
adjustment.
10. Do not cover or block any openings on the appliance.
11. Do not tamper with or make any adjustments or
repairs to the door.
12. Do not store this appliance outdoors. Do not use this
product near water, for example, near a kitchen sink,
in a wet basement, near a swimming pool, or similar
locations.
13. Do not immerse the power cord or plug in water.
14. Keep the cord away from heated surfaces. (including
the back of the oven).
15. Do not let the cord hang over the edge of a table or
counter.
16oWhen cleaning surfaces of the door and oven that
come together when the door closes, use only mild,
nonabrasive soaps, or detergents applied with a
sponge or soft cloth. Unplug the microwave before
cleaning.
17. To reduce the risk of fire in the oven cavity.
ao Do not overcook food. Carefully attend appliance
when paper, plastic, or other combustible materials
are placed inside the oven to facilitate cooking.
b. Remove wire twist-ties from paper or plastic bags
before placing the bags in the oven.
co If materials inside the oven ignite, keep the oven
door closed, turn the oven off, and disconnect the
power cord, or shut off the power at the fuse or
circuit breaker panel. If the door is opened, the fire
may spread.
do Do not use the cavity for storage purposes. Do not
leave paper products, cooking utensils, or food in
the cavity when it is not in use.
18. Liquids, such as water, milk, coffee, or tea can be
overheated beyond the boiling point without appearing
to be boiling. Visible bubbling or boiling when the
container is removed from the microwave oven is
not always present. THIS COULD RESULT IN VERY
HOT LIQUIDS SUDDENLY BOILING OVER WHEN
THE CONTAINER IS DISTURBED OR A SPOON OR
OTHER UTENSIL IS INSERTED INTO THE LIQUID. To
reduce the risk of injury:
a. Do not overheat liquid.
b. Stir liquid both before and halfway through heating it.
co Do not use straight-sided containers with narrow
necks.
do After heating, allow the container to stand in the
microwave oven for a short time before removing
the container.
e. Use extreme care when inserting a spoon or other
utensil into the container.
19. Oversized foods or oversized metal utensils should
not inserted in microwave / toaster oven as they may
create a fire of electric shock.
20. Do not clean with metal scouring pads. Piece can burn
off the pad and touch electrical parts involving a risk of
electric shock.
21. Do not use paper products when appliance is
operated in the toaster mode.
22. Do not store any materials, other than manufacturer's
recommended accessories, in this oven when not in use.
23. Do not cover racks or any other part of the oven with
metal foil. This will cause overheating of the oven.
CAUTION
CAUTION
1. Over The Range model Only.
Clean Ventilating Hoods Frequently.
Grease should not be allowed to accumulate on the
hood of the filter.
When flaming foods under the hood, turn the fan on.
Use care when cleaning the vent-hood filter.
Corrosive cleaning agents, such as lye-based oven
cleaner, may damage the filter.
2. Push Button type model Only.
Pre-caution for safe use to avoid possible exposure
to excessive micro oven energy : Do not attempt to
pull any part of the door by hand to open the door.
Open the door only utilizing the push button located
at front-right-bottom side.
SAVETHESEINSTRUCTIONS
English - 3
GROUNDINGiNSTRUCTiONS
This appliance must be grounded. In the event of an
electrical short circuit, grounding reduces the risk of
electric shock by providing an escape wire for the
electrical current. This appliance is equipped with a cord
that includes a grounding wire and a grounding plug.
The plug must be plugged into an outlet that is properly
installed and grounded.
WARNING
Improper use of the grounding plug can result in a risk of
electric shock.
,, Plug into a grounded 3 prong outlet. Do not remove
the third (grounding) prong. Do not use an adaptor or
otherwise defeat the grounding plug.
,, Consult a qualified electrician or service person if you
do not understand the grounding instructions or if you
are not sure if the appliance is properly grounded.
,, We do not recommend using an extension cord with
this appliance. If the power-supply cord is too short,
have a qualified electrician or serviceman install an
outlet near the appliance. However, if it is necessary
to use an extension cord, read and follow the "Use of
Extension Cords" section below.
Use of Extension Cords
A short power-supply cord is provided to reduce the risk
of your becoming entangled in or tripping over a longer
cord. Longer cord sets or extension cords are available
and you can use them if you exercise care. If you use a
long cord or extension cord:
1, The marked electrical rating of the cord set or
extension cord should be at least as great as the
electrical rating of the appliance.
2, The extension cord must be a grounding-type 3-wire
cord and it must be plugged into a 3-slot outlet.
3, The longer cord should be arranged so that it will not
drape over the counter top or tabletop where it can be
pulled on by children or tripped over accidentally. If you
use an extension cord, the interior light may flicker and
the speed of the blower may vary when the microwave
oven is on. Cooking times may be longer too.
/k
WARNING
CRITICAL
INSTALLATION
WARNINGS
This appliance must be installed by a qualified
technician or service company.
,, Failing to have a qualified technician install
the oven may result in electric shock, fire, an
explosion, problems with the product, or injury.
Unpack the oven, remove all packaging material and
examine the oven for any damage such as dents
on the interior or exterior of the oven, broken door
latches, cracks in the door, or a door that is not lined
up correctly. If there is any damage, do not operate
the oven and notify your dealer immediately.
®
@
@
Make sure to install your oven in a location with
adequate space.
Remove all foreign substances such as dust or water
from the power plug terminals and contact points
using a dry cloth on a regular basis.
,, Unplug the power plug and clean it with a dry
cloth.
Failing to do so may result in electric shock or fire.
Plug the power cord into a properly grounded
3 pronged outlet. Your oven should be the only
appliance connected to this circuit.
,, Sharing a wall socket with other appliances, using
a power strip, or extending the power cord may
result in electric shock or fire.
,, Do not use an electric transformer. It may result in
electric shock or fire.
,, Ensure that the voltage, frequency and current
provided match the product's specifications.
Failing to do so may result in electric shock or fire.
Keep all packaging materials out of the reach of
children. Children may use them for play.
This appliance must be properly grounded. Read
and follow the specific "Grounding instructions"
found in the beginning of this Section. Do not ground
the appliance to a gas pipe, plastic water pipe, or
telephone line.
This may result in electric shock, fire, an
explosion, or problems with the product
,, Never plug the power cord into a socket that is
not grounded correctly and make sure that it is in
accordance with local and national codes.
Do not cut or remove the third (ground) prong from
the power cord under any circumstances.
Connect the oven to a 20A circuit. If you connect the
oven to a 15A circuit, make sure that circuit breaker
is operable.
Do not install this appliance in a humid, oily, or dusty
location, or in a location exposed to direct sunlight or
water (rain drops).
This may result in electric shock or fire.
Plug the power plug into the wall socket firmly. Do
not use a damaged power plug, damaged power
cord, or loose wall socket.
This may result in electric shock or fire.
Do not mount over a sink.
Do not pull or excessively bend the power cord.
Do not twist or tie the power cord.
Do not hook the power cord over a metal object,
place a heavy object on the power cord, insert the
power cord between objects, or push the power
cord into the space behind the appliance.
This may result in electric shock or fire.
Do not pull the power cord when you unplug the
oveR.
,, Unplug the oven by pulling the plug only.
Failing to do so may result in electric shock or fire.
SAVETHESEINSTRUCTIONS
English - 4
Whenthepowerplugorpowercordisdamaged,
contactyournearestservicecenterfora
replacementorrepair.
INSTALLATION
CAUTION
CAUTIONS
Do not attempt to repair, disassemble, or modify the
appliance yourself.
,, Because a high voltage current enters the product
chassis during operation, opening the chassis can
result in electric shock or fire.
,, You may be exposed to electromagnetic waves.
When the oven requires repair, contact your
nearest service center.
[_ osition the oven so that the plug is easily
accessible.
Failing to do so may result in electric shock or fire
due to electric leakage.
@
If any foreign substance such as water enters the
microwave, unplug it and contact your nearest
service center.
Failing to do so may result in electric shock or fire.
Unplug the oven when it is not being used for long
periods of time or during a thunder/lightning storm.
Failing to do so may result in electric shock or
fire.
A CRITICAL USAGE
WARNING
WARNINGS
lf the microwave appliance is flooded please contact
your nearest service center : Failing to do so may
result in electric shock or fire.
Read and follow the specific "Precautions to Avoid
Possible Exposure to Excessive Microwave Energy",
found in the beginning of this Section.
If the microwave generates a strange noise, a
burning smell, or smoke, unplug it immediately and
contact your nearest service center.
• Failing to do so may result in electric shock or fire.
In the event of a gas leak (propane gas, LP gas,
etc.), ventilate the room immediately. Do not touch
the microwave, power cord, or plug.
,, Do not use a ventilating fan.
• A spark may result in an explosion or fire.
Take care that the door or any of the other parts do
not come into contact with your body while cooking
or just after cooking.
• Failing to do so may result in burns.
In the event of a grease fire on the surface units
below the oven, smother the flaming pan on the
surface unit by covering the pan completely with a
lid, a cookie sheet or a flat tray.
Never leave surface units beneath your oven
unattended at high heat settings. Boil overs cause
smoking and greasy spillovers that may ignite and
spread if the vent fan is operating. To minimize
automatic fan operation, use adequate sized
cookware and use high heat on surface units only
when necessary.
If materials inside the oven should ignite, keep the
oven door closed, turn the oven off, and disconnect
the power cord, or shut off power at the fuse or
circuit breaker panel. If the door is opened, the fire
may spread.
,, Always observe Safety Precautions when using
your oven. Never try to repair the oven on your
own. There is dangerous voltage inside. If the
oven needs to be repaired, contact an authorized
service center near you.
@
Do not touch the power plug with wet hands.
,, This may result in electric shock.
Do not turn the appliance off by unplugging the
power plug while the appliance is in operation.
,, Plugging the power plug into the wall socket again
may cause a spark and result in electric shock or
fire.
Keep all packaging materials well out of the reach of
children. Packaging materials can be dangerous to
children.
,, If a child places a bag over its head, the child can
suffocate
Do not let children or any person with reduced
physical, sensory or, mental capabilities use this
appliance unsupervised.
Make sure that the appliance is out of the reach of
children.
• Failing to do so may result in electric shock,
burns, or injury.
• Keep children away from the door when opening
or closing it as they may bump themselves on the
door or catch their fingers in the door.
Do not touch the inside of the appliance immediately
after cooking. The inside of the appliance will be hot.
,, The heat on the inside of the oven can cause
burns.
Do not put aluminum foil (except as specifically
directed in this manual), metal objects (such as
containers, forks, etc.), or containers with golden or
silver rims into the microwave.
,, These objects can cause sparks or a fire.
Do not use or place flammable sprays or objects
near the oven.
,, Heat from the microwave can cause flammable
sprays to explode or burn.
• Failing to do so may result in electric shock or
injury.
Do not tamper with or make any adjustments or
repairs to the door. Under no circumstances should
you remove the outer cabinet.
Do not store or use the oven outdoors.
SAVETHESEINSTRUCTI0NS
English - 5
USAGE CAUTIONS @
lf the surface of the microwave is cracked, turn it off.
Failing to do so may result in electric shock.
Dishes and containers can become hot. Handle with
care.
Hot foods and steam can cause burns. Carefully
remove container coverings, directing steam away
from your hands and face.
Remove lids from baby food before heating. After
heating baby food, stir well to distribute the heat
evenly. Always test the temperature by tasting before
feeding the baby. The glass jar or surface of the food
may appear to be cooler than the food in the interior,
which can be so hot that it will burn the infant's
mouth.
Make sure all cookware used in the oven is suitable
for microwaving.
Use microwavable cookware in strict compliance
with such manufacturer's recommendations.
Do not stand on top of the microwave or place
objects (such as laundry, oven covers, lighted
candles, lighted cigarettes, dishes, chemicals, metal
objects, etc.) on the appliance.
,, Items, such as a cloth, may get caught in the
door.
This may result in electric shock, fire, problems
with the product, or injury.
Do not operate the appliance with wet hands.
This may result in electric shock.
Do not spray volatile material such as insecticide
onto the surface of the appliance.
,, As well as being harmful to humans, it may also
result in electric shock, fire, or problems with the
product.
Do not place the appliance over a fragile object such
as a sink or glass object.
,, This may result in damage to the sink or glass
object.
Do not put your face or body close to the appliance
while cooking or when opening the door just after
cooking.
,, Take care that children do not come too close to
the appliance.
Failing to do so may result in children burning
themselves.
Do not place food or heavy objects over the door
when opening the door.
The food or object may fall and this may result in
burns or injury.
Do not abruptly cool the door, the inside of the
appliance, or the dish by pouring water over it during
or just after cooking.
,, This may result in damage to the appliance. The
steam or water spray may result in burns or injury.
Do not try to preheat the oven or operate it while
empty.
Do not cook without the glass tray in place on the
oven floor. Food will not cook properly without the
tray.
Do not defrost frozen beverages in narrow-necked
bottles. The containers can break.
Do not scratch the glass of the oven door with a
sharp object.
,, This may result in the glass being damaged or
broken.
Do not store anything directly on top of the appliance
when it is in operation.
Do not use sealed containers. Remove seals and lids
before use. Sealed containers can explode due to
buildup of pressure even after oven has been turned
off.
/t,, CRITICAL CLEANING
WARNING
INSTRUCTIONS
Do not clean the appliance by spraying water directly
onto it.
Do not use benzene, thinner, or alcohol to clean the
appliance.
This may result in discoloration, deformation,
damage, electric shock, or fire.
Before cleaning or performing maintenance, unplug
the appliance from the wall socket and remove food
waste from the door and cooking compartment.
Failing to do so may result in electric shock or fire.
Take care not to hurt yourself when cleaning the
appliance (external/internal)
You may hurt yourself on the sharp edges of the
appliance.
Do not clean the appliance with a steam cleaner.
This may result in corrosion.
Keep the inside of the oven clean. Food particles or
spattered oils stuck to the oven walls or floor can
cause paint damage and reduce the efficiency of the
oven.
/k
WARNING
STATE OF CALIFORNIA
PROPOSITION 65
WARNINGS:
This product contains chemicals known to the State of
California to cause cancer and reproductive toxicity.
SAVETHESEINSTRUCTIONS
English - 6
ont nt
SETTING UP YOUR MICROWAVE OVEN
',,,,,,s
8 Checking the parts
8 Warranty and service information
8 Setting up your microwave oven
9 Features
9 The control panel
10 Setting the time
10 Child lock
10 Options
USING YOUR MICROWAVE OVEN
10 Kitchen timer button
i
10 Add 30 sec button
10 Vent buttons (4 speed & on/off)
10 Vent delay off button
10 Light hi/Io/off button
11 Set timer button
11 Turntable on/off button
11 Metal shelf
11 Eco mode
12 Sensor cooking buttons
12 Reheat button
13 Auto defrost button
14 Fit choice button
14 1 Pound defrost button
15 Soften/melt button
15 Kids meals button
16 Snacks button
16 Microwave cooking times &
Power levels
17 Keep warm
17 Favorite cook button
COOKWARE GUIDE
_ 17 Microwave-safe utensils
COOKING GUIDE
18
..........19
19
2O
2O
2O
2O
General microwave tips
Cooking meat
Cooking poultry
Cooking seafood
Cooking eggs
Cooking vegetables
Recipes
CLEANING AND MAiNTAiNING YOUR MICROWAVE
OVEN
21 Cleaning the exterior
21 Cleaning the interior
22 Cleaning the turntable and roller
rings
22 Storing and repairing your
microwave oven
22 Replacing the cooktop/night light
22 Replacing the oven light
22 Cleaning the grease filter
23 Replacing the charcoal filter
TROUBLESHOOTING
APPENDIX
WARRANTY (USA)
/
WARRANTY (CANADA)
f-_
English - 7
P
Be sure to fallow these instructions closely so
that your new microwave oven works properly,
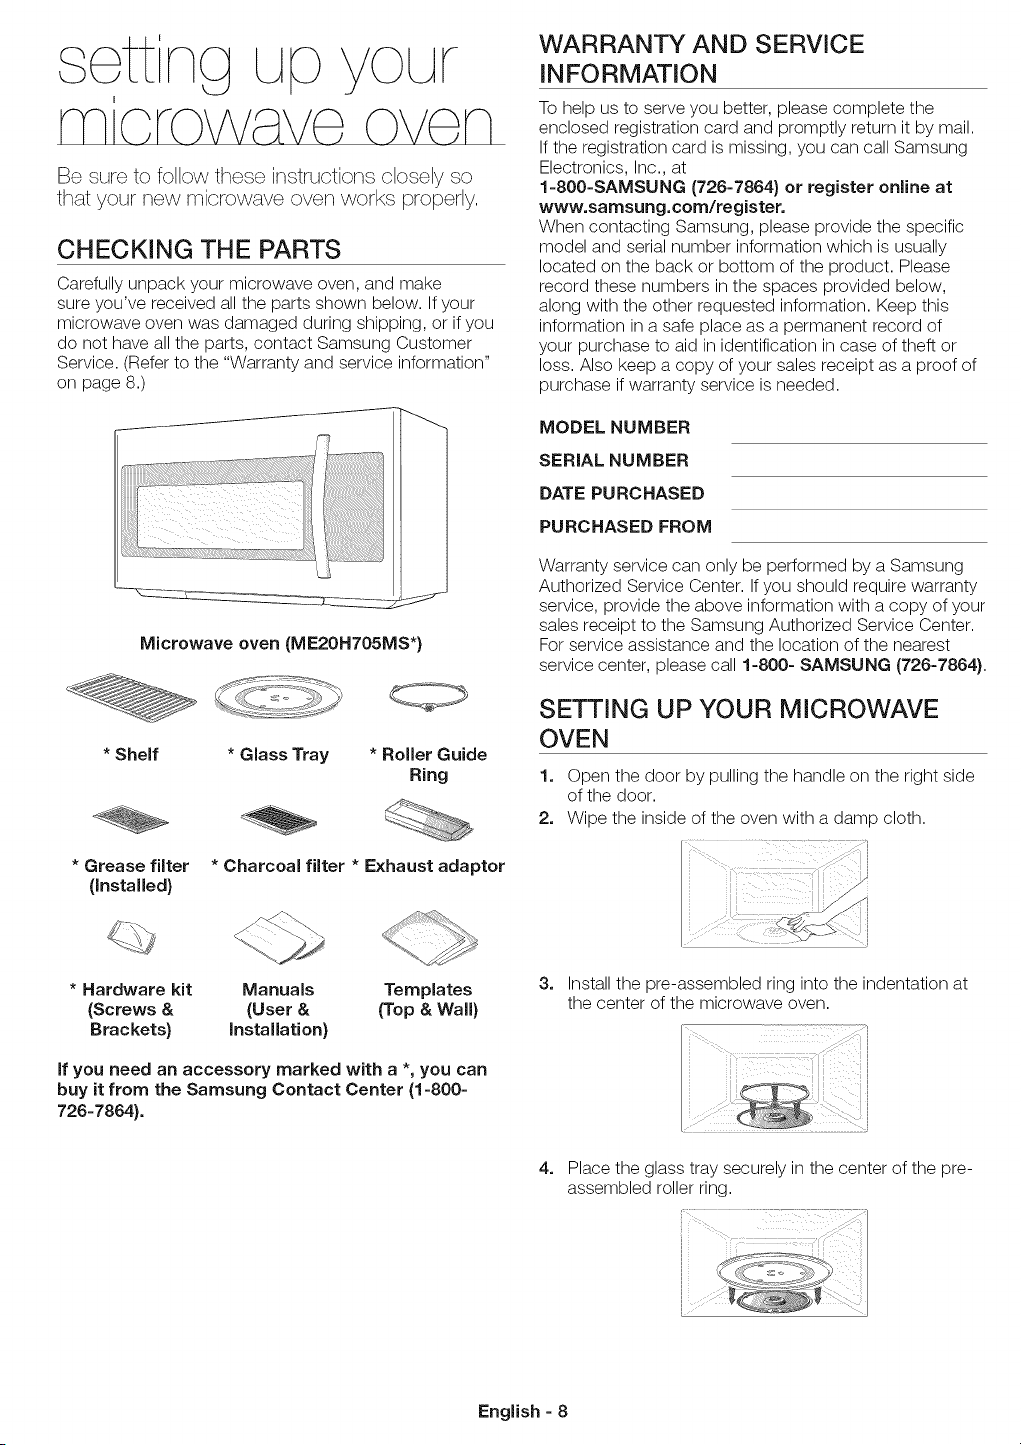
CHECKING THE PARTS
Carefully unpack your microwave oven, and make
sure you've received all the parts shown below. If your
microwave oven was damaged during shipping, or if you
do not have all the parts, contact Samsung Customer
Service. (Refer to the "Warranty and service information"
on page 8.)
Microwave oven (ME20H705MS*)
* Shelf
* Grease filter
(Installed)
* Glass Tray * Roller Guide
Ring
* Charcoal filter * Exhaust adaptor
WARRANTY AND SERVICE
INFORMATION
To help us to serve you better, please complete the
enclosed registration card and promptly return it by mail.
If the registration card is missing, you can call Samsung
Electronics, Inc., at
1-8OO-SAMSUNG (726=7864) or register online at
www.samsung.com/register.
When contacting Samsung, please provide the specific
model and serial number information which is usually
located on the back or bottom of the product. Please
record these numbers in the spaces provided below,
along with the other requested information. Keep this
information in a safe place as a permanent record of
your purchase to aid in identification in case of theft or
loss. Also keep a copy of your sales receipt as a proof of
purchase if warranty service is needed.
MODEL NUMBER
SERIAL NUMBER
DATE PURCHASED
PURCHASED FROM
Warranty service can only be performed by a Samsung
Authorized Service Center. If you should require warranty
service, provide the above information with a copy of your
sales receipt to the Samsung Authorized Service Center.
For service assistance and the location of the nearest
service center, please call 1-800- SAMSUNG (726-7864).
SETTING UP YOUR MICROWAVE
OVEN
1, Open the door by pulling the handle on the right side
of the door.
2, Wipe the inside of the oven with a damp cloth.
* Hardware kit Manuals Templates
(Screws & (User & (Top & Wall)
Brackets) Installation)
If you need an accessory marked with a *, you can
buy it from the Samsung Contact Center (1-800-
726-7864).
3. Install the pre-assembled ring into the indentation at
the center of the microwave oven.
4=
Place the glass tray securely in the center of the pre-
assembled roller ring.
English - 8
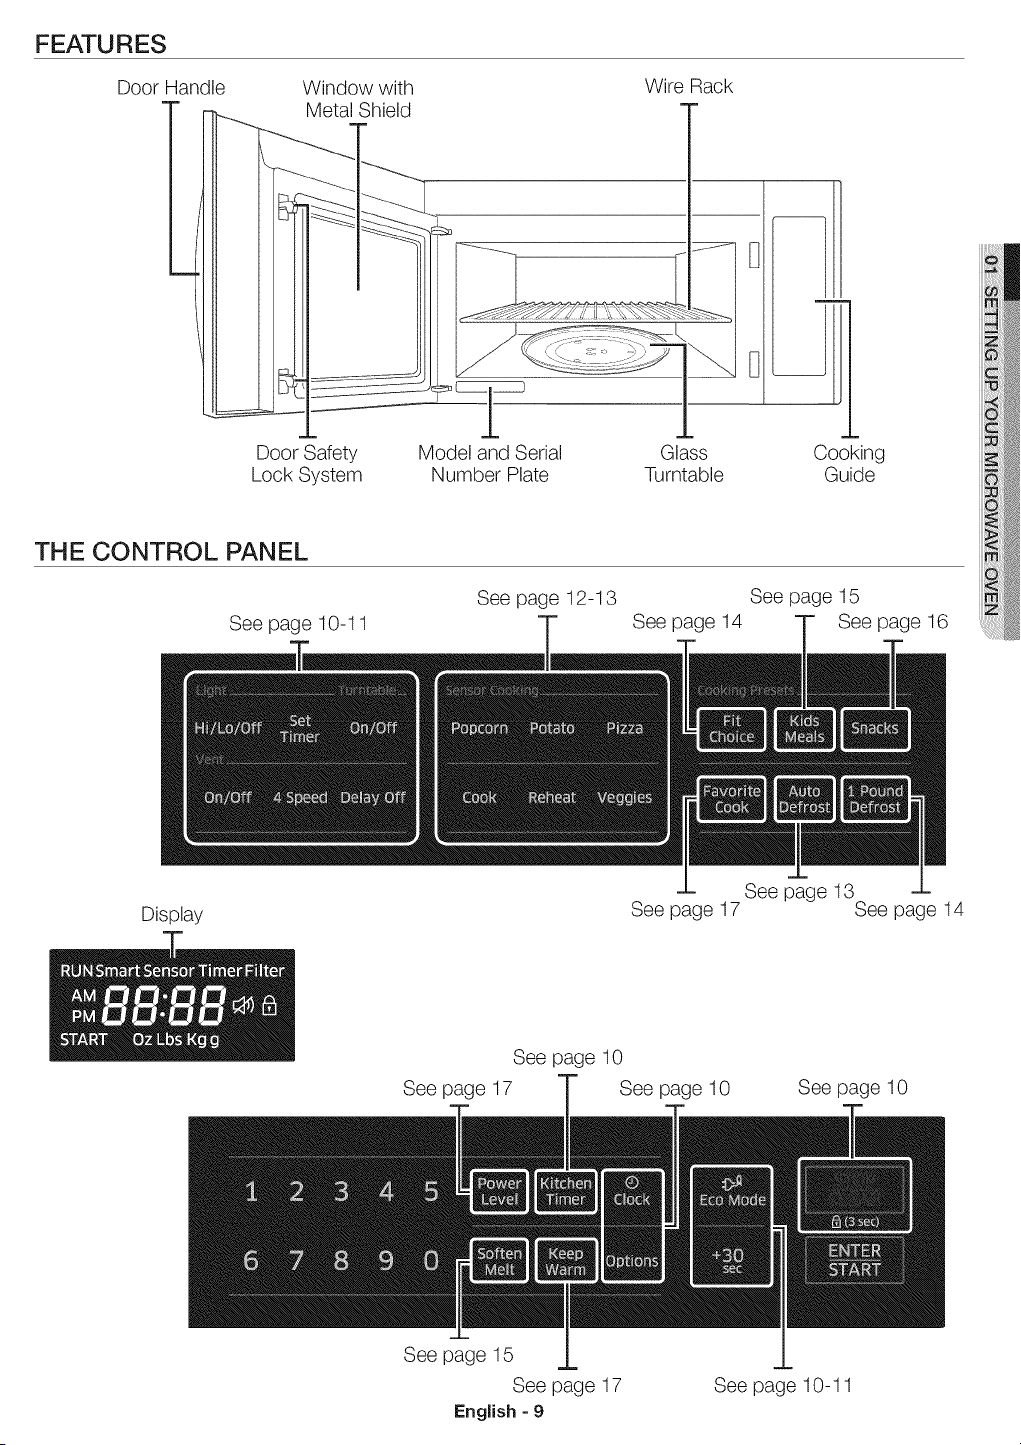
FEATURES
Door Handle
mm
Window with
Metal Shield
Door Safety
Lock System
Wir_ Rack
U
Model and Serial Glass Cooking
Number Plate Turntable Guide
THE CONTROL PANEL
See page 10-11
See page 12-13 See page 15
See page 14 See page 16
Display
See page 13
See page 17 See page 14
See page 10
See page 17 See page 10 See page 10
See page 15
See page 17
English - g
See page 10-11
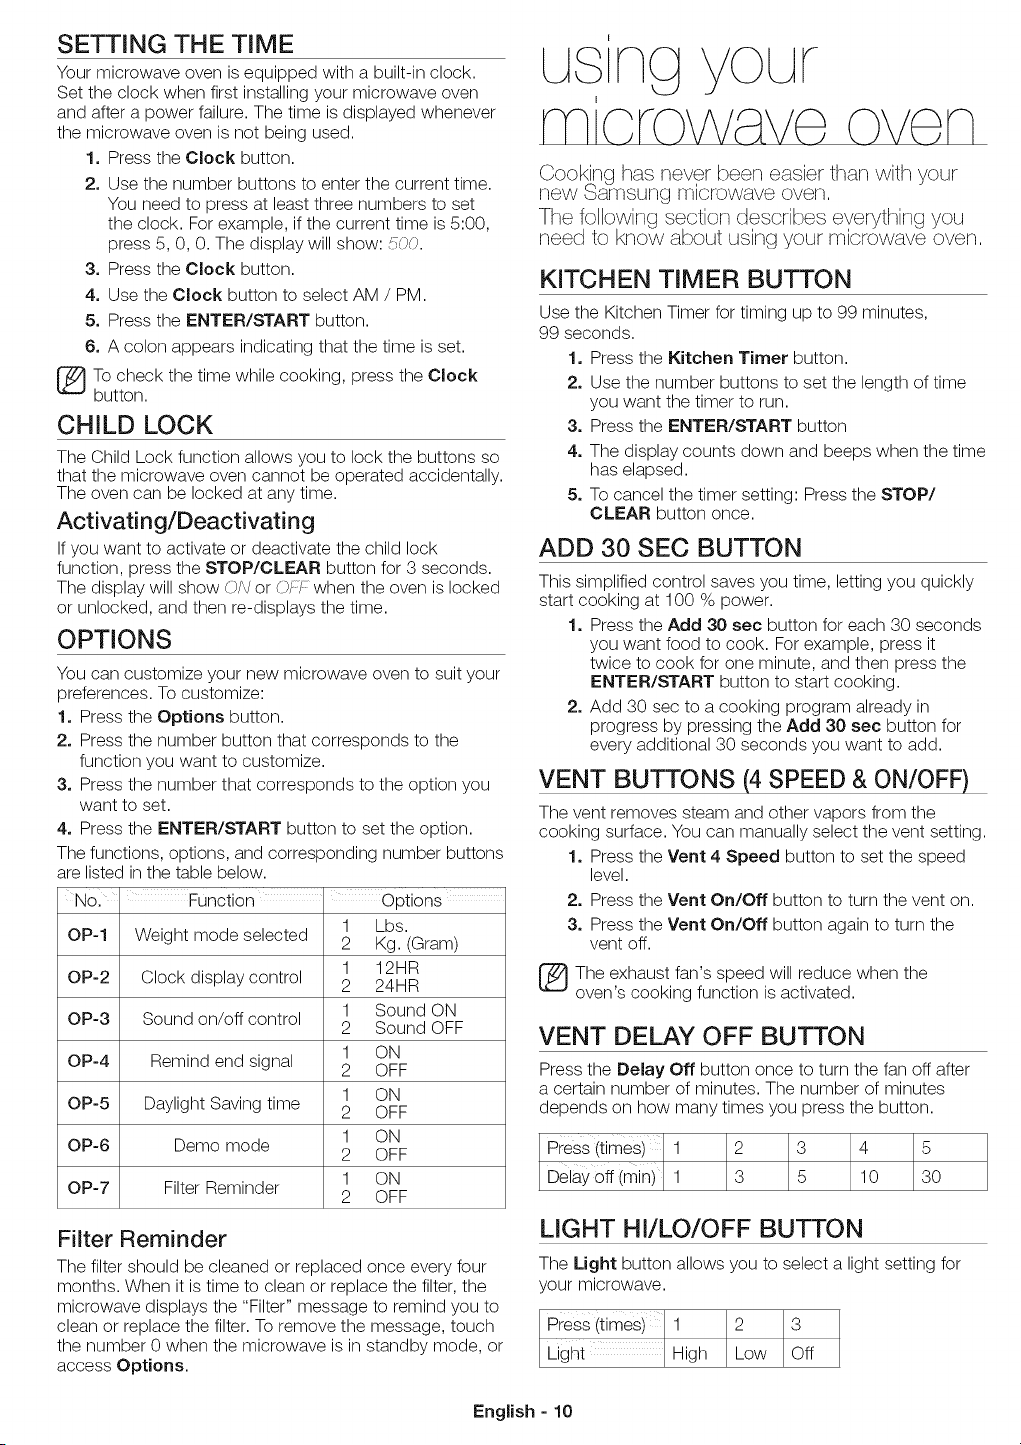
SETTING THE TIME
Your microwave overs is equipped with a built-in clock.
Set the clock when first installing your microwave oven
and after a power failure. The time is displayed whenever
the microwave oven is not being used.
1. Press the Clock button.
2. Use the number buttons to enter the current time.
You need to press at least three numbers to set
the clock. For example, if the current time is 5:00,
press 5, 0, 0. The display will show: 500.
3. Press the Clock button.
4. Use the Clock button to select AM / PM.
5. Press the ENTER/START button.
6. A colon appears indicating that the time is set.
To check the time while cooking, press the Clock
button.
CHILD LOCK
The Child Lock function allows you to lock the buttons so
that the microwave oven cannot be operated accidentally.
The oven can be locked at any time.
Activating/Deactivating
If you want to activate or deactivate the child lock
function, press the STOP/CLEAR button for 3 seconds.
The display will show ON or ©Si when the oven is locked
or unlocked, and then re-displays the time.
OPTIONS
You can customize your new microwave oven to suit your
preferences. To customize:
1. Press the Options button.
2. Press the number button that corresponds to the
function you want to customize.
3. Press the number that corresponds to the option you
want to set.
4. Press the ENTER/START button to set the option.
The functions, options, and corresponding number buttons
are listed in the table below.
Nol Function Options ....
1 Lbs.
OP-1 Weight mode selected 2 Kg. (Gram)
1 12HR
OP-2 Clock display control 2 24HR
OP-3 Sound on/off control 1 Sound ON
2 Sound OFF
1 ON
OP-4 Remind end signal 2 OFF
1 ON
OP-5 Daylight Saving time 2 OFF
1 ON
OP-6 Demo mode
2 OFF
1 ON
OP-7 Filter Reminder
2 OFF
Filter Reminder
The filter should be cleaned or replaced once every four
months. When it is time to clean or replace the filter, the
microwave displays the "Filter" message to remind you to
clean or replace the filter. To remove the message, touch
the number 0 when the microwave is in standby mode, or
access Options.
Cook_ng has never been easbr than with your
new Samsung mbrowave oven,
The following section describes everything you
need to know about using your mbrowave oven,
KITCHEN TIMER BUTTON
Use the Kitchen Timer for timing up to 99 minutes,
99 seconds.
1. Press the Kitchen Timer button.
2. Use the number buttons to set the length of time
you want the timer to run.
3. Press the ENTER/START button
4. The display counts down and beeps when the time
has elapsed.
5. To cancel the timer setting: Press the STOP/
CLEAR button once.
ADD 30 SEC BUTTON
This simplified control saves you time, letting you quickly
start cooking at 100 % power.
1. Press the Add 30 sec button for each 30 seconds
you want food to cook. For example, press it
twice to cook for one minute, and then press the
ENTER/START button to start cooking.
2. Add 30 sec to a cooking program already in
progress by pressing the Add 30 sec button for
every additional 30 seconds you want to add.
VENT BUTTONS (4 SPEED & ON/OFF)
The vent removes steam and other vapors from the
cooking surface. You carsmanually select the verst setting.
1. Press the Vent 4 Speed button to set the speed
level.
2. Press the Vent On/Off button to turn the vent on.
3. Press the Vent On/Off button again to turn the
vent off.
The exhaust fan's speed will reduce when the
oven's cooking function is activated.
VENT DELAY OFF BUTTON
Press the Delay Off button once to turn the fan off after
a certain number of minutes. The number of minutes
depends orshow many times you press the button.
Press (times)1 2 s 4 5
UelW0ff (min) 1 3 5 10 30
LIGHT Hi/LO/OFF BUTTON
The Light button allows you to select a light setting for
your microwave.
Press (times) 1 2 3
Light High Low Off
English - 10
SET TIMER BUTTON
You can set the microwave so the light turns on and off
automatically at a preset time. The light comes on at the
same time every day until reset.
1. Press the Set Timer button.
2. Use the number buttons to set the light on time.
3. Press the Clock button to select AM or PM.
4. Press the ENTER/START button.
5. Use the number buttons to set the light off time.
6. Press the Clock button to select AM or PM.
7. Press the ENTER/START button.
TURNTABLE ON/OFF BUTTON
For best cooking results, leave the turntable on. However,
for large dishes it can be turned off.
Press the Turntable On/Off button to turn the turntable
on or off.
z_ The turntable may become too hot to touch. Use
....... pot holders to touch the turntable during and after
cooking.
METAL SHELF
Use the metal shelf to cook more than one item at the
same time.
/k
CAUTION
Do not use a microwave browning dish on the
shelf. The shelf could overheat.
Do not use the oven with the shelf on the
microwave floor. This could damage the
microwave.
Use pot holders when handling the shelf as it
may be hot.
Do not use the metal shelf when cooking
popcorn.
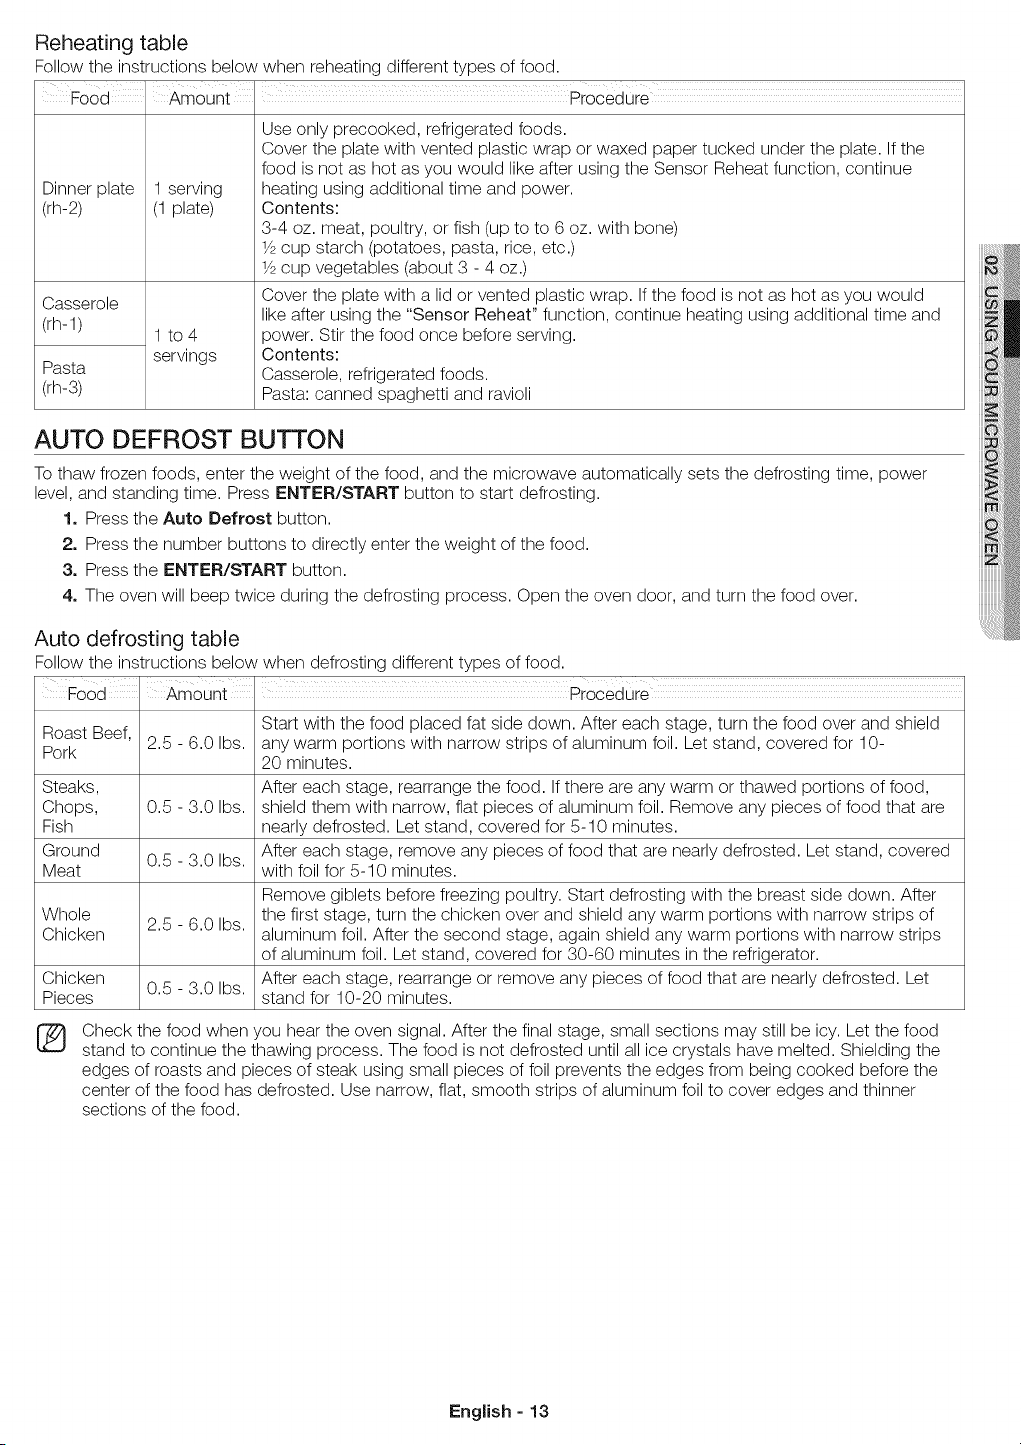
Food cooks best on the turntable.
For best results
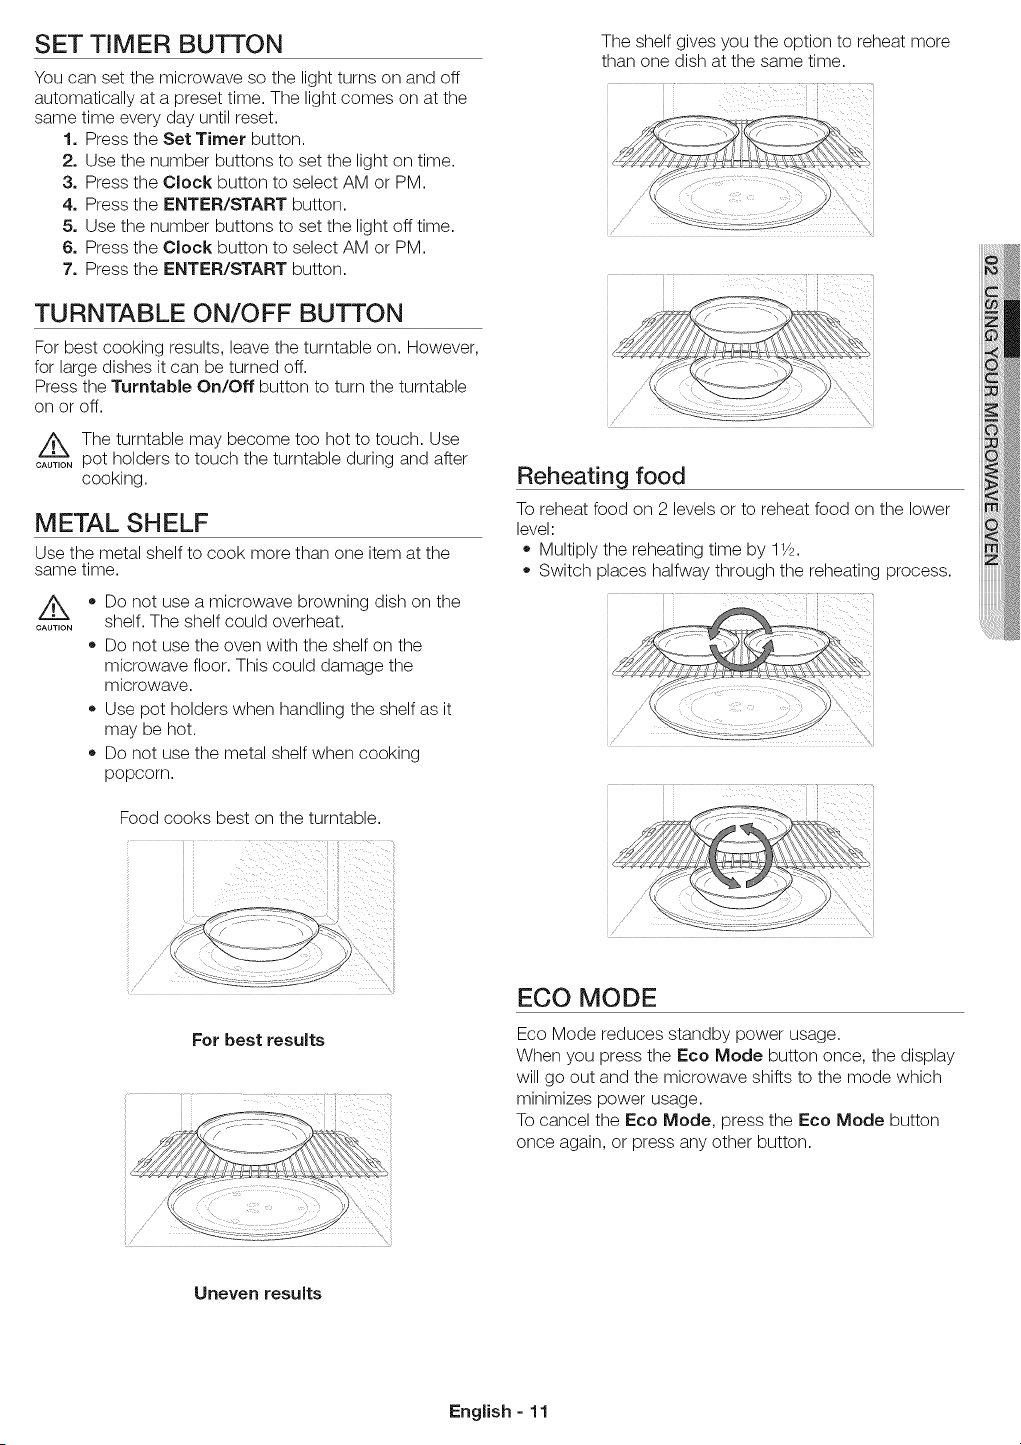
The shelf gives you the option to reheat more
than one dish at the same time.
x : r'i-qxi / ¸¸yi;i
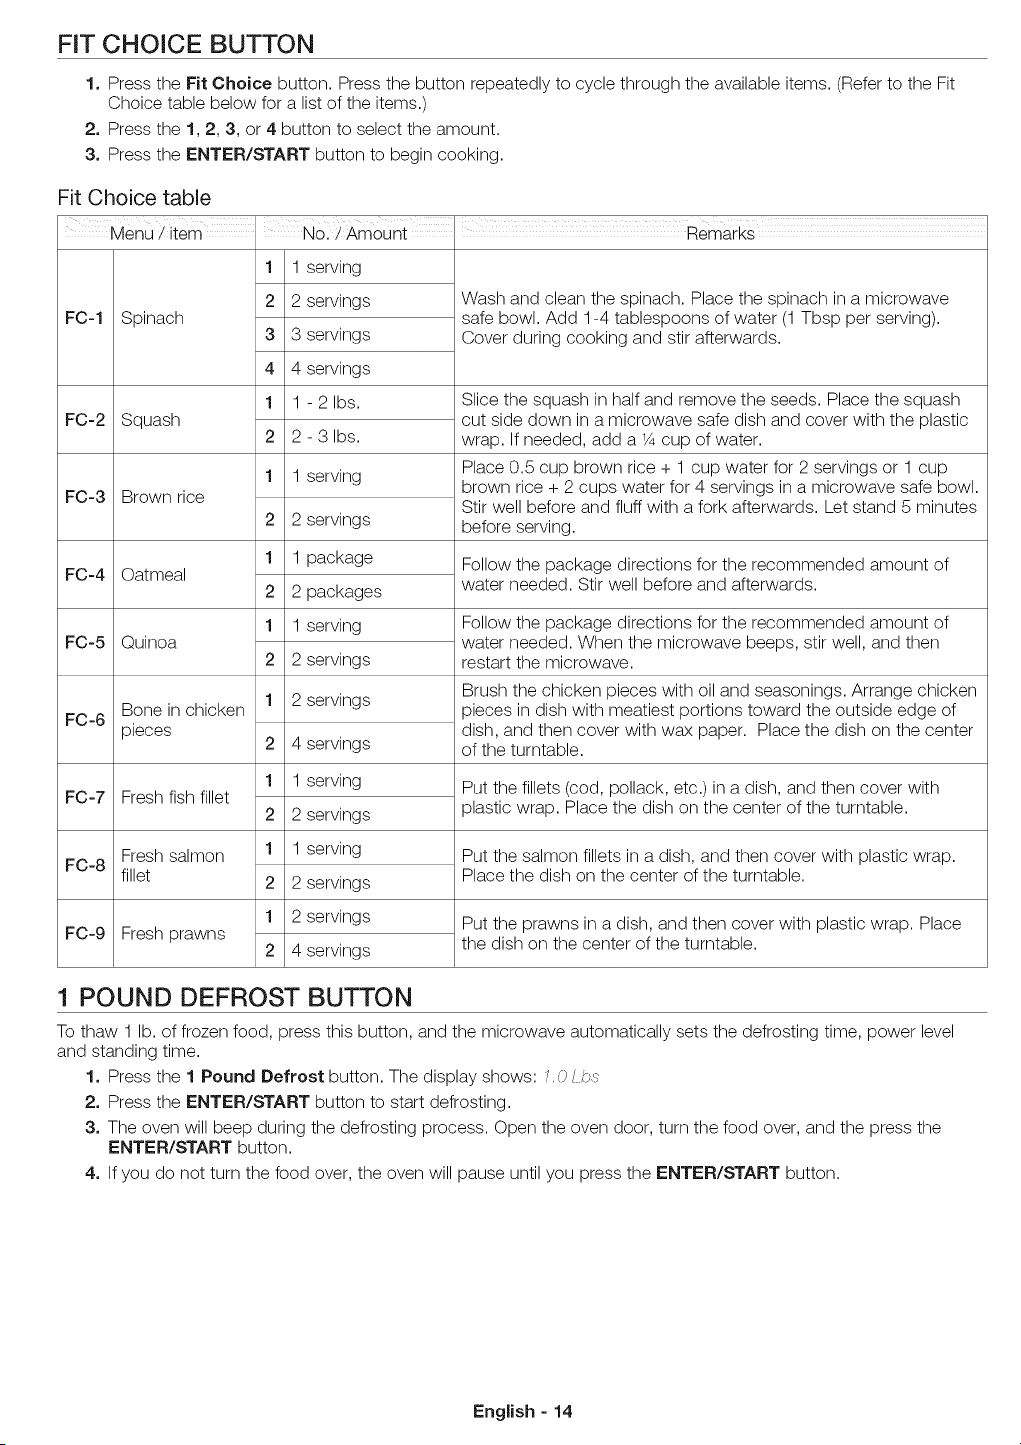
Reheating food
To reheat food on 2 levels or to reheat food on the lower
level:
Multiply the reheating time by 11_.
Switch places halfway through the reheating process.
ECO MODE
Eco Mode reduces standby power usage.
When you press the Eco Mode button once, the display
will go out and the microwave shifts to the mode which
minimizes power usage.
To cancel the Eco Mode, press the Eco Mode button
once again, or press any other button.
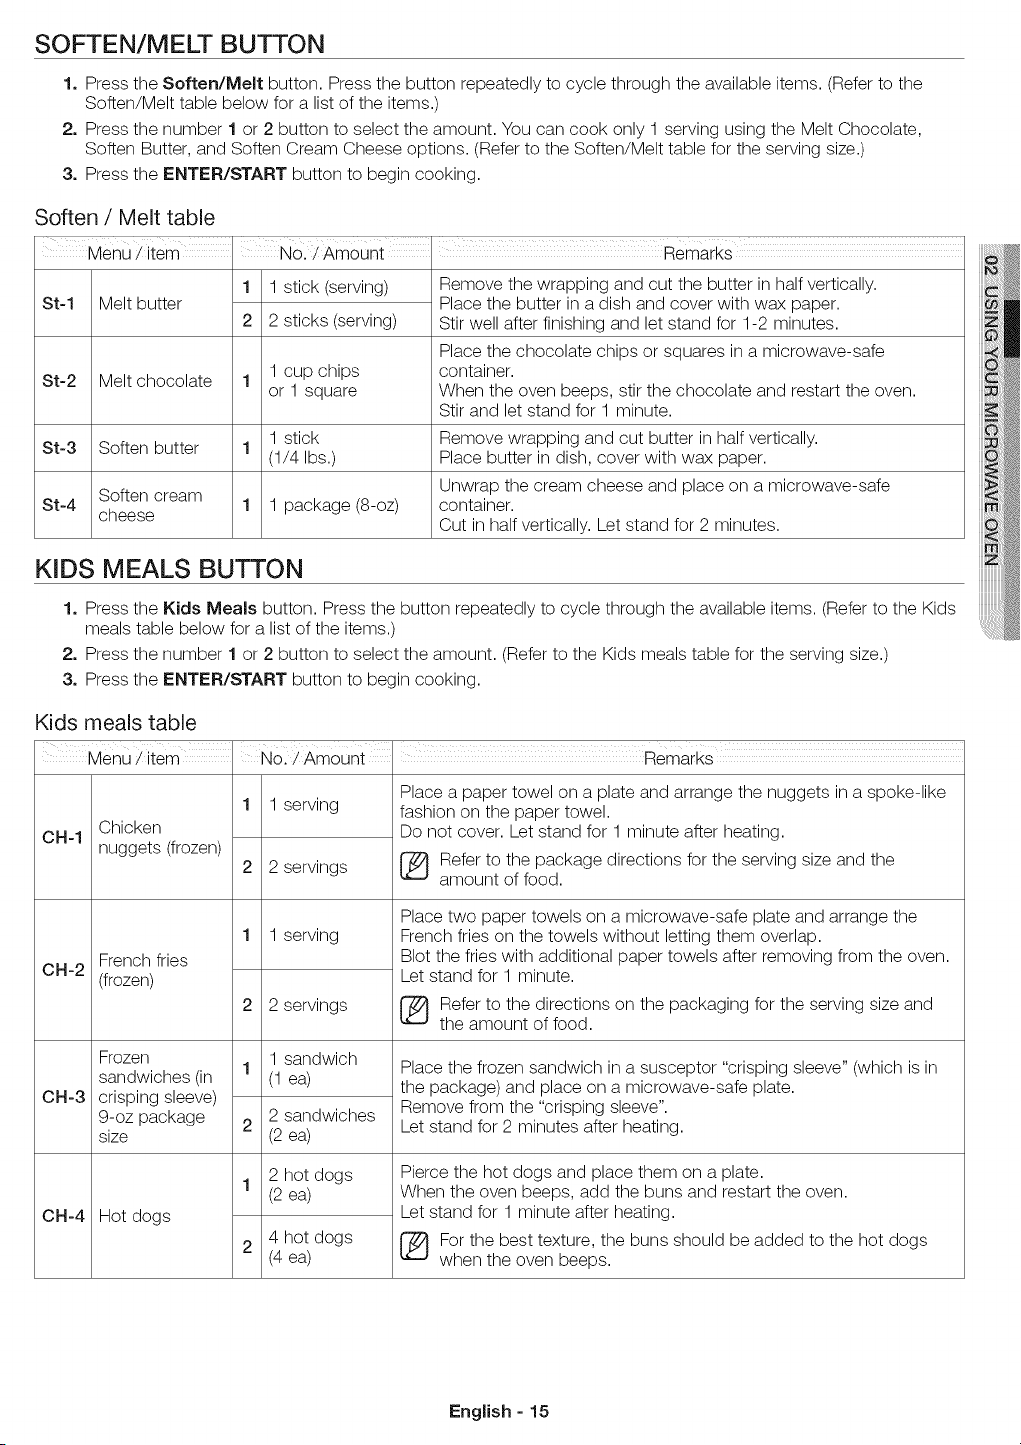
Uneven results
English - 11

SENSOR COOKING BUTTONS
The Sensor Cooking buttons let you cook favorite foods using preset power levels and times at the touch of a button.
If the food is not thoroughly cooked or reheated when you use the auto cook feature, complete the cooking process by
selecting a power level and cooking the food for an additional amount of time.
Do not use the Sensor Cooking buttons continuously. The oven must cool for 5 minutes between uses or the
....... food will overcook.
Sensor cooking utensils & covers
To obtain good cooking results using these functions, follow the directions for selecting appropriate containers and
covers in the Cookware Guide section on page 17-18.
Z_ Always use microwave-safe containers and cover with a lid or plastic wrap. When using plastic wrap, turn back
....... one corner to allow steam to escape.
CAUTION
(B
%
%
Fill containers at least half full.
Foods that require stirring or rotating should be stirred or turned at the end of the Sensor Cook cycle, when the
time has started to count down on the display.
Do not use the Auto Sensor cooking feature continuously. Wait 5 minutes before selecting another sensor cooking
operation.
For the best cooking results, do not use the Auto Sensor when the ambient room temperature is too high or too
low.
Sensor cooking table
I I
Food Amount i Procedure
3.0 - 3.5 oz. Heat only one microwave popcorn bag at a time. Be careful when removing
Popcorn 1 package the heated bag from the oven and opening it. Let the oven cool for at least
5 minutes before using it again.
Use a measuring cup or mug and do not cover. Place the beverage in the
Beverage 8 oz. oven. After heating, stir well. Let the oven cool for at least 5 minutes before
(Co-1) using it again.
Chicken
Place the chicken breasts in a microwave safe plate and cover with plastic
breast 8 to 16 oz.
(Co-2) wrap. Cook to an internal temperature of 170 °F. Let stand for 5 minutes.
Cook
Frozen Use this button for frozen sandwiches, breakfast entrees, pancakes, waffles,
breakfast 4 to 8 oz. etc. Follow the package instructions for covering and standing. Let the oven
(Co-3) cool for at least 5 minutes before using it again.
Frozen Remove the food from its wrapping and follow the instructions on the box
dinner 8 to 14 oz. for covering and letting stand. Let the oven cool for at least 5 minutes before
(Co-4) using it again.
Place the fresh vegetables in a microwave-safe ceramic, glass, or plastic dish
Fresh
vegetables 1 to 4 cups and add 2-4 tbs. water. Cover with a lid or vented plastic wrap while cooking
and stir before letting stand. Let the oven cool for at least 5 minutes before
(Fr-1) using it again.
Veggies Frozen Place the frozen vegetables in a microwave-safe ceramic, glass, or plastic
vegetables 1 to 4 dish and add 2-4 tbs. water. Cover with a lid or vented plastic wrap to cook.
(Fr-2) servings stir before letting stand for 3-5 minutes. Let the oven cool for at least 5
minutes before using it again.
Pierce each potato several times with a fork. Place on the turntable in a
1 to6
Potato spoke-like fashion. After cooking, let the potatoes stand for 3-5 minutes. Let
potatoes, the oven cool for at least 5 minutes before using it again.
Place 1-3 pizza slices on a microwave-safe plate with the wide ends of the
Pizza 1 to 3 slices slices towards the outside edge of the plate. Do not let the slices overlap. Do
not cover. Let the oven cool for at least 5 minutes before using it again.
REHEAT BUTTON
Heating leftovers and precooked foods is easy with your new microwave. By actually sensing the humidity that
escapes as the food is heated, the oven's heating time is automatically adjusted depending on the type and amount of
precooked food.
[_ ll food must ah'eady be precooked. Plates of food and casseroles should be stored at refrigerator temperature.
Press the Reheat button and ENTER/START button to begin reheating your precooked food. If you want to
check the current time while reheating, press the Clock button.
English - 12
Reheating table
Follow the instructions below when reheating different types of food.
Food Amount _ Procedure
Dinner plate
(rh-2)
Casserole
(rh-1)
1 serving
(1 plate)
1 to4
servings
Pasta
(rh-3)
Use only precooked, refrigerated foods.
Cover the plate with vented plastic wrap or waxed paper tucked under the plate. If the
food is not as hot as you would like after using the Sensor Reheat function, continue
heating using additional time and power.
Contents:
3-4 oz. meat, poultry, or fish (up to to 6 oz. with bone)
1_cup starch (potatoes, pasta, rice, etc.)
1_cup vegetables (about 3 - 4 oz.)
Cover the plate with a lid or vented plastic wrap. If the food is not as hot as you would
like after using the "Sensor Reheat" function, continue heating using additional time and
power. Stir the food once before serving.
Contents:
Casserole, refrigerated foods.
Pasta: canned spaghetti and ravioli
AUTO DEFROST BUTTON
To thaw frozen foods, enter the weight of the food, and the microwave automatically sets the defrosting time, power
level, and standing time. Press ENTER/START button to start defrosting.
1. Press the Auto Defrost button.
2. Press the number buttons to directly enter the weight of the food.
3. Press the ENTER/START button.
4. The oven will beep twice during the defrosting process. Open the oven door, and turn the food over.
Auto defrosting table
Follow the instructions below when defrosting different types of food.
i
Food Amount _ Procedure
Roast Beef, Start with the food placed fat side down. After each stage, turn the food over and shield
Pork 2.5 - 6.0 Ibs. any warm portions with narrow strips of aluminum foil. Let stand, covered for 10-
20 minutes.
Steaks, After each stage, rearrange the food. If there are any warm or thawed portions of food,
Chops, 0.5 - 3.0 Ibs. shield them with narrow, flat pieces of aluminum foil. Remove any pieces of food that are
Fish nearly defrosted. Let stand, covered for 5-10 minutes.
Ground 0.5 - 3.0 Ibs. After each stage, remove any pieces of food that are nearly defrosted. Let stand, covered
Meat with foil for 5-10 minutes.
Remove giblets before freezing poultry. Start defrosting with the breast side down. After
Whole 2.5 - 6.0 Ibs. the first stage, turn the chicken over and shield any warm portions with narrow strips of
Chicken aluminum foil. After the second stage, again shield any warm portions with narrow strips
of aluminum foil. Let stand, covered for 30-60 minutes in the refrigerator.
Chicken 0.5 - 3.0 Ibs. After each stage, rearrange or remove any pieces of food that are nearly defrosted. Let
Pieces stand for 10-20 minutes.
®
Check the food when you hear the oven signal. After the final stage, small sections may still be icy. Let the food
stand to continue the thawing process. The food is not defrosted until all ice crystals have melted. Shielding the
edges of roasts and pieces of steak using small pieces of foil prevents the edges from being cooked before the
center of the food has defrosted. Use narrow, flat, smooth strips of aluminum foil to cover edges and thinner
sections of the food.
English - 13
FIT GHOIGE BUTTON
1. Press the Fit Choice button. Press the button repeatedly to cycle through the available items. (Refer to the Fit
Choice table below for a list of the items.)
2. Press the 1,2, 3, or 4 button to select the amount.
3. Press the ENTER/START button to begin cooking.
Fit Choice table
FC-1 Spinach
FC-2 Squash
FC-3 Brown rice
FC-4 Oatmeal
FC-5 Quinoa
Bone in chicken
FC-6
pieces
FC-7 Fresh fish fillet
Fresh salmon
FC-8
fillet
FC-9 Fresh prawns
1
2
3
4
1
2
1
2
1
2
1
2
1
2
1
2
1
2
1
2
1 serving
2 servings
3 servings
4 servings
1 - 2 Ibs.
2 - 3 Ibs.
1 serving
2 servings
1 package
2 packages
1 serving
2 servings
2 servings
4 servings
1 serving
2 servings
1 serving
2 servings
2 servings
4 servings
Wash and clean the spinach. Place the spinach in a microwave
safe bowl. Add 1-4 tablespoons of water (1 Tbsp per serving).
Cover during cooking and stir afterwards.
Slice the squash in half and remove the seeds. Place the squash
cut side down in a microwave safe dish and cover with the plastic
wrap. If needed, add a X cup of water.
Place 0.5 cup brown rice + 1 cup water for 2 servings or 1 cup
brown rice + 2 cups water for 4 servings in a microwave safe bowl.
Stir well before and fluff with a fork afterwards. Let stand 5 minutes
before serving.
Follow the package directions for the recommended amount of
water needed. Stir well before and afterwards.
Follow the package directions for the recommended amount of
water needed. When the microwave beeps, stir well, and then
restart the microwave.
Brush the chicken pieces with oil and seasonings. Arrange chicken
pieces in dish with meatiest portions toward the outside edge of
dish, and then cover with wax paper. Place the dish on the center
of the turntable.
Put the fillets (cod, pollack, etc.) in a dish, and then cover with
plastic wrap. Place the dish on the center of the turntable.
Put the salmon fillets in a dish, and then cover with plastic wrap.
Place the dish on the center of the turntable.
Put the prawns in a dish, and then cover with plastic wrap. Place
the dish on the center of the turntable.
1 POUND DEFROST BUTTON
To thaw 1 lb. of frozen food, press this button, and the microwave automatically sets the defrosting time, power level
and standing time.
1. Press the 1 Pound Defrost button. The display shows: /.0 / b.s
2. Press the ENTER/START button to start defrosting.
3. The oven will beep during the defrosting process. Open the oven door, turn the food over, and the press the
ENTER/START button.
4. If you do not turn the food over, the oven will pause until you press the ENTER/START button.
English - 14
SOFTEN/MELT BUTTON
1. Press the Soften/Melt button. Press the button repeatedly to cycle through the available items. (Refer to the
Soften/Melt table below for a list of the items.)
2. Press the number 1 or 2 button to select the amount. You can cook only 1 serving using the Melt Chocolate,
Soften Butter, and Soften Cream Cheese options. (Refer to the Soften/Melt table for the serving size.)
3. Press the ENTER/START button to begin cooking.
Soften / Melt table
Menu J item I NO. iAm0unt I Remarks
st-1 Melt butter
1 1 stick (serving)
2 2 sticks (serving)
St-2 Melt chocolate 1 1 cup chips
or 1 square
1 stick
St-3 Soften butter 1
(1/4 Ibs.)
Soften cream
St-4 cheese 1 1 package (8-oz)
KIDS MEALS BUTTON
Remove the wrapping and cut the butter in half vertically.
Place the butter in a dish and cover with wax paper.
Stir well after finishing and let stand for 1-2 minutes.
Place the chocolate chips or squares in a microwave-safe
container.
When the oven beeps, stir the chocolate and restart the oven.
Stir and let stand for 1 minute.
Remove wrapping and cut butter in half vertically.
Place butter in dish, cover with wax paper.
Unwrap the cream cheese and place on a microwave-safe
container.
Cut in half vertically. Let stand for 2 minutes.
1. Press the Kids Meals button. Press the button repeatedly to cycle through the available items. (Refer to the Kids
meals table below for a list of the items.)
2. Press the number 1 or 2 button to select the amount. (Refer to the Kids meals table for the serving size.)
3. Press the ENTER/START button to begin cooking.
Kids meals table
Chicken
OH-1
nuggets (frozen)
French fries
OH-2
(frozen)
OH=3
OH=4
Frozen
sandwiches (in
crisping sleeve)
9-oz package
size
Hot dogs
1 1 serving
2 2 servings
1 1 serving
2 2 servings
1 sandwich
1
(1 ea)
2 sandwiches
2
(2 ea)
2 hot dogs
1
(2 ea)
4 hot dogs
2
(4 ea)
Place a paper towel on a plate and arrange the nuggets in a spoke-like
fashion on the paper towel.
Do not cover. Let stand for 1 minute after heating.
Refer to the package directions for the serving size and the
amount of food.
Place two paper towels on a microwave-safe plate and arrange the
French fries on the towels without letting them overlap.
Blot the fries with additional paper towels after removing from the oven.
Let stand for 1 minute.
Refer to the directions on the packaging for the serving size and
the amount of food.
Place the frozen sandwich in a susceptor "crisping sleeve" (which is in
the package) and place on a microwave-safe plate.
Remove from the "crisping sleeve".
Let stand for 2 minutes after heating.
Pierce the hot dogs and place them on a plate.
When the oven beeps, add the buns and restart the oven.
Let stand for 1 minute after heating.
For the best texture the buns should be added to the hot dogs
when the oven beeps.
English - 15
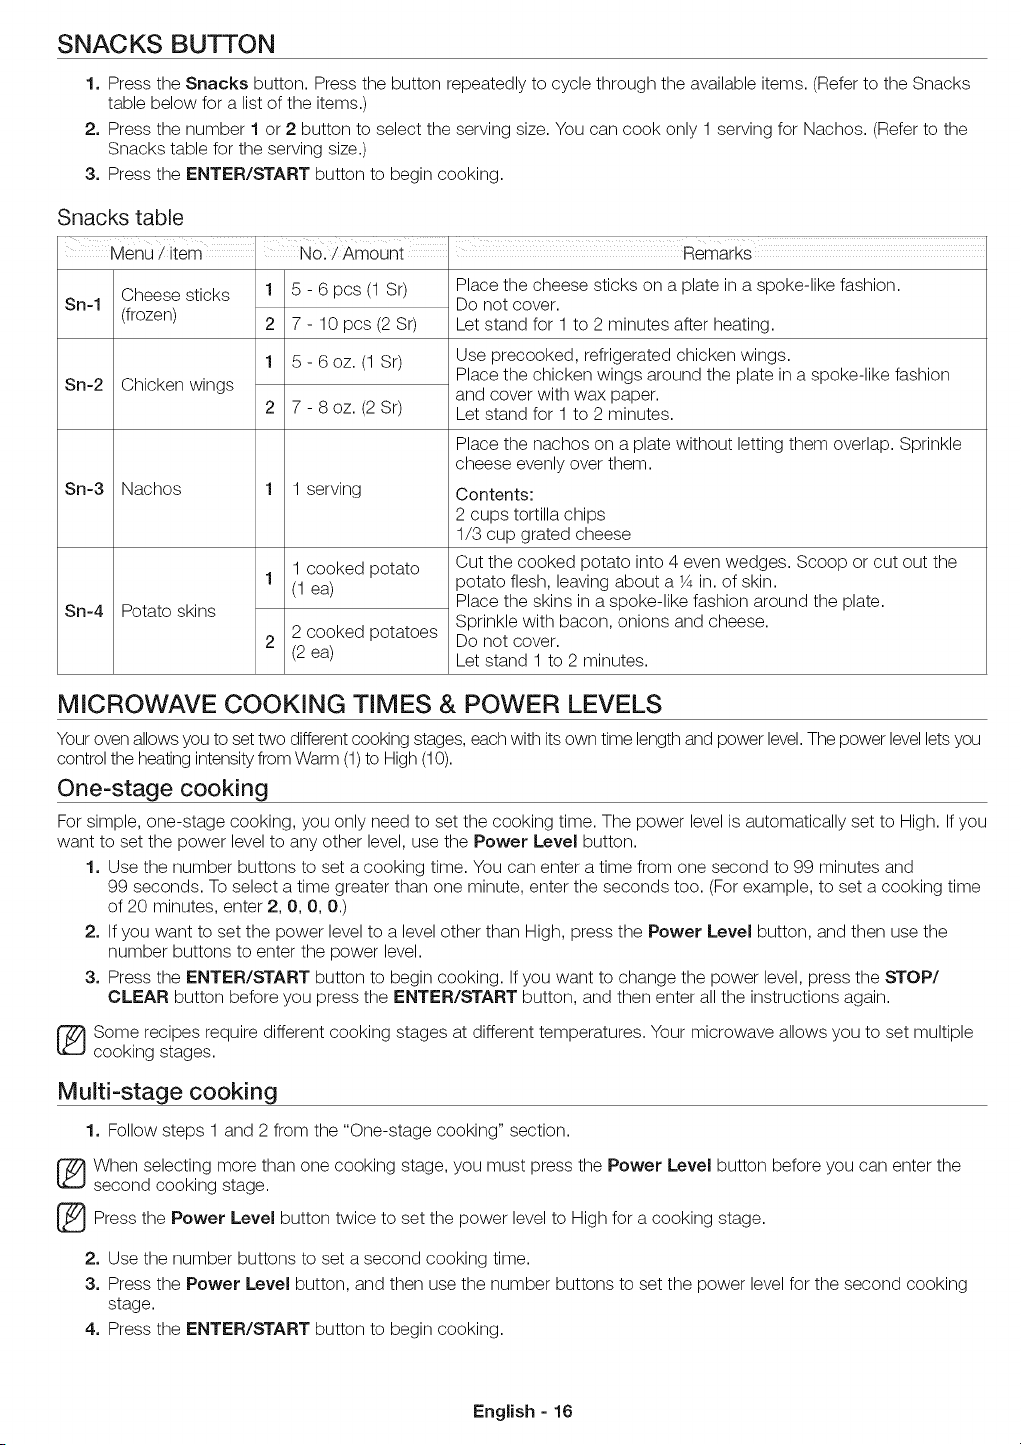
SNACKS BUTTON
1. Press the Snacks button. Press the button repeatedly to cycle through the available items. (Refer to the Snacks
table below for a list of the items.)
2. Press the number 1 or 2 button to select the serving size. You can cook only 1 serving for Nachos. (Refer to the
Snacks table for the serving size.)
3. Press the ENTER/START button to begin cooking.
Snacks table
Menu/item i No./Amount I Remarks
Cheese sticks
Sn-1
(frozen)
Sn-2 Chicken wings
Sn-3 Nachos
1 5-6pcs(1Sr)
2 7-10pcs(2Sr)
1 5-6oz.(1Sr)
2 7 - 8 oz. (2 Sr)
1 1 serving
1 cooked potato
1
(1 ea)
2 cooked potatoes
2
(2 ea)
Sn-4 Potato skins
Place the cheese sticks on a plate in a spoke-like fashion.
Do not cover.
Let stand for 1 to 2 minutes after heating.
Use precooked, refrigerated chicken wings.
Place the chicken wings around the plate in a spoke-like fashion
and cover with wax paper.
Let stand for 1 to 2 minutes.
Place the nachos on a plate without letting them overlap. Sprinkle
cheese evenly over them.
Contents:
2 cups tortilla chips
1/3 cup grated cheese
Cut the cooked potato into 4 even wedges. Scoop or cut out the
potato flesh, leaving about a 1_ in. of skin.
Place the skins in a spoke-like fashion around the plate.
Sprinkle with bacon, onions and cheese.
Do not cover.
Let stand 1 to 2 minutes.
MICROWAVE COOKING TIMES & POWER LEVELS
Your oven allows you to set two different cooking stages, each with its own time length and power level.The power level lets you
control the heating intensity from Warm (1)to High (10).
One-stage cooking
For simple, one-stage cooking, you only need to set the cooking time. The power level is automatically set to High. If you
want to set the power level to any other level, use the Power Level button.
1. Use the number buttons to set a cooking time. You can enter a time from one second to 99 minutes and
99 seconds. To select a time greater than one minute, enter the seconds too. (For example, to set a cooking time
of 20 minutes, enter 2, O, O, 0.)
2. If you want to set the power level to a level other than High, press the Power Level button, and then use the
number buttons to enter the power level.
3. Press the ENTER/START button to begin cooking. If you want to change the power level, press the STOP/
CLEAR button before you press the ENTER/START button, and then enter all the instructions again.
[_ ome recipes require different cooking stages at different temperatures. Your microwave allows you to set multiple
cooking stages.
Multi-stage cooking
1. Follow steps 1 and 2 from the "One-stage cooking" section.
(_ hen selecting more than one cooking stage, you must press the Power Level button before you can enter the
second cooking stage.
[_ Press the Power Level button twice to set the power level to High for a cooking stage.
2. Use the number buttons to set a second cooking time.
3. Press the Power Level button, and then use the number buttons to set the power level for the second cooking
stage.
4. Press the ENTER/START button to begin cooking.
English - 16
Power Levels
The 10 power levels allow you to choose the optimal
power level for your cooking needs.
1 Warm 6 Simmer
2 Low 7 Medium high
3 Defrost 8 Reheat
4 Medium low 9 Saut_
5 Medium 10 High
KEEP WARM
You can keep cooked food warm in your microwave oven
for up to 99 minutes 99 seconds.
1. Press the Keep Warm button.
2. Enter the warming time.
3. Press the ENTER/START button.
[_ eep Warm operates for up to 99 minutes 99
seconds.
[_ ood that is cooked covered should also be
covered during Keep Warm.
_ astry items (pies, turnovers, etc.) should be
uncovered during Keep Warm.
(_ omplete meals kept warm on a dinner plate can
be covered during Keep Warm.
Below are the amounts of food we recommend you apply
the Warm and Hold function to by Food Type.
F0od type Recommended Quantity
Liquid 1 - 2 cups
Dry 5 - 10 oz.
FAVORITE COOK BUTTON
The Favorite Cook button lets you store a customized
set of cooking instructions, and recall this setting later
from the microwave's memory to begin cooking quickly.
_Only one set can at a
of instructions be stored time.
1. Press the Favorite Cook button.
2. Use the number buttons to enter the cooking time.
The display will show the set time.
3. Press the Power Level button and use the number
buttons to enter the power level. The display will show
the selected power level. You can set the power level
from 0 to 9. If you do not set the Power Level, the
oven sets itself to the highest level automatically.
4. Press the ENTER/START button again.
5. To retrieve a Favorite Cook setting, press the Favorite
Cook button, then press the ENTER/START button.
* You cars only recall one stored Custom Cook setting
at a time.
6. If you want to set a new time and power level, repeat
steps 1-5.
You can check the power level anytime while
cooking by pressing the Power Level button.
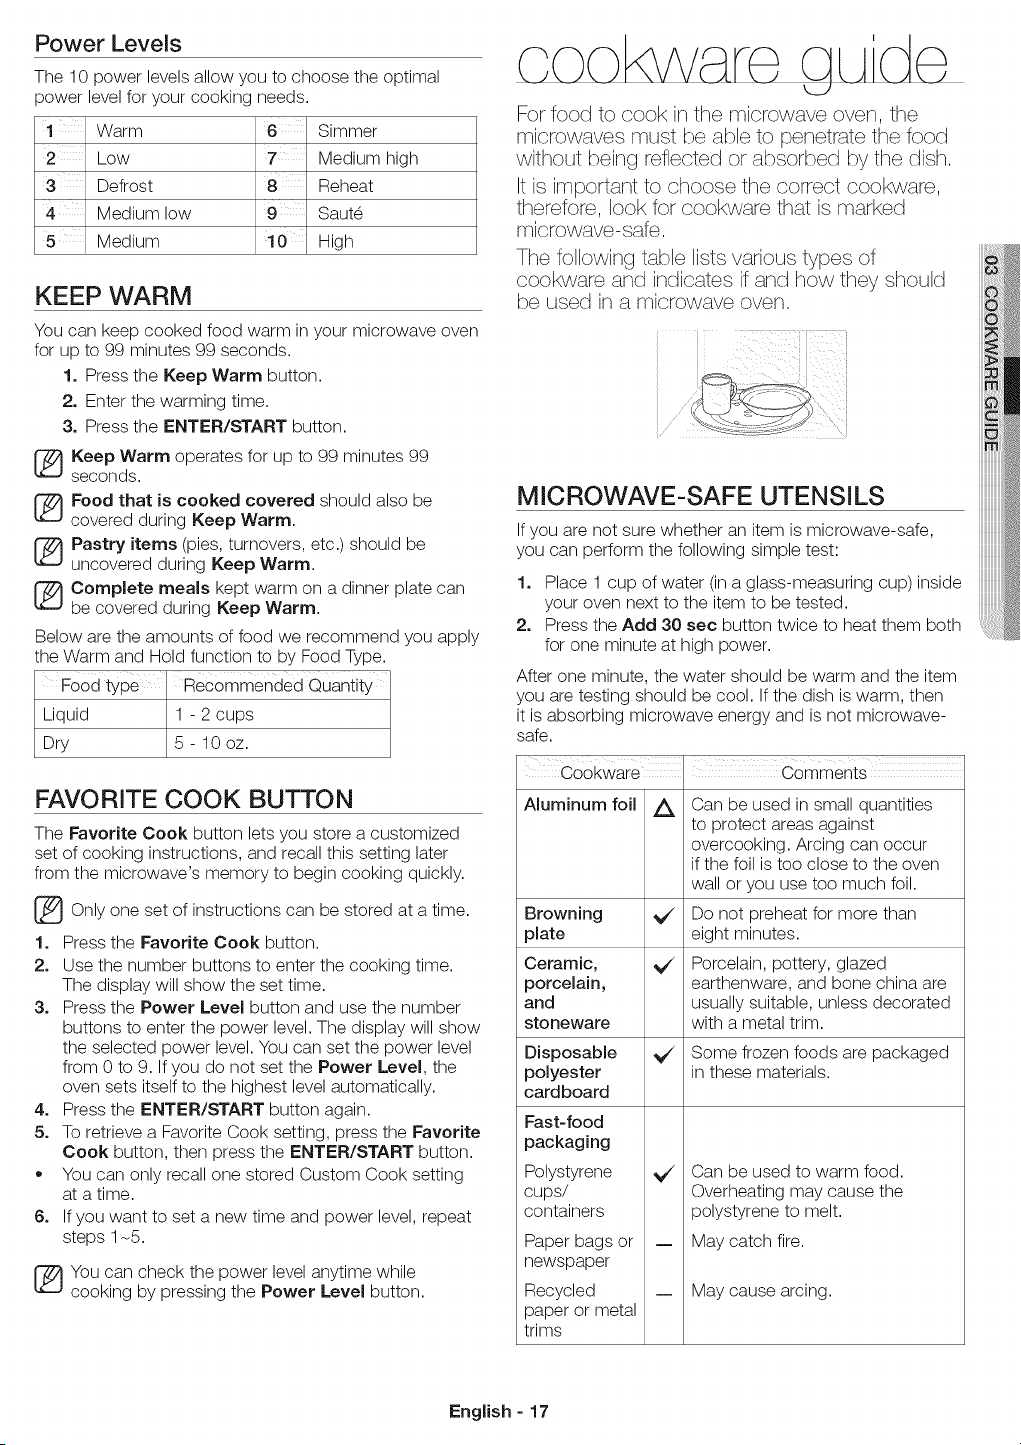
For food to cook in the microwave oven, the
microwaves must be able to penetrate the food
without being reflected or absorbed by the dish,
It is important to choose the correct cookware,
therefore, look for cookware that is marked
microwave-safe,
The following table lists various types of
cookware and indicates if and how they shoukt
be used in a microwave oven,
MICROWAVE-SAFE UTENSILS
If you are not sure whether an item is microwave-safe,
you can perform the following simple test:
1. Place 1 cup of water (in a glass-measuring cup) inside
your oven next to the item to be tested.
2. Press the Add 30 sec button twice to heat them both
for one minute at high power.
After one minute, the water should be warm and the item
you are testing should be cool. If the dish is warm, then
it is absorbing microwave energy and is not microwave-
safe.
Cookware i Comments
Aluminum foil A
Browning V /
plate
Ceramic,
porcelain,
and
stoneware
Disposable V';
polyester
cardboard
Fast-food
packaging
Polystyrene
cups/
containers
Paper bags or
newspaper
Recycled
paper or metal
trims
Can be used in small quantities
to protect areas against
overcooking. Arcing can occur
if the foil is too close to the oven
wall or you use too much foil.
Do not preheat for more than
eight minutes.
Porcelain, pottery, glazed
earthenware, and bone china are
usually suitable, unless decorated
with a metal trim.
Some frozen foods are packaged
in these materials.
Can be used to warm food.
Overheating may cause the
polystyrene to melt.
May catch fire.
May cause arcing.
English - 17
c00k:ware I comments
Glassware
Oven-to-table
ware
Fine _/"
glassware
Glassjars _/_
Metal
Canbeused,unlessdecorated
withametaltrim.
Canbeusedtowarmfoodsor
liquids.Delicateglassmaybreak
orcrackifheatedsuddenly.
Regularglassistoothintobe
usedinamicrowave,andcan
shatter.
Dishes,
Utensils
Freezerbag
twistties
Paper
Plates,cups, _/_
napkins,and
kitchenpaper
Recycled _/_
paper
Plastic
_ Maycausearcingorfire.
_ Maycausearcingorfire.
Forshortcookingtimesand
warming.Alsotoabsorbexcess
moisture.
Donotuserecycledpapertowels,
whichmaycontainmetalandmay
catchfireorcausearcing.
Containers
Clingfilm
Freezerbags
Wax or
grease-proof
paper
Thermometer
Straw,
wicker, and
wood
_/_ Can be used if heat-resistant
thermoplastic. Some plastics
may warp or discolor at high
temperatures. Do not use
Melamine plastic.
_/" Can be used to retain moisture.
Avoid wrapping the food too
tightly. Take care when removing
the film. Hot steam will escape.
Z_ Only if boilable or oven-proof.
Should not be airtight. Pierce with
a fork if necessary.
_/_ Can be used to retain moisture
and prevent spattering.
Use only those marked
"Microwave-safe" and follow the
directions. Check the temperature
in several places. You can use
conventional thermometers once
the food has been removed from
the oven.
Use only for short-term heating,
as these materials are flammable.
A
Recommended to use
Use with Caution
Unsafe to use / Do not use
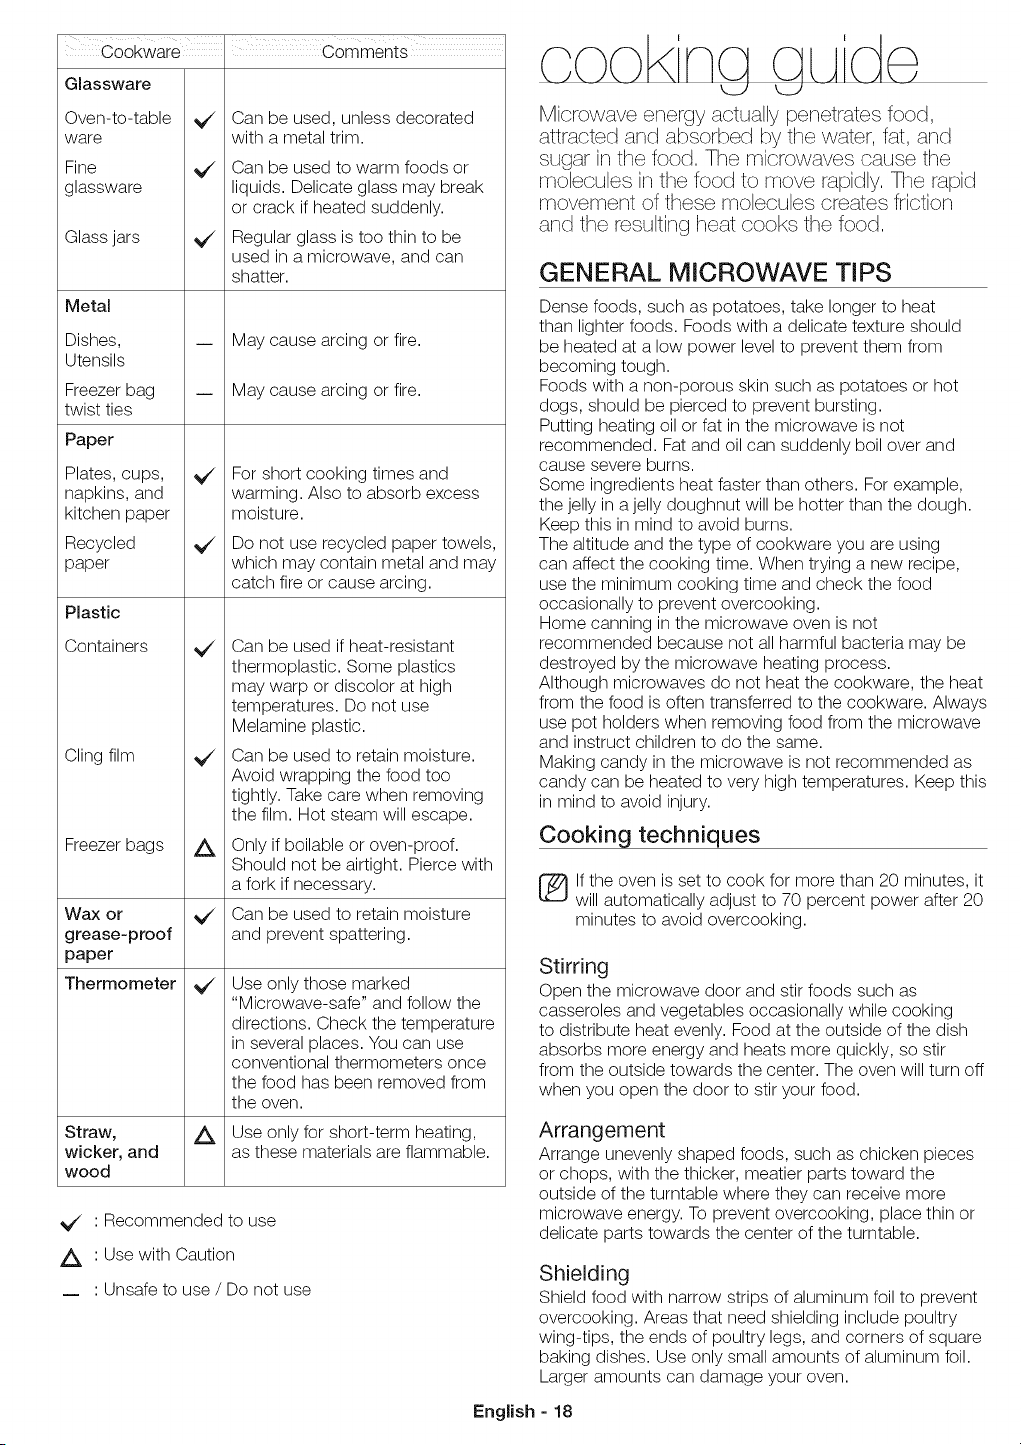
Microwave energy actually penetrates food,
attracted and absorbed by the water, fat, and
sugar in the food, The microwaves cause the
molecules in the food to move rapidly, The rapid
movement of these molecules creates friction
and the resulting heat cooks the food,
GENERAL MICROWAVE TIPS
Dense foods, such as potatoes, take longer to heat
than lighter foods. Foods with a delicate texture should
be heated at a low power level to prevent them from
becoming tough.
Foods with a non-porous skin such as potatoes or hot
dogs, should be pierced to prevent bursting.
Putting heating oil or fat in the microwave is not
recommended. Fat and oil can suddenly boil over and
cause severe burns.
Some ingredients heat faster than others. For example,
the jelly in a jelly doughnut will be hotter than the dough.
Keep this in mind to avoid burns.
The altitude and the type of cookware you are using
can affect the cooking time. When trying a new recipe,
use the minimum cooking time and check the food
occasionally to prevent overcooking.
Home canning in the microwave oven is not
recommended because not all harmful bacteria may be
destroyed by the microwave heating process.
Although microwaves do not heat the eookware, the heat
from the food is often transferred to the cookware. Always
use pot holders when removing food from the microwave
and instruct children to do the same.
Making candy in the microwave is not recommended as
candy can be heated to very high temperatures. Keep this
in mind to avoid injury.
Cooking techniques
lf the oven is set to cook for more than 20 minutes, it
will automatically adjust to 70 percent power after 20
minutes to avoid overcooking.
Stirring
Open the microwave door and stir foods such as
casseroles and vegetables occasionally while cooking
to distribute heat evenly. Food at the outside of the dish
absorbs more energy and heats more quickly, so stir
from the outside towards the center. The oven will turn off
when you open the door to stir your food.
Arrangement
Arrange unevenly shaped foods, such as chicken pieces
or chops, with the thicker, meatier parts toward the
outside of the turntable where they can receive more
microwave energy. To prevent overcooking, place thin or
delicate parts towards the center of the turntable.
Shielding
Shield food with narrow strips of aluminum foil to prevent
overcooking. Areas that need shielding include poultry
wing-tips, the ends of poultry legs, and corners of square
baking dishes. Use only small amounts of aluminum foil.
Larger amounts can damage your oven.
English-18
Turning
Turn foods over midway through the cooking cycle
to expose all parts to the microwave energy. This is
especially important with large items such as roasts.
Standing
Foods cooked in the microwave build up internal heat
and continue to cook for a few minutes after the oven
stops. Let foods stand to complete the cooking process,
especially foods such as roasts and whole vegetables.
Roasts need this time to complete cooking in the center
without overcooking the outer areas. All liquids, such as
soup or hot chocolate should be shaken or stirred when
cooking is complete. Let liquids stand a moment before
serving. When heating baby food, stir well and test the
temperature before serving.
Adding moisture
Microwave energy is attracted to water molecules. Food
that is uneven in moisture content should be covered or
allowed to stand so that the heat disperses evenly. Add a
small amount of water to dry food to help it cook.
Venting
After covering a dish with plastic wrap, vent the plastic
wrap by turning back one corner to let excess steam
escape.
COOKING MEAT
Place the meat fat side down on a microwave-safe
roasting rack in a microwave-safe dish. Use narrow strips
of aluminum foil to shield any bone tips or thin pieces of
meat. Check the temperature in several places before
letting the meat stand the recommended time.
The following temperatures are the removal temperatures.
The temperature of the food will rise during standing time.
Food Cooking time! instructions
power level
Roast beef
(boneless)
Up to 4 Ibs.
Pork
(boneless
or bone-in)
Up to 4 Ibs.
Cooking Time:
3-9 min. /lb. for
145 °F - Rare
10-15 min./lb, for
160 °F - Medium
12-17 min./lb, for
170 °F - Well Done
Power Level:
High (10) for first
5 minutes, then
Medium (5).
Cooking Time:
13-17 min./lb, at
170 °F Well Done
Power Level:
High (10) for first
5 minutes, then
Medium (5).
Place the roast fat-
side down on the
roasting rack and
cover with wax paper.
Turn over halfway
through the cooking
process. Let stand for
10 to 15 minutes.
Place the pork fat-side
down on the roasting
rack and cover with
wax paper. Turn
over halfway through
cooking process.
Let stand for 10 to
15 minutes.
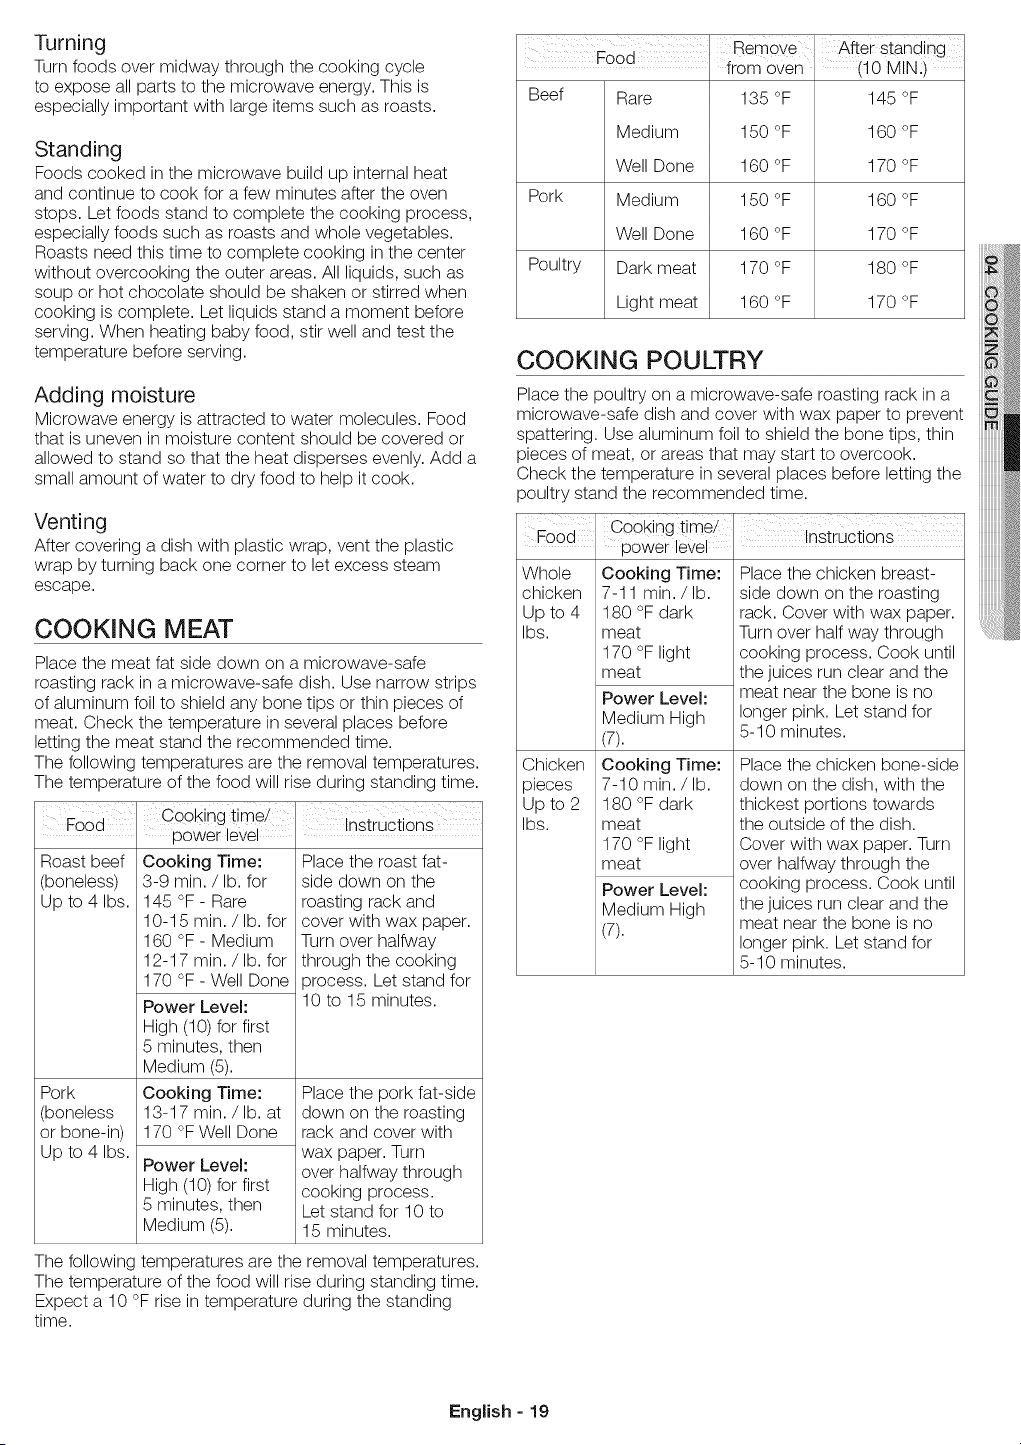
The bllowin( temperatures are the removal temperatures.
The temperature of the food will rise during standing time.
Expect a 10 °F rise in temperature during the standing
time.
Food i Remove
from oven
Beef Rare 135 °F
Pork
Poultry
Medium 150 °F
Well Done 160 °F
Medium 150 °F
Well Done 160 °F
Dark meat 170 °F
Light meat 160 °F
After standing
(10 MINI)
145 °F
160 °F
170 °F
160 °F
170 °F
180 °F
170 °F
COOKING POULTRY
Place the poultry on a microwave-safe roasting rack in a
microwave-safe dish and cover with wax paper to prevent
spattering. Use aluminum foil to shield the bone tips, thin
pieces of meat, or areas that may start to overcook.
Check the temperature in several places before letting the
poultry stand the recommended time.
Co0king time/ .... :
Food _2'"_'r I£Vxlp_vv_ _ _ nstructlons
Whole Cooking Time:
chicken 7-11 min. /lb.
Up to4 180°Fdark
Ibs. meat
17O °F light
meat
Power Level:
Medium High
(7).
Chicken Cooking Time:
pieces 7-10 min./lb.
Up to2 180°Fdark
Ibs. meat
17O °F light
meat
Power Level:
Medium High
(7).
Place the chicken breast-
side down on the roasting
rack. Cover with wax paper.
Turn over half way through
cooking process. Cook until
the juices run clear and the
meat near the bone is no
longer pink. Let stand for
5-10 minutes.
Place the chicken bone-side
down on the dish, with the
thickest portions towards
the outside of the dish.
Cover with wax paper. Turn
over halfway through the
cooking process. Cook until
the juices run clear and the
meat near the bone is no
longer pink. Let stand for
5-10 minutes.
English - 19
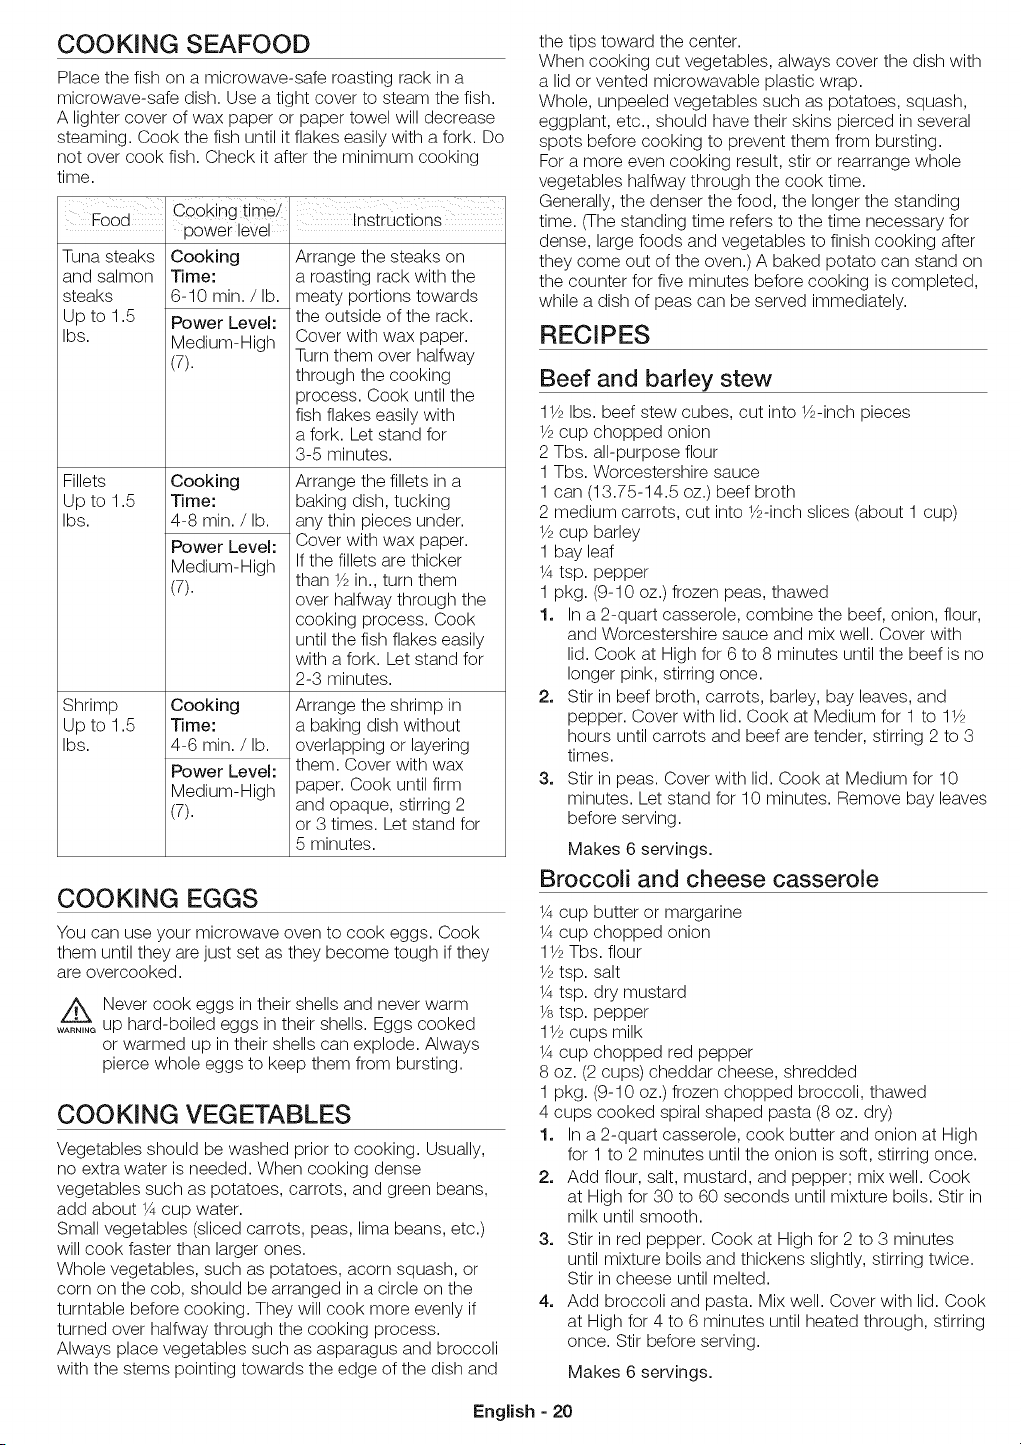
COOKING SEAFOOD
Place the fish on a microwave-safe roasting rack in a
microwave-safe dish. Use a tight cover to steam the fish.
A lighter cover of wax paper or paper towel will decrease
steaming. Cook the fish until it flakes easily with a fork. Do
not over cook fish. Check it after the minimum cooking
time.
I , ,
Food Cooking time! InStrUCtiOns
power eve
Tuna steaks
and salmon
steaks
Up to 1.5
Ibs.
Fillets
Up to 1.5
Ibs.
Cooking
Time:
6-10 min. /lb.
Power Level:
Medium-High
(7).
Cooking
Time:
4-8 min. /lb.
Power Level:
Medium-High
(7).
Cooking
Time:
4-6 min. /lb.
Power Level:
Medium-High
(7).
Shrimp
Up to 1.5
Ibs.
Arrange the steaks on
a roasting rack with the
meaty portions towards
the outside of the rack.
Cover with wax paper.
Turn them over halfway
through the cooking
process. Cook until the
fish flakes easily with
a fork. Let stand for
3-5 minutes.
Arrange the fillets in a
baking dish, tucking
any thin pieces under.
Cover with wax paper.
If the fillets are thicker
than 1/2in., turn them
over halfway through the
cooking process. Cook
until the fish flakes easily
with a fork. Let stand for
2-3 minutes.
Arrange the shrimp in
a baking dish without
overlapping or layering
them. Cover with wax
paper. Cook until firm
and opaque, stirring 2
or 3 times. Let stand for
5 minutes.
COOKING EGGS
You can use your microwave oven to cook eggs. Cook
them until they are just set as they become tough if they
are overcooked.
A Never cook eggs in their shells and never warm
....... up hard-boiled eggs in their shells. Eggs cooked
or warmed up in their shells can explode. Always
pierce whole eggs to keep them from bursting.
COOKING VEGETABLES
Vegetables should be washed prior to cooking. Usually,
no extra water is needed. When cooking dense
vegetables such as potatoes, carrots, and green beans,
add about 1_cup water.
Small vegetables (sliced carrots, peas, lima beans, etc.)
will cook faster than larger ones.
Whole vegetables, such as potatoes, acorn squash, or
corn on the cob, should be arranged in a circle on the
turntable before cooking. They will cook more evenly if
turned over halfway through the cooking process.
Always place vegetables such as asparagus and broccoli
with the stems pointing towards the edge of the dish and
the tips toward the center.
When cooking cut vegetables, always cover the dish with
a lid or vented microwavable plastic wrap.
Whole, unpeeled vegetables such as potatoes, squash,
eggplant, etc., should have their skins pierced in several
spots before cooking to prevent them from bursting.
For a more even cooking result, stir or rearrange whole
vegetables halfway through the cook time.
Generally, the denser the food, the longer the standing
time. (The standing time refers to the time necessary for
dense, large foods and vegetables to finish cooking after
they come out of the oven.) A baked potato can stand on
the counter for five minutes before cooking is completed,
while a dish of peas can be served immediately.
RECIPES
Beef and barley stew
11_2Ibs. beef stew cubes, cut into l_-inch pieces
1_2cup chopped onion
2 Tbs. all-purpose flour
1 Tbs. Worcestershire sauce
1 can (13.75-14.5 oz.) beef broth
2 medium carrots, cut into l_-inch slices (about 1 cup)
1_ cup barley
1 bay leaf
1Atsp. pepper
1 pkg. (9-10 oz.) frozen peas, thawed
1. In a 2-quart casserole, combine the beef, onion, flour,
and Worcestershire sauce and mix well. Cover with
lid. Cook at High for 6 to 8 minutes until the beef is no
longer pink, stirring once.
2. Stir in beef broth, carrots, barley, bay leaves, and
pepper. Cover with lid. Cook at Medium for 1 to 11_
hours until carrots and beef are tender, stirring 2 to 3
times.
3. Stir in peas. Cover with lid. Cook at Medium for 10
minutes. Let stand for 10 minutes. Remove bay leaves
before serving.
Makes 6 servings.
Broccoli and cheese casserole
1Acup butter or margarine
1Acup chopped onion
11/2Tbs. flour
1_ tsp. salt
1Atsp. dry mustard
1/8tsp. pepper
11_cups milk
1Acup chopped red pepper
8 oz. (2 cups) cheddar cheese, shredded
1 pkg. (9-10 oz.) frozen chopped broccoli, thawed
4 cups cooked spiral shaped pasta (8 oz. dry)
1. In a 2-quart casserole, cook butter and onion at High
for 1 to 2 minutes until the onion is soft, stirring once.
2. Add flour, salt, mustard, and pepper; mix well. Cook
at High for 30 to 60 seconds until mixture boils. Stir in
milk until smooth.
3. Stir in red pepper. Cook at High for 2 to 3 minutes
until mixture boils and thickens slightly, stirring twice.
Stir in cheese until melted.
4. Add broccoli and pasta. Mix well. Cover with lid. Cook
at High for 4 to 6 minutes until heated through, stirring
once. Stir before serving.
Makes 6 servings.
English - 20

Warm potato salad
2 Ibs. small red potatoes, cut into l_-inch pieces
4 slices bacon (uncooked), cut into l_-inch pieces
1Acup chopped onion
2 tsp. sugar
1 tsp. salt
1 tsp. flour
1_ tsp. celery seed
1/8tsp. pepper
21_Tbs. apple cider vinegar
1. In a 2-quart casserole, combine the potatoes and
1Acup water. Cover with lid. Cook at High until the
potatoes are tender (7-10 minutes); stir twice. Drain
and set aside to cool slightly.
2. In a medium bowl, cook the bacon at High until crisp
(21/2-31/2minutes); stir once. Place the bacon on a
paper towel. Reserve 1 Tbs. drippings.
3. Combine the drippings and onion. Cover with plastic
wrap; turn a corner back to vent steam. Cook at High
until tender (11_-21_minutes); stir once.
4. Stir in sugar, salt, flour, celery seed, and pepper.
Cook at High until mixture boils (30-40 seconds). Stir
in vinegar and 1/2cup water. Cook at High until liquid
boils and thickens slightly (1-2 minutes); stir once.
Add bacon to dressing. Pour dressing over potatoes.
Stir well.
Makes 6 servings.
Black bean soup
1 cup chopped onion
1 clove garlic, minced
2 cans (15 oz. each) black beans, drained
1 can (14-16 oz.) stewed tomatoes, chopped
1 can (13.75-14.5 oz.) chicken broth
1 can (7-8.5 oz.) corn
1 can (4 oz.) chopped green chilies
1-2 tsp. ground cumin
1. Place the onion and garlic in a 3-quart casserole.
Cover with lid. Cook at High for 2 to 4 minutes until
tender.
2. Add one can of beans, and mash the beans with a
fork. Add remaining ingredients and mix well.
3. Cook uncovered at High for 10 minutes; stir. Reduce
power to Medium and cook for 5 minutes. Stir before
serving.
Makes about 2 quarts.
Keeping your microwave oven clean improves
its performance, wards off unnecessary repairs,
and lengthens its life,
CLEANING THE EXTERIOR
It's best to clean spills on the outside of your microwave
oven as they occur. Use a soft cloth and warm, soapy
water. Rinse and dry.
A Do not get water into the vents. Never use abrasive
....... products or chemical solvents such as ammonia or
alcohol as they can damage the appearance of your
microwave.
Cleaning under your microwave oven
Regularly clean grease and dust from the bottom of your
microwave using a solution of warm water and detergent.
Cleaning the control panel
Wipe with a damp cloth and dry thoroughly. Do not
use cleaning sprays, large amounts of soap and water,
abrasives, or sharp objects on the panel as it is easily
damaged.
Cleaning the door and door seals
Always ensure that the door seals are clean and that the
door closes properly. Take particular care when cleaning
the door seals to ensure that no particles accumulate and
prevent the door from closing correctly. Wash the glass
door with very mild soap and water. Be sure to use a soft
cloth to avoid scratching.
If a thin film of water accumulates on the inside or outside
of the oven door, wipe it off with a soft cloth. A thin water
film can accumulate when you operate the oven at high
humidity and in no way indicates microwave leakage.
CLEANING THE INTERIOR
Z_ Ensure that the microwave oven has cooled down
....... before cleaning it to avoid injury.
Z_ Remove the glass tray from the oven when cleaning
....... the oven or tray. To prevent the tray from breaking,
handle it with care and do not put it in water
immediately after cooking. Wash the tray carefully in
warm sudsy water or in the dishwasher.
Clean the interior surfaces (oven cavity) of your microwave
oven periodically to remove any splashes or stains. To
remove hardened food articles and remove smells, place
2 cups of water (add lemon juice for extra freshness) into
a four-cup measuring glass. Run the microwave at High
power for 5 minutes or until the water boils. Let water
stand in the oven for one or two minutes.
English - 21
CLEANING THE TURNTABLE AND
ROLLER RINGS
Clean the roller rings periodically and wash the turntable
as required. You can wash the turntable safely in your
dishwasher.
STORING AND REPAIRING YOUR
MICROWAVE OVEN
If you need to store your microwave oven for a short or
extended period of time, choose a dust-free, dry location.
Dust and dampness may adversely affect the ability of the
microwave parts.
WARNING
• Do not repair, replace, or service any part of your
microwave oven yourself. Allow only a qualified
service technician to perform repairs. If the oven
is faulty and needs servicing, or you are in doubt
about its condition, unplug the oven from the
power outlet and contact your nearest service
center.
• Do not use the oven if it is damaged, in
particular, if the door or door seals are damaged.
Door damage includes a broken hinge, a worn
out seal, or a distorted/bent casing.
• Do not remove the oven from its casing.
• This microwave oven is for home use only and is
not intended for commercial use.
REPLACING THE COOKTOP/NIGHT
LIGHT
When replacing the cooktop/night light, make sure that
you are wearing gloves to avoid injury from the heat of the
bulb.
1. Unplug the oven or turn off the power at the main
power supply.
2. Remove the screw from the light cover and lower the
cover.
3. Replace the bulb with a 40 watt incandescent bulb.
4. Replace the light cover and mounting screw.
5 Turn the power back on at the main power supply.
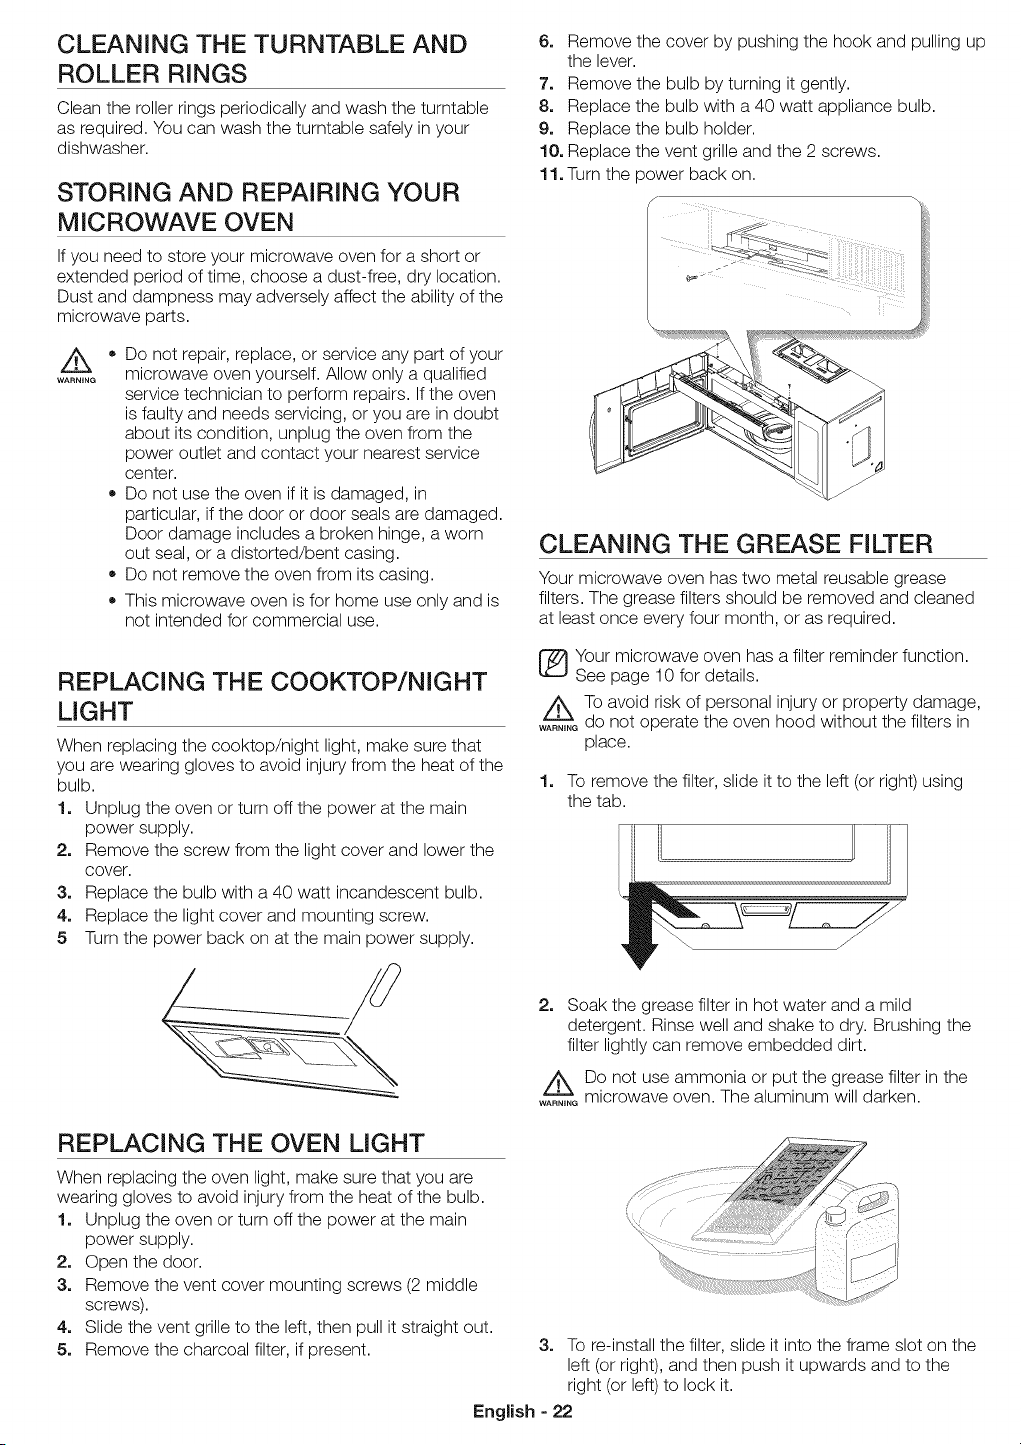
6. Remove the cover by pushing the hook and pulling up
the lever.
7. Remove the bulb by turning it gently.
8. Replace the bulb with a 40 watt appliance bulb.
9. Replace the bulb holder.
10. Replace the vent grille and the 2 screws.
11. Turn the power back on.
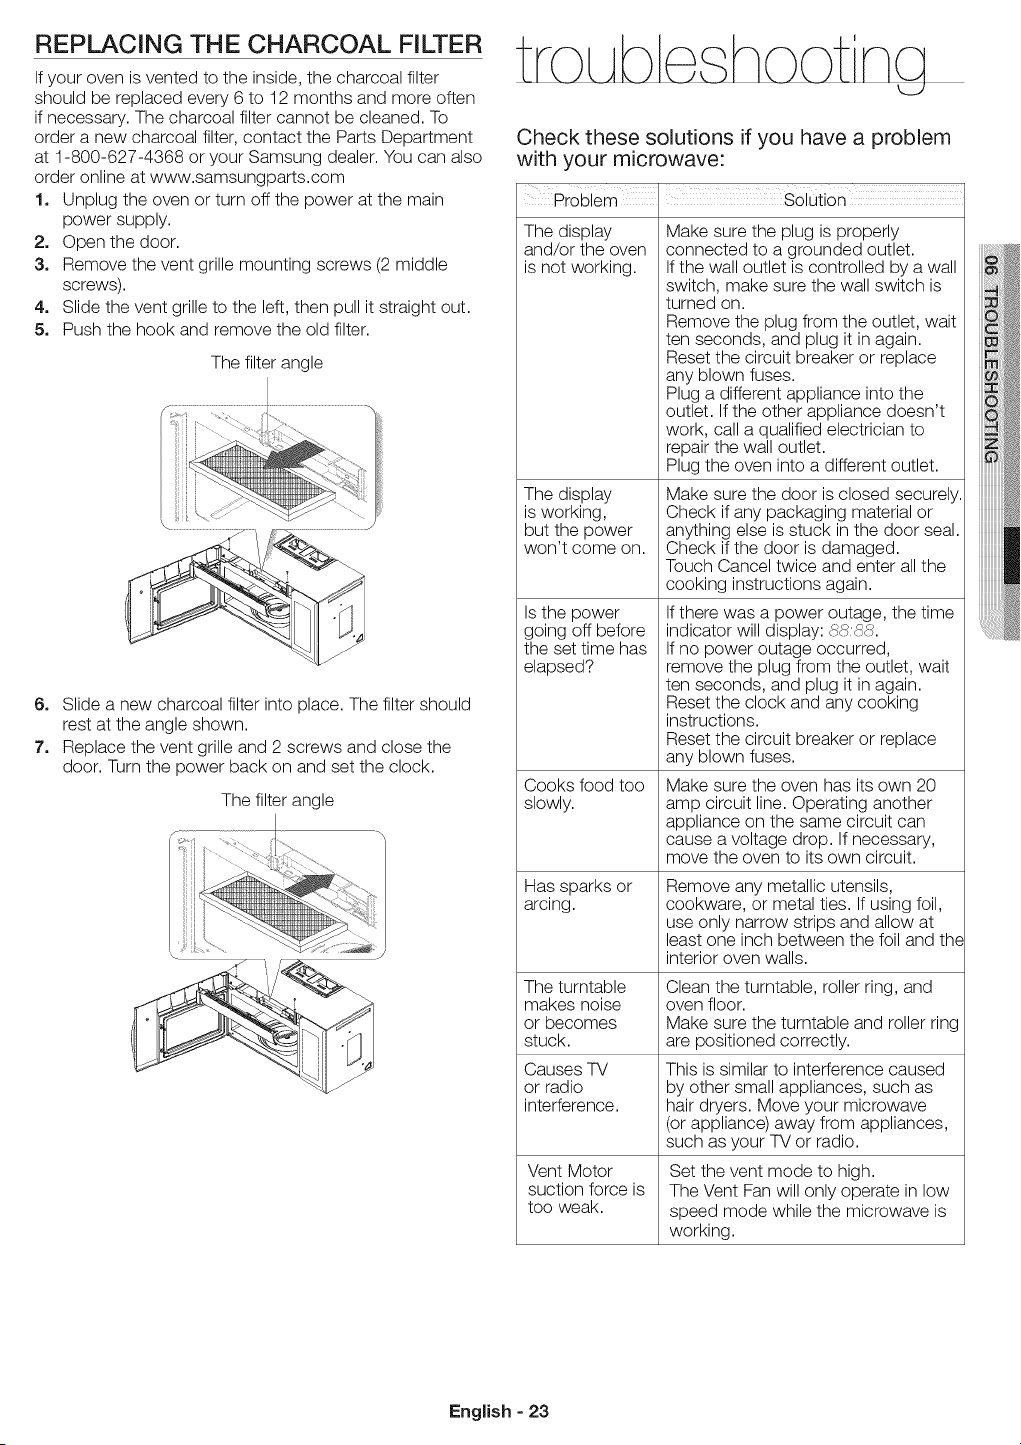
CLEANING THE GREASE FILTER
Your microwave oven has two metal reusable grease
filters. The grease filters should be removed and cleaned
at least once every four month, or as required.
[_ our microwave oven has a filter reminder function.
See page 10 for details.
i_k To avoid risk of personal injury or property damage,
......._ do not operate the oven hood without the filters in
place.
1.
To remove the filter, slide it to the left (or right) using
the tab.
2. Soak the grease filter in hot water and a mild
detergent. Rinse well and shake to dry. Brushing the
filter lightly can remove embedded dirt.
ADo not use ammonia or put the grease filter in the
....... microwave oven. The aluminum will darken.
REPLACING THE OVEN LIGHT
When replacing the oven light, make sure that you are
wearing gloves to avoid injury from the heat of the bulb.
1. Unplug the oven or turn off the power at the main
power supply.
2. Open the door.
3. Remove the vent cover mounting screws (2 middle
screws).
4. Slide the vent grille to the left, then pull it straight out.
5. Remove the charcoal filter, if present.
3. To re-install the filter, slide it into the frame slot on the
left (or right), and then push it upwards and to the
right (or left) to lock it.
English - 22
REPLACING THE CHARCOAL FILTER
If your oven is vented to the inside, the charcoal filter
should be replaced every 6 to 12 months and more often
if necessary. The charcoal filter cannot be cleaned. To
order a new charcoal filter, contact the Parts Department
at 1-800-627-4368 or your Samsung dealer. You can also
order online at www.samsungparts.com
1, Unplug the oven or turn off the power at the main
power supply.
2, Open the door.
3, Remove the vent grille mounting screws (2 middle
screws).
4. Slide the vent grille to the left, then pull it straight out.
5. Push the hook and remove the old filter.
The filter angle
6. Slide a new charcoal filter into place. The filter should
rest at the angle shown.
7. Replace the vent grille and 2 screws and close the
door. Turn the power back on and set the clock.
The filter angle
troLJbl shoot na
k_/
Check these solutions if you have a problem
with your microwave:
Problem SOlUtion
The display
and/or the oven
is not working.
The display
is working,
but the power
won't come on.
Is the power
going off before
the set time has
elapsed?
Cooks food too
slowly.
Has sparks or
arcing.
The turntable
makes noise
or becomes
stuck.
Causes TV
or radio
interference.
Vent Motor
suction force is
too weak.
Make sure the plug is properly
connected to a grounded outlet.
If the wall outlet is controlled by a wall
switch, make sure the wall switch is
turned on.
Remove the plug from the outlet, wait
ten seconds, and plug it in again.
Reset the circuit breaker or replace
any blown fuses.
Plug a different appliance into the
outlet. If the other appliance doesn't
work, call a qualified electrician to
repair the wall outlet.
Plug the oven into a different outlet.
Make sure the door is closed securely.
Check if any packaging material or
anything else is stuck in the door seal.
Check if the door is damaged.
Touch Cancel twice and enter all the
cooking instructions again.
If there was a power outage, the time
indicator will display: 88:88.
If no power outage occurred,
remove the plug from the outlet, wait
ten seconds, and plug it in again.
Reset the clock and any cooking
instructions.
Reset the circuit breaker or replace
any blown fuses.
Make sure the oven has its own 20
amp circuit line. Operating another
appliance on the same circuit can
cause a voltage drop. If necessary,
move the oven to its own circuit.
Remove any metallic utensils,
cookware, or metal ties. If using foil,
use only narrow strips and allow at
least one inch between the foil and the
interior oven walls.
Clean the turntable, roller ring, and
oven floor.
Make sure the turntable and roller ring
are positioned correctly.
This is similar to interference caused
by other small appliances, such as
hair dryers. Move your microwave
(or appliance) away from appliances,
such as your TV or radio.
Set the vent mode to high.
The Vent Fan will only operate in low
speed mode while the microwave is
working.
English - 23
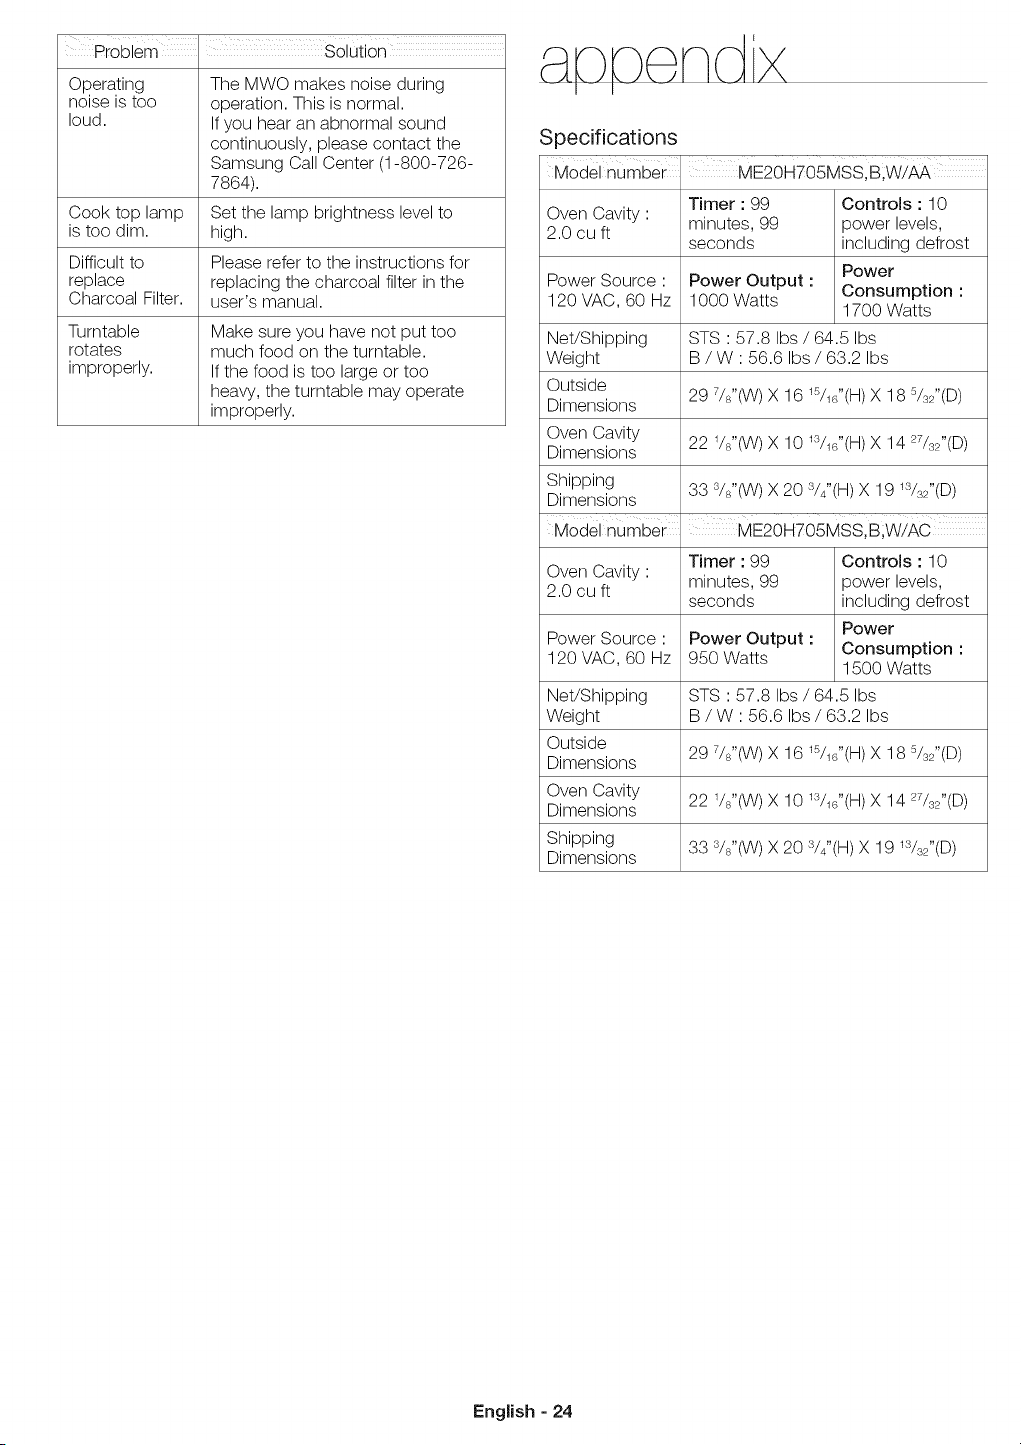
ProblemI solution
Operating
noise is too
loud.
Cook top lamp
is too dim.
Difficult to
replace
Charcoal Filter.
Turntable
rotates
improperly.
The MWO makes noise during
operation. This is normal.
If you hear an abnormal sound
continuously, please contact the
Samsung Call Center (1-800-726-
7864).
Set the lamp brightness level to
high.
Please refer to the instructions for
replacing the charcoal filter in the
user's manual.
Make sure you have not put too
much food on the turntable.
If the food is too large or too
heavy, the turntable may operate
improperly.
Specifications
Model number
Oven Cavity '
2.0 cu ft
Power Source '
120 VAC, 60 Hz
Net/Shipping
Weight
Outside
Dimensions
Oven Cavity
Dimensions
Shipping
Dimensions
ME20H705MSS,B;W!AA
Timer : 99
minutes, 99
seconds
Power Output :
1000 Watts
Controls : 10
power levels,
including defrost
Power
Consumption :
1700 Watts
STS ' 57.8 Ibs / 64.5 Ibs
B / W ' 56.6 Ibs / 63.2 Ibs
29 7/i'(W) X 16 15/16"(H) X 18 5/,d'(D)
22 1/8"(W) X 10 13/16"(H) X 14 27/,d'(D)
33 'Vi(W) X 20 s/4"(H) X 19 lS/s2"(D)
Model number ME2OHT05MSS,B;W!AC
Timer : 99 Controls : 10
Oven Cavity '
2.0 cu ft minutes, 99 power levels,
seconds including defrost
Power
Power Source ' Power Output :
120 VAC, 60 Hz 950 Watts Consumption :
1500 Watts
Net/Shipping STS : 57.8 Ibs / 64.5 Ibs
Weight B / W : 56.6 Ibs / 63.2 Ibs
Outside
Dimensions 29 7/i'(W) X 16 15/1/'(H)X 18 s/,d'(D)
Oven Cavity
Dimensions 22 Vi'(W) X 10 I'Vd'(H) X 14 27/s2"(S)
Shipping 33 ,Vi'(W) X 20 s//'(H) X 19 lS/s2"(U)
Dimensions
English - 24
SAMSUNG OVER-THE-RANGE (OTR)
MICROWAVE OVEN
Limited warranty to original purchaser
This SAMSUNG brand product, as supplied and distributed by
Samsung Electronics America, Inc. (SAMSUNG) and delivered
new, in the original carton to the original consumer purchaser,
is warranted by SAMSUNG against manufacturing defects in
materials and workmanship for a limited warranty period of:
ONE (1) YEAR PARTS AND LABOR, TEN (10) YEARS
PARTS WARRANTY FOR MAGNETRON
Samsung will charge a repair fee for replacing an accessory
or repairing a cosmetic defect if the damage to the unit and/
or damage to or loss of the accessory was caused by the
customer. Items this stipulation covers include:
- A Dented, Scratched, or Broken Door, Handle, Out-Panel, or
Control Panel
- A Broken or missing Tray, Guide Roller, Coupler, Filter, or Wire
Rack
User Replaceable Parts may be sent to the customer for unit
repair. If necessary, a Service Engineer can be dispatched to
perform service.
This limited warranty begins on the original date of purchase,
and is valid only on products purchased and used in the United
States. To receive warranty service, the purchaser must contact
SAMSUNG for problem determination and service procedures.
Warranty service can only be performed by a SAMSUNG
authorized service center. The original dated bill of sale must be
presented upon request as proof of purchase to SAMSUNG or
SAMSUNG's authorized service center.
SAMSUNG will repair or replace this product, at our option and
at no charge as stipulated herein, with new or reconditioned
parts or products if found to be defective during the limited
warranty period specified above. All replaced parts and products
become the property of SAMSUNG and must be returned to
SAMSUNG. Replacement parts and products assume the
remaining original warranty, or ninety (90) days, whichever is
longer.
In-home service will be provided during the warranty labor
period subject to availability within the contiguous United States.
In-home service is not available in all areas. To receive in-home
service, the product must be unobstructed and accessible to
service personnel. If during in-home service repair can not be
completed, it may be necessary to remove, repair and return
the product. If in-home service is unavailable, SAMSUNG may
elect, at our option, to provide for transportation of our choice
to and from a SAMSUNG authorized service center. Otherwise,
transportation to and from the SAMSUNG authorized service
center is the responsibility of the purchaser.
This limited warranty covers manufacturing defects in materials
and workmanship encountered in normal, noncommercial use of
this product and shall not apply to the following, including, but
not limited to: damage which occurs in shipment; delivery and
installation; applications and uses for which this product was not
intended; altered product or serial numbers; cosmetic damage
or exterior finish; accidents, abuse, neglect, fire, water, lightning
or other acts of nature; use of products, equipment, systems,
utilities, services, parts, supplies, accessories, applications,
installations, repairs, external wiring or connectors not supplied
or authorized by SAMSUNG which damage this product or result
in service problems; incorrect electrical line voltage, fluctuations
and surges; customer adjustments and failure to follow
operating instructions, cleaning, maintenance and environmental
instructions that are covered and prescribed in the instruction
book; problems caused by pest infestations, and overheating or
overcooking by user; glass tray or turntable; reduced magnetron
power output related to normal aging. SAMSUNG does not
warrant uninterrupted or error-free operation of the product.
THERE ARE NO EXPRESS WARRANTIES OTHER THAN
THOSE LISTED AND DESCRIBED ABOVE, AND NO
WARRANTIES WHETHER EXPRESS OR IMPLIED, INCLUDING,
BUT NOT LIMITED TO, ANY IMPLIED WARRANTIES OF
MERCHANTABILITY OR FITNESS FOR A PARTICULAR
PURPOSE, SHALL APPLY AFTER THE EXPRESS WARRANTY
PERIODS STATED ABOVE, AND NO OTHER EXPRESS
WARRANTY OR GUARANTY GIVEN BY ANY PERSON, FIRM
OR CORPORATION WITH RESPECT TO THIS PRODUCT
SHALL BE BINDING ON SAMSUNG. SAMSUNG SHALL
NOT BE LIABLE FOR LOSS OF REVENUE OR PROFITS,
FAILURE TO REALIZE SAVINGS OR OTHER BENEFITS, OR
ANY OTHER SPECIAL, INCIDENTAL OR CONSEQUENTIAL
DAMAGES CAUSED BY THE USE, MISUSE OR INABILITY
TO USE THIS PRODUCT, REGARDLESS OF THE LEGAL
THEORY ON WHICH THE CLAIM IS BASED, AND EVEN IF
SAMSUNG HAS BEEN ADVISED OF THE POSSIBILITY OF
SUCH DAMAGES. NOR SHALL RECOVERY OF ANY KIND
AGAINST SAMSUNG BE GREATER IN AMOUNT THAN THE
PURCHASE PRICE OF THE PRODUCT SOLD BY SAMSUNG
AND CAUSING THE ALLEGED DAMAGE. WITHOUT LIMITING
THE FOREGOING, PURCHASER ASSUMES ALL RISK AND
LIABILITY FOR LOSS, DAMAGE OR INJURY TO PURCHASER
AND PURCHASER'S PROPERTY AND TO OTHERS AND THEIR
PROPERTY ARISING OUT OF THE USE, MISUSE OR INABILITY
TO USE THIS PRODUCT SOLD BY SAMSUNG NOT CAUSED
DIRECTLY BY THE NEGLIGENCE OF SAMSUNG. THIS LIMITED
WARRANTY SHALL NOT EXTEND TO ANYONE OTHER
THAN THE ORIGINAL PURCHASER OF THIS PRODUCT,
IS NONTRANSFERABLE AND STATES YOUR EXCLUSIVE
REMEDY.
Some provinces or territories may or may not allow limitations on
how long an implied warranty lasts, or the exclusion or limitation
of incidental or consequential damages, so the above limitations
or exclusions may not apply to you. This warranty gives you
specific legal rights, and you may also have other rights which
vary from state to state.
To obtain warranty service, please contact SAMSUNG at:
1-800-SAMSUNG (726-7864) or www.
samsung.com/us/support
English - 25
SAMSUNG OVER-THE-RANGE (OTR)
MICROWAVE OVEN
Limited warranty to original purchaser
This SAMSUNG brand product, as supplied and distributed by
Samsung Electronics Canada, Inc. (SAMSUNG) and delivered
new, in the original carton to the original consumer purchaser,
is warranted by SAMSUNG against manufacturing defects in
materials and workmanship for a limited warranty period of:
ONE (1) YEAR PARTS AND LABOR, FIVE (5) YEARS
PARTS WARRANTY FOR MAGNETRON
Samsung will charge a repair fee for replacing an accessory
or repairing a cosmetic defect if the damage to the unit and/
or damage to or loss of the accessory was caused by the
customer. Items this stipulation covers include:
- A Dented, Scratched, or Broken Door, Handle, Out-Panel, or
Control Panel
- A Broken or missing Tray, Guide Roller, Coupler, Filter, or Wire
Rack
User Replaceable Parts may be sent to the customer for unit
repair. If necessary, a Service Engineer can be dispatched to
perform service.
This limited warranty begins on the original date of purchase,
and is valid only on products purchased and used in the
Canada. To receive warranty service, the purchaser must contact
SAMSUNG for problem determination and service procedures.
Warranty service can only be performed by a SAMSUNG
authorized service center. The original dated bill of sale must be
presented upon request as proof of purchase to SAMSUNG or
SAMSUNG's authorized service center.
SAMSUNG will repair or replace this product, at our option and
at no charge as stipulated herein, with new or reconditioned
parts or products if found to be defective during the limited
warranty period specified above. All replaced parts and products
become the property of SAMSUNG and must be returned to
SAMSUNG. Replacement parts and products assume the
remaining original warranty, or ninety (90) days, whichever is
longer.
In-home service will be provided during the warranty labor
period subject to availability within the contiguous Canada.
In-home service is not available in all areas. To receive in-home
service, the product must be unobstructed and accessible to
service personnel. If during in-home service repair can not be
completed, it may be necessary to remove, repair and return
the product. If in-home service is unavailable, SAMSUNG may
elect, at our option, to provide for transportation of our choice
to and from a SAMSUNG authorized service center. Otherwise,
transportation to and from the SAMSUNG authorized service
center is the responsibility of the purchaser.
This limited warranty covers manufacturing defects in materials
and workmanship encountered in normal, noncommercial use of
this product and shall not apply to the following, including, but
not limited to: damage which occurs in shipment; delivery and
installation; applications and uses for which this product was not
intended; altered product or serial numbers; cosmetic damage
or exterior finish; accidents, abuse, neglect, fire, water, lightning
or other acts of nature; use of products, equipment, systems,
utilities, services, parts, supplies, accessories, applications,
installations, repairs, external wiring or connectors not supplied
or authorized by SAMSUNG which damage this product or result
in service problems; incorrect electrical line voltage, fluctuations
and surges; customer adjustments and failure to follow
operating instructions, cleaning, maintenance and environmental
instructions that are covered and prescribed in the instruction
book; problems caused by pest infestations, and overheating or
overcooking by user; glass tray or turntable; reduced magnetron
power output related to normal aging. SAMSUNG does not
warrant uninterrupted or error-free operation of the product.
THERE ARE NO EXPRESS WARRANTIES OTHER THAN
THOSE LISTED AND DESCRIBED ABOVE, AND NO
WARRANTIES WHETHER EXPRESS OR IMPLIED, INCLUDING,
BUT NOT LIMITED TO, ANY IMPLIED WARRANTIES OF
MERCHANTABILITY OR FITNESS FOR A PARTICULAR
PURPOSE, SHALL APPLY AFTER THE EXPRESS WARRANTY
PERIODS STATED ABOVE, AND NO OTHER EXPRESS
WARRANTY OR GUARANTY GIVEN BY ANY PERSON, FIRM
OR CORPORATION WITH RESPECT TO THIS PRODUCT
SHALL BE BINDING ON SAMSUNG. SAMSUNG SHALL
NOT BE LIABLE FOR LOSS OF REVENUE OR PROFITS,
FAILURE TO REALIZE SAVINGS OR OTHER BENEFITS, OR
ANY OTHER SPECIAL, INCIDENTAL OR CONSEQUENTIAL
DAMAGES CAUSED BY THE USE, MISUSE OR INABILITY
TO USE THIS PRODUCT, REGARDLESS OF THE LEGAL
THEORY ON WHICH THE CLAIM IS BASED, AND EVEN IF
SAMSUNG HAS BEEN ADVISED OF THE POSSIBILITY OF
SUCH DAMAGES. NOR SHALL RECOVERY OF ANY KIND
AGAINST SAMSUNG BE GREATER IN AMOUNT THAN THE
PURCHASE PRICE OF THE PRODUCT SOLD BY SAMSUNG
AND CAUSING THE ALLEGED DAMAGE. WITHOUT LIMITING
THE FOREGOING, PURCHASER ASSUMES ALL RISK AND
LIABILITY FOR LOSS, DAMAGE OR INJURY TO PURCHASER
AND PURCHASER'S PROPERTY AND TO OTHERS AND THEIR
PROPERTY ARISING OUT OF THE USE, MISUSE OR INABILITY
TO USE THIS PRODUCT SOLD BY SAMSUNG NOT CAUSED
DIRECTLY BY THE NEGLIGENCE OF SAMSUNG. THIS LIMITED
WARRANTY SHALL NOT EXTEND TO ANYONE OTHER
THAN THE ORIGINAL PURCHASER OF THIS PRODUCT,
IS NONTRANSFERABLE AND STATES YOUR EXCLUSIVE
REMEDY.
Some provinces or territories may or may not allow limitations on
how long an implied warranty lasts, or the exclusion or limitation
of incidental or consequential damages, so the above limitations
or exclusions may not apply to you. This warranty gives you
specific legal rights, and you may also have other rights which
vary from state to state.
To obtain warranty service, please contact SAMSUNG at:
1-800-SAMSUNG (726-7864) or www.
samsung.com/ca/support (English),
www.samsung.com/ca_fr/support
(French)
English - 26


Scan this with your smartphone
Scan the QR code* or visit
www.samsung.com/spsn
to view our helpful
How-to Videos and Live Shows
*Requires reader to be instatbd on your smar[phone
Please be advised that the Samsung warranty does NOT cover service calls to explain product
operation, correct improper installation, or perform normal cleaning or maintenance.
QUESTIONS OR COMMENTS
CANADA 1-800-SAMSUNG (726-7864)
U.S.A
1-800-SAMSUNG (726-7864) www.samsu ng.com/us/support
Consumer Electronics
U.S.A
1-800-SAMSUNG (726-7864) www.samsu ng.com/us/support
Mobile Phones
www.samsung.com/ca/su pport (English)
www.samsu ng.com/ca fr/su pport (French)
!OH7
PN©FO orld@8
manuel d'uti isation
100 % )
Recycled Paper
recycl_ a 100 %_
monde de possibilites
Nous vous remercions d'avoir choisi ce produit Samsung.
ME20H705MSS AA AC CFR.indd 1 2014-07-23 2:25:54
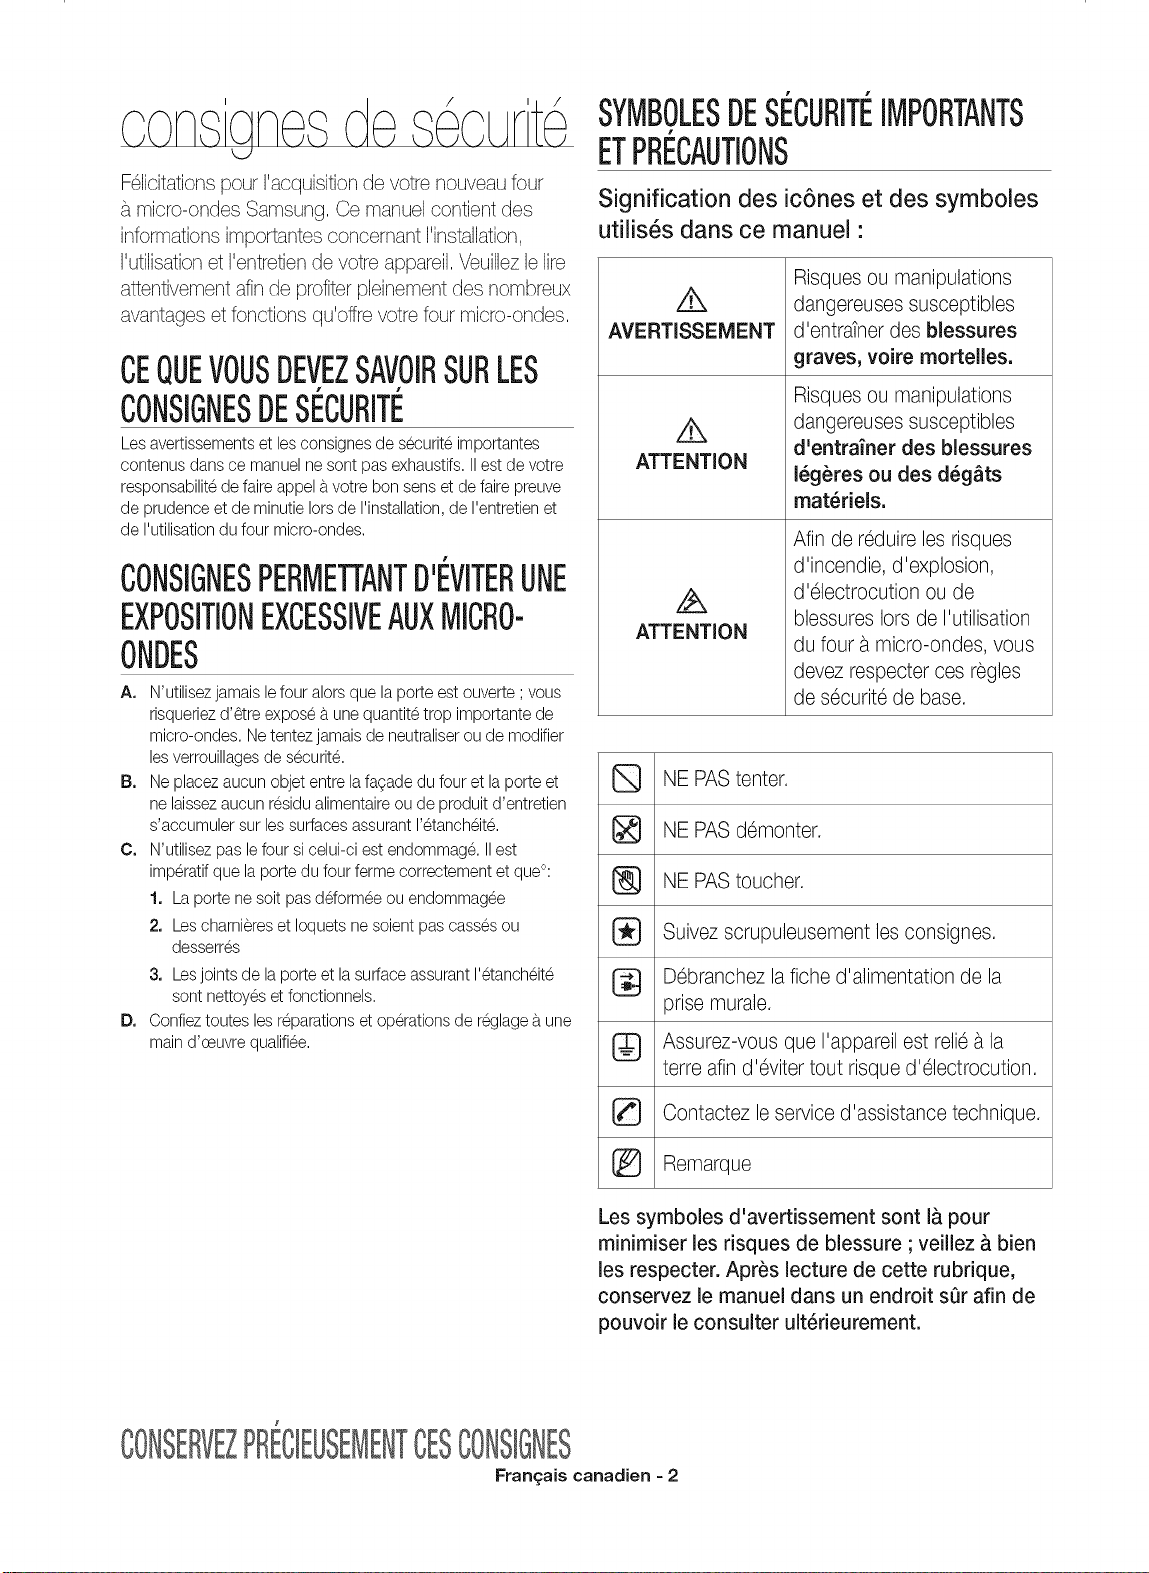
con,sQne,s ,secL;rt
tj
F61icitationspour I'acquisition de votre nouveau four
micro-ondes Samsung, ©e manuel contbnt des
informations importantes concernant I1nstallation,
I'utilisation et I'entretien de votre appareil, Veuilbz b life
attentivement afin de profiter pbinement des nombreux
avantages et fonctions qu'offre votre four micro-ondes,
CEQUEVOUSDEVEZSAVOIRSUBLES
CONSIGNESDESI_CURITi_
Les avertissementset les consignes de securiteimportantes
contenus dans ce manuelne sont pas exhaustifs. IIest de votre
responsabilitede faire appel a.votre bon sens et de faire preuve
de prudence et de minutie lots de I'installation,de I'entretienet
de I'utilisationdu four micro-ondes.
F
CONSIGNESPERMETTANTD'EVITERUNE
EXPOSITIONEXCESSIVEAUXMICRO-
ONDES
A. N'utilisezjamais lefour alorsque la porte est ouverte ; vous
risqueriezd'6tre expose a.une quantite trop importante de
micro-ondes. Ne tentez jamais de neutraliserou de modifier
lesverrouillagesde s@urit&
B, Ne placezaucun objet entre la fagade du four et la porte et
ne laissezaucun residu alimentaireou de produit d'entretien
s'accumuler sur les surfaces assurant I'etanch6it&
O, N'utilisez pas lefour si celui-ci est endommag& IIest
imperatifque la porte du four ferme correctement et que°:
1, La porte ne soit pas ddormee ou endommagee
2, Leschamieres et Ioquets ne soient pas cassesou
desserres
3, Lesjoints de la porte et la surface assurant I'etanch6it6
sont nettoyes et fonctionnels.
D, Confieztoutes les r@arations et operations de reglage a.une
maind'oeuvre qualifiee.
SYMBOLESDESi_CURITi_IMPORTANTS
ETPRI_CAUTIONS
Signification des ic6nes et des symboles
utilis6s dans ce manuel •
ik
AVERTISSEMENT
z_
ATTENTION
ATTENTION
Risques ou manipulations
dangereuses susceptibles
d'entratner des blessures
graves, voire mortelles.
Risques ou manipulations
dangereuses susceptibles
d'entrainer des blessures
legeres ou des deg_ts
materiels.
Afin de reduire les risques
d'incendie, d'explosion,
d'electrocution ou de
blessures lots de I'utilisation
du four a micro-ondes, vous
devez respecter ces regles
de securit6 de base.
NE PAS tenter.
NE PAS demonter.
[_ NE PAS toucher.
Suivez scrupuleusement les consignes.
D6branchez la fiche d'alimentation de la
prise murale.
Assurez-vous que I'appareil est relie a la
terre afin d'eviter tout risque d'electrocution.
Contactez le service d'assistance technique.
Remarque
Les symboles d'avertissement sont I_.pour
minimiser les risques de blessure ; veillez _ bien
les respecter. Apr_s lecture de cette rubrique,
conservez le manuel dans un endroit s0r afin de
pouvoir le consulter ult_rieurement.
CONSERVEPRB@SENENTCESCONSBNES
Frangais canadien - 2
CONSIGNESDESECURITEIMPORTANTES
Lorsque vous utilisez des appareils _lectriques, respectez
les consignes de s_curit_ de base suivantes :
,,'k AVERTISSEMENT
AVERTI_SEMENT
Consignes visant b.reduire les risques de brOlure,
d'electrocution, d'incendie, de blessure ou d'expesition
excessive aux micro-endes :
1. Lisez attentivement toutes les consignes de securite avant
d'utiliser I'appareil.
2. Lisez et respectez les _,Consignes permettant d'eviter
une exposition excessive aux micro-ondes ,_detaillees sur
cette page.
3. Cet appareil doit _tre relieb.la terre. N'effectuez le
branchement que sur des prises cerrectement mises b.la
terre. Repertez-vous b.la section _,Censignes de mise b.la
terre ,_en page 4 de ce manuel.
4. Installez I'appareil conformement aux instructions fournies.
5. Certains produits tels que les oeufsentiers (avec leur
cequille) et les recipients cles (ex. : recipients en verre
fermes) sent susceptibles d'expleser s'ils sent chauffes
rapidement. Ne lesfaites jamais chauffer au four micro-
endes.
6. Utilisez ce four uniquement pour I'usage auquel il est
destine (telque decrit dans ce manuel). N'utilisez pas de
preduits chimiques ou de vapeurs b.caractere corrosif
dans ce four. Ce type de four est specialement congu
pour faire rechauffer, cuire ou deshydrater des aliments. II
n'est pas cengu pour _tre utilise dans un laberatoire ou b.
des fins industrielles.
7, Comme pour tout appareil, une vigilance extreme
s'impese Iorsque le four est utilise par des enfants.
8. N'utilisez pas ce four si un cb.bled'alimentation ou
une fiche est endemmage(e), s'il ne fenctionne pas
correctement ou s'il a ete endommage ou a subi une
chute.
9. La reparation ou I'entretien de cet appareil doit
imperativement _tre assure(e) par une main d'oeuvre
quali%e. Centactez le service d'assistance technique le
plus proche de chez vous si vous souhaitez effectuer un
contr61e,une reparation ou un reglage.
10. N'obstruez jamais les ouvertures du four.
11. N'essayez pas de modifier, d'ajuster ou de reparer la
porte.
12. N'entrepesez jamais le four b.I'exterieur. N'utilisez pas cet
appareil b.proximite d'eau (ex. : pres d'un evier, dans une
cave humide, b.c6te d'une piscine ou dans des endroits
similaires).
13. N'immergez jamais la fiche ou le cb.bled'alimentation dans
I'eau.
14. Tenez le cordon eloigne des surfaces chaudes. (y compris
de I'arriere du four).
15. Ne laissez pas le cordon pendre par-dessus le berd d'une
table ou d'un compteir.
16. Lorsque vous netteyez les zones de la porte et du four
qui entrent en contact une fois la porte fermee, utilisez
uniquement une epenge ou un chiffon deux imbibe(e)
d'un preduit menager doux et non cerresif. Debranchez
I'appareil avant de preceder au nettoyage.
17. Pour reduire le risque d'incendie b.I'interieur du four :
a. Evitez de surcuire ves aliments. Surveillez attentivement
la cuissen Iorsque veus placez du papier, du plastique
ou d'autres materiaux combustibles b.I'interieur du four
pour faciliter la cuisson.
b. Retirez les ligatures metalliques des sacs en papier ou
en plastique avant de les placer dans le four.
c. En cas de depart de feu, laissez la porte du four
fermee, eteignez I'appareil et debranchez le cb.ble
d'alimentation ou ceupez I'alimentation au niveau du
tableau de fusibles ou du disjoncteur. Si veus euvrez la
porte du four, I'incendie risque de se propager.
d. N'entreposez pas d'objets b.I'interieurdu four. Ne laissez
pas de papiers, d'ustensiles de cuisine ou d'aliments b.
I'interieur du four Iorsque celui-ci est inutilise.
18. Tout liquide(ex. : eau, lait, cafeou the) est susceptible de
depasser le point d'ebullition sans que le phenomene soit
pour autant visible. Un bouillonnementn'est par consequent
pas toujours visible Iorsquevous retirezle recipientdu four.
ENCAS DE MOUVEMENTBRUSQUEOU DECONTACT
AVEC UNE CUILLEREOU UN AUTREUSTENSILE,DE
L'EAUBOUILLANTERISQUEDESOUDAIN DBORDER DU
RI£CIPIENT.Consignes pour reduire lesrisques de blessure'
a. Ne faites pas surchauffer les liquides.
b. Remuez le liquide avant et b.la moitie du temps de
chauffe.
c. N'utilisez pas de recipients b.col etroit.
d. Une feis le temps de chauffe ecoule, laissez le recipient
dans le micro-ondes pendant quelques instants avant
de le sortir.
e. Soyez extr6mement prudent Iorsque veus introduisez
une cuillere ou un autre ustensile dans le recipient.
19. N'intreduisez jamais d'aliments eu d'ustensiles metalliques
volumineux dans le four b.micro-ondes/gril car ils risquent
de prevequer un incendie eu une electrocution.
20. N'utilisez pas d'epenges b.recurer metalliques pour le
nettoyage. Elles peurraient s'enflammer et toucher les
parties electriques, et veus risqueriez de veus electrocuter.
21. N'utilisez pas de papier Iorsque I'appareil fonctionne en
mode gril.
22. Ne stockez aucun autre accessoire que ceux recommandes
par le fabricant dans ce four Iorsqu'il est inutilise.
23. Ne couvrez pas les grilles ou tout autre element du
four avec une feuille metallique. Cela entra_neraitune
surchauffe du four.
,,'k ATTENTION
A_ENTION
1. Modele b.hotte integree uniquement.
Netteyez regulierement les orifices de ventilation.
Ne laissez pas la hotte ou le filtre s'encrasser.
Si les aliments situes sur la cuisiniere s'enflamment,
activez la ventilation.
Netteyez le filtre de la hette avec precaution. Les
detergents caustiques, comme les netteyants pour four
b.base de lessive, risquent d'endommager le filtre.
2. Modele b.bouton-poussoir uniquement.
Consignes de securite pour eviter une possible exposition
a une quantite trop importante de micro-ondes : Ne
tentez pas de tirer d'une pattie quelconque de la porte
pour I'ouvrir. Pour ouvrir la porte, utilisezuniquement le
bouton-poussoir situe en basb. droite sur la fagade.
CONSERVEZPRECIEUSEMENTCESCONSIGNES
Frangais canadien - 3
INSTRUCTIONSDEMISELATERRE
Cet appareildoit _tre relieb la terre.La raiseb laterrereduitlerisque
de chocelectrique,car ellefournitau courant un cheminde fuite en
cas decourt-circuit.Cefour est equip6d'un cordond'alimentation
disposantd'unefiche de raisea laterre. La fichedoit _tre branchee
sur uneprisesecteurposee et raisea laterreconformementa la
legislationenvigueur.
AVERTISSEMENT
AVERTISS[MENT
Touteutilisationnonconformede la fichede raisea laterrepeut
entraTnerun risqued'electrocution.
,, BranchezI'appareilsur uneprisemuraletripolairerelieea la
terre. Necoupezni ne retirezlatroisiemebroche(raisea laterre).
N'utilisezpas d'adaptateuret nedemontezpas lafiche de mise
laterre.
,, Contactezun electricienou un r@arateurquali% si lesconsignes
de raisea laterrene vous semblentpasclairesou si vous n'_tes
pas certainquevotre appareilest correctementreliea la masse.
,, IIest deconseilled'utiliserunerallongeaveccet appareil.Sile
cordond'alimentationest trop court,faitesinstalleruneprise
proximitede votreappareilpar unelectricienouun r@arateur
quali%.Toutefois,s'il s'avereindispensabled'utiliserune
rallonge,lisezet respectezlesconseilsindiquesdans larubrique
,,Utilisationde rallonges,, ci-dessous.
Utilisati0nderall0nges
Le four est fourniavecuncordon d'alimentationcourt afin de limiter
les risquesd'entravement,Descordonsplus longsou des rallonges
sont disponibleset peuvent_tre utilisessi vous faites preuvede
prudence.En casd'utilisationd'un cordon pluslongou d'une
rallonge:
1. Lescaracteristiqueselectriquesdu cordon ou de larallonge
doivent_tre au moinsegalesa cellesde I'appareil.
2. La rallongedoit _tre un cordona 3 fils reliablesa laterreet
brancheesur uneprisefemelletripolaire.
3. Encas d'utilisationd'un cordonplus long,celui-ci ne doit pas
passer par-dessuslecomptoirou latable afind'@iterqu'un
enfantne tiredessusou que quelqu'unne s'y entrave.Sivous
utilisezune rallonge,I'intensitede I'eclairageint@ieurpeut
vacilleret la ventilationsubir desvariationsIorsquelefour micro-
ondes fonctionne.Lestemps de cuisson peuventegalement
_tre plus longs.
@
@
Veillezace que lefour soit installedans un emplacement
suffisammentgrand.
Retirezregulierementtoute substanceetrangere(poussiereou
eau)presentesur lesborneset les pointsde contact de lafiche
d'alimentationa I'aided'un chiffonsec.
,, Debranchezlafiche et nettoyez-laa I'aide d'un chiffonsec.
,, Le non-respectde cetteconsignepeut entraTnerun risque
d'electrocutionou d'incendie.
Branchezlecordon d'alimentationsur uneprisetripolaire
correctementrelieea laterre. Nebranchezaucun autreappareil
electriquesur ce circuit.
,, Partagerla m_meprisemuraleavecd'autresappareils
I'aide d'une multipriseou d'unerallongerisquede
provoqueruneelectrocutionou un incendie.
,, N'utilisezpas de transformateurelectrique.Celapourrait
entraTnerun risqued'electrocutionou d'incendie.
,, Veillezace que latension,la frequenceet I'intensitedu
courantsoientconformesauxcaract@istiquesde I'appareil.
Le non-respectde cetteconsignepeut entraTnerun risque
d'electrocutionou d'incendie.
Gardeztous lesel6mentsd'emballagehorsde laporteedes
enfants.Oeux-cirisqueraientdelesutiliserpour jouer.
Cetappareildoit _tre correctementreliea la terre. Lisezet
respectezles,,Consignesde raisea laterre>>detailleesau
debutde ce chapitre.Nereliezjamaiscet appareila une
conduitede gaz, a un tuyaud'eau en plastiqueou a uneligne
tel@honique.
,, Celapourraitentra_nerun risqued'electrocution,d'incendie,
d'explosionou de defaillancede I'appareil.
,, Ne branchezjamaislecordon d'alimentationsurune prise
qui n'est pas correctementrelieea laterreet assurez-vous
que laraisea laterreest conformeaux normeslocaleset
nationales.
Necoupez nine retirezJAMAISlatroisiemebroche(raisea la
terre)de lafiche du cordond'alimentation.
Connectezle four a un circuit de 20 A. Si le four est connecte
un circuit de 15 A, assurez-vousquele disjoncteurfonctionne.
N'installezpas cet appareildansun endroithumide,graisseux
ou poussiereuxet veilleza ce qu'il nesoit pasexpose
directementa la lumieredu soleilou a unesourced'eau (eau
de pluie).
,, Celapourraitentra_nerun risqued'electrocutionou
d'incendie.
AVERTBSEMENT
AVERTISSEMENTS
IMPORTANTSRELATIFS
L'INSTALLATION
Cet appareildoit _tre installeparun technicienquali% ou une
societede d@annage.
,, Le non-respectde cette consignepeut provoquer
uneelectrocution,unincendie,uneexplosion,un
dysfonctionnementdeI'appareiloudes blessures.
DeballezI'appareil: retireztousles elementsd'emballageet
verifiezquele four n'est pasendommage(tracesde choc
I'int@ieurou _.I'exterieur,Ioquetscasses,fissuresau niveaude
la porteou porterealalignee).En cas de dommages,n'utilisez
pas lefour et contactezimmediatementvotre revendeur.
CONSERVEPRECEUSEMENTCESCONSBNES
Branchezcorrectementlafiche dansla prisemurale.N'utilisez
jamaisunefiche ou un cordon d'alimentationendommage(e)
ou une prisemuralemalfixee.
,, Celapourraitentra_nerun risqued'electrocutionou
d'incendie.
N'installezpas I'appareilau-dessusd'un @ier.
Netirezjamaissur le cordond'alimentationet ne lepliezpas
de fagon excessive.
Nevrillezet neserrezpas le cordon d'alimentation.
Concemantlecordond'alimentation: ne I'accrochezpassur
un objet metallique; ne posezpas d'objetIourddessus; ne
lefaites passerentredes objetset ne lepoussezpas dans
I'espacea I'arrierede I'appareil.
,, Celapourraitentra_nerun risqued'electrocutionou
d'incendie.
Pourdebrancherlafiche, ne tirezpas sur le cordon.
,, Debranchezlefour en tirantsur lafiche uniquement.
,, Le non-respectde cetteconsignepeut entra_nerun risque
d'electrocutionou d'incendie.
Fran_:ais canadien - 4
Silaficheoulecordond'alimentationestendommage(e),
contactezlecentreded@annageleplusprochepour
demanderacequ'ellesoitremplaceeour@aree.
it,,
ATTENTION
SYMBOLES
D'AVERTISSEMENT
RELATIFSA L'INSTALLATION
_ Installezle four de tellefaoonque lafiche restefacilement
accessible.
,, Le non-respectde cetteconsignepeut entraTnerun risque
d'electrocutionou d'incendiesuitea unefuiteelectrique.
Debranchezla prised'alimentationsi I'appareildoit rester
inutilisependantune periodeprolongeeou en cas d'orage.
,, Le non-respectde cetteconsignepeut entraTnerun risque
d'electrocutionou d'incendie.
,, Respectezsystematiquementles consignesde Securite
Iorsquevous utilisezvotre four.Netentezjamaisde r@arer
lefour vous-m_me.La tensioncirculanta I'int@ieurest tres
elevee.Sile four necessitedes r@arations,contactezun
centrede d@annageagre6prochede chez vous.
Netentezpas de r@arer,demonterou modifiervous-m_me
I'appareil.
,, Le chassisde I'appareiletanttraverseparun courant
hautetension,il existeun risqued'electrocutionou
d'incendie.
,, Vousrisqueriezd'etre exposea des ondes
electromagn6tiques.
,, Silefour necessitedes r@arations,contactezlecentrede
d@annagele plusprochede chezvous.
Siunesubstanceetrangeretelle quede I'eaupenetre
dansI'appareil,debranchez-leet contactezvotre centrede
d@annageleplus proche.
,, Le non-respectde cette consignepeut entraTnerun risque
d'electrocutionou d'incendie.
AVER_SSEMENT
AVERTISSEMENTS
IMPORTANTSRELATIFSA
L'UTILISATION
En casd'inondation, contactezlecentrede d@annagele
plus prochesi votre appareila et6en contact avec I'eau.
Le non-respectde cetteconsignepeut entraTnerun risque
d'electrocutionou d'incendie.
Lisezet respectezles ,, Consignespermettantd'@iterune
expositionexcessiveaux micro-ondes,,detaill6esau debut de
ce chapitre.
Si I'appareilgenereun bruit anormal,uneodeurde brClleou de
lafumee,debranchez-leimmediatementet contactezleservice
de d@annageleplus proche.
,, Le non-respectde cetteconsignepeut entraTnerun risque
d'electrocutionou d'incendie.
En casde fuitede gaz (propane,GPL,etc.), a@ez
immediatementlapiecesans touchera I'appareil,au cordon
d'alimentationou a lafiche.
,, N'utilisezpas de ventilateur.
,, La moindreetincellerisqueraitde provoquerune explosion
ou unincendie.
Veillez_.ne toucheraucunedes partiesdu four (ex.: porte)
Iorsquecelui-ci est en marcheou vientjuste de fonctionner.
,, Le non-respectde cetteconsignerisqued'entraTnerdes
br_lures.
En casde d@art de feu sur lacuisinieresitueesous lefour,
etouffezlesflammesa I'aide d'un couvercle,d'une plaquede
cuissonmetalliqueou d'un plateau.
Lors d'uneutilisationa puissanceelevee,ne laissezjamaisles
el6mentssituessous I'appareilsans surveillance.Encas de
debordement,lesparticulesgrassesprovenantdes aliments
risquentde s'enflammersi lahotte fonctionne.Afin que la hotte
ne se declenchepas automatiquementchaquefois quevous
vous servezde votre four,utilisezdes plats de tailleappropriee
et nefaites fonctionnervotretablede cuissona puissance
maximaleque Iorsquecela estvraimentnecessaire.
En casde d@art de feu a I'interieurdu four, laissezsa
portefermee,eteignezI'appareilet debranchezle cordon
d'alimentationou coupezI'alimentationau niveaudu tableau
de fusiblesou du disjoncteur.Sivous ouvrezla portedu four,
I'incendierisquede se propager.
Netouchezpas lafiched'alimentationsi vous avez lesmains
mouillees.
,, Celapourraitentra_nerun risqued'electrocution.
N'eteignezpas I'appareilalorsqu'il est en fonctionnementen
debranchantle cordond'alimentation.
,, Le fait derebrancherle cordon d'alimentationdansla
prisemuralepeut provoqueruneetincelleentra_nantune
electrocutionou unincendie.
Teneztousles elementsd'emballagehorsde porteedes
enfantsafind'@itertout accident.
,, Risqued'asphyxieavec les sacsplastique.
Nelaissezpas lesenfantsoutoute personnea capacites
physiques,sensoriellesou mentalesreduitesutilisercet
appareilsans surveillance.
Veillezace queI'appareilsetrouvehors de portee desenfants.
,, Le non-respectde cette consignepeut entra_nerun risque
d'electrocution,de brClluresou de blessures.
,, Veillezace que lesenfantssoienteloignesde laporteIors
de son ouvertureou de safermeturecarils pourraientse
cognercontrelaporte ou se prendrelesdoigtsdedans.
Netouchezpas I'interieurdu four juste apresson
fonctionnement; les elementssontencorebrOlants.
,, La chaleura I'int@ieurdu four risquede provoquerdes
brC_lures.
N'utilisezpas de papieraluminium(saufsi indiqueprecisement
dansce manuel),d'objets metalliques(recipients,fourchettes,
etc.)ou de recipientscomportant des ornementsdores ou
argentes.
,, Cesobjetsrisquentde provoquerdes etincellesou de
s'enflammer.
N'utilisezet n'entreposezpas d'aerosolsou d'objets
inflammablesa proximitedufour.
,, La chaleurdegageepar lefour micro-ondesrisquedefaire
exploserous'enflammerlesgaz.
,, Le non-respectde cette consignepeut entra_nerun risque
d'electrocutionou des blessures.
N'essayezpas de modifier,d'ajusterou de r@arerla porte.
Le chassisext@ieurne doit 6tre retiresous aucunpretexte.
N'entreposezet n'utilisezjamaislefour en ext@ieur.
CONSERVEZPRECEUSEMENTCESCONSIGNES
Frangais canadien - 5
AVERTISSEMENTSRELATIFS
A L'UTILISATION
[_} i des fissuresapparaissenta la surfacedufour micro-ondes,
eteignezce dernier.
,, Le non-respectde cette consignerisqued'entraTnerune
electrocution.
Les plats et recipientspeuventdevenirextr_mementchauds.
Manipulez-lesavecprecaution.
Les plats chaudset lavapeurpeuventprovoquerdes brQlures.
Retirezle couvercledesrecipientsavec precautionen veillant
eloignerces derniersde votrevisageet devos mainsafin
d'eviterque ledegagementde vapeurne vous br01e.
Retirezlescouverclesdes petits pots pourbeb6 avantde les
fairechauffer.Lorsquevousrechauffezdes alimentspour beb6,
remuez-lesbienpour repartirla chaleuruniformement.Testez
toujourslatemperaturedes alimentsavantde lesdonner a un
beb6 Contrairementace qu'il paraTt,le recipientenverreou la
surfacedes alimentspeuvent_trechauds au pointde brCflerla
bouchedu beb6.
Veillezace quetous lesustensilesutilisesdansle four soient
adaptesa la cuissonaux micro-ondes.
Utilisezdes ustensilesadaptesa lacuissonauxmicro-ondes
en respectantrigoureusementlesrecommandationsdes
fabricants.
Ne montezpassur I'appareilet ne posezpas d'objets dessus
(ex.: linge,couverclede four, bougiesallumees,cigarettes
allumees,plats,produitschimiques,objetsmetalliques,eta).
,, Desarticlespeuventrestercoincesdansla porte.
,, CelapourraitentraTnerun risqued'electrocution,d'incendie,
de defaillancede I'appareiloudes blessures.
N'utilisezpas I'appareilaveclesmainsmouillees.
,, CelapourraitentraTnerun risqued'electrocution.
Nevaporisezpas de substancesvolatiles(ex.: insecticide)sur
la surfacede I'appareil.
,, Cessubstancessont non seulementnocivespourla sante,
maisellespeuventegalemententraTnerune electrocution,
un incendieou uneddaillance de I'appareil.
Neplacezpas I'appareilsurun support fragile,commeun evier
ou unobjet enverre.
,, L'evierou I'objeten verrepourrait_treendommage.
N'approchezpas votrevisageou votrecorps de I'appareil
pendant lacuissonou Iorsde I'ouverturede laportejuste
apres lacuisson.
,, Veilleza ce que lesenfantsne s'approchentpas trop pres
de I'appareil.
,, Le non-respectde cette consignerisqued'entraTnerdes
brCflurespour les enfants.
Neplacezpas de nourritureou d'objetsIourdssur la porte Iors
de sonouverture.
,, En casde chute,vous risqueriezde vous br01erou de vous
blesser.
Necreezpas de choc thermiquebrutal au niveaude laporte,
de I'interieurde I'appareilou du plat (ex.: en versantde I'eau
dessuspendantou juste apres la cuisson).
,, Celarisqued'endommagerI'appareil.La vapeurou les
projectionsd'eau pourraiententraTnerdes br01uresou des
blessures.
@
Netentezjamaisde faireprechaufferou fonctionnerlefour
micro-ondesa vide.
Veilleztoujoursa ce quele plateauenverrese trouve
I'interieurdu four avantde mettre en marchece dernier.
Danslecas contraire,lesalimentsne seraientpas cuits
correctement.
Nefaitesjamaisdecongelerde boissonssurgeleescontenues
dansdes bouteillesa col etroit. Celles-cirisqueraientd'eclater.
Nerayezpas lasurfacevitreede laportedu four a I'aide d'un
objettranchant.
,, Celapourraitendommager,voirebriserlavitre.
Neposezriensur I'appareilIorsquecelui-cifonctionne.
N'utilisezpas de recipientsfermeshermetiquement.Retirezles
obturateurset les couverclesavantI'utilisation.Lesrecipients
fermeshermetiquementpeuventexploserenraisonde
I'accumulationde pression,m_meapresI'arr_tdu four.
CONSIGNESDENETTOYAGE
AVE_TISSEMENT
IMPORTANTES
NenettoyezpasI'appareilenpulverisantdirectementde I'eau
dessus.
N'utilisezpas de benzene,dediluantou d'alcool pour nettoyer
I'appareil.
,, CelapourraitentraTnerunedecoloration,uneddormation,
des dommagessur I'appareilainsiqu'un risque
d'electrocutionou d'incendie.
Avantde nettoyerI'appareilou d'effectuerun entretien,
debranchez-lecordond'alimentationde laprisemuraleet
elimineztout restealimentairede la porteet du compartiment
de cuisson.
,, Le non-respectde cetteconsignepeut entraTnerun risque
d'electrocutionou d'incendie.
Prenezgardea ne pas vous blesseren nettoyantI'appareil
(exterieur/interieu0
,, Les ar_tesde celui-cipeuventse revelertrestranchantes.
NenettoyezpasI'appareila I'aided'un nettoyeurvapeur.
,, Celapourraitentra_nerun phenomenedecorrosion.
Veilleza maintenirI'interieurdu four toujourspropre.Les
particulesd'alimentsou lesprojectionsd'huile adherantaux
paroisrisquentd'ab_merlefour ou d'en reduireson efficacite.
AVE_TISSEMENT
AVERTISSEMENTSDE
LAPROPOSITION65
ADOPTEEPARL'I TATDELA
CALIFORNIE'.
Ceproduitcontient des substanceschimiquesreconnuespar
I'Etatde laCaliforniecommeetantdes substancestoxiquespour la
reproductionet provoquantdes cancers.
CONSERVEPRBIEUSEMENTCESCONSIGNES
Frangais canadien - 6
I
S0113113
RI_GLAGE DE VOTRE FOUR MICRO-ONDES
8
8
9
9
10
10
10
Contr01e du contenu
Informations concemant la
garantie et I'assistance
Preparation de votre four micro-
ondes
Fonctions
Panneau de configuration
Reglage de I'horloge
Securite enfants
Options
UTILISATION DU FOUR MICRO-ONDES
10 Bouton minuterie
10 Bouton ajouter 30 s
10 Boutons ventilation
(4 vitesses et marche/arr_t)
10 Bouton arr_t retarde de la
ventilation
10 Bouton eclairage elev6/faible/
desactiv6
11 Bouton reglage de la minuterie
11 Bouton marche/arr_t du plateau
11 Grille metallique
11 Mode eco
12 Boutons cuisson par capteur
12 Bouton rechauffage
13 Bouton decong61ation
automatique
14 Bouton selon ses pref6rences
14 Bouton decong61ation 1 livre
15 Bouton ramollir/faire fondre
15 Bouton menus enfants
16 Bouton en-cas
16 Temps de cuisson au four micro-
ondes et niveaux de puissance
17 Maintien au chaud
17 Bouton cuisson favorite
GUIDE DE CUISSON
" 18 Conseils generaux d'utilisation du
micro-ondes
19 Cuisson de la viande
19 Cuisson de la volaille
20 Cuisson des fruits de met
20 Cuisson des ceufs
20 Cuisson des legumes
20 Recettes
NETTOYAGE ET ENTRETIEN DE VOTRE FOUR
MICRO-ONDES
21
21
22
22
22
22
22
23
Nettoyage de la pattie exterieure
Nettoyage de la pattie interieure
Nettoyage du plateau toumant et
de I'anneau de guidage
Rangement et entretien du four
micro-ondes
Remplacement de I'ampoule de la
surface de cuisson/veilleuse
Remplacement de I'ampoule du
four
Nettoyage du filtre a graisse
Remplacement du filtre a charbon
Di_PANNAGE
ANNEXE
GARANTIE (€:TATS-UNIS}
/:
GARANTIE (CANADA)
GUIDE DES RI_CIPIENTS
"_ 17 Ustensiles adaptes a la cuisson
au four micro-ondes
Fran_:ais canadien - 7
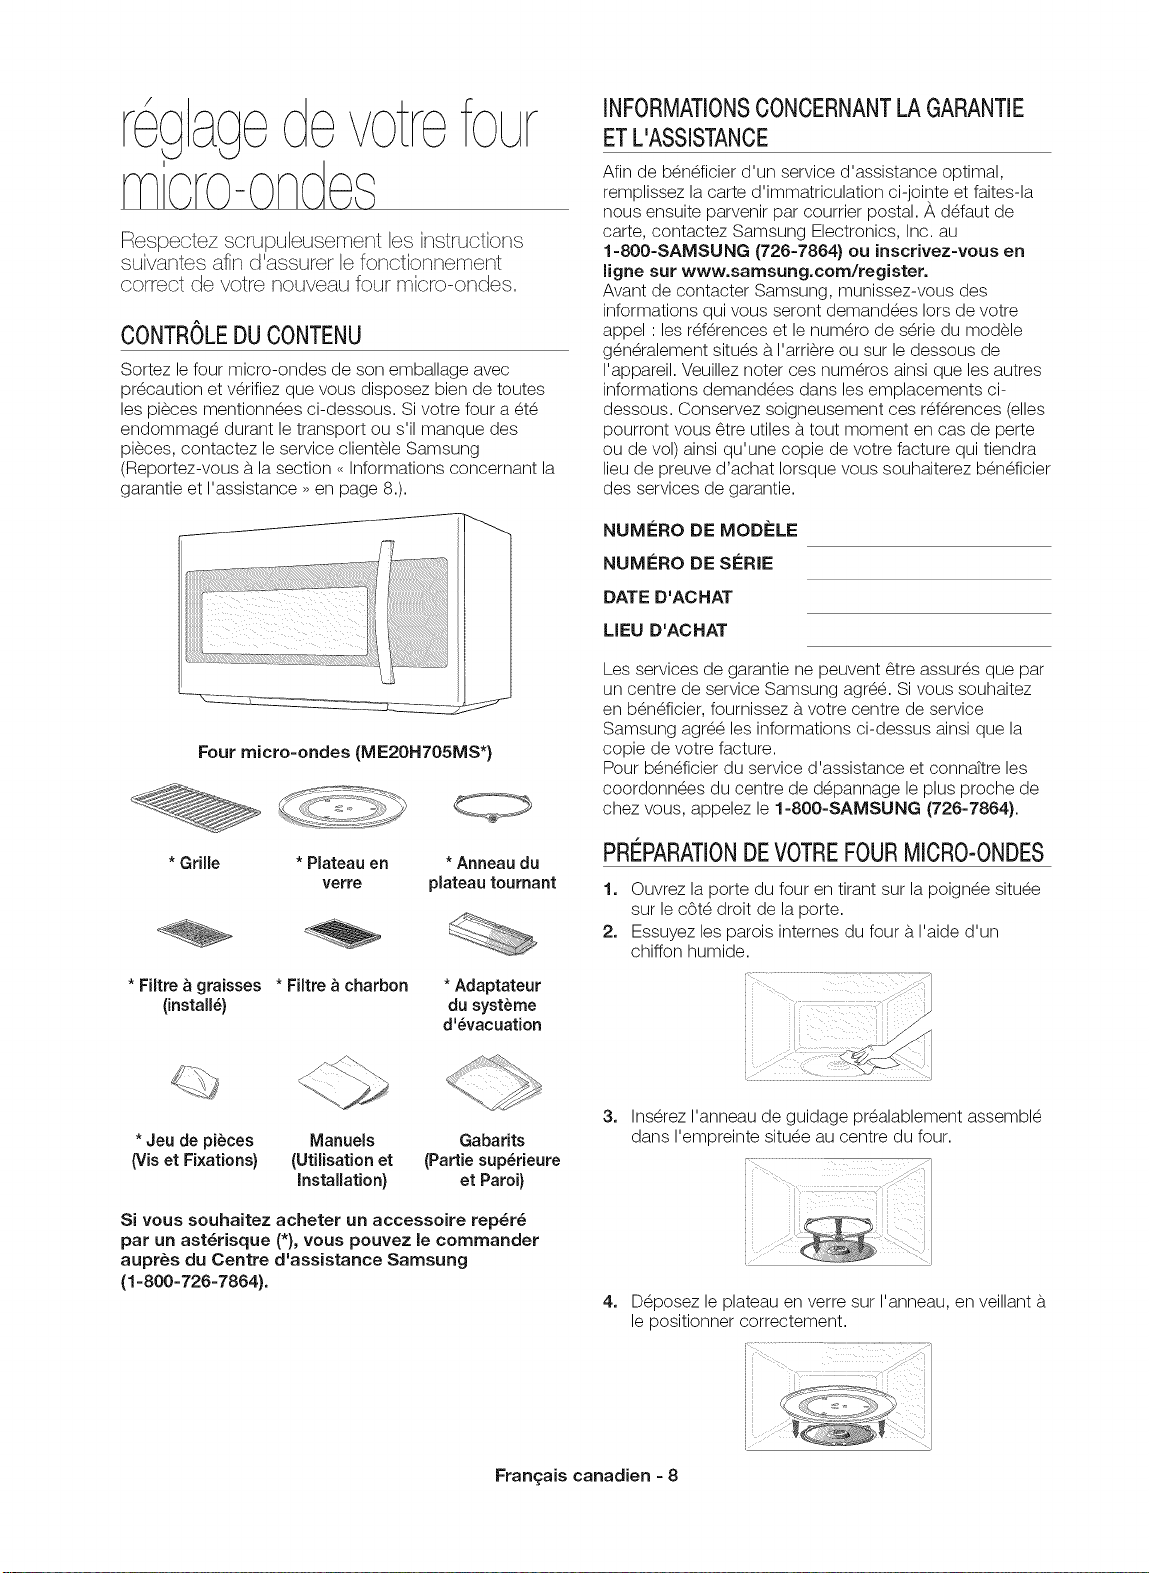
Respectez scrupubusement bs instructions
suivantes afin d'assurer b foncSonnement
correct de votre nouveau four micro-ondes,
CONTROLEDUCONTENU
Sortez le four micro-ondes de son emballage avec
precaution et verifiez que vous disposez bien de toutes
les pieces mentionn_es ci-dessous. Si votre four a _t_
endommage durant le transport ou s'il manque des
pi_ces, contactez le service clientele Samsung
(Reportez-vous b. la section <<Informations concernant la
garantie et I'assistance >>en page 8.).
J
Four micro-ondes (ME2OHTO5MS*}
* Grille * Plateau en * Anneau du
verre plateau tournant
* Adaptateur
du syst_me
d'_vacuation
* Filtre _ graisses * Filtre _ charbon
(installS)
INFORMATIONSCONCERNANTLA GARANTIE
ETL'ASSISTANCE
Afin de b_n_ficier d'un service d'assistance optimal,
remplissez la carte d'immatriculation ci-jointe et faites-la
nous ensuite parvenir par courrier postal. A d_faut de
carte, contactez Samsung Electronics, Inc. au
1-800-SAMSUNG (726-7864} ou inscrivez-vous en
ligne sur www.samsung.com/register.
Avant de contacter Samsung, munissez-vous des
informations qui vous seront demand_es lots de votre
appel : les r_f_rences et le num_ro de s_rie du modele
g_bn_ralement situ_s b.I'arriere ou sur le dessous de
I'appareil. Veuillez noter ces num_ros ainsi que les autres
informations demand_es dans les emplacements ei-
dessous. Conservez soigneusement ees r_f_rences (elles
pourront vous 6tre utiles b.tout moment en cas de perte
ou de vol) ainsi qu'une copie de votre facture qui tiendra
lieu de preuve d'achat Iorsque vous souhaiterez b_n_fieier
des services de garantie.
NUMI'=RO DE MOD_::LE
NUMERO DE SERIE
DATE D'ACHAT
LiEU D'ACHAT
Les services de garantie ne peuvent 6tre assures que par
un centre de service Samsung agree. Si vous souhaitez
en b_n_ficier, fournissez b.votre centre de service
Samsung agr_ les informations ci-dessus ainsi que la
copie de votre facture.
Pour b_n_fieier du service d'assistance et connaTtre les
coordonnees du centre de depannage le plus proche de
chez vous, appelez le 1-800-SAMSUNG (726-7864).
PRI_PARATIONDEVOTREFOURMICRO-ONDES
1o Ouvrez la porte du four en tirant sur la poign_e situ_e
sur le cOt_ droit de la porte.
2. Essuyez les parois internes du four b.I'aide d'un
chiffon humide.
* Jeu de pi_ces Manuels Gabarits
(Vis et Fixations) (UtiUsation et (Pattie sup_rieure
installation) et Paroi)
Si vous souhaitez acheter un accessoire rep_r_
par un ast_risque (*}, vous pouvez le commander
aupr_s du Centre d'assistance Samsung
(1-800-726-7864).
3. Ins_rez I'anneau de guidage pr_alablement assembl_
dans I'empreinte situee au centre du four.
4. D_posez le plateau en verre sur I'anneau, en veillant b.
le positionner correctement.
Fran_:ais canadien - 8
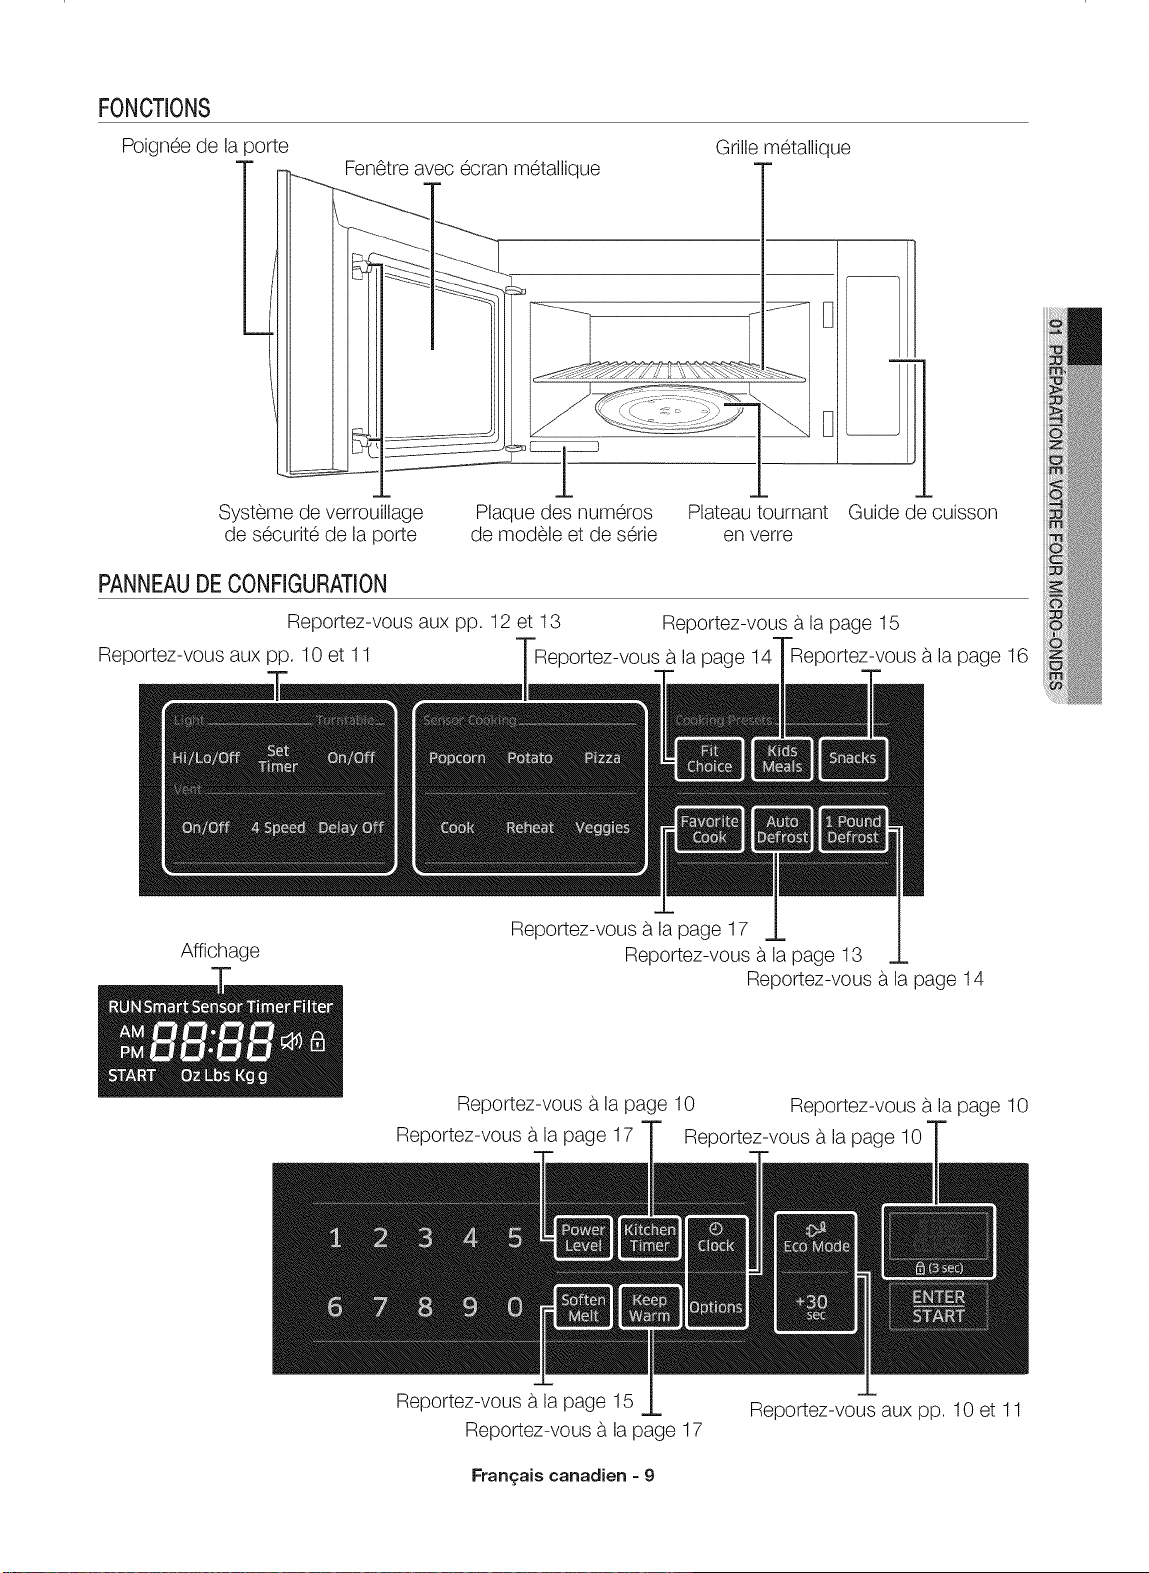
FONCTIONS
Poignee de la porte
==
Fen@treavec ecran metallique
Grille metallique
Systeme de verrouillage
de securit6 de la porte
Plaque des numeros
de modele et de serie
Plateau tournant Guide de cuisson
en verre
PANNEAUDECONFIGURATION
Reportez-vous aux pp. 12 et 13 Reportez-vous a la page 15
Reportez-vous aux pp. 10 et 11 Reportez-vous a la page Reportez-vous a la page 16
Affichage
Reportez-vous a la page 17
Reportez-vous a la page 13
Reportez-vous a la page 14
Reportez-vous a la page 10 Reportez-vous a la page 10
Reportez-vous a la page 17 Reportez-vous a la page 10
Reportez-vous a la page 15
Reportez-vous a la page 17
Reportez-vous aux pp. 10_11
_an£ais canadien-9
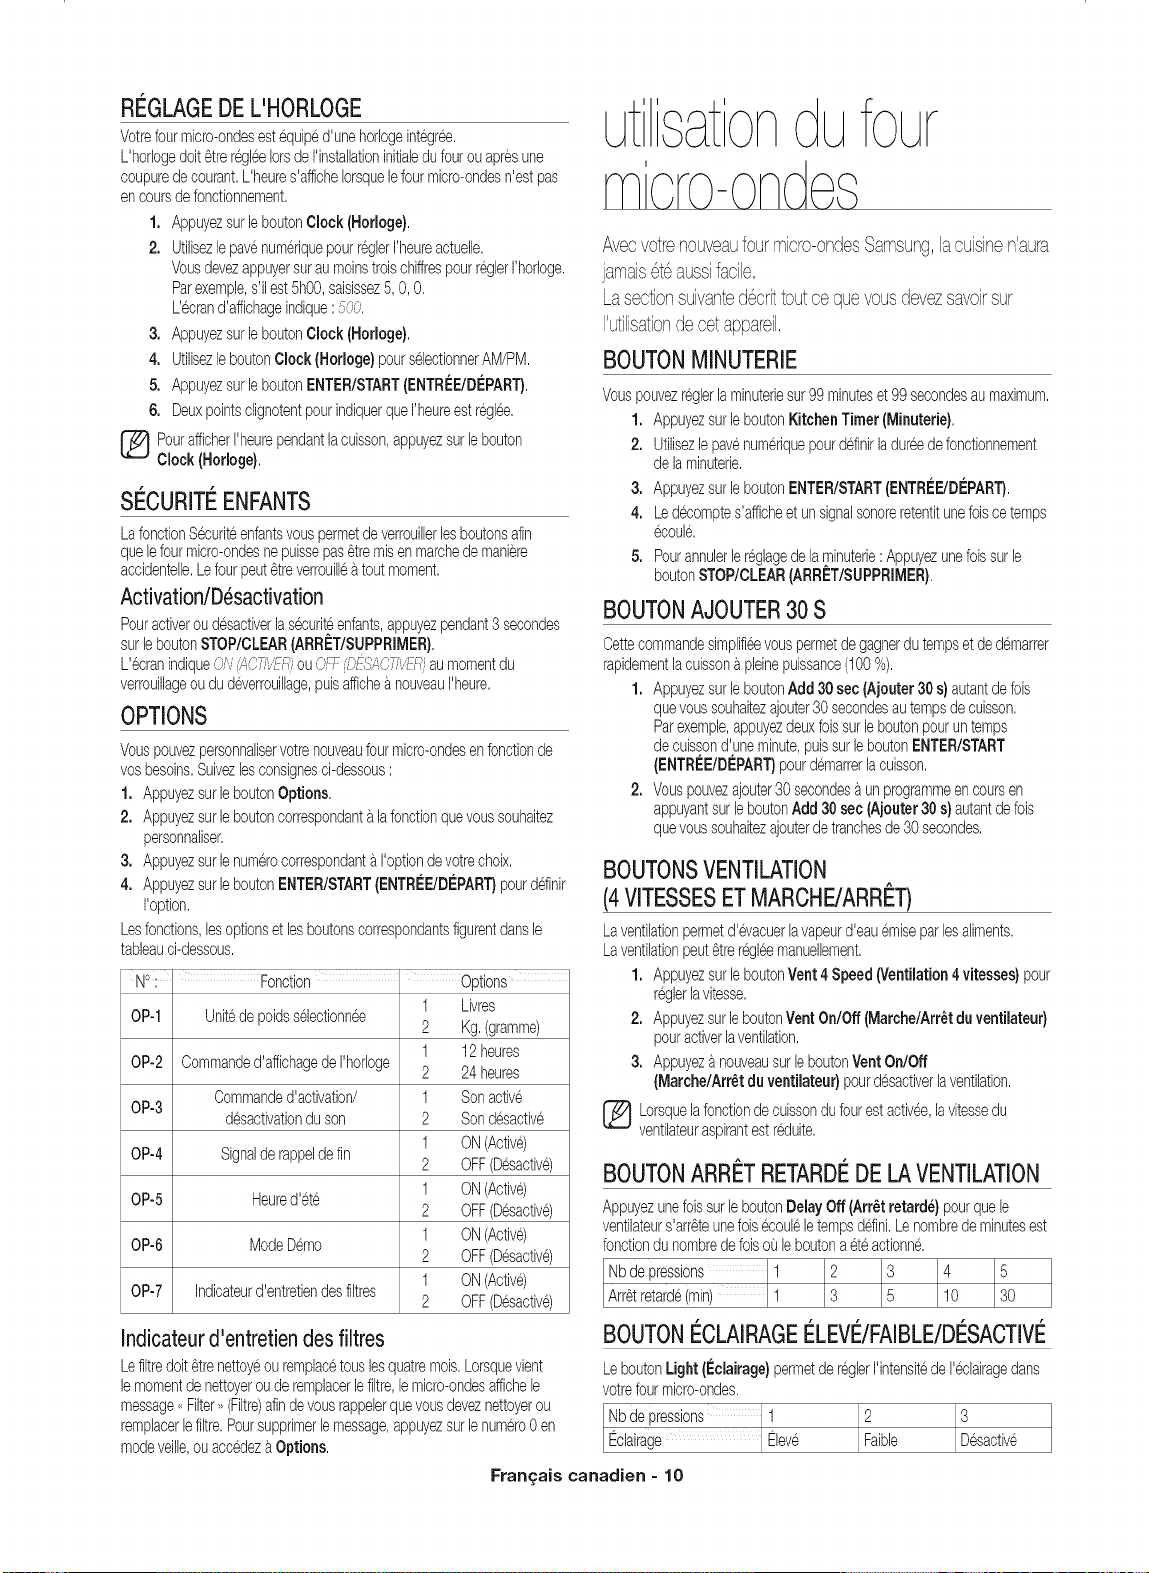
RI_GLAGEDEL'HORLOGE
Votrefourmicro-ondesestequiped'unehorlogeintegree.
L'horlogedolt6treregleelotsderinstallationinitiabdu fourouapresune
coupuredecourant.L'heures'afficheIorsquelefourmicro-ondesn'estpas
encoursdefonctionnement.
1. AppuyezsurleboutonClock(Horloge).
2. Utilisezlepavenumeriquepourreglerrheureactuelle.
Vousdevezappuyersuraumoinstroischiffrespourreglerrhorloge.
Parexemple,s'il est5h00,saisissez5,0,0.
L'@rand'affichageindique:500.
3. AppuyezsurleboutonClock(Horloge}.
4. UtilisezleboutonClock{Horloge}pourselectionnerAM/PM.
5. AppuyezsurleboutonENTER/START(ENTREE/DI_PART)
6. Deuxpointsclignotentpourindiquerquerheureestregl@.
[_ ourafficherrheurependantlacuisson,appuyezsurlebouton
Clock (Horloge},
S!_CURITI_ENFANTS
LafonctionS@uriteenfantsvouspermetdeverrouillerlesboutonsdin
quelefourmicro-ondesnepuissepas6tremisen marchedemaniere
accidentelle.Lefourpeut6treverrouilleatoutmoment.
Activation/D_sactivation
Pouractiverou desactiverlas@uriteenfants,appuyezpendant3secondes
surleboutonSTOP/CLEAR(ARRET/SUPPRIMER)
L'@ranindiqueSi',,5sd}fi.,,..ji',ouOF7_[}ES,4CfiyZ-7_,aumomentdu
verrouillageoududeverrouillage,pubafficheanouveaurheure.
OPTIONS
Vouspouvezpersonnaliservotrenouveaufourmicro-ondesenfonctionde
vosbesoins.Suivezbs consignesci-dessous:
1. AppuyezsurleboutonOptions.
2. Appuyezsurleboutoncorrespondantalafonctionquevoussouhaitez
personnaliser.
3. Appuyezsurlenumerocorrespondantaroptiondevotrechoix.
4. AppuyezsurleboutonENTER/START(ENTRI_E/DEPART}pourddinir
roption.
Lesfonctions,lesoptionsetlesboutonscorrespondantsfigurentdansle
tableauci-dessous.
NO: . Fonction Options
OP-1 Unitede poids@lectionn@
OP-2 Commanded'affichagederhorloge
Commanded'activation/
OP-3
d@activationdu son
OP-4 Signalderappeldefin
OP-5 Heured'ete
OP-6 ModeDemo
OP-7 Indicateurd'entretiendesfiltres
Indicateurd'entretiendes filtres
1 Livres
2 Kg.(gramme)
1 12heures
2 24 heures
1 Sonactive
2 Sondesactive
1 ON(Active)
2 OFF(Desactive)
1 ON(Active)
2 OFF(Desactive)
1 ON(Active)
2 OFF(Desactive)
1 ON(Active)
2 OFF(Desactive)
Avecvotrenouveaufourmicro-ondesSamsung,la cuisinen'aura
jamais6t6aussifacile,
Lasectionsuivanted@rittoutce quevousdevezsavoirsur
I'utilisationdecet appareil,
BOUTONMINUTERIE
Vouspouvezreglerlaminuteriesur99 minuteset99 secondesaumaximum.
1. AppuyezsurleboutonKitchenTimer(Minuterie}.
2. Utilisezlepavenumeriquepourddinirladur@defonctionnement
de laminuterb.
3. AppuyezsurleboutonENTER/START(ENTRI_E/DEPART}.
4. Led@omptes'afficheetunsignalsonoreretentitunefoiscetemps
@oule,
5, Pourannuletb reglagedelaminute@: Appuyezunefobsurb
boutonSTOP/CLEAR(ARRET/SUPPRIMER},
BOUTONAJOUTER30S
Cettecommandesimpli%evouspermetdegagnerdutempsetdedemarrer
rapidementlacuissona pieinepuissance(I00 %).
1. AppuyezsurleboutonAdd30 sec(Ajouter30 s}autantdefob
quevoussouhaitezajouter30secondesautempsdecuisson.
Parexemple,appuyezdeuxfob surleboutonpouruntemps
de cuissond'uneminute,pubsurieboutonENTER/START
(ENTREE/DEPART)pourdemarrerlacuisson.
2. Vouspouvezajouter30secendesaunprogrammeencoursen
appuyantsurb boutonAdd30 sec(Ajouter30s) autantdefob
quevoussouhaitezajouterdetranchesde30 secondes.
BOUTONSVENTILATION
(4VITESSESETMARCHE/ARRI_T)
Laventilationpermetd'@acuerlavapeurd'eauemiseparbsaliments.
Laventilationpeut6treregleemanuelbment.
1. AppuyezsurleboutonVent4Speed(Ventilation4 vitesses}pour
regierlavitesse.
2. AppuyezsurleboutonVentOn/Off(Marche/Arr_tduventilateur)
pouractiveriaventilation.
3. AppuyezanouveausurleboutonVentOn/Off
(Marche/Arr_.tdu ventilateur}pourd@activerlaventilation.
Lorsquelafonctionde cuissondufourestactiv@,lavitessedu
ventilateuraspirantestreduite.
BOUTONARRI_TRETARDI_DE LAVENTILATION
Appuyezunefob surleboutonDelayOff(Arr_tretardS)pourquele
ventilateurs'arr6teunefob@ouleletempsdefini.Lenombrede minutesest
fonctiondu nombredefobouleboutona eteactionne.
Nbde pressions 1 2 3 4 5
Arr6tretarde(min) 1 3 5 10 30
BOUTONI_CLAIRAGEI_LEVI_/FAIBLE/DI_SACTIVI_
LeboutonLight(l_clairage}permetdereglerrintensiteder@lairagedans
votrefourmicro-ondes,
Nbdepressi0ns ! 2 3
Ecarage Eleve Fable Desactive
Lefiltredoit6trenettoyeourempla@touslesquatremob.Lorsquevbnt
lemomentdenettoyerou deremplacerlefiltre,lemicro-ondesaffichele
message,<Filter>,(Filtre)afindevousrappelerquevousdeveznettoyerou
remplacerlefiltre.Poursupprimerlemessage,appuyezsurlenumero0 en
modeveille,ou ac@deza Options.
Fran_:ais canadien - 10
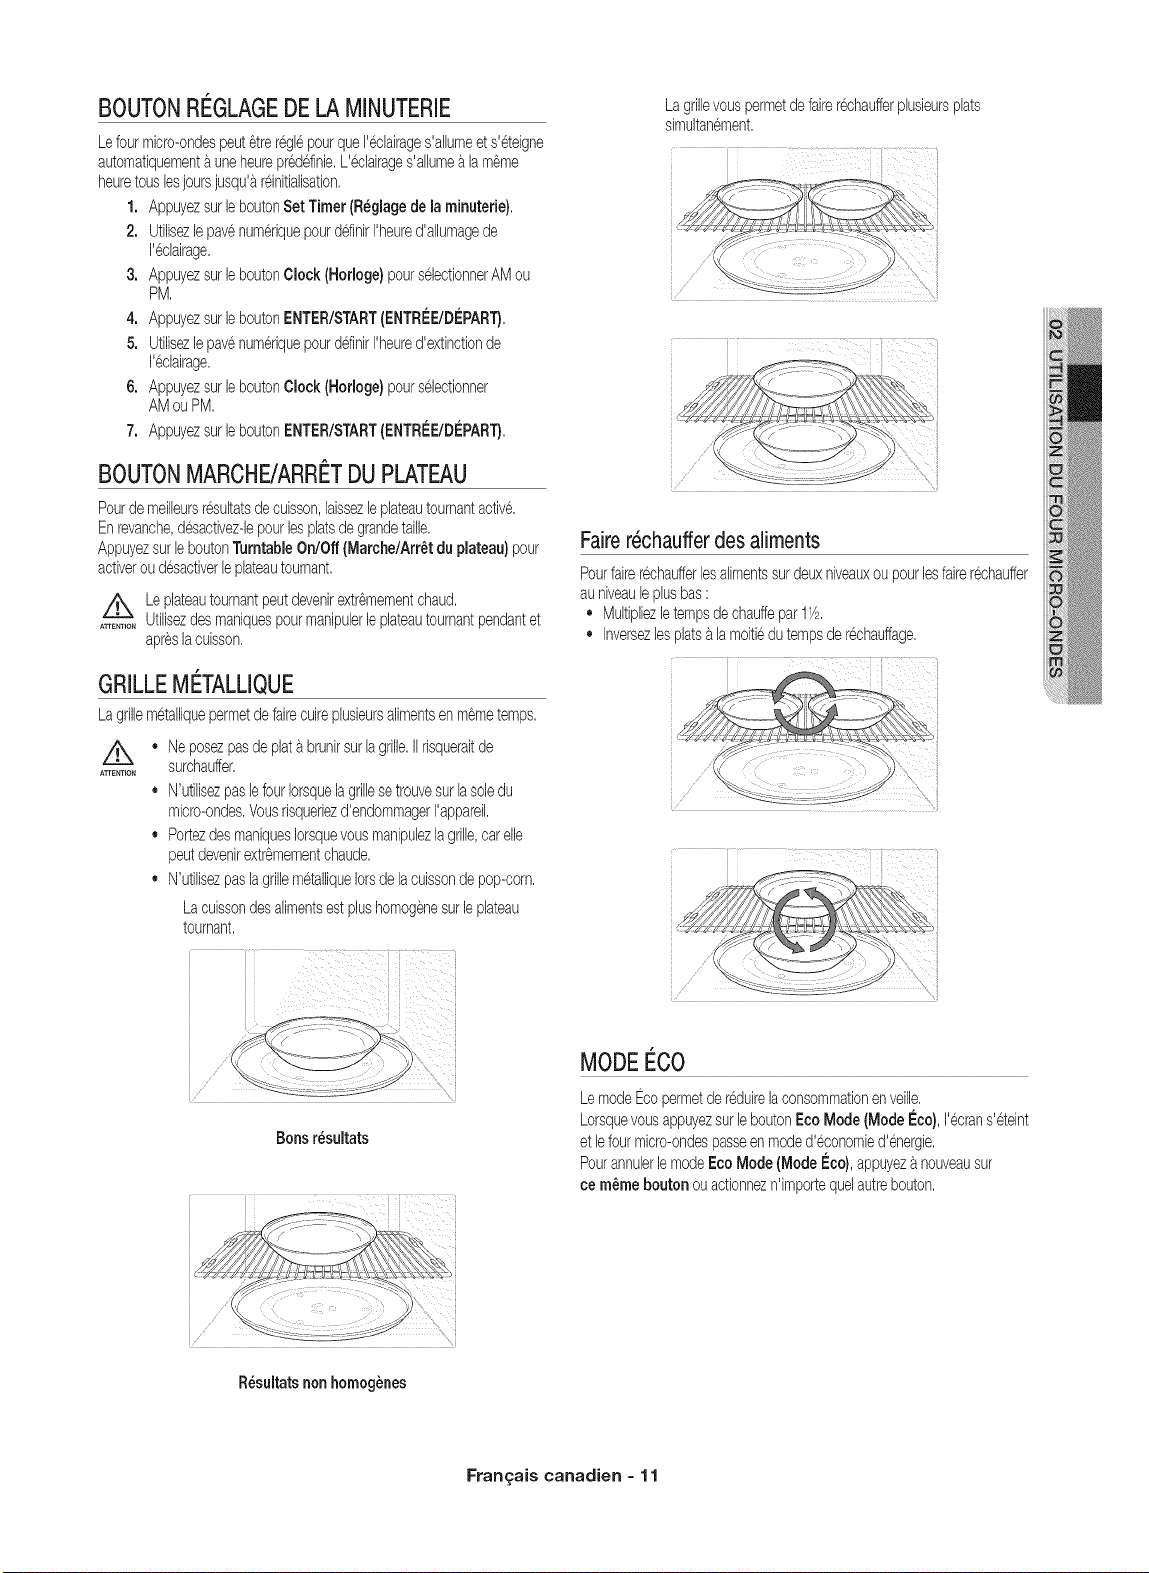
BOUTONRCGLAGEDELA MINUTERIE
Lefourmicro-ondespeut_trereglepourqueI'eclairages'alhmeets'eteigne
automatiquementauneheurepreddinie,L'echirages'alhmea lam_me
heuretouslesjoursjusqu'areinitialisation,
1. Appuyezsur]eboutonSet Timer(R6glagede laminutede},
2, UtilisezlepavenumeriquepourdefinirI'heured'allumagede
I'eclairage,
3. AppuyezsurleboutonClock (Horloge}pourselectionnerAMou
PM,
4, AppuyezsurleboutonENTER/START(ENTR#E/DI_PART},
5. UtilisezlepavenumeriquepourdefinirI'heured'extinctionde
I'eclairage,
6, AppuyezsurleboutonClock(Horloge}pourselectionner
AMou PM,
7, AppuyezsurleboutonENTER/START(ENTRI_E/DI_PART},
BOUTONMARCHE/ARRCTDUPLATEAU
Pourdemeilleursresultatsdecuisson,laissezleplateautoumantactive,
Enrevanche,desactivez-lepourlesplatsdegrandetaille,
AppuyezsurleboutonTurntableOn/Off(Marche/Arr#.tdu plateau}pour
activeroudesactiverleplateautournant,
Z_ Leplateautournantpeutdevenirextr_mementchaud,
........ Utilisezdesmaniquespourmanipulerleplateautournantpendantet
apreslacuisson,
GRILLEMI_TALLIQUE
Lagrillemetalliquepermetde fairecuirephsieursalimentsenm_metemps,
ATTENTION
Neposezpasdeplatabrunirsur lagrille,IIrisqueraitde
surchauffer,
N'utilisezpaslefourIorsquelagrillesetrouvesurlasoledu
micro-ondes,Vousrisqueriezd'endommagerI'appareil,
PortezdesmaniquesIorsquevousmanipulezlagrille,carelle
peutdevenirextr_mementchaude,
N'utilisezpaslagrillemetalliqueIorsdelacuissonde pop-corn,
Lacuissondesalimentsestplushomogenesurleplateau
tournant,
Bonsr6sultats
i,,,,,"" " i,ii !I:ii,
R6sultatsnonhomogenes
Lagrillevouspermetdefairerechaufferphsieursplats
simultanement,
i i
Fairer6chaufferdes aliments
Pourfairerechaufferlesalimentssurdeuxniveauxou pourlesfairerechauffer
auniveaule phs bas:
Multipliezletempsde chauffepar11/2,
Inversezlesplatsa lamoitiedutempsderechauffage,
i! _il i
MODEECO
LemodeEcopermetdereduirelaconsommationenveille,
LorsquevousappuyezsurleboutonEco Mode(ModeI_co),I'ecrans'eteint
etlefourmicro-ondespasseenmoded'economied'energie,
Pourannuletle modeEcoMode(ModeI_co},appuyezanouveausur
ce m6meboutonouactionnezn'importequelautrebouton,
Fran£ais canadien - 11
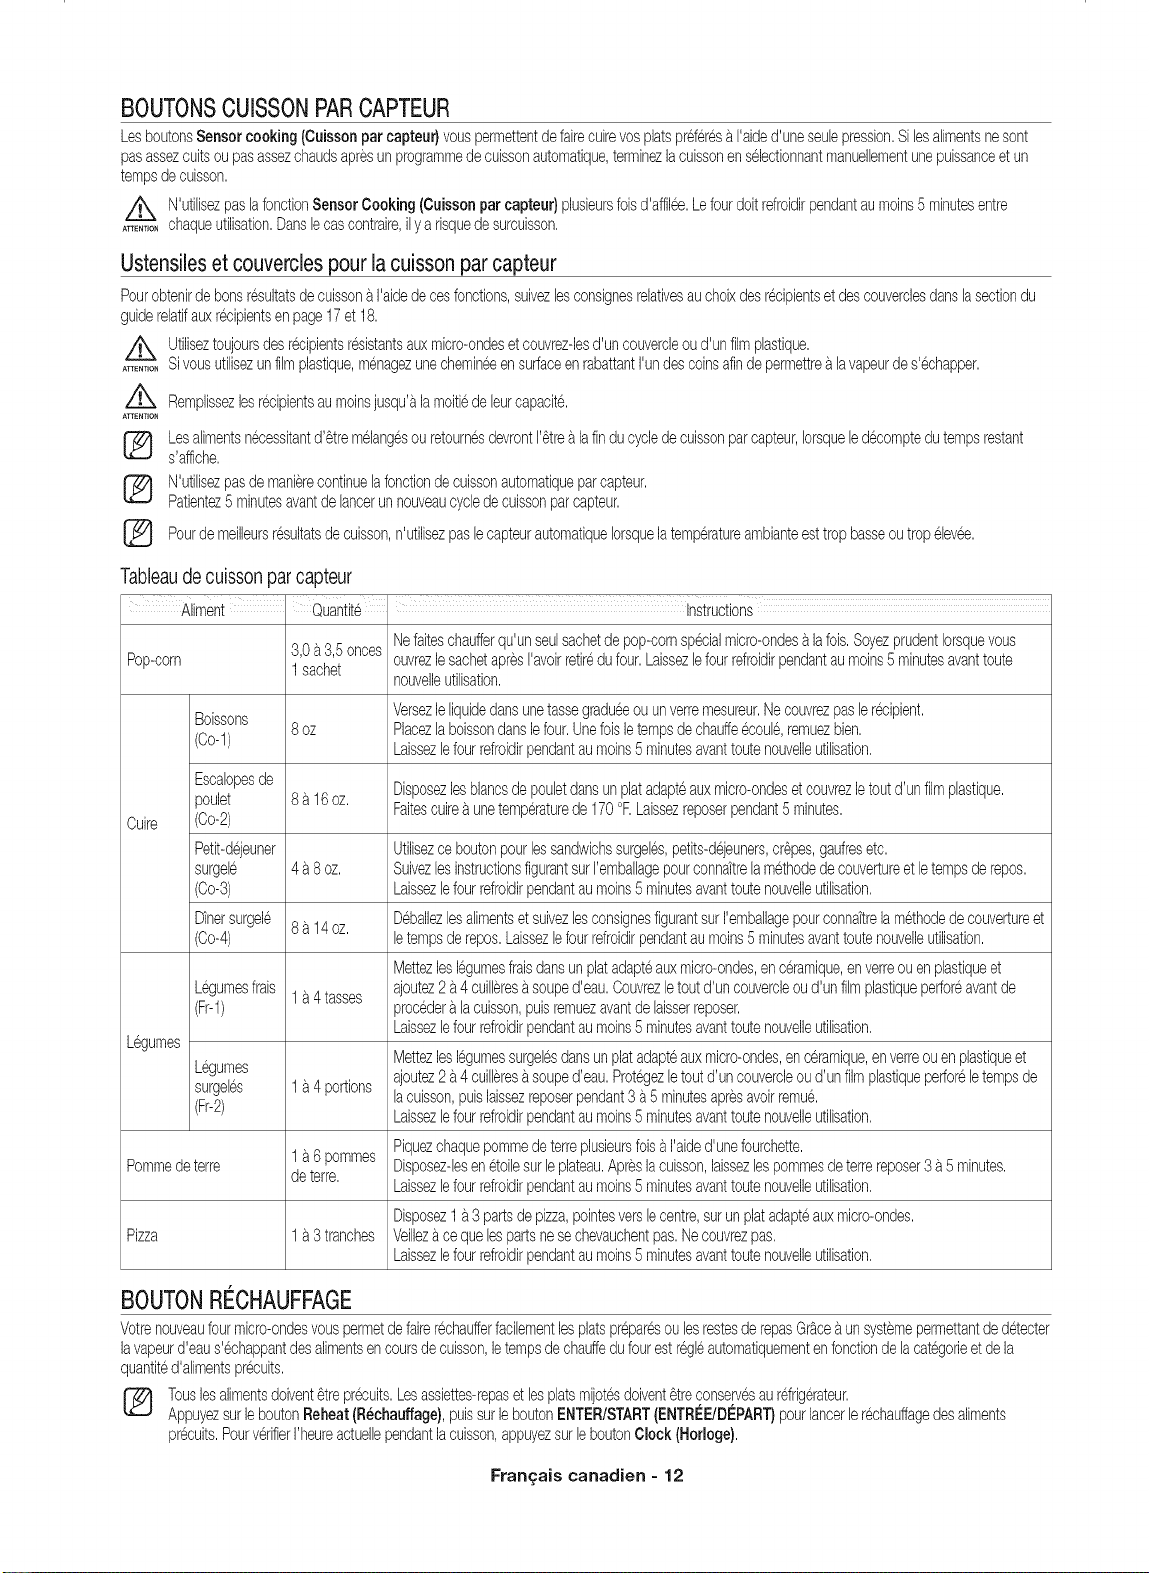
BOUTONSCUISSONPARCAPTEUR
LesboutonsSensorcooking(Cuissonpar capteur)vouspermettentdefairecuirevosplatspreferesa Faided'uneseubpression,Silesalimentsnesont
pasassezcuitsoupasassezchaudsapresun programmedecuissonautomatique,terminezlacuissonenselectionnantmanuellementunepuissanceetun
tempsdecuisson,
/_ N'utilisezpaslafonctionSensorCooking(Cuissonparcapteur}plusieursfoisd'affilee,Lefourdoltrefroidirpendantaumoins5 minutesentre
........_ chaqueuti%ation,Dansb cascontraire,ily arisquedesurcuisson,
Ustensileset couverclespour la cuissonpar capteur
Pourobtenirde bonsresultatsdecuissonaI'aidedecesfonctions,suivezlesconsignesrelativesauchoixdesrecipientset descouverclesdanslasectiondu
guiderelatifauxrecipientsenpage17et 18,
z_ Utiliseztoujoursdesrecipientsresistantsauxmicro-ondesetcouvrezdesd'uncouvercleoud'unfilmplastique,
........ Sivousutilisezunfilmplastique,menagezunechemineeensurfaceenrabattantFundescoinsafindepermettrea lavapeurdes'echapper,
/k
ATTENTION
®
®
Remplissezlesrecipientsau moinsjusqu'alamoitbdeleurcapacite,
Lesalimentsnecessitantd'StremSlangSsou retournesdevrontI'_trealafinducycledecuissonparcapteur,Iorsqueledecornptedutempsrestant
s'affiche,
N'utilisezpasdemanierecontinuelafonctiondecuissonautomatiqueparcapteur,
Patientez5 minutesavantde lancerunnouveaucyclede cuissonparcapteur,
Pourde meilleursresultatsdecuisson,n'utilisezpaslecapteurautomatiqueIorsquelatemperatureambianteesttropbasseoutropelevee,
Tableaude cuissonpar capteur
Aliment Quantite _ Instructions
Nefareschaufferqu'unseulsachetdepop-cornspecialmicro-ondes_tlafois,SoyezprudentIorsquevous
Pop-corn 3,0_t3,5onces ouvrezle sachetapresI'avoirretiredufour,Laissezlefourrefroidirpendantaumoins5 minutesavanttoute
1sachet
nouvelJeutJlisatJon,
Versezleliquidedansunetassegradueeou unverremesureur,Necouvrezpaslerecipient,
Boissons
(Co-1) 8 oz Placezlaboissondanslefour,Unefoisletempsdechauffeecoule,remuezbien,
Laissezlefourrefroidirpendantaumoins5 minutesavanttoutenouvelleutilisation,
Escalopesde Disposezlesblancsde pouletdansunplatadapteauxmicro-ondesetcouvrezletoutd'unfilmplastique,
poulet 8 a 16oz, Faitescuireaunetemperaturede170°F,Laissezreposerpendant5minutes,
Ouire (00-2)
Petit-dejeuner Utilisezce boutonpourlessandwichssurgebs,petits-dejeuners,cr6pes,gaufresetc,
surgeb 4 a8 oz, SuivezlesinstructionsfigurantsurI'emballagepourconna'ftrelamethodede couvertureet letempsde repos,
(Co-3) Laissezlefourrefroidirpendantaumoins5 minutesavanttoutenouvelleutilisation,
D_nersurgele 8 a 14oz, Deballezlesalirnentset suivezlesconsignesfigurantsurI'emballagepourconna'itrela methodedecouvertureet
(Co-4) letempsderepos,Laissezlefourrefroidirpendantaumoins5 minutesavanttoutenouvelleutilisation,
Mettezleslegumesfraisdansunplatadapteauxmicro-ondes,enceramique,enverreou enplastiqueet
Legumesfrais 1a4 tasses ajoutez2a 4cuilbresa souped'eau,Couvrezletoutd'uncouvercleoud'unfilmplastiqueperforeavantde
(Fr-1) procedera lacuisson,puisremuezavantde laisserreposer,
LaissezlefourrefroidJrpendantaumoins5 minutesavanttoutenouvelleutJlisatJon,
Legumes
Legumes Mettezleslegumessurgebsdansun platadaptsauxmicro-ondes,en ceramique,enverreouenplastiqueet
surgebs 1a4 portions ajoutez2a 4cuilbresa souped'eau,Protegezletoutd'uncouvercleoud'unfilmplastiqueperforeletempsde
(Fr-2) lacuisson,puislaissezreposerpendant3 a5 minutesapresavoirremuS,
Laissezlefourrefroidirpendantaumoins5 minutesavanttoutenouvelleutilisation,
Piquezchaquepornmede terreplusieursfois_tI'aided'unefourchette,
Pommedeterre 1a6 pommes Disposez-lesenetoilesurleplateau,Apreslacuisson,laissezlespommesdeterrereposer3a 5minutes,
deterre,
Laissezlefourrefroidirpendantaumoins5 minutesavanttoutenouvelleutilisation,
Disposez1a 3partsdepizza,pointesverslecentre,surunplatadapteauxmicro-ondes,
Pizza 1a3 tranches Veillezace quelespartsnesechevauchentpas,Necouvrezpas,
Laissezlefourrefroidirpendantaumoins5 minutesavanttoutenouvelleutilisation,
BOUTONRI CHAUFFAGE
Votrenouveaufourmicro-ondesvouspermetde fakerechaufferfacilementlesplatspreparSsoulestestesde repasGr&ce_tunsystemeperrnettantdedetecter
lavapeurd'eaus'echappantdesalimentsencoursdecuisson,letempsdechauffedufourestregbautomatiquementenfonctionde lacategorieetde la
quantited'alimentsprecuits,
(_ ouslesalimentsdoiventStreprecuits,Lesassiettes-repaset lesplatsmijotesdoiventStreconservesaurefdgerateur,
AppuyezsurleboutonReheat(R6chauffage},puJssurleboutonENTER/START(ENTRI_E/DEPART}pourlancerlerechauffagedesaliments
precuits,PourverifierI'heureactuellependantlacuisson,appuyezsurleboutonClock(Horloge},
Fran_:ais canadien - 12
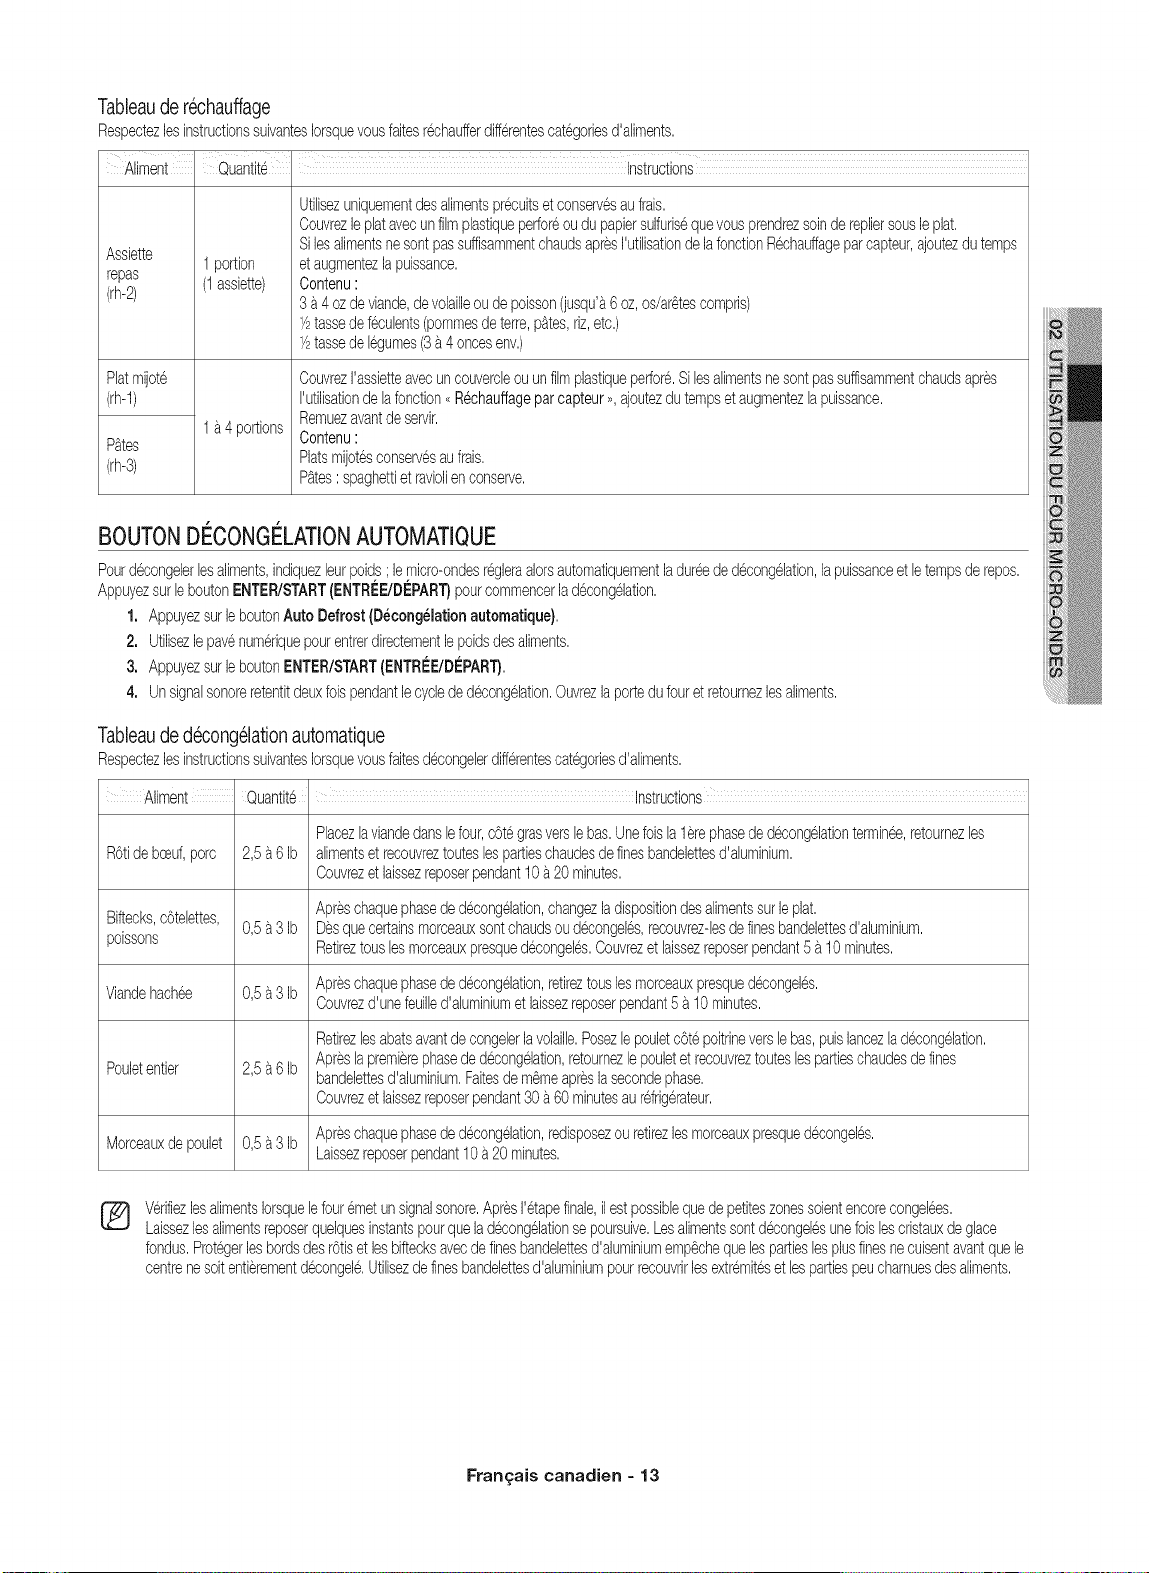
Tableauderechauffage
RespectezlesinstructionssuivantesIorsquevousfaresr@haufferdifferentescategoriesd'aliments.
Aliment Quantite . Instructions
Assiette
repas
(rh-2)
Platmijote
(rh-1)
1portion
(I assiette)
1a4 portions
%tes
(rh-S)
Utilisezuniquementdesalimentspr@uitsetconser%saufrais.
Couvrezle platavecunfilmplastiquepedoreoudu papiersulfurisequevousprendrezsoinderepliersousleplat.
SilesalimentsnesontpassuffisammentchaudsapresI'utilisationdelafonctionR@hauffageparcapteur,ajoutezdu temps
etaugmentezlapuissance.
Contenu:
3 a4 ozdeviande,devolailleou depoisson(jusqu'a6oz,os/ar@tescompris)
1/2tassedef@ulents(pommesde terre,p_tes,riz,etc.)
1/2tassede legumes(3a4 oncesenv.)
CouvrezI'assietteavecuncouvercleouunfilmplastiquepedore.Si lesalimentsnesontpassuffisammentchaudsapres
Futilisationde lafonction,<R@hauffageparcapteur,,,ajoutezdu tempsetaugmentezlapuissance.
Remuezavantde servir.
Contenu:
Platsmijotesconser%saufrais.
PAtes:spaghettietraviolienconsen/e.
BOUTONDC:CONGC:LATIONAUTOMATIQUE
Pourdecongelerbsaliments,indiquezburpoids;lemicro-ondesregleraalorsautomatiquementladureeded@ongehtion,lapuissanceet letempsde repos.
AppuyezsurleboutonENTER/START(ENTREE/DISPART}pourcommencerlad@ongelation.
1. AppuyezsurleboutonAuto Defrost(D_cong_iationautomatique},
2. Utilisezlepavenumeriquepourentrerdirectementlepoidsdesaliments.
3. AppuyezsurleboutonENTER/START(ENTRI_E/DI_PART}.
4. Unsignalsonoreretentitdeuxfoispendantle cycleded@ongehtion.Ouvrezlaportedufouret retournezlesaliments.
Tableaudedecongelationautomatique
RespectezlesinstructionssuivantesIorsquevousfaitesd@ongelerdifferentescategoriesd'alirnents.
Aliment Quantite Instructions
Placezlaviandedanslefour,cOtegrasverslebas.Unefoisla1erephaseded@ongehtiontermin@,retournezles
ROtide bceuf,pore 2,5a 6Ib alimentsetrecouvreztouteslespartieschaudesdefinesbandelettesd'ahminhm.
Couvrezetlaissezreposerpendant10a20 minutes.
Apreschaquephaseded@ongehtion,changezladispositiondesalimentssurleplat.
Biftecks,cOtelettes, 0,5a 3Ib Desquecertainsmorceauxsontchaudsoud@ongeles,recouvrez-lesdefinesbandebttesd'ahminium.
poissons Retireztouslesmorceauxpresqued@ongebs.Couvrezet laissezreposerpendant5 a 10minutes.
Viandehach@ 0,5a 3Ib Apreschaquephaseded@ongehtion,retireztouslesmorceauxpresqued@ongeles.
Couvrezd'unefeuilled'ahminhmetlaissezreposerpendant5 a 10minutes.
Retirezlesabatsavantdecongebrlavolaille.PosezlepouletcOtepoitrineversle bas,puislancezlad@ongehtion.
Pouletentier 2,5a 6Ib Apreslapremierephaseded@ongehtion,retournezlepouletet recouvreztouteslespartieschaudesdefines
bandebttesd'ahminium.Faitesdem_meapreslasecondephase.
Couvrezetlaissezreposerpendant30a60 minutesau rdrigerateur.
Morceauxdepoulet 0,5a 3Ib Apreschaquephaseded@ongelation,redisposezouretirezlesmorceauxpresqued@ongeles.
Laissezreposerpendant10a 20minutes.
_} VerifiezlesalimentsIorsquelefouremetunsignalsonore.ApresI'etapefinale,ilestpossiblequedepetiteszonessoientencorecongel@s.
Laissezlesalimentsreposerquelquesinstantspourquelad@ongehtionsepoursuive.Lesalimentssontd@ongebsunefoislescristauxdeglace
fondus.ProtegerlesbordsdesrOtiset lesbiftecksavecdefinesbandelettesd'ahminiumemp_chequelespartieslesplusfinesnecuisentavantquele
centrenesoitentierementd@ongele.Utilisezdefinesbandelettesd'ahminhmpourrecouvrirlesextremitesetlespartiespeucharnuesdesaliments.
Fran_:ais canadien = 13
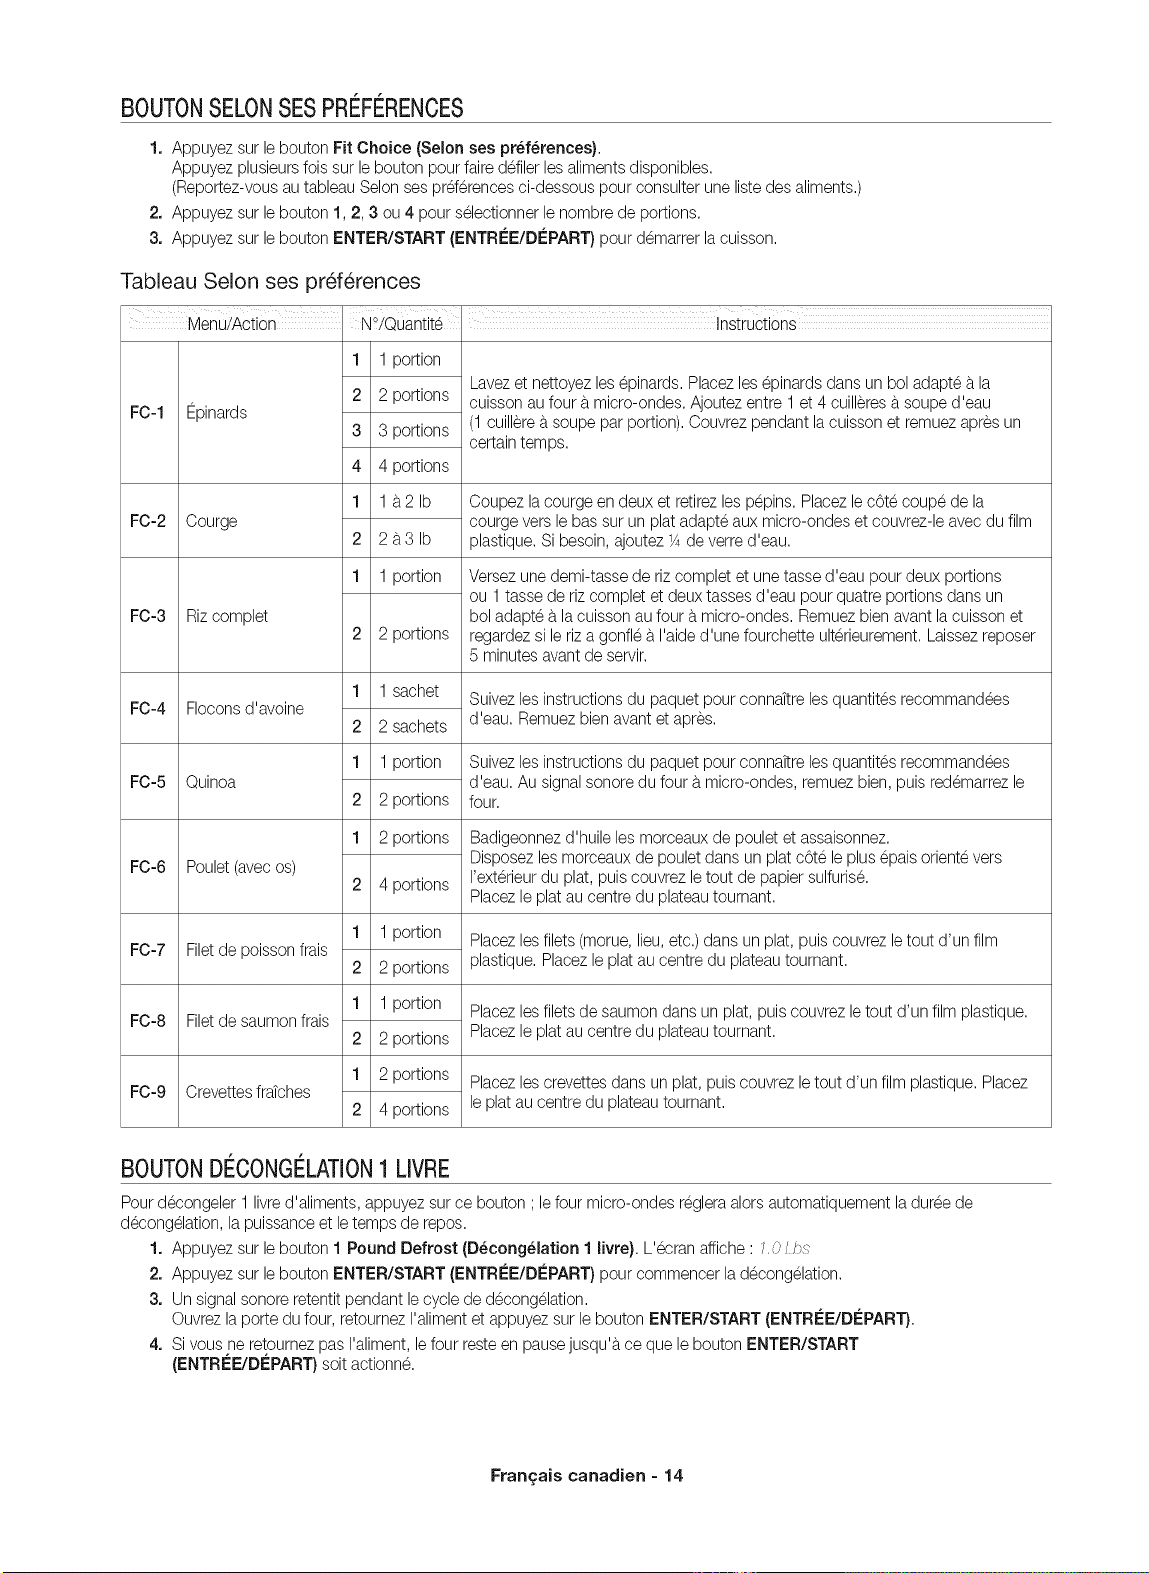
BOUTONSELONSESPRI FI RENCES
1. Appuyez sur lebouton Fit Choice (Selon ses preferences).
Appuyez plusieursfois sur le bouton pour faire defiler lesaliments disponibles.
(Reportez-vousau tableau Selonses prderences ci-dessous pour consulter une listedes aliments.)
2. Appuyez sur lebouton 1, 2, 3 ou 4 pour selectionnerle nombre de portions.
3. Appuyez sur lebouton ENTER/START (ENTREE/DEPART) pour demarrer la cuisson.
Tableau Selon ses pr6f@ences
I I
Menu!Action N°iQuantite instructions
FC-1 Epinards
FC-2 Courge
FC-3 Riz complet
FC-4
FC-5
FC-6
FC-7
FC-8
1
Flocons d'avoine
2
1
Quinoa
2
1
Poulet (avecos)
2
1
Filetde poisson frais
2
1
Filetde saumon frais
2
1
Crevettesfrafches
2
FC-9
1 1 portion
2 2 portions
3 3 portions
4 4 portions
1 1 b.21b
2 2 b.3 Ib
1 1 portion
2 2 portions
1 sachet
2 sachets
1 portion
2 portions
2 portions
4 portions
1 portion
2 portions
1 portion
2 portions
2 portions
4 portions
Lavezet nettoyez les@inards. Placez les @inards dans un bol adapte b.la
cuisson au four b.micro-ondes. Ajoutez entre 1 et 4 cuilleresb.soupe d'eau
(1 cuillereb.soupe par portion). Couvrez pendant la cuisson et remuez apres un
certain temps.
Coupez la courge en deux et retirezles p@ins. Placez le c6te coupe de la
courge vers le bas sur un plat adapte aux micro-ondes et couvrez-le avec du film
plastique. Si besoin, ajoutez X de verred'eau.
Versez une demi-tasse de riz complet et une tasse d'eau pour deux portions
ou 1 tasse de riz complet et deux tasses d'eau pour quatre portions dans un
bol adapte b.la cuisson au four b.micro-ondes. Remuez bien avant lacuisson et
regardez si le riz a gon% b.I'aide d'une fourchette ulterieurement.Laissezreposer
5 minutes avant de servir.
Suivez les instructions du paquet pour connaRreles quantites recommandees
d'eau. Remuez bien avant et apres.
Suivez les instructions du paquet pour connaRreles quantites recommandees
d'eau. Au signal sonore du four b.micro-ondes, remuez bien, puis redemarrezle
four.
Badigeonnezd'huile les morceaux de poulet et assaisonnez.
Disposez les morceauxde poulet dans un plat c6te le plus @ais oriente vers
I'ext@ieurdu plat, puis couvrez letout de papiersulfurise.
Placez le plat au centre du plateautoumant.
Placez lesfilets (morue, lieu, etc.) dans un plat, puis couvrez le tout d'un film
plastique. Placez le plat au centre du plateautournant.
Placez lesfilets de saumon dans un plat, puis couvrez letout d'un film plastique.
Placez le plat au centre du plateautournant.
Placez lescrevettes dans un plat, puis couvrez le tout d'un film plastique. Placez
le plat au centre du plateautournant.
BOUTON DECONGELATIONI LIVRE
Pour d@ongeler 1 livred'aliments, appuyez sur ce bouton ; le four micro-ondes reglera alors automatiquement la duree de
d@ongelation, la puissance et le temps de repos.
1. Appuyez sur lebouton 1 Pound Defrost (D_cong_lation 1 livre}. L'@ran affiche : l. 0 _bs
2. Appuyez sur lebouton ENTER/START (ENTRI£E/DI£PART)pour commencer la d@ongelation.
3. Un signal sonore retentit pendant lecycle de decong61ation.
Ouvrez laporte du four, retournez I'alimentet appuyez sur le bouton ENTER/START (ENTRI£E/DI£PART).
4. Sivous ne retournez pas I'aliment, le four reste en pause jusqu'b,ce que le bouton ENTER/START
(ENTREE/DEPART) soit actionne.
Fran_:ais canadien - 14

BOUTONRAMOLLIR/FAIREFONDRE
1. Appuyez sur le bouton Soften/Melt (Ramollir/Faire fondre).
Appuyez plusieurs fois sur le bouton pour faire defiler les alimentsdisponibles.
(Reportez-vousau tableau Ramollir/Fairefondre ci-dessous pour consulter une liste des aliments.)
2. Appuyez sur le bouton 1 ou 2 pour selectionnerle nombre de portions.
Vous ne pouvez faire cuire que 1 portion avec les options Fairefondre du chocolat, Faireramollir du beurre et Faireramollirdu
fromage b.la creme. (Reportez-vousau tableau Ramollir/Fairefondre pour le nombre de portions.)
3. Appuyez sur le bouton ENTER/START (ENTR#E/D#PART) pour demarrer la cuisson.
Tableau Ramollir/Faire fondre
Menu!Action N°iQuantite _ Instructions
Fairefondre
St-1
du beurre
1 1 plaquette
(portion)
2 plaquettes
2
(portions)
Retirezle beurrede son emballageet coupez-le en deux dans le sens de la largeur.
Placez le beurre dans un plat et couvrez letout de papier sulfurise.
Remuezbien une fois le beurrefondu et laissezreposer pendant 1 b.2 minutes.
1 tasse de Mettezles copeaux ou lescartes de chocolat dans un recipientadapte aux micro-
Fairefondre p@ites de ondes. Lorsque le four emet un signal sonore, remuez le chocolat et redemarrer le
St-2 1
du chocolat chocolat four. Remuez b.nouveau et laisserreposer une minute.
ou un carte
Faireramollir 1 plaquette Retirezle beurre de son emballageet coupez-le en deux parties egales dans le sens
St-3 1
du beurre (1/4 Ib) de la largeur. Placez le beurredans un plat et couvrez letout de papiersulfuris&
Faireramollir Retirezlefromage b.la creme de son emballage et placez-le dans un recipient
St-4 du fromage 1 1 pot (8 onces) adapte aux micro-ondes. Coupez en deux dans le sens vertical.
b.la creme Laissezreposer pendant 2 minutes.
BOUTONMENUSENFANTS
1. Appuyez sur le bouton Kids Meals (Menus enfants}.
Appuyez plusieurs lois sur le bouton pour faire driller les aliments disponibles.
(Reportez-vousau tableau Menus enfants ci-dessous pour consulter une listedes aliments.)
2. Appuyez sur le bouton 1 ou 2 pour selectionnerle nombre de portions.
(Reportez-vousau tableau Menus enfants pour le nombre de portions).
3. Appuyez sur le bouton ENTER/START (ENTRI_E/DI_PART)pour demarrer la cuisson.
Tableau Menus enfants
I I
Menu!Action N°iQuantite Instructions
CH-1 Beignets de poulet
(surgele)
CH-2 Frites(surgelees)
Sandwichs surgeles
(dans une enveloppe
speciale croustillante)
paquet de 9 onces
OH-3
CH-4 Hot-dogs
1 1 portion
2 2 portions
1 1 portion
2 2 portions
1 sandwich
1
(1ea)
2 sandwichs
2
(2ea)
2 hot-dogs
1
(2ea)
4 hot-dogs
2
(4ea)
Placez une feuille de papier absorbant sur une assiette et disposez-y les
beignets en etoile. Ne couvrez pas. Laissezreposer 1 minute apres lacuisson.
Consultez les instructions figurant sur I'emballage pour la taille des
portions et les quantites.
Placez deux feuillesde papier absorbant sur uneassiette adaptee aux micro-
ondes, puis etalez lesfrites sans qu'elles nese chevauchent.
Apres avoir retire lesfrites du four, @ongez-les avec une autrefeuille de papier
absorbant. Laissezreposer pendant 1 minute.
Consultez les instructions figurant sur I'emballage pour connaftre la taille
des portions et les quantites.
Placez le sandwich surgeledans son emballage special (qui se trouve dans le
paquet)et posez-le sur une assiette allant au micro-ondes.
Retirez-lede son ,,enveloppe croustillante ,,.
Laissezreposer 2 minutes apres lacuisson.
Piquez les hot-dogs et posez-les sur une assiette. Lorsque lefour emet un
signal sonore, ajoutez les petits pains et redemarrez lefour.
Laissezreposer 1 minute apresla cuisson.
[_ our une meilleureconsistance, ajoutez les petits pains aux hot-dogs
seulement apres le signal sonore.
Fran£ais canadien = 15
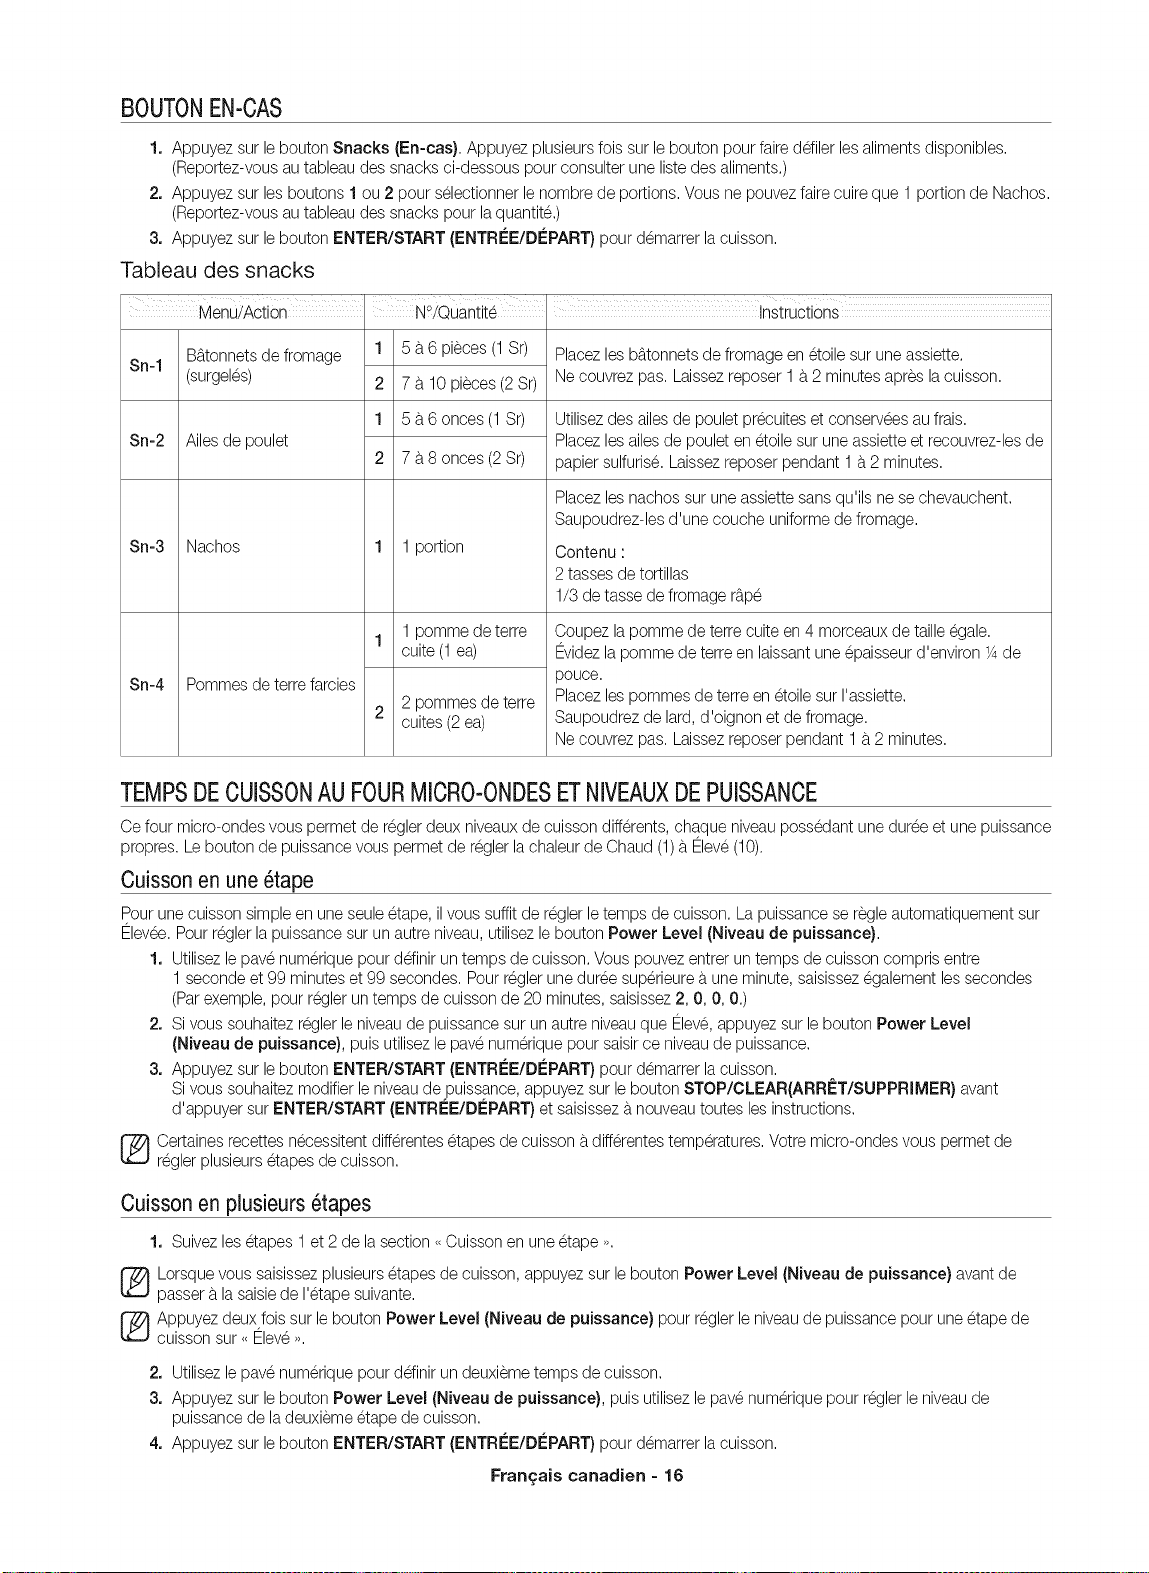
BOUTONENoCAS
1. Appuyez sur lebouton Snacks (En-cas}. Appuyez plusieursfois sur le bouton pour faire ddiler les aliments disponibles.
(Reportez-vousau tableau des snacks ci-dessous pour consulter une listedes aliments.)
2. Appuyez sur les boutons 1 ou 2 pour selectionnerle nombre de portions. Vous ne pouvez fairecuire que 1 portion de Nachos.
(Reportez-vousau tableau des snacks pour laquantite.)
3. Appuyez sur lebouton ENTER/START (ENTR[=E/DEPART) pour demarrer la cuisson.
Tableau des snacks
Menu!Action N°!Quantite Instructions
B_ttonnetsde fromage
Sn-1
(surgeles)
Sn-2 Ailes de poulet
Sn-3 Nachos
1 5 b.6 pieces (1St)
2 7 b.10 pieces (2St)
1 5 b.6 onces (1St)
2 7 b.8 onces (2 St)
1 1 portion
1 pomme de terre
cuite (1 ea)
2 pommes de terre
cuites (2 ea)
Sn-4 Pommes deterrefarcies
Placez les b_ttonnetsde fromage en etoilesur uneassiette.
Ne couvrez pas. Laissezreposer 1 b.2 minutesapres la cuisson.
Utilisezdes ailes de poulet precuites et conservees au frais.
Placez les ailesde poulet en etoile sur une assiette et recouvrez-lesde
papier sulfurise. Laissez reposer pendant 1 b.2 minutes.
Placez les nachos sur une assiette sans qu'ils ne se chevauchent.
Saupoudrez-lesd'une couche uniforme defromage.
Contenu :
2 tasses de tortillas
1/3 de tasse de fromage r_.p6
Coupez la pomme de terre cuite en 4 morceaux de taille egale.
Evidez la pomme de terre en laissantune epaisseur d'environ 1_de
pouce.
Placez les pommes de terre en etoilesur I'assiette.
Saupoudrezde lard, d'oignon et de fromage.
Ne couvrez pas. Laissezreposer pendant 1 b.2 minutes.
TEMPSDECUISSONAU FOURMICRO=ONDESETNIVEAUXDEPUISSANCE
Ce four micro-ondes vous permet de regler deux niveaux de cuisson differents, chaque niveau possedant une duree et une puissance
propres. Le bouton de puissance vous permet de reglerla chaleur de Chaud (1)b.Eleve(10).
Cuisson en une 6tape
Pour une cuisson simpleen une seule etape, il vous suffit de reglerle temps de cuisson. La puissance se regle automatiquement sur
Elevee. Pour regler la puissancesur un autre niveau, utilisezle bouton Power Level (Niveau de puissance}.
1. Utilisezle pave numerique pour ddinir un temps de cuisson. Vous pouvez entrer un temps de cuisson compris entre
1 seconde et 99 minutes et 99 secondes. Pour reglerune duree superieure b.une minute,saisissezegalement les secondes
(Parexemple,pour reglerun temps de cuisson de 20 minutes,saisissez2, 0, 0, 0.)
2. Sivous souhaitez reglerle niveau de puissance sur un autre niveau que Eleve,appuyez sur le bouton Power Level
(Niveau de puissance), puis utilisezle pave numerique pour saisir ce niveaude puissance.
3. Appuyez sur lebouton ENTER/START (ENTREE/DEPART) pour demarrer la cuisson.
Sivous souhaitez modifier le niveaude puissance, appuyez sur le bouton STOP/CLEAR(ARR#T/SUPPRIMER) avant
d'appuyer sur ENTER/START (ENTRL_E/D#PART)et saisissezb.nouveautoutes lesinstructions.
Certaines recettes necessitent differentesetapes de cuisson b.differentestemperatures.Votre micro-ondesvous permet de
regler plusieursetapes de cuisson.
Cuisson en plusieurs 6tapes
1. Suivez lesetapes 1 et 2 de la section ,,Cuisson en une etape ,,.
Lorsque vous saisissezplusieurs etapes de cuisson, appuyez sur le bouton Power Level (Niveau de puissance) avant de
passer b.lasaisie de I'etape suivante.
Appuyez deux fois sur le bouton Power Level (Niveau de puissance) pour regler le niveaude puissance pour une etape de
cuisson sur ,, Eleve ,,.
2. Utilisezle pave numerique pour ddinir un deuxiemetemps de cuisson.
3. Appuyez sur lebouton Power Level (Niveau de puissance), puis utilisez le pave numerique pour regler le niveaude
puissancede la deuxieme etape de cuisson.
4. Appuyez sur lebouton ENTER/START (ENTREE/DL_PART)pour demarrer la cuisson.
Fran_:ais canadien - 16
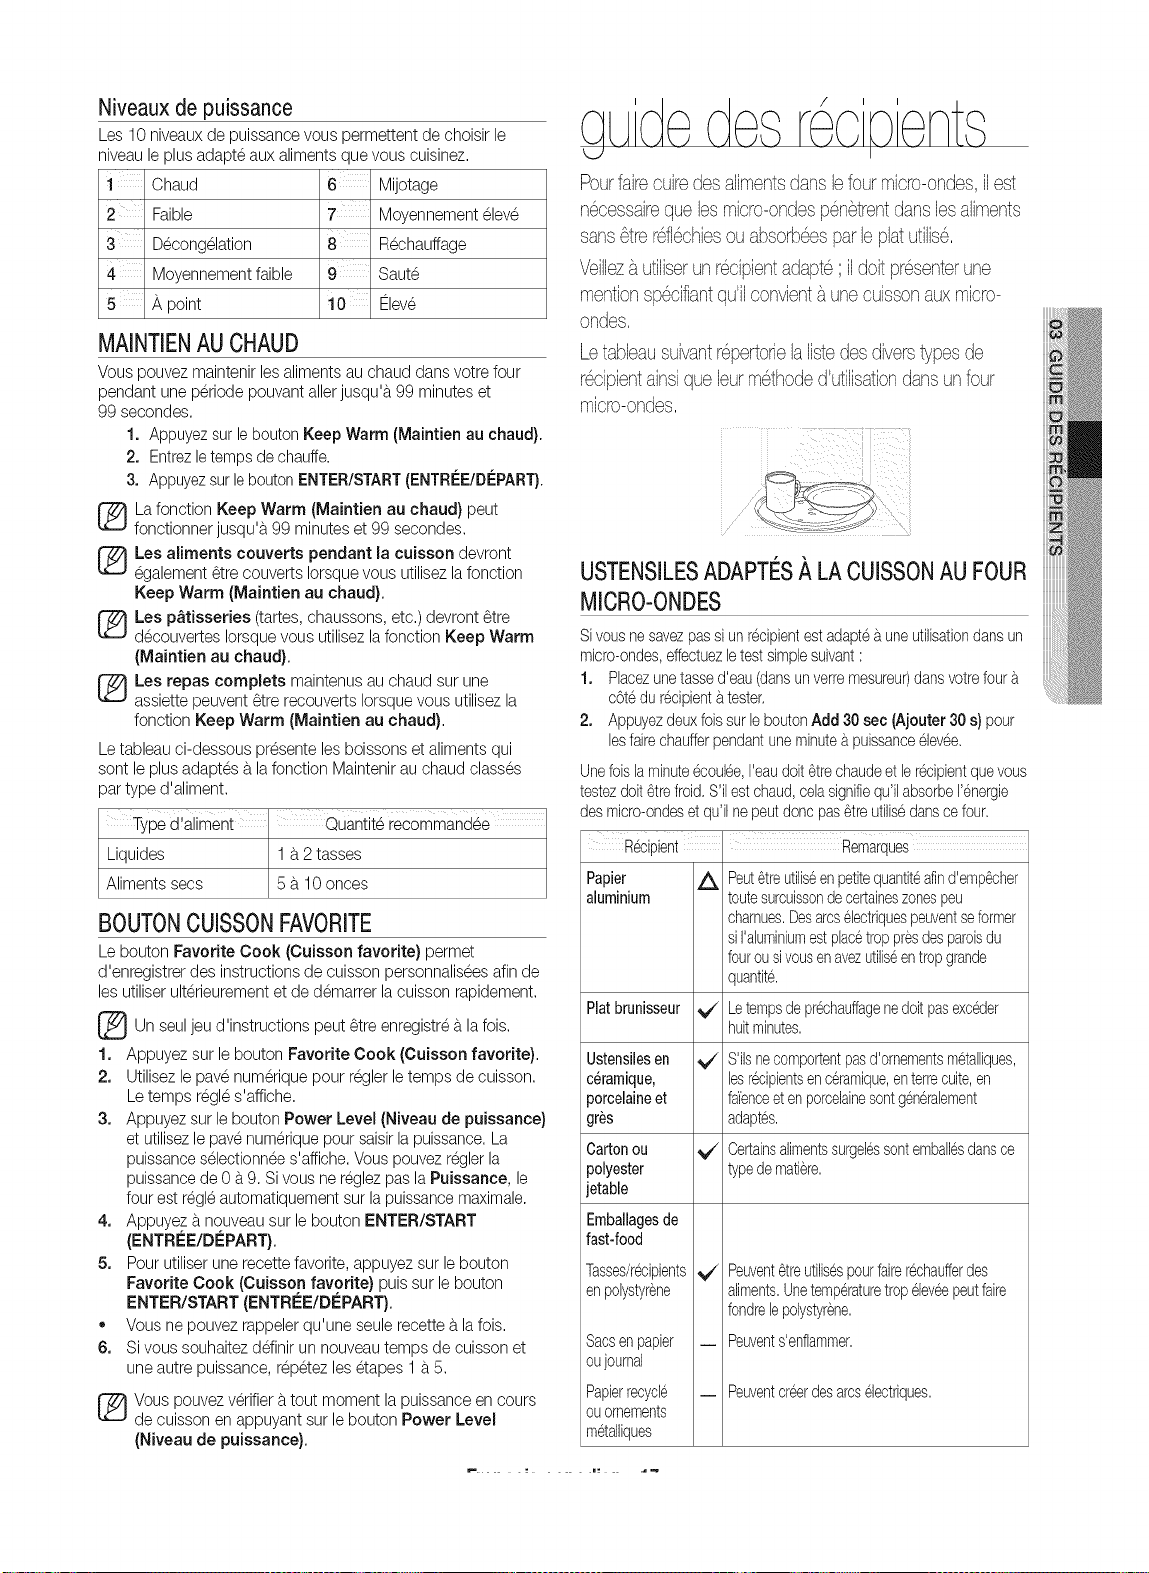
Niveaux de puissance
Les 10 niveauxde puissance vous permettent de choisir le
niveau le plus adapte aux aliments que vous cuisinez.
1 Chaud 6 Mijotage
Faible 7 Moyennement elev6
3 D@ongelation R@hauffage
4 Moyennementfaible 9 Saute
5 ,&,point 10 Beve
MAINTIENAUCHAUD
Vous pouvez maintenir les aliments au chaud dans votre four
pendant une periode pouvant allerjusqu'b.99 minutes et
99 secondes.
1. Appuyezsurle bsutsn Keep Warm (Maintien au chaud}.
2. Entrezletemps de chauffe.
3. Appuyezsur lebsut8n ENTER/START(ENTREE/DEPART).
La fonction Keep Warm (Maintien au chaud) peut
fonctionner jusqu'b.99 minutes et 99 secondes.
Les aliments couverts pendant la cuisson devront
egalement _tre couverts Iorsque vous utilisezla fonction
Keep Warm (MaintJen au chaud).
Les p&tisseries (tartes, chaussons, etc.) devront _tre
decouvertes Iorsque vous utilisezla fonction Keep Warm
(Maintien au chaud).
Les repas complets maintenus au chaud sur une
assiette peuvent _tre recouvertsIorsque vous utilisezla
fonction Keep Warm (Maintien au chaud).
Le tableau ci-dessous presente les boissons et aliments qui
sont le plus adaptes b.lafonction Maintenir au chaud classes
par type d'aliment.
I
Type d!aliment ' Quantite recommande8
Liquides 1 b.2 tasses
Aliments secs 5 b.10 onces
BOUTONCUISSONFAVORITE
Le bouton Favorite Cook (Cuisson favorite) permet
d'enregistrer des instructions de cuisson personnaliseesafin de
les utiliserulterieurementet de demarrer la cuisson rapidement.
[_Un seul d'instructions 6tre b.la fois.
jeu peut enregistre
1. Appuyez sur le bouton Favorite Cook (Cuisson favorite).
2. Utilisez le pave numerique pour regler letemps de cuisson.
Le temps regl6 s'affiche.
3. Appuyezsur le bouton Power Level (Niveau de puissance)
et utilisezle pave numeriquepour saisirla puissance.La
puissanceselectionnees'affiche. Vouspouvez reglerla
puissancede 0 _t9. Si v8usne reglezpas la Puissance, le
four est regl6autsmatiquementsur lapuissancemaximale.
4. Appuyez b.nouveau sur le bouton ENTER/START
(ENTR#E/D#PART).
5. Pour utiliserune recette favorite,appuyez sur lebouton
Favorite Cook (Cuisson favorite} puis sur le bouton
ENTER/START (ENTREE/D#PART).
• Vous nepouvez rappelerqu'une seule recette b.lafob.
6. Si vous souhaitez ddinir un nouveau temps de cuisson et
une autre puissance, r@etez les etapes 1 b.5.
Vous pouvez verifierb.tout moment la puissance en cours
de cuisson en appuyant sur le bouton Power Level
(Niveau de puissance}.
gLEl e,s rec' ent,s
Pourfairecuiredes alimentsdansb four micro-ondes,il est
necessaire que bs micro-ondes p6n6trent dans bs aliments
sans 6tre rdlechies ou absorbees par b platutilise,
Veillez a utiliser un recipientadapte ;il dolt presenterune
mention specifiant qull convbnt a une cuisson aux micro-
ondes,
Letableausuivantrepertorielaliste des diverstypes de
recipbntainsique bur methoded'utilisationdansunfour
micro-ondes,
ix l i iii i il
USTENSILESADAPTES_,LA CUISSONAU FOUR
MICRO-ONDES
Sivousne savezpassi unrecipientestadapteb.uneutilisationdansun
micr8-8ndes,effectuezletest simplesuivant:
1. Placezunetassed'eau(dansunverremesureur)dansv8trefoura.
cotedu r@ipientb.tester,
2. Appuyezdeuxf8issurle b8ut8nAdd 30 sec (Ajouter 30 s} pour
lesfairechaufferpendantuneminuteb.puissanceelev6e,
Unefsis la minute@8ulee,I'eaud8it 6trechaudeet le r@ipientquev8us
testezd8it6trefrsid,S'ilestchaud,celasignifiequll abs8rbeI'energie
desmicr8-8ndeset qu'il nepeutd8ncpas6treutilisedanscefour,
R@ipient Remarques
Papier _,
aluminium
Platbrunisseur _/'
Ustensiles en v /
c@amique,
porcelaine et
gr_s
Cartonou _/
polyester
jetable
Emballagesde
fast-food
Tasses/r@ipients
enpslystyrene
Sacsenpapier _
oujournal
Papierrecycle _
ou8rnements
metalliques
Peut6treutiliseen petitequantiteafind'emp@her
toutesurcuisssndecertaineszonespeu
charnues.Desarcselectriquespeuventseformer
siI'ahminiumestplacetroppresdespar8isdu
fourousivousenavezutiliseentropgrande
quantit&
Letempsde pr@hauffagenedoitpasex@der
huitminutes.
S'ilsnecsmportentpasd'srnementsmetalliques,
lesr@ipientsenceramique,enterrecuite,en
fai'enceeten psrcelainesont@nerabment
adaptes.
Certainsalimentssurgelessontemballesdansce
typedematiere.
Peuvent6treutilisespourfairerechaufferdes
aliments,Unetemperatur8trspeleve8peutfaire
fondrelepolystyr@e,
Peuvents'enflammer.
Peuventcreerdesarcselectriques.
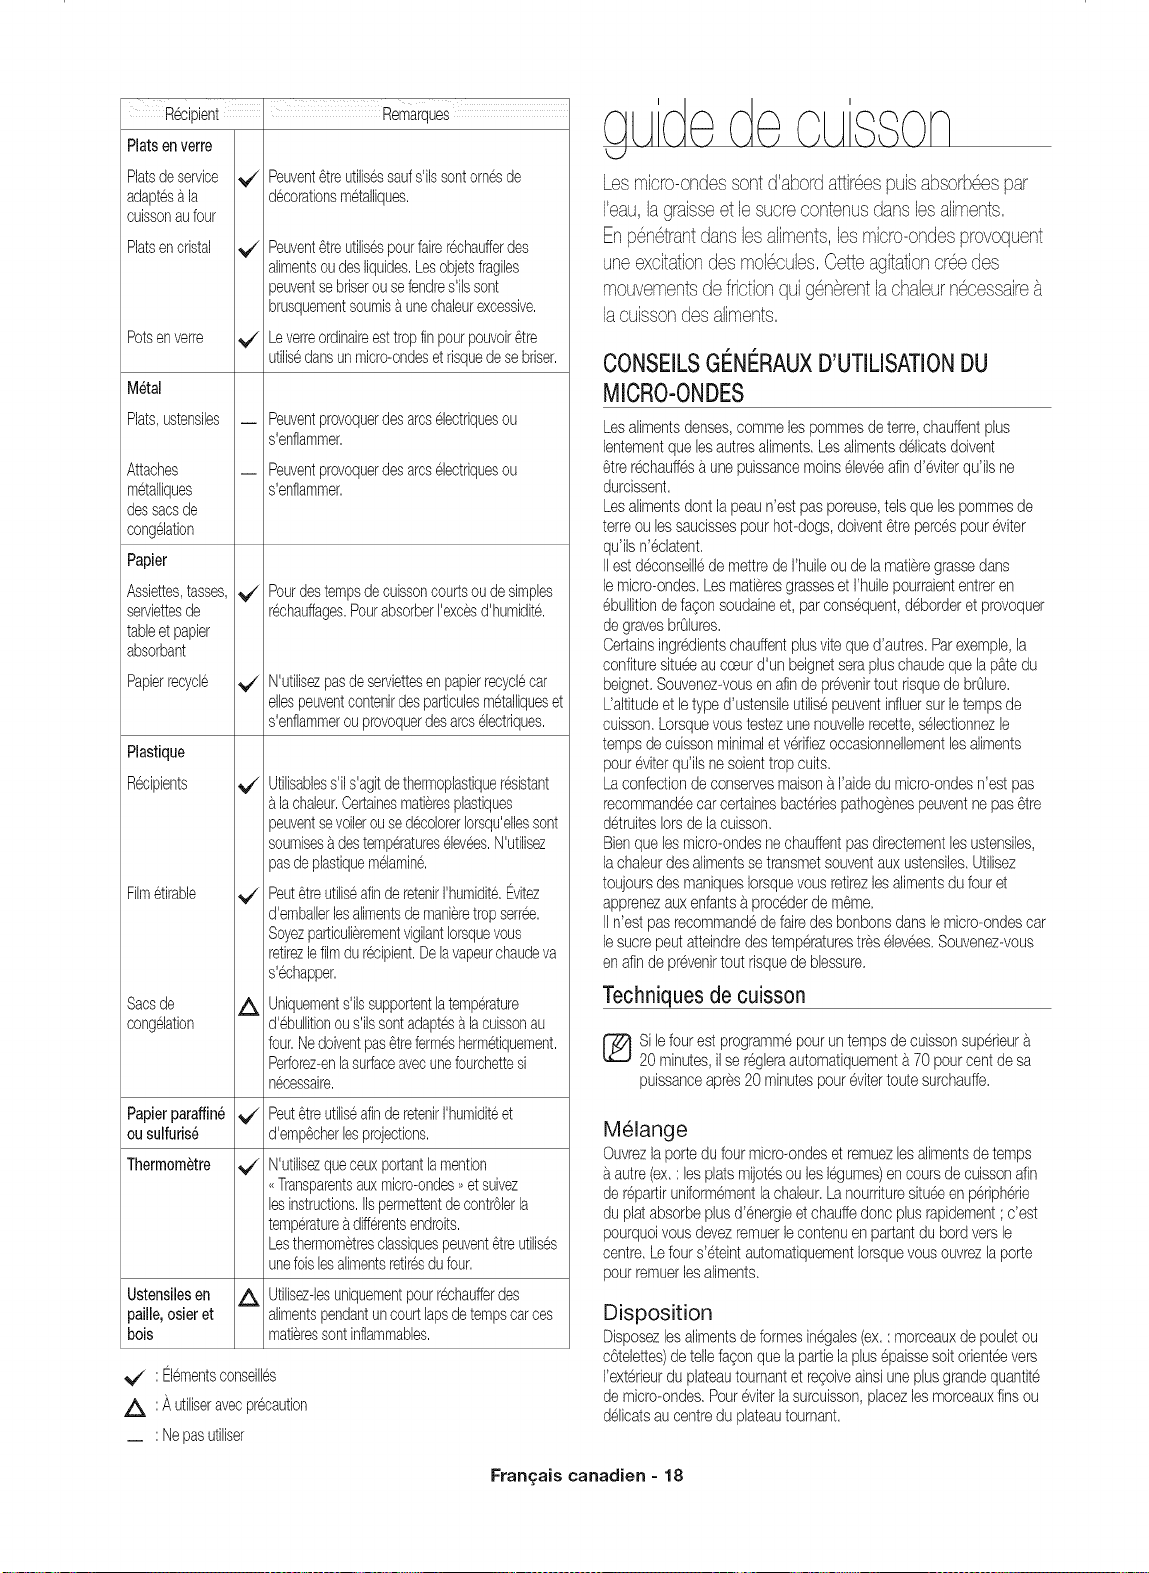
R@ipient Remarques
Platsenverre
Platsdeservice
adaptesa la
cuissonaufour
Platsencristal
Potsenverre
Metal
Plats,ustensiles
Attaches
metalliques
dessacsde
congelation
Papier
Assiettes,tasses,
serviettesde
tableet papier
absorbant
Papierrecycle
Plastique
R@ipients
Film@able
Peuvent_treutilisessaufs'ilssontornesde
d@orationsmetalliques.
Sacsde
congelation
Peuvent_treutilisespourfairer@haufferdes
alimentsoudesliquides.Lesobjetsfragiles
peuventsebriserousefendres'ilssont
brusquementsoumisa unechaleurexcessive.
Leverreordinaireesttropfinpourpouvoir_tre
utilisedansunmicro-ondesetrisquedesebriser.
Peuventprovoquerdesarcselectriquesou
s'enflammer.
Peuventprovoquerdesarcselectriquesou
s'enflammer.
Pourdestempsdecuissoncourtsou desimples
r@hauffages.PourabsorberI'ex@sd'humidite.
Papierparaffine
ou sulfurise
Thermom_tre
N'utilisezpasdeserviettesenpapierrecyclecar
ellespeuventcontenirdesparticulesmetalliqueset
s'enflammerou provoquerdesarcselectriques.
Utilisabless'ils'agitdethermoplastiqueresistant
lachaleur.Certainesmatieresphstiques
peuventsevoileroused@olorerIorsqu'ellessont
soumisesa destemperatureselevees.N'utilisez
pasde phstiquemelamine.
Peut_treutiliseafinderetenirI'humidite.Evitez
d'emballerlesalimentsdemanieretropsettee.
SoyezparticulierementvigilantIorsquevous
retirezlefilmdur@ipient.Delavapeurchaudeva
s'@happer.
Uniquements'ilssupportentlatemperature
d'ebullitionous'ilssontadaptesalacuissonau
four.Nedoiventpas_trefermeshermetiquement.
Perforez-enlasurfaceavecunefourchettesi
n@essaire.
Peut_treutiliseafinderetenirI'humiditeet
d'emp_cherlesprojections.
N'utilisezqueceuxportantlamention
,,Transparentsauxmicro-ondes,,et suivez
lesinstructions.IIspermettentdecontr61erla
temperatureadifferentsendroits.
Lesthermometresclassiquespeuvent_treutilises
unefoislesalimentsretiresdufour.
Ustensilesen A. Utilisezdesuniquementpourr@haufferdes
paJlle,osieret alimentspendantuncourtlapsdetempscarces
bois matieressontinflammables.
v" Bementsconseilles
A Autiliseravecpr@aution
_ Nepasutiliser
N
Les micro-ondessont d'abordattireespuisabsorbeespar
I'eau,lagraisseet le sucrecontenusdans les aliments,
Enpen6trantdans lesaliments,les micro-ondesprovoquent
uneexcitationdes molecules,Cetteagitationtree des
mouvementsde frictionquigen6rentlachaleurnecessaire
lacuissondes aliments,
CONSEILSGC:NI_RAUXD'UTILISATIONDU
MICROoONDES
Lesalimentsdenses,commelespommesde terre,chauffentplus
lentementquelesautresaliments.Lesalimentsdelicatsdoivent
6trer@hauffesa.unepuissancemoinseleveeafind'@iterqu'ilsne
durcissent.
Lesalimentsdontlapeaun'estpasporeuse,telsquelespommesde
terreou lessaucissespourhot-dogs,doivent6trepercespour@iter
qu'ilsn'@latent.
IIestdeconseillede mettrede I'huileou de lama%regrassedans
lemicro-ondes.Lesmatieresgrasseset I'huilepourraiententreren
ebullitionde fagonsoudaineet, parconsequent,deborderet provoquer
de gravesbrOhres.
Certainsingredientschauffentplusvitequed'autres.Parexemple,la
confituresitu@au cceurd'un beignetserapluschaudequelapatedu
beignet.Souvenez-vousenafinde pr@enirtout risquede brOhre.
Ualtitudeet letyped'ustensileutilisepeuventinfhersurletempsde
cuisson.Lorsquevoustestezunenouvellerecette,selectionnezle
tempsdecuissonminimaletverifiezoccasionnellementles aliments
pour@iterqu'ilsnesoienttropcults.
La confectionde conservesmaisona I'aidedu micro-ondesn'estpas
recommandeecarcertainesbacteriespathogenespeuventnepas6tre
detruiteslotsde lacuisson.
Bienquelesmicro-ondesne chauffentpasdirectementlesustensiles,
lachaleurdesalimentsse transmetsouventaux ustensiles.Utilisez
toujoursdes maniquesIorsquevousretirezlesalimentsdufour et
apprenezauxenfantsb.procederde m6me.
IIn'estpas recommandedefairedes bonbonsdanslemicro-ondescar
lesucrepeutatteindredestemperaturestreselevees.Souvenez-vous
en afinde pr@enirtoutrisquede blessure.
Techniques de cuisson
Sile fourest programmepouruntempsde cuissonsuperieur
20 minutes,ilse regleraautomatiquementb.70 pourcentde sa
puissanceapres20minutespourevitertoutesurchauffe.
M_lange
Ouvrezla portedufourmicro-ondeset remuezlesalimentsde temps
a.autre(ex.: lesplatsmijotesou leslegumes)encoursde cuissonafin
de r@artiruniformementlachaleur.Lanourrituresitu@en peripherie
du platabsorbeplusd'@ergieet chauffedoncplusrapidement;c'est
pourquoivousdevezremuerlecontenuen partantdu bordvers le
centre.Lefours'eteintautomatiquementIorsquevousouvrezlaporte
pour remuerlesaliments.
Disposition
Disposezlesalimentsdeformesinegales(ex.: morceauxde pouletou
c6telettes)detellefa_onquelapartiela plus@aissesoitorient@vers
I'exterieurdu plateautournantet re_oiveainsiuneplusgrandequantite
de micro-ondes.Pour@iterlasurcuisson,placezlesmorceauxfinsou
delicatsaucentredu plateautournant.
Fran_:ais canadien = 18
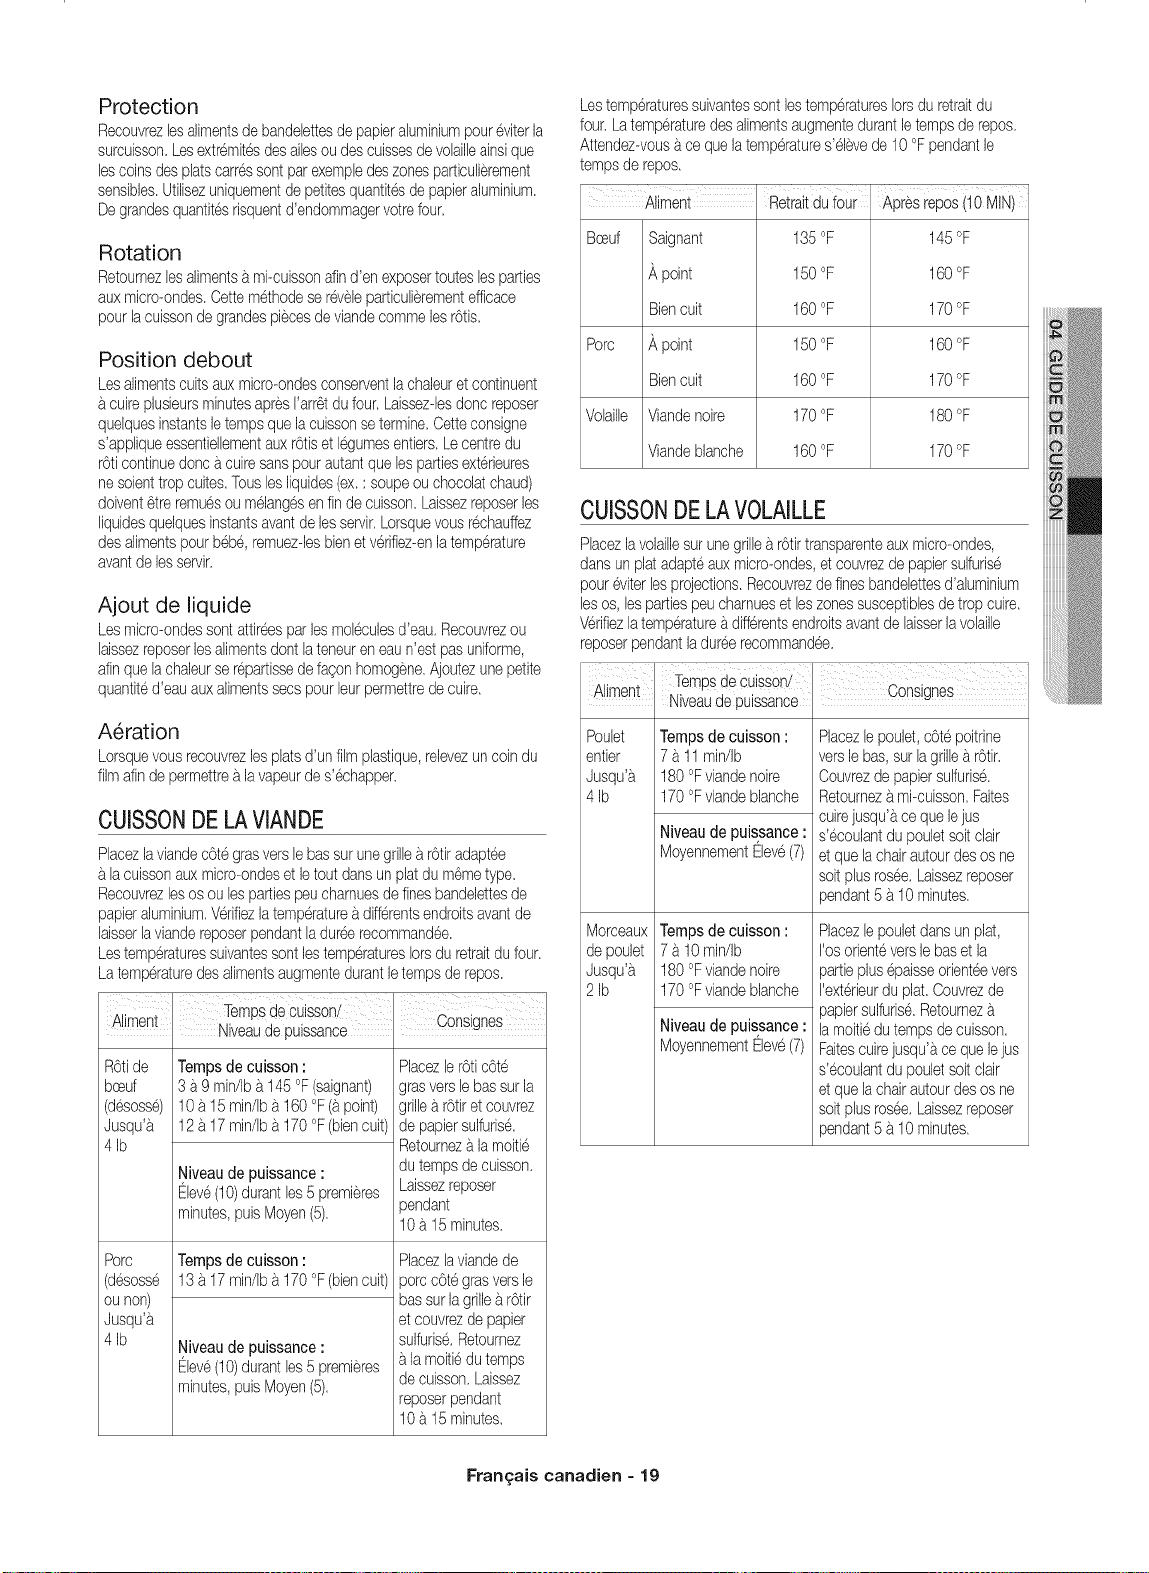
Protection
Recouvrezlesalimentsde bandebttesde papieraluminiumpoureviterla
sumuisson.Lesextremit6sdesaibsoudescuissesdevolailbainsique
lescoinsdesplatscartessont parexempbdeszonesparticulbrement
sensibles.Utilisezuniquementde petitesquantitesde papieraluminium.
Degrandesquantitesrisquentd'endommagervotrefour.
Rotation
Retoumezbs alimentsb.mi-cuissonafind'en exposertoutesbs parties
auxmicro-ondes.Cettemethodese reveleparticulbrementefficace
pourlacuissondegrandespbcesde viandecommelesrods.
Position debout
Lesalimentscuitsauxmicro-ondesconserventlachaleuret continuent
b.cuireplusieursminutesapresI'arr_tdufour.Laissezdesdoncreposer
quelquesinstantsletempsquelacuissonsetermine.Cetteconsigne
s'appliqueessentielbmentauxr6tiset legumesentiers.Lecentredu
r6ticontinuedoricacuiresanspourautantquelespartiesexterieures
nesoienttropcuites.Touslesliquides(ex.: soupeou chocolatchaud)
doivent_treremuesou melang6senfin decuisson.Laissezreposerles
Iiquidesquelquesinstantsavantde lesservir.Lorsquevousrechauffez
desalimentspourbeb6,remuezdesbienetverifiez-enlatemperature
avantdelesservir.
Ajout de liquide
Lesmicro-ondessontattireesparlesmoleculesd'eau.Recouvrezou
laissezreposerlesalimentsdontlateneureneaun'estpasuniforme,
afinquelachaleurserepartissede fagonhomogene.Ajoutezunepetite
quantited'eauauxalimentssecspourbur permettredecuire.
A_ration
Lorsquevousrecouvrezlesplatsd'un filmpiastique,relevezuncoindu
filmafinde permettrea.lavapeurde s'echapper.
CUISSONDELAVIANDE
Piacezlaviandec6te grasverslebassur unegrillea.r6tiradaptee
b.lacuissonaux micro-ondeset letout dansun platdu m6metype.
Recouvrezlesosou lespartiespeuchamuesde finesbandelettesde
papieraluminium.Vedfiezlatemperaturea differentsendroitsavantde
laisserlaviandereposerpendantladureerecommandee.
LestemperaturessuivantessontlestemperaturesIorsdu retraitdufour.
Latemperaturedesalimentsaugmentedurantletempsde repos.
: Tempsde Cuissoni :
Ailment Niveaude puissance Conslgnes
R6tide
bceuf
(desoss@
Jusqu'b.
4 Ib
Porc
(desoss6
ou non)
Jusqu'b.
4 Ib
Tempsde cuisson:
3 a9 min/Ibb.145°F(saignant)
10 a I5 min/Iba 160°F(b.point)
12 b.17min/Ibb.170°F (biencult)
Niveaude puissance:
Eleve(10)durantles5 prembres
minutes,puisMoyen(5).
Tempsde cuisson:
13 b.17min/Ibb.170°F (biencult)
Niveaude puissance:
Eleve(10)durantles5 prembres
minutes,puisMoyen(5).
Placezler6tic6te
grasverslebas surla
grillea r6tiret couvrez
de papiersulfurise.
Retoumeza lamoitie
du tempsdecuisson.
Laissezreposer
pendant
10a 15minutes.
Placezlaviandede
porccOtegrasversle
bassur lagrilleb.r6tir
et couvrezde papier
sulfurise.Retournez
lamoitiedutemps
de cuisson.Laissez
reposerpendant
10a 15minutes.
LestemperaturessuivantessontlestemperaturesIorsdu retraitdu
four. Latemperaturedes alimentsaugmentedurantletempsde repos.
Attendez-vousace quelatemperatures'elevede 10°F pendantle
tempsde repos.
I I
Aliment
Bceuf Saignant
_,point
Biencult
Porc _,point
Biencult
Volaille Viandenoire
Viandeblanche
Retraitdu four
135°F
150°F
160°F
150°F
160°F
170°F
160°F
Apresrepos(10MtN)
145°F
160°F
170°F
160°F
170°F
180°F
170°F
CUISSONDELAVOLAILLE
Placezlavolaiilesurunegrillea r6tirtransparenteauxmicro-ondes,
dansun platadapteauxmicro-ondes,et couvrezde papiersulfurise
poureviterlesprojections.Recouvrezdefinesbandebttesd'aluminium
lesos, lespartiespeucharnueset leszonessusceptiblesdetrop cuire.
Verifiezlatemperatureb.differentsendroitsavantde laisserlavolaille
reposerpendantladureerecommandee.
i
Aliment TempsdeCuisson/ , , .....
• , uonslgnes
Nlveaude puissance
Pouiet Tempsde cuisson :
entier 7 a 11min/Ib
Jusqu'a. 180°Fviandenoire
4 Ib 170°Fviandeblanche
Niveaude puissance:
MoyennementEleve(7)
MorceauxTempsde cuisson:
de poulet 7 a 10min/Ib
Jusqu'a. 180°Fviandenoire
2 Ib 170°Fviandeblanche
Niveaude puissance:
MoyennementEleve(7)
Placezlepoulet,c6tepoitrine
verslebas,surlagrillea.r6tir.
Couvrezdepapiersulfurise.
Retournezb.mi-cuisson.Faites
cuirejusqu'b,ce quelejus
s'ecoulantdupouletsoitclair
et quelachairautourdes osne
soitplusrosee.Laissezreposer
pendant5 b.10minutes.
Placezlepouletdansun plat,
I'osorienteverslebaset la
partieplusepaisseorienteevers
I'exterieurdu plat.Couvrezde
papiersulfurise.Retournez
lamoitiedutempsde cuisson.
Faitescuirejusqu'b,ce quelejus
s'ecoulantdupouletsoitclair
et quelachairautourdes osne
soitplusrosee.Laissezreposer
pendant5 b.10minutes.
Fran_:ais canadien - 19
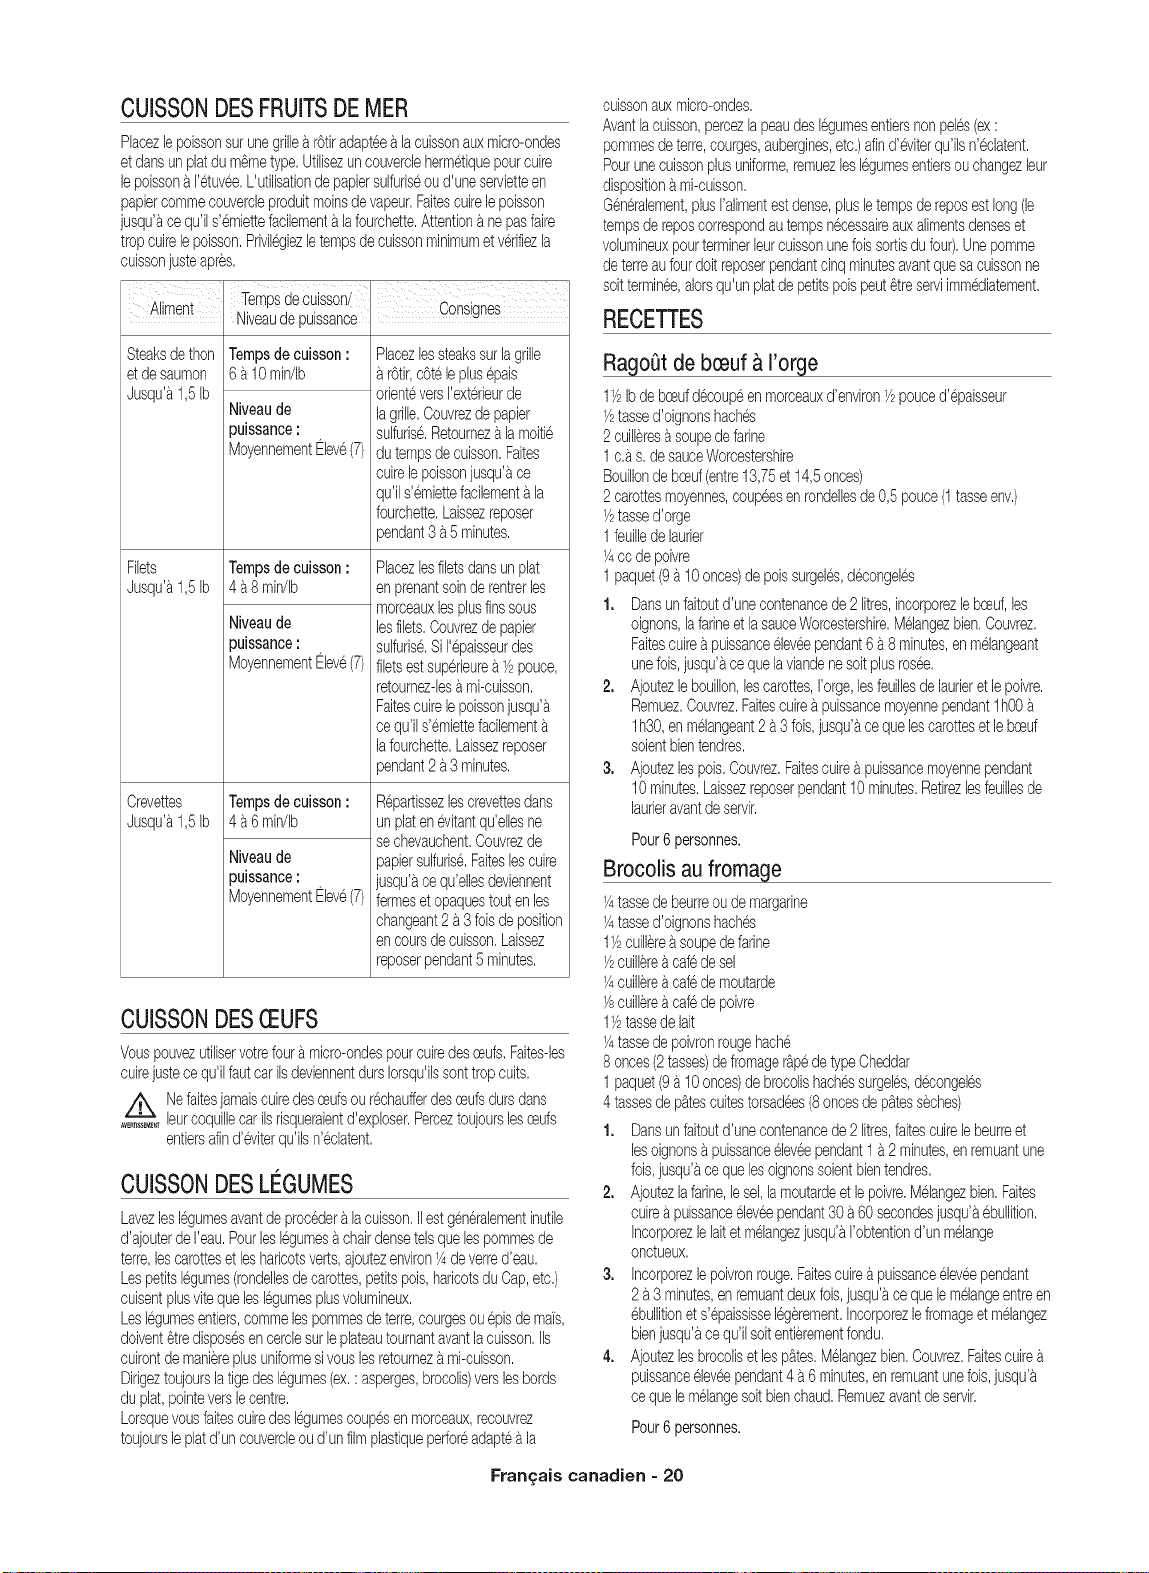
CUBSONDESFRUITSDEMER
PhcezlepoissonsurunegrillearOtiradapteealacuissonauxmicro-ondes
etdansunplatdu m_metype.Utilisezuncouverclehermetiquepourcuire
lepoissona I'etuvee.L'utilisationdepapiersulfuriseoud'uneservietteen
papiercommecouvercleproduitmoinsdevapeur.Faitescuirelepoisson
jusqu'acequ'ils'emiettefacilementa lafourchette.Attentiona nepasfaire
tropcuirelepoisson.Privilegiezletempsde cuissonminimumetverifiezla
cuissonjusteapres.
Steaksdethon
etde saumon
Jusqu'a1,5Ib
Filets
Jusqu'a1,5Ib
Crevettes
Jusqu'a1,5Ib
Tempsdecuisson:
6 a 10min/Ib
Niveau de
puissance :
MoyennementEleve(7)
Tempsdecuisson:
4 a8 min/Ib
Niveau de
puissance :
MoyennementEleve(7)
Tempsdecuisson:
4 a6 min/Ib
Niveau de
puissance :
MoyennementEleve(7)
Placezlessteakssurlagrille
r6tir,c6teleplusepais
orienteversI'exterieurde
lagrille.Couvrezdepapier
sulfuris&Retournez_tlamoitie
dutempsdecuisson.Faites
cuirelepoissonjusqu'ace
qu'ils'emiettefacilementa la
fourchette.Laissezreposer
pendant3a 5minutes.
Placezlesfiletsdansunplat
enprenantsoinde rentrerles
morceauxlesplusfinssous
lesfilets.Couvrezde papier
sulfuris&SiI'epaisseurdes
filetsestsuperieurea1/2pouce,
retoumez-lesa mi-cuisson.
Faitescuirele poissonjusqu'a
cequ'ils'emiettefacilement
lafourchette.Laissezreposer
pendant2a 3minutes.
Repartissezlescrevettesdans
unplatenevitantqu'ellesne
sechevauchent,Couvrezde
papiersulfuris&Faiteslescuire
jusqu'acequ'ellesdeviennent
fermeset opaquestoutenles
changeant2 a3 loisdeposition
encoursdecuisson,Laissez
reposerpendant5minutes,
CUBSONDESQEUFS
Vouspouvezutiliservotrefouramicro-ondespourcuiredesceufs.Faites-les
cuirejustecequ'ilfautcarilsdeviennentdursIorsqu'ilssonttropcults.
A Nefaitesjamaiscuiredesceufsourechaufferdesceufsdursdans
..........._ leurcoquillecarilsrisqueraientd'exploser.Perceztoujourslesceufs
entiersafind'eviterqu'ilsn'eclatent.
CUBSONDESLEGUMES
Lavezleslegumesavantdeprocedera lacuisson,IIestgeneralementinutile
d'ajouterde I'eau,Pourleslegumesachairdensetelsquelespommesde
terre,lescarotteset lesharicotsverts,ajoutezenviron1/4deverred'eau,
Lespetitslegumes(rondellesdecarottes,petitspois,haricotsduCap,etc,)
cuisentplusvitequeleslegumesplusvolumineux,
Leslegumesentiers,commelespommesdeterre,courgesouepisde mai's,
doivent_tredisposesencerclesurleplateautoumantavantlacuisson,IIs
cuirontdemaniereplusuniformesivouslesretoumezami-cuisson,
Dirigeztoujourslatigedeslegumes(ex,:asperges,brocolis)verslesbords
du plat,pointeverslecentre,
Lorsquevousfaitescuiredeslegumescoupesenmorceaux,recouvrez
toujoursle platd'uncouvercleoud'unfilmplastiqueperforeadaptea la
cuissonauxmicro-ondes.
Avantlacuisson,percezlapeaudeslegumesentiersnonpeles(ex:
pommesdeterre,courges,aubergines,etc.)din d'eviterqu'ilsn'eclatent.
Pourunecuissonplusuniforme,remuezleslegumesentiersouchangezleur
dispositiona mi-cuisson.
Generalement,plusI'alimentestdense,plusletempsdereposestlong(le
tempsdereposcorrespondautempsnecessaireauxailmentsdenseset
volumineuxpourterminerleurcuissonunefoissortisdufour).Unepomme
deterreaufourdoltreposerpendantcinqminutesavantquesacuissonne
soitterminee,alorsqu'unplatdepetitspoispeut_treserviimmediatement.
RECETTES
RagoQtde bceuf & I'orge
11/2ibde bceufdecoupeenmorceauxd'environ_/2pouced'epaisseur
_/2tassed'oignonshaches
2 cuilleresasoupedefarine
1 c.as.de sauceWorcestershire
Bouillondebceuf(entre13,75et 14,5onces)
2 carottesmoyennes,coupeesenrondeilesde0,5pouce(1tasseenv.)
_/2tassed'orge
1feuilledehurler
_/4ccde poivre
1 paquet(9a 10onces)de poissurgeles,decongeles
1. Dansunfaitoutd'unecontenancede 2litres,incorporezlebceuf,les
oignons,lafarineet lasauceWorcestershire,Melangezbien,Couvrez,
Faitescuireapuissanceeleveependant6 a 8minutes,enmelangeant
unelois,jusqu'acequelaviandenesoitplusrosee,
2. Ajoutezlebouillon,lescarottes,I'orge,lesfeuillesde hurleretlepoivre,
Remuez,Couvrez,Faitescuireb puissancemoyennependantlh00
lh30,enmelangeant2a 3lois,jusqu'acequelescarottesetlebceuf
soientbientendres,
3. Ajoutezlespois,Couvrez.Faitescuirea puissancemoyennependant
10minutes,Laissezreposerpendant10minutes,Retirezlesfeuillesde
laurieravantdeservir,
Pour6 personnes.
Brocolis au fromage
_/4tassedebeurreoudemargarine
_/4tassed'oignonshaches
11/2cuiliere_tsoupedefarine
1/2cuiilerea cafedesel
1/4cuiilerea cafedemoutarde
1/scuiilerea cafedepoivre
11/2tassedelait
1/4tassedepoivronrougehache
8 onces(2tasses)defromagerapedetypeCheddar
1 paquet(9a 10onces)de brocolishachessurgeles,decongeles
4tassesde patescuitestorsadees(8oncesdepatesseches)
1. Dansunfaitoutd'unecontenancede 2litres,faitescuirelebeurreet
iesoignonsapuissanceeieveependant1a 2 minutes,enremuantune
fois,jusqu'acequelesoignonssoientbientendres.
2. Ajouteziafarine,lesel,lamoutardeet iepoivre.Melangezbien.Faites
cuireapuissanceeieveependant30a 60secondesjusqu'aebullition.
Incorporeziehitet melangezjusqu'aI'obtentiond'un melange
onctueux.
3. Incorporeziepoivronrouge.Faitescuireapuissanceeleveependant
2 a3 minutes,en remuantdeuxfois,jusqu'acequelemelangeentreen
ebullitionet s'epaississeiegerement.Incorporeziefromageetmeiangez
bienjusqu'acequ'ilsoitentierementfondu.
4. Ajouteziesbrocolisetiespates.Melangezbien.Couvrez.Faitescuire
puissanceeleveependant4a 6minutes,enremuantunefois,jusqu'a
cequelemelangesoitbienchaud.Remuezavantdeservir.
Pour6 personnes.
Fran£ais canadien - 20
Salade de pommes de terre chaude
2Ibde petitespommesdeterreapeaurouge(Roseval),
coup@senmorceauxde _/2pouce
4tranchesde lard(cru)coupeesen morceauxde1/2pouce
14tassed'oignonshach@
2cuilleres_tcafedesucre
1cuillerea cafedesel
1cuillerea cafedefarine
1/2cuillerea cafede grainesde@leri
1/8cuillerea cafede poivre
21/2cuilleresasoupedevinaigredecidre
1, Dansunfaitoutd'unecontenancede2 litres,incorporezlespommes
deterreavecb Y4detassed'eau,Couvrez,Faitescuireapuissance
elev@jusqu'acequelespommesdeterresoienttendres(7 a10min,),
enmehngeantdeuxfob,Egouttezet laissezrefroidirletoutquelques
instants,
2, Dansunsaladierdetaillemoyenne,faitescuirelestranchesdelard
puissanceelev@,enmelangeantunefob,jusqu'acequ'elles
deviennentcroustillantes(21/2a31/2minutes),Disposezlestranches
surdupapierabsorbant,Prebvezunecuillereasoupedegraissede
cuissondu lard,
3. Melangez-laaveclesoignons,Recouvrezletoutdefilmetirableet
relevez-enuncoinpourhissers'@happerlavapeur,Faitescuire
puissanceeleveejusqu'acequelapr@arationsoittendre
(11/2a21/2minutes);melangezunefob,
4, Incorporezlesucre,lesel,lafarine,lesgrainesdeceleriet le poivre,
Faitescuirea puissanceeleveejusqu'aebullitiondu melange
(30a40 secondes),Ajoutezlevinaigreet une1/2tassed'eau,Faites
cuireapuissanceeleveejusqu'_tcequeleliquideentreenebullitionet
s'@aississele@rement(1a 2minutes),melangez,Ajoutezlestranches
delardalasauce,Versezlasaucesurlespommesdeterre,Remuez
bien,
Pour6 personnes.
Soupe de haricots noirs
1tassed'oignonshach@
1goussed'ail,emin@e
2bo;tes(15onceschacune)deharicotsnoirsegouttes
1bo;te(entre14et 16onces)detomatesconcass@s
Bouillondepoulet(entreI3,75 et 14,5onces)
1bo;te(entre7et 8,5onces)de mai's
1bo;te(4onces)depimentsvertsemin@s
1a 2c, acafedecuminenpoudre
1, Mettezlesoignonset Faildansunfaitoutd'unecontenancede3 litres,
Couvrez,Faitescuirea puissanceelev@pendant2a 4 minutesjusqu'a
cequ'ilsdeviennenttendres,
2, Ajoutezunebo_tedeharicotset@rasez-bsa I'aided'unefourchette,
Ajoutezlerestedesingredbntsetmelangezbien,
3. Faitescuirea puissanceeleveependant10minutessanscouvercb;
melangez,Reglezlapuissancesurleniveaumoyenet faitescuire
pendant5 minutes,Remuezavantde servir,
Pourenvirondeuxlitresdesoupe.
Gardervotrefour mbro-ondesproprepermetd'am61iorerses
performances,d'eviterbs r@arationsinutibset de prolonger
sa dureede vie,
NETTO¥AGEDELAPARTIEEXTERIEURE
IIest preferablede nettoyerimmediatementbs tracesde projections
b.I'exterieurdu four,Utilisezunchiffondouxet deI'eauchaude
savonneuse,Rincezets@hez,
Z_ Evitezde mouillerbs orificesde ventilation,N'utilisezjamaisde
........ pro@itsabrasifsoude solvantschimiquestelsqueI'ammoniac
ou I'alcool,quirisqueraientd'altererI'apparencede votremicro-
ondes,
Nettoyage du dessous de votre four micro-ondes
Nettoyezr%ulierementla graisseet lapoussiereaccumuleessurle
dessousdevotremicro-ondesa I'aided'un melanged'eauchaudeet
de produitdenettoyage.
Nettoyage du tableau de commande
Frotteza I'aided'untorchonhumide,pub essuyezsoigneusement.
N'utilisezpasded@apants,de savonet d'eauengrandesquantites,de
produitsabrasifsou d'objetspointussurle tableaucar ilestfragile.
Nettoyage de la porte et des joints
Veilleztoujoursace quebs jointsde laportesobnt propreset b.ceque
celle-cifermecorrectement,Nettoyezavecun sointoutparticulierles
jointsde laporteafinqu'aucuneparticubnes'accumubet nenuise
I'etancheitede laporte,Nettoyezlavitredela portea I'aided'eauet de
savontresdoux.Veillezb.utiliserun chiffondouxpour@iterlesrayures.
Siunemincepellicubd'eauseformesur lapard interieureou exterieure
de lavitredufour,essuyezdaa I'aided'unchiffondoux,Cephenomene
peutseproduireIorsquebs alimentsplacesb.I'interieurdufour
possedentuneforteteneuren eau;celan'indiqueen rienlapresence
d'unefuitedartslemicro-ondes.
NETTO¥AGEDELAPARTIEINTERIEURE
Z_ Assurez-vousquelefourmicro-ondesa refroidiavantde le
........ nettoyerafind'@itertouteblessure.
z_ Retirezb plateauen verredu fourIorsquevoussouhaitez
........ nettoyerb fourou leplateau,Pournepasbriserleplateau,
manipulezdeavecpr@autionet neleplongezpasdans
I'eauimmediatementapreslacuisson,Lavezb plateauavec
pr@autiondansde I'eauchaudesavonneuseou au lave-
vaisselle.
Nettoyezregulierementbs surfacesinternes(pards)de votrefour micro-
ondesafind'eliminerlesprojectionsoubs taches,Poureliminerbs
particubsd'alimentsincrust@set bs mauvaisesodeurs,faiteschauffer
2tassesd'eau(additionn@dejusde citronpourdesodoriser)dansun
r@ipientenverred'unecapacitedequatretassesb.puissanceelevee
pendant5 minutesoujusqu'aebullition.Laissezreposerdanslefour
pendantuneadeuxminutes.
Fran£ais canadien = 21
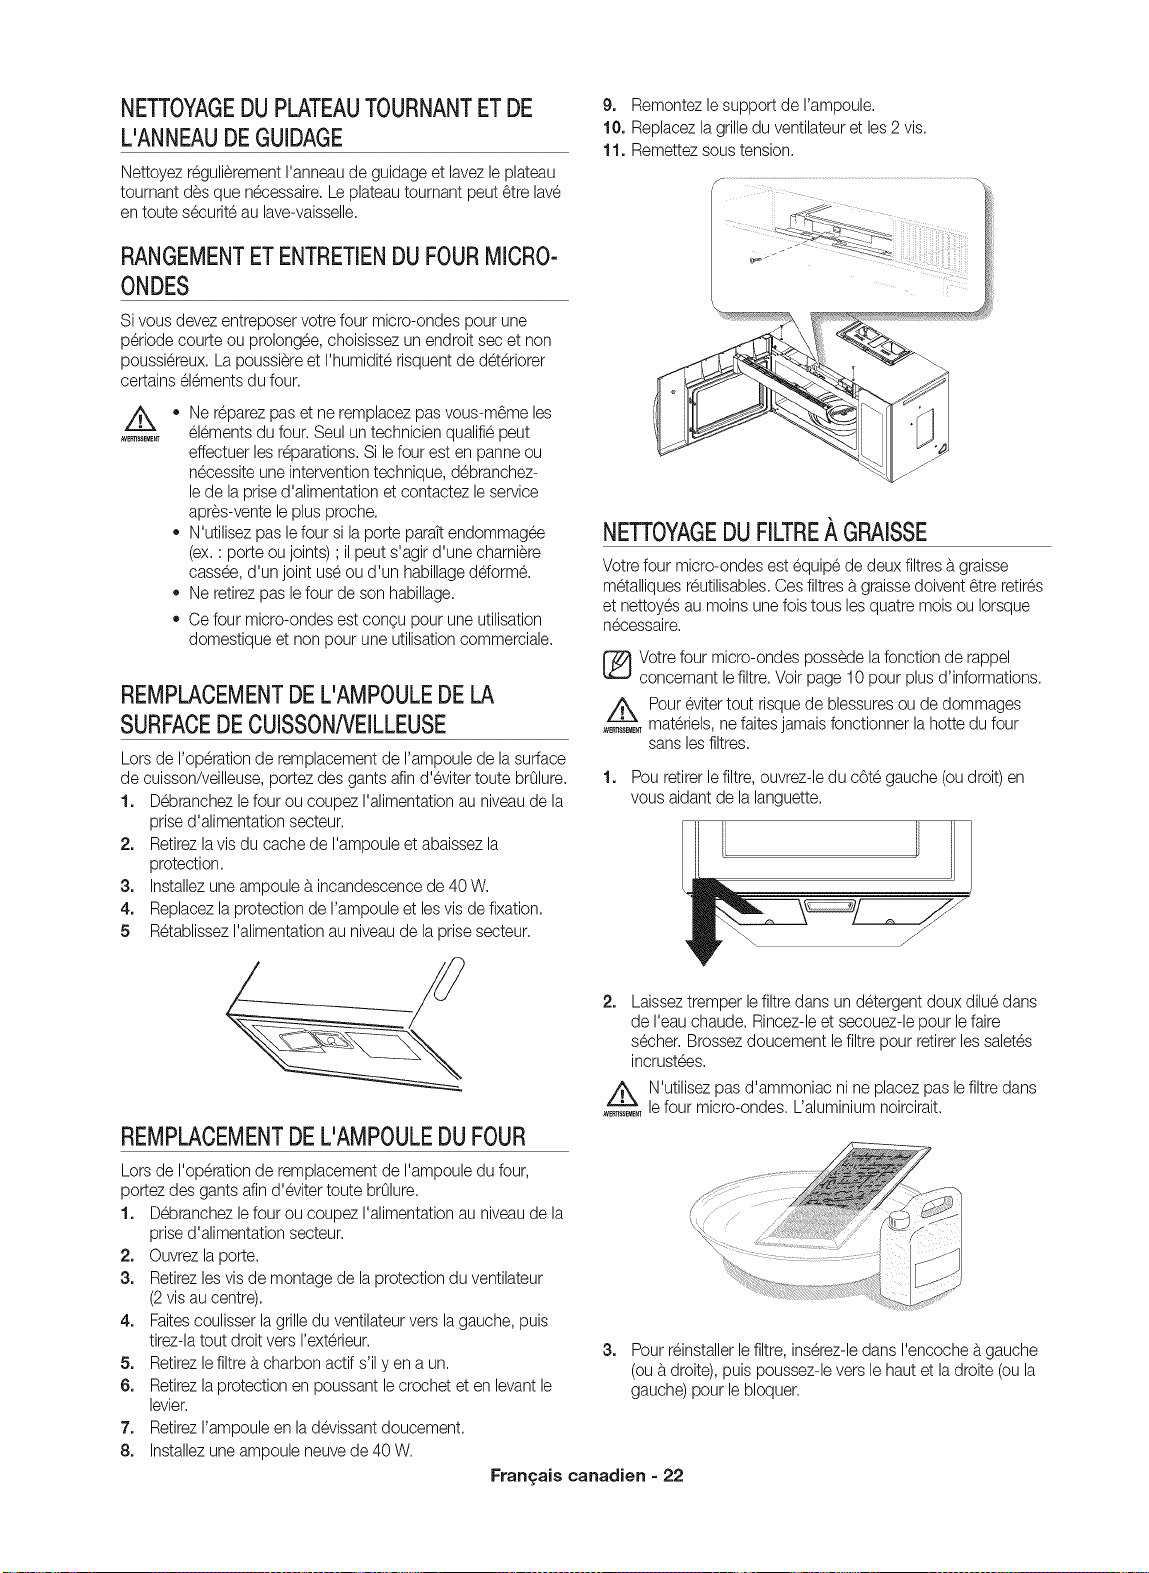
NETTOYAGEDUPLATEAUTOURNANTETDE
L'ANNEAUDEGUIDAGE
Nettoyez r_gulierement I'anneaude guidage et lavez le plateau
tournant des que necessaire. Le plateau tournant peut _tre lave
en toute securiteau lave-vaisselle.
RANGEMENTETENTRETIENDUFOURMICRO-
ONDES
Si vous devezentreposer votre four micro-ondes pour une
periode courte ou prolongee, choisissez un endroit sec et non
poussiereux. La poussiereet I'humidit_ risquent de d6t_riorer
certains elementsdu four.
A
AVEFm_$EME_
* Ne reparezpas et ne remplacez pas vous-m_me les
elements du four. Seulun technicienqualifie peut
effectuer les r_parations.Si lefour est en panne ou
necessite une interventiontechnique, debranchez-
le de laprise d'alimentation et contactez leservice
apres-vente le plus proche.
* N'utilisez pas lefour si la porte paraTtendommagee
(ex. : porte ou joints) ; il peut s'agir d'une charniere
cassee, d'un joint use ou d'un habillageddorme.
Ne retirezpas lefour de son habillage.
Ce four micro-ondes est congu pour une utilisation
domestique et non pour une utilisationcommerciale.
REMPLACEMENTDEL'AMPOULEDELA
SURFACEDECUISSON/VEILLEUSE
Lors de I'op_ration de remplacement de I'ampoule de la surface
de cuisson/veilleuse,portez des gants afin d'eviter toute brOlure.
1. Debranchezlefour ou coupez I'alimentation au niveaude la
prised'alimentation secteur.
2. Retirezla vis du cache de I'ampoule et abaissez la
protection.
3. Installezune ampoule b.incandescence de 40 W.
4. Replacezla protection de I'ampoule et les vis de fixation.
5 RetablissezI'alimentationau niveaude la prisesecteur.
REMPLACEMENTDEL'AMPOULEDUFOUR
Lors de I'op_ration de remplacement de I'ampoule du four,
portez des gants afin d'eviter toute brOlure.
1. Debranchezlefour ou coupez I'alimentation au niveaude la
prised'alimentation secteur.
2. Ouvrez la porte.
3. Retirezles vis de montage de la protection du ventilateur
(2vis au centre).
4. Faitescoulisser la grille du ventilateurvers la gauche, puis
tirez-la tout droit vers I'exterieur.
5. Retirezle filtre b.charbon actif s'il yen a un.
6. Retirezla protection en poussant le crochet et en levant le
levier.
7. RetirezI'ampoule en ladevissant doucement.
8. Installezune ampoule neuve de 40 W.
9. Remontezle support de I'ampoule.
10. Replacezla grille du ventilateuret les 2 vis.
11. Remettezsous tension.
>
NETTOYAGEDUFILTRE,_GRAISSE
Votrefour micro-ondes est equipe de deux filtres a graisse
metalliques r6utilisables.Ces filtres b.graisse doivent 6tre retires
et nettoyes au moins une fois tousles quatre mois ou Iorsque
necessaire.
_} Votre four micro-ondes possede la fonction de rappel
concemant lefiltre. Voir page 10 pour plus d'informations.
Z_ Pour eviter tout risque de blessuresou de dommages
......... materiels, nefaites jamais fonctionner la hotte du four
sans les filtres.
1.
Pouretirer le filtre, ouvrez-le du c6te gauche (oudroit) en
vous aidant de la languette.
2. Laisseztremper lefiltre dans un detergent doux dilue dans
de I'eauchaude. Rincez-leet secouez-le pour le faire
secher. Brossez doucement le filtrepour retirer les salet6s
incrust_es.
Z_ N'utilisez pas d'ammoniac ni ne placez pas le filtre dans
......... lefour micro-ondes. L'aluminium noircirait.
3. Pour reinstallerlefiltre, inserez-ledans I'encoche b.gauche
(ou b.droite), puis poussez-levers le haut et la droite (ou la
gauche) pour le bloquer.
Frangais canadien - 22
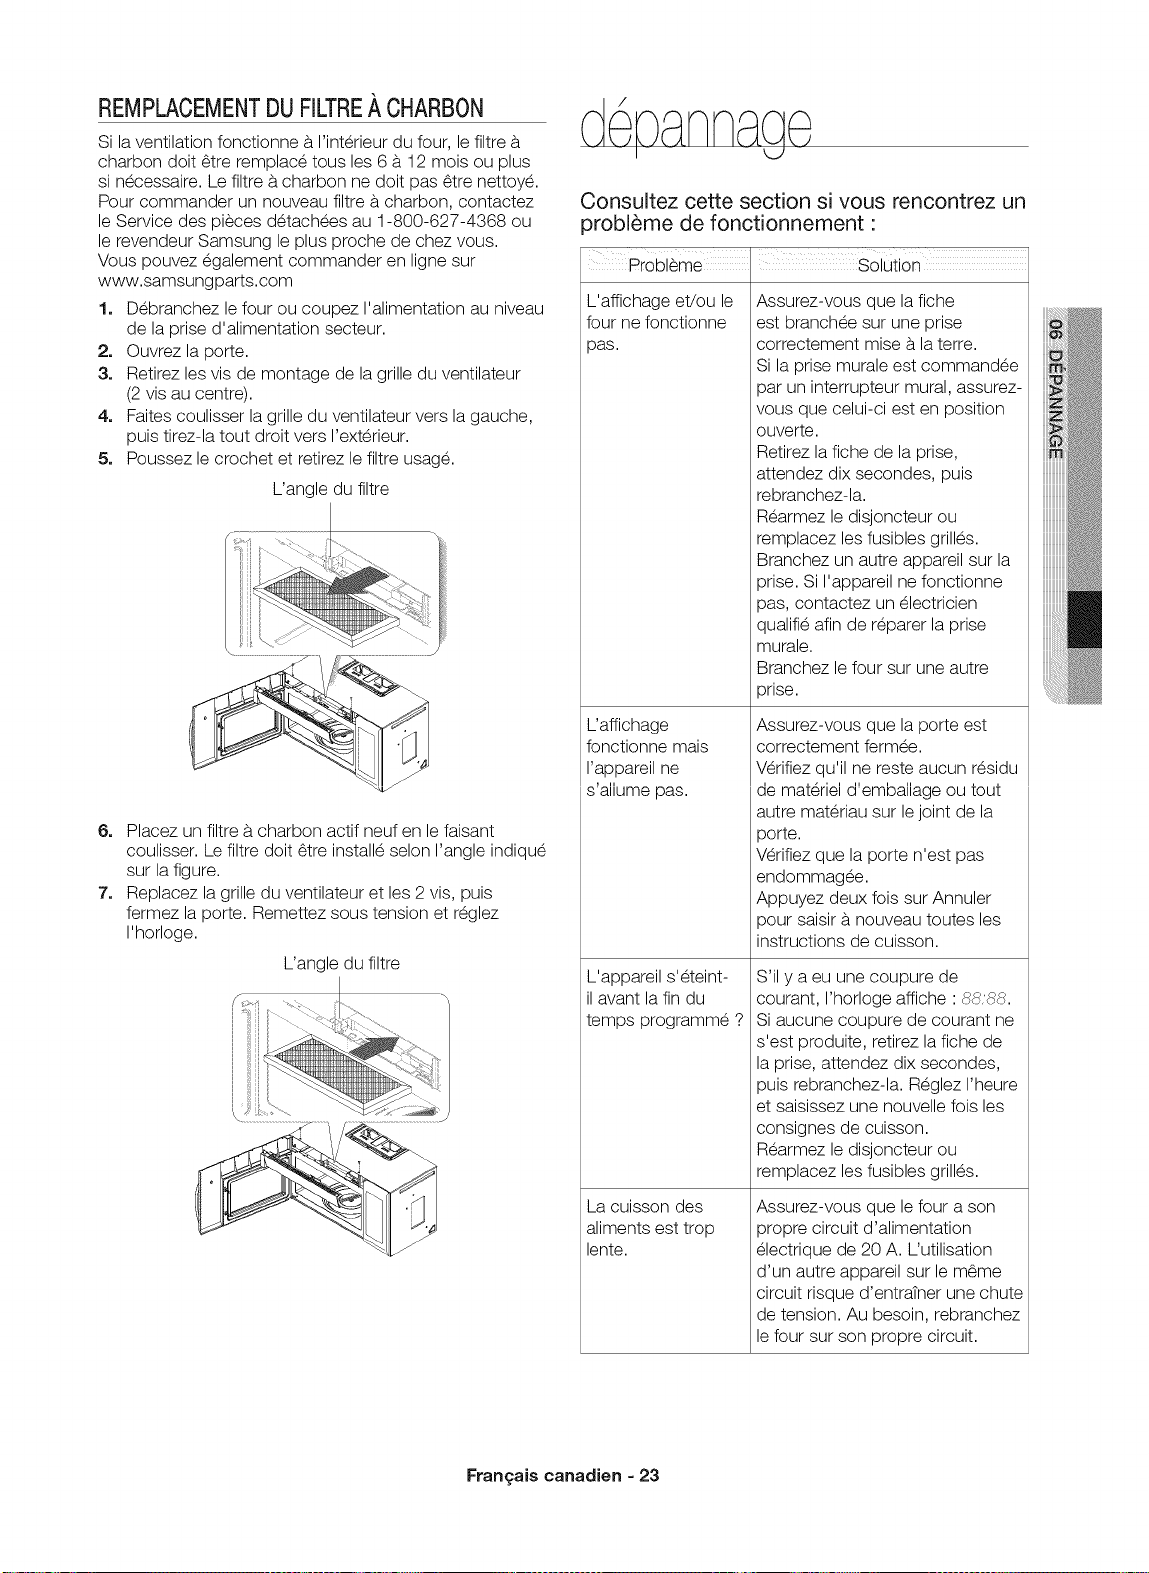
REMPLACEMENTDUFILTREA CHARBON
Si la ventilation fonctionne b. I'interieur du four, le filtre b.
charbon doit 6tre remplace tousles 6 b. 12 mois ou plus
si necessaire. Le filtre b.charbon ne doit pas 6tre nettoye.
Pour commander un nouveau filtre b.charbon, contactez
le Service des pieces detachees au 1-800-627-4368 ou
le revendeur Samsung le plus proche de chez vous.
Vous pouvez egalement commander en ligne sur
www.samsungparts.com
1. Debranchez le four ou coupez I'alimentation au niveau
de la prise d'alimentation secteur.
2. Ouvrez la porte.
3. Retirez les vis de montage de la grille du ventilateur
(2 vis au centre).
4. Faites coulisser la grille du ventilateur vers la gauche,
puis tirez-la tout droit vers I'exterieur.
5. Poussez le crochet et retirez le filtre usage.
L'angle du filtre
6o Placez un filtre b.charbon actif neuf en le faisant
coulisser. Le filtre doit 6tre installe selon I'angle indique
sur la figure.
7. Replacez la grille du ventilateur et les 2 vis, puis
fermez la porte. Remettez sous tension et reglez
I'horloge.
L'angle du filtre
d sannaae
I k_J
Consultez cette section si vous rencontrez un
3robl_me de fonctionnement "
Probl6me I Solution
L'affichage et/ou le
four ne fonctionne
pas.
L'affichage
fonctionne mais
rappareil ne
, n
s anume pas.
L'appareil s'eteint-
il avant la fin du
temps programme ?
La cuisson des
aliments est trop
lente.
Assurez-vous que la fiche
est branchee sur une prise
correctement mise b. la terre.
Si la prise murale est commandee
par un interrupteur mural, assurez-
vous que celui-ci est en position
ouverte.
Retirez la fiche de la prise,
attendez dix secondes, puis
rebranchez-la.
Rearmez le disjoncteur ou
remplacez les fusibles grilles.
Branchez un autre appareil sur la
prise. Si I'appareil ne fonctionne
pas, contactez un electricien
quali% afin de reparer la prise
murale.
Branchez le four sur une autre
prise.
Assurez-vous que la porte est
correctement fermee.
Wrifiez qu'il ne reste aucun residu
oe ma[erlel c1emDanage ou [ou[
autre materiau sur le joint de la
porte.
Wrifiez que la porte n'est pas
endommagee.
Appuyez deux fois sur Annuler
pour saisir b.nouveau toutes les
instructions de cuisson.
S'il y a eu une coupure de
courant, I'horloge affiche ' 88:88.
Si aucune coupure de courant ne
s'est produite, retirez la fiche de
la prise, attendez dix secondes,
puis rebranchez-la. Reglez I'heure
et saisissez une nouvelle fois les
consignes de cuisson.
Rearmez le disjoncteur ou
remplacez les fusibles grilles.
Assurez-vous que le four a son
propre circuit d'alimentation
electrique de 20 A. L'utilisation
d'un autre appareil sur le m6me
circuit risque d'entratner une chute
de tension. Au besoin, rebranchez
le four sur son propre circuit.
Frangais canadien - 23
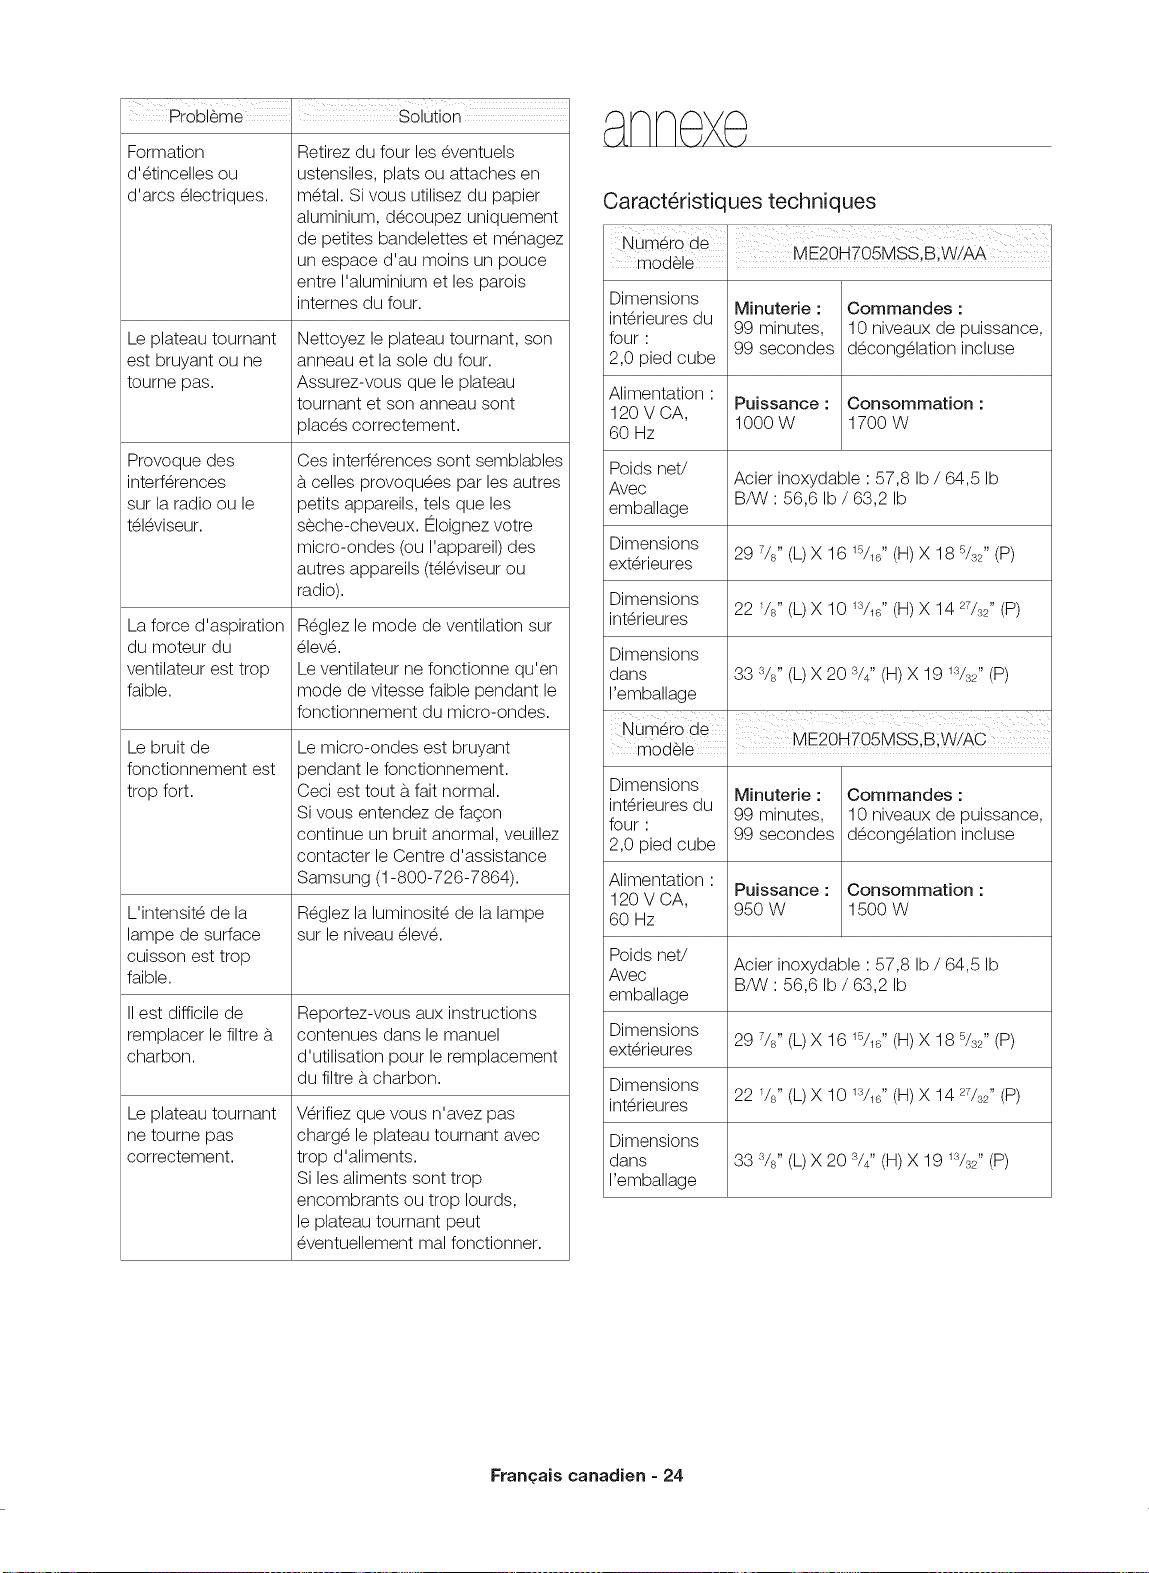
Probl6me' Solution
Formation
d'_tincellesou
d'arcs_lectriques.
Leplateautournant
estbruyantoune
tournepas.
Provoquedes
interf@ences
surlaradiooule
t_l_viseur.
Laforced'aspiration
dumoteurdu
ventilateuresttrop
faible.
Lebruitde
fonctionnementest
tropfort.
L'intensit_dela
lampedesurface
cuissonesttrop
faible.
IIestdifficilede
remplacerlefiltreb.
charbon.
Le plateau tournant
ne tourne pas
correctement.
Retirez du four les _ventuels
ustensiles, plats ou attaches en
m_tal. Si vous utilisez du papier
aluminium, d_coupez uniquement
de petites bandelettes et m_nagez
un espace d'au moins un pouce
entre I'aluminium et les patois
internes du four.
Nettoyez le plateau tournant, son
anneau et la sole du four.
Assurez-vous que le plateau
tournant et son anneau sont
places correetement.
Ces interf@ences sont semblables
b.celles provoqu_es par les autres
petits appareils, tels que les
seehe-cheveux. Eloignez votre
miero-ondes (ou I'appareil) des
autres appareils (t_l_viseur ou
radio).
R_glez le mode de ventilation sur
_lev_.
Le ventilateur ne fonctionne qu'en
mode de vitesse faible pendant le
fonctionnement du micro-ondes.
Le micro-ondes est bruyant
pendant le fonctionnement.
Ceci est tout a.fait normal.
Si vous entendez de fa9on
continue un bruit anormal, veuillez
contacter le Centre d'assistance
Samsung (1-800-726-7864).
R_glez la luminosit_ de la lampe
sur le niveau _lev_.
Reportez-vous aux instructions
contenues dans le manuel
d'utilisation pour le remplacement
du filtre b.charbon.
Wrifiez que vous n'avez pas
charg_ le plateau tournant avec
trop d'aliments.
Si les aliments sont trop
encombrants ou trop Iourds,
le plateau tournant peut
_ventuellement real fonctionner.
ANNOX@
Caract@istic ues techniques
NUmo_r_d e I ME20HTOBMSSIB;W!AA
Dimensions
Minuterie : Commandes :
int@ieures du
99 minutes, 10 niveaux de puissance,
four:
99 seeondes d_cong_lation incluse
2,0 pied cube
Alimentation :
Puissance : Consommation :
120 V CA, 1000 W 1700 W
60 Hz
Poids net/
Acier inoxydable : 57,8 Ib / 64,5 Ib
Avec
BAN : 56,6 Ib / 63,2 Ib
emballage
Dimensions
29 7/s" (L) X 16 15/16" (m) X 18 s&2" (P)
ext@ieures
Dimensions
22 l/s" (L) X 10 1'3/16" (m) X 14 27/._2"(P)
int@ieures
Dimensions
dans 33 'Vs" (L) X 20 s/4" (H) X 19 1'_&2"(P)
I'emballage
Numb[ °de ME20HT05MSS a W!AC
moaele i ' '
Dimensions
Minuterie : Commandes :
int@ieures du
99 minutes, 10 niveaux de puissance,
four:
99 secondes d_cong_lation incluse
2,0 pied cube
Alimentation :
Puissance : Consommation :
120 V CA, 950 W 1500 W
60 Hz
Poids net/
Acier inoxydable : 57,8 Ib / 64,5 Ib
Avec
BAN : 56,6 Ib / 63,2 Ib
emballage
Dimensions
29 7/s" (L) X 16 15/16" (H) X 18 _A2" (P)
ext@ieures
Dimensions
22 l/s" (L) X 10 1'V16"(H) X 14 27/._2"(P)
int@ieures
Dimensions
dans 33 'Vs" (L) X 20 s/4" (H) X 19 u_A2"(P)
I'emballage
Fran¢ais canadien = 24
/
Q rante (Etat,sLJn,st
tJ \ I
FOUR MICRO=ONDES ,&,HOTTE
INTI GRI E DE SAMSUNG
Garantie limit6e & I'acqu6reur d'origine
Ce produit de la marque SAMSUNG, fourni et distribue par
Samsung Electronics America, Inc, (SAMSUNG), livre en etat
neuf dans son carton d'origine et achete par le consommateur et
acquereur d'origine, s'accompagne d'une garantie de SAMSUNG
centre tout vice de fabrication au niveau des pieces et de la main
d'oeuvre pendant une periode limitee de :
UN (1) AN POUR LES PIISCES ET LA MAIN D'CEUVRE,
DIX (10)ANS POUR LES PIISCES DU MAGNE_TRON
Samsung facturera les travaux de reparation Iorsqu'un
accessoire doit _tre r6pare ou un defaut esthetique corrige, si
I'endommagement de I'appareil et/ou I'endommagement ou la
perte de I'accessoire a et6 occasionne(e) par le client. Les elements
concernes par cette stipulation sont :
- Une porte, une poignee, un panneau exterieur ou le tableau de
commandes bossele(e), raye(e) ou brise(e).
- Un plateau, un guide de plateau roulant, un coupleur, un filtre ou
une grille metallique brise(e) ou manquant(e)
Les pieces remplacees par I'utilisateur peuvent _tre envoyees
au client pour reparation. Si necessaire, un ingenieur du service
d'assistance pourra _tre envoye pour effectuer les reparations.
Cette limite de garantie s'applique a compter de la date d'acquisition
et couvre uniquement les produits achetes et utilises aux 12tats-Unis.
Pour se prevaloir du service de garantie, I'acheteur doit contacter
SAMSUNG afin d'etablir les procedures relatives au diagnostic et
I'intervention necessaire. Pour _tre couverte par la garantie, la
maintenance ne peut _tre effectuee que par un service technique
agree SAMSUNG. Lors de la remise d'un produit defectueux
SAMSUNG ou a un centre de service SAMSUNG agree, I'acquereur
est tenu de presenter le coupon d'achat d'origine a la demande des
interess6s a titre de preuve d'achat.
La societe SAMSUNG prendra en charge, a sa convenance, la
reparation ou le remplacement du produit a ses frais tel que stipule
dans les presentes conditions et procedera au remplacement ou au
changement des pieces ou des produits si ces derniers s'averent
defectueux dans la limite de la periode de garantie mentionnee
pr6cedemment. Toute piece ou tout produit remplace devient
la propriet6 de SAMSUNG et doit lui _tre restitu& Les pieces et
produits de rechange sont proteg6s pour le reste de la periode de
garantie initiale ou pour quatre-vingt-dix (90) jours, selon I'eventualite
la plus eloignee.
En fonction des disponibilites sur le territoire des Etats-Unis
contigus, un service a domicile est propose dans la limite de la
periode de garantie. Le service a domicile n'est pas disponible pour
toutes les zones. Pour beneficier du service a domicile, I'appareil doit
_tre facilement accessible a notre personnel. Dans le cas oQ il serait
impossible de reparer I'appareil au cours du service a domicile, il se
peut que I'appareil doive _tre emporte, repare et retourn& En cas
d'indisponibilite du service a domicile, SAMSUNG pourra choisir
le moyen de transport de son choix pour acheminer ou renvoyer
I'appareil vers et depuis un centre de service agree de SAMSUNG.
Dans le cas contraire, la responsabilite du transport vers et depuis le
centre de service agree de SAMSUNG incombera a I'acquereur.
Cette garantie limitee couvre les defauts de fabrication des pieces
et la main d'oeuvre survenant suite a une utilisation normale et non
commerciale de ce produit et ne s'applique pas aux problemes
ci-apres, y compris, mais sans s'y limiter : tout dommage survenant
au cours de I'expedition, la livraison et I'installation ; toute utilisation
de I'appareil contraire au but auquel il etait destine ; tout numero de
produit ou de serie efface ; tout dommage du rev_tement exterieur
ou de I'aspect du produit ; tout dommage cause par accident,
abus, negligence, incendie, inondation, foudre ou autre catastrophe
naturelle ; toute utilisation de produits, equipements, syst_mes,
appareils, services, pieces, fournitures, accessoires, applications,
installations, reparations, c_blages externes ou connecteurs non
fournis ou autorises par SAMSUNG et susceptibles d'endommager
ledit appareil ou de nuire a son fonctionnement ; toute surtension,
fluctuation ou tension de ligne electrique incorrecte ; tout reglage
effectue par I'acquereur et non-respect des instructions de
fonctionnement, de nettoyage, d'entretien et de respect de
I'environnement couvertes et prescrites dans le present carnet
d'entretien ; tout probleme resultant d'une proliferation d'insectes
nuisibles, d'une surchauffe ou d'un plat trop cuit par I'utilisateur ;
tout probleme relatif au plateau en verre ou plateau tournant ou
une puissance reduite du magnetron en raison d'une usure normale.
SAMSUNG ne garantit pas un fonctionnement continu ou sans
erreur de ce produit.
SAMSUNG NE FOURNIT AUCUNE AUTRE GARANTIE AUTRE QUE
CELLES MENTIONNEES ET DECRITES CI-DESSUS, ET AUCUNE
GARANTIE, EXPRESSE OU IMPLICITE, Y COMPRIS, MAIS
SANS S'Y LIMITER, LES GARANTIES IMPLICITES DE QUALITE
COMMERCIALE OU D'APTITUDE _, UN USAGE PARTICULIER,
NE DOlT S'APPLIQUER APRES EXPIRATION DES PERIODES
DE GARANTIE EXPRESSES CONSIDI2RI2ESCI-DESSUS, ET
AUCUNE AUTRE GARANTIE EXPRESSE RELATIVEAU PRI2SENT
PRODUIT, QU'ELLE SOIT DONNEE PAR UNE TIERCE PERSONNE,
UNE ENTREPRISE OU UNE PERSONNE MORALE NE POURRA
ETRE CONSIDEREE COMME UN ENGAGEMENT DE LA PART DE
SAMSUNG. SAMSUNG N'ENDOSSE AUCUNE RESPONSABILITE
EN CAS DE PERTE DE REVENU, DE MANQUE _, GAGNER,
D'INCAPACITE _, REALISER DES ECONOMIES OU TOUT AUTRE
AVANTAGE FINANCIER, OU EN CAS DE DOMMAGE RESULTANT
DE L'UTILISATION OU D'UNE MAUVAISE UTILISATION DE CET
APPAREIL OU D'UNE INCAPACITE _, UTILISER CET APPAREIL,
QUELLE QUE SOIT LA BASE LI2GALE SUR LAQUELLE
REPOSE LA PLAINTE, ET MftME SI SAMSUNG A ETE AVERTIE
DE L'EVENTUALITE DE TELS DOMMAGES. TOUT TYPE DE
COMPENSATION EXIGI2EAUPRES DE SAMSUNG NE SAURA EN
AUCUN CAS EXCEDER LE PRIX D'ACHAT DU PRODUIT VENDU
PAR SAMSUNG ET _, L'ORIGINE DES DOMMAGES ALLEGUES.
SANS LIMITER CE QUI SUIT, L'ACQUEREUR PREND EN CHARGE
TOUS LES RISQUES ET RESPONSABILITI2S CONCERNANT
LA PERTE, LES DOMMAGES OU LES BLESSURES INFLIGEES
_, L'ACQUI2REUR ET AUX BIENS DE CELUI-CI ET _, TOUTE
AUTRE PERSONNE ET BIEN RESULTANT DE L'UTILISATION,
LA MAUVAISE UTILISATION DE L'APPAREIL ET L'INCAPACITE
_, UTILISER LE PRESENT APPAREIL VENDU PAR SAMSUNG ET
QUI NE SERAIT PAS LIllE DIRECTEMENT _, UNE NEGLIGENCE
DE LA PART DE SAMSUNG. CETTE GARANTIE LIMITEE N'EST
VALABLE POUR PERSONNE D'AUTRE QUE L'ACHETEUR INITIAL
DU PRODUIT, N'EST PAS TRANSFERABLE ET ENONCE VOTRE
RECOURS EXCLUSIF.
Certaines provinces ou territoires peuvent autoriser ou non des
limitations quanta la duree des garanties implicites, ou I'exclusion
ou la limitation de dommages accessoires ou indirects ; il se peut
par consequent que les limitations et exclusions enoncees ci-dessus
ne s'appliquent pas a votre cas. Cette garantie vous confere des
droits legaux specifiques, vous pouvez egalement avoir d'autres
droits qui varient d'un Etat a I'autre.
Pour beneficier d'un service d'assistance couvert par votre garantie,
contactez SAMSUNG a I'adresse suivante :
1-800-SAMSUNG (726-7864) ou
www.samsung.com/us/support
Fran£ais canadien = 25
FOUR MICRO=ONDES ,&,HOTTE
INTI GRI E DE SAMSUNG
Garantie limit6e & I'acqu6reur d'origine
Ce produit de la marque SAMSUNG, fourni et distribue par
Samsung Electronics Canada, Inc. (SAMSUNG), livre en etat
neuf dans son carton d'origine et achete par le consommateur et
acquereur d'origine, s'accompagne d'une garantie de SAMSUNG
contre tout vice de fabrication au niveau des pieces et de la main
d'oeuvre pendant une p@iode limitee de :
UN (1)AN POUR LES PII=CES ET LA MAIN D'(:EUVRE,
CINQ (5) ANS POUR LES PIECES DU MAGNI=TRON
Samsung facturera les travaux de reparation Iorsqu'un
accessoire doit _tre r6pare ou un defaut esthetique corrige, si
I'endommagement de I'appareil et/ou I'endommagement ou la
perte de I'accessoire a 6te occasionne(e) par le client. Les elements
concernes par cette stipulation sont :
- Une porte, une poignee, un panneau exterieur ou le tableau de
commandes bossele(e), raye(e) ou brise(e).
- Un plateau, un guide de plateau roulant, un coupleur, un filtre ou
une grille metallique brise(e) ou manquant(e)
Les pieces remplacees par I'utilisateur peuvent _tre envoyees
au client pour reparation. Si necessaire, un ingenieur du service
d'assistance pourra _tre envoye pour effectuer les reparations.
Cette limite de garantie s'applique a compter de la date d'acquisition
et couvre uniquement les produits achetes et utilises au Canada.
Pour se prevaloir du service de garantie, I'acheteur doit contacter
SAMSUNG afin d'etablir les procedures relatives au diagnostic et
I'intervention necessaire. Pour _tre couverte par la garantie, la
maintenance ne peut _tre effectuee que par un service technique
agree SAMSUNG. Lors de la remise d'un produit defectueux
SAMSUNG ou a un centre de service SAMSUNG agree, I'acquereur
est tenu de presenter le coupon d'achat d'origine a la demande des
interess6s a titre de preuve d'achat.
La societ6 SAMSUNG prendra en charge, a sa convenance, la
r@aration ou le remplacement du produit a ses frais tel que stipule
dans les presentes conditions et procedera au remplacement ou au
changement des pieces ou des produits si ces derniers s'averent
defectueux dans la limite de la periode de garantie mentionnee
prec6demment. Toute piece ou tout produit remplace devient
la propri6te de SAMSUNG et doit lui _tre restitu& Les pieces et
produits de rechange sont proteges pour le reste de la p@iode de
garantie initiale ou pour quatre-vingt-dix (90)jours, selon I'@entualite
la plus eloignee.
En fonction des disponibilites sur le territoire canadien contigu,
un service a domicile est propose dans la limite de la periode de
garantie. Le service a domicile n'est pas disponible pour toutes les
zones. Pour beneficier du service a domicile, I'appareil doit _tre
facilement accessible a notre personnel. Dans le cas or1 il serait
impossible de r@arer I'appareil au cours du service a domicile, il se
peut que I'appareil doive _tre emporte, repare et retourn& En cas
d'indisponibilite du service a domicile, SAMSUNG pourra choisir
le moyen de transport de son choix pour acheminer ou renvoyer
I'appareil vers et depuis un centre de service agree de SAMSUNG.
Dans le cas contraire, la responsabilite du transport vers et depuis le
centre de service agree de SAMSUNG incombera a I'acquereur.
Cette garantie limitee couvre lee defauts de fabrication des pieces
et la main d'oeuvre survenant suite a une utilisation normale et non
commerciale de ce produit et ne s'applique pas aux problemes
ci-apres, y compris, mais sans s'y limiter : tout dommage survenant
au cours de I'expedition, la livraison et I'installation ; toute utilisation
de I'appareil contraire au but auquel il etait destine ; tout num@o de
produit ou de s@ie efface ; tout dommage du rev_tement exterieur
ou de I'aspect du produit ; tout dommage cause par accident,
abus, negligence, incendie, inondation, foudre ou autre catastrophe
naturelle ; toute utilisation de produits, equipements, syst_mes,
appareils, services, pieces, fournitures, accessoires, applications,
installations, reparations, c_blages externes ou connecteurs non
fournis ou autorises par SAMSUNG et susceptibles d'endommager
ledit appareil ou de nuire a son fonctionnement ; toute surtension,
fluctuation ou tension de ligne electrique incorrecte ; tout reglage
effectue par I'acquereur et non-respect des instructions de
fonctionnement, de nettoyage, d'entretien et de respect de
I'environnement couvertes et prescrites dans le present carnet
d'entretien ; tout probleme resultant d'une prolif@ation d'insectes
nuisibles, d'une surchauffe ou d'un plat trop cuit par I'utilisateur ;
tout probleme relatif au plateau en verre ou plateau tournant ou
une puissance reduite du magnetron en raison d'une usure normale.
SAMSUNG ne garantit pas un fonctionnement continu ou sans
erreur de ce produit.
SAMSUNG NE FOURNIT AUCUNE AUTRE GARANTIE AUTRE QUE
CELLES MENTIONNEES ET DI2CRITESCI-DESSUS, ET AUCUNE
GARANTIE, EXPRESSE OU IMPLICITE, Y COMPRIS, MAIS
SANS S'Y LIMITER, LES GARANTIES IMPLICITES DE QUALITE
COMMERCIALE OU D'APTITUDE _, UN USAGE PARTICULIER,
NE DOlT S'APPLIQUER APRES EXPIRATION DES PERIODES
DE GARANTIE EXPRESSES CONSIDI2RI2ESCI-DESSUS, ET
AUCUNE AUTRE GARANTIE EXPRESSE RELATIVE AU PRESENT
PRODUIT, QU'ELLE SOIT DONNEE PAR UNE TIERCE PERSONNE,
UNE ENTREPRISE OU UNE PERSONNE MORALE NE POURRA
ETRE CONSIDEREE COMME UN ENGAGEMENT DE LA PART DE
SAMSUNG. SAMSUNG N'ENDOSSE AUCUNE RESPONSABILITI2
EN CAS DE PERTE DE REVENU, DE MANQUE _, GAGNER,
D'INCAPACITE _, RI2ALISER DES ECONOMIES OU TOUT AUTRE
AVANTAGE FINANCIER, OU EN CAS DE DOMMAGE RE_SULTANT
DE L'UTILISATION OU D'UNE MAUVAISE UTILISATION DE CET
APPAREIL OU D'UNE INCAPACITE _, UTILISER CET APPAREIL,
QUELLE QUE SOIT LA BASE LEGALE SUR LAQUELLE
REPOSE LA PLAINTE, ET MEME SI SAMSUNG A ETEAVERTIE
DE L'EVENTUALITE DE TELS DOMMAGES. TOUT TYPE DE
COMPENSATION EXIGI2EAUPRES DE SAMSUNG NE SAURA EN
AUCUN CAS EXCEDER LE PRIX D'ACHAT DU PRODUIT VENDU
PAR SAMSUNG ET _, L'ORIGINE DES DOMMAGES ALLEGUt2S.
SANS LIMITER CE QUI SUIT, L'ACQUEREUR PREND EN CHARGE
TOUS LES RISQUES ET RESPONSABILITES CONCERNANT
LA PERTE, LES DOMMAGES OU LES BLESSURES INFLIGI2ES
_, L'ACQUEREUR ET AUX BIENS DE CELUI-CI ET _, TOUTE
AUTRE PERSONNE ET BIEN RI2SULTANTDE L'UTILISATION,
LA MAUVAISE UTILISATION DE L'APPAREIL ET L' INCAPACITE
_, UTILISER LE PRESENT APPAREIL VENDU PAR SAMSUNG ET
QUI NE SERAIT PAS LIEE DIRECTEMENT _, UNE NEGLIGENCE
DE LA PART DE SAMSUNG. CETTE GARANTIE LIMITEE N'EST
VALABLE POUR PERSONNE D'AUTRE QUE L'ACHETEUR INITIAL
DU PRODUIT, N'EST PAS TRANSFERABLE ET ENONCE VOTRE
RECOURS EXCLUSIF.
Certaines provinces ou territoires peuvent autoriser ou non des
limitations quanta la duree des garanties implicites, ou I'exclusion
ou la limitation de dommages accessoires ou indirects ; il se peut
par consequent que les limitations et exclusions enoncees ci-dessus
ne s'appliquent pas a votre cas. Cette garantie vous confere des
droits legaux specifiques, vous pouvez egalement avoir d'autres
droits qui varient d'un Etat a I'autre.
Pour beneficier d'un service d'assistance couvert par votre garantie,
contactez SAMSUNG a I'adresse suivante :
1-800-SAMSUNG (726-7864) ou
www.samsung.com/us/support (anglais),
www.sarnsung.com/ca_fr/support (fran£ais)
Fran£ais canadien = 26

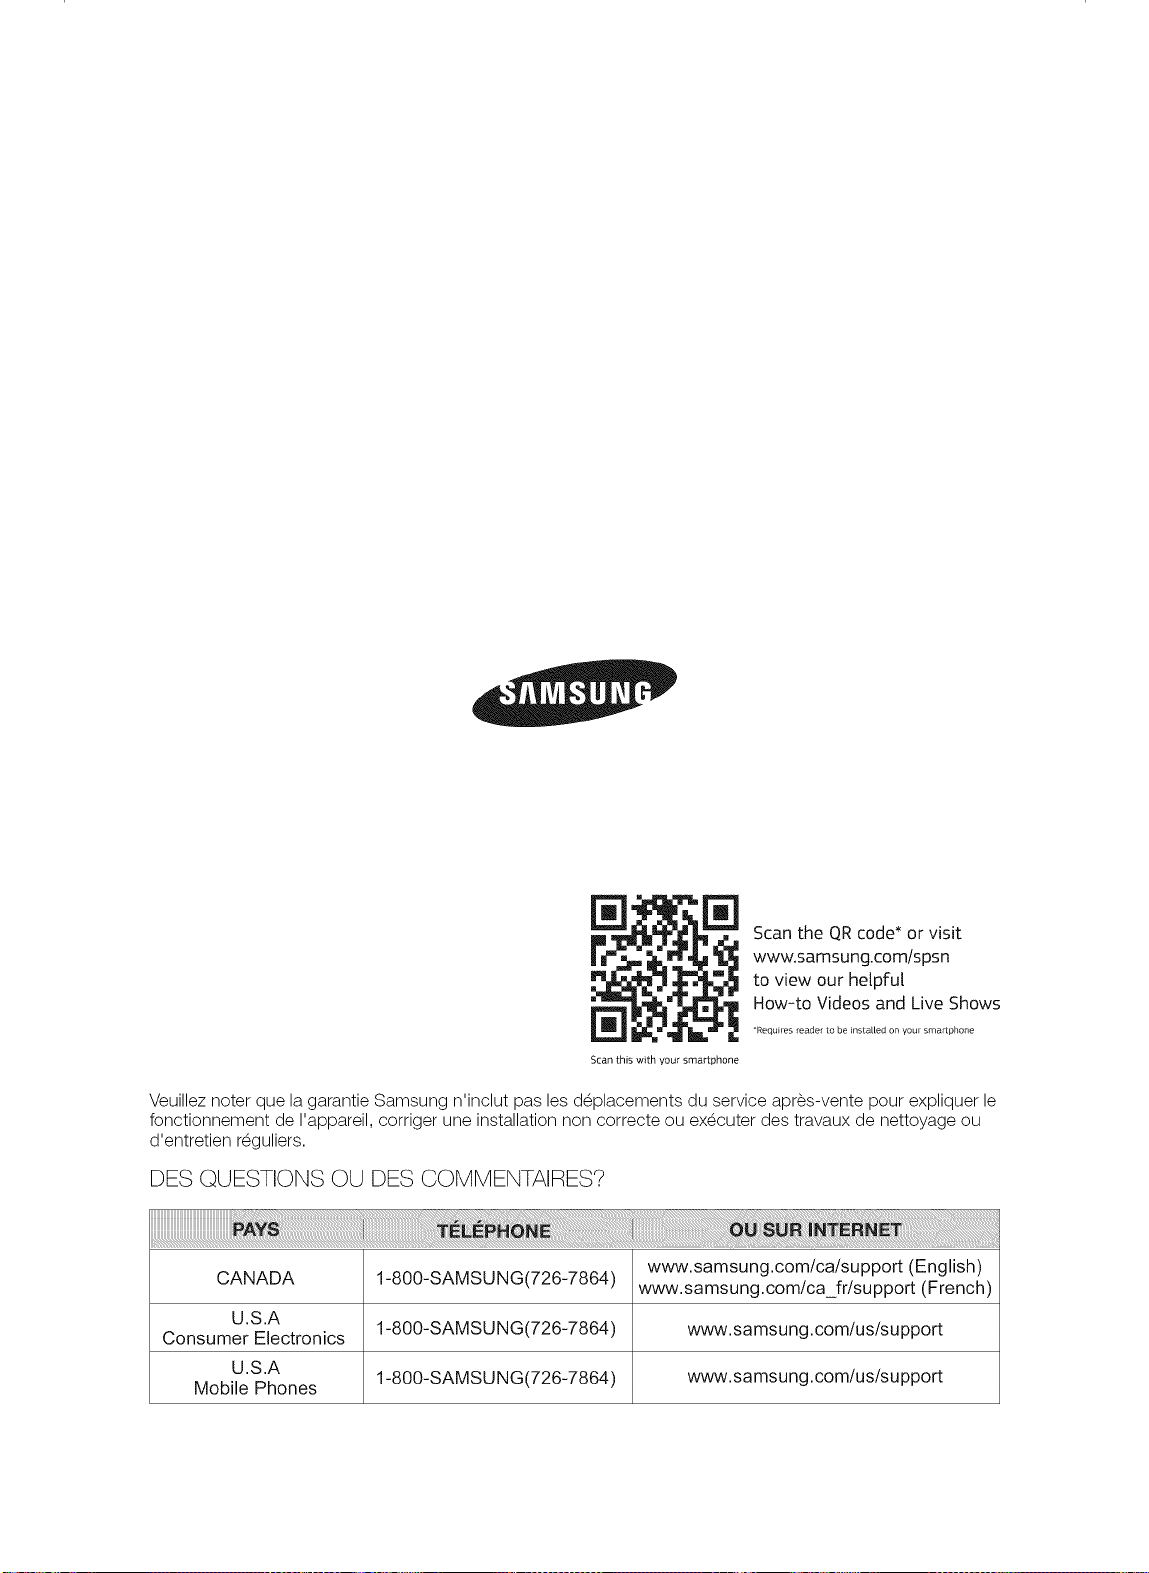
Scan this with your smartphone
Scan the QR code * or visit
www.samsung.com/spsn
to view our helpful
How-to Videos and Live Shows
*Requires reader to be installed on your smartphone
Veuillez noter que la garantie Samsung n'inclut pas les d_placements du service apres-vente pour expliquer le
fonctionnement de I'appareil, corriger une installation non correcte ou ex_cuter des travaux de nettoyage ou
d'entretien r_guliers.
DES QUESTIONS OU DES COMMENTAIRES?
www.samsu ng.com/ca/su pport (English)
CANADA 1-800-SAMSUNG(726-7864) www.samsung.com/ca_fr/support (French)
U.S.A
Consumer Electronics 1-800-SAMSU NG(726-7864) www.samsung.com/us/su pport
U.S.A 1-800-SAMSU NG(726-7864) www.samsung.com/us/su pport
Mobile Phones


