

3
THANK YOU FOR CHOOSING POLSEN.
The Polsen RC-77-U is a large-diaphragm studio condenser USB microphone ideal for singers,
songwriters, and podcasters who want to record high-quality sound directly to their computer.
The stylish, retro look of the RC-77-U makes it an eye-catching addition to any studio.
This retro-styled microphone is Mac and PC compatible and connects directly
to a computer’s USB port. No drivers, power supply, or audio interface are
necessary to begin recording. Launch your recording software, plug in the
microphone, and you’re ready to record. A headphone output provides low-
latency volume adjustment, and a mute button gives you additional control.
In addition to the extreme ease of operation, the large 32 mm diaphragm delivers
clean and natural sound. An integrated dual-stage grille minimizes pops and
vocal plosives while protecting the capsule from corrosive moisture. The cardioid
polar pattern focuses on the source in front of it while minimizing off-axis
sound, and it makes the RC-77-U an excellent choice for recording vocals.

4
Among the benets you’ll enjoy:
• Studio condenser microphone ideal for singers, songwriters, and podcasters.
• Record directly to your computer. No drivers, power supply, or audio interface needed.
• Large, 32 mm diaphragm delivers clean and natural sound.
• Mac and PC compatible. Connects directly to your computer’s USB port.
• Headphone output offers low-latency volume adjustment.
• Mute switch provides additional control when recording.
• Dual-stage grille minimizes pops and vocal plosives.
• Power, peak, and mute LED indicator lets you know your microphone's status at all times.
• Stylish, retro look makes a swell addition to any studio!
5
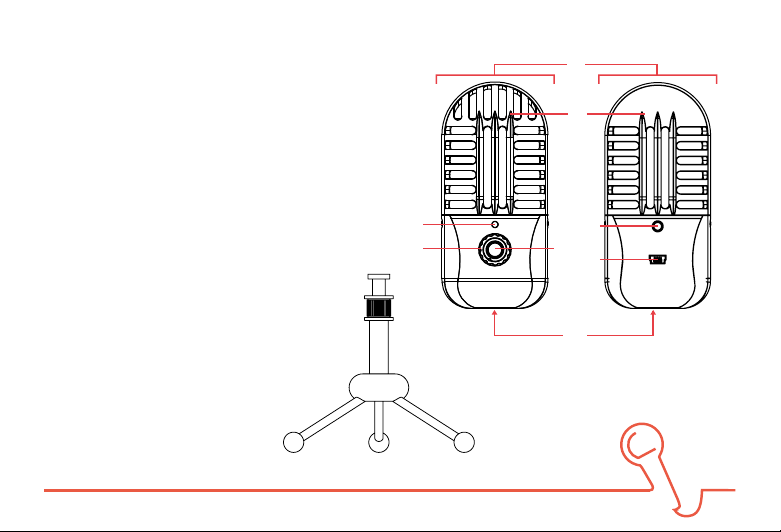
OVERVIEW
Front Back
1. Microphone capsule
2. Grille
3. LED indicator
4. Headphone volume control
5. Microphone mute button
6. Headphone jack
7. USB Mini-B jack
8. Threaded 5/8″ mount
9. Adjustable mic stand
1.
2.
3.
4.
8.
5.
9.
6.
7.

6
PRECAUTIONS
• Please read and follow these instructions and keep this manual in a safe place.
• Exposure to high sound levels can cause permanent hearing loss. Avoid listening at high
volumes for extended periods of time.
• Keep this product away from water and ammable gases or liquids.
• Do not attempt to disassemble or repair this product.
• Handle this product with care
• Clean this product with only a soft, dry cloth.
• Make sure that this product is intact and that there are no missing parts.
• To avoid damage to this product, be careful not to overtighten or improperly thread any of
the threaded ttings.
• All images are for illustrative purposes only.

7
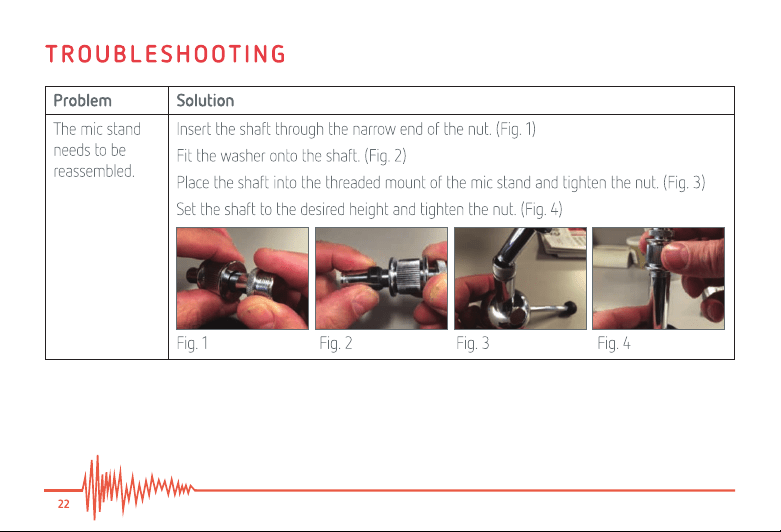
SETTING UP THE MICROPHONE
1. Screw the mic stand into the RC-77-U microphone, unfold the legs, and place the
microphone on your desktop.
2. Loosen the locking collar to set the microphone to the desired height and securely tighten
it so it remains in place.
3. Use the included USB cable to connect the microphone’s Mini-B USB port to a powered
USB port on your computer.
Note: When the microphone is receiving power, the LED on the front of the microphone will
glow a constant blue.

8
SETTING THE AUDIO PREFERENCES IN YOUR COMPUTER
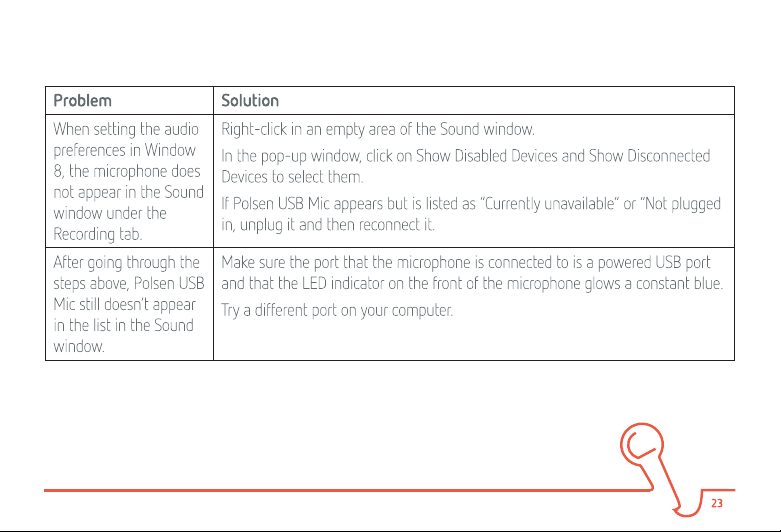
Windows 7/8
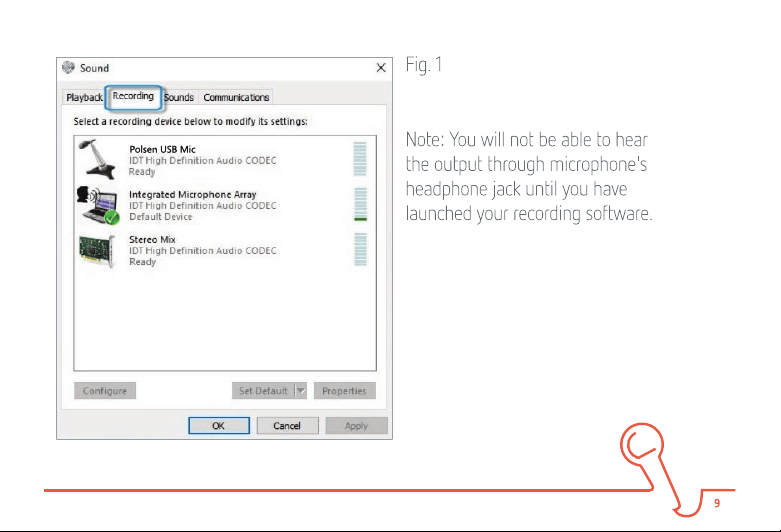
1. Go to the Control Panel and open the Sound window.
2. Click on the Recording tab (Fig. 1) and select Polsen USB Mic. If the Polsen USB Mic
icon appears with a small circle with a downward pointing arrow, right-click on the device
and select Enable from the drop-down menu.
Note: If the RC-77-U microphone does not appear in the Recording window, see the
Troubleshooting
section below.
3. Click on the Set Default button and then click on OK to make the RC-77-U as your default
microphone. The microphone should appear with a green check mark next to it.
4. Test the microphone by speaking into it. If the meter next to the microphone registers
your voice with green bars, your microphone is active, and the audio signal is reaching the
computer.

12
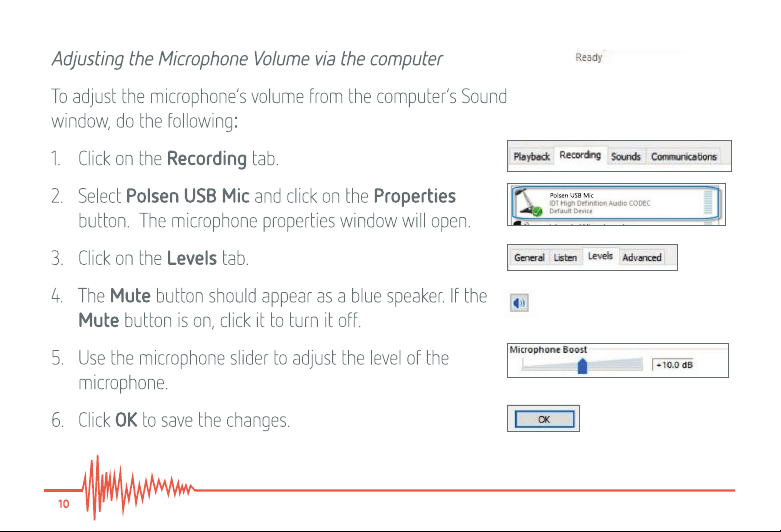
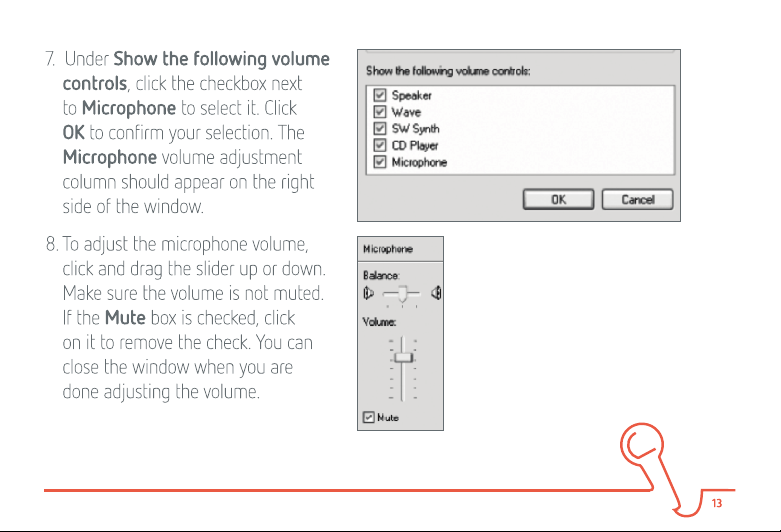
Adjusting the Microphone Volume via the computer
To adjust the microphone’s volume from the computer’s Sounds and Audio Devices
Properties window, do the following:
1. Go to the Control Panel and then double-click on the Sounds and Audio Devices icon.
2. Click on the Volume tab. Under Device volume, click on the Advanced… button to
display the Speaker window.
3. If the Microphone volume adjustment column appears on the right side of the window,
skip to step 7.
4. If the Microphone volume adjustment column does not appear on the right side of the
window, click Options in the menu bar, and then select Properties.
5. In the Mixer device drop-down menu, make sure Polsen USB Mic is selected. Under
Adjust volume for, make sure the recording button is selected.

14
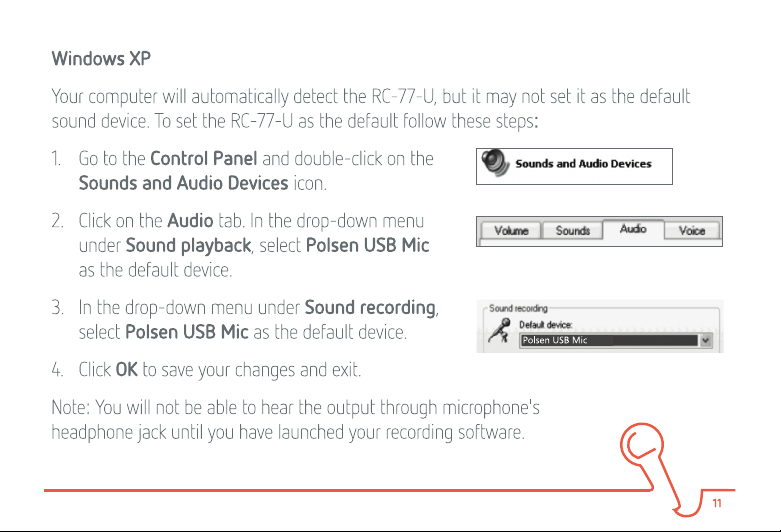
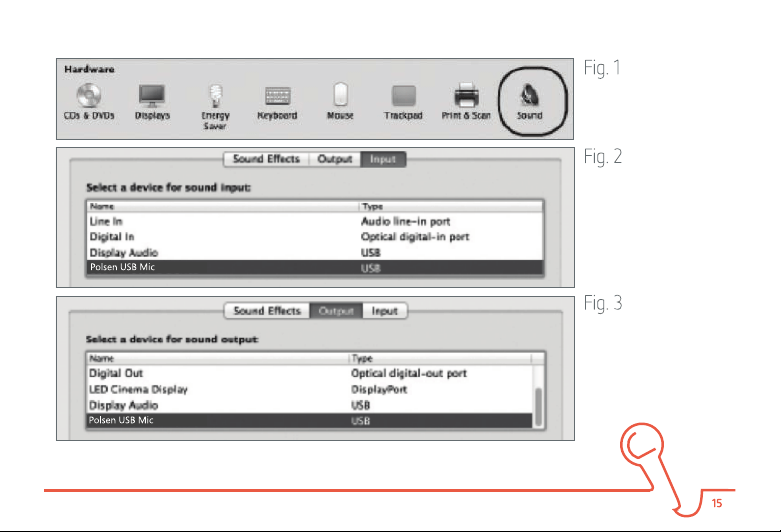
Mac OS X
Your computer will automatically detect the RC-77-U, but it may not set it as the default
sound device. To set the RC-77-U as the default, follow these steps:
1. Go to System Preferences and select Sound. (Fig. 1)
2. Click on the Input tab and then click on Polsen USB Mic to select it as the default sound
input device. (Fig. 2)
3. Click on the Output tab and then click on Polsen USB Mic to select it as the default
sound output device. (Fig. 3)
From the Sound window, you can adjust the computer’s input and output volumes, adjust the
stereo balance, and elect to show the volume in the menu bar.
Note: You will not be able to hear the output through microphone's headphone jack until you
have launched your recording software.

16
POSITIONING THE MICROPHONE
The RC-77-U employs a cardioid pickup pattern design to capture sound mostly in front of the
microphone.
You will usually want to position microphone so the button on the front is pointed directly
at the sound source. However, it’s important to experiment with microphone placement and
positioning to nd the best solution for your specic recording.

17
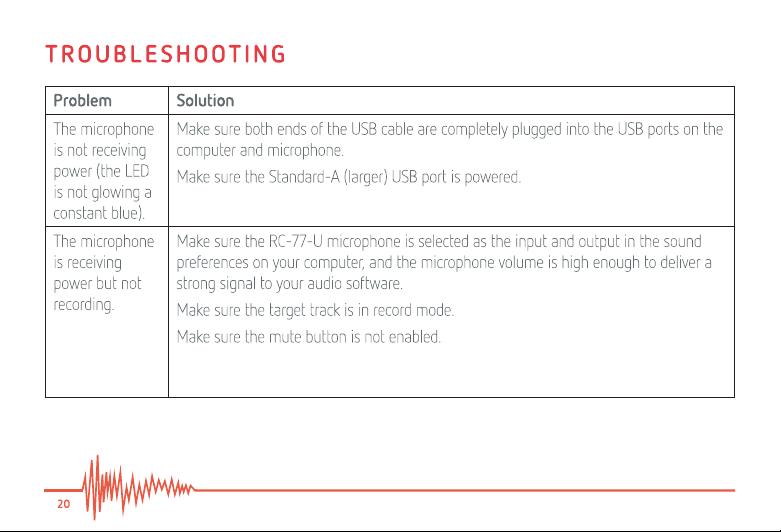
RECORDING WITH THE RC-77-U
1. Launch your recording software and select the RC-77-U for the input and output.
2. Create a new mono track and enable record mode.
3. Turn the headphone volume control down on the microphone.
4. If the mic input level needs to be adjusted, access the Microphone Volume slider window
(Windows 7/8, page 10; Windows XP, page 12) or in the Input tab of Sound Preferences
(Mac, page 14).
5. Talk, sing, or play into the microphone while turning the microphones headphone volume
control up to a comfortable listening level.

18
Note: The LED indicator glows red to indicate clipping. If you see the LED indicator turn red, do
one or both of the following:
• Move the microphone further away from the sound source.
• Turn down the microphone input level by following the procedures in step 4 on page 17.
For best results, it’s recommended to always do a test recording.
To mute the microphone, press the mute button. The LED will glow a constant amber.
Note: The mute button mutes both the microphone and the headphones. You will not be able
to listen to playback when the mute button is engaged.
Tip: To avoid an accidental burst of high volume, make sure to turn the headphone volume
down before plugging in your headphones.
RECORDING WITH THE RC-77-U (continued)

19
SPECIFICATIONS
POLAR PATTERN Cardioid
CAPSULE 32 mm large-diaphragm condenser
FREQUENCY RESPONSE 20 Hz to 20 kHz
MAX SPL 120 dB
SAMPLE RATE 44.1/48 kHz
BIT DEPTH 16 bit
POWER REQUIREMENTS 5 V 70 mA (idle),
100 mA (peak)
CONTROLS Headphone volume, mic mute
switch
OUTPUT 1/8″ (3.5 mm) TRS
HEADPHONE IMPEDANCE 16 Ω
HEADPHONE OUTPUT 85 mW @ 16 Ω
THD 0.001% unloaded, 0.004% @ 32 Ω
HEADPHONE FREQUENCY RESPONSE 20 Hz
to 20 kHz
SNR 96 dB (A)
HEIGHT RANGE 9.5″–11.3″ (24.1–28.7 cm)
WEIGHT 1.2 lb. (544 g)