Loading ...
Loading ...
Loading ...
8. Turnthe outerdoorassemblya half turn (180°)
and replacethe outer door assemblyover the
lower door assembly.Replacethe nylon slide
underthehandle(thinsidefacinginward)onthe
samesideof the ballscrew.Replacethe 2 screws
underthe door andthe 3 screwson top of the
door.
9. Turn the door so the external panel faces the work
table. Interchange the position of the latch pin
with the latch pin cap on the opposite end of the
door.
10.
NOTE: The latch pin is to one side of its mounting
holes and its position on the door is very
important. Improper mounting may damage the
porcelain finish on the oven frame when closing
the door. The latch pin must be on the right side
of the mounting screws on a left-hand door, and
on the left side of the mounting screws on a right-
hand door.
Remove the lower hinge on the left side of the
oven frame. Save for reassembly later.
Latch _, Latch
Pin _ I Pin
Iz
L.H. Ri. _ R.H.
DOOR DOOR
Figure 9
11. Relocate the 3 right side upper dummy hinge
screws toward the lower left side of the oven
frame.
12. Replace the threaded pin (removed in step 2) onto
the hinge that was removed in step 10, and
replace the hinge assembly at the upper right end
of the oven frame.
13. Remove the adjustable door support at the lower
right side of the oven frame and move to the left
side of the frame (with 1 retainer screw).
14. Remove the upper left side hinge from the oven
frame, then remove the threaded pin from the
hinge. Save the threaded pin for reassembly later.
15. Relocate the 3 dummy hinge screws from the
lower right side of the oven frame toward the
upper left side of the oven frame.
16. Replace the hinge removed in step 14 toward the
lower right side of the oven frame.
17. Put the washer (removed in step 3) on the hinge's
counterbore made for this purpose.
18. Move the oven light switch to the left side of the
over frame:
a) Grab the switch plunger and gently pull out from its
location. Usethe small, flat-head screw driver.
b) Unplug the switch from the terminal connector and
push the door switch terminal and wire assembly
inside the oven frame.
c) Remove the switch plug on the left side of the oven
frame. Use the flat-blade screw driver if necessary.
Replacethe switch plug on the right side of the oven
frame.
d) Use long nose pliers to grab and pull out the door
switch terminal connector and wire assembly from
the hole on the left side of the frame.
e) Connect the door switch to the terminal connector.
f) Push the oven light switch into the new hole in the
over frame.
19. Replace the door. First engage the sleeve in the
upper end of the door over the upper hinge pin.
Lift the door and slide over the lower hinge.
(Ensure the washer stays in place.)
20. Gently close the door while ensuring it will stay in
place on the lower hinge. Replace the lower hinge
threaded pin saved in step 14 into the lower hinge.
21. Replace the lower moulding.
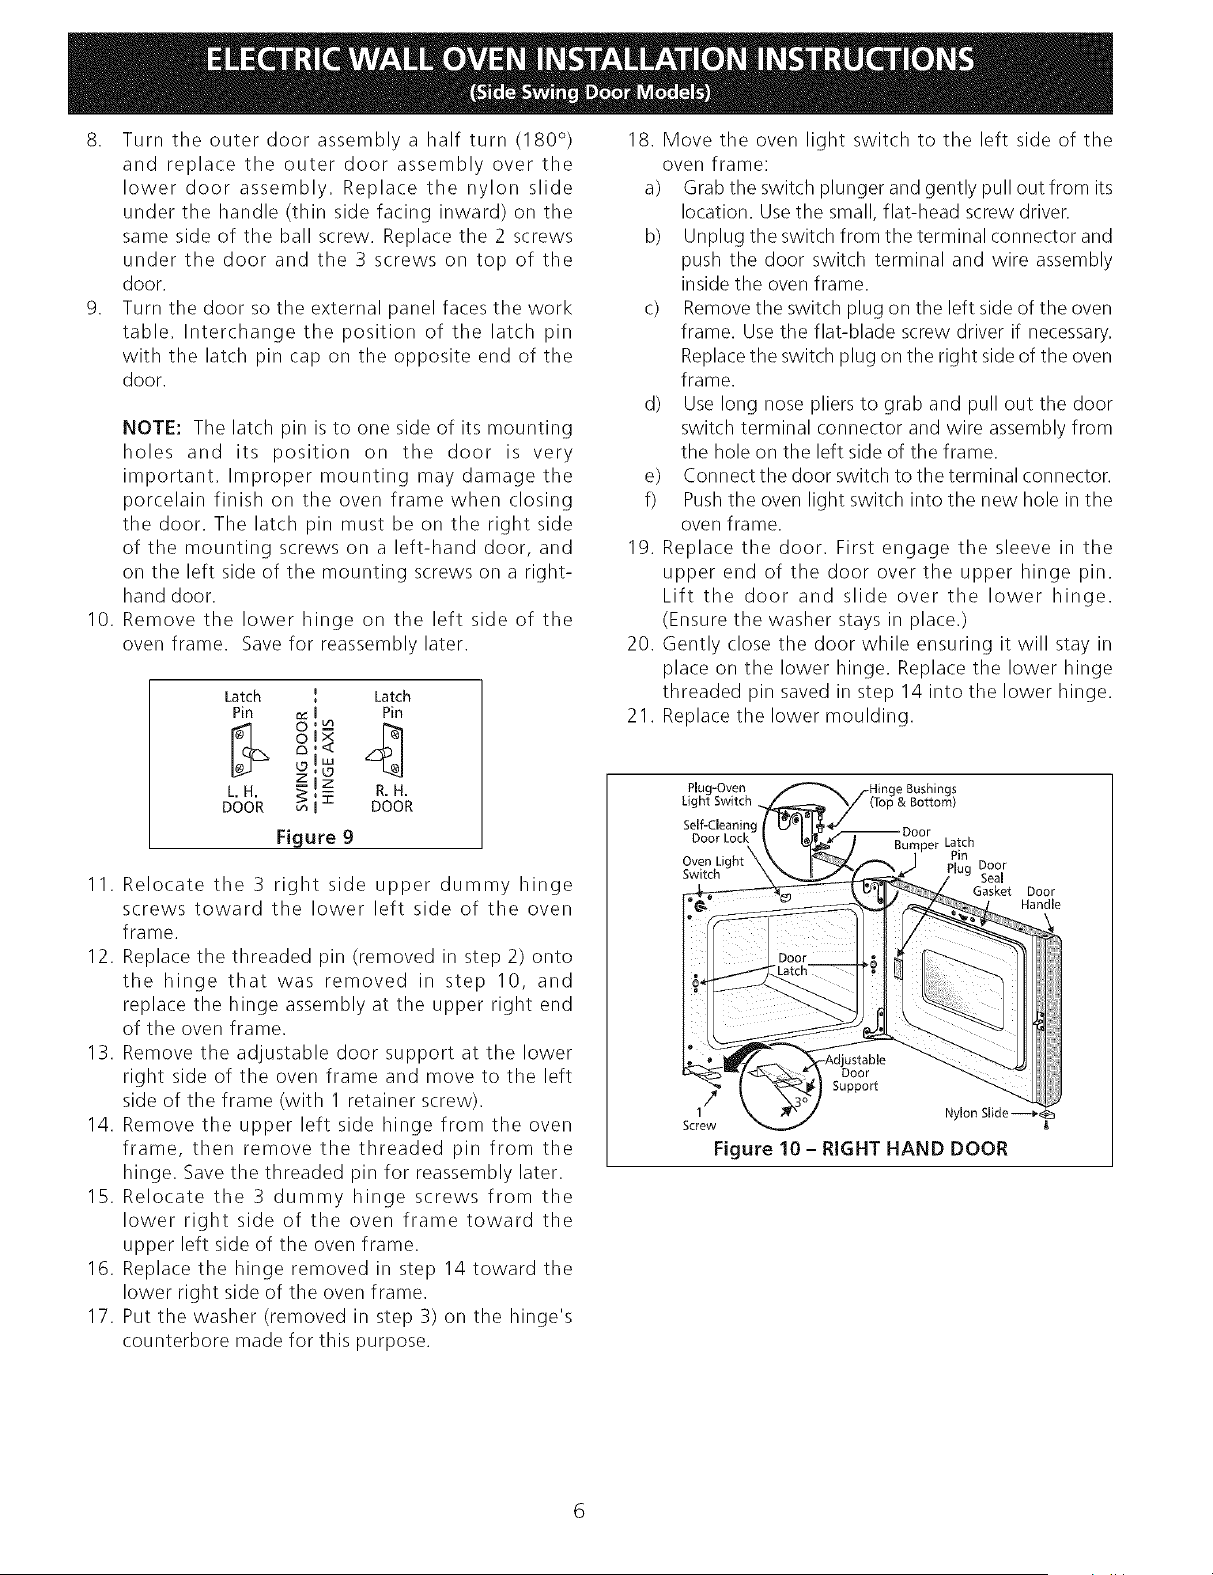
Plug-Oven
Light Switch
Self-Cleanin_
Oven Lk
Switch
Latch
Door
Seal
Gasket Door
Handle
Door
Support
/
1 Nylon
Screw
Figure 10 - RIGHT HAND DOOR
Loading ...
Loading ...
Loading ...