Loading ...
Loading ...
Loading ...
19ninjakitchen.co.uk
18 ninjakitchen.co.uk
USING THE SLICING/GRATING DISC
IMPORTANT: Use only the LOW setting
when using the Slicing/Grating Disc.
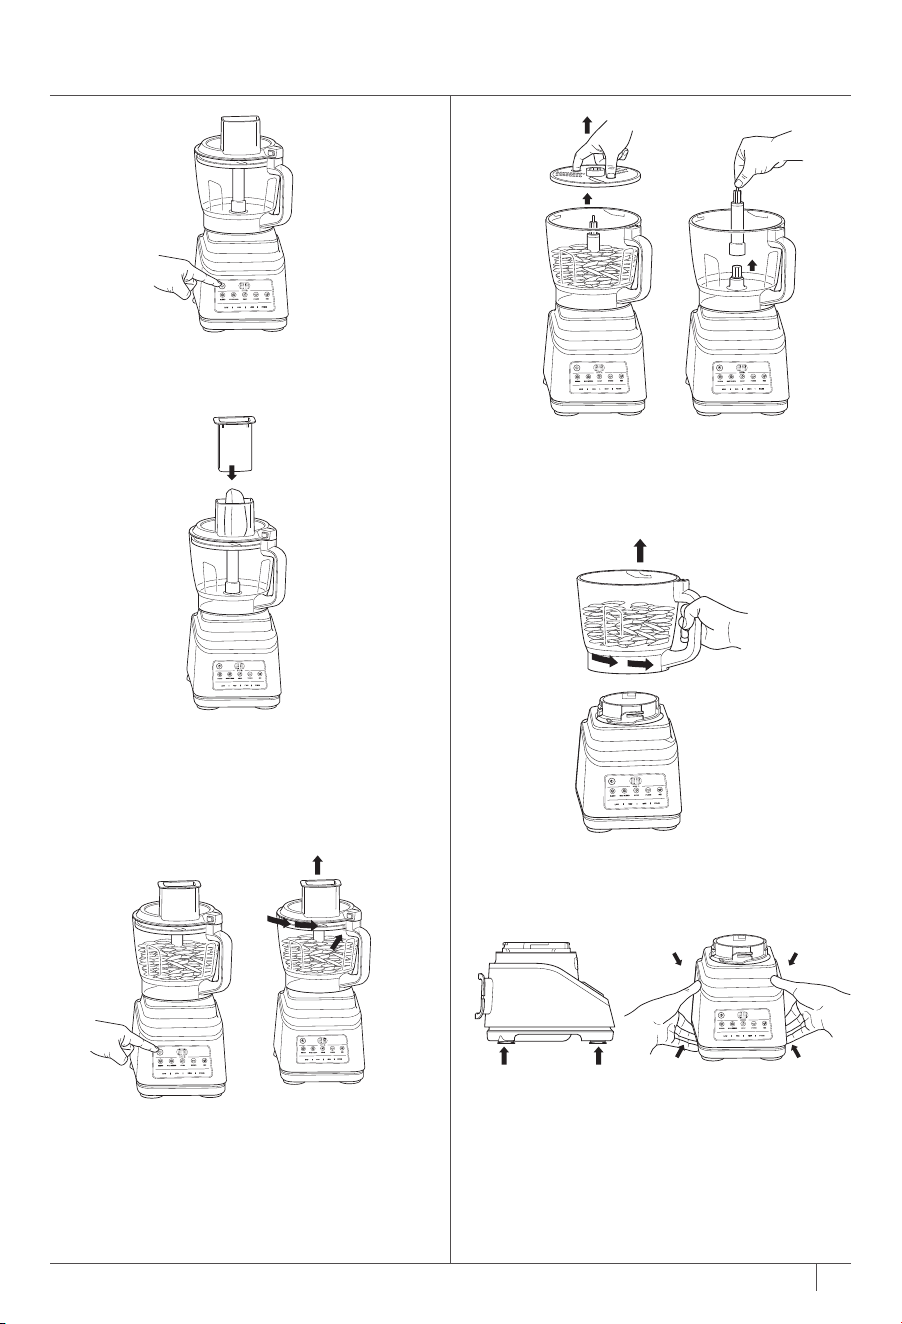
4 Use the finger holes to grasp the disc and
place it over the adapter with the side
you would like to use facing up.
3 Place the disc adapter onto the drive
gear inside the bowl.
5 Place the feed chute lid on the bowl and
turn clockwise until you hear a click,
indicating the lid is locked in place.
NOTE: The feed chute lid features
a pusher to guide food through the
chute.
NOTE: The Slicing/Grating Disc
is reversible. Use the side labeled
“Slicer” for slicing. Carefully flip
the disc over to the side labeled
“Shredder” for Grating.
1 Place motor base and place on a clean,
dry, level surface such as a work surface
or table.
2 Lower the Food Processor Bowl onto
the motor base and rotate clockwise
until it clicks into place.
IMPORTANT: Review all warnings on
pages 4–7 before proceeding.
6 Plug in the unit, then press the Power
button to turn it on. Select LOW.
The disc will begin spinning.
7 Add the ingredients you want to slice
or shred through the feed chute on the
lid. Use the food pusher to help guide
the ingredients through the feed chute.
The middle piece of the food pusher is
removable to use for smaller ingredients.
8 When finished, stop the unit by touching
the Power button and wait for the disc
to stop spinning. Press the button on the
feed chute lid near the handle to unlock,
then turn the lid anti-clockwise. Lift the lid
from the bowl.
9 Using the finger holes, carefully lift the
disc out of the bowl.
10 Grasp the adapter by the top of the
shaft and lift it out of the bowl.
12 Press the Power button to turn the unit
o, then unplug the unit. Refer to the
Care & Maintenance section for cleaning
and storage instructions.
11 To remove the bowl from the motor
base, turn the bowl anti-clockwise and
then lift it.
IMPORTANT: If the control panel is
flashing, this means the lid is not locked
in place correctly. Review the steps 2-5 to
ensure you are installing the disc adapter,
ingredients, disc and lid correctly.
Loading ...
Loading ...
Loading ...