Loading ...
Loading ...
Loading ...
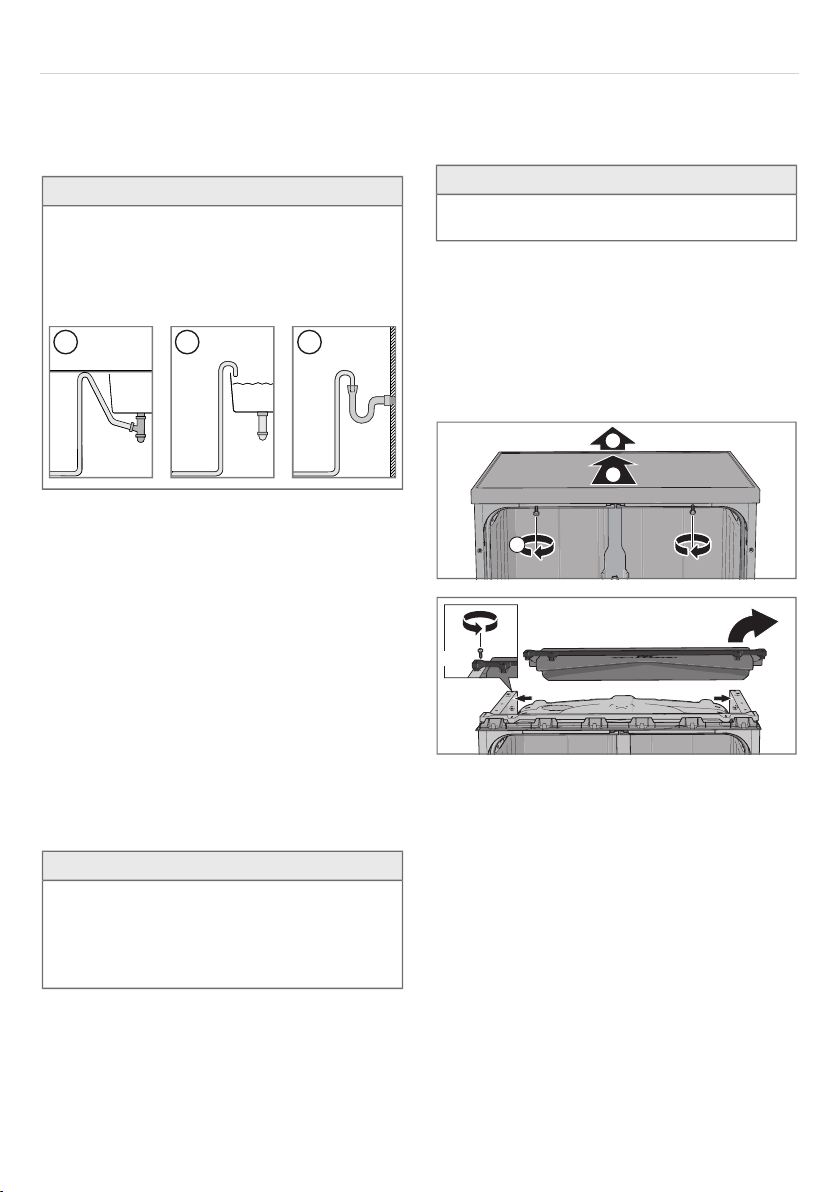
The hose must always discharge at least 350 mm above
the bottom of the machine.
Ensure that the drainage hose has no kinks.
NOTE!
When the drainage hose is routed to a connection nipple
on the sink unit’s water trap (see Illustration 1), please
note that the hose must be attached at the same height
as the underside of the sink unit. Otherwise dishwater
from the sink may flow back into the dishwasher. For
other connection alternatives, see Illustrations 2 and 3.
1 2 3
Connection to water supply
Use only the supply hose provided with the dishwasher. Do
not re-use old hoses or other spare supply hoses.
The supply pipe must be fitted with a stopcock. The stopcock
must be easily accessible, so that the water can be shut off
if the dishwasher has to be moved.
Once the installation is complete, the stopcock should be
opened to allow the pressure to settle for a while and to
check that all connections are tight.
Connect to cold water...
If you use oil or electricity to heat your home.
Connect to hot water (max. 70 °C)...
If you use district heating, solar power or geothermal power
to heat your home. Choosing a hot water connection cuts
program times and reduces the dishwasher's electricity
consumption.
NOTE!
Connecting a dishwasher to the water supply via certain
types of pressure limiting valves may restrict the water
supply!
This may cause F12 error code/ Water inlet fault to be
displayed.
Electrical connection
Information about the electrical connection can be found on
the compliance plate. This specification must match the
electricity supply.
The dishwasher must be connected to an earthed wall
socket.
The electric wall socket must be placed outside of the instal-
lation area to be easily accessible after installing the dish-
washer. Do not use an extension cord!
NOTE!
Repairs and maintenance must be carried out by a quali-
fied professional.
Remove dishwasher worktop
The dishwasher can be installed in a recess without its
worktop. If the dishwasher's worktop is removed, the dish-
washer must be installed so that it is enclosed on both sides
and is under a separate worktop. If the dishwasher is in-
stalled so that one of its sides is visible, a brace must be
fitted to the rear edge of the dishwasher. Accessories can
be purchased where you purchased your dishwasher.
1
2
3
2x
For recess installation, see the section Placing the dishwash-
er.
17
Loading ...
Loading ...
Loading ...