£_ectric Shock Hazard
Read and foJJow the iMPORTANT SAFETYiNSTRUCTiONS
outJined in this User Guide before operating this appliance,
pages 11 - 13.
Failure to do so can result in death, e[ectdc shock, fire or injury
to personso
PleaseNote: lo obtain maximum efficiency, your/¢osrrl(;rl" washer hasthe ability to learn and
adapt to the local environment. This may take several wash cycles, therei%re maximum enercty
efficier_cy may not be achieved until a number of wash cycles have beers completed This
usually takes about 5 cycles
Engmi_h7!i- _! p_'_:_ 3_:4 :!i!{
Franqais Page 40 - 67
As an ENERGYSTAR_*Partner Fisher & Payke[ Limited has determined
that this product meets ENERGYSTAR_*guidelines for energy efficiency.
Installation _nstructions
Important Safety _nstructions
How to get Started
About your Fcosmay£ _'_
How Idosm_;rtTM Works
I kt Lock
Wash Cycles and Options
The Wash Progress Lights
The Wash Cycles,Wash Options
Softener Rinse,Soak,Time Saver
Water i evels
Spin Hold, Delay Start, Clothes Care Safeguards
Customizing the Wash (}yde, Favorite Cycle
Washing Bulky Items, VV_;shingWoollens, Cold VV_;terWashing
Befo re You Wa sh
Sortin(t and l oadinc
Bleach
Fabric Softener
Scrud
Changing 9re=Set Options
Option Adjustment Mode
Out of Balance Recovery Routine
Auto VV{}terFill level
End of Cycle Beeps
De;auk RinseOptions
Volume of Water used in the Shower Rinse
Controlled Cold
Cadng for Your Fcosm_srt _'_
Care and Cleaning
Products that Might Damage Your Fcosmt;rtTM
Fd:osmtS_*'Sounds and Beeps
Automatic tint System
If Your F_osm_sr£_''_Beeps for Help
Service
Operating Problems
Wash Problems
Limited Warranty
5
]
4
24
25
25
25
2d
28
28
29
29
29
29
_0
_2
_3
_4
_5
%
7
8
9
2o
21
22
23
CongratulationsonpurchasinganewFisher&PaykelwashingmachineWeareveryproudof
ourwashersandtrusttheywillserveyouwellformanyyears
AtFisher&Paykelweaimtoprovkteinnovativeproductsthataresimpletouse,ergonomicand
energyefficientThousandsoftonnesofwashingand70}/earsoflaundryexperiencehavebeers
procyammedintoyourwashin<]machinetohelpdtiveyouthebestpossibleperformance
Wehopeyouenjoyyournewwashingmachine,wehavecertainlyenjoyeddesigningit
J
J
J
J
i
It is important that the User Guide should be retained with the appliance for future
reference_ Should the appliance be sold or transferred to another owner', always ensure
that the User Guide is left with the appliance in order that the new owner can familiarize
themselves with the appliance and the relevant warnings,
+"° _ C q..... i
nsta at n tr, ct o
Before you begin - read these instructions completely and carefu[[yo
Electric Shock Hazard
Read and follow the IMPORTANT SAFETY INSTRUCTIONS
outlined in this User Guide before operating this app[iance_
pages 11 - 13.
Failure to do so can result in death, electric shock, fire or injury
to persons°
Observe all governing codes and ordinances,
Installation Requirements
Location
Your washer must be installed ors firm floorinc_ to minimize vibration during] spin cycles Concrete
flooring is best, but wood base is sufficient provkting the floor support meets FHAstandards
Your washer shoukt not be installed on rugs or exposed to the weather
Your cokt water should not exceed %°F (35°C) or your hot water exceed 150°F (dS°C)
femperatures above this may dama<]eyour washer
Shut Off Valves
Both hot and cold shut off valves (faucets) should be available in the laundry area
©_ain
Water may be drained into a standpipe or set tub The standpipe must be ]/i'(38mm) minimum
interior diameter and must be open to the atmosphere
Electrical
This appliance must be supplied with ]IOV ]2(7%60Hz electrical supply and connected to an
indivktual, properly firounded branch circuit, protected by a 15 or 20 amp circuit breaker or time
delay fuse
I
i
i
I
i
÷
i
i
i
iI ii
//
/ /
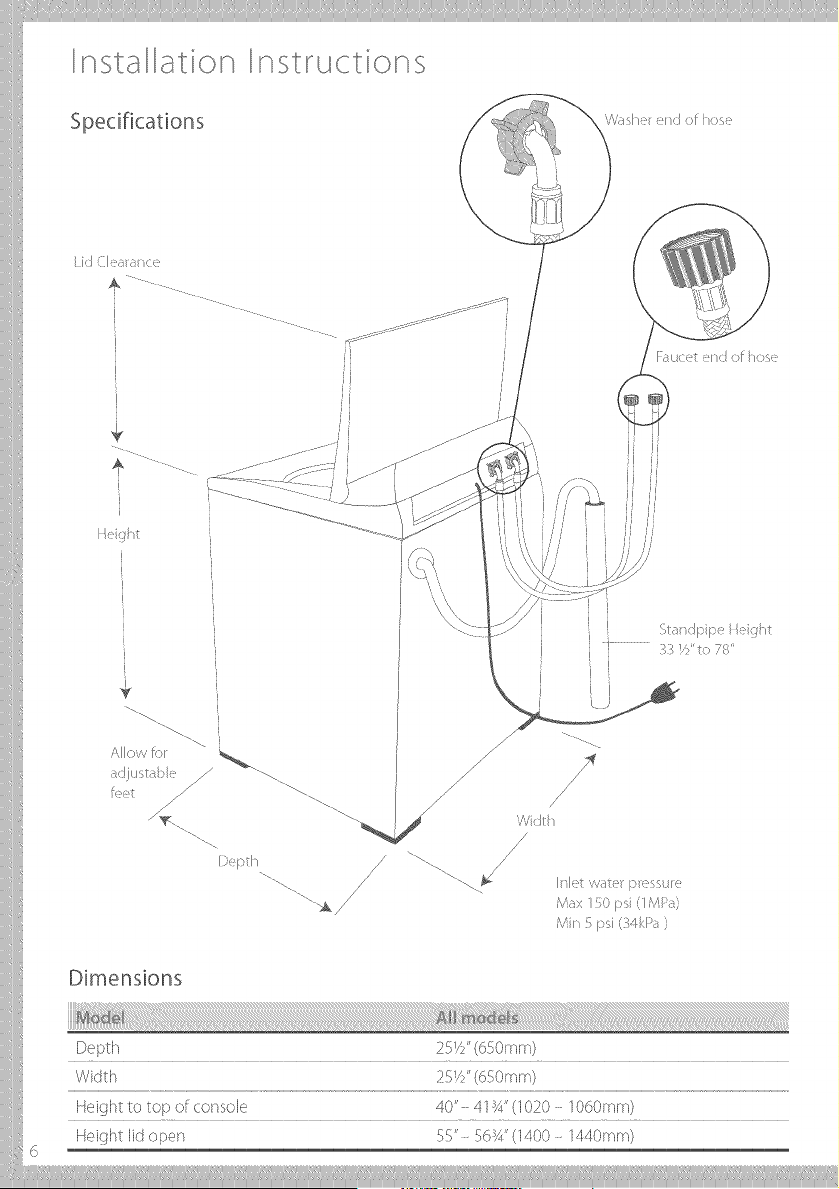
Dimensions
Depth 25 _S'(650mm)
Width 29 !,S'(650rY_rn)
Height to top of console 40' 4164'(1020 1060IT]IT/)
Height lid open 5<:' 96!q'(1400 1440rY_m)
6
1
2
nsta ato nstr, ct o
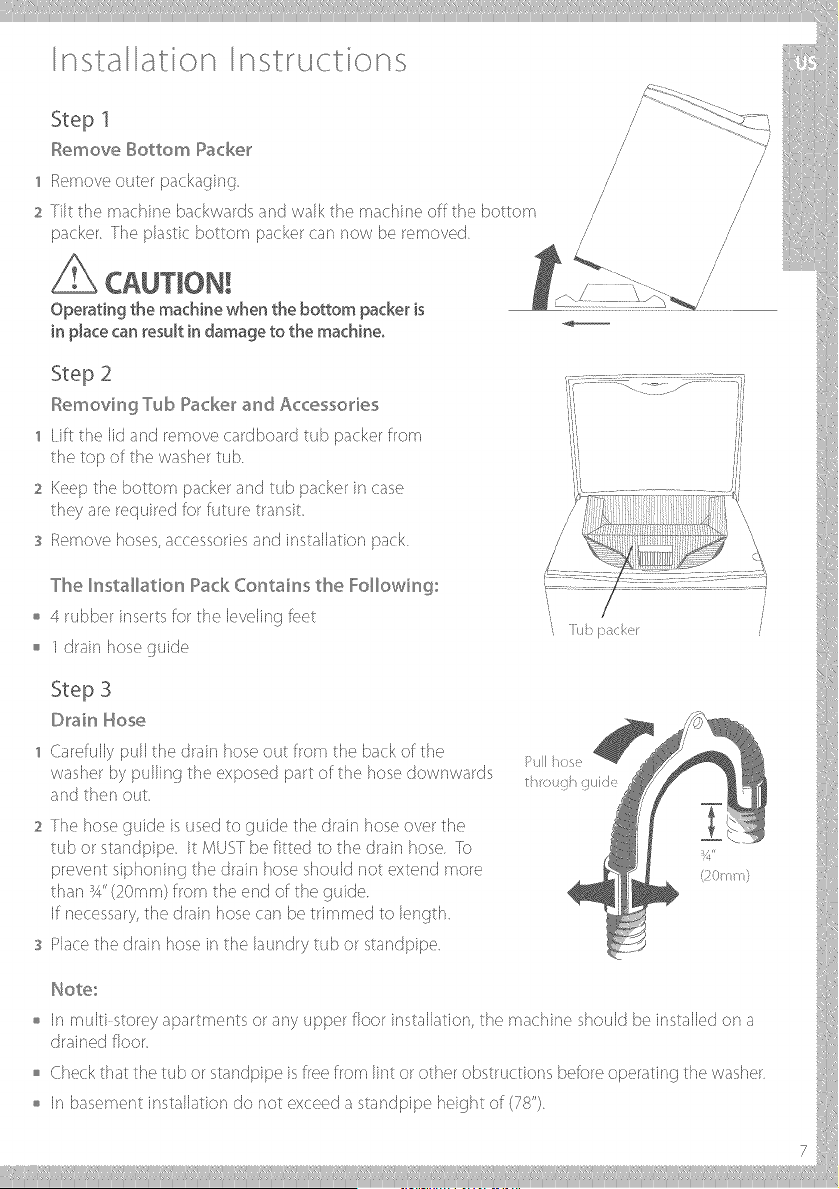
Step 1
Remove Bottom Packer
Remove outer packagin9
Tilt the machine backwards and walk the machine off the bottom
packer The plastic bottom packer can now be removed
Operating the machine when the bottom packer is
in place can result in damage to the machine,
/ /
/ //
, /
/
/
/
_.... //
/
iiiiiiiiiiiiiilll
Step 2
Removing Tub Packer and AccessoFies
1 [ii;/the lid and remove cardboard tub packer from
the top of the washer tub
2 Keep the bottom packer and tub packer in case
they are required for future transit
s Remove hoses,accessories and installation pack

nsta ato ,, ct o
Step 4
In_et Hoses
1 Install hoses with the straight end (with filters)
fitted to the faucets
2 hstall elbow ends onto washing machine (inlet
valves are marked on the back of the machine
H=hot, C- cold) Ensurethe hot is connected to the
hot, and the cold is connected to the cold
Hote:
If there is a cold water supply only, an inlet valve
cap (available from Fisher & Paykel)MU%Tbe
connected to the hot valve The cap prevents
water leaking from the hot valve However, we
recommend this product is connected to both hot
and cokt water
Step .5
Leveling the Washe_
'1 Unscrew the i%et so the machine is NOT sitting on
the corner cabinets, then fit the rubber leveling
inserts (reef to diagram 1)
2 Move the washer into its final position We suggest
a minimum clearance of 1"(2r_mm)on each side lot
easeof i/]stallation (%eediagram 2)
s Turn ors water and check hose connections for
leaks Check that there are no kinks in the hoses
4 It is IMPORV\N] to level the washer to ensure
proper performance during spin
Adjust the f{,et by imscrewingiscrewing to make
sure the washer is level and cannot rock
s Use the walls and adjacent counter tops asa sight
guide to check to see if washer appears level
Readjust the feet if necessary
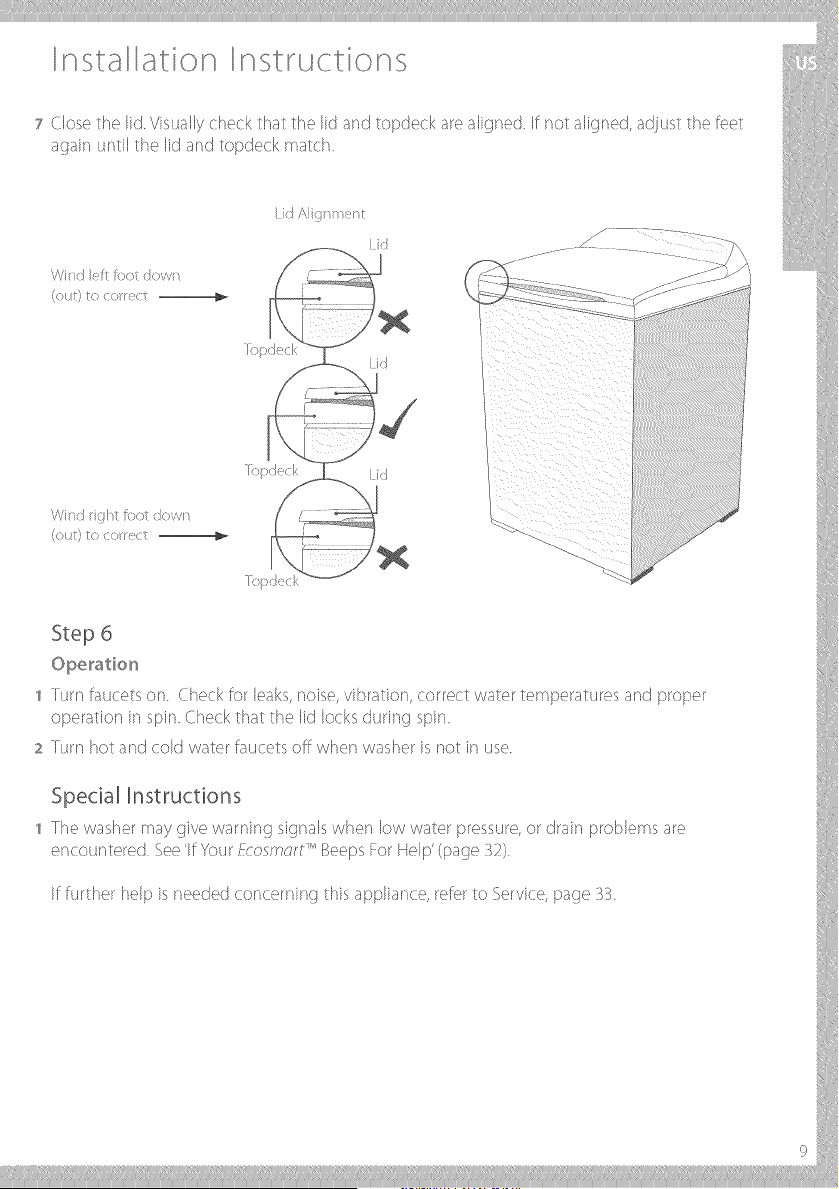
6 Open the Ikt and check the washer tub to see that
it sits slightly lorward of centre (%eediagram _)
2
"( of
o S!
ii ii
Fh f7 h
:::j::::::: I',/t i
d:::j:::i:
/' (}'_) ' (}"_)
iII iii I T
D a_.:_¢_t 2
D ag"aK 3
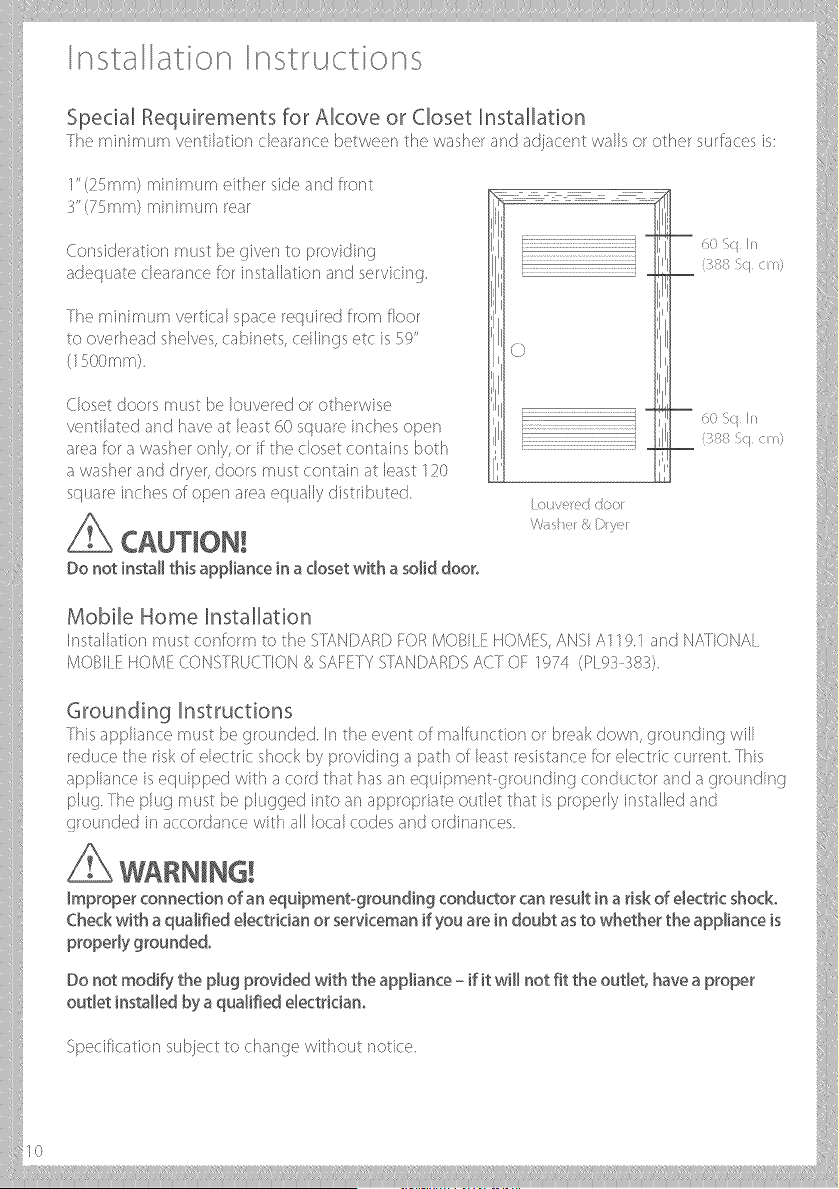
Special Requirements for Alcove or Closet Installation
The minimum ventilatior_ clearance between the washer and adjacer¢ walls or other surfaces is
1"(25ram) minimum either skte and front
_"(75mm} minimum rear
Consideration must be giver] to providing
adequate clearance for installatior_ and servking.
The minimum vertical space required from floor
to overhead shelves, cabinets, ceilings etc is 59"
(]500mm}
Closet doors must be Iouvered or otherwise
ventilated and have at least (tOsquare inches open
area for a washer only, or if the closet contair_s both
a washer and dryer, doors must contain at least ] 20
squaro inchos of open aroa _,qually distributed
! iafety nstr, ct ons
Read all Safety Information Before Using
Many washers are located near a gas dryer or a water heater in the home,
Fire Hazard
For your safety the information in this manual must be
followed to minimize the risk of fire or explosion or to prevent
property damage, personal injury or loss of life,
Do not store or use gasoline or other flammable vapors and
liquids in the vicinity of this or any other appliance,
Installation and service must be performed by a qualified
installer, service agency or the gas supp[iero
What to do if You Smell Gas
o DO NOT try to Iktht any appliance
o DO NOT touch an electrical switch; do not use any phor_e its your buikJirsc_.
o Clear the room, k>uildir_c_or area of all occuparcs
o Immediately call your 0as supplier from your nekthbor's phone
Follow the dtassuppliers instructior_s
ff you cannot reach your gas supplier, call the fire ctepartment
Water Heater Safety
Under certain condiSons Hydro(ten {tas may be produced in a water heater that has not beers
used lot two weeks or more
HYDROGEN GAS CAN BE EXPLOSIVE UNDER THESE C_RCUMSTANCESo
If the hot water has not been used for two weeks or more, prevent the possibility of damage or
injury by tl4ming on all hot water faucets and allowing them to n4nfor several minutes beh)re
using any electrical appliance which is connected to the hot water system. This will allow any
hydrogen gas to escape _}irscethe gas is flammable, do not smoke or use an open flame or
appliance durin<] this process
I I
£_ectric Shock Nazard
Follow the safety p_ecautions outlined in this User Guide°
Failure to do so can result in death, ÷[÷ctdc shock, fire or injury
to pe_sonso
12
Safety Precautions:
o Readall instructions before usinc_the appliance
o Usethis appbnce only for its intended purpose as described in this User Gukte
o This washer must be properly installed and located in accordance with the Instalbdon
Instructions before it is used
o Properly ground to conform with all governing codes and ordinances
Follow details in the Insta%tion Instructions
o Do not install or store washer where it will be exposed to temperatures below freezing or
exposed to the weather
o Connect to a properly rated, protected and sized power supply circuit to avokt electrical
overload
o Connect to adequate plumbing and drain facilities as described in the Instalbtior_ Instructions
o Turn off water faucets when the washer is not in use to relieve pressure on hoses and valves and
to minimize leakages if a hose or valve shoukS break or rupture
o Do not repair or replace any part of the appliance or attempt any servicing unless specifically
recommended in this User OukSeor in published user repair instructions that you understand,
and have skills to carry out
o When disconnectin(t the appliance pull by the pluo rather than the cord or junction of cord to
avoid damacte to the cord or junction of the cord and plug.
o Make sure that the cord is located so that it will not be stepped on, tripped over or otherwise
subject to damage or stress
o Keep all laundry aids (such as detergents, bleach, fabric softener, etc) out of the reach of
children, preferably in a locked cabinet Observe all warnings on container labels to avoid
personal injury
o Do not tamper with the controls
o Keep the area arol4r_d/14r_derneathyour appliance free from the accumulatior_ of combustible
materials, such as lint, paper, rags,chemicals, etc
o Keep the floor around your appliance clean and dry to reduce the possibility of slipping.
o Never reach into the washer if the tub or agitator is moving
mportant : afety nstr, ct on]
o Before loading, unloading or adding clothes, press START/PAUSEand wait until the machine has
completely stopped before openin9 the lid
Close sl@ervision is necessary if this appliance is used by or near chiktrer_ Do not allow chiktren
to play inskte, or on, or with this appliance or any discarded appliance
Dispose of discarded appliances and shippin(_/packin(_ materials properly Before ctiscardin<]a
washer, or removin(_ from service, remove the washer Ikt
o Do not leave the washer Ikt up durir_(-_the cycle The machine will not functior_ fb start, close Ikt
and press START/PAUSE
o Do not wash or dry articles that have beerscleaned in, washed in, soaked in, or spotted with
combustible or explosive substances (such as wax, oil, paint, (_asoline,de(_reasers,dry cleaninf_
solver ts, kerosene, etc.) which may i_nite or explode Do not add these sl_bstancesto the wash
water Do not use these substances around your washer and/or dryer durir_c_operation, as they
{tive off vapors that could i(_nite or explode
The laundry process can reduce the flame retardancy of fabrics. ]o avoid such a result, the
garment manl4facturer's care instrl4ctions should be followed very carefully
o Do not mix chlorine bleach with ammonia or acid such as vinegar and/or rust remover Mixing
can produce a toxic gas which may cause death
o Never climb on or stand on the washer top or lid
Do not wash fibreglass articles in your washer. Skin irritation could result from the remaininc t
particles that may be picked up by clothing durir_g subsequent washer use
o fo minimize the possibility of electric shock, unplu(_ this appliance from the power supply or
disconnect the washer at the household distributior_ panel by removinf_ the fuse or switchin<]
off the circuit breaker beiore attempting an}i maintenance or cleaning.
Note: Pressing the POWERbuttor_ does NOT ctisconr_ect the appliance from the power supply,
ever] though the lights are out
Do not operate this appliance if it is damaged, malfw]ctiorg]g, partially disassembled or has
missing or broken parts, incll_dir_ga damaged cord or plug.
Do not operate this appliance if the Ikt has been incorrectly fitted
If you are using an extension cord or a portable electrical outlet device (eg mulitsocket outlet
box), ensure that it is positioned so that it does not come into contact with water or moisture
Do not wash a total textile load (dry weight) of more thai] 7 kilograms in this washer
SAMlieTIliqlieSlieIiiN STIRUCT Iii0 NS
] 3
(_ 4.. (_ 4 .... i I
t/ow To . et .: tarted
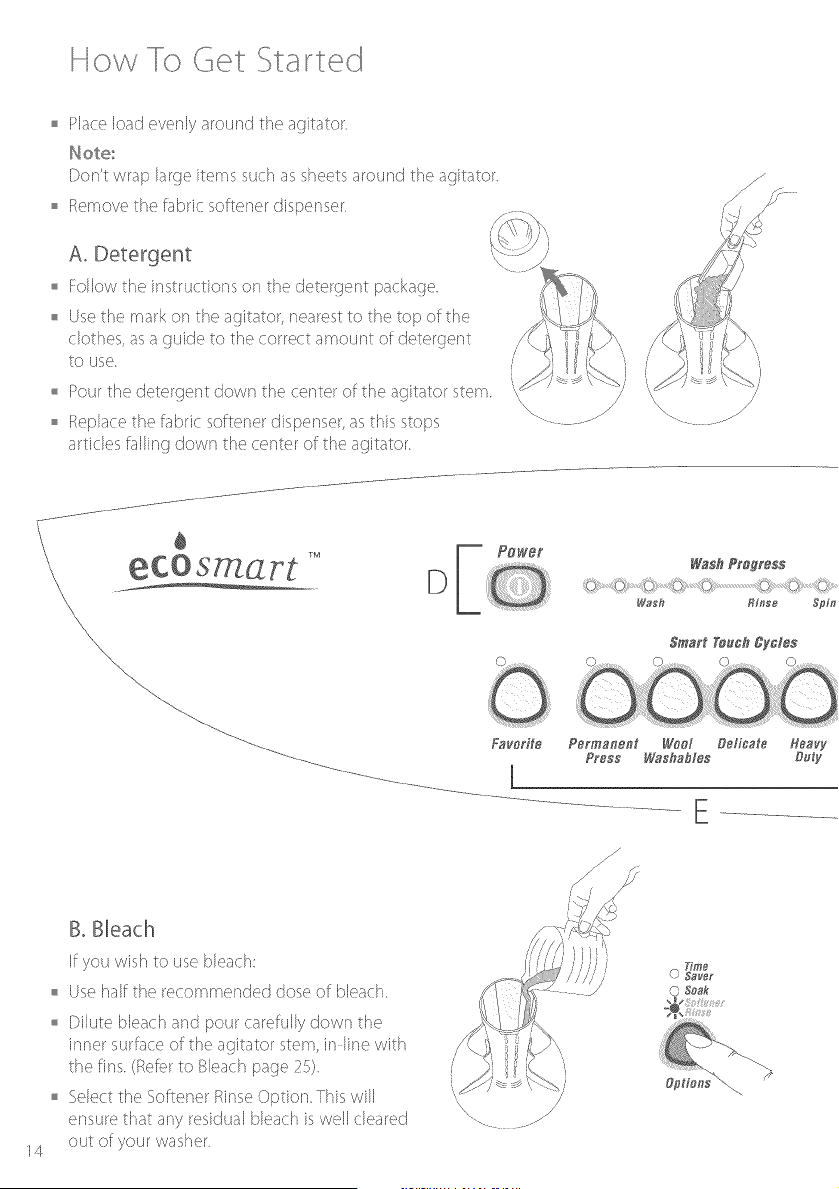
Place load evenly around the agitator
Note;
rPon't wrap large items such as sheets around the agitator
o Remove the fabric softener ctispenser
A° Detergent
Follow the instructior_s on the deterger¢ packaqe
o Use the mark on the aqitator, nearest to the top of the
clothes, asa quicte to the correct amount of deterqer_t
to Hse
Pour the detergent down the center of the agitator stem
o Replace the fabric softener ctispenser,as this stops
articles failing down the center of the agitator
\\\\
_eCOST aFt Dr
WasaPregress
o :o O; ..................................0 0 O:.......
W_sh f_i_s_ Spin
Smal't T_¢h @¢les
Psrm_nt Woo[ Delicate H_avy
Press Washabfes Duty
/
/
/i
E
14
B° Bleach
If you wish to use bleach:
Use hail the recommended dose of bleach
Dilute bleach and pour carefully down the
inner surface of the agitator stem in line with
the fins (Refi,r to Bleach page 2)
<}electthe %fiener RinseOption This wi[[
ensure that any residual bleach is well cleared
out of your washer
/
'\\\
_- Tim_
xh S_ak

C° Fabric Softener
If you wish to use fabric softener, place it it] the
dispenser on the top of the agitator
Select the f,oftener Rinse option so that the
softener will be dispensed correctly into the final
rinse (Referto fabric softener page 19 and 2r_)
D° Power
Tim] your ,:co. rs_crl on bv pressinq the POWERbutton
/
/
O Soak
Power
E°Wash Cycle
Close the lid and press your chosen wash cycle
F,Wash Options
Select the wash temperature and other wash options. (Referto papes 18 z )
Auto
0 fli_h 0 t@d O _hr
0 t_fed 0 $1o_;_ 0 3h_"
0 Low 0 I@lff 0 lhr
F/ash
Temp
l
F
Start/Pause
Delay
St;_rt
Wa,,r l ]
Level
G. Sta rt
PressSTART/PAUSEto start the machine
If you wish to stop your F_osmart _'
PressSTART/PAUSE
o VVaituntil the machine has fully stopped, and the lid lock lioht is off, before oper_inq the lid.
For best fabric and color care remove your clothes as soon as the cycle has finished
15
A bo Yo r Eco srna rt ''J'
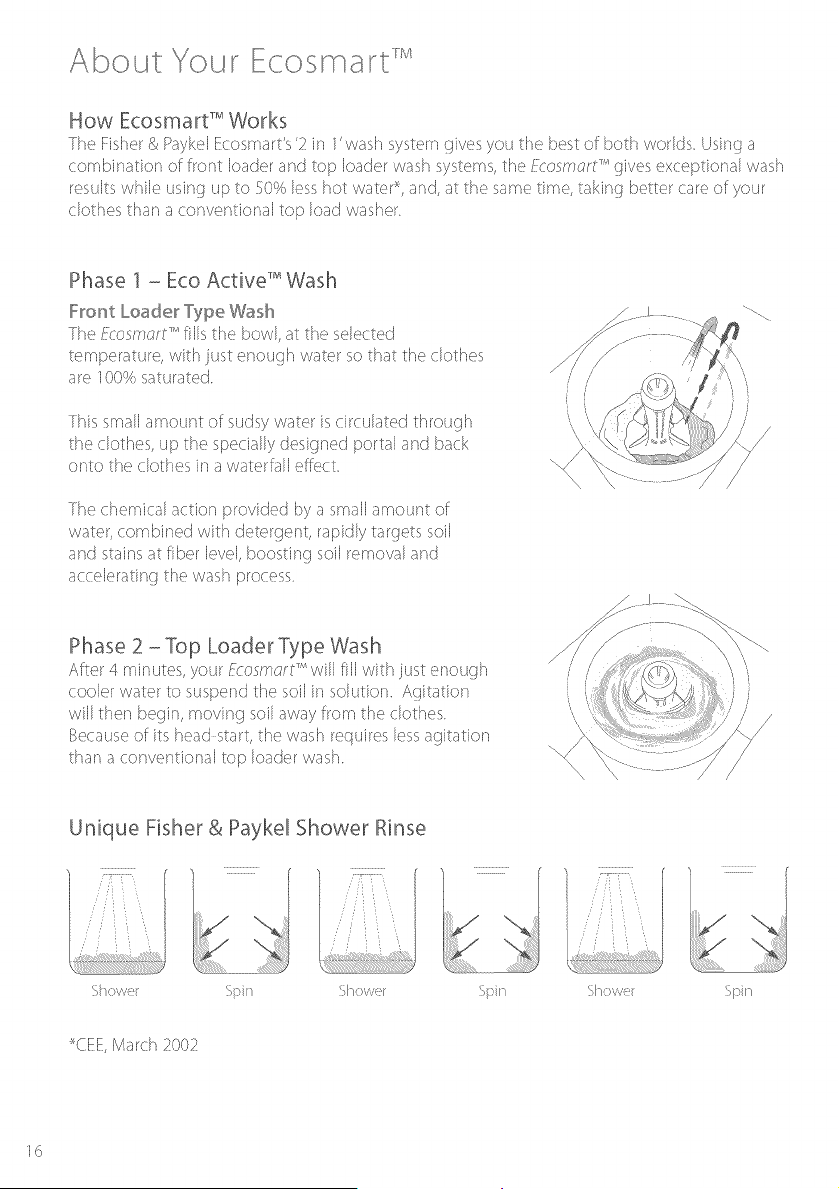
How Ecosma rt TM Works
The Fishor P_Paykol Ecosmart's'2 in 1'wash systom gives you the bost of both worlds Usinq a
combination of front loader and top Goaderwash systems, the/qosm_rF "_gives exceptional wash
results wNle usin9 up to 50% less hot wateP<,and, at the same time taking better care of your
clothes thai] a conventional top load washer
Phase 1 - Eco Active T_v_Wash
F_ont Loade_ Type Wash
The/qosmt;r/-T_'fills the bowl, at the selected
temperature, with just enough water so that the clothes
are 100% saturated
This small amount of sudsy water is circulated through
the clothes, up the specially designed portal and back
onto the clothes in a waterfall effect
The chemical action provided by a small amount of
water, combined with detergent, rapidly targets soil
and stains at fiber level, boosting soil removal and
accelerating the wash process
\
,/ /i
/
Phase 2 - %p Loader Type Wash
Afi('r 4 minutos, your P,osmt;rF" will fill with just enouqh
cooler water to suspend the soil in solution. Agitation
win then begin, moving soil away from the clothes
Becauseof its head start, the wash requires lessagitation
than a cor_ver_tionaltop loader wash
Unique Fisher & Paykel Shower Rinse
!;
<71(>%17 <})h <71(>%17r <7)h <71(>%17r <7)h
_CEE,March 2002
16

Abo Yo r Ecos m art n,,A
Lid Lock o gh,
?o_r ,-cesri_;rl has a lict lock.This ensures the lid cannot be o _t_
opened during the cycle, provkting added safety for you and o _
The lid lock light {above the start/pause button} comes on
Delay
when the Ikt is Io_ked to tall you when you cannot open the Ikt sfan
If the lid lock light is flashing the lid lock is in the process of locking or unlocking (ie while the
machine coasts down or start/pause has been pressed} During this stage the lid still cannot
be lifted
Ifthe lid is left open,the machinewill be unableto lockand the cyclewill behalted ] he
machinewill beepandthe lid locklight will flashuntil the lid is dosed andthe START/PAUSE
button is pressed.
Do not put anything down the slot in the top deck of your machine°
Do not try to disable the lid [ocko
Wash Cyces and Opt ons
The Wash Progress Lights
The wash progress lights show all the tasks your £cosn'_;rS"will complete durino the wash cycle
As each task is completed a light goes out, so you can tell at a gbnce how far the cycle has to go
Advancing the Wash Cycle
fo shorten the wash time, to rinse and spin only, or to spin only
1 Select the wash cycle
2 PressADVANCE repeatedly until only the required number of lights remain on.
s PressSTART/PAUSE _,@shProgress
Note:
The wash consists of two parts The first amber
light is essential for all washes except Permanent
Press,therel'ore, you can only advance through
the green lights, not the amber
_x/asfl Rfnse Spi_
SmartFauc_@¢les
WOOl DeNtate Heavy
Wasflafl@s Duty
ReFular
\...
17
Wash Cyc es dnd Options
18
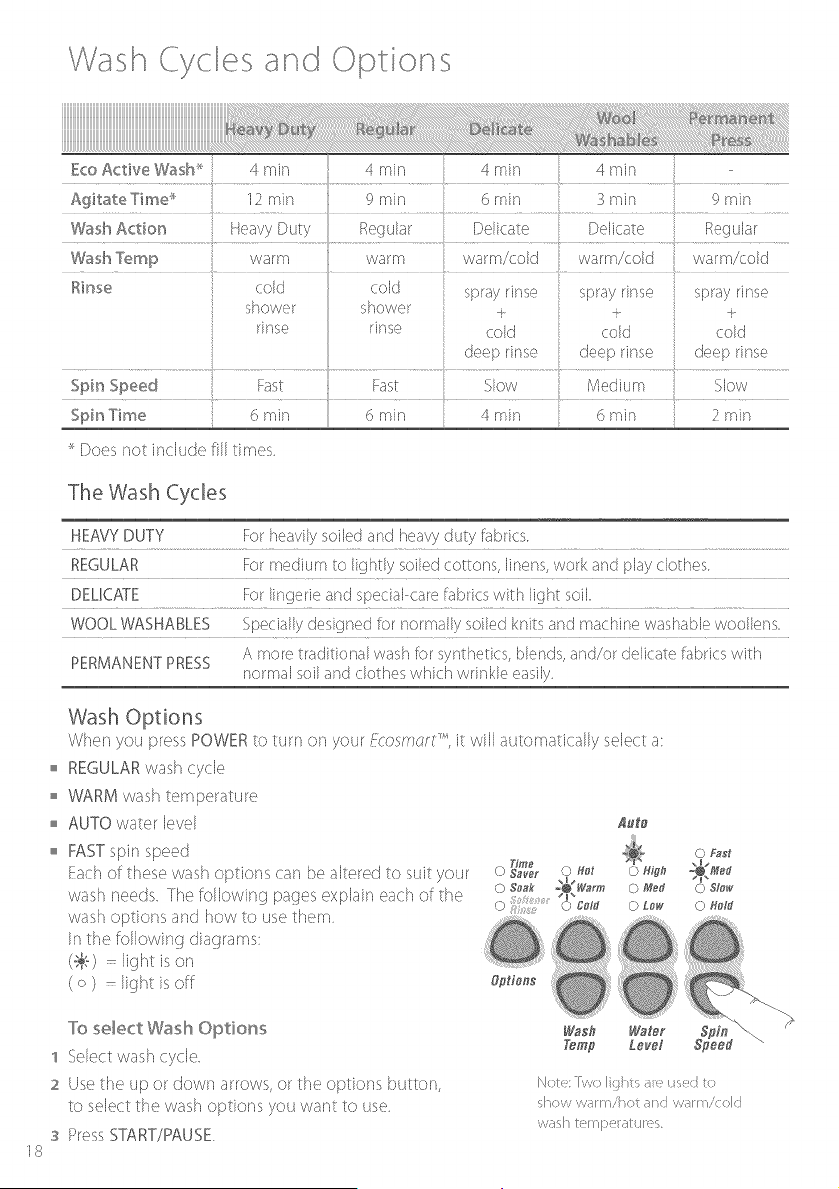
Eco Active Wash_; 4 rain 4 rain 4 IT]in 4 rnin
AgitateTime u 12 r@n 9 rain 6 inin 3 rain 9 rain
Wash Action HeavyDuty Regular Delicate Delicate Regular
w_h T_?mr_ .... wa_'] wa_'] ......wa_']ico_d.......watn'_i_:o_dwatnV_:o_d
Rinse cold cNd sprayrinse spray rinse sprayrinse
shower shower + + +
rinse rinse cold cok/ cold
deep rinse <deeprinse deep rinse
Spi_sSpeed Fast Fast Slow Medium Slow
Spin Time (i rain (i rain 4 rain (i rain 2 rain
Does not include fill times
The Wash Cydes
HEAVYDUTY Forheavily soiled and heavy duty/abrics_
REGULAR For medium to lightly soiled cottons, linens,work and play c[othes_
DELICATE For lingerie and special care fabrics with light soil
WOOLWASHABLES Speciallydesigned for normally soiled knits and machine washable wooHens_
A more traditional wash for synthetics, blends,and/or delicate fabrics with
PERMANENTPRESS
normal soil and clothes which wrinkle easily
Wash Options
When you press POWERto turn on your Rosmc;rN%it will automatically select a
REGULARwash cycle
o WARM wash temperature
AUTO water level Aufo
o FASTspin speed
F,
,.j
Eachof these wash optioris can be akered to suit your ,_H_ m o HJ_h
wash needs flhe following pages explain each of the o s_,_k _,,_ o p,_
o o cmd o _,'
wash optior sand how to use them ..........
W-_the following diagrams:
(6_:-) light is on
(o) light is off @u_ns
To select Wash Options
1 Select wash cycle
2 Usethe up or down arrows, or the options button,
to select the wash options you want to use
s PressSTART/PAUSE
Wash Wafer
Temp Level
0 Fast
0 S,'ow
0 H_t'd
N<t, /,/< I ts s:, R
"JOY? ,ql I'1 ,' O[ / ( ,ql" /C(>
k,17i',l
Wash Cyces and Opt ons
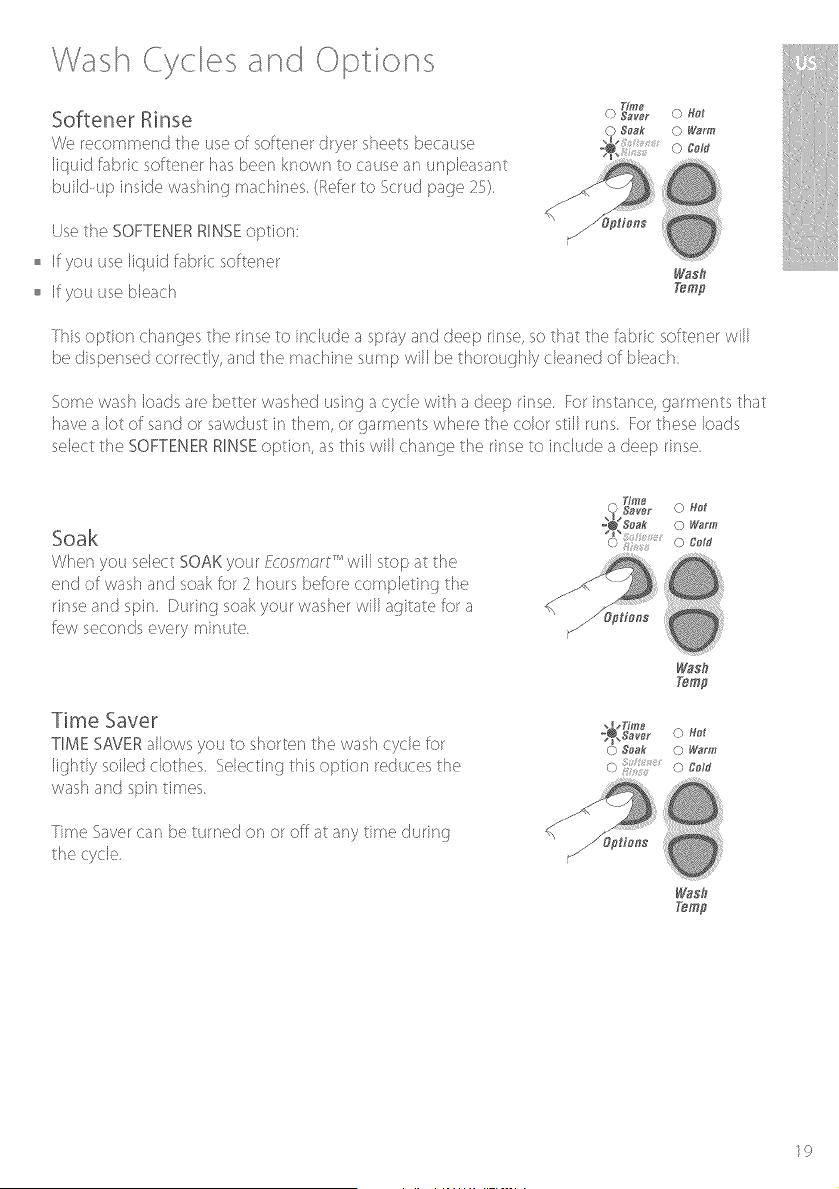
Softener Rinse
We recommend the use of softener dryer sheets because
liqukt fabric softener has been known to cause an unpleasant
buikt up inside washing machines (Refer to <}crudpage 2r_)
() TTme
0 W_fm
0 8dd
Usethe SOFTENERRINSEopSon:
o If you use Iiqukt fabnc softener
o ffyou use bleach
Wash
Temp
This option changes the rinse to include a spray and deep rinse, so that the fabdc softener will
be dispensed correctly, and the machine sump will be thoroughly cleaned of bleach
Some wash loads are better washed using a cycle with a deep rinse. For instance, garments that
have a lot of sand or sawdust in them, or garments where the color still rl4ns For these loads
select the SOFTENERRINSEoption, as this will change the rinse to include a deep rinse
When you select SOAKyour/dosmcrS _'will stop at the
end of wash and soak Rot2 hours before completing the
rinse and spin During soak your washer will agitate lot a
few seconds ever}i minute
0 H_
0 [@rm
0 Odd
Time Saver
TIME SAVERallows you to shorten the wash cycle for
lightly soiled clothes. Selectinq this option reduces the
wash and spin times
Time Saver cars be turned ors or off at any time during
the cycle
Wash
Temp
0 Her
0 0 corn
W_sh
Temp
19
Wash Cyces and Opt o
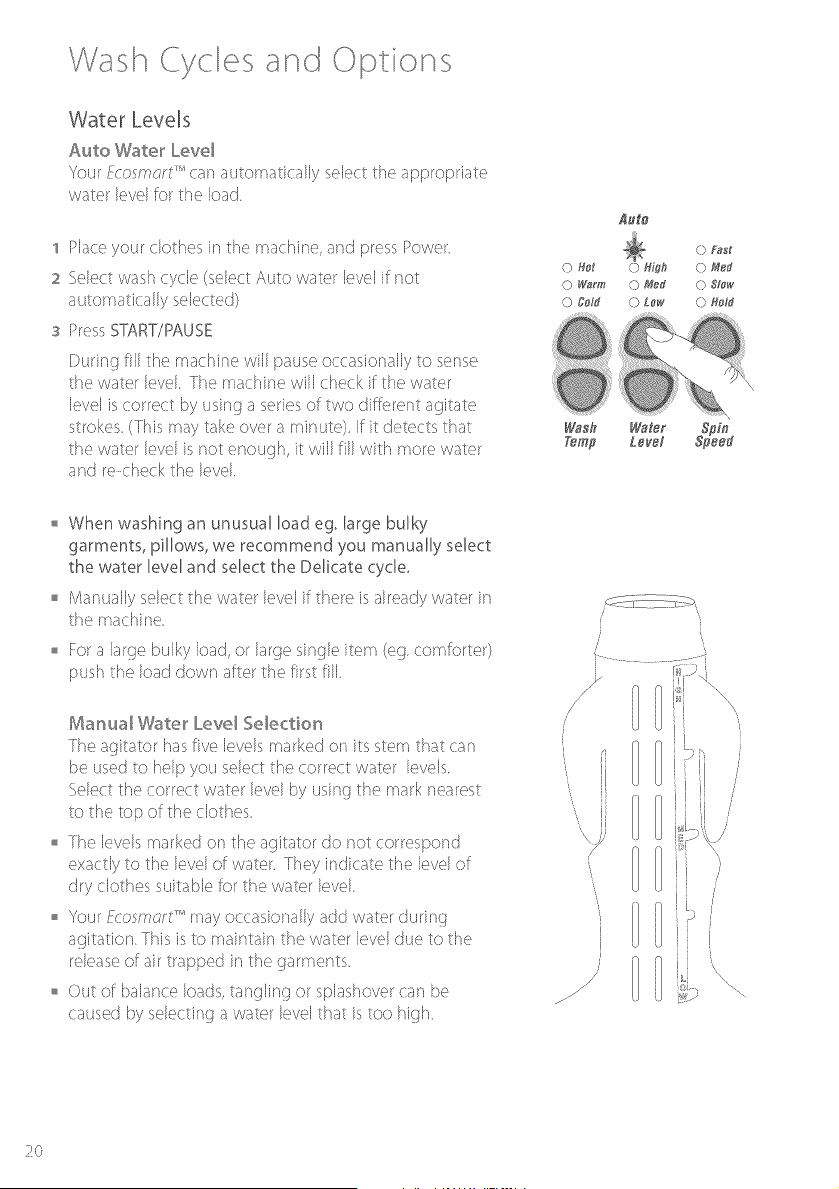
Water Levels
Auto Wate_ Leve_
Your Fcosmsr; _'can automatically select the appropriate
water level for the load
1 Place your clothes in the machine, and press Power
2 Select wash cycle (select Auto water level if not
automatically selected)
s PressSTART/PAUSE
During fill the machine will pause occasiorially to sense
the water levd The machine will check if the water
level is correct by using a series of two different agitate
strokes (This may take over a minute). If it detects that
the water level is not enough, it will fill with more water
and recheck the level
0 Ho_
0 W_rm
0 Cdff
W_$h
A_O
0 H@h
0 Med
0 L_w
Wa@r
L_vd
0 F_st
0 SPew
0 Hdd
o When washing an unusual load eg, large bulky
garments, pillows, we recommend you manually select
the water level and select the Delicate cycle,
Manually select the water level if there is already water in
the machine
For a large bulky load, or large single item (eg. comforter)
push the load down after the first fill
Ma_sua_ Wate_ Leve_ Selection
The agitator has five levels marked or its stem that car]
be used to help you select the correct water levels
<}electthe correct water level by using the mark nearest
to the top of the clothes
The levels marked on the agitator do not correspond
exactly to the level of water. They indicate the level of
dry clothes suitable for the water level
o Your tkosrr/_;r/-T_'may occasionally add water during
a(_itation This is to maintain the water level due to the
release of air trapped in the garments
o Out of balance loads, tangling or splashover can be
caused by selecting a water level that is too high
ii "i
2O
Wash £7ces and Opt or s
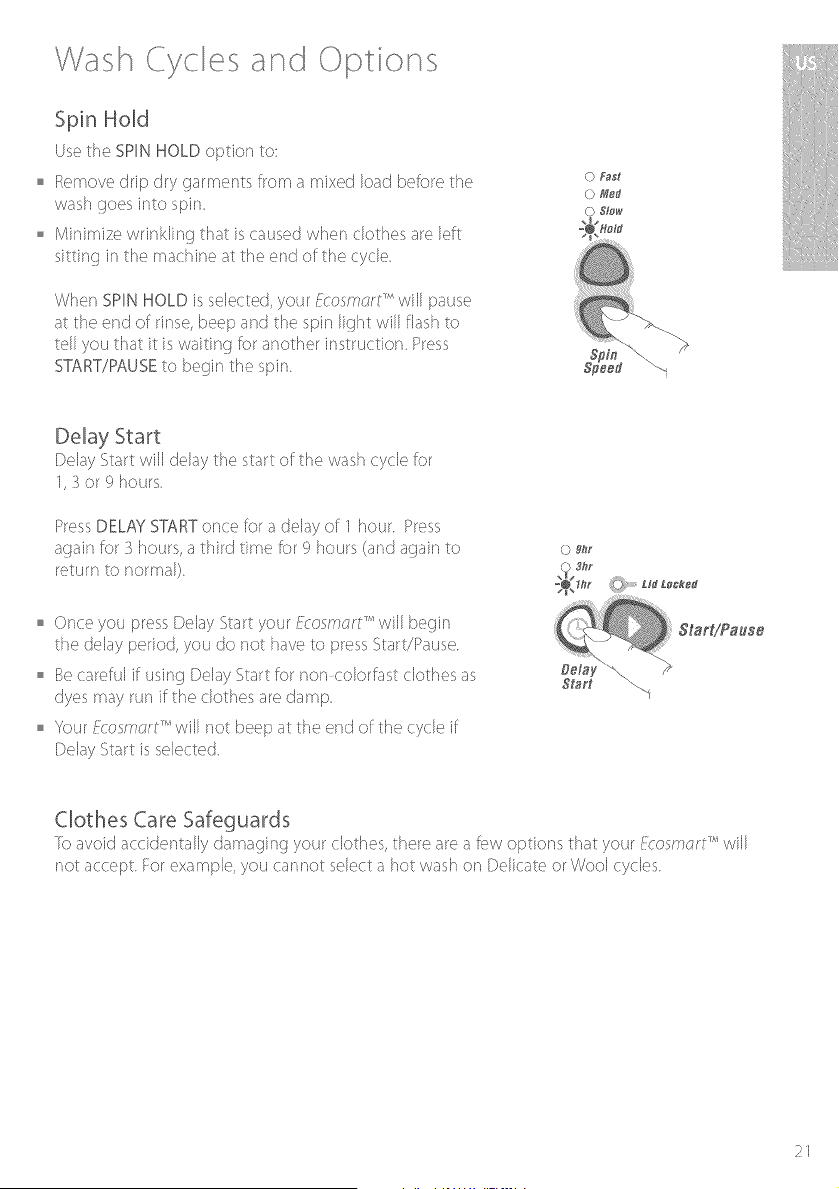
Spin HoM
Use the SPIN HOLD option to:
o Remove drip dry garments from a mixed load before the
wash goes into spin
o Minimize wrinkling that is caused when clothes are left
sitting in the machine at the end of the cycle
When SPIN HOLD is selected, your Rosm(;rN "_will pause
at the end of rinse, Deep and the spin light will flash to
tell you that it is waitin D for another instruction Press
START/PAUSEto begin the spin
Delay Start
Delay Start will delay the start of the wash cycle for
1, Bor 9 hours
PressDELAYSTARTonce for a delay of I hour. Press
again for ? hours, a third time for 9 hours (and adair] to
return to normab
Once you press Delay Start your r(osm(;rt TM will Degin
the delay period, you do not have to press Start/Pause
Be careful if using Delay Start for non colorfast clothes as
dyes may run/the clothes are damp
Your/:(osm(;rl _' will not Deep at the end of the cycle if
Delay Start is selected
0 ghr
Cbthes Care Safeguards
b avokt acddentally damaDing your clothes, there are a f(_woptions that your Ecosm(;rt_''will
not accept For example, pu cannot select a hot wash or] Delicate or WoN cycles
21

Wash Cyces and Opt ons
Customizing the Wash Cycles
You can program your fcosmc;rl_T'_to remember the wash options you prefer for each wash
cycle For instance, you may want to set the Regular cycle to cold wash or set Heavy Duty to
include a soak
To Customize a Cycle
1 Pressthe Power _utton
2 Pressselected wash cycle button Hold down for
4 seconds Youwill hear two quick beeps and
the wash cycle light will flash
s <Selectyour wash options, (eg cold wash, soak)
a Pressthe wash cycle button again to store your
customized cycle
When you are customizing a wash cycle, you cars
shorten or lengthen the agitation time
22
[o shorten the agitation time, press ADVANCE to
reduce the number of green lights
fo increase the agitation time keep pressing ADVANCE
until all the green lights are on (On Heavy Duty you
catsonly decrease the wash time)
_4/ash Rins_ $ein ...........
Note:
Unlike the Favorite cycle you cannot customize a wash cycle to start at the rinse or spitsstage
Favorite Cycle
Favorite cycle lets you design your own wash cycle Favorite carsbe any waspscycle with any of
its waspsoptions, and it can start from any point its the cycle
To Set You_ Favorite Cycle
1 Pressthe POWERButton
2 Pressthe FAVORITEcycle button Hold down for 4 seconds
until you hear two quick beeps and the Favorite light flashes
s <Selectyour favorite cycle (eg Regular or Delicate)
a <Selectthe wash options (eg soak, time saver) Use Advance if
you want part of a cycle (eg spin only)
5 PressFAVORITEagain to store your lavorite cycle
Note:
Your Fc:osmcr/-T_'will remember your favorite cycle, or any other cycle that has been customized,
even when unplugged from the wall it is not possible to program a delayed start into the
Favorite cycle
Wash Cyces and Opt ons
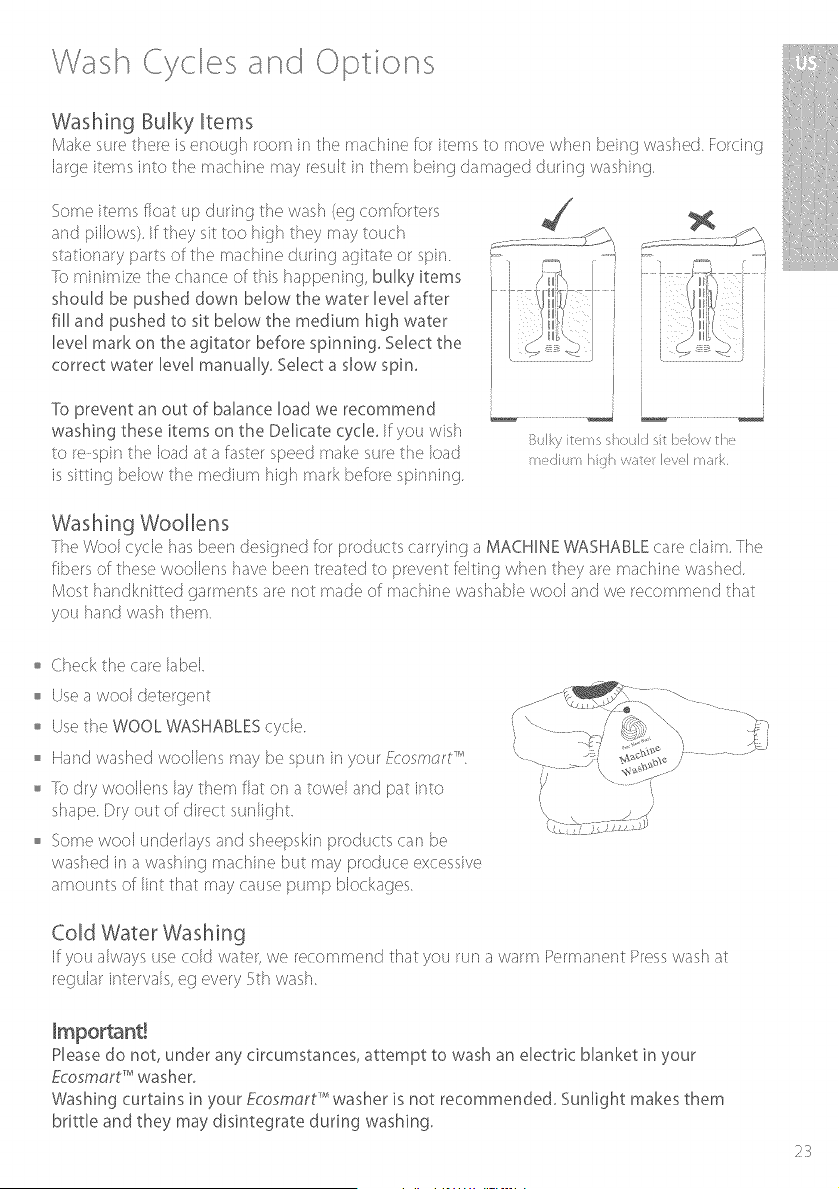
Washing Bulky Items
Make sure there is er ough room in the machine for items to move when being washed Forcing
brge items into the machine may result in them being damaged <:turingwashing.
<Someitems float up durir_g the wash (eg comforters j
and pillows), if they sit too high they may touch ..... -........_ _ ...o:S_,.
stationary parts of the machine dudnq aqitate or spin. ;: .... tL:
fomnmz_thochantoofthshapp_ii_rii_ buky tems i '-_ _w_
_ I
should be pushed down below the water level after
fill and pushed to sit below the medium high water _ '
level mark on the agitator before spinning, Select the
correct water' level manually, Select a slow spin,
To prevent an out of balanceload we recommend
washing these items on the Delicate cycle, Ifyou wish
to respin the load at a fasterspeedmakesurethe load
issitting below the medium high markbeforespinr_ir_g.
i i
13tllkyite ssloul]sit/:>eow tl _
Washing Woollens
The VVoolcycle has been desi(tn_'d for products carryin(t a MACHINE WASHABLEcare claim. The
fibers of these woollens have been treated to prevent fiqting when they are machine washed.
Most handknitted garments are not made of machine washable wool an(:}we recommend that
you hand wash them
o Check the care label
Usea wool detergent
Usethe WOOL WASHABLEScycle
Hand washed woollens may be spur_ in your fcos/'rlcrt TM
o [o dry woollens lay them flat or/a towel and pat into
shape Dry out of direct sunNght
o <Somewool underlays and sheepskin products can be
washed in a washing machine but may produce excessive
amol4nts of lint that may cause pump blockages
Cold Water Washing
b"you always use cold water, we recommend that you mna warm Permaner¢ Presswaspsat
regular intervals, eg every 5th wash
Please do not, under any circumstances, attempt to wash an electric blanket in your
Ecosmart '_washer_
Washing curtains in your Ecosmart '_ washer is not recommended, Sunlight makes them
brittle and they may disintegrate during washing,
23
Before Wash
fo get the best wash results sort your clothes
Color
Sortwhite fabricsfrom coloredfabrics
Care Labeb
The care label will tell you about the fabric of
the garment and how it should be washed
Soi_
Sort clothes according to the type and amount
of soil Some soils suit warmor washes eg oily
soils,while others are best washed in cokt
water, eg mud, blood
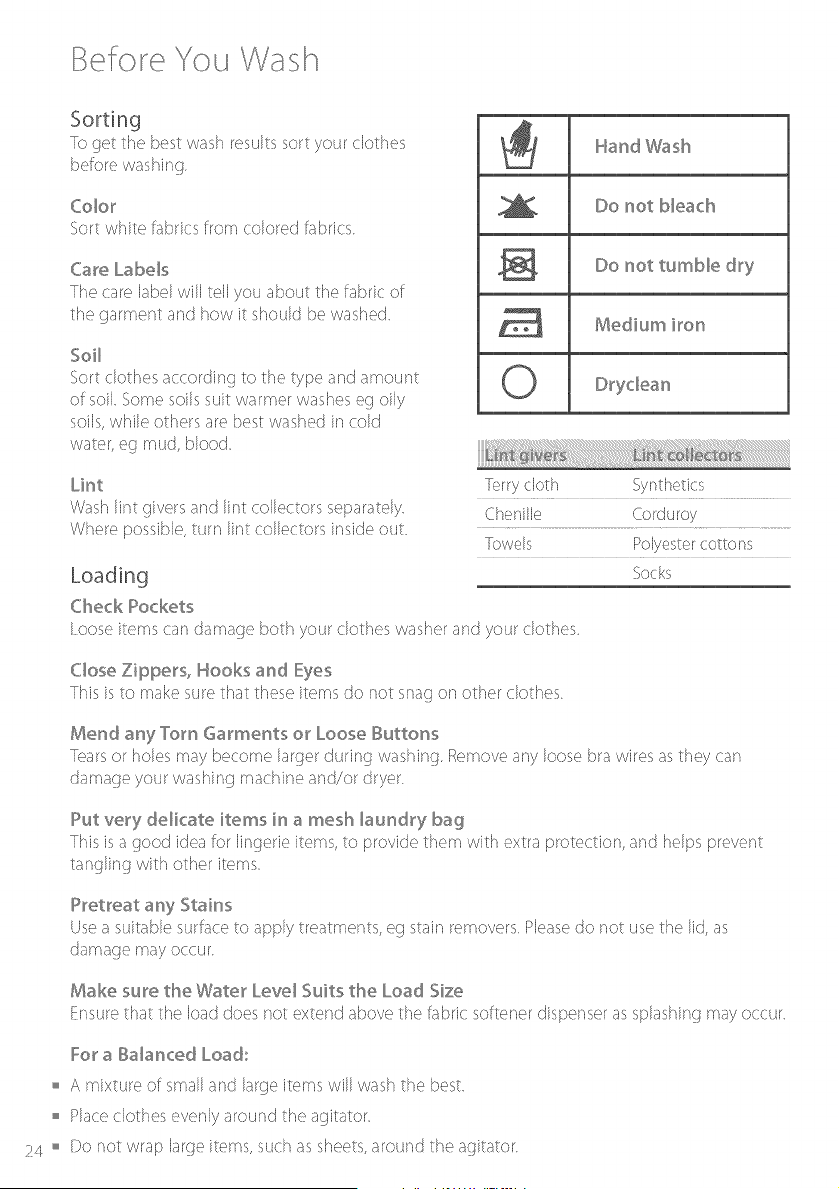
_t Hand Wash
Do not bleach
Do not tumble dry
Medium iron
Lint
Wash lint givers and lint collectors separately
Where possible, turn lint collectors inskte out
Check Pockets
lorry cloth Synthetics
Chenille Corduroy
Iowels Polyestercottons
Socks
l oose items can damage both your clothes washer and your clothes
Close Zippers, Hooks and Eyes
This is to make sure that these items do not snag on other clothes
Mend any Torn Garments or Loose Buttons
[ears or holes may become larger during washing. Remove any loose bra wires asthey cart
damage your washing machine and!or dryer
Put very delicate items in a mesh _aundry bag
This is a good idea for lingerie items, to provide them with extra protectior], and helps )revent
tangling with other items
Pretreat any Stains
Usea suitable surface to apply treatments, eg stairsremovers Pleasedo not use the lid, as
damage may occur
Make sure the Water Leve_ Suits the Load Size
Ensurethat the load does not extend above the fabric softener dispenser as splashing may occur
For a Balanced Load:
o A mixture of small and large items will wash the best
Place clothes evenly around the aoitator
24 ° Do not wrap large items, such as sheets, around the agitator

efore Wash
Check clothing care labels for special instrl]ctior_s
Liquid B_each:
I Usehalfthe recommendeddoseof bleachanddilute with water
2 Remove the fabric sof/ener dispenser and pour down the inside edge
oi; the aoitator stem, in line with the fins Select the SOFTENERRINSE
button. This changes the nnse to ensure thorough removal of any
bleach residue
s Add ctetergent and replace the fabric softener ctispenser
4 For best results, add liquid bleach after the first amber wash lioht is no Ion<]ervisible
_'gash
Temp
Powdered B_each:
Pourhalfthe recommendeddoseof powdered bleachinto the agitator with your detergent.
Note: Never pour undiluted, liquid chlodne bleach directly onto clothes, into the wash tub,
or into the center of the agitator. Irreversible damage to your clothing may occur.
Fabric Softener o .or
The fabdc softener ooes ir_to the disper_sel or_the top of the a_;itator osoak ow_m
The ring ors the dispenser cup is a gukte for the amount of fabric o c_
softener to add for a full load <}mailer loads require lessfabric softener
Softener Rinse
If you wish to use fabric softener when using the Regular or Heavy
Duty cycles you must select the SOFTENERRINSEoption This
changes the nnse option to inc[14dea deep nnse so the fabric softener
will be ctispensed correctly
Wash
Eemp
Scn/d is the name given to the waxy build up that can occur within any washer when fabric
softener comes into contact with detergent This build up is not brought about by a fault in the
machine. If scrud is allowed to build up in the machine it carsresuk in stains orsyour clothes or
an imp[easant smell in your washer
If You Wish to Use Fabric Softener We Recommend:
o Using fabric softener sparingly
o When filling the (tispenser, do not splash or overfill
Clean the dispenser as soon as the cycle is finished, (refer pa<]e_O)
Clean your machine regularly (refer page _O)
o Cold water washing increases the chance of the build up occurnng.
VVerecommend that a warm Permanent Presswash be used at regular
intervals, eg every 5th wash should be warm
Fabric softener of a thinner consistency is less likely to leave residue ors
the dispersser and contribute to a build up
25

f et OptChan!:l nf! .................
Option Adjustment Mode
After usin(l your Ecosmt;rtT''you may want to fine tune some of the options to suit your
wash needs
You can change the following pre set options:
the default rinse option
the amount of water used in the Shower Rinse
the number of beeps at the end of the cycle
the Out of Balance recovery routine
o the fill level selected by auto water level
the controlled cold option
Io make these changes it is necessary to enter the "Option Adjustment Mode"
To Enter Option Adjustment Mode
Pluo the machine in, but do not press POWER
PressSTART/PAUSEand hold down, then press
POWER
2 You will hear three quick beeps and the machine
will show an unusual pattern of lights, in this mode
the Eightsare used to indicate the different options
available. The diagram on page 27 shows how the
lights relate to the options you can change,
Pages 28 29 explain the different options in more
detail
s Use the buttons ors the panel to make your changes
to the pre set options
4 PressPOWERto return to normal mode
5 Your EcosmcrtT''will automatically remember your
6 [o make further changes, repeat the above steps
0 _hr
0 3hr
0 lhr Md Lo_k_d
Start
Favorite Perma_eI_
Pfss$
2d
Chan_l n_9Pro Set Opt ons
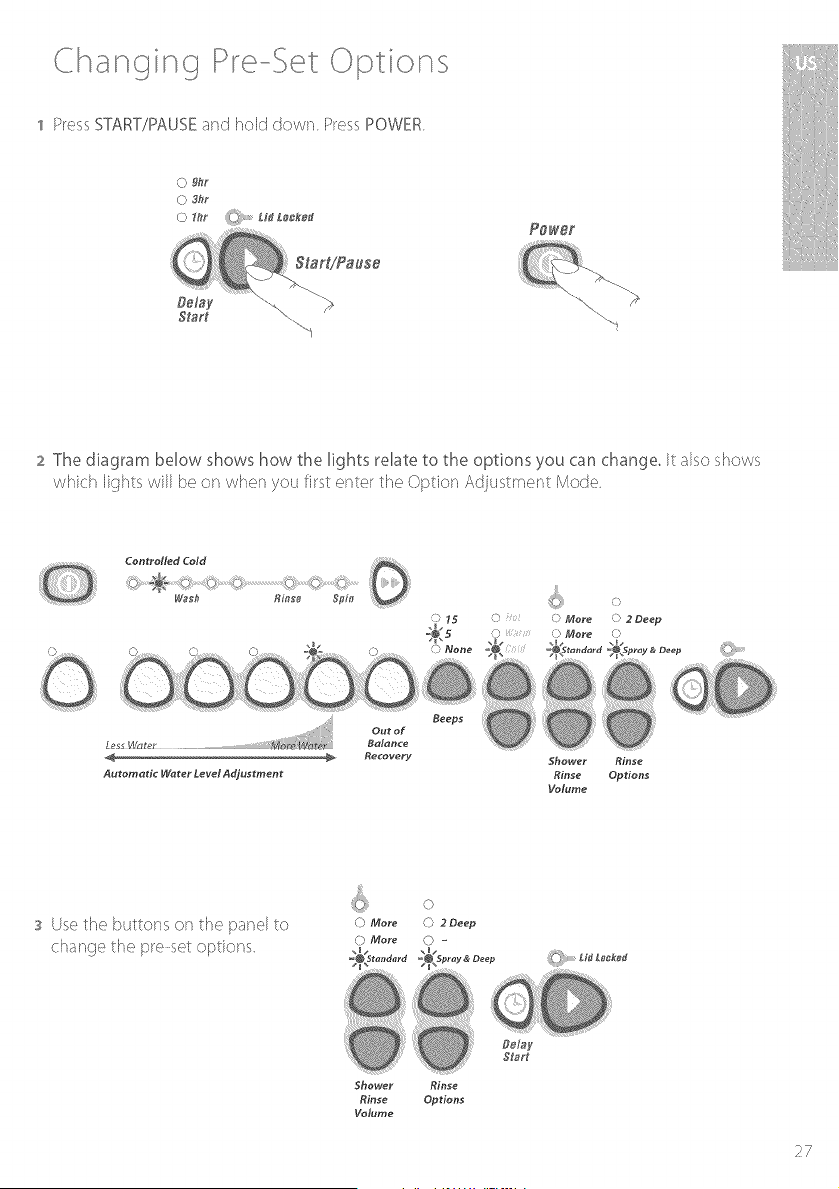
1 PressSTART/PAUSEand hold down PressPOWER
0 gh_'
0 Sh_
0 _hr Lift £_k_d
Power
2 The diagram below shows how the lights relate to the options you can change, It also shows
which lif_hts will be on when you first _,nter the Option Adjl_stment Mode
coo,to,,,co. C)
..............................r>
ff_tt Rins_ @in
Out of
Balance
Recovery
}}ii
<:s, ,:>
') 15 (" 0 MoYe 0 2Deep
B 0 ,') MoYe 0
0 Notre
Beeps
Shower Rinse
Autornatic Water Level Adju_trnent Rinse Options
Volume
Delay
Slarl
s Use the buttons on the panel to o Mor_
change the pro set options ,o More
ShoweJ"
Binge
Volume
Rinse
Options
27
Opt onsCt-l n 9n!9 Pre : .....
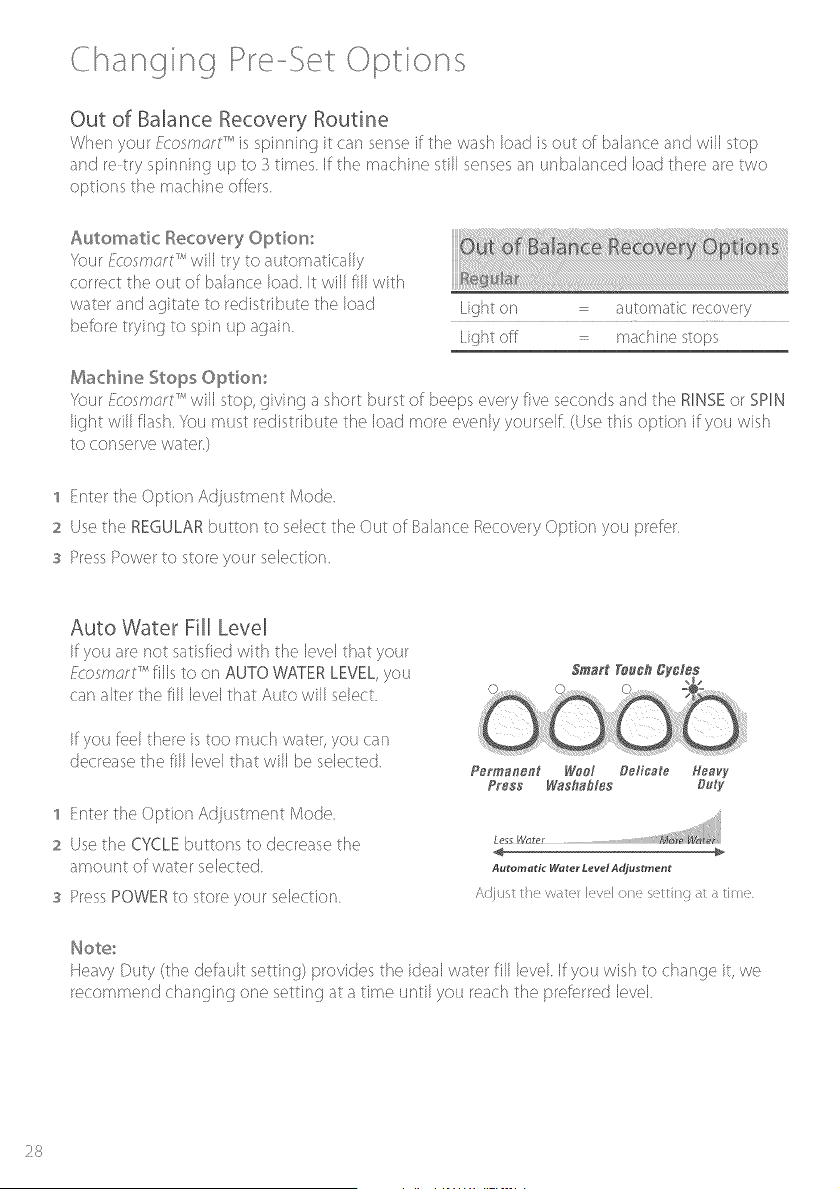
Out of Balance Recovery Routine
When your F,:osmc;r/-T"is spipnin(t it car" sense if the wash load is out of balance ar'd will stop
and re try spinning up to _ times If the machine still senses an unbalanced load there are two
options the machine offers
Automatic Recovery Option:
Your f-:osmcrl:" will try to automatically
(orre(t the out of balar'_e load It will fill with
water ar'd agitate to redistribute the load
before trying to spin up again
Light on automatic recovery
right off machine stops
Machine Stops Options:
Your f-:osmorl_" will stop, giving a short burst of beeps every five seconds and the RINSEor SPIN
light will flash. You must redistribute the load more evenly yoursdf (Use this option if you wish
to conserve water)
1 Enter the Option Adjustment Mode
2 Usethe REGULARbutton to select the Out of Balance Recovery Option you prefer
s PressPower to store your selection
Auto Water Fill Level
If you are not satisfied with the level that your
F,:osmcr/:" fills to orsAUTO WATERLEVEL,you
carsalter the fill level that Auto will select
If you feel there is too much water, you can
decrease the fill level that will be selected
1 Enter the Option Adjustment Mode
2 Usethe CYCLEbuttons to decrease the
amount of water selected
s PressPOWERto store your selection
Pgrm_ngnt WOOf Del:ca:e Heavy
Press Wash_l+s D._y
Automatic Water Level Adjustment
Note:
Heavy Duty (the deiault setting) provides the ideal water fill level If you wish to change it, we
recommend changing one setting at a time until you reach the preferred level
28

re .: et .....)proChanting P "
End of Cycle Beeps
The beeps signaling the end of the cycle can be
increased or decreased
1 Enter the Optior Adjustment Mode
2 Usethe WASH OPTION button to select the number
of beeps you prefer
3 PressPOWERto store your selection
Default Rinse Option
The normal rinse on the Regular and Heavy Duty
cycles is a Shower Rinse.When you select Softener
Rinseon these cycles the rinse changes to the
defauk rinse. The defauk rinse is the rinse option
used on the Wool, Delicate and Permanent Press
cycles The default rinse is a spray rinse followed by
a deep rinse However you can change the default
rinse to two <:Seeprinses
MED spin deep deep
rinse rinse
SLOWspin
HOLD spray deep
rinse rinse
1 Enter the Option Adjustment Mode
Usethe SPIN SPEEDbuttons to select the rinse option you prefer.
s PressPOWERto store your selection
Volume of Water Used in the Shower Rinse
(Regular cycle}
You can increase or decrease the volume of water
added during the shower rinse on the Regular cycle
1 Enter the Optior Adjustment Mode
Usethe WATERLEVELbuttons to select the volume
of water you wish to be used in the shower rinse
S PressPOWERto store your selection
HIGH mote water
MED more water
LOW FACTORYSETTING
Controlled Cold
Fcosrs_?t;r/-_'_is designed for installations that have both
hot and cold water. ]o ensure optimum performance
ever] in very cold weather, the cold water temperature
is controlled to F>O°FHowever if for some reason you
do not have hot water available you may need to
change to i_ncontrolled cold in very cold weather
green conttoNed cold
amber un<on rolled cold
Fcosrs_t;rS'' leaves the factory with the Controlled Cold Option set. You carl change this by
entering the Option Adjustment mode and by pressing the ADVANCE button once
_g
Car For Ecosmart n'A
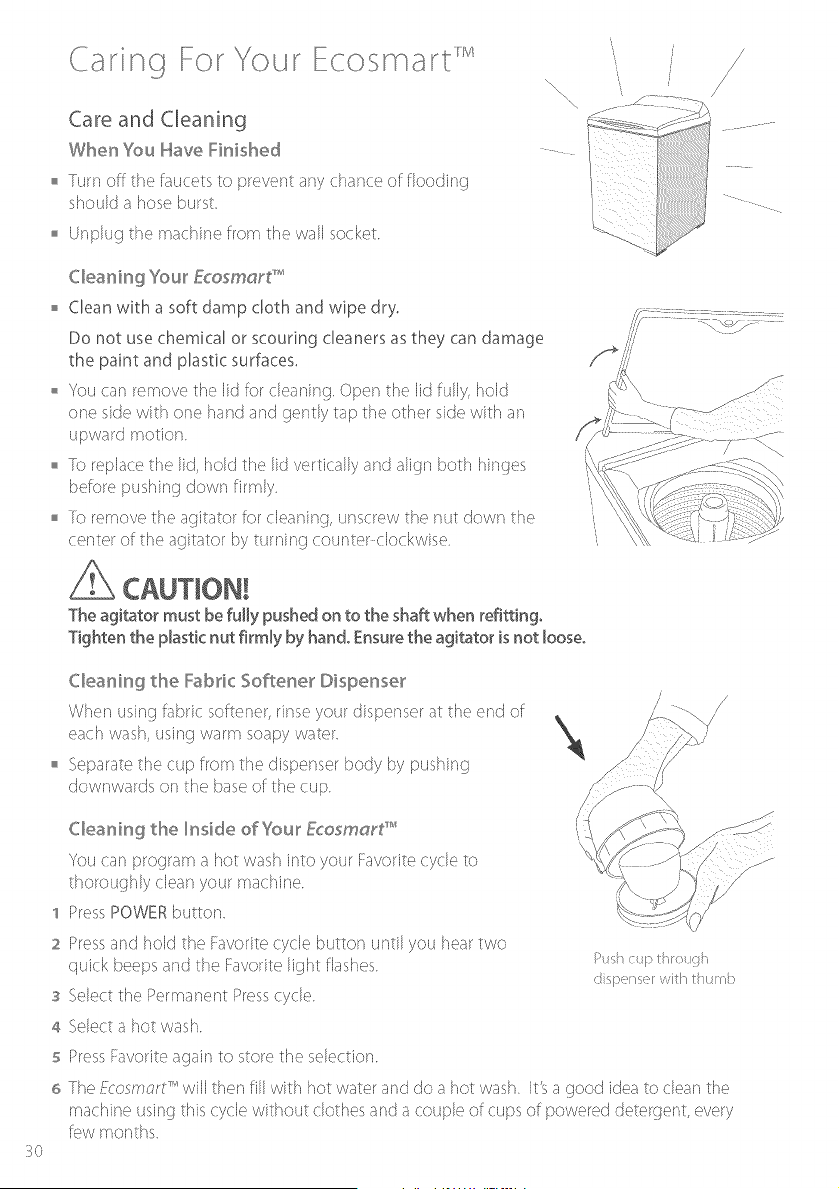
Care and Cleaning
When You Have Finished
Turn off the faucets to prevent any chance of floodinc_
shoukt a hose burst
o Unplu{t the machine from the wall socket
,\
Cleaning Your Fco,smayt '_'
o Clean with a soft damp cloth and wipe dry,
Do not use chemical or scouring cleaners as they can damage
the paint and plastic surfaces,
o You can remove the lid for cleaning. Open the lid fully, hold
one side with one hand and gently tap the other side with an
upward motion
o fo replace the lid, hold the lid vertically and alion both hin<]es
before pushing down firmly
fo remove the agitator for cleaning, unscrew the nut down the
center of the a<]itator by tuminc_ counter clockwise
/
/
/
3O
The agitator must be fully pushed on to the shaft when refitting°
Tighten the plastic nut firmly by hand° Ensure the agitator is not Ioose_
Cleaning the Fabric Softener Dispenser
When using fabric softener, rinse your dispenser at the end of
each wash, usin<]warm soapy water
Separate the cup from the dispenser body by pushin<]
downwards on the base of the cup
\
/
/ -.
Cleaning the hsside of Your F_o,smay8'_'
You can program a hot wash into your Favorite cycle to
thoroughly clean your machine
1 PressPOWER button
2 Pressand hokt the Favorite cycle button until yol4 hear two
quick beeps and the Favorite light flashes v_H _:> tl _o_@
]s:>e s_'wd tltll !:>
s Select the Permanent Presscycle
a Select a hot wash
5 PressFavorite again to store the selection
6 The E:osmt;r8_' wiII then fiII with hot water and do a hot wash It's a good idea to clean the
machine using this cycle without clothes and a couple of cups of powered detergent, every
lew months
£ar g For Ecosm rt 'M
Products that Might Damage 'four Ecosmart _wClothes Washer
(oncentrated bleaches, diaper sanitizers and hydrocarbor solvents (eg gasoline and paint
thinners) can cause damage to the paintwork and components of your clothes washer (Do
not wash or dry garments stained with these solvents as they are flammable)
Do not use pre treatment sprays or liquids or] or near your clothes washer as they car] damage
your machine's control panel and other surfaces
Useof dyes in your clothes washer may cause stainir_(t of the plastic components The dye
will not dama(te the machine but we suf#)est you thorouf_hly clean your clothes washer
afterwards We do not recommend the use of dye strippers in your clothes washer
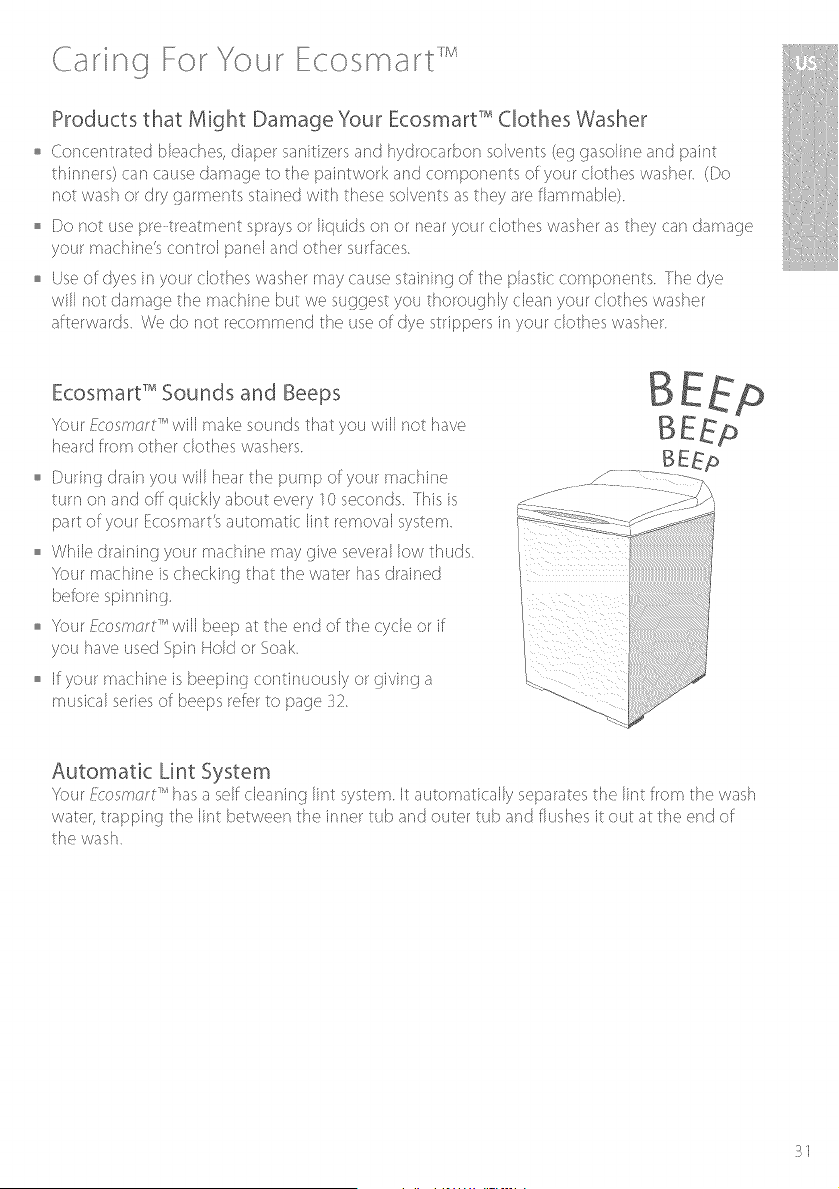
Ecosmart TM Sounds and Beeps
Your Ecosrlw;rS"will make sounds that you will not have
heard from other clothes washers
o During ctrain you will hear the pump of your machine
tl4rn on and off quickly about every I0 seconds. This is
part of your Ecosmart's automatic lint removal system
o While ctraining your machine may give several low thuds
Your machine is checking that the water has drained
before spinnin t.
Your/(os£1sr8 TM will beep at the end of the cycle or if
you have used <}pin Hold or <}oak
If your machine is k>eepin_}cor¢inl4ol4sly or {tivin<] a
musical series of beeps refer to page _2
Automatic Lint System
Your too. r;_crl has a self cleanin£_lint system. It automatically separates the lint from the wash
water, trapping the lint between the inner tub and outer tub and flushes it out at the end of
the wash
3]
Before Ca For : erv ce
Pleaseread the following pages before calling for service
You can correct many of your machine's problems using the checklists on the following pages
Your machine is capable of diagnosing its own problems If it has a problem it will Deep and
display a message telling you what is wrong
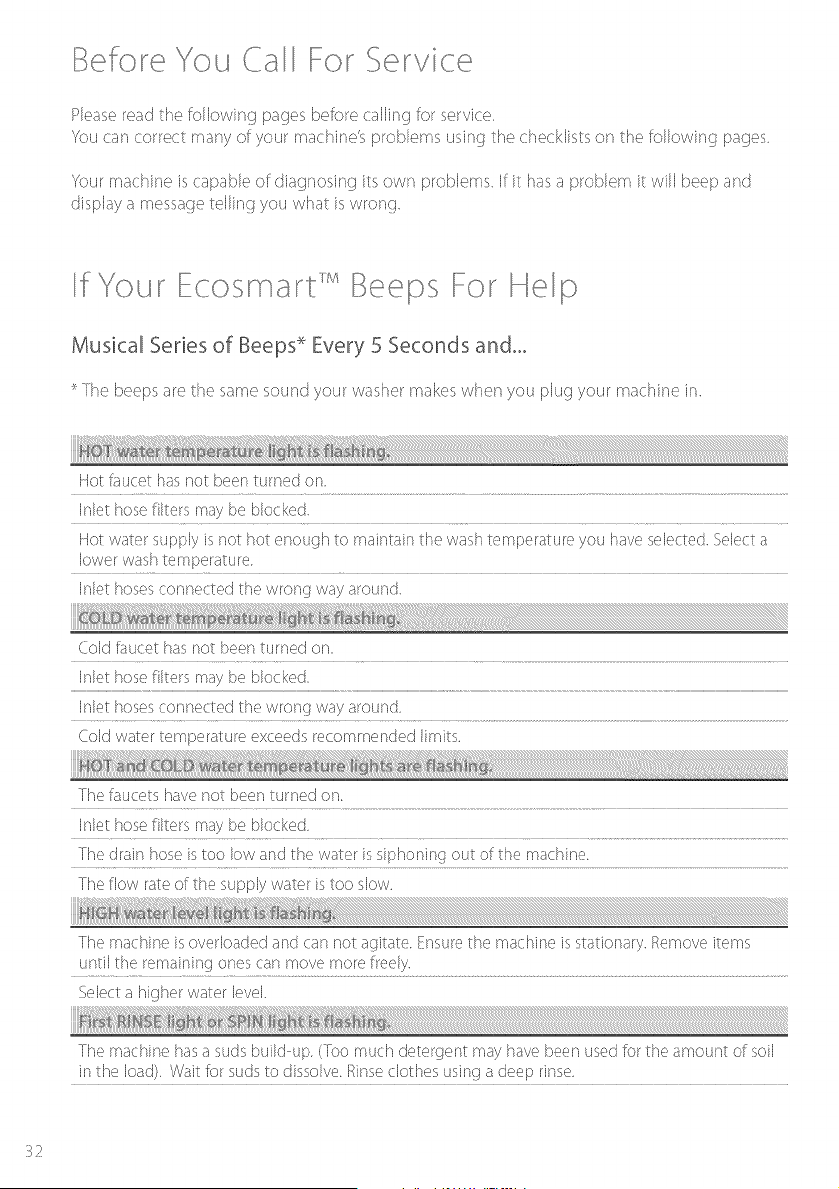
f Yo, r Ecosmart 'MBeeps For Hep
Musical Series of Beeps _*Every 5 Seconds and°°°
_The beeps are the same sound your washer makes when you plug your machine in.
Hot/aucet has not been turned on
Inlet hose filters may be blocked.
Hot water supply is not hot enough to maintain the wash tempe/atu/e you have sele<ted. Select a
lower wash temperature
Inlet hoses conne<ted the wrong way around.
Cold/au< et has not been ruined on_
Inlet hose filte/s may be blocked
Inlet hoses connected the wrong way around
Cold water temperature exceeds recommended limits.
The/aucets have not been turned on.
Inlet hose filters may be blocked
The drain hose is too low and the water is siphoning out of the machine.
The [low rate of the supply water is too slow.
The ma(hine is overloaded and can not agitate. Ensure the machine is stationary. Remove items
until the remaining ones can move mole f/eely.
Select a higher water level.
The machine has a suds build up. (k}o mu(h dete/gent may have been used for the amount of soil
in the load) Wait for suds to dissolve I_inse clothes using a deep rinse
32

f yo,, rEcosmart Boeps Fo H p
Wah load is out of balan(e. F __,_ _
_n lit tn_ ma(hine is stationary. Manually redistribute the load Che(k
ma(hine is level [nsure the machine's feet haw_been unscrewed and the rubber levelling inserts
havebeen fitted so the machine sits on its [pet and not on tl_ecorner cabinets. Refprto Installation
Instructions pages 8 - 9.
Make surethe lid is ck)sed,
PressSTART/PAUSE(re[er to page 17)
Single beep every second and°°°
I Unplug machine from the walk Wait 60 seconds, plug back in and operate machine
2 If the fault re occurs repeat step I
If the problem persists refer to the service contacts below,
(Before calling for help please locate the serial number of your washer on its back top left
corner),
berv ce
For your local Fisher& Paykd Authorized _ervice Aqent pk,ase call
USA and Ca_ada
[0[[ FREElo888ogoFHgoUSA (1o888o9o367o872)
or use the link at: wwwo'fishe_paykehcom/_ocatodse_v[ce_/
Note:
Proof of purchase is required for any warranty claim For your records we suqoest you attach your
proof of purchase here
) o
p p
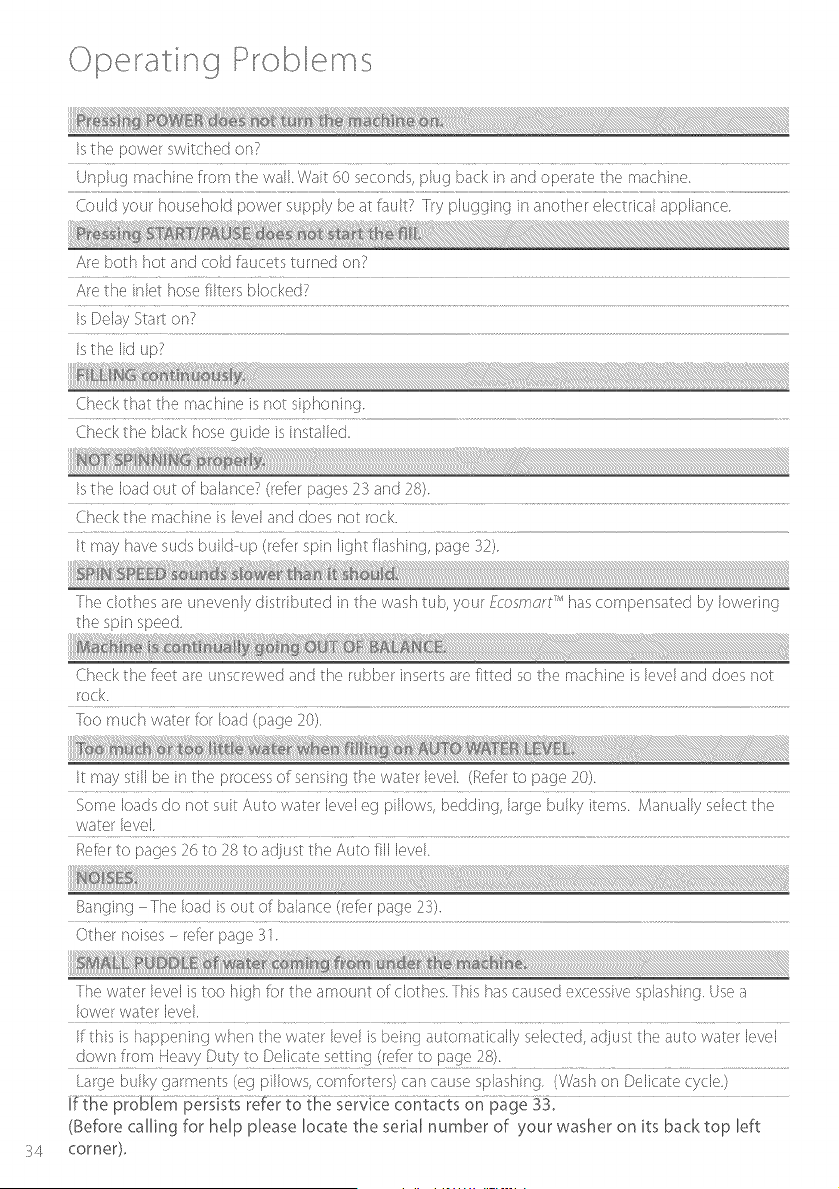
OI,>er tin! l Problern
Is the power switched on?
Unplug ma(hine from the wall. Wait 60 se(onds, plug ba(k in and op_rat the machine
Could you/household power supply be at fault? Try plugging in another ele< trK al appliawe
Are both hot and (old faucets turned on?
Are the inlet hose fikers blocked]?
Is Delay Start on?
Is the lid up?
Check that the machine is not siphoning.
Cl_e<k the black hose guide is installed.
Is the load out of balance? (reler pages 25 and 38),
E _ eChe(k the macnln' is level and does not lock,
It may have suds buildup (refer spin light flashing, page 33),
The clothes _._/
.....e unevenly distributed in the wash tub, you/Ecos?/_rt TM has compensated by lowering
the spin speed
Check the feet are unscrewed and the rubber inserts are fitted so the machine is level and does not
rock.
Ioo rnuch water for load (page 30).
It may still be in the process of sensing the ware/level (Reler to page 30)
Some loads do not suit Auto water level eg pillows, bedding, large bulky items. /\4anually select the
water level.
I_e[pr to pages 3c, to 38 to adjust the Auto f_ll level.
Banging -The load is out of balance (refer page 23).
Other noises - refer page :_].
_4
The water level is too high for the amount of clothes. This has caused excessive splashing. Use a
lower water level.
If this is happening when the water level is being automatically selected, adjust the auto water level
down f_om Heavy Duty to Delicate setting (_ef_,rto page 38).
large bulky garments (eg pillows, comfo/ters) can cause splashing. (Wash on Delicate cycle)
(Before calling for help please locate the serial number of your washer on its back top left
corner),
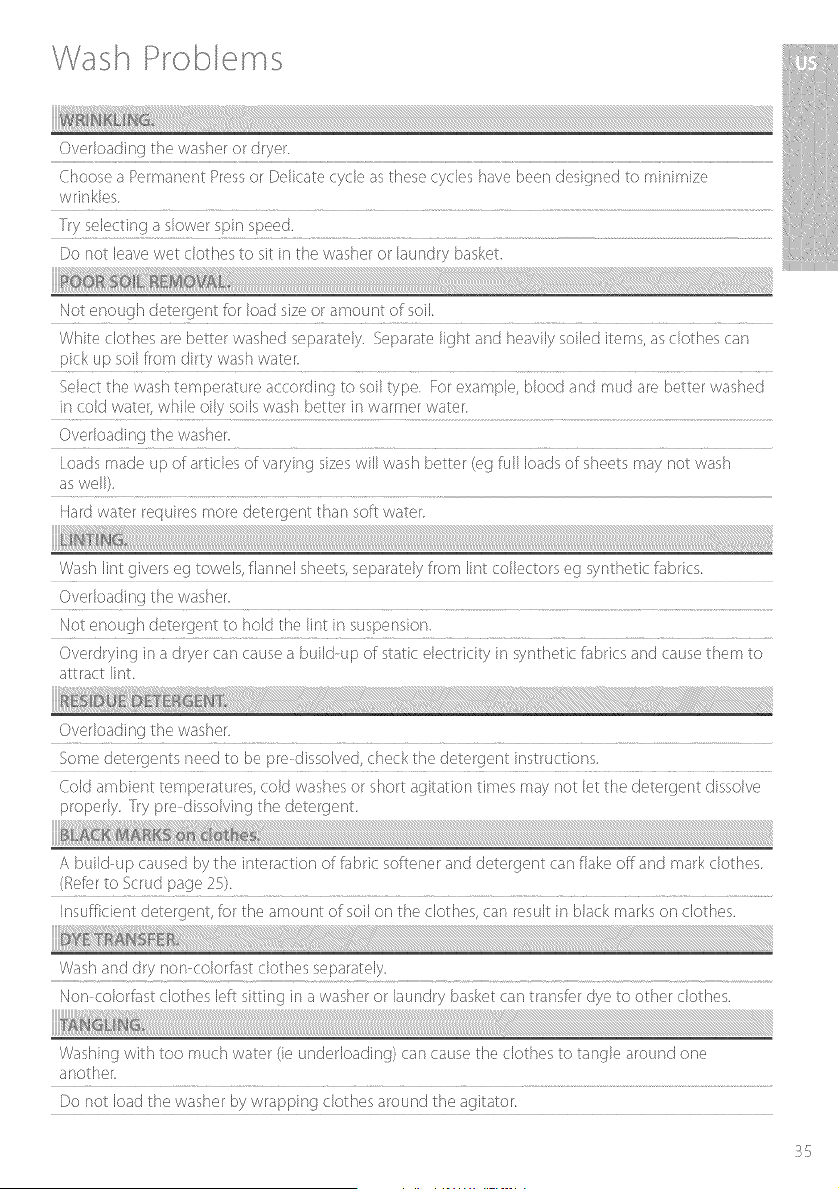
Y\!a h F: robl
Ove/Ioadinq the washe/or d/ye/
Choose a Permanent Press or Delicate (ycle a_,thee cy(les have been desiqned to minimize
wrinkles
Try selecting a slower spin speed.
Do not leave wet clothes to sit in the washer or laundry basket.
Not enough detergent for load size or amount of oil.
White clothes are better washed separatel}f. Separate light and heavily soiled items, as clothes can
pick up soil from dirty wash water_
Select the wash temperature according to soil t_,pe. For example, blood and mud are better washed
in cold water, while oily soils wash better in warmer water
Overloading the washeh
[ ()ads made up of articles of varying sizes will wash bette_ (eg full loads of sheets may not wash
as well).
Ha_d water requires more detergent than soft water.
Wash lint givers eg towels, flannel sheets, separately from lint collectors eg synthetic fab_ics_
Overloading the washeh
Not enough detergent to hold the lint in suspension.
Overdrying in a dryer can cause a buildup of static electridt7 in synthetic [abrics and cause them to
attract lint.
Overloading the washe_
Some detergents need to be pre dissolved, (beck the detergent inst/u(tions.
Cold ambient temperatures, cold washes or short agitation tirqes may not let the detergent dissolve
properly_ Try pre dissolving the detergent_
A build up caused by the interaction of fabric so/tener and detergent can flake off and mark clothes.
(r_el<_rto Scrudpage 25)
Insufficient detergent,/_a/the amount of soil on the clothes, can result in black marks on clothes.
Wash and dry non colorfast clothes separately.
Non colorfast clothes left sitting in a washer or laundry basket can transfer dye to other clothes.
Washing with too much water (ie unde/Ioading) can cause the <Iothes to tangle a/ound one
another_
Do not load the washer by wrapping clothes around the agitatoh
3_
L m to t Warrant7
When you purchase any new Fisher & Paykelwhiteware product for personal or consumer
use you automatically receive a one year limited warranty covering parts and labor for
servicing within the 4_ mainland United States, Hawaii, Washington DC and Canada In
Alaska the limited warranty is the same except that you must pay to ship the product to
the service shop or the service technician's travel to your home Products for use in Canada
must be purchased through the Canadiar_distributior_ chanr_el to ensure regulatory
If the product is installed in a motor vehicle, boat or similar mobile facility, you receive the
same one year limited warranty, but you must bring the vehicle, boat or mobile facility
containing the product to the service shop at your expense or pay the service technician's
travel to the location of the product
Fisher & Paykel undertakes to:
Repair without cost to the owner either for material or labor any part of the ;>roduct, the
serial number of which appears on the product, which is found to be defective In Alaska,
you must pay to ship the product to the service shop or for the service technician's travel
to your home If the product is installed in a motor vehicle, boat or similar mobile facility,
you must bring it to the service shop at your expense or pay for the service technician's
travel to the location of the product If we are unable to repair a defective part of the
product after a reasonable number of attempts, at our option we may replace the part or
the product, or we may provide you a full refund of the purchase price of the product (not
including installatior_ or other charges)
This warranty extends to the original purchaser and any sl4cceeding owner of the product
lot products purchased for orctinary single family home use
All service under this limited warranty shall be provided by Fisher& Paykelor its
Authorized %rvice Agent cturing normal business hours
How long does this limited warranty last?
Our liability under this limited warranty expires ONEYEARfrom the date of purchase of the
product by the first consumer
Our liability under any implied warranties, including the implied warranty of
merchantability (an unwritten warranty that the product is fit for ordinary use) also expires
ONEYAR (or such longer period as required by applicable law) from the date of purchase
of the product by the first consumer Some States do not allow limitations on how long an
implied warranty lasts, so this limit on implied warranties may not apply to you
36
Lmted Warranty
This Warranty Does Not Cover:
A Service calls that are not related to any defect in the Product. The cost of a service call will be
charoed if the problem is not found to be a defect of the Product For example:
I Correct faulty installation of the Product
2. Instruct you how to use the Product.
Replace house fuses, reset circuit breakers,correct house wiring or plumbing,
4 Correct fault(s) caused by the user
5 Change the set<@ of the Product.
(7 Unauthorized modifications of the Product.
7 Noise or vibration that is considered normal, for example, drain/fan sounds, refrigeration
noises or user warning beeps.
8 Correcting damage caused by pests edt.rats,cockroaches etc
s Deflects caused by factors other than:
1, Normal domestic use or
2 Use in accordance with the Product's User Guide
c Defects to the Product caused by accktent, neglect, misuse, fire, flood or Act of God
D The cost of repairs carried out by non authorized repairers or the cost of correcting such
unauthorized repairs
z Travel Feesand associated charges incurred when the product is installed in a location with
limited or restricted access (ie airplane flights, ferry charges, isolated geographic areas)
F Normal recommended maintenance as set forth in the Product's User Guide
If you have an installation problem contact your dealer or installer. You are responsible for
providing adequate electrical, exhausting and other connection facilities
VVeare not responsible for consequential or incidental damages (the cost of repairing or
replacing other property damaged if the Product is defoctive or any of your expenses caused if
the Product is defoctive) Some States do not allow the exclusion or limitation of incidental or
consequential damages, so the above limitation or exclusion may not apply to you
37
Limited Warranty
How to Get Service
Pleaseread your User Guide. ff you then have any questions about operatirx] the Product,
need the name of your local Fisher& Paykel Authorized <}erviceAgent, or believe the Product is
defective and wish service under this limited Warranty, please contact your dealer or call us at:
USA and Ca_]ada
loll FREE1o888ogoFHPoUSA (1o888o936o7872}
or use the link at: wwwofishe_paykekcom/Iocato£se_vice_/
You may be required to provkte reasonable proof of the date of purchase of the Product before
the Product will be serviced under this l imited Warranty
Commercial Use
Ii;you are usin<]the Product in a commercial setting (any use other than a single family dwellin<]),
we agree to repair or replace, without cost to you for parts only, any defective parts, the serial
number of which appears on the Product Our liability for these repairs expires ONE YEARfrom
the date of original purchase
At our option we may replace the part or the Product, or we may provide you a full refund of
the purchase price of the Product (not including installation or other charges). All service under
this Limited Warranty shall be provided by Fisher & Paykel or its Authorized <}erviceAgent during
normal business hours
No Other Warranties
This Limited Warranty is the complete and e×clusive a(treement between you and Fisher & Paykel
re(_ardin(t any defect in the Product None of our employees (or our Authorized Service Afients)
are authorized to make any addition or modification to this limited Warranty
Warrantor: Fisher& Paykel Appliances, Inc
If you need further help concerning this limited Warranty, please call us at the above number,
or write to:
Fisher & Payke_ Applia_]ces_ _nc
5900 Skylab Road
Huntington Beach
CA 92647
This kimited Warranty gives you specific legal rights, and you may also have other rights which
vary from State to State
38

Tabe des mat 6res
Instructions d installation
_mpor'tan'tes <onsignes de s6curi't@
Apropos de votre Fcosma_8 _
Verrouillage du couvercle
Cycles et options de _avage
l es Cycles de lava(_e
Rinta(_e avec actoucissant,Tremper_Gain de temps
Niveau× ct%au
En attente, D6part diff(_r6,Recommandations de lavage
Avant _e _avage
Tria@eet char<-tementdu lave linge
Eau de Javel
Adoucissant
D6pOt cNlant
Entretien de votre Ycosmay8 _'
Entretien et nettoyage
Produits susceptibles cX,ndomma£_ervotre machine P,osmorS"
Sigr@u×et Nps sonores d(4GaveIinge P,os/_?orN_'
Systkme anti peluche automatique
En cas de signal sonore d%ppel a _%ide
Service a _a client6_e
Probl@mes de fonctionnement
Probl_mes de _avage
6arantie _imit@e
4]
47
5O
52
53
54
55
56
57
58
58
58
59
6O
6O
6O
6]
62
63
64
65
4O
nstr. ct o d'nsta ato
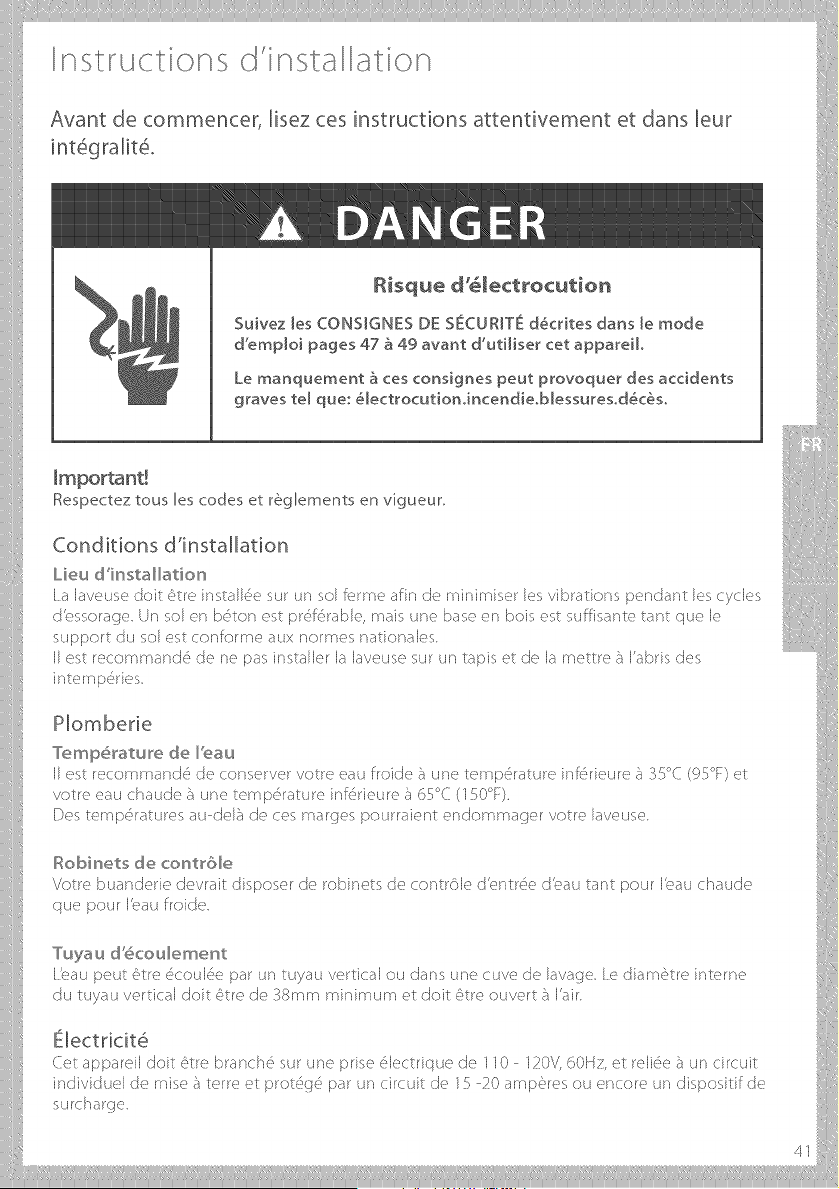
Avant de commencer, bez ces instructions attentivement et dans leur
int6gralit6o
Risque d_lectrocution
Suivez [es CONSIGNES DE SECURITE d_crites darts [e mode
d'emp[oi pages 47 _ 49 avant d'uti[iser cet apparei[o
Le manquement & ces consignes peut provoquer des accidents
graves tel que: _[ectrocutionoincendieob[essuresod_c_so
Respectez tousles codes et r6glements en vigueur.
Conditions d'installation
Lieu d'instaHatio_s
[ a laveuse doit 6tre install6e sw _Ansol ferme afin de minimiser les vibrations aendant les cycles
d_,ssoraoe Un sol en bd,ton est pr(%rable, mais une base en bois est suffisante tant que le
support du sol est conforme aux normes nationales
II est recommand6 de ne pas installer la Bveuse sur un tapis et de la mettre a I'abris des
internp(_ries
P[ombede
Tc_mp6ralu_e de I_au
II est recommand6 de conserver votre eau froide a une temp@ature inf6rieure {_35°C (9}5°F} et
votre eau chaude 5 une temp6rature infd-rieure _}65°C (15()°F}.
Des tempd, ratures au del_ de ces mar(/es pourraient endomma(ler votre laveuse
Robinets de cont_8_e
Votre buanderie devrait disposer de robinets de contr61e d'ontrd_e d_au tant pour I_alJ chaude
que pour I_au froide
Tuyau d_r_coulemet'_t
['eau petit 6tre 6couk% par un tuyau vertical ou dans une cuve de lavage [e diam<',tre interne
du tuya(A vertical dnit .atre de 38mm minimum et doit .atre ouvert {) I'air
Cetappareildnit6trebranch6suruneprise61ectriquede110 120V,60Hz, etreli6ebuncircuit
individuel de raise 5 terre et protd,gd_par un circuit de I5 20 amp6res ou encore un dispositif de
surcharge
4]
C.j
n_tr_ctons d _sta ato_
_f-................
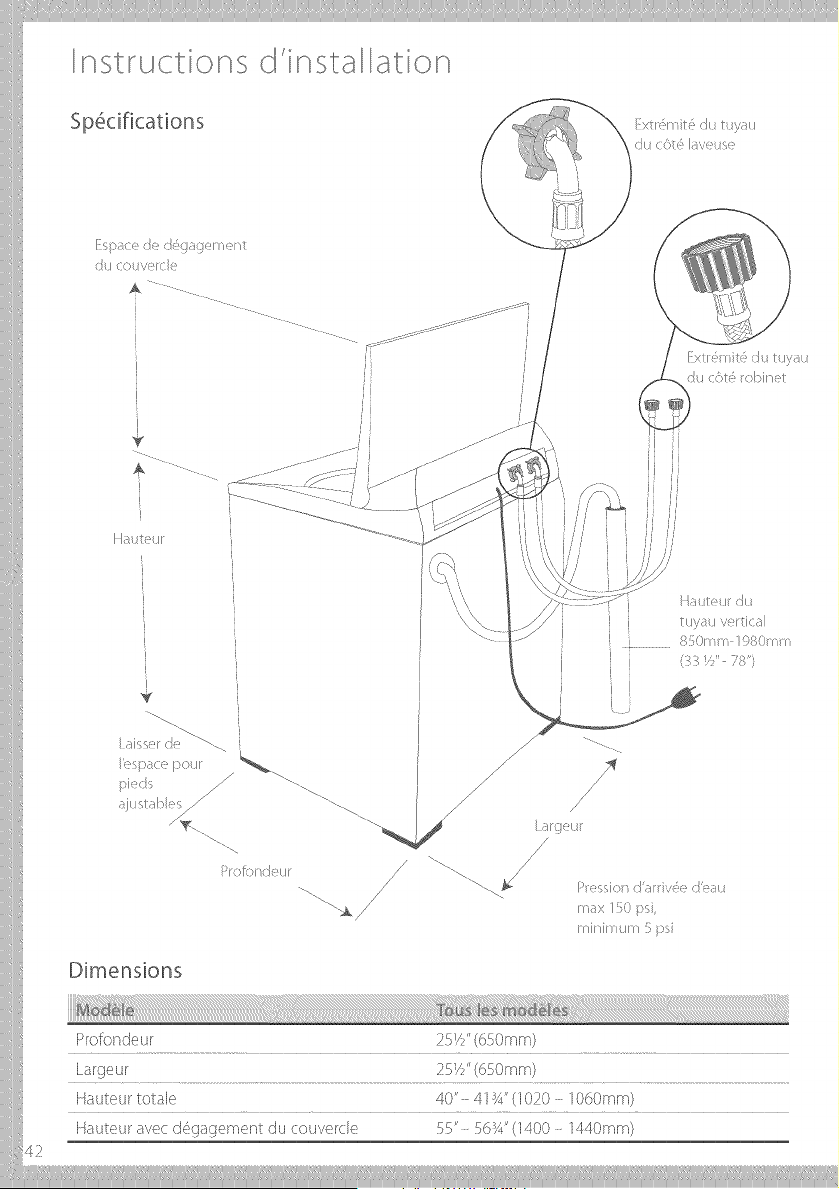
Dimensions
Prof,ondeur 25//' (650mm)
Largeu/ 25/9 '(650mm)
Hauteur totale 40' 416';/'(1020 - ]060iT}m)
Hauteur avec ddaaq_m_nt__ _ du cou_r(KJ__ $5' $6!',Y'(1400 1440mm)
42
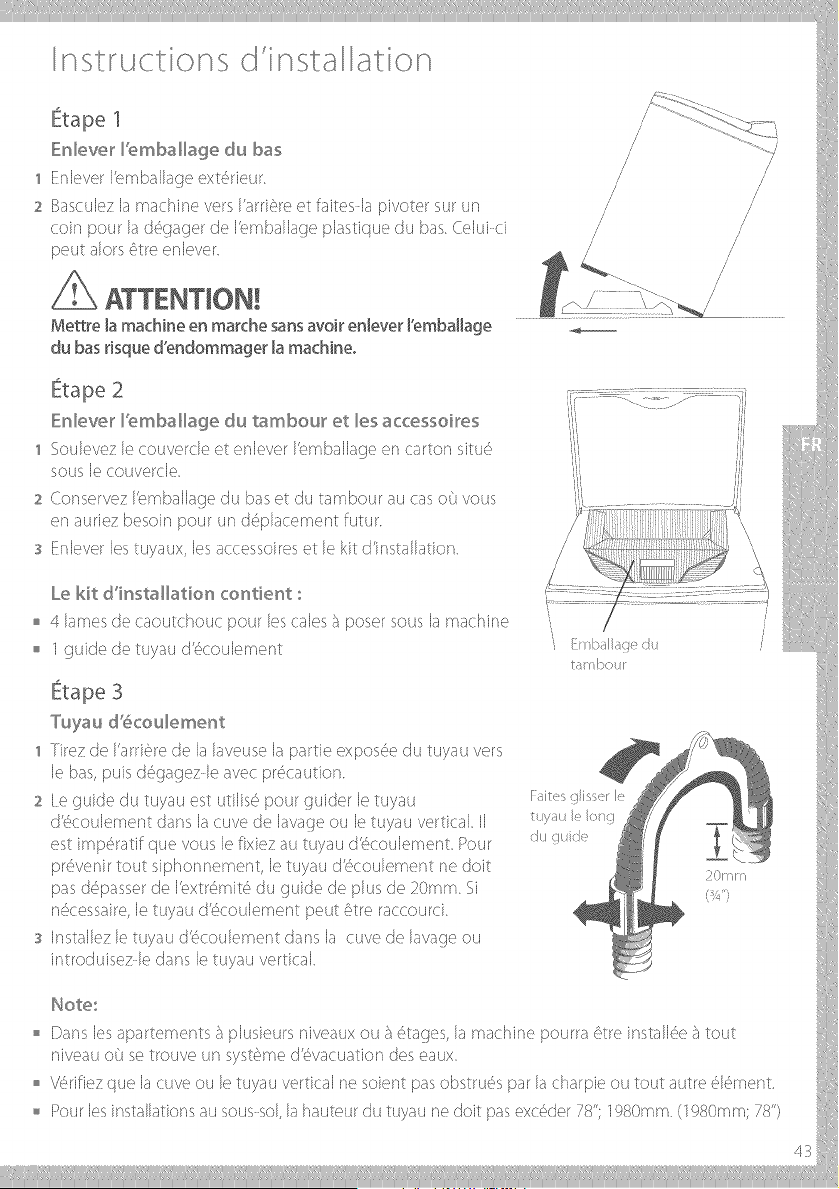
dubasHsqued'endommager[amachh÷o
Etape2
Enlever_%mbaHagedutambouret_esaccessoi_es
1SoulevezlecouvercleetenleverI'emballac]eencartonsitu(;_
souslecouvercle
2ConservezI'omballaf_eduhasetdutambouraucas08vous
enaunezbesoinpourund6placementfl4tur
s Enleverlestuyaux,lesaccessoiresetlekitd'insta[ladon
/
/
/
Le kit d'i_sstallado_s co_stie_st :
4 lames de caoutchouc pour les cales {._poser sous la machine
I dluide de tuyau d'd_coulement
Etape 3
Tuyau d_6cou_ement
1 Tirez de I'arri#re de la laveuse la pattie e×pos<%du tuyau vers
le bas, puis d6_taf_ezle avec pr6caution
2 [ e 9uide du tuyau est utilis6 pour (_uider le tuyau
d'{_coulement dans la cuve de lavage ou le tuyau vertical II
est impd_ratifque vous le fixiez au t%,'au dbcoulement Pour
pr{wenir tout siphonnement, le tuyau d'(_coulement ne dolt
pas dd,passer de Ibxtr(_mit<'_du gukte de plus de 20ram <}i
n6cessaire, [e tuyau d'.,Scou[ementpeut Otre raccourd
s Installez le tuyau d'<%oulement darts la cuve de lavad_eou
introduisez le dans le tuyau vertical
Note:
o Darts [es apartements _ plusieurs niveaux ou _ (_taoes,la machine pourra Otre instalk% _ tout
niveau o_'.ise trouve un systOmed'dwacuation des eaux
Vd_rifiezque la cuve ou le tuyau verdcal ne soient pas obstru{_spar la charpie ou tout autre dq6ment.
o Pour lesinstallations au sous sol, la hauteur du tuyau ne doit pas e×c{_der78"; ]9}80mm (19}80ram;78")
43
n tr,, ct o d nsta ato
'I
2
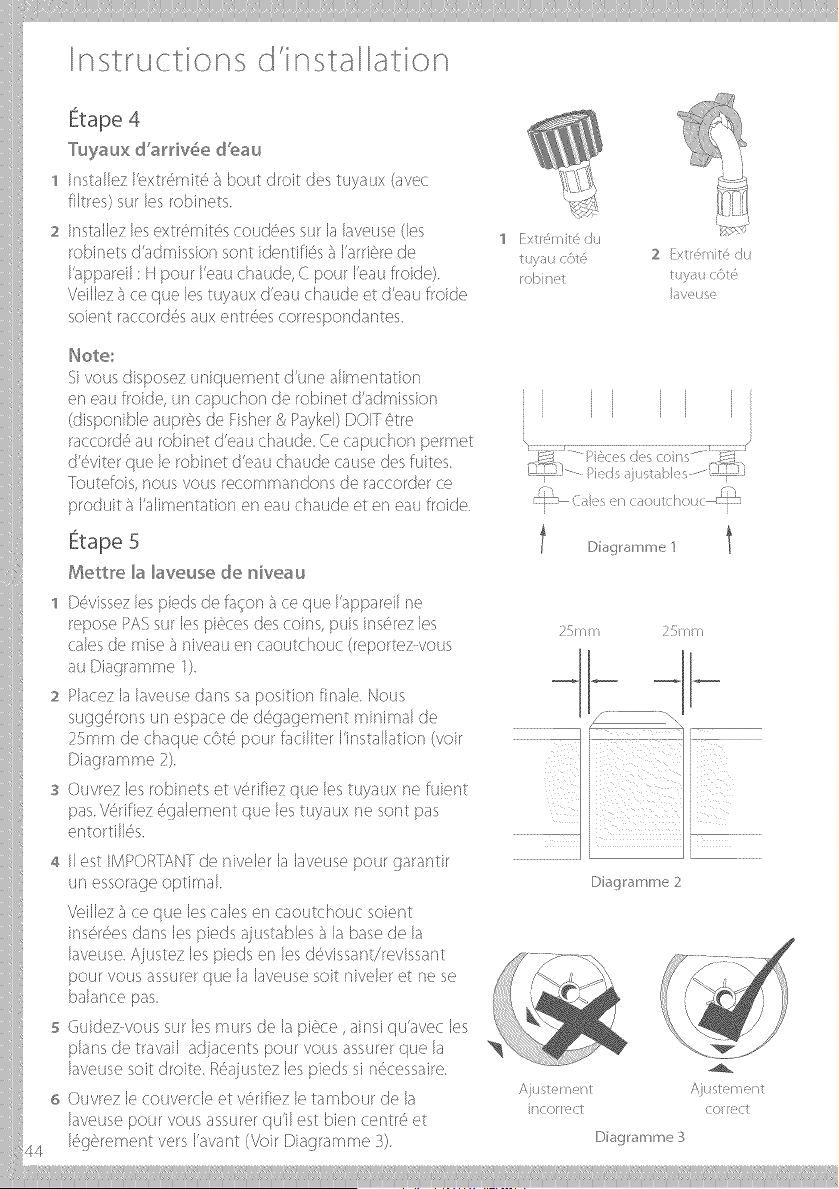
Etape 4
Tuyaux d'aFdv6e d%au
Installez I'extr{_mitd_{7bout droit des tuyaux (avec
filtres) sur les robinets
Enstallezlesextr6mit6s coud6es sur la laveuse (les
robinets d'admission sont ktentifi6s b I'arri6re de
I'appareil : H pour I'eau chaude, C pour I'eau froide)
Veillez £}ce que lestuyaux d'eau chaude et d'eau froide
soient raccord6s aux entrd_escorrespondarces
Exl {_ it <:tl
ttl)/ tl(ol_,
[(>!) I _1
_Sd,Sd
2 Ext'_' t <£1
ttlyau cob,
lavmis _
44
Note:
Sivous disposez uniquemer_t d'une alimentation
en eau froide, un capuchon de robinet d'admission
(disponible aupr#s de Fisher P_Paykel)DOlT 0tre
raccord6 au robinet d'eau chaude Ce capuchon permet
d'_witerque le robinet d'eau chaude cause des fuites
foutefois, nous vous recommandons de raccorder ce
produit {_I'alimentation en eau chaude et en eau froide
Etape 5
Mettle _a _aveuse de niveau
1 D_'wissezles pieds de f%on 5;ce que I'appareil ne
repose PASsur les pi6cesdes coins, puis ins6rez les
tales de raise£aniveau en caoutchouc (reportez vous
au Diaoramme I)
2 Hacez la laveuse dans sa position finale Nous
sugg6rons un espace de d<',gagement minimal de
25ram de chaque c6t(', pour fadliter I'installation (voir
Diagramme 2)
s Ouvrez les robinets et v{_dfiezque lestuyau× ne fwent
pas Vd_rifiez{_galement que lestuyaux ne sont pas
entortilk',s.
4 II est IMPOR[ANTde niveler la laveuse pour garantir
un essorage optimal
Veillez £_ce que les tales eri caoutchouc soient
ins6r6es dans les pieds ajustables F,la base de la
laveuse Ajustez les pieds en les d6vissant/revissant
pour vous assurer que la laveuse soit niveler et ne se
balance pas
5 Guidez vol_s sur les tours de la pi6ce, ainsi qu'avec les
plans de travail adjacents pour vous assurer que la
laveuse soit droite R6ajustez les pieds si n6cessaire
60uvrez le couvercle et v{_rifiezle tambour de la
laveuse pour vous assurer qu'il est bien centr6 et
16g6rement vers I'avant (Voir Diagramme 3).
i i i i
i i
dT h _ ¸"
', I!s caotll <>tl<_
l Dag a_ re " l
2 2:
D a_.:_a_ _ e 2
AtIsl ,tl AtIsl _ t
I (( :!(1 ((} _!(1
Dagar re :

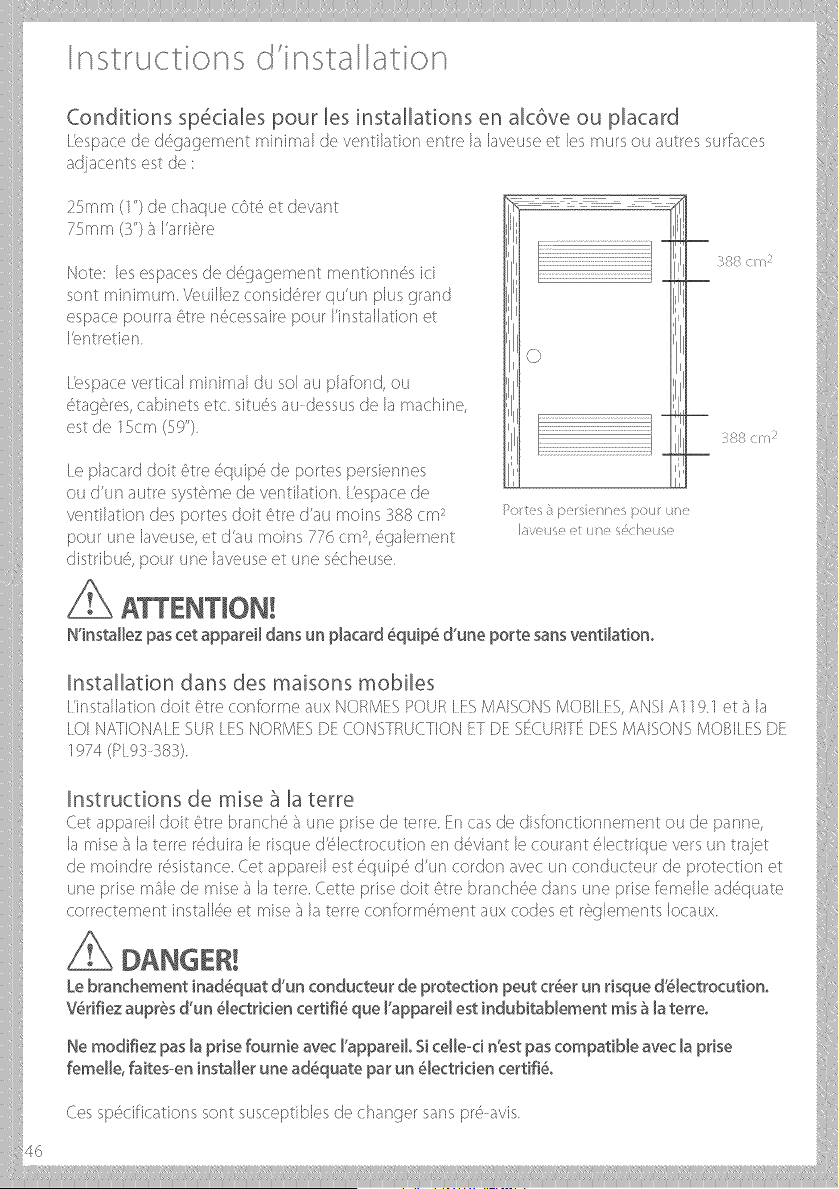
..... nsta atonn trJct ons d'
Conditions sp6ciaies pour [es installations en aic6ve ou placard
I'ospace de d_gagemer¢ minimal de ventilation entre la laveuse et les tours ou autres surfaces
25rnm (1") de chaque cot(<`et c}evant
75ram (3") b I'arnOre
Note: lesespaces de d6gagement mentionn6s ici
sont minimum Veuillez consid6rer qu'ur_ plus grand
espace pourra 6tre n6cessaire pour I'installatior_ et
I'entretier_
Ibspace vertical minimal du sol au plafond, ou
<<_tag6res,cak>inetsetc situ6s au dessus de la machine,
est de 15cm (59")
{ e placard doit 6ire 6quipd_de portes persiennes
ou d'un autre systt_me de ventilation hT,spacede
ventilation des portes doit Otre d'au moins 388 cm 2
pour une laveuse, et d'au moins 77d_cm 2,6galement
distribu6, pour une laveuse et une s_cheuse
lOtS <S >} S{! t {'S :Ot]" tl{!
I ',,/ !tlS{! {! ill{! S{!( {!tlS{!
<, ( { :
? >
<, (] {
N'installez pas cet appareil dans un placard _quip_ d'une porte sans ventilationo
Installation darts des maisons mobiles
{!installation doit 6ire conforme aux NOF(MESPOURIES MAISONS MOBIl ES,ANSI A119.1 et D la
{ 01 NATIONAlESt;F(I ESNOF(MESDECONSTF(U(TIONETDESI( UF(IT[DESMAISONSMOBIl ESDE
1974 (PI 93 383)
Instructions de raise _ la terre
Cet appareil doit 6tre branch6 D une prise de terre En cas de disfor_ctior_nemer¢ ou de pantie,
la raise D la terre r6duira le risque dblectrocution en ddwiant le courant 61ectrique vers un irajet
de moindre r6sistance. Cet appareil est 6quip6 d'un cordon avec un conducteur de protection et
i_ne prise mDle de raise D la terre. Cette pdse doit 6tre branch6e dans une prise femelle ad6quate
correctement install6e et raise D la terre conformd_ment au× codes et rOglements Iocau×
46
Le branchement inad_quat d'un conducteur de p_otection peut crier un risque d'_lectrocutiono
V@ifiez aupr_s d'un _[ectricien certifi_ que ['appareil est indubitab[ement mis _ [a terreo
Ne modifiez pas la p_isefoumie avec I'appareil° Si celleocin'est pas compatible avec [a prise
femell÷, faitesoen installer un÷ adequate par un _[÷ctdcien certifi_,
Cessp6cifications sont susceptibles de changer sans pr6 avis
rnporta tes cons gnes de
Veuillez life toutes les informations sur la s6curit6 avant FutiBation
I)e nombroux lave Iinc_osont instalk"s dans les maisons _,_sroximit(" d'un s4_cheIinc_oou d'un
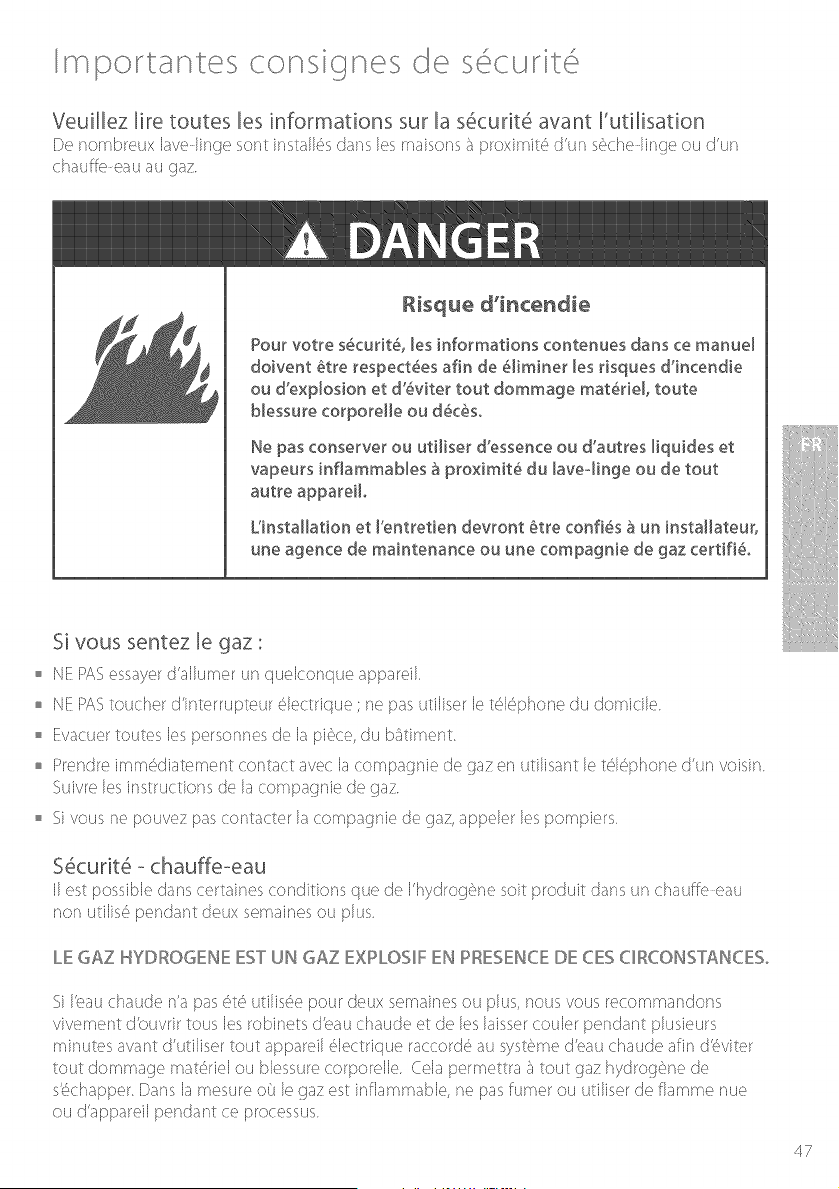
Risque d'incendie
Pour votre s_curit_, les informations contenues dans ce manuel
doivent _tre respect_es afin de _[iminer [es dsques dlncendie
ou d'exp[osion et d'_viter tout dommaye materiel, toute
blessure corporelle ou d_c_s°
Ne pas conserver ou ut[l[ser d'essence ou d'autres I[qu[des et
vapeurs inflammables _ prox[m[t_ du [aveo[[nge ou de tout
autre appare[[o
Unstallation et ['entretlen devront _tre confi_s _ un [nstallateur,
une agence de maintenance ou une compagnle de gaz certlf[_
Si vous sentez [e gaz"
o NE PAS_'ssayerd'allumer un quelconque appareil
NE PAStoucher ctfinterrupteur (;qectrique ; ne pas utiliser le t6[6phor_e du domicile
o Evacuer routes les personr_esde la pi6ce, du k;adment
Prendre imm6ctiatement contact avec la compactrfie de gaz en udlisant le t616phor_ed'un voisin
Swvre [es instructior_s de [a compagrfie de 9az
Si vous ne pouvez pas contacter la compa{]rfie de gaz, appeler les pompiers
S6cudt6 - chauffe-eau
II est possible dans certaines conditions que de N_ydro_0ne soit produit dans un chauffe eau
non utilis<'_pendant deux semaines ou plus
LE GAZ NYDROGENE EST UN GAZ EXPLOS_F EN PRESENCE DE CES CIRCONSTANCESo
Si lYau chaude n'a pas d_td,utilisd,e pour deux semair_esou plus, nous vous recommandor_s
vivement dtx_vrir tousles robinets dbau chaude et de les laisser couler pendant plusieurs
minutes avant d'utiliser tout appareil ddectrique raccord<'_au systC_med'eau chaude afin dSviter
tout dommage matc'_rielou blessure corporelle. Cela permettra _ tout gaz hydrogS_nede
sSchapper Dans la mesure ou le gaz est inflammable, ne pas ruiner ou utiliser de flamme nue
ou d'appareil pendant ce processus
47
mportantes co gnes de s c,, r
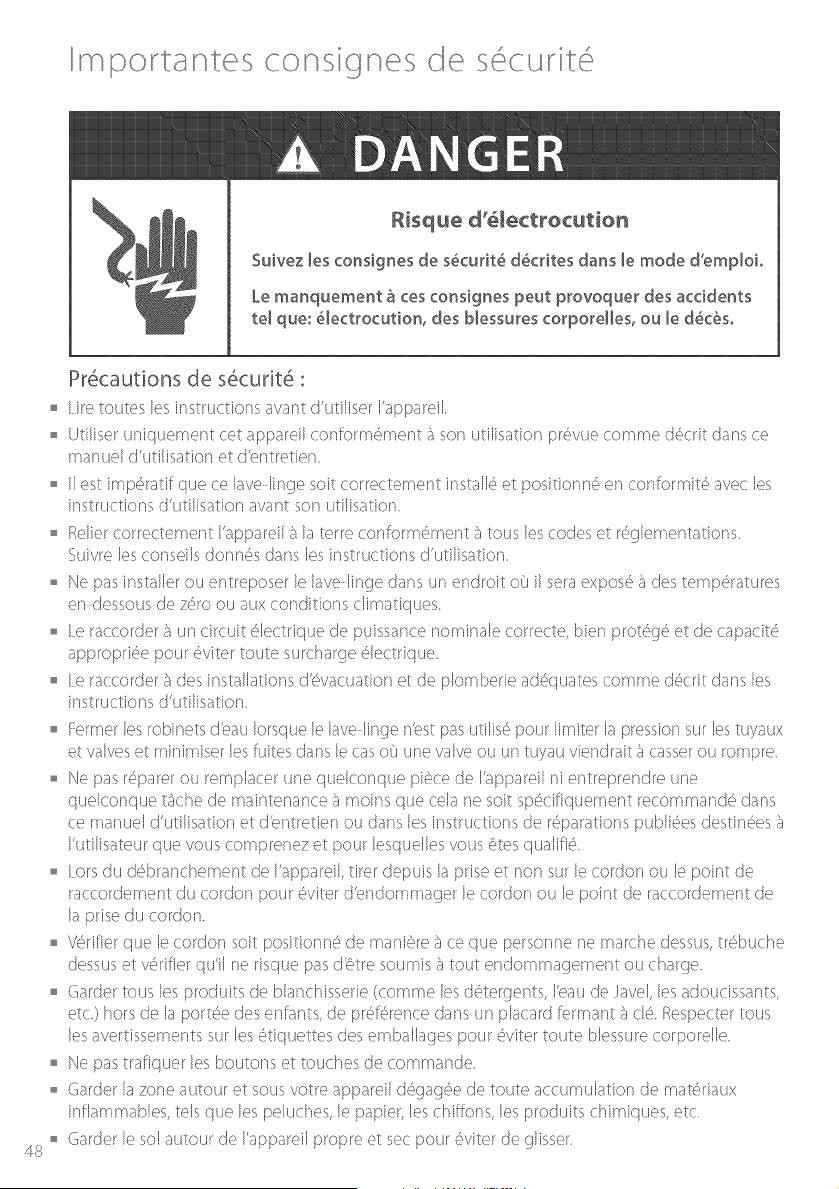
Risque d'_lectrocution
Su[vez les cons[gnes de s_cur[t_ d_cr[tes darts [e mode d'emploL
Le manquement _ ces cons[gnes put provoquer des acddents
t÷[ qu÷: _[÷ctrocution, des b[essures corpore[[es, ou [÷ d_c_so
48
Pr6cautions de s6curit6 :
[ire toutes les instructions avant d'utilisor I'appareil
o Ud[iser uniquement cet appareil conform6ment _}son utilisation prdwuecomme d6crit dans ce
manuel d'utilisation et d'er_tretien
o II est imp6ratif que ce lave lin<]e soit correctement install6 et sositionn6 en conformit6 avec les
instructions d'utilisation avant son utilisadon
Relier correctement I'appareil 5 la terre conform6ment 5 tousles codes et r6<]lementations
Swvre lesconseils donn6s dans les instructions d'udlisation
o Ne pas installer ou entreposer le lavelin<]e dans un endroit o8 il sera expos6 ;} des temp6ratures
en dessous de z6ro ou aux conditions climadques
[e raccorder 5 un circuit 6lectrique de puissance nominale correcte, bien prot606 et de capacit6
appropri6e pour 6viter route surchar(_e61ectrique
[e raccorder a des installations d'd_vacuationet de plomberie ad6quates comme d6crit dans les
instructions d'uti[isation
Fermer lesrobinets cX,auIorsque le lave linge n'est pas utilis<'_pour limiter la pression sur les tuyau×
et valves et minimiser les fuites dans lecas o_3une valve ou un tuyau viendrait {}casserou rompre
o Ne pas r6parer ou remplacer une quelconque pi6ce de I'appareil ni e/}treprendre une
quelconque tSche de maintenance {_,moins que cela ne soit spd_cifiquement recommand{ _dans
ce manuel d'utilisadon et dbntreden ou dans les instructions de r<'_parationspublk%s destir%es _}
I'utilisateur que vous comprenez et pour lesquelles vous (_tesqualifi('_
o [ors du dd_branchement de I'appareil, tirer depuis la prise et non sur le cordon ou le point de
raccordement du cordon pour {_viterd'endommager le cordon ou le point de raccordement de
la prise du cordon
o Vd_rifierque le cordon soit positionn6 de mani6re £_,ce que personne ne marche dessus,tr6buche
dessuset vd_rffierqu'il ne risque pasdStre soumis ;_,tout endomma<]ement ou char<]e
Garder tousles produits de blanchisserie (comme lesd6ter(_ents, I'eau de/avel, les adoucissants,
etc) hors de la port(% des enfants, de pr<'_fd_rencedans un placard fermant _}old_.Respecter tous
les avertissements sur les d4iquettes des emk)allages pour _',vitertoute blessure corporelle
Ne pas trafiquer les boutons et touches de commande
o Garder la zone autour et sous votre appareil ct_'_gagd_ede toute accumulation de matd_riaux
inflammables, tels que les peluches, le papier, les chiffons, les produits chimiques, etc
Garder le sol autour de I'appareil propre et sec pour <Mter de glisser

mportantes cons gnes de
Ne jamais essayer d'attraper quelque chose dans le lave Iinge si le tambour ou I'agitateur sont
en mouvement
Avant d'ouvrir le couvercle, de d6charoer ou d'ajouter des v#tements, appuyer sur la touche
MAACHE/PAUSEet attendre que la machine soit compl6tement arr6t6e avant de soulever le
couvercle
Une 6troite surveillance est recommand6e si cet appareil est utilis6 par ou ;7proximit6 d'enfants
Ne pas laisser lesenfants jouer a I'int6rieur de cet appareil, rfi jouer avec cet appareil ou tout
autre appareil remiJ _
Vous J?arer de maniOre approprk'_ede tout appareil mis de cot#_pour le rebut et des matc',riau×
dbmballage/db×p<'_dition. Avant de mettre au rebut un lave linge ou de le mettre hors service,
retirer le couvercle du lave linge
Ne pas laisser le couvercle relev_.'_pendant le cycle l a machine ne fonctionnera pas Pour la
d6marrer, rabaisser le couvercle et appuyer sur la touche MARCHE/PAUSE
Ne pas laver ou s6cher des articles ayant <'_t6nettoy6s avec, lavd_sdans, mis _,tremper dans ou
tachd_sde substances explosives ou inflammables (comme la cite, I'huile, la peinture, It,ssence,
les produits ct_'_graissant,les solvants de nettoyage {}sec, le k('_ros#ne,etc) pouvant s'enflammer
ou exploser. Ne pas ajouter ces substances ;_,I'eau de lavage. Ne pas utiliser ces substances
autour de votre lave Jingeet/ou s_che linge pendant h4tilisation, car ils dd_gagentdes vapeurs
pouvant sWfflammer ou exploser
o l e processus de blanchisserie peut r_'_ctuirele ctegr_',ignifuge des tissus. Pour .i,viter un tel r_'_sukat,
les instructions de nettoyage du fabriquant du v(!_tementdevront (?_tresuivies attentivement
Ne pas m#'qangerd'eau de Javel ;} base de chlorure avec de I'ammoriiaque ou des acides teB
que le vinaigre et/ou des agents antirouille l e mdqangepeut ct{_gagerun gaz toxique pouvant
entrai'ner la mort.
Ne jamais grimper sur ou vous tenir debout sur le dessusdu lave linge ou le couvercle du lave linge
Ne pas laver d'artides en fibre de verre dans votre lave lin<]e Vous risquez de provoquer une
irritation cutan6e {spartir des particules restantes qui pourront _tre r6cup6r6es par les v_!_tements
au cours des prochaines utilisations du lave linge
Pour {qiminer les risques d'(qectrocution, d_'_brancherI'appareil de la prise _qectrique et
dd_connecter le lave linge du panneal4 de distribution de la maisori en retirant les fusibles
ou en d_'_connectantle disjoncteur avant d'entreprendre tout travaux de maintenance ou de
nettoyage
o I_EL4Af<QU: En appuyant starle bouton PUISSANCE,vous ne coupez PASI'appareil de
I'alimentation dqectrique, m_me si tousles td_moinssont d4eints
Ne pas utiliser cet appareil s'il a d_td_endommagG en cas de mauvais fonctionnement, s'il est
partiellement d(',montd_ou en cas de piOces manquantes ou cassd_es,y compris une prise ou un
cordon endom mag('_(e)
Ne pas utiliser cet appareil si le couvercle n'a pas d_t('_correctement remis en place
<}ivous utilisez urie rallonge ou un dispositif de prise dflectrique portable (comme par exemple
une boi'tes ;} prises de courant mukiples), vd_rifierqu'il soit positionn{ _de maniOre ;} ne pas entrer
en contact avec de I'eau ou I'humictit( '_
N'utilisez jamais cet appareil pour laver une brassd_edont le pokts total (£}sec) e×c4_cte7 kg.
VEUILLEZ CONSERVER CES INSTRUCTIONS 49
%"
ernarrage
o Repartir de mani{,re {_gale la charge autour de I'agitateur
Rema_que ;
N'enroulez pas d'artides de grande taille, comme les draps, 8utour de I'agitateur
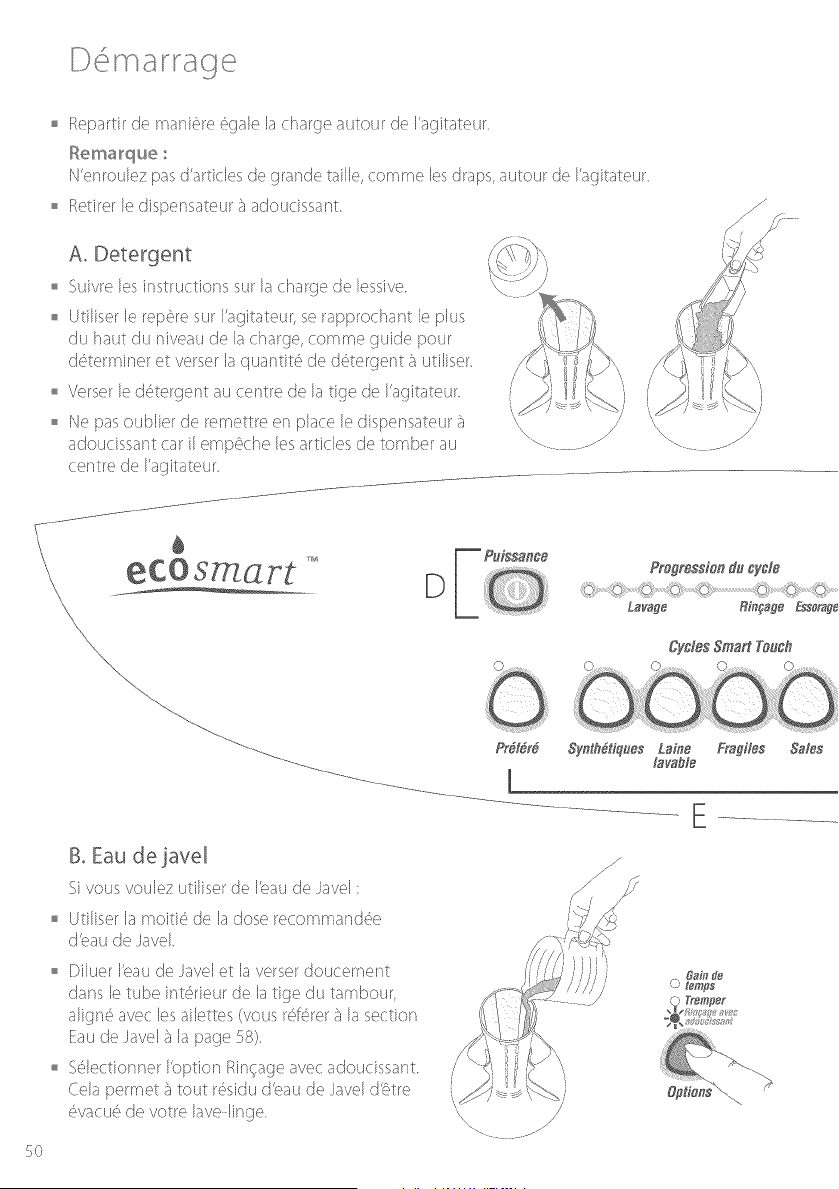
Retirer le dispeNsateur 3 adoucissar¢
A° Detergent
Suivre les instructions sur la charge de lessive
Utiliser le rep6re sur I'agitateur, se rapprochant le plus
du haut du niveau de la charge, cornrne guide pour
d6terminer et verser la quantit6 de d6tergent {_utiliser
Verser le d6tergent au centre de la tige de I'agitateur
o Ne pas ouNier de rernettre en place le dispensateur {_
adoudssant car il emp#che lesarticles de tomber au
centre de I'agitateur
/
/
/
\\
B° Eau de iavel
£.
_1vous voulez utiliser de I'eal_de/avel •
Utiliser la moiti6 de la dose recommand6e
d%au de Javel
Dih/er I%au de Javel et la verser doucernent
dans le tube int6rieur de la tige du tambour,
align6 avec les ailettes (vous r6f6rer a la section
Eau de Javel 3 la page 58)
SNectionner Ibption @in€ageavec adoucissant.
Cela permet _ tout r(sktu d%au de Javel d%tre
6vacu6 de votre lave linge
5O
Progressiondu@'c@
Lavage R#_ge Ess_r@_
Cycles Smart Toucfl
Syr@6t@ues Laine FragHes Safes
tavable
E
/
/
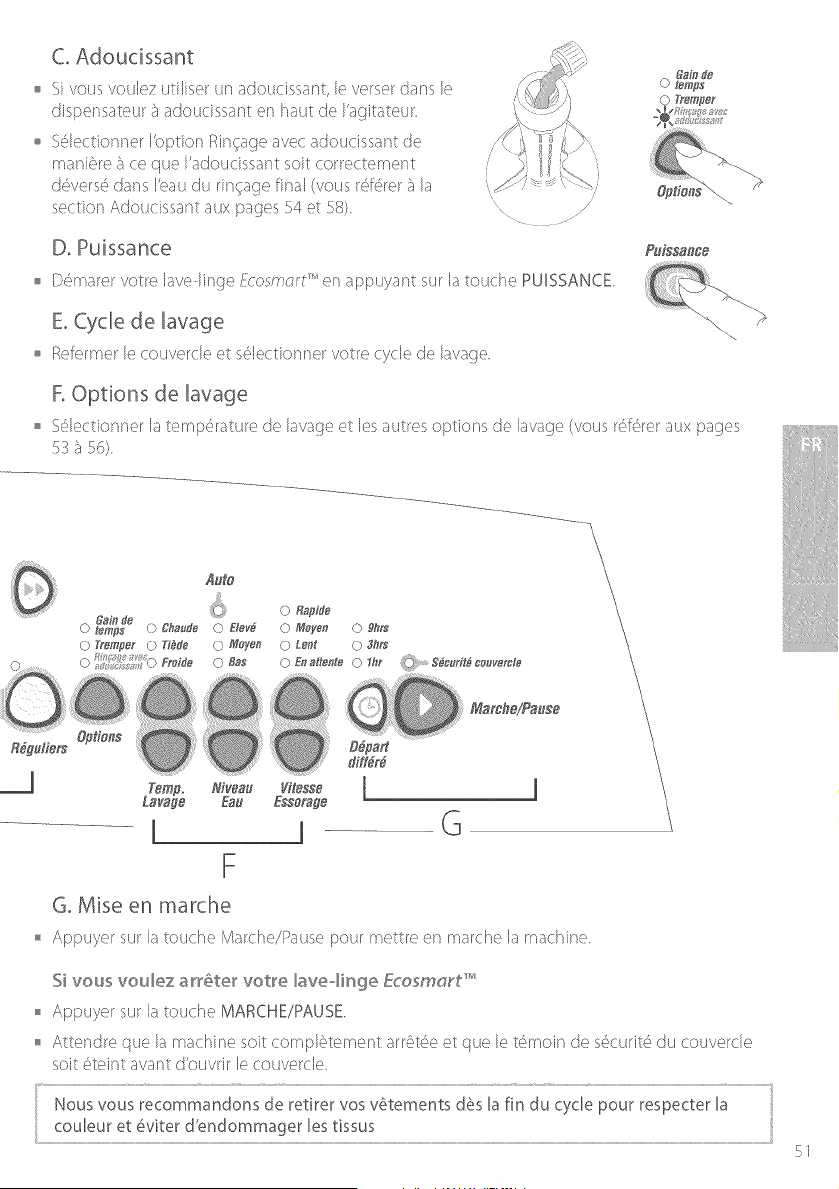
C° Adoucissant
o Si vous voulez udliser un adoucissant, le verser dans le
dispensateur D adoucissant en haut de I'agitateur
= S61ectionner Ibption Rintage avec adoucissant de
mani6re _ ce que I%doucissant soit correctement
dd_vers6dans k_audu ri%age final (vous r6f6rer _ la
section Adoucissant aux pages 54 et 58)
/
-; _emf_s
} Tremt_er
D, Puissance
= I}<'_marorvotre lave lingo ,:co.rr crl en appuyant sur la touche PUISSANCE
E, Cycle de lavage
= Refermer le couverde et s61ectionner votre cycle de lavage
@issance
....\
F°Options de lavage
= S61ectionner la temp6rature de lavage et les autres options de lavage (vous r6f6rer aux pages
;)
Auto
£
,{) 0 Ral_ide
Gain de
O l_mps O Chaud_ O H_6 O _@Ve'_ O gh_s_
0 Tremp_r O T_'de O Moyel 0 Le_li O 3hrs
Nivea_ V_tesse
@_ Essomge
\
\
\
Maid,e/Pause
l
F
G, Mise en marche
o@a#
d£F_r4_
= Appuyer sur la touche Marche/Pause pour mettre en marche la machine
Si vous voulez a_@te_ vot_e lave=li_sge F_osma_t _'
o Appuyer sur la touche MARCHE/PAUSE
o Attendre que la machine soit compl#tement arr6t6e et que le t6moin de s6curit6 du couverde
soit 6teint avant d'ouvrir le couvercle
Nous vous recommandons de retirer vos v6tements d6s la fin du cycle pour respecter la
couleur et 6vlter d'endommager les tlssus
51
Apropos de votre Ecosmart ''J'
Verrouillage du couverc[e
Votre lave linge/qosmt;rl _' est d,quip6 d'un syst_,mede s('_curit6
avec verrouillage du couverde. (]race b cette for/ction, le
couverde ne pourra pas 6tre ouvert db(_ une s_'_curit6accrue
pour vous et les membres de votre famille
l e t6moin de s6curitd_du couvercle(situ6au dessusde
latouche Marche/Pauses'allumeIorsquele couverdeest
verrouilk'_pourvousindiquerque vousne pouvezpasouvrir le
couverde
D@a_
dffF4r4
C"
_,lle t6moin de s._',curitd,du couvercle clignote, cela sigrfifie que le verrouillage du couverde est
en phase de verrouilbge ou de d6verrouilh.,ge Per_dantcette phase, vous ne pouvez toujours
pas soulever le couvercle
C"
_,lle couvercle est laiss<'_ouvert, le lave Iinge ne pourra passe verrouiller et le cycle sera arr6t6
I a machine 6mettra un hip sonore et le td_moinde sd,curitd_du couvercle dignotera jusqu'b ce
que le couvercle soit rabattu et que vous appuyiez sur [a touche MARCHE/PAUSE.
NE MEN ins@er dans [a fente sur [e plateau sup@ieur de votre [ave°Jinge,
NE PAS essaye_ de d_sactiver [e verrouillage du couve_cle,
52
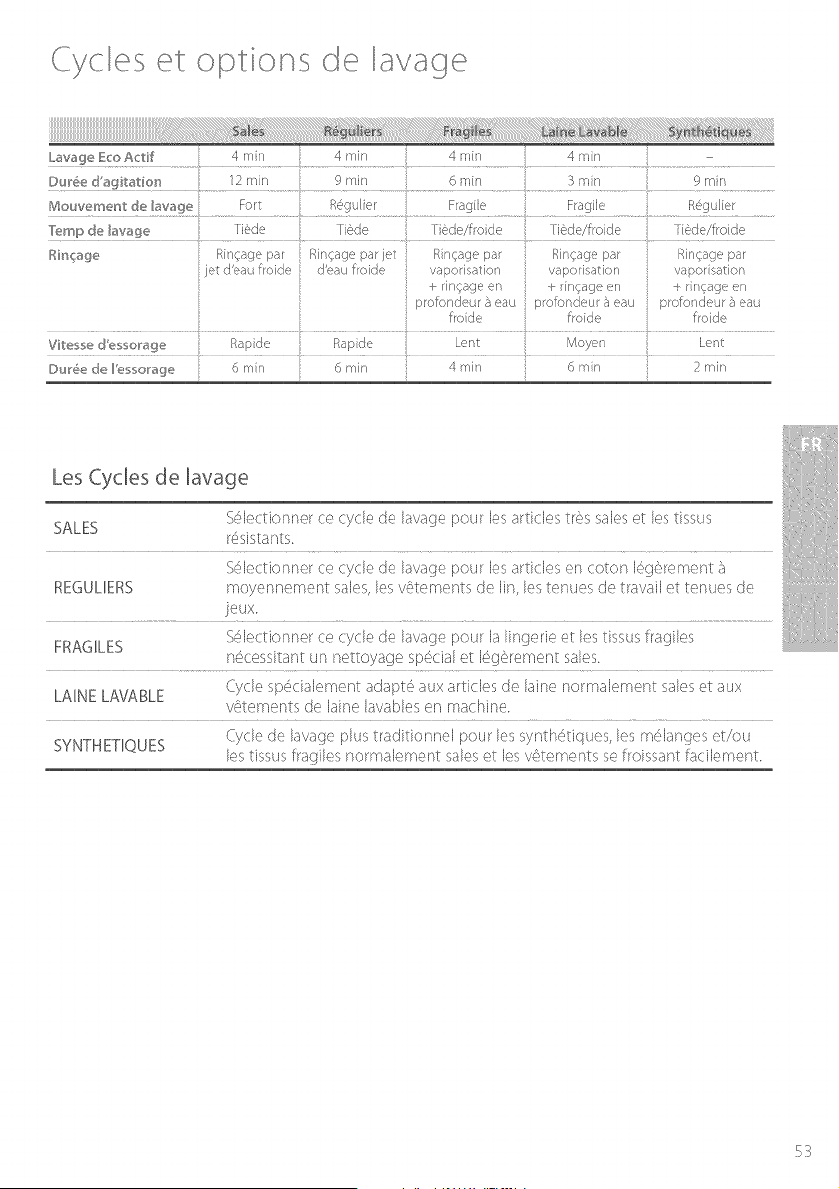
Cyc et options de lavage
_avage Eco Actif 4 mir 4 mn 4 mi_ 4 mr
12 rain fP mr/ 6 T/in }_ rT/r 9 mr/
Dur&e d'agitation ................................
Mouveme_st de _avage For R6gulier Frao[e Frag[e R6gulier
Ri_sgage
let d'eauf(oide d'eaufroide vapo/isatio_ vaporisation vapor sa_on
+_ngageen + i_gageen +rngac_ee_
: p/cfor_d_u/?aeau p ofor_deu _ eau profo/deut,'/eau
.................................................................................................!....................................................................................................................................................................................................................................
Vitesst d'_ss_[afl Rapde Rapde hers........ Moyt , b, nt....
D_6e de I%,sso_v_ge Omn Omn 4 mi/ 1)mn 2 mi_
Les Cycles de lavage
SALES Sdl,:(donner ce cycle de lava,oe pour les articles t/,}_ssales et les tissus
r6sistants_
S61ectionner ce cycle de lavage pour les arti(les en coton 16g0rement _
REGULH}_RS moyennement saks, I< _<t< m< nts de lin, les tenues de travail et tenues de ......................................................
FRAGILES S6Bctionner ce (ycB de lavag, pour la ling< tie et I_s tissus flagil s
n6cessitant un nettoyage sp6cial et 16g_Srement sales
LAINE LAb"ABLE Cycle sp6(ialement adapt6 aux articles de laine normalement sales et aux
vgtements de laine lavables en machine,
SYNTHETIQUES Cycle de lavage pks traditionnel pour les synth6tiques, les m61anges et!ou
les tissus fragiles normalement sales e les v# ements se froissant fa<ilemen
$3
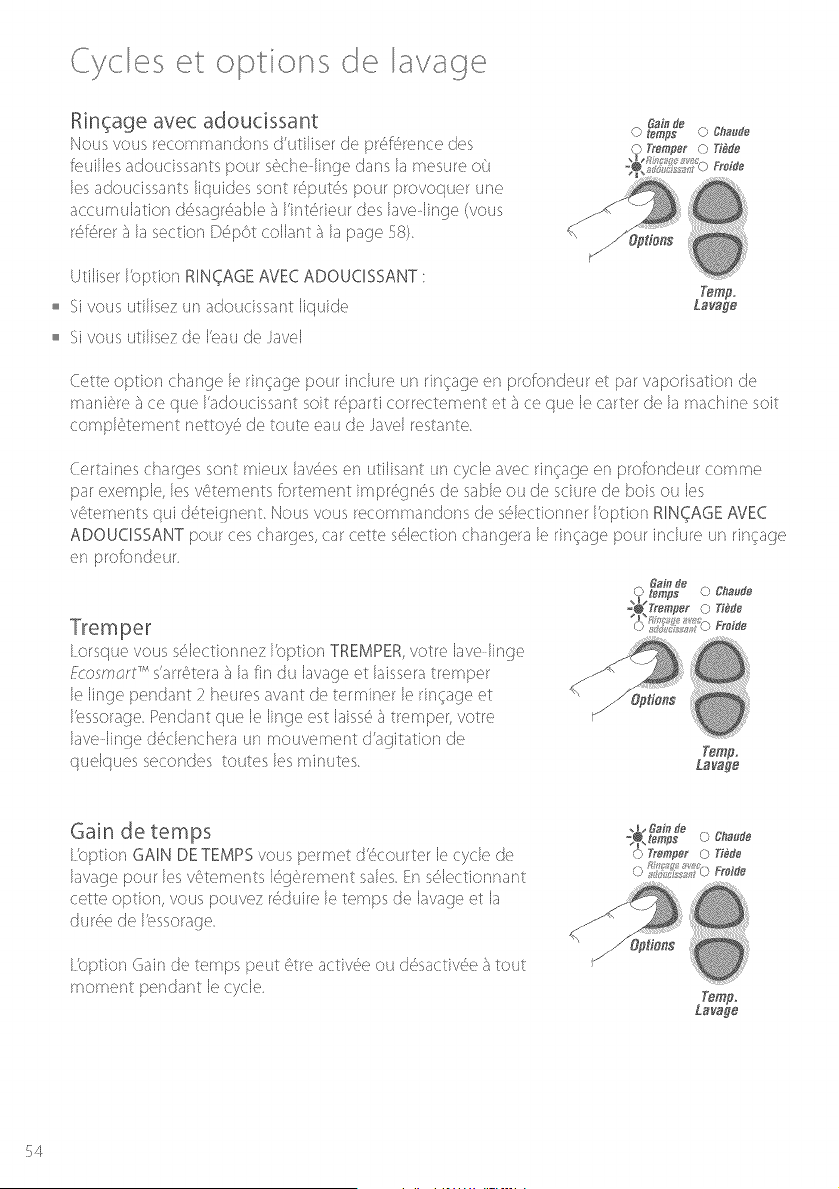
Cyces et oI:>t o de avage
fiin_age avec adoucissant
Nous vous recommandor_s d'utiliser de prd_fGrencedes
feuilles adoucissarcs pour sGche linge dans la mesure o8
les adoucissants liquides sont rGputGspour provoquer une
accuml/lation dGsagrGablea I'intGrieur des lavedinge (vous
rGfGrer;} la section D<'_pOtcollant {} la page _fi)
Utiliser IbpSon RINgA(}E AVECADOUCISSANT
C"
_1vous utilisez un actoucissant liquide
C"
_1vous utilisez de I'eaude Javel
Temp
Lavage
Cette option change le rin{_agepour inclure un rlnqage en profondeur et par vaporisation de
maniS_re_,ce que I'adoucissant soit r{_particorrectement et ;} ce que le carter de la machine soit
compl0tement nettoy6 de route eau de Javd restante
Certaines charges sont mbux lavGesen utMsant un cycle avec ri%age en profix]deur comme
par exemple, les v_tements fortement imprGgnGsde sable ou de sciure de bois ou les
v_tements qui ct_'_teignentNous vous recommandons de sGlectionner I'option RINgAGE AVEC
ADOUCISSANT pour ces charges, car cette s{_lectionchangera le rinqage pour inclure un ringage
en profondel4r
[ orsque vous sGlectionnez Ibption TfiEMPER,votre lave linge
Fcosmc;r/-_''s'arrGterab lafin du bvage et bissera tremper
le Iinge pendar¢ 2 heures avant de terminer le rin(_ageet
h_ssorage Pendant que le linge est laiss6a tremper, votre
lave linge dGclenchera 14nmol4vement d'agitatior_ de
quelques secondes routes les minutes
Gaifl d@
(_) temps" C, C;flaude
2_Tr_mper O Tilde
L) "_ nssa £ _ Fta_d_
Gain de temps
[t}ption GAIN DETEMPSvous permet d'Gcourter le cycle de
lavage pour les vGtements k',O_,rementsales En sGlectior_nant
cette option, vous pouvez r<'_duirele temps de lavage et la
durkeede I'essoracte
Ibption (}air] de temps peut (?_treactivGeou d{_sactivGe_}tout
moment pendant le cycle
Temp_
La_a_e
© T_mp_r O T_de
_4
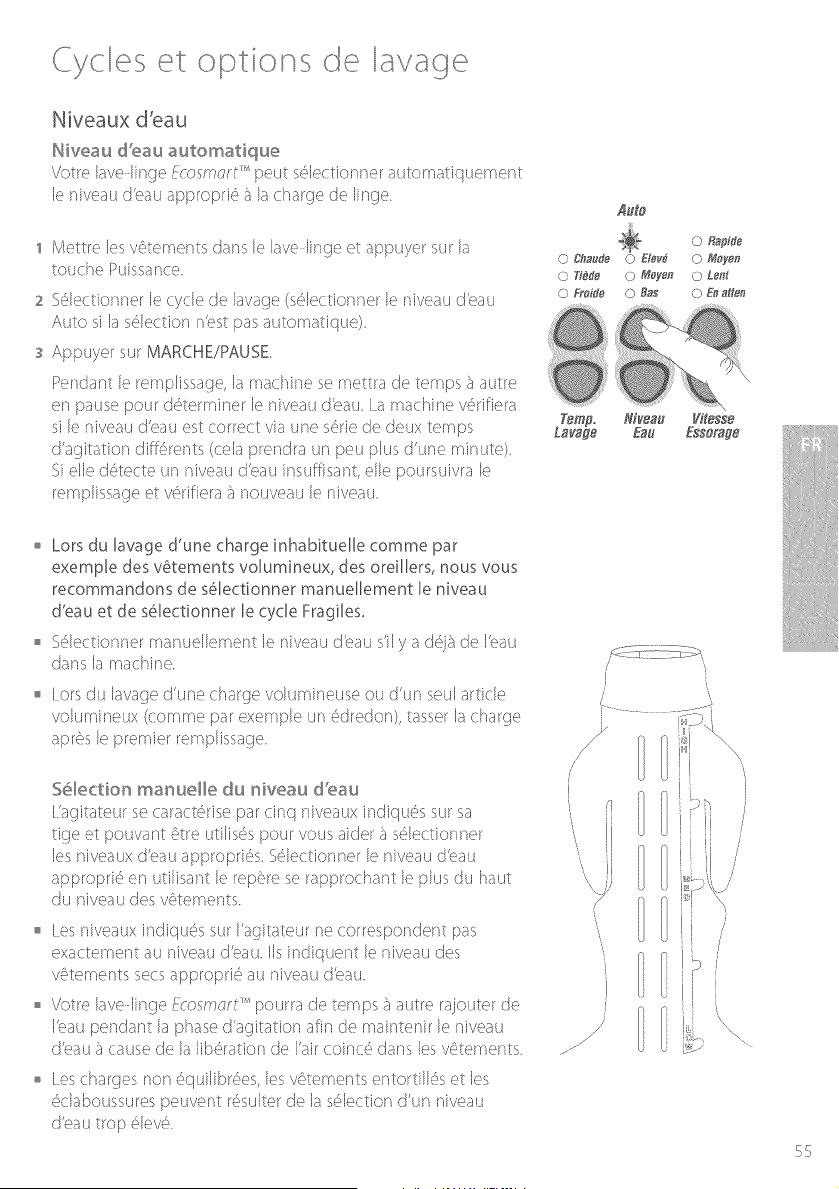
Cyces et opt uns de avage
Niveaux d'eau
Hiveau d%au automadque
Votre lavehnoe rco.rr t;rl peut s61ectionner automatiquement
le niveau d'eau approprk <_D la charge de Nnge
1 Mettre lesv6tements dans le lave linge et appuyer sur la
touche Puissance
2 S61ecdonnerle cycle de lavage (s61ecdonr_erle niveau d'eau
Auto si la s61ection n'est pas automatique)
s Appuyer sur MAACHE/PAUSE
Pendant le remplissage, la machine se mettra de temps b autre
en pause pour d6termir_er le niveau ctk_auI a machine v6rifiera
si le niveau d'eau est correct via une s6rie de deux temps
d'agitation diff6rer_ts (cela preridra un peu plus d'l_ne minute)
Sielle d6tecte un niveau d'eau insuMsant, elle poursuivra le
rempNssageet v6rifiera D,nouveau le niveau
Auto
_>r_Chaude 0 Elev4
O Ti_d_ () lffoy_n
O Fr_i_e 0 Bas
Niv_au
@u
0 R_p_J_
0 _oyen
0 Le_f
() @ atfea
o Lors du lavage d'une charge inhabituelle comme par
exemple des v(;tements volumineux, des oreillers, nous vous
recommandons de s#lectionner manuellement le niveau
d'eau et de s61ectionner le cycle Fragiles,
S61ectior_nermanuellemer¢ le niveau d'eau s'il y a d6jb de I'eau
dans la machine
o I ors du lavage d'une charge voh_mineuse ou d'un seul article
voh4minel4x (comme par exemple un 6dredon), tasser la charge
apr4_sle premier remplissage
S61ecdon manuelle du niveau d%au
{!agitateur se caractd_risepar cinq niveaux indiqu6s sur sa
tige et pouvant #tre utilis6s pour vous aider D,s61ectionner
les niveaux d'eau appropri6s. S61ectionner le niveau d'eau
appropri# en utilisant le rep#re se rapprochant le plus du haut
du niveau des v6tements
o { es niveaux indiqu6s sur I'agitateur ne correspor dent pas
exactement au niveau dbau IIsindiquent le niveau des
v6tements secsappropri6 au niveau d'eau
o Votre lavedinge #cosmcr/-_''pourra de temps D,autre rajouter de
I'eau pendant la phase d'agitation afin de maintenir le niveau
d'eau D cause de la lib6ratior_ de Faircoinc6 ctans lesv_tements
l es charges non 6quilibr6es, les v6tements entortill6s et les
6claboussures peuvent r6sulter de la s61ectiond'un niveau
d'eau trop #lev#
r- • ............ e
55
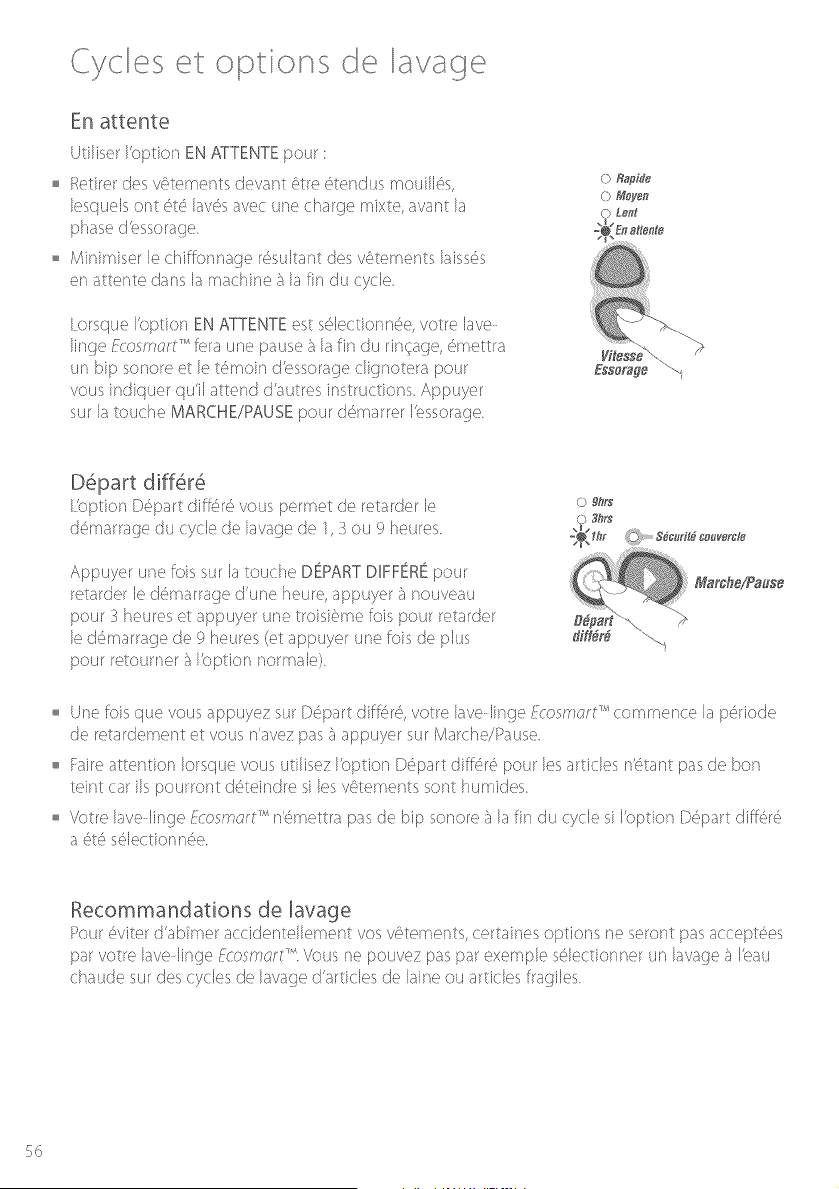
Cyces et opt ons de avage
En attente
Utiliser Ibption EN ATTENTEpour:
Retirer des v0tements devant 0tre ._',tendusmouill<%
lesquels ont <'_t<',laves avec une charge mixte, avant la
Minimiser le chiffonnage rc'_sultantdes v0tements laissCs
en attente dans la machine {_,la fin du cycle
[orsque Ibption EN ATTENTEest s¢lectionnCe, votre lave
linge/:<-osmcr/-_'fera une pause {_,la fin du tint age, Cmettra
un hip sonore et le t6moin dbssorage dktnotera pour
vous indiquer qu'il attend d'autres instructions Appuyer
sur la touche MARCHE/PAUSEpour cbmarrer I'essorage
D6part diff6r6
I'option I){_part diff{_r<'_w}us permet do retarder Io
dCmarrac< du cyck, de lavac< de 1,2 ou 9 houres
Appuyer une lois sur la touche DEPARTDIFFEfiEpour
retarder le (:td_marrage(:t'/me heure, appuyer t_no/_veau
pour _ heures et appuyer une troisi#me lois pour retarder
le dCmarrage de c)heures (et appuyer une lois <:teplus
pour retourner _,_Ibption normale)
© ghrs
C) 3hrs
dNt6r_
Mamhe!Pa_se
o Une lois que vous appuyez sur D<'_partdifi%'_rGvotre lave linge/qosmt;r/-_' commence la pCriode
de retardement et vous n'avez pas ;_,appuyer sur Marche/Pause
Faireatterstion Iorsque vous utilisez I'option D<'_partctiffd_r<'_pour lesarticles n'¢tant pas de bon
teint car ils pourront d<'4eindresi les v0tements sont humides
Votre lave linge Frosmt;r/-_'n'¢mettra pas de hip sonore _ la fin du cycle si I'option Depart differ€
a ¢t¢ s¢lectionnCe
fiecommandations de lavage
Pour d,viter d'abi'mer accidentellement vos v#tements, c_,rtainesoptions ne seront pas accept<',es
par votre lavelinge/:dosmt;rl _'' Vous ne pouvez pas par exemple s¢lectionner un lava<]e;._I'eau
chaude sur des cycles de lavage d'ardcles de laine ou articles fragiles
56
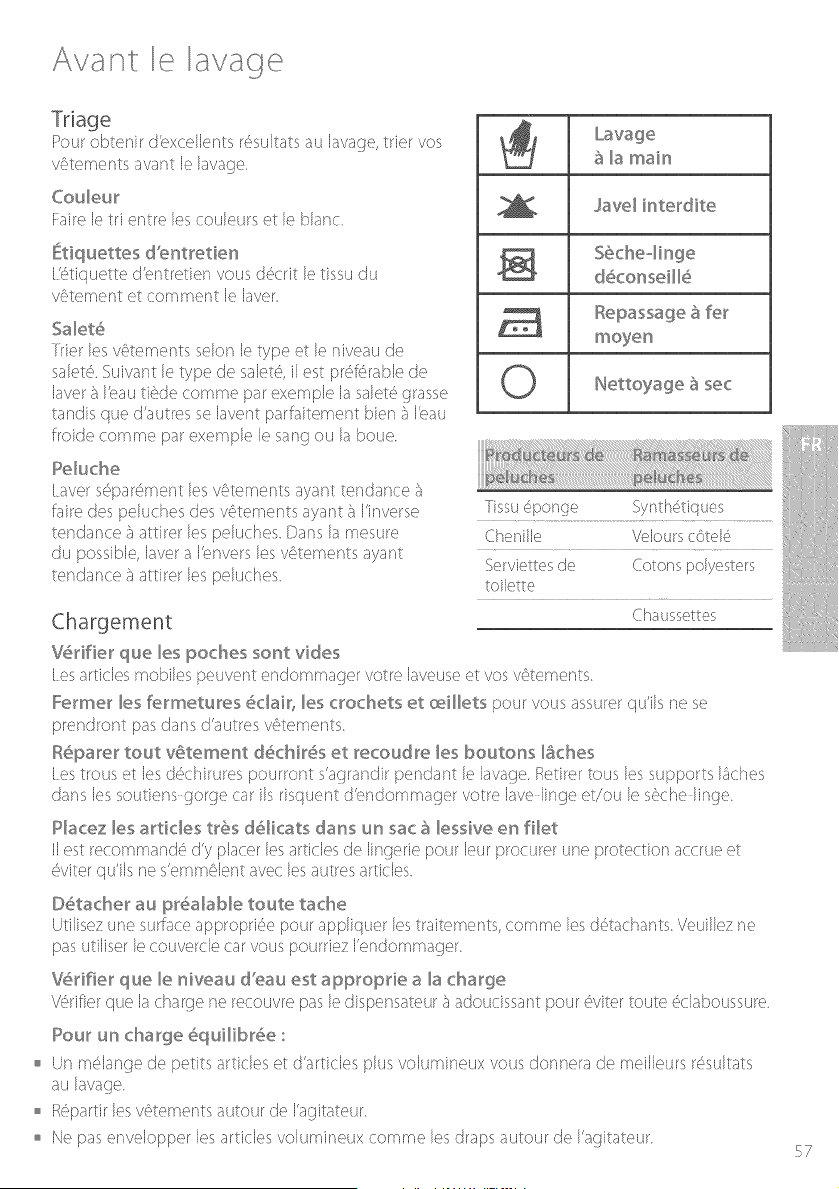
Avant e avage
Pour obtenir d%xcellents r6sultats au lavage, trier vos
v6tements avant le lavage
Co@our
Fairele tri entre loscouleurset le Nanc
l'<',tiquette d'_,ntretien vous d<',cntle tissu du
v6tement et comment le laver
Sa_et6
Trier los vCtements solon le type et le niveau de
salet& _uivant le type de salet6, il est pr6f{_rablede
laver {_,Itau titde comme par exemple la salet6 grasse
tandis que d'autres se lavent parfaitement bient I'eau
frQde comme par exemple le sang ou la boue
Penuche
[_avers¢pa@ment los vCtements ayant tendance £a
laire des peluches des v6ternents ayant b I'inverse
tendance t attirer los peluches Darts la mesure
du possible, laver a k,nvers les v6tements ayant
tendance t attirer los peluches
_a main
Javel interdite
d6conseiH6
Repassage a fer
moye_
Hettoyage _ sec
Verifier que les poches so,st vides
[ esarticles mobiles peuvent endommager votre laveuse et vos v6tements
Fermer _es Fermetures 6clair, _es crochets et @iHe% pour vous assurer qu'ils nese
plendront pas dans d'autres v6tements
R@parer tout v@tement d6chk6s et recoudre _es boutons _aches
les trous et los d6chirures pourront s'agrandir pendant le lavage. Rotifer tous los supports laches
dans los soutiens gorge car ils risquent d'endommager Morrolave lingo et/ou le s6che lingo
TiSSLi6po(!gechenilleserviettes....................de......................................VeloutScotonspolyestersc(%teI(_........................
toilette
Hacez _esarticles tr6s d61icats darts un sac a _essive en filet
IIest recommand6 d'y placer los articles de lingerie pour leur procurer une protection accrue et
6viter qu'ils ne s'emm¢lent avec losautres articles
©@rather au pr6a_ab_e route rathe
U@isezune surfaceapproprk',e pour ap@iquer lostraitements, comme losd6tachants Veuillez ne
pas utiliser le couverde car vous pourriez I'endommager
V6rifier que _e niveau d%au est approprie a _a charge
V6rifier que la charge ne recouvre pas le dispensateur t adoucissant pour 6viter route 6clabolissure
Pour us charge @quHibr6e :
Un m61angede petits articles et d'artides plus vollimir_eux vous donnera de meilleurs r6sultats
au lavage
o R6partir losv6tements autour de I'agitateur
Ne pas envelopper los articles voh4mineu× comme los draps autour de I'agkateur
57

Avant e avage
Eau de Javel
Vd,rifier 1'6tiquette ct'entretier_pour route recommandatior_ sp<',ciale
Eau de Javel _iquide :
1 Utiliser la moiti{ _de la dose d%au de Javel recommandd_eet la diluer
ctansde I'eau
2 Retirer le distributeur ;7adoucissant et verser le liquide dans le
rebord interne de la tige de I'agitateur, en ligne dr©ire avec les
ailettes %%ctionr_er la touche RINgAGEAVECADOUCISSANT Vous
obtiendrez un rint_ageen profondel4r qui fera disparai'tre tousles
r_skSusde javellisant
s Ajouter le ct6teroent et remettre en place le dispensateur a adoucissant.
a Pour i4n r6sultat optimum, ajouter le liquide javellisant apr0s que les deu×
lumineu× de lavage ambres soient {4eints
Temp,
Lavage
_>remiersvoyants
Eaude Javel en poud_÷ :
Verserlamoiti%de ladosedbaude JaveJen poudrerecommand6edam I'agitateuravecvotred6tergent
_8
dans B cuve de hvage ou au centre de l'agitateur. Cda pourrait causer des dommages
[Jadoucissantse verse dans le dispensateur _}adoucissant situ{_een haut de
I'agitateur Ia ligne trac6e sur le dispensateur _ adoucissant sert de guide
pour d6termir_er la ql_antit6 ct'adoucissanta,ajouter {_,i_nemachine pleine
l es charges plus petites n6cessiteror¢ re©insd'adoucissar¢
Rin1:age avec adoucissant
Si vous voulez utiliser de I'adoucissant Iorsque vous utilisez les cycles
R6(tuliersou Sales,vous devez imp6rativement s61ectionner I'option
RIN_AGEAVECADOUCISSANT.Cela modifie I'option de ringa_]epour inclure
un rin(_a(_een prof,_x-_deurde mani6re {} ce que I'adoudssar¢ soit bier] r6parti
La_age
D6p6t coHant
le d6pOt collant correspond a I'accumulaSonparaffineuse provoqu_'_epar le m<'qan;}edu d<'_terf_entet
de I'adoucissar¢comme r(_guliS,rt_mentobserw', dans les lavelinge. Cette accumulation ne r<'_sultepas
d'une ct("faillancedu lave-linge.Dans lecasol'_le d_',pS>tco%nt ne serait pas r_guli0roment retir(,du lave
lin_]e,cela risque de tacher vos v0tements ou de diffuser 14neodeur (:t6sa<]r6abledans votre lavelin<]e
Si vous vou_ez utHise_ de _%doucissant, suiwe nos _ecommandations :
Utiliser une petite quantit6 d'adoucissant.
o l orsque vous remplissez le disperisateur _ actol_cissant,<',viterles
<'_claboussureset ne pas le remplir jusqu'au rebord
Nettoyer le dispensateur _}adoucissant d6s la fin du cycle
Nettoyer votre lave lin<]er6(_141i6rement(vous r6fd_rer_ la pa<]e59)
o l es accumulations sont plus fr6quentes Iorsque le lavaqe est effectu6 a I'eau
froide Nous vous recommandor_s d'utiliser un cycle <}}mthd_tiquesti0de {_
intervalles r6(_uliers(ex.:_}tousles 5 lavaoes)
o l es actol/cissants re©ins .:,paislaissent re©ins de r(_sidusdans le dispensateur
_}adoudssant et ne contribuent donc pas _}la cr{,ation de I'accumulation du
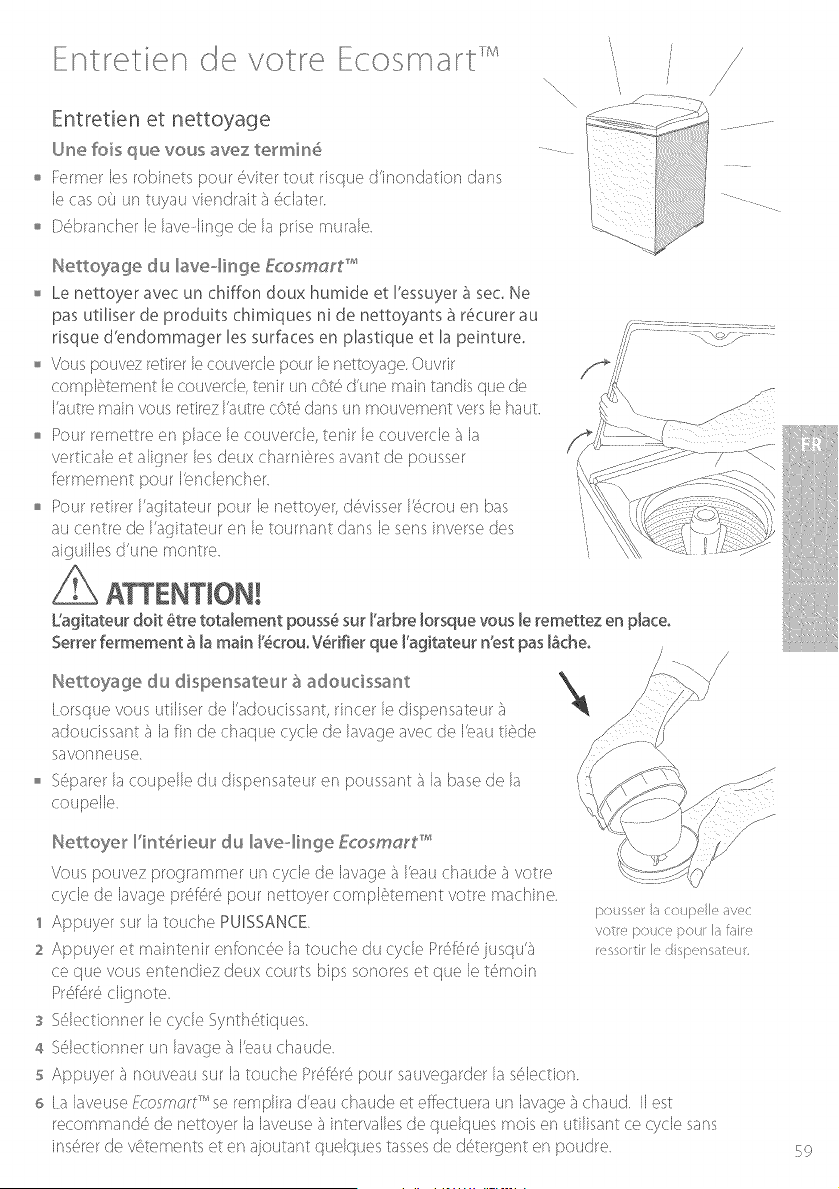
Entret en de votre Ecosrnart rM
Entretien et nettoyage
Une fob que vous avez terrain6
o Fermer les robinets pour .X,viter tout risque d'ir_or_dationdans
le cas o8 un tuyau viendrait t 6claret
o D<',brancherle lavelin<]e de la prise murale
x, \\ ,,
-\
/
/
/
Nettoyage du _aveqing÷ £co.smc_y8_'w
o Le nettoyer avec un chiffon doux humide et I'essuyer a sec Ne
pas utiliser de produits chimiques ni de nettoyants {t r6curer au
risque d'endommager les surfaces en plastique et la peinture,
o Vous pouvez retirer lecouvercle pour le net_,oyaf_e.Ouvrir
compl6tement lecouvercle, tenir un cot6 d'une main tandis que de
I'autre main vous retirezI'autre cot6 dans un mouvement vers le haut.
Pour remettre en place le couvercle, tenir le couvercle {_la
verticale et aligner les deux charniOresavant de pousser
refinement pour Itr_clencher
Pour retirer I'agitateur pour le nettoyer, d6visser Ibcrou eri bas
au centre de I'agitateur en le tournant dans le sens inverse des
aiguilles d'une montre
Uagitateur doit #tte tota[ement pouss# sur tarbre brsque vous [e remettez ÷n place,
Se_terfetmement _ la main t_crouoV_dfiet que tagitateut n'est pas lache,
/
Nettoyage du dispensateur _ adoucissant X.
i orsque vous utiliser de I'adoucissant, rincer le dispensateur t
adoucissant a la fin de chaque cycle de lavad}eavec de I'eau ti¢cte
savonne(_se
/
C'
o __eparerla coupelle (:tudispensateur en poussant t la base (:tela i
Hettoyer _'i_]t4_deur du _ave..@nge Eco.sm_ws*'
Vous pouvez programmer un cycle de lavage a Itau chaude £avotre
cycle de lavage pr{_f{_r{_pour nettoyer complOtement votre machine
1 Appuyer sur la touche PUISSANCE
2 Appuyer et maintenir enfonc(_e la touche ctu cycle Pr(_f_r(_jusqu'{_.
ce que vous entendiez deux courts bips sonores et que le t6moin
Pr6fK_r6clktnote
s S61ectionner le cycle Synth6tiques
4 S61ectionnerun lava<]et I'eau chaude.
5 Appuyer t nouveal4 sur la touche Pr6fK_r6pour sauve(_arderla s61ection
6 [ a laveuse/:cosine;r8TM se remplira d'eau chaude et effi_ctuera un lavao;et chaud IIest
recommand_s de nettoyer la laveuse £_,intervaNesde quelques mobsen utilisant ce cycle sans
ins(_rerde vCtements et en ajoutant quelques tassesde d{_tergent en poudre
I:x>t/SS ! ',,/_,(
',iOt! ;>OII(;o;>()tI" [ "}
K _ss(> t " I_ Sy' S1tI"
$9
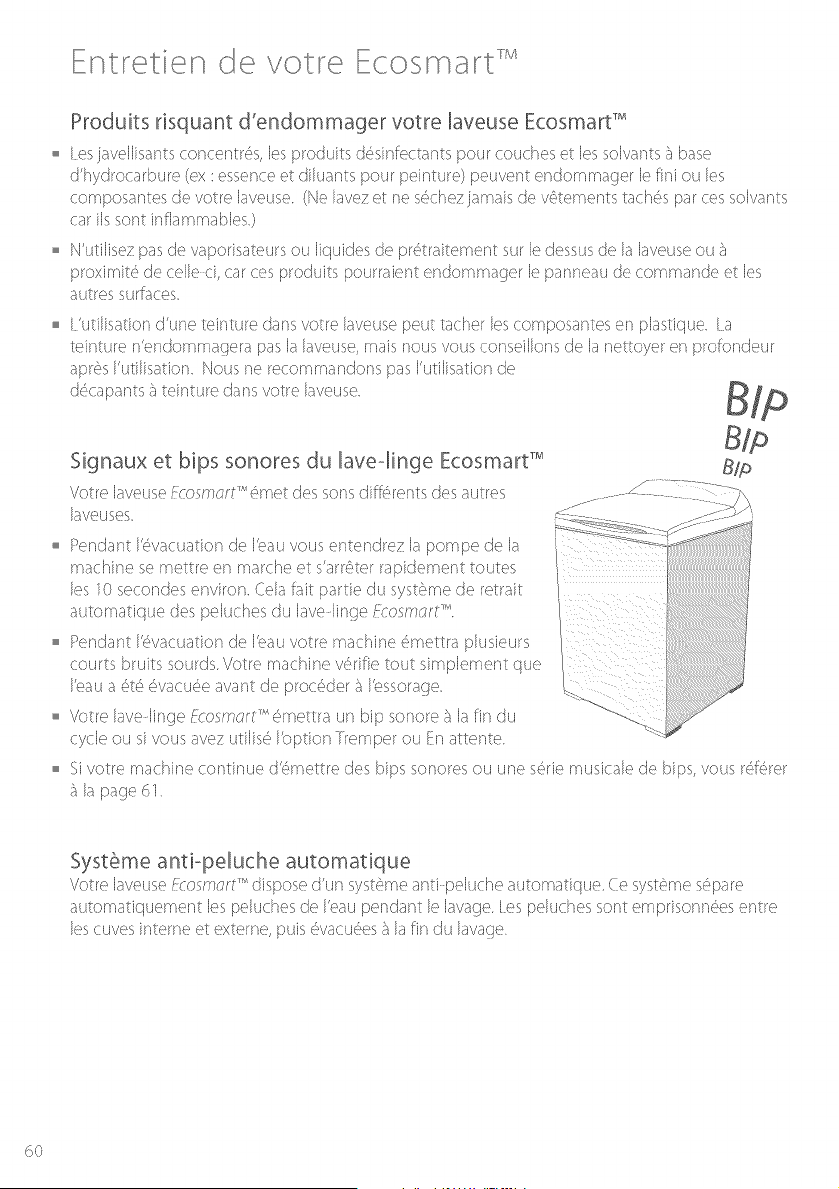
Entret e de votro Ecosmart
Produits risquant d'endommager votre laveuse Ecosmart TM
o { esjavellisants conceritrd,s, lesproduits d<'_sinfectantspour couches et les solvants D,base
d'hydrocarbure (ex :essence et diluants pour peinture) peuvent endomma<]er le fini ou les
composantes de votre laveuse (Ne lavez et ne s6chezjamais de v(!Stementstach6s par ces solvants
car ils sont inflammables)
° N'utilisez pas de vaporisateurs ou liquides de pr<'_traitementsur le dessusde la laveuse ou F.
proximit<<,de celle ci, car ces produits polJrraient endommager le panr_ealJde commandeet les
autres surfaces
{ 'utilisation d'une teinture dans votre laveuse peut tacher lescomposantes en plastique Ia
teinture n'er_dommagera pas la laveuse, mais nous vous conseillons de la nettoyer en profondeur
aprs_,sI'utilisation Nous ne recommandons pas I'utilisation de
d<%apantsDteinture dans votre laveuse
Signaux et bips sonores du lave-Iinge Ecosmard _"_
Votre laveuse EcosmcrJ"<<,metdes sons cJifi((_rentsdes autres
lave(Jses
j ........ _ -T_ ..............
PencJantI'd_vacuationde It,au vous enter_drez la pompe de la
machine se mettre en marche et s'arr,Dterrapidement routes ,,
les lO se(ondes environ. (}ela fait partie du syst_me de retrait
Pendar¢ 1'6vacuadonde I'_auvotre machir_e 6mettra plusieurs
I'eau a 6t6 6vacu6e avant de proc6der D I'essora<]e
o Votre laveNnge Fcosmcr__''d_mettraiJn hip sonore D la fir_ du
cycle ou si vous avez utilis6 I'optior_Tremper ou En attente
q.
_l votre machine contir_lJedSmettre des hips sonores ou line s<'_riemusicale de hips, vous r<'_f<'_rer
D la page d_l
Syst6me anti-peluche automatique
Votre laveuse f}:osmt;r/-_' dispose d'un systOmeanti peluche automatique. Ce systS,me sd_pare
automatiquemer/t les peluches de I'eau pendant le lavage. {es peluches sont emprisonn<%sentre
lescuves interne et externe, puis <'_vacu<%sD la firsdu lavage
6O
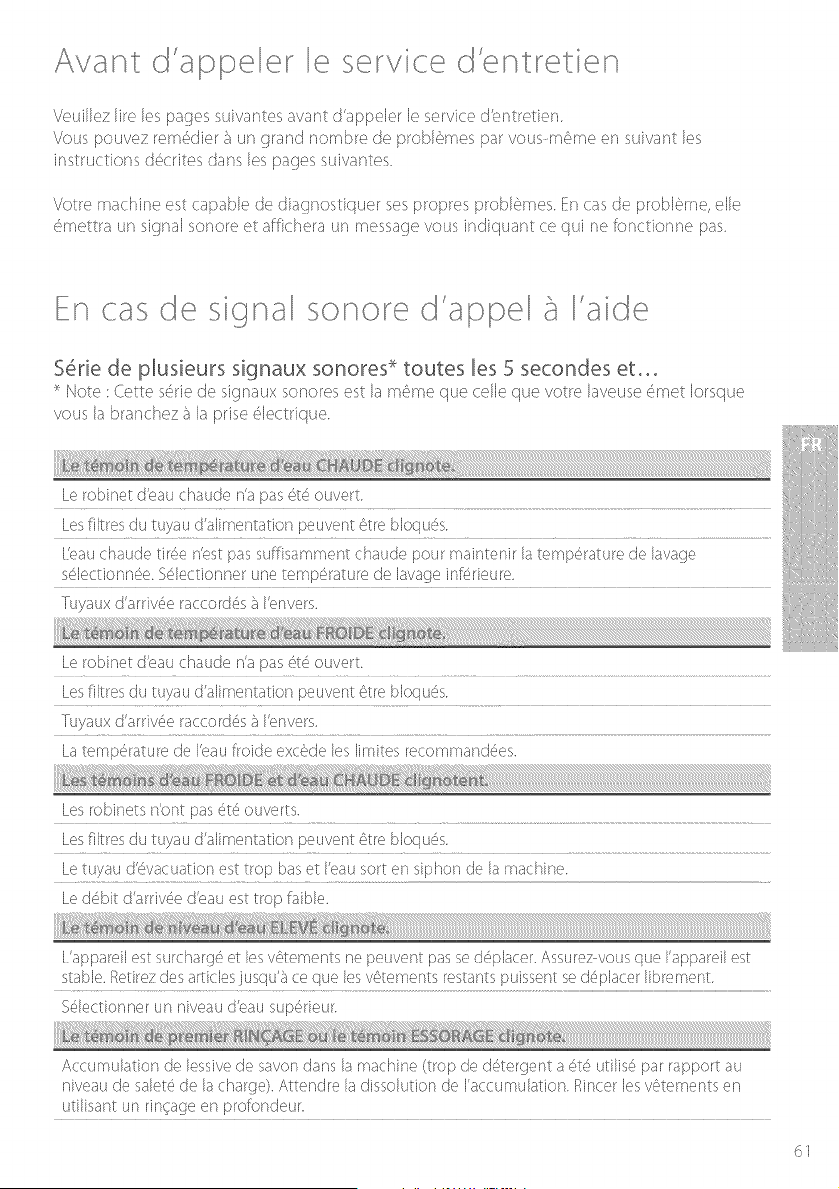
. i r .... i......... i.....
Avant d'appe er e serv ce d entret en
Veuillez life les pages suivantes avant d'appeler le service d'entretien.
Vous pouvez remd_ctierb un grand nombre de problOmes par vous m4_me en suivant les
instructions d6crites dans les pages suivantes
Votre machine est capable de diagnosdquer ses propres problOmes En cas de probbme, elle
<<_mettraun signal sonore et affichera un message vous indiquant ce qui ne lonctionne pas
En cas de sftna so ore d'appe 'ade
S#rie de phsieurs signaux sonores <*toutes les 5 secondes et°°°
Note : (tette s6rie de signaux sor_ores est la m6me que celle que votre laveuse d}met Iorsque
vous fabranchez;] faprise61ectrique.
Le robine[ d'eau chaude n'a pas 616 ouve/
LesfiRresc!u u}/au d,a!imentatior/peuvent 6tre bloq/;d_s. ..............................................................
i rs /s, " s " s _s s s
Ifeau cnaud,_ tlr_e n'est pas suffisamment chaude pour malnt_ nit la temp¢rature de lavage
s61ectionn6e S61ectionne_ une temp6_atu_e de lavage inf6_ieu_e .....................................................
T%/at]× d'arriwSe raccordSs _ I'envers.
Le robinet d'eau chaude n'a pas 6t6 ouvert
Lesfilt_es du tuyau d'aNmentation peuvent 6t_e bloqu_s.
Tu}Jaux d'arriv6e raccord6s _ I'enve/s.
La temp#rature de I'pau froide exc#de les Iimites recornmand#es.
Les robinets n'ont pas 6t6 ouverts.
Les filt/es du tu}/au d'alimentation peuvent 6tie bloqu6s.
Le tuyau d'#vacuation est trop bas et I'eau so/t en siphon de la machine.
Le d6bit d'arriv6e d'eau est trop Mble.
I 'appareil est surcharg6 et les v6_tements ne peuvent passe d6placer. Assurez vous que I'appareil est
stable, f_etimz des articles jusqu'_sce que les v6tements/estants puissent se dd'_/.)lacerlibrement.
S61ectionner un niveau d'eau sup6rieur.
A(cumulation de lessive de savon dans la machine (trop de d6tergent a 6t6 udlis6 par rapport au
niveau de salet6 de la charge). Attendre la dissolution de I'accumulation. f/incer les v6tements en
utiNsant un rin_.age en profondeuk
61

En de sigr al onore dappl I' ioe
l.a brassie n'est pas K,partie correctement. Assurez-vous que I'appareil est stable. I%partissez la
brassie manuellement. V(Sriflez si I'appareil est au niveau Assurez vous que les pieds de I'appareil
sont d('wiss_s et que les tales de raise ;9niveau en caoutchouc sont ins(_rd,es de fa?on _ ce qu'il
repose sur les pieds plut6t que su/les pi_ces des coins Reportez vous aux Instructions d'insta%tion
(pages 44 - 4_i).
V#dfier que le couvercle est ferm('_.
Appu}/er sur MARCHE/PAUSE (vous r6f6rer ;_ la page 53)
Un seul bip 6mis toutes les secondes et ooo
1 D_brancher la machine de la prise murale. Attendre 60 secondes et la rebrancher avant de faire
fonctionne_ la r_acnlne.........
2 Si le probl6me se reproduit, r6p6tez 1'6tape 1.
Si le probl_me persiste, contactez votre service d'entreden le plus proche (voir d-dessous).
(Avant d'appeler, veuillez identifier le num6ro de s@ie de votre laveuse situ6 au coin arri@re
gauche de la machine},
Servce a c ent6e
Pour communiquer avec un agent du service ;} la clientde Fisher & Paykel de votre r<'_gion,vewIlez
Etats=U_sis et Ca_sada
£ _ r
,AN3 _-RAISl o888ogoFHPoUSA (1o888o936o7872}
ou utilisez le lien sur cette pa<]e wwwofishe_'paykelocom/bcatodse_vice_'/
Note :
Une preuve d'achat vous sera ctemand,.'_epour route demande de remboursement ou rd_paradon
Nous vous recommandons d'agrafer votre preuve d'achat ;,_cette page pour ne pas 15garer
62
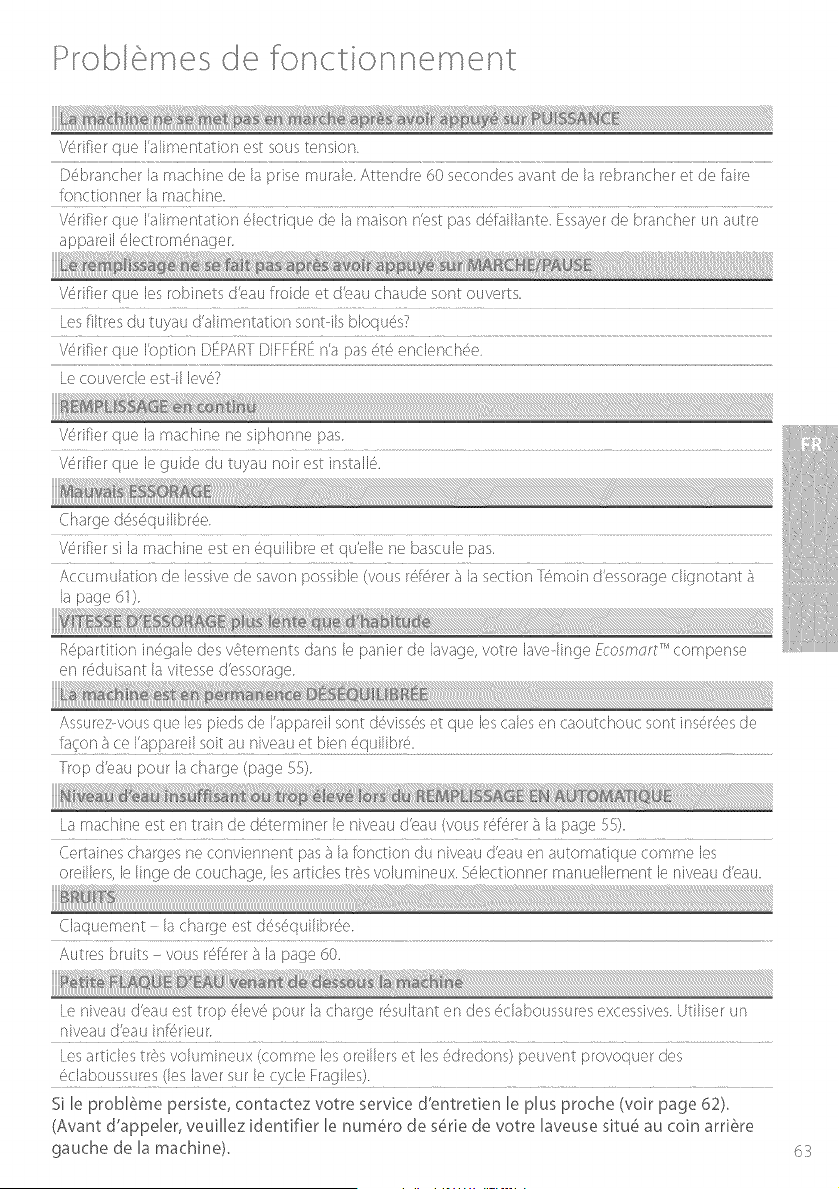
Probl rues d fonctior nernent
V_'_rifierque I'alimenta ion est sous tension.
D6brancher la machine de la prisemurale. Attendre 60 secondes awmt de la rebrancher et de faire
fonctionnerlamachine,
V(',rifw que h_limentation 61ectrique de la rnaison ntst pas d#Mllante. Essayer de brancher un autre
appareil 61ectrorn6nager.
V6rifie/que les robinets d'eau froide et d'eau chaude sont ouverts.
e e ,1
\/6rifler que I'option DEPARTDIFFERE n'a pas 6t6 ncl nch_e.
Le couw_rcle estil lev6?
V6rifier que B machine ne siphonne pas
V6rifier que le guide du tuyau noir est instaIB.
Charge df',s6quilibr6e.
V6rifier si la machine est en 6quilibre et qu'elle ne bascule pas.
A((umulation de lessive de savon possible (vous r#'4@er;_la section f','_moin d'essorage dignotant ;_
la page c1), .....................................................
Rd,partition indwale des v6,topaents dans le panier de lavaoe, votre lav(_lincteEcosrn_rt _"cornF<-_se
en r_Sduisantlavitessed'essorage
Assurez vous que les pieds de I'appareil sont d_viss6s et que les tales en caoutchouc sont ins_r6es de
fa ol] ;__:o I'appa!e!l .................................................................................................................................................................................................................................................
Trop d'eau pour la charge (page 55),
La machine est en train de d6terminer le niveau d'eau (vous r6f6ret ;_la page %).
('q _ q s @ s s......rtaln_s charaes ne convknm nt pas _ la fonction dt niwau d'eau En automatique comm< les
oreillers, le linge de couchage, les articles tr6s volurnineux. %lectionner manuellement le niveau d'eau.
Claquement lacharge std{squlhb/e_.
Autres bruits - vous r6f6rer _ la page fi0.
l e niveau d'eau est trop 6lev6 pour la charge/6sultant en des 6claboussures excessives. Utiliser un
niveau dYau infd,_ieur.
l es articles trCs volumineux (comme les oreillers et les 6dredons) peuvent provoque/des
6daboussures (les laver sur le cycle Fragiles).
Si le probBme persBte, contactez votre service d'entretkn le plus proche (voir page 62)_
(Avant d appder, veuillez identifier' le num@o de s@ie de votre kveuse situ6 au coin arri6re
gauche de la machine), 63
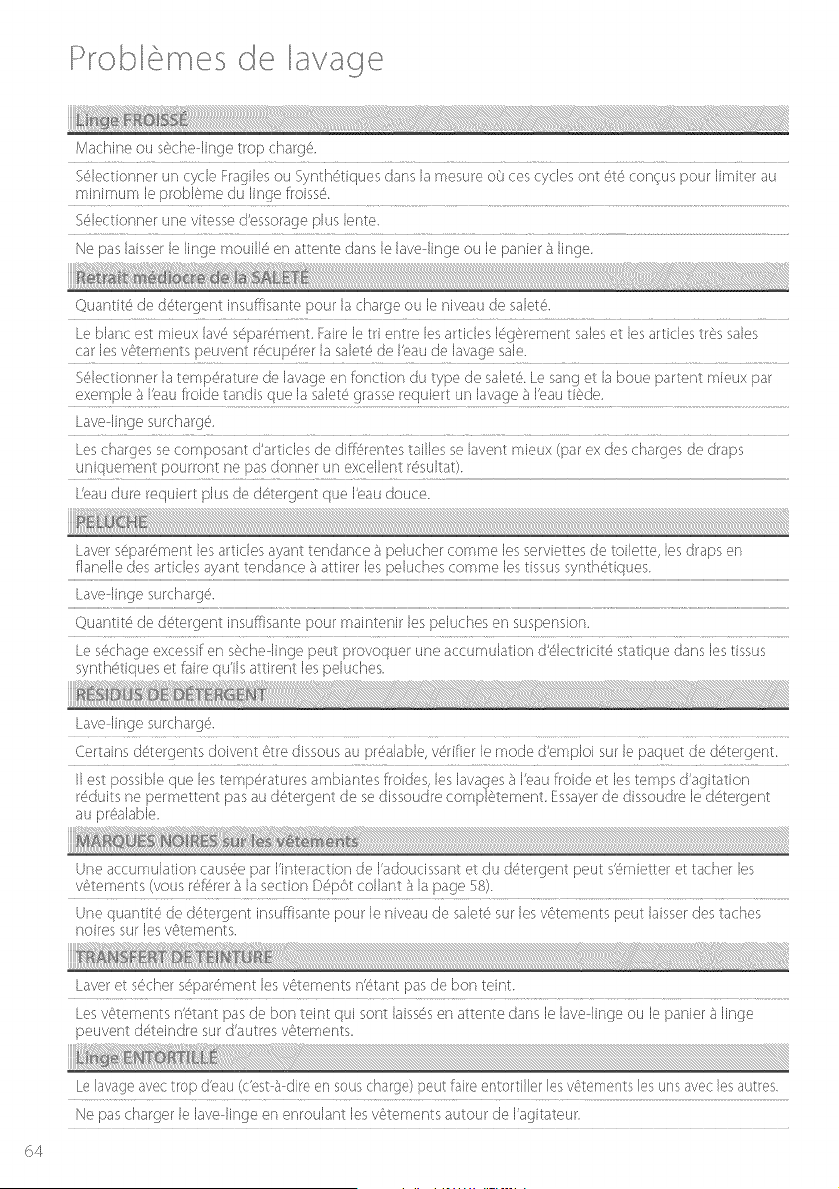
Probl rn s
Machine ou g:,chedinge trop charg&
S¢,lectionne_un cycle Fragiles ot Syn h6 iques dam la mesure o(] ces cycles ont #,#_con(us pour Iimiter au
minimum le protg_me du Iinge f_oissO_
S@lecionner une vitesse d'essorage plus lente.
He pas laisser le linge mouill4 en attente dans le lave linge ou le panier _ linge.
quantitd, de dd_tergent insuMsante pour la charge ou le niveau de salet&
Le blanc est mieux lav6 s_par6ment. Faire le tri entre les articles Id,g_,/emen !,aleset les a/titles W,s sales
car les v_,tements peuvent rOcupd,re/la salet6 de I'eau de lavage sale.
S_i,]ecionne/la temp6/ature de lavage en font ion du type de sale& Le sang e la boue partent mieux par
exemple _ I'oau #oide tandis que la saleO g/asse requie/t un lavage _ I'_at/ti_,de.
Lave Iinge surcha_g_£
Lescha/ges se composant d'a/tides de diff_qrentestallies se lavent mieux (pal ex des cha/ges de draps
uniquement pour/ont ne pas donner tin excellent r6sultat).
L'eaudure requier plus de dd,,ergent que I'eau douce_
Lave/sqpa/6ment les article,s ayant tendance a peluche/comme les se/viettes de toilette, les draps en
flanelle de,>articles ayant tendance ;_attiret les peluches comme les tissus synthd,tique_;
Lave-linge surcharg6.
quantitd, de dd, e/gent insuffisante pour maintenir les pek/ches en suspension.
Le sd<hage excessif en s?_chelinge peut p_ovoquer une accumulation d'd,lec ridtd, statique dans les issus
synthd,,tiquese faire qu'ils attirent les peluches.
Lave Iinge surcharg_.
Ce/tains d6te/gents doivent C_tredissous au p/_,alable, v6rifier le mode d'emploi sur le paquet de d_ e/gent_
II est possible que les erTip_,/atu/es arabian es fioides, les lavages _ h,au f_oide e les temps d'agitation
r6duits ne pe/mettent pas au d_tergent de se dissoudre compl84ement_ Essayerde dissoud/e le dd,,tergent
au prd,,alable
Une accumulation caus6e pal I'inte/action de I'adoudssant et du d4te/gent peut s'6miette/et tache/les
vC_ternents(vous r6_,/er a la !section D6p6 collant a la page 58)
Une quantitO de d6 e/gent insuffisante pour Jeniveau de saletd,sur Jesvd::,tementspeut laisser des aches
noires sur Jesvd::,tements.
Lave/et s_,chersd_pa/6mer¢les v_tements n'd4ant pas de Don teint.
Lesv6 ements n'6 ant pas de bon ein qui sont Jaissdsen attente dam le lave Iinge ou le panier _aIinge
peuvent d#, eindre sur d'autres vC,tements_
64
Le avage avec trop d'eau (c'est _ dire en sous charge) peut fire entorti er les vS,tements les u/is avec es autres
He pas charge_ le lave Iinge en enroulant les v?_tementsautour de I'agitateur
Garantie limitee
[ orsque vous achetez un nouvel appareil ._%ctromd_nagerFisher & Paykelpour une
utilisation md_nagt'_re,vous recevez automatiquement une garantie limitd,e d'un an
couvrant les piOcesde rechange et la main dbeuvre pour le service dans les4S (,tats du
continent amd,ricain, Hawal, Washington DC. et au Canada. u d_gard{_,I'!\laska, lagarantie
limitd,e est identique saul que vous devez preridre en charge les frais dbxpd,dition du
produit jusqu'al4 service clientOle ou prendre eri charge les frais de d{_placement du
technicien de maintenance jusqu'__,votre domicile, l es produits destir%s _,Otre utilisd,s au
Canada doivent Otre achet(',spar I'intermd_diairede la chai'ne de distribution canadienne
pour garantir la conformit<', avec la r{_glementation en vigueur
Si le produit est install(" dans un vd'hicule automobile, sur un bateau ou sur une unitd,
mobile similaire, vous bd_ndfficiezde la md'_megarantie limit(% d'uN an, mais il relieve
de votre responsabilit(', d'amener le w.'_hicuJe,bateau ou I'unit<',mobile dans laquelle est
instalid_le produit au service aprOsvente ;,,vos frais ou de prendre en charge lesfrais de
dd_placementdu technider_ de maircer_ance jl4sql4'aulieu o_'.ise trouve le produit
Fisher & Paykel s'engage _ "
R<',parersans frais _,ncourus sur le proprkXaire en termes de main dbeuvre ou de mat(',dau
une quelconque pattie du produit, dont le numd_rode sd_riese trouve sur le produit,
s'avd,rant ddffectueuse.Eu <'_gard{,,I'Alaska,vous devez prendre en charge les frais
dbxpd,dition du produit jusqu'au service clientde ou prendre en charge les frais de
dd_placementdu techniden de maintenance jusqu';} votre domicile <}ile produit est install(',
dans un vd_hiculeautomobile, sur un bateau ou sur urie Hriit(', mobile similaire, il rel_we
de votre responsabilit(', d'amener le w.'_hicule,bateau ou I'unit<',mobile dans laquelle est
install(, le produit au service aprt'_svente _,vos frais ou de prendre en charge lesfrais de
d(_placemer¢ du techniden de maintenance jusqu'au lieu o(/se trouve le produit. Si nous
ne pouvons pas rd_parerune piOce dd%ctueuse du produit ape, s un nombre raisonnable
de tentatives, nous procd,derons au remplacement de la pit'_ceou du produit ou nous
vous proposerons de vous rembourser int<',gralement le pdx d'achat du :)roduit (frais
d'i/hstallatio/] et autres frais d4ant exclus), selon notre choix
Cette garantie sbtend {_,I'acheteur original et _,tout proprid¢aire successeur du produit
pour les produits achet<',spour toute utilisation md_nagOrepar une seule famille
l e service en vertu de cette garantie limitd,e devra .i',treassur{_par Fisher& Paykelou par
son agent agrd_d_pendant les heures normales de bureau
Dur6e de cette garantie limit6e?
Notre responsabilit(', en vertu de cette c]arantie limit(',e expire UN AN aprOs la date d'achat
du produit par le premier consommateur
Notre responsabilitd, en vertu de toutes garanties implicites, y compris lagarantie implicite
de qualitd_marchande (une garantie implicite selon laquelle le produit est adaptd_{} toute
utilisation ordinaire) expire {_galement UN AN (ou dur(_esupd,rieure comme requis par
la Ioi en vigueur) £_,compter de la date d'achat du produit par le premier consommateur
Certains d4ats n'autorisent pas les limitations sur la durd_ede la garantie implicite, il est
donc possible que les limitations sur les garanties implicites ne vous concernent pas
65

Garant e rote
Cette garantie ne couvre pas [es points suivants "
Ales d(_placements d'un technicien de maintenance jusqu'_ votre domicile pour tout problOme
non Iid_b,un ctdq;autctansle Produit Lesfrais du old,placement vous seront factur(_ssi le problOme
s'avOrene pasOtre tanddffaut du Produit. Parexemple :
I Rectifier une mauvaise installation du Produit
2. \/,'xJsexpliquer commerst utiliser le Produit.
Remplacer les fusibles de la maison ou proc(_derau r(_glagedes disjoncteurs, refaire le
c3blage ou la plombene de la maison ou template[ les ampoules
4 Rectifier lesdd,faillances provoqu(_es par I'utilisateur
5 Rectifier le r(_glagedu Produit.
d> Modifications non autorisd_esdu Produit.
7 Bruits ou vibrations consid(_r(_snormaux, comme par exemple, les sons de ctrair_/ventilateur,
les bruits de rd,fdgd,ration ou les hips sonores
8 Rd,parations des dommages provoqu(_s -}atdes animaux nuisibles comme les rats ou les
cafards, etc
S D(%uts cause%par des facteurs autres que
] Uutilisation md_nagt',reno[male ou
2 t!utilisation en conformit(, avec le manuel d'utilisation du Produit
C [es dd,iaillances du Produit caus('es par accident, la n(_gligence, une mauvaise utilisation,
I'incendie, I'inondation ou une catastrophe naturelle
D l es frais des rd,parations effoctl4(_espar des rd_parateursnon agr(_<',sou les frais associ(_s;} la
correctior] de telles r(_parations non autoris(_es
z l es frais de rid,placement et frais assock',sencourus Iorsque le Produit est installd, dans un
endroit disposant d'un accOslimit<',ou restreint (par e× frais d'avions, frais de ferry et zones
gd,ographiques isol(_es)
F [ a maintenance recommand(_e no[male comme <'_nonc(_ectansle manuel ct'utilisation du
Produit
En cas de problS,me avec I'installation, prenez contact avec votre revendeur ou installateur
l es facto[dements (qectriques et ct'(_vacuationet autres facto[dements relOventde votre
Nous ne sommes pas responsable des dommages indirects des frais des r(_parationsou les
frais de [emplacement d'autres propri6t6s endomma(td_es si le Produit est d6fectueux ou vos
d(_pensesencourues si le Produit est d(%ctueux). Certains [tats n'autorisent pas I'oxclusion ou la
limitation des dommages indirects, il est done possible que la limitation ou I'exclusion ci dessus
ne s'applique pas ;} votre situation
66
Garantie lirnitee
Comment solliciter le service clientele ?
V_uillez life le manuel ct'u@isation Si apn',s la lecture du manuN, vous avez toujours des
questions sur le ffx-_ctionnement du Produit, ou si vous avez besoin de connai'tre le nora de votre
rep@sentant Fisher& Paykel agr66 local ou si vous pensez que le Produit eat dCf{,ctueux et que
vous souhaitez contacter le service dientkle ctansle cadre de cette 6aranSe IimitCe,veu@ez
prersdre contact avec votre reversdeurou nous appeler au numd_rosuivant :
Etats=Unis et Canada
SANSFRAISlo888ogoFHPoUSA (1o888o936o7872)
ou utilisez le lien surcette page wwwofishe_paykelocom/_ocato_/se_vked
II eat possible qu'il vous soit (temand(_de fournir une preuve valable de la date d'achat du
Prod@t avant que le Prod@t pease 0tre accept6 par le service clientCle en vertu de cette
Garantie Iimit(',e
UtiBation commerciale
Si vous utilisez le Produit dana un erwironnement commercial (route autre utilisatior que
I'utilisatior/par une unit( _familiale simple), nous nous engageor_s _ r(,parer ou remplacer, sans
frais de piCces uniquement, lea piCces dCf_,ctl4eusesdont le numCro de sCriefigure su le Produit
Notre responsaNIk6 eu <h]ard;} ces rd_paraSonsexpire UN AN ;} compter de la date d'achat
Selon notre choix, nous procd_cteronsau remplacement de la piS_ceou du Produit ou nous vous
proposerons de vous rembourser int(_gralement le Nix d'achat du Produit (frais d'installatior_ et
autres frais (_tant exclus). I e service en vertu de cette Garantie Iimit(_edevra 0tre assur__par ......................................................
Fisher & Paykel ou par son agent agr{_{_pendar¢ lea heures normales de bureau
Aucune autre garantie
Cette Garantie limit_e constitue I'int(,(_ralit('_de I'accord exclusif pass{_entre I'acheteur et
Fisher & Paykel eu (_gard_ toute d(,faillance du Produit. Al_cun de nos employ.i,s (ou de
nos agents ag@Cs)n'est autods6 ;_procCder ;} un quekorql4e ajout ou ;} une quelconque
modificatior_ de cette Oaranfie limitCe
Oarant : Fisher & PaykelAppliances, Inc
Si vous avez besoin d'assistance eu (,gard b cette Garantie limit('_e,veuillez nous contacter au
num{_ro ci dessus ou nous <'_crire;} I'adresseci dessous :
Fishe_ & Payke_ Appliances, k_c
55)00 Skylab Road
Huntington Beach
CA 92647
Cette 6arantie limit(,e vous donne des droits juddiques sp(,dfiques et il eat {_galement possible
que vous b_'_n{fficiezd'autres droks pouvant vaner d'un <'_tat_}un autre
67