READ AND SAVE THESE mNSTRUCTmONS
Operator's Manua_
®
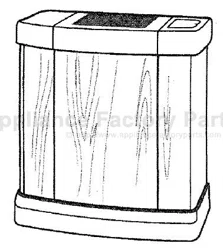
WHOLE HOUSE HUMiDiFiER
12 Galton Output with
innovative Twin Fan Technonogy
Model 758.144161
CAUTION: Before using this
product, read this manuam and
follow aH its Safety Ru_es and
Operating instructions.
o Safety
o Assembmy
o Operation
o Maintenance
o Parts
o EspaSoL p. 17
Sears, Roebuck and Co., Hoffman Estates, mL60179 U.S.A.
wwwosearsocom
Part No. SP6595 Printed in Canada
_"ONE YEAR FULL WARRANTY ON KENMORE HUMIDIFIER _
ff any part of this humidifier fails due to a defect in materiam or workmanship
within one year from the date of purchase, or it the humidifier motor fans due
to a defect in materiam or workmanship during the second year from the date
of purchase, RETURN THE HUMmDmFiER TO THE NEAREST SEARS PARTS &
REPAIR CENTER, and it win be repaired free of charge. This warranty does
not incmude humidifier filters, which are e×pendabme parts that can wear out
from normal use in messthan one year. This warranty gives you specific megam
rights, and you may also have other rights which vary from state to state.
Sears, Roebuck and Co., Dept. 817WA, Hoffman Estates, mL80179
GENERAL SAFETY iNSTRUCTiONS
Safety Signal Words
DANGER: means if the safety
information is not followed someone wHI
be seriously injured or killed.
WARNING: means if the safety
information is not followed someone
toured be seriously iniured or killed.
CAUTION: means if the safety
information is not followed someone may
be iniured.
1. To reduce the risk of fire or shock
hazard, plug humidifier directly into a
120V, A.C. electrical outlet. Do not use
extension cords.
2. Keep the electric cord out of traffic
areas. To reduce the risk of fire
hazard, never put the electric cord
under rugs, near heat registers,
radiators, stoves or heaters.
3. Always unplug the humidifier before
moving it, before cleaning, or
whenever the humidifier is not in
service.
4. Keep the humidifier clean.
5. Do not put foreign objects inside the
humidifier.
6. Do not allow to be used as a toy.
Close attention is necessary when
used by or near children.
7. Never use your humidifier while any
part is missing or damaged in any
manner.
8. To reduce the risk of electrical
hazard or damage to humidifier, do
not tilt, jolt or tip humidifier while unit
is running.
9. To reduce the risk of damage to
humidifier, unplug when not in use.
10. To reduce the risk of accidental
electrical shock, do not touch the
cord or controls with wet hands.
11. Note the warning label shown below.
WARNING: To reduce risk of fire,
electric shock, or injury always unplug
before servicing or cleaning.
Table of Contents
Water Fill ................................................. 6
Operating Humidifier Controls ............... 7
Using Your Humidifier ............................. 8
Operating Tips for Best Performance .....8
Replacement and Care of Filters .......9-10
Cleaning and Maintenance .............. 11-12
Troubleshooting ................................... 13
Repair Parts ..................................... 14-15
To Save A Service Carl
Check the following if your humidifier is
not operating.
1. Is power cord attached to outlet?
2. Is there electrical power to outlet?
3. Is airflow control in operating position?
4. Is humidity control set high enough?
5. Is there enough water in the humidifier
cabinet?
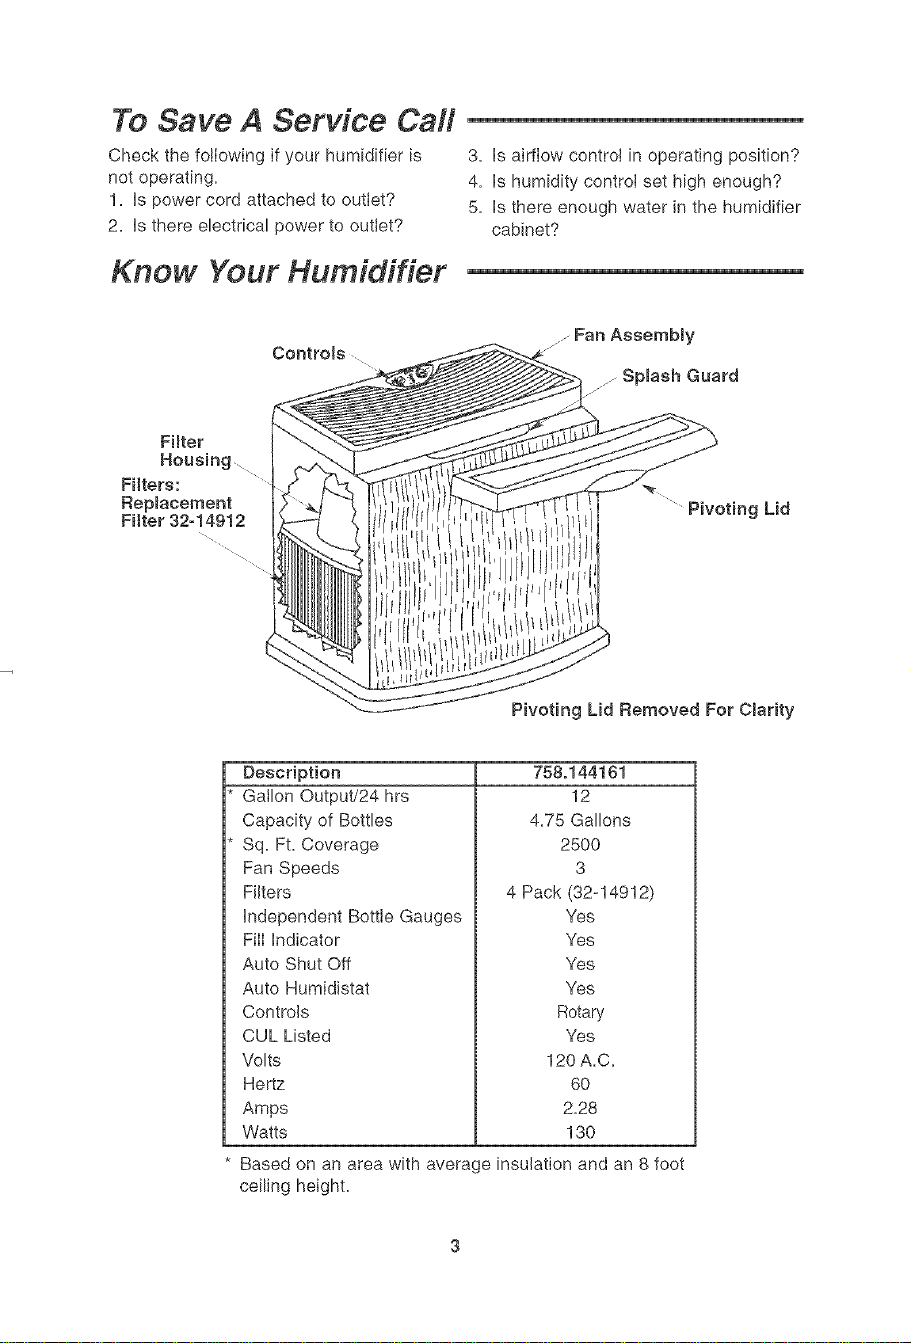
Know Your Humidifier --
Controls
FHter
Housing ....
FHtere:
Repmacement
FHter 32-14912
Pivoting Lid
Pivoting Lid Removed For Cmarity
Description
Gallon Output/24 hrs
Capacity of Bottles
Sq. Ft. Coverage
Fan Speeds
Filters
Independent Bottle Gauges
Fill Indicator
Auto Shut Off
Auto Humidistat
758.144181
12
4.75 Gallons
2500
3
4 Pack (32-14912)
Yes
Yes
Yes
Yes
Controls
CUL Listed
Volts
Hertz
Amps
Watts
Rotary
Yes
120 A.C.
6O
2.28
130
Based on an area with average insulation and an 8 foot
ceiling height.
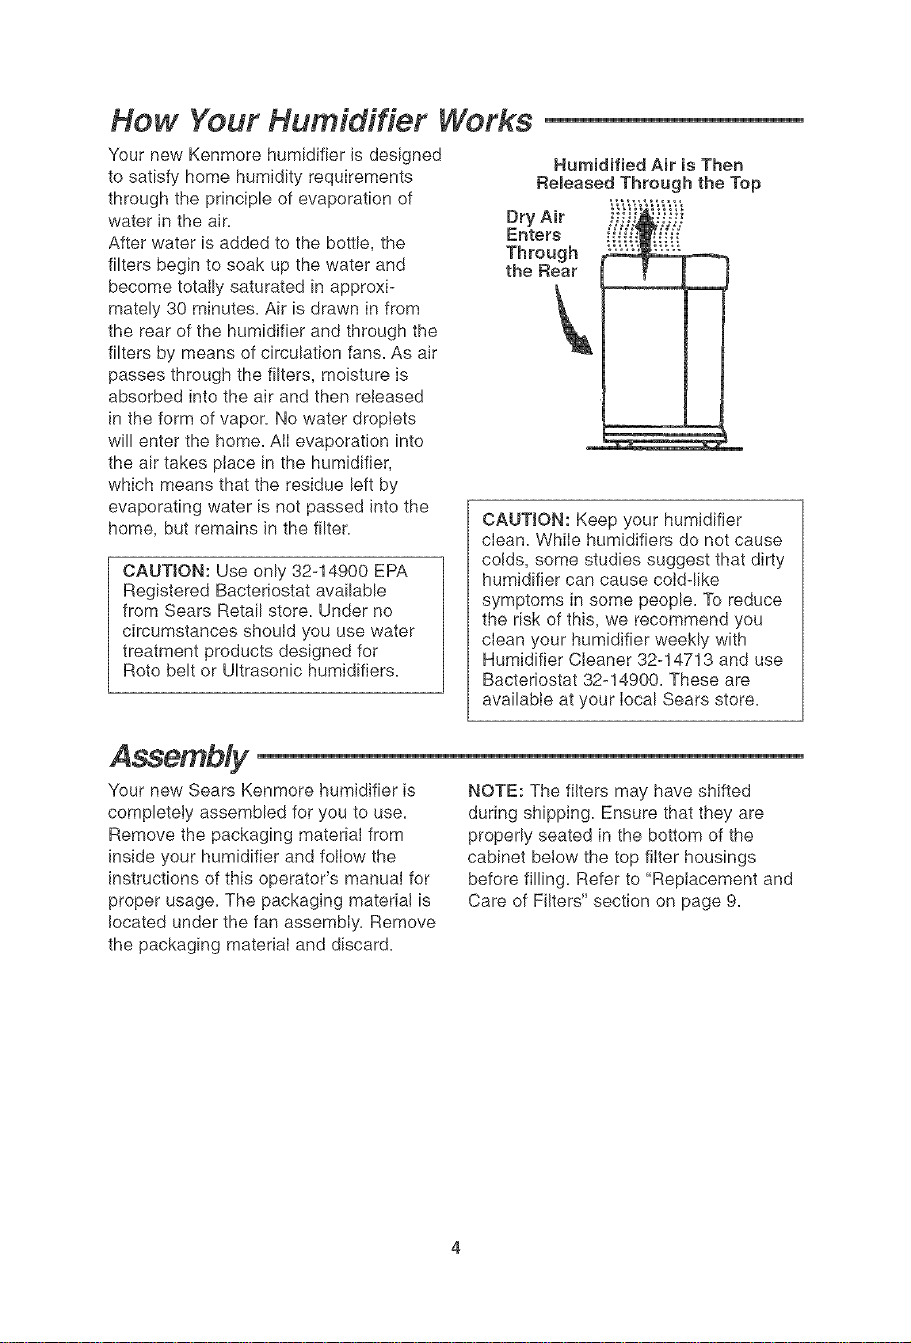
How Your Humidifier Works
Your new Kenmore humidifier is designed
to satisfy home humidity requirements
through the principle of evaporation of
water in the air.
After water is added to the bottle, the
filters begin to soak up the water and
become totally saturated in approxi-
mately 30 minutes. Air is drawn in from
the rear of the humidifier and through the
filters by means of circulation fans. As air
passes through the filters, moisture is
absorbed into the air and then released
in the form of vapor. No water droplets
will enter the home. AII evaporation into
the air takes place in the humidifier,
which means that the residue left by
evaporating water is not passed into the
home, but remains in the filter.
CAUTION: Use only 32-14900 EPA
Registered Bacteriostat available
from Sears Retail store. Under no
circumstances should you use water
treatment products designed for
Rots belt or Ultrasonic humidifiers.
Humidified Air is Then
Remeased Through the Top
Dry Air
Enters
Through
the Rear
CAUTION: Keep your humidifier
clean. While humidifiers do not cause
colds, some studies suggest that dirty
humidifier can cause cold-like
symptoms in some people. To reduce
the risk of this, we recommend you
clean your humidifier weekly with
Humidifier Cleaner 32-14713 and use
Bacteriostat 32-14900. These are
available at your local Sears store.
Assembly
Your new Sears Kenmore humidifier is
completely assembled for you to use.
Remove the packaging material from
inside your humidifier and follow the
instructions of this operator's manual for
proper usage. The packaging material is
located under the fan assembly. Remove
the packaging material and discard.
NOTE: The filters may have shifted
during shipping. Ensure that they are
properly seated in the bottom of the
cabinet below the top filter housings
before filling. Refer to "Replacement and
Care of Filters" section on page 9.
Location Instrucdons
WARNING: For your own safety, do
not use humidifier if any parts are
damaged or missing.
Step 1:
Place humidifier on a flat level surface in
an area of your house where humidity is
needed most, or in an area which would
likely result in moist air being circulated
throughout the house, such as near a
cold air return.
Placing the unit level is very important if
the humidifier is located on carpeting.
Moist air (humidity) produced will
disperse into the whole house, but area
closest to the unit wilI have the highest
humidity. If the unit is positioned close to
a window, condensation may form on the
window pane. If this is not appropriate
the unit should be repositioned in another
location.
NOTE: Due to release of cool, moist air
from humidifier, it is best to direct air
away from home thermostat and hot air
registers. It is best to position humidifier
next to an inside walk Hot air registers
and cold air from outside walls can affect
the efficiencies of the controls. Unit
should not be placed where warm air
from a hot air register blows directly on
unit.
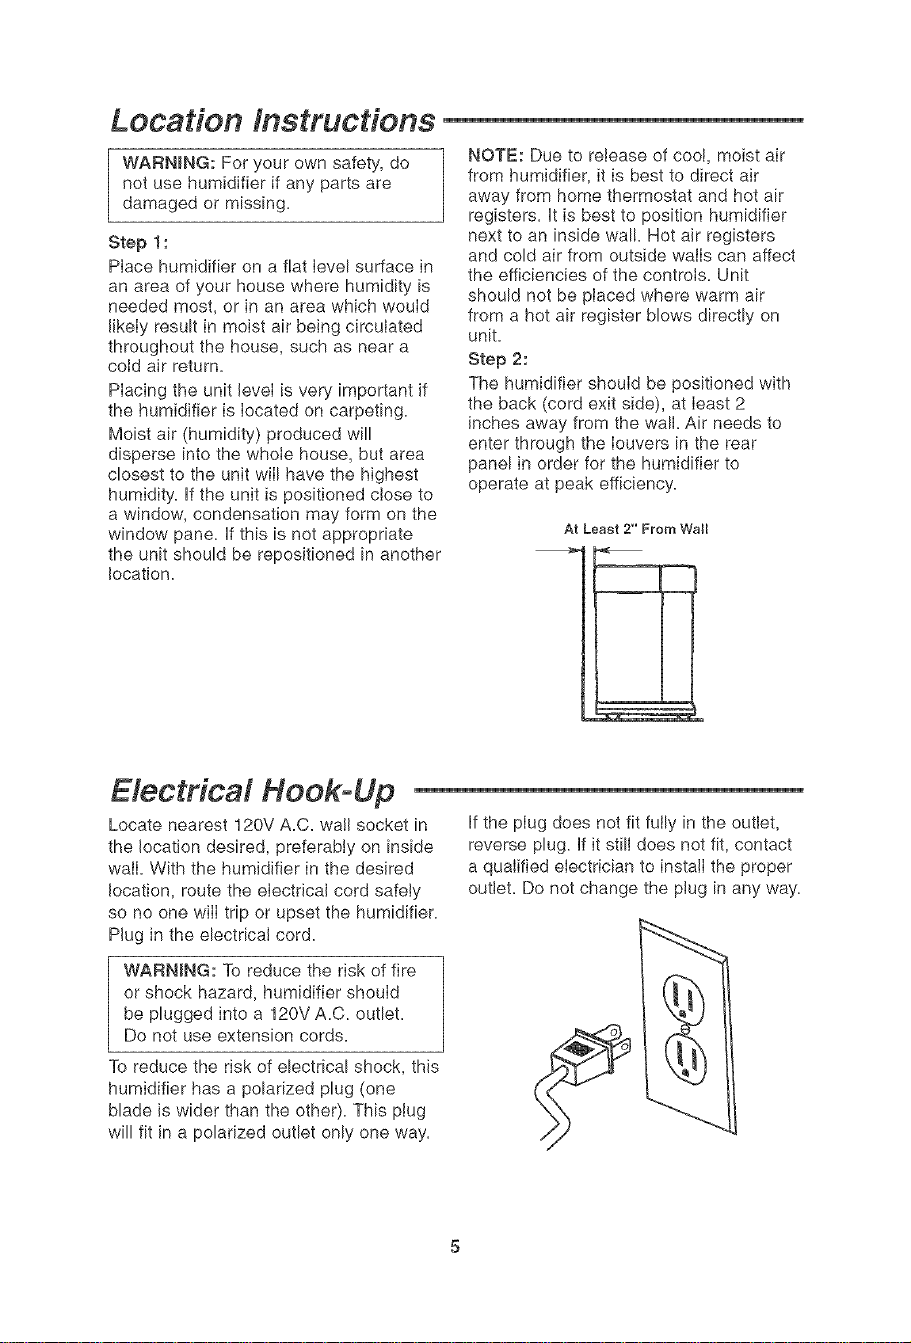
Step 2:
The humidifier should be positioned with
the back (cord exit side), at least 2
inches away from the wall. Air needs to
enter through the louvers in the rear
panel in order for the humidifier to
operate at peak efficiency.
At Least 2" From WaSI
Eiectrical Hook-Up
Locate nearest 120V A.C. wall socket in
the location desired, preferably on inside
wail. With the humidifier in the desired
location, route the electrical cord safely
so no one wilI trip or upset the humidifier.
Plug in the electrical cord.
WARNING: To reduce the risk of fire
or shock hazard, humidifier should
be plugged into a 120V A.C. outlet.
Do not use extension cords.
To reduce the risk of electrical shock, this
humidifier has a polarized plug (one
blade is wider than the other)+ This plug
will fit in a polarized outlet only one way.
if the plug does not fit fully in the outlet,
reverse plug. if it still does not fit, contact
a qualified electrician to instalI the proper
outlet. Do not change the plug in any way.

Water Fifl
WARNING: To reduce the risk of
shock, always unplug humidifier
before cleaning or servicing.
WARNING: To reduce the risk of fire
or shock hazard, do not pour or spill
water into control or motor area.
If controls get wet, Iet them dry
completely and have unit checked by
authorized service personnel before
plugging in.
This humidifier is designed to be filled
using a bucket fill method. The unit
should be positioned where it wilI be
operating. To filI the humidifier, close the
control cover and open the pivoting lid.
Notice the splash guard inside the
cabinet of the humidifier.
Use recommended mixture of cold water
and if necessary Sears Bacteriostat #32-
14900 only. Pour the water slowly from a
bucket into the cabinet onto the center of
splash guard.
NOTE: Deflect water off center of splash
guard when filling. The water deflects off
the spiash guard and drops into the
bottom of the cabinet. Do not pour water
onto top of unit or control area.
Standing in front of the humidifier, notice
the "FULL" labels positioned to the left
and right at the bottom inside of the
cabinet. These labels indicate the
maximum amount of water that can be
poured into the humidifier.
Do not fill water in the cabinet above
this line. If you do, water will Beak out
of the cabinet and onto the floor.
Pivoting Lid
Cabinet
Front of Humidifier
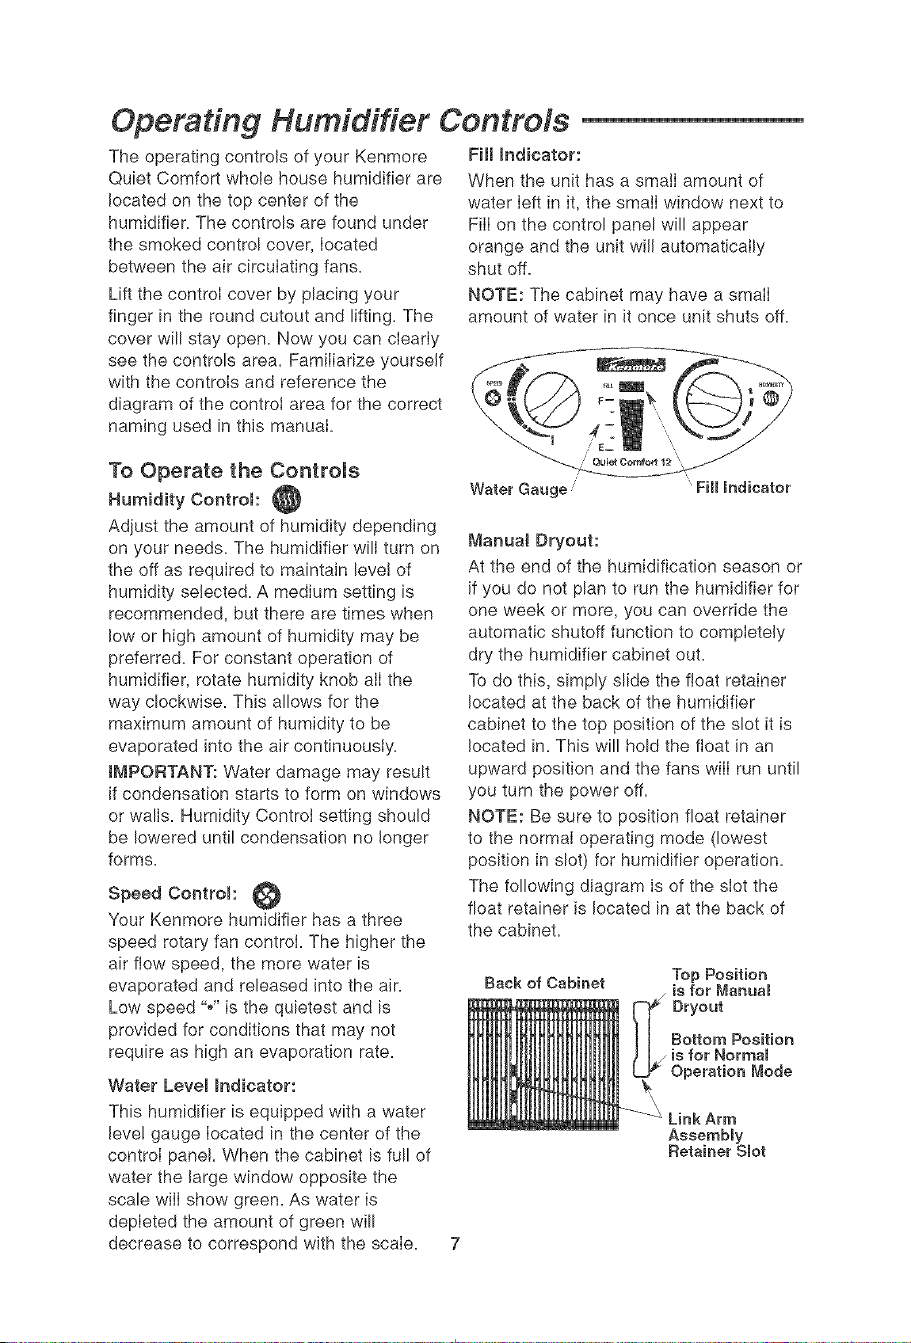
Operating Humidifier Controls
The operating controls of your Kenmore Fill _ndicator:
Quiet Comfort whole house humidifier are
located on the top center of the
humidifier. The controls are found under
the smoked control cover, located
between the air circulating fans.
Lift the control cover by placing your
finger in the round cutout and lifting. The
cover will stay open. Now you can clearly
see the controls area. Familiarize yourself
with the controls and reference the
diagram of the control area for the correct
naming used in this manual.
When the unit has a small amount of
water Ieft in it, the small window next to
FilI on the control panel will appear
orange and the unit will automatically
shut off.
NOTE: The cabinet may have a small
amount of water in it once unit shuts off.
To Operate the Controls
Humidity ControE @
Adjust the amount of humidity depending
on your needs. The humidifier will turn on
the off as required to maintain leve! of
humidity selected. A medium setting is
recommended, but there are times when
low or high amount of humidity may be
preferred. For constant operation of
humidifier, rotate humidity knob alI the
way clockwise. This allows for the
maximum amount of humidity to be
evaporated into the air continuously.
t_,_PORTANT: Water damage may result
if condensation starts to form on windows
or walls. Humidity Control setting should
be lowered until condensation no longer
forms.
Speed Controm:
Your Kenmore humidifier has a three
speed rotary fan control. The higher the
air flow speed, the more water is
evaporated and released into the air.
Low speed ",," is the quietest and is
provided for conditions that may not
require as high an evaporation rate.
Water LeveBindicator:
This humidifier is equipped with a water
leve! gauge located in the center of the
controI panel. When the cabinet is full of
water the large window opposite the
scale wiiI show green. As water is
depleted the amount of green will
decrease to correspond with the scaIe.
Water Gauge " Fill Indicator
t_anual Dryout:
At the end of the humidification season or
if you do not plan to run the humidifier for
one week or more, you can override the
automatic shutoff function to completely
dry the humidifier cabinet out.
To do this, simply slide the float retainer
located at the back of the humidifier
cabinet to the top position of the slot it is
located in. This will hold the float in an
upward position and the fans wiII run until
you turn the power off.
NOTE: Be sure to position float retainer
to the normaI operating mode (lowest
position in slot) for humidifier operation.
The following diagram is of the slot the
float retainer is located in at the back of
the cabinet.
Back of Cabinet
Top Position
is for Manual
Bryout
Bottom Position
is for Norma_
Operation Mode
LinkArm
AssemMy
Retainer S_ot
Using Your Humidifier
Step 1:
Be sure humidifier is fuil of water and
plugged in.
Step 2:
Set Speed Control " _ " to lowest
speed ",,".
Step 3: @
Set Humidity Control .... to medium
position.
NOTE: Humidifier should operate with
humidity control on the recommended
medium setting, if it does not, the
humidity is at a relatively high IeveI.
To test the unit under this condition, turn
Humidity Control all the way to clockwise
and unit should begin to operate. After
the unit has been tested, set Humidity
Controi to medium or desired Ievel.
Ailow 24 hours for humidifier to adjust.
if humidity IeveI in home is sufficient, the
humidifier will only operate with Humidity
Control turned all the way clockwise.
tr-aPORTANT: Water damage may result
if condensation starts to form on windows
or walls. Humidity Controt setting should
be lowered until condensation no longer
forms.
Step 4:
if humidifier stops running and the unit is
not empty, the humidity leve! is at the
normal requirements for that setting or it
is adjusting to the home conditions. The
table below shows recommended indoor
humidity Ievets. The figure shows
approximate relative humidity
percentages which correspond to the
various settings of the Humidity Control.
When Outdoor Recommended Indoor
Temperature is: Relative Humidity is:
-10°F 20%
0°F 25%
10°F 30%
20°F 35%
Operating Tips for Best Performance
1. Position the humidifier at least 2 inches
from any wall and away from any heat
registers.
2. Do not restrict airflow from entering or
exiting the humidifier.
3. Use Sears recommended bacteriostat
32-14900 to retard bacteria growth
that may cause odors and may be
harmful to your health.
4. Perform regular cleaning as instructed
in "Cleaning and Maintenance" section
of this manual.
5. Replace the evaporative wicking filters
at least once per humidification
season or more depending on water
conditions in your area.
Replacement and Care of Filters
WARNING: To reduce the risk of
shock or injury from moving parts,
always unplug humidifier before
removing or replacing any parts.
Pivoting Lid
Fan Assembmy
CAUTION: To help retard bacteria
growth and keep maximum efficiency,
the filter should be replaced at least
once per season, or more often
under hard water conditions. Use
Kenmore 32-14912 recommended
replacement filter.
AII filters may be rinsed periodically in
clear water only. Take care not to damage
paper. To replace evaporative wicking
filters in your Kenmore Quiet Comfort
Whole House humidifier, follow these
instructions.
1. Unplug humidifier and proceed to
clean. Before removing the filters, we
recommend moving the humidifier to
an area where floor coverings are not
susceptible to water damage, i.e.
kitchen or bath areas.
2. To remove parts: Remove the fan
assembly by opening the pivoting lid.
Grasp the fan assembly front center
and rear center. Lift off and set aside
on a clean fiat surface. The filter
housings are now accessible.
NOTE: There are two filter housing
assemblies. Each assembly consists of
a top filter housing and a front filter
housing. The front filter housing contains
tabs that secure the top filter housing.
Do not remove the front filter housings.
3. To remove top filter housing, deflect
the two vertical tabs on top of front
filter housing and Iift up and out of
cabinet. With a soft, absorbent cloth
remove any remaining water or loose
minera! deposits not trapped in the
filter from the filter housing
assemblies.
4. Remove the two filters and dispose of
properly. Repeat for other top filter
housing. Clean internal parts of
humidifier per the'Cleaning and
Maintenance" section of this operator's
manual.
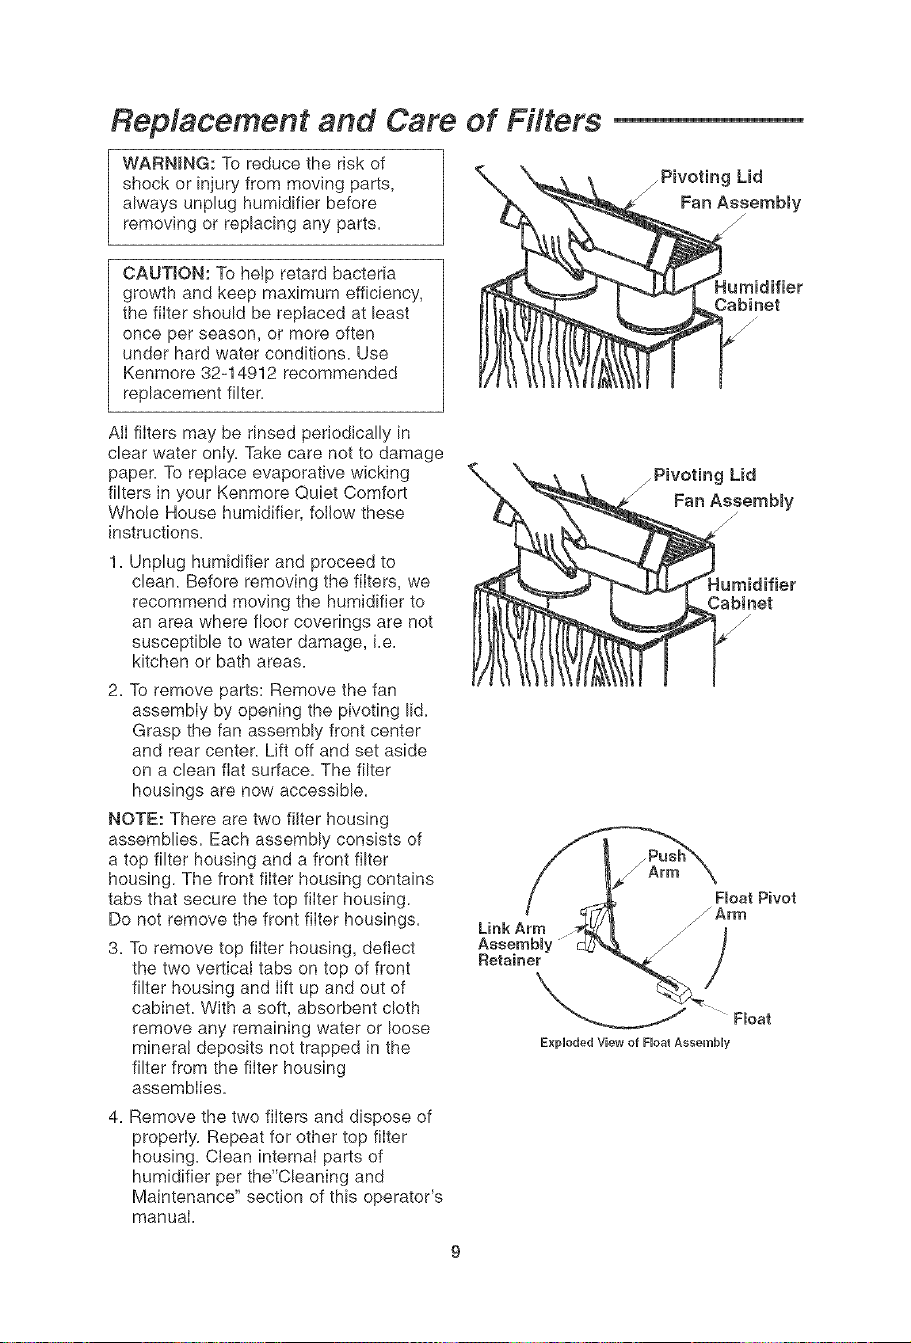
'_. "%-_,,._-_'_lmb__-Z Fan As sembmy
_ J_Ca bi net
ExpUoded View of FUoat AssembUy
Replacement and Care of Filters (conrd.)
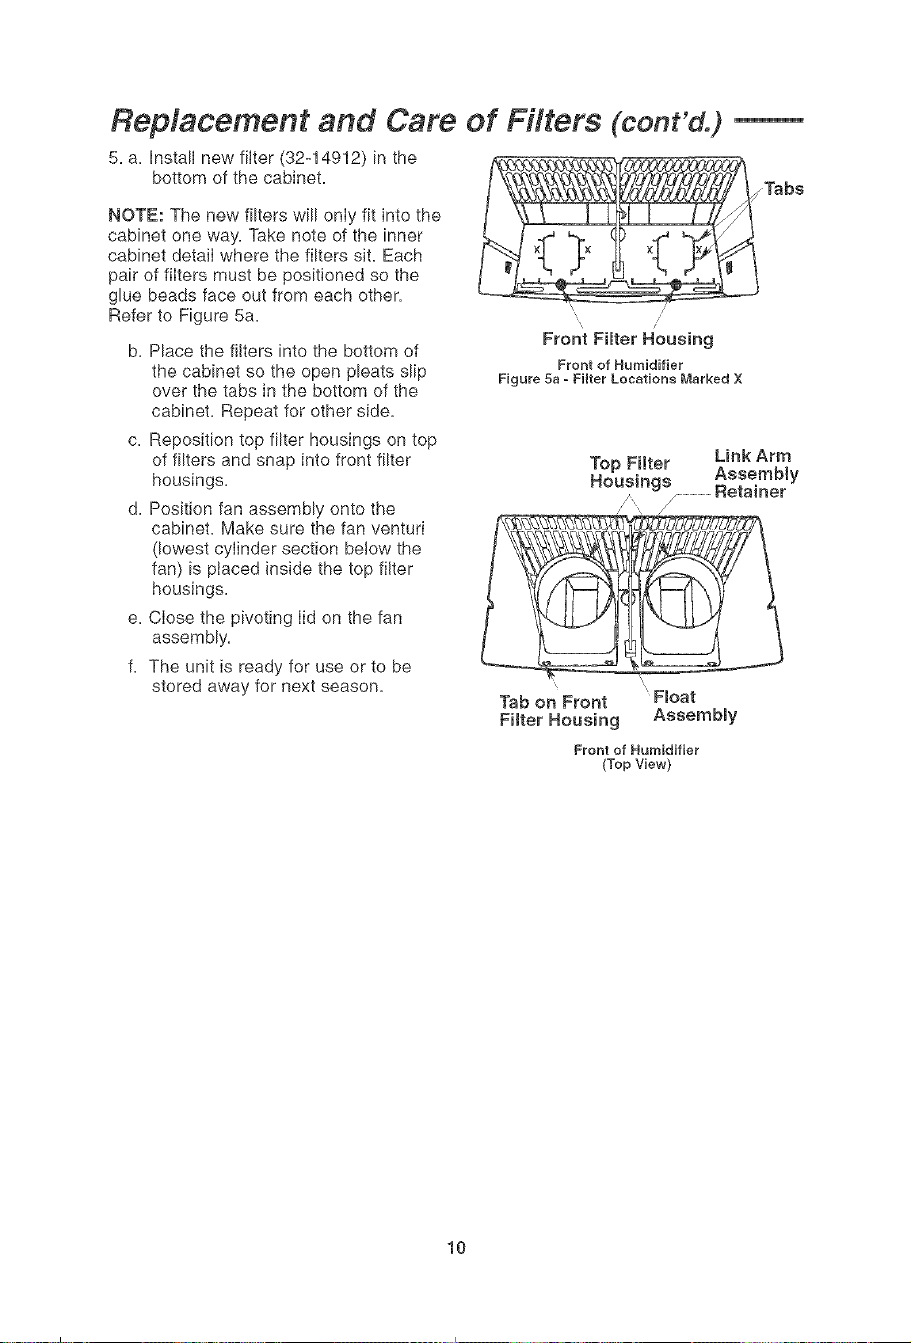
5. a. Install new filter (32-14912) in the
bottom of the cabinet.
NOTE: The new filters will only fit into the
cabinet one way. Take note of the inner
cabinet detail where the filters sit. Each
pair of filters must be positioned so the
glue beads face out from each other.
Refer to Figure 5a.
b. Place the filters into the bottom of
the cabinet so the open pleats slip
over the tabs in the bottom of the
cabinet. Repeat for other side.
c. Reposition top filter housings on top
of filters and snap into front filter
housings,
d. Position fan assembly onto the
cabinet. Make sure the fan venturi
(lowest cylinder section below the
fan) is placed inside the top filter
housings.
e. Close the pivoting Iid on the fan
assembly,
f. The unit is ready for use or to be
stored away for next season.
Tabs
\
s
Front Filter Housing
Front of Humidifier
Figure 5a - Filter Locations Marked X
Top Filter Link Arm
Assembly
Tab on Front Float
FHter Housing Assembmy
Front of Humidifier
(Top View}
10
Cleaning and Maintenance
WARNING: To reduce the risk of injury,
fire or damage to humidifier, use only
cleaners specifically recommended for
humidifiers. Never use flammable,
combustible or poisonous materials to
clean your humidifier. To reduce the
risk of scalds and damage to
humidifier, never put hot water in
humidifier.
CAUTION: Local water purity varies
from area to area and under certain
conditions water impurities and
airborne bacteria may promote the
growth of microorganisms in the
reservoir of the humidifier.
To retard bacteria growth that may
cause odors and be harmful to your
health, use only Sears replacement
filters. We also recommend using EPA
approved bacteriostat, 32q 4900 and
humidifier cleaner, 32-14713, available
at your local Sears store.
NOTE: if it is necessary to use approved
bacteriostat, follow directions correctly.
The cabinet of the whole house
humidifier will hold 4-3/4 gallons of water.
Step 1:
To make cleaning easier, the humidifier
cabinet should be empty and completely
dried out. To accomplish this, use the
following method:
a. On the back side of the humidifier
cabinet, find the float retainer. In
norma! operating mode, the retainer
wilI be positioned in the bottom of the
slot in the cabinet. Push the retainer
up to the top slot position in the
cabinet until it locks in place. (See
"Manual Dryout" section on page 8.)
b. AIIow the humidifier to run until there is
no water left in the cabinet.
c. Unplug humidifier.
WARNING: To reduce the risk of shock,
always unplug humidifier before
cleaning or servicing. If humidifier is not
unplugged, fan could start after
housing is removed.
Step 2:
To Remove Parts
a. Remove the fan assembly by opening
the pivoting Iid. Grasp the fan
assembly front center and rear center.
Lift off and set aside on a clean flat
surface.
b. Before removing the internal parts of
the humidifier cabinet, we recommend
moving the humidifier to an area
where floor covers are not susceptible
to water damage, i.e.; kitchen or bath
area.
c. Deflect the two vertical tabs on top of
the front filter housing to release the
top filter housing. Lift top filter housing
straight up and out of cabinet. Repeat
for other top filter housing.
d. Remove old filters and dispose of
properIy.
e. Remove the water leve! float from the
humidifier cabinet by pinching the float
retainer to release it from the cabinet.
The cabinet should be empty before
cleaning. The cabinet consists of the
lower areas of the humidifier where
the filters are during normal operation
time.
L Empty cabinet of any remaining water.
g. Proceed to "Bi-Weekly Maintenance"
or "End of Season Maintenance" and
then continue as described below.
Step 3:
Install new filters (Kenmore 32-14912
Replacement Filters) into the location
where the old filters were positioned.
Reinstall the water level float assembly
into the cabinet.
NOTE: Link arm assembly retainer
should be positioned in normal operating
mode. Assure that it is positioned in the
bottom of the slot in the back of the
cabinet (See page 7 for diagram of slot).
Reposition top filter housing on top of the
filters and snap onto front filter housings.
Position the fan assembly on top of the
cabinet and return the humidifier to the
desired location for use.
Refill humidifier cabinet with fresh cool
water. Plug the unit into a 120 volt A.C.
power outlet and set the controls per the
"Operating Humidifier Controls" section of
this manual.
11
Cleaning and Maintenance (cont'd.)
BFWeekmy Maintenance End of Season Maintenance
Removing Scame
1. Fill the humidifier base with one 8
oz. cup of undiluted white vinegar,
Let solution stay 20 minutes,
2. Clean aiI interior surfaces with a
soft brush. Dampen a soft cloth
with undiluted white vinegar and
wipe out the base to remove scale.
3. Rinse thoroughly with clean warm
water to remove scale and cleaning
solution before disinfecting cabinet.
4. Dust the fan assembiy and outside
surfaces with a soft cloth only.
Disinfecting Humidifier
Cabinet
1. Fill humidifier cabinet with 1
teaspoon chlorine bleach in 1
gallon of water. Let solution stay for
20 minutes, carefully swishing
every few minutes. Wet all surfaces
normally exposed to water.
2. Empty humidifier cabinet after 20
minutes. Rinse with water until
bleach smell is gone. Allow unit to
dry out completely..
1. Follow"Bi-Weekly Maintenance"
instructions at end of humidification
season.
2. Remove and throw away filters.
3. Let humidifier dry completely before
storing. Do not store with water inside
cabinet.
4. Store in cool, dry location.
5. Install a new filters in clean humidifier
before next season begins.
6. "Bi-Weekly Maintenance" procedure is
also recommended if you do not plan
to run the humidifier for one week or
more.
12
Troub/eshoodng
Trouble Probable Cause Remedy
Unit will nst run. • SsIsctsd humidity level has , Raise humidistat setting if
been established, dssired.
• No Power. _Check 120 volt source fsr
power.
Unit will nst shut off. • Float retainer is positioned in _ Slids link arm asssmbly
"Manual Drysut" position, rstainer ts lowest positisn in
slot at back sf cabinet. (See
page 7).
• Float is not free. _ Free float from obstruction.
Unit will nst dry out completely. • A small amount of watsr _ Position float assembly in
remains in cabinst when "Manual Drysut" position.
water level indicator reads (Sss page 7).
FILL.
Unit is not emptying during • Dirty filters. , Change ts fresh nsw filters.
USS,
Water runts out of rear of unit.
Water IsvsI gauge not
functioning properly.
Water splashing during filling.
Filters interfsring with float.
Deflect fill water off ths center
of ths splash guard.
Do not ovsrfill past "Full" label
in cabinet.
Be sure filtsrs ars positisnsd
properly in bottom of cabinet.
(Sss page 9).
CAUTION: Uss only 32-14900 EPA Rsgistsrsd Bacteriostat availabIs from Sears Rstail store.
Uss of other water treatment products may damage ths filter sIsmsnts.
Under no circumstances shsuld ysu use water treatment products designed for Rata belt sr
Ultrasonic humidifiers.
13

i
22
22
_.J:3
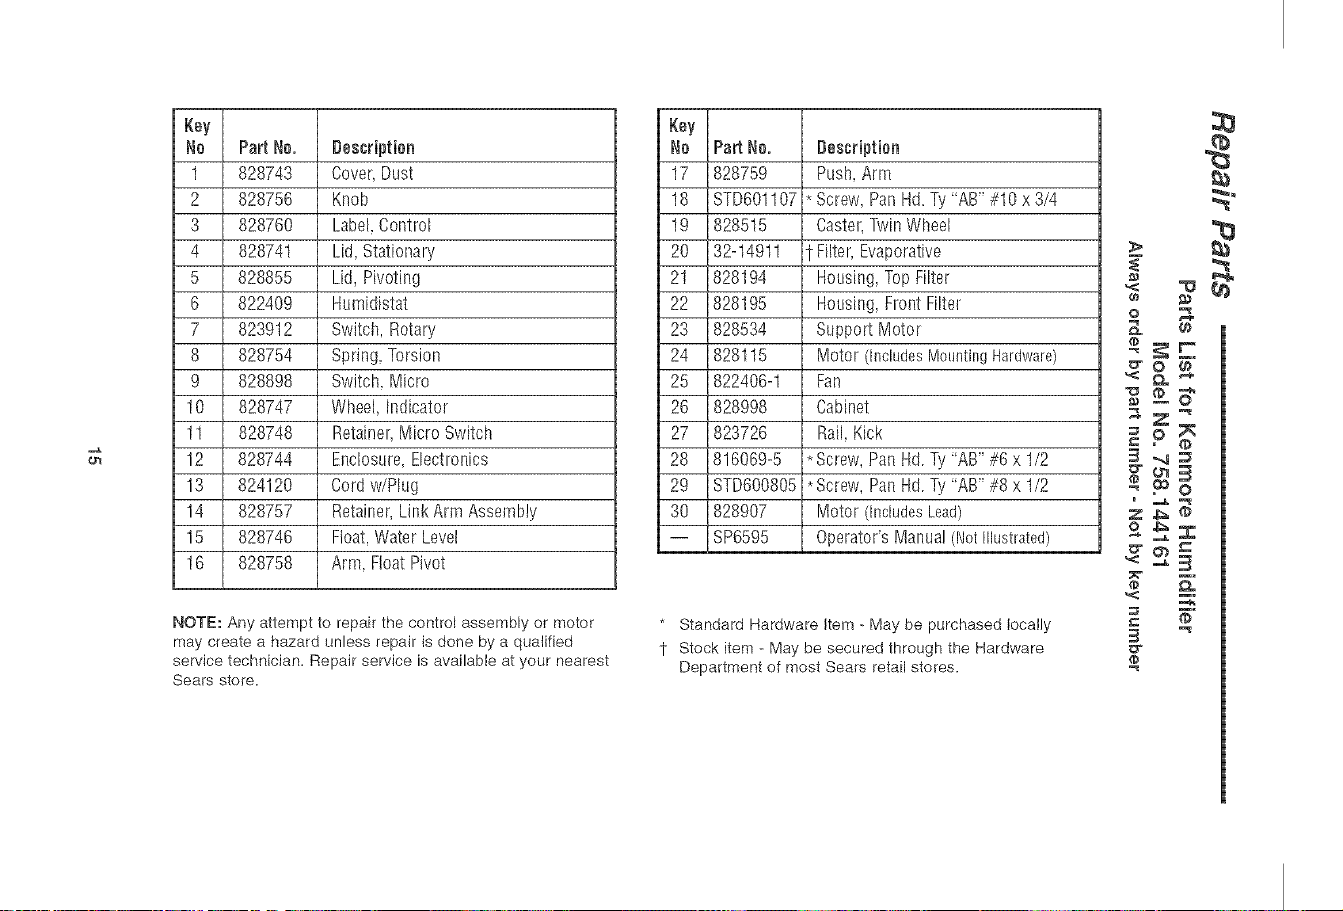
Key
No PartNo,
1 828743
2 828756
3 828760
4 828741
5 828855
6 822409
7 823912
8 828754
9 828898
10 828747
11 828748
12 828744
18 824120
14 828757
15 828746
16 828758
Description
Cover,Dust
Knob
Label,Control
Lid, Stationary
Lid, Pivoting
Humidistat
Switch, Rotary
Spring, Torsion
Switch, Micro
Wheel, Indicator
Retainer,Micro Switch
Enclosure,Electronics
Cord w/Plug
Retainer,Link Arm Assembly
Float.Water Level
Arm, FloatPivot
NOTE: Any attempt to repair the control assembly or motor
may create a hazard unless repair is done by a qualified
sewice technician, Repair sewice is available at your nearest
Sears store.
Key
No Pa_ No.
17 828759
18 STD601t07
19 828515
20 32q491t
21 828194
22 828195
23 828534
24 828115
25 822406-1
26 828998
27 823726
28 816069-5
29 STD600805
30 828907
-- SP6595
Bescripfion
Push, Arm
* Screw, Pan Hd,Ty "AB" #10 x 3/4
Caster,TwinWheel
-Filter, Evaporative
Housing, Top Filter
Housing, Front Filter
Support Motor
Motor (includesMountingHardware)
Fan
Cabinet
Rail, Kick
*Screw, Pan Hd.Ty "AB" #6 x t/2
*Screw, Pan Hd.Ty "AB" #8 x t/2
Motor (IncludesLead)
OperatoFsManual (NotIllustrated)
* Standard Hardware Item - May be purchased locally
1 Stock item - May be secured through the Hardware
Department of most Sears retail stores.
o
,<=
o
@
B
8
2
,1fl
e 5-
=
m_

Notes
16
LEAY GUABDE ESTAStNSTBUCCIONES
Manuam_emusuario
®
HUMIDIFICADOBPABA TODA LACASA
Ptoducci6nde 12 galonescon
tecnoiog{a innovaciorade ventiiadotes gemeios
modeio 758.144161
PBECAUCI()N:Antesde utilizareste
producto,meaestemanuamysiga
todas las normas de seguridad e
instruccionesdeutiiizaci6n.
,,Seguridad
,,Ensamblaje
oUtilizaci6n
_,IViantenimiento
.Piezas
Sears, RoebuckandCo., Hoffman Estates, JL6017{)U.S.A.
www.sears.com
No. de piezaSP6595 Irnpresoen Canada
FGARANTiA COMPLETA DE UN ANO PARA EL HUIVIIDIFICADORKENMORE _
SicualquierpUezade estehumidHicadorfaliadebidoa un defectode materialo de fabricacU6n
dentrodelplazode un a_o a parflrde lafechade Gompra,o sieJmoto_delhumUdificadorfaIla
debidoa un defectode material o de fabricaci6nduranteelsegundoa_o a partirde lafechade
compra,DEVUELVA EL HUMIDIFICADOR AL CENTRO DE PIEZA$Y BEPABACI()NDE SEARS MAS
CEBCANO Y ser_ reparado sin ning_n cargo.Esta garantiano induye io_ filtrosdel
humidifl_ador,que son piezasperecederasque se pueden desgastarpotcausadeluso normal
en menos de unado.Estagarantia le confierea ustedderechoslegalesespedficosy esposible
qua ustedtambi_ntengaotrosderechosque variande un estadoa otto=
Sears, Roebuck and Co., Dept. 817WA, Haffmae Estates, mL60179 ,_
INSTRUCCmONESGENERALESDE SEGURmDAD
Pamabrasdese amdeseguridad 5. No ponga objetos extra#os dentro del
PELIGRO: Signlfica que si no se sigue la hurnidificador.
informaci6n de seguridad, alguien resumtar_
leslonadogravementeo murlrA.
ADVERTENCIA:Significa que s[ no se s[gue la
informaciOndeseguridad,algu[enpodria resultar
leslonadogravementeo morlr.
PRECAUCm6N:Significa que si no se sigue la
informac[On de seguridad, alguien pudiera
resultarleslonado.
1. Parareducire[riesgodepeligrode lncendioo
descargas e[_ctricas, enclrufe e[ humidi-
ficador directamenteen un tomacorriente de
120V C.A.No usecordonesde extensi6n.
2. Mantenga el cable el6ctrico aleiado de las
zonas de tr_.fico. Para reducir e[ rlesgo de
pellgro de incendio no ponga nunca el
cord6n el_ctrlcodebajodea[fumbrasni cerca
de sa[idas de calor radladores de calor,
estufasde cocina o calentadores.
3. Desenchufesiempre el hurnidificador antes
de trasladarlo, antesde lirnplarlo o siernpre
queno est_enservlclo.
4. MantengaIlmpio e! humidificador.
6. Nodeje queel humidificadorseusecomu LIn
iuguete.Esnecesarioprestar muchaatenciOn
cLlandoe[ hurnidiflcadorseausadopor nlSos
o cercadeellos.
7. No utilice nunca el humidificador mientras
alguna plezafalte o est_da_iadade cualquier
manera.
8. Para reducir el riesgo de pdigro e[_ctrlco o
dahos al humidificador,no incline, sacudani
vuelque e[ humidificador m[entras la un[dad
est6 en marcha.
9. Para reducir el riesgo de da_os al humi-
dificador, desenchOfdo cuando no est_ en
USO.
10. Parareducir ei riesgode descargase!_ctricas
accidentales,no toque et cable de allmenta-
ciOnnl los controlescon las manos mojadas.
11. Fijese en la etiquetade adve!tencia que se
muestraa continuaciOn.
ADVERTENCIA:Parareducirel riesgodeincendio,
descargas eldctricas o lesiones, desenchufe
siempreel humidificaderantesdehacerleservicio
deaiustesy reparacionese limpiarlo.
InformaciOnde garantia ...............................18
Instrucciones genera[esde seguridad .........18
Paraahorrarse LmaIlamadade servicio .......19
Familiaricesecon el humidificader ..............19
C6mofunciona el Irurnidlficador ................. 20
Ensambiaie......................................................4
Instrucciones de ub[caciOn..........................21
Conexi6nel_ctrica ...................................... 21
Llenadocon agua ........................................22
Utillzaci6n de loscontroles
del humidlficador .....................................23
Util[zaciOndel humidificador.........................24
Consejosde uti[[zaci6n para Iograr
et rnejor rendimientu.................................24
Reemplazoy cuidado de los filtros ........25-26
Lirnpiezay rnantenirniento ......................27-28
ResoluciOnde problemas ............................29
Piezasde repuesto .................................30-31
18
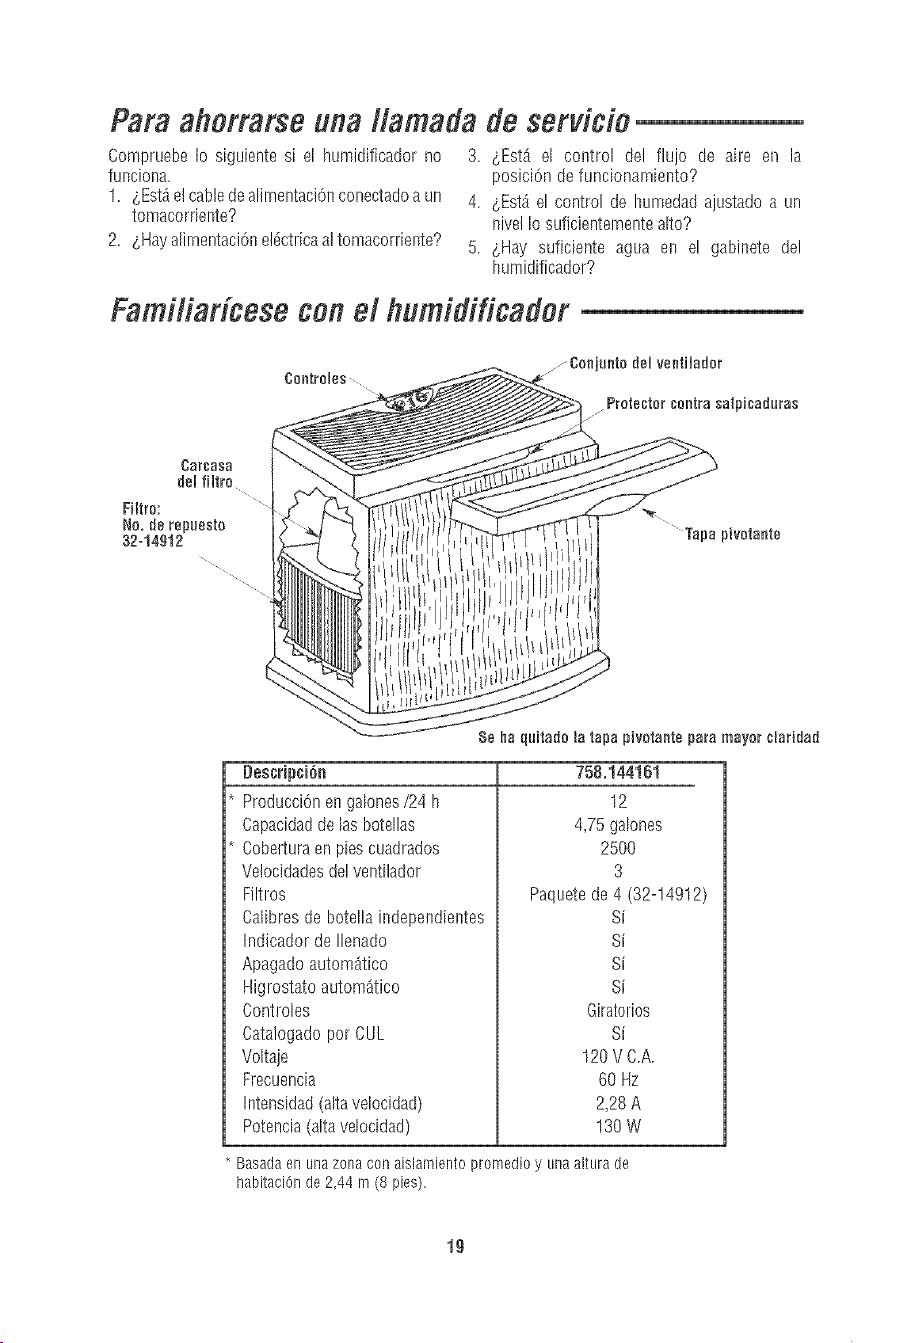
Paraahorrarse unallamada deserddo
CompruebeIoslguientesl el humidificadorno
funciona.
1. &Est,.elcabledealirnentaci6nconectadoaun
tomacorrlente?
2. &Hayalirnentaci6ne!_ctrlcaa!tomacorrlente?
3. &EstA el control del flujo de aire en la
posiciOn defuncionarniento?
4. &EstAe[ control de humedad ajustado a un
nivelIo suficienternentealto?
5. &Hay suficiente agua en el gabinete del
humidificador?
Familiariceseconel humidificador
Careasa
del filtro
Filtre:
No.derepuesto
32-14912
Tapa pivotante
8e ha quitado la tapa pivotaete para mayor ciaridad
Descfipci6n
Producci6n engalones/24 h
Capacidaddehs bote[las
Coberturaen piescuadrados
Velocidadesdelventilador
Filtros
758.144161
12
4,75 ga[ones
2500
3
Paquetede 4 (32-14912)
Calibresdebotellaindependlentes
IndicadordeIlenado
Apagadoautom_.tico
Higrostatoautom_tico
Controles
Cata!ogadoporCUL
Voltaje
Frecuencia
Intensldad(altavelocldad)
Potencia(altavelocidad)
S_
S_
S_
S_
Giratorios
S_
120VC.A.
60 Hz
2,28A
130W
Basadaen unazona con aislamiento promedio y unaaltura de
habitaci6n de 2,44 m (8 pies).
19
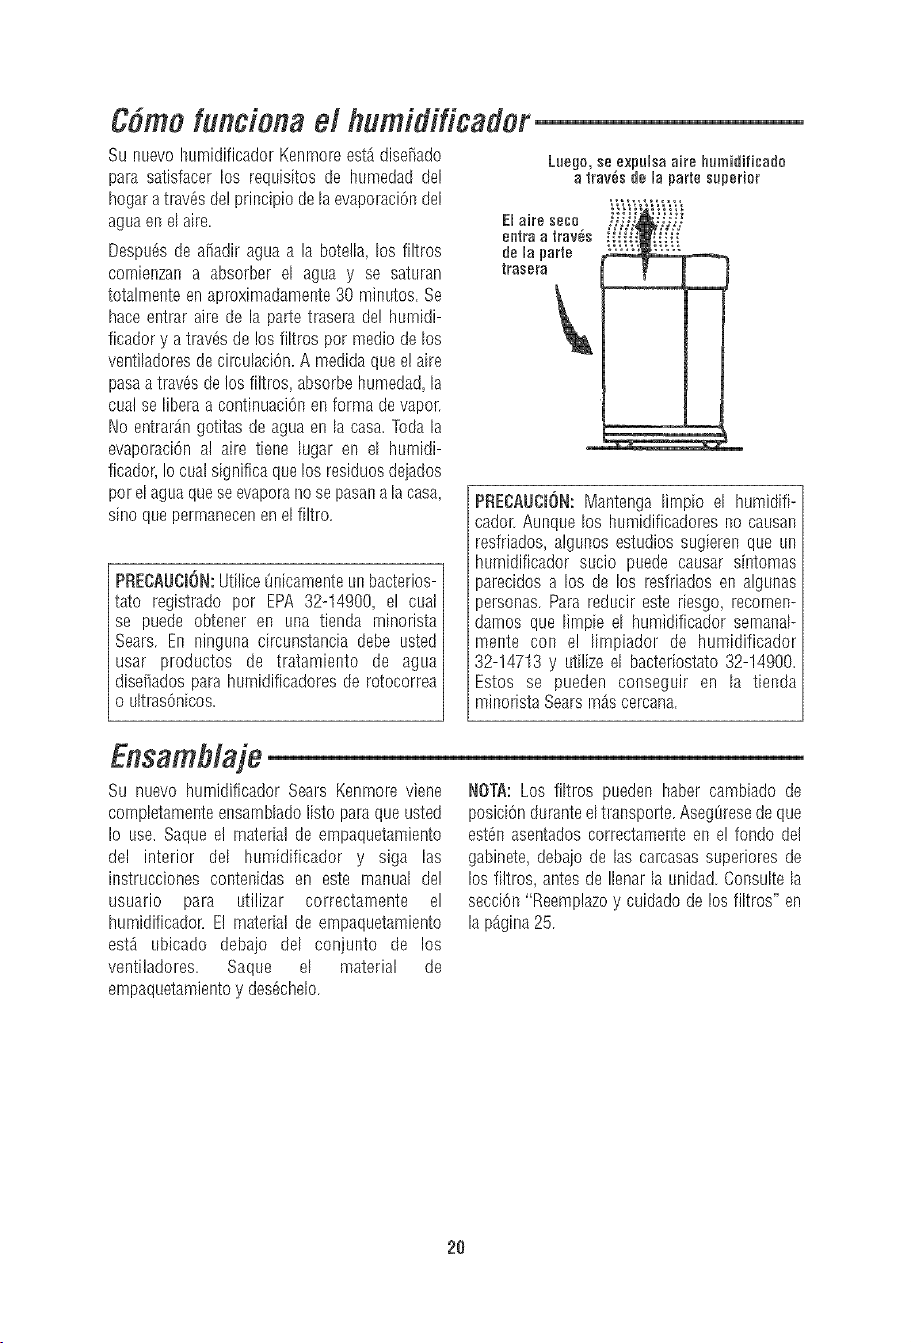
Cdmofundonael humidificador
Su nuevo hurnidificador Kenmoreest_ diseff_ado
para satisfacer los requisitos de humedad del
hogaratrav6sde!principio dela evaporaciOndel
aguaenel aire.
Despu6sde af-iadiragua a la bote!la, los filtros
comienzan a absorber el agua y se saturan
totalmenteenaproximadamente30 minutos. Se
haceentrar aire de la parte trasera de! hurnidi-
ficador y a trav_sde losfiltros por medio de los
ventiladoresde chculaciOn.A medidaque e!aire
pasaatravas delos filtros, absorbehumedad,la
cual seliberaa continuaciOnen forma de vapor.
No entrar_.ngotitas de agua en la casa. Todala
evaporaci6n al aire tiene lugar en el hurnidi-
ficador,Iocualsignifica quelos residuosdeiados
porel aguaqueseevaporano sepasana lacasa,
sino que perrnanecenen elfiltro.
PRECAUCm6N:Utilice8nicamenteunbacterios-
taro registrado por EPA 32-14900, el cual
se puede obtener en Lma tienda minorista
Sears. En ninguna circunstancia debe usted
usar productos de tratamiento de agua
diseF_adospara humidificadoresde rotocorrea
o ultrasOnicos.
Luego,se expulsaairehumidificado
atrav_,sde la partesuperior
Elaire seco
entraatray,s
dela parte
trasera
PRECAUCB6N:Mantenga lirnpio el humidifi-
cador. Aunque los humidificadores no causar_
resfriados,aigLmosestudios sugieren qLleun
humidificador SLICiOpLlede causar sintomas
;arecidos a los de los resfriados en algLmas
:_ersonas.Para reducir este riesgo, recomerl-
damos que lirnpie el humidificador semanal-
mente con e! limpiador de humidificador
32-14713 y utilizeel bactefiostato 32-14900.
Estos se pueden conseguir en la tienda
minoristaSearsrn_.scercana.
Ensamb/aje
Su nuevo hurnidificador Seals Kenmore viene
completamer_teensarnbladolisto paraque usted
Io use. Saque ei material de ernpaquetamiento
del interior del humidificador y siga las
instrucciones contenidas en este manual de!
usuario para utilizar correctamente el
humidificador. El material de empaquetamiento
est_ ubicado debajo del conjunto de los
ventiladores. Saque el material de
ernpaquetamientoy des_chelo.
NOTA:Los filtros pueden haber cambiado de
posiciOnduranteeltranspo!te. Asegqresedeque
est6n asentadoscorrectamente en e! rondo de!
gabinete,debaio de las carcasassuperiores de
los filtros, antes de Ilenar la unidad. Consultela
seeciOn"Reemplazoy cuidado de los filtros" en
la p_gina25.
20
/nstruccionesde ubicad6n
ABVERTENCIA:Para su propia segur[dad, no
ut[lice e[ hurnidificador si alguna pieza est,.
dafiadao falta.
Paso1:
Coloqueel humidificadorenunasuperficieplana
y nivelada,enunAreadesucasadondemAsse
necesitela humedado en un Areaen la que
probablementeseharAcircularairehLimedopor
toda la casa,corno por eiemptocercade un
retornodeairefrio.
La colocaciOnde la unidadde modoqueest6
niveladaes muyimportantesi el humidificador
estAubicadosobreunaa]fombra.
E!airehtimedo(lahurnedad)queseproducese
dispersar_,portodala casa,peroe! Aream_.s
prOximaa launidadtendrAlahumedadmAsalto.
Sila LmidadestAposicionadacercadeunaven-
tana,esposiblequeseformecondensaciOnenel
vidriodelaventana.Siestonoesapropiado,se
debereposicionarlaunidadenotraubicaciOn.
NOTA:Debidoaqueelhumidificadorexpu[saaire
frioy h_medo,[omejoresdirigire!airealejAn-
dolodeltermostatode lacasay [assalidasde
aireca]lento.Lorneioresposic[onarelhum[dill-
cador junto a una paredinterior. Las salidas de
aire ca]iente y el aire frio procedente de las
paredesexteriorespuedenafectarlos eficiencias
delos controles.Launidadno sedebecotocaren
lugares donde elaireternplado de una salida de
aireca%ntesople directamentehaciaella.
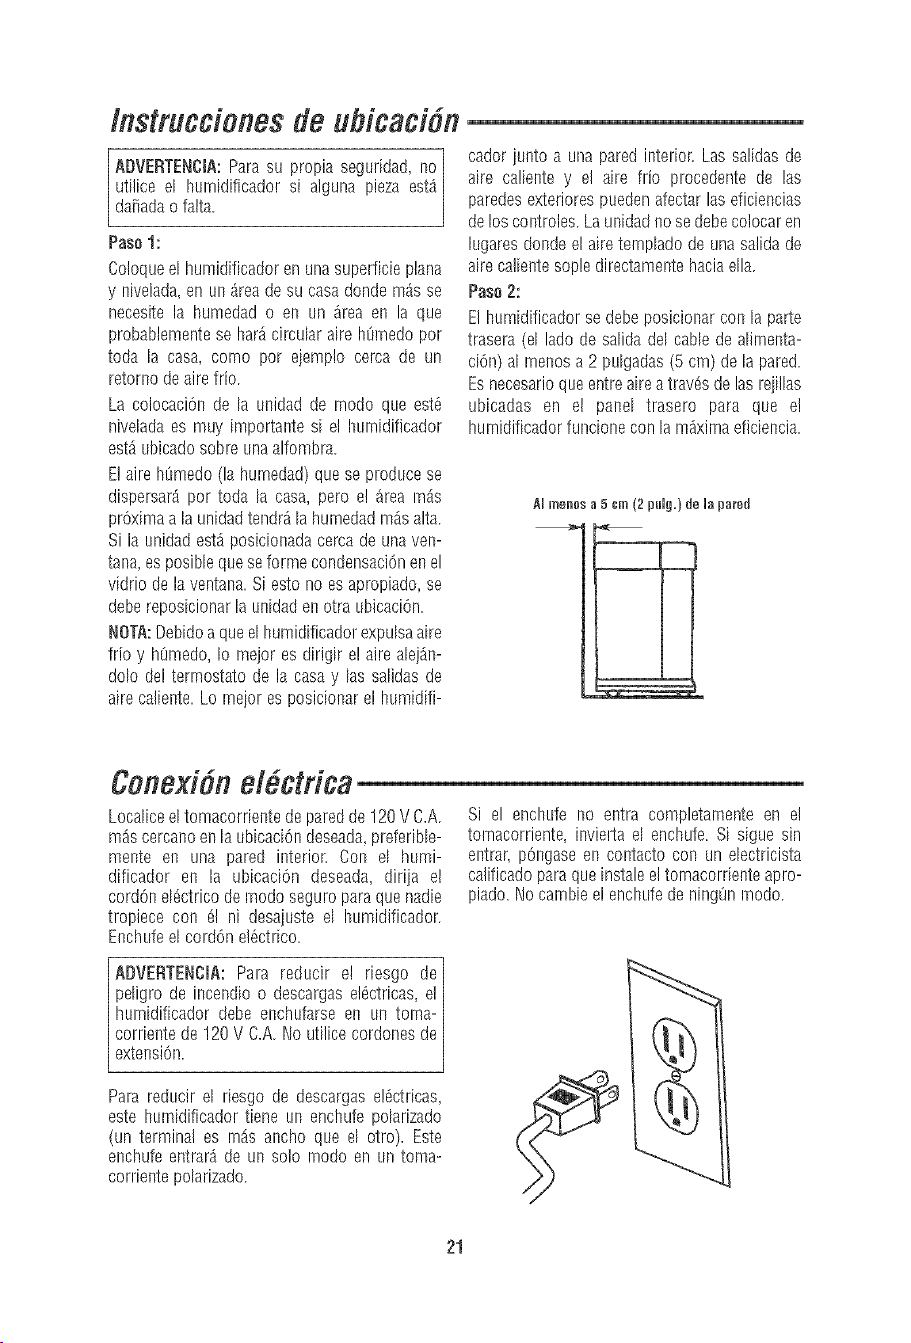
Paso 2:
El humidificador sedebeposicionarcon la parte
trasera (el lado de salida de[ cable de afimenta-
ciOn)a[rnenosa2 pu[gadas(5 cm) de lapared.
Esnecesarioque entreaire a trav_sde lasrejilIas
ubicadas en el panel trasero para que e]
hurnidificadorfuncione col! la maximaeficiencia.
AImenesa5 cm(2 pulg.)dela pared
Coned6n efdctrica
Localiceel tomacorrientede paredde 120 V C.A.
mAscercanoen[aubicaciOndeseada preferible-
monte en una pared interior. Con el humi-
dificador en la ubicaciOn deseada, dirija el
cordone[_ctrico dernodoseguro paraque nadie
tropiece con _! ni desaiuste el humidificador.
Enchufeel cordon e!_ctr[co.
Si el enchufe no entra completamente en e!
tornacorriente, invie!ta e[ enchufe.Si sigue sin
entrar, pOngaseen contacto con un e[ectricista
calificadopara queinstale eltomacorriente apro-
piado. ['docambieel enchufe de n[ngOnrnodo.
ADVERTENCIA: Para reducir el riesgo de
pdigro de incendio o descargasel_ctricas, el
hurnidificador debe enchufarse en LIn torna-
corriente de 120V C.A.No utilice cordonesde
extension.
Para reducir e[ iiesgo de descargas e!Octr[cas,
este humidificador tiene Lmenchufe polarizado
(un terminal es rnAs ancho que el otro). Este
enchufeentrar_,de un solo rnodo en un toma-
corr[entepolar[zado.
21
Menadoconagua
ADVERTENCIA: Para reducir el riesgo de
descargas el_ctricas, desenchLifesiernpre el
hurnidificador antes de lirnpiarlo o hacetle
servicio de ajustesy reparaciones.
ADVERTENCIA: Para reducir el riesgo de
peligro de incendio o descargasel6ctricas, no
eche ni derrame agua en el Area de los
controles o del motor. Si los controles se
moian, de]e qLlese sequen completamentey
hagaque la unidad sea revisadapor personal
de servicio autorizadoantesdeenchufarla.
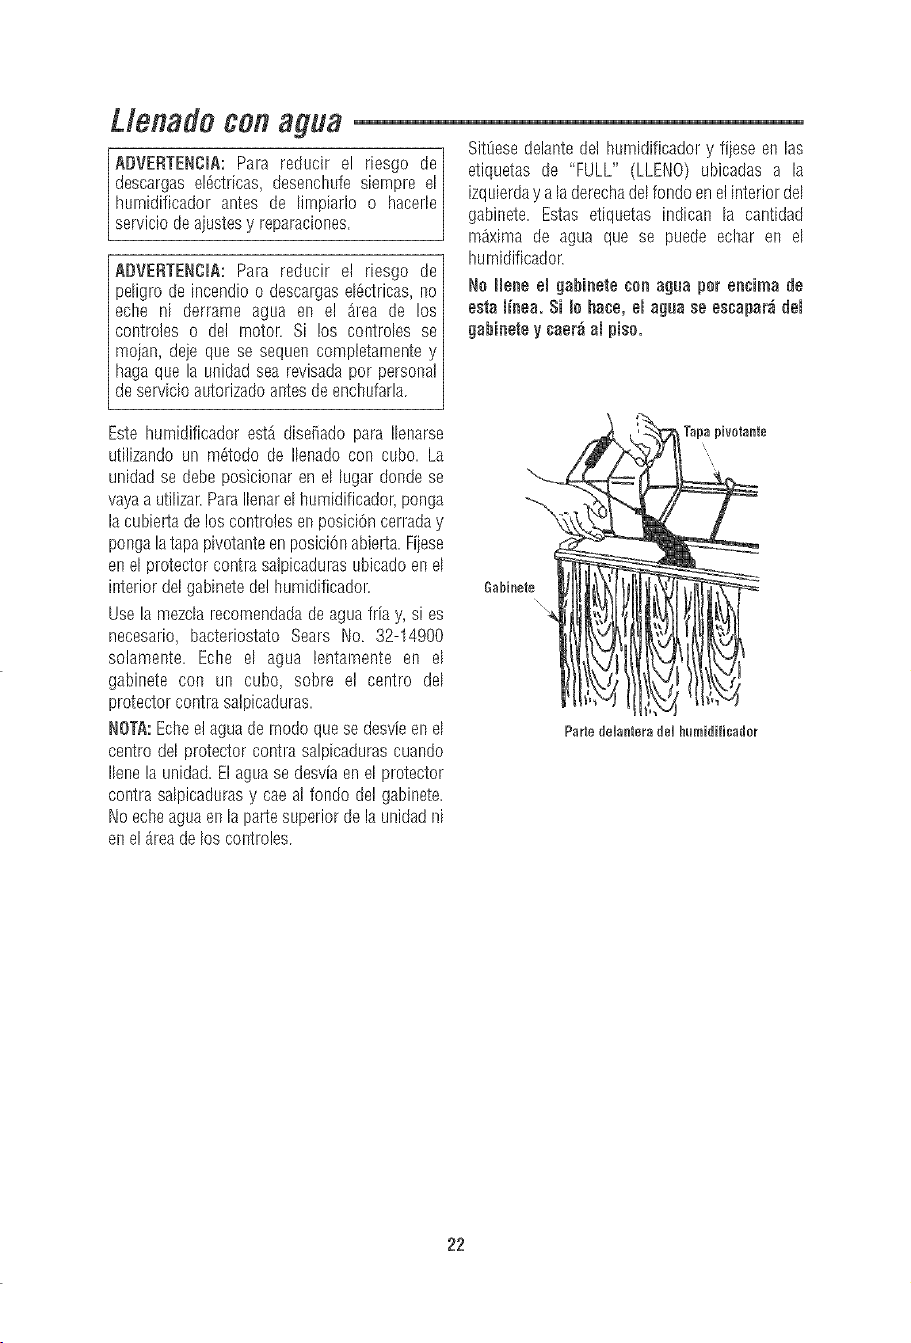
Sit_esedelante del hurnidificador y fi]ese en las
etiquetas de 'FULL" (LLENO) ubicadas a la
izquierday aladerechadelfondo enel interior del
gabinete. Estas etiquetas indican la cantidad
m_xima de agua que se puede echar en el
hurnidificador.
No Hone emgabinete con agua per encima de
esta linea. Si Io hate, el agua se eseapard del
gabinetey ¢aer_aJpiso.
Este humidificador est_ dise_fadopara Ilenarse
utilizando un m6todo de Ilenado con cubo. La
unidad se debe posicionaren el lugar donde se
vayaa utilizar.ParaIlenarel humidificador,ponga
la cubierta delos controles enposiciOncerraday
ponga latapapivotante enposici6nabie!ta. Fi]ese
en elprotector contra salpicadurasubicadoen el
interior delgabinetede! humidificador.
Use la mezda recomendadade aguafria y, si es
necesario, bacteriostato Sears !,lo. 32-14900
solamente. Echo el agua lentarnente en el
gabinete con un cubo, sobre el centro del
protector contra salpicaduras.
NOTA:Echoel aguade rnodoquese desvieen el
centro del protector contra salpicadurascuando
Ilenela unidad. El aguasedesviaen el protector
contra salpicadurasy cae al fondo de! gabinete.
No echoaguaen la partesuperior dela unidad ni
en elAreade los controles.
Parte deOanteradeOhumidi_icador
22
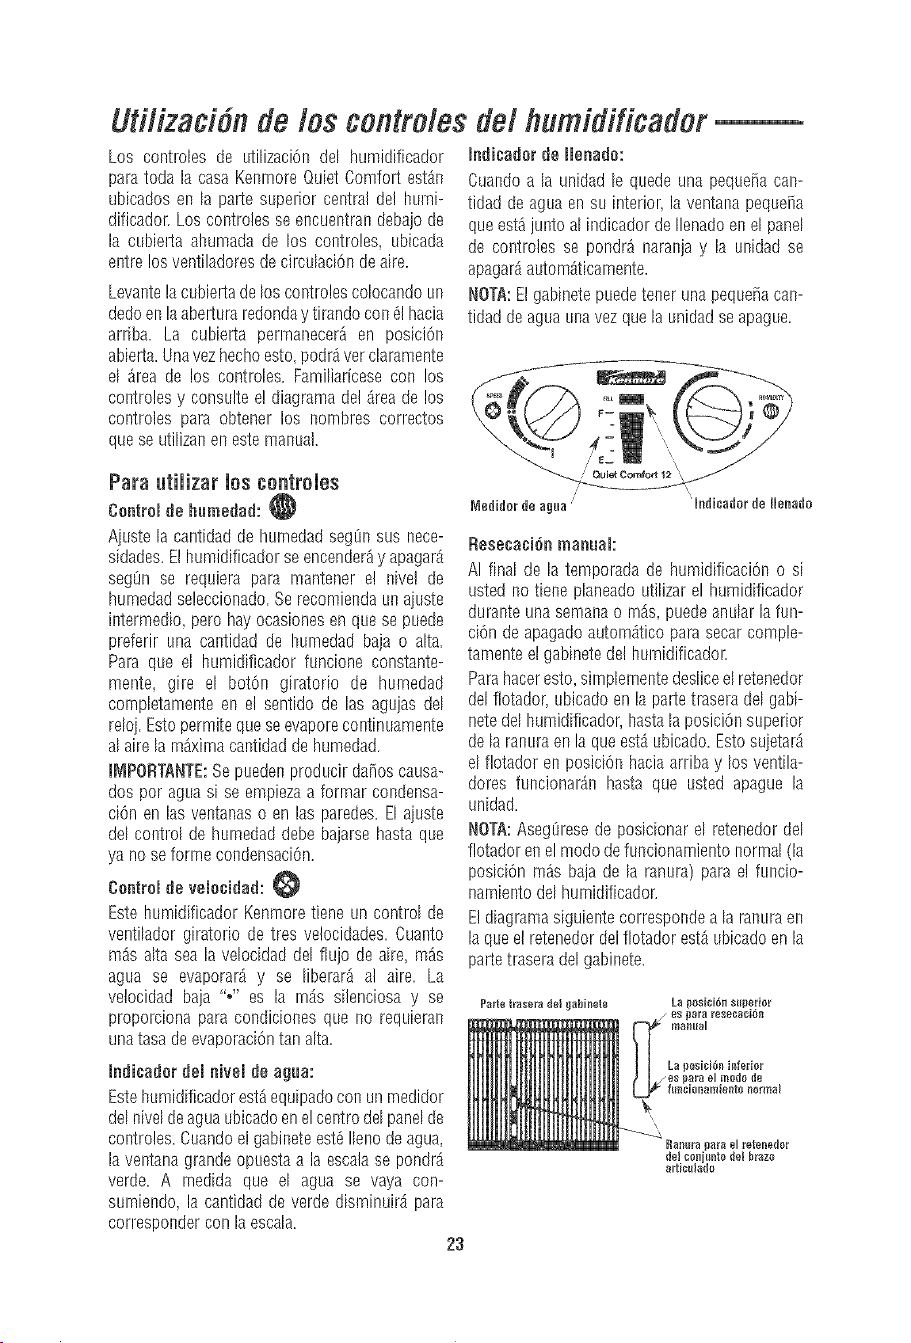
Ufi/izad6n deloscontro/es dd humidificador
Los controles de utiIizaci0n del humidificador
para toda la casa KenmoreQuietComfolt est_n
ubicados en la parle superior central de! hurni-
dificador.Los controlesse encuentrandebajo de
la cubierLaahumada de los controles, ubicada
entre los ventiladoresdecirculaciOndeaire.
LevantelacubierLadelos controlescolocandoun
dedoenlaaberLuraredonday tirandocon81hacia
arriba. La cubierta permanecer_ en posiciOn
abierta.Unavezhechoesto,pedrO,vet cIaramente
el _rea de los controles. Familiaricesecon los
controlesy consulte e! diagramadel_.reade los
controles para obtener los nombres correctos
queseutilizanen estemanual.
Indicador de Ilenade:
Cuandoa la unidad le quede una pequeiia can-
tidad deagua en su interior, la ventanapeque_a
queest_junto a[indicadorde [lenadoene[ pane[
de controles se pondr_ naranjay la Lmidadse
apagar_,autom_ticamente.
NOTA:Elgabinetepuedetenet unapeque_acan-
tidadde aguaLinavezque la LinidadseapagLle.
Parautiiizar ies centreies
ControJde humedad:
AjLIstela cantidadde hurnedadseg0nsus nece-
sidades.El humidificadorseencender_y apagarA
segOn se requiera para mantener e! nive] de
hurnedadseleccionado.Serecomiendaun ajuste
intermedio,pero hayocasionesen quesepuede
preferir una cantidad de humedad baja o aIta.
Para que el humidificador funcione constante-
mente, gire el botOn giratorio de hurnedad
completamenteen el sentido de las agujas del
reIoj.Estopermiteque seevaporecontinuamente
al aire la m_ximacantidad dehumedad.
INIPORTANTE:Sepuedenproducir da_oscausa-
dos per aguasi se empiezaa forrnar condensa-
ci0n en lasventanaso en las paredes.EIajuste
del control de humedad debebajarse hastaque
yano seforme condensaci0n.
Contromde vemeeidad:
Este humidlficador Kenmoretiene un control de
ventilador giratorio de tres ve!ocidades.Cuanto
m_isalta sea la veIocidad del fiujo de aire, m_s
agua se evaporar_,y se liberar_ al aire. La
vetocidad baja '_" es la rn_.ssilenciosa y se
proporciona para condiciones que no requieran
unatasade evaporaciOntan alta.
Indicaderdemnivemde agtla:
Estehumidlficadorest_equipadocon un medidor
delnivd deaguaubicadoenelcentre dd panelde
controles.Cuandoel gabineteest6IIenodeagua,
la ventana grandeopuestaa la escalase pondr_.
verde. A medida que el agua se vaya con-
surniendo,la cantidad de verde disrninuir_,para
correspondercon la escala.
23
Reeeca¢idn manual
AI final de [atemporada de humidificaci6n o si
usted no tiene planeadoutiIizarel humidificador
durante una semanao m_s, puedeanuIarla fun-
ci6n de apagadoautom_.ticopara secarcomple-
tamenteel gabinetedel hurnidificador.
Parahaceresto,simpIementedesliceelretenedor
delflotador, ubicado en la pratetrasera del gabi-
netede[humidificador,hasta[aposiciOnsuperior
de laranuraen la queest,. ubicado.Estosujetar_.
el flotador en posici0n haciaarriba y los ventila-
dotes funcionar_.nhasta que Listed apague la
unidad.
NOTA:Aseg8resede posicionarel retenedor del
flotadoren elmode defuncionamiento norrnal(la
podciOn m_s baja de la ranura) para et funcio-
namientodel humidificador.
E!diagramasiguientecorrespondeala rannraen
la que etretenedordelfiotador est,. ubicadoenla
partetraseradel gabinete.
Parle tra_era de! gabinete
La pesici6n sllperior
/ es para resecaci6n
La posi¢i6n inferior
es para el modo de
_Ll_lci_rtamiellt_ norlgi_l
_amll'a pal'a _l i-etenedoi-
det con i_nto del brazo
Ud/izacidnde/humidificador
Paso 1:
Aseg[_resede queel humidificador est_ Ilenode
aguay enchufado.
Paso 2:
Ajuste el control de ve!ocidad '_" a la
velocidadm_s baja'o"
Paso 3:
Ajuste el control de humedad "_" en la
posici6ninterrnedia.
Paso 4:
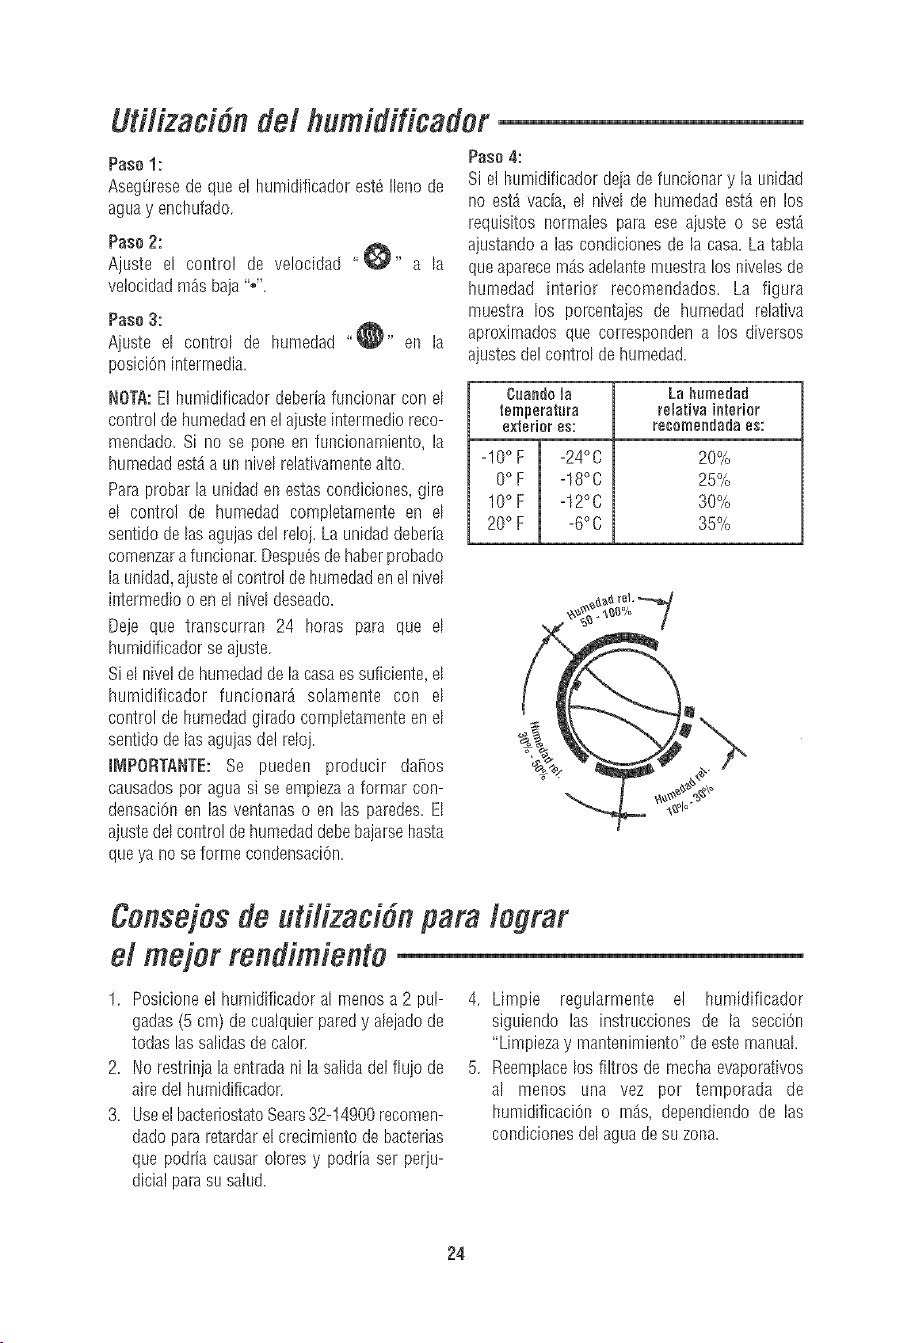
Si el humidificador dejade funcionar y la unidad
no est&vacia, el nivel de humedad est&en los
requisitos normales para ese aiuste o se est,.
ajustandoa los condiciones de la casa.La tabla
queaparecern_.sadelantemuestralos nivelesde
humedad interior recomendados. La figura
muestra los porcentajes de hurnedad relativa
aproximados que corresponden a los diversos
ajustesde! control de hurnedad.
NO]A: El humidificador deberiafuncionar con el
control de humedadenel ajusteinterrnedioreco-
mendado. Si no se pone en funcionamiento, la
humedadest,. aun nivelrelativarnentealto.
Paraprobar la unidad en estascondiciones,gire
el control de humedad completarnente en el
sentido delas agujasdeireloi. Launidad deberia
comenzarafoncionar.Despots dehaberprobado
la unidad,aiusteelcontrol de humedaden e!nivel
intermedioo enel nivd deseado.
Deje que transcurran 24 horas para que el
hurnidificadorse ajuste.
Si el hive!dehumedadde la casaessuficiente,el
humidificador funcionar_ solamente con el
control de humedadgirado cornpletamenteen el
sentidode lasaguiasde! reloj.
INIPORTANTE: Se pueden producir da_os
causadospot aguasi se empiezaa formar con-
densaci6nen las ventanas o en las paredes. El
ajustedelcontrol de humedaddebebajarsehasta
queyano seforrne condensaciOn.
Cuandola La humedad
temperalura relativainterior
exteriores: recomendadaes:
-10° F -24°C 20%
0° F -18°C 25%
10° F -12°C 30%
20° F -6°C 35%
Consejosde uti/izad6n para /ograr
el meier rendimiento
1. Posicioneel humidificadoral menos a2 pul-
gadas(5 cm) de cualquierparedy alejadode
todas los salidasdecolor.
2. No restrinja la entradani la salidadelflujo de
airedelhumidificador.
3. UseelbacteriostatoSears32-14900 recomen-
dadopara retardaretcrecirnientode bacterias
que podria causar olores y podria ser perju-
dicial parasosalud.
4. Lirnpie regularmente el humidificador
siguiendo las instrucciones de la secciOn
' Limpiezay rnantenimiento"de estemanual.
5. Reemplacelos filtros de mocha evaporativos
al menos una vez por temporada de
humidificaci6n o rn_.s,dependiendo de las
condicionesdd aguadesu zona.
24
Reemplazoy cuidado de losffltros
ADVERTENCIA:Parareducirel riesgodedescar-
gas el6ctricaso lesionescausadaspor las piezas
m6viles, desenchufesiempre el humidificador
antesdequitaroreemplazarcualquierpieza.
PRECAUCION:Paraayudara retardar el creci-
miento de bacterias y mantener la m_,xima
eficiencia,sedebereernplazarel filtro almenos
unavezpot estaci6n,om_sa menudoencondi-
clones de agua dura. Use el filtro de repuesto
recomendadoKenmore32-14912.
Todos los fiitros se pueden enjuagar peri6dica-
mente pero s61ocon agualirnpia.Tengacuidado
de no daSare!papel. ParareempIazarlos filtros
de rnechaevaporativos de! humidificador para
toda la casaKenmoreQuiet Comfort, siga estas
instrucdones.
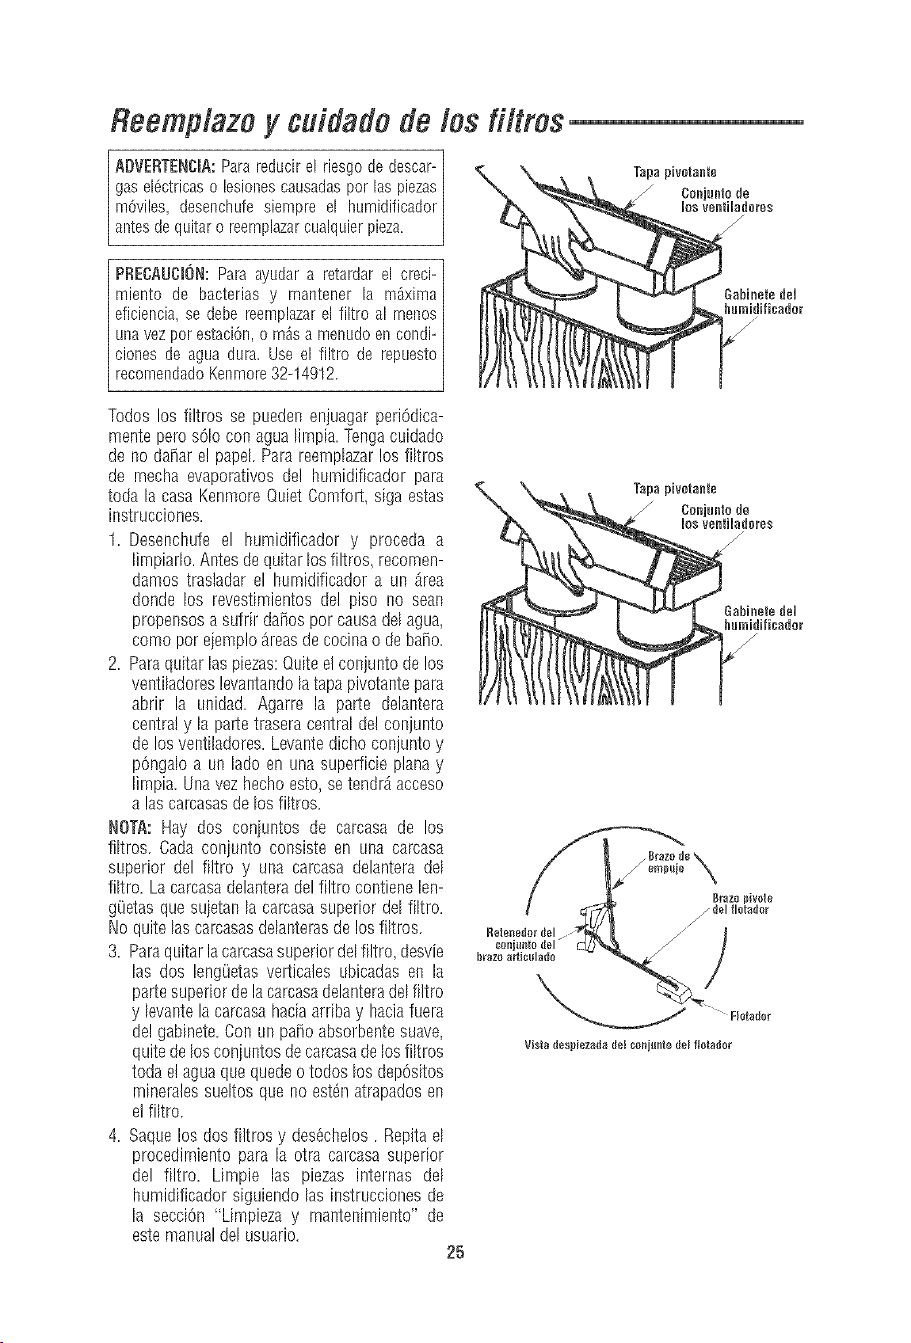
1. Desenchufe el humidificador y proceda a
limpiarlo. Antesde quitarlos filtros, recomen-
damos tras!adar el hurnidificador a un _rea
donde los revestimientos del piso no sean
propensosasufrir daSospot causadelagua,
como poreiemp!o_reasde cocinao de baSo.
2. Paraquitar laspiezas:Quiteel conjunto de los
ventiladores levantandolatapapivotante para
abrir la Lmidad.Agarre la parte delantera
centraly h parte traseracentral de!conjunto
de losventiladores.Levantedicho conjunto y
pOngaloa un lado en una superficie planay
lirnpia. Unavez hecho esto, setendr_,acceso
alas carcasasde losfiItros.
NOTA: Hay dos coniuntos de carcasa de los
fiItros. Cada con]unto consiste en Lmacarcasa
superior del filtro y una carcasa delantera del
fiItro. Lacarcasadelanteradelfiltro contiene len-
gOetasque su]etanla carcasasuperior del fiItro.
No quite las carcasasdeIanterasdelos filtros.
3. Paraquitarla carcasasuperior delfi!tro desvie
las dos lengOetasvelticales ubicadas en la
partesuperior delacarcasadelanteradelfi]tro
y levantela carcasahaciaarribay haciafuera
del gabinete.Con Lmpatioabsorbentesuave,
quitedelos con]Lmtosdecarcasadelos fiItros
toda el aguaquequedeo todos los depOsitos
rnineralessueltos que no est_natrapadosen
el fiItro.
4. Saque los dos fiitros y des6chelos. Repitael
procedimiento para la otra carcasa superior
del filtro. Limpie las piezas internas del
humidificador siguiendo hs instrucciones de
la secciOn Limpieza y mantenimiento" de
estemanual delusuario.
25
Reemp/azoy cuidado de losfi/tros (continuaci6n)
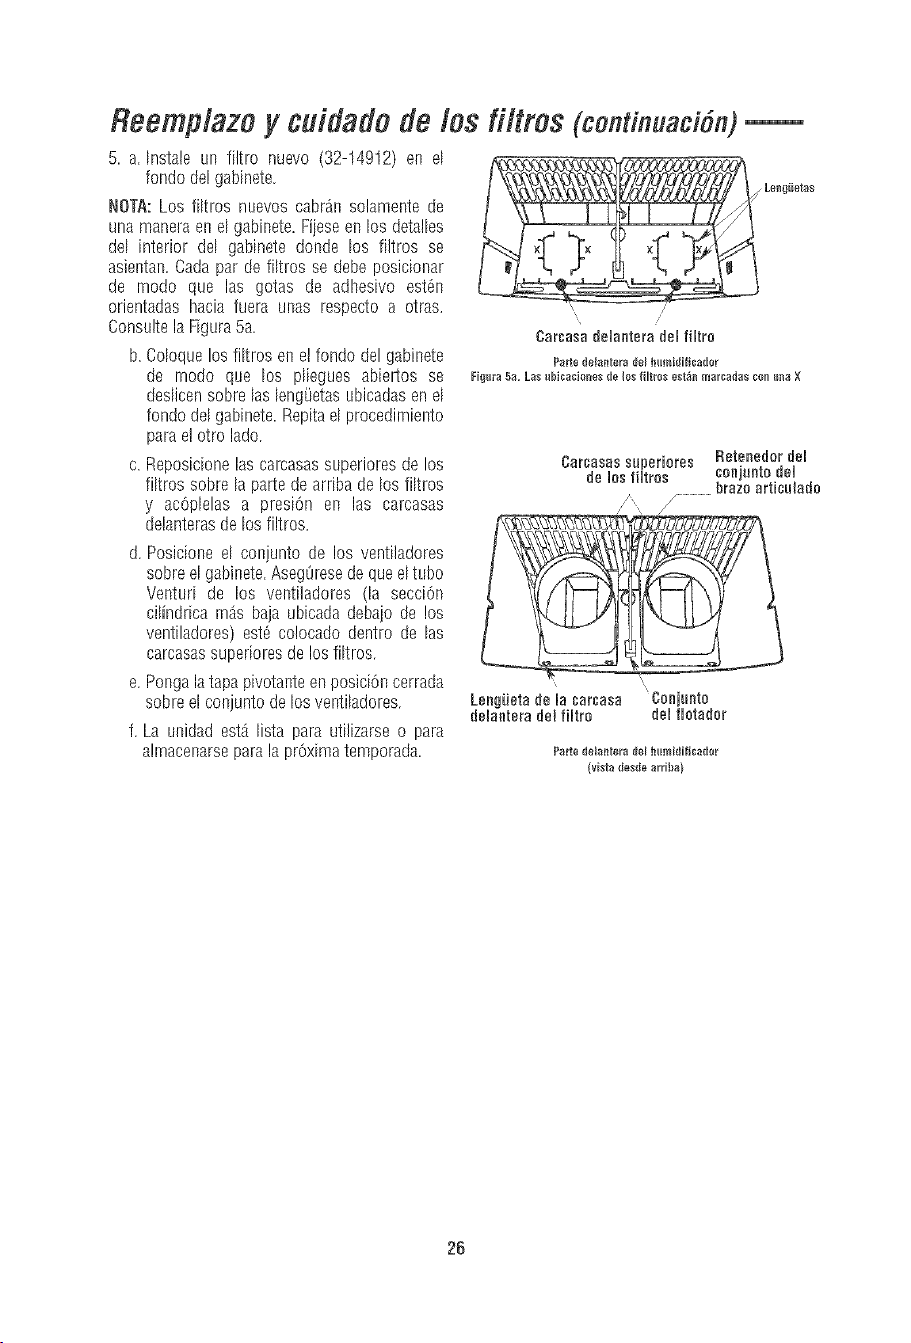
5. a. hlstale un filtro nuevo (32-14912) en el
fondo delgabinete.
NOTA:Los filtros nuevos cabr_r_solamente de
unamanera enel gabinete.Fiieseen los detalles
del interior del gabinete donde los filtros se
asientan.Cada par de filtros se debeposicionar
de rnodo que las gotas de adhesivo est_n
orientadas hacia fuera unas respecto a otras.
Consultela Figura5a.
b.Coloquelos filtros en el fondo dei gabinete
de modo que los pliegues abiettos se
deslicensobre laslengQetasubicadasen el
fondo delgabinete.Repitael procedimiento
para e!otro lado.
c. Reposicionelas carcasassuperioresde los
filtros sobre la partede arriba de los filtros
y ac6plelas a presi6n en las carcasas
delanterasde los filtros.
d. Posicioneel conjuntode losventiladores
sobreelgabinete.AsegOresedequeeltubo
Venturide los ventiladores(la secciOn
cilindricam_sbajaubicadadebajode los
ventiladores)est6co!ocadodentrode las
carcasassuperioresdelosfiltros.
e.PongalatapapivotanteenposiciOncerrada
sobreetconjuntodelosventihdores.
f. La unidadest_lista parautilizarseo para
alrnacenarseparalaprOximatemporada.
Lengiietas
Carcasadelanleradelfiltre
Parle delantera del hl_midificader
Figl_ra 5a. Las ubicaci_nes de ies fiitres est_n rear,arias c_n i_naX
Car_asas supem'iom'es
de losfiltros
Leng_elade ia carcasa Conjunto
delanteradelfiltro delfloladol"
Retenedor del
conjunto del
brazo articulado
Paite delantera del I_l_idificader
(vista desde arriba}
26
Limpiezay mantenimiento
ADVERTENCIA: Para reducir el riesgo de
lesiones, incendio o da_iosal humidificador,
utilice Onicarnentelimpiadores recomendados
especificamente para humidificadores. No
utilice nunca materiales infiamables,
combustibles o t6xicos para limpiar el
hurnidificador. Para reducir el riesgo de
quemarse y de da#ar el humidificador, no
ponganLmcaaguacalienteen el humidificador.
PRECAUCm6N:Lapurezadelagualocal variade
una zona a otra yen ciertas condiciones las
impurezascontenidasene!aguay las bactefias
suspendidas en el aire pueden fornentar el
crecimiento de microorganismos en el
depOsitode! humidificador.
Para retardar el crecimiento de bacterias que
)uedencausaroloresy ser perjudicialesparala
salud, utilice Linicamentefiltros de repuesto
Kenmore. Tarnbi@ recomendarnosutilizar el
bacteliostato32-14900 aprobado por la EPAy
el limpiadorpara hurnidificadores2!-1473, los
cua]esse puedenconseguir en su tienda local
Sears.
NOTA:Si es necesarioutilizar un bacteriostato
aprobado,sigacorrectarnenteBs instrucciones.
El gabinetedel hurnidificador para toda la casa
tienecapacidadpara4-3/4 galonesdeagua.
Paso 1:
Para facilitar la limpieza,el gabinete del hurni-
dificador se debevaciary secarcompletarnente.
Para!ograresto, useel m_todosiguiente:
a. Enel ladotrasero delgabinetedel humidifica-
dot, Iocalice el retenedor del fiotador. En el
modo defuncionamiento normal,elretenedor
estar_ posicionado en la parte inferior de la
ranura ubicadaenel gabinete.Empujee!rete-
nedor haciaarriba hastala posici0n superior
de la ranura del gabinete, hasta qoe quede
bloqueadoen esaposiciOn.(Consultela sec-
ci6n 'Resecaci0n manuar'en la p_.gina23.)
ADVERTENCIA:Parareducir el riesgo de des-
cargas el_ctricas, desenchufe siernpre el
hurnidificador antes de limpiarlo o hacerb
servicio de aiustes y reparaciones. Si el
humidificador no est_ desenchufado, el
ventilador podria ponerse en marcha despu6s
de quitar la carcasa.
b. Deieque el humidificador funcione hastaque
no quedeaguaen el gabinete.
c. Deserlchufee!humidificador.
Paso 2:
Paraquitar maspiezas
a. Quite el con]unto de los ventiladoreslevan-
tando latapa pivotante para abfir la unidad.
Agarre la parte delantera central y la parte
trasera central del conjunto de los ventila-
dotes. Levantedicho coniuntoy pOngaloaLm
lado en Lmasuperficieplanay limpia.
b. Antesdequitarlas piezasinternasdelgabinete
delhumidificador,recomendamostrasBdar el
humidificador a un _.readon@ los revesti-
rnientos del piso no seanpropensos a sufrir
daSospor causadel agua,como por ejemp!o
un _readecocina o debaSo.
c. Desvielas dos lengOetasverticales ubicadas
enla partesuperiorde lacarcasadelanteradel
filtro para soltar la carcasasuperior del filtro.
Levante la carcasa superior de!filtro direc-
tamente hacia arriba y hacia fuera del
gabinete.Repitael procedirnientopara laotra
carcasasuperior de!fittro.
d. Saquelos filtros vieios y des_chdosapropia-
damente.
e. Saquee!flotadorde!nivel deaguade!gabinete
del humidificador comprimiendo e!retenedor
del flotador para soltar!o del gabinete. El
gabinetedebeestar vacio antesde limpiarlo.
Elgabineteconsisteen las_reasinfefiores del
humidificador don@ est_nlos filtros durante
el tiempo defuncionamiento normal.
f. Vacieel gabinetehastaqueno quedenadade
agua.
g. Vayaa "Mantenimiento cada dos semanas" o
"Mantenimiento de final de temporada" y
luego continOe tal como se describe a
continuaciOn.
Paso 3:
Instale !os filtros noevos (filtros de repuesto
Kenmore 32-14912) en la Libicaci6n donde
estaban posicionados los filtros vie]os.
Reinstale el conjunto del f!otador del nivel de
agua enel gabinete
NOTA: El retenedor del conjunto del brazo
articulado debe estar posicionado en el modo
de funcionarniento normal, Asegqrese de que
est_ posicionado en la parte inferior de la
ranura ubicada en la parte trasera del gabinete
(veaei diagrama de la ranura queapareceen la
p_.gina23)
27
Limpiezay mantenimiento(continuad6n)
Reposicione la carcasa superior de los filtros
sobre laparte superior de los filtros y ac6plelaa
presi6n sobre las carcasas delanteras de los
filtros. Posicioneel conjunto de los ventiladores
sobre lapaltesuperior delgabinetey devuelvael
humidificador a la ubicaci6n deseada para
utilizarlo.
Rellene e! gabinetedel humidificador con agua
limpia y ilia. Enchufe la unidad en un
tornacorriente de 120 V C.A. y aiuste los
controles siguiendo las instrucciones de la
secciOn 'Utilizaci6n de los controles del
hurnidificador" de estemanual.
Mantenimiento cada des semanas
Remeei6n de ¢ostra
1. Llenelabasedelhurnidificadorcon unataza
de 240 rnl (8 onzas) de vinagreblanco sin
di]uir.Dejequela soluci6n permanezcaenla
basedurante20 minutos.
2. Lirnpietodaslassuperficiesinterioresconun
cepillo blando. Hurnedezcaun paiio suave
convinagre blancosin diluir y limpiela base
conel pasoparaquitar h costra.
3. Enjuague a fondo coil agua templada y
limpia para quitar la costra y la soluci6n
lirnpiadoraantesde desinfectare]gabinete.
4. Quite el polvo de! conjunto de los ventila-
dotes y las superficies exteriores con un
patio suave solamente.
iViantenimientede final de temperada
1. Siga las instrucciones de "Mantenimiento
cadados semanas" al final de la temporada
de bumidificaciOn.
2. Saquey tire los filtros.
3. Dejeque el humidificadorsesequecompleta-
mente antes de guardarlo. No almacenela
unidadcon aguadentrodel gabinete.
4. Guardeel bumidificador en un lugarfresco y
seco.
5. Instale un filtro nuevo en el humidificador
limpio antes de que comience la prOxima
temporada.
6. E! procedimiento de "Mantenimiento cada
dos semanas" tambi_n se recomienda si
usted no piensa utilizar e! burnidificador
durante una semanao m_s.
Desinfec¢i6n dei gabinete
dei humidifica_ler
1. Llene el gabinete del humidificador con 1
cucharadita de blanqueador de cloro en
1 galOn de agua. Deje que la soluciOn
permanezcaenla basedurante 20 minutos,
agit_ndola cuidadosarnente cada pocos
rninutos. Moje todas las superficies que
normalrnenteest_nexpuestasaagua.
2. Vacie el gabinete del humidificador
despu6s de 20 minutos. Enju_gue!ocon
agua hastaque el olor a blanqueadorbaya
desaparecido.Dejeque la unidad se seque
completarnente.
28
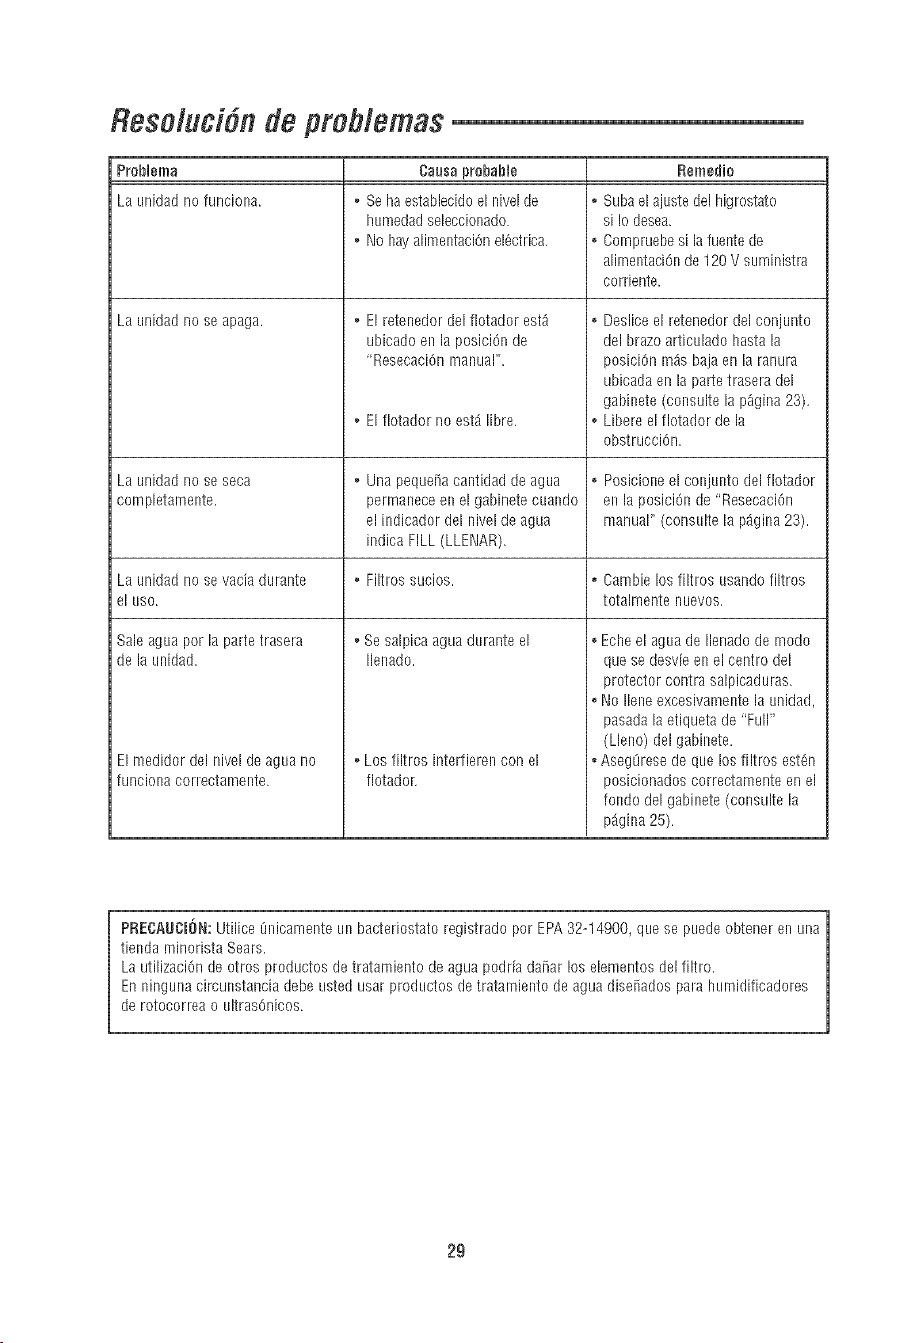
Reso/uci6ndeproblemas
Problema Causa probable Remedio
Launidad nofunciona. _ Sehaestablecido elnivel de , Subael ajuste del higrostato
humedadseleccionado, si Io desea.
No hay alimentaciOnel_ctrica, _ Compruebesi lafuentede
alimentaci6nde 120V suministra
corriente.
Launidad no se apaga.
El retenedor del flotador est9
ubicado en la posici6n de
"ResecaciOnmanual'.
o Deslice el retenedor del conjunto
del brazo articulado hasta la
posiciOn m_s baja en la ranura
ubicada en la parte trasera del
gabinete (consulte la p_gina 23),
Libere el flotador de la
obstrucciOn.
, El flotador no est_ libre,
Launidad no se seca o Una peque_acantidad de agua o Posicione el conjunto del flotador
cornpletarnente, perrnanece en el gabinete cuando en la posici6n de 'Resecaci0n
el indicador del nivel de agua manual" (cons[rite la p_gina23).
indica FILL (LLENAR).
Launidad no se vacia durante o Filtros sucios, o Cambie los filtros usando filtros
el uso. totalrnente i][levos,
Sale aguapor la partetrasera oSe salpica agua durante el
de la unidad. Ilenado.
Los filtros interfieren con el
flotador,
Elmedidor del nivel de agua no
f/Jrlciol]acorrectalTlel]te.
oEcheel aguade Ilenadode rnodo
quese desvie en el centro del
protector contra salpicaduras.
oNo Ileneexcesivamente la unidad,
pasadala etiqueta de 'Full"
(Lleno) del gabinete,
• Aseg0rese de que losfiltros est_n
posicionados correctamente en el
fondo del gabinete (cons[rite la
p_gina 25),
PRECAUI}II_N:Utilice 8nicamente un bacteriostato registrado por EPA32-14900, que se puede obtener en una
tienda minorista Sears.
LautilizaciOn de otros productos de tratamiento de agua podria danar los elementos del filtro.
Enninguna circunstancia debeusted usar productos detratamiento deagua diseiiados para hurnidificadores
de rotocorrea o ultras0nicos.
29
i
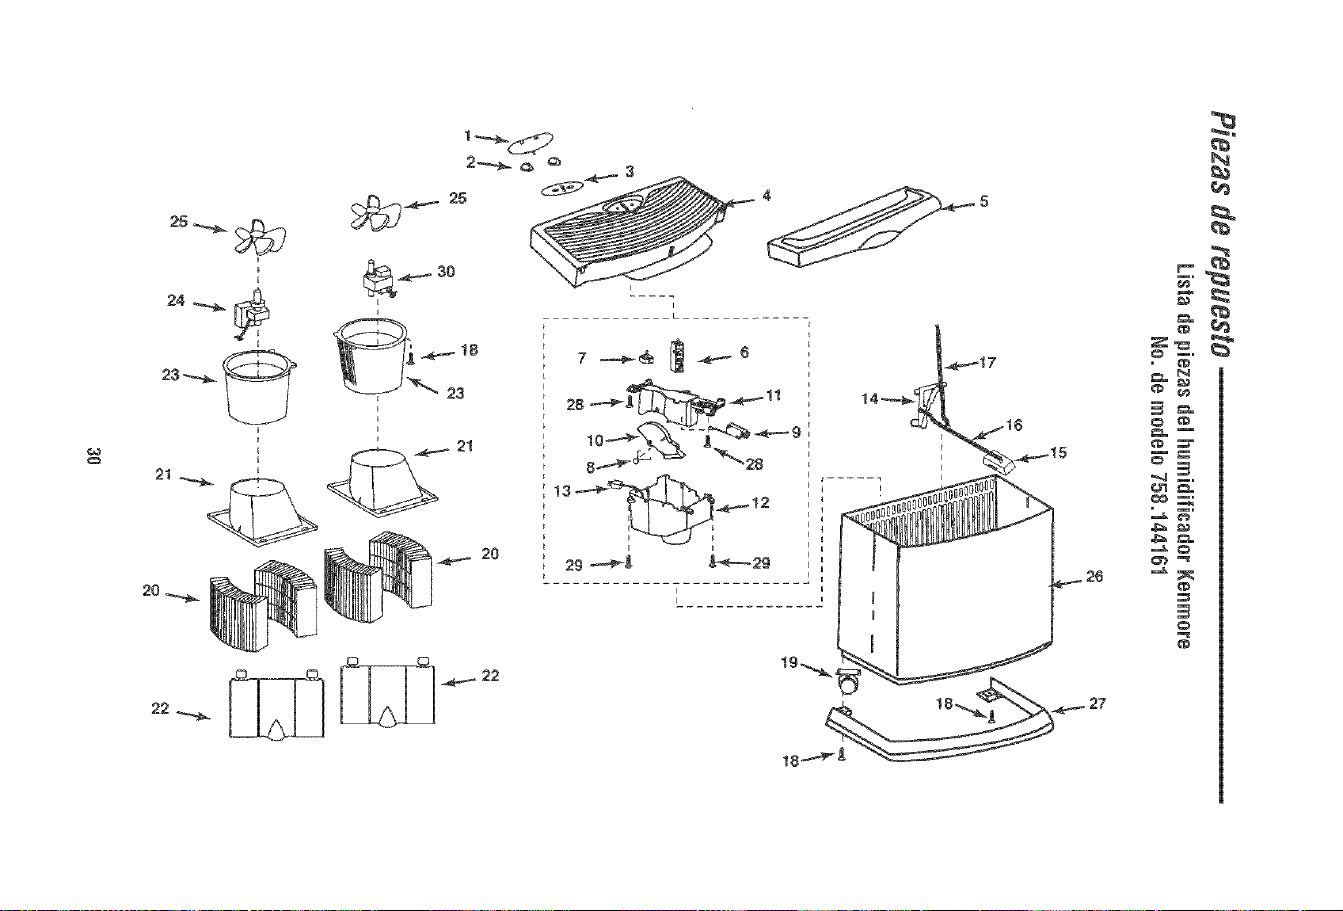
22
22
,J;z=
_z, O
N_
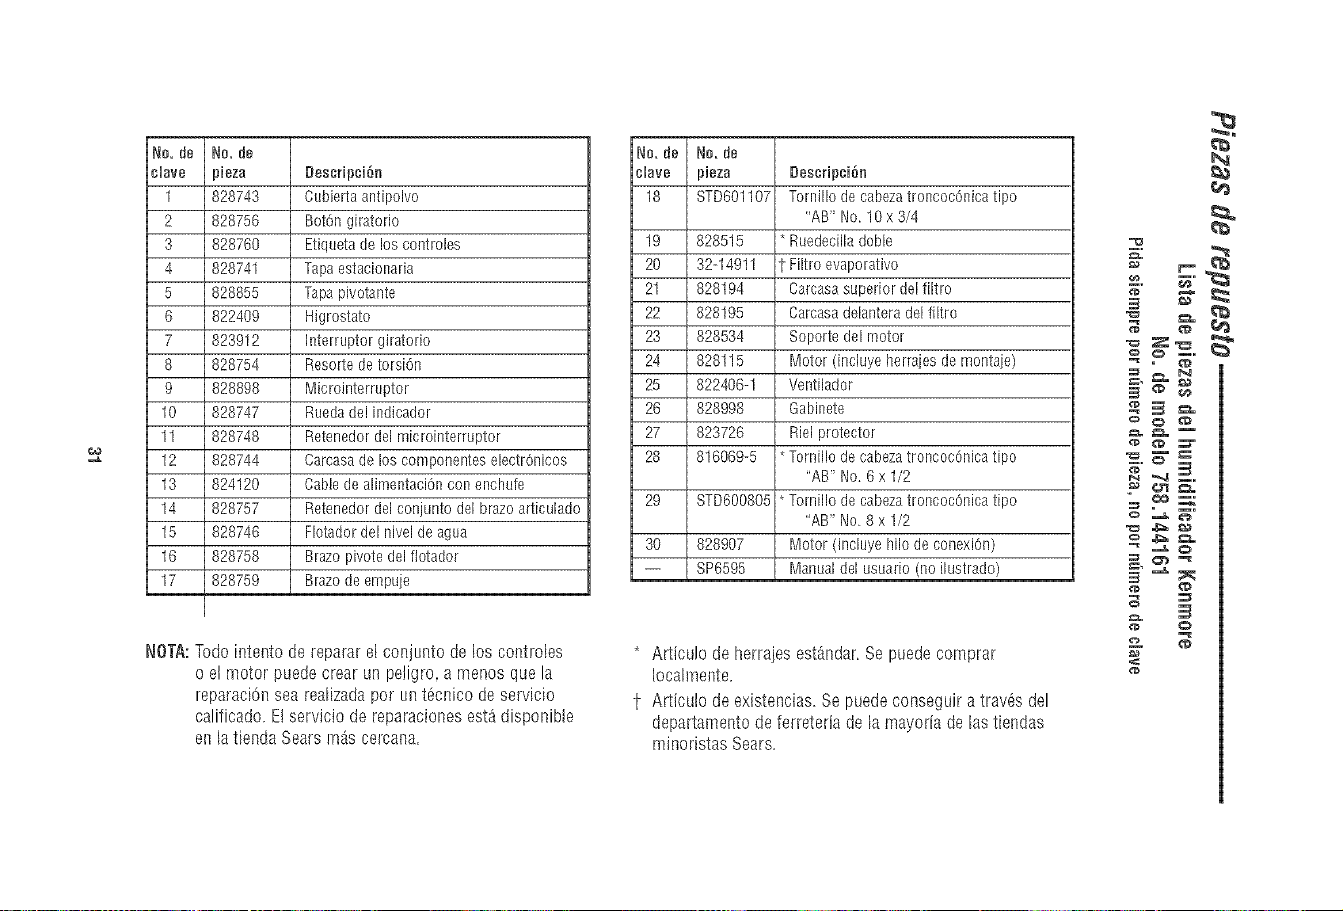
No, de
clave
1
2
3
4
5
6
7
8
9
10
11
12
13
14
15
16
17
No. de
pbza
828743
828756
828760
828741
828855
822409
823912
828754
828898
828747
828748
828744
824120
828757
828746
828758
828759
Descripci6n
Cubierta antipolvo
8ot6n giratorio
Etiqoeta de los controles
Tapaestacionaria
Tapapivotante
Higrostato
Interruptor giratorio
Resorte detorsi6n
Microinterruptor
Ruedadel indicador
Retenedor del mic[ointerruptor
Carcasade los componentes electr@icos
Cable de alimentaci6n con enchufe
Retenedor del conjunto del brazoarticulado
Flotador del nivel deagua
Brazo pivote del flotador
8razo de empqe
NOTA:Todo intento de reparar el conjunto de los controbs
o el motor puede crear un petigro, a menos que la
reparaciOnsea realizadapot un tecnico de servicio
calificado. Etservicio de reparacionesest_ disponibJe
en latienda Sears rn_,scercana.
No, de No, de
clave pieza
18 STD601107
19 828515
20 32-14911
21 828194
22 828195
23 828534
24 828115
25 822406-1
26 828998
27 823726
28 816069-5
29 STD600805
30 828907
-- 8P6595
DescNpci6n
Tornillo de cabezatroncocOnica tipo
'A8" No. 10 x 3/4
* Ruedecilladone
1-Filtro evaporativo
Carcasasuperior del filtro
Carcasadelantera del filtro
Soporte del moto[
N1oto[(incluye herrajes demontaje)
Ventilador
Gabinete
Riel protector
*Tornillo de cabezatroncocdnica tipo
'AB" No. 6x 1/2
* Tomillo de cabezatroncoc6nica tipo
'AB" No, 8 x 1/2
Motor (incluye hilo de conexi6n)
N1anualdel usuario (no ilustrado)
* Articu!o de herrajes estandar,Sepuede comprar
[oeah_nente,
l- Articulo de existencias. Se puedeconseguir a traves del
departamentode ferreteda de la rnayoria de lastiendas
minoristas Sears,
==
==,
3
t_
E.

Your Home
For repair -- in your home --of all major brand appliances,
{_ Sears, Roebuck and Co.
_) Registered Trademark / TMTrademark / sMService Mark of Sears, Roebuck and Co.
_) Marca Registrada / T_,_Marca de Fabrica / sMMarca de Servicio de Sears, Roebuck and Co.
McMarque de commerce / M_Marque d6pos6e de Sears Roebuck and Co.
Part [/o. SP6595 Forrn [/0. SP6595 Printed inCanada 07/05