f
READ AND
SAVE THESE
mNSTRUCTmONS
SF_AIRS
OWner'S
Stock No.
42°14410
Mode_ No.
758.144107
FOR YOUR
READ
ALL mNSTRUCTIONS
CAREFULLY
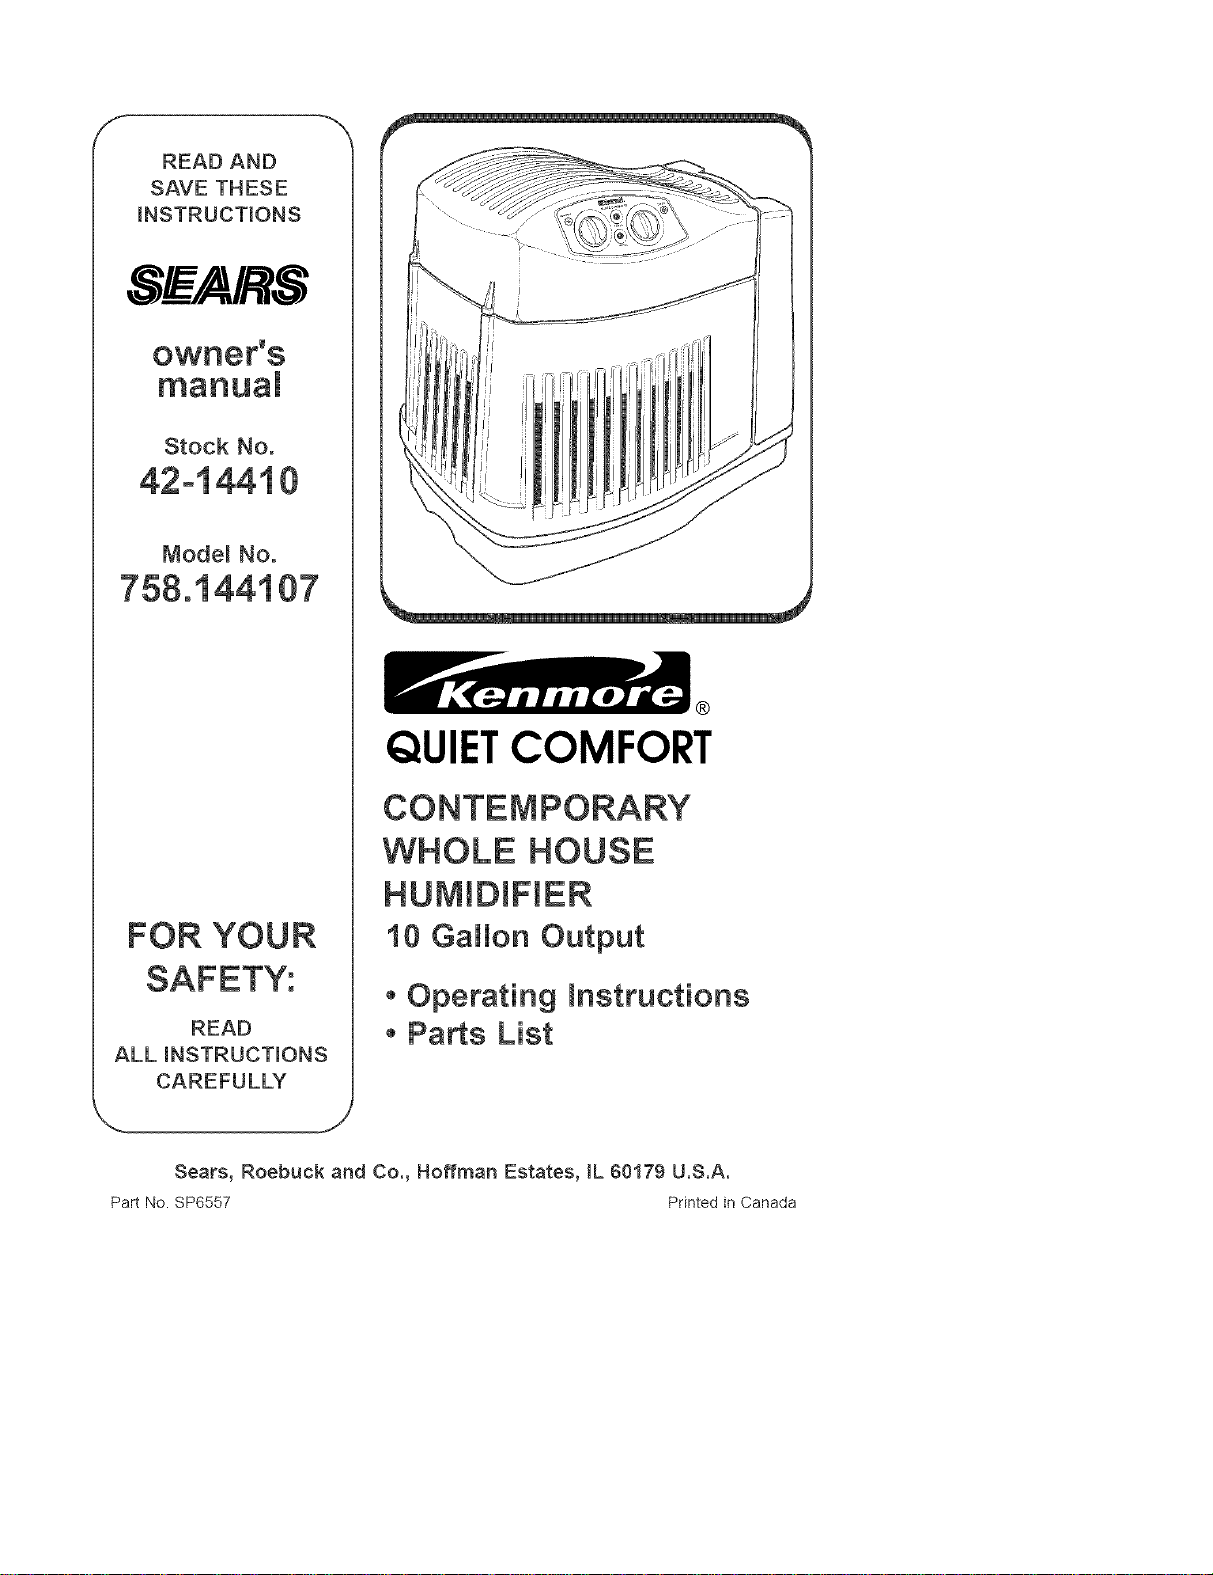
QUIETCOMFORT
WHOLE HOUSE
HUMIDmFIER
10 Ga_on Output
• Operating mnstructions
• Parts List
Sears, Roebuck and Co., Hoffman Estates, IL 60179 U.S.A.
Part No. SP6557 Printedin Canada
_#" FULL ONE YEAR WARRANTY ON HUIVImDtFmER "_
[f within one (1) year from the date of purchase, th{e humidifier fairs due to a defect in
material or workmanship, Sears will repair it, free of charge. If within two (2) years from
the date of purchase, the motor fails due to defect in materia_ or workmanship, Sears
will repair it free of charge.
This warranty service is available by simply returning the humidifier to the nearest Sears
Store, and it wilt be repaired or replaced, at Sears option, free of charge.
Th{s warranty applies onmy while this product is used in the United States.
This warranty gives you spec{fic _ega_rights, and you may also have other rights which
GENERAL SAFETY
Safety Signal Words 5.
DANGER: means if the safety information is
not followed, someone will be seriously 6.
injured or killed.
WARNING: means if the safety information is
not followed, someone could be seriously 7.
injured or killed.
CAUTION: means if the safety information is 8.
not followed, someone may be seriously
injured or killed.
1. To reduce the risk of fire or shock hazard, plug 9.
humidifier directly into a 120V, A.C. electrical
outlet. Do not use extension cords.
2. Keep the electric cord out of traffic areas. To
reduce the risk of fire hazard, never put the
electric cord under rugs, near heat regis-
ters, radiators, stoves or heaters.
3. Always unplug the humidifier before mov-
ing it, before cleaning, or whenever the
humidifier is not in service.
4. Keep the humidifier clean.
iNSTRUCTiONS
Do not put foreign objects inside the
humidifier.
Do not allow to be used as a toy. Close
attention is necessary when used by or
near children.
Never use your humidifier while any part
is missing or damaged in any manner.
To reduce the risk of electrical hazard or
damage to humidifier, do not tilt, jolt or tip
humidifier while unit is running.
To reduce the risk of damage to humidifier,
unplug humidifier, when the base is empty
or when the humidifier is not in use.
10.To reduce the risk of accidental electrical
shock, do not touch the cord or controls
with wet hands.
11.Note the warning label shown below.
WARNING: To reduce risk of fire, elec-
tric shock, or injury always unplug
before filling, servicing or cleaning.
Table of Contents
Warranty Information .................................. 2
General Safety instructions ........................ 2
To Save A Service Call ............................... 2
Know Your Humidifier ................................. 3
Humidifier Operations ................................ 4
Assembly .................................................... 4
Location instructions .................................. 5
Electrical Hook-Up ...................................... 5
Water Fill .................................................. 6-7
Operating Humidifier Controls ................... 7
Using Your Humidifier ................................. 8
Operating Tips for Best Performance ......... 8
Replacement and Care of Filters ........... 9-10
Cleaning Your Humidifier ..................... 11-12
Troubleshooting ....................................... ! 3
Repair Parts ......................................... 14o15
To Save a Service Call
Check the following if your humidifier is 3. is airflow control in operating position?
not operating. 4. is humidity control set high enough?
1. Is power cord attached to outlet? 5. Is the humdifier sitting on a level sur-
2. Is there electrical power to outlet? face?
2
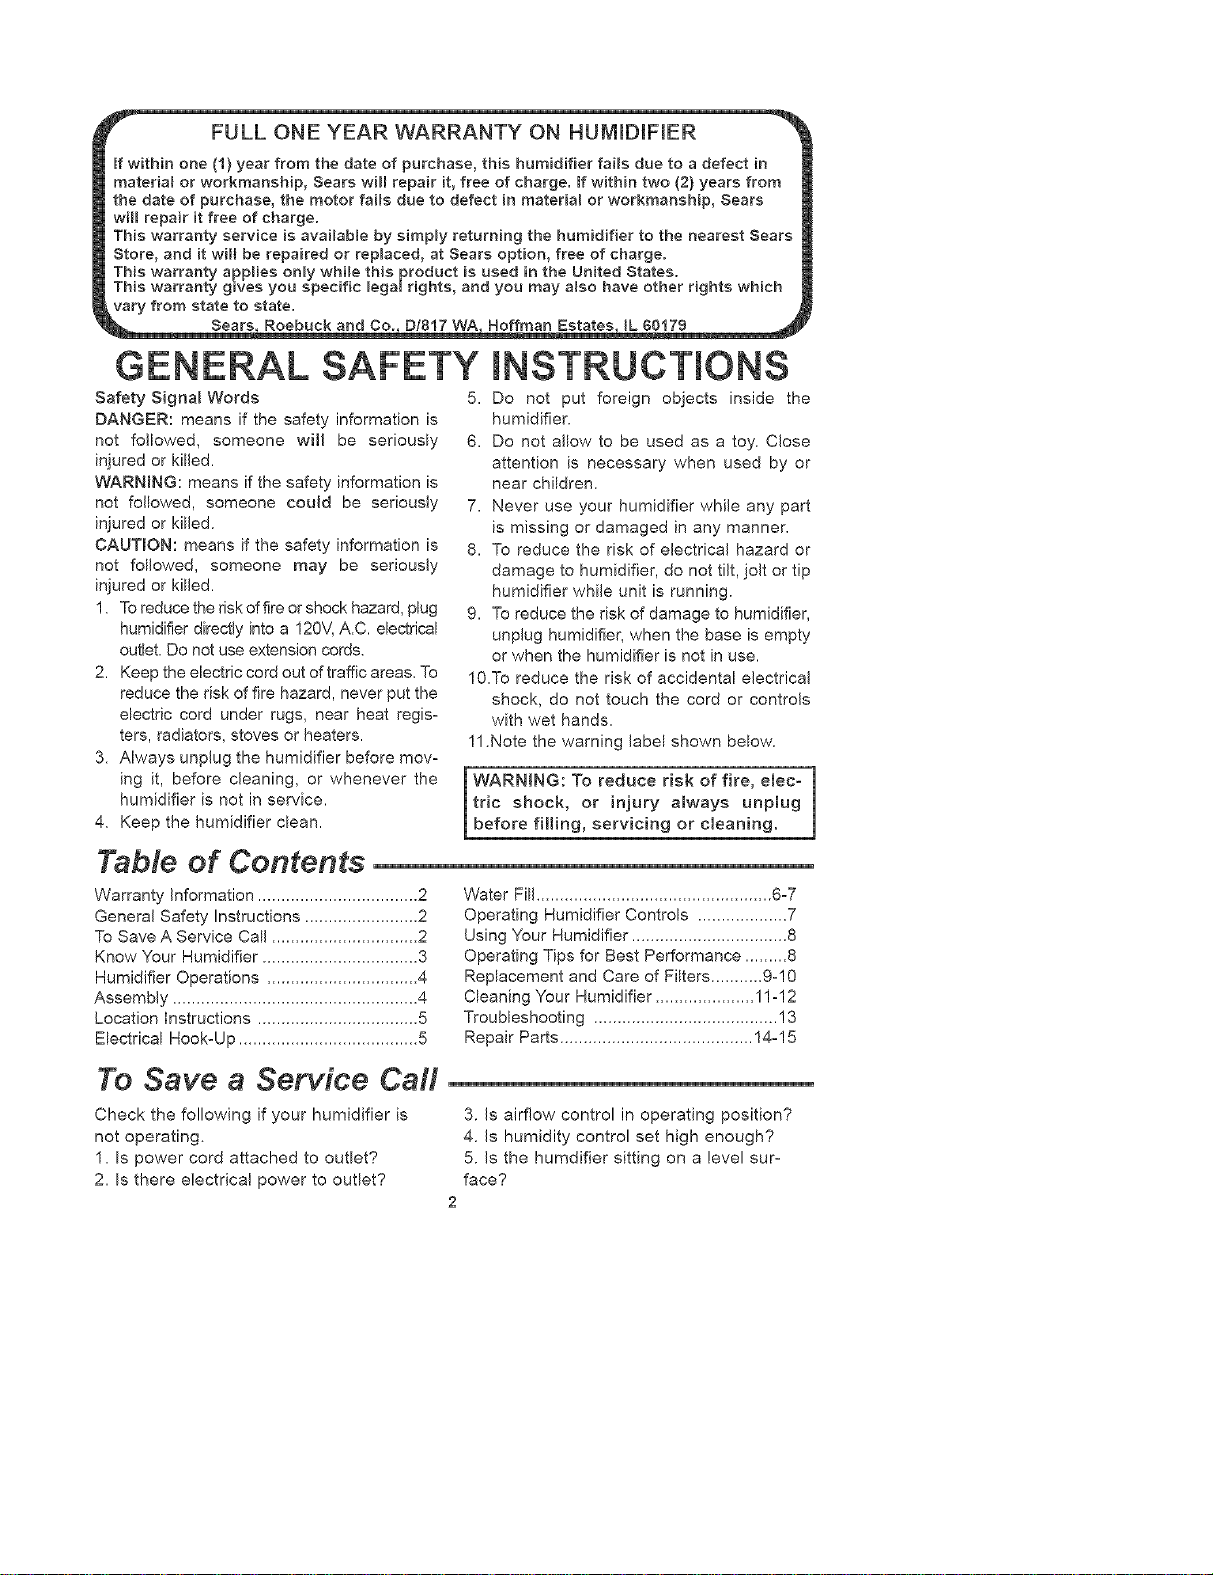
Know Your Humidifier
Humidity ControB
Bottle HandRe
_ Speed Control
Bottle
BQse
"_ Filter:
Replacement No,
42=14906
Description
Gallon Output/24 hrs
Capacity of Bottle
Capacity of Base
Sq. Ft. Coverage
Fan Speeds
Replacement Filter
Power Light
Fill Light
Auto Humidistat
42=14410
10
1,9 Gallons
2,0 Gallons
2100
3
42=14906
Yes
Yes
Yes
Auto Shut Off
Controls
CUL Listed
Volts
Hertz
Amps
Watts
Yes
Rotary
Yes
120 A,C,
6O
0,80
8O
Based on an area with average insulation
and an 8 foot ceiling height.
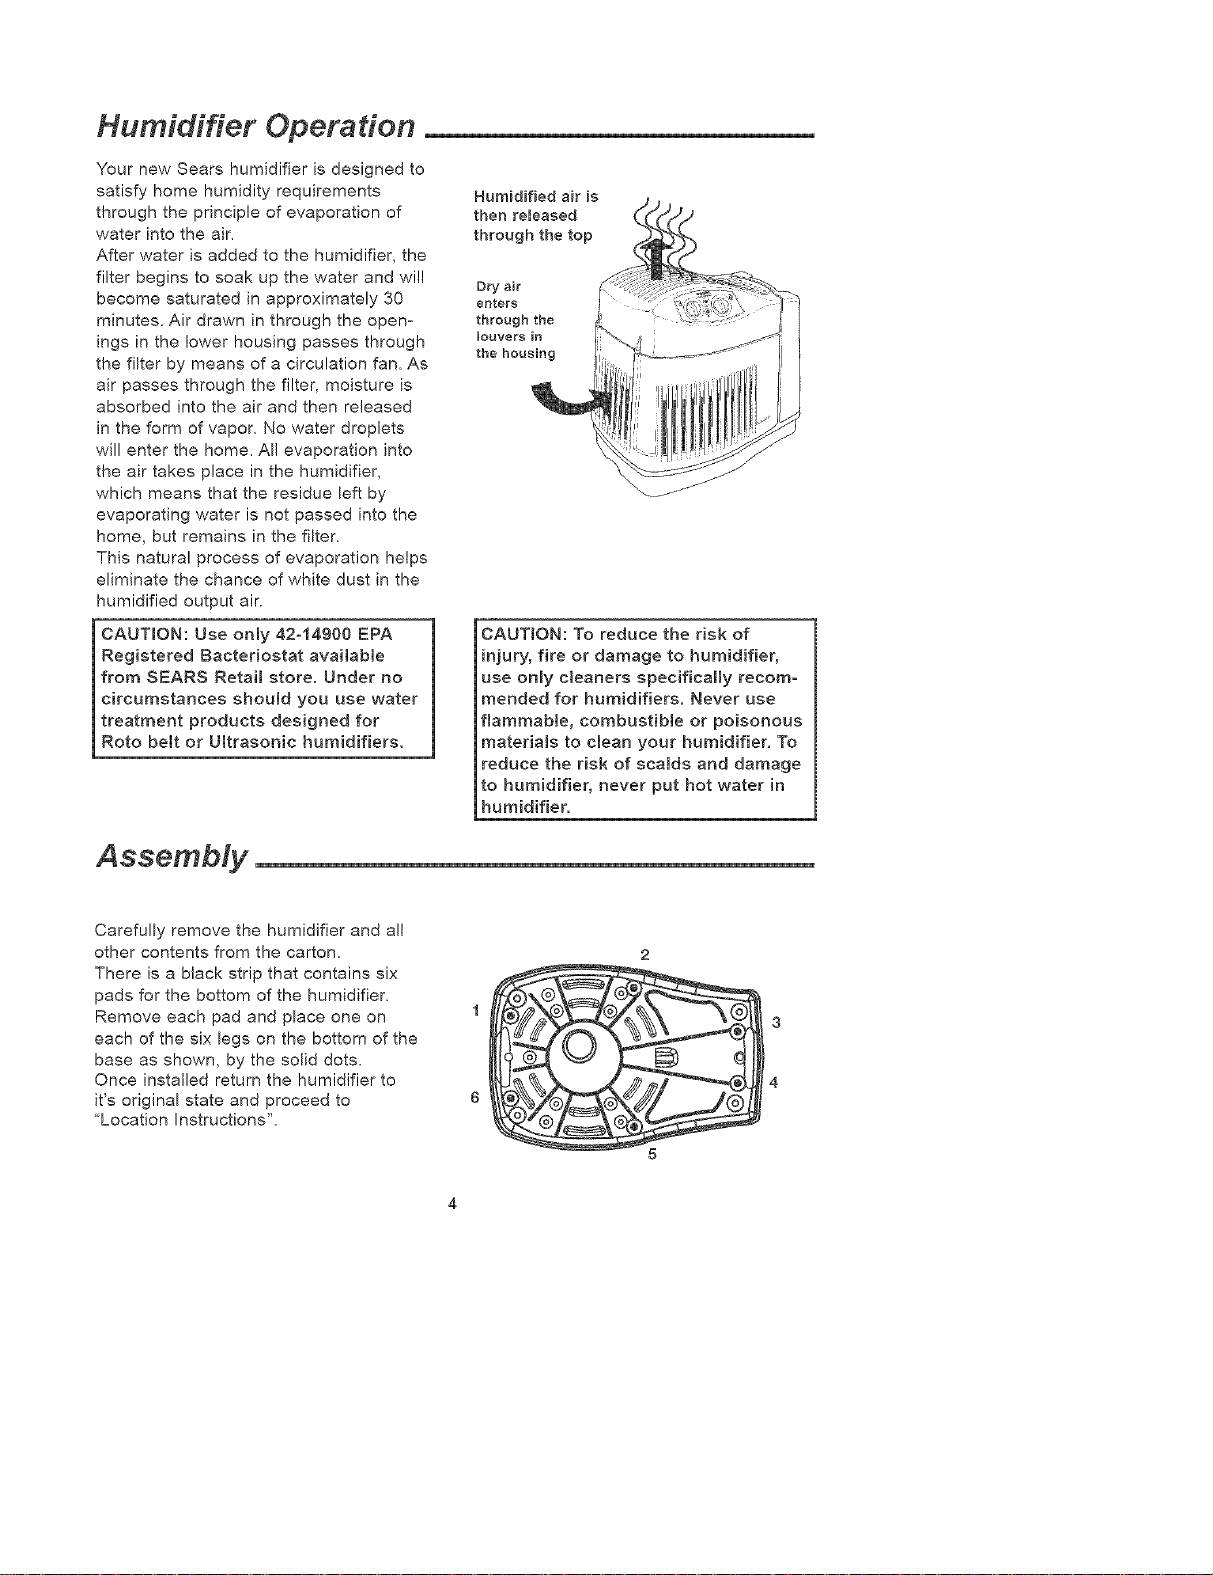
Humidifier Operation
Your new Sears humidifier is designed to
satisfy home humidity requirements
through the principle of evaporation of
water into the air.
After water is added to the humidifier, the
filter begins to soak up the water and will
become saturated in approximately 30
minutes. Air drawn in through the open-
ings in the lower housing passes through
the filter by means of a circulation fan. As
air passes through the filter, moisture is
absorbed into the air and then released
in the form of vapor. No water droplets
will enter the home. All evaporation into
the air takes place in the humidifier,
which means that the residue left by
evaporating water is not passed into the
home, but remains in the filter_
This natural process of evaporation helps
eliminate the chance of white dust in the
humidified output air.
CAUTmON: Use only 42°14900 EPA
Registered Bacteriostat available
from SEARS Retail store. Under no
circumstances should you use water
treatment products designed for
Roto belt or Ultrasonic humidifiers.
Humidified air is
then reBeased
through the top
Dry air
enters
through the
louvers in
the housing
CAUTION: To reduce the risk of
injury, fire or damage to humidifier,
use only cleaners specifically recom-
mended for humidifiers. Never use
flammable, combustible or poisonous
materials to clean your humidifier. To
reduce the risk of scalds and damage
to humidifier, never put hot water in
humidifier.
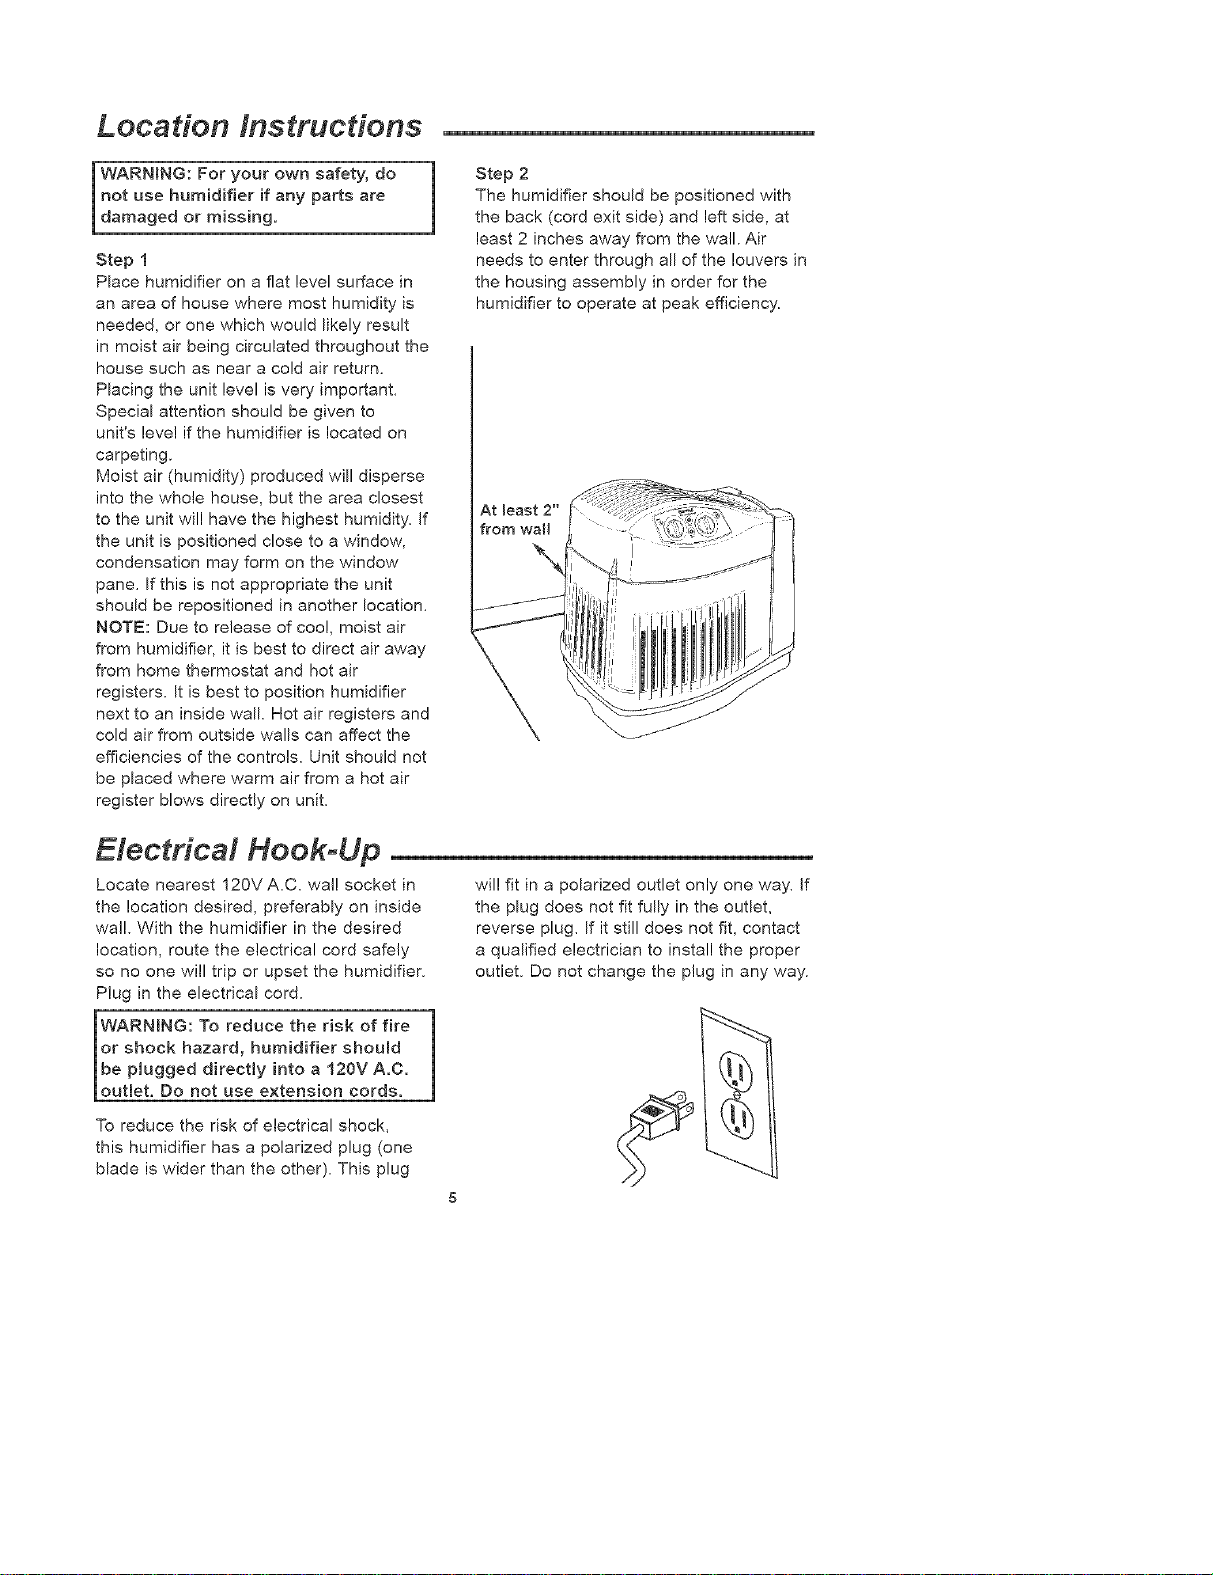
Assembly
Carefully remove the humidifier and a!l
other contents from the carton.
There is a black strip that contains six
pads for the bottom of the humidifier.
Remove each pad and place one on
each of the six legs on the bottom of the
base as shown, by the solid dots.
Once installed return the humidifier to
it's original state and proceed to
'Location Instructions".
3
4
5
Location instructions --
WARNBNG: For your own safety, do
not use humidifier if any parts are
damaged or missing.
Step 1
Place humidifier on a flat level surface in
an area of house where most humidity is
needed, or one which would likely result
in moist air being circulated throughout the
house such as near a cold air return.
Placing the unit level is very' important.
Special attention should be given to
unit's level if the humidifier is located on
carpeting.
Moist air (humidity) produced will disperse
into the whole house, but the area closest
to the unit wil! have the highest humidity. If
the unit is positioned close to a window,
condensation may form on the window
pane. If this is not appropriate the unit
should be repositioned in another location.
NOTE: Due to release of coo!, moist air
from humidifier, it is best to direct air away
from home thermostat and hot air
registers. It is best to position humidifier
next to an inside wall. Hot air registers and
cold air from outside walls can affect the
efficiencies of the controls. Unit should not
be placed where warm air from a hot air
register blows directly on unit.
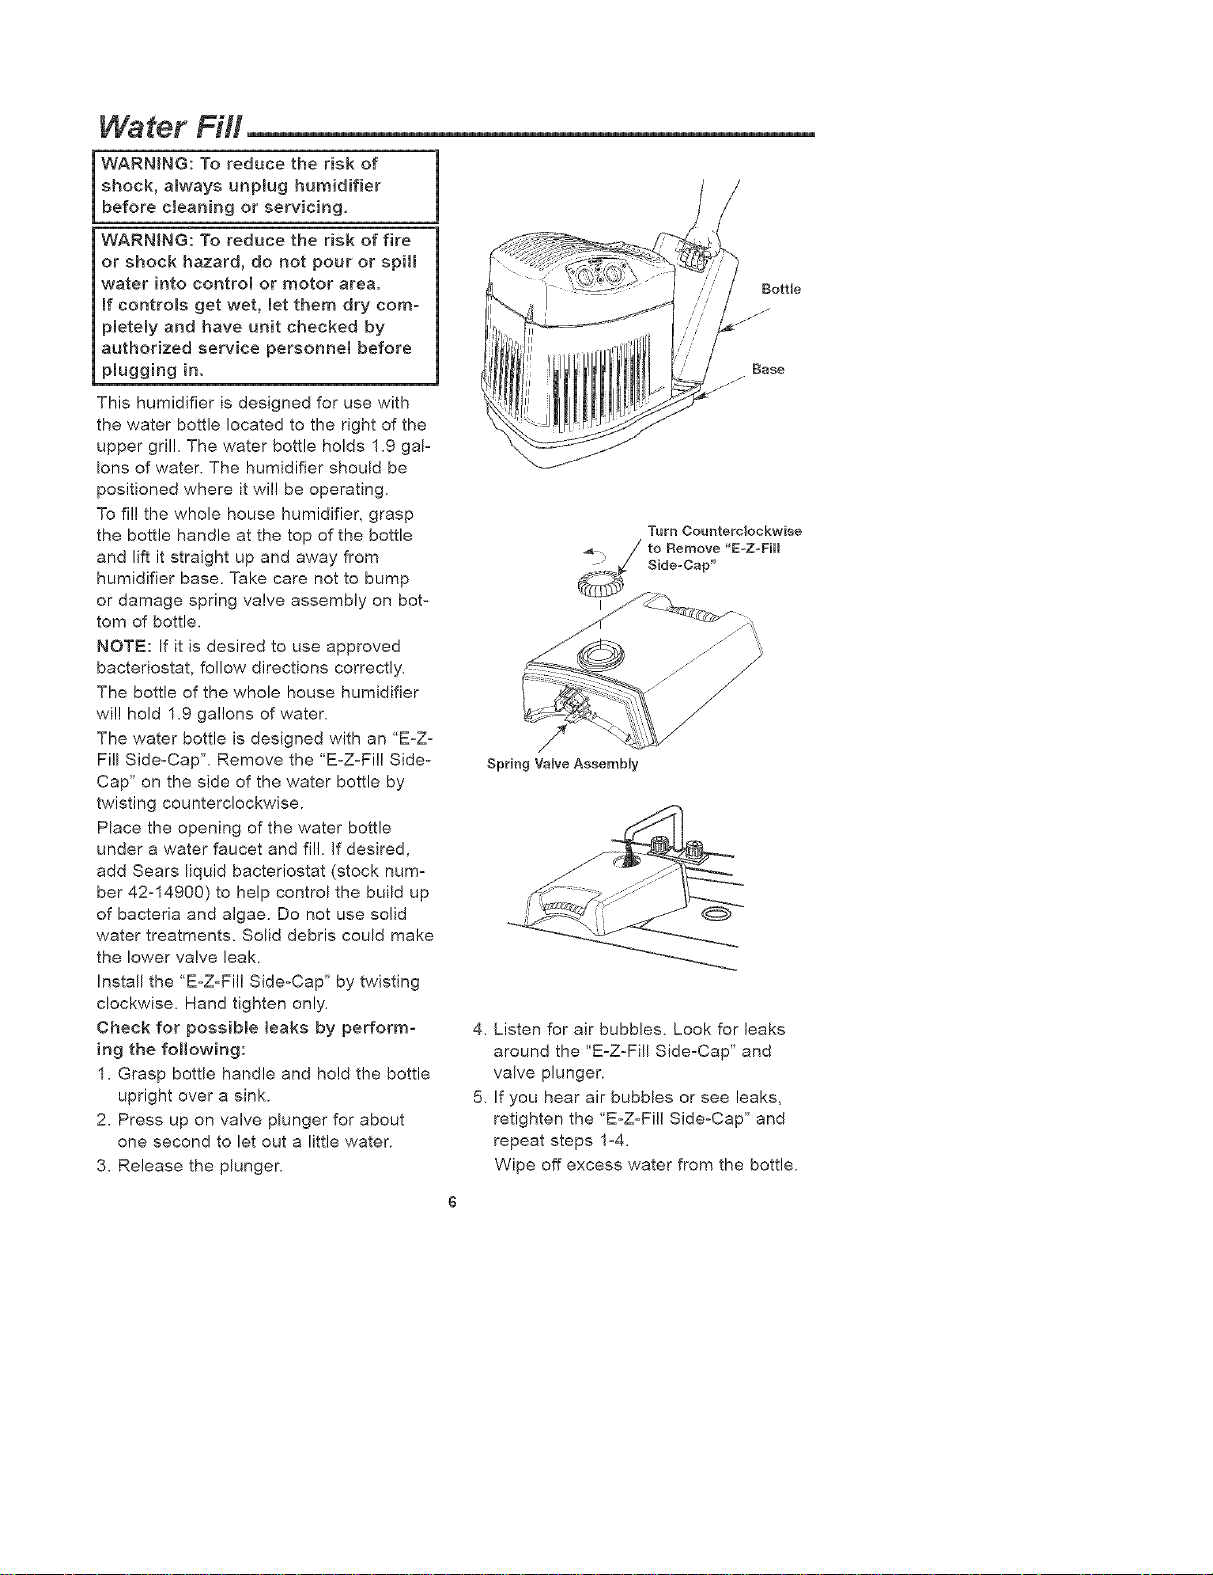
Step 2
The humidifier should be positioned with
the back (cord exit side) and left side, at
least 2 inches away from the wall. Air
needs to enter through all of the louvers in
the housing assembly in order for the
humidifier to operate at peak efficiency.
At least 2"
from wall
Electrical Hook-Up
wil! fit in a polarized outlet only one way. if
the plug does not fit fully in the outlet,
reverse plug. If it still does not fit, contact
a qualified electrician to install the proper
outlet. Do not change the plug in any way.
Locate nearest 120V A.C. wal! socket in
the location desired, preferably on inside
wal!. With the humidifier in the desired
location, route the electrical cord safely
so no one will trip or upset the humidifier.
Plug in the electrical cord.
WARNmNG: To reduce the risk of fire
or shock hazard, humidifier should
be plugged directJy into a 120V A.C.
outlet. Do not use extension cords.
To reduce the risk of electrical shock,
this humidifier has a polarized plug (one
blade is wider than the other). This plug
1
Water Fill
WARNING: To reduce the risk of
shock, always unplug humidifier
before cleaning or servicing,
WARNING: To reduce the risk of fire
or shock hazard, do not pour or spill
water into control or motor area.
mfcontroms get wet, let them dry como
p[ete[y and have unit checked by
authorized service personnel before
plugging in.
This humidifier is designed for use with
the water bottle located to the right of the
upper grill, The water bottle holds 1.9 gaF
Ions of water. The humidifier should be
positioned where it will be operating.
To fill the whole house humidifier, grasp
the bottle handle at the top of the bottle
and lift it straight up and away from
humidifier base. Take care not to bump
or damage spring valve assembly on bot-
tom of bottle.
NOTE: If it is desired to use approved
bacteriostat, follow directions correctly,
The bottle of the whole house humidifier
will hold 1.9 gallons of water,
The water bottle is designed with an "E-Z-
Fill Side-Cap", Remove the "E-Z-Fill Side-
Cap" on the side of the water bottle by
twisting counterclockwise.
Place the opening of the water bottle
under a water faucet and fill. If desired,
add Sears liquid bacteriostat (stock num-
ber 42-14900) to help control the build up
of bacteria and algae. Do not use solid
water treatments. Solid debris could make
the lower valve leak.
Install the "E-Z-Fil! Side-Cap" by twisting
clockwise. Hand tighten only,
Check for possible leaks by perform°
ing the following:
1, Grasp bottle handle and hold the bottle
upright over a sink.
2, Press up on valve plunger for about
one second to let out a little water.
3, Release the plunger.
/
/
_se
/
/
Spring VaUveAssemMy
4, Listen for air bubbles. Look for leaks
around the "E-Z-Fill Side-Cap" and
valve plunger.
5, If you hear air bubbles or see leaks,
retighten the ' E-Z-Fill Side-Cap" and
repeat steps 1-4,
Wipe off excess water from the bottle.
Positionthewaterbottlebackintothe
humidifierbasetotherightofthegrille.
The"E-Z-FillSide-Cap"mustbefacing
outward.Whenpositionedproperly,the
plungerwillopenandwaterwillflowinto
thebase.Thebasewillholdtheentire
contentsofthewaterbottle.Allowupto
oneminuteforthewatertoflowintothe
base.Oncethebottleisempty,removeit
andrefillitasmentionedearlier.Returnit
totherightsideofthegrille.Thehumidifi-
erisnowfilledtocapacity.
Thewaterbottlemaybefilledatanytime
asnecessaryduringoperation.Tobenefit
fromlessfrequentfillingletthehumidifier
exhaustboththewaterfromthebottle
andbasebeforefilling.
Theunitisnowreadyforoperation.
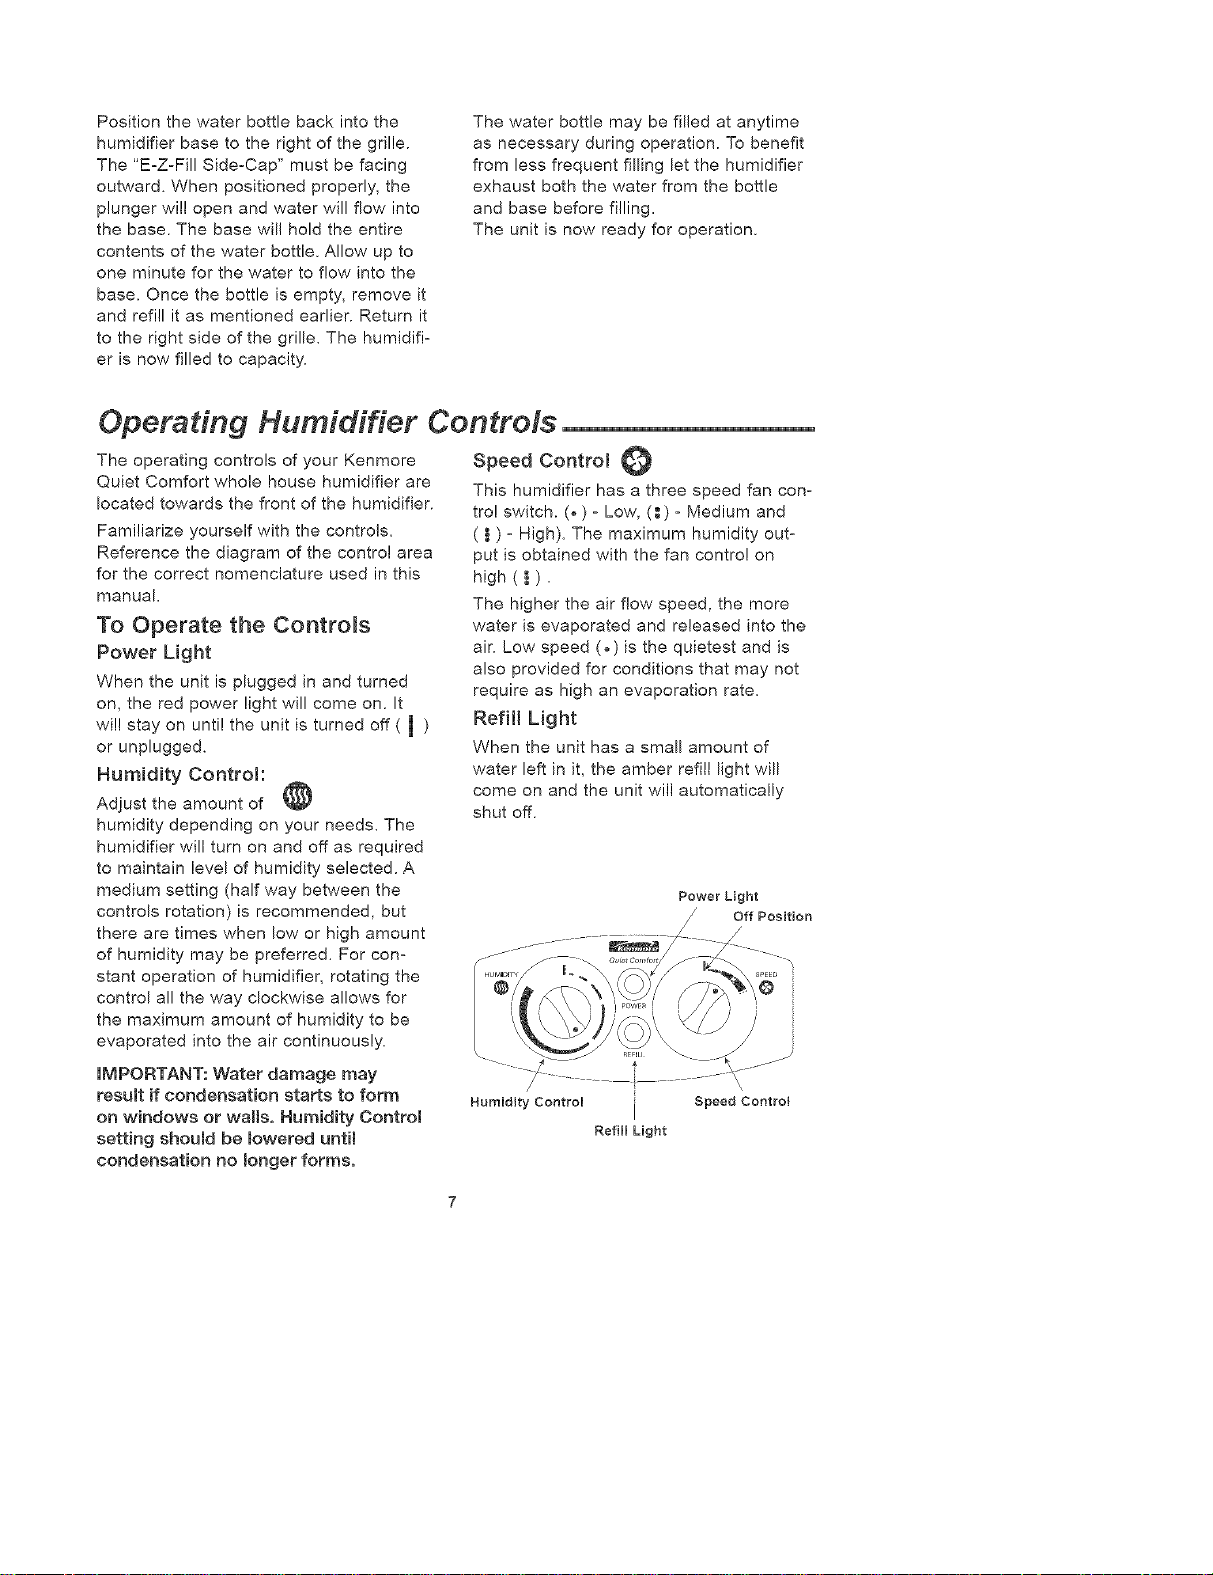
Operating Humidifier Controls
The operating controls of your Kenmore
Quiet Comfort whole house humidifier are
located towards the front of the humidifier.
Familiarize yourself with the controls.
Reference the diagram of the control area
for the correct nomenclature used in this
manual.
To Operate the Controls
Power Light
When the unit is plugged in and turned
on, the red power light will come on. It
will stay on until the unit is turned off ( _ )
or unplugged.
Humidity Control:
Adjust the amount of
humidity depending on your needs. The
humidifier will turn on and off as required
to maintain level of humidity selected. A
medium setting (half way between the
controls rotation) is recommended, but
there are times when low or high amount
of humidity may be preferred. For con-
stant operation of humidifier, rotating the
control all the way clockwise allows for
the maximum amount of humidity to be
evaporated into the air continuously.
Speed Control O
This humidifier has a three speed fan con-
tro! switch. (.) - Low, (_) - Medium and
( } ) - High). The maximum humidity out-
put is obtained with the fan control on
high ( } ).
The higher the air flow speed, the more
water is evaporated and released into the
air. Low speed (.) is the quietest and is
also provided for conditions that may not
require as high an evaporation rate.
Refill Light
When the unit has a small amount of
water left in it, the amber refill light will
come on and the unit will automatically
shut off.
Power Light
/ Off Position
IMPORTANT: Water damage may
result if condensation starts to form
on windows or walls, Humidity Control
setting should be lowered until
condensation no longer forms,
Humidity Control I Speed Control
Refill Light
Using Your Humidifier
Step 1
Be sure unit is full of water and plugged
in.
Step 2
Set the Speed Control to LOW ( _ ).
Step 3
Set Humidity Control to a medium position
(see diagram below)
NOTE: Humidifier should operate with
humidity control on the recommended
medium setting. If it does not, the humidi-
ty is at a relatively high level. To test the
unit under this condition, turn Humidity
Control all the way to clockwise and unit
should begin to operate. After the unit has
been tested, set Humidity Control to
medium or desired level.
Allow 24 hours for humidifier to adjust.
If humidity level in home is sufficient, the
humidifier will only operate with Humidity
Control set on maximum.
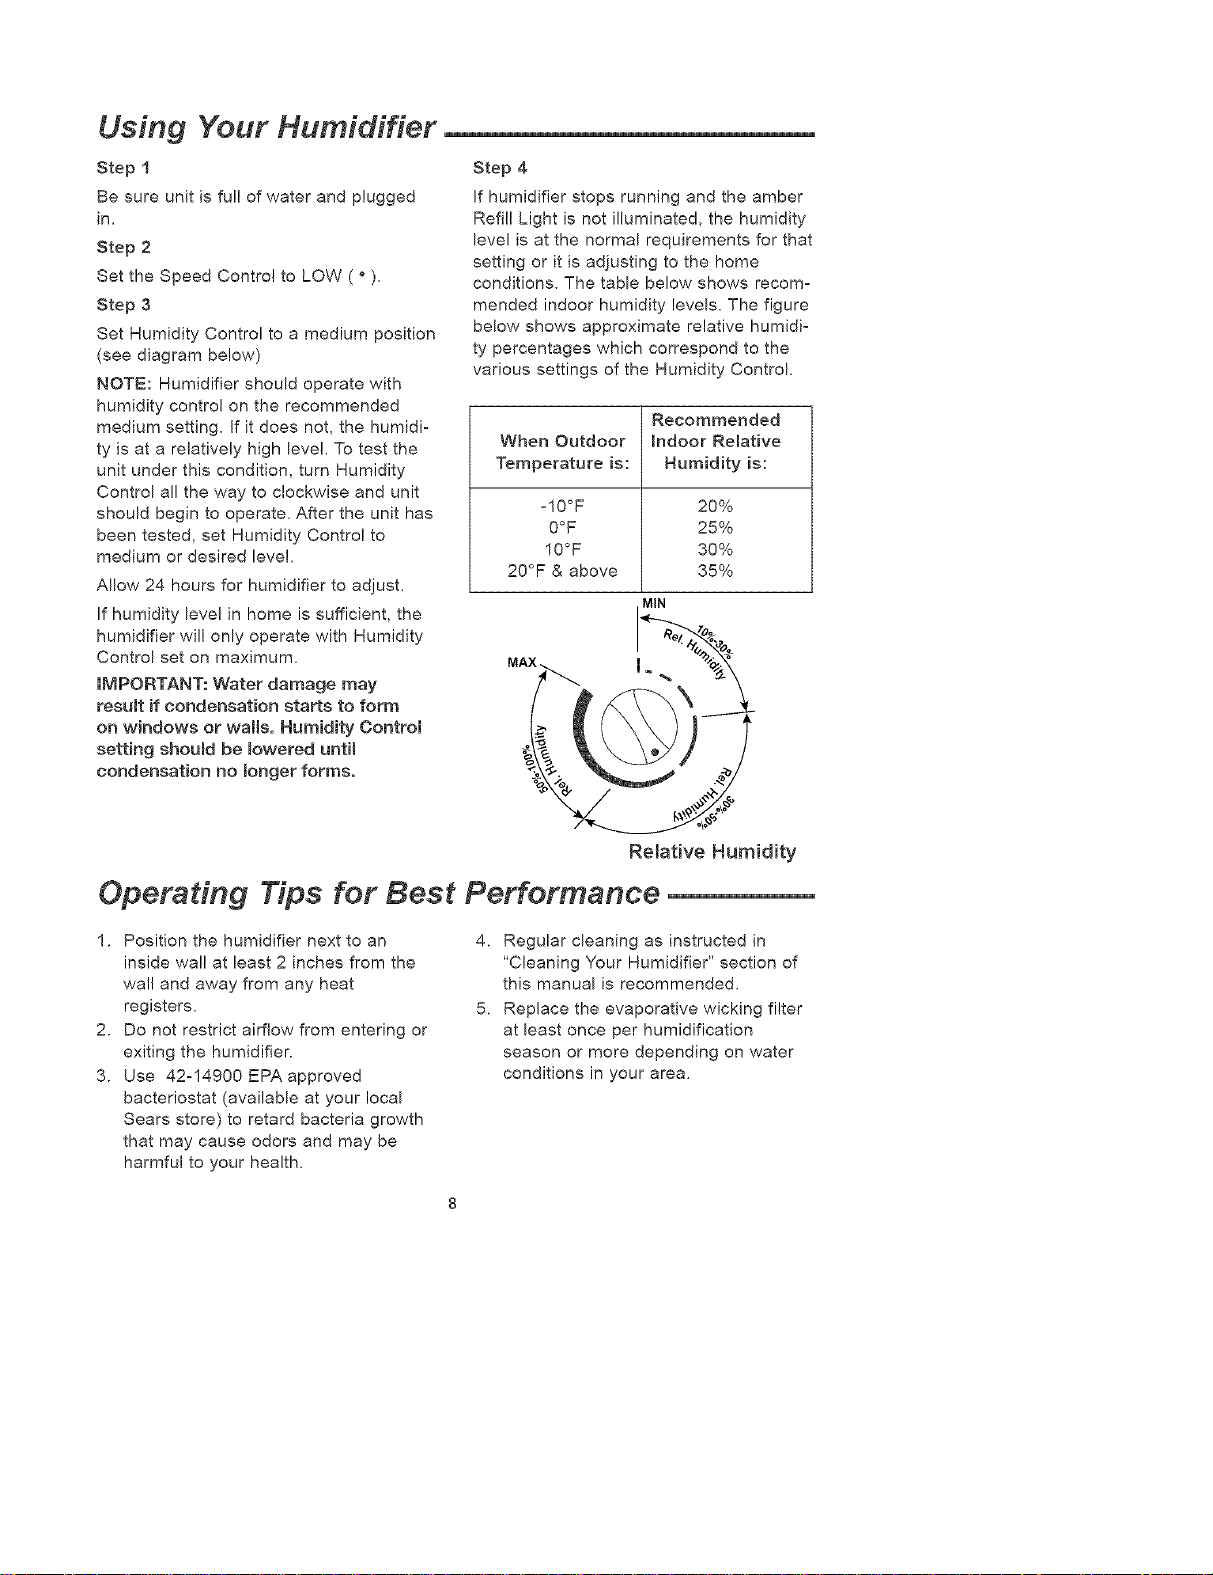
Step 4
If humidifier stops running and the amber
Refill Light is not illuminated, the humidity
level is at the normal requirements for that
setting or it is adjusting to the home
conditions. The table below shows recom-
mended indoor humidity levels. The figure
below shows approximate relative humidi-
ty percentages which correspond to the
various settings of the Humidity Control.
Recommended
When Outdoor Indoor Relative
Temperature is: Humidity is:
-10°F 20%
0°F 25%
10°F 30%
20°F & above 35%
MIN
IMPORTANT: Water damage may
result if condensation starts to form
on windows or walls, Humidity Control
setting shoumd be Bowered until
condensation no monger forms,
Relative Humidity
Operating Tips for Best Performance
1. Position the humidifier next to an
inside wal! at least 2 inches from the
wall and away from any heat
registers.
2. Do not restrict airflow from entering or
exiting the humidifier.
3. Use 42=14900 EPA approved
bacteriostat (available at your local
Sears store) to retard bacteria growth
that may cause odors and may be
harmful to your health.
4. Regular cleaning as instructed in
"Cleaning Your Humidifier" section of
this manual is recommended.
5. Replace the evaporative wicking filter
at least once per humidification
season or more depending on water
conditions in your area.
Replacement and Care of Filters
WARMNG: To reduce the dsk of
shock or injury from moving parts,
always unplug humidifier before
removing or replacing any parts.
CAUTION: To help retard bacteria
growth and keep maximum effic[em
cy, the fimter shoumd be replaced at
[east once per season, or more often
under hard water conditions. Use
Sears recommended replacement
filter 42o14g06.
To replace the filter in your humidifier,
follow the instructions below.
Unplug humidifier.
Before removing the filters, we recom-
mend moving the humidifier to an
area where floor coverings are not
susceptible to water damage. (i.e.
kitchen or bath areas.)
Remove the water bottle and set aside.
Be sure not to bump or damage the
lower spring valve.
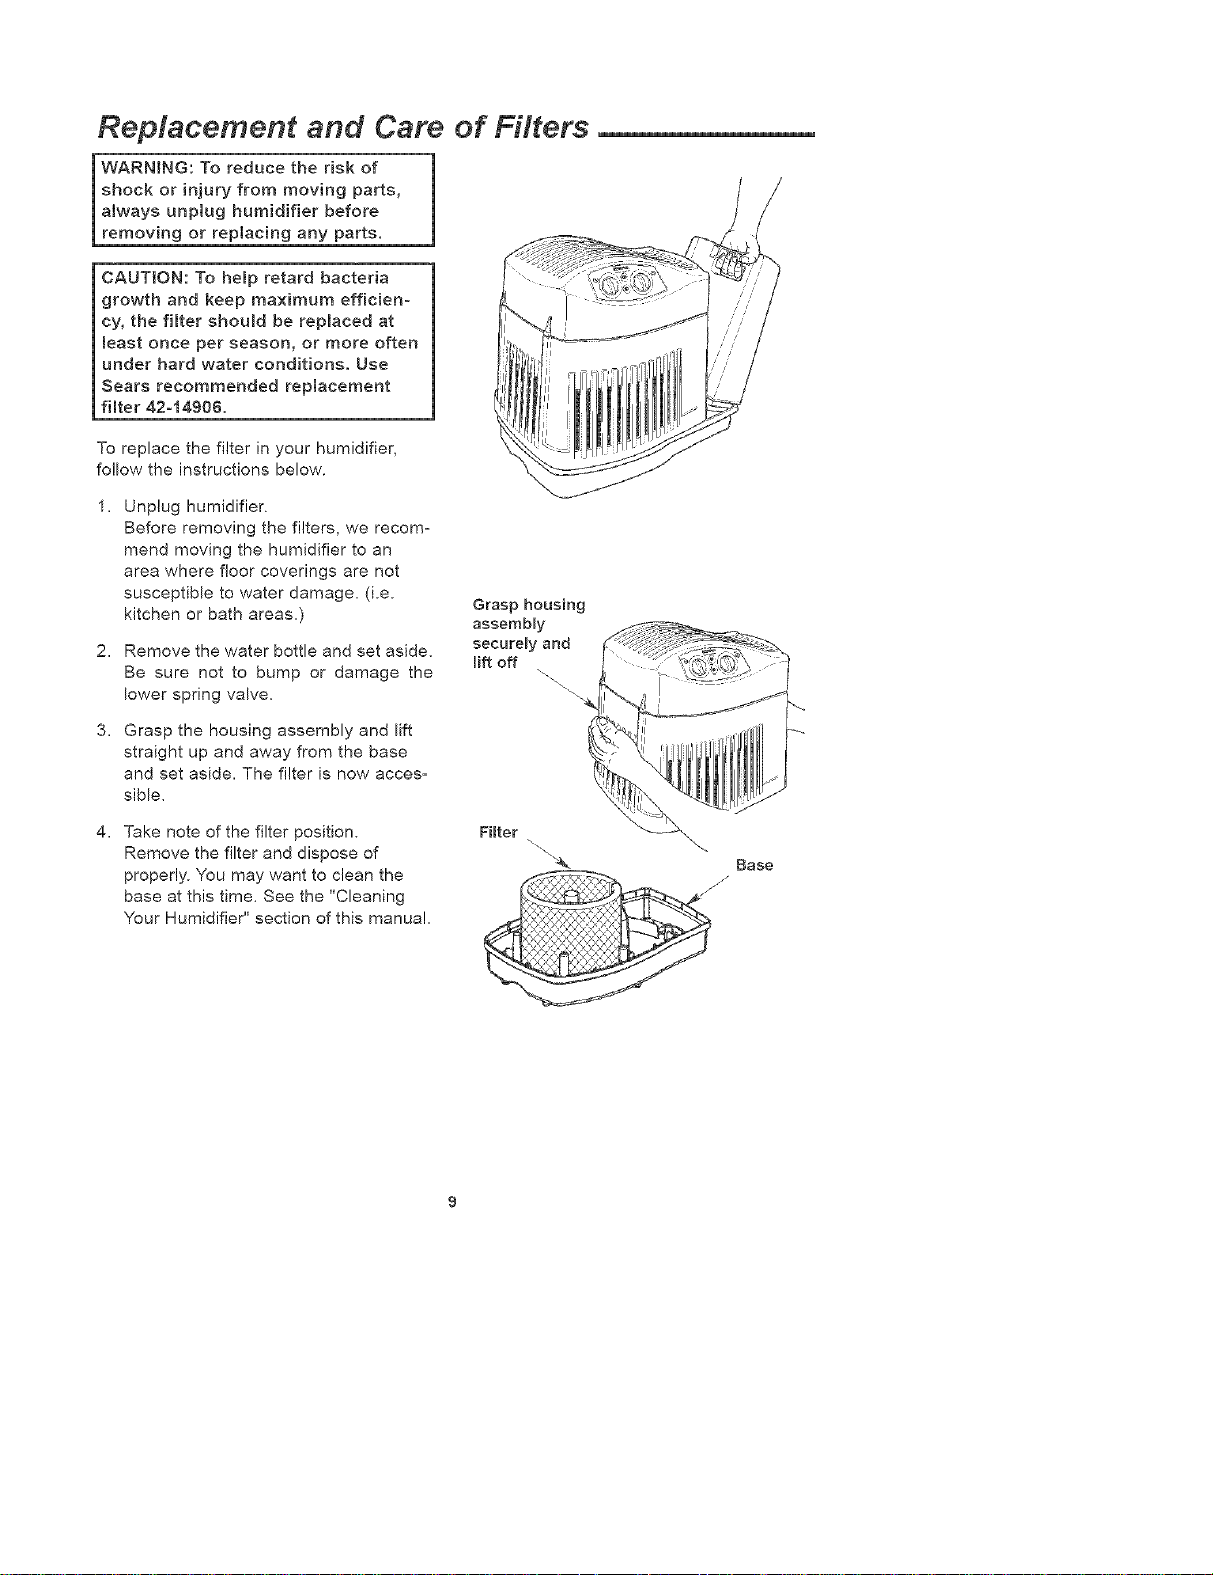
Grasp the housing assembly and lift
straight up and away from the base
and set aside. The filter is now acces-
sible.
Grasp housing
assembly
securely and
lift off
4. Take note of the filter position.
Remove the filter and dispose of
properly. You may want to clean the
base at this time. See the "Cleaning
Your Humidifier" section of this manual.
Filter
Base
/I
Replacement and Care of Filters (continued)
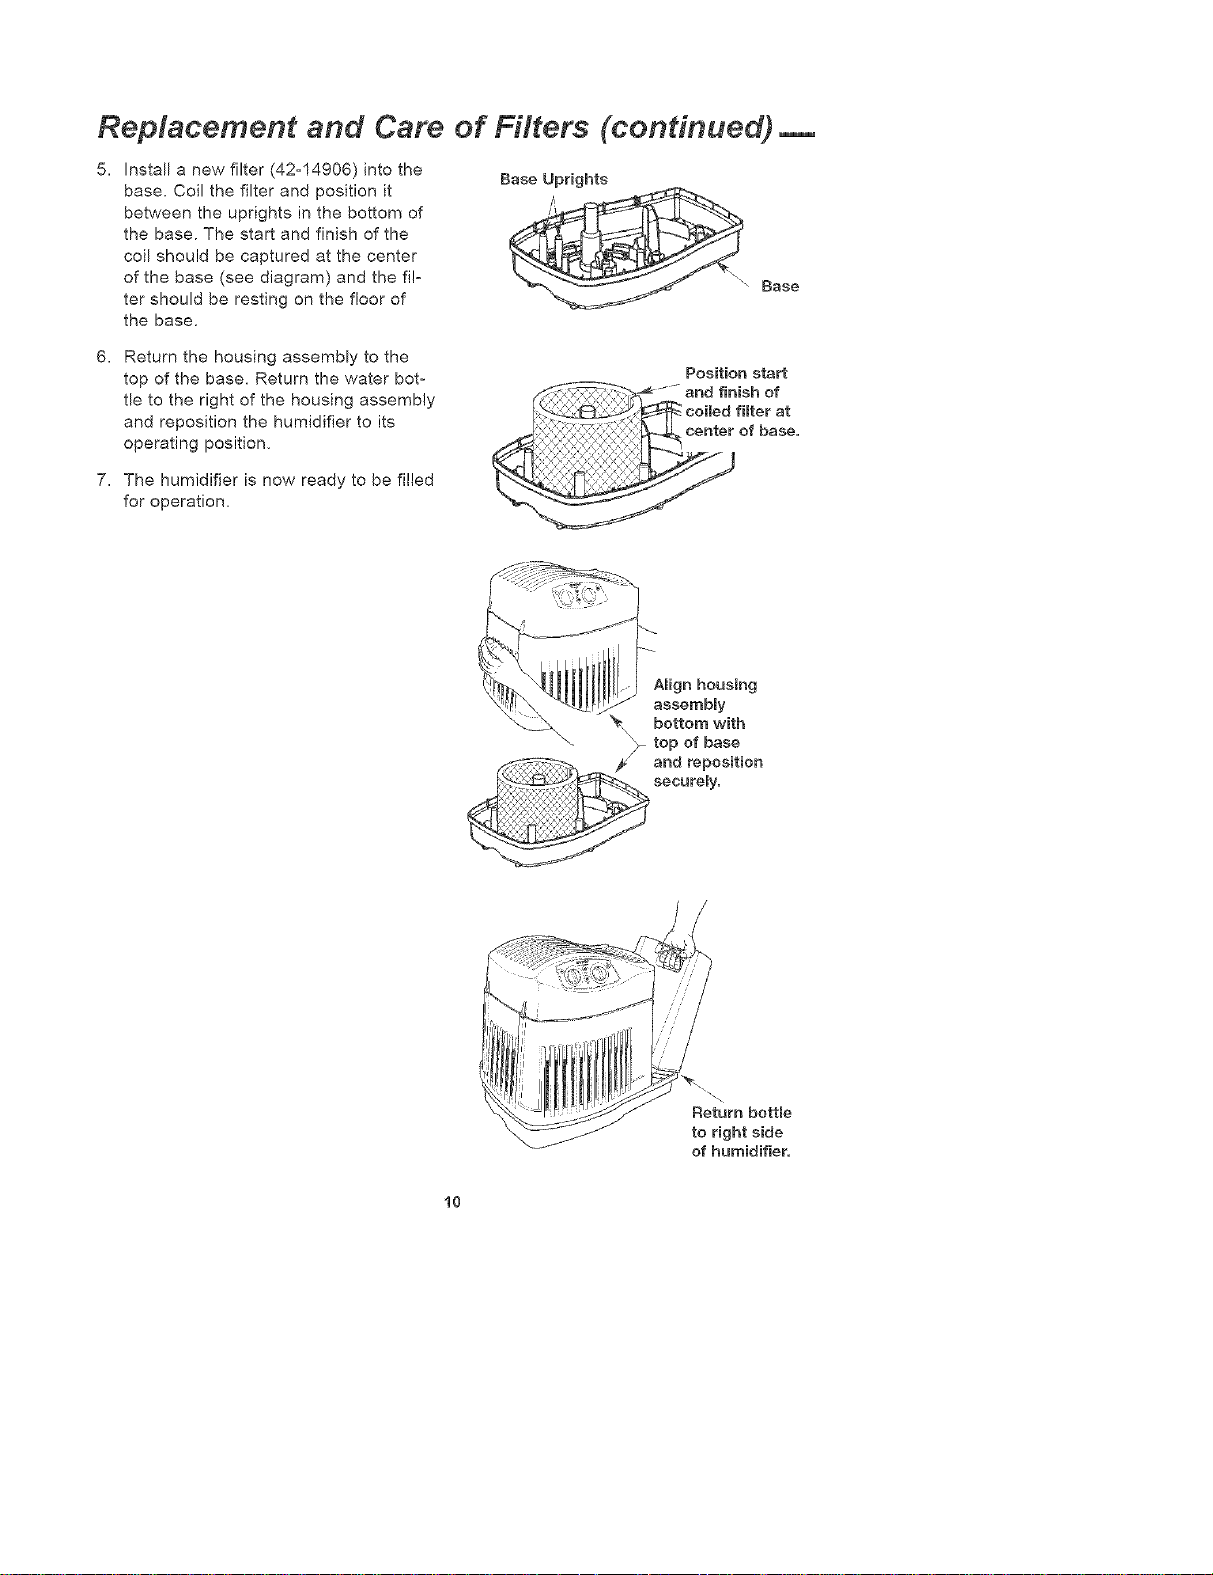
Install a new filter (42°14906) into the
base. Coil the filter and position it
between the uprights in the bottom of
the base. The start and finish of the
coil should be captured at the center
of the base (see diagram) and the fi!-
ter should be resting on the floor of
the base.
Base Uprights
\
Base
Return the housing assembly to the
top of the base. Return the water bot-
tle to the right of the housing assembly
and reposition the humidifier to its
operating position,
Position start
7, The humidifier is now ready to be filled
for operation,
Return bottBe
to right side
of humidifier.
10
Cleaning Your Humidifier
WARNING: To reduce the risk of
injury, fire or damage to humidifier,
use only cleaners specificalmy rec-
ommended for humidifiers. Never
use flammable, combustible or poi-
sonous mateNa[s to clean your
humidifier. To reduce the risk of
scalds and damage to humidifier,
never put hot water in humidifier.
CAUTION: Local water purity varies
from area to area and under certain
conditions water impurities and air-
borne bacteria may promote the
growth of microorganisms in the
reservoir of the humidifier.
To retard bacteria growth that may
cause odors and be harmfu[ to your
health, use only Sears replacement
riflers. We also recommend using
EPA approved bacteriostat, 42°14900
and humidifier cleaner 42°14713,
available at your local Sears store.
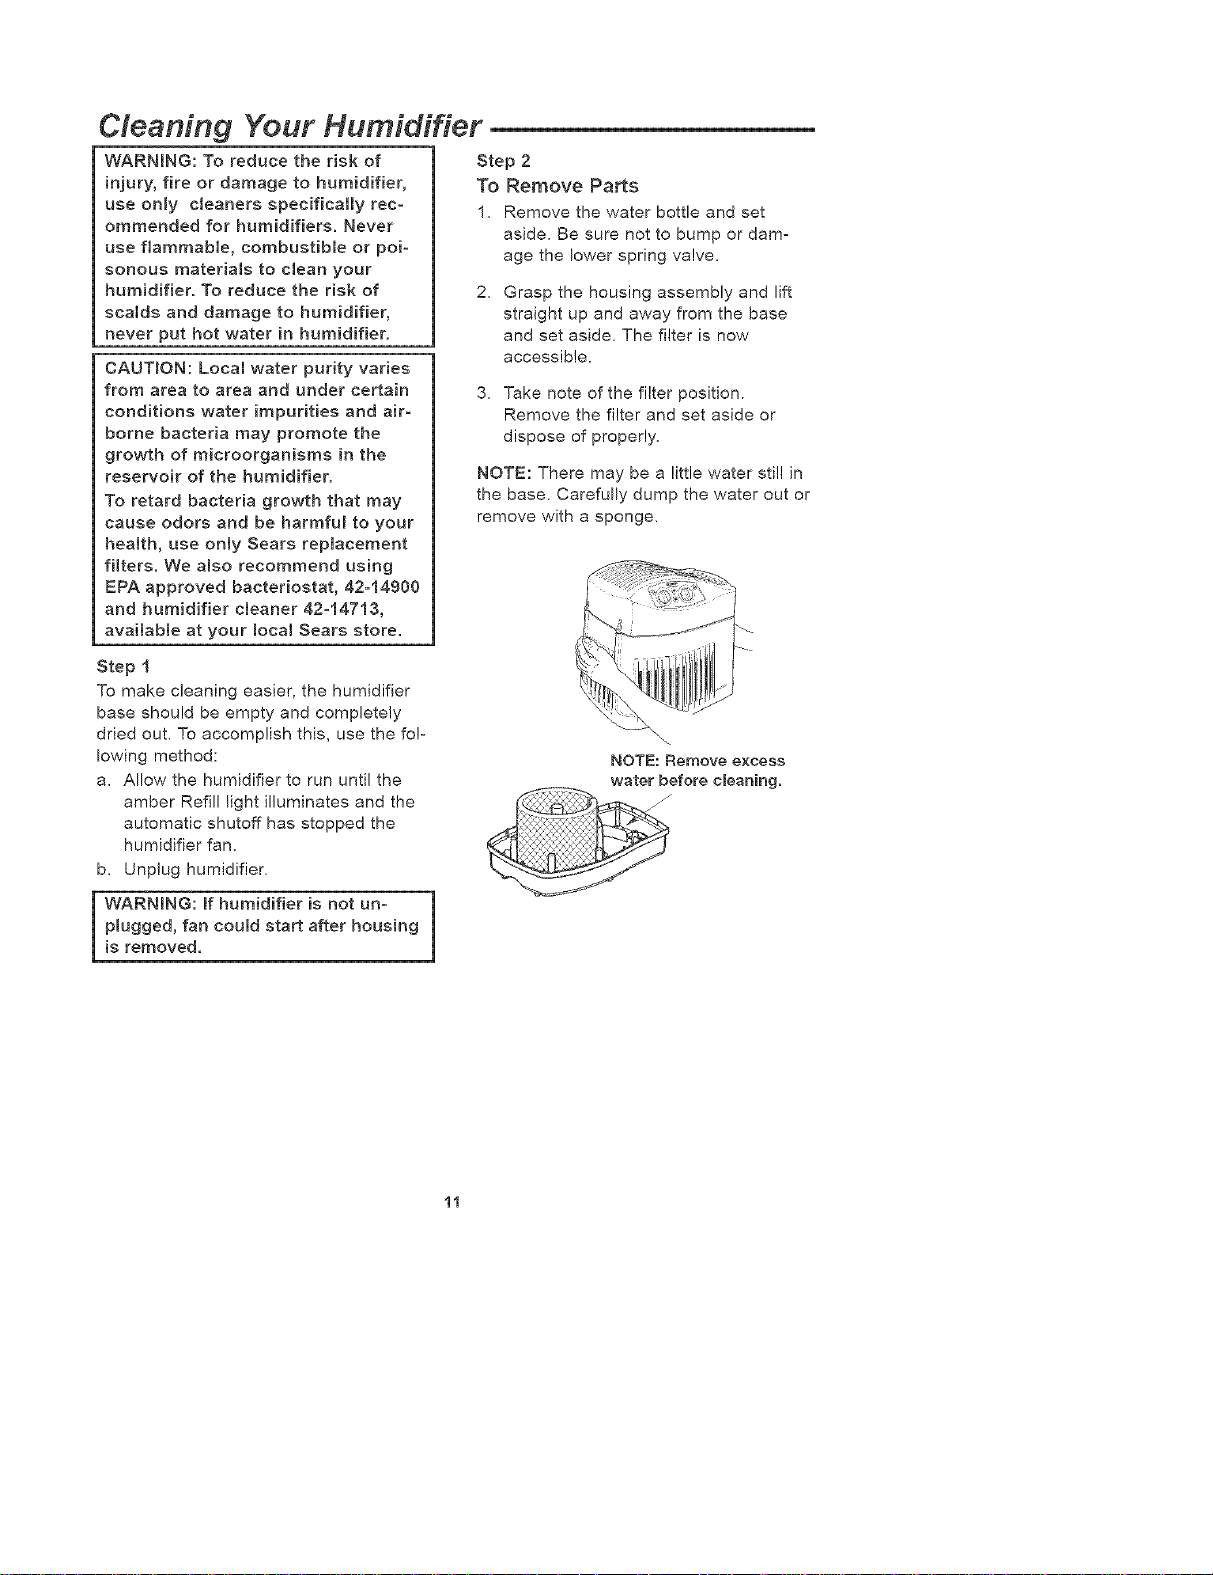
Step 2
To Remove Parts
1, Remove the water bottle and set
aside. Be sure not to bump or dam-
age the lower spring valve,
2_
Grasp the housing assembly and lift
straight up and away from the base
and set aside, The filter is now
accessible.
3, Take note of the filter position.
Remove the filter and set aside or
dispose of properly,
NOTE: There may be a little water still in
the base. Carefully dump the water out or
remove with a sponge,
Step 1
To make cleaning easier, the humidifier
base should be empty and completely
dried out, To accomplish this, use the fo!-
lowing method:
a, Allow the humidifier to run until the
amber Refill light illuminates and the
automatic shutoff has stopped the
humidifier fan,
b, Unplug humidifier,
WARNING: if humidifier is not uno [
plugged, fan could start after housing
is removed.
NOTE: Remove excess
water before cleaning.
ii
Cleaning of Humidifier (continued)
Step 3
BFWeeHy [vlaintenance
Removing Scame
1, Fill the humidifier base ,with one 8 oz.
cup of undiluted white vinegar. Let
solution stay 20 minutes,
2, Clean all interior surfaces with a soft
brush. Dampen a soft cloth with undi-
luted white vinegar and wipe out the
base to remove scale.
3, Rinse thoroughly with clean warm
water to remove scale and cleaning
solution.
Disinfecting Base
1, Pour 1 gallon of water and 1 teaspoon
chlorine bleach into the base. Let
solution stay for 20 minutes, carefully
swishing every few minutes, Wet all
surfaces normally exposed to water.
2, Empty base after 20 minutes. Rinse
with water until bleach smell is gone,
Allow unit to dry out completely,
NOTE: The water bottle should be
cleaned in the same manner as the base.
Rinse thoroughly with clean water after al!
steps are complete,
End of Season Maintenance
1, Follow "Bi-Weekiy Maintenance"
instructions at end of humidification
season,
2. Remove filter and dispose of properly,
3, Let humidifier dry completely before
storing. Do not store with water inside
base or bottle.
4, Store in coo!, dry location.
5, Install a new filter in clean humidifier
before next season begins.
Note: ' Bi-Weekly Maintenance" is
also recommended if you do not plan
to run the humidifier for one week or
more.
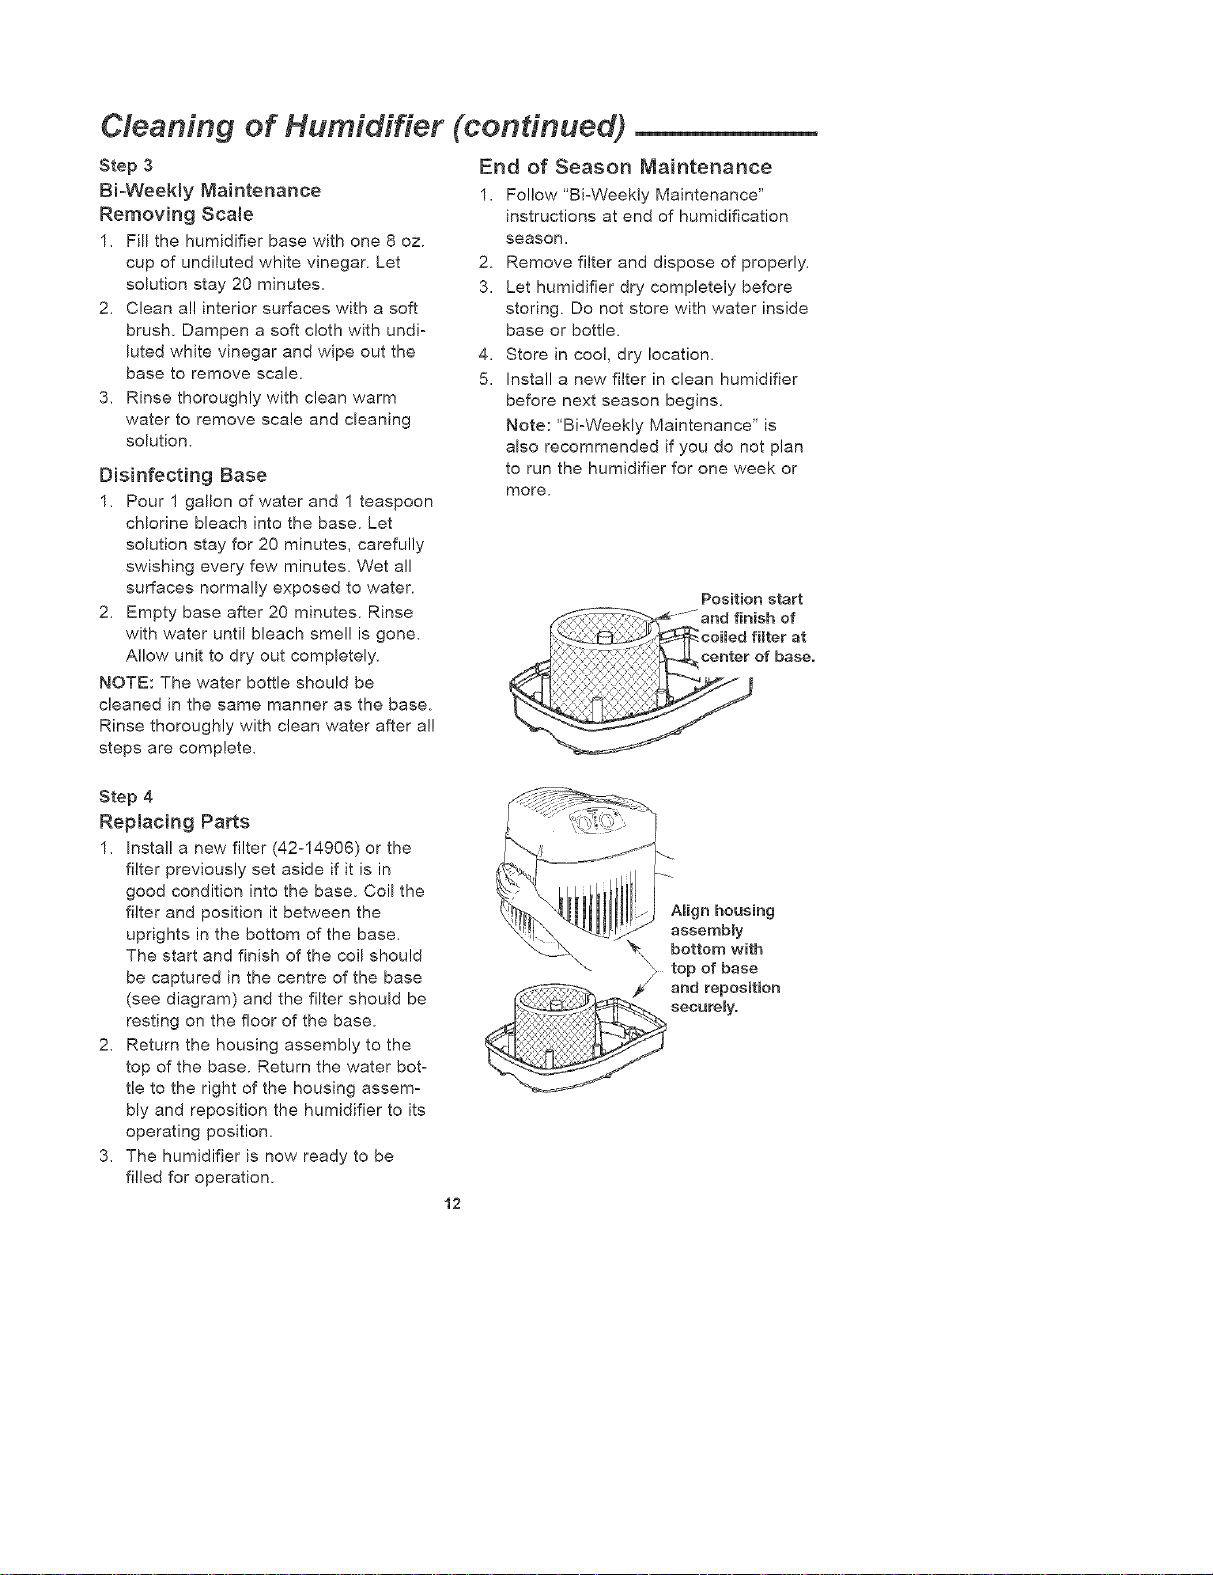
Position start
Step 4
Replacing Parts
1, Install a new filter (42-14906) or the
filter previously set aside if it is in
good condition into the base. Coil the
filter and position it between the
uprights in the bottom of the base,
The start and finish of the coil should
be captured in the centre of the base
(see diagram) and the filter should be
resting on the floor of the base.
2, Return the housing assembly to the
top of the base. Return the water bot-
tle to the right of the housing assem-
bly and reposition the humidifier to its
operating position,
3, The humidifier is now ready to be
filled for operation.
12
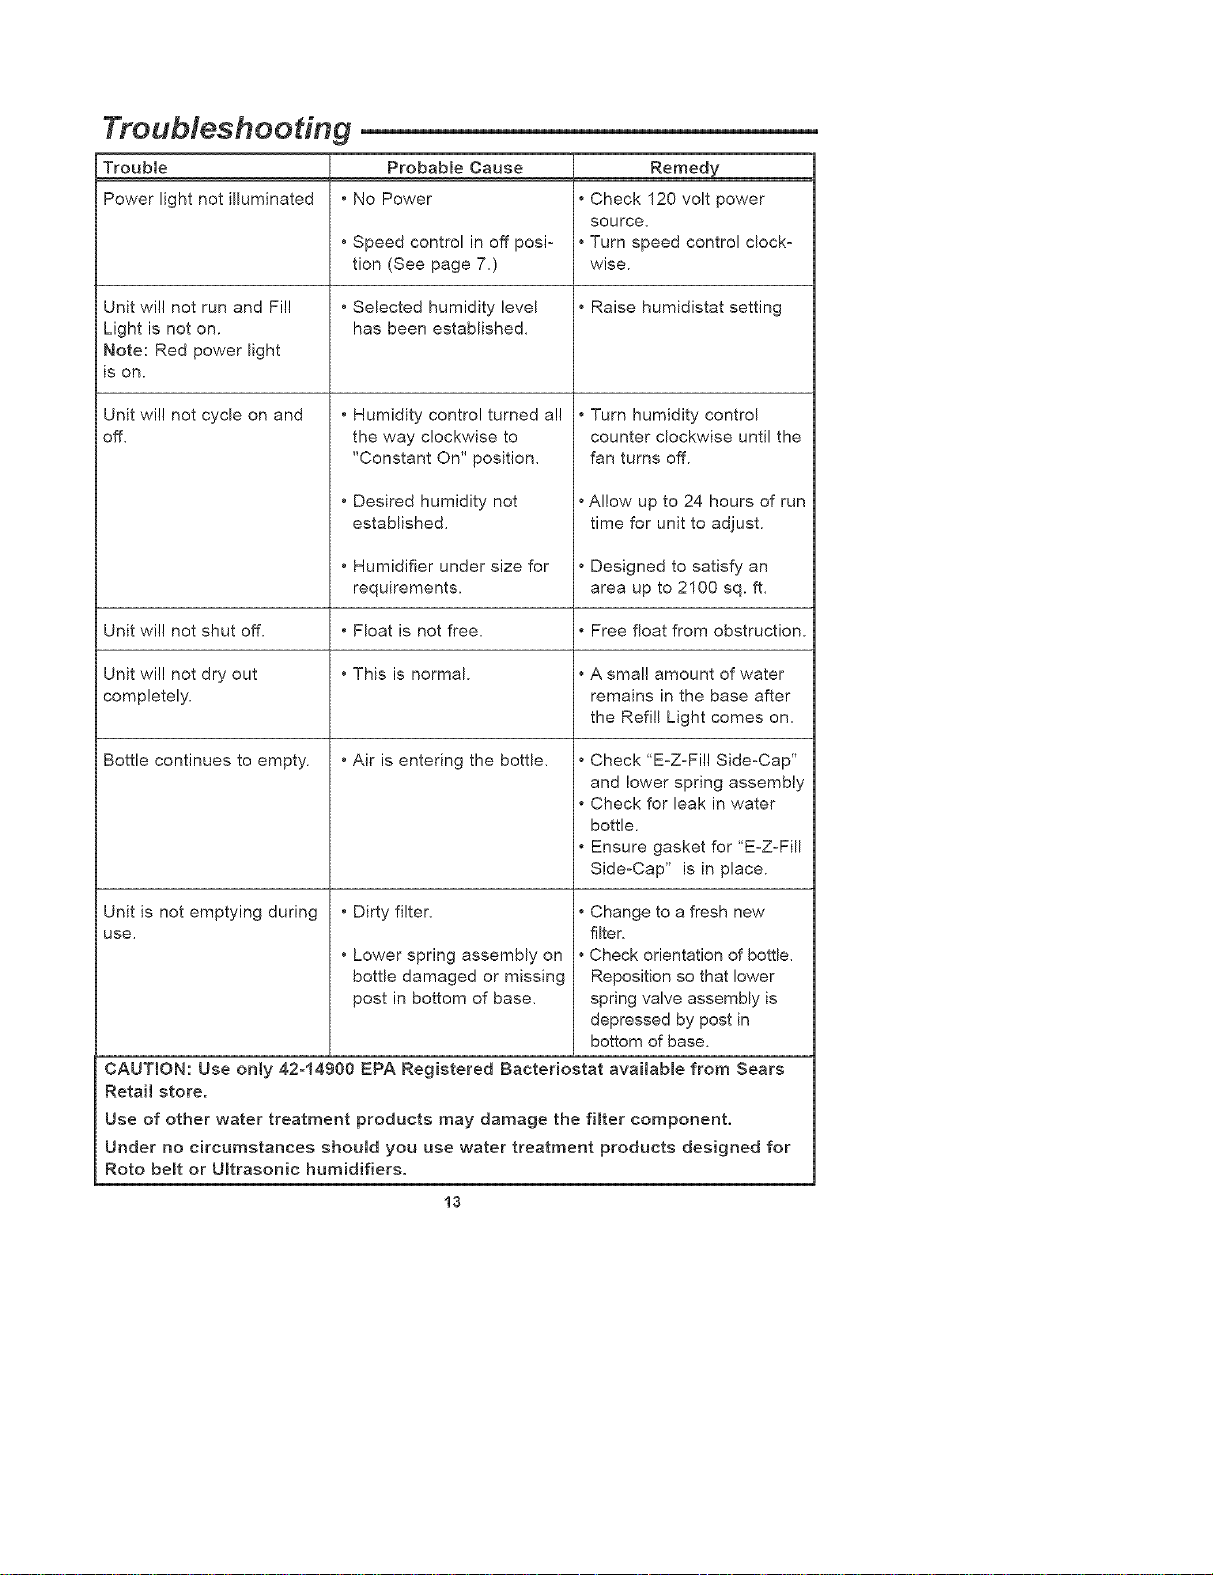
Troubleshooting
Trouble Probable Cause Remedy
Power light not illuminated ° No Power ° Check 120 volt power
source,
• Speed control in off posF • Turn speed control clock-
tion (See page 7,) wise.
Unit will not run and Fill • Selected humidity level • Raise humidistat setting
Light is not on. has been established,
Note: Red power light
is on.
Unit will not cycle on and
oft,
• Humidity control turned al!
the way clockwise to
"Constant On" position,
• Desired humidity not
established,
• Humidifier under size for
requirements.
• Float is not free,
• This is normal.
• Turn humidity control
counter clockwise until the
fan turns off.
• Allow up to 24 hours of run
time for unit to adjust.
• Designed to satisfy an
area up to 2100 sq. ft,
Unit will not shut off. • Free float from obstruction.
Unit wil! not dry out • A small amount of water
completely, remains in the base after
the Refill Light comes on,
Bottle continues to empty. • Air is entering the bottle,
Unit is not emptying during
use,
• Dirty filter,
• Lower spring assembly on
bottle damaged or missing
post in bottom of base,
• Check "E-Z-Fill Side-Cap"
and lower spring assembly
• Check for leak in water
bottle.
• Ensure gasket for 'E-Z-Fill
Side-Cap" is in place.
• Change to a fresh new
filter,
• Check orientation of bottle,
Reposition so that lower
spring valve assembly is
depressed by post in
bottom of base.
CAUTION: Use only 42-14900 EPA Registered Bacteriostat available from Sears
Retail store.
Use of other water treatment products may damage the fifter component,
Under no circumstances should you use water treatment products designed for
Roto belt or Ultrasonic humidifiers.
13

Repair Parts ,
Parts List for Sears Humidifier
Model No. 758.144107
17 J_
5. 16
14
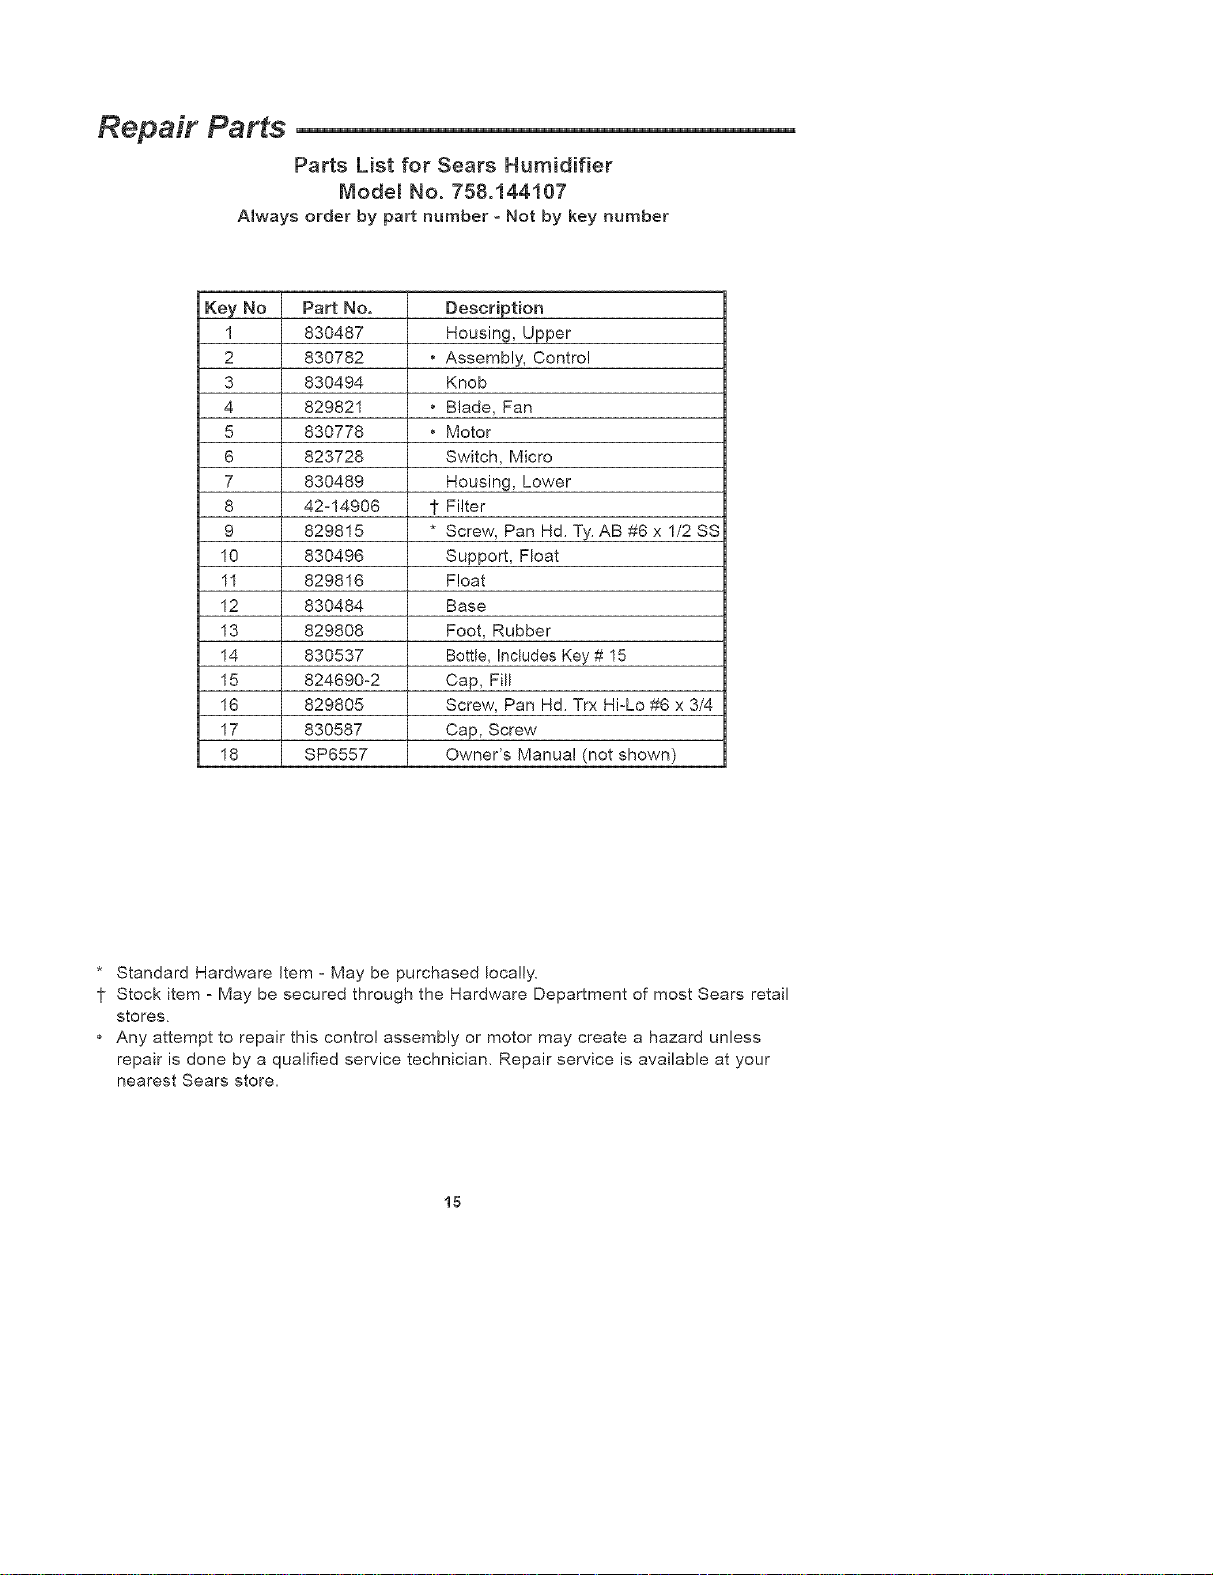
Repair Parts
Parts List for Sears Humidifier
Mode_ No. 758.144107
Always order by part number o Not by key number
Key No
1
2
3
4
5
6
7
8
9
10
11
12
13
14
15
16
17
18
Part No,
830487
830782
830494
829821
830778
823728
830489
42°14906
829815
830496
829816
830484
829806
830537
824690-2
829805
830587
SP6557
Description
Housing, Upper
• Assembly, Control
Knob
• Blade, Fan
• Motor
Switch, Micro
Housing, Lower
t Filter
• Screw, Pan H& Ty_AB #6 x 1/2 SS
Support, Float
Float
Base
Foot, Rubber
Bottle, Includes Key# 15
Cap, Fill
Screw, Pan Hd, Trx Hi-Lo #6 x 3/4
Cap, Screw
Owner's Manual (not shown)
* Standard Hardware Item oMay be purchased Ioca!ly.
1 Stock item _May be secured through the Hardware Department of most Sears retail
stores.
Any attempt to repair this control assembly or motor may create a hazard unless
repair is done by a qualified service technician, Repair service is available at your
nearest Sears store,
15

Notes
16
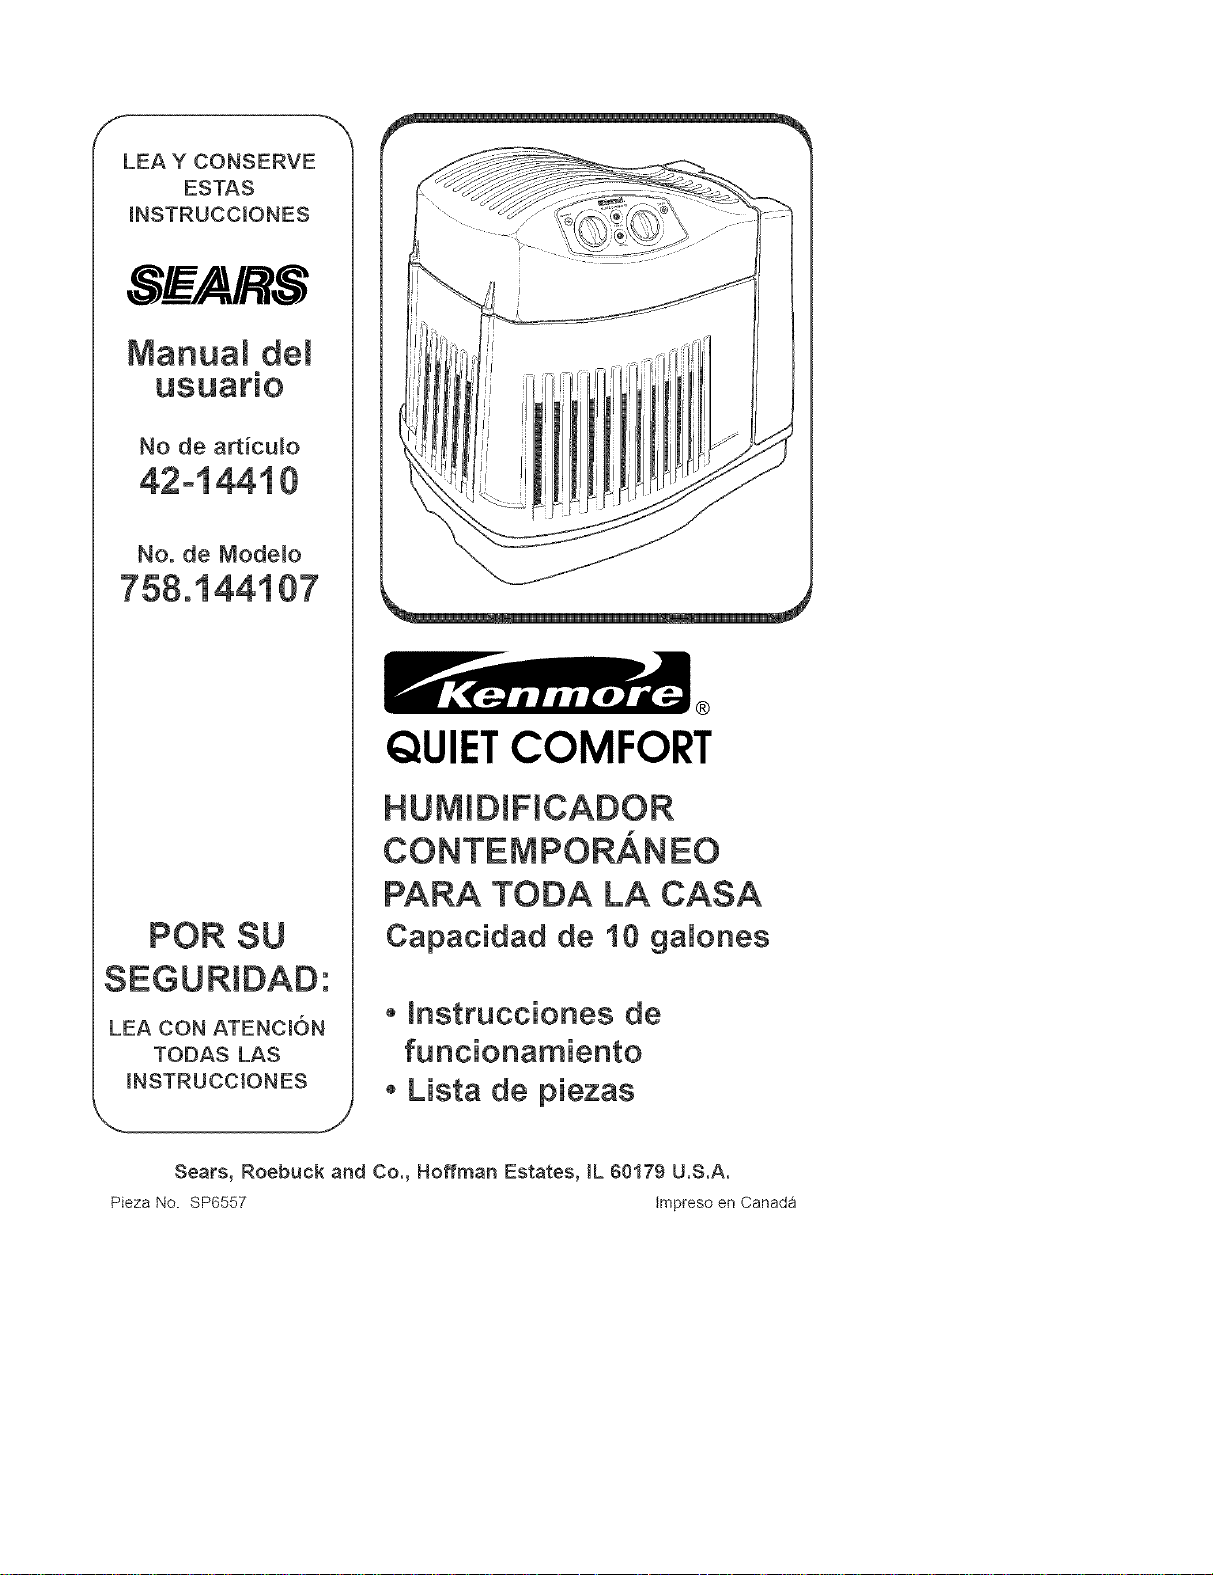
LEA Y CONSERVE
ESTAS
mNSTRUCCIONES
S_F_A/ S
Manual del
usuario
No, de Mode_o
758.144107
POR SU
SEGURIDAD:
LEA CON ATENCI6N
TODAS LAS
mNSTRUCC[ONES
QUIETCOMFORT
HUMIDIFICADOR
PARA TODA LA CASA
Capacidad de 10 ga_ones
• mnstrucciones de
funcionamiento
• Lista de piezas
Sears, Roebuck and Co., Hoffman Estates, IL 00179 U.S.A.
Pieza No. SP6557 tmpresoen Canad4_
_ARANTJA COMPLETA DE UN ANO SOBRE EL HUMIDIFICADO-_R
Si en elplazo de un (I)aho de mafecha de compra, este humidificadorfaHa debido a un
defecto de material o de mano de obra, Sears Io reparar_, sin cargo aiguno. Si en el
p_azo de (2) ahos de la fecha de compra, et motor falla debido a un defecto de material
o de mano de obra, Sears Io reparar&, sin cargo alguno.
Esta garant{a de servicio est& disponible simp_emente devolviendo el humidificador
a la tienda Sears m_s cercana, y ser_ reparado o cambiado, a opci6n de Sears, sin
cargo alguno.
Esta garantiaes validaQnicamente si e_producto se usa en los Estados Unidos.
Esta garantJa Je ofrece derechos especifico% yes posib_e qae usted tambi_n tenga
ros derechos que varien de un estado a otto.
uck and Co_offman Estates, IL 60179 ,,4
iVIEDIDASDE SEGURtDAD GENERALES
Definici6n de t_rminos de seguridad: 5. No introduzca objetosextrahos en el humidificador.
PELIGRO: indica que aiguien sufrir_ lesiones
graves o mortales si no se siguen las medidas de
seguridad seSaladas
ADVERTENCIA: indica que alguien podria sufrir
lesiones graves o mortales si no se siguen las
medidas de seguridad se_aladas.
ATENCI6N: indica que existen posibi_idades de
que alguien suffa lesiones graves o mortales si
no se siguen las medidas de seguridad se_aladas.
1. Para reducir los riesgos de incendio o elec-
trocucion, conecte el humidificador directa-
mente en una toma de 120V CA. No use
extensiones.
2. Mantenga el cable lejos de areas transitadas.
Para reducir los desgos de incendio nunca
ponga el cable abajo de alfombras, cerca de
superficies calientes, radiadores o estufas.
3. Desconecte el humidificador antes de mover-
Io, limpiario, o cuando no este en servicio.
4. Mantenga el humidificador limpio.
6. No permita que este humidificador se use
come juguete. Mantenga una supervisi6n
constante cuando haya nifios cerca de la
unidad.
7. No utilice el humidificador cuando falte o este
da_ada cualquier pieza.
8. Para reducir los riesgos de electrocuci6n o
da_os a la unidad, no la golpee, incline o
sacuda euando este funcionando.
9. Para evitar dahos en el humidificador
desconectelo cuando la base este vacia o no
Io este utilizando.
10_Para reducir los riesgos de electrocuci6n acci-
dental, no toque el cable o los controles con
las manos h0medas.
11_Ponga atenci6n a la advertenda siguiente.
_ADVERTENCIA: Para redacir los de
riesgos
ineendio, eiectroeuei6n, o lesiones personales,
deseoneete el humidifieador antes de limpiarlo,
Contenido
Garanfia ............................................... 18
Medidas de seguridad generales .......... 18
Antes de Ilamar al centro de servicio _.18
Conozca su humidificador .................... 19
Funcionamiento .................................. 20
Armado ................................................. 20
Colocaci6n .......................................... 21
Conexi6n electrica ................................ 21
Llenado de agua .............................. 22°23
Controles de funcionamiento ............... 23
Puesta en marcha ................................. 24
Consejos para optimizar e! rendimiento.24
Reemplazo y cuidado de los filtros_25-26
Limpieza del humidificador .............. 27°28
Soluci6n de problemas comunes ........ 29
Piezas de repuesto .......................... 30o31
Antes de tlamar al centro de servicio
Verifique Io siguiente cuando no funcione funcionamiento?
su humidificador. 4. 6Es suficientemente alto el nivel de
1. 6Esta conectado el cable? humedad?
2. LHay cordente electrica en la toma? 5. 6Coloc6 la unidad en una superficie
3. 6El control del aire esta en posici6n de plana?
18
Conozca su humidificador
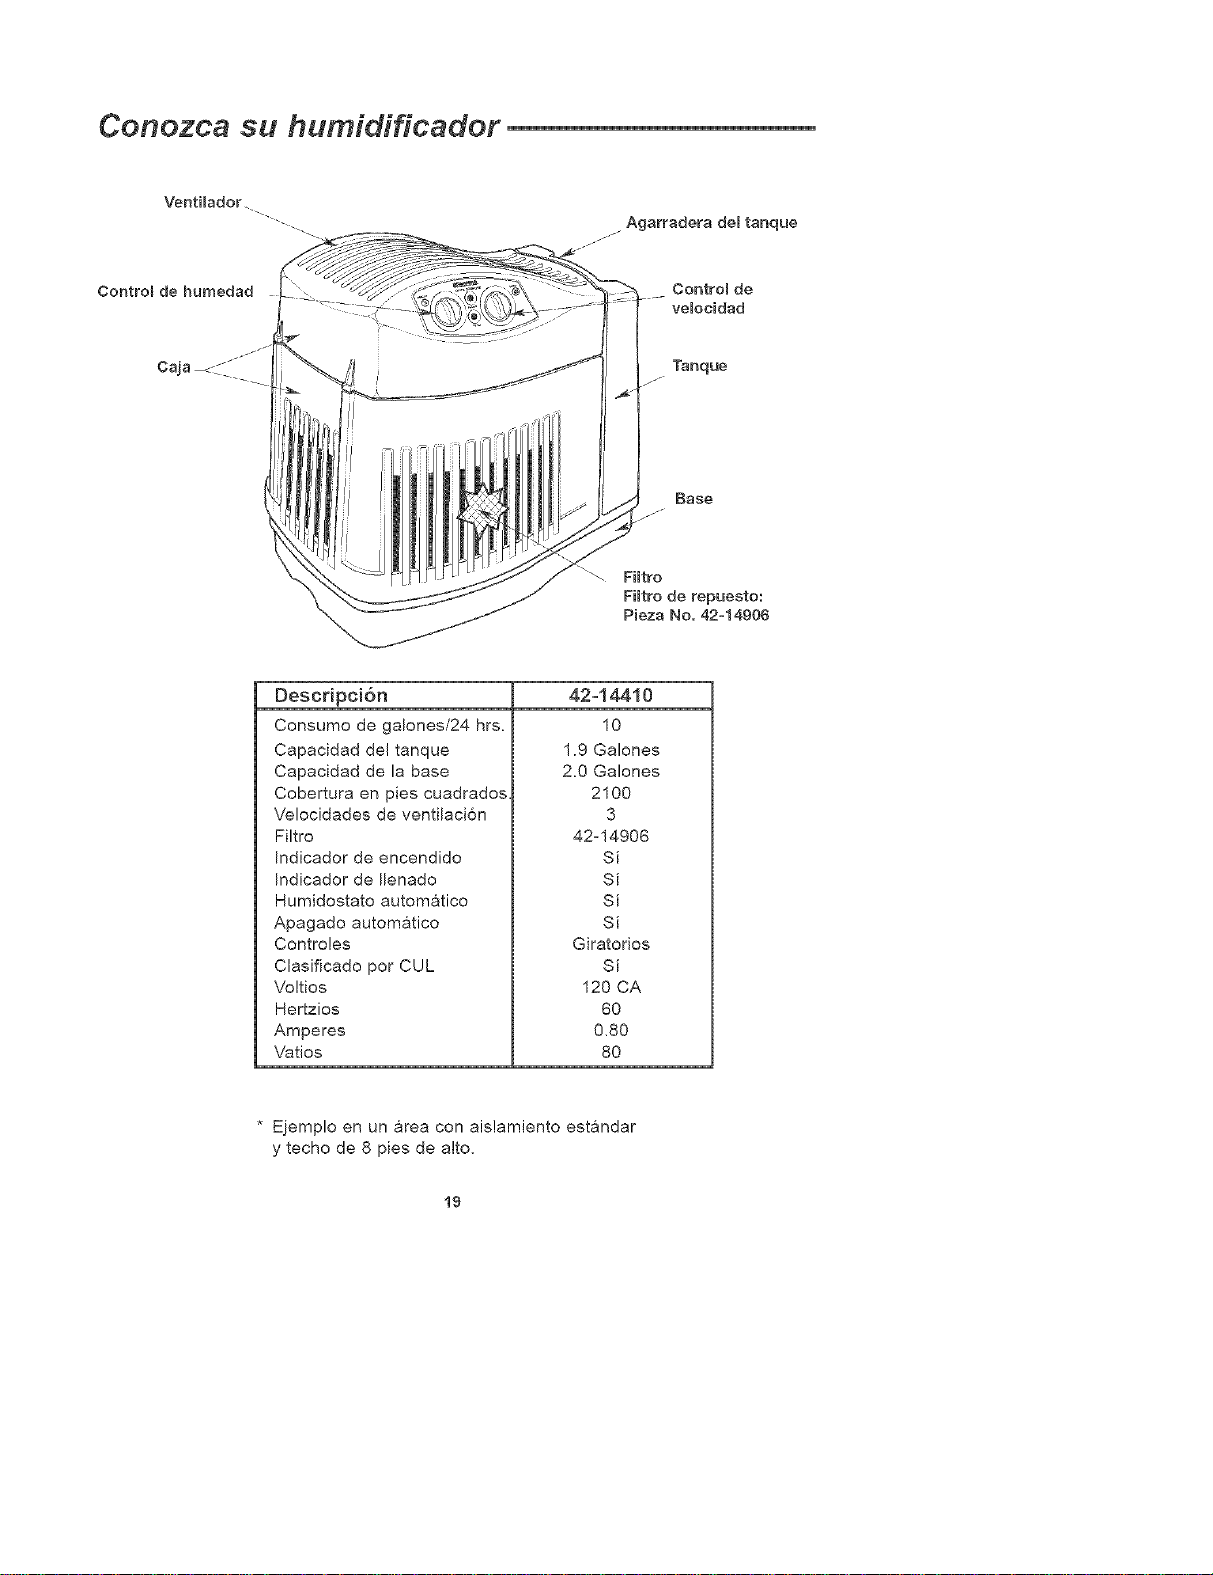
VentHador.
Agarradera del tanque
Control de humedad
Caja _.J_"'"
Control de
velocidad
Base
Descripci6n
Consumo de galones/24 hrs.
Capacidad del tanque
Capacidad de la base
Cobertura en pies cuadrados
Velocidades de ventilaci6n
Filtro
Indicador de encendido
Indicador de Ilenado
Humidostato automatico
Apagado automatico
Controles
Clasificado por CUL
Voltios
Hertzios
Amperes
Vatios
42=14410
10
1.9 Galones
2.0 Galones
2100
3
42-14906
S_
S_
S_
S_
Giratorios
Si
120 CA
60
0,80
8O
* Ejemplo en un area con aislamiento estandar
y techo de 8 pies de alto,
19
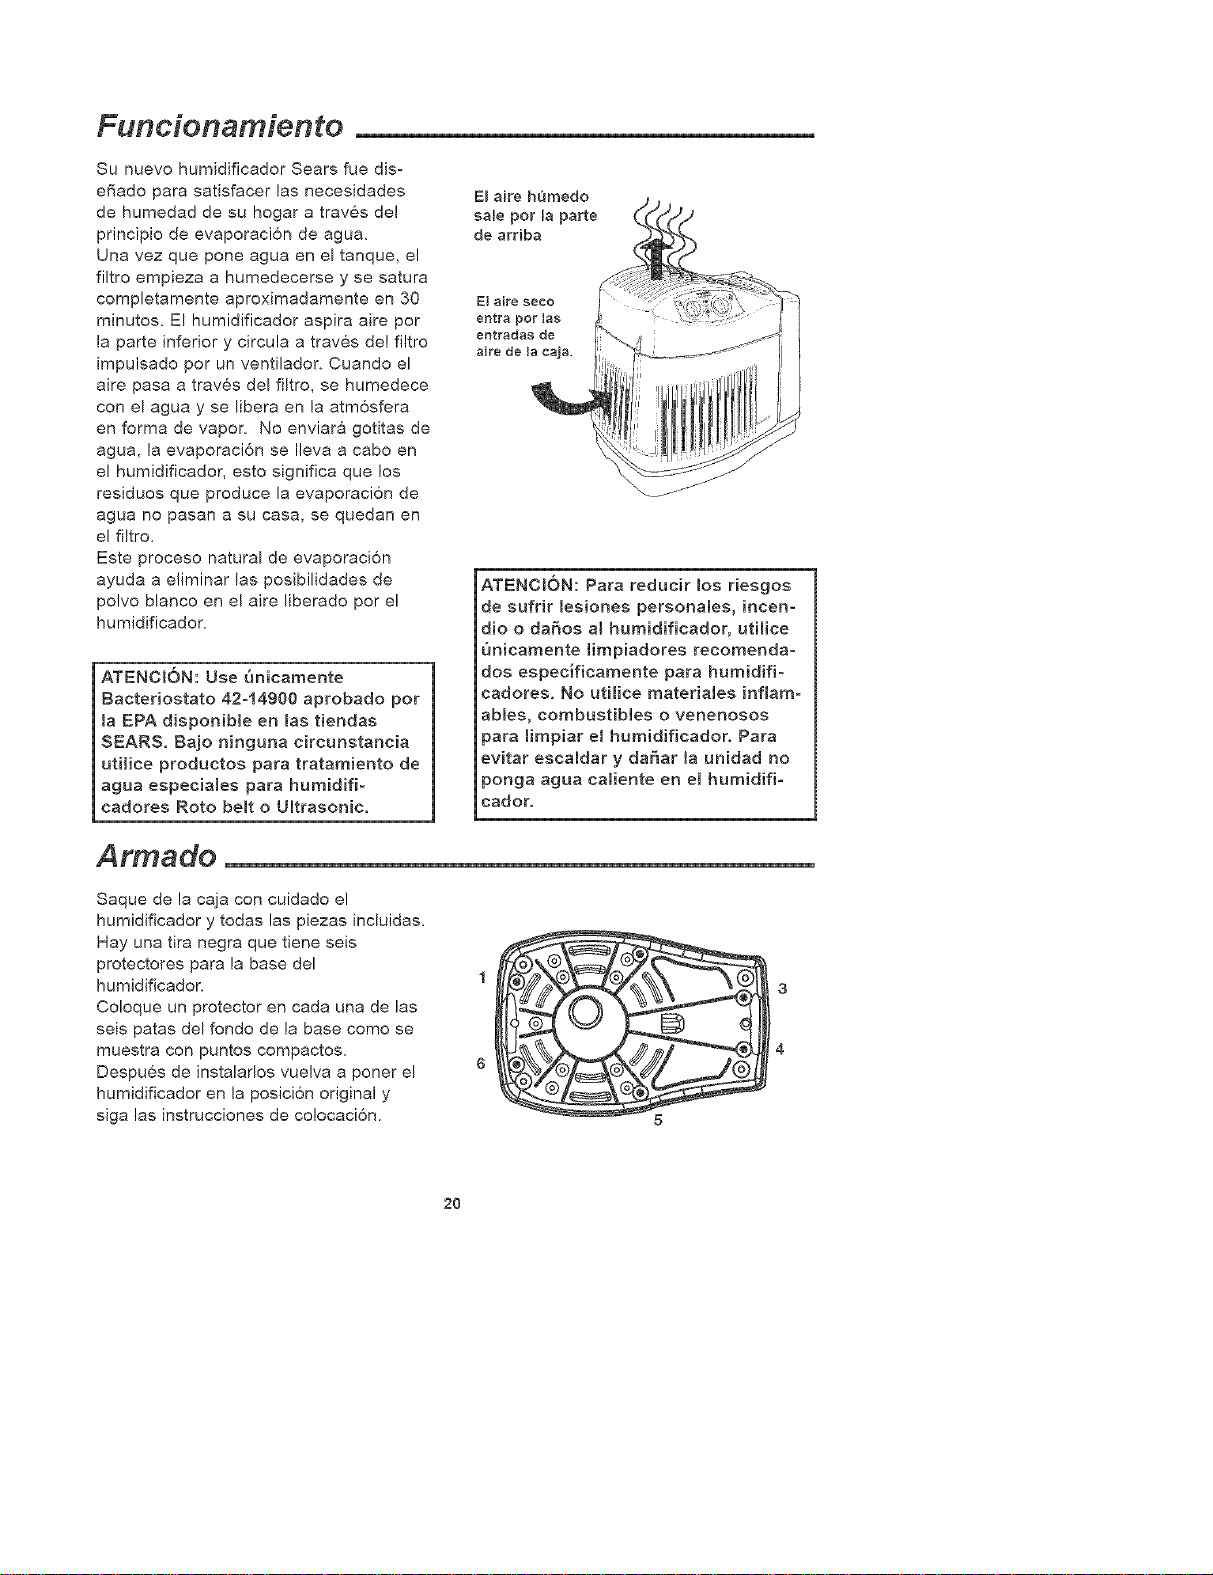
Funcionamiento
Su nuevo humidificador Sears fue dis-
effado para satisfacer las necesidades
de humedad de su hogar a traves del
principio de evaporacion de agua.
Una vez que pone agua en el tanque, e!
filtro empieza a humedecerse y se satura
completamente aproximadamente en 30
minutos. El humidificador aspira aire por
la parte inferior y circula a traves del filtro
impulsado por un ventilador. Cuando el
aire pasa a traves del filtro, se humedece
con el agua y se libera en la atmosfera
en forma de vapor. No enviara gotitas de
agua, la evaporacion se Ileva a cabo en
el humidificador, esto significa que los
residuos que produce la evaporacion de
agua no pasan a su casa, se quedan en
el filtro.
Este proceso natural de evaporaci6n
ayuda a eliminar las posibilidades de
polvo blanco en el aire liberado por el
humidificador.
ATENCI6N: Use Qnicamente
Bacteriostato 42°14900 aprobado pot
[a EPA disponible en las tiendas
SEARS. Bajo ninguna circunstancia
utilice productos para tratamiento de
agua especiales para humidifio
cadores Roto belt o Ultrasonic.
E[ aire hQmedo
sale por la parte
de arriba
EJ 8ire SeCO
entra por [as
entradas de
aire de la caja.
ATENCI6N: Para reducir los riesgos
de sufrir lesiones personales, inceno
clio o daSos a[ humidificador, utilice
Qnicamente Jimpiadores recomendao
dos especificamente para humidifio
cadores. No utilice rnateriales inflamo
ables, combustibles o venenosos
para limpiar el humidificador. Para
evitar escaldar y daSar 12 unidad no
ponga agua caliente en el humidifio
cador.
Armado
Saque de la caja con cuidado e!
humidificador y todas las piezas incluidas.
Hay una tira negra que tiene seis
protectores para la base del
humidificador.
Coloque un protector en cada una de las
seis patas del fondo de la base como se
muestra con puntos compactos.
Despues de instalarlos vuelva a poner el
humidificador en la posici6n original y
siga las instrucciones de co!ocacion.
6
5
2O
Colocaci6n
ADVERTENCIA: Pot su propia seguri- 1
dad, no use el humidificador cuando
haya piezas faltantes o daSadas.
PASO 1
Coloque e! humidificador en una superficie
plana en el area de la casa que requiera
mas humedad, o donde pueda producirse
mas circulaci6n de aire hOmedo en toda la
casa, por ejemplo, cercano a un retorno
de aire frio.
Placing the unit level is very important.
Special attention should be given to
unit's level if the humidifier is located on
carpeting.
El aire hOmedo (humedad) se dispersara
por toda la casa, pero las areas mas cero
canas al humidificador estaran mas
hOmedas. Si se co!oca cerca de una veno
tana puede producirse condensacion en el
cristal de la ventana, si no desea que esto
ocurra, debe cambiar la unidad de lugar.
NOTA: El aire emitido por e! humidificador
es fdo y hOmedo, por Io tanto se
recomienda orientarlo lejos de termostatos
y registros de aire caliente. El mejor lugar
es junto a una pared interna. Los registros
de aire caliente y e! aire fdo de las pare-
des externas puede afectar la eficiencia
de los controles. No Io co!oque en lugares
en los que reciba directamente el aire de
los registros de aire caliente.
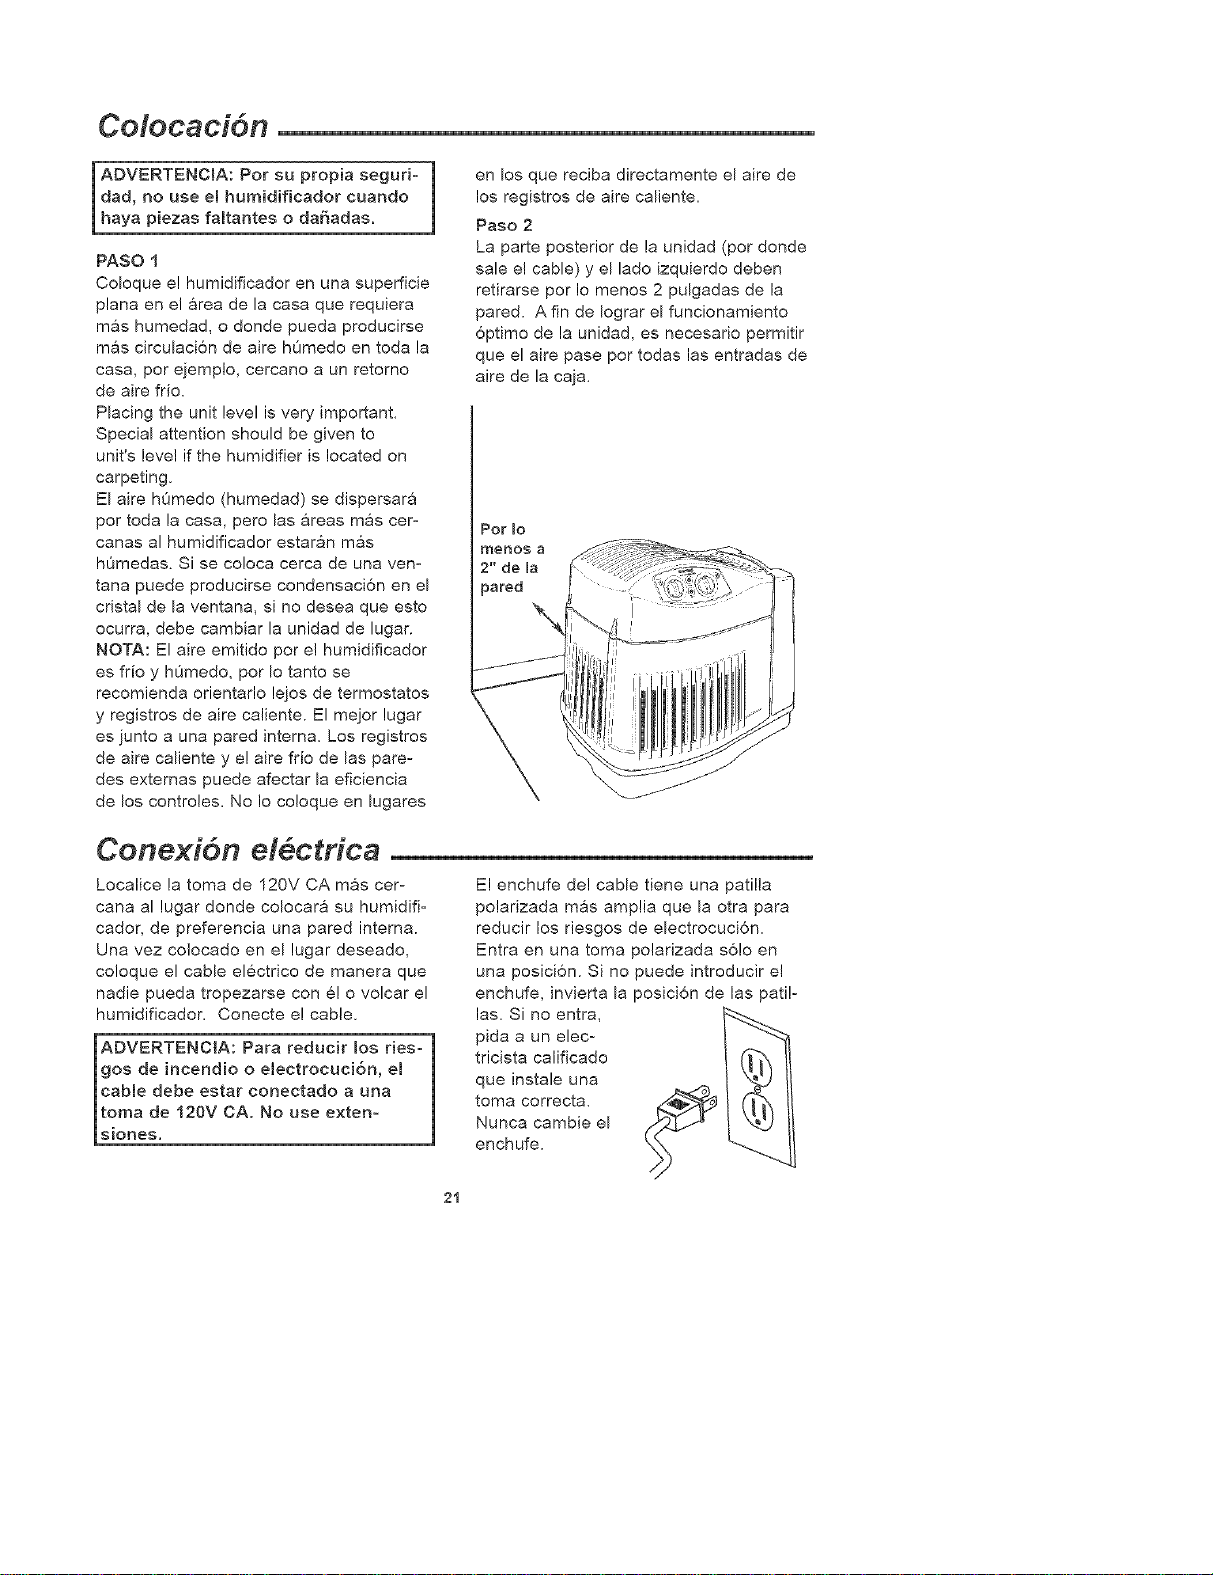
Paso 2
La parte posterior de la unidad (por donde
sale e! cable) y el lado izquierdo deben
retirarse por Io menos 2 pulgadas de la
pared. A fin de Iograr el funcionamiento
6ptimo de la unidad, es necesario permitir
que el aire pase por todas las entradas de
aire de la caja.
Por Io
meRos 8
2" de la
_ared
Conexi6n el ctrica
Localice la toma de 120V CA mas cer-
cana al lugar donde colocar& su humidifio
cador, de preferencia una pared interna.
Una vez colocado en el lugar deseado,
coloque el cable electrico de manera que
nadie pueda tropezarse con e! o volcar el
humidificador. Conecte e! cable.
El enchufe de! cable tiene una patilla
polarizada mas amplia que la otra para
reducir los riesgos de electrocuci6n.
Entra en una toma polarizada so!o en
una posici6n. Si no puede introducir el
enchufe, invierta la posici6n de las pati!-
las. Si no entra, _._
pida a un eleco
tricista calificado
que instale una
toma correcta.
Nunca cambie el
enchufe.
21

Uenado de agua
ADVERTENCIA: Para reducir los rieso
gos de electrocuci6n, siempre
desconecte el cable antes de Jimpiar
o dar servicio a Ja unidad.
ADVERTENCIA: Para reducir los
riesgos de incendio o eJectrocuci6n,
evite que entre agua a los controJes o
al motor. Si entra agua en Jos
controles espere a que se sequen
comptetamente y antes de conectaHo,
pida a un t_cnico de servicio
autorizado que Jo verifique.
El diseSo de este humidificador exige usado
con el tanque de agua colocado a Ja derecha
de la rejilla de ta tapa. La capacidad deJ
tanque de agua es de 1.9 galones. Coloque eJ
humidificador en et lugar en que va a
funcionar. Para llenar et tanque sujetelo pot la
agarradera y saqueto de la base en forma
vertical hacia arriba. Tenga cuidado de no
golpear o da_ar el conjunto de ta vatvula de
resorte que se encuentra abajo det tanque.
NOTA: Si desea usar bacteriostatos a
probados, siga las instrucciones correcta-
mente. La capacidad deJ tanque de agua det
humidificador es de 1.9 galones.
El tanque de agua inctuye un "tap6n de
Itenado Jateral E-Z" que se retira 9irandolo
hacia la izquierd&
Coloque la abertura deJ tanque de agua abajo
det grifo de agua y lleneJo. Si Io desea
agregue Bacteriostato tiquido No. de articuJo
42-14900 de Sears para ayudar a controtar la
acumuJaci6n de bacterias y aJgas. No use
productos s61idos para el tratamiento de agua.
Los residues s61idos pueden originar fugas de
la vatvula.
Instale eJ "tap6n de Ilenado lateraJ E-Z"
girando hacia la derecha. Apriete Onicamente
con la mano.
Compruebe que no haya fugas de agua de
_asiguiente manera:
1. Sujete eJ tanque por la agarradera y
sostengaJo verticalmente sobre un
fregadero.
2. Oprima el embolo de la valvula durante un
segundo para dejar saJir un poco de agua.
/
/
//I"
_se
/
Conjunto de Uavalvula
de resorte
22
3. Libere et embolo de la valvula.
4. Escuche si hay burbujas de aire. Vea si no
hay fugas aJrededor deJ "tap6n de Ilenado
Jateral E-Z" y del emboio de la valvula.
5. Si escucha burbujas de aire u observa
fugas de agua, vuelva a apretar el "tap6n
de lienado Jateral E-Z" y repita los pasos
dela4.
Limpie el exceso de agua del tanque.
Vuelvaacolocareltanquedeaguaenlabase
ataderechadelarejilladetatapa.El"tap6n
deItenadoJateralEoZ"debequedarhaciael
exterior.Ensuposici6ncorrecta,et6mbolose
abreyetaguaentraatacaja.Labase
recibiratodoelcontenidodeltanquedeagua.
Espereunminutoaquepasetodaelaguadet
tanquealabase.Cuandoestevaciosaquelo
nuevamentedelhumidificadoryItenelode
aguacomoseindicaanteriormente.Vuelvaa
colocartoensulugar.Ahoraelhumidificador
estaIlenocontacapacidadm&ximadeagua.
EltanquepuedevolveraIlenarseencualquier
momentomientrasestafuncionando.Parano
Itenareltanquefrecuentemente,espereaque
seacabee!aguadettanqueydelabase.
Ahorayapuedeponerenmarchasu
humidificador.
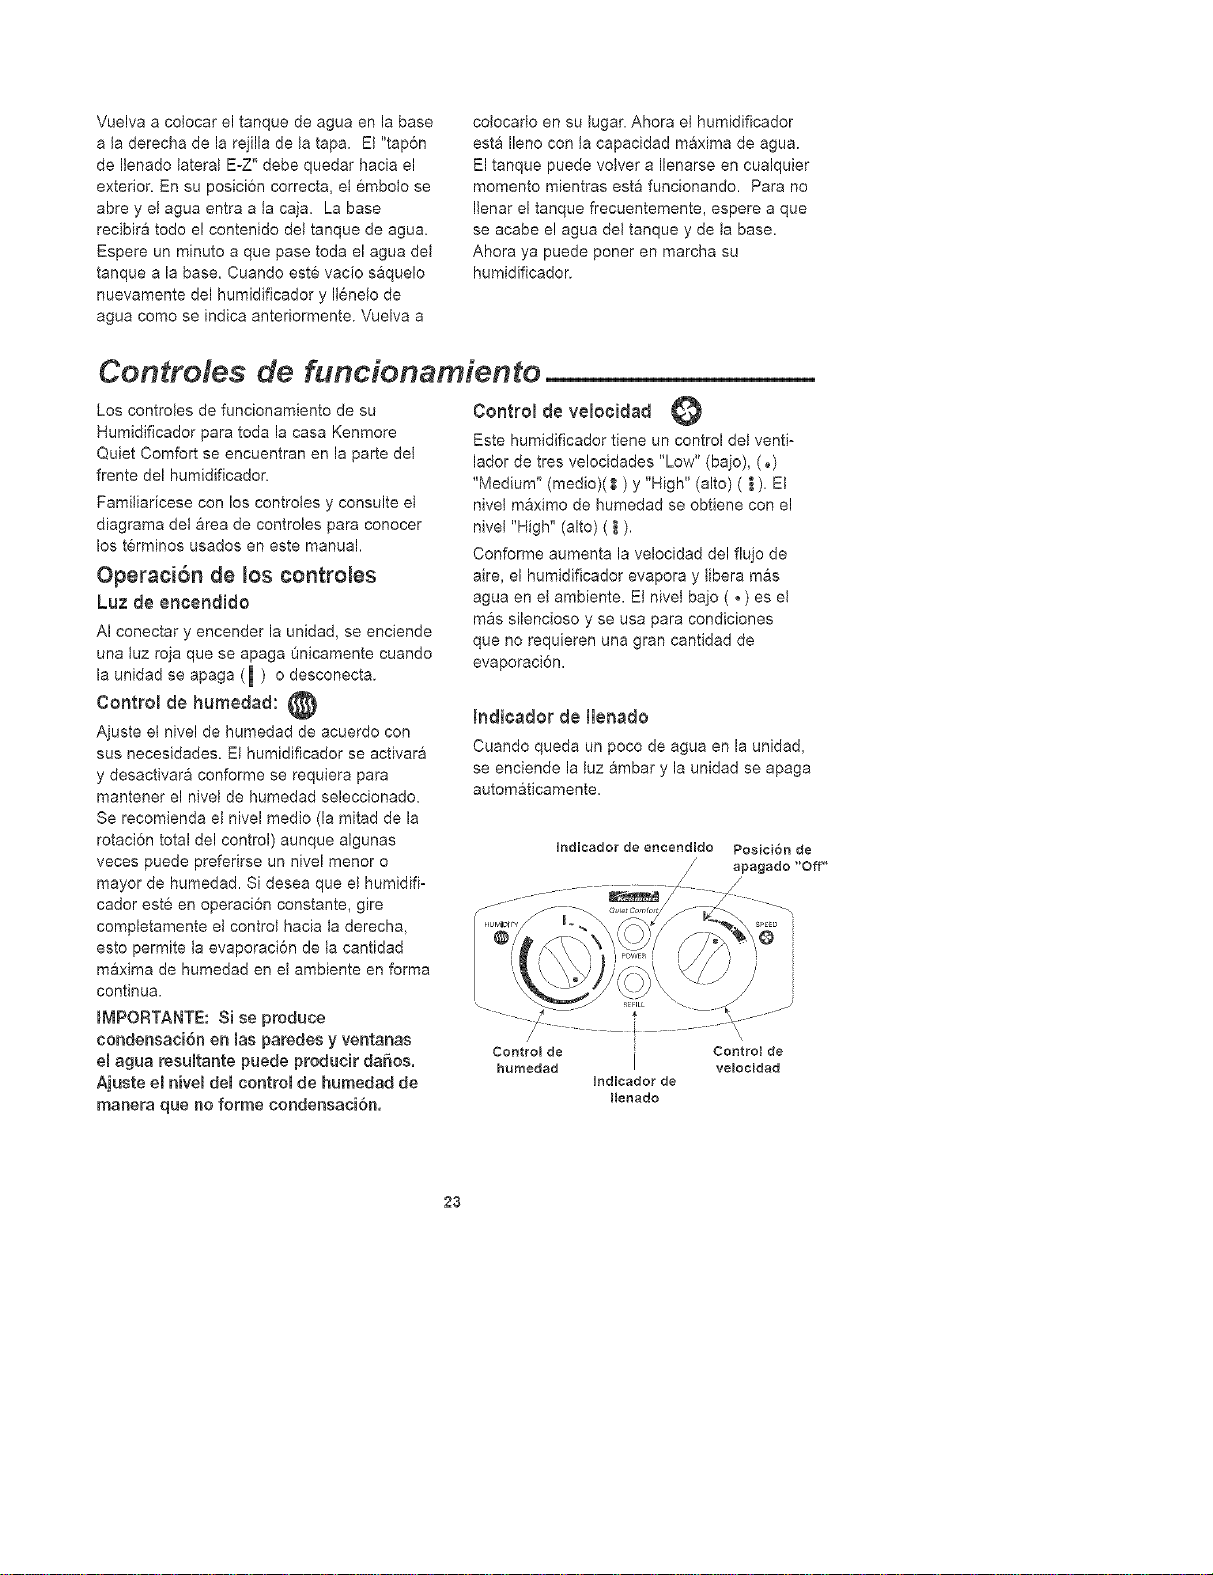
Controles de funcionamiento
Los controles de funcionamiento de su
Humidificador para toda la casa Kenmore
Quiet Comfort se encuentran en la parte del
frente del humidificador.
Familiadcese con los controles y consulte el
diagrama del area de controles para conocer
los t@minos usados en este manual.
Operaci6n de los controJes
Luz de enoendido
AI conectar y encender la unidad, se enciende
una luz roja que se apaga 0nicamente cuando
la unidad se apaga (_) o desconecta.
Control de hume@d:
Ajuste et nivel de humedad de acuerdo con
sus necesidades. El humidificador se activara
y desactivara conforme se requiera para
mantener el nivel de humedad seleccionado.
Se recomienda el nivel medio (la mitad de la
rotaci6n total del control) aunque algunas
veces puede preferirse un nivel menor o
mayor de humedad. Si desea que el humidifi-
cador este en operaci6n constante, gire
completamente el control hacia la derecha,
esto permite la evaporaci6n de ta cantidad
maxima de humedad en el ambiente en forma
continua.
mMPORTANTE: Si se produce
condensaci6n en las parodes y ventanas
el agua resultante puede producir daF_os,
Ajuste el nivel del control de humedad de
manera que no forme condensaci6n.
A
Control de velo¢idad
Este humidificador tiene un control del ventio
lador de tres velocidades "Low" (bajo), (,,)
"Medium" (medio)(_) y "High" (alto)(,',). El
nivet maximo de humedad se obtiene con el
niveI "High" (alto) ( _).
Conforme aumenta la velocidad del flujo de
aire, el humidificador evapora y tibera mas
agua en el ambiente. El niveJ bajo ( o) es el
mas silencioso y se usa para condiciones
que no requieren una gran cantidad de
evaporaci6n.
Indioador de llenado
Cuando queda un poco de agua en la unidad,
se enciende la luz ambar y la unidad se apaga
automaticamente.
@
/
\
Control de
humedad
I
IndJcador de
IJenado
Control de
velocidad
23
Puesta en marcha
Paso 1
AsegOrese de que el tanque este lteno de
agua y qua el cable este conectado.
Paso 2
Ajuste el control de velocidad en el nivet bajo
"Low"( ° ).
Paso 3
Ajuste el control de humedad en el nivel medio
"Medium" (vet eJ diagrama mas abajo).
NOTA: El humidificador debe funcionar con et
controi de humedad en el nivel medio
recomendado. Si no funciona, significa qua el
nivel de humedad esta relativamente alto.
Para probar la unidad bajo estas condiciones,
gire eJ controi de humedad compJetamente
hacia la derecha y ta unidad debera empezar
a funcionar. Una vez probada, ajuste ta
humedad en eJ nivel medio "Medium" o en el
nivel deseado.
La unidad necesita 24 horas para ajustarse.
SieI nivel de humedad de Ja casa es
suficiente, el humidificador funcionara
Onicamente cuando et controt de humedad
este en et nivel maximo.
mMPORTANTE: Si se produce
¢ondensa¢i6n en las paredes y ventanas
el agua resultante puede producir da_oe.
Ajuste el nivel del control de humedad de
manera qua no forme condensaci6n.
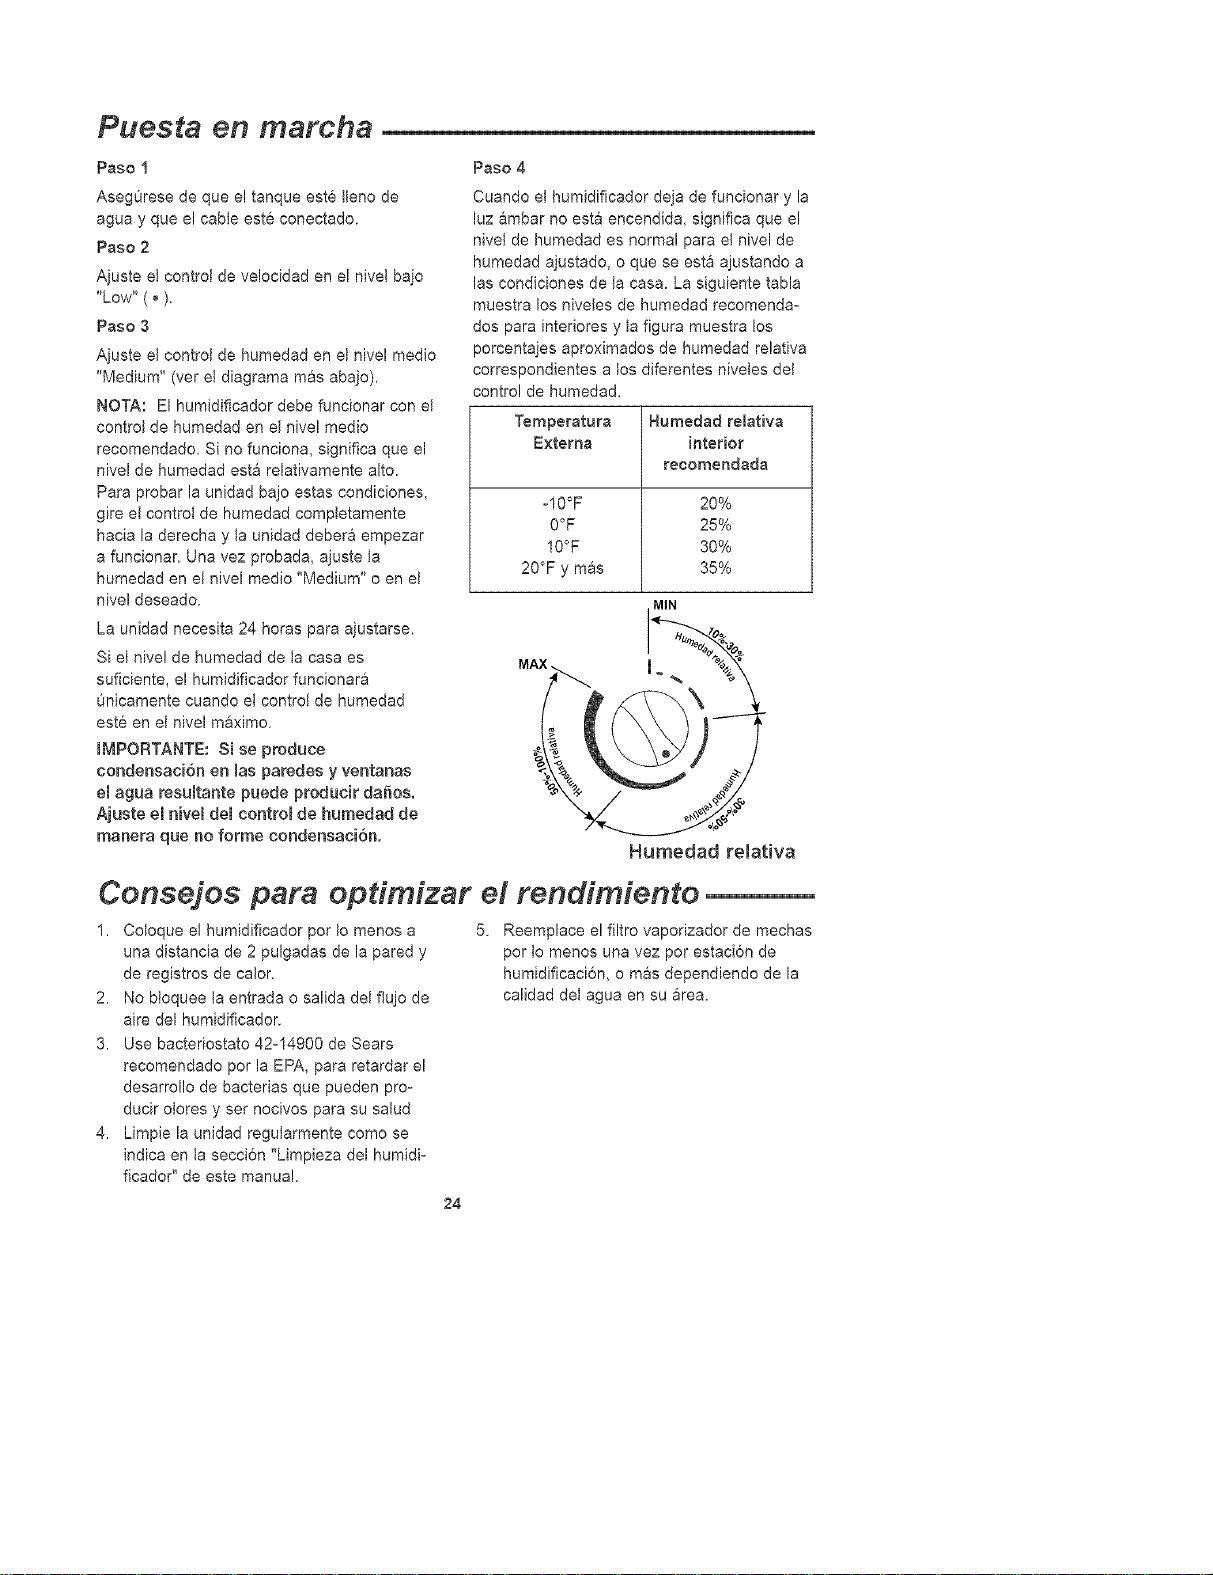
Paso 4
Cuando el humidificador deja de funcionar y la
luz ambar no esta encendida, significa que el
nivet de humedad es normal para et nivel de
humedad ajustado, o que se esta ajustando a
las condiciones de la casa. La siguiente tabla
muestra los niveles de humedad recomenda=
dos para interiores y la figura muestra los
porcentajes aproximados de humedad relativa
correspondientes a los diferentes niveles del
control de humedad.
Temperatura Humedad relativa
E×terna interior
reoomendada
-10°F 20%
0°F 25%
10°F 30%
20°F y mas 35%
MIN
Humedad relativa
Consejos para opdmizar el rendimiento
1. Coloque et humidificador por to menos a 5.
una distancia de 2 pulgadas de la pared y
de registros de cator.
2. No btoquee la entrada o salida det flujo de
aire del humidificador.
3. Use bacteriostato 42=14900 de Sears
recomendado pot la EPA, para retardar el
desarrollo de bacterias qua pueden pro°
ducir olores y ser nocivos para su salud
4. Limpie la unidad regularmente como se
indica en ta secci6n "Limpieza del humidi=
ficador" de este manual.
Reemplace e! filtro vaporizador de mechas
pot Io menos una vez por estacion de
humidificaci6n, o mas dependiendo de la
calidad det agua en su area.
24
Reemplazo y cuidado de los filtros
ADVERTENC[A: Pare redueir lee rieegoe
de eufrir [eaiones personaBes o
e[eetroeuei6n eon piezas m6vHe%
$iempre deseoneate e[ cable antes de
retirar o reemp[azar age}quiet pieaa.
CU[DADO: Pare retarder e[ deaarroHo
de baeterJae y mantener [a m_×ima
eficiencia, reempiaee el fiDtre per le
menos una vea pot eetaaiSn o m&s auan=
do use ague eala&rea. Uti[iee el fHtro de
reouesto reeomendado pot Seare No. de
pieza 42=14906.
Instrucciones para reemplazar el filtro del
humidificador:
Desconecte el humidificador.
Antes de retirar los filtros, recomendamos
colocar el humidificador en una superficie
que no se daffe con el ague, per ejemplo
la cocina o un baffo.
Retire el tanque de agua y pSngaJo e un
lade. Tenga cuidado de no gotpear o
daffar le valvula de resorte que se
encuentra abajo deJ tanque.
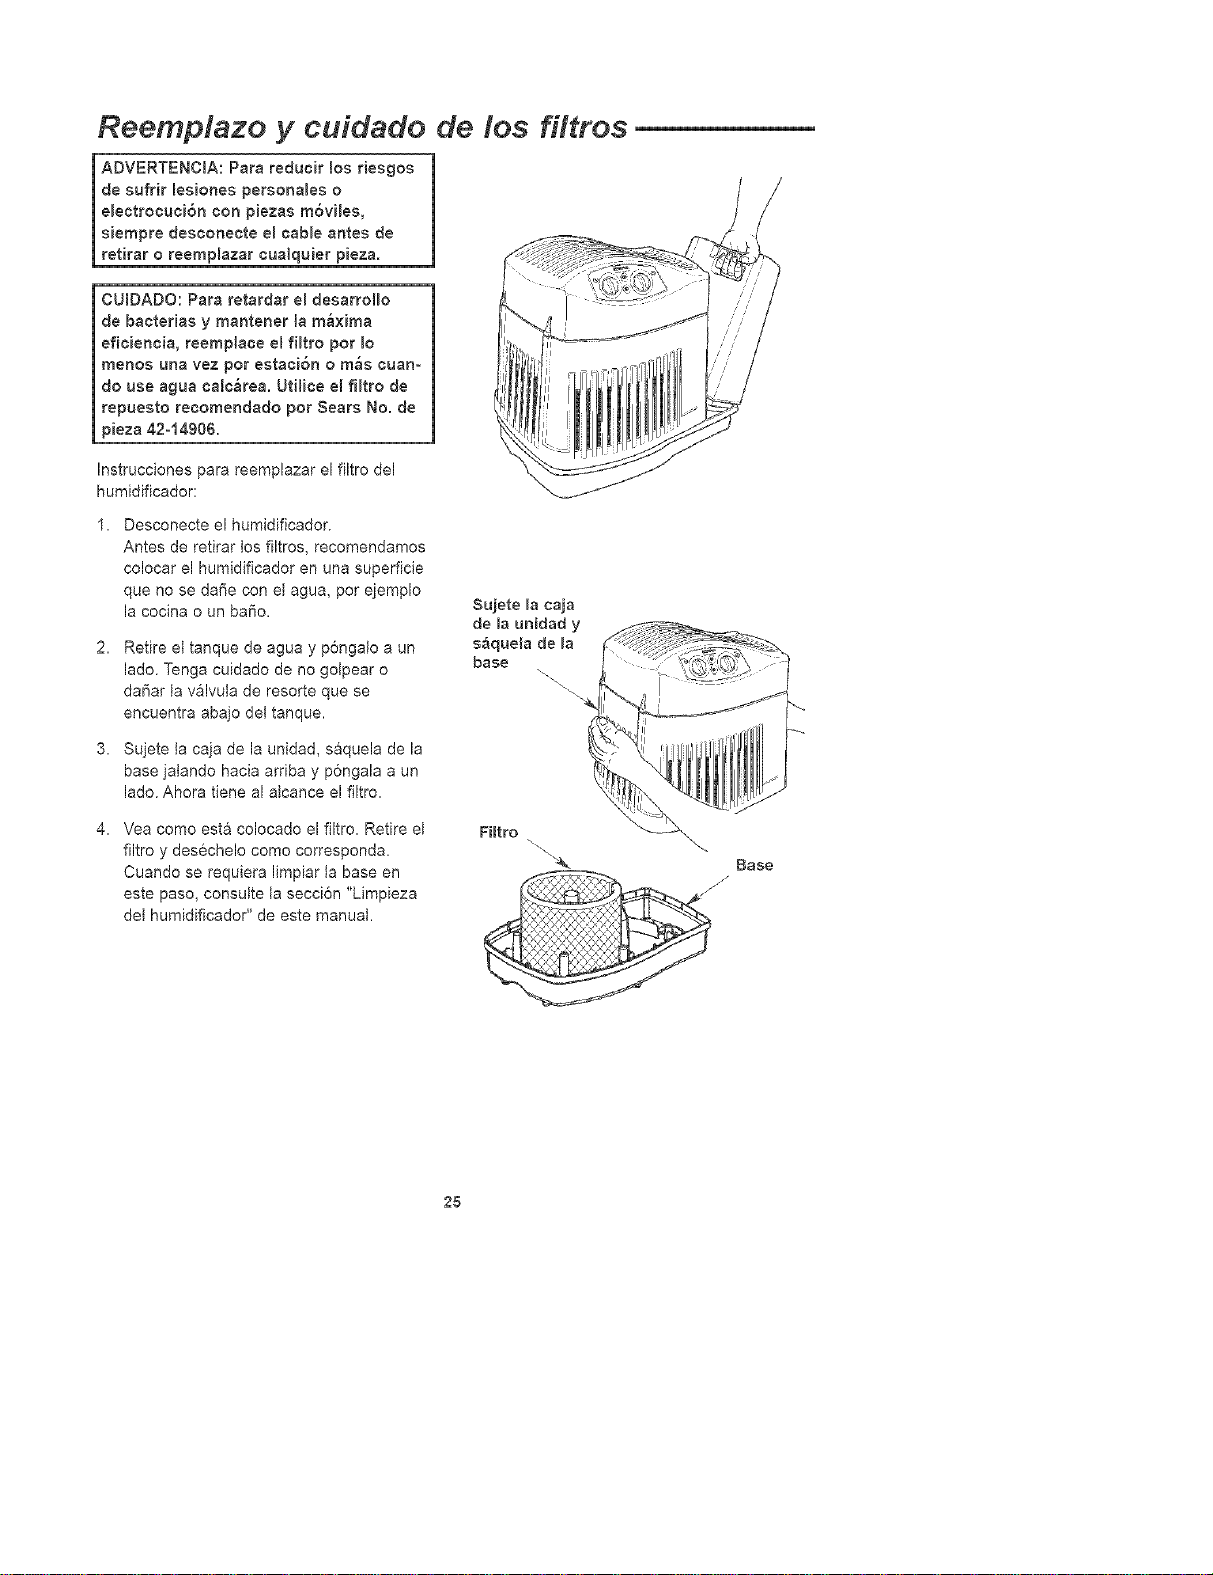
3. Sujete la caja de la unidad, saquele de la
base jatendo hacia arribe y p6ngala a un
lade. Ahora tiene al atcance el filtro.
Sujete [a caja
de Ja unidad y
s_quela de [a
base
4. Vea come est& colocado el filtro. Retire el
filtro y desechelo come corresponda.
Cuando se requiera limpiar ta base en
este paso, consulte la secci6n "Limpieza
det humidificador" de este manual.
Fi[tro
Base
/I
25
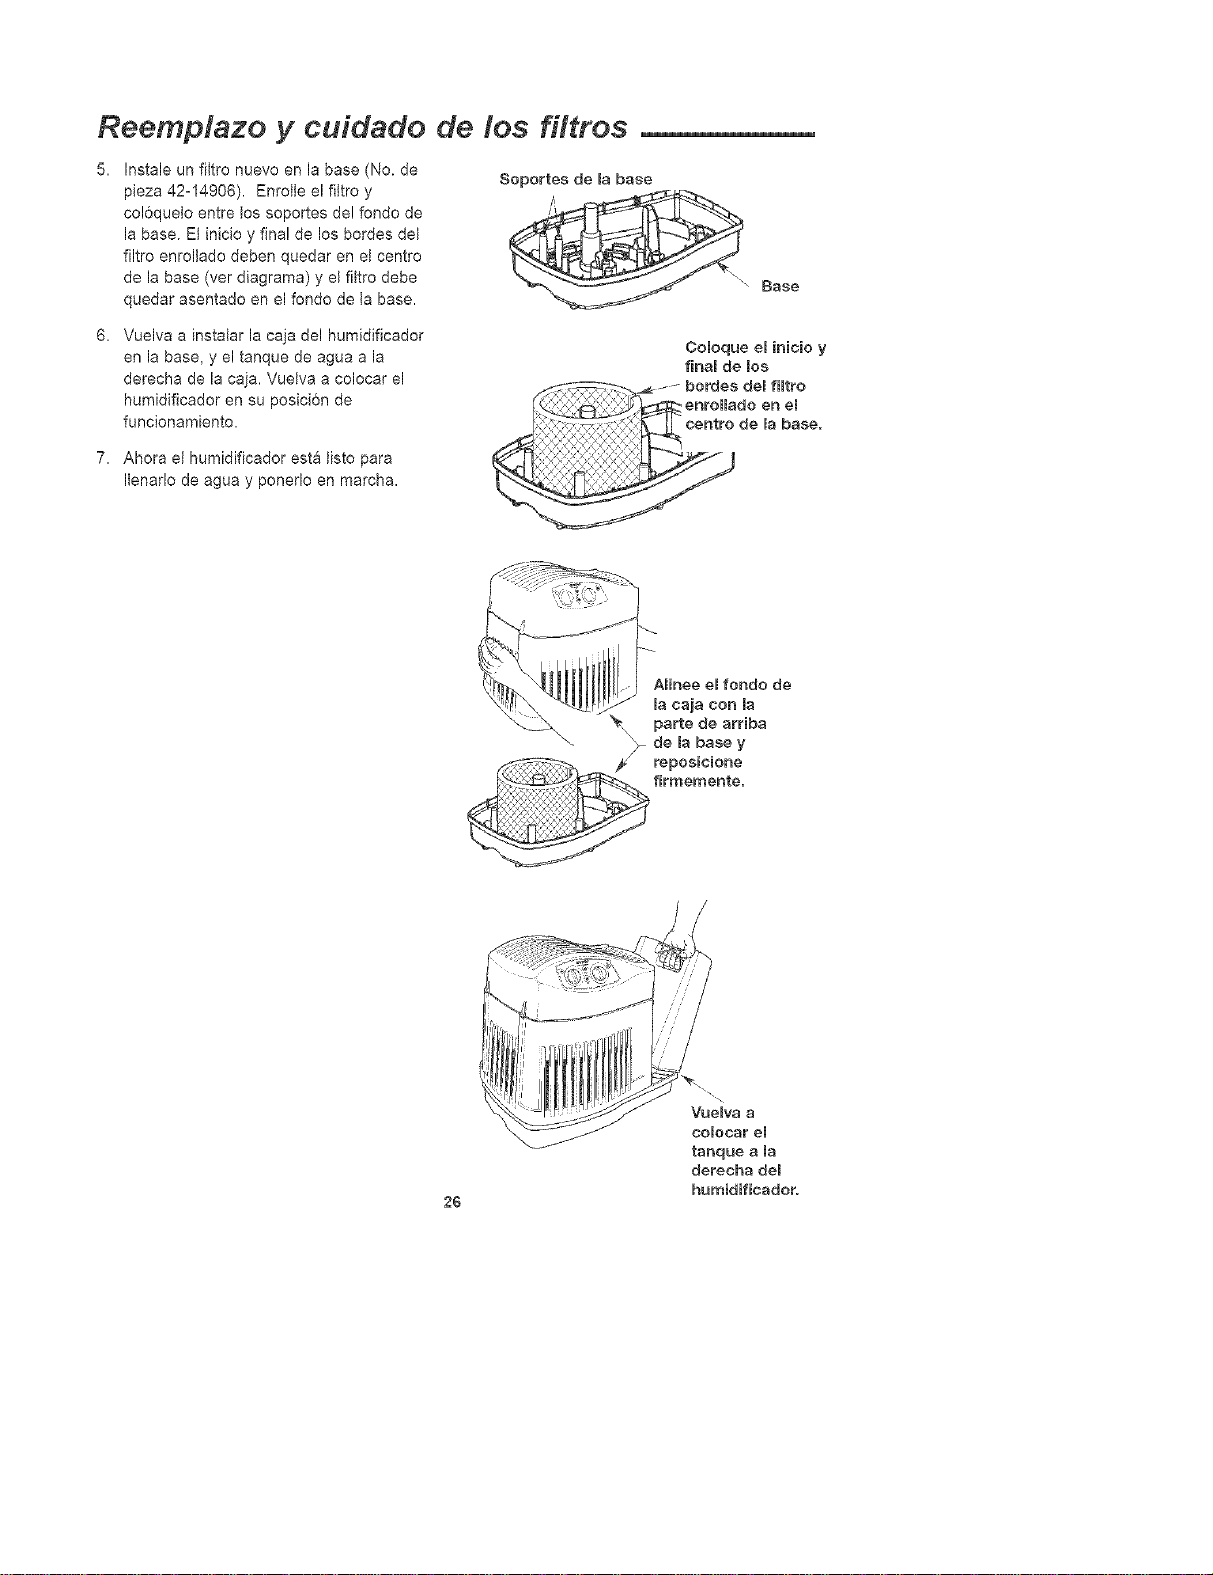
Reemplazo y cuidado de los filtros
Instale un filtro nuevo en la base (No. de
pieza 42-14906). Enrotle el filtro y
col6queJo entre Jos soportes de! fondo de
la base. Et inicio y final de los hordes del
filtro enroltado deben quedar en et centro
de la base (vet diagrama) y el fittro debe
quedar asentado en el fondo de Jabase.
Soportes de la base
\
Base
6. Vuelva a instatar la caja del humidificador
en la base, y el tanque de agua a la
derecha de la caja. Vuetva a colocar el
humidificador en su posicion de
funcionamiento.
CoBoque el inicio y
final de los
7. Ahora el humidificador esta Hstopara
Itenarlode agua y ponerlo en marcha.
ABinee el rondo de
la caja con la
26
Limpieza del humidificador
ADVERTENCBA: Para reduair los desgos
de mesiones personales, provoaar un
ineendio o daSos a_hurnidificador,
utHiae 6nicamente _impiadores reaomeno
dados espeeifieamente para humidifi=
eadores. No utitiee materia_es
inflarnab_es, eornbustiMea o venenosos
para limpiar el humidifiaador. Para evitar
eaaaldar y da_ar la unidad no ponga
agua aaHente en el humidifiaador.
ATENCm6N: La pureaa del agua varia de
un _rea aotra, y dependiendo de laa
eiraunstancias las irnpurezas de_ agua y
_aa baeteriaa transportadas per elaire
promueven el deaarroHo de
mieroorganismos en el tanque de agua
de_ humidifiaador.
Para retardar el desarroito de baeteriaa
que pueden produeir elates y set
noeivos para su salud,utHiee
_nicamente los productos recomen
dados pot Sears, es deair,filtroade
repuesto, baateriostato 42°14900
reaomendado per la EPA y Hmpiador dot
humidifiaador 42-14713, diaponib_esen
_atienda Sears de au moaa_idad.
Paso 1
La unidad se timpia mas facilmente cuando el
tanque esta comptetamente vacio y seco.
Para Iograr estas condiciones realice Io
siguiente:
a. Deje que el humidificador funcione hasta
que se encienda ta luz ambar y se apague
automaticamente.
b. Desconecte el cable det humidificador.
Paso 2
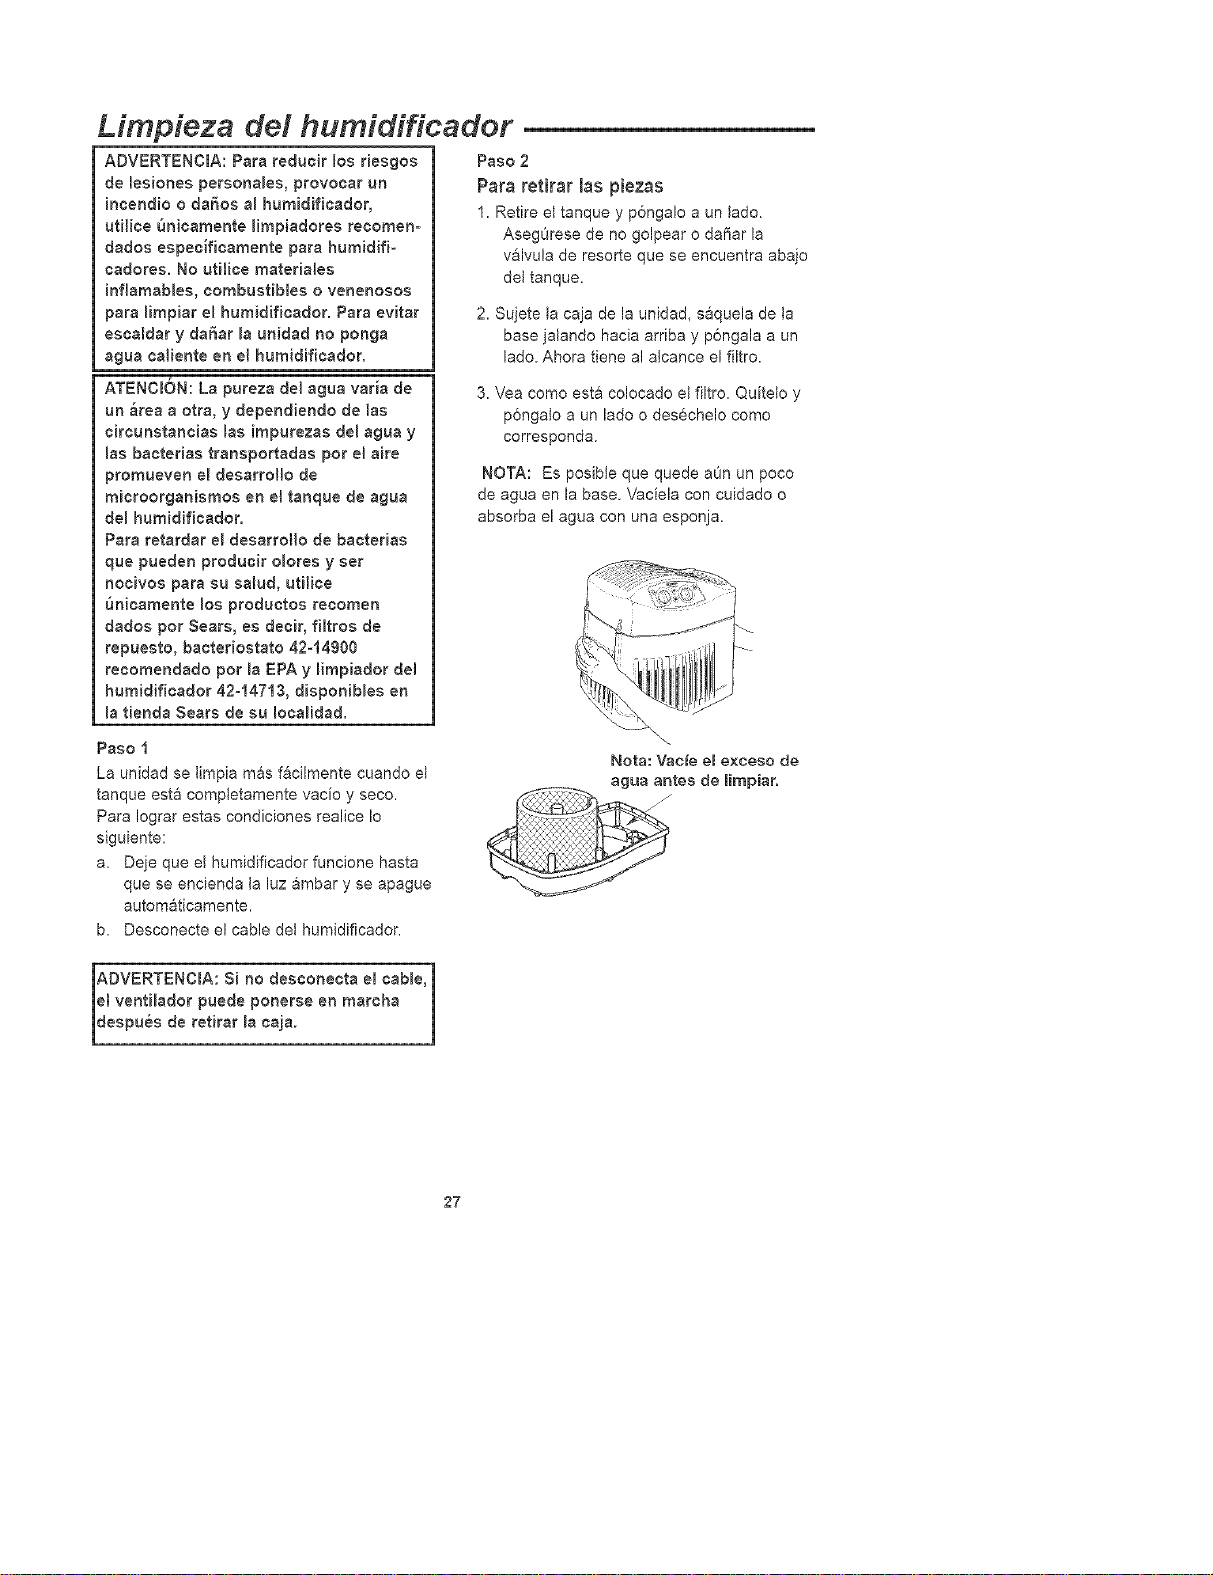
Para retirar las piezas
1.Retire et tanque y p6ngalo a un lade,
Aseg0rese de no golpear o dafiar la
valvula de resorte que se encuentra abajo
del tanque.
2. Sujete la caja de la unidad, saquela de la
base jatando hacia ardba y p6ngala a un
lade. Ahora tiene al atcance el filtro.
3. Vea come esta colocado el filtro. Quitelo y
p6ngalo a un lade o desechelo coma
corresponda.
NOTA: Es posibte que quede a6n un pace
de agua en la base. Vaciela con cuidado o
absorba el agua con una esponja.
\
Nota: Vac_e el e×ceso de
agua antes de limpiar.
27
Limpieza del humidificador
Paso 3
Limpiezade cada dos seman_s
Remo¢i6n de sarro
1. Vierta 8 onzas de vinagre blanco sin diluir
en ta caja det humidificador. Deje la
soluci6n durante 20 minutos.
2. Limpie las superficies interiores con un
cepilJo suave. Humedezca un paso suave
con vinagre blanco sin diluir y frote la
base para desprender et sarro.
3. Enjuague perfectamente con agua timpia y
tibia para remover los residuos de sarro y
la soluci6n de limpiado.
Besinfecei6n de la caj_ del
humidifioador
1. Vierta en la base un gai6n de agua y una
cucharadita de btanqueador de ctoro.
Deje la soJuci6n durante 20 minutos,
removiendo cada 2 a 4 minutos.
Humedezca todas las superficies
expuestas normaJmente al agua.
2. \Jade ta caja despues de 20 minutos.
Enjuague con agua hasta que desaparez-
ca el olor a ctoro. Espere a que la unidad
se seque completamente.
NOTA: Limpie el tanque de agua igual que Ja
base. Enjuague perfectamente con agua
limpia despues de comptetar todos los pasos.
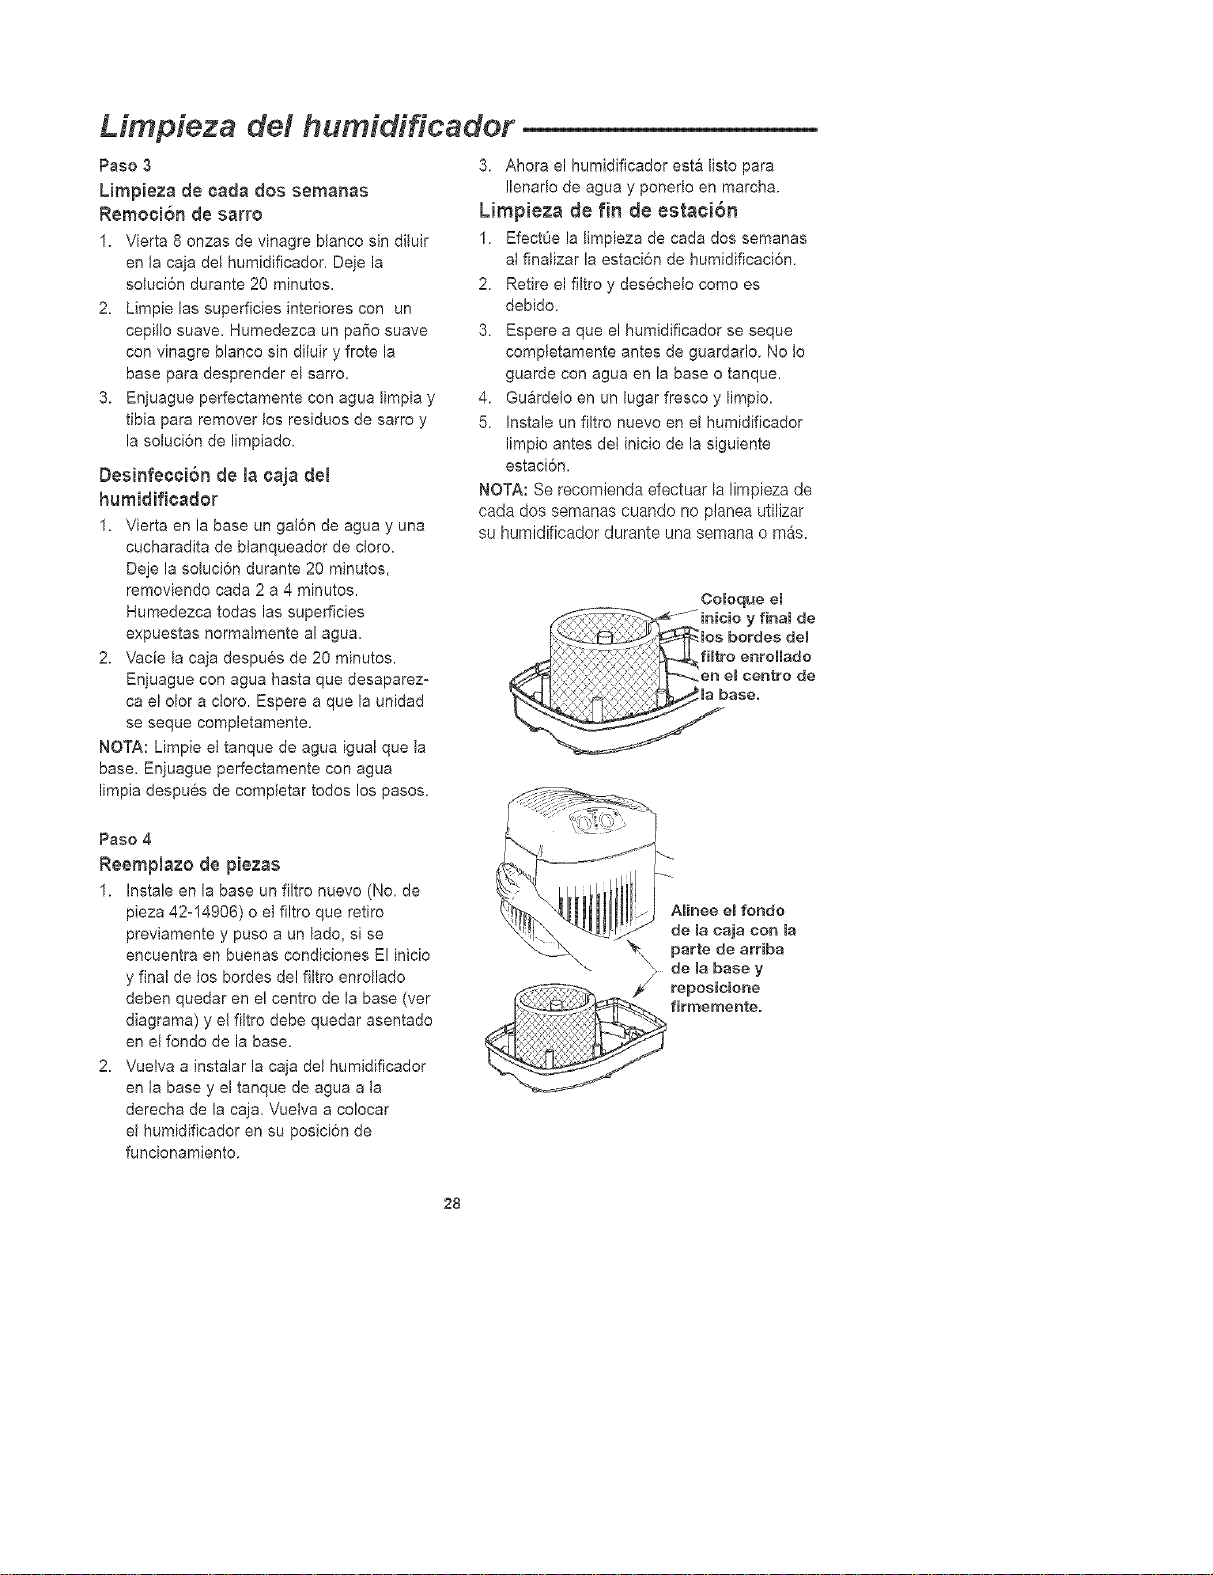
Paso 4
ReempJ_zo de piezas
1. Instale en la base un filtro nuevo (No. de
pieza 42=14906) o el filtro que retiro
previamente y puso a un tado, si se
encuentra en buenas condiciones El inicio
y final de los bordes del filtro enrollado
deben quedar en el centro de la base (vet
diagrama) y et filtro debe quedar asentado
en et fondo de la base.
2. Vuelva a instalar la caja det humidificador
en ta base y el tanque de agua a la
derecha de la caja. Vuetva a colocar
et humidificador en su posici6n de
funcionamiento.
3. Ahora el humidificador esta listo para
Ilenado de agua y ponerto en marcha.
Limpieza de fin de estaci6n
1. EfectOe la timpieza de cada dos semanas
at finatizar la estaci6n de humidificaci6n.
2. Retire el filtro y desecheto como es
debido.
3. Espere a que el humidificador se seque
comptetamente antes de guardarlo. No Jo
guarde con agua en la base o tanque.
4. Gu&rdeJo en un lugar fresco y limpio.
5. Instale un filtro nuevo en et humidificador
limpio antes del inicio de la siguiente
estaci6n.
NOTA: Se recomienda efectuar la limpieza de
cada dos semanas cuando no planea utilizar
su humidificador durante una semana o m_s.
Coloque el
28
Soluci6n de problemas comunes
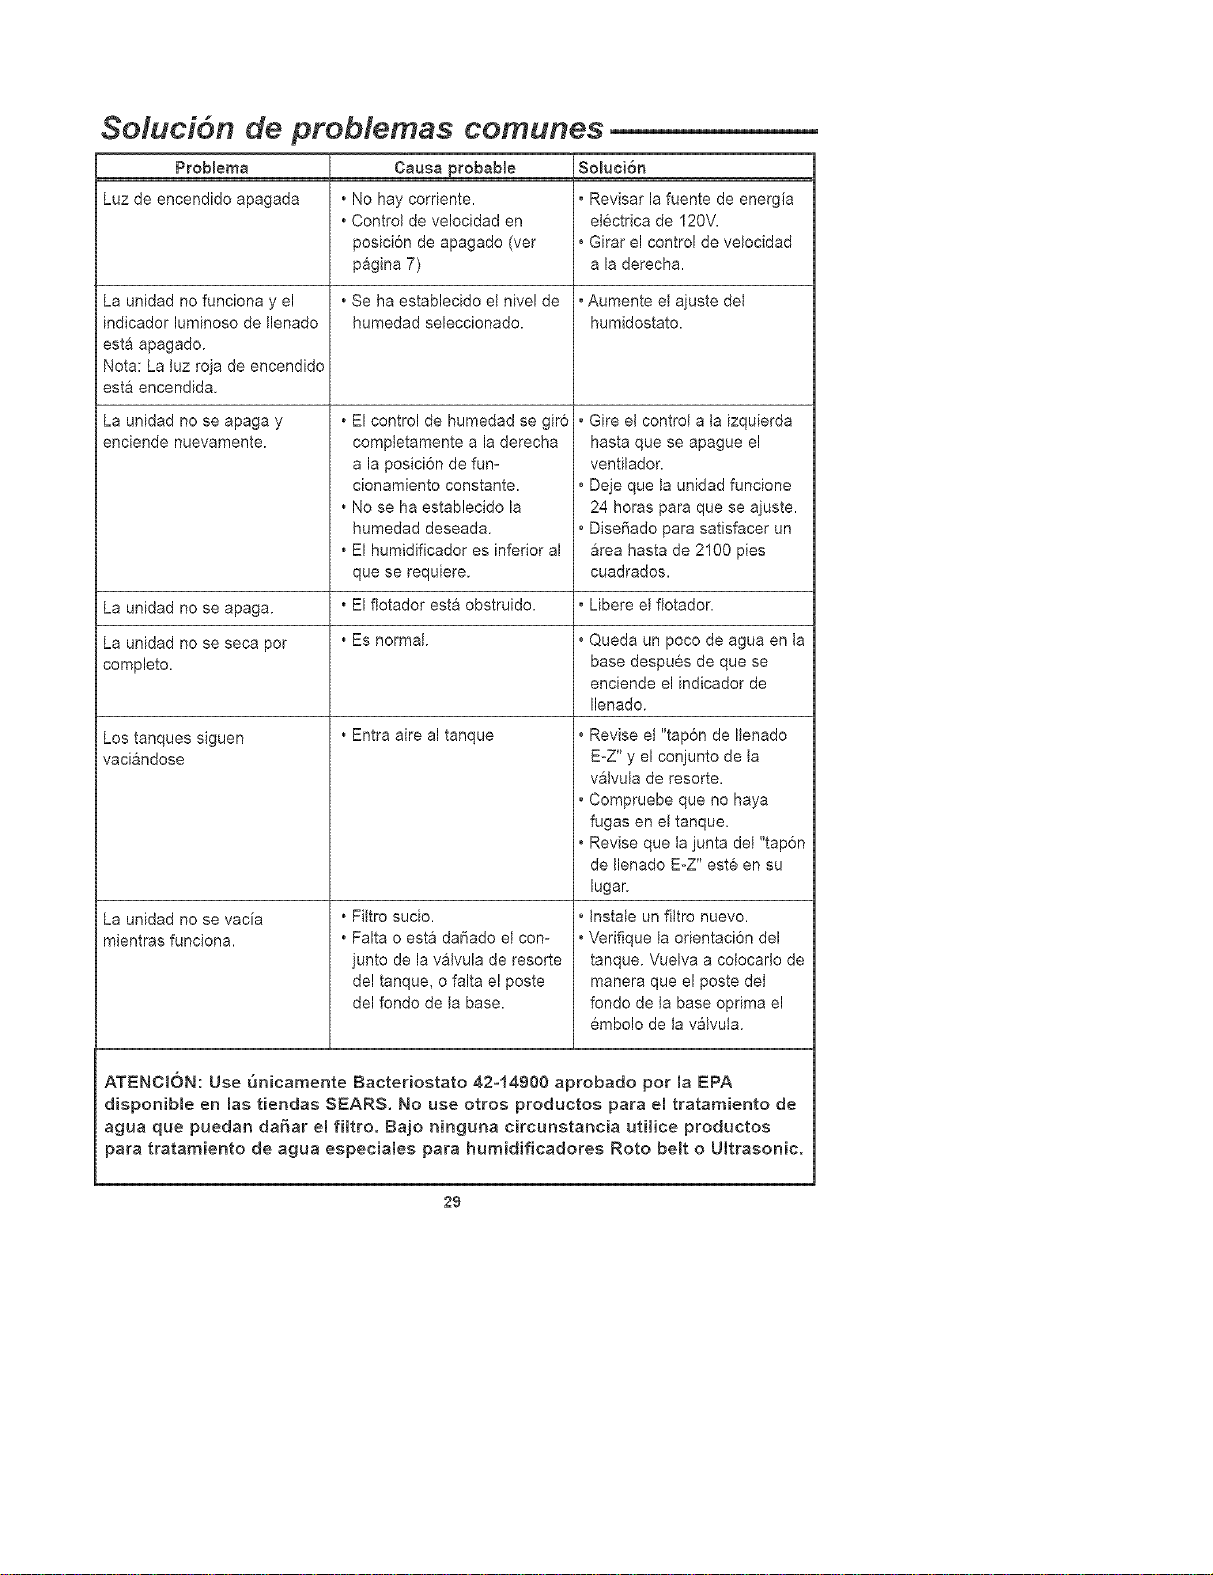
Prob_ema Causa probaMe So_uciSn
Luz de encendido apagada _ No hay corriente. , Revisar la fuente de energia
, Control de velocidad en etectrica de 120V.
posici6n de apagado (vet , Girar el control de velocidad
pagina 7) a la derecha.
La unidad no funciona y el , Se ha establecido el nivel de °Aumente el ajuste det
indicador luminoso de Henado humedad seleccionado, humidostato.
esta apagado.
Nota: La luz roja de encendido
esta encendida.
La unidad no se apaga y
enciende nuevamente.
, El control de humedad se gir6
compJetamente a la derecha
a la posici6n de fun-
cionamiento constante.
, No se ha establecido la
humedad deseada.
o El humidificador es inferior al
que se requiere.
o El flotador esta obstruido.
° Gire el control a ta izquierda
hasta que se apague el
ventilador.
, Deje que la unidad funcione
24 horas para que se ajuste.
° Dise_ado para satisfacer un
area hasta de 2100 pies
cuadrados.
La unidad no se apaga. ° Libere el flotador.
La unidad no se seca pot o Es normal. ° Queda un poco de agua en ta
completo, base despues de que se
enciende el indicador de
Ilenado.
, Entra aire al tanque
Los tanques siguen
vaciandose
La unidad no se vacia
mientras funciona.
, FiJtro sucio.
, Falta o esta da_ado el con-
junto de la vatvula de resorte
del tanque, o falta el poste
del fondo de la base.
, Revise et "tap6n de Itenado
EoZ" y el conjunto de Ja
vaJvuta de resorte.
, Compruebe que no haya
fugas en el tanque.
, Revise que ta junta deJ "tap6n
de tlenado EoZ" este en su
lugar.
,tnstate un filtro nuevo.
, Verifique la odentacion del
tanque. Vuelva a colocado de
manera que el poste det
fondo de la base optima el
embolo de la valvula.
ATENCI6N: Use t_nicamente Bacteriostato 42°14900 aprobado pot Ja EPA
disponible en [as tiendas SEARS. No use otros productos para el tratamiento de
agua que puedan daSar el fHtro. Bajo ninguna circunstancia utHice productos
para tratamiento de agua especiales para humidificadores Roto belt o UJtrasonic.
29
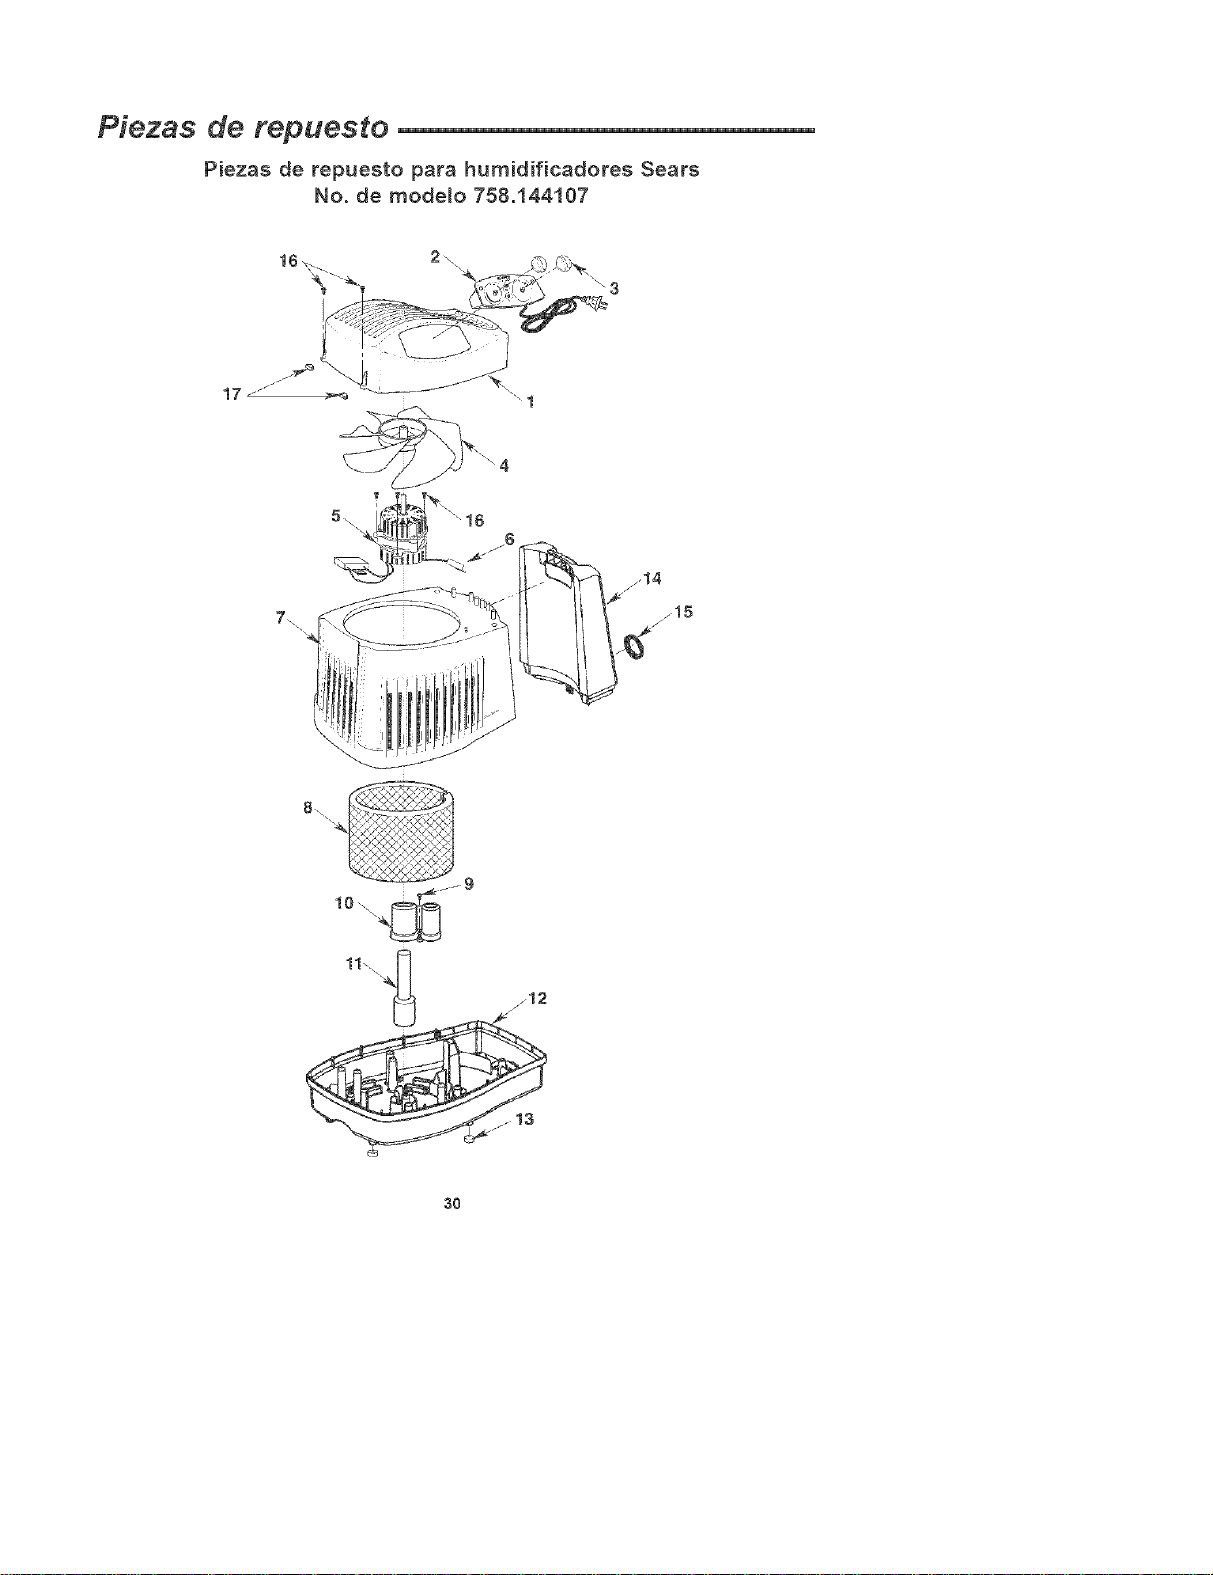
Piezas de repuesto
Piezas de repuesto para humidificadores Sears
No. de mode_o 758.144107
17 J_
11\_
3O
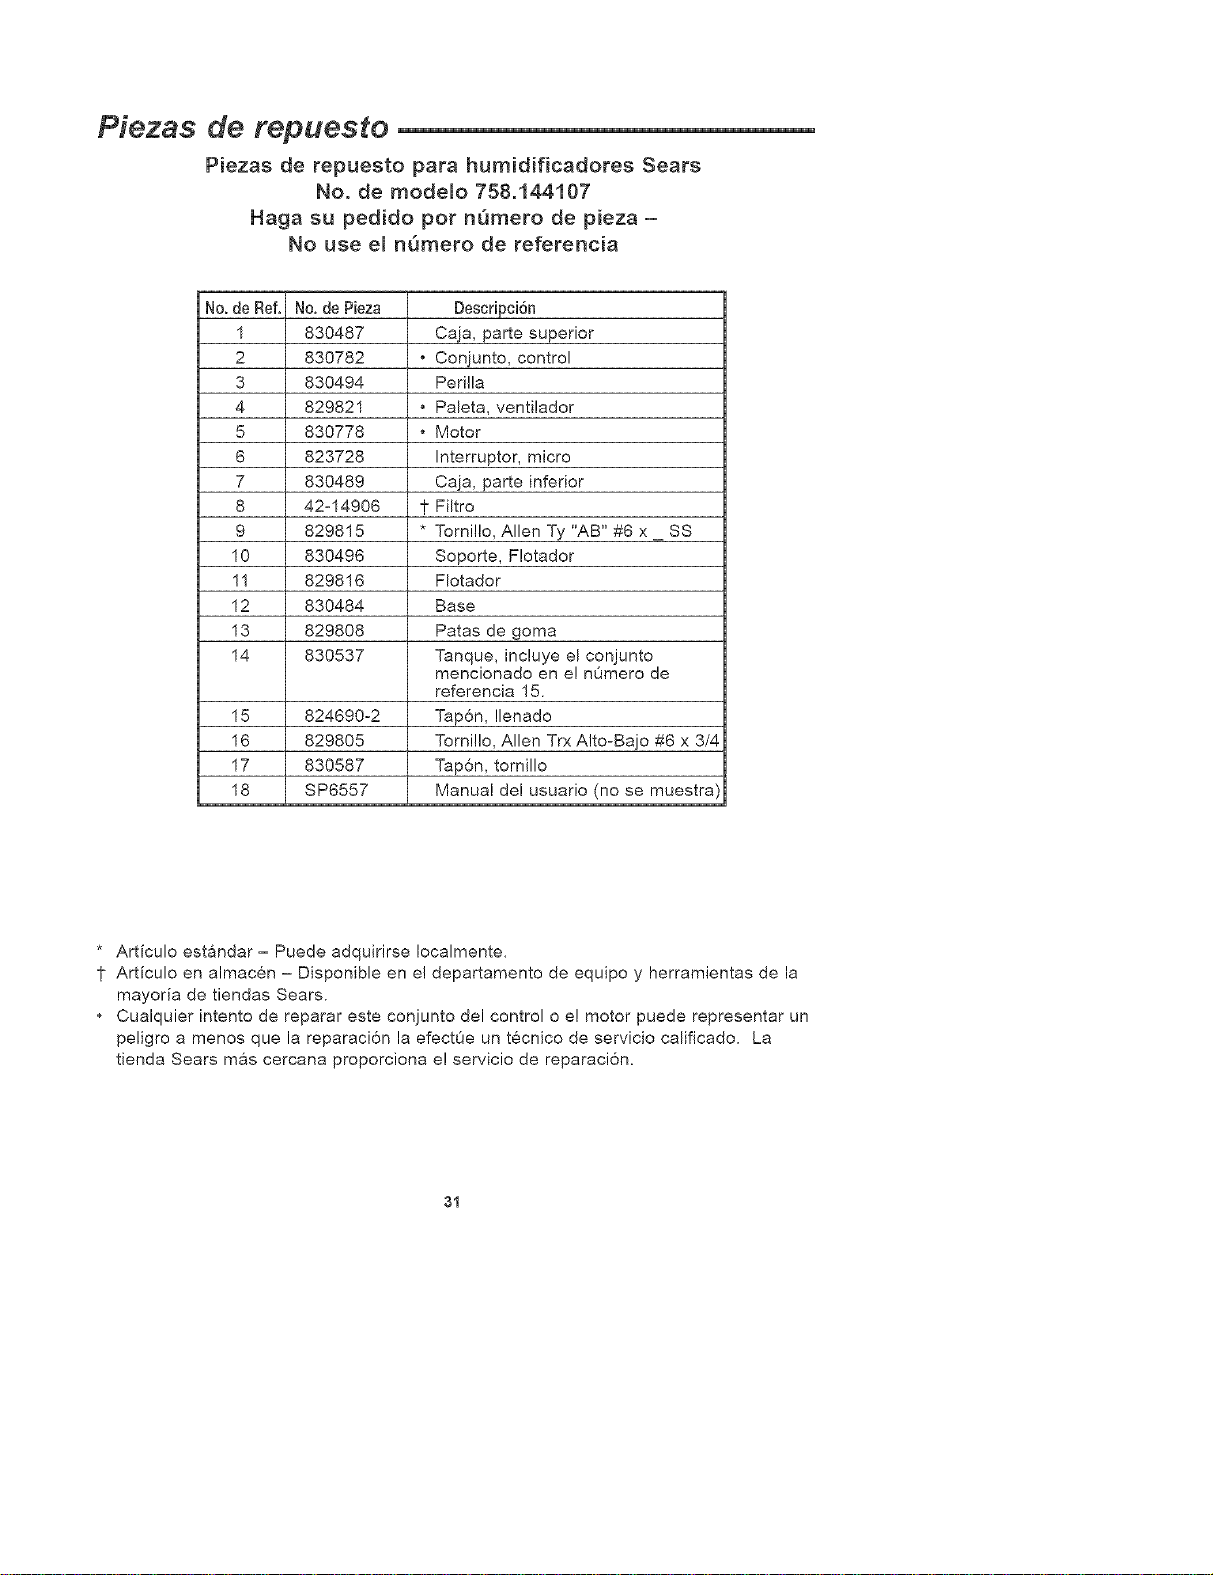
Piezas de repuesto
Piezas de repuesto para humidificadores Sears
No. de modelo 758,144107
Haga su pedido pot nQmero de pieza -
No use el nQmero de referencia
No. de Ref. No. de Pieza Descripcidn
1 830487 Caja, parte superior
2 830782 * Conjunto, control
3 830494 Perilla
4 829821 * Paleta, ventilador
5 830778 * Motor
6 823728 Interruptor, micro
7 830489 Caja, parte inferior
8 42°14906 i" Filtro
9 829815 * Tornillo, Allen Ty "AB" #6 x _ SS
10 830496 Soporte, F!otador
11 829816 FIotador
12 830484 Base
13 829808 Patas de goma
14 830537 Tanque, incluye el conjunto
mencionado en e! nOmero de
referencia 15.
15 824690-2 Tap6n, Ilenado
16 829805 Tornillo, Allen Trx Alto-Bajo #6 x 3/4
17 830587 Tap6n, tornillo
18 SP6557 Manual del usuario (no se muestra
* Articulo estandar - Puede adquirirse Iocalmente.
1" Articulo en almacen - Disponible en e! departamento de equipo y herramientas de la
mayoria de tiendas Sears.
* Cualquier intento de reparar este conjunto del control o e! motor puede representar un
peEigro a menos que la reparacion la efectOe un tecnico de servicio calificado. La
tienda Sears m&s cercana proporciona e! servicio de reparacion.
3t

Your Home
For repair-in your home-of all major brand appliances,
lawn and garden equipment, or heating and cooling systems,
no matter who made it, no matter who sold it!
For the replacement parts, accessories and
owner's manuals that you need to do-it-yourself.
For Sears professional installation of home appliances
and items like garage door openers and water heaters.
1-800-4-MY-HOME ® (1-800-469-4663)
Call anytime, day or night(U.S.A, and Canada)
www.sears,com www.sears.ca
Our Home
For repair of carry-in items like vacuums, lawn equipment,
and electronics, call or go on-line for the location of your nearest
Sears Parts & Repair Center.
1-800-488-1222
Call anytime, day or night (U.S.A. only)
www.sears.com
To purchase a protection agreement (U.S.A.)
or maintenance agreement (Canada) on a product serviced by Sears:
1-800-827-6655 (U.S.A.) 1-800-361-6665 (Canada)
Para pedir servicio de reparaci6n
a domicilio, y para ordenar piezas:
1-888-SU-HOGAR _
(1-888-784-6427)
Au Canada pour service en fran_ais:
1-800-LE-FOYER M°
(1-800-533-6937)
www.sears.ca
6E/.4RS
iiiiiiiiiiiiiiiiiiii
TM SM
_b Registered Trademark / Trademark / , Service Mark of Sears, Roebuck and Co
TM Sty'
Q Marca Registrada / Marca de Fabrica / Marca de Servicio de Sears, Roebuck and Co
_4c MD
Marque de commerce / ' Marque deposee de Sears Roebuck and Co © Sears Roebuck and Co
Part No. SP6557 Form No. SP6557 Printed in Canada 10/04