f
READ AND
SAVE THESE
INSTRUCTIONS
SF_AIRS
Stock No.
42-14410
Modem No,
758.144108
FOR YOUFt
READ
ALL RNSTFIUCTIONS
CAREFULLY
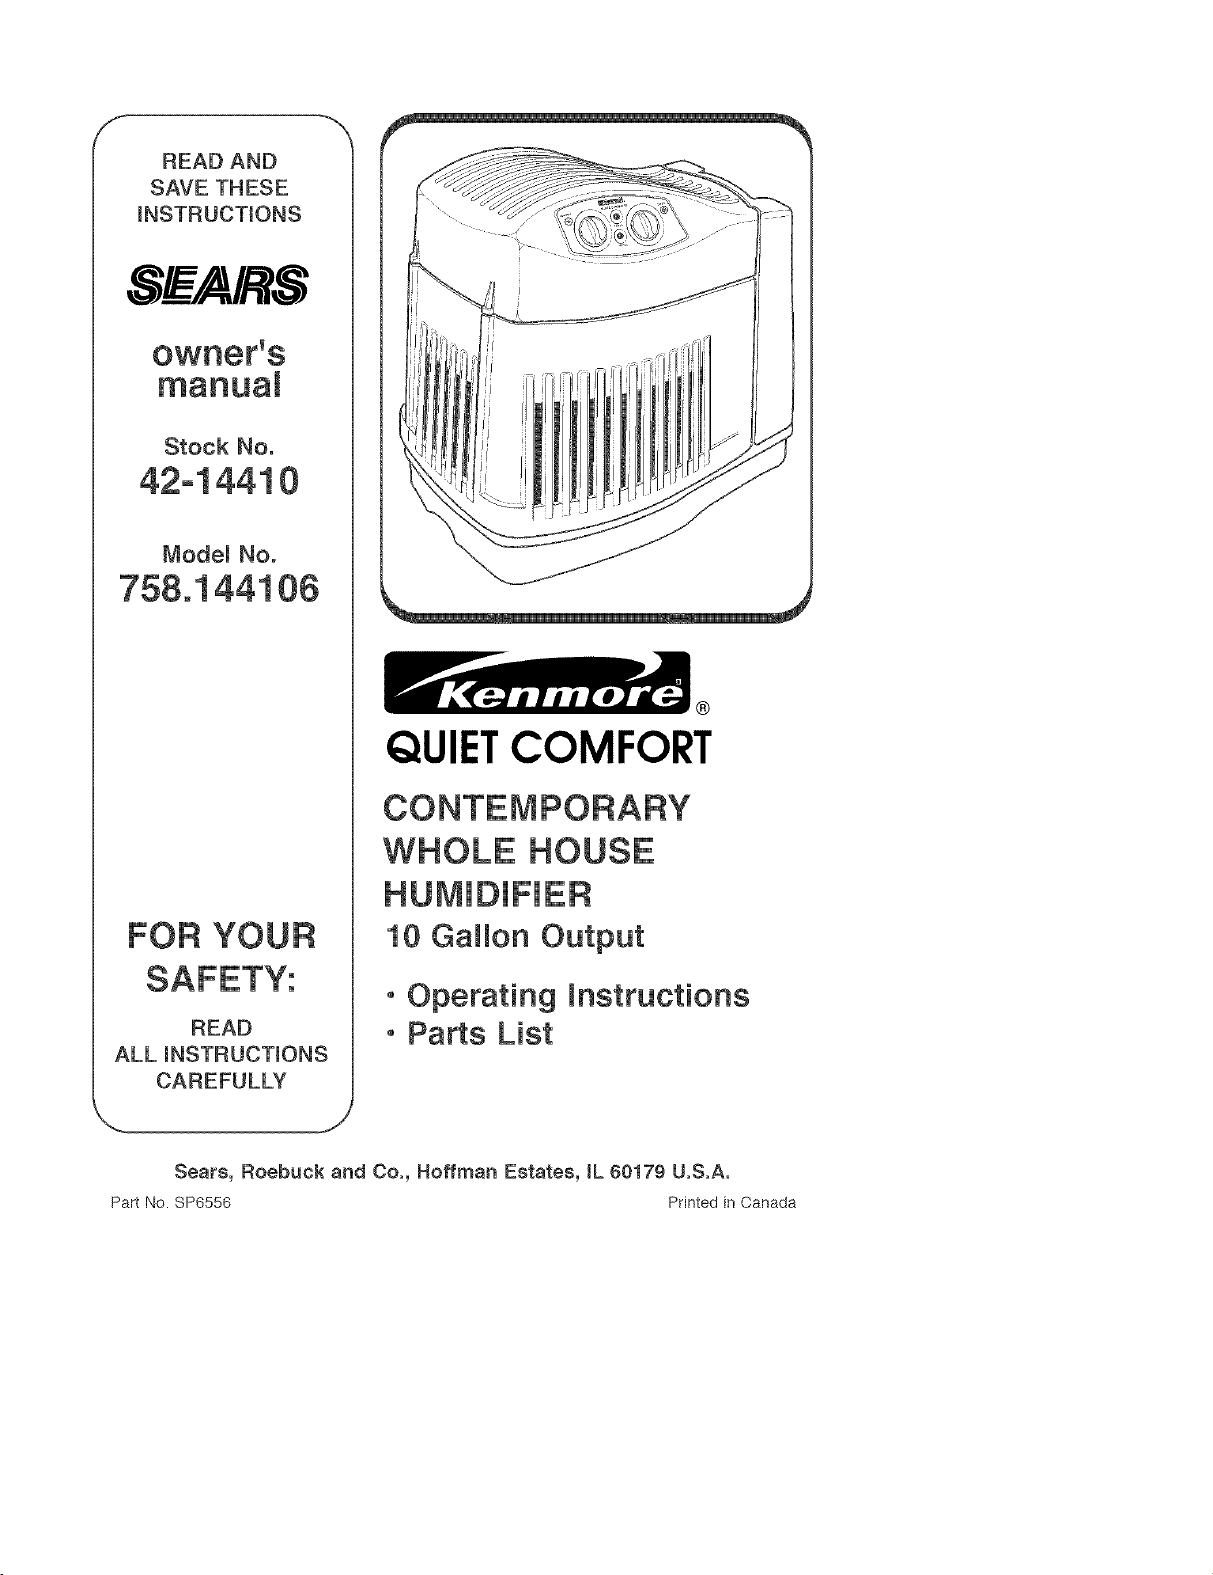
QUIETCOMFORT
WHOLE HOUSE
HUMiDiFiER
t0 Gallon Output
, Operating instructions
, Parts List
Sears, Roebuck and Co., Hoffman Estates, tL 60179 U.S.A.
Part No. $PG556 Printedin Canada
FULL ONE YEAR WARRANTY ON HUMIDmFmER "_
if within one (1) year from the date of purchase, this humidifier fails due to a defect in
material or workmanship, Sears will repair it, free of charge, if within two (2} years from
the date of purchase, the motor fails due to defect in material or workmanship, Sears
witl repair it free of charge.
This warranty service is available by simply returning the humidifier to the nearest Sears
Store, and it will be repaired or replaced, at Sears option, free of charge.
This warranty applies only while this product is used in the United States.
This warranty gives you specific _ega/rights, and you may also have other rights which
ry from state to state.
Sears, Roebuck a_tates, tL 60179
GENERAL SAFETY
Safety Signal Words 5.
DANGER: means if the safety information is
not followed, someone will be seriously 6.
injured or killed.
WARNING: means if the safety information is
not followed, someone could be seriously 7.
injured or killed.
CAUTION: means if the safety informationis 8.
not followed, someone may be seriously
injured or killed.
1. To reduce the riskof fire orshock hazard,plug 9.
humidifierdirectly into a 120V,A.C. electrical
outlet. Do not use extension cords.
2. Keep the electric cord out of traffic areas. To
reduce the riskof fire hazard, never put the
electric cord under rugs, near heat regis-
ters, radiators, stoves or heaters.
3. Always unplug the humidifier before mov-
ing it, before cleaning, or whenever the
humidifier is not in service.
4. Keep the humidifier dean.
iNSTRUCTiONS
Do not put foreign objects inside the
humidifier.
Do not allow to be used as a toy. Close
attention is necessary when used by or
near children.
Never use your humidifier while any part
is missing or damaged in any manner.
To reduce the risk of electrical hazard or
damage to humidifier, do not tilt, jolt or tip
humidifier while unit is running.
To reduce the risk of damage to humidifier,
unplug humidifier, when the base is empty
or when the humidifier is not in use.
10.To reduce the risk of accidental electrical
shock, do not touch the cord or controls
with wet hands.
11.Note the warning !abel shown below.
WARNmNG: To reduce risk of fire, elec=
trie shock, or injury always unptug
before fiIHng, servicing or cleaning.
Table of Contents
Warranty Information .................................. 2
General Safety instructions ........................ 2
To Save A Service Call ............................... 2
Know Your Humidifier ................................. 3
Humidifier Operations ................................ 4
Assembly .................................................... 4
Location Instructions .................................. 5
Electrical Hook-Up ...................................... 5
Water Fill .................................................. 6-7
Operating Humidifier Controls ................... 7
Using Your Humidifier ................................. 8
Operating Tips for Best Performance ......... 8
Replacement and Care of Filters ........... 9-10
Cleaning Your Humidifier ..................... 11-12
Troubleshooting ....................................... 13
Repair Parts ......................................... 14-15
To Save a Service Call --
Check the following if your humidifier is 3. Is airflow control in operating position?
not operating. 4. Is humidity control set high enough?
1. Is power cord attached to outlet? 5. Is the humdifier sitting on a level sur-
2. Is there electrical power to outlet? face?
2

Know Your Humidifier
Bottle HandRe
_ Speed Control
Description
Gallon Output/24 hrs
Capacity of Bottle
Capacity of Base
Sq. Ft. Coverage
Fan Speeds
Replacement Filter
Power Light
FHILight
Auto Humidistat
42-14410
10
1.9 Gallons
2.0 Gallons
2100
3
42=14906
Yes
Yes
Yes
Auto Shut Off
Controls
CUL Listed
Volts
Hertz
Amps
Watts
Yes
Rotary
Yes
120 A.C.
6O
0.80
8O
Based on an area with average insulation
and an 8 foot ceiling height.
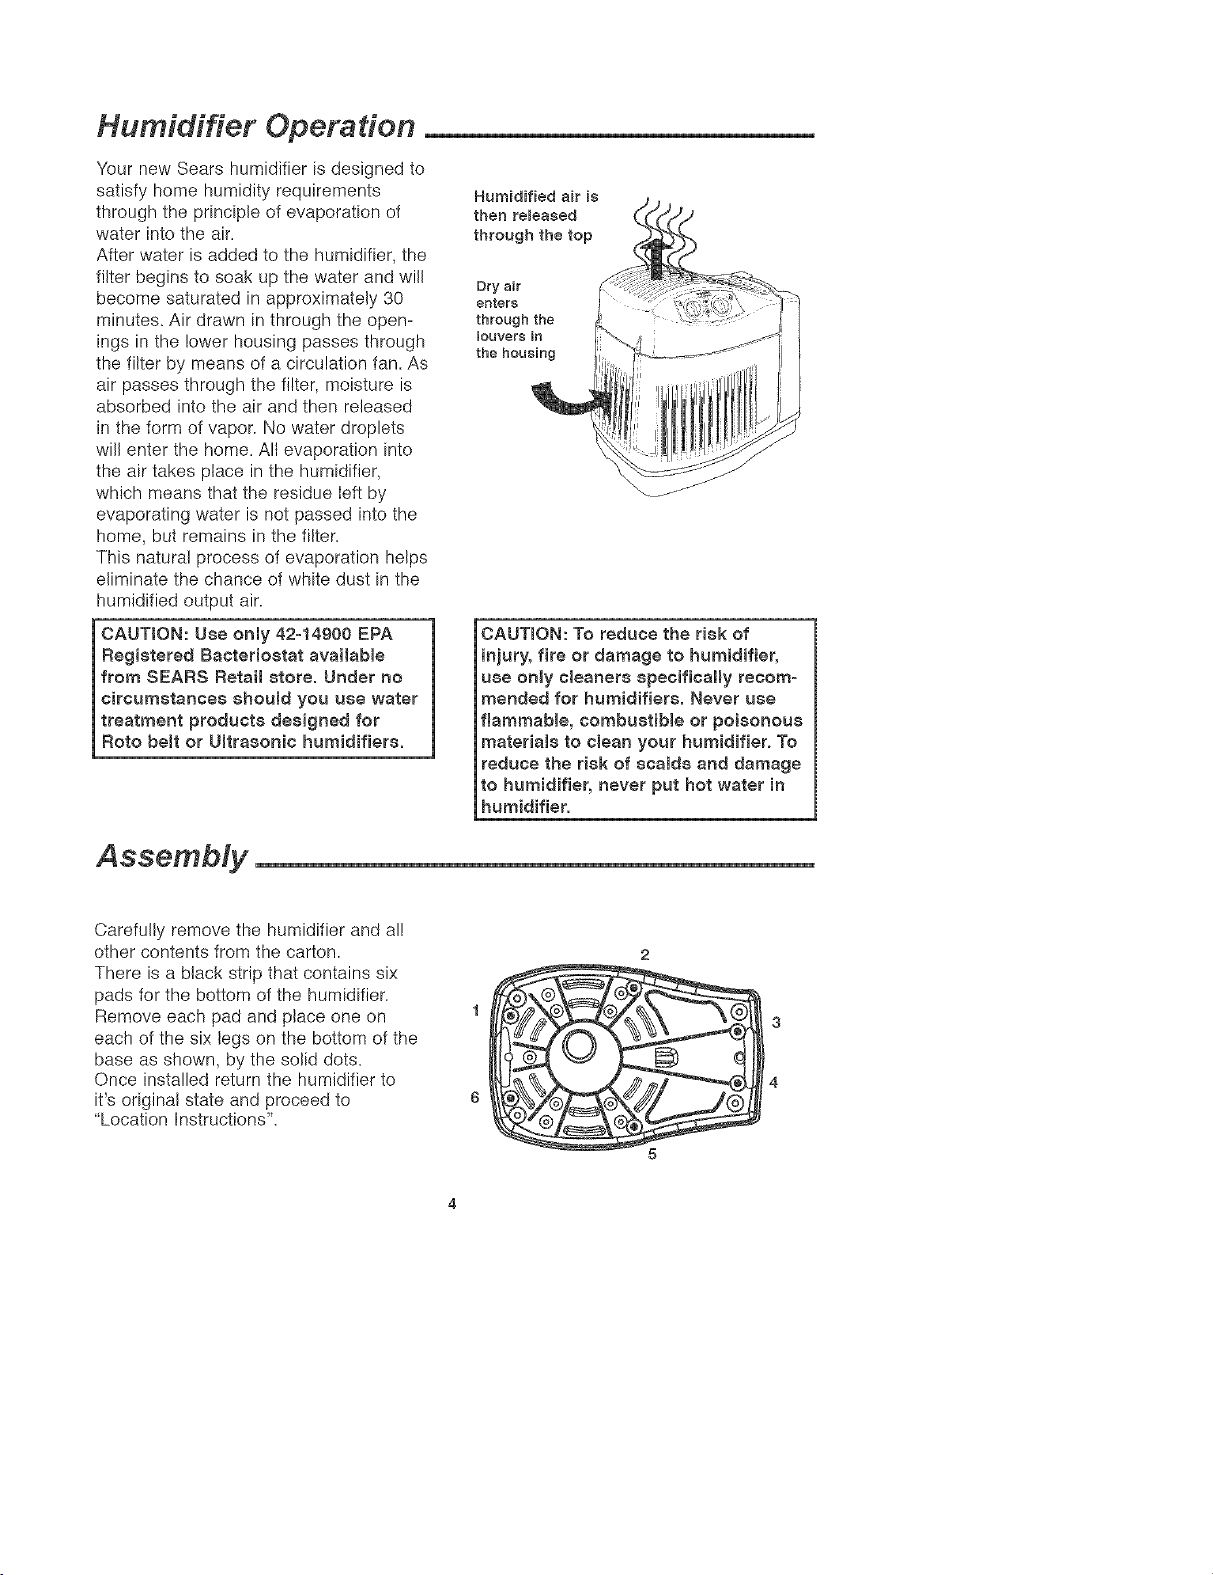
Humidifier Operation
Your new Sears humidifier is designed to
satisfy home humidity requirements
through the principle of evaporation of
water into the air.
After water is added to the humidifier, the
filter begins to soak up the water and will
become saturated in approximately 30
minutes. Air drawn in through the open-
ings in the lower housing passes through
the filter by means of a circulation fan. As
air passes through the filter, moisture is
absorbed into the air and then released
in the form of vapor. No water droplets
will enter the home. All evaporation into
the air takes place in the humidifier,
which means that the residue left by
evaporating water is not passed into the
home, but remains in the filter.
This natural process of evaporation helps
eliminate the chance of white dust in the
humidified output air.
CAUTION: Use only 42-14900 EPA
Registered Baeteriostat available
from SEARS Retait store. Under no
circumstances should you use water
treatment products designed for
Rote beretor Ultrasonic humidifiers.
Humidified air is
then released
through the top
Dry sir
enters
through the
louvers in
the housing
CAUTmON: To reduce the risk of
injury_ fire or damage to humidifier,
use only cleaners specifically recom-
mended for humidifiers. Never use
flammable, combustible or poisonous
materials to s_ean your humidifier. To
reduce the risk of saamds and damage
to humidifier, never put hot water in
humidifier.
Assembly
Carefully remove the humidifier and al!
other contents from the carton.
There is a black strip that contains six
pads for the bottom of the humidifier.
Remove each pad and place one on
each of the six legs on the bottom of the
base as shown, by the solid dots.
Once installed return the humidifier to
it's original state and proceed to
"Location Instructions".
3
4
5
Location instrucdons --
WARNING: For your own safety, do
not use humidifier if any parts are
damaged or miseing,
Step 1
Place humidifier on a fiat level surface in
an area of house where most humidity is
needed, or one which would likely result
in moist air being circulated throughout the
house such as near a cold air return.
Placing the unit level is very important.
Special attention should be given to
unit's level if the humidifier is located on
carpeting.
Moist air (humidity) produced will disperse
into the whole house, but the area closest
to the unit will have the highest humidity. If
the unit is positioned close to a window,
condensation may form on the window
pane. if this is not appropriate the unit
should be repositioned in another location.
NOTE: Due to release of cool, moist air
from humidifier, it is best to direct air away
from home thermostat and hot air
registers. It is best to position humidifier
next to an inside wall. Hot air registers and
cold air from outside walls can affect the
efficiencies of the controls. Unit should not
be placed where warm air from a hot air
register blows directly on unit.
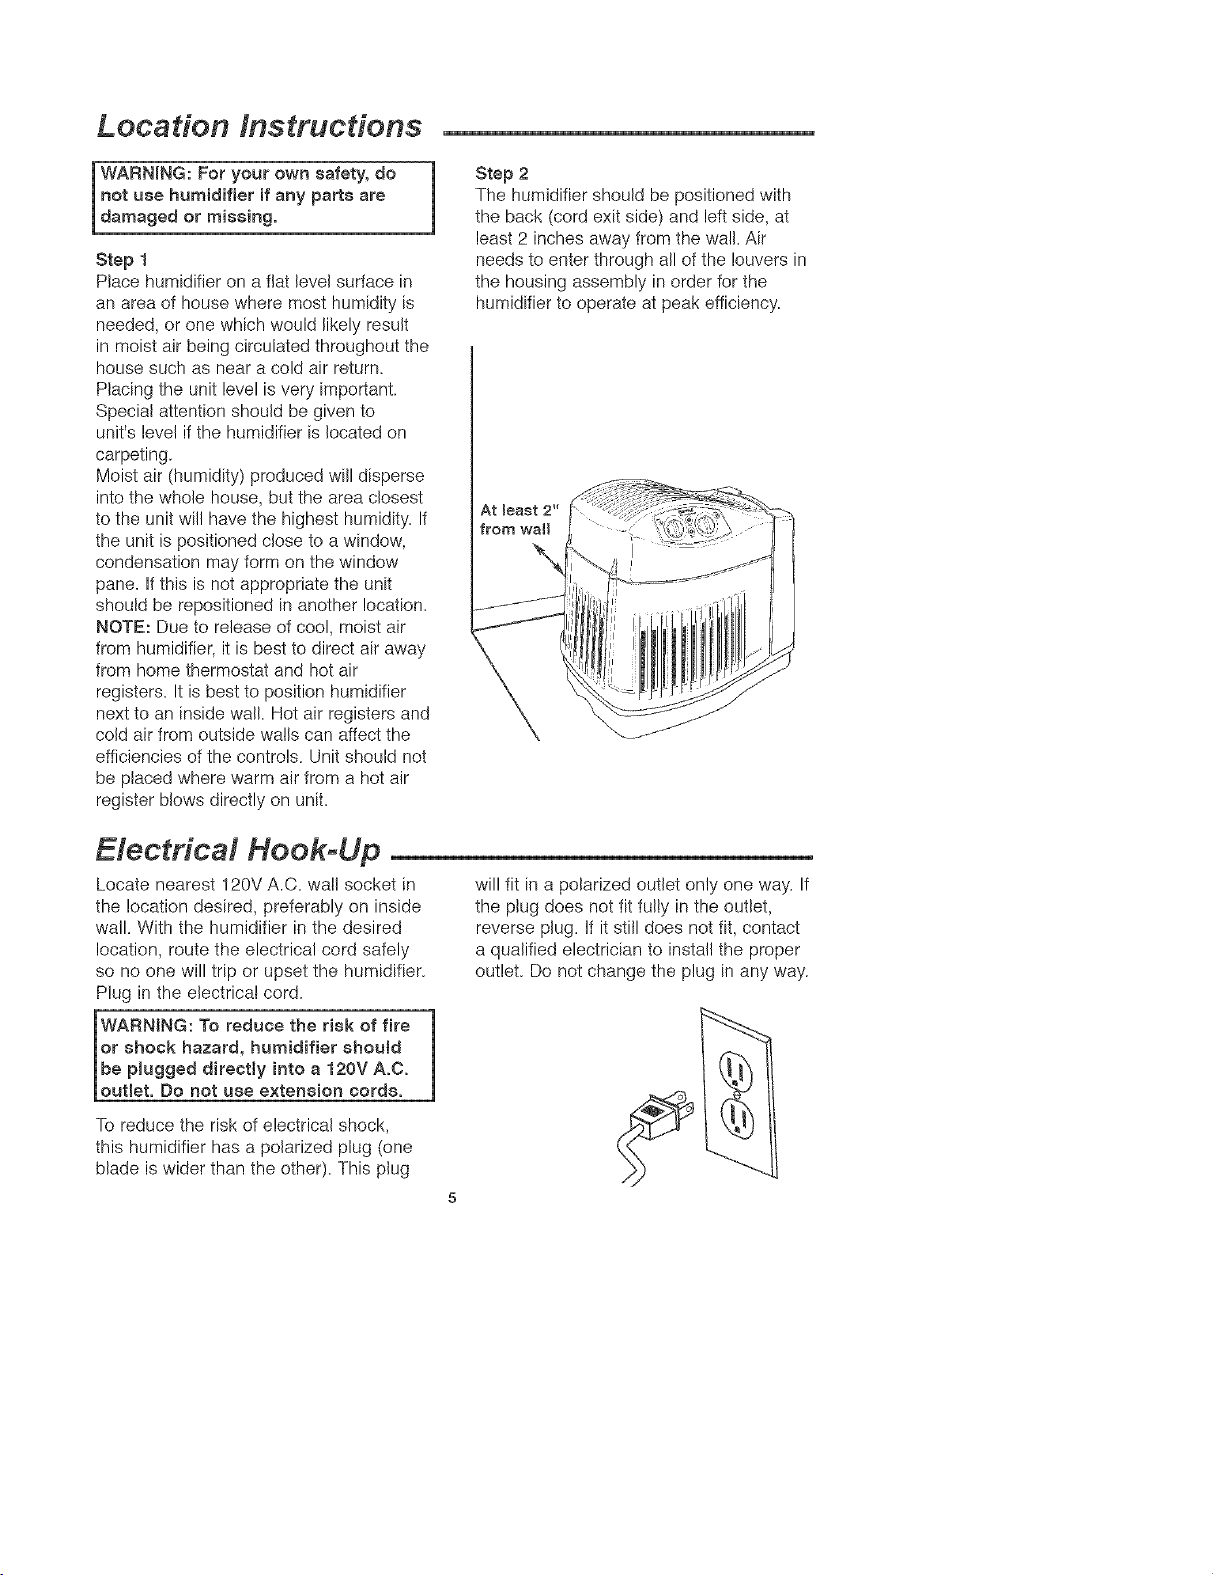
Step 2
The humidifier should be positioned with
the back (cord exit side) and left side, at
least 2 inches away from the wall. Air
needs to enter through all of the louvers in
the housing assembly in order for the
humidifier to operate at peak efficiency.
At least 2"
from wall
Electrical Hook-Up
Locate nearest 120V A.C. wall socket in
the location desired, preferably on inside
wall. With the humidifier in the desired
location, route the electrical cord safely
so no one will trip or upset the humidifier.
Plug in the electrica! cord.
WARNING: To reduce the rick of fire
or chock hazard, humidifier shoutd
be pmugged directJy into a 120V A.C.
out_et, Do not use extension eorde.
To reduce the risk of electrical shock,
this humidifier has a polarized plug (one
blade is wider than the other). This plug
1
will fit in a polarized outlet only one way. If
the plug does not fit fully in the outlet,
reverse plug. If it still does not fit, contact
a qualified electrician to instal! the proper
outlet. Do not change the plug in any way.
Water Fill
WARNmNG: To reduce the risk of
shock, always unplug humidifier
before cleaning or servicing,
WARNING: To reduce the risk of fire
or shock hazard, do not pour or spilt
water into control or motor area.
if controls get wet, let them dry com-
pletely and have unit checked by
authorized service personnel before
plugging in.
This humidifier is designed for use with
the water bottle located to the right of the
upper grill. The water bottle holds 1.9 gaF
Ions of water. The humidifier should be
positioned where it will be operating.
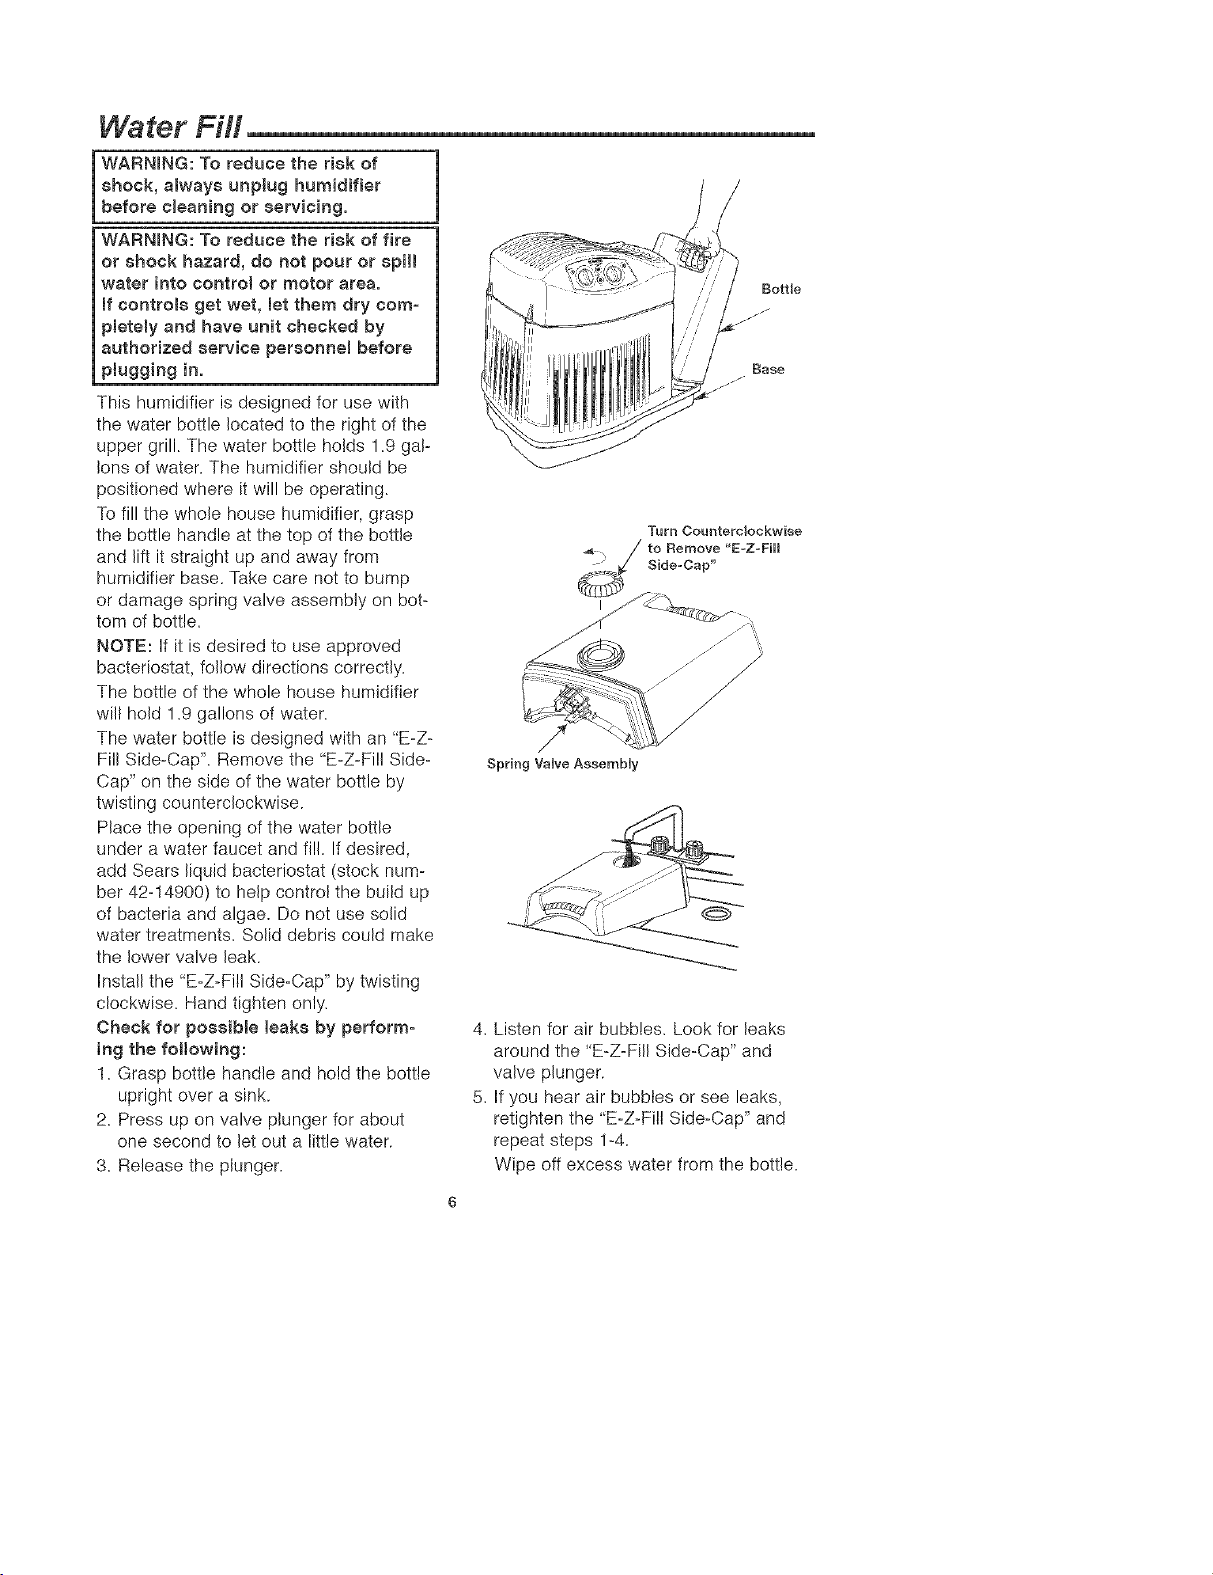
To fill the whole house humidifier, grasp
the bottle handle at the top of the bottle
and lift it straight up and away from
humidifier base. Take care not to bump
or damage spring valve assembly on bot-
tom of bottle.
NOTE: If it is desired to use approved
bacteriostat, follow directions correctly.
The bottle of the whole house humidifier
wilt hold 1_9gallons of water.
The water bottle is designed with an "E-Z-
Fill Side-Cap'. Remove the "E-Z-Fi!I Side-
Cap" on the side of the water bottle by
twisting counterclockwise.
Place the opening of the water bottle
under a water faucet and fill. If desired,
add Sears liquid bacteriostat (stock num-
ber 42=14900) to help control the build up
of bacteria and algae. Do not use solid
water treatments. Solid debris could make
the lower valve leak.
install the "E-Z-Fill Side=Cap" by twisting
clockwise. Hand tighten only.
Check for possible leaks by perform°
ing the following:
1. Grasp bottle handle and hold the bottle
upright over a sink.
2. Press up on valve plunger for about
one second to let out a little water.
3. Release the plunger.
/
/
B_se
Turn Cou_ltercBockwise
/ to Remove "E-Z_FiH
/
i
/
Spring VaUveAssemMy
4. Listen for air bubbles. Look for leaks
around the "E=Z-Fill Side-Cap" and
valve plunger.
5. If you hear air bubbles or see leaks,
retighten the "E-Z-Fill Side-Cap" and
repeat steps 1-4.
Wipe off excess water from the bottle.

Positionthewaterbottlebackintothe
humidifierbasetotherightofthegrille.
The"E-Z=FillSide=Cap"mustbefacing
outward.Whenpositionedproperly,the
plungerwillopenandwaterwillflowinto
thebase.Thebasewillholdtheentire
contentsofthewaterbottle.Allowupto
oneminuteforthewatertoflowintothe
base.Oncethebottleisempty,removeit
andrefillitasmentionedearlier.Returnit
totherightsideofthegrille.Thehumidifi-
erisnowfilledtocapacity.
Thewaterbottlemaybefilledatanytime
asnecessaryduringoperation.Tobenefit
fromlessfrequentfillingletthehumidifier
exhaustboththewaterfromthebottle
andbasebeforefilling.
Theunitisnowreadyforoperation.
Operating Humidifier Controls
The operating controls of your Kenmore
Quiet Comfort whole house humidifier are
located towards the front of the humidifier.
Familiarize yourself with the controls.
Reference the diagram of the control area
for the correct nomenclature used in this
manual.
To Operate the Controls
Power Light
When the unit is plugged in and turned
on, the red power light will come on. It
wil! stay on until the unit is turned off ( _ )
or unplugged.
Humidity Controh
Adjust the amount of
humidity depending on your needs. The
humidifier will turn on and off as required
to maintain level of humidity selected= A
medium setting (half way between the
controls rotation) is recommended, but
there are times when low or high amount
of humidity may be preferred. For con-
stant operation of humidifier, rotating the
contro! all the way clockwise allows for
the maximum amount of humidity to be
evaporated into the air continuously.
IMPORTANT: Water damage may
result if condensation starts to form
on windows or waBts, Humidity Control
setting shoumdbe Bowered untit
condensation no monger forms,
Speed Control O
This humidifier has a three speed fan con-
trol switch. (,) =Low, (;) =Medium and
( _) - High). The maximum humidity out-
put is obtained with the fan control on
high ( _).
The higher the air flow speed, the more
water is evaporated and released into the
air. Low speed (,) is the quietest and is
also provided for conditions that may not
require as high an evaporation rate.
Refill Light
When the unit has a small amount of
water left in it, the amber refill light will
come on and the unit will automatically
shut off.
Power Light
/ Off Position
Using Your Humidifier
Step 1
Be sure unit is full of water and plugged
in.
Step 2
Set the Speed Control to LOW ( +).
Step 3
Set Humidity Control to a medium position
(see diagram below)
NOTE: Humidifier should operate with
humidity control on the recommended
medium setting. If it does not, the humid]°
ty is at a relatively high [eve[. To test the
unit under this condition, turn Humidity
Controt art the way to clockwise and unit
should begin to operate. After the unit has
been tested, set Humidity Control to
medium or desired level.
Allow 24 hours for humidifier to adjust.
If humidity level in home is sufficient, the
humidifier will only operate with Humidity
Control set on maximum.
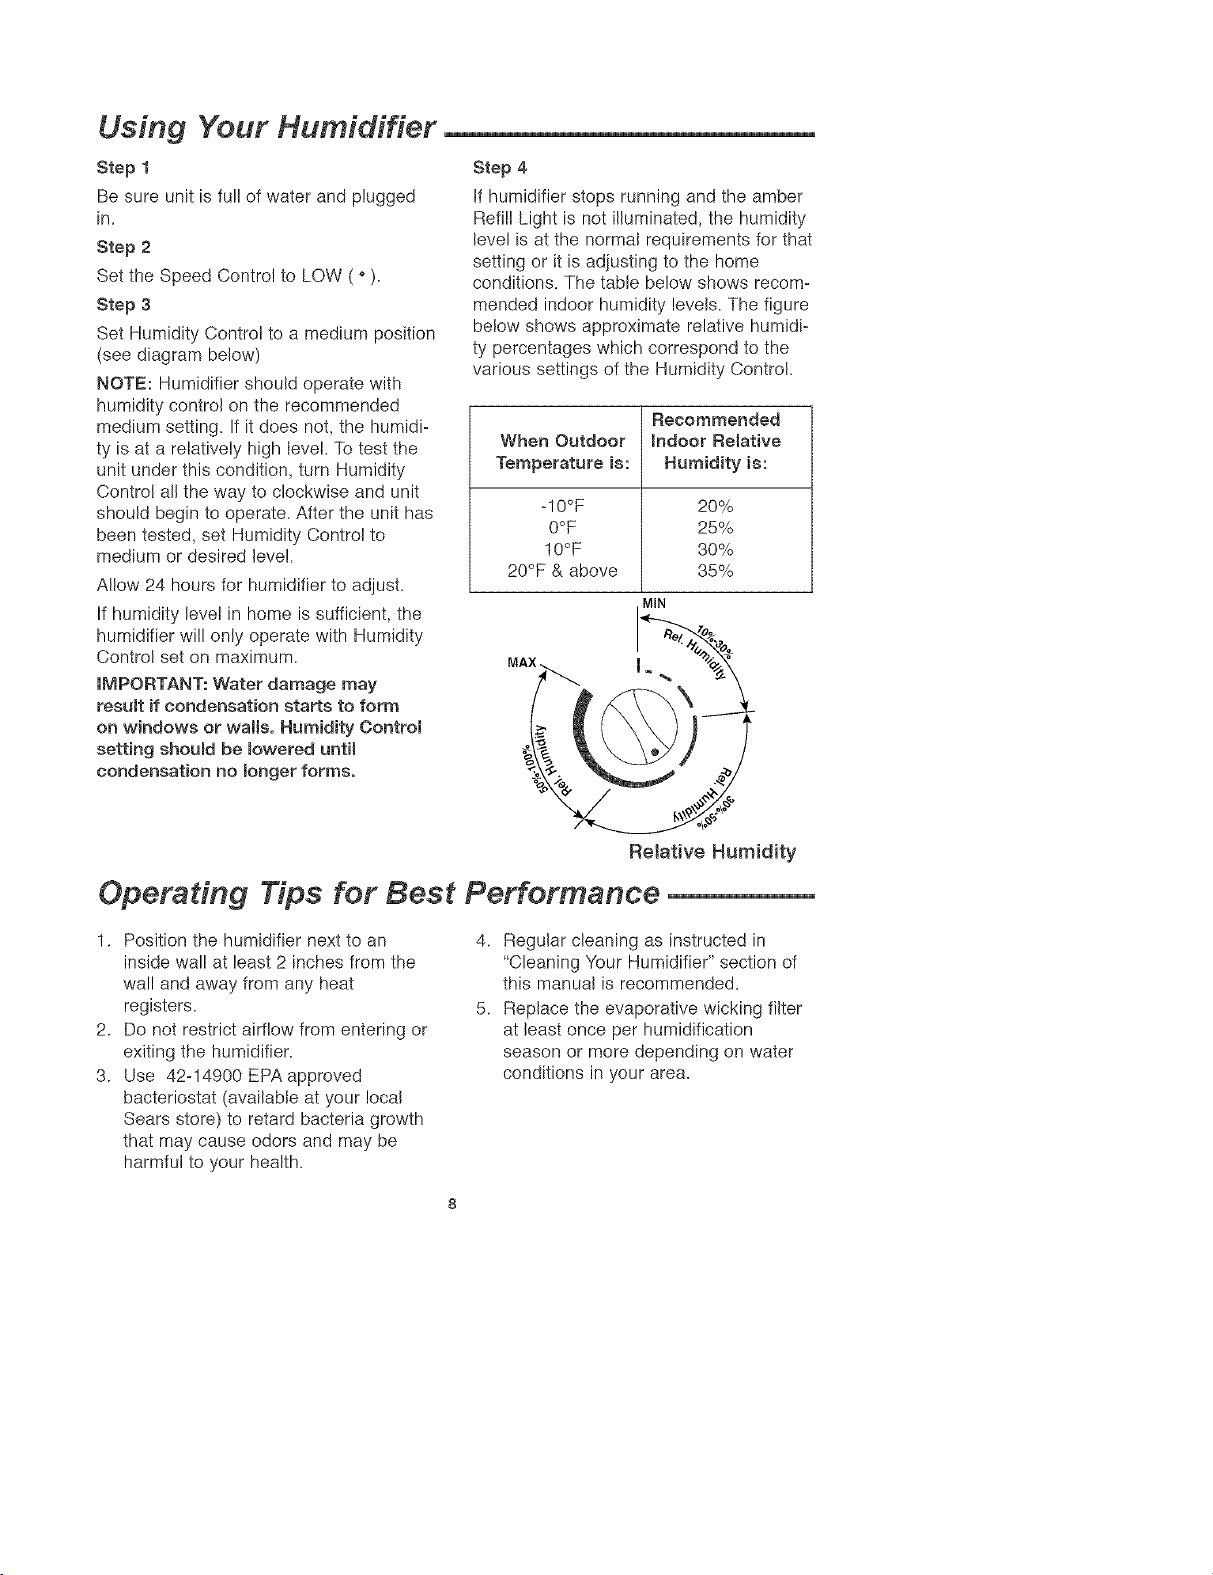
Step 4
If humidifier stops running and the amber
Refill Light is not illuminated, the humidity
level is at the normal requirements for that
setting or it is adjusting to the home
conditions. The table below shows recom-
mended indoor humidity levels. The figure
below shows approximate relative humidi-
ty percentages which correspond to the
various settings of the Humidity Control.
Recommended
When Outdoor Indoor Relative
Temperature is: Humidity is:
-10°F 20%
0°F 25%
10°F 30%
20°F & above 35%
MtN
IMPORTANT: Water damage may
result if condensation starts to form
on windows or walls. Humidity Control
setting shoumdbe Bowered until
condensation no monger forms.
Relative Humidity
Operating Tips for Best Performance
1. Position the humidifier next to an
inside wal! at least 2 inches from the
wall and away from any heat
registers.
2. Do not restrict airflow from entering or
exiting the humidifier.
3. Use 42-14900 EPA approved
bacteriostat (available at your local
Sears store) to retard bacteria growth
that may cause odors and may be
harmful to your health.
4. Regular cleaning as instructed in
+'Cleaning Your Humidifier" section of
this manual is recommended.
5. Replace the evaporative wicking filter
at least once per humidification
season or more depending on water
conditions in your area.
Replacement and Care of Filters
I WARNmNG: To reduce the risk of
shock or injury from moving parts,
always unplug humidifier before
removing or replacing any parts.
CAUTION: To help retard bacteria
growth and keep maximum efficien-
cy, the fitter should be reptaced at
[east once per season, or more often
under hard water conditions. Use
Sears recommended replacement
filter 42-14906.
To replace the filter in your humidifier,
follow the instructions below.
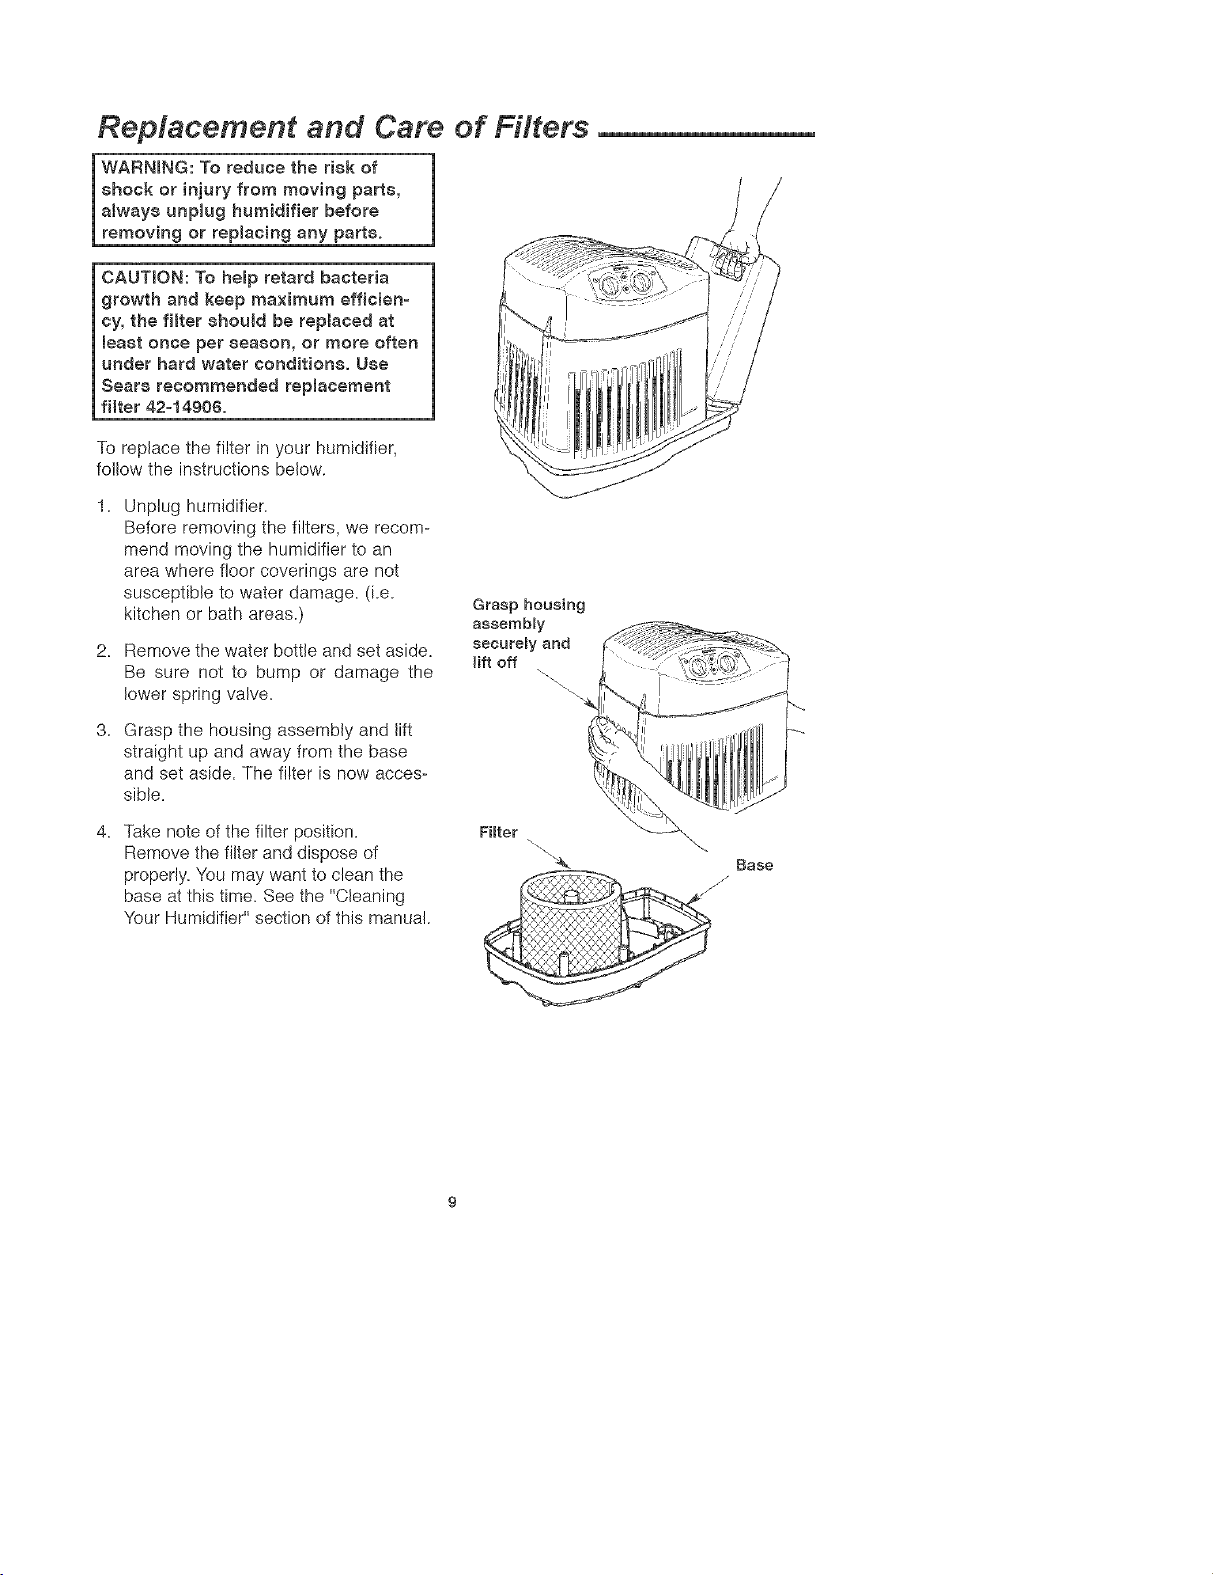
Unplug humidifier.
Before removing the filters, we recom-
mend moving the humidifier to an
area where floor coverings are not
susceptible to water damage. (i.e.
kitchen or bath areas.)
Remove the water bottle and set aside.
Be sure not to bump or damage the
lower spring valve.
Grasp the housing assembly and lift
straight up and away from the base
and set aside. The filter is now acces-
sible.
Grasp housing
assembly
securely and
lift off
4. Take note of the filter position.
Remove the filter and dispose of
properly. You may want to clean the
base at this time. See the "Cleaning
Your Humidifier" section of this manual.
Fiffer
Base
Replacement and Care of Filters (continued)
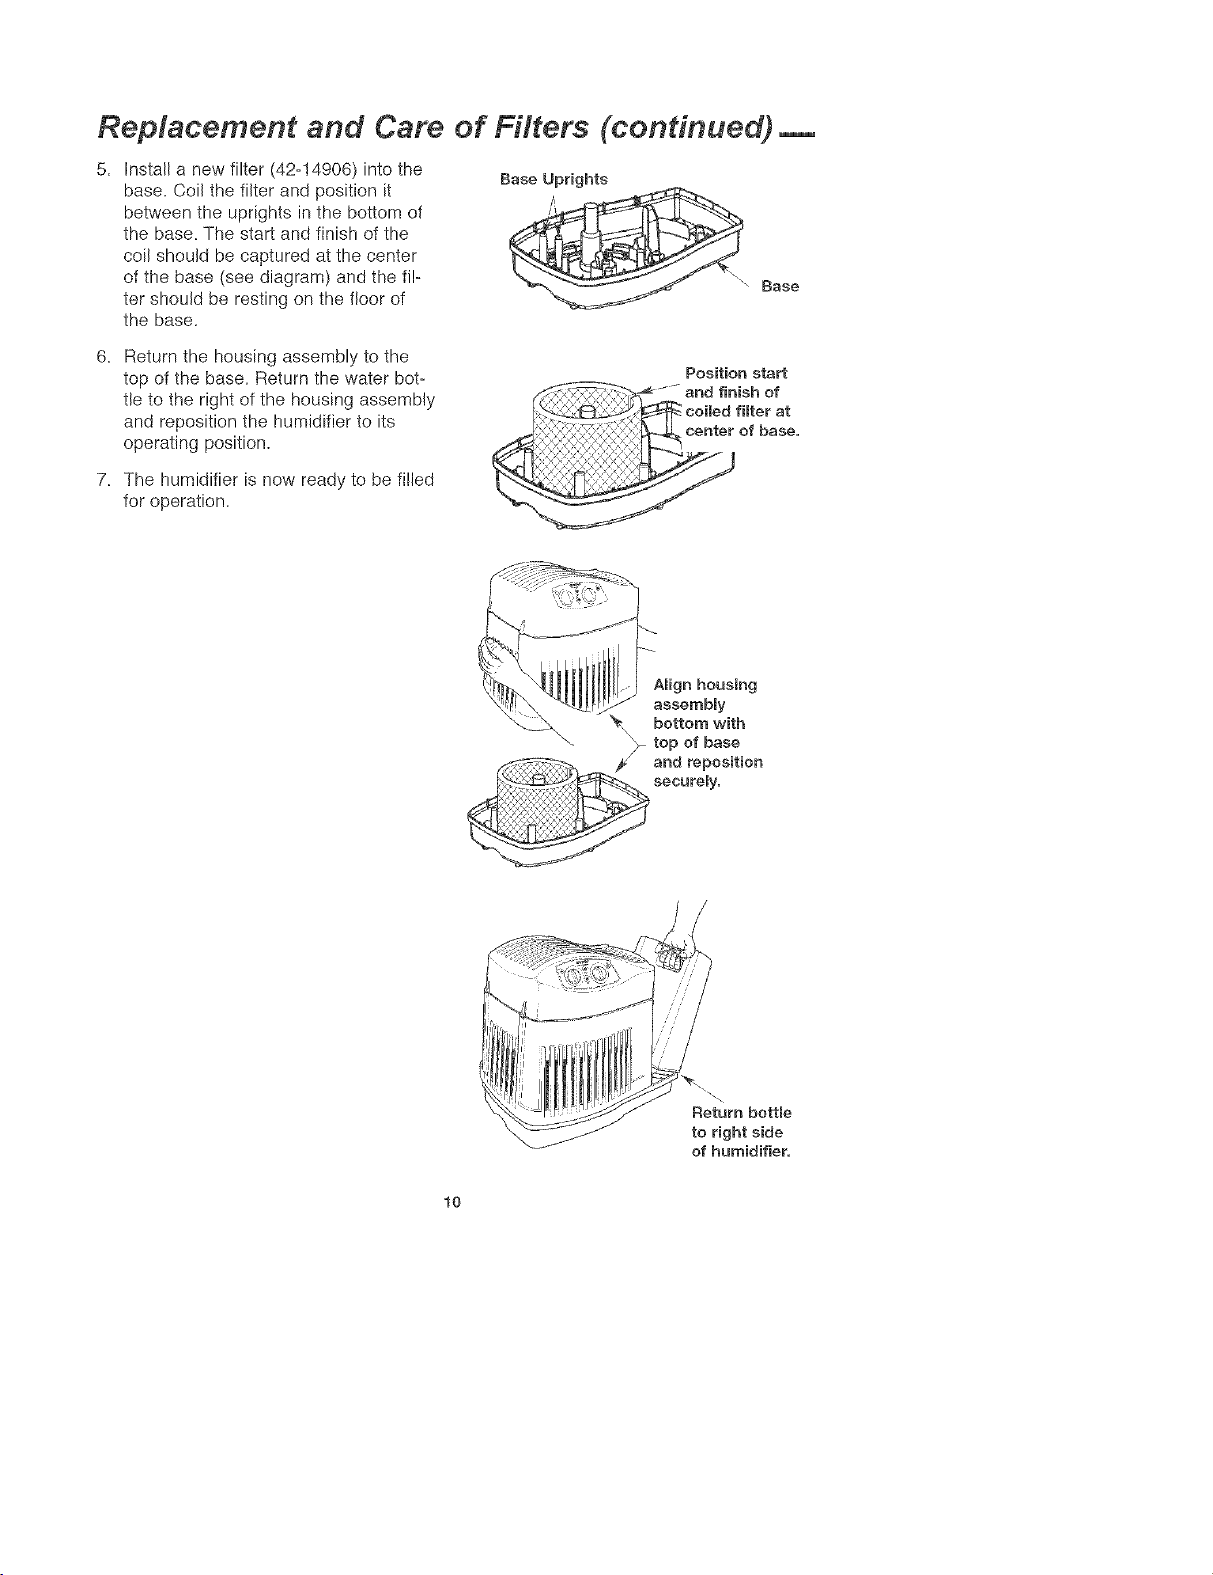
Install a new filter (42q4906) into the
base. Coil the filter and position it
between the uprights in the bottom of
the base_ The start and finish of the
coil should be captured at the center
of the base (see diagram) and the fi!-
ter should be resting on the floor of
the base.
Base Uprights
\
Base
Return the housing assembly to the
top of the base. Return the water bot-
tle to the right of the housing assembly
and reposition the humidifier to its
operating position.
Position start
7. The humidifier is now ready to be filled
for operation.
lO
Cleaning Your Humidifier
WARNING: To reduce the risk of
injury, fire or damage to humidifier,
use only cleaners specifically rec=
ommsnded for humidifiers. Never
use flammable, combustible or poi-
sonous materials to clean your
humidifier. To reduce the risk of
scalds and damage to humidifier,
never put hot water in humidifier.
CAUTmON: Loeamwater purity varies
from area to area and under certain
conditions water impurities and air=
borne bacteria may promote the
growth of microorganisms in the
reservoir of the humidifier.
To retard bacteria growth that may
cause odors and be harmful to your
health, use only Sears replacement
filters. We also recommend using
EPA approved bacteriostat, 42-14900
and humidifier cleaner 42-14713,
available at your local Sears store.
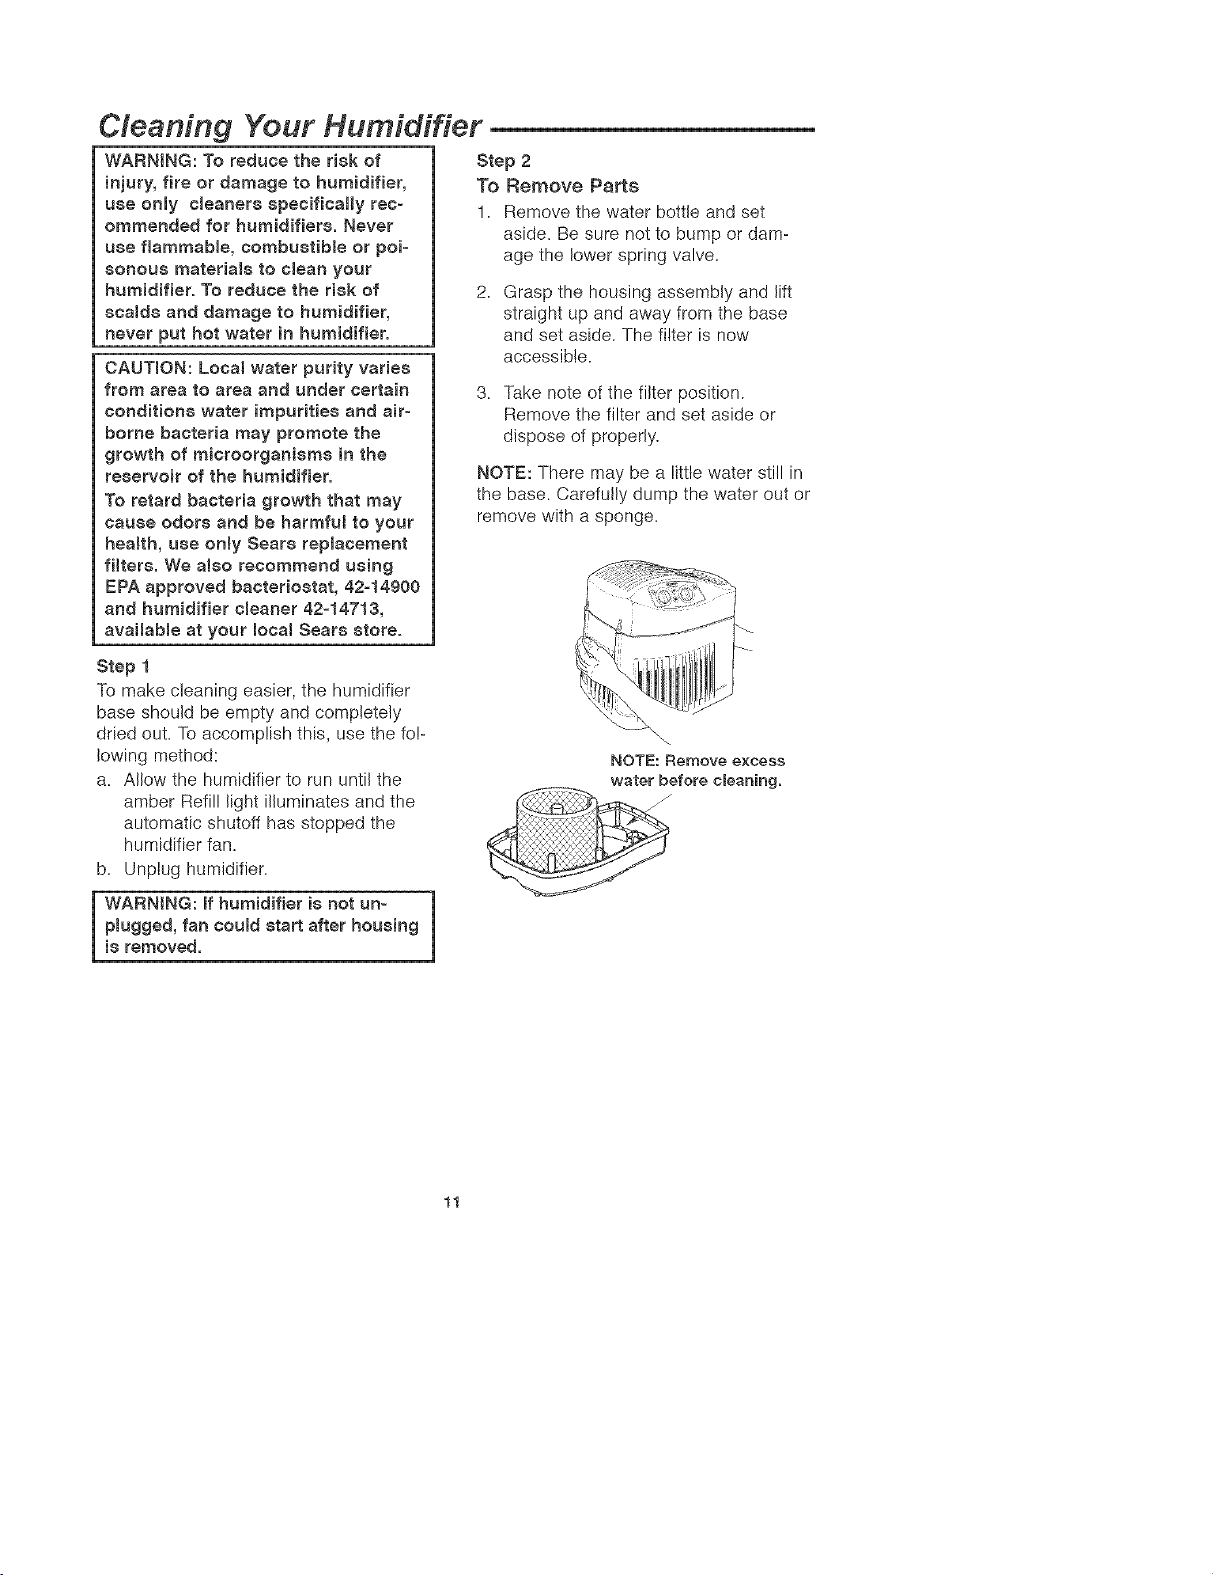
Step 2
To Remove Parts
1. Remove the water bottle and set
aside. Be sure not to bump or dam-
age the lower spring valve.
2,
Grasp the housing assembly and lift
straight up and away from the base
and set aside. The filter is now
accessible.
3. Take note sf the filter positisn.
Remove the filter and set aside or
dispose of properly.
NOTE: There may be a little water still in
the base. Carefully dump the water out or
remove with a sponge.
Step !
To make cleaning easier, the humidifier
base should be empty and completely
dried out. To accsmplish this, use the fol-
lowing method:
a. AIIsw the humidifier ts run until the
amber Refill light illuminates and ths
automatic shutoff has stopped the
humidifier fan.
b. Unplug humidifier.
i ARNING: if humidifier is not un- 1
pJugged, fan could start after housing
i8 removed.
NOTE: Remove excess
water before cleaning.
11

Cleaning of Humidifier (continued)
Stop 3
Bi-Weekty Maintenance
Removing Scale
1. Fili the humidifier base with one 8 oz.
cup of undiluted white vinegar. Let
solution stay 20 minutes.
2. Clean all interior surfaces with a soft
brush. Dampen a soft cloth with undi-
luted white vinegar and wipe out the
base to remove scale.
3. Rinse thoroughly with clean warm
water to remove scale and cleaning
solution.
Disinfecting Base
1. Pour 1 gallon of water and 1 teaspoon
chlorine bleach into the base. Let
solution stay for 20 minutes, carefully
swishing every few minutes. Wet all
surfaces normally exposed to water.
2. Empty base after 20 minutes. Rinse
with water until bleach smell is gone.
A!low unit to dry out completely.
NOTE: The water bottle should be
cleaned in the same manner as the base.
Rinse thoroughly with clean water after al!
steps are complete.
End of Season Maintenance
1. Follow "Bi-Weekly Maintenance"
instructions at end of humidification
season.
2. Remove filter and dispose of properly.
3. Let humidifier dry completely before
storing. Do not store with water inside
base or bottle.
4. Store in coo!, dry location.
5. Install a new filter in clean humidifier
before next season begins.
Note: "Bi-Weekly Maintenance" is
also recommended if you do not plan
to run the humidifier for one week or
more.
Position start
Step 4
Replacing Parts
1. Install a new filter (42-14906) or the
filter previously set aside if it is in
good condition into the base. Coil the
filter and position it between the
uprights in the bottom of the base.
The start and finish of the coil should
be captured in the centre of the base
(see diagram) and the filter should be
resting on the floor of the base.
2. Return the housing assembly to the
top of the base. Return the water bot-
tle to the right of the housing assem-
bly and reposition the humidifier to its
operating position.
3. The humidifier is now ready to be
filled for operation.
12

Troubleshooting
Trouble Probable Cauee Remedy
Power light not illuminated , No Power , Check 120 volt power
source.
, Speed control in off posi- , Turn speed control clock=
tion (See page 7.) wise.
Unit will not run and Fill , Selected humidity level , Raise humidistat setting
Light is not on. has been established.
Note: Red power light
is on.
Unit will not cycle on and
off.
, Humidity control turned al!
the way clockwise to
"Constant On" position.
• Desired humidity not
established.
, Humidifier under size for
requirements.
, Turn humidity control
counter clockwise until the
fan turns off.
, Allow up to 24 hours of run
time for unit to adjust.
• Designed to satisfy an
area up to 2100 sq. ft.
Unit will not shut off. , Float is not free. , Free float from obstruction.
Unit will not dry out , This is normal. , A small amount of water
completely, remains in the base after
the Refill Light comes on.
Bottle continues to empty. • Air is entering the bottle.
Unit is not emptying during
use.
, Dirty filter.
, Lower spring assembly on
bottle damaged or missing
post in bottom of base.
• Check "E-ZoFill Side-Cap"
and lower spring assembly
, Check for leak in water
bottle.
• Ensure gasket for "E-Z=Fill
Side-Cap" is in place.
, Change to a fresh new
filter.
, Check orientation of bottle.
Reposition so that lower
spring valve assembly is
depressed by post in
bottom of base.
CAUTION: Use only 42°14900 EPA Registered Bacterioetat available from Sears
Retail store.
Uee of other water treatment products may damage the filter component,
Under no cireumetancee should you uee water treatment produete deeigned for
Roto belt or UItraeonic humidifiere.
13

Repair Parts ,
Parts List for Sears Humidifier
Modem No. 758.144106
17 J_
5. 16
14
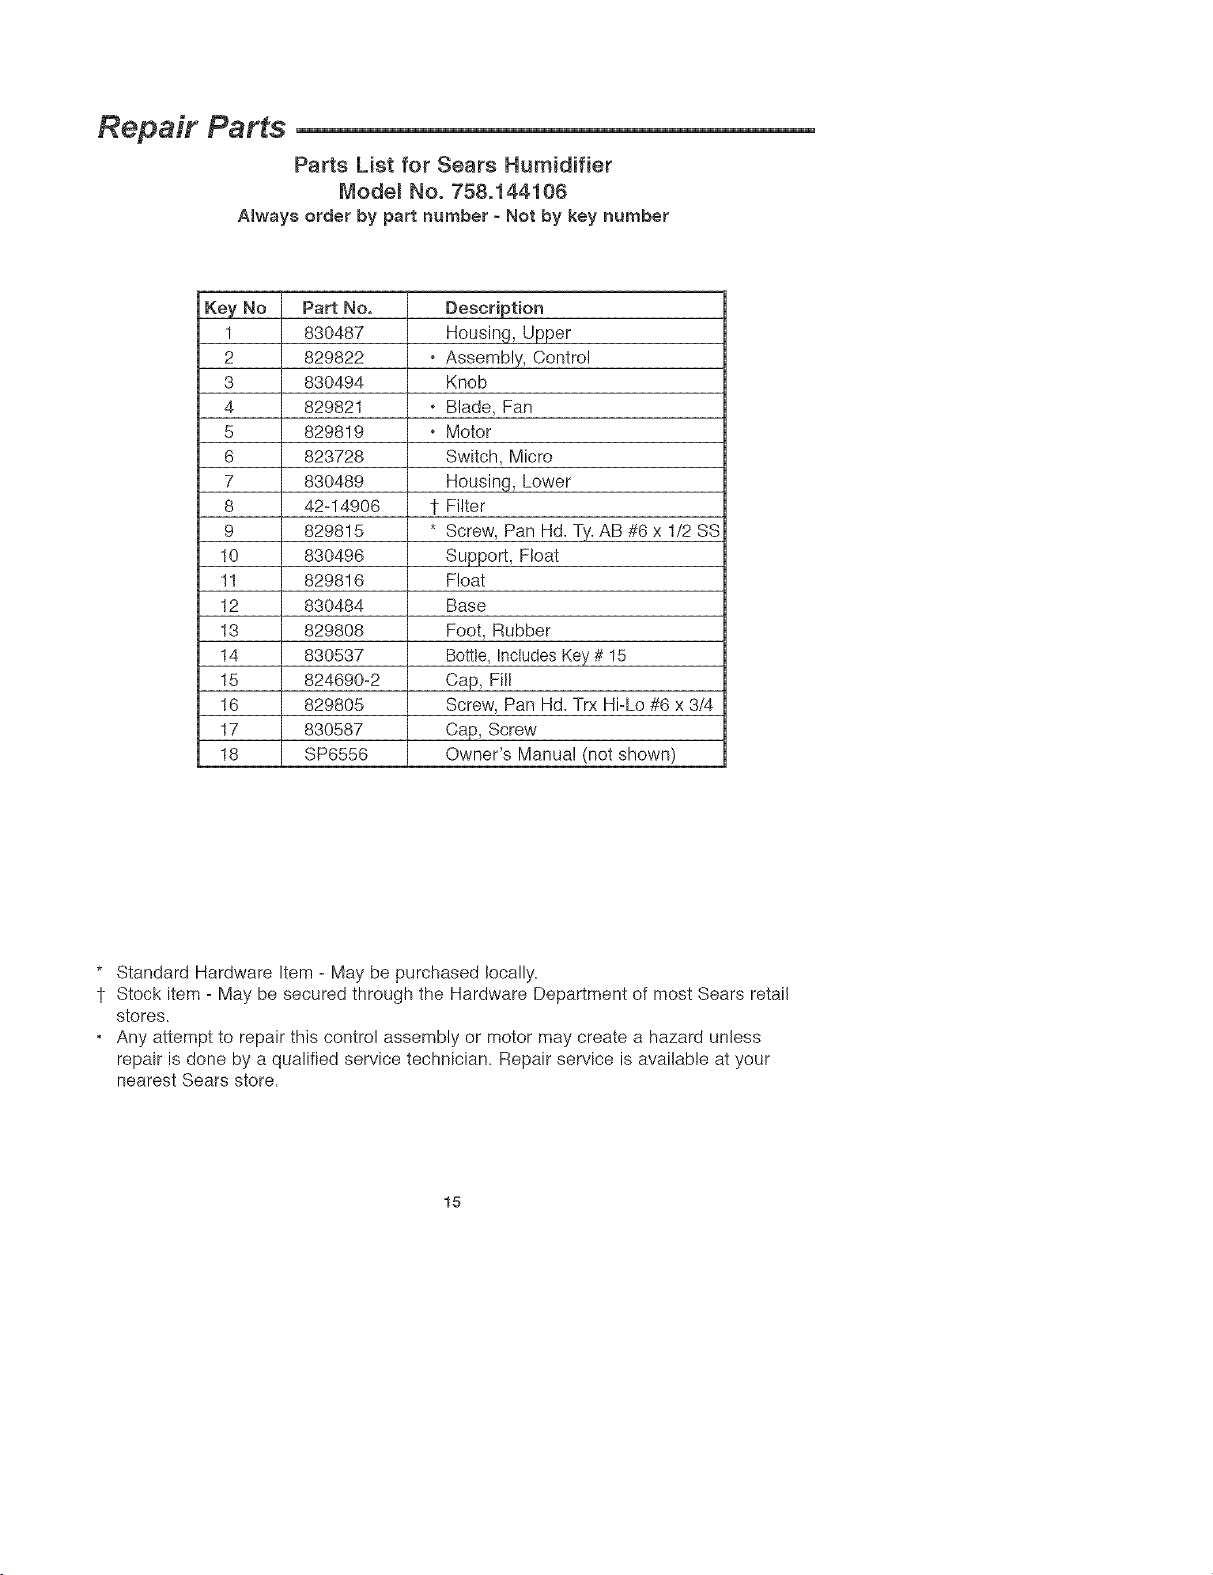
Repair Parts
Parts List for Sears Humidifier
Model No. 758.144108
Always order by part number o Not by key number
Key No
1
2
3
4
5
6
7
8
9
10
11
12
13
14
15
16
17
18
Part No.
830487
829822
830494
829821
829819
823728
830489
42-14906
829815
830496
829816
830484
829808
830537
824690-2
829805
830587
SP6556
Description
Housing, Upper
o Assembly, Control
Knob
o Blade, Fan
• Motor
Switch, Micro
Housing, Lower
1- Filter
• Screw, Pan Hd. Ty. AB #6 x 1/2 SS
Support, Float
Float
Base
Foot, Rubber
Bottte, Includes Key# 15
Cap, Fill
Screw, Pan Hd. Trx Hi-Lo #6 x 3/4
Cap, Screw
Owner's Manual (not shown)
* Standard Hardware Item - May be purchased locally.
1- Stock item - May be secured through the Hardware Department of most Sears retail
stores.
o Any attempt to repair this control assembly or motor may create a hazard unless
repair is done by a qualified service technician. Repair service is available at your
nearest Sears store.
15

Notes
16

LEA Y CONSERVE
ESTAS
INSTRUCCIONES
SF_AI/ S
Manua_ del
usuario
No de articulo
42-14410
No. de Modeio
758.144108
POR SU
SEGURmDAD:
LEA CON ATENCKSN
TODAS LAS
INSTRUCCIONES
QUIETCOMFORT
HUMIDIFICADOR
PARA TODA LA CASA
Capacidad de 10 gaiones
o mnstrucciones de
funcionamiento
o Lista de piezas
Sears, Roebuck and Co,, Hoffman Estates, tL 60179 U,S,A,
Pieza No. SP6556 Impreso en Canada

_ARANTJA COMPLETA DE UN ANO SOBRE EL HUMIDIHCADO_
Si en el plazo de un (1) aSo de la fecha de compra, este hurnidifieador falla debido a un
defecto de rnateriaJ o de mane de obta, Sears Io reparar&, sin cargo alguno. Si en el
pJazode (2) aSos de la fecha de cornpra, eJmotor faHadebido a an defecto de material
o de mane de obra, Sears Io reparar& sin cargo alguno.
Esta garantia de servicio est_ disponible sirnplernente devolviendo eJhurnidificador
a la tienda Sears rn_s cereana, y sera reparado o carnbiado, aopci6n de Sears, sin
cargo alguno.
Esta garantia es v_Hda Qnicarnente si el producto se usa en los Estados Unidos.
Esta garant_ale ofreee derechos especificos, yes posibJe que usted tarnbien tenga
_eara, Roebuck andros derechos qae var_ende an estado a otto.
Co., O/817WA, Hoffrnan Estates, IL 60179
NEDIDAS DE SEGURJDAD GENERALES
Definici6n de terrninos de seguridad: 5. NointroduzcaobjetosextraBosenelhumidificador.
PELJGRO: indica que alguien sufrira lesiones
graveso mortalessi no sesiguen las medidasde
seguridadsefialadas.
ADVERTENCIA: indicaque alguienpodda sufrir
lesiones graves o mortales si no se siguen las
medidasde seguridadsefialadas.
ATENCi0N: indieaqueexisten posibiHdades de
que alguien sufra lesionesgraves o mortalessi
no sesiguenlas medidasde seguridadsefialadas.
I. Para reducir los riesgos de incendio o elec-
trocuci6n, conecte el humidificador directa-
mente en una toma de 120V CA. I/o use
extensiones.
2. Mantengael cable lejosde areas transitadas
Para reducir los riesgos de incendio nunca
ponga el cable abajo de alfombras, cerca de
superficies calientes, radiadores o estufas.
3. Desconecteel humidificadorantes de mover-
Io,limpiario, o cuandono este en servicio
4. Mantengael humidificador limpio
6. No permita que este humidificador se use
como juguete. Mantenga una supervisi6n
constante cuando haya ni¢_oscerca de la
unidad.
7. No utiliceel humidificadorcuandofaite o este
dafi_adacualquier pieza.
8. Para reducir los riesgos de electrocuci6n o
dafios a la unidad, no la golpee, incline o
sacuda cuando este funcionando.
9. Para evitar dafitos en el humidificador
descon6ctelo cuando la base este vada o no
Ioest6 utiiizando.
I0. Parareducirlos riesgosde electrocuci6nacci-
dental, no toque el cable o los controles con
las manos hOmedas.
I1. Ponga atenci6na la advertenciasiguiente.
IADVERTENCIA: Para reducJr los de
rieago8
incendio,elestrocuci6n, o lesiones personale&
desconecteel humidiflcadorantesde limpiarlo,
darle servicio o IJenarlode a_ua.
Contenido
Garantia ............................................... 18
Medidas de seguridad generales .......... 18
Antes de llamar aJcentro de servicio ...18
Conozca su humidificador .................... 19
Funcionamiento .................................. 20
Armado ................................................. 20
Colocacidn .......................................... 21
Conexi6n electdca ................................ 21
Llenado de agua .............................. 22-23
Controles de funcionamiento ............... 23
Puesta en marcha ................................. 24
Consejos para optimizar el rendimiento.24
Reemplazo y cuidado de los filtros..25-26
Limpieza del humidificador .............. 27°28
SoluciOn de probiemas comunes ........ 29
Piezas de repuesto .......................... 30-31
Antes de flamar al centre de servicio
Verifique Io siguiente cuando no funcione funcionamiento?
su humidificador. 4. _,Es suficientemente alto el niveJ de
1. sEsta conectado el cable? humedad?
2. _,Hay corriente electrica en la toma? 5. _,Coloc6 la unidad en una superficie
3.4,El control del aire esta en posici6n de plana?
16
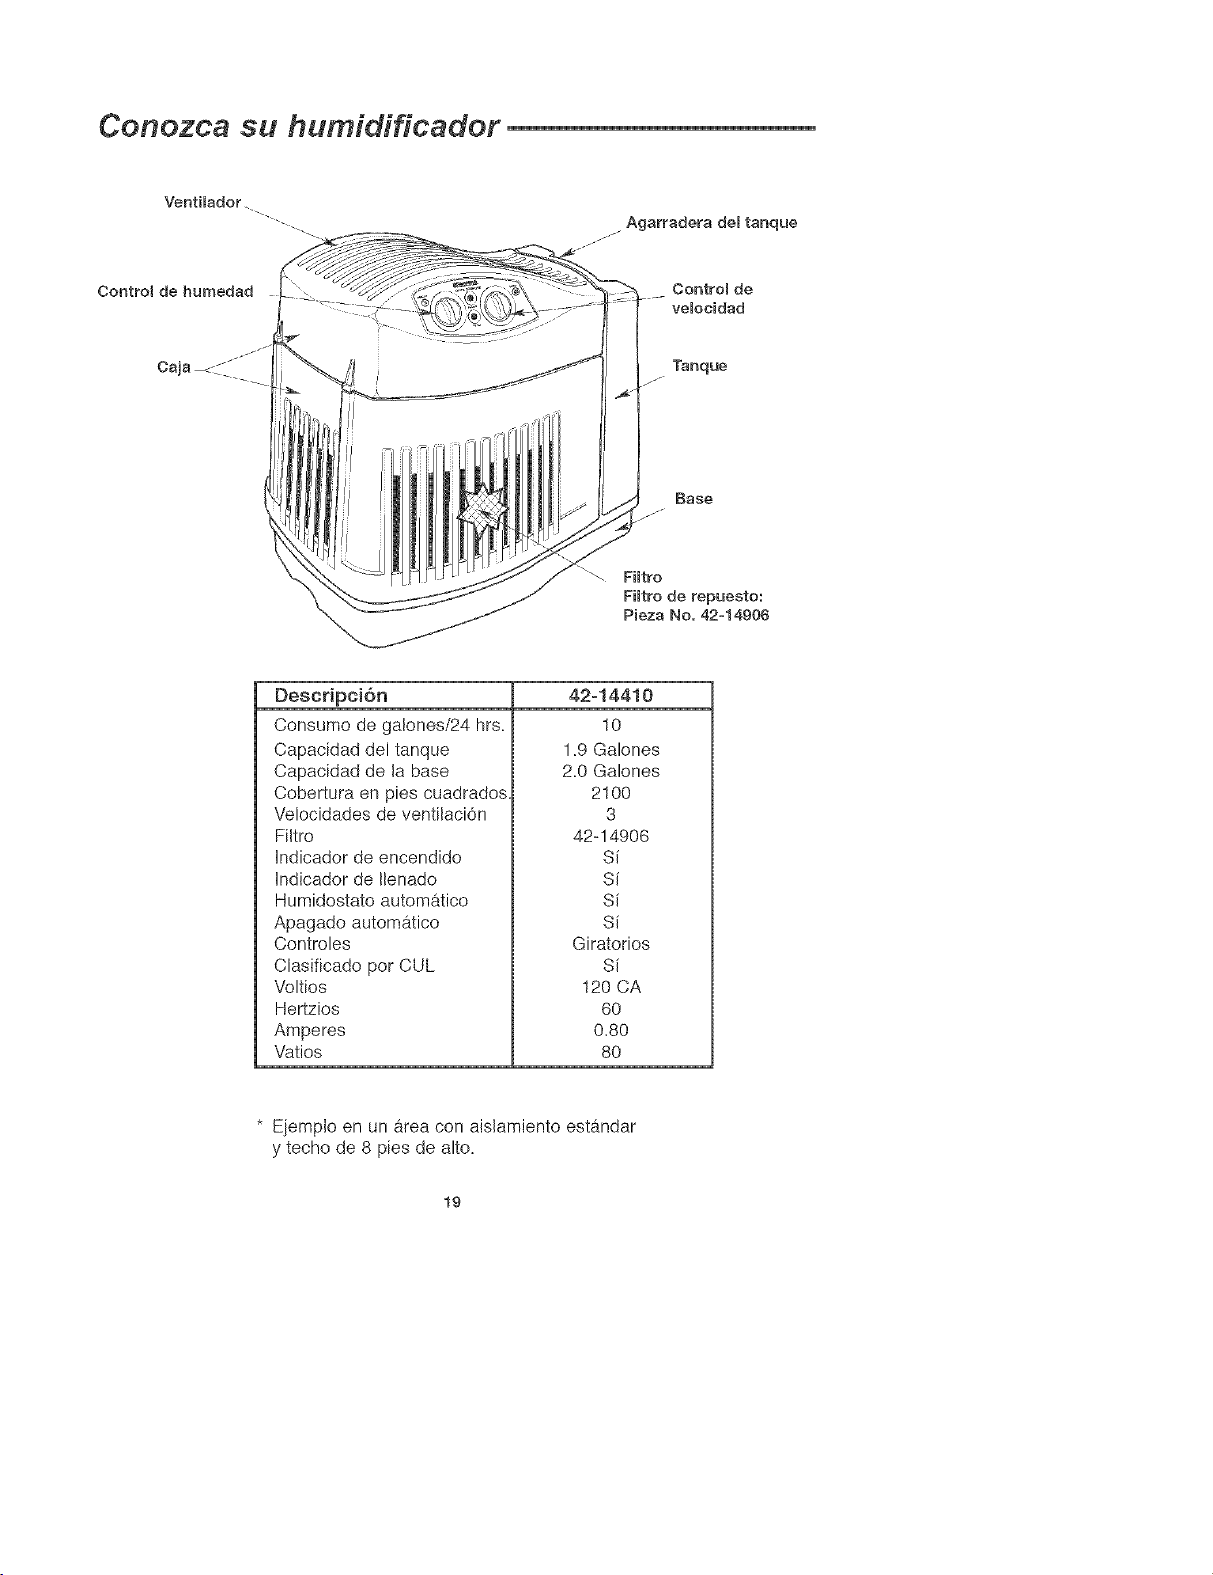
Conozca su humidificador
VentHador.
Agarradera del tanque
Control de
velocidad
Descripci6n
Consumo de galones/24 hrs.
Capacidad del tanque
Capacidad de la base
Cobertura en pies cuadrados
Velocidades de ventilaci6n
Filtro
Indicador de encendido
Indicador de Ilenado
Humidostato automatico
Apagado automatico
Controles
Ciasificado por CUL
Voltios
Hertzios
Amperes
Vatios
42-14410
10
1.9 Galones
2.0 Galones
2100
3
42-14906
S{
S{
S[
S[
Giratorios
S_
120 CA
60
0.80
8O
* Eiemplo en un _trea con aislamiento estandar
y techo de 8 pies de alto.
19
Funcionamiento
Su nuevo humidificador Sears fue dis-
ehado para satisfacer las necesidades
de humedad de su hogar a traves del
principle de evaporaciOn de agua.
Una vez que pone agua en el tanque, el
filtro empieza a humedecerse y se satura
completamente aproximadamente en 30
minutes. El humidificador aspira aire per
la parte inferior y circula a traves del filtro
impulsado per un ventilador. Cuando el
aire pasa a traves del filtro, se humedece
con el agua y se libera en la atm6sfera
en forma de vapor. No enviara, gotitas de
agua, la evaporaciOn se Ileva a cabo en
el humidificador, esto significa que los
residues que produce la evaporaci6n de
agua no pasan a su casa, se quedan en
el filtro.
Este proceso natural de evaporaci6n
ayuda a eliminar las posibilidades de
polvo blanco en el aire liberado per el
humidificador,
ATENCl6N: Uee t_nieamente
Baeterioetato 42°14900 aprobado per
ta EPA dieponible en lae tiendae
SEARS. Bajo ningun3 eireunetanei3
utiliee productoe par3 tratamiento de
3gu3 eepeciatee par3 humidifi=
eadoree Rote belt o Ultraeonic.
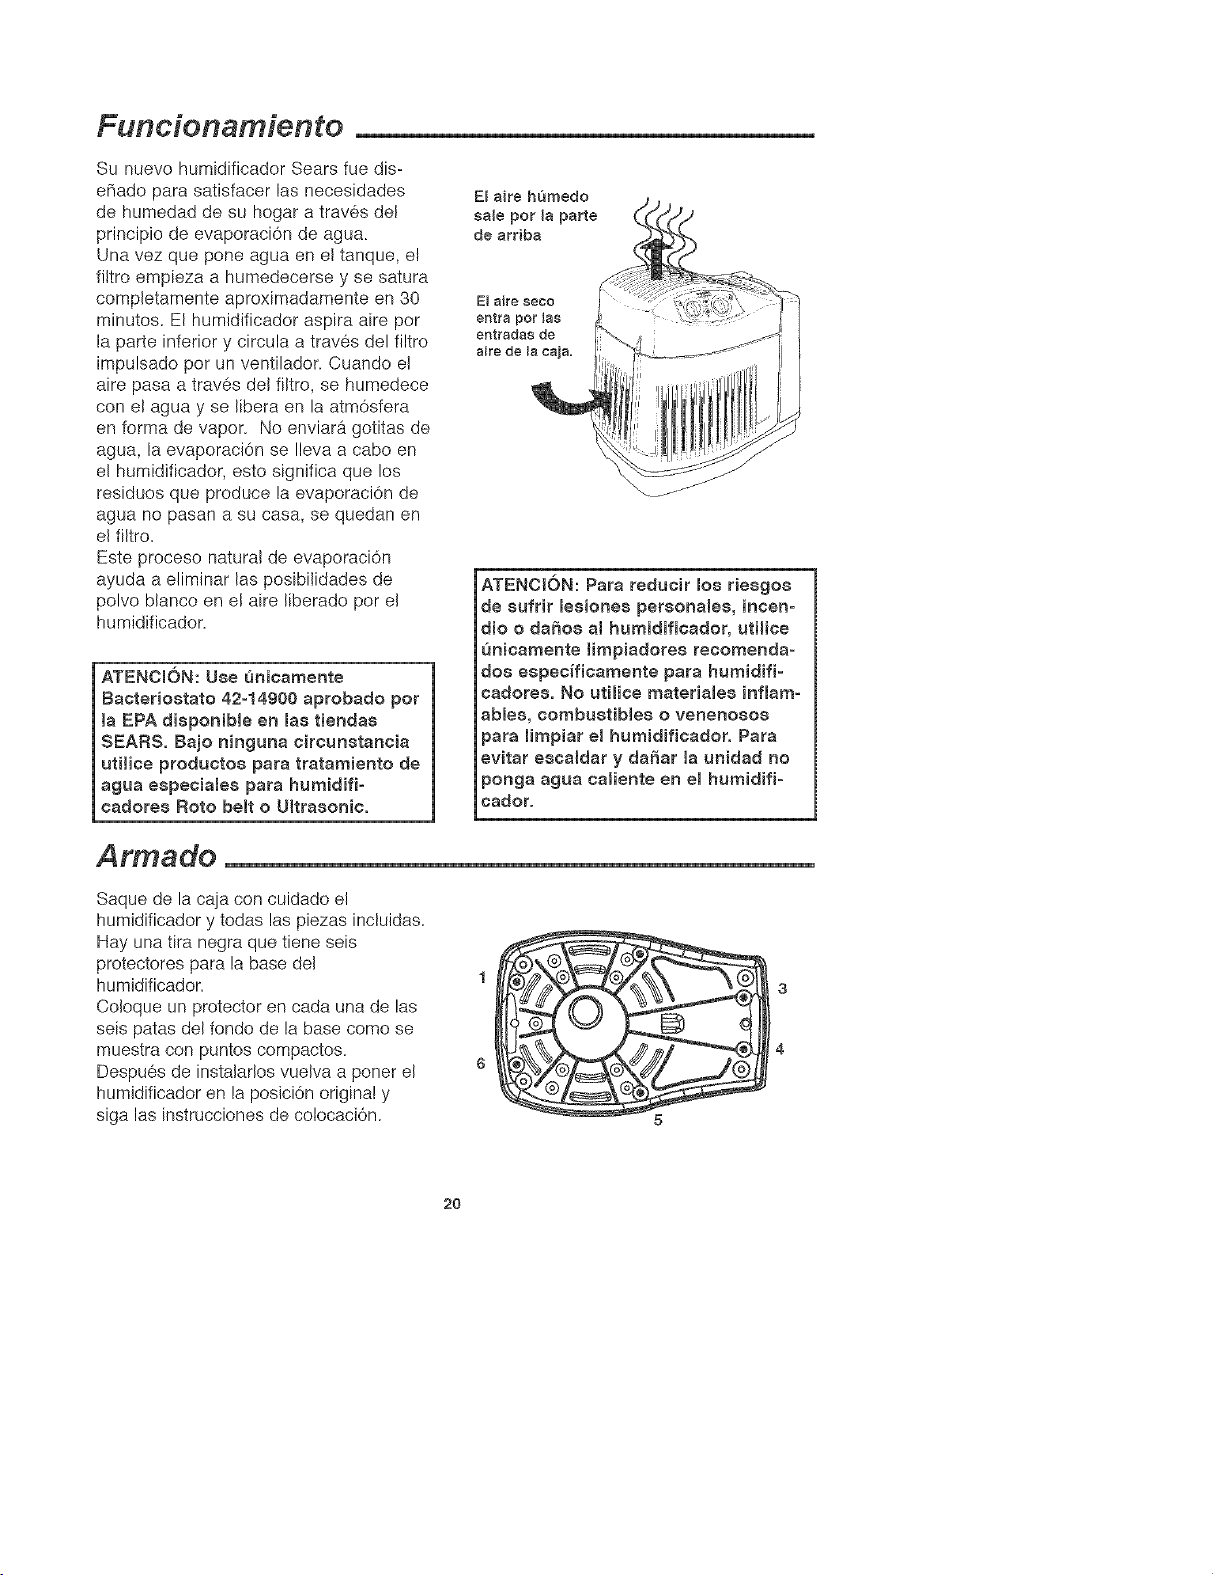
El aire hSmedo
sale per la parte
de arriba
El 8ire 8eco
entra per las
entrada8 de
airede la caja.
ATENCtON: Par3 redueir Ioe rieegoe
de eufrir leeionee pereonalee, ineen=
clio 0 daSoe 31humidificador, utitiee
uni¢3mente tirnpiadoree re¢omend3-
doe eepecffieamente par3 humidifi-
cadoree. No utiliee materialeG inflam-
3blem combustiblee 0 venenoeoe
par3 limpiar el humidificador. Par3
evitar e_caldar y da_ar 13unidad no
pong3 3gu3 ealiente en el humidifi-
eador.
Armado
Saque de la caia con cuidado el
humidificador y todas las piezas incluidas.
Hay una tira negra que tiene seis
protectores para la base del
humidificador.
Coloque un protector en cada una de las
seis patas del fondo de la base come se
muestra con puntos compactos.
Despues de instalarlos vuelva a poner el
humidificador en la posici6n original y
siga las instrucciones de colocaciOn.
6
5
2O
Colocaci6n
ADVERTENCUA: Pot su propia segud- 1
dad, no use el humidificador cuando
haya piezae faltantee o dahadae.
PASO 1
Coloque el humidificador en una superficie
plana en el area de la casa que requiera
mas humedad, o donde pueda producirse
mas circulaci6n de aire hOmedo en toda la
casa, por ejemplo, cercano a un retorno
de aire frio.
Placing the unit level is very important.
Special attention should be given to
unit's level if the humidifier is located on
carpeting.
El aire hOmedo (humedad) se dispersara
pot toda la casa, pero las areas mas cero
canas al humidificador estaran mas
hOmedas. Si se coloca cerca de una veno
tana puede producirse condensacion en el
cristai de la ventana, si no desea que esto
ocurra, debe cambiar la unidad de lugar.
NOTA: El aire emitido pot el humidificador
es frio y hOmedo, por Io tanto se
recomienda orientarlo lejos de termostatos
y registros de aire caliente. El mejor lugar
es junto a una pared interna. Los registros
de aire caliente y el aire frio de las pare-
des extemas puede afectar la eficiencia
de los controles. No Io coloque en lugares
en los que reciba directamente el aire de
los registros de aire caliente.
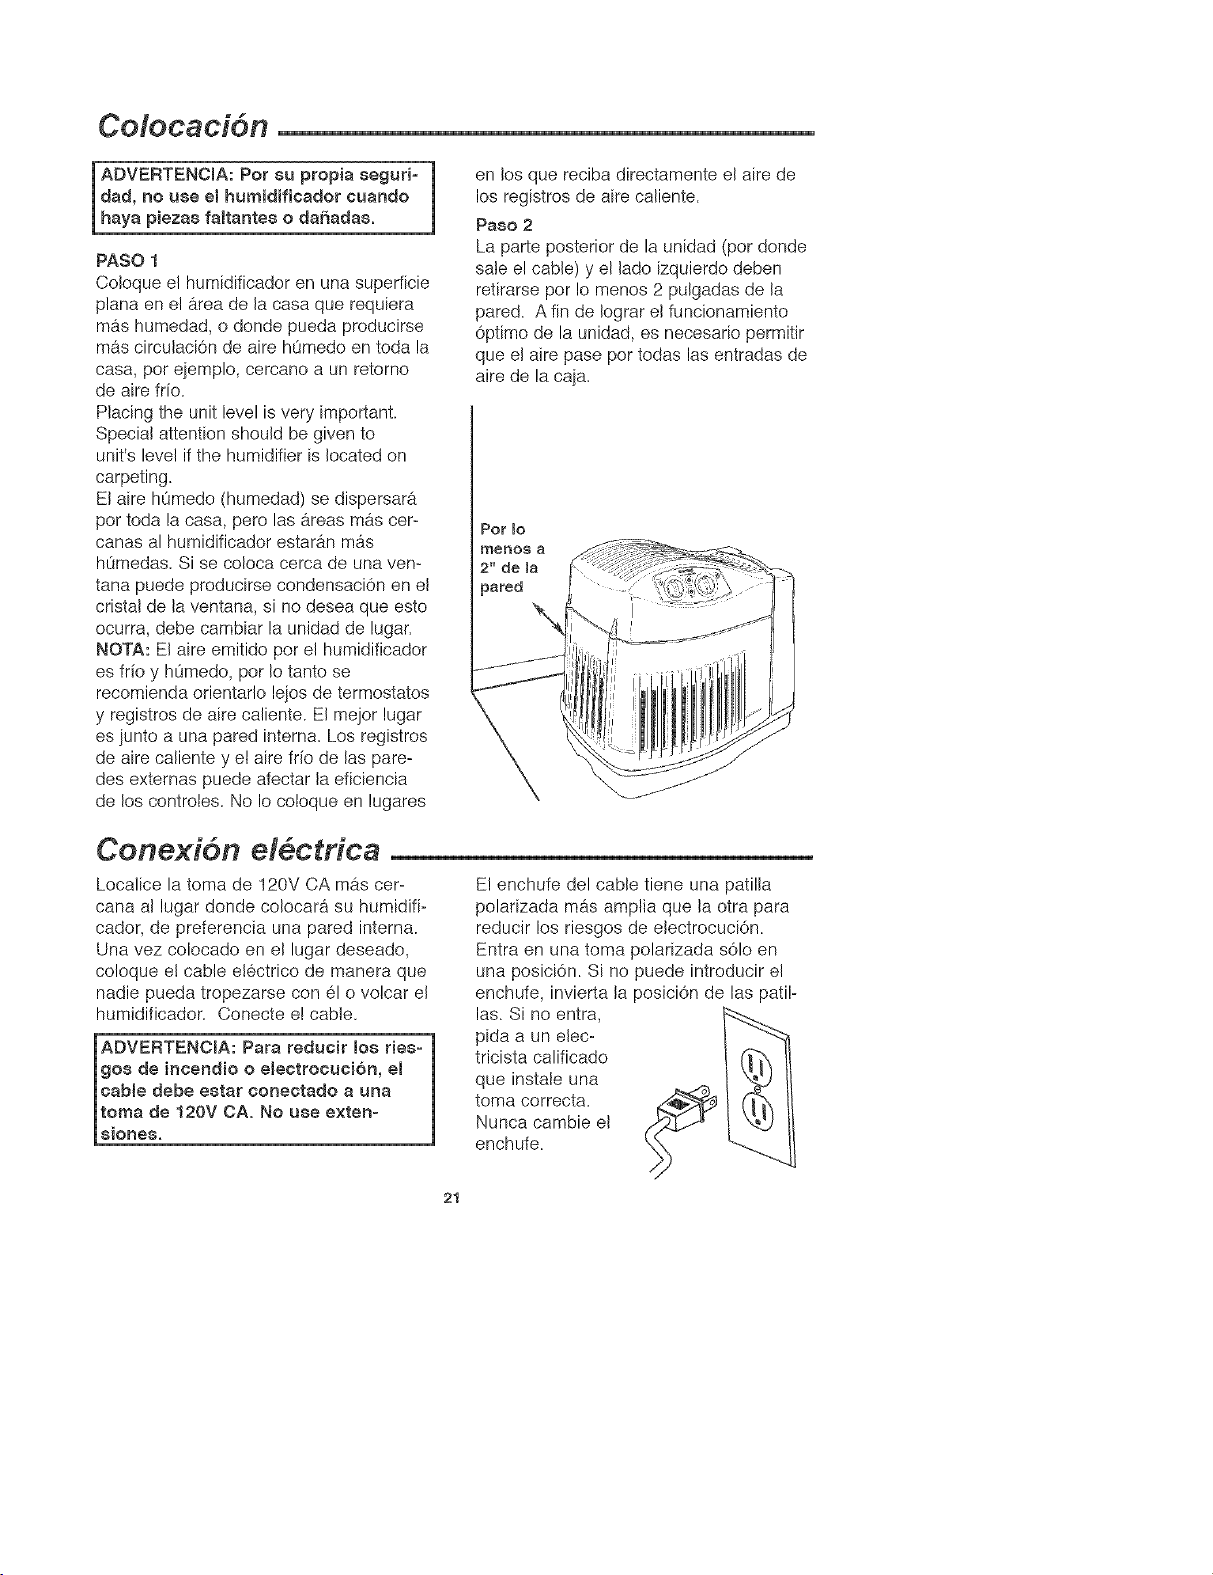
Paeo 2
La parte posterior de la unidad (por donde
sate el cable) y el lado izquierdo deben
retirarse per !o menos 2 pulgadas de la
pared. A fin de Iograr el funcionamiento
optimo de la unidad, es necesario permitir
que el aire pase pot todas las entradas de
aire de la caja.
Conexi6n el ctrica
Localice la toma de 120V CA mas cer-
cana al lugar donde colocara su humidifio
cador, de preferencia una pared intema.
Una vez colocado en el lugar deseado,
coloque et cable electrico de manera que
nadie pueda tropezarse con el o volcar el
humidificador. Conecte e! cable.
E! enchufe del cable tiene una patilla
polarizada mas amplia que la otra para
reducir los riesgos de electrocuci6n.
Entra en una toma polarizada s61o en
una posici6n. Si no puede introducir el
enchufe, invierta la posici6n de las patilo
las. Si no entra, _.>__
pida a un elec-
tricista calificado
que instale una
toma correcta.
Nunca cambie el
enchufe.
21
Uenado de agua
ADVERTENCIA: Para redusir los ries=
gos de electrosuei6n, siempre
desaoneste el sable antes de Jimpiar
o dar servicio a la unidad.
ADVERTENCmA: Para reducir Jos
riesgos de incendio o eteetroeusi6n,
evite que entre agua a JoGcontroles o
al motor. Si entra agua en los
sontroJe8 espere a que 8e 8equen
sompletamente y antes de sonestario,
pida a un tesnice de servisio
autorizadoque _overifique.
El disefio de este humidificador exige usado
con el tanque de agua colocado aia derecha
de la rejilla de ta tap& La capacidad dei
tanque de agua es de 1.9 galones. Coioque eI
humidilicador en el Iugar en que va a
funcionar. Para llenar et tanque suj6telo por la
agarradera y saquetode la base en forma
vertical hacia arriba. Tenga cuidado de no
goipear o daflar el conjunto de tavb,ivuiade
resorte que se encuentra abajo det tanque.
NOTA: Si desea usar bacteriostatos a
probados, siga las instrucciones correcta-
mente. Lacapacidad dei tanque de agua det
humidificador es de 1.9 galenes.
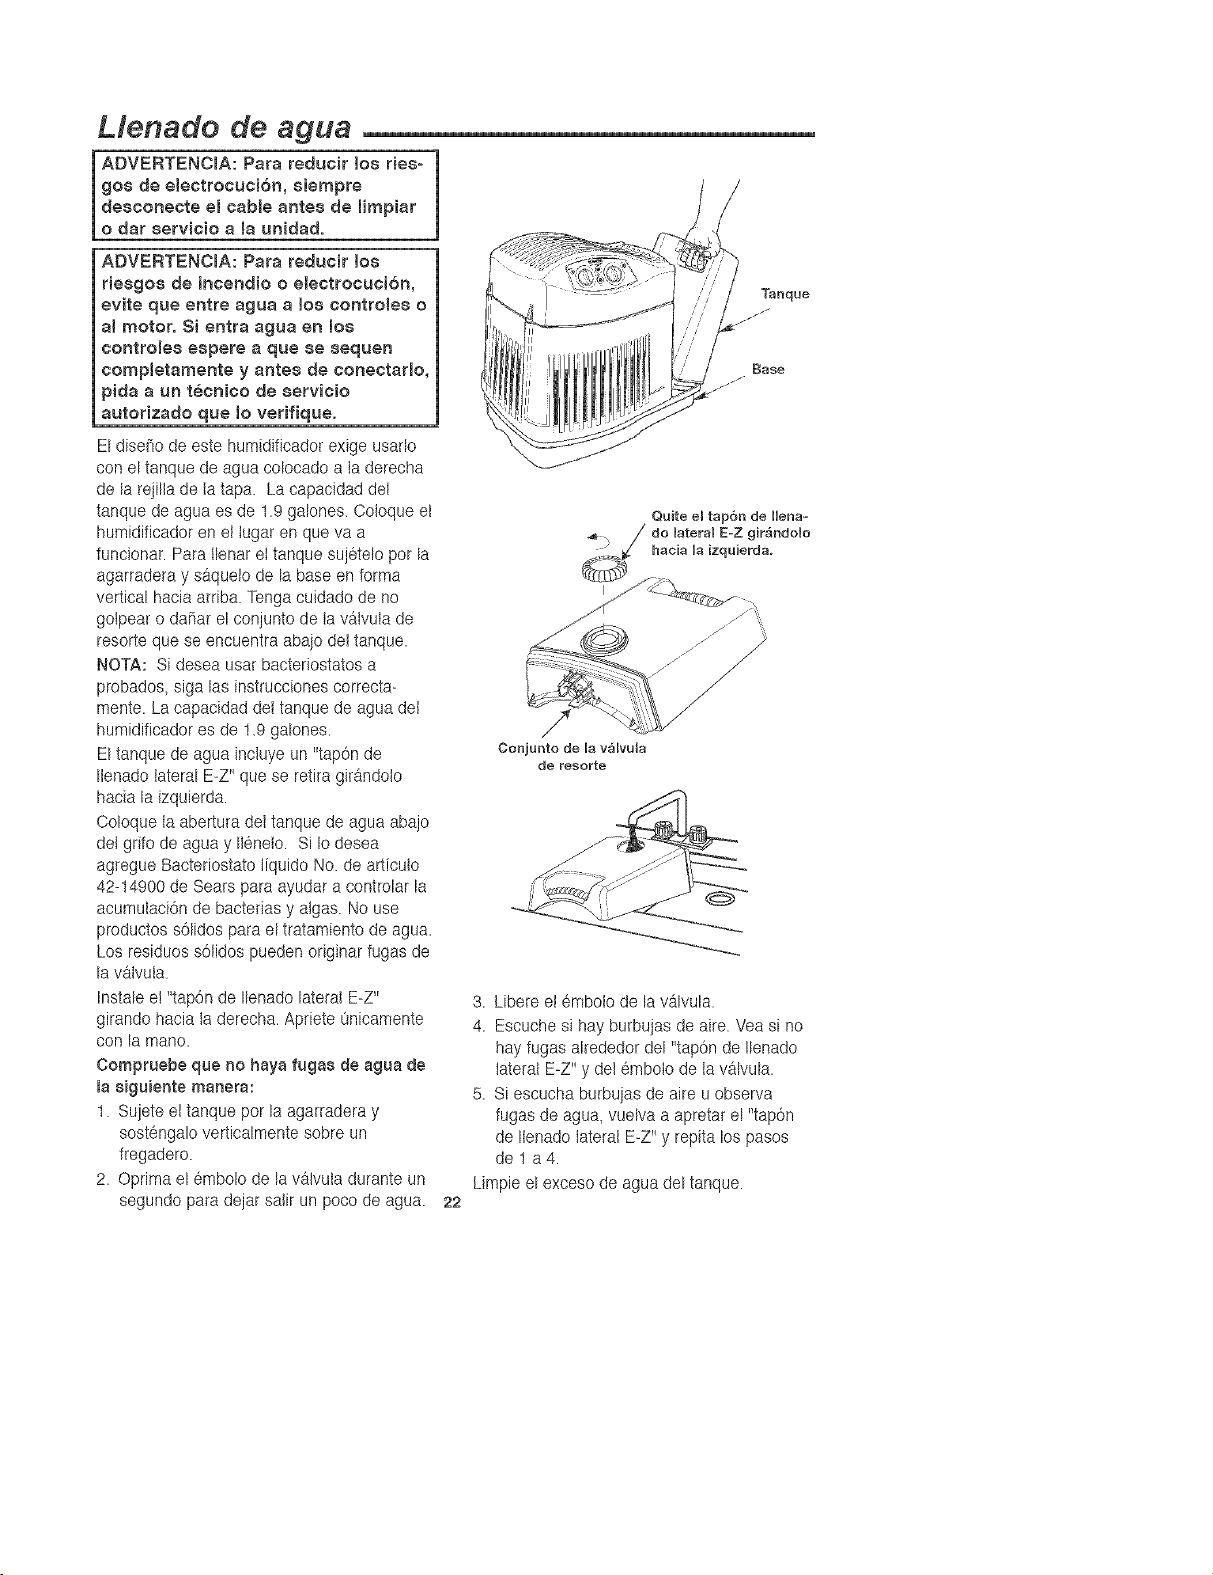
El tanque de agua incluye un "tap6n de
Ilenado lateral E-Z" que se retira girandoto
hacia la izquierda.
Ooloque ia abertura det tanque de agua abajo
dei grifo de agua y Iteneto. Si Io desea
agregue Bacteriostato tiquido No. de articuto
42-14900 de Sears para ayudar a controlar la
acumuiaci6n de bacterias y atgas. No use
productos s61idospara el tratamiento de agua.
Los residues s6Iidos pueden originar fugas de
la vatvula.
Instale et 'tap6n de Ilenado lateral E-Z"
girando hacia ta derecha. Apriete Onicamente
con la mane.
Compruebe que no haya fugas de agua de
la siguiente manera:
t. Sujete et tanque por la agarradera y
sostengalo verticalmente sobre un
fregadero.
2. Oprima el 6mbolo de la vatvula durante un
segundo para dejar salir un poco de agua.
/
/
/j-"
_ase
Quite el tap6n de Hena-
do lateral E-Z gir&ndolo
hacia Ua izqaierda.
/
Cenjunto de Uavalvula
de resorte
22
3. Libere et embolo de la valvula.
4. Escuche si hay burbujas de aire. Vea si no
hay fugas akededor del "tap6n de Ilenado
Iateral E-Z" y det embolo de tavalvula.
5. Si escucha burbujas de aire u observa
fugas de agua, vuelva a apretar el "tap6n
de Ilenado IateratE-Z" y repita los pasos
de1 a4.
Limpie el exceso de agua del tanque.
Vuelvaacoiocareltanquedeaguaenlabase
aladerechadelarejilladetatapa.Et"tap6n
delienadolateralE-Z"debequedarhaciael
exterior.Ensuposici6ncorrecta,elembolose
abreyetaguaentraalaca]a.Labase
recibiratodoelcontenidodettanquedeagua.
Espereunminuteaquepasetodaelaguadel
tanquealabase.Cuandoestevaciosaquelo
nuevamentedelhumidificadorylt6netode
aguacomeseindicaanteriormente.Vuelvaa
coiocarloensulugarAhoraethumidificador
estatlenocontacapacidadmaximadeagua.
Eltanquepuedevolveratlenarseencualquier
momentomientrasestatuncionando.Parano
Ilenareltanquefrecuentemente,espereaque
seacabeelaguadettanqueydelabase.
Ahorayapuedeporterenmarchasu
humidificador.
Controles de funcionamiento
Los controies de funcionamiento de su
Humidificador para toda la casa Kenmore
Quiet Oomfort se encuentran en la parte det
frente del humidificador.
Famitiaricese con los controles y consuReet
diagrama det area de controles para conocer
los terminos usados en este manual.
Operaci6n de Jos controles
Luz de encendido
AI conectar y encender Ia unidad, se enciende
una luz roja que se apaga 0nicamente cuando
la unidad se apaga (_) o desconecta.
Control de humedad:
Ajuste et nivel de humedad de acuerdo con
sus necesidades. El humidificador se activara.
y desactivara conforme se requiera para
mantener el nivei de humedad seleccionado.
Se recomienda e! nivel medio (la mitad de ta
rotaci6n total del control) aunque algunas
veces puede preferirse un nivet menor o
mayor de humedad. Si desea que et humidifi-
cador este en operaci6n constante, gire
completamente el control hacia la derecha,
esto permite la evaporaci6n de ta cantidad
maxima de humedad en eJambiente en forma
continua.
mMPORTANTE: Si se produce
condensaci6n eft masparodes y ventanas
el agua resultante puede producir daF_os.
Ajuste el nivel del control de humedad de
manera que no forme condensaci6n.
Control de velocidad @
Este humidificador tiene un control delventi-
lador de tres velecidades "Low" (bajo), (.)
"Medium" (medio}(.*) y "High" (alto) (.'.). El
nivel mb,ximo de humedad se obtiene con et
nivel "High" (alto) ( _.).
Conforme aumenta la velocidad del flujo de
aire, el humidificador evapora y Iibera mb,s
agua en eI ambiente. El nivel bajo ( o) es el
mas silencioso y se usa para condiciones
que no requieren una gran cantidad de
evaporaci6n.
mndicador de Henado
Cuando queda un poco de agua en la unidad,
se enciende la tuz a.mbary la unidad se apaga
automa.ticamente.
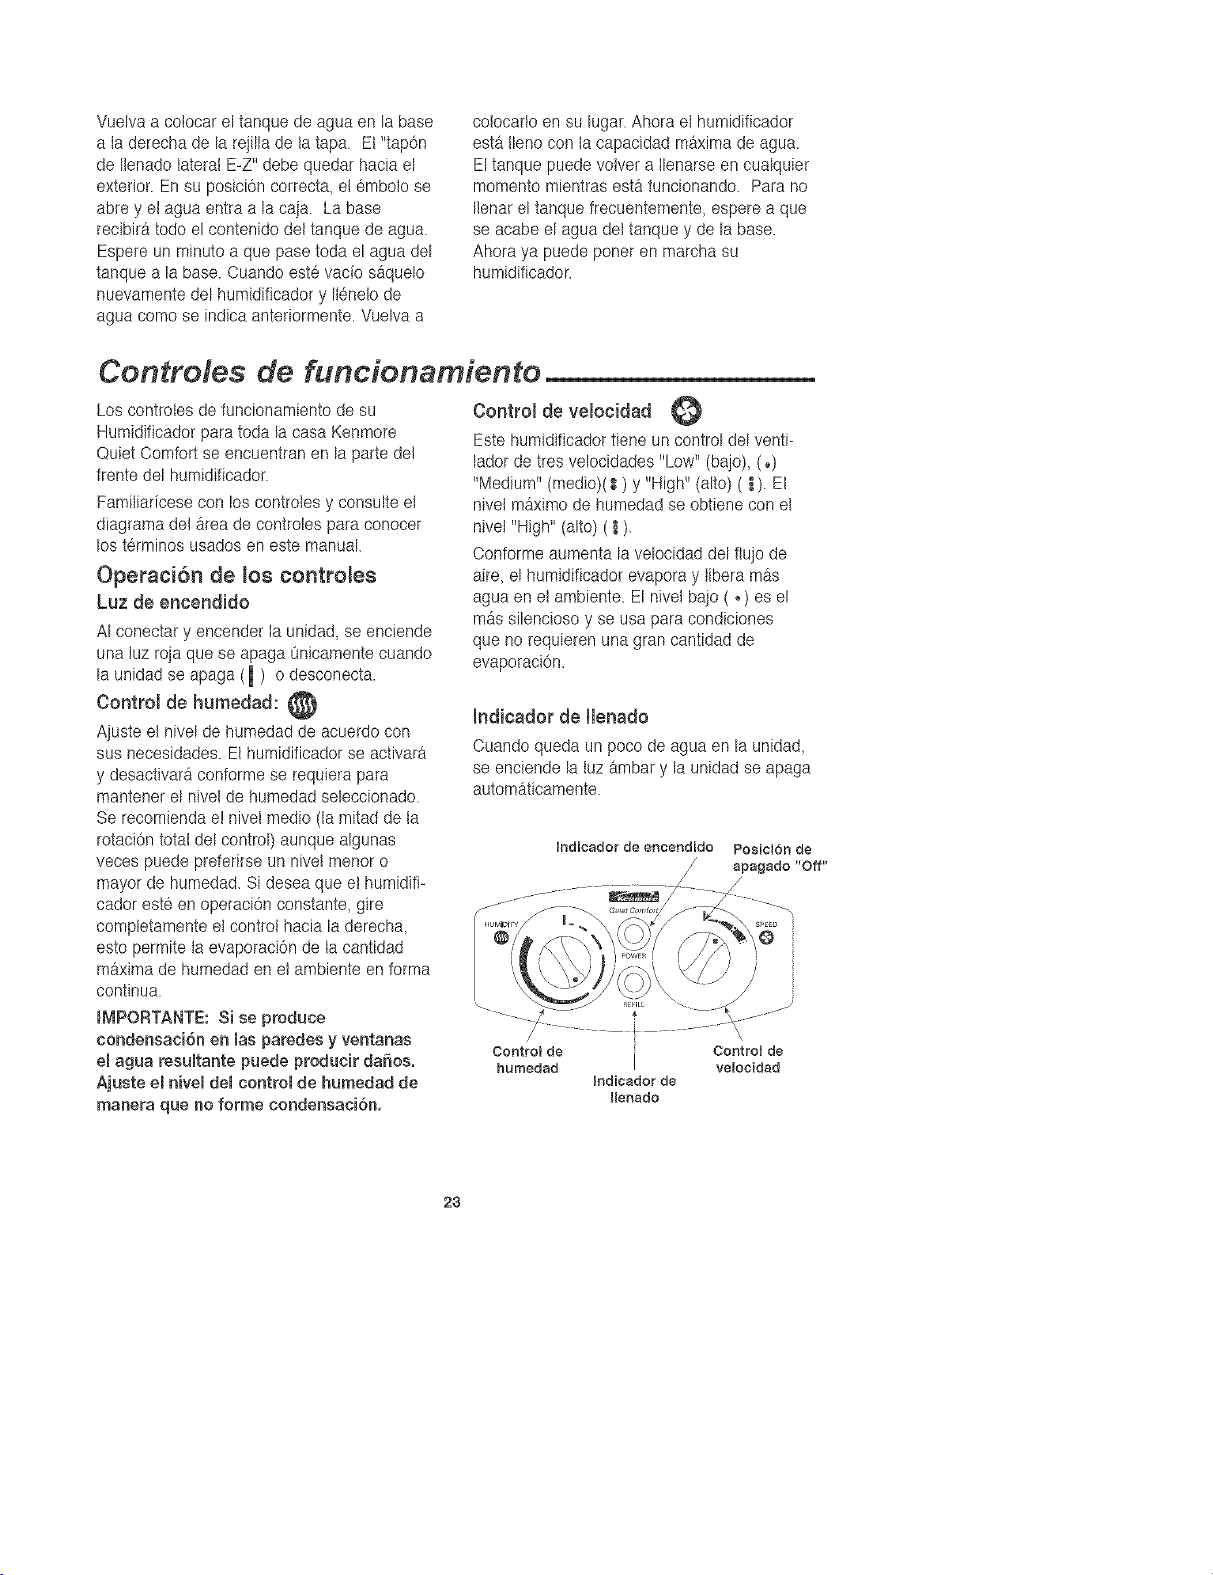
Indicador de er_cer_dido PosicJ6n de
/ apagado "Off"
@
/
\
Control de
humedad
I
Indicador de
Ilenado
Control de
velocidad
23
Puesta en marcha
Paso 1
Aseg0rese de que el tanque este Itenode
agua y que el cable este conectado.
Paso 2
Ajuste eI control de velocidad en el niveI bajo
"Low" (.).
Paso 3
Ajuste el control de humedad en et nivel medio
"Medium" (vet et diagrama mas abajo).
NOTA: El humidificador debe funcionar con et
control de humedad en el nivel medio
recomendado. Si no funciona, significa que el
nivel de humedad esta relativamente alto.
Para probar la unidad bajo estas condiciones,
gire el control de humedad completamente
hacia la derecha y la unidad debera empezar
a funcionar. Una vez probada, ajuste la
humedad en el nivel medio "Medium" o en el
nivel deseado.
La unidad necesJta24 horas para ajustarse.
Si el nJvelde humedad de la casa es
suficJente,el humidificador funcionara
0nicamente cuando et controt de humedad
este en et nlvel m_ximo.
mMPORTANTE: Si se produce
condensaci6n en masparedes y ventanas
emagua resumtantepaede producir da_os.
Ajuste emnivemdemcontrol de humedad de
manera que no forme condensaci6n.
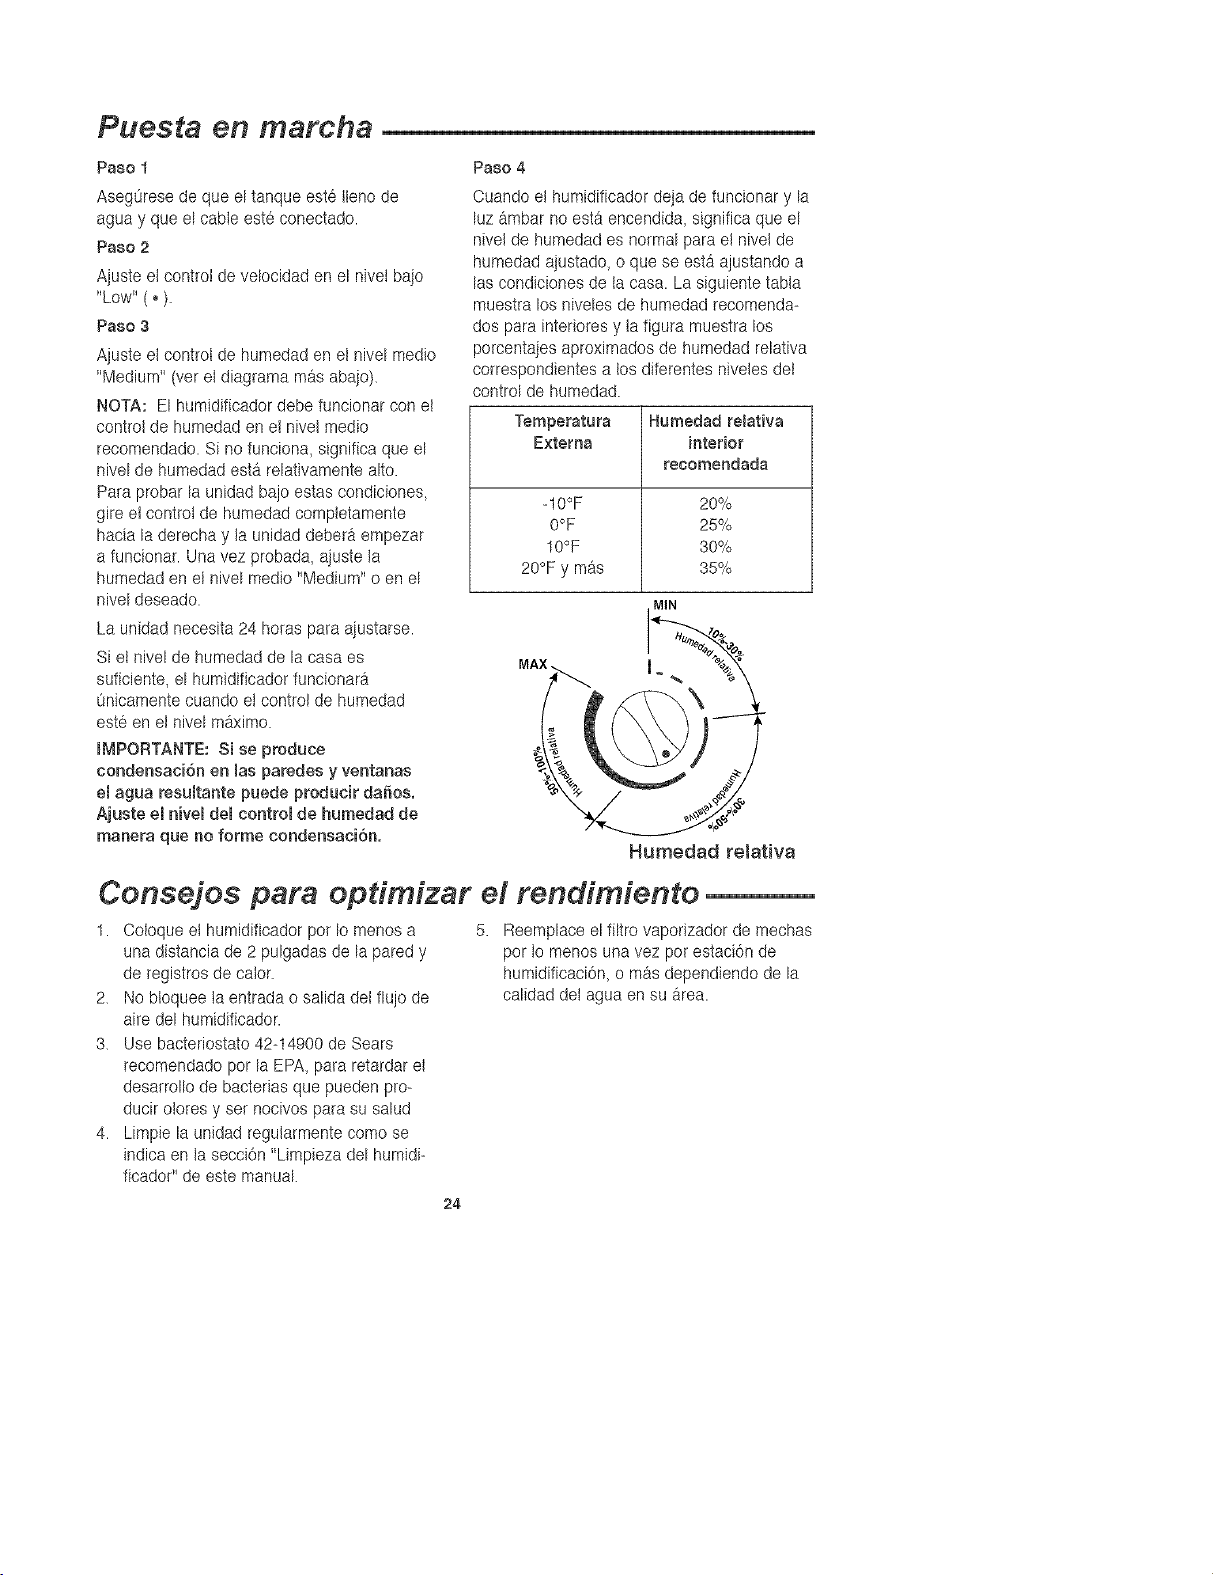
Paso 4
Cuando el humidificador deja de funcionar y la
luz ambar no esta encendida, significa que el
nivel de humedad es normal para et nivel de
humedad ajustado, o que se estb,ajustando a
las condiciones de tacasa. La siguiente tabta
muestra los niveles de humedad recomenda-
dos para interiores y tafigura muestra los
porcentajes aproximados de humedad relativa
correspondientes a los diferentes niveles del
control de humedad.
Temperatura Humedad relativa
E×terna interior
recomendada
-t0°F 20%
0°F 25%
10°F 30%
20°F y mas 35%
MIN
Hurnedad relativa
Consejos para opdmizar el rendimiento
1. Ooloque et humidificador pot Iomenos a 5.
una distancia de 2 pulgadas de la pared y
de registros de calor.
2. No bloquee ta entrada o salida del flujo de
aire del humidificador.
3. Use bacteriostato 42-14900 de Sears
recomendado pot la EPA, para retardar el
desarrollo de bacterias que pueden pro-
ducir otores y set nocivos para su salad
4. Limpie la unidad regularmente como se
indica en la secciOn"Limpieza del humidi-
ficador" de este manual
Reemplace el filtro vaporizador de mechas
pot Io menos una vez pot estaci6n de
humidificacion, o mas dependiendo de la
calidad det agua en su area.
24
Reemplazo y cuidado de los filtros
ADVERTENCIA: Para reducir Wosriesgos
de 8ufrir leeiones personale8 o
eEectreeuei6n con piezae m6vilee,
$iempre deeconeete el cable antes de
retirar o reemplazar cualquier pieza.
CUIDADO: Para retardar et desarroHo
de bacteriae y mantener la ma×ima
eficiencia, reemplaee el filtro per Io
meno8 Una ve;_ pot eetaci6n o m_e CU_n=
do use agua calcarea, Utilice el filtro de
repueeto reeomendado per Sears No, de
p}eza 42=14908,
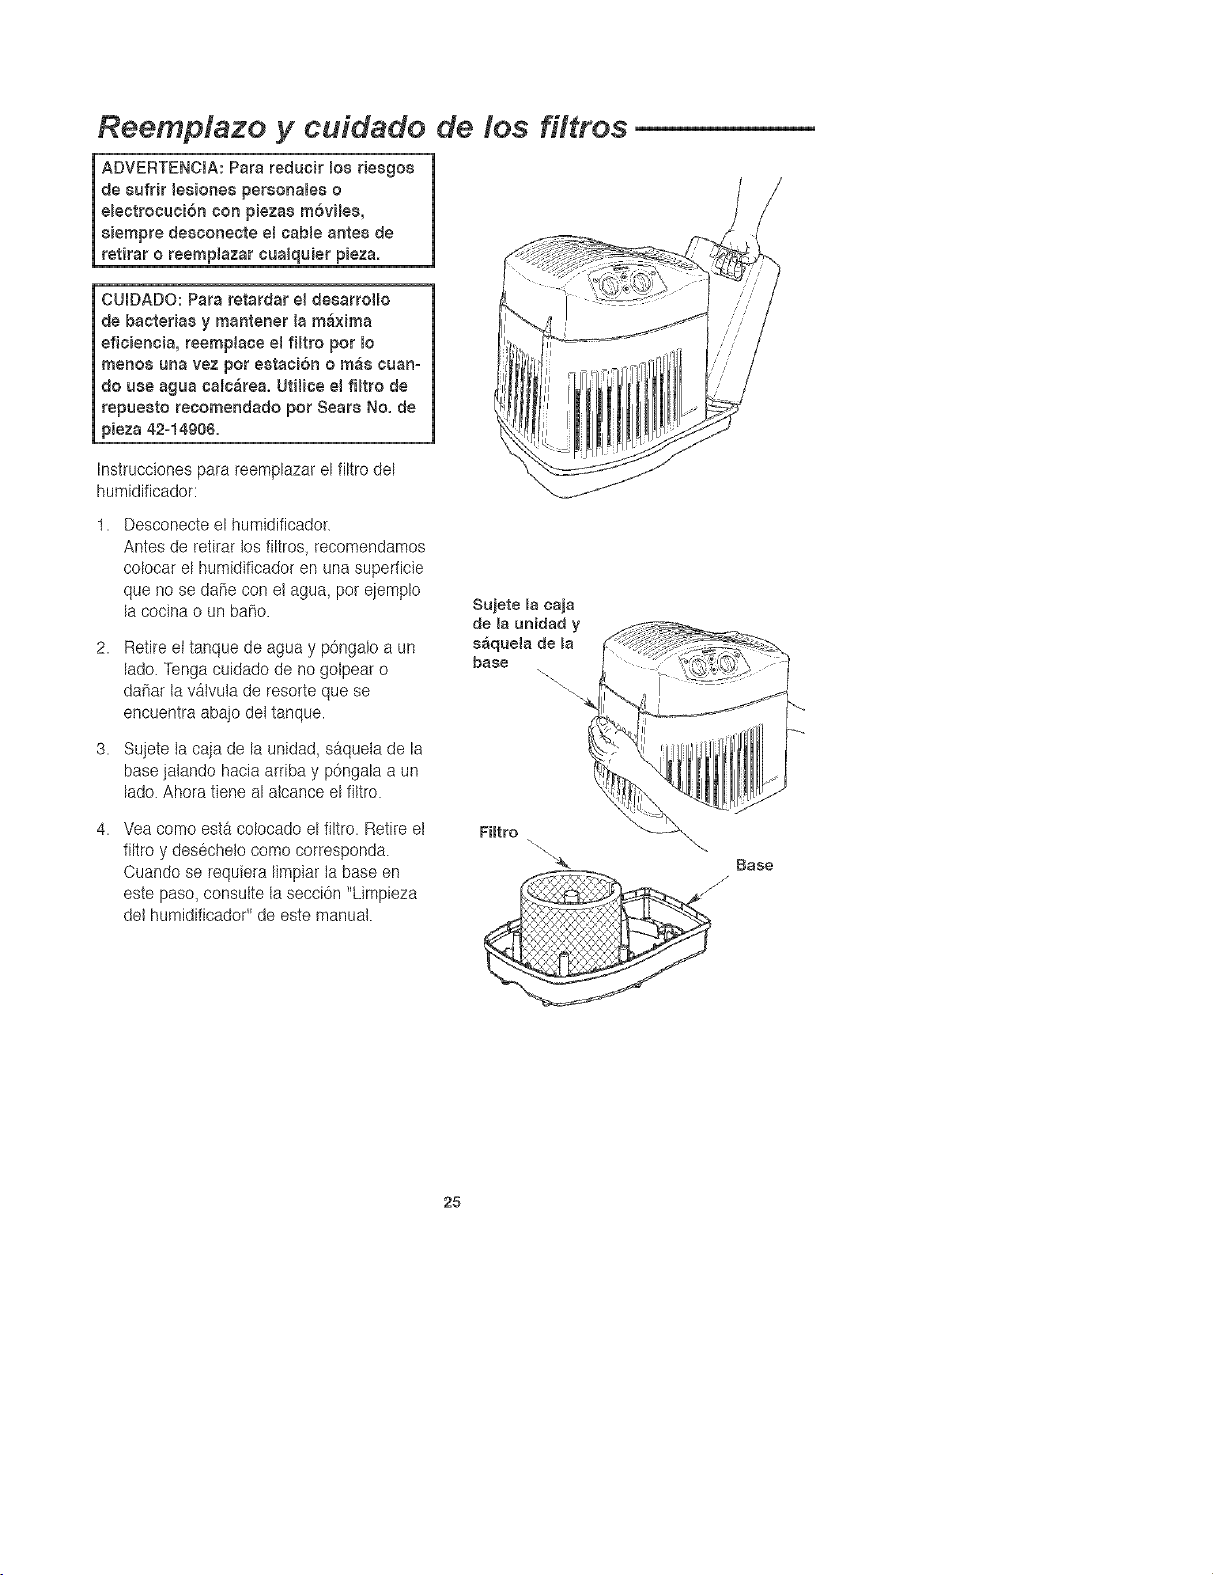
Instrucciones para reemplazar el filtro del
humidificador:
Desconecte el humidificador.
Antes de retirar los filtros, recomendamos
colocar el humidificador en una superficie
que no se da_e con el agua, per ejemplo
la cocina o un ba_o.
Retire ettanque de agua y p6ngalo a un
lade.Tenga cuidado de no gotpear o
da_ar la valvuta de resorte que se
encuentra abajo det tanque.
Sujete la caja de la unidad, saqueta de la
basejalandohacia arriba y p6ngala a un
lade.Ahora tiene al alcance el filtro.
Sujete la caja
de la unidad y
saquela de la
base
4. Yea como esta colocado el filtro. Retire et
filtro y desechelo come corresponda.
Cuando se requiera limpiar Ia base en
este paso,consulte la secciOn"Limpieza
det humidificado¢' de este manual.
Filtro
Baso
/1
25
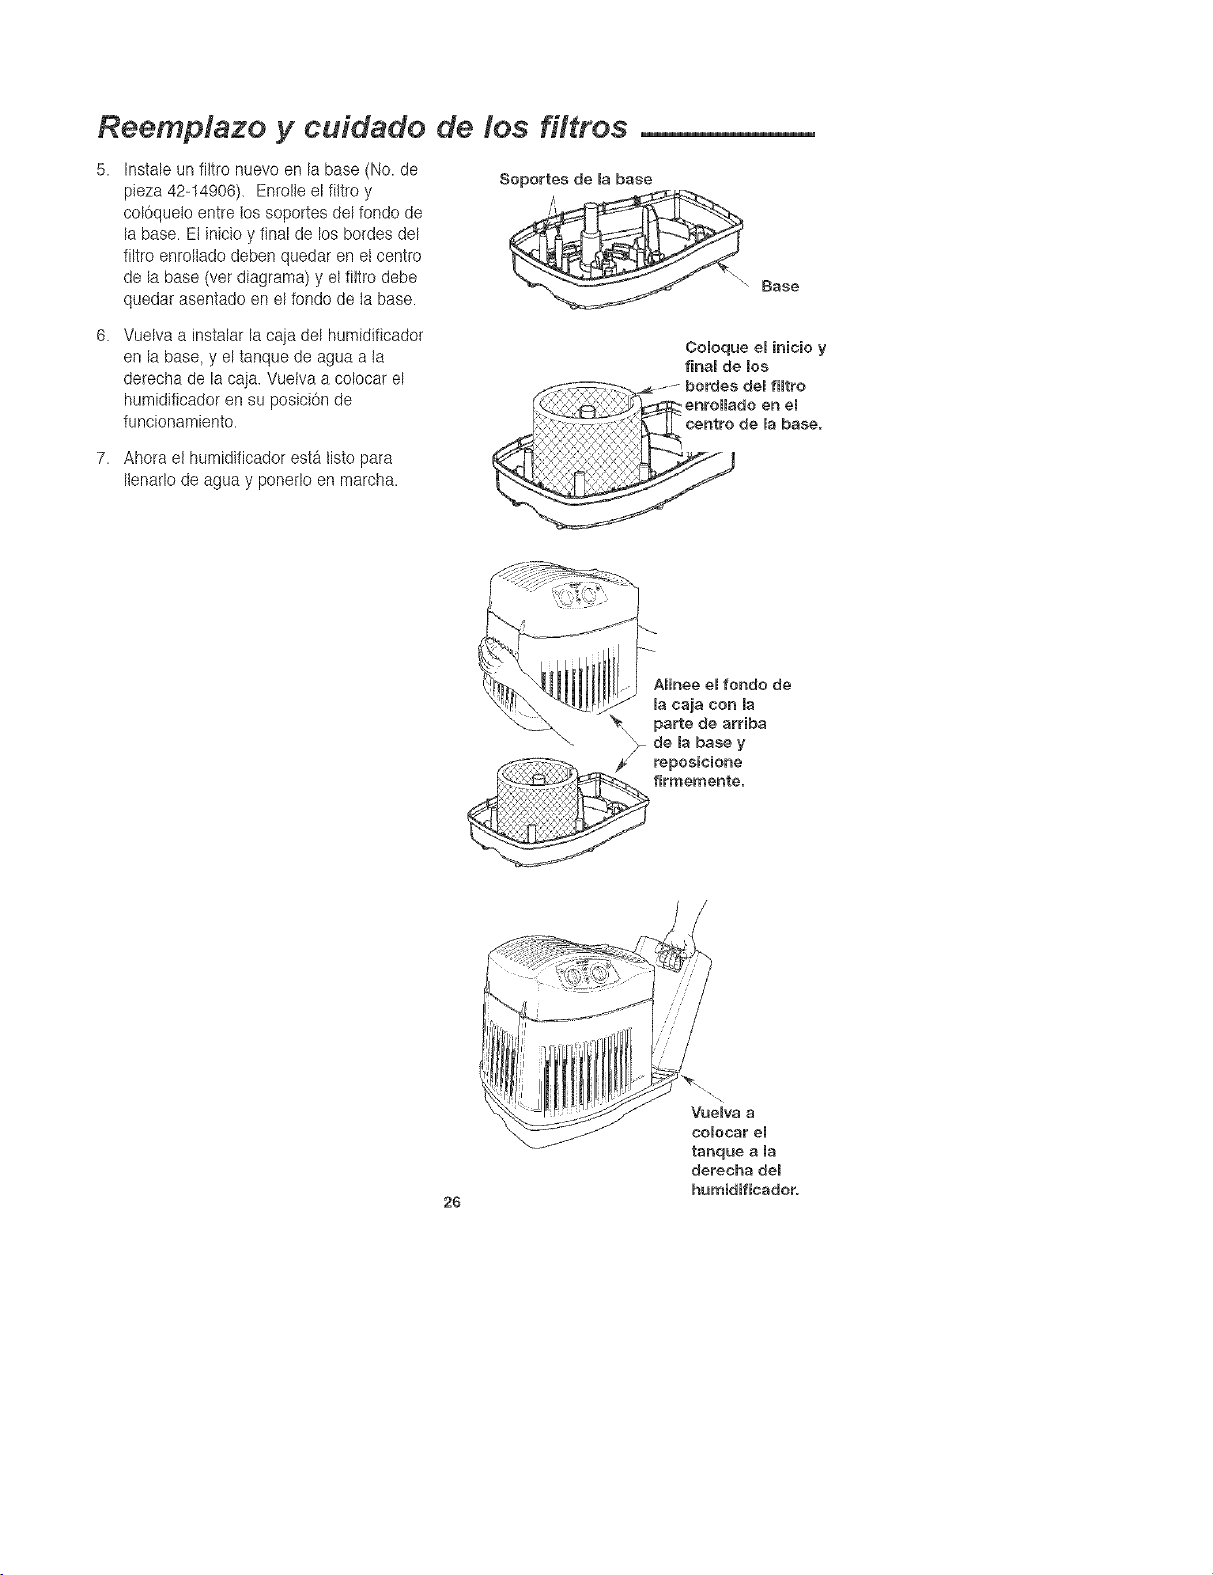
Reemplazo y cuidado de los filtros
Instale un filtro nuevo en la base (No. de
pieza 42-14906). Enrolle el fiitro y
colbqueto entre tossoportes del rondo de
la base. El inicio y final de los bo_des del
filtro enroltado deben quedar en et centro
de la base (vet diagrama) y el filtro debe
quedar asentado en el rondo de la base.
Soportes de la base
\
Base
6. Vuelva a instalar la caja del humidificador
en la base, y el tanque de agua a la
derecha de la caja. Vuetva a coloca_el
humidificador en su posiciOnde
funcionamiento.
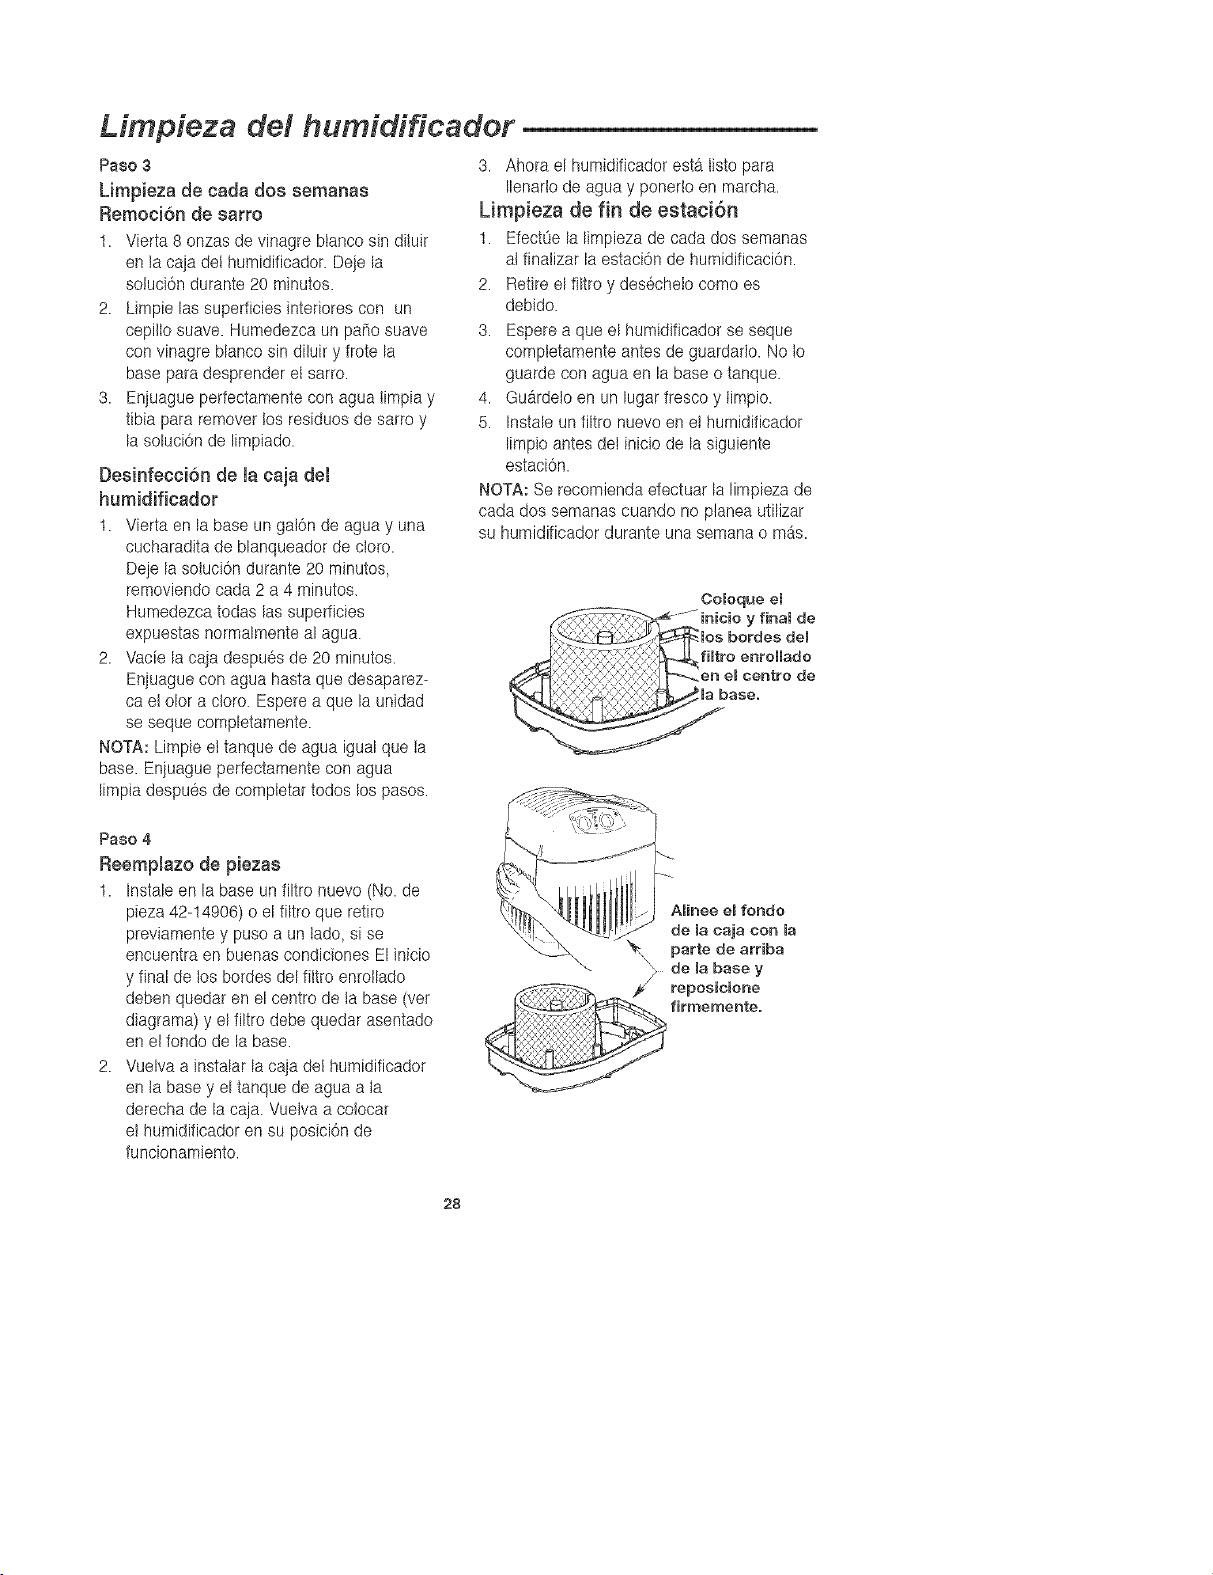
CoBoque el inicio y
final de los
7. Ahora et humidilicador esta Iisto para
Ilenarlo de agua y ponerlo en marcha.
ABinee el rondo de
la caja con la
26
Limpieza del humidificador
ADVERTENCIA: Para redueir los riesges
de _esione8 persona_es, proveear un
incendio o daffos al humidificador,
utilice _nicamente limpiadore8 recomen=
dade8 especffJcamente para humidffi=
cadores. No utiliee materiate8
inflarnabWes, combustibles e venenese8
para limpiar el humidificader. Para evitar
esca]dar y dahar la unidad no ponga
agua caHente en el humidifieador.
ATENCION: La pureza del agua vada de
un area a etra, y dependiendo de la8
circunstaseia8 _a8 impureza8 del agua y
las bacterias transportadas per el aire
promueven el desarroHe de
rnicroorganismos en el tanque de agua
del humidificador.
Para retardar el desarreHo de bacterias
que pueden producir olore8 y set
nocive8 para 8u 8atud, utHice
(Jnieamente los products8 recomen
dade8 per Sears, e8 decir, filtro8 de
repueste, baeteriostato 42=14900
recomendade per la EPA y Hrnpiador de1
humidificader 42=14713, disponibles en
la tienda Sears de su IocaHdad.
Paso 1
La unidad se limpia mas fb,cilmente cuando el
tanque esta comptetamente vacio y seco.
Para Iograr estas condiciones realice Io
siguiente:
a. Deje queet humidificador funcione hasta
que se encienda ta luz ambar y se apague
automaticamente.
b. Desconecte el cable deI humidificador.
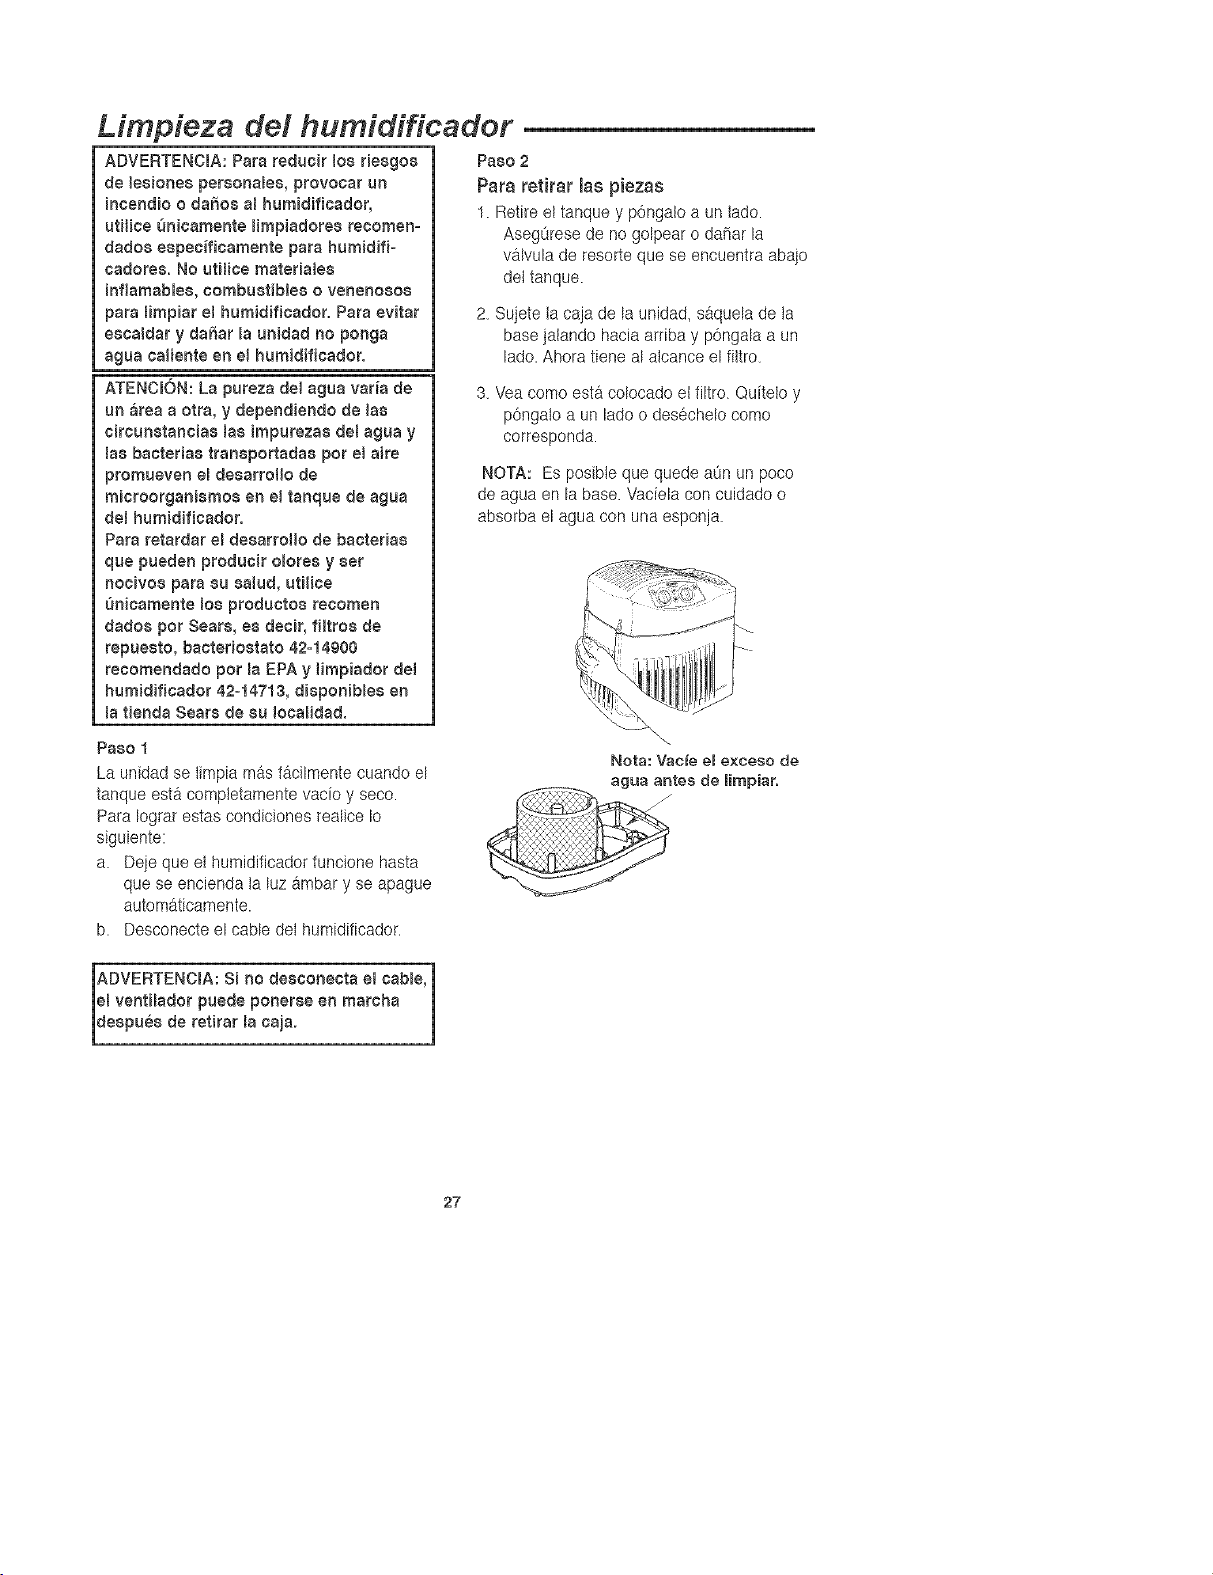
Paso 2
Para retitar las piezas
1. Retire el tanque y p6ngato a un tado.
Aseg0rese de no golpear o daSarla
va.lvulade resorts que se encuentra abajo
det tanque.
2. Sujete tacaja de la unidad, saquela de la
base jalando hacia arriba y p6ngala a un
lade. Ahora tiene al atcance el fittro.
3. Vea como esta colocado et fi[tro. Quiteto y
p6ngato a un lade o desechelo come
corresponda.
NOTA: Es posible que quede a0n un poco
de agua en la base. Vadela con cuidado o
absorba el agua con una esponja.
\
Nota: Vac_e el e×ceso de
agua antes de limpiar.
27
Limpieza del humidificador
Paso 3
Limpieza de cada dos semanas
Remoci6n de sarro
t. Vierta 8 onzas de vinagre Nanco sin dituir
en la caja del humidificador. Deje la
sotuci6n durante 20 minutos.
2. Limpie las superficies interiores con un
cepillo suave. Humedezca un paF_osuave
con vinagre blanco sin diluir y frote la
base papadesprender et sarro.
3. Enjuague perfectamente con agua timpia y
tibia para remover los residuos de sarro y
la soluci6n de Iimpiado.
Desinfecci6n de la caja del
humidificador
t. Vierta en la base un gal6n de agua y una
cucharadita de blanqueador de cloro.
Deje la soluci6ndu_ante 20 minutos,
removiendo cada 2 a 4 minutos.
Humedezca todas las superficies
expuestas normalmente al agua.
2. Vacie la caja despues de 20 minutes.
Enjuague con agua hasta que desaparez-
ca etolor a cloro. Espere a que la unidad
se seque completamente.
NOTA: Limpie et tanque de agua igual que Ia
base. Enjuague perfectamente con agua
limpia despues de compIetar todos los pasos.
Paso 4
ReempJazo de piezas
t. Instale en la base un filtro nuevo (No. de
pieza 42-14906) o elfiltro que retiro
previamente y puso a un tado, si se
encuentra en buenas condiciones El inicio
y final de tos bordes del fittro enrotlado
deben quedar en el centro de ta base (ver
diagrama) y el filtro debe quedar asentado
en etrondo de la base.
2. Vuelva a instalar la caja del humidificador
en ta base y el tanque de agua a ta
derecha de la caja. Vuetva a coiocar
et humidificador en su posici6n de
funcionamiento.
3. Ahora el humidificador esta tistopara
Ilenartode agua y ponerlo en marcha.
Limpieza de fin de estaci6n
t. Efect0e la limpieza de cada dos semanas
at finaiizar la estaci6n de humidificaci6n.
2. Retire el filtro y desecheto como es
debido.
3. Espere a que el humidificador se seque
completamente antes de guardarlo. No Io
guarde con agua en la base o tanque.
4. Guardeto en un lugar fresco y timpio.
5. Instale un filtro nuevo en el humidificador
limpio antes det inicio de la siguiente
estacion.
NOTA: Se recomienda efectuar la limpieza de
cada dos semanas cuando no planea utilizar
su humidificador durante una semana o m_s=
Coloque el
28
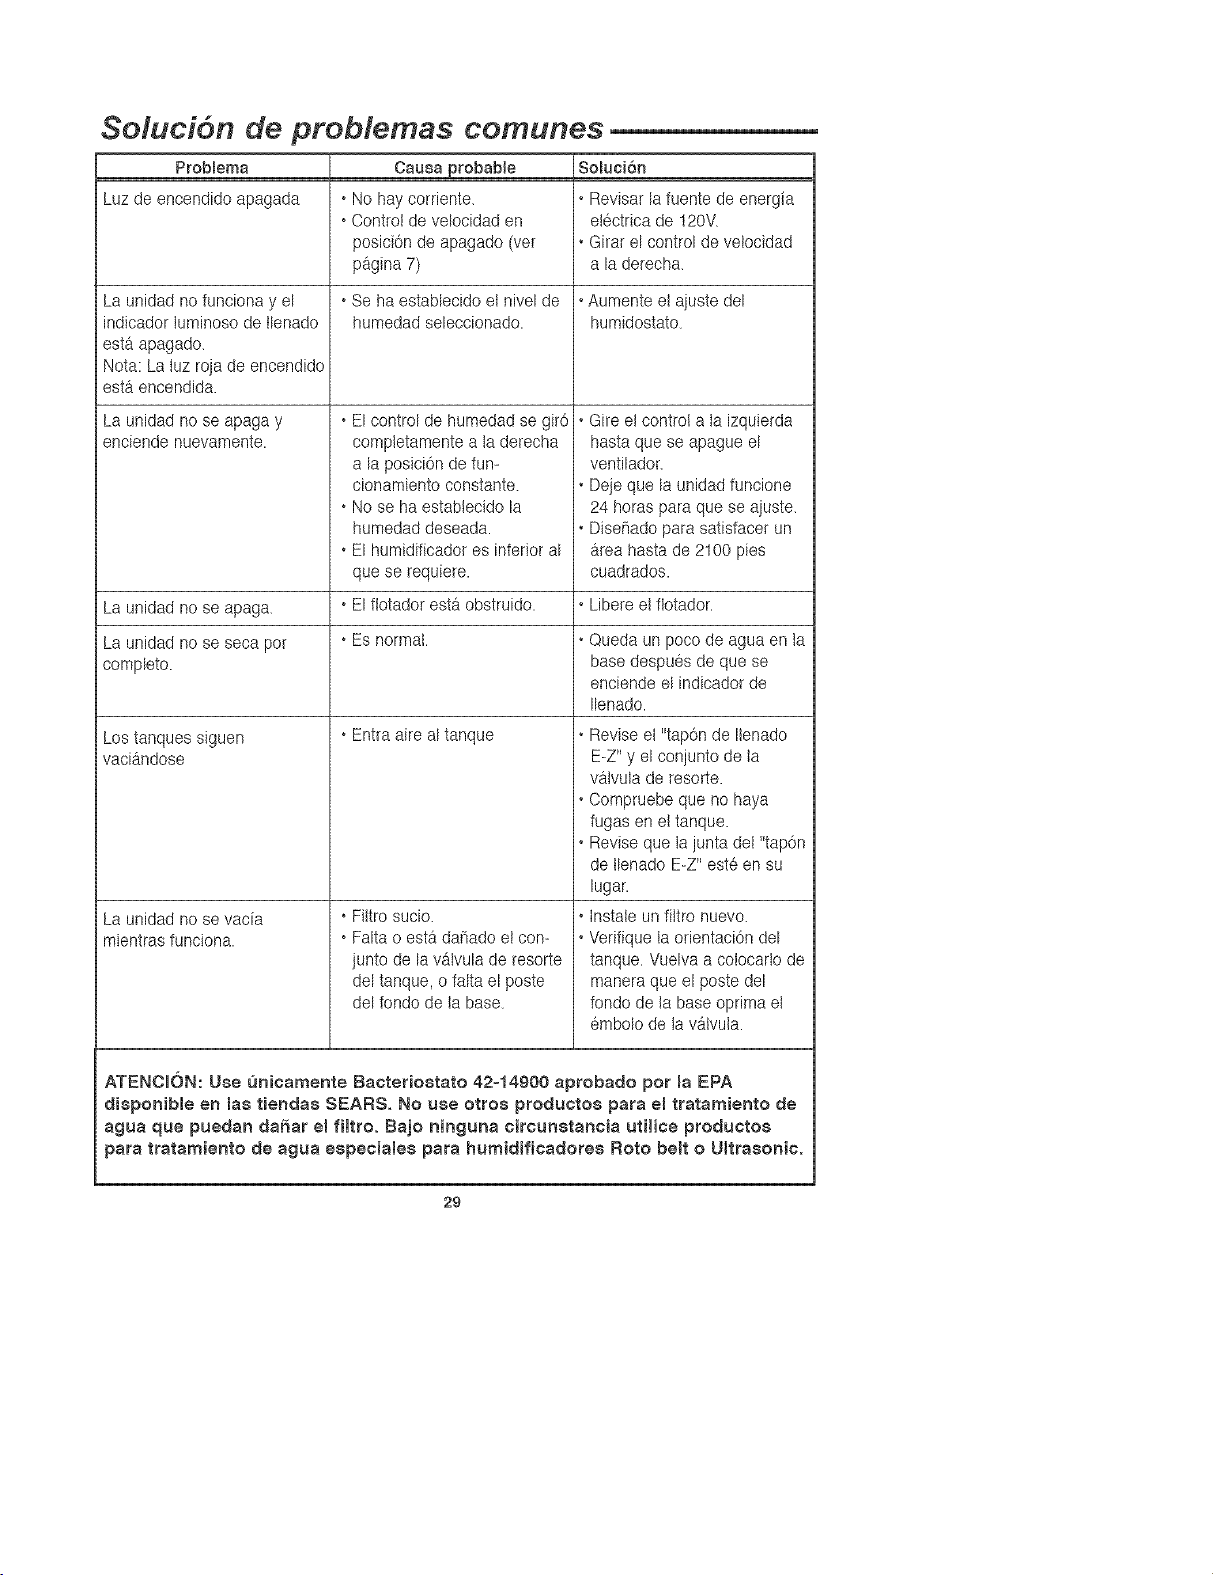
Soluci6n de problemas comunes
ProbEema Causa probable SoEuci6n
Luz de encendido apagada • No hay coFriente. • Revisar la fuente de energia
• Control de velecidad en electrica de t20V.
posici6n de apagado (vet • Girar el control de velocidad
pagina 7) a laderecha.
La unidad no funciona y el • Se ha establecido el nivel de • Aumente el ajuste del
indicador tuminoso de llenado humedad seleccienado, humidestate.
esta apagado.
Neta: La tuz roja de encendido
esta encendida.
La unidad no se apaga y
enoiende nuevamente.
• El control de humedad se gir6
completamente a taderecha
a la posici6n de fun-
cionamiento constante.
• No se ha establecido la
humedad deseada.
• El humidificador es interior al
que se requiere.
• El flotador esta obstruido.
• Gke etcontrol a la izquierda
hasta que se apague el
ventilador.
• Deje que la unidad funcione
24 betas para que seajuste.
• Dise_ado para satisfacer un
area hasta de 2100 pies
cuadrados.
La unidad no se apaga. • Libere et ftotader.
La unidad no se seca pot • Es normal.
complete.
• Entra aire al tanque
Los tanques siguen
vacia.ndose
La unidad no se vacia
mientras funciona.
• Fittro sucie.
• Falta o estb,dahado et con-
junto de la vatvula de resorte
del tanque, o falta el poste
del rondo de la base.
• Queda un poco de agua en ta
base despu6s de que se
enciende el indicador de
Ilenado.
• Revise et "tap6n de Itenado
E-Z' y el conjunto de la
va.tvuIade resorte.
• Compruebe que no haya
fugas en el tanque.
• Revise que ta junta det "tap6n
de Ilenado E-Z" este en su
lugar.
• Instate un fittro nuevo.
• Verifique Ia odentaci6n del
tanque. Vuelva a colocarto de
manera que el poste del
rondo de la base optima et
embole de la valvuta.
ATENCU6N: Use unicamente Bacteriostato 42-14900 aprobado pot la EPA
disponible en las tiendss SEARS. No use otros productos para el tratsmiento de
agua que puedan dahar emfiltro. Bajo rlinguna circunstansis utHise produstos
pars tratamiento de agua espesiales psra humidifissdores Roto be{t o Umtrasonis.
29

Piezas de repuesto
Piezas de repuesto para humidificadores Sears
No. de modelo 758.144106
11\_
3O
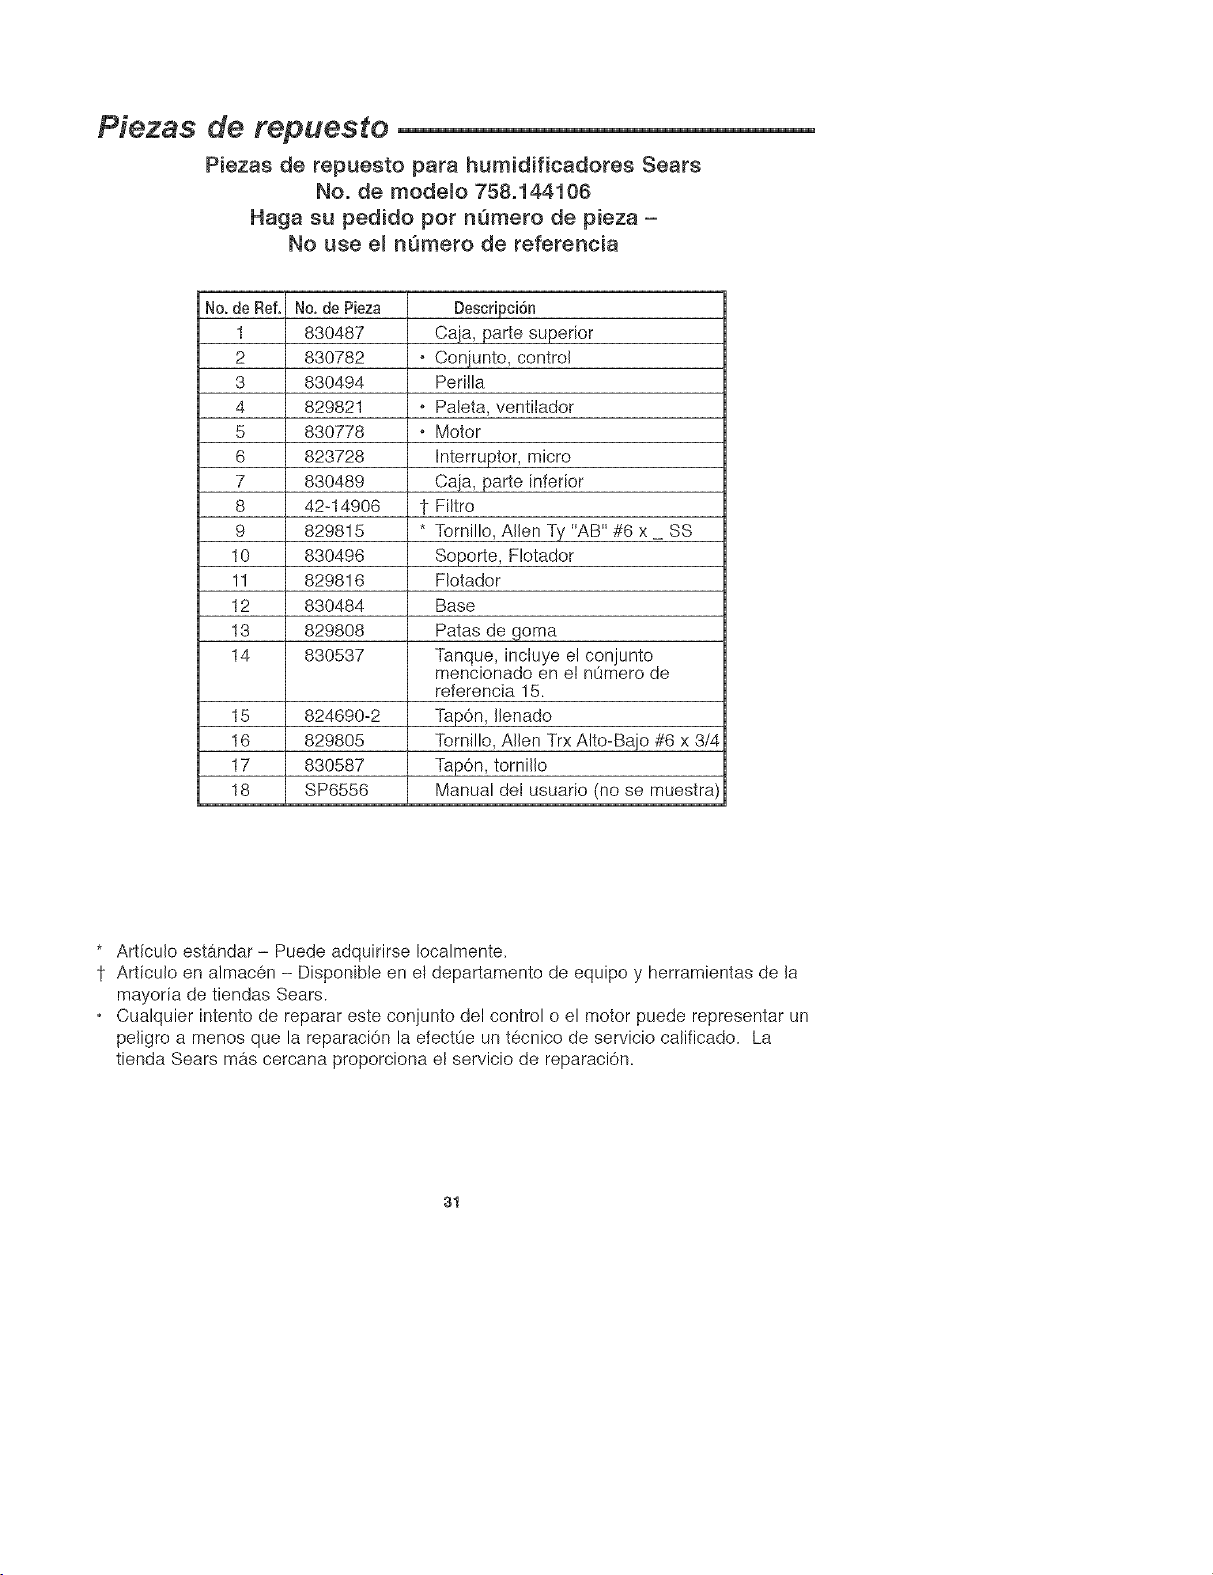
Piezas de repuesto
Piezas de repuesto para humidificadores Sears
No. de modelo 758°144106
Haga su pedido por nQmero de p{eza -
No use el n_mero de referencia
No.de
1
2
3
4
5
6
7
8
9
10
11
12
13
14
15
16
17
18
Ref. No. de Pieza
830487
830782
830494
829821
830778
823728
830489
42-14906
829815
830496
829816
830484
829808
830537
824690-2
829805
830587
SP6556
Descripci6n
Caia, parte superior
• Coniunto, control
Perilla
• Paleta, ventilador
• Motor
Interrupter, micro
Caia, parte inferior
t Filtro
• Tomillo, Allen Ty "AB" #6 x _ SS
Soporte, F!otador
Flotador
Base
Patas de goma
Tanque, incluye el conjunto
mencionado en el nQmero de
referenda 15.
Tap6n, Ilenado
Tomillo, Allen Trx Alto-Baio #6 x 3/4
Tap6n, tomillo
Manuai del usuario (no se muestra
* Articulo estandar - Puede adquirirse Iocalmente.
1- Articulo en almacen - Disponible en el departamento de equipo y herramientas de la
mayoria de tiendas Sears.
o Cualquier intento de reparar este conjunto del control o el motor puede representar un
peligro a menos que la reparaci6n la efectOe un tecnico de servicio calificado. La
tienda Sears mas cercana proporciona el servicio de reparaciOn.
31

Your Home
For repair-in your home-of all major brand appliances,
lawn and garden equipment, or heating and cooling systems,
no matter who made it, no matter who sold it!
For the replacement parts, accessories and
owner's manuals that you need to do-it-yourself.
For Sears professional installation of home appliances
and items like garage door openers and water heaters.
1-800-4-MY-HOIMIE <°_' (1-800-469-4663)
Call anytime, day or night (U.S.A. and Canada)
www.sears.com www.sears.ca
Our Home
For repair of carry-in items like vacuums, lawn equipment,
and electronics, call or go on-line for the location of your nearest
Sears Parts & Repair Center.
1-800-488-1222
Call anytime, day or night (U.S.A. only)
www.sears.com
To purchase a protection agreement (U.S.A.)
or maintenance agreement (Canada) on a product serviced by Sears:
1-800-827-6655 (U.S.A.) 1-800-361-6665 (Canada)
Para pedir servicio de reparaciSn
a domicilio, y para ordenar piezas:
1-888-SU-HOGAR SM
(1-888-784-6427)
Au Canada pour service en frangais:
1-800-LE-FOYER M°
(1-800-533-6937)
www.sears.ca
6E/.4RS
iiiilililililililili!iiii
M M
©RegisteredTrademark/T Trademark/s Service Mark ol Sears, RoebL_ck and Co
TM S_,_
© Marca Registrada / Marca de F_brica / Marca de Servic]o de Sears, Roebuck and Co.
M MD
C Marque de commerce / Marque d6pos6e de Sears, Roebuck and Co. © Sears, Roebuck and Co
Part No. SP6556 Form No. SP6556 Printed in Canada 06/04