
Read manual before use. Keep it well for future reference.
Pictures are for reference only, actual product may vary.
ROIDMI Cordless Vacuum Cleaner Operation Manual
Scan the QR code for manuals
in multiple languages

1
CONTENTS
1 . Latest operating instructions
...........................................................................................
2
2 . Explanation of symbols
...................................................................................................
2
3 . Safety instructions
........................................................................................................
2
4 . Product overview
..........................................................................................................
4
5 . Parts and accessories
....................................................................................................
4
6 . Assembly
.....................................................................................................................
5
7 . Operation
.....................................................................................................................
5
8 . Cleaning and maintenance
..............................................................................................
7
9 . Troubleshooting
............................................................................................................
8
10 . Technical data
.............................................................................................................
8
11 . Disposal
......................................................................................................................
8
12 . Warranty and limitations of liability
..................................................................................
9

2
1.Latest operating instructions
2.
Explanation of symbols
The lightning symbol inside a triangle is used when there is a potential risk of personal injury, such as electric shock.
An exclamation mark in a triangle indicates important instructions in this operating manual that carefully have to be observed.
The arrow symbol indicates specific tips and advice on operation.
3. Safety instructions
Read the manual before use.
IMPORTANT SAFETY INSTRUCTIONS
BEFORE USING READ ALL INSTRUCTIONS
When using an electrical appliance, basic precautions should always be followed, including the following: READ ALL INSTRUCTIONS
BEFORE USING (THIS APPLIANCE).Failure to follow the warnings and instructions may result in electric shock, fire and/or serious injury.
WARNING –
To reduce the risk of fire, electric shock, or injury:
WARNING:
Scan the QR code for manuals in multiple languages
The full text of the EU declaration of conformity is available at the following internet address:
http://doc.roidmi.com/web/#/27?page_id=0
1.If the supply cord is damaged, it must be replaced by the manufacturer, its service agent or qualified persons in order to avoid a hazard.
2.Before charging, read the instructions.
3.For indoor use only, do not expose to rain.
4.The battery charger is designed for charging the rechargeable battery provided by manufacturer.
5.Do not use any other charger to recharge the battery provided by manufacturer and do not try recharge other types of battery with
this charger. Also do not try to charge non-rechargeable batteries with this charger.
6.Before charging, check whether the voltage specified on the marking label corresponds to the mains voltage.
7.During charging, the appliance must be placed at well-ventilated area.
8.Please remove the plug from the socket before cleaning or maintaining the charger.
9.The appliance is only to be used with the power supply unit provided with the appliance.
10.This appliance contains batteries that are only replaceable by skilled persons.
11.The battery must be removed from the appliance before it is scrapped.
12.The appliance must be disconnected from the supply mains when removing the battery.
13.This appliance can be used by children aged from 8 years and above and persons with reduced physical, sensory or mental capabilities
or lack of experience and knowledge only if they have been given supervision or instruction concerning use of the appliance in a safe
way and understand the hazards involved.
14. Cleaning and user maintenance shall not be made by children without supervision.
15. Children should not play with the appliance.
16. Do not use outdoors or on wet surfaces.
17. Do not allow to be used as a toy. Close attention is necessary when used by or near children, pets or plants.
18. Use only as described in this manual. Use only manufacturer’s recommended attachments.
19. Do not use with damaged cord or plug. If appliance is not working as it should, has been dropped, damaged, left outdoors, or dropped
into water, return it to a service center.
20. Do not pull or carry by cord, use cord as a handle, close a door on cord, or pull cord around sharp edges or corners. Do not run appliance
over cord. Keep cord away from heated surfaces.
21. Do not unplug by pulling on cord. To unplug, grasp the plug, not the cord.
22. Do not handle charger, including charger plug, and charger terminals with wet hands.
23. Do not put any object into openings. Do not use with any opening blocked; keep free of dust, lint, hair, and anything that may reduce air flow.
24. Keep hair, loose clothing, fingers, and all parts of body away from openings and moving parts.
25. Use extra care when cleaning on stairs.
26. Do not use to pick up flammable or combustible liquids, such as gasoline, or use in areas where they may be present.
27. Do not pick up anything that is burning or smoking, such as cigarettes, matches, or hot ashes.
28. Do not use without dust cup and filter in place.
29. Prevent unintentional starting. Ensure the switch is in the off-position before connecting to battery pack, picking up or carrying the
appliance. Carrying the appliance with your finger on the switch or energizing appliance that have the switch on invites accidents.
30. Disconnect the battery pack from the appliance before making any adjustments, changing accessories, or storing appliance. Such
preventive safety measures reduce the risk of starting the appliance accidentally.
31. Recharge only with the charger specified by the manufacturer. A charger that is suitable for one type of battery pack may create a
risk of fire when used with another battery pack.

SAVE THESE INSTRUCTIONS
3
32. Use appliances only with specifically designated battery packs. Use of any other battery packs may create a risk of injury and fire.
33. When battery pack is not in use, keep it away from other metal objects, like paper clips, coins, keys, nails, screws or other small metal
objects, which can make a connection from one terminal to another. Shorting the battery terminals together may cause burns or a fire.
34. Under abusive conditions, liquid may be ejected from the battery; avoid contact. If contact accidentally occurs, flush with water.
If liquid contacts eyes, additionally seek medical help. Liquid ejected from the battery may cause irritation or burns.
35. Do not use a battery pack or appliance that is damaged or modified. Damaged or modified batteries may exhibit unpredictable
behavior resulting in fire, explosion or risk of injury.
36. Do not expose a battery pack or appliance to fire or excessive temperature. Exposure to fire or temperature above 266°F (130°C)
may cause explosion.
37. Follow all charging instructions and do not charge the battery pack or appliance outside of the temperature range specified in the
instructions. Charging improperly or at temperatures outside of the specified range may damage the battery and increase the risk of fire.
38. Have servicing performed by a qualified repair person using only identical replacement parts. This will ensure that the safety of the
product is maintained.
39. Do not modify or attempt to repair the appliance or the battery pack except as indicated in the instructions for use and care.
40. Always turn off this appliance before connecting or disconnecting electric brush.
41. The plug must be removed from the socket-outlet before.
42.He appliance is not to be used by persons (including children) with reduced physical, sensory or mental capabilities, or lack of
experience and knowledge, unless they have been given supervision or instruction。he appliance is not to be used by persons
(including children) with reduced physical, sensory or mental capabilities, or lack of experience and knowledge, unless they have been
given supervision or instruction
CAUTION:
1. Make sure the plug is well inserted to avoid electric shock, short circuit and fire.
2. Immediately cut off the power supply and unplug in case of product distortion, overheat, unusual smell and sound during charging or
operation. Place the product in an open and non-combustible area. Have servicing performed by the manufacturer or a qualified repair
person. This will ensure that the safety is maintained.
3. Do not pour water on the product or plug or immerse them in water.
4. If the brush roller fails, turn off the vacuum cleaner immediately. Check if the brush roller is wrapped by hair or other excessively long
fibers and clean.
5. Keep the vacuum cleaner away from someone carrying a pacemaker device during use.
6. Keep the vacuum cleaner out of the reach of children or pets to avoid injuries when it is attached on the wall-mounted charging dock
for storage.
7. When charging with the wall-mounted charging dock, make sure the main unit fits perfectly against the wall-mounted charging dock
to avoid falling off and causing injuries.
8. When charging the main unit, make sure the battery indicator is on.
9. Keep children away from the wall-mounted charging dock, especially one with charging function. Product falling during charging can
cause hazards such as electric shock due to leakage.
10. Do not drop the product. Do not place the product under any mechanical stress. Prevent the product from colliding with other objects.
11. Timely clean the dust cup to guarantee good air ventilation, so as to avoid poor suction or motor heating caused by air blockage.
12. Protect the vacuum cleaner from extreme temperatures. Recommended operating and storage temperatures are 32°F (0°C) to
95°F (35°C). Keep it in a cool and dry place.
13. Do not use vacuum cleaner to suck up water to avoid water entering the main unit and causing malfunction. When water enters
the dust cup, turn off the vacuum cleaner immediately and empty the dust cup. Make sure the dust cup is completely dry.
14. Dry after washing the brush roller completely before reinstalling.
15. Timely clean attachments after use to prevent food residue, cotton wool from rotting in them.
16. Use only the cleaning brush supplied by the manufacturer to clean the dust cup filter. Do not use other steel or hard brushes.
17. Keep the cleaning brush out of the reach of children to avoid injury. With a sharp blade, the cleaning brush is used to cut off entangled
substances that are
difficult to clean.
Household use only.
4
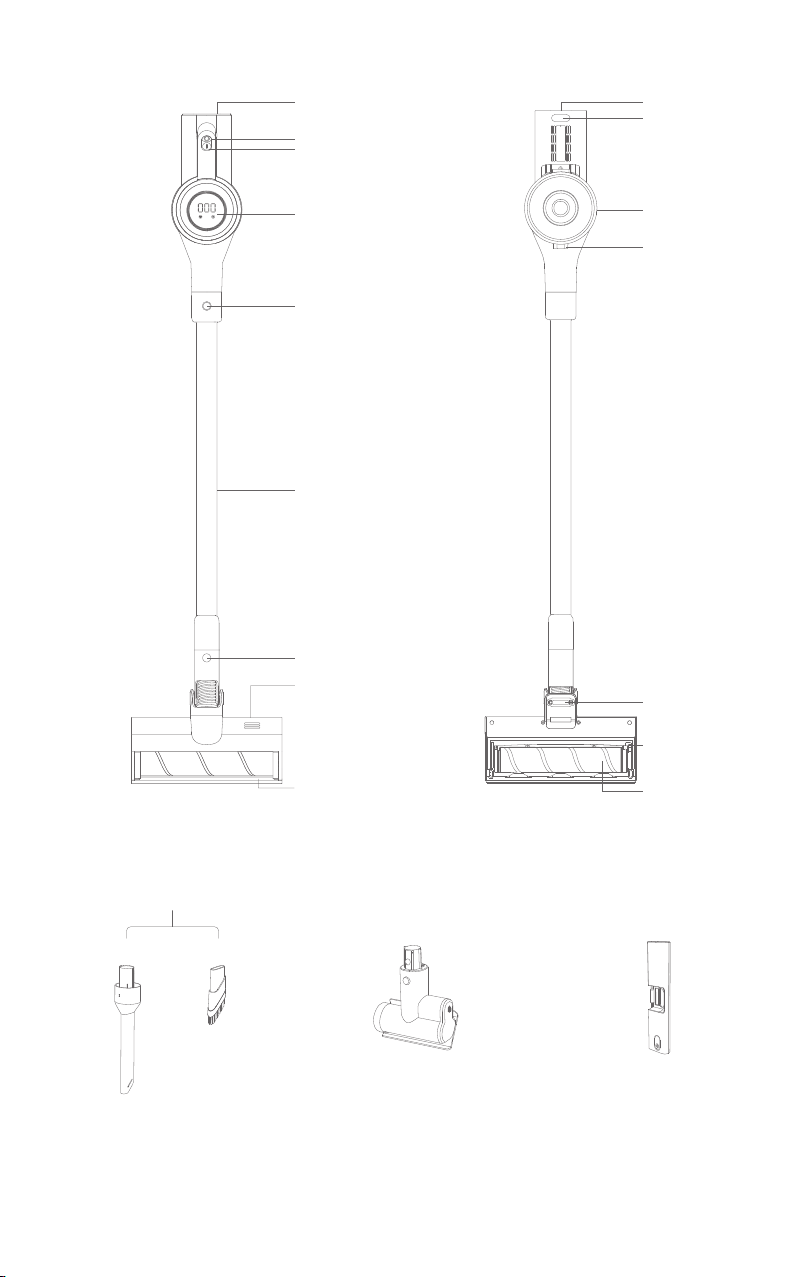
Mode switch
Power switch
Display
Extension wand release
button
Metal extension wand
Electric brush release button
Ventilation hole
Bumper
Contact charging point
4.Product overview
5.Parts and accessories
Charging port
Dust cup
Dust cup release button
Wheel
Brush roller end cap
fastener
Anti-slip cushion
Brush roller
*Crevice tool *Soft brush
*Crevice tool assembly
*Mattress brush
For cleaning small gaps such as dead
corners of doors , windows and stairs;
For cleaning dust and mites on textile materials
such as beds,curtains and sofas;
For mopping on floor tiles;
*Water tank module
5
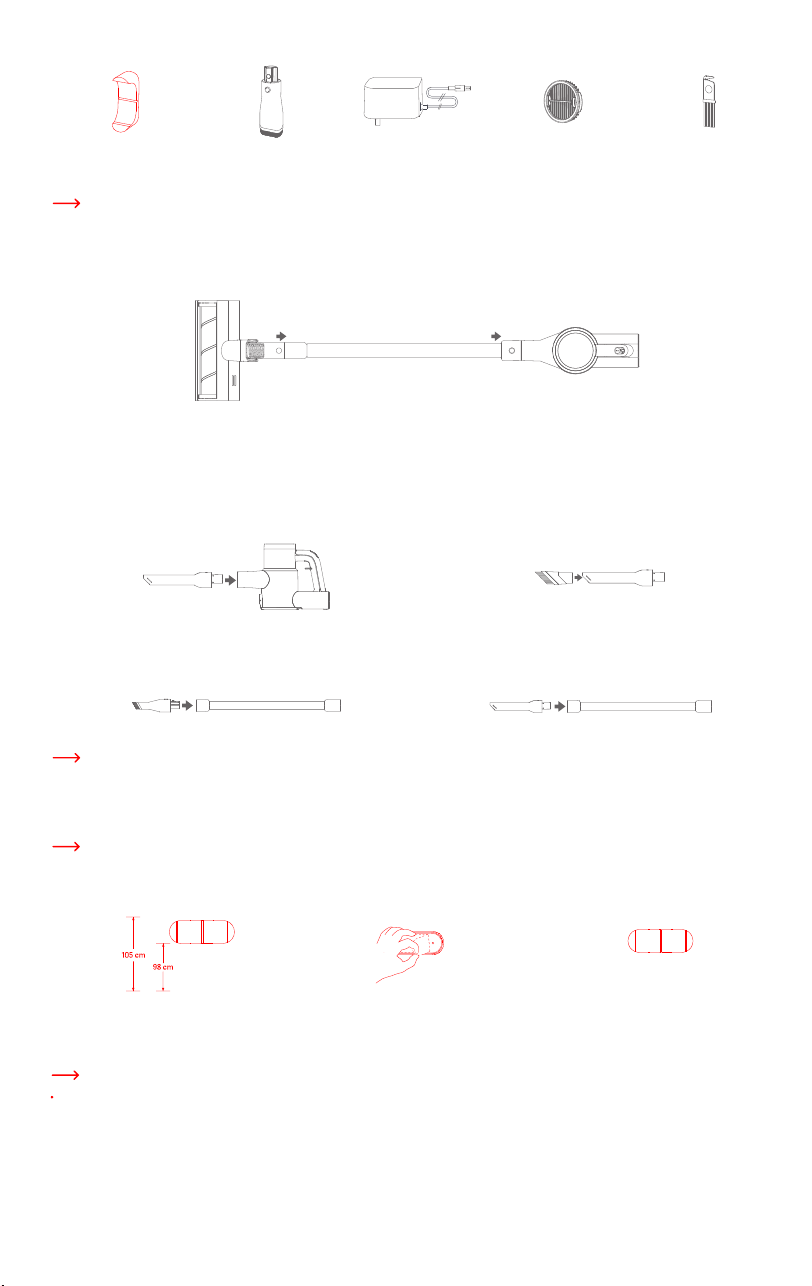
6.Assembly
a)Assembling your vacuum cleaner
b)Assembling accessories
7.Operation
c ) Installing wall mount
Wall mount
For fixing vacuum cleaner on glass
walls , ceramic walls , etc.
For cleaning on sofas , closets
window sills , etc
For charging the main unit For filtering out tiny dust and
air particles , etc
For cleaning dust cup and removing
hair , fibers and other impurities
entangled on the brush roller
*Wide nozzle Power adapter *HEPA filter Cleaning brush
*For actual items included, please refer to the packing list.
There are a variety of accessories that are compatible with this vacuum cleaner. Attach desired accessory or cleaning tool to the vacuum
cleaner for specific cleaning purpose.
Wall mount is designed to store the vacuum cleaner while not in use . Be sure it is installed near an outlet.
Ensure the wall is clean and free of dust before installing
1.Measure a height of 98 to 105 cm and mark
the installation position.
2.Remove the protective film.
3.Paste the wall mount on the wall , pressing
slightly to make sure it is firmly adhered
to the wall.
Accessories which can be directly connected to the main unit include wide nozzle, metal extension wand and mattress brush. The
method for attaching them is the same as for attaching the crevice tool.
1.Attaching crevice tool: Insert as illustrated the crevice tool into
the main unit suction inlet, pressing it until it secures into place.
3.Attaching wide nozzle to metal extension wand: Insert the wide
nozzle into the metal extension wand, pressing it until it secures into place.
4.Attaching crevice tool to metal extension wand: Insert the crevice
tool into the metal extension wand, pressing it until it secures into place.
2.Attaching soft brush: As desired, attach the soft brush to the crevice
tool, pressing it until it secures into place.
a)Charging
Fully charge the vacuum cleaner before first use.
To charge, connect the power adapter to the charging port on the vacuum cleaner, then connect the other end of the power adapter
to a wall outlet. It takes approx. 2.5 hours to fully charge.
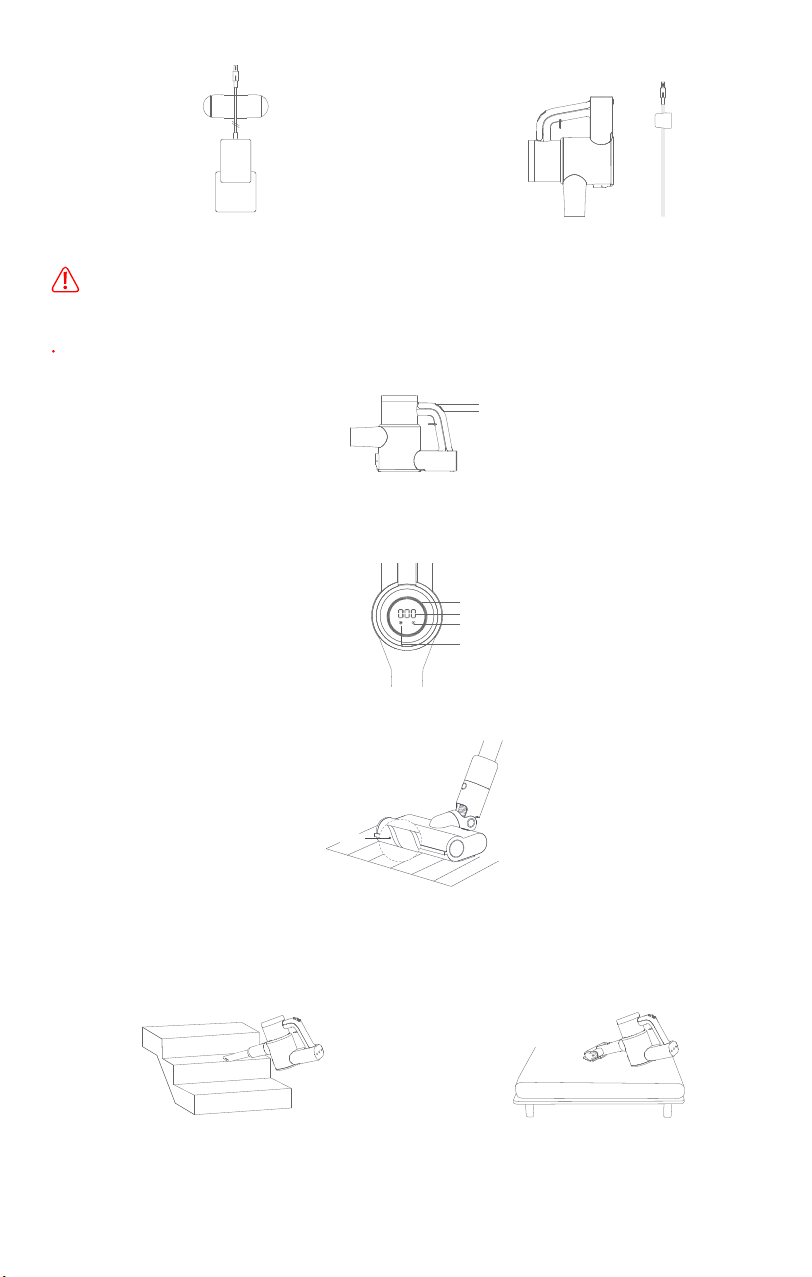
Using wall mount :
1.Attach the main unit on the wall mount , press slightly to make sure
the vacuum cleaner is firmly attached to the wall mount . To charge ,
connect the power adapter to a rated AC power supply , then connect
the other end of the power adapter to the charging port on the main
unit . Fix the charging cable along the grooves of the wall mount.
2.While charging , the battery level number on the display increases
and the LED loop lights up gradually . Until battery is fully charged , the
number turns to 100,and the LED loop fully lights up.
6
AC power interface
Keep the vacuum cleaner out of the reach of children or pets to avoid injuries when it is attached on the wall-mounted charging
dock for storage.
Make sure the vacuum cleaner fits securely on the charging dock to avoid injuries in case the main unit falls down.
b)Turning on/off
c)Using brush roller
d)Using accessories
Press the power switch to turn the vacuum cleaner on. The vacuum cleaner enters ECO mode by default. While operating, press the
mode switch to switch between ECO, STANDARD and BOOST modes. Press the power switch again to turn it off.
Mode switch
Power switch
Display
While operating, LED loop on the display changes depending on the operating modes. In BOOST mode, all LED lights on; in STANDARD
mode, 1/3 LED lights off; in ECO mode, 1/3 LED lights on. In addition, icons of filter change reminder, dust cup full reminder are shown
on the display.
Filter change reminder
LED loop
Power level indicator
Dust cup full reminder
HL soft roller can be used to clean floor tiles, wooden floors, carpets, etc.
HL soft roller
Crevice tool: for tight spaces such as corners of doors, windows
and stairs, etc.
Mattress brush: for the surfaces of beds, curtains and other
textile surfaces, and removing mites.
8.Cleaning and maintenance
7
Always switch “OFF” and unplug before carrying out any maintenance.
Never use aggressive detergents, rubbing alcohol or other chemical solutions, as these may damage the casing or cause the
appliance to malfunction.
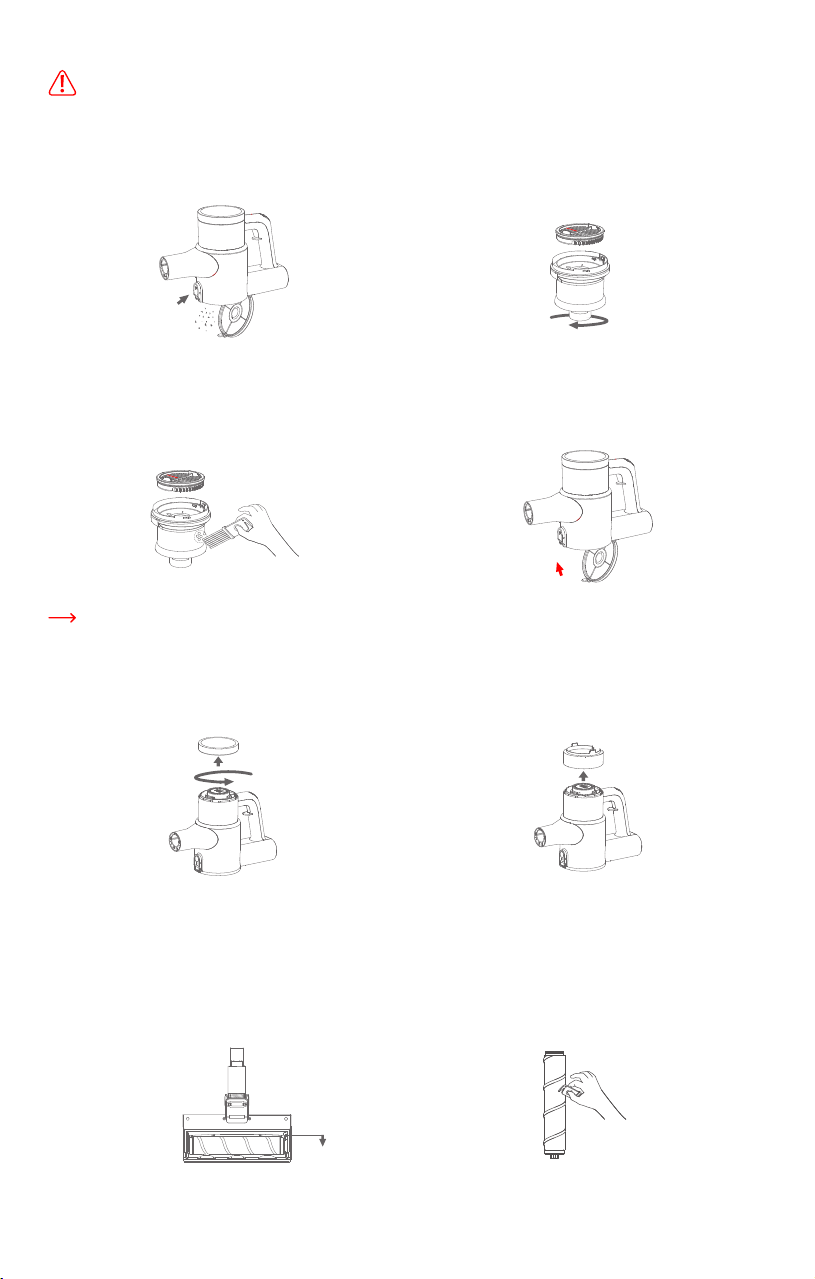
a)Cleaning dust cup
1.Position dust cup over a bin. Press the dust cup release button
to open the dust cup cover and empty the dust cup.
2.Hold the cyclone and turn clockwise to remove the cyclone from
the dust cup. Pull up the filter and remove it from the cyclone.
3.
Use cleaning brush to clean the filter and cyclone. Wash them
under running water. Air-dry completely for at least 24 hours before
reinstalling.
4.Reinstall the filter and cyclone into the dust cup. Push the dust
cup cover up until it clicks into place.
It is recommended to replace the filter every 3 months to maintain the highest efficiency. Use only filters specified by the manufacturer.
b)Cleaning rear filter
1.Remove head cover of main unit
To remove the head cover of the main unit, hold it and turn anticlockwise.
1.Assemble and disassemble the brush roller
Place the electric brush backside up.Pull down the end cap fastener
on the right side of the electric brush . Lift up the brush roller and
eplace with a clean one.Insert the cap fastener into the slot until
it clicks into place
2.Clean the rear filter
Use the cleaning brush to remove hair and fibers attached to the
brush roller.Wash it under running water . Air-dry completely for
at least 24 hours before installing.
2.Clean the rear filter
Pull up the rear filter handle to take out the rear filter.
Wash the rear filter under running water. Air-dry completely for
at least 24 hours before reinstalling.
b)Cleaning rear filter
Pull down the brush
roller end cap fastener
XCQ18RM
XCQDS08RM
XCQCMS08RM
8
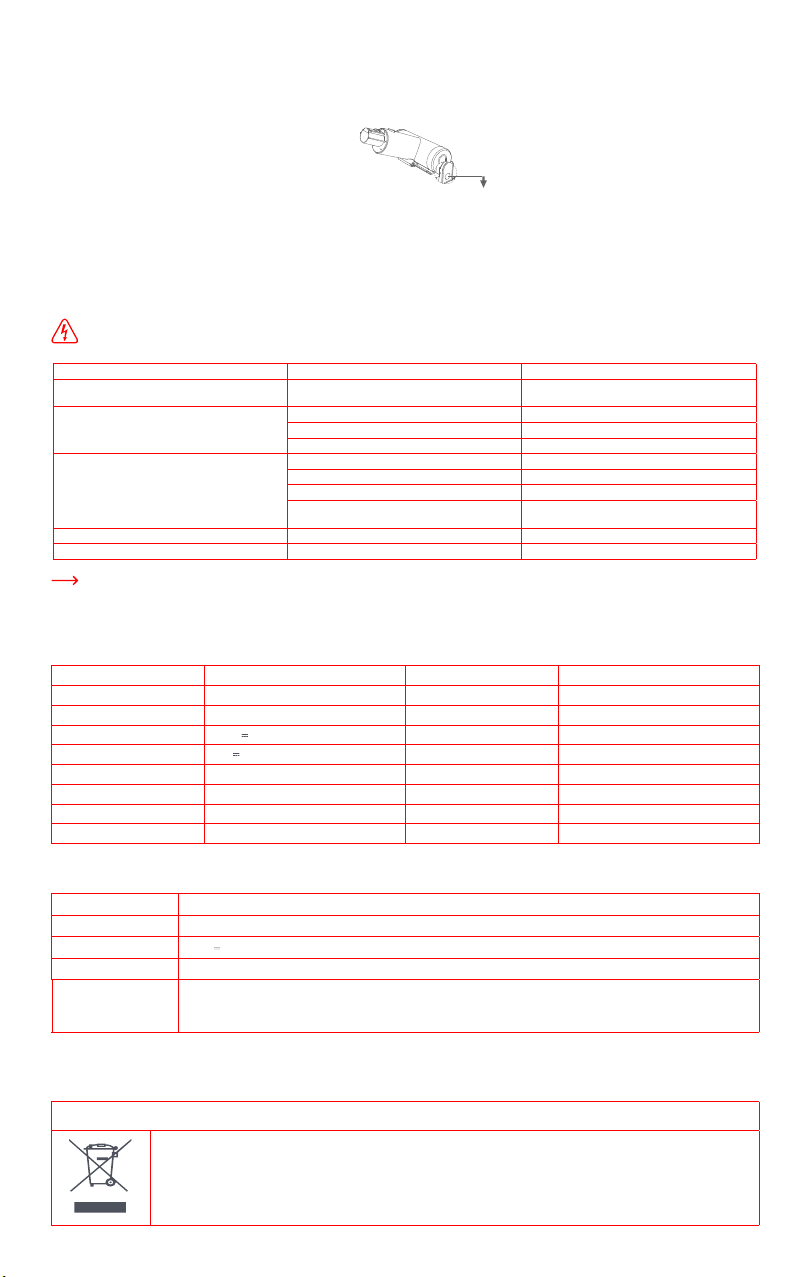
d) Cleaning mattress brush
1. Pull down as illustrated the mattress brush end cap fastener to remove the cap. Take out the mattress brush roller and wash it under
running water. Air-dry completely for at least 24 hours before reinstalling.
Pull down the end
cap fastener
2. Reinstall the brush roller and the end cap fastener.
9.Troubleshooting
To reduce the risk of shock and unintended operation, turn off power and unplug the appliance before servicing.
Problem description Possible cause Possible solution
Brush roller does not spin
Brush roller wrapped by hair, fibers and other long
impurities
Remove impurities entangled on the brush
roller
Motor does not work Low battery Charge the vacuum cleaner
Dust cup full of dust Empty the dust cup
Vacuum cleaner overheats due to extended runtime Restart after cooling
Poor suction Filter full of dust Clean or change the filter
Air inlet of brush roller or brush roller itself blocked Clean electric brush
Cyclone blocked by paper or wool fibers Regularly check and clean cyclone
Air channel between dust cup and main unit
blocked
Regularly check and clean air channel between
dust cup and main unit
Display screen not on during charging Power adapter not plugged in properly Plug in power adapter properly
Wheel on the brush roller does not rotate Wheel wrapped by hair, fibers and other impurities Clean or change the wheel
In any other case or if the solution explained above did not solve the problem, please contact us at service@roidmi.com.
10. Technical data
a)
Vacuum cleaner
Charging time
≤ 3.5 hours
Running time approx. 65 mins (ECO mode)
Running time
approx. 30 mins (STANDARD mode)
25.2 V
Running time
approx. 10 mins (BOOST mode)
30 V
Dust cup capacity
approx. 0.65 L
2500 mAh/ 63 Wh
Noise
<82dB(A)
385 W (Total)
Dimensions 1191 x 259 x 221 mm
350 W (Motor)
Weight (net) approx. 2.7 kg
35 W (Electric brush)
Product model
Electric brush model
Mattress brush model
Rated operating voltage
Rated charging voltage
Lithium battery capacity
Motor Power
Motor Power
Motor Power
b)Power adapter
Rated input voltage 100-240V~
Rated input current
1.0A
Rated output voltage
30 V
Rated output current 0.8A
Product model
Sydkorea: KA2401A-3000800KR, European Union: KA2401A-3000800EU, Australia: KA2401A-3000800AU,
United Kingdom: KA2401A-3000800BS, United States: KA24B-3000800US, Japan: KA2401A-3000800JP, Taiwan:
KA2401A-3000800TW, China: KA2401A-3000800CN
11.Disposal
Correct disposal of this product
This marking indicates that this product should not be disposed with other household wastes throughout the EU.
To prevent possible harm to the environment or human health from uncontrolled waste disposal, recycle it responsibly
to promote the sustainable reuse of material resources. To return your used device, please use the return and collection
systems or contact the retailer where the product was purchased. They can take this product for environmental
safe recycling.

9
12.
Warranty and limitations of liability
More specifically, the warranty does not cover:
• Damage or problems caused by improper use, accident, alteration or electrical connection of improper intensity or voltage.
• Modified products, those whose warranty seal or serial number have been damaged, altered, removed or oxidized.
• Failure of the battery due to overcharging or failure to observe the safety instructions explained in the instruction manual.
• Cosmetic damage, including scratches, dents, or any other element.
• Damage caused by any intervention carried out by an unauthorised person.
• Defects caused by normal wear and tear or due to normal ageing of the product.
• Software updates due to a change in network settings.
• Product failures due to the use of third party software to modify, change or adapt the existing software.
• Product failures caused by use without accessories approved by the manufacturer.
• Oxidised products.
Terms and conditions of implementation:
• Repair or replace defective parts.
• Exchange the returned product with a product that has at least the same functionality and that is equivalent in terms of performance.
• Refund the product at the purchase price of the product mentioned on the proof of purchase.
If one of these 3 solutions is used, this does not give rise to the extension or renewal of the warranty period.
This product is guaranteed for a period of 24 months (defined by local law) from the date of purchase against any failure resulting from
manufacturing or material defects. This warranty does not cover damage caused by improper installation, improper use, or normal wear
and tear of the product.
To obtain a warranty service, you are requested to return your product to the customer service desk of your retail outlet with your proof
of purchase (receipt, invoice, …), the product and its supplied accessories, with its original packaging.
It is important to have the date of purchase, the model and the serial or IMEI number on hand as information (this information
usually appears on the product, the packaging or your proof of purchase).
Failing this, you must return the product with the accessories necessary for its proper operation (power supply, adaptor, etc.). In the
event that your claim is covered by the warranty, the after-sales service may, within the limits of local law, either:
(EC) 1275/2008: 2008-12-17Amended by (EC) 278/2009:2009-04-06, (EC) 642/2009:2009-07-22, (EU) 617/2013:2013-06-26; (EU) 801/2013:2013-08-22
EN 50564:2011,EN 60335-1:2012/A15:2021,EN 60335-2-2:2010/A1:2013,EN 62233:2008,EN 55014-1:2017/A11:2020,EN IEC 55014-1:2021,EN 55014
-2:2015,EN IEC 55014-2:2021,EN 61000-3-2:2014,EN IEC 61000-3-2:2019/A1:2021,EN 61000-3-3:2013;EN 61000-3-3:2013/A1:2019,2011/65/EU
Manufacturer: ROIDMI INFORMATION TECHNOLOGY CO., LTD.
Address: 4F, C8 BUILDING, NO. 1699 HUISHAN ROAD, LIFE SCIENCE AND TECHNOLOGY PARK, HUISHAN DISTRICT, WUXI, JIANGSU, PRC
Service Email : [email protected]
Corporate website: www.roidmi.com/en
For product sales information, please check the website: www.roidmi.com/en
XCQ18RM_UM_EN_No.1.2022
Illustrations may differ from actual product. We are constantly striving to improve our products; therefore
the specifications contained herein are subject to change without notice.
