Owner’s Manual
Model 47251
Questions or Concerns?
Toll Free: 1-877-689-2838 • help@nuwavenow.com
(Mon-Fri 7:30am-4:30pm CST)
2
REGISTER
NOW!
As a special thank-you for registering your NuWave
®
OxyPure
ZERO
™
,
you’ll automatically receive an additional 12 months added to your
limited manufacturer’s warranty!*
All you have to do is follow these simple steps.
Using your smartphone or smart
device’s camera function, scan
the QR code located on the
back of the unit, then accept
the prompt to be directed to the
registration page.
You will be directed to NuWave’s
product registration page with
your OxyPure’s unique serial
number automatically entered in
the appropriate eld.
NOTE: If you do not have a
web-enabled smart device,
simply visit nuwavenow.com/
QR and manually enter in your
Oxypure’s serial number.
Fill out the remaining information
and complete the optional survey.
Once you submit your
information, you will receive
a conrmation email containing
your extended warranty details.
1
2
3
4
*Register your product within 1 year of the date of purchase for a free
12-month extension of your limited warranty.
nuwavenow.com

3
12
for an additional
-month
warranty!
Open your mobile app store
(App Store, Google Play).
Search for "QR code readers."
Simply download the QR code reader to your phone,
open it, scan the code and you are ready to go.
NOTE: You may need to open your downloaded QR
code reader each time you want to scan a QR code.
1
2
3
DOWNLOAD THE QR CODE
APP TO YOUR MOBILE DEVICE
QR code readers
nuwavenow.com
4
TABLE OF CONTENTS
nuwavenow.com
Visit nuwavenow.com to see our other NuWave
®
products and accessories.
Owner’s Manual
Important Safeguards ............................................................................6-8
Parts & Accessories .................................................................................. 9
Wi-Fi Connection ...............................................................................10-12
Instructions.........................................................................................12-17
Cleaning & Maintenance ..................................................................... 18-21
Troubleshooting Guide .......................................................................22-23
Limited Warranty .................................................................................24-27
Spanish.................................................................................................28-53
Replaceable Parts................................................................................54-55
Intertek Electrical
Testing Lab
Underwriters
Laboratories
U.S. Environmental
Protection Agency
Conformité Européenne
(European Union Health
and Safety Standards)
•
2

5
nuwavenow.com
Visit nuwavenow.com to see our other NuWave
®
products and accessories.
#nuwavenow
Connect with us!
Welcome to the NuWave
®
Family!
Congratulations on your NuWave
®
OxyPure ZERO
™
Smart Air Purier
purchase! We’re incredibly excited for you to enjoy pure, clean air in
your home with your new OxyPure.
We want to make sure you get the most out of your OxyPure experience
so we have provided detailed operating instructions here in this manual
so you know all the ins and outs to make sure the OxyPure is meeting
your needs.
We want every step of your NuWave
®
experience to be as easy and
rewarding as possible, so if you have any questions, comments, or
concerns, please don’t hesitate to contact Customer Service by calling
1-877-689-2838 or emailing help@nuwavenow.com
(Mon-Fri 7:30am-4:30pm CST).

nuwavenow.com
6
IMPORTANT SAFEGUARDS
HOUSEHOLD USE ONLY • READ ALL INSTRUCTIONS BEFORE USE
important safeguards
ALWAYS KEEP THIS MANUAL HANDY
FOR FUTURE REFERENCE.
READ ALL INSTRUCTIONS and WARNINGS: The failure to follow any
of the important safeguards, warnings, or instructions for safe use
is a misuse of the OxyPure
®
that can void your warranty and create
the risk of serious injury. When using the OxyPure, basic safety
precautions should always be followed.
1. ONLY use the OxyPure for its intended purpose.
2. To protect against the risk of electrical shock, DO NOT immerse the
cord, plug, or any part of the OxyPure in water or any other liquid.
3. Close supervision is necessary when the OxyPure is used by or near
children. The OxyPure is not intended for use by children, persons with
reduced physical, sensory, or mental capabilities, or those who lack
expertise or knowledge of this device.
4. DO NOT operate the OxyPure with a damaged cord, plug, after
any malfunction, or if the unit has been dropped or damaged in any
way. Contact Customer Service at 1-877-689-2838 or email help@
nuwavenow.com for more information.
5. Discard the protective plastic covering the power plug before use.
6. DO NOT run the cord under carpeting. DO NOT cover the cord with
throw rugs, runners, or other coverings.
7. DO NOT route the cord under furniture or appliances. Arrange the cord
away from high-trafc areas where it will not be tripped over.
8. DO NOT plug the OxyPure into an outlet or power strip that is being
used by other appliances.
9. Remove any dust or water from the plug, if needed.
10. ALWAYS set up the OxyPure on at, stable ground.
11. DO NOT set up the OxyPure where it could be pushed, kicked, or
tripped over.
12. Leave at least 2-3 feet of space between the OxyPure’s vents and
any walls.
13. DO NOT install the OxyPure near a heating device, ammable or
combustible gases or vapors, or in areas exposed to moisture or water.
14. DO NOT operate the OxyPure on its side.
15. DO NOT place objects on top of the OxyPure.

nuwavenow.com
7
16. DO NOT sit or stand on, or lean against, the OxyPure.
17. Alteration or modication of any part of the OxyPure, or the use of
attachments not recommended by the manufacturer, may cause re,
injury, or damage to property.
18. As with most electrical units, electrical parts are live even when the
OxyPure is off. Be sure the OxyPure is unplugged when assembling.
19. DO NOT use the OxyPure in a factory or industrial setting where
machine oil may be present in the air.
20. Turn the power OFF on the OxyPure before unplugging the OxyPure.
Unplug the OxyPure from outlet when the unit is not in use or will be left
unattended for an extended period of time; before putting on or taking
off parts; when removing or replacing the lters; and before cleaning.
21. DO NOT operate the OxyPure if abnormal sounds or motion is detected.
22. If a hard or foreign object comes into contact with the fan, do not
operate. Turn off and unplug the OxyPure.
23. Inspect the OxyPure for any loose or missing parts before and after
each use. If parts are loose, damaged, or missing, contact Customer
Service at 1-877-689-2838 or email help@nuwavenow.com.
24. DO NOT pull, lift, drag, pick up, or carry the OxyPure by its cord.
25. DO NOT block the air inlet or outlet vents.
26. DO NOT operate the OxyPure without all lters in place.
27. The Bio-Guard
®
lters carry an 8000V charge. When inserting them,
make sure they are dry and that the electrical contacts are fully engaged.
28. When using the OxyPure as a tabletop unit, ALWAYS remove the wheels.
WARNING
RISK OF ELECTRIC SHOCK: To reduce the risk of electric shock, this
equipment has a polarized plug (one blade is wider than the other). This
plug will t in a polarized outlet only one way. If the plug does not t fully in
the outlet, reverse the plug. If it still does not t, contact qualied personnel
to install the proper outlet. Do not alter the plug in any way.
These servicing instructions are for use by qualied personnel only. To
reduce the risk of electric shock, do not perform any servicing other than that
contained in the operating instructions unless you are qualied to do so.

8
IMPORTANT SAFEGUARDS
HOUSEHOLD USE ONLY • READ ALL INSTRUCTIONS BEFORE USE
important safeguards
Power-Supply Cords
A short power-supply cord (or detachable power-supply cord) is provided
to reduce the risk of becoming entangled in, or tripping over, a longer cord.
Longer detachable power-supply cords or extension cords are available and
may be used if care is exercised in their use. If a longer detachable power-
supply cord or extension cord is used:
1. The marked electrical rating of the extension cord should be at least as
great as the electrical rating of the appliance.
2. The longer cord should be arranged so that it will not drape over any
countertop or tabletop where it could be pulled on or tripped over
unintentionally.
3. The OxyPure should be operated on a separate electrical outlet from
other operating appliances due to wattage limitations.
4. The appliance has a polarized plug (one blade is wider than the other).
To reduce the risk of electric shock, this plug is intended to t into a
polarized outlet only one way. If the plug does not t fully into the outlet,
reverse the plug. If it still does not t, contact a qualied electrician. Do
not attempt to modify the plug in any way.
5. If the appliance is of the grounded type, the cord set or extension cord
should be a grounding type 3-wire cord.
Filter Cleaning Precautions
1. DO NOT vacuum lters. Doing so will release dust and other pollutants
back into the air.
2. ALWAYS wear a mask and use rubber gloves when handling or
cleaning the lters.
3. When removing dirty lters for cleaning, ALWAYS begin the cleaning
process intermediately to prevent captured particles and pathogens
from being released back into the air.
A. When removing lters, move carefully and DO NOT SHAKE them.
B. Immediately immerse the Stainless-Steel Prelter and the Bio-Guard
®
lters in water. DO NOT allow the Ozone Emission Removal Filter to
get wet.
C. Wash as instructed.
9
PARTS & ACCESSORIES
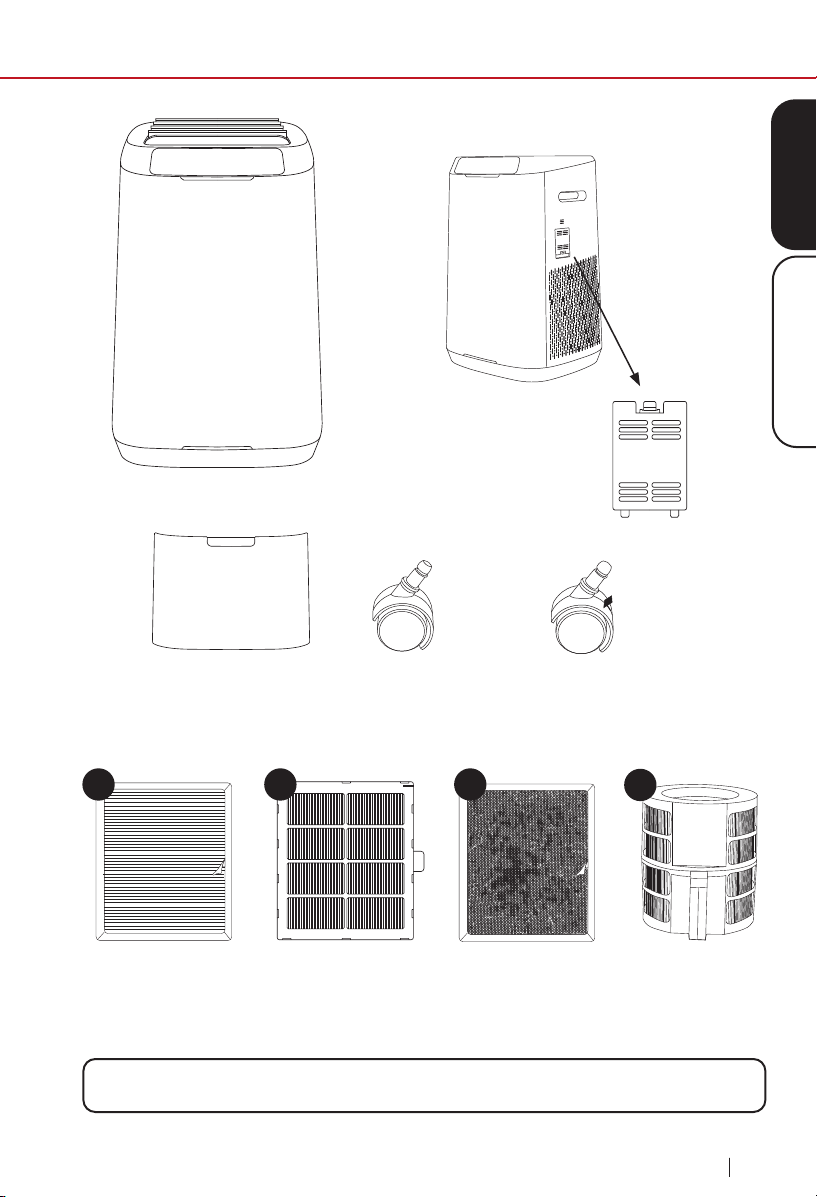
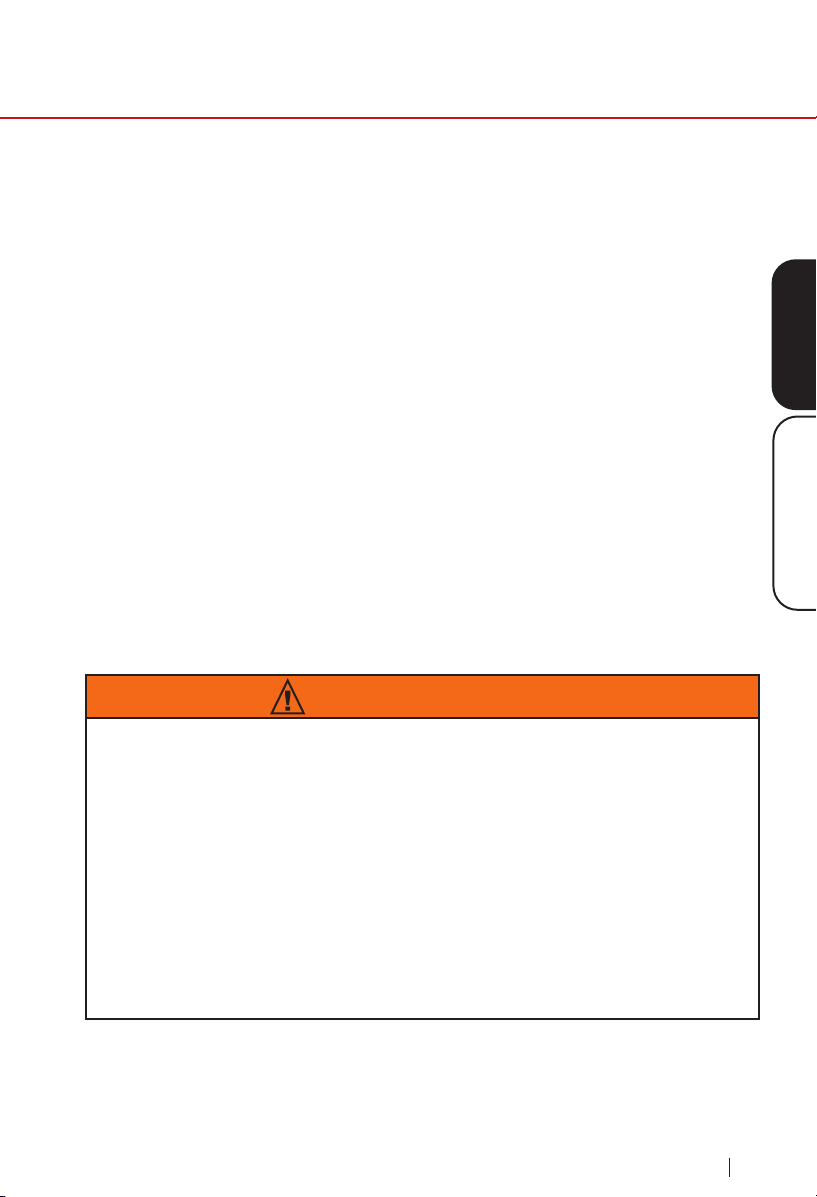
ENGLISHParts and Accessories
To order replaceable parts, nd the part number under Replaceable Parts then
call Customer Service at 877-689-2838 or visit nuwavenow.com
Dust Sensor Cover
Part #: OTP2
Filter Access Panel
Part #: OTP3
Ozone Emission
Removal Filter (2)
Part #: OTA2
Bio-Guard
®
Filter (2)
Part #: OTA3
Bio-Guard
®
360
Filter
Part #: OOA1
Stainless Steel
Prefilter (2)
Part #: OTA4
Wheels (2)
Part #: OTP1
Wheels with Brake (2)
Part #: OTP4
Side
1
4
2
3

10
WIFI CONNECTION
wi connection
nuwavenow.com
Using the built-in QR reader in your Camera App:
Downloading a QR reader App:
Download the NuWave
®
Connect App
This is an optional feature that is not required to operate your OxyPure
®
.
1
2
1
2
3
Scan the QR code below.
Open your mobile app store (App Store, Google Play).
Search for “QR code readers.”
Simply download the QR code reader to your phone, open it,
scan the code and you are ready to go.
It will take you to the App’s download page on either the Google
™
Play Store or the Apple AppStore, then just follow the download
and installation instructions.
If your phone does not have that capability built-in, simply
download a 3rd-Party QR Scanning App before scanning the
NuWave
®
QR Codes and you are ready to go.

11
nuwavenow.com
ENGLISHWi Connection
The OxyPure
®
is equipped with Wi-Fi allowing you to operate the OxyPure
from any location. To set up and activate the Wi-Fi:
1. Download the NuWave
®
Connect app via the Apple Store or Google
™
Play on your smartphone or device and open the app.
2. Make sure your phone is connected to your network. Open the
app and follow the instructions for the verification process. Once
verification is complete, begin adding devices. To add a device, tap “+”
then select “OxyPure.”
3. Next, plug the OxyPure into a compatible power outlet. To activate Wi-
Fi Pairing Mode, press and hold ULTIMATE CLEAN on the OxyPure
for 2 seconds until the light next WIFI begins to blink at a rate of about
2 blinks per second. Once the Wi-Fi light is rapidly blinking, in the app,
tap the Finish Network Configuration button on the bottom of the Add
Device page.
4. Next, you will be prompted to either connect to your network or confirm
your existing network password.
Note: To either connect to or change networks, depending on your cellular
service, you may need to remove the app and reinstall it to complete the
connection before continuing with the setup process.
5. When the OxyPure is connected to the Wi-Fi, the light next to “WIFI” will
stop flashing and stay continuously lit.
6. If the OxyPure did not connect to your network, the WIFI light will turn
off. Repeat steps 3-4. Make sure to select the proper Wi-Fi network and
type the correct password.
Note: The OxyPure, as with most IoT devices (computing devices), will only
connect to a 2.4GHz* network.
7. To reset the OxyPure WIFI, press and hold down ULTIMATE CLEAN
for 3 seconds. Follow Step 4 (see above). The OxyPure can now be
operated from any location.
*Most routers will broadcast in 2.4GHz. If you need help activating 2.4GHz,
contact your ISP (Internet Service Provider).
WIFI CONNECTION
nuwavenow.com
12
WIFI CONNECTION
wi connection
nuwavenow.com
Wi-Fi LED Status
Pairing Mode & Standby Mode
Solid Light
The OxyPure
®
is paired with the Wi-Fi and ready to be used.
Rapid Blinking Light
The OxyPure is in Pairing Mode. The OxyPure will remain in Pairing Mode
for up to 3 minutes, or until your device is paired.
Slow Blinking Light
The OxyPure is in Standby Mode.
No Light
The OxyPure’s Wi-Fi is off.
Note: If the light on your OxyPure is blinking slower, the OxyPure is in Wi-Fi
Standby Mode. To exit Standby Mode and initiate the Pairing Mode, press
and hold POWER for 2 seconds until the Wi-Fi light begins blinking rapidly.
Bluetooth Connection
The OxyPure Wi-Fi module also offers back-up Bluetooth connectivity.
If your Wi-Fi network goes down, the OxyPure’s Bluetooth signal will
automatically pair with your Bluetooth device.
To take advantage of this feature, ensure that your smart device’s
Bluetooth, Wi-Fi and Mobile Data options are all enabled.
Pairing your device with the OxyPure via Bluetooth takes up to 5 minutes,
but once your device is paired, the NuWave Connect app will operate
normally within the range of the Bluetooth signal.
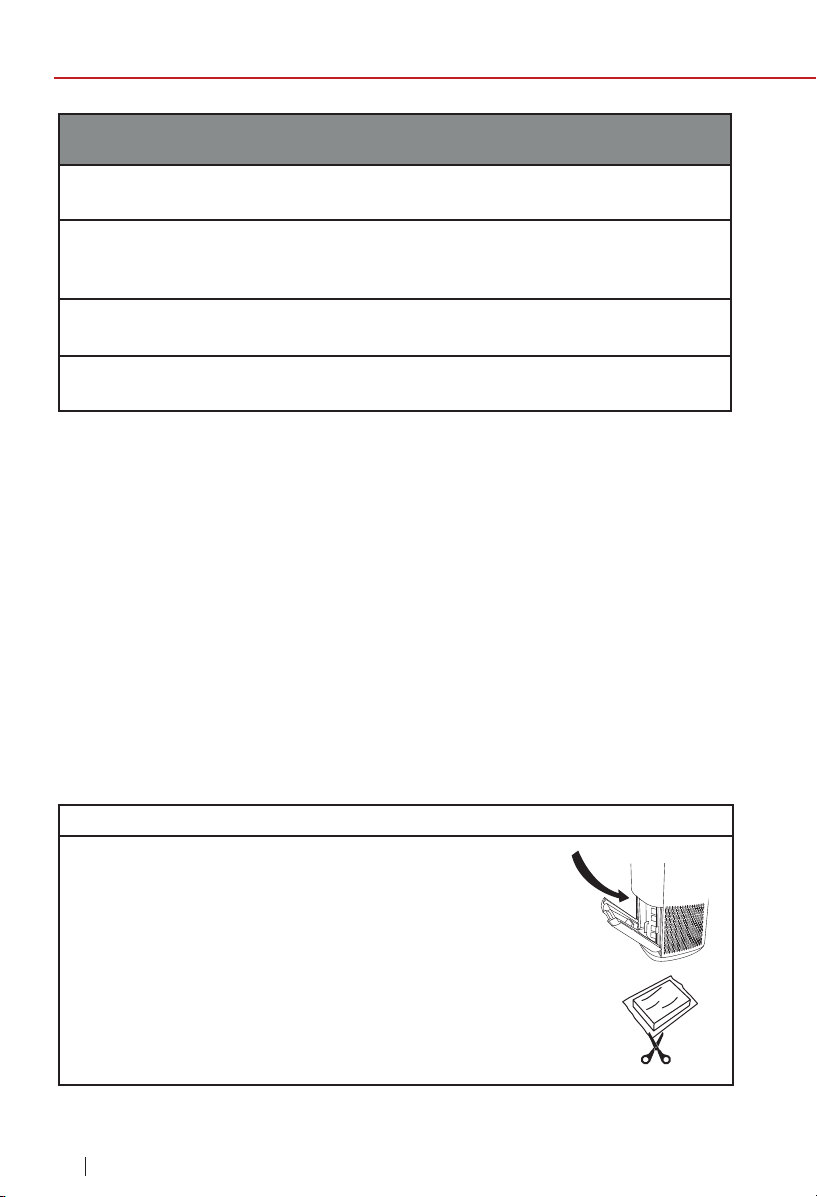
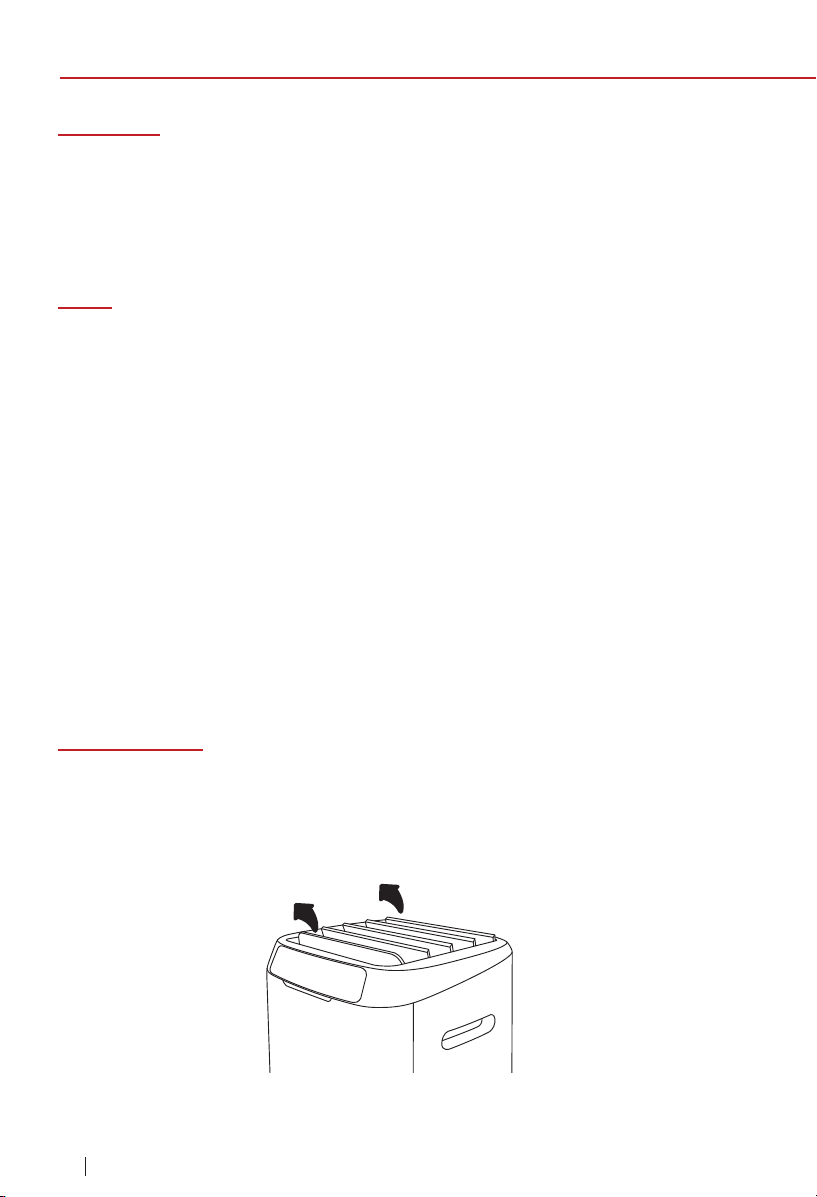
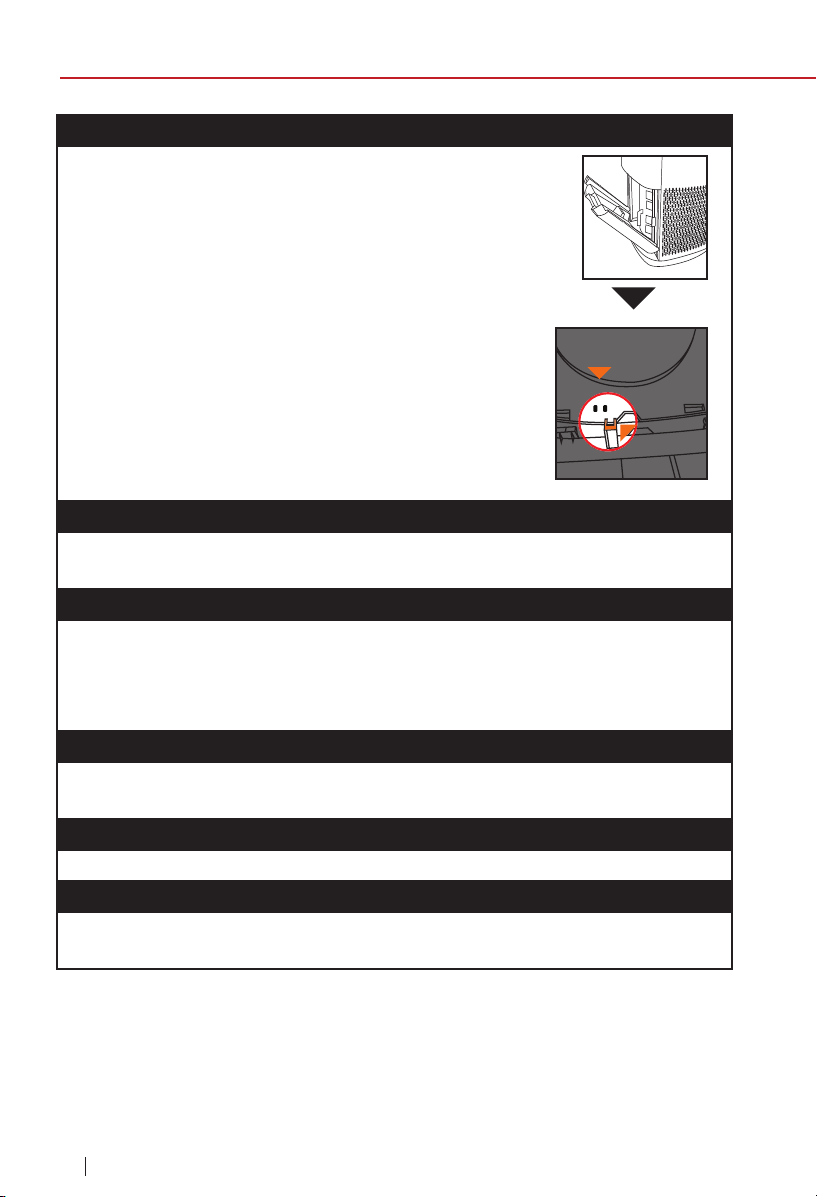
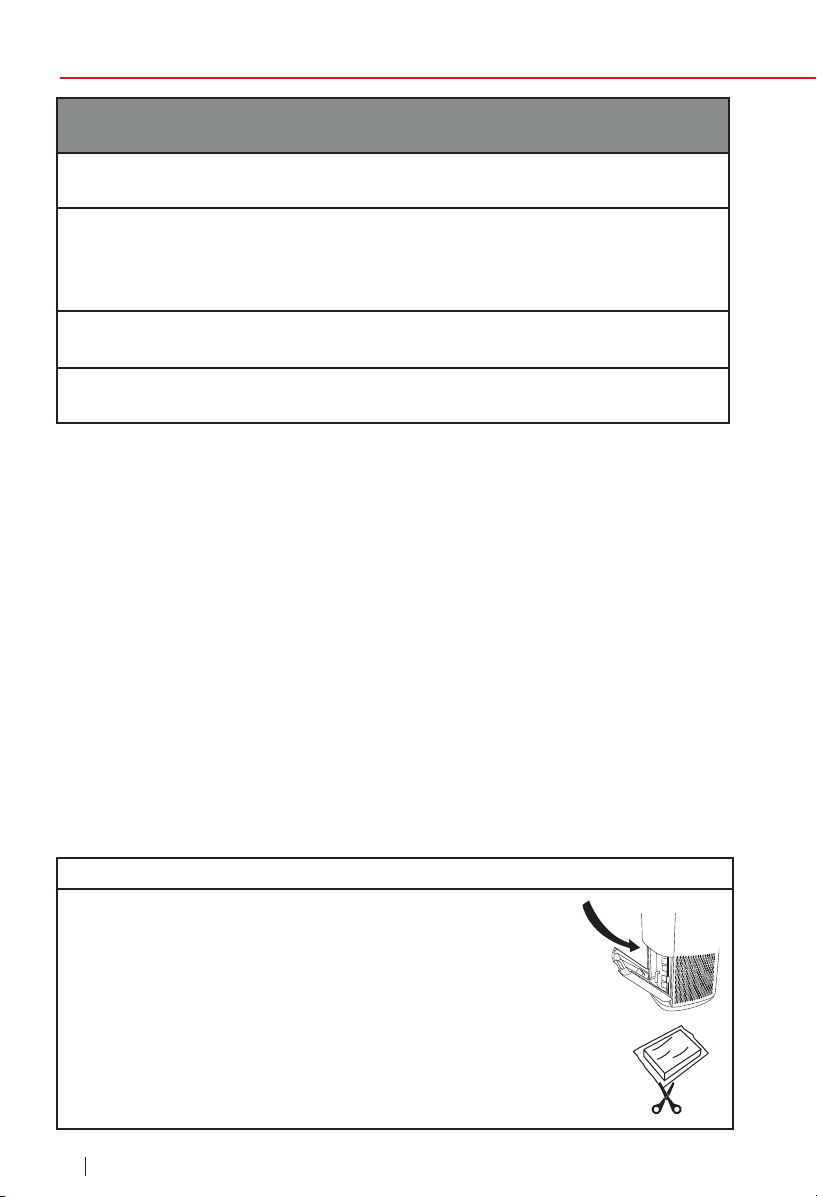
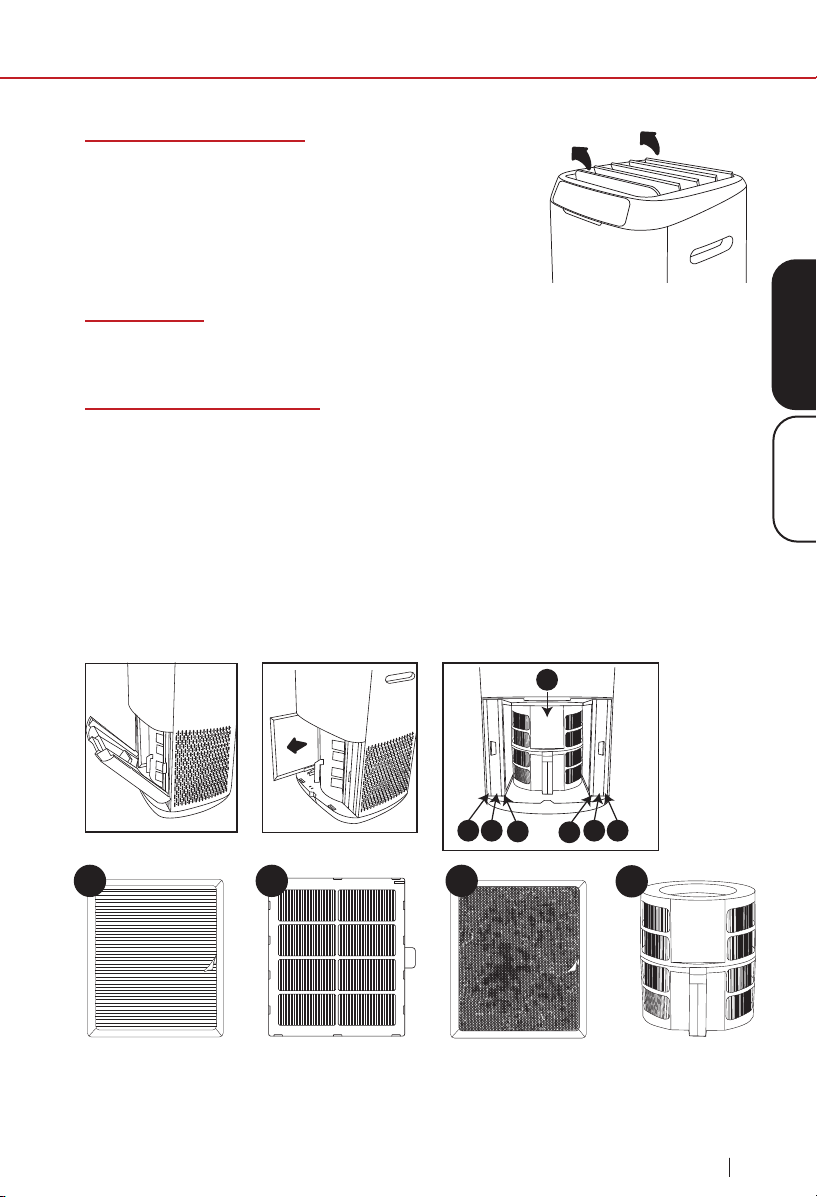
Before Use:
1. Make sure the OxyPure
®
is unplugged. Open the
panel on the back to expose the lters.
2. Pull the lters from their slots.
3. Remove the plastic wrapping from the lters.
4. Fully reinsert the lters into the Oxypure and close
the panel.
5. Remove the sticker from the control panel, making sure
to t the sensor tabs into their corresponding slots.
INSTRUCTIONS
ENGLISHInstructions
13
nuwavenow.comnuwavenow.com
Operating the Oxypure
®
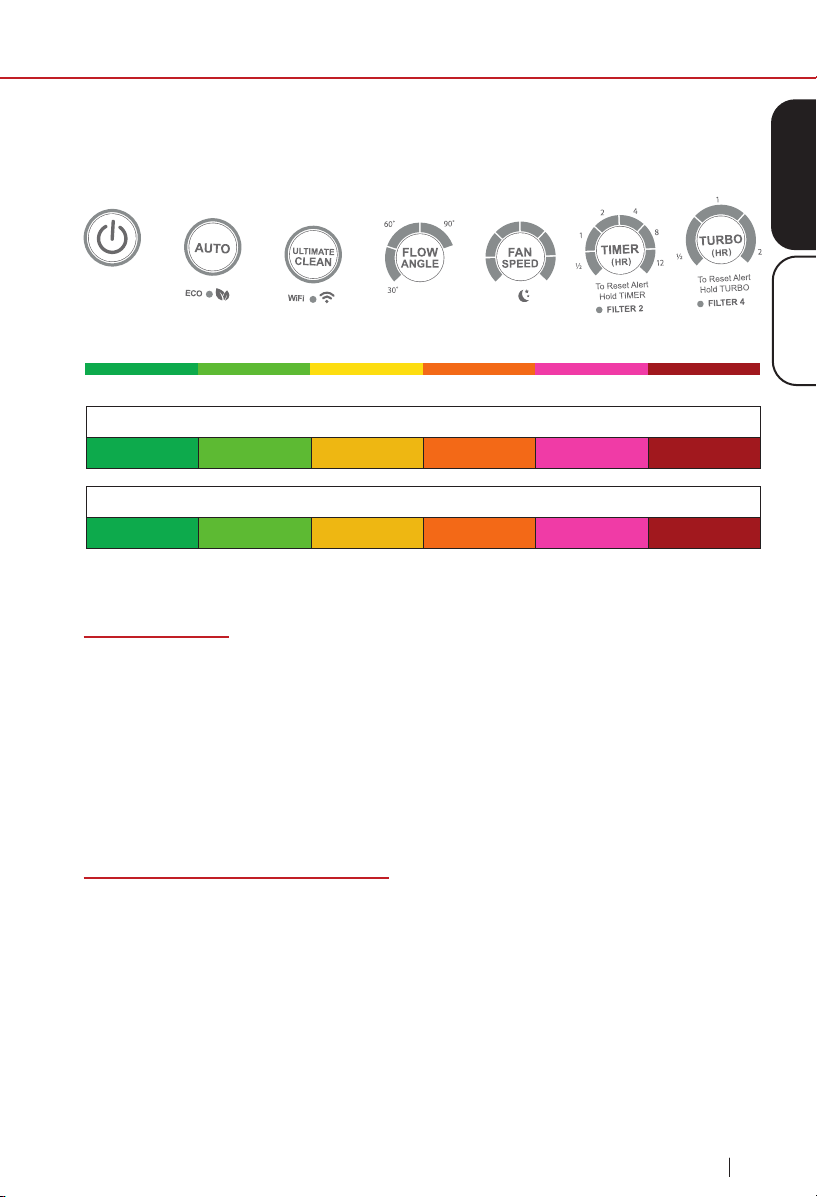
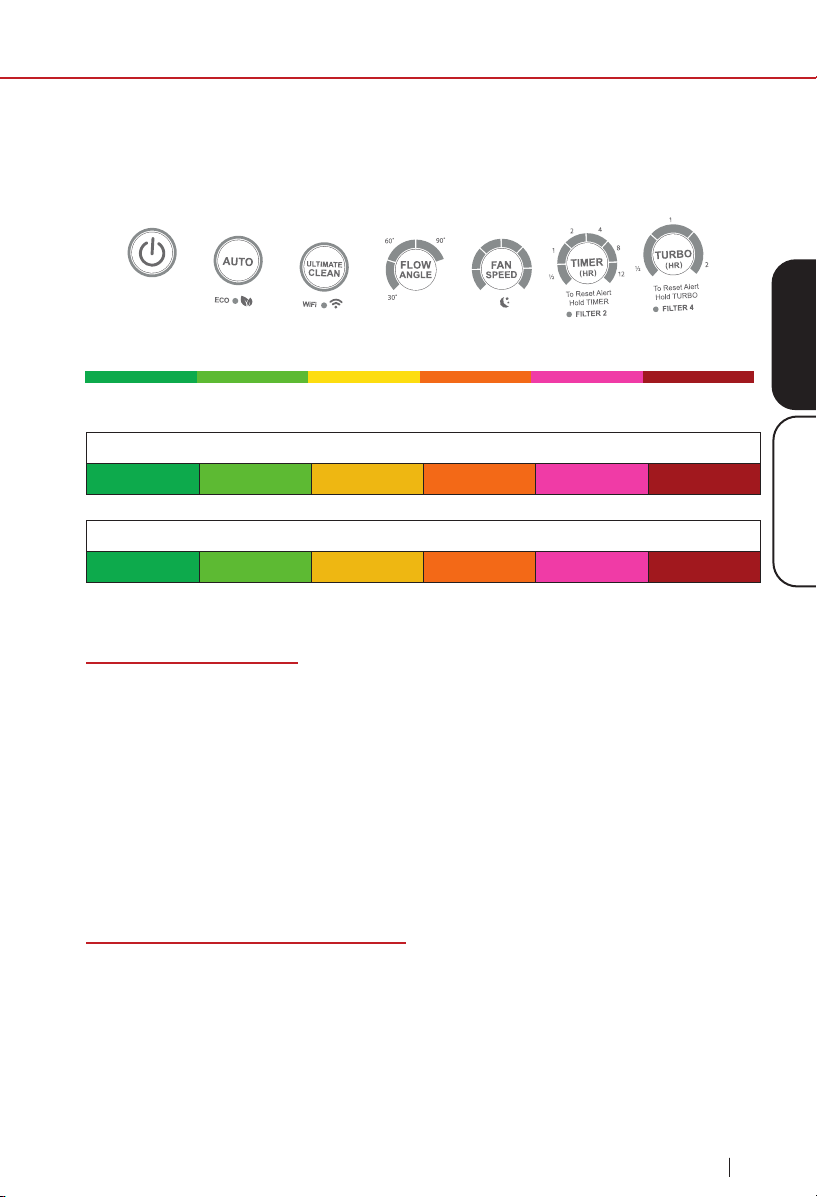
The OxyPure’s control panel allows you to turn the unit on and off, choose
an operating mode or function (see below), and monitor your lter health.
Air/Odor Quality - Detects particles as small as 2.5/1000mm
Clean Dirty
See Troubleshooting Guide section.
POWER Button
1. Plug in the OxyPure. The unit will go into standby mode, with the red
LED around the POWER button illuminated.
2. Press POWER to activate the OxyPure. The LED will change to green.
3. After you press POWER for the rst time, the OxyPure will default to
FAN SPEED 1 with no time limit. The airow angle will be 90°.
Note: Subsequently, the unit will default to the last setting used.
Operating Modes and Functions
The OxyPure offers a number of different operating modes to handle nearly
any air cleaning need you have. These include Auto, Eco, Turbo, Ultimate
Clean and Sleep modes. If user has chosen any mode to run, the unit will
automatically run the same mode until it is changed. In addition, there are
also the Fan Speed, Timer, and Air Flow Angle functions.
Particulate Matter (PM) with a diameter of 2.5 microns or less
0~5 5~10 10~20 20~30 30~50 Over 50
Fan Speeds
1 2 3 4 5 6

14
INSTRUCTIONS
instructions
nuwavenow.com
Auto Mode
Auto mode allows you to run the unit automatically at the lowest fan speed
until the unit detects a drop in the air quality, causing it to go to the highest
fan speed until air quality improves.
1. Press AUTO, and the Power and Auto back lights will turn on.
2. The unit will automatically go into Auto mode. There is no time limit on
Auto mode.
Note: The AUTO and FAN SPEED buttons cannot work together. While in
Auto mode, if you press FAN SPEED, Auto mode will turn off, replaced by
Manual Fan Speed mode. While the unit is running in Auto mode, the user
can adjust the working time by pressing TIMER. While Manual Fan Speed is
engaged, if you press AUTO, the unit will go into Auto mode and remain in
Auto mode until changed.
Ultimate Clean Mode
When in Ultimate Clean mode, the OxyPure
®
will automatically adjust the
fan speed based on your air quality and run as long as is necessary to
clean the air.
1. Press ULTIMATE CLEAN. The LEDs around the ULTIMATE CLEAN button
will be lit green.
2. Press ULTIMATE CLEAN again to turn it off.
Note: The ULTIMATE CLEAN and FAN SPEED buttons cannot work
together While in Ultimate Clean mode, if you press FAN SPEED, Ultimate
Clean mode will turn off, replaced by Manual Fan Speed mode. While the
unit is running in Ultimate Clean mode, the user can adjust the working
time by pressing TIMER. While Manual Fan Speed is engaged, if you press
Ultimate Clean, the unit will go into Ultimate Clean mode and remain in
Ultimate Clean mode until changed.
ECO Mode
ECO mode allows you to save energy and money by turning the OxyPure off
when it is not needed. Press POWER and then press and hold AUTO for 1
second. The unit will then go into Eco mode. The LED light above Eco Mode
will be green.
• When the air quality is poor, the fan will automatically run.
• When the air quality is good, the fan will turn off.
To run both Eco and Ultimate Clean or AUTO modes together, press
ULTIMATE CLEAN or AUTO while Eco Mode is activated. The timer in
Ultimate Clean is adjustable by pressing TIMER until the desired time is
selected. The OxyPure
®
will run in Eco Mode and Ultimate Clean until the
time is nished, after which it will return back to just Eco Mode.

15
ENGLISHInstructions
instructions
nuwavenow.com
Press AUTO and hold for 2 seconds again to deactivate Eco mode. Once
Eco mode is off, the Power light will turn back to green and the OxyPure
will return to its previous setting.
Turbo Mode
Turbo mode allows you to run the unit at the highest fan speed for a set
length of time: 30 Minutes, 1 hour, or 2 hours. When used with other
modes, Turbo mode has priority.
Turn on the OxyPure and press TURBO as follows:
1. Once to run at top fan speed for 30 minutes,
2. Twice to run at top fan speed for 1 hour, and
3. Three times to run at top fan speed for 2 hours.
If no other button is pressed after TURBO, then the OxyPure will go to
Fan Speed 1 after the set time.
Turbo + Auto Modes
Press TURBO and then AUTO: The OxyPure will run in Turbo mode for
30 minutes and then Auto mode until changed.
Note: If more time in Turbo is desired, press TURBO until that amount
of time is reached.
Turbo + Timer
1. When Turbo mode is running, the user may set the running time up
to 12 hours by pressing TIMER.
2. If you press TURBO once, the OxyPure will run for 30 minutes;
twice, and it will run for 1 hour; and three times, and it will run for
2 hours. The OxyPure will operate under Turbo mode rst for the
selected time. It will then continue to run for the time specied on
the Timer. After that, it will go on the next mode or function.
Sleep Mode
When in Sleep mode, the LED lights on the control panel will be off, but
the fan will still be active. Adjust the fan speed to your preference prior
to going into Sleep mode.
1. Manually adjust the Fan Speed with the FAN SPEED button.
2. Press and hold FAN SPEED for 2 seconds to activate Sleep mode.
3. To turn off Sleep mode, press any button.
16
INSTRUCTIONS
instructions
nuwavenow.com
Fan Speed
Adjust the OxyPure
®
’s fan speed by pressing FAN SPEED. There are 6 fan
speed levels. Press once for fan speed level 1 (the rst bar will light up),
again for fan speed level 2 (the rst and second bars will light up), etc. Press
FAN SPEED a 7th time to return to fan speed level 1. No matter what mode it
is, the OxyPure will display the current fan speed level.
Timer
You can adjust the running time by pressing the TIMER button. There are 6
different timing selections:
• 30 minutes
• 1 hour
• 2 hours
• 4 hours
• 8 hours
• 12 hours
If you press TIMER once, it will work with the selected fan speed for 30
minutes. Press TIMER twice for 1 hour, three times for 2 hours, etc. Pressing
TIMER 7 times will turn off the Timer function.
Timer can be used along with Auto and Turbo modes:
• When used with AUTO and TURBO: Run TURBO, then run AUTO
with a set time.
Air Flow Angle
Pressing Air Flow Angle will allow you to adjust how the clean air leaves the
OxyPure, going from 30° to 60° to 90° and back.
17
ENGLISHInstructions
instructions
nuwavenow.com
Bio-Guard
®
360
Filter
Tabletop Use
To use the OxyPure as a tabletop unit, simply remove the wheels to ensure
that it is stable and does not roll off the table.
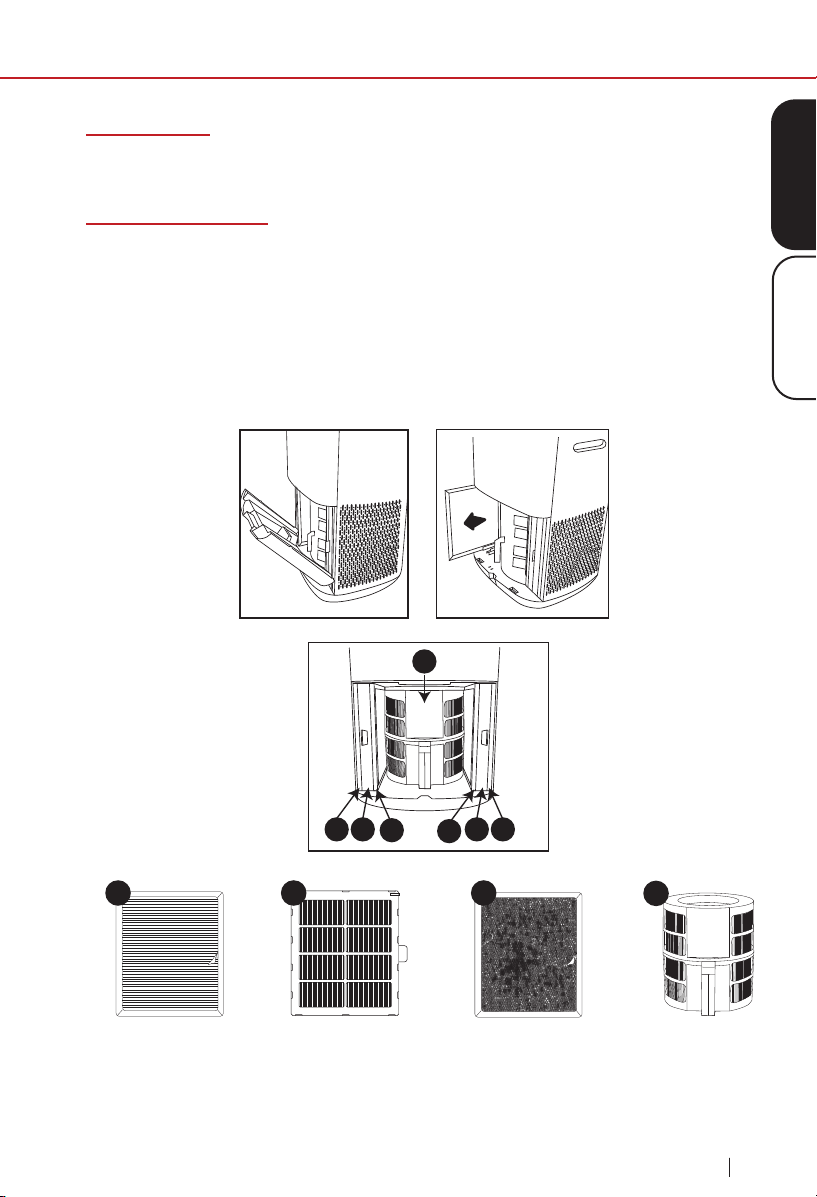
Air Filter Assembly
The OxyPure
®
comes with seven different preassembled filters inside the
unit (see diagram below). Each filter is labeled with a number. Match these
with the slot numbers when installing the filters. When the filters require
cleaning, please refer to Cleaning & Maintenance.
To install the Bio-Guard
®
360 filter, remove the other filters and set them
aside. Press down on the floor of the unit and slide in the filter, ensuring
that the electrical contacts are fully engaged.
1 2
4
3
3
2 1
Ozone Emission
Removal Filter (2)
Bio-Guard
®
Filter (2)Stainless Steel
Pre-Filter (2)
1
4
2 3

18
CLEANING & MAINTENANCE
cleaning & maintenance
nuwavenow.com
FILTER CLEANING TIPS AND TRICKS
Over time, the lters in your OxyPure can get caked with dust,
pollen, pathogens and other contaminants that can be accidentally
inhaled or released into the air if the lters are not handled properly
during cleaning.
Indoor vs. Outdoor Filter Cleaning
Ideally, you should clean your lters outdoors, where you will have access
to a water hose (DO NOT USE A PRESSURE WASHER) that will allow
you to clean the lters from a distance while eliminating the possibility of
reintroducing trapped contaminants back into your home. Outdoor cleaning,
however, is not always practical due to weather or property issues (i.e.,
you live in an apartment), so you will have to clean your lters indoors. It is
not difcult, and to make it even easier and more effective, here are some
general and lter-specic cleaning tips.
General Tips
1. Always Wear a Mask
This will prevent accidental inhalation of any contaminants when
cleaning your lters.
2. Move the OxyPure, Not the Filters
Move the OxyPure as close as possible to the location where you
will clean the filters. This will minimize the chance of the filter being
shaken (see 3, below).
3. Handle the Filters Carefully
As you remove the lters from the unit, be careful not to shake, drop,
bump, or otherwise agitate them as doing so can cause the release of
trapped contaminants.
4. Dry the Filters Completely
Never install a wet or damp lter into your OxyPure as doing so will
interfere with the lter’s function.
Filter-Specic Tips
1. The Stainless-Steel Prelter (Filter 1)
• Immerse the lters in water immediately to eliminate the chance of
any contaminants being released into the air.
• Wash and rinse as directed.
• After rinsing, shake the water out the lter to help it dry.
• Dry thoroughly, away from direct sunlight, in a room with a strong
breeze or a fan to blow air through the lter.

19
ENGLISHCleaning & Maintenance
cleaning & maintenance
nuwavenow.com
2. The Bio-Guard and Bio-Guard 360 Filters (Filters 2 & 4)
• Immerse the lters in water immediately to eliminate the chance of
any contaminants being released into the air.
• Wash and rinse as directed, but only long enough to clean the lter.
• After rinsing, shake the water out the lter to help dry the lter’s
internal electrical components.
• Dry thoroughly, away from direct sunlight, in a room with a strong
breeze or a fan to blow air through the lter. Remember: The Bio-
Guard Filter carries an 8,000V charge when it is operating, so it
MUST be completely dry inside and out before it is reinstalled into
the OxyPure.
3. The Ozone Emissions Removal Filter (Filter 3)
• DO NOT get the Ozone Emissions Removal Filter wet.
• Take this lter outside if at all possible.
• Clean with a brush-equipped vacuum.
• Marks on the lter media are normal and expected. They have no
effect on the lter’s functionality.
Filter Maintenance
When maintaining the lters, unplug the unit and open the Filter Access
Panel. You will see that the order of the lters, from the outside in,
is as follows:
1. 2 Stainless-Steel Prelters (Filter 1)
2. 2 Bio-Guard
®
Filters (Filter 2)
3. 2 Ozone Emission Removal Filters (Filter 3)
4. 1 Bio-Guard
®
360 Filter (Filter 4)

20
CLEANING & MAINTENANCE
cleaning & maintenance
nuwavenow.com
Filter Maintenance Indicator
The FILTER 2 and FILTER 4 lights will turn green in about 3 months to
alert you that the Bio-Guard
®
lters SHOULD be cleaned to maintain
optimal performance (NuWave Recommendation). When either light turns
red (after about 6 months), that Bio-Guard
®
lter MUST be cleaned. Once
cleaned, press and hold down TIMER for 2 seconds until a beep is heard
to reset the Clean Filter 2 Indicator. To reset the Clean Filter 4 light, hold
the TURBO button for 2 seconds until a beep is heard. Once the Clean
Filter lights are reset, they will go out.
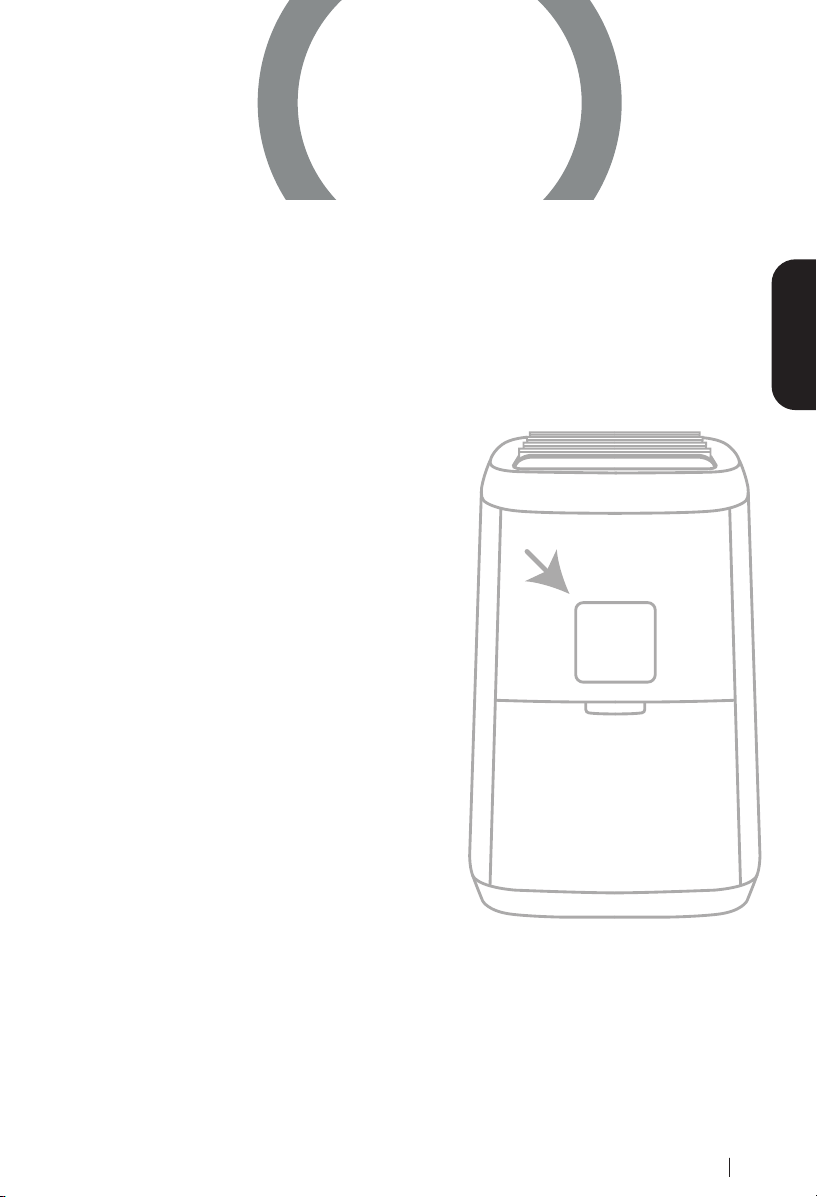
Cleaning the Dust Sensor
The Dust Sensor is located on the side of the unit.
1. Open the Dust Sensor Cover.
2. Using a dry cotton swab or small, soft brush, gently remove any dirt or
dust from the Sensor.
3. For more buildup on the Sensor, wipe it with a slightly wet cotton swab.
4. Remove any moisture with a dry cotton swab.
5. The Sensor requires regular cleaning (approx. every 3 months) for the
unit to operate efciently.
6. If the OxyPure
®
is set up in an area with high dust accumulation, more
frequent cleaning of the Sensor is needed.
7. Do not use the cotton swab on any part or area other than the Sensor.
Do not immerse the OxyPure in water. Clean the outside of the unit with
a damp sponge or cloth and wipe it dry. Make sure all parts and covers
are securely attached. Do not dry the lters with a hot blow dryer.
Changing and Cleaning the Filters
The lters need to be cleaned on schedule to help the unit maintain
optimum performance.
1. Remove the Filter Access Panel in the rear of the OxyPure
®
using its
built-in handle.
2. Carefully slide out the lters that need cleaning. Do not shake them.
3. Immerse the Stainless-Steel prelter and Bio-Guard
®
lters in water.
DO NOT get the Ozone Emission Removal Filter wet.
4. Clean the lters as directed. DO NOT use paper towels.
5. Always allow the washable lters to dry completely, out of direct sunlight,
before you reinstall them. Never place a wet lter into the OxyPure.
6. Reattach and close the Filter Access Panel. If the panel is not properly
closed, the POWER button will blink red and the unit will not power on.
21
ENGLISHCleaning & Maintenance
cleaning & maintenance
nuwavenow.com
Do not dry the lters in direct sunlight or with a hot blow dryer. Do
not use a vacuum cleaner or too stiff a brush to clean the Bio-Guard
®
lters or Prelters.
To Clean the Bio-Guard
®
Filters
1. Remove the lters and immerse them in water.
2. Spray the lters with a mild detergent and let them sit for 2 – 3 minutes.
3. Submerge the lters in warm water, shake, and remove. If you cannot
fully submerge the Bio-Guard
®
360 Filter, then place it under low-
pressure running water.
4. Repeat this process until the lters are clean.
5. Rinse the lters with warm water (see 3 above).
6. Dry the lters completely, out of direct sunlight, before use.
To Clean the Ozone Emission Removal Filters
1. Remove the lters. If possible, take them outside to clean.
2. Gently, but thoroughly, clean the lters using a brush-tipped vacuum.
3. Repeat the process on the other side. DO NOT GET WET.
To Clean the Stainless-Steel Prelters
The Prelters need to be cleaned at least once every two months,
depending on use. Begin by immersing the Prelter in water. Then:
1. Use a dry cloth or soft brush to remove any dust or lint.
2. Clean the lters with warm soapy water.
3. Rinse the lters thoroughly and remove any soap particles.
4. Allow the lters to dry completely, out of direct sunlight, BEFORE
reinstalling them in the OxyPure (up to 12-24 hours).
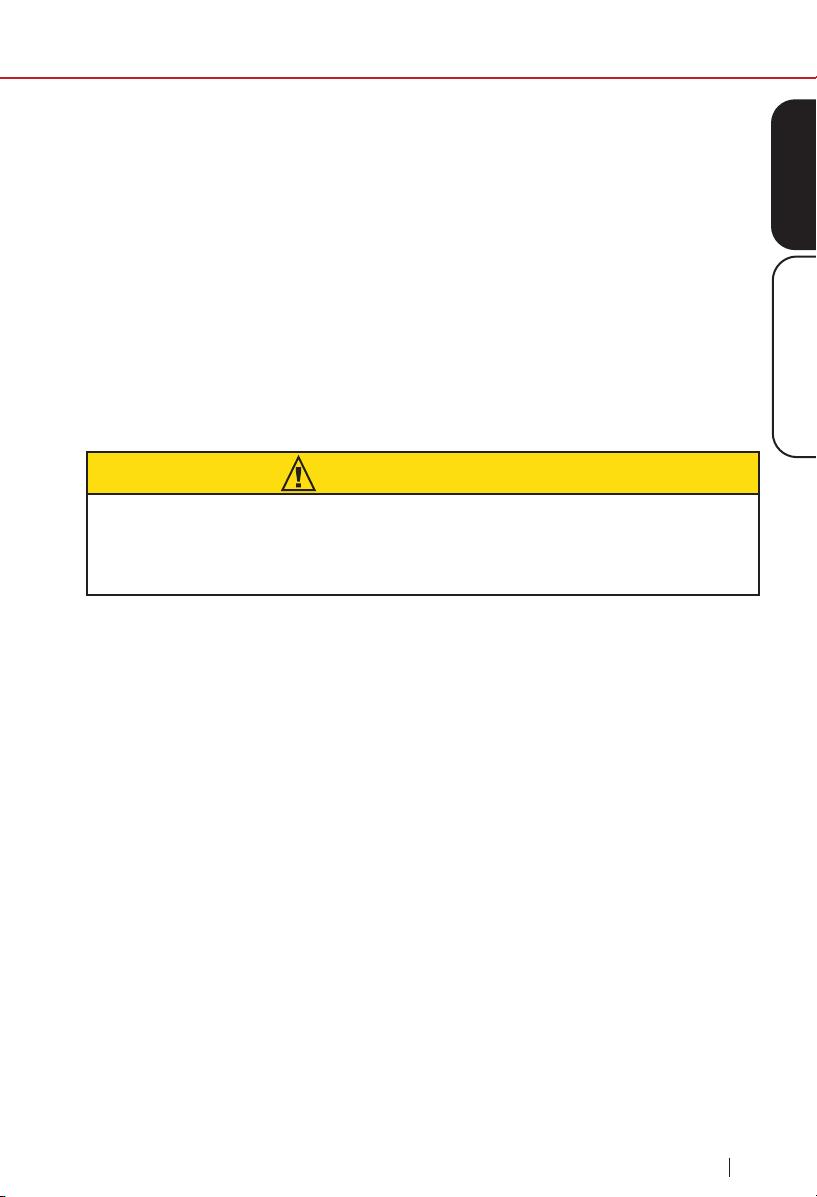
CAUTION
Clean the Bio-Guard
®
lters IN WATER ONLY. Using a brush or a vacuum
cleaner will only put the captured particles, allergens and pathogens back
into the air.
22
TROUBLESHOOTING GUIDE
troubleshooting guide
nuwavenow.com
The OxyPure does not turn on.
1. The plug is not in the wall outlet. Plug it into the wall
outlet.
2. POWER on the touch pad panel is not on. Press
POWER.
3. The Filter Access Panel in the back rear is off or
loose. Make sure the Filter Access Panel is on securely.
4. If you are unable to close the Filter Access Panel
for any reason, the OxyPure will not operate
and you will need to contact NuWave Customer
Service. Exercise caution to ensure the tabs
are not damaged when securing the Filter
Access Panel.
TIMER does not work when pressed.
The OxyPure is not reading the function selected. Press “FAN SPEED” or
“AUTO”, then press “TIMER”.
The fan is not blowing.
1. An appropriate outlet is not being used. Make sure the outlet has
appropriate voltage for use.
2. The Filter Access Panel in back rear is not properly in place. Make
sure the Filter Access Panel is on securely.
Speed of the airow is not changing when FAN SPEED is pressed.
The OxyPure may be in AUTO mode. Set the OxyPure to another
operating mode on the touch pad then press “FAN SPEED”.
Airow from the Top Vent is weak.
The air lter(s) are dirty. Clean the air lters.
The OxyPure
®
is producing smoke or odor.
The air lter(s) are dirty. Clean the air lters. If the problem continues, con-
tact Customer Service at 1-877-689-2838 or email help@nuwavenow.com.
Tab
Sensor
23
ENGLISHTroubleshooting Guide
troubleshooting guide
nuwavenow.com
CLEAN FILTER Indicators have not reset after the lter(s) have
been cleaned.
1. The Filter Sensor is not reading the clean lter. Turn the OxyPure
®
off
then on again. Press and hold down “TIMER” for 2 seconds until a
beep is heard.
2. Turn the OxyPure off, unplug and adjust the lter(s). Plug in and turn
the OxyPure on again.
3. The Filter Access Panel in back rear is not securely in place. Make
sure Filter Access Panel is on securely.
4. The Filter Sensor is dirty. Clean the Filter Sensor.
ULTIMATE CLEAN does not come on when pressed.
The OxyPure is not reading the function selected. Turn the OxyPure on
and off by pressing POWER twice.
Power is blinking red.
When the Filter Access Panel is removed, the power icon will be back-
lit solid red. Pressing POWER will make it blink. However, as a safety
measure, the OxyPure will not operate when the Filter Access Panel is
removed. Ensure that Filter Access Panel is installed securely.
The Odor Sensor is not resetting itself and the indicator light
is not clearing.
Contact Customer Service at 1-877-689-2838 or
email help@nuwavenow.com.
Clean Dirty
Air and Odor LEDs
The OxyPure will display the Air/Odor quality from Clean to Dirty as
represented below. If the contamination in the air exceeds Dirty (red LED), a
warning alert will be triggered by both a beeping sound and ashing LED.
To turn off this warning, press AUTO and Fan Speed at the same time.
Press the same buttons to turn the warning feature on.

24
LIMITED WARRANTY
limited warranty
nuwavenow.com
24
The NuWave
®
OxyPure
ZERO™
Air Purifier
THE MANUFACTURER WARRANTS
NuWave
®
warrants that the OxyPure
Zero
™
Air Purifier fan motor, blower,
control panel, Stainless-Steel Prefilters, Ozone Emission Removal filters,
and Bio-Guard
®
filters will be free from manufacturer defects under normal
household use for 3 years from the date of purchase. This Warranty covers
original owner of this Air Purifier for personal household use only and when
operated in accordance with the Manufacturer’s written instructions.
This Warranty does not apply to products used for commercial, rental or
resale purposes. The Manufacturer will provide the necessary parts and labor
to repair any part of the NuWave OxyPure ZERO
™
at NuWave
®
LLC Service
Department. After the expiration of the warranty, the cost of the labor and
parts will be the responsibility of the owner.
THE WARRANTY DOES NOT COVER
The Limited Warranty is voided if repairs are made by an unauthorized dealer
or the serial number data plate is removed or defaced. Normal deterioration
of nish due to use or exposure is not covered by this Warranty. This Limited
Warranty does not cover failure, damages or inadequate performance due
to accident, acts of God (such as lightning), uctuations in electric power,
alterations, abuse, misuse, misapplications, corrosive-type atmospheres,
improper installation, failure to operate in accordance with the Manufacturer’s
written instructions, abnormal use or commercial use. NuWave LLC reserves
the right to void the Limited Warranty, where allowable by law, for products
purchased from an unauthorized dealer.
TO OBTAIN SERVICE
The owner shall have the obligation and responsibility to: pay for all services
and parts not covered by the warranty; prepay the freight to and from Service
Department for any part or system returned under this warranty; and carefully
package the product using adequate padding material to prevent damage
in transit. The original container is ideal for this purpose. Include in the
package the owner’s name, address, daytime telephone number, a detailed
description of the problem, and your “RGA number.” (Call 1-877-689-2838)
or email help@nuwavenow.com to obtain the RGA number (Return Goods
Authorization number). Provide the cooking system model & serial number
and proof of date of purchase (a copy of the receipt) when making claims
under this warranty.

25
ENGLISHLimited Warranty
limited warranty
nuwavenow.com
MANUFACTURER’S OBLIGATION
The Manufacturer’s obligation under this Limited Warranty is limited, to
the extent allowable by law, to repairing or replacing any part covered by
this Limited Warranty which upon examination is found to be defective
under normal use. The Limited Warranty is applicable only within the
continental United States and only to the original purchaser of the
manufacturer’s authorized channels of distribution. THE LIMITED
WARRANTY MAY NOT BE ALTERED, VARIED OR EXTENDED EXCEPT
BY A WRITTEN INSTRUMENT EXECUTED BY THE MANUFACTURER.
THE REMEDY OF REPAIR OR REPLACEMENT AS PROVIDED UNDER
THIS LIMITED WARRANTY IS EXCLUSIVE. IN NO EVENT SHALL
THE MANUFACTURER BE LIABLE FOR ANY CONSEQUENTIAL
OR INCIDENTAL DAMAGES TO ANY PERSON, WHETHER OR
NOT OCCASIONED BY NEGLIGENCE OF THE MANUFACTURER,
INCLUDING WITHOUT LIMITATION, DAMAGES FOR LOSS OF USE,
COSTS OF SUBSTITUTION, PROPERTY DAMAGE, OR OTHER
MONEY LOSS.
Some states do not allow the exclusion or limitation of incidental or
consequential damages, so the above limitation exclusions may not
apply. This Limited Warranty gives specic legal rights, and there
may also be other rights which vary from state to state. EXCEPT AS
OTHERWISE EXPRESSLY PROVIDED ABOVE, THE MANUFACTURER
MAKES NO WARRANTIES EXPRESSED OR IMPLIED ARISING BY
LAW OR OTHERWISE, INCLUDING WITHOUT LIMITATION, THE
IMPLIED WARRANTIES OF MERCHANTABILITY AND FITNESS FOR
A PARTICULAR PURPOSE TO ANY OTHER PERSON. READ YOUR
OWNER’S MANUAL. IF YOU STILL HAVE ANY QUESTIONS ABOUT
OPERATION OR WARRANTY OF THE PRODUCT, PLEASE CONTACT
NUWAVE LLC.

26
LIMITED WARRANTY
limited warranty
nuwavenow.com
DISPUTE RESOLUTION PROCEDURE. For disputes relating to use of the
website or use or purchase of a NuWave product or service (collectively
"Disputes"), you agree to rst contact NuWave LLC at (877) 689-2838
(phone), (847) 367-5486 (facsimile), or legal@nuwavenow.com (email).
If we cannot resolve your dispute informally, any and all disputes shall
be submitted to nal and binding arbitration. You may start the arbitration
process by submitting in writing a demand to the American Arbitration
Association ("AAA") and sending a copy to NuWave. NuWave will pay
all ling costs. A single arbitrator of the AAA will conduct the arbitration
in a location convenient to you or by phone. The arbitrator’s award will
be binding and may be entered as a judgment in a court of competent
jurisdiction. The arbitration will be conducted in accordance with the
provisions of AAA’s Commercial Arbitration Rules and Mediation Procedures
in effect at the time of submission of your demand for arbitration. See
https://www.adr.org/sites/default/les/CommercialRules_Web.pdf. Except as
may be required by law as determined by an arbitrator, no party or arbitrator
may disclose the existence, content, or results of any arbitration hereunder
without prior written consent of both parties.
A. WAIVER OF RIGHT TO SUE. By agreeing to arbitration you understand
that, to the maximum extent permitted by law, you are agreeing to waive your
right to le suit in any court, to a court hearing, judge trial, and jury trial.
B. CLASS ACTION WAIVER. To the maximum extent permitted by law
you expressly agree to refrain from bringing or joining any claims in any
representative or class-wide capacity, including but not limited to, bringing or
joining any claims in any class action or class-wide arbitration.
C. OPT OUT PROCEDURE. To opt out of arbitration you must contact
NuWave. To request to opt out of arbitration contact us at legal@
nuwavenow.com (email), NuWave
®
LLC, 560 Bunker Ct., Vernon Hills, IL
60061, U.S.A., (847) 367-5486 (fax), or (877) 689-2838 or (224) 206-3019
(phone). You will have thirty (30) days from the date of product delivery to
opt out of arbitration with respect to any dispute arising out of or relating to
use or purchase of any NuWave product. If more than 30 days have passed
you are not eligible to opt out of arbitration and will have waived your right
to sue or participate in a class action with respect to the dispute arising out
of your purchase or use of a NuWave product. For any dispute arising out of
your use of NuWave’s website, you have thirty (30) days from the date you
provided information to the website to opt out of arbitration. If more than 30
days have passed you are not eligible to opt out of arbitration and you will
have waived your right to sue and participate in a class action with respect
to the dispute arising out of your use of NuWave’s website.

27
ENGLISHLimited Warranty
limited warranty
nuwavenow.com
D. SOME MATTERS ARE NOT SUBJECT TO ARBITRATION.
Notwithstanding the foregoing, the following shall not be subject to
arbitration and may be adjudicated only in the state and federal courts of
Illinois: (i) any dispute, controversy, or claim relating to or contesting the
validity of our intellectual property rights and proprietary rights, including
without limitation, patents, trademarks, service marks, copyrights, or trade
secrets; (ii) an action by a party for temporary, preliminary, or permanent
injunctive relief, whether prohibitive or mandatory, or other provisional
relief; or (iii) interactions with governmental and regulatory authorities.
(i) any dispute, controversy, or claim relating to or contesting the validity
of our intellectual property rights and proprietary rights, including without
limitation, patents, trademarks, service marks, copyrights, or trade secrets;
(ii) an action by a party for temporary, preliminary, or permanent injunctive
relief, whether prohibitive or mandatory, or other provisional relief; or (iii)
interactions with governmental and regulatory authorities. You expressly
agree to refrain from bringing or joining any claims in any representative
or class-wide capacity, including but not limited to, bringing or joining any
claims in any class action or any class-wide arbitration.
READ YOUR OWNER’S MANUAL
If you still have any questions about operation or warranty of the product,
please contact NuWave
®
LLC at:
1-877-689-2838 or emailing help@nuwavenow.com
(Mon-Fri 7:30am-4:30pm CST).
28
nuwavenow.com
Manual del Propietario
Modelo 47251
Questions or Concerns?
Toll Free: 1-877-689-2838 • help@nuwavenow.com
(Mon-Fri 7:30am-4:30pm CST)
29
ESPAÑOL
nuwavenow.com
¡REGÍSTRESE
AHORA!
Como agradecimiento especial por registrar su NuWave
®
OxyPure
ZERO
™
¡recibirá automáticamente 12 meses adicionales a la garantía
limitada de su fabricante!*
Todo lo que tiene que hacer es seguir estos sencillos pasos.
Usando la función de cámara
de su teléfono inteligente o
dispositivo inteligente, escanee
el código QR ubicado en la parte
posterior de la unidad, luego
acepte el mensaje para ser
dirigido a la página de registro.
Se le dirigirá a la página de
registro de productos de
NuWave con el número de serie
único de su Oxypure ingresado
automáticamente en el campo
correspondiente.
NOTA: Si no tiene un dispositivo
inteligente habilitado para
la web, simplemente visite
nuwavenow.com/QR e ingrese
manualmente el número de serie
de su Oxypure.
Complete la información restante
y la encuesta opcional.
Una vez que envíe su
información, recibirá un correo
electrónico de conrmación
con los detalles de su garantía
extendida.
1
2
3
4
* Registre su producto en el plazo de 1 año a partir de la fecha de compra
para obtener una extensión gratuita de 12 meses de su garantía limitada.
12
!para una garantía
adicional de
meses!
Abra su tienda de aplicaciones móviles (App Store,
Google Play).
Busque “lectores de códigos QR.”
Simplemente descargue el lector de códigos QR a
su teléfono, ábralo y escanee el código, ya está listo
para comenzar.
NOTA: Es posible que deba abrir el lector de código
QR descargado cada vez que desee escanear un
código QR.
1
2
3
QR code readers
DESCARGUE LA APLICACIÓN DE CÓDIGO
QR EN SU DISPOSITIVO MÓVIL
30
nuwavenow.com
Visite nuwavenow.com para ver nuestros otros productos y accesorios de NuWave
®
#nuwavenow
¡Conéctese con nosotros!
¡Bienvenido a la Familia NuWave
®
!

31
nuwavenow.com
Visite nuwavenow.com para ver nuestros otros productos y accesorios de NuWave
®
#nuwavenow
¡Conéctese con nosotros!
¡Bienvenido a la Familia NuWave
®
!
¡Felicitaciones por la compra de su Puricador de Aire Inteligente
NuWave
®
OxyPure
®
ZERO
™
! Estamos increíblemente emocionados de
que disfrute de aire puro y limpio en su hogar con su nuevo OxyPure
®
.
Queremos asegurarnos de que aproveche al máximo su experiencia
en OxyPure
®
por lo que hemos proporcionado instrucciones de
funcionamiento detalladas aquí en este manual para que conozca todo
sobre él y asegurarnos de que el OxyPure
®
satisfaga sus necesidades.
Queremos que cada paso de su experiencia en NuWave
®
sea lo
más fácil y graticante posible, por lo que si tiene alguna pregunta,
comentario o inquietud, no dude en comunicarse con Servicio al Cliente
llamando al 1-877-689-2838 o enviando un correo electrónico a help@
nuwavenow.com (Lun-Vie 7:30am-4:30pm CST).
ESPAÑOL

32
MEDIDAS DE SEGURIDAD IMPORTANTES
PARA USO DOMÉSTICO SOLAMENTE Y LEA TODAS LAS INSTRUCCIONES ANTES
DE USARLO
medidas de seguridad importantes
nuwavenow.com
TENGA SIEMPRE A LA MANO ESTE
MANUAL PARA UNA REFERENCIA
EN EL FUTURO.
LEA TODAS LAS INSTRUCCIONES Y ADVERTENCIAS: El incumplimiento
de cualquiera de las medidas de seguridad, advertencias o instrucciones
importantes para un uso seguro representará un uso indebido del OxyPure
®
que puede anular su garantía y crear el riesgo de lesiones graves. Al usar el
OxyPure,siempre se deben seguir las precauciones básicas de seguridad.
1. SOLO use el OxyPure para su propósito previsto.
2. Para protegerse contra el riesgo de descarga eléctrica, NO sumerja el cable, el
enchufe o cualquier parte del OxyPure en agua o cualquier otro líquido.
3. Es necesaria una estrecha supervisión cuando el OxyPure es utilizado por
o cerca de niños. El OxyPure no está destinado a ser utilizado por niños,
personas con capacidades físicas, sensoriales o mentales reducidas, o aquellos
que carecen de experiencia o conocimiento de este dispositivo.
4. NO opere el OxyPure con un cable o enchufe dañados, después de cualquier
mal funcionamiento, o si la unidad se ha caído o dañado de alguna manera.
Comuníquese con el Servicio al Cliente al 1-877-689-2838 o envíe un correo
electrónico a help@nuwavenow.com para obtener más información.
5. Deseche el plástico protector que cubre el enchufe de alimentación antes de usarlo.
6. NO corra el cable debajo de la alfombra. NO cubra el cordón con alfombras,
guías u otras cubiertas.
7. NO enrosque el cable debajo de los muebles o electrodomésticos. Coloque el
cable lejos de las áreas de alto tráco donde no se tropezarán.
8. NO enchufe el OxyPure a una toma de corriente o regleta que esté siendo
utilizada por otros aparatos.
9. Retire el polvo o el agua del tapón, si es necesario.
10. SIEMPRE coloque el OxyPure en un terreno plano y estable.
11. NO coloque el OxyPure donde podría ser empujado, pateado o pudieran
tropezarse con él.
12. Deje al menos 2-3 pies de espacio entre las rejillas de ventilación del OxyPure y
cualquier pared.
13. NO instale el OxyPure cerca de un dispositivo calefactor, gases o vapores
inamables o combustibles, o en áreas expuestas a humedad o agua.
14. NO opere el OxyPure de lado.
15. NO coloque objetos encima del OxyPure.
16. NO se siente ni se pare sobre él, ni se apoye sobre el OxyPure.
17. La alteración o modicación de cualquier parte del OxyPure,o el uso de
accesorios no recomendados por el fabricante, puede causar incendios,
lesiones o daños a la propiedad.
33
ESPAÑOLSeguridad Importantes
medidas de seguridad importantes
nuwavenow.com
18. Al igual que con la mayoría de las unidades eléctricas, las piezas eléctricas
están activas incluso cuando el OxyPure está apagado. Asegúrese de que el
OxyPure esté desenchufado durante el montaje.
19. NO utilice el OxyPure en una fábrica o entorno industrial donde el aceite de la
máquina pueda estar presente en el aire.
20. Apague el OxyPure antes de desconectarlo. Desenchufe el OxyPure de la toma
de corriente cuando la unidad no esté en uso o se deje desatendida durante
un período prolongado de tiempo; antes de poner o quitar piezas; al quitar o
reemplazar los ltros; y antes de limpiarlo.
21. NO opere el OxyPure si se detectan sonidos o movimientos anormales.
22. Si un objeto duro o extraño entra en contacto con el ventilador, no lo utilice.
Apague y desenchufe el OxyPure.
23. Inspeccione el OxyPure en busca de piezas sueltas o faltantes antes y después
de cada uso. Si las piezas están sueltas, dañadas o faltan, comuníquese con
el servicio al cliente al 1-877-689-2838 o envíe un correo electrónico a help@
nuwavenow.com.
24. NO jale, levante, arrastre, recoja o cargue el OxyPure por su cable.
25. NO bloquee las entradas de aire o salidas.
26. NO opere el OxyPure sin un ltro.
27. Los ltros Bio-Guard
®
tienen una carga de 8000V. Al insertarlos, asegúrese
de que estén secos y de que los contactos eléctricos estén completamente
acoplados.
ADVERTENCIA
RIESGO DE DESCARGA ELÉCTRICA: Para reducir el riesgo de
descarga eléctrica, este equipo tiene un enchufe polarizado (una cuchilla
es más ancha que la otra). Este enchufe encajará en una toma polarizada
solo de una manera. Si el enchufe no cabe completamente en la toma de
corriente, invierta el enchufe. Si aún no encaja, póngase en contacto con
personal calicado para instalar la toma de corriente adecuada. No altere
el enchufe de ninguna manera.
Estas instrucciones de mantenimiento son solo para uso de personal
calicado. Para reducir el riesgo de descarga eléctrica, no realice
ningún mantenimiento que no esté contenido en las instrucciones de
funcionamiento a menos que esté calicado para hacerlo.

34
MEDIDAS DE SEGURIDAD IMPORTANTES
PARA USO DOMÉSTICO SOLAMENTE Y LEA TODAS LAS INSTRUCCIONES ANTES
DE USARLO
medidas de seguridad importantes
nuwavenow.com
Cables de alimentación
Se proporciona un cable de fuente de alimentación corto (o cable de
fuente de alimentación desmontable) para reducir el riesgo de enredarse o
tropezar con un cable más largo. Los cables de alimentación desmontables
más largos o los cables de extensión están disponibles y se pueden usar
si se ejerce cuidado en su uso. Si se utiliza un cable de alimentación
desmontable más largo o un cable de extensión:
1. La clasicación eléctrica marcada del cable de extensión debe ser al
menos tan grande como la clasicación eléctrica del aparato.
2. El cable más largo debe estar dispuesto de manera que no cubra
ninguna encimera o mesa donde pueda ser tirado o tropezado
involuntariamente.
3. El OxyPure debe funcionar en una toma de corriente separada de otros
aparatos operativos debido a limitaciones de potencia.
4. El aparato tiene un enchufe polarizado (una cuchilla es más ancha
que la otra). Para reducir el riesgo de descarga eléctrica, este enchufe
está diseñado para caber en una toma de corriente polarizada solo de
una manera. Si el enchufe no encaja completamente en la toma de
corriente, invierta el enchufe. Si aún no encaja, póngase en contacto
con un electricista calicado. No intente modicar el enchufe de
ninguna manera.
5. Si el aparato es del tipo conectado a tierra, el conjunto de cables o el
cable de extensión deben ser un cable de 3 hilos de tipo de conexión
a tierra.
Precauciones para la Limpieza del Filtro
1. NO aspire los ltros. Hacerlo liberará polvo y otros contaminantes al aire.
2. SIEMPRE use guantes de goma al manipular o limpiar los ltros.
3. Al retirar los ltros sucios para la limpieza, SIEMPRE comience el
proceso de limpieza de forma intermedia para evitar que las
partículas y patógenos capturados se liberen de nuevo en el aire.
A. Al retirar los ltros, muévase con cuidado y NO LOS AGITE.
B. Sumerja inmediatamente el preltro de acero inoxidable y los ltros
Bio-Guard
®
en agua. NO permita que el ltro de eliminación de
emisiones de ozono se moje.
C. Lávese según las instrucciones.
35
PARTES Y ACCESORIOS
ESPAÑOLPartes y Accesorios
medidas de seguridad importantes
nuwavenow.com
Para solicitar piezas reemplazables, busque el número de pieza en Partes
Reemplazables y luego llame al Servicio al Cliente al 877-689-2838 o visite
nuwavenow.com
Cubierta del Sensor de
Polvo Parte #: OTP2
Panel de Acceso al
Filtro Parte #: OTP3
Filtro de Eliminación
de Emisiones de
Ozono (2)
Parte #: OTA2
Filtro Bio-Guard
®
(2)
Parte #: OTA3
Filtro
Bio-Guard
®
360
Parte #: OOA1
Prefiltro de Acero
Inoxidable (2)
Parte #: OTA4
Ruedas (2)
Parte #: OTP1
Ruedas con Freno (2)
Parte #: OTP4
Lado
1
4
2 3

36
CONEXIÓN WIFI
conexión wi
nuwavenow.com
Uso del lector QR incorporado a su aplicación de cámara:
Descarga de una aplicación de lector QR:
Descargue la aplicación NuWave
®
Esta es una característica opcional que no es necesaria para operar
su OxyPure
®
.
1
2
1
2
3
Escanee el código QR a continuación.
Abra su tienda de aplicaciones móviles (App Store, Google
™
Play).
Busque “lectores de códigos QR”.
Simplemente descargue el lector de códigos QR en su teléfono,
ábralo, escanee el código y estará listo para comenzar.
Lo llevará a la página de descarga de la aplicación en Google
™
Play Store o Apple AppStore, luego simplemente siga las
instrucciones de descarga e instalación. Si su teléfono no
tiene esa capacidad incorporada, simplemente descargue una
aplicación de escaneo QR de 3ª parte antes de escanear los
códigos QR de NuWave
®
y estará listo para comenzar.

37
nuwavenow.com
ESPAÑOL
Conexión Wi
CONEXIÓN WIFI
El OxyPure
®
está equipado con Wi-Fi que le permite operar el OxyPure
desde cualquier ubicación. Para configurar y activar el Wi-Fi:
1. Descargue la aplicación NuWave
®
Connect a través de Apple Store o
Google
™
Play en su teléfono inteligente o dispositivo y abra la aplicación.
2. Asegúrese de que el teléfono esté conectado a la red. Abra la aplicación
y siga las instrucciones para el proceso de verificación. Una vez
completada la verificación, comience a agregar dispositivos. Para
agregar un dispositivo, toque “+” y luego seleccione “OxyPure”.
3. A continuación, conecte el OxyPure a una toma de corriente compatible.
Para activar el modo de emparejamiento Wi-Fi, mantenga presionado
ULTIMATE CLEAN en el OxyPure durante 2 segundos hasta que la luz del
próximo WIFI comience a parpadear a una velocidad de aproximadamente
2 parpadeos por segundo. Una vez que la luz de Wi-Fi parpadee
rápidamente, en la aplicación, toque el botón Finalizar Configuración de
Red en la parte inferior de la página Agregar Dispositivo.
4. A continuación, se le pedirá que se conecte a su red o confirme su
contraseña de red existente.
Nota: Para conectarse o cambiar de red, dependiendo de su servicio
celular, es posible que deba eliminar la aplicación y volver a instalarla para
completar la conexión antes de continuar con el proceso de configuración.
5. Cuando el OxyPure esté conectado al Wi-Fi, la luz junto a “WIFI” dejará
de parpadear y permanecerá continuamente encendida.
6. Si el OxyPure no se conectó a su red, la luz WIFI se apagará. Repita los
pasos 3-4. Asegúrese de seleccionar la red Wi-Fi adecuada y escriba la
contraseña correcta.
Nota: El OxyPure, al igual que con la mayoría de los dispositivos IoT
(dispositivos informáticos), solo se conectará a una red de 2.4 GHz*.
7. Para restablecer el WIFI del OxyPure, mantenga presionada la tecla
ULTIMATE CLEAN durante 3 segundos. Siga el paso 4 (ver arriba). El
OxyPure ahora se puede operar desde cualquier ubicación.
*La mayoría de los enrutadores transmitirán en 2.4GHz. Si necesita ayuda para
activar 2.4GHz, comuníquese con su ISP (Proveedor de Servicios de Internet).
38
CONEXIÓN WIFI
conexión wi
nuwavenow.com
Antes de su uso:
1. Asegúrese de que el OxyPure
®
esté desconectado.
Abra el panel en la parte posterior para exponer
los ltros.
2. Jale de los ltros de sus ranuras.
3. Retire el envoltorio de plástico de los ltros.
4. Vuelva a insertar completamente los ltros en el
Oxypure y cierre el panel.
5. Retire la etiqueta del panel de control.
Estado del LED Wi-Fi
Modo de Emparejamiento y Modo de Espera
Luz Sólida
El OxyPure
®
está emparejado con el Wi-Fi y listo para ser utilizado.
Luz Parpadeante Rápida
El OxyPure está en Modo de Emparejamiento. El OxyPure permanecerá
en Modo de Emparejamiento durante un tiempo de hasta 3 minutos o
hasta que su dispositivo esté emparejado.
Luz de Parpadeo Lento
El OxyPure está en modode espera.
Sin luz
El Wi-Fi del OxyPure está desactivado.
Nota: Si la luz de su OxyPure parpadea más lentamente, el OxyPure está
en modo de espera de Wi-Fi. Para salir del modo de espera e iniciar el
modo de emparejamiento, mantenga presionado el botón POWER durante
2 segundos hasta que la luz de Wi-Fi comience a parpadear rápidamente.
Conexión Bluetooth
El módulo Wi-Fi de OxyPure también ofrece conectividad Bluetooth de
respaldo. Si su red Wi-Fi se apaga, la señal Bluetooth del OxyPure se
emparejará automáticamente con su dispositivo Bluetooth.
Para aprovechar esta función, asegúrese de que las opciones de Bluetooth,
Wi-Fi y Datos Móviles de su dispositivo inteligente estén habilitadas.
Emparejar su dispositivo con el OxyPure a través de Bluetooth toma
hasta 5 minutos, pero una vez que su dispositivo esté emparejado, la
aplicación NuWave Connect funcionará normalmente dentro del alcance
de la señal Bluetooth.
INSTRUCCIONES
39
nuwavenow.com
ESPAÑOL
Conexión Wi
INSTRUCCIONES
Funcionamiento del Oxypure
®
El panel de control del OxyPure le permite encender y apagar la unidad,
elegir un modo de operación o función (consulte a continuación) y
supervisar el estado de su ltro.
Calidad Aire/Olor - Detecta partículas tan pequeñas como 2.5/1000mm
Limpio Sucio
Consulte la sección Limpienza y Mantenimiento.
Botón de ENCENDIDO
1. Conecte el OxyPure. La unidad entrará en modo de espera, con el
LED rojo alrededor del botón POWER.
2. Presione POWER para activar el OxyPure. El LED cambiará a verde.
3. Después de presionar POWER por primera vez, el OxyPure tendrá
como valor predeterminado FAN SPEED 1 sin límite de tiempo. El
ángulo de ujo de aire será de 90°.
Nota: Posteriormente, la unidad tendrá como valor predeterminado la
última conguración utilizada.
Modos de Operación y Funciones
El OxyPure ofrece una serie de modos de operación diferentes para
manejar casi cualquier necesidad de limpieza de aire que tenga. Estos
incluyen los modos Auto, Eco, Turbo, Ultimate Clean y Sleep. Si el
usuario ha elegido cualquier modo para ejecutar, la unidad ejecutará
automáticamente el mismo modo hasta que se cambie. Además, también
están las funciones de Velocidad del Ventilador, Temporizador y Ángulo de
Flujo de Aire.
Instrucciones
Material particulado (PM) con un diámetro de 2,5 micrones o menos
0~5 5~10 10~20 20~30 30~50 Over 50
Velocidades del Ventilador
1 2 3 4 5 6

40
instrucciones
nuwavenow.com
INSTRUCCIONES
Modo Automático
El modo automático le permite ejecutar la unidad automáticamente a la
velocidad más baja del ventilador hasta que la unidad detecte una baja en la
calidad del aire, lo que hace que vaya a la velocidad más alta del ventilador
hasta que mejore la calidad del aire.
1. Presione AUTO y se encenderán las luces traseras Power y Auto.
2. La unidad entrará automáticamente en modo Automático. No hay límite
de tiempo en el modo automático.
Nota: Los botones AUTO y FAN SPEED no pueden funcionar juntos.
Mientras esté en modo Automático, si presiona FAN SPEED, el modo
automático se apagará, siendo reemplazado por el modo de Velocidad
del Ventilador Manual. Mientras la unidad está funcionando en modo
Automático, el usuario puede ajustar el tiempo de trabajo presionando
TIMER. Mientras se activa la velocidad manual del ventilador, si presiona
AUTO, la unidad entrará en modo automático y permanecerá en modo
automático hasta que se cambie.
Modo Ultimate Clean
Cuando esté en modo Ultimate Clean, el OxyPure
®
ajustará
automáticamente la velocidad del ventilador en función de la calidad del aire
y funcionará todo el tiempo que sea necesario para limpiar el aire.
1. Presione ULTIMATE CLEAN. Los LED alrededor del botón ULTIMATE
CLEAN se iluminarán en verde.
2. Presione ULTIMATE CLEAN nuevamente para apagarlo.
Nota: Los botones ULTIMATE CLEAN y FAN SPEED no pueden funcionar
juntos Mientras esté en el modo Ultimate Clean, si presiona FAN SPEED,
el modo Ultimate Clean se apagará, siendo reemplazado por el modo
Velocidad del Ventilador Manual. Mientras la unidad está funcionando
en modo Ultimate Clean, el usuario puede ajustar el tiempo de trabajo
presionando TIMER. Mientras la velocidad manual del ventilador está
activada, si presiona Ultimate Clean, la unidad entrará en modo Ultimate
Clean y permanecerá en el modo Ultimate Clean hasta que se cambie.
Modo ECO
El modo ECO le permite ahorrar energía y dinero apagando el OxyPure
cuando no es necesario. Presione POWER y luego mantenga presionado
AUTO durante 1 segundo. La unidad entrará en modo Eco. La luz LED sobre
el modo Eco será verde.
• Cuando la calidad del aire es mala, el ventilador funcionará
automáticamente.
• Cuando la calidad del aire es buena, el ventilador se apagará.

41
ESPAÑOLInstrucciones
instrucciones
nuwavenow.com
Para ejecutar los modos Eco y Ultimate Clean o AUTO juntos, presione
ULTIMATE CLEAN o AUTO mientras el Modo Eco está activado. El
temporizador en Ultimate Clean es ajustable presionando TIMER hasta que
se seleccione el tiempo deseado. El OxyPure
®
se ejecutará en modo Eco
y Ultimate Clean hasta que nalice el tiempo, después de lo cual volverá al
modo Eco.
Presione AUTO y manténgalo presionado durante 2 segundos nuevamente
para desactivar el modo Eco Una vez que el modo Eco esté apagado, la
luz de encendido volverá a verde y el OxyPure volverá a su conguración
anterior.
Modo Turbo
El modo Turbo le permite ejecutar la unidad a la velocidad más alta del
ventilador durante un período de tiempo establecido: 30 minutos, 1 hora o 2
horas. Cuando se usa con otros modos, el modo Turbo tiene prioridad.
Encienda el OxyPure y presione TURBO de la siguiente manera:
1. Una vez para que funcione a la máxima velocidad del ventilador durante
30 minutos,
2. Dos veces para funcionar a la máxima velocidad del ventilador durante
1 hora, y
3. Tres veces para funcionar a la máxima velocidad del ventilador durante
2 horas.
Si no se presiona ningún otro botón después de TURBO,entonces el
OxyPure irá a la velocidad del ventilador 1 después del tiempo establecido.
Modos Turbo + Auto
Presione TURBO y luego AUTO: El OxyPure trabajará en modo Turbo
durante 30 minutos y luego en modo Automático hasta que se cambie.
Nota: Si desea más tiempo en Turbo, presione TURBO hasta que se
alcance esa cantidad de tiempo.
Turbo + Temporizador
1. Cuando se está ejecutando el modo Turbo, el usuario puede establecer
el tiempo de ejecución hasta 12 horas presionando TIMER.
2. Si presiona TURBO una vez, el OxyPure funcionará durante 30
minutos; dos veces, y funcionará durante 1 hora; y tres veces, y
funcionará durante 2 horas. El OxyPure funcionará primero en modo
Turbo durante el tiempo seleccionado. A continuación, funcionará
durante el tiempo especicado en el temporizador. Después de eso,
pasará al siguiente modo o función.

42
instrucciones
nuwavenow.com
INSTRUCCIONES
Modo Sleep
Cuando esté en modo de Suspensión, las luces LED del panel de control
estarán apagadas, pero el ventilador seguirá activo. Ajuste la velocidad del
ventilador a su preferencia antes de entrar en modo de Suspensión.
1. Ajuste manualmente la velocidad del ventilador con el botón FAN SPEED.
2. Mantenga presionado FAN SPEED durante 2 segundos para activar el
modo de suspensión.
3. Para desactivar el modo de suspensión, presione cualquier botón.
Velocidad del Ventilador
Ajuste la velocidad del ventilador del OxyPure
®
presionando FAN SPEED.
Hay 6 niveles de velocidad del ventilador. Presione una vez para el nivel
de velocidad del ventilador 1 (la primera barra se iluminará), nuevamente
para el nivel de velocidad del ventilador 2 (la primera y la segunda barra se
encenderán), etc. Presione FAN SPEED una 7ª vez para volver al nivel de
velocidad del ventilador 1. No importa qué modo sea, el OxyPure mostrará
el nivel de velocidad actual del ventilador.
Temporizador
Puede ajustar el tiempo de ejecución presionando el botón TIMER. Hay 6
selecciones de tiempo diferentes:
• 30 minutos
• 1 hora
• 2 horas
• 4 horas
• 8 horas
• 12 horas
Si presiona TIMER una vez, funcionará con la velocidad del ventilador
seleccionada durante 30 minutos. Presione TIMER dos veces para 1 hora,
tres veces para 2 horas, etc. Al presionar TIMER 7 veces, se desactivará la
función del Temporizador.
El temporizador se puede utilizar junto con los modos Auto y Turbo:
• Cuando se utiliza con AUTO y TURBO: Ejecute TURBO y, a
continuación, ejecute AUTO con un tiempo establecido.
43
ESPAÑOLInstrucciones
instrucciones
nuwavenow.com
Ángulo de Flujo de Aire
Presionar Air Flow Angle le permitirá ajustar la for-
ma en que el aire limpio sale del OxyPure, pasando
de 30° a 60° a 90° y viceversa.
Uso de mesa
Para usar el OxyPure como una unidad de mesa, simplemente retire las
ruedas para asegurarse de que sea estable y no se caiga de la mesa.
Conjunto de Filtro de Aire
El OxyPure
®
viene con siete ltros premontables diferentes dentro de la
unidad (consulte el diagrama a continuación). Cada ltro está etiquetado
con un número. Haga coincidir estos con los números de ranura al instalar
los ltros. Cuando los ltros requieran limpieza, consulte Limpieza y
Mantenimiento.
Para instalar el Filtro Bio-Guard
®
360, retire los otros ltros y déjelos a un lado.
Presione hacia abajo en el piso de la unidad y deslice el ltro, asegurándose de
que los contactos eléctricos estén completamente acoplados.
Filtro
Bio-Guard
®
360
1 2
4
3
3
2 1
Filtro de Eliminación
de Emisiones de
Ozono (2)
Filtro Bio-Guard
®
(2)
Prefiltro de Acero
inoxidable (2)
1
4
2
3

44
limpieza y mantenimiento
nuwavenow.com
LIMPIEZA Y MANTENIMIENTO
CONSEJOS Y TIPS PARA LA LIMPIEZA DE LOS FILTROS
Con el tiempo, los ltros de su OxyPure pueden cubrirse de polvo,
polen, patógenos y otros contaminantes que pueden ser inhalados
accidentalmente o liberados en el aire si los ltros no se manejan ade-
cuadamente durante la limpieza.
Limpieza de Filtros Interiores vs. Exteriores
Lo ideal es que limpie sus ltros al aire libre, donde tenga acceso a una
manguera de agua (NO UTILICE UNA LAVADORA A PRESIÓN) que le
permita limpiar los ltros con distancia a la vez que elimina la posibilidad
de reintroducir los contaminantes atrapados a su hogar. La limpieza al aire
libre, sin embargo, no siempre es práctica debido al clima o problemas de
la propiedad (es decir, que viva en un apartamento), por lo que tendrá que
limpiar sus ltros en el interior. No es difícil, y para hacerlo aún más fácil y
efectivo, aquí hay algunos consejos generales y especícos para la limpie-
za de los ltros.
Consejos Generales
1. Siempre Use una Máscara.
Esto evitará la inhalación accidental de cualquier contaminante al
limpiar sus ltros.
2. Mueva el OxyPure, no los Filtros.
Mueva el OxyPure lo más cerca posible de la ubicación donde limpiará
los ltros. Esto minimizará la posibilidad de que el ltro se afecte (ver 3,
a continuación).
3. Manipule los Filtros con Cuidado. Al
retirar los ltros de la unidad, tenga cuidado de no sacudirlos, dejarlos
caer, golpearlos o afectarlos de otra manera, ya que hacerlo puede
causar la liberación de contaminantes atrapados.
4. Seque los Filtros por Completo.
Nunca instale un ltro mojado o húmedo en su OxyPure, ya que hacerlo
interferiría con la función del ltro.
Consejos Especícos para el Filtro
1. El Preltro de Acero Inoxidable (Filtro 1)
• Sumerja los ltros en agua inmediatamente para eliminar la posibili-
dad de que se liberen contaminantes en el aire.
• Lave y enjuague según las indicaciones.
• Después de enjuagar, sacuda el agua del ltro para ayudar a que
se seque.

45
ESPAÑOL
Limpieza y Mantenimiento
limpieza y mantenimiento
nuwavenow.com
• Seque bien, lejos de la luz solar directa, en una habitación con una
brisa fuerte o un ventilador que sople aire a través del ltro.
2. Los Filtros Bio-Guard y Bio-Guard 360 (Filtros 2 y 4)
• Sumerja los ltros en agua inmediatamente para eliminar la posibili-
dad de que se liberen contaminantes en el aire.
• Lave y enjuague según las indicaciones, pero solo el tiempo suci-
ente para limpiar el ltro.
• Después de enjuagar, sacuda el agua del ltro para ayudar a secar
los componentes eléctricos internos del ltro.
• Seque bien, lejos de la luz solar directa, en una habitación con
una brisa fuerte o un ventilador que sople aire a través del ltro.
Recuerde: El ltro Bio-Guard lleva una carga de 8,000V cuando
está funcionando, por lo que DEBE estar completamente seco por
dentro y por fuera antes de reinstalarlo en el OxyPure.
3. El Filtro de Eliminación de Emisiones de Ozono (Filtro 3)
• NO moje el ltro de eliminación de emisiones de ozono.
• Lleve este ltro afuera, si es posible.
• Limpie con una aspiradora equipada con cepillo.
• Las marcas en el material del ltro son normales y esperadas. No
tienen ningún efecto en la funcionalidad del ltro.
Mantenimiento de los Filtros
Al dar mantenimiento a los ltros, desenchufe la unidad y abra el Panel de
Acceso a los Filtros. Verá que el orden de los ltros, de afuera hacia aden-
tro, es el siguiente:
1. 2 Preltros de Acero Inoxidable (Filtro 1)
2. 2 Filtros Bio-Guard® (Filtro 2)
3. 2 Filtros de Eliminación de Emisiones de Ozono (Filtro 3)
4. 1 Filtro Bio-Guard® 360 (Filtro 4)

46
limpieza y mantenimiento
nuwavenow.com
LIMPIEZA Y MANTENIMIENTO
Mantenimiento de los Filtros
Para dar mantenimiento a los ltros, desenchufe la unidad y abra el Panel de
Acceso a los Filtros. Verá que el orden de los ltros, de afuera hacia adentro,
es el siguiente:
1. 2 Preltros de Acero Inoxidable (Filtro 1)
2. 2 Filtros Bio-Guard
®
(Filtro 2)
3. 2 Filtros de Eliminación de Emisiones de Ozono (Filtro 3)
4. 1 Filtro Bio-Guard
®
360 (Filtro 4)
Indicador de Mantenimiento del Filtro
Las 2 luces del ltro limpio se volverán verdes en aproximadamente 3
meses para alertarlo de que los Filtros Bio-Guard
®
DEBEN limpiarse para
mantener un rendimiento óptimo (Recomendación NuWave). Cuando
cualquiera de las luces se vuelve roja (después de aproximadamente
6 meses), ese Filtro Bio-Guard
®
DEBE limpiarse. Una vez limpiado,
mantenga presionado TIMER durante 2 segundos hasta que se escuche
un pitido para restablecer el indicador Clean Filter 2. Para restablecer la luz
Clean Filter 4, mantenga presionado el botón TURBO durante 2 segundos
hasta que se escuche un pitido. Una vez que se restablezcan las luces del
ltro limpio, se apagarán.
Limpieza del Sensor de Polvo
El sensor de polvo se encuentra en el lateral de la unidad.
1. Abra la Cubierta del Sensor de Polvo.
2. Con un hisopo de algodón seco o un cepillo pequeño y suave, retire
suavemente la suciedad o el polvo del sensor.
3. Para obtener más acumulación en el sensor, límpielo con un hisopo de
algodón ligeramente húmedo.
4. Retire la humedad con un hisopo de algodón seco.
5. El sensor requiere una limpieza regular (aprox. cada 3 meses) para que
la unidad funcione de manera eciente.
6. Si el OxyPure
®
está colocado en un área con alta acumulación de polvo,
se necesita una limpieza más frecuente del sensor.
7. No utilice el hisopo de algodón en ninguna parte o área que no sea el sensor.
No sumerja el OxyPure en agua. Limpie el exterior de la unidad con una
esponja o paño húmedo y séquelo. Asegúrese de que todas las piezas
y cubiertas estén bien unidas.
47
ESPAÑOL
Limpieza y Mantenimiento
limpieza y mantenimiento
nuwavenow.com
Cambio y Limpieza de Filtros
Los ltros deben limpiarse a tiempo para ayudar a la unidad a mantener
un rendimiento óptimo.
1. Retire el Panel de Acceso al Filtro en la parte posterior del OxyPure
®
con su asa incorporada.
2. Deslice con cuidado los ltros que necesitan limpieza. No los agite.
3. Sumerja el preltro de acero inoxidable y los ltros Bio-Guard
®
en agua.
NO moje el ltro de eliminación de emisiones de ozono.
4. Lave los ltros como se indica. NO use toallas de papel.
5. Siempre permita que los ltros lavables se sequen por completo, fuera
de la luz solar directa, antes de volver a instalarlos. Nunca coloque un
ltro húmedo en el OxyPure.
6. Vuelva a conectar y cierre el Panel de Acceso al Filtro. Si el panel no
está cerrado correctamente, el botón POWER parpadeará en rojo y la
unidad no se encenderá.
No seque los ltros a la luz solar directa o con un secador de pelo
caliente. No utilice una aspiradora o un cepillo demasiado rígido para
limpiar los ltros o preltros Bio-Guard
®
.
Para Limpiar los Filtros Bio-Guard
®
1. Retire los ltros y sumérjalos en agua.
2. Rocíe los ltros con un detergente suave y déjelos reposar durante 2 a
3 minutos.
3. Sumerja los ltros en agua tibia, agite y retire. Si no puede sumergir
completamente el ltro Bio-Guard
®
360, colóquelo bajo agua corriente a
baja presión.
4. Repita este proceso hasta que los ltros estén limpios.
5. Enjuague los ltros con agua tibia (ver 3 arriba).
6. Seque los ltros completamente, fuera de la luz solar directa, antes de usar.
PRECAUCIÓN
Limpie los Filtros Bio-Guard
®
SOLO CON AGUA. El uso de un cepillo
o una aspiradora solo pondrá las partículas, alérgenos y patógenos
capturados de nuevo en el aire.
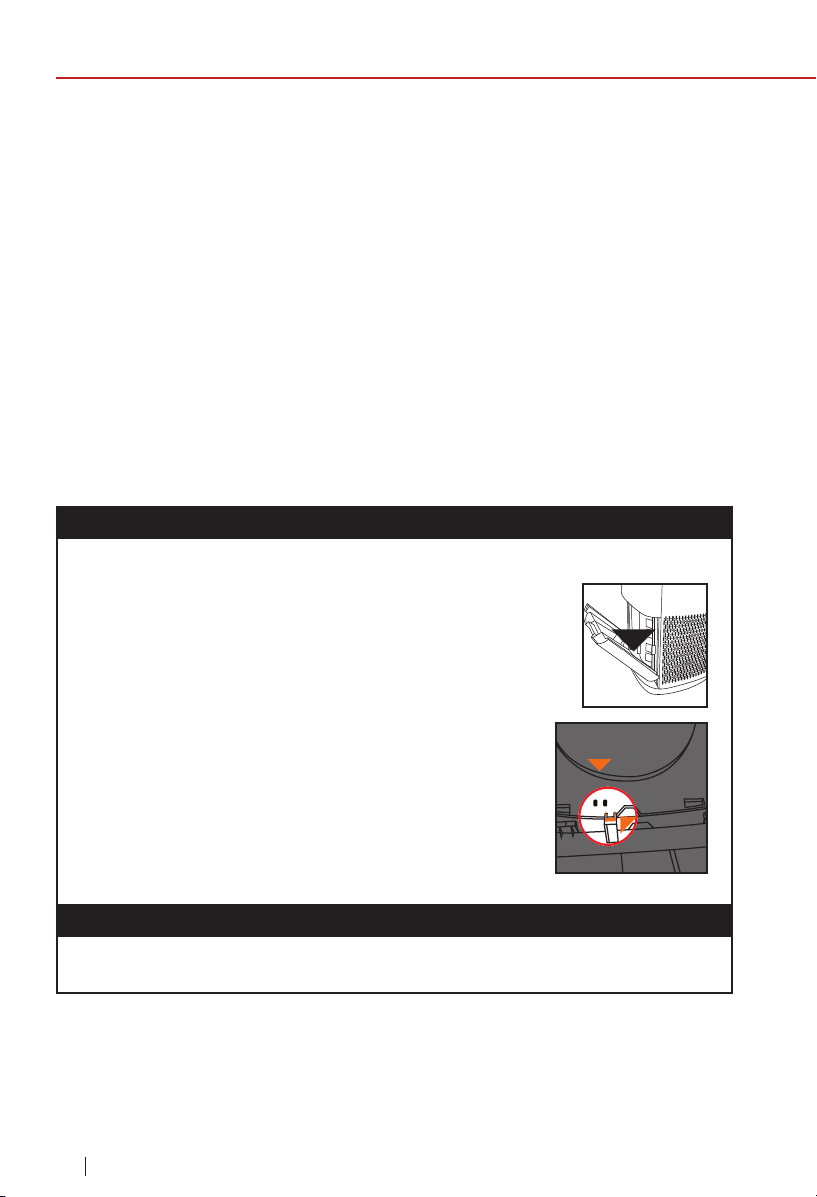
48
limpieza y mantenimiento
nuwavenow.com
LIMPIEZA Y MANTENIMIENTO
Para Limpiar los Filtros de Eliminación de Emisiones de Ozono
1. Retire los ltros. Si es posible, llévelos afuera para limpiar.
2. Limpie los ltros con cuidado, pero a fondo, utilizando una aspiradora
con punta de cepillo.
3. Repita el proceso en el otro lado. NO LOS MOJE.
Para Limpiar los Preltros de Acero Inoxidable
Los preltros deben limpiarse al menos una vez cada dos meses,
dependiendo del uso. Comience sumergiendo el preltro en agua. Luego:
1. Use un paño seco o un cepillo suave para eliminar el polvo o la pelusa.
2. Limpie los ltros con agua tibia y jabón.
3. Enjuague bien los ltros y elimine las partículas de jabón.
4. Deje que los ltros se sequen completamente, fuera de la luz solar
directa, ANTES de reinstalarlos en el OxyPure (hasta 12-24 horas).
El OxyPure no enciende.
1. El enchufe no está en la toma de corriente. Conéctelo a la toma de
corriente.
2. POWER en el panel táctil no está encendido.
Presione POWER.
3. El Panel de Acceso al Filtro en la parte trasera está
apagado o suelto. Asegúrese de que el Panel de
Acceso al Filtro esté encendido de forma segura.
4. Si no puede cerrar el Panel de Acceso al Filtro
por cualquier motivo, el OxyPure no funcionará
y deberá ponerse en contacto con el Servicio de
atención al cliente de NuWave. Tenga cuidado
de asegurarse de que las pestañas no estén
dañadas al asegurar el Panel de Acceso al
Filtro.
El Temporizador no funciona cuando se presiona.
El OxyPure no está leyendo la función seleccionada. Presione “FAN
SPEED” o “AUTO” y, a continuación, presione “TIMER”.
Tab
Sensor
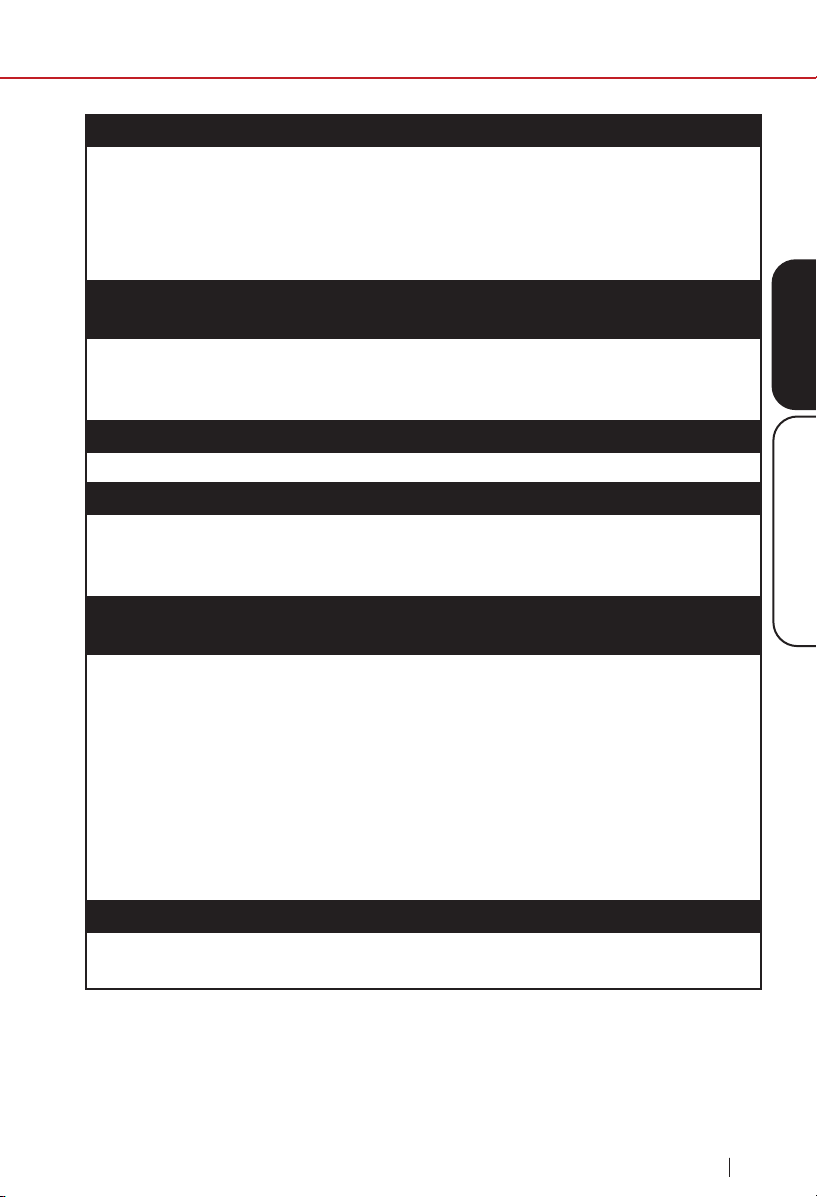
49
ESPAÑOL
Limpieza y Mantenimiento
limpieza y mantenimiento
nuwavenow.com
El ventilador no está soplando.
1. No se está utilizando una salida adecuada. Asegúrese de que la toma
de corriente tenga el voltaje adecuado para su uso.
2. El Panel de Acceso al Filtro en la parte trasera no está correctamente
en su lugar. Asegúrese de que el Panel de Acceso al Filtro esté
encendido de forma segura.
La velocidad del ujo de aire no cambia cuando se presiona FAN
SPEED.
El OxyPure puede estar en modo AUTO. Congure el OxyPure en
otro modo de funcionamiento en el panel táctil y luego presione “FAN
SPEED”.
El ujo de aire desde la ventilación superior es débil.
Los ltros de aire están sucios. Limpie los ltros de aire.
El OxyPure
®
está produciendo humo u olor.
Los ltros de aire están sucios. Limpie los ltros de aire. Si el problema
continúa, comuníquese con Servicio al Cliente al 1-877-689-2838 o envíe
un correo electrónico a help@nuwavenow.com.
Los indicadores CLEAN FILTER no se han restablecido después de
que se hayan limpiado los ltros.
1. El sensor de ltro no está leyendo el ltro limpio. Apague el OxyPure
®
y vuelva a encenderlo. Mantenga presionado “TIMER” durante 2
segundos hasta que se escuche un pitido.
2. Apague el OxyPure, desenchufe y ajuste los ltros. Conecte y
encienda el OxyPure de nuevo.
3. El Panel de Acceso al Filtro en la parte trasera no está bien colocado.
Asegúrese de que el Panel de Acceso al Filtro esté encendido de
forma segura.
4. El Sensor del Filtro está sucio. Limpie el Sensor del Filtro.
ULTIMATE CLEAN no se enciende cuando se presiona.
El OxyPure no está leyendo la función seleccionada. Encienda y apague
el OxyPure presionando POWER dos veces.

50
guía para resolver problemas
nuwavenow.com
GUÍA PARA RESOLVER PROBLEMAS
Power parpadea en rojo.
Cuando se quita el Panel de Acceso al Filtro, el icono de encendido estará
retroiluminado en rojo sólido. Presionar POWER hará que parpadee. Sin
embargo, como medida de seguridad, el OxyPure no funcionará cuando
se retire el Panel de Acceso al Filtro. Asegúrese de que el Panel de
Acceso al Filtro esté instalado de forma segura.
El sensor de Olor no se restablece y no borra todas las barras.
Todas las barras del panel de control parpadean.
Comuníquese con Servicio al Cliente al 1-877-689-2838 o envíe un correo
electrónico help@nuwavenow.com.
GARANTÍA LIMITADA
El puricador de aire inteligente NuWave
®
OxyPure ZERO
™
EL FABRICANTE GARANTIZA
NuWave
®
garantiza que el motor del ventilador, el ventilador, el panel de control, los
Preltros de Acero Inoxidable, los ltros de eliminación de emisiones de ozono y los
ltros Bio-Guard
®
del puricador de aire inteligente OxyPure
®
Zero
™
estarán libres de
defectos de fabricación en condiciones normales de uso doméstico durante 3 años
a partir de la fecha. de compra. Esta garantía cubre al propietario original de este
puricador de aire para uso doméstico personal únicamente y cuando se opera de
acuerdo con las instrucciones escritas del fabricante.
Esta garantía no se aplica a los productos utilizados con nes comerciales, de alquiler
o de reventa. El fabricante proporcionará las piezas y la mano de obra necesarias
para reparar cualquier pieza del NuWave OxyPure
®
ZERO
™
en el Departamento de
servicio de NuWave
®
LLC. Después del vencimiento de la garantía, el costo de la
mano de obra y las piezas será responsabilidad del propietario.
LA GARANTÍA NO CUBRE
LED de Aire y Olor
El OxyPure mostrará la calidad del aire / olor de limpio a sucio, como se
muestra a continuación. Si la contaminación en el aire excede Dirty (LED
rojo), se activará una alerta de advertencia tanto por un pitido como por un
LED parpadeante.
Para apagar esta advertencia, presione AUTO y Fan Speed al mismo
tiempo. Presione los mismos botones para activar la función de advertencia.
Limpio Sucio

51
ESPAÑOL
GuÍa Para Resolver Problemas
guía para resolver problemas
nuwavenow.com
La garantía limitada se anula si las reparaciones son realizadas por un distribuidor
no autorizado o si la placa de datos del número de serie se retira o borra. Esta
garantía no cubre el deterioro normal del acabado debido al uso o la exposición.
Esta garantía limitada no cubre fallas, daños o un desempeño inadecuado debido
a un accidente, actos de Dios (como rayos), uctuaciones en la energía eléctrica,
alteraciones, abuso, mal uso, aplicaciones incorrectas, atmósferas de tipo corrosivo,
instalación incorrecta, falta de funcionamiento de acuerdo con las instrucciones
escritas del fabricante, uso anormal o uso comercial. NuWave LLC se reserva el
derecho de anular la Garantía Limitada, según lo permita la ley, para los productos
adquiridos a través de un distribuidor no autorizado.
OBTENER SERVICIO
El propietario tendrá la obligación y la responsabilidad de: pagar por todos los
servicios y piezas no cubiertos por la garantía; prepagar el ete hacia y desde
el Departamento de Servicio para cualquier parte o sistema devuelto bajo esta
garantía; y empacar cuidadosamente el producto con materialde relleno adecuado
para evitar daños durante el transporte.El envase original es ideal para este
propósito. Incluya en el paquete el nombre del propietario, la dirección, el número de
teléfono durante el día, una descripción detallada del problema y su “número RGA”.
(Llame al 877-689-2838) o envíe un correo electrónico a help@nuwavenow.
com para obtener el número RGA (Número de autorización de devolución de
mercancías). Proporcione el modelo del sistema de cocción y el número de
serie y el comprobante de la fecha de compra (una copia del recibo) al realizar
reclamaciones bajo esta garantía.
OBLIGACIÓN DEL FABRICANTE
La obligación del Fabricante en virtud de esta Garantía Limitada se limita, en la
medida permitida por la ley, a reparar o reemplazar cualquier pieza cubierta por
esta Garantía Limitada que, tras un examen, se encuentre defectuosa en el uso
normal. La Garantía Limitada es aplicable solo dentro de los Estados Unidos
continentales y solo al comprador original de los canales de distribución autorizados
por el fabricante. LA GARANTÍA LIMITADA NO PUEDE SER ALTERADA, VARIADA
O EXTENDIDA EXCEPTO POR UN INSTRUMENTO ESCRITO EJECUTADO POR
EL FABRICANTE. EL RECURSO DE REPARACIÓN O REEMPLAZO SEGÚN LO
DISPUESTO EN ESTA GARANTÍA LIMITADA ES EXCLUSIVO. EN NINGÚN CASO
EL FABRICANTE SERÁ RESPONSABLE DE NINGÚN DAÑO CONSECUENTE
O INCIDENTAL A NINGUNA PERSONA, YA SEA OCASIONADO O NO POR
NEGLIGENCIA DEL FABRICANTE, INCLUIDOS, ENTRE OTROS, DAÑOS POR
PÉRDIDA DE USO, COSTOS DE SUSTITUCIÓN, DAÑOS A LA PROPIEDAD U
OTRA PÉRDIDA DE DINERO.

garantía limitada
52
nuwavenow.com
GARANTÍA LIMITADA
Algunos estados no permiten la exclusión o limitación de daños incidentales
o consecuentes, por lo que las exclusiones de limitación anteriores pueden
no aplicarse. Esta Garantía Limitada otorga derechos legales especícos, y
también puede haber otros derechos que varíen de un estado a otro. SALVO
QUE SE DISPONGA EXPRESAMENTE LO CONTRARIO ANTERIORMENTE,
EL FABRICANTE NO OFRECE GARANTÍAS EXPRESAS O IMPLÍCITAS QUE
SURJAN POR LEY O DE OTRO MODO, INCLUIDAS, ENTRE OTRAS, LAS
GARANTÍAS IMPLÍCITAS DE COMERCIABILIDAD E IDONEIDAD PARA UN
PROPÓSITO PARTICULAR PARA CUALQUIER OTRA PERSONA. LEA EL
MANUAL DEL PROPIETARIO. SI AÚN TIENE ALGUNA PREGUNTA SOBRE EL
FUNCIONAMIENTO O LA GARANTÍA DEL PRODUCTO, COMUNÍQUESE CON
NUWAVE LLC.
PROCEDIMIENTO DE RESOLUCIÓN DE CONFLICTOS. Para disputas relacionadas
con el uso del sitio web o el uso o la compra de un producto o servicio de NuWave
(colectivamente “Disputas”), usted acepta comunicarse primero con NuWave LLC
al (877) 689-2838 (teléfono), (847) 367-5486 (fax) o a legal@nuwavenow.com (por
correo electrónico). Si no podemos resolver su disputa de manera informal, todas y
cada una de las disputas se someterán a arbitraje nal y vinculante. Puede iniciar el
proceso de arbitraje presentando por escrito una demanda a la Asociación Americana
de Arbitraje (“AAA”) y enviando una copia a NuWave. NuWave pagará todos los
costos de presentación. Un solo árbitro de la AAA llevará a cabo el arbitraje en un
lugar conveniente para usted o por teléfono. El laudo del árbitro será vinculante y
podrá ser ingresado como sentencia en un tribunal de jurisdicción competente. El
arbitraje se llevará a cabo de acuerdo con las disposiciones de las Reglas de Arbitraje
Comercial y los Procedimientos de Mediación de la AAA vigentes en el momento de
la presentación de su demanda de arbitraje. Ver https://www.adr.org/sites/default/
les/CommercialRules_Web.pdf. Salvo que lo exija la ley según lo determine un
árbitro, ninguna de las partes o árbitros puede divulgar la existencia, el contenido o
los resultados de cualquier arbitraje en virtud del presente sin el consentimiento previo
por escrito de ambas partes.
A. RENUNCIA AL DERECHO A DEMANDAR. Al aceptar el arbitraje, usted entiende
que, en la medida máxima permitida por la ley, acepta renunciar a su derecho a
presentar una demanda en cualquier tribunal, a una audiencia judicial, un juicio con
juez y un juicio con jurado.
B. RENUNCIA A LA ACCIÓN DE CLASE. En la medida máxima permitida por la ley,
usted acepta expresamente abstenerse de presentar o unirse a cualquier reclamo en
cualquier capacidad representativa o de toda la clase, incluidos, entre otros, presentar
o unirse a cualquier reclamo en cualquier demanda colectiva o arbitraje colectivo.
C. PROCEDIMIENTO DE EXCLUSIÓN VOLUNTARIA. Para optar por no participar
en el arbitraje, debe ponerse en contacto con NuWave. Para solicitar optar por
no participar en el arbitraje, contáctenos en legal@nuwavenow.com (por correo
electrónico), NuWave® LLC, 560 Bunker Ct., Vernon Hills, IL 60061, U.S.A., (847)
367-5486 (fax), o (877) 689-2838 o (224) 206-3019 (teléfono). Tendrá treinta (30)
días a partir de la fecha de entrega del producto para optar por no participar en el
arbitraje con respecto a cualquier disputa que surja de o esté relacionada con el uso
o la compra de cualquier producto NuWave. Si han pasado más de 30 días, no es

53
ESPAÑOL
GarantÍa Limitada
nuwavenow.com
elegible para optar por no participar en el arbitraje y habrá renunciado a su derecho
a demandar o participar en una demanda colectiva con respecto a la disputa que
surja de su compra o uso de un producto NuWave. Para cualquier disputa que surja
de su uso del sitio web de NuWave, tiene treinta (30) días a partir de la fecha en
que proporcionó información al sitio web para optar por no participar en el arbitraje.
Si han pasado más de 30 días, no es elegible para optar por no participar en el
arbitraje y habrá renunciado a su derecho a demandar y participar en una demanda
colectiva con respecto a la disputa que surja de su uso del sitio web de NuWave.
D. ALGUNOS ASUNTOS NO ESTÁN SUJETOS A ARBITRAJE. No obstante lo
anterior, lo siguiente no estará sujeto a arbitraje y puede ser adjudicado solo en
los tribunales estatales y federales de Illinois: (i) cualquier disputa, controversia o
reclamo relacionado o que impugne la validez de nuestros derechos de propiedad
intelectual y derechos de propiedad, incluidos, entre otros, patentes, marcas
comerciales, marcas de servicio, derechos de autor o secretos comerciales; (ii)
una acción de una parte para medidas cautelares temporales, preliminares o
permanentes, ya sean prohibitivas u obligatorias, u otra medida provisional; o (iii)
interacciones con autoridades gubernamentales y reguladoras. (i) cualquier disputa,
controversia o reclamo relacionado o que impugne la validez de nuestros derechos
de propiedad intelectual y derechos de propiedad, incluidos, entre otros, patentes,
marcas comerciales, marcas de servicio, derechos de autor o secretos comerciales;
(ii) una acción de una parte para medidas cautelares temporales, preliminares
o permanentes, ya sean prohibitivas u obligatorias, u otra medida provisional; o
(iii) interacciones con autoridades gubernamentales y reguladoras. Usted acepta
expresamente abstenerse de presentar o unirse a cualquier reclamo en cualquier
capacidad representativa o colectiva, incluidos, entre otros, presentar o unirse a
cualquier reclamo en cualquier demanda colectiva o cualquier arbitraje colectivo.
LEA EL MANUAL DEL PROPIETARIO
Si aún tiene alguna pregunta sobre el funcionamiento o la garantía del producto,
comuníquese con NuWave® LLC en: 1-877-689-2838 o enviando un correo
electrónico a help@nuwavenow.com (Lun-Vie 7:30am-4:30pm CST).
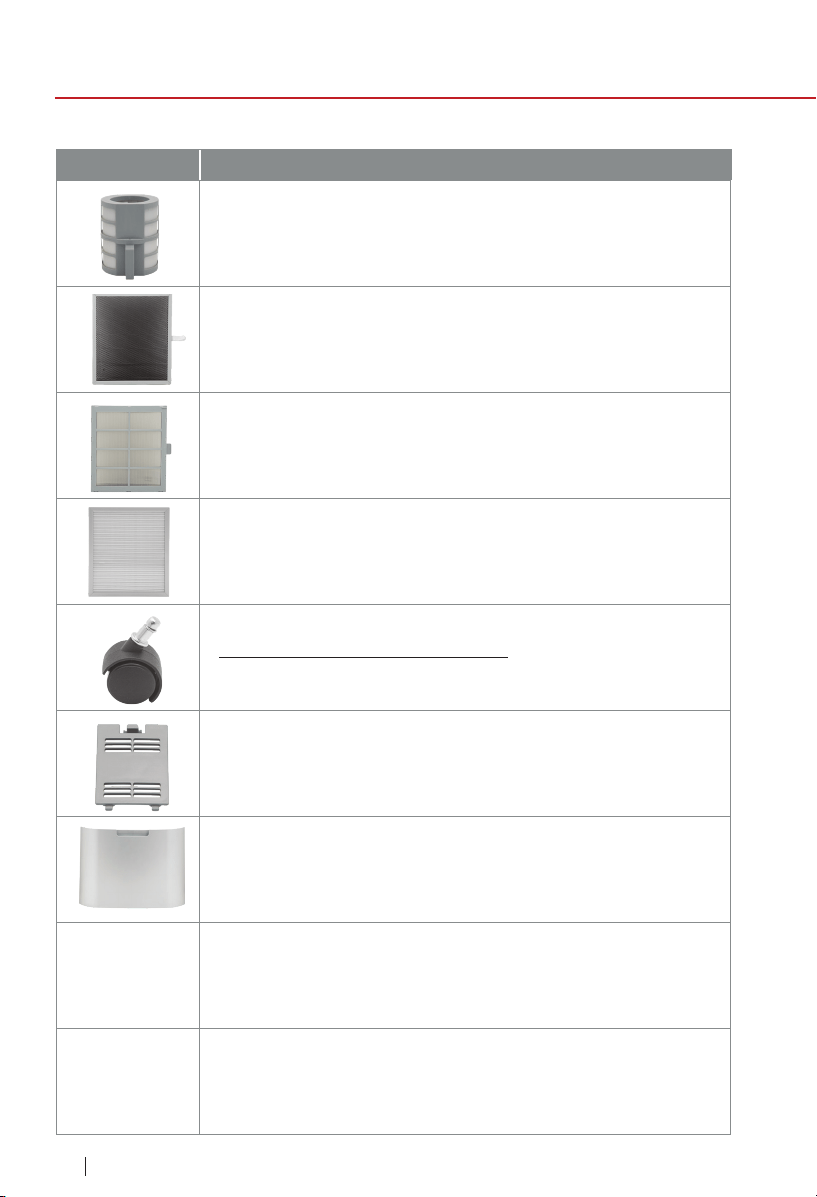
54
REPLACEABLE PARTS
Part Name
replaceable parts
nuwavenow.com
To order replaceable parts head over to NuWaveNow.com
Wheels (2)
Ruedas (2)
Wheels with Brakes (2)
Ruedas con Frenos (2)
Dust Sensor Cover
Cubierta del Sensor de Polvo
Ozone Emission Removal Filter
Filtro de Eliminación de Emisiones de Ozono
Bio-Guard
®
360 Filter
Filtro Bio-Guard
®
360
Bio-Guard
®
Filter
Filtro Bio-Guard
®
Stainless-Steel Prelter
Preltro de Acero Inoxidable
Filter Access Panel
Panel de Acceso de Filtros
:OTP1
:OTP4

55
Part Description Part No.
replaceable parts
nuwavenow.com
Eliminates harmful ozone emissions by converting
ozone to oxygen.
Kills 99.99% of mold, bacteria, and viruses as small as
0.09 microns.
Kills 99.99% of mold, bacteria, and viruses as small as
0.09 microns.
Captures and collects large particles, pollutants, and
allergens including pet hair, dander, and pollen.
Located on the bottom of the OxyPure
®
for
easy transport.
Located on the side, encloses and covers the
Filter Sensor.
Located on the back, encloses and covers the lters.
OTP2
OTA2
OOA1
OTA3
OTA4
OTP1
OTP4
OTP3

BM47251
Rev. 3-OG
01-20-22
FOR HOUSEHOLD USE ONLY
120V, 60Hz, 60 Watts
Model: 47251
Rev. 1
For patent information please go to:
www.nuwavenow.com/legal/patent
Designed in France & Developed in USA
NuWave LLC
560 Bunker Ct.
Vernon Hills, IL 60061, U.S.A.
Tel: 1-877-689-2838
Mon - Fri 7:30 am to 4:30 pm (CST)
Email: help@nuwavenow.com
Made in China
©2022 NuWave LLC • All Rights Reserved.