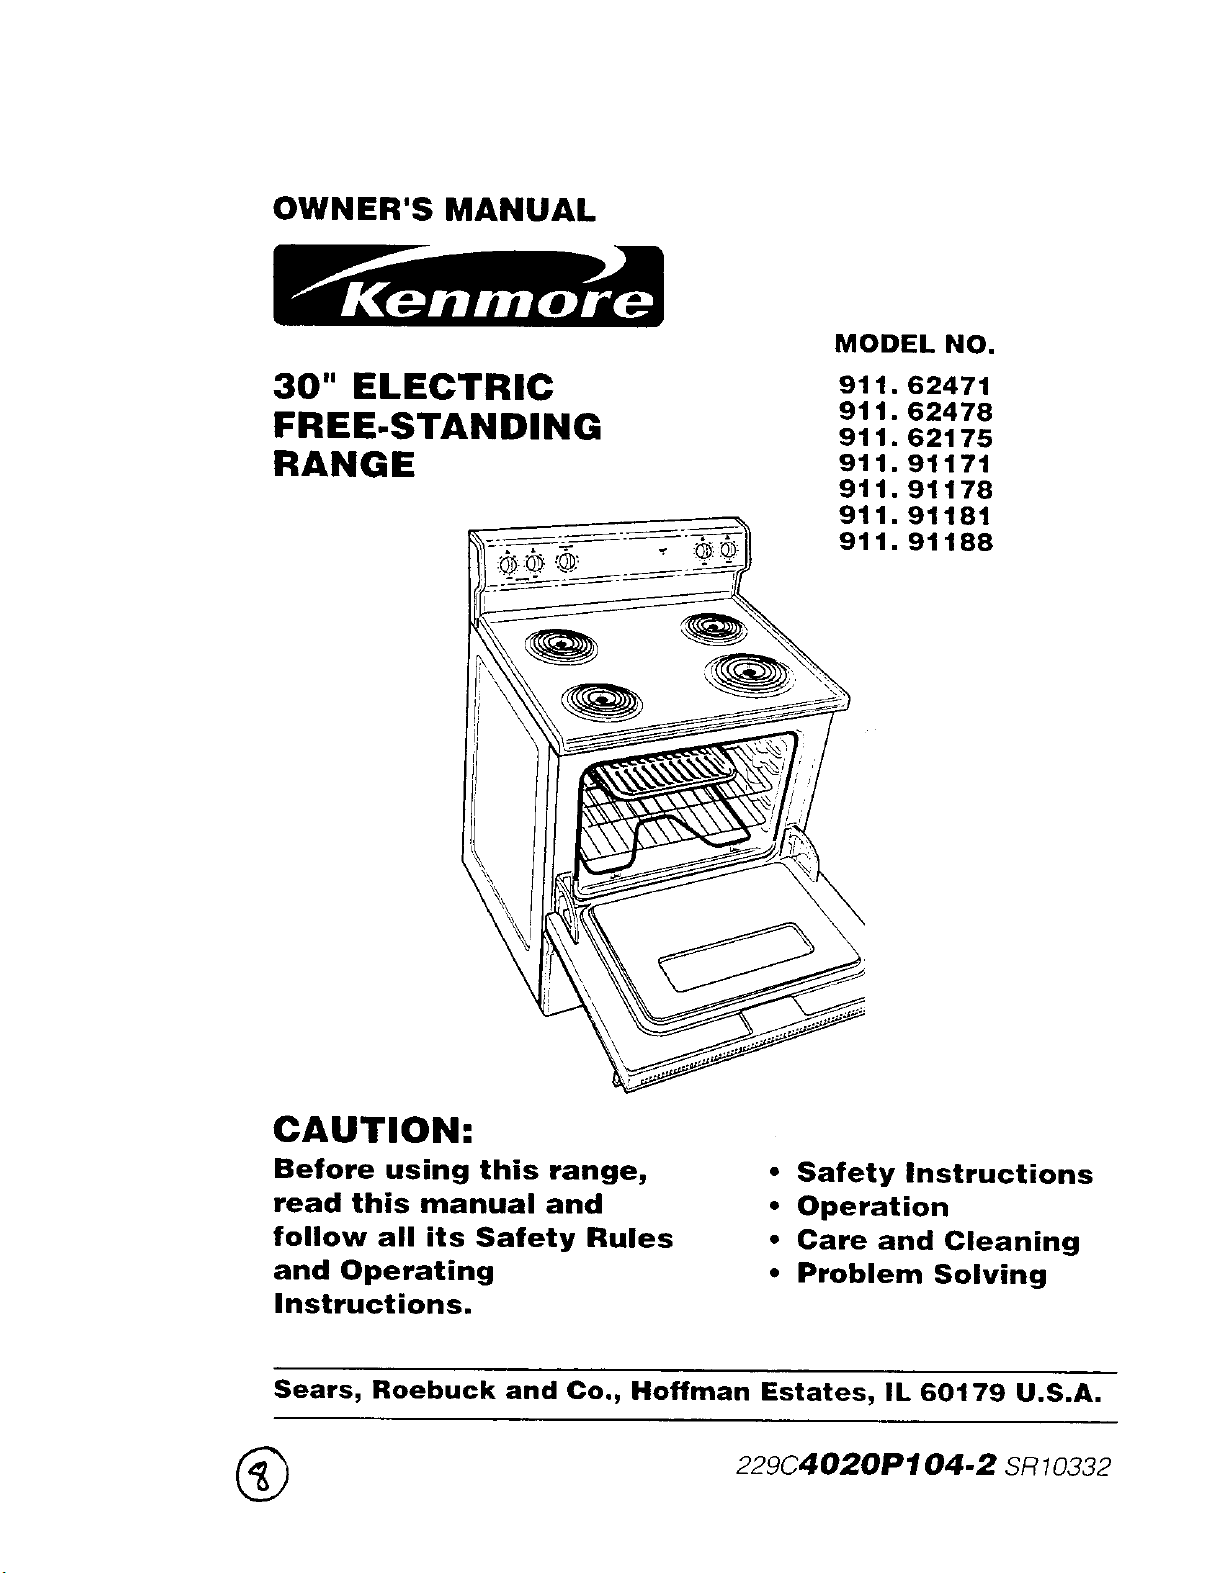
OWNER'S MANUAL
30" ELECTRIC
FREE-STANDING
RANGE
MODEL NO.
911.62471
911.62478
911.62175
911.91171
911.91178
911.91181
911.91188
CAUTION:
Before using this range,
read this manual and
follow all its Safety Rules
and Operating
Instructions.
• Safety Instructions
• Operation
• Care and Cleaning
• Problem Solving
Sears, Roebuck and Co., Hoffman Estates, IL 60179 U.S.A.
(_ 229C4020P 104-2 SR 10332
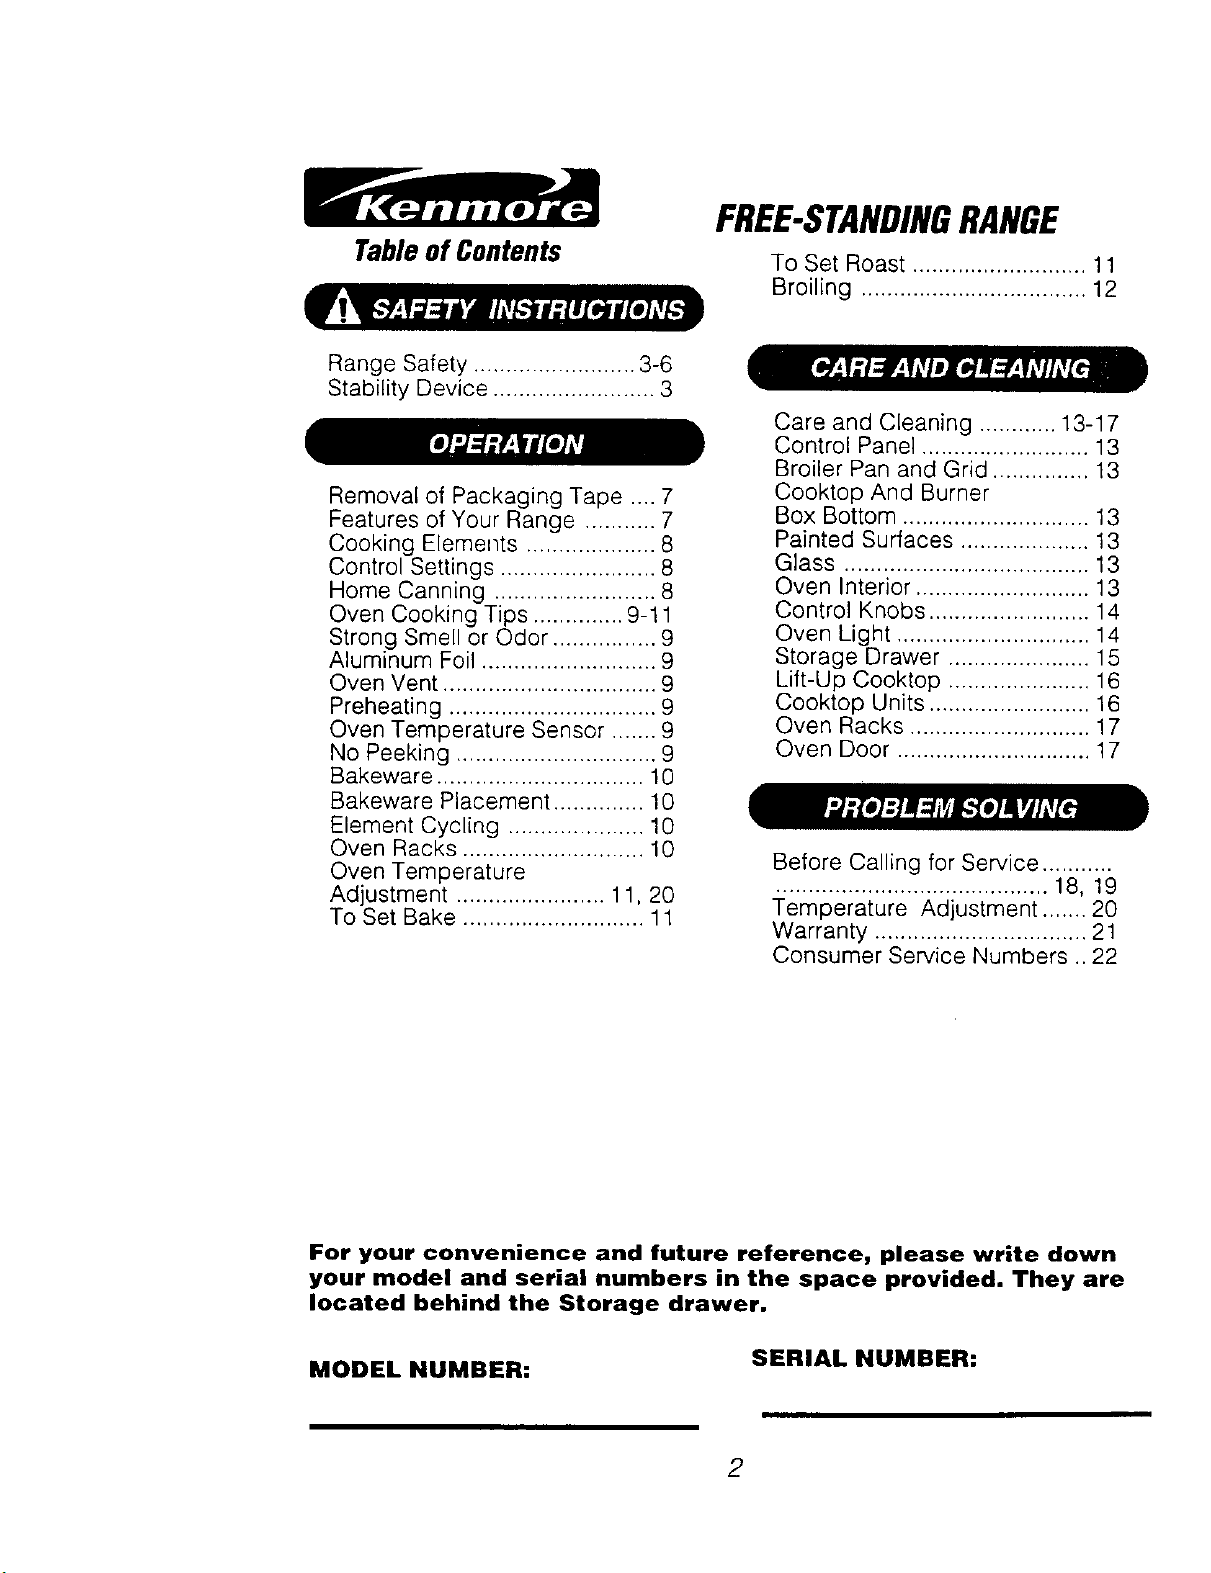
Tableof Contents
FREE-STANDINGRANGE
To Set Roast ........................... 11
Broiling ................................... 12
Range Safety ......................... 3-6
Stability Device ......................... 3
Removal of Packaging Tape .... 7
Features of Your Range ........... 7
Cooking Elements .................... 8
Control Settings ........................ 8
Home Canning ......................... 8
Oven Cooking Tips .............. 9-11
Strong Smell or Odor ................ 9
Aluminum Foil ........................... 9
Oven Vent ................................. 9
Preheating ................................ 9
Oven Temperature Sensor ....... 9
No Peeking ............................... 9
Bakeware ................................ 10
Bakeware Placement .............. 10
Element Cycling ..................... 10
Oven Racks ............................ 10
Oven Temperature
Adjustment ....................... 11, 20
To Set Bake ............................ 11
Care and Cleaning ............ 13-17
Control Panel .......................... 13
Broiler Pan and Grid ............... 13
Cooktop And Burner
Box Bottom ............................. 13
Painted Surfaces .................... 13
Glass ...................................... 13
Oven Interior ........................... 13
Control Knobs ......................... 14
Oven Light .............................. 14
Storage Drawer ...................... 15
Lift-Up Cooktop ...................... 16
Cooktop Units ......................... 16
Oven Racks ............................ 17
Oven Door .............................. 17
Before Calling for Service ...........
.......................................... 18, 19
Temperature Adjustment ....... 20
Warranty ................................. 21
Consumer Service Numbers .. 22
For your convenience and future reference, please write down
your model and serial numbers in the space provided. They are
located behind the Storage drawer.
MODEL NUMBER:
SERIAL NUMBER:
2

IMPORTANTSAFETY
INSTRUCTIONS
SAVE THESE INSTRUCTIONS
Read all instructions before using this appliance. When using
gas or electrical appliances, basic safety precautions should
be followed, including the following:
Injury To Persons
Could Result
Device Packed With
See Installation
!
Tools you will need:
• Phillips head screwdriver
• 13/8" open end or adjustable wrench
1. Remove the bracket from the
prepack located inside the oven.
2. Decide whether the bracket will be
installed on the right or left side of
range Location.
3, If the bracket side of the range is
adjacent to a cabinet, place the
bracket against back wall and
cabinet as shown in Fig. 1.
If there is no adjacent cabinet,
determine where the location of
the range side (painted outside
panel) will be. Place the bracket
with its outside edge at this
location and against back wall.
See Fig. 2.
4. Determine whether you will anchor
the bracket to the floor or wall.
Make sure this location is clear of
electrical wiring or plumbing.
Outside Edge Of
Bracket To Be
Flush With Left Or
ide Of Range
Fig. I
So
Fasten the bracket securely with
the screws provided. Screws are
self-drilling in wood, plywood,
particle and chip board, and most
metal framing. If attaching to
masonry, you can buy suitable
screws and anchors at hardware
stores. Use a masonry drill to drill
the required holes.
Bracket II Wall
Screw Must Enter \ II Plate
Wood Or Metal -,_,._
I I_1
Fig. 2 Attachment To Wall
o
1
Using the wrench, back out the
four leg levelers at least two turns.
See your installation guide for
more leveling information before
positioning range.
Slide the range into place. Be sure
rear leg leveler fully engages the
slot in the bracket. If range cannot
be moved back far enough for
rear leg leveler to enter bracket,
move bracket forward as required
and attach to floor in new location.
3
IMPORTANTSAFETY
INSTRUCTIONS
WARNING! To pre-
vent accidental tipping
of the range from ab-
normal usage, including ex-
cessive loading of the oven
door, attach the range to the
wall or floor by installing the
Anti-Tip device supplied. If the
range is moved for cleaning,
servicing or any reason, be
sure the Anti-Tip device is re-
engaged properly when the
range is slid back in the open-
ing. Failure to do so could
result in the range tipping or
personal injury. To inspect the
anti ;.ttip device, remove the
storage drawer and look to
see if the rear leg leveler fully
engages the slot in the
bracket.
Important: To insure safety for
yourself, family and home, please read
your Owner's Manual carefully. Keep it
handy for reference. Pay close attention
to Safety Sections. BE SURE your
appliance is installed and grounded by a
qualified technician.
• DO NOT leave children alone or
unattended near an appliance in use.
• TEACH CHILDREN not to play with
controls or any part of the appliance,
and not to sit, climb or stand on the
door, or any other part of the appliance.
CAUTION: NEVER STORE items
of interest to children on the
backguard or in cabinets above the
appliance Children climbing on the
appliance could be seriously injured
• KEEP THIS book for later use.
• NEVER USE your appliance for
warming or heating the room.
• NEVER TRY to repair or replace any
part of the appliance unless instruc-
tions are given in this manual All other
work should be done by a qualified
technician.
• ALWAYS KEEP combustible wall
coverings, curtains, dish cloths,
towels, potholders, and other linens a
safe distance from the appliance.
• NEVER HEAT unopened food
containers. Pressure buildup can
cause the container to burst and cause
injury.
• NEVER LEAVE jars or cans of fat or
drippings in your oven.
• ALWAYS KEEP the oven and
surface unit areas free from things that
will burn. Food, wooden utensils, and
grease buildup could catch fire
Plastic utensils could melt and canned
foods could explode Your appliance
should never be used as a storage
area.
• ALWAYS KEEP your appliance clear
of things that will burn (gasoline and
other flammable vapors or liquids).
• NEVER TRY to clean a hot surface.
Some cleaners produce noxious
fumes, and wet cloths or sponges
could cause steam burns.
• NEVER WEAR loose fitting clothing
when using your appliance.
• NEVER USE a towel or other bulky
cloth as a potholder, and make sure
the potholder is dry. Moist potholders
and wet cloths or sponges could
cause steam burns DO NOT let
potholders touch hot heating elements.
4
IMPORTANTSAFETY
INSTRUCTIONS
• DO NOT touch heating elements,
surfaces near them, or interior oven
surfaces. These may be hot enough to
cause burns even though they are
dark in color. During and after use. do
not touch or let clothing or flammable
material contact the etements or hot
surfaces until they have had time to
cool. Other surfaces near the oven
vent openings, oven door and
window, and cooktop surfaces may
also be hot enough to cause burns.
• ONLY SOME kinds of glass or
ceramic cookware can be used for
cooktop cooking. Make sure the
cookware you choose to use is
designed for cooktop cooking without
breaking due to the sudden tempera-
ture change.
• ALWAYS USE care when touching
cooktop elements. They will retain
heat after the range has been turned
off.
• NEVER BLOCK the oven air vent
under the right rear element.
• COOKWARE USED for coektop
cooking should be flat on the bottom
and large enough to cover the heating
area being used. Undersized utensils
expose the heating element and may
result in direct contact or ignition of
clothing.
• ALWAYS USE drip bowls to prevent
wiring and component damage. Do
not use aluminum liners or foil in drip
bowls. Improper use may result in risk
of electrical shock or fire.
• NEVER LEAVE surface units
unattended at high settings. Believers
result in smoking or greasy spills
which could catch fire.
• ALWAYS TURN utensil handles
inward and away from other surface
units to reduce the risk of burns.
ignition, unintended contact, and
spillage.
• NEVER put heating elements in
water.
• WHEN PREPARING flaming foods
under the hood. turn the fan on.
• PLACE OVEN RACKS in the
desired position while the oven is
coot. If racks must be moved while
oven is hot. do not !et potholder
contact the hot oven element.
• AFTER BROILING, always take
the broiler pan and grid out of the
oven and clean them Leftover
grease in the broiler pan could catch
fire the next time you use your oven.
• ALWAYS USE care when opening
the oven door. Let hot air and steam
escape before mowng foods.
• NEVER USE aluminum foi! to line the
oven bottom. Improper use of foil could
result in the risk of electrica! shock and
fire.
5

IMPORTANTSAFETY
INSTRUCTIONS
ill
r_ CAUTION: Never line
the drip bowls with
aluminum foil. Foil
can block the normal heat
flow and damage the range,
Always use cookware and
woks that are flat on the
bottom and the same size
as the cooking element
being used. Cookware
should not extend more
than 1" beyond the edge of
the cooking element.
READ AND UNDERSTAND THIS
INFORMATION NOW!
Be sure everyone in your home
knows what to do in case of
fire. Never use water on a
grease fire; it will only spread
the flames.
COOKTOP GREASE FIRE:
Never pick up a flaming pan...
1. Turn off the surface elements.
2. Smother the flame with a tightly
fitting lid, or use baking soda or a
dry chemical, foam, or halon type
extinguisher.
OVEN FIRE:
Do not try to move the pan!
1. Close the oven door and turn
controls off.
2. If fire continues, carefully open
the door, throw baking soda on
the fire, or use a dry chemical,
foam, or halon type extinguisher.
6
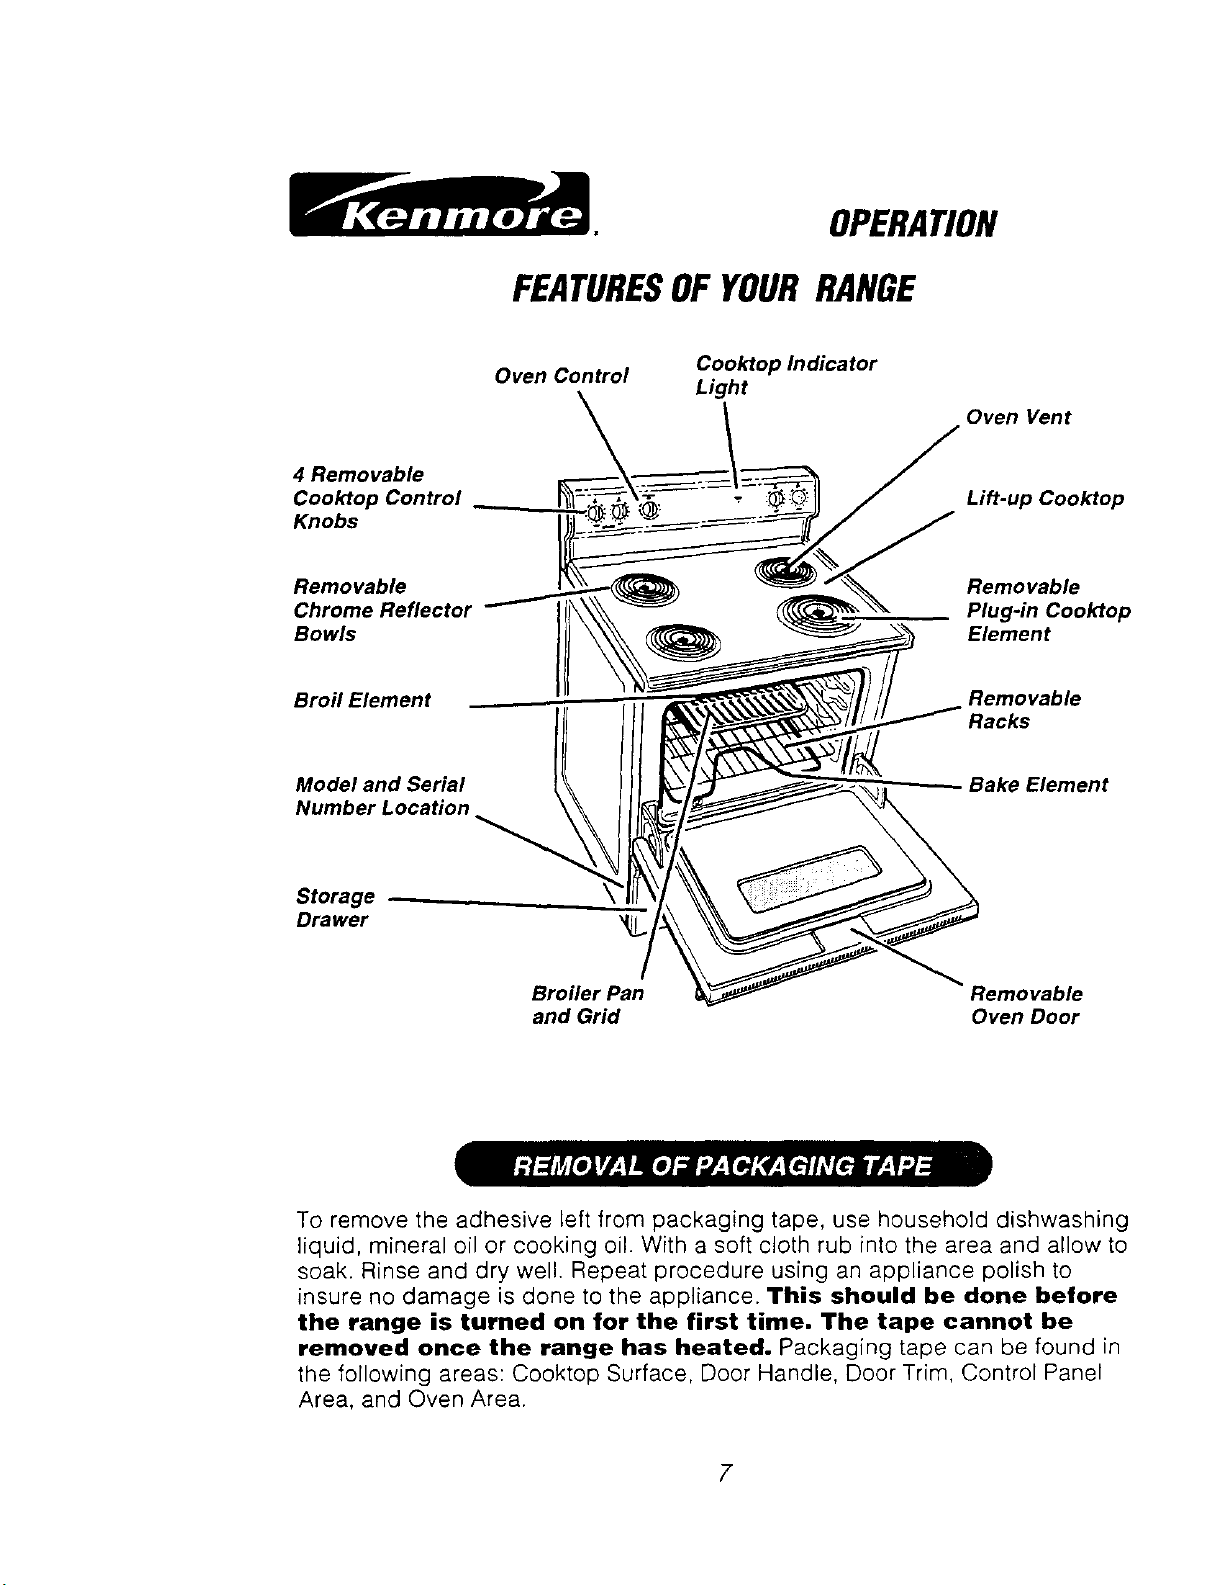
OPERATION
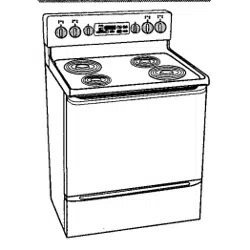
FEATURESOF YOURRANGE
Oven Control
Cooktop Indicator
Light
Oven Vent
4 Removable
Cooktop Control
Knobs
Lift-up Cooktop
Removable
Chrome Reflector
Bowls
Removable
Plug-in Cooktop
Element
Broil Element Removable
Racks
Model and Serial
Number Location
Bake Element
Storage --
Drawer
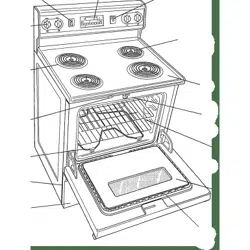
Broiler Pan Removable
and Grid Oven Door
To remove the adhesive left from packaging tape, use household dishwashing
liquid, mineral oil or cooking oil. With a soft cloth rub into the area and allow to
soak. Rinse and dry well. Repeat procedure using an appliance polish to
insure no damage is done to the appliance. This should be done before
the range is turned on for the first time. The tape cannot be
removed once the range has heated. Packaging tape can be found in
the following areas: Cooktop Surface, Door Handle, Door Trim, Control Panel
Area, and Oven Area.
7
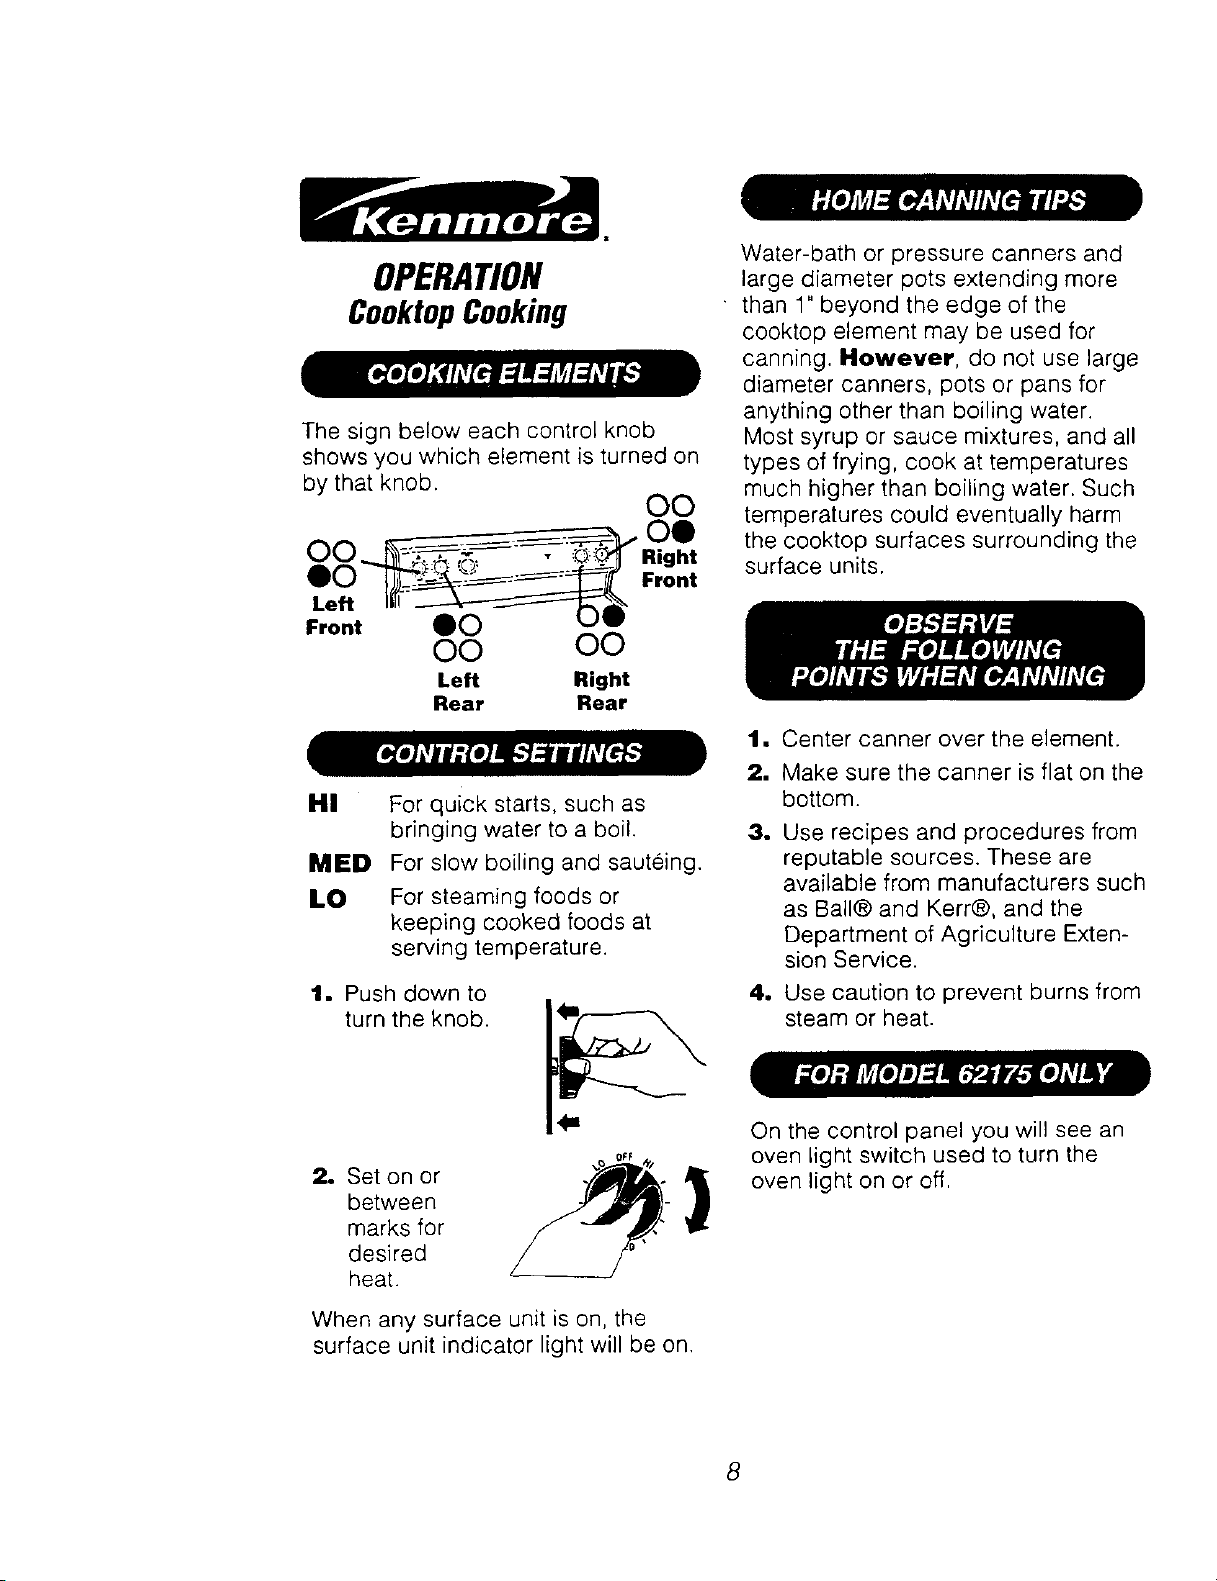
OPERATION
CooktopCooking
The sign below each control knob
shows you which element is turned on
by that knob.
O0
Oe
O0 _ Right
eo F,o.,
Left I|il _--_------'l_,l_
Front !O %)1r
O0 O0
Left Right
Rear Rear
HI For quick starts, such as
bringing water to a boil.
MED For slow boiling and sauteing.
LO For steaming foods or
keeping cooked foods at
serving temperature.
t. Push down to
turn the knob.
2. Set on or
between
marks for
desired
heat.
When any surface unit is on, the
surface unit indicator light will be on.
Water-bath or pressure canners and
large diameter pots extending more
than 1" beyond the edge of the
cooktop element may be used for
canning. However, do not use large
diameter canners, pots or pans for
anything other than boiling water.
Most syrup or sauce mixtures, and all
types of frying, cook at temperatures
much higher than boiling water. Such
temperatures could eventually harm
the cooktop surfaces surrounding the
surface units.
1, Center canner over the element.
2. Make sure the canner is flat on the
bottom.
3. Use recipes and procedures from
reputable sources. These are
available from manufacturers such
as Ball@ and Kerr@, and the
Department of Agriculture Exten-
sion Service.
4. Use caution to prevent burns from
steam or heat.
On the control panel you will see an
oven light switch used to turn the
oven light on or off,
8
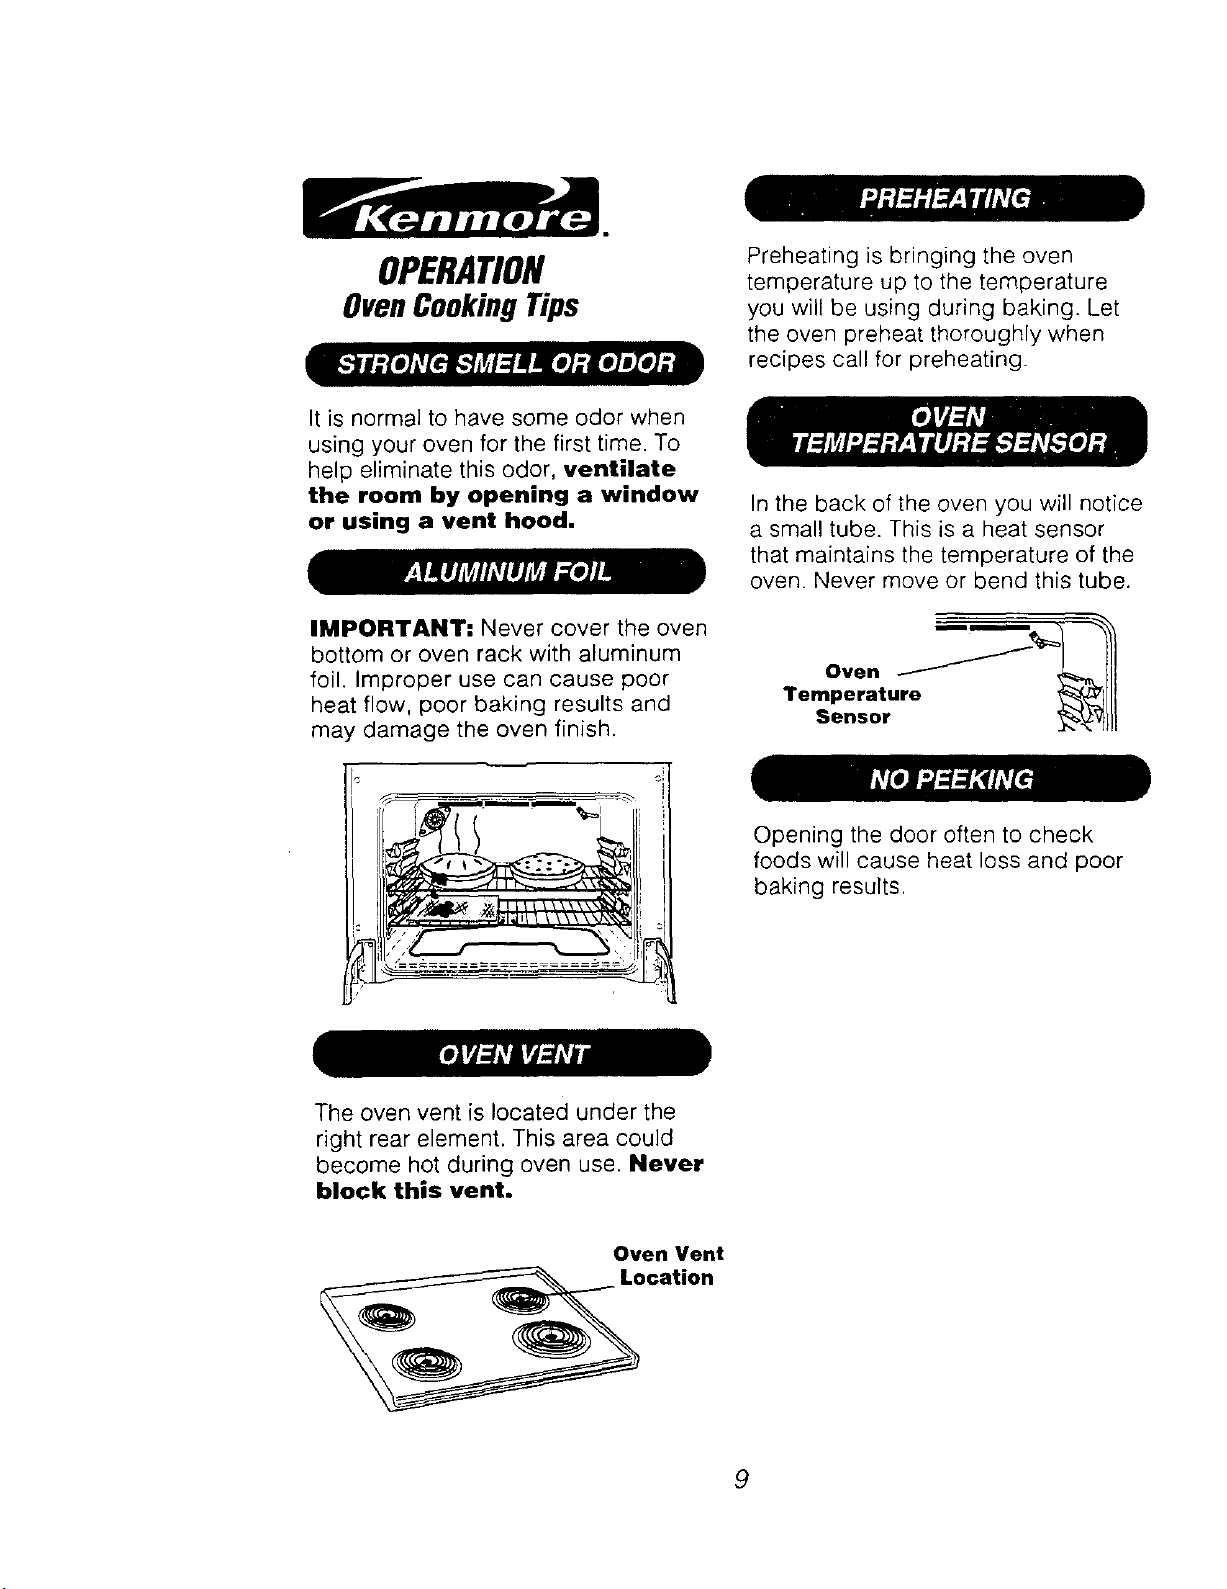
OPERATION
OvenCookingTips
Preheating is bringing the oven
temperature up to the temperature
you will be using during baking. Let
the oven preheat thoroughly when
recipes call for preheating.
It is normal to have some odor when
using your oven for the first time. To
help eliminate this odor, ventilate
the room by opening a window
or using a vent hood.
IMPORTANT: Never cover the oven
bottom or oven rack with aluminum
foil. Improper use can cause poor
heat flow, poor baking results and
may damage the oven finish.
In the back of the oven you will notice
a small tube. This is a heat sensor
that maintains the temperature of the
oven. Never move or bend this tube.
Opening the door often to check
foods will cause heat loss and poor
baking results.
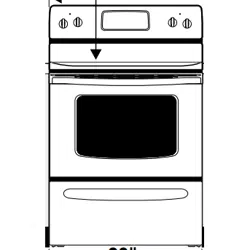
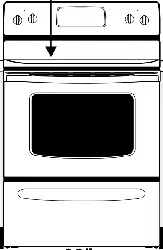
The oven vent is located under the
right rear element. This area could
become hot during oven use. Never
block this vent.
Oven Vent
Location
9
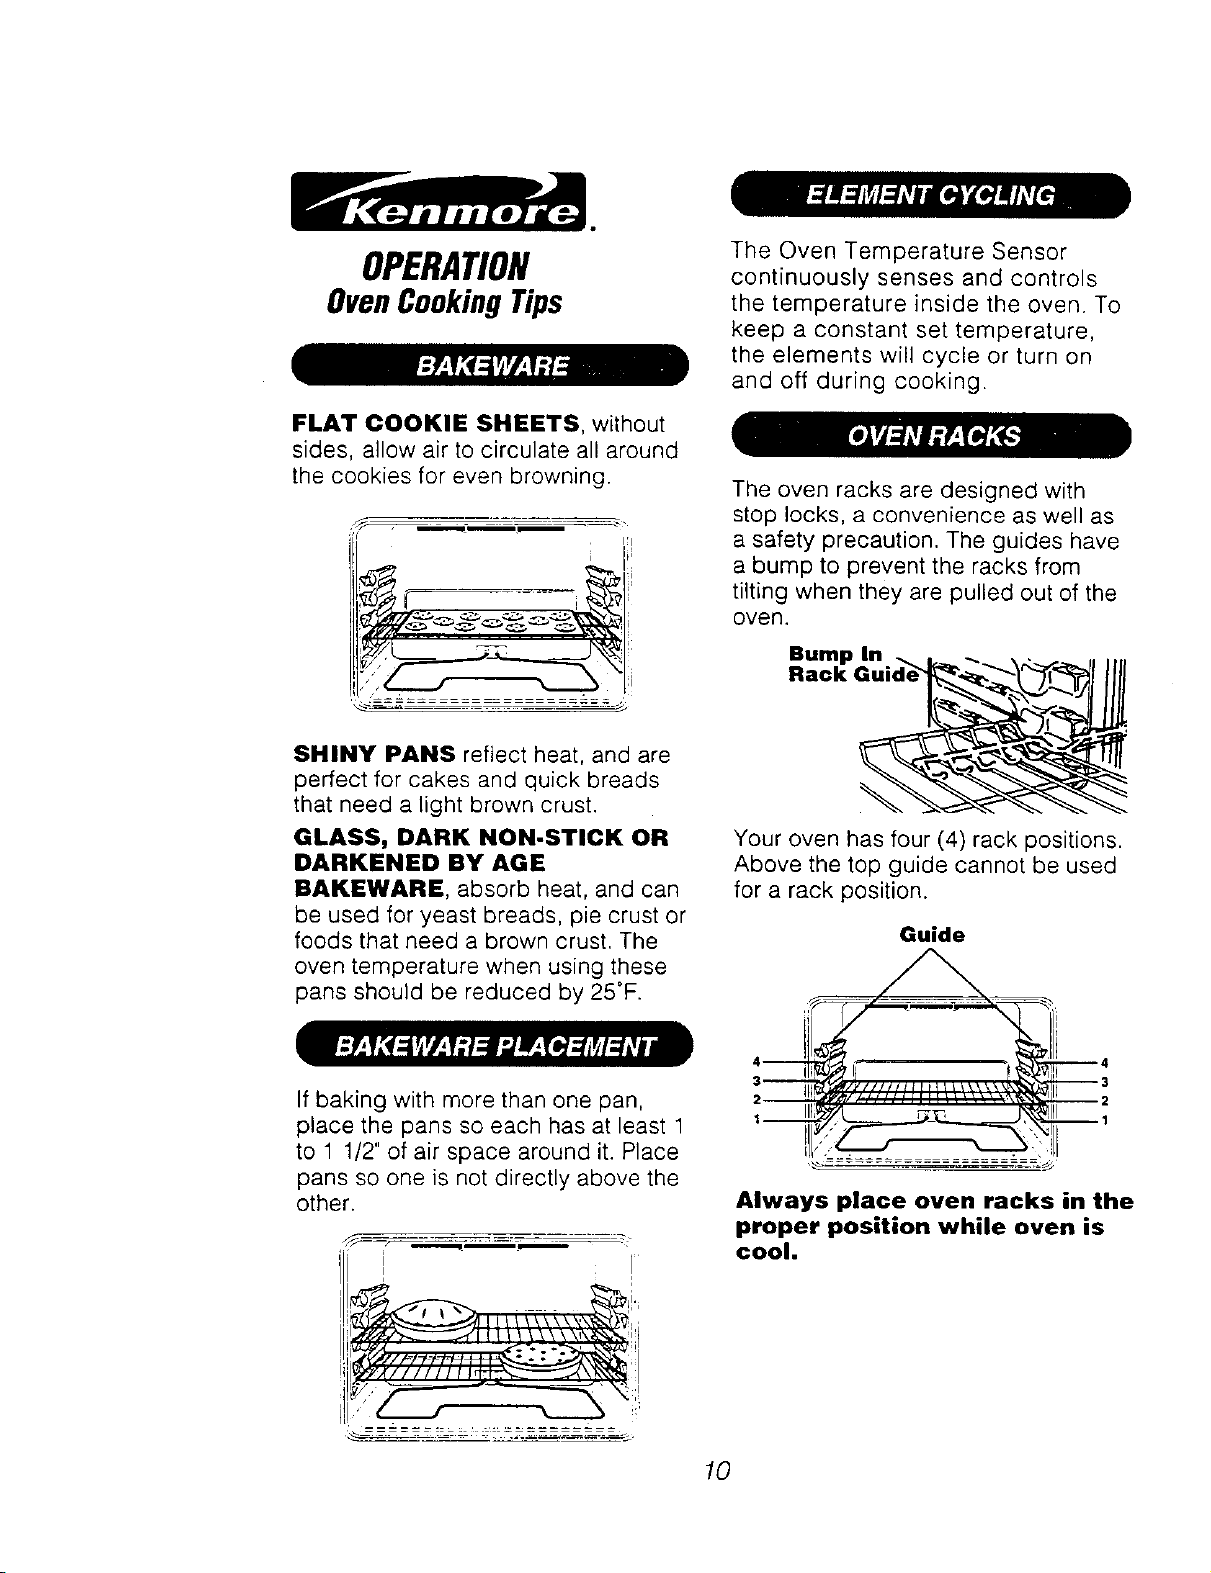
OPERATION
OvenCookingTips
FLAT COOKIE SHEETS, without
sides, allow air to circulate all around
the cookies for even browning.
i
SHINY PANS reflect heat, and are
perfect for cakes and quick breads
that need a light brown crust.
GLASS, DARK NON-STICK OR
DARKENED BY AGE
BAKEWARE, absorb heat, and can
be used for yeast breads, pie crust or
foods that need a brown crust. The
oven temperature when using these
pans should be reduced by 25°F.
The Oven Temperature Sensor
continuously senses and controls
the temperature inside the oven. To
keep a constant set temperature,
the elements will cycle or turn on
and off during cooking.
The oven racks are designed with
stop locks, a convenience as well as
a safety precaution. The guides have
a bump to prevent the racks from
tilting when they are pulled out of the
oven.
Bump In
Rack
%
Your oven has four (4) rack positions.
Above the top guide cannot be used
for a rack position.
Guide
If baking with more than one pan,
place the pans so each has at least 1
to 1 1/2" of air space around it. Place
pans so one is not directly above the
other.
i
!
Always place oven racks in the
proper position while oven is
cool.
10
OPERATION
OvenCookingTips
You may feel that your new oven
cooks differently than the oven it
replaced. We recommend that you
use your new oven a few weeks to
become more familiar with it,
following the times given in your
recipes as a guide. See Do It
Yourself Adjustment in the back of
this manual to make the adjustment if
you feel your oven is too hot or too
cool for your cooking preference.
1. Set the OVEN CONTROL
KNOB to the desired tempera-
ture.
2, When baking is finished, turn the
OVEN CONTROL KNOB to the
"OFF" position.
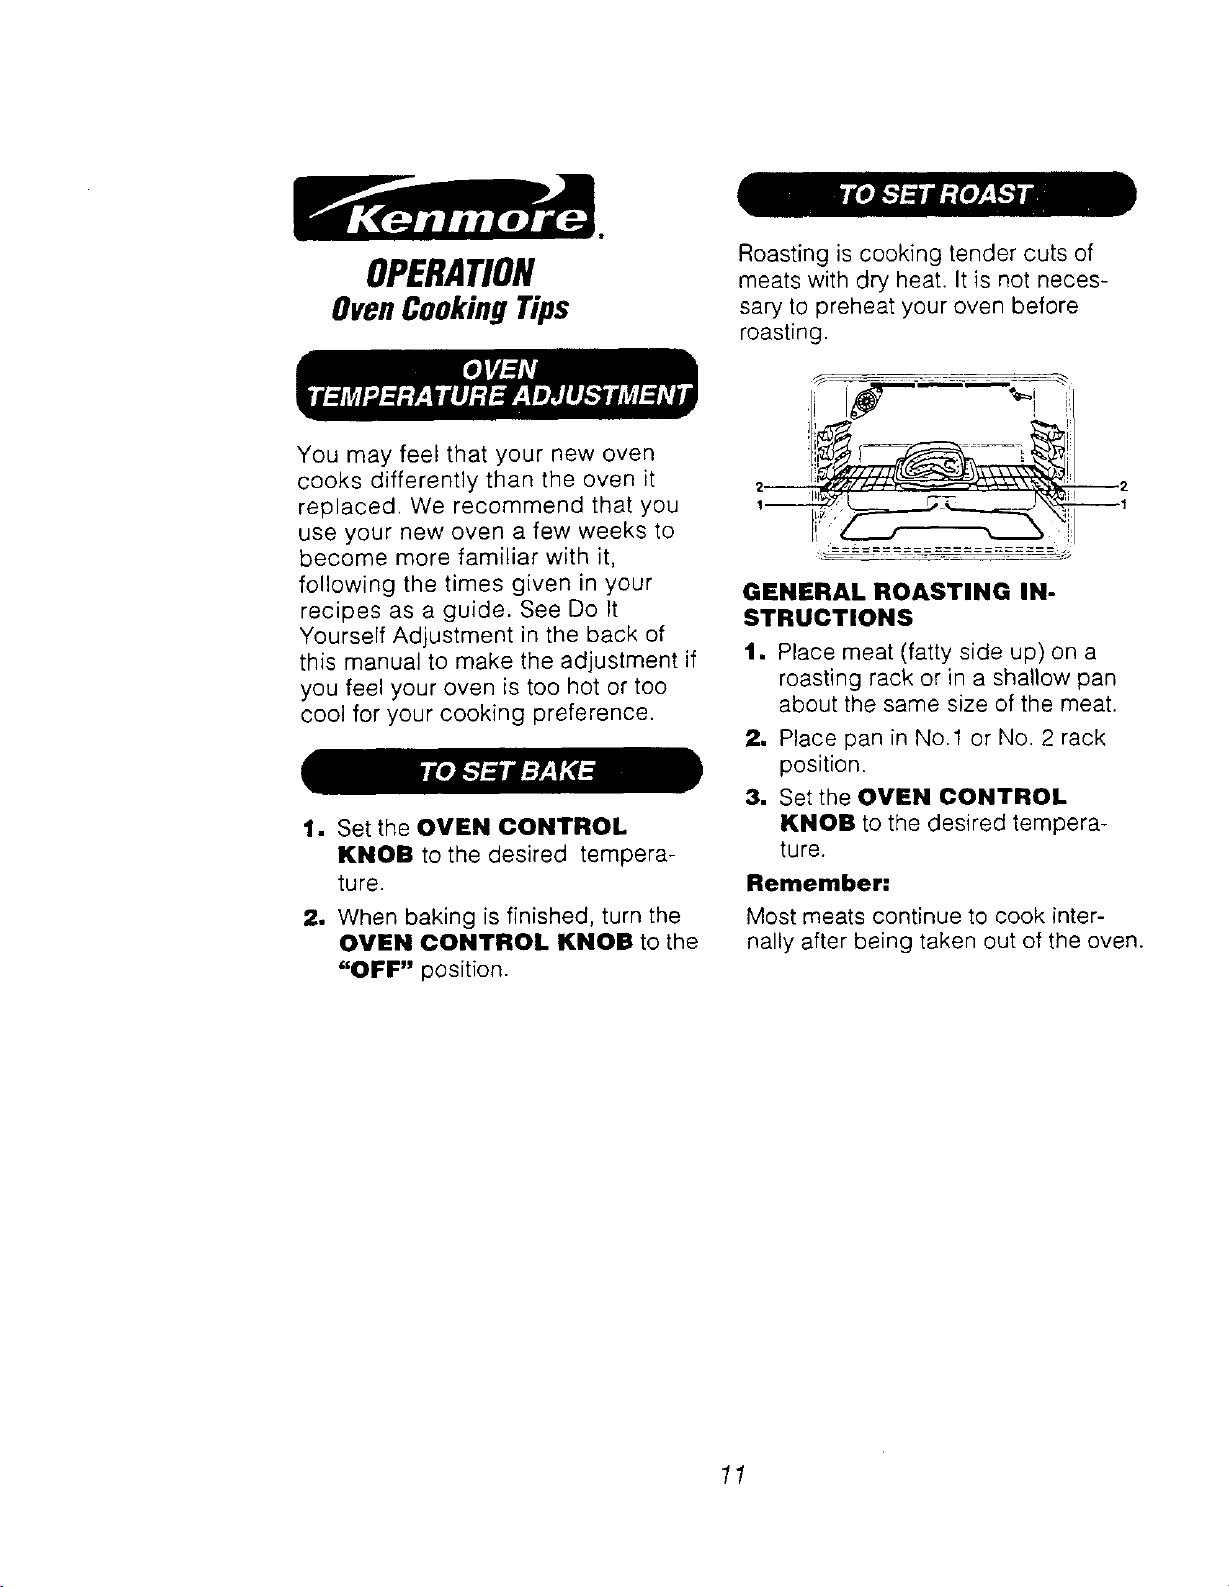
Roasting is cooking tender cuts of
meats with dry heat. It is not neces-
sary to preheat your oven before
roasting.
GENERAL ROASTING IN-
STRUCTIONS
1. Place meat (fatty side up) on a
roasting rack or in a shallow pan
about the same size of the meat.
2, Place pan in No. 1 or No. 2 rack
position.
3. Set the OVEN CONTROL
KNOB to the desired tempera-
ture.
Remember:
Most meats continue to cook inter-
nally after being taken out of the oven.
11
OPERATION
Broiling
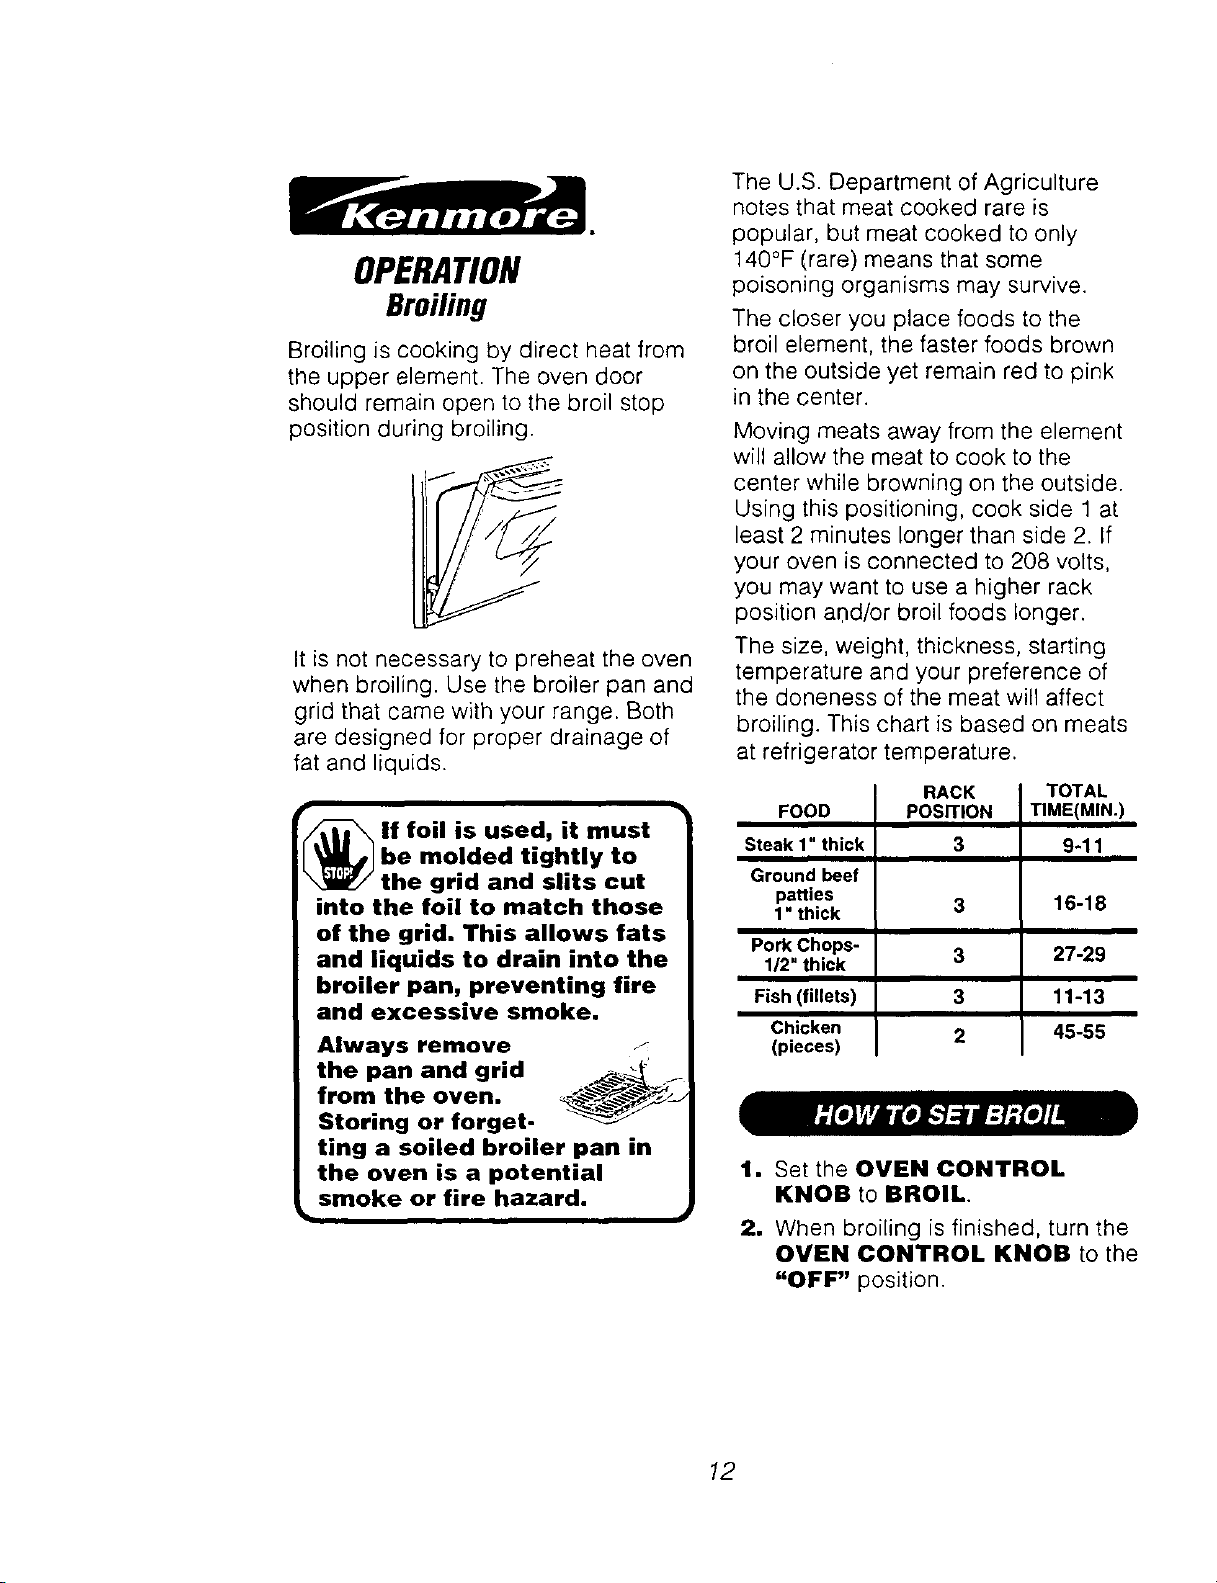
Broiling is cooking by direct heat from
the upper element. The oven door
should remain open to the broil stop
position during broiling.
It is not necessary to preheat the oven
when broiling. Use the broiler pan and
grid that came with your range. Both
are designed for proper drainage of
fat and liquids.
lf foil is used, it must
be molded tightly to
the grid and slits cut
into the foil to match those
of the grid. This allows fats
and liquids to drain into the
broiler pan, preventing fire
and excessive smoke.
Always remove
the pan and grid .,.-
from the oven. _<_-f
Storing or forget- _-_
ting a soiled broiler pan in
the oven is a potential
_ smoke or fire hazard. •
The U.S. Department of Agriculture
notes that meat cooked rare is
popular, but meat cooked to only
140°F (rare) means that some
poisoning organisms may survive.
The closer you place foods to the
broil element, the faster foods brown
on the outside yet remain red to pink
in the center.
Moving meats away from the element
will allow the meat to cook to the
center while browning on the outside.
Using this positioning, cook side 1 at
least 2 minutes longer than side 2. If
your oven is connected to 208 volts,
you may want to use a higher rack
position and/or broil foods longer.
The size, weight, thickness, starting
temperature and your preference of
the doneness of the meat will affect
broiling. This chart is based on meats
at refrigerator temperature.
FOOD
Steak 1" thick
Ground beef
patties
1" thick
Pork Chops-
1/2" thick
Fish (fillets)
Chicken
(pieces)
RACK
POSITION
3
3
3
3
2
TOTAL
TIME(MIN.)
9-11
16-18
27-29
11-13
45-55
1. Set the OVEN CONTROL
KNOB to BROIL.
2. When broiling is finished, turn the
OVEN CONTROL KNOB to the
"OFF" position.
12
Cleaning
CAREANDCLEANING
CLEANING MATERIALS
• Dishwashing detergent
• Warm water
• Soft cloth
Do not use abrasive cleaners,
industrial cleaners, or bleach.
CLEANING MATERIALS
• Dishwashing detergent
• Warm water
• Soap-filled steel wool pad
• Commercial oven cleaner
TO CLEAN:
Allow the pan to soak. Sprinkle the grid
with dishwashing detergent and cover
with a damp cloth or paper towel and let
stand. Scour as needed. Wash, rinse, and
dry well. You may also place both the pan
and grid in the dishwasher.
CLEANING MATERIALS
• Dishwashing detergent
• Warm water
• Paper towels
TO CLEAN:
Do not use oven cleaners, cleansing
powder, or harsh abrasives. If marinades,
tomato sauce, basting materials, etc.,
should spill, wipe up as much as possible.
When surfaces have cooled thoroughly
clean painted areas.
CLEANING MATERIALS
• Oven cleaner
TO CLEAN:
Clean up after each oven use. Rinse
thoroughly. Do not coat bake or broil
element with oven cleaner. When using
oven cleaner read directions on container
carefully.
CLEANING MATERIALS
• Dishwashing detergent
• Warm water
• Paper towel
• Ammonia
• Abrasive cleaner
• Scouring pad
TO CLEAN:
Clean after each use. If acidic foods (hot
fruit filling, milk, tomatoes, sauerkraut or
sauces with vinegar or lemon juice) spill,
use a dry paper towel to wipe up as much
as possible. When surface has cooled
thoroughlyclean cooktop.
CLEANING MATERIALS
• Glass cleaner
• Paper towels
• Baking soda
TO CLEAN:
For everyday cleaning, use glass cleaner
and a paper towel. For stubborn soil, use
paste of baking soda and water. Rinse
thoroughly.
13
CAREANDCLEANING
RemovableParts
CLEANING MATERIALS
• Dishwashing detergent
• Warm water
• Soft cloth
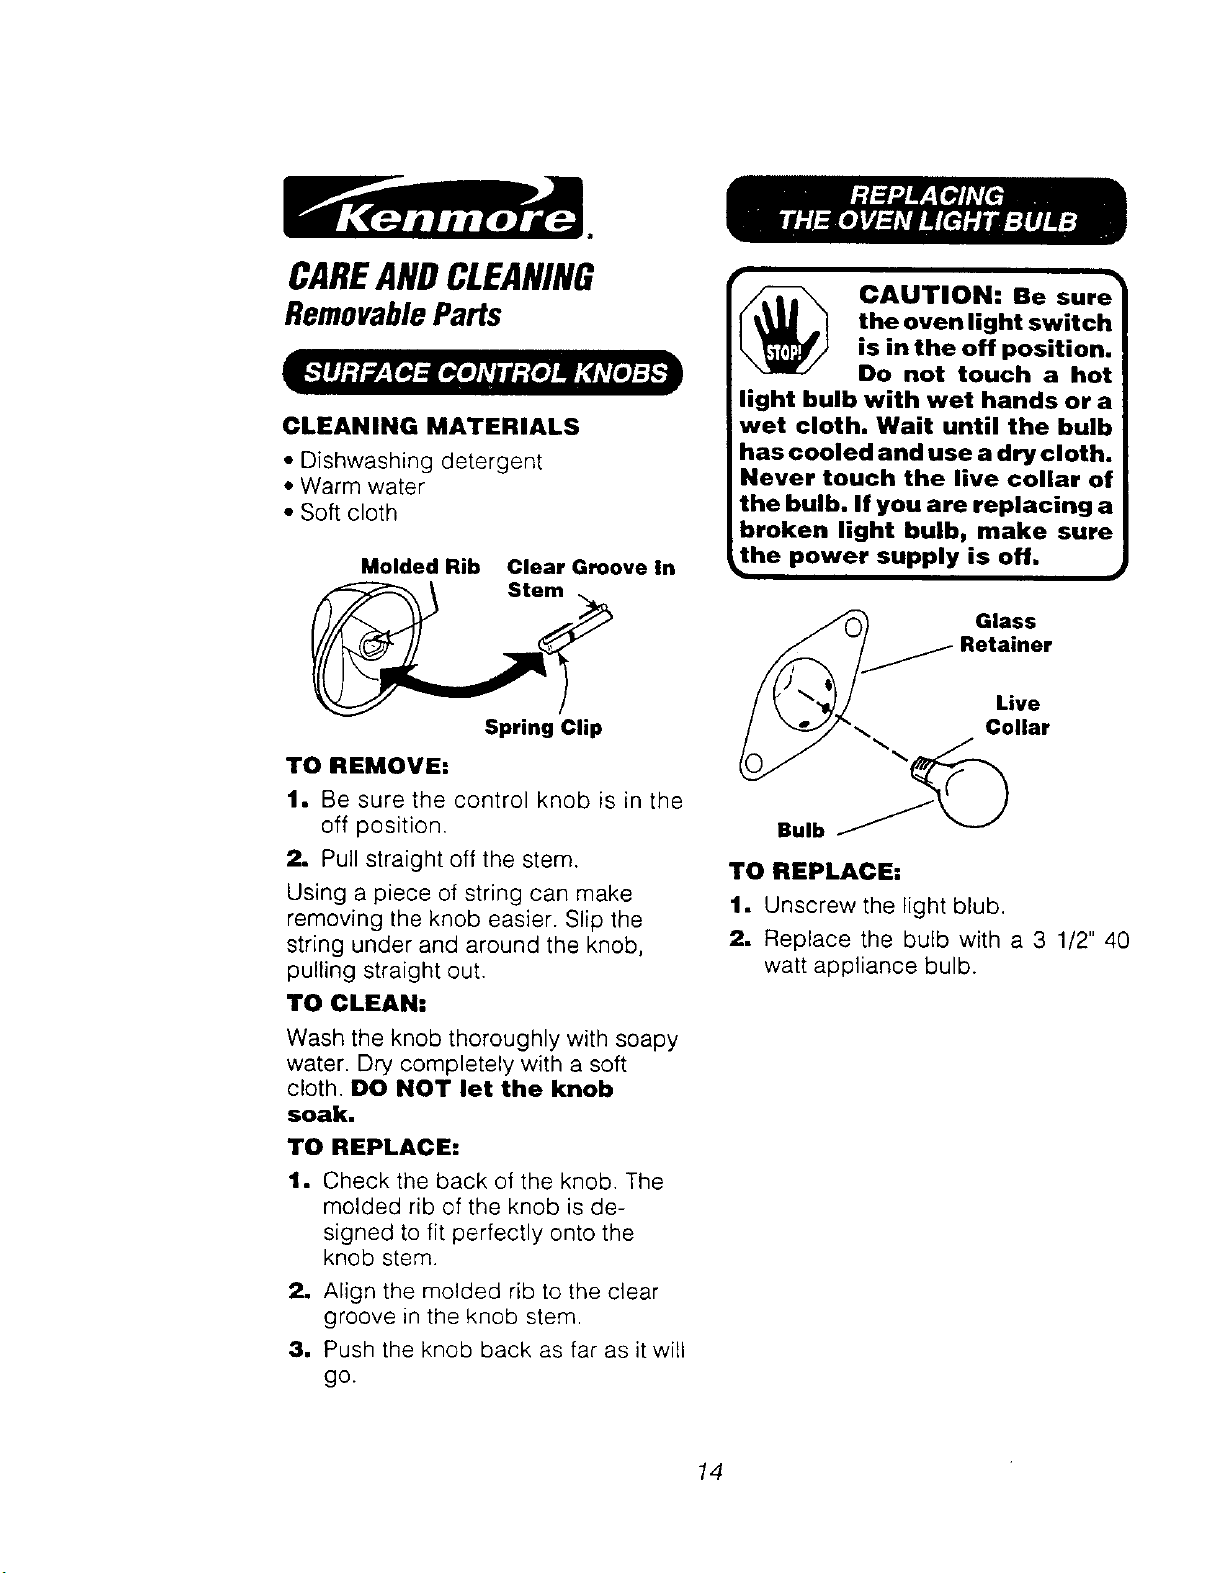
Molded Rib Clear Groove In
Spring Clip
TO REMOVE:
1, Be sure the control knob is in the
off position.
2, Pull straight off the stem.
Using a piece of string can make
removing the knob easier. Slip the
string under and around the knob,
pulling straight out.
TO CLEAN:
Wash the knob thoroughly with soapy
water. Dry completely with a soft
cloth. DO NOT let the knob
soak.
TO REPLACE:
1. Check the back of the knob. The
molded rib of the knob is de-
signed to fit perfectly onto the
knob stem.
2, Align the molded rib to the clear
groove in the knob stem.
3, Push the knob back as far as it will
go.
CAUTION: Be sure
the oven light switch
is in the off position.
Do not touch a hot
light bulb with wet hands or a
wet cloth. Wait until the bulb
has cooled and use a dry cloth.
Never touch the live collar of
the bulb. If you are replacing a
broken light bulb, make sure
_he power supply is off.
J
__ Glass
Retainer
Live
Collar
TO REPLACE:
1, Unscrew the light blub.
2, Replace the bulb with a 3 1/2" 40
watt appliance bulb.
14
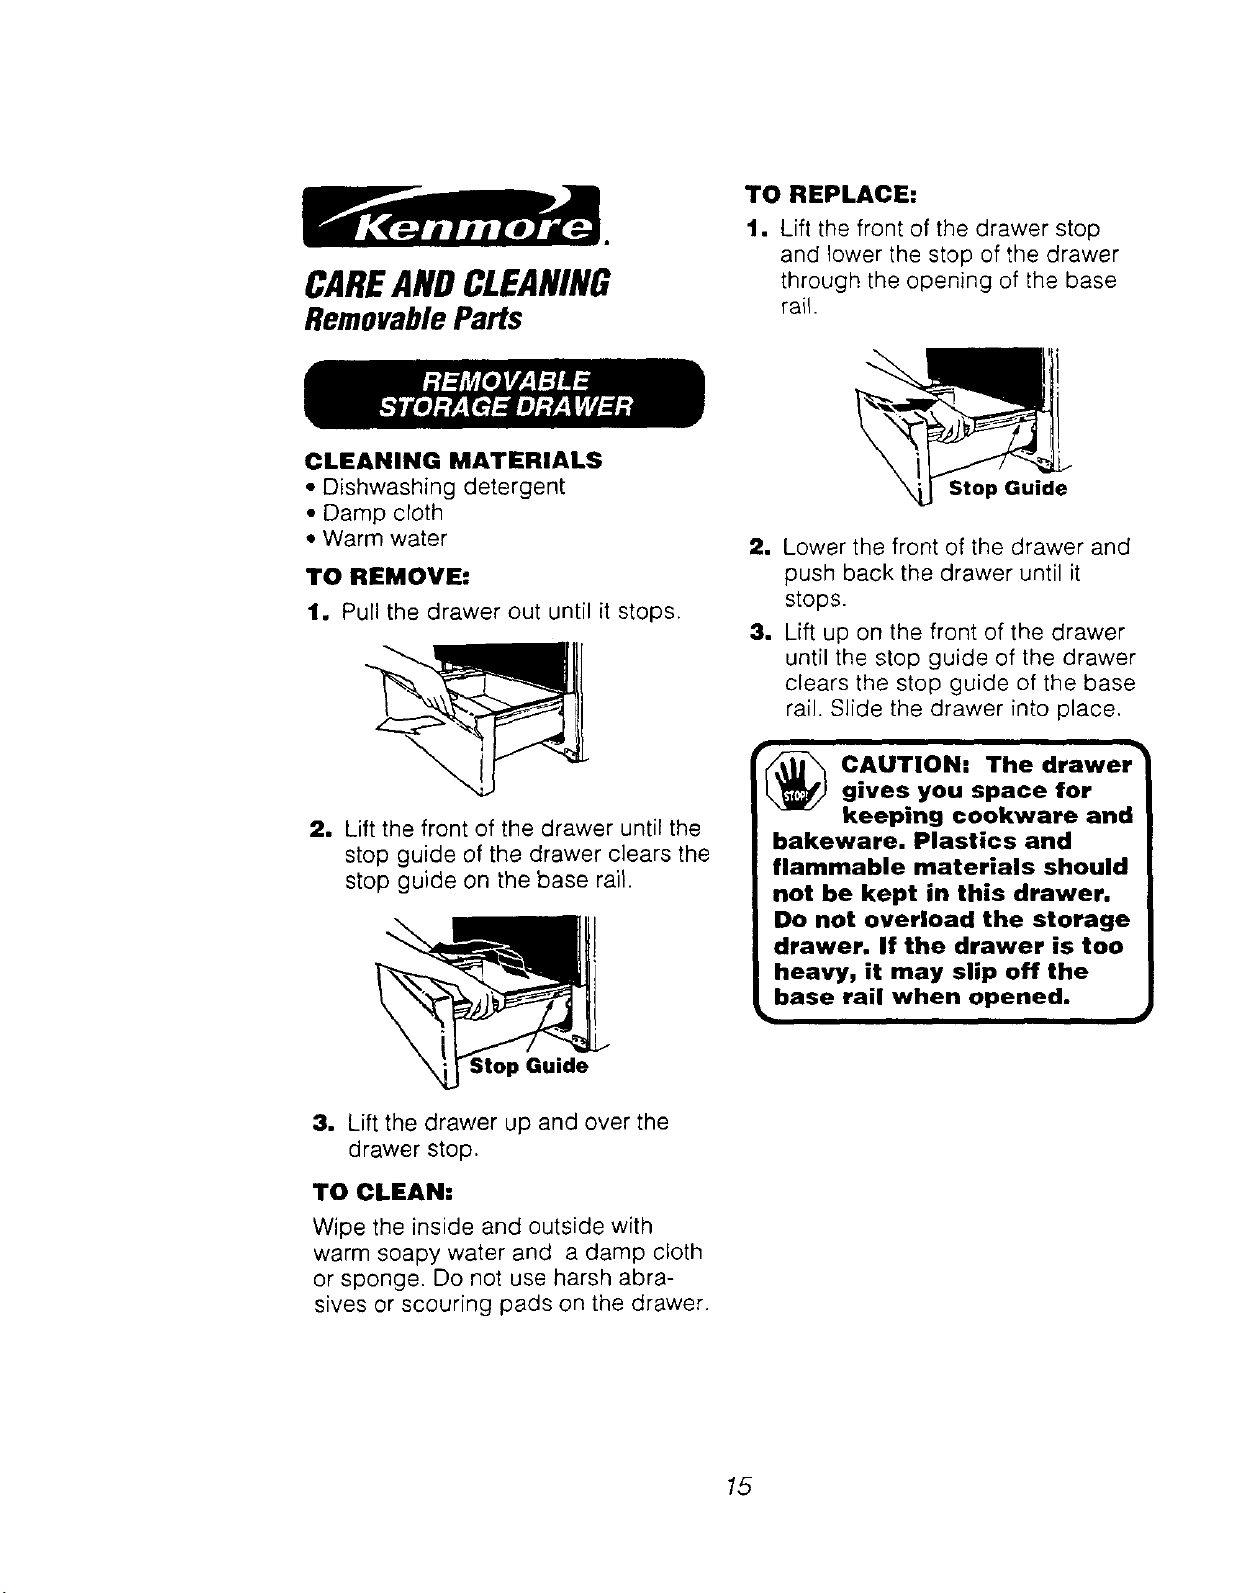
CAREANDCLEANING
RemovableParts
TO REPLACE:
1, Lift the front of the drawer stop
and lower the stop of the drawer
through the opening of the base
rail.
CLEANING MATERIALS
• Dishwashing detergent
• Damp cloth
• Warm water
TO REMOVE:
1. Pull the drawer out until it stops.
2, Lift the front of the drawer until the
stop guide of the drawer clears the
stop guide on the base rail.
Guide
Stop Guide
2, Lower the front of the drawer and
push back the drawer until it
stops.
3, Lift up on the front of the drawer
until the stop guide of the drawer
clears the stop guide of the base
rail. Slide the drawer into place.
_ AUTION: The drawer"
gives you space for
keeping cookware and
bakeware. Plastics and
flammable materials should
not be kept in this drawer.
Do not overload the storage
drawer. If the drawer is too
heavy, it may slip off the
base rail when opened.
•
3. Lift the drawer up and over the
drawer stop.
TO CLEAN:
Wipe the inside and outside with
warm soapy water and a damp cloth
or sponge. Do not use harsh abra-
sives or scouring pads on the drawer.
15
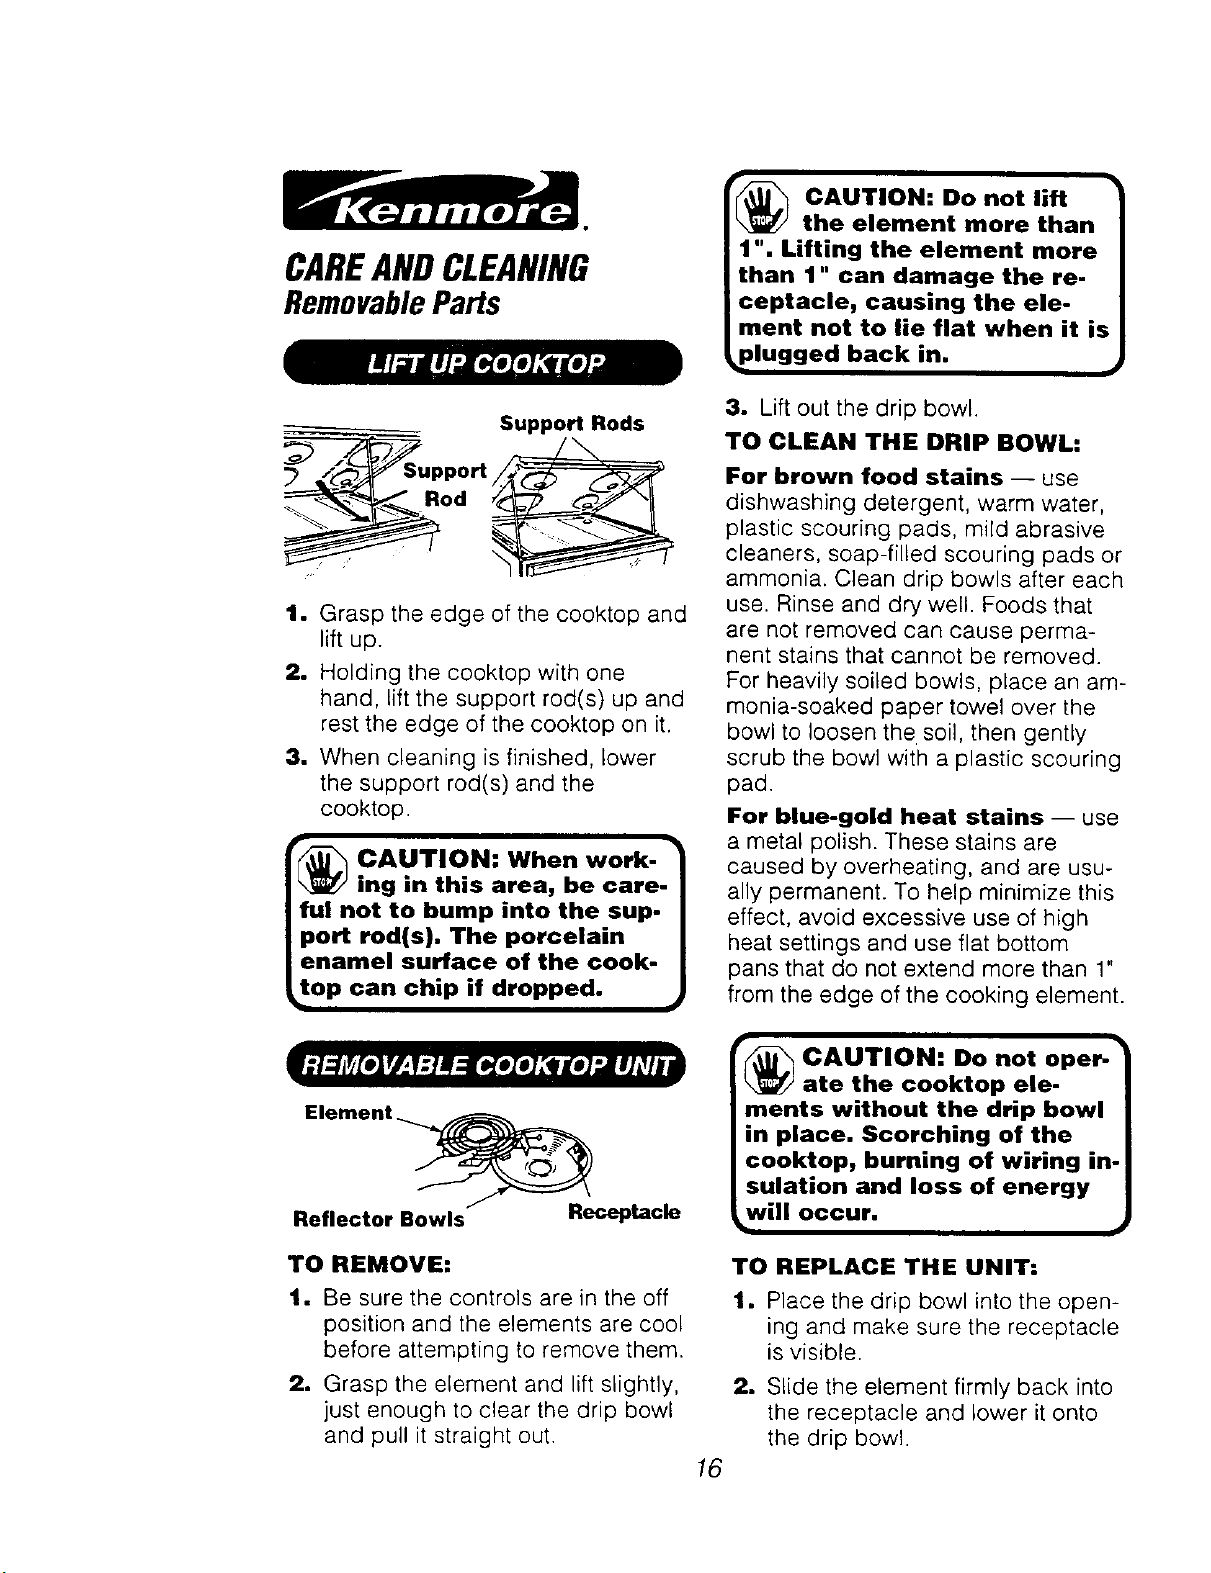
CAREAND CLEANING
RemovableParts
"_ CAUTION: Do not lift •
the element more than
1 ". Lifting the element more
than 1" can damage the re-
ceptacle, causing the ele-
ment not to lie flat when it is
J
_plugged back in.
Suppo_ Rods
pport
1. Grasp the edge of the cooktop and
lift up.
2. Holding the cooktop with one
hand, lift the support rod(s) up and
rest the edge of the cooktop on it.
3. When cleaning is finished, lower
the support rod(s) and the
cooktop.
_ AUTION: When work-."
mg :n this area, be care
ful not to bump into the sup-
port rod(s). The porcelain
enamel surface of the cook-
top can chip if dropped. ,
3. Lift out the drip bowl.
TO CLEAN THE DRIP BOWL:
For brown food stains -- use
dishwashing detergent, warm water,
plastic scouring pads, mild abrasive
cleaners, soap-filled scouring pads or
ammonia. Clean drip bowls after each
use. Rinse and dry well. Foods that
are not removed can cause perma-
nent stains that cannot be removed.
For heavily soiled bowls, place an am-
monia-soaked paper towel over the
bowl to loosen the soil, then gently
scrub the bowl with a plastic scouring
pad.
For blue-gold heat stains -- use
a metal polish. These stains are
caused by overheating, and are usu-
ally permanent. To help minimize this
effect, avoid excessive use of high
heat settings and use flat bottom
pans that do not extend more than 1"
from the edge of the cooking element.
Element _
Reflector Bowls Receptacle
TO REMOVE:
1. Be sure the controls are in the off
position and the elements are cool
before attempting to remove them.
2. Grasp the element and lift slightly,
just enough to clear the drip bowl
and pull it straight out.
16
CAUTION: Do not oper-
ate the cooktop ele-
ments without the drip bowl
in place. Scorching of the
cooktop, burning of wiring in-
sulation and loss of energy
,will occur.
TO REPLACE THE UNIT:
1. Place the drip bowl into the open-
ing and make sure the receptacle
is visible.
2. Slide the element firmly back into
the receptacle and lower it onto
the drip bowl.
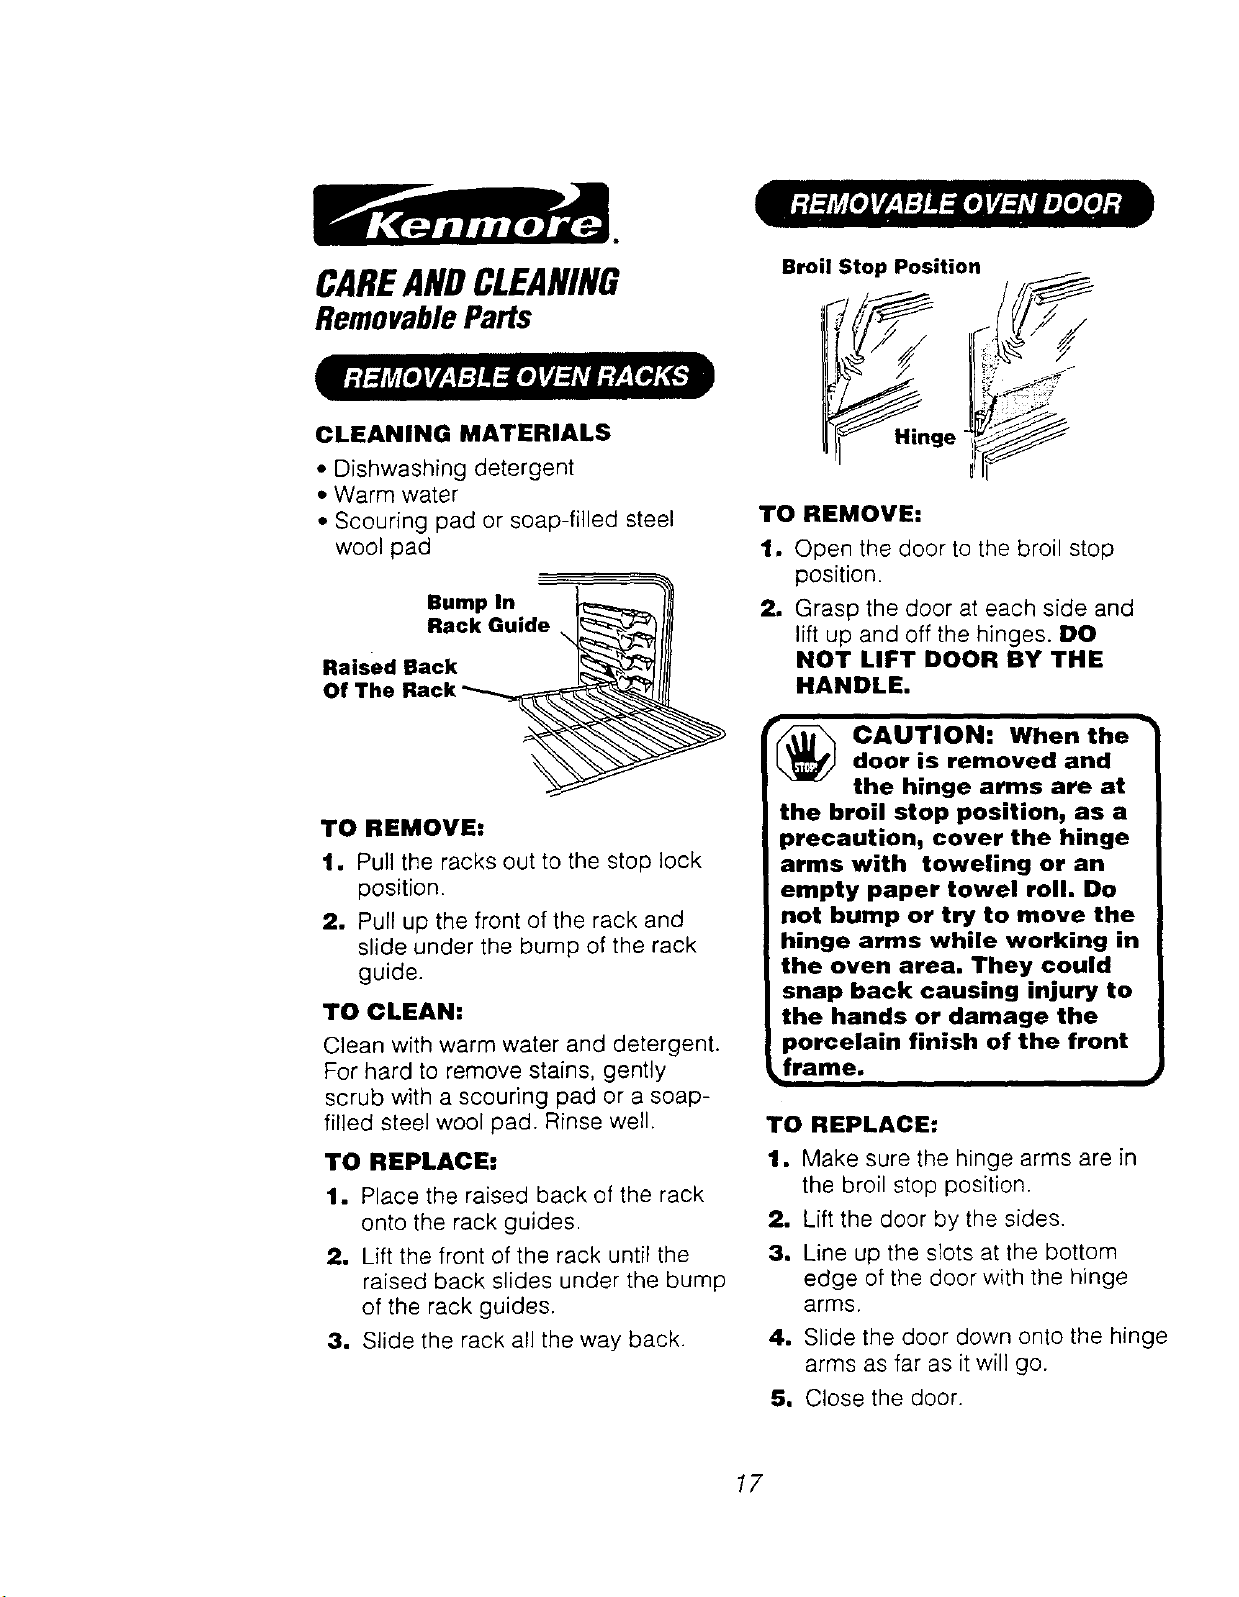
CAREANDCLEANING
RemovableParts
CLEANING MATERIALS
• Dishwashing detergent
• Warm water
• Scouring pad or soap-filled steel
wool pad
Bump In
Rack Guide
\
Raised Back
Of The Rack
TO REMOVE:
1. Pull the racks out to the stop lock
position.
2, Pull up the front of the rack and
slide under the bump of the rack
guide.
TO CLEAN:
Clean with warm water and detergent.
For hard to remove stains, gently
scrub with a scouring pad or a soap-
filled steel wool pad. Rinse well.
TO REPLACE:
1. Place the raised back of the rack
onto the rack guides.
2, Lift the front of the rack until the
raised back slides under the bump
of the rack guides.
3, Slide the rack all the way back.
Broil Stop Position
_Hinge
TO REMOVE:
1. Open the door to the broil stop
position.
2, Grasp the door at each side and
lift up and off the hinges. DO
NOT LIFT DOOR BY THE
HANDLE.
_ AUTION: When the
door is removed and
the hinge arms are at
the broil stop position, as a
precaution, cover the hinge
arms with toweling or an
empty paper towel roll. Do
not bump or try to move the
hinge arms while working in
the oven area. They could
snap back causing injury to
the hands or damage the
porcelain finish of the front
_frame.
TO REPLACE:
1, Make sure the hinge arms are in
the broil stop position.
2, Lift the door by the sides.
3, Line up the slots at the bottom
edge of the door with the hinge
arms.
4, Slide the door down onto the hinge
arms as far as it will go.
5, Close the door.
17
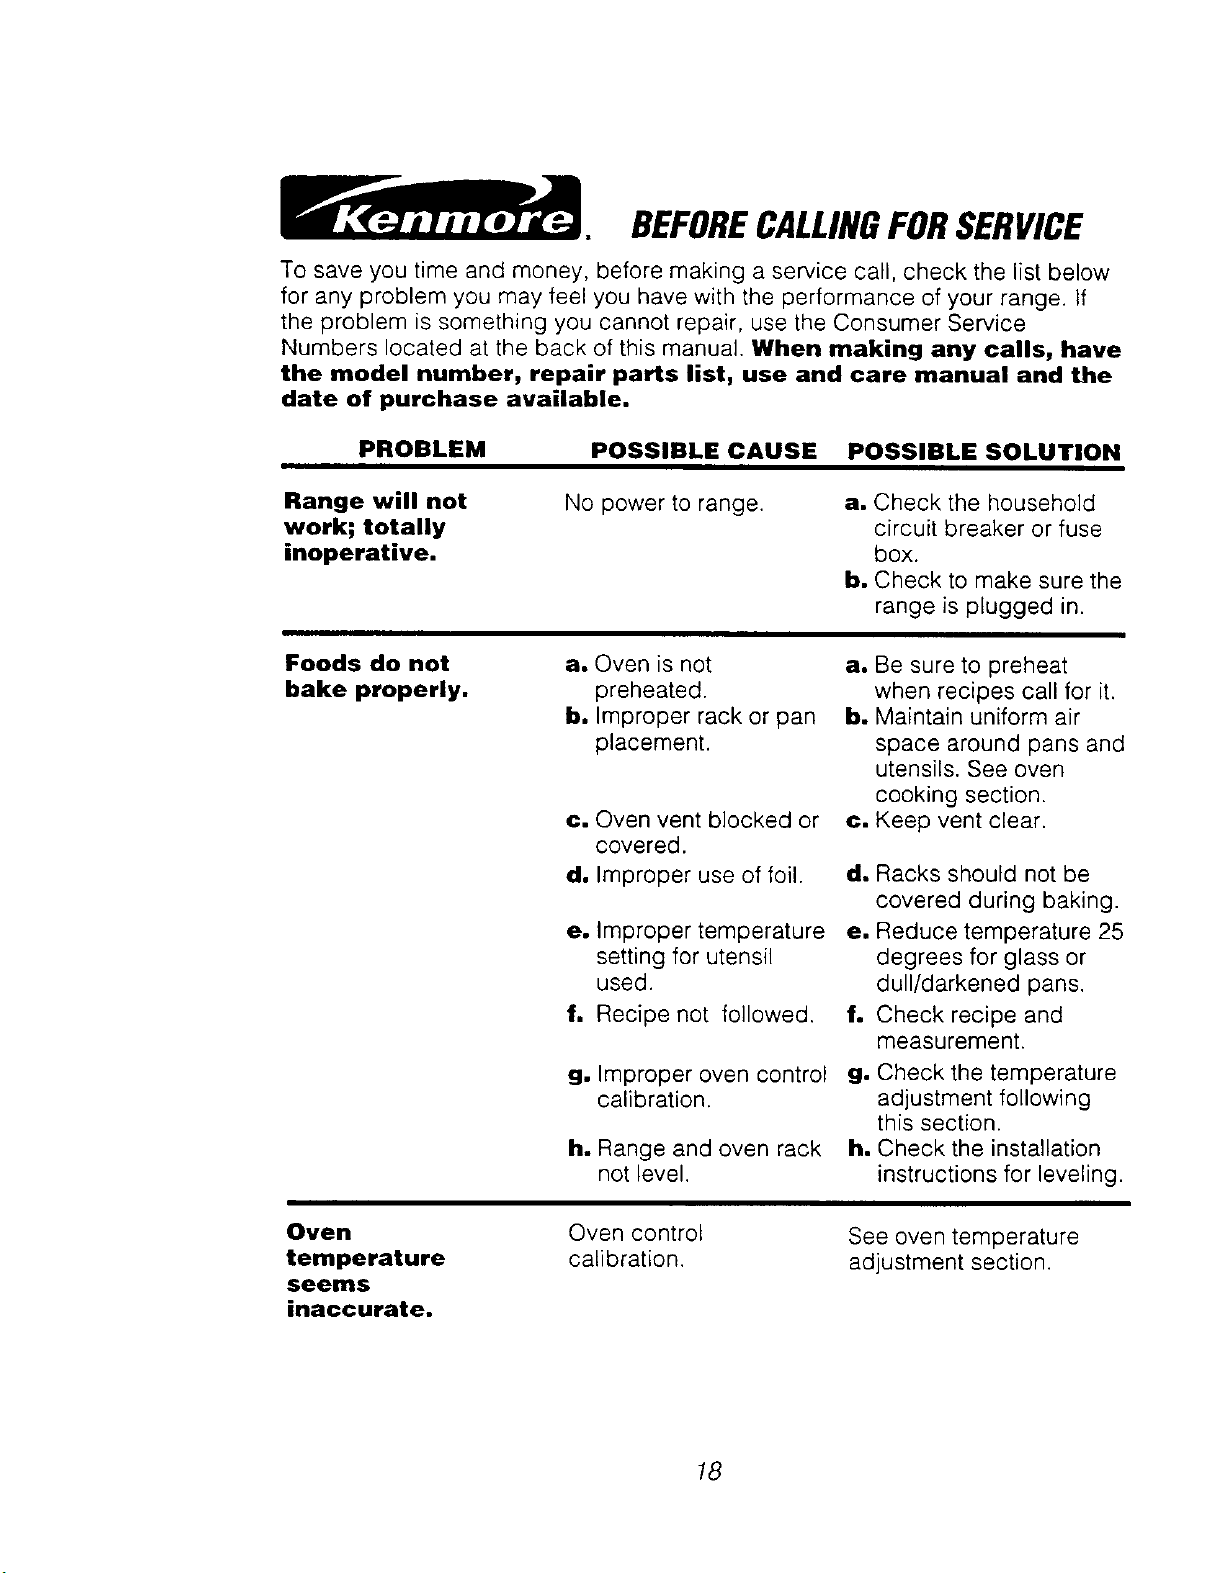
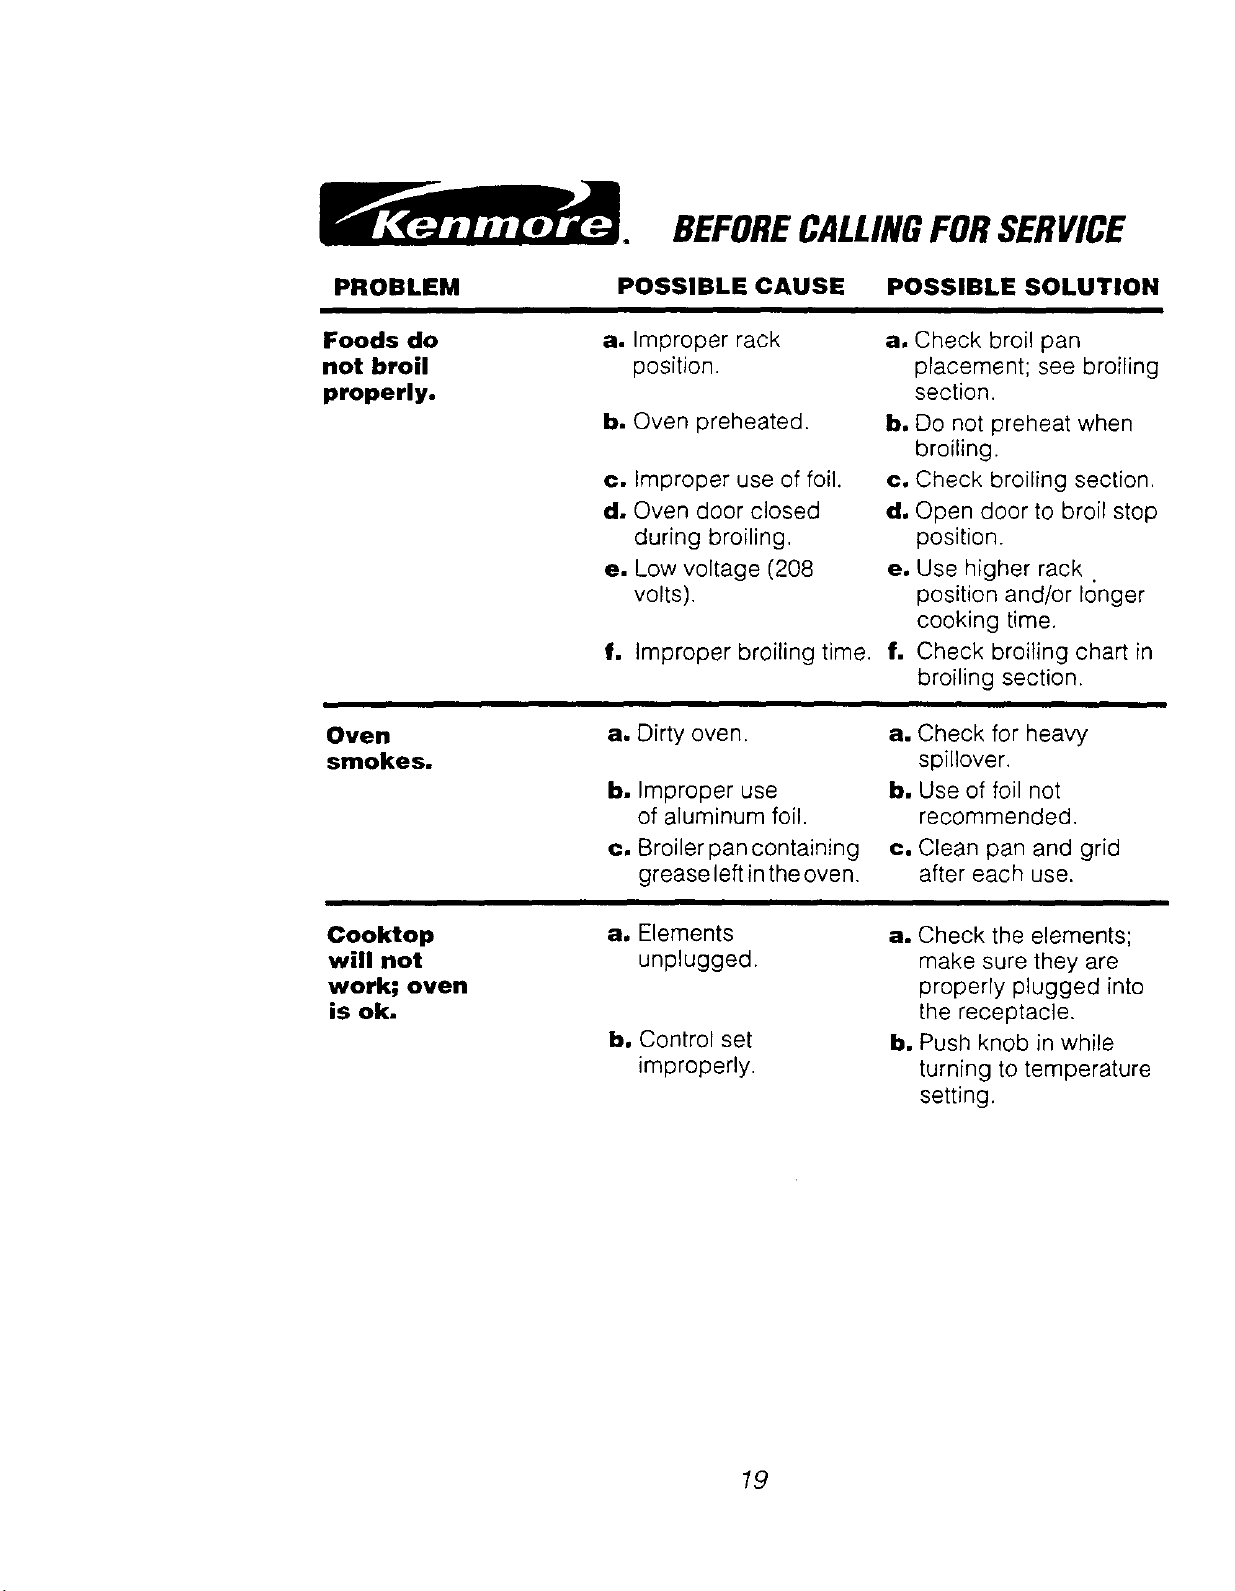
BEFORECALLINGFORSERVICE
To save you time and money, before making a service call, check the list below
for any problem you may feel you have with the performance of your range. If
the problem is something you cannot repair, use the Consumer Service
Numbers located at the back of this manual. When making any calls, have
the model number, repair parts list, use and care manual and the
date of purchase available.
PROBLEM
POSSIBLE CAUSE POSSIBLE SOLUTION
Range will not
work; totally
inoperative.
No power to range.
a. Check the household
circuit breaker or fuse
box.
b, Check to make sure the
range is plugged in.
Foods do not
bake properly.
a. Oven is not
preheated.
b. Improper rack or pan
placement.
c. Oven vent blocked or
covered.
d. Improper use of foil. do
e. Improper temperature
setting for utensil
used.
f. Recipe not followed.
g, Improper oven control
calibration.
h, Range and oven rack
not level.
a, Be sure to preheat
when recipes call for it.
b, Maintain uniform air
space around pans and
utensils. See oven
cooking section.
c, Keep vent clear.
Racks should not be
covered during baking.
e, Reduce temperature 25
degrees for glass or
dull/darkened pans.
f, Check recipe and
measurement.
g, Check the temperature
adjustment following
this section.
h, Check the installation
instructions for leveling.
Oven
temperature
seems
inaccurate.
Oven control
calibration.
See oven temperature
adjustment section.
18
PROBLEM
Foods do
not broil
properly.
Oven
smokes.
BEFORECALLINGFORSERVICE
POSSIBLE CAUSE POSSIBLE SOLUTION
a. Improper rack
position.
b. Oven preheated.
c. Improper use of foil.
d. Oven door closed
during broiling,
e, Low voltage (208
volts).
f, Improper broiling time.
a. Dirty oven.
b, Improper use
of aluminum foil.
c, Broiler pan containing
grease left in the oven.
a. Check broil pan
placement; see broiling
section.
b. Do not preheat when
broiling.
c. Check broiling section.
d, Open door to broil stop
position.
eo Use higher rack
position and/or longer
cooking time.
f. Check broiling chart in
broiling section.
a, Check for heaw
spillover.
b, Use of foil not
recommended.
c. Clean pan and grid
after each use.
Cooktop
will not
work; oven
is ok.
a, Elements
unplugged.
bo Control set
improperly.
a, Check the elements;
make sure they are
properly plugged into
the receptacle.
b, Push knob in while
turning to temperature
setting.
19

"DOIT YOURSELF"
TEMPERATURE
ADJUSTMENT
You may feel that your new oven
cooks differently than the oven it
replaced. We recommend that you
use your new oven a few weeks to
become more familiar with it, following
the times given in your recipes as a
guide.
If you think your new oven is too hot
(burning foods) or not hot enough
(foods are undercooked) you can
adjust the temperature yourself. The
appearance and texture of foods is a
better indicator of oven accuracy than
an inexpensive thermometer, such as
those found in grocery stores, to
check the temperature setting of your
new oven. These thermometers can
vary by 20-40 degrees. In addition,
the oven door must be opened to
read these thermometers. Opening
the door will change the temperature
of the oven.
To decide how much to change the
temperature, set the oven
temperature 25 degrees higher (if
foods are undercooked) or 25
degrees lower (if foods are burning)
than the temperature in your recipe,
then bake. The results of this "test"
should give you an idea of how much
the temperature should be changed.
.
m
3.
4,
Turn the oven control to OFF and
remove the knob by pulling
straight off.
Look at the back of the knob.
The arrow pointing to the center
of the bottom screw indicates the
original factory setting.
Use a screwdriver to loosen the
two screws about 2 turns each.
Hold the knob handle (A on
illustration) while turning the disk
(B on illustration) in the desired
direction to increase or decrease
the temperature. (See illustration
below for "Standard Thermostat.")
As you turn, you should be able
to hear clicks and feel notches or
teeth. Each click or notch is 15°R
You can turn up to 2 clicks or
notches in either direction.
5. When you reach the desired
adjustment, retighten both
screws. Return the knob to the
range.
(See illustration below--use
the arrows in the gray area to
make your temperature
adjustment.}
"A" "B"
KNOB DISK To Make Oven
Turn Disk
To Make
Oven
Hotter
Arrow Turn Disk
2O
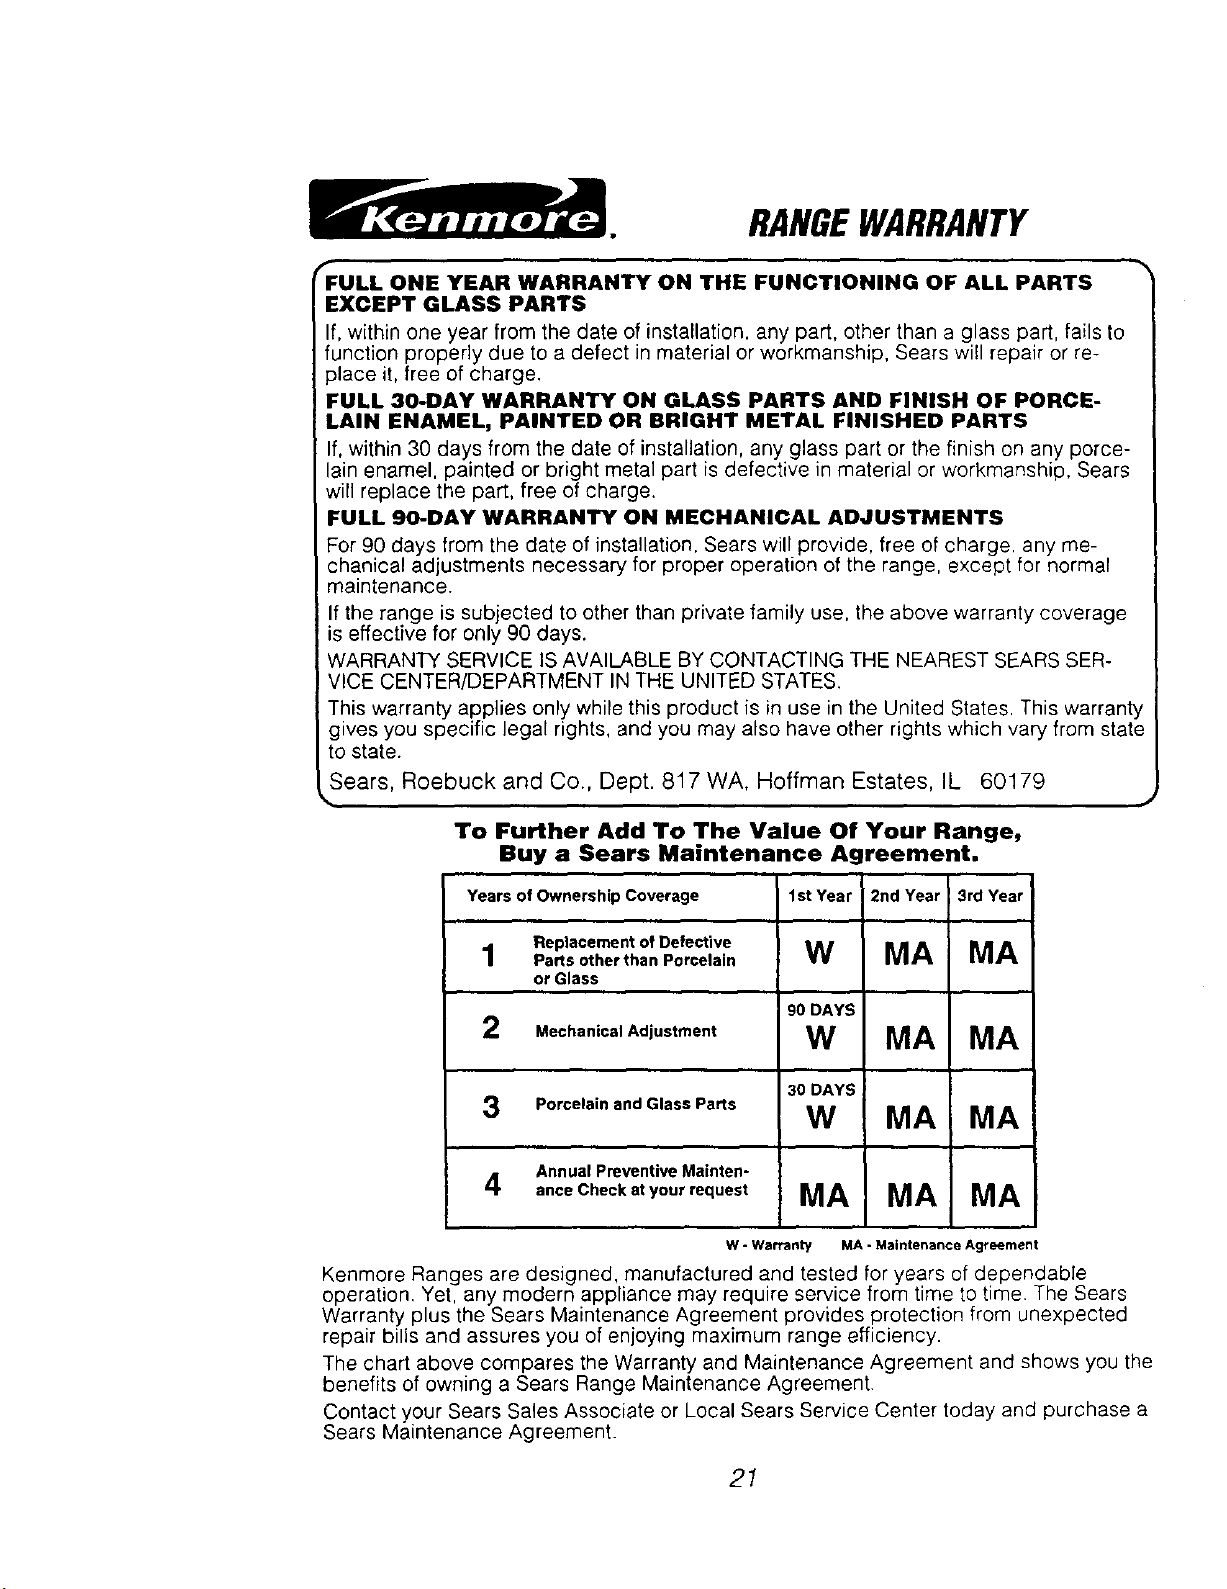
RANGEWARRANTY
f
FULL ONE YEAR WARRANTY ON THE FUNCTIONING OF ALL PARTS
EXCEPT GLASS PARTS
If, within one year from the date of installation, any part, other than a glass pad, fails to
function properly due to a defect in material or workmanship, Sears will repair or re-
31ace it, free of charge.
FULL 30-DAY WARRANTY ON GLASS PARTS AND FINISH OF PORCE-
LAIN ENAMEL, PAINTED OR BRIGHT METAL FINISHED PARTS
If, within 30 days from the date of installation, any glass part or the finish on any porce-
lain enamel, painted or bright metal part is defective in material or workmanship, Sears
will replace the part, free of charge.
FULL 90-DAY WARRANTY ON MECHANICAL ADJUSTMENTS
For 90 days from the date of installation, Sears will provide, free of charge, any me-
chanical adjustments necessary for proper operation of the range, except for normal
maintenance.
If the range is subjected to other than private family use, the above warranty coverage
is effective for only 90 days.
WARRANTY SERVICE IS AVAILABLE BY CQNTACTING THE NEAREST SEARS SER-
VICE CENTER/DEPARTMENT IN THE UNITED STATES.
This warranty applies only while this product is in use in the United States. This warranty
gives you specific legal rights, and you may also have other rights which vary from state
to state.
Sears, Roebuck and Co., Dept. 817WA, Hoffman Estates, IL 60179
%
To Further Add To The Value Of Your Range,
Buy a Sears Maintenance Agreement,
Years of Ownership Coverage
Replacement of Defective
4
/ Parts other than Porcelain
or Glass
1st Year 2nd Year
3rd Year
W MA MA
90 DAYS
2 Mechanical Adjustment W MA MA
30 DAYS
3 Porcelain and Glass Parts W MA MA
Annual Preventive Mainten-
4 anceCheckatyourrequest MA MA MA
W - Warranty MA - Maintenance Agreement
Kenmore Ranges are designed, manufactured and tested for years of dependable
operation, Yet, any modern appliance may require service from time to time. The Sears
Warranty plus the Sears Maintenance Agreement provides protection from unexpected
repair bills and assures you of enjoying maximum range efficiency.
The chart above compares the Warranty and Maintenance Agreement and shows you the
benefits of owning a Sears Range Maintenance Agreement.
Contact your Sears Sales Associate or Local Sears Service Center today and purchase a
Sears Maintenance Agreement.
21
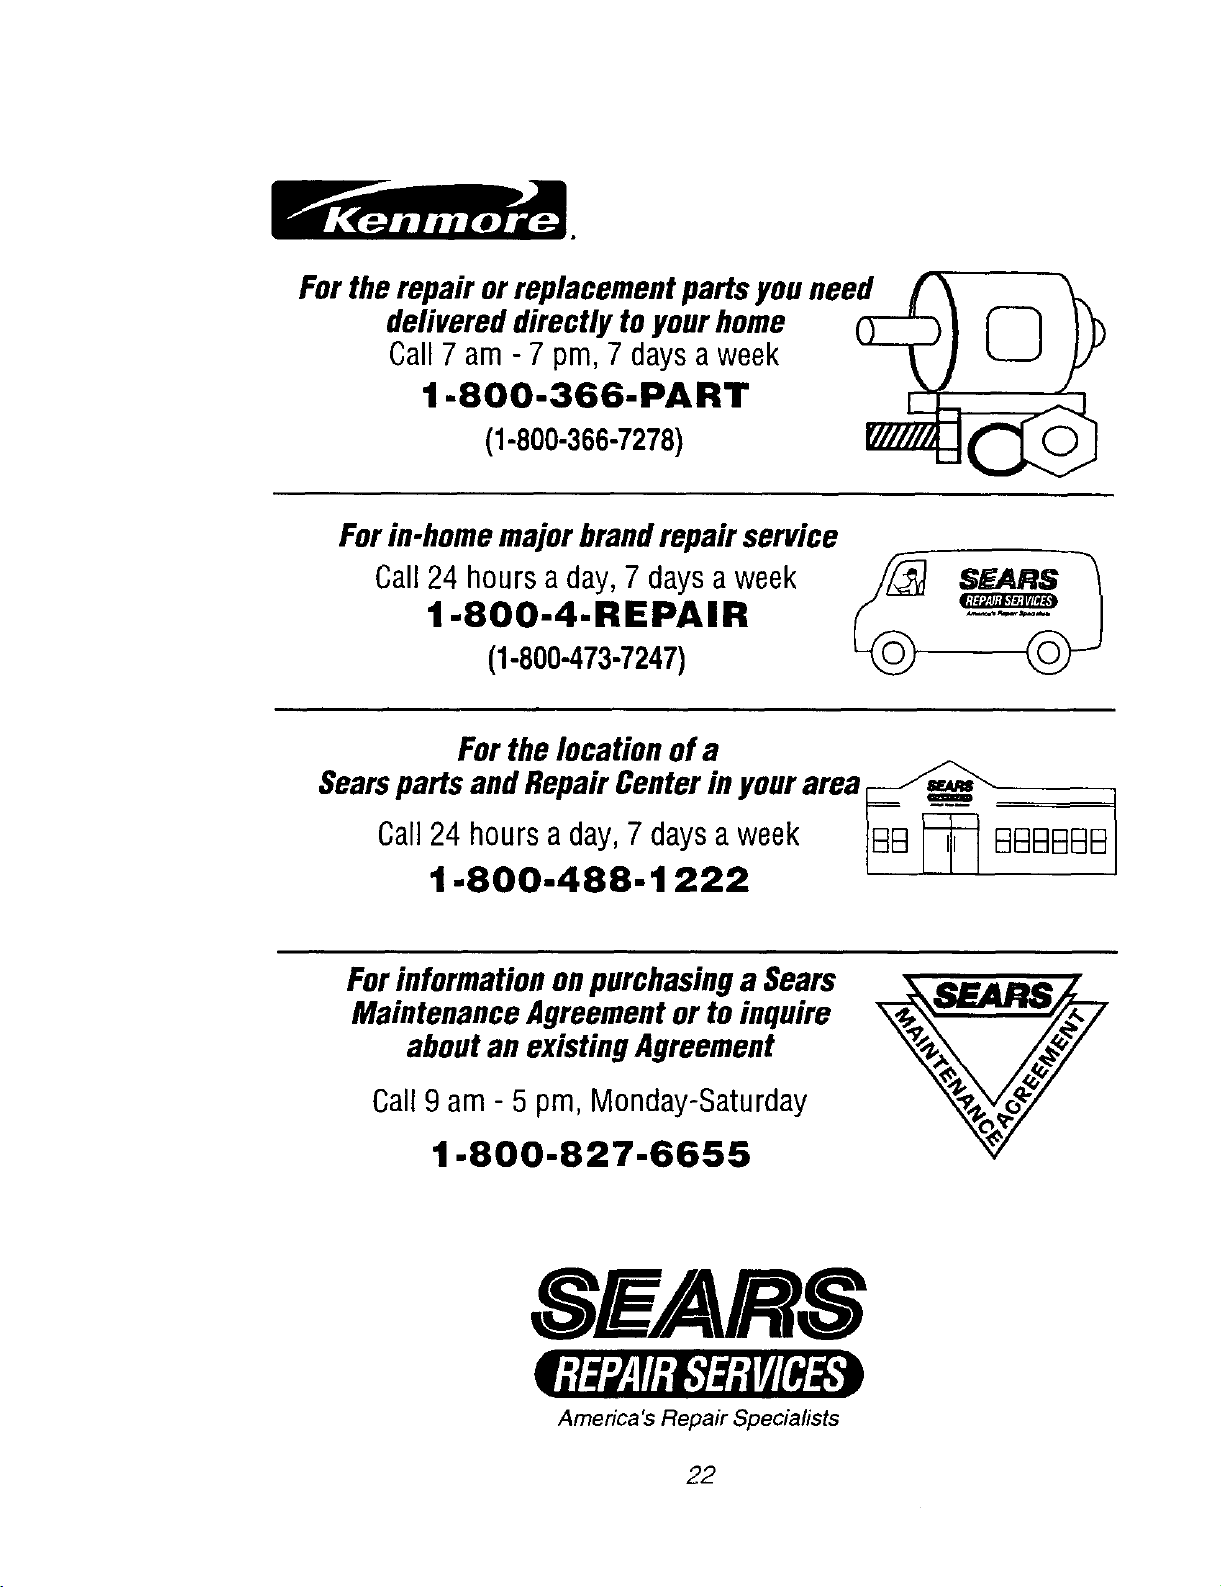
Forthe repair or replacementparts youneed /
delivereddirectly toyourhome
Call7 am - 7 pm, 7 daysaweek
1-800-366-PART L_
(1-800-366-7278) E7//'/_,
Forin-homemajorbrandrepair service
Call24 hours a day,7 daysa week /FZ_
1-800-4-REPAIR
(1-800-473-7247)
For the locationof a
Searsparts andRepairCenterin yourarea
Call24 hours a day,7 daysa week BB _ BBBBBB
1-800-488-1222
I I I
Forinformationonpurchasinga Sears
MaintenanceAgreementor to inquire
aboutan existingAgreement
Call9 am - 5 pm, Monday-Saturday
1-800-827-6655
SEARS
America's Repair Speciafists
22