
Table of Contents
3
EN
1 Description 12
1.1 General Description 12
1.2 Cooktop 13
1.3 Control panel 14
1.4 Other parts 15
1.5 Available accessories 15
2Use 17
2.1 Instructions 17
2.2 Using the accessories 19
2.3 Using the cooktop 19
2.4 Using the oven 25
2.5 Programming clock 26
2.6 Using the temperature probe 30
2.7 Cooking advice 33
3 Cleaning and maintenance 37
3.1 Instructions 37
3.2 Cleaning the cooktop 38
3.3 Cleaning the oven cavity 40
3.4 Steam clean function 41
3.5 Special maintenance 42
Definitions
This manual contains important safety symbols and instructions. Please pay
attention to these symbols and follow all instructions given.
WARNING
This symbol will help alert you to situations that may cause serious bodily harm, death
or property damage.
CAUTION
This symbol will help alert you to situations that may cause injury or property damage.
We advise you to read this manual carefully, which contains all the instructions for
maintaining the appliance’s aesthetic and functional qualities.
For further information on the product: www.smeg.com

Important Safety Instructions
4
Important Note to the Customer
Do not attempt to install or operate
your appliance until you have read
the safety precautions in this manual.
Safety items throughout this manual
are labeled with a WARNING or
CAUTION statement based on the
risk type.
Warnings and important instructions
appearing in this guide are not
meant to cover all possible
conditions and situations that may
occur. Common sense, caution, and
care must be exercised with
installing, maintaining, or operating
your appliance.
• Check for proper installation and
use of the anti-tip bracket.
Carefully tip the range forward
by pulling it from the back to
ensure that the anti-tip bracket
engages the range leg and
prevents tip-over. The range
should not move more than 1”
(2.5cm).
• Read all instructions before using
this appliance.
• Keep these instructions with your
owner's guide for future
reference.
Unpacking and installation
• Remove all tape and packaging
before using the appliance.
Dispose of the carton and plastic
bags after unpacking the
appliance. Never allow children
to play with packaging material.
Do not remove the wiring label
and other information attached to
the appliance. Do not remove
model/serial number plate.
• Cold temperatures can damage
the electronic control. If this
appliance has not been used for
a long time, make sure that it has
been stored at temperatures
above 32ºF (0ºC) for at least 3
hours before turning on power to
the appliance.
IMPORTANT SAFETY INSTRUCTIONS
WARNING: Tip Over Hazard
• A child or adult
could tip the
range over and
be killed.
• Verify the anti-tip
device has been properly
installed and engaged.
• Ensure the anti-tip device is re-
engaged when the range is
moved.
• Do not operate the range
without the anti-tip device in
place and engaged.
• Failure to follow these
instructions can result in death or
serious burns to children and
adults.

Important Safety Instructions
5
EN
• Never modify or alter the
construction of the appliance by
removing the leveling legs,
panels, wire covers, anti-tip
brackets/screws, or any other
part of the appliance. Be sure to
have an appropriate foam-type
fire extinguisher available, clearly
visible and easily accessible
located near the appliance.
• All materials used in construction
of cabinets, enclosures, and
supports surrounding the product
must have a temperature rating
above 200°F (94°C).
Grounding instructions
• Proper Installation—Be sure your
appliance is properly installed
and grounded by a qualified
technician. In the United States,
install in accordance with the
National Fuel Gas Code ANSI
Z223.1/NPFA No. 54, latest
edition and National Electrical
Code NFPA No. 70 latest
edition, and local electrical code
requirements. In Canada, install in
accordance with CAN/CGA
B149.1 and CAN/CGA B149.2
and CSA Standard C22.1,
Canadian Electrical code, Part 1-
latest editions and local electrical
code requirements. Install only as
per the installation instructions
provided in the documentation
received with this appliance.
• For personal safety, this appliance
must be properly grounded. For
maximum safety, the power cord
must be securely connected to an
electrical outlet or junction box
that is the correct voltage, is
correctly polarized and properly
grounded, and protected by a
circuit breaker in accordance with
local codes.
WARNING
• Avoid fire hazard or electrical shock.
Failure to follow this warning may cause
fire, serious injury, or death.
• Avoid fire hazard or electrical shock. Do
not use an adapter plug, an extension
cord, or remove the grounding prong
from the power plug. Failure to follow
this warning may cause fire, serious
injury, or death.

Important Safety Instructions
6
• It is the personal responsibility of
the consumer to have the
appropriate outlet or junction box
with the correct, properly
grounded wall receptacle
installed by a qualified electrician.
It is the responsibility and
obligation of the consumer to
contact a qualified installer to
ensure that the electrical
installation is suitable and in
conformance with all local codes
and ordinances.
• See the installation instructions
provided with this appliance for
complete installation and
grounding instructions.
Important instruction for using the
appliance
• Persons with a pacemaker or
similar medical device should
exercise caution using or standing
near an induction unit while it is in
operation as the electromagnetic
field may affect the working of the
pacemaker or similar medical
device. It would be advisable to
consult your doctor or the
pacemaker or similar medical
device manufacturer about your
particular situation.
• Do not touch surface cooking
zones, areas near these zones or
elements, interior surfaces of the
oven, or the warmer drawer (if
provided). Surface and oven
elements may be hot even though
they appear to be cool. Areas
near surface elements may
become hot enough to cause
burns. During and after use, do
not touch, or let clothing or other
flammable materials come into
contact with these areas until they
are cool. These areas may
include the cooktop, surfaces
facing the cooktop, oven vent
areas and the oven door and
oven window.
• Storage In or On the Appliance -
Flammable materials should not
be stored in the oven, near
surface burners or elements, or in
the storage or warmer drawer (if
provided). This includes paper,
plastic, and cloth items, such as
cookbooks, plasticware and
towels, as well as flammable
liquids. Do not store explosives,
such as aerosol cans, on or near
the appliance.
• Do not leave children alone -
Children should not be left alone
or unattended in the area where
appliance is in use. They should
never be allowed to sit or stand
on any part of the appliance,
including the storage drawer,
lower broiler drawer, warmer
drawer, or lower double oven.
• Do not store items of interest to
children in the cabinets above the
appliance or on the backguards
of ranges. Children climbing on or
near the appliance to reach items
could be seriously injured.
• Do not allow children to climb or

Important Safety Instructions
7
EN
play around the appliance. The
weight of a child on an open
oven door may cause the
appliance to tip, resulting in
serious burns or other injury. An
open drawer when hot may
cause burns.
• Stepping, leaning, or sitting on the
door or drawers of this appliance
can result in serious injuries and
also cause damage to the
appliance.
• Never cover any slots, holes or
passages in the oven bottom or
cover and entire rack with
materials such as aluminum foil.
Aluminum foil linings may also
trap heat, causing a fire hazard.
• When heating fat or grease,
watch it closely. Grease may
catch fire if it becomes too hot.
• Do not use water or flour on
grease fires.
• Smother fire or flame or use dry
chemical or foam-type
extinguisher. Cover the fire with a
pan lid or use baking soda.
• Only use dry potholders. Moist or
damp potholders on hot surfaces
may result in burns from steam. Do
not let potholders touch hot
heating elements or hot cooking
areas. Do not use towels or other
bulky cloths.
• Do not heat unopened food
containers - Build-up of pressure
may cause the container to burst
and result in injury.
• Wear proper apparel - Loose-
fitting or hanging garments should
never be worn while using the
appliance. Do not let clothing or
other flammable materials come
into contact with hot surfaces.
• Do not attempt to operate the
appliance during a power failure.
If the power fails, always turn off
the appliance. If the appliance is
not turned off, electric surface
elements may resume operation
when power is restored. Once the
power is restored, reset the clock
and the oven function.
• Never use your appliance for
warming or heating the room.
Important instruction for using your
induction cooktop
• Know which knob or key controls
each surface heating area. Place
the cookware containing food on
the cooking area before turning it
on. Turn the cooking area off
before removing the cookware.
• Cookware handles should be
turned inward and not extend
over adjacent surface elements. —
To reduce the risk of burns,
ignition of flammable materials
and spillage due to unintentional
contact with the utensil, the handle
of the cookware should be
positioned so that it is turned
inward and does not extend over
other cooking areas.

Important Safety Instructions
8
• Use proper pan size — This
appliance is equipped with one
or more surface units of different
sizes. Select cookware with flat
bottoms that match the surface unit
size. Using the proper cookware
on the cooking area will improve
efficiency.
• Glazed cooking utensils — Only
certain types of cookware are
suitable for cooktop service and
must be magnetic in order to work
properly on the induction zones.
Check the manufacturer’s
recommendations for cooktop use
to ensure that the cookware is
compatible with induction
cooking.
• Improper cookware may break
due to sudden changes in
temperature. Check the
cookware manufacturer’s
recommendations for cooktop
use.
• Do not place metallic objects
such as knives, forks, spoons and
lids on the cooktop surface since
they can become hot.
• Never leave surface elements
unattended. Boil-overs may cause
smoking and greasy spills that
may ignite. A pan that has boiled
dry could be damaged and may
damage the cooktop
• When you are flaming foods
under a ventilating hood, turn on
the fan.
Important instructions for glass and
ceramic cooktops
Clean cooktop glass with caution. If
a wet sponge or cloth is used to
wipe spills on a hot cooking area, be
careful to avoid steam burns. Some
cleaners can produce harmful fumes
if applied to a hot surface. Avoid
scratching the cooktop glass with
sharp objects.
Important instructions for using
your oven
• Protective liners—Do not use
aluminum foil, aftermarket oven
liners, or any other materials or
devices to line oven bottom, oven
racks, or any other part of the
appliance. Only use aluminum as
recommended for baking, such as
lining cookware or as a cover
placed on food. Any other use of
protective liners or aluminum foil
may result in a risk of electric
shock, fire or a short circuit.
• Prevent aluminum foils and the
temperature probe from
contacting the heating elements.
WARNING
• Do Not Clean or Operate a Broken
Cooktop. If cooktop should break,
cleaning solutions and spillovers may
penetrate the broken cooktop and
create a risk of electric shock. Contact a
qualified technician immediately.

Important Safety Instructions
9
EN
• Take care when opening oven
door, lower oven door, or
warmer drawer (some models).
Stand to the side of the appliance
when opening the door of a hot
oven. Let hot air or steam escape
before you remove food or place
it back in the oven.
• Keep oven vent ducts
unobstructed. Touching surfaces in
this area when the oven is on may
cause severe burns. Do not place
plastic or heat-sensitive items on
or near the oven vent. These items
can melt or ignite.
• Placement of oven racks - Always
place oven racks in required
position while the oven is cool. If a
rack has to be moved while the
oven is hot, do not let the
potholder come into contact with
a hot burner or element in oven.
Use potholders and grasp the
rack with both hands when
repositioning it. Remove all
cookware and utensils before
moving the rack.
• Do not use a broiler pan without
its insert.
• Broiler pans and inserts allow
dripping fat to drain away from
the high heat of the broiler. Do not
cover the broiler insert with
aluminum foil; exposed fat and
grease could ignite.
• Do not cook food on the oven
bottom.
• Always cook in proper cookware
and always use the oven racks.
Important instructions for cleaning
your appliance
• Clean the appliance regularly to
keep all parts free of grease that
could catch fire. Do not allow
grease to accumulate. Greasy
deposits in the fan could catch
fire.
• Always follow the manufacturer’s
recommended directions when
using kitchen cleaners and
aerosols. Be aware that excess
residue from cleaners and
aerosols may ignite causing
damage and injury.
• Clean ventilating hoods
frequently, grease should not be
allowed to accumulate on hood
or filter. Follow the manufacturer’s
instructions for cleaning ventilating
hoods.
CAUTION
• Make sure all controls are turned off
and that the appliance is cool before
manually cleaning any part of the
appliance. Cleaning a hot appliance
can cause burns.

Important Safety Instructions
10
Important instruction for service
and maintenance
• Do not repair or replace any part
of the appliance unless
specifically recommended in the
manuals. All other servicing
should be done only by a
qualified technician. This reduces
the risk of personal injury and
damage to the appliance.
• Always contact your dealer,
distributor, service agent, or
manufacturer about problems or
conditions you do not understand.
• Ask your dealer to recommend a
qualified technician and an
authorized repair service. Know
how to disconnect the power to
the appliance at the circuit
breaker or fuse box in case of an
emergency.
• Remove the oven door from any
unused oven if it is to be stored or
discarded.
• Do not touch a hot oven light bulb
with a damp cloth. Doing so
could cause the bulb to break.
Handle halogen lights (if
provided) with paper towels or
soft gloves.
• Disconnect the appliance or shut
off the power to the appliance
before removing and replacing
the bulb.
State of California Proposition 65
WARNING
Cancer or Reproductive Harm -
www.P65Warnings.ca.gov
Important Safety Instructions
11
EN
Important: This appliance has been
tested and found to comply with the
limits for a class B digital device,
pursuant to Part 18 of the FCC rules
(United States) and ICES-001
(Canada). These limits are designed
to provide reasonable protection
against harmful interference in a
residential installation. This unit uses
and can radiate radio frequency
energy that may interfere with radio
communications if not installed and
used in accordance with the
instructions manual. However, there
is no guarantee that interference will
not occur in a particular installation. If
this unit does cause interference to
radio or television reception, which
can be determined by turning the unit
off and on, the user is encouraged to
try to correct the interference by one
or more of the following measures:
• Reorient or relocate the receiving
antennae.
• Increase distance between unit
and receiver.
• Connect the unit into an outlet or a
circuit different from the one to
which the receiver is connected.
How to read the user manual
This user manual uses the following reading
conventions:
1. Use instruction sequence.
• Single use instructions.
SAVE THESE INSTRUCTIONS
Instructions
General information on this user
manual, on safety and final
disposal.
Description
Description of the appliance and its
accessories.
Use
Information on the use of the
appliance and its accessories,
cooking advice.
Cleaning and maintenance
Information for proper cleaning and
maintenance of the appliance.
Safety instructions
Information
Advice
Description
12
1 Description
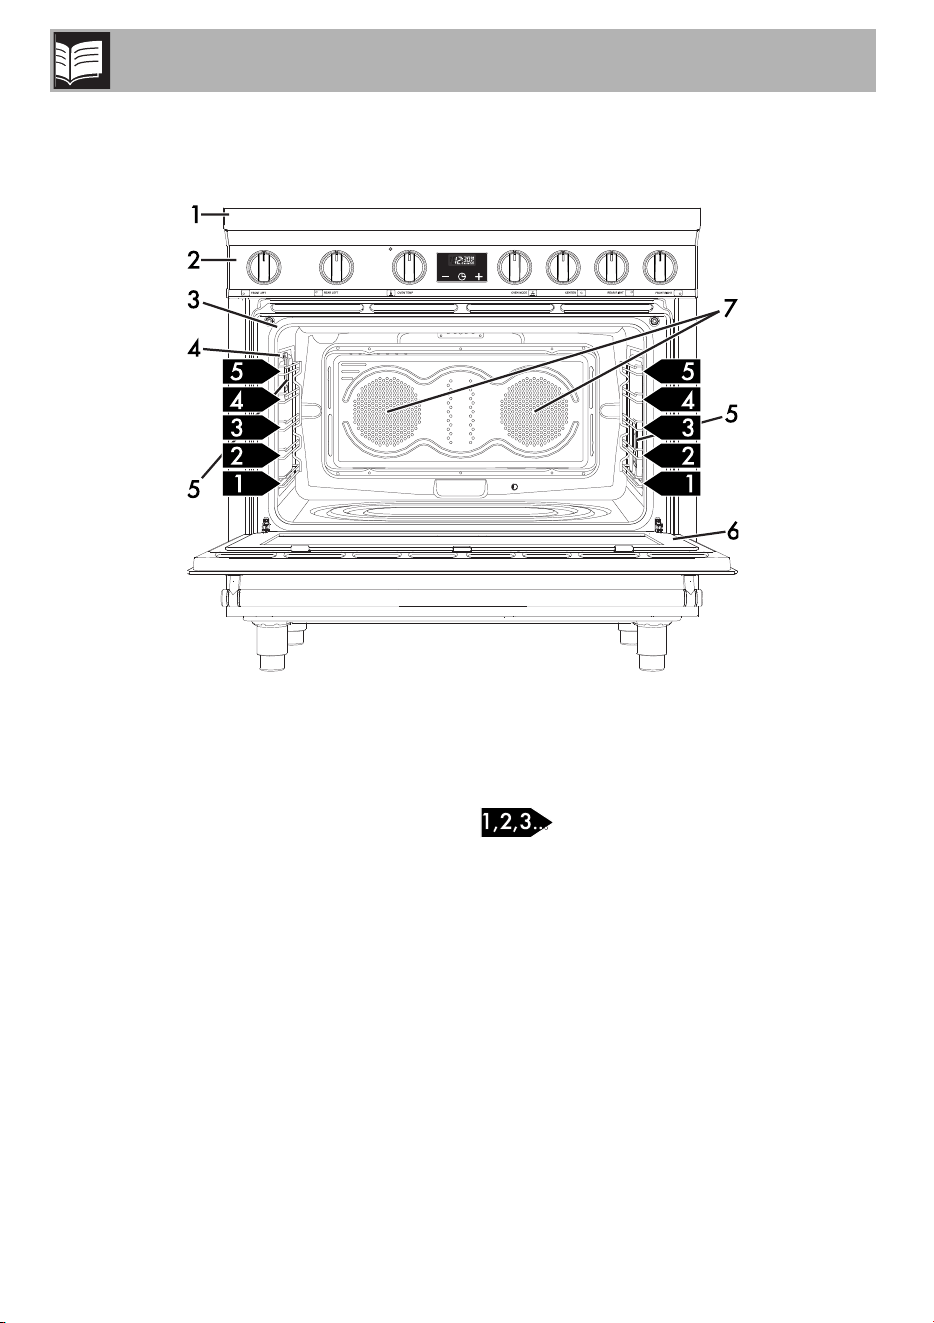
1.1 General Description
1 Cooktop
2 Control panel
3 Seal
4 Temperature probe socket
5 Oven light
6 Door
7 Fan
Rack/tray support frame shelf
Description
13
EN
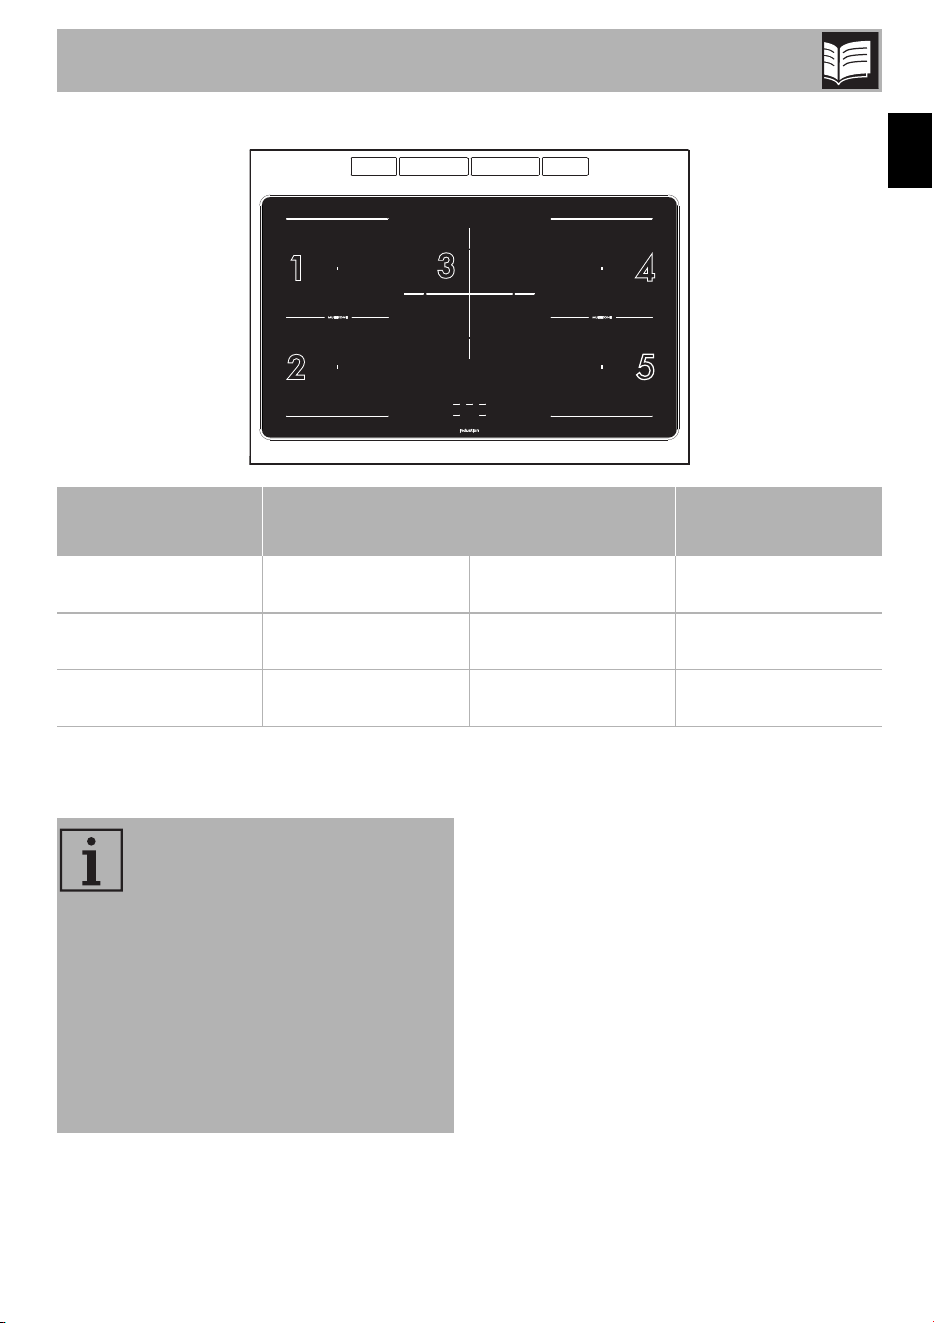
1.2 Cooktop
* Power levels are approximate and can vary according to the pan used or the settings made.
Advantages of induction cooking
• Energy saving thanks to the direct
transmission of energy to the pan
(suitable magnetisable cookware is
required) compared to traditional
electric cooking.
• Improved safety as the energy is only
transmitted to the pan placed on the
cooktop.
• High level of energy transmitted from the
induction cooking zone to the base of
the pan.
• Rapid heating speed.
• Reduced danger of burns as the cooking
surface is only heated under the base of
the pan; foods which overflow do not
stick.
Zone
Dimensions
H x L (mm - in)
Max. power
draw (W)*
Power draw in
Booster function (W)*
1 - 2 - 4 - 5
Single Zone
205 x 210 - 8”1/16 x
8” 4/16
1850 3000
1 - 2 - 4 - 5
Double Zone
410 x 210 - 16”4/16
x 8”4/16
3700 -
3
270 x 270 - 10”5/8 x
10”5/8
2600 3700
The cooktop is equipped with an
induction generator for each
cooking zone. Each generator
located under the glass ceramic
cooking surface creates an
electromagnetic field which
induces a thermal current in the
base of the pan. This means the
heat is no longer transmitted from
the hob to the pan but created
directly inside the pan by the
inductive current.
Description
14
1.3 Control panel
1 Cooktop cooking zones knobs
Used for turning on the cooking zones and
adjusting the power levels.
The following markings appear on each
cooktop knob:
cooking zone OFF position;
, , Melting,
Keep Warm and Simmering functions;
cooking zones power
levels;
Boost mode.
Only on the front/rear left and right
cooking zones knobs:
Heating Accelerator and Bridge
functions;
Only on the central cooking zone knob:
Heating Accelerator function;
Control Lock function;
2 Hot oven indicator light
The indicator light comes on to indicate that
the oven is hot. Each time the indicator light
comes on, the appliance emits an acoustic
signal.
Depending on the set temperature (from
150 to 500°F) it will activate after about
10-12 minutes of operation.
It switches off when the oven cavity has
cooled down.
3 Temperature knob
This knob allows you to select the cooking
temperature. Turn the knob clockwise to the
required value between the minimum and
maximum settings.
4 Programmer clock
Used for displaying the current time and
setting the timer.
5 Function knob
The oven's various functions are suitable for
different cooking modes. After selecting the
required function, set the cooking
temperature using the temperature knob.
CAUTION
High temperature inside the oven.
NOTE: In Broil mode, the indicator
light remains off. It lights up at the
end of the function during the
cooling phase to indicate that the
oven is still hot.
Description
15
EN
1.4 Other parts
Shelves
The appliance is fitted with shelf supports to
position trays and racks at different heights.
The insertion heights are indicated from the
bottom upwards (see 1.1 General
Description).
Interior lighting
The appliance’s interior lighting comes on:
• When the door is opened.
• When any function is selected.
Cooling fan
The fan cools the oven and comes into
operation during cooking.
The fan causes a steady outflow of air that
exits from the rear of the appliance, which
may continue for a brief period of time even
after the appliance has been turned off.
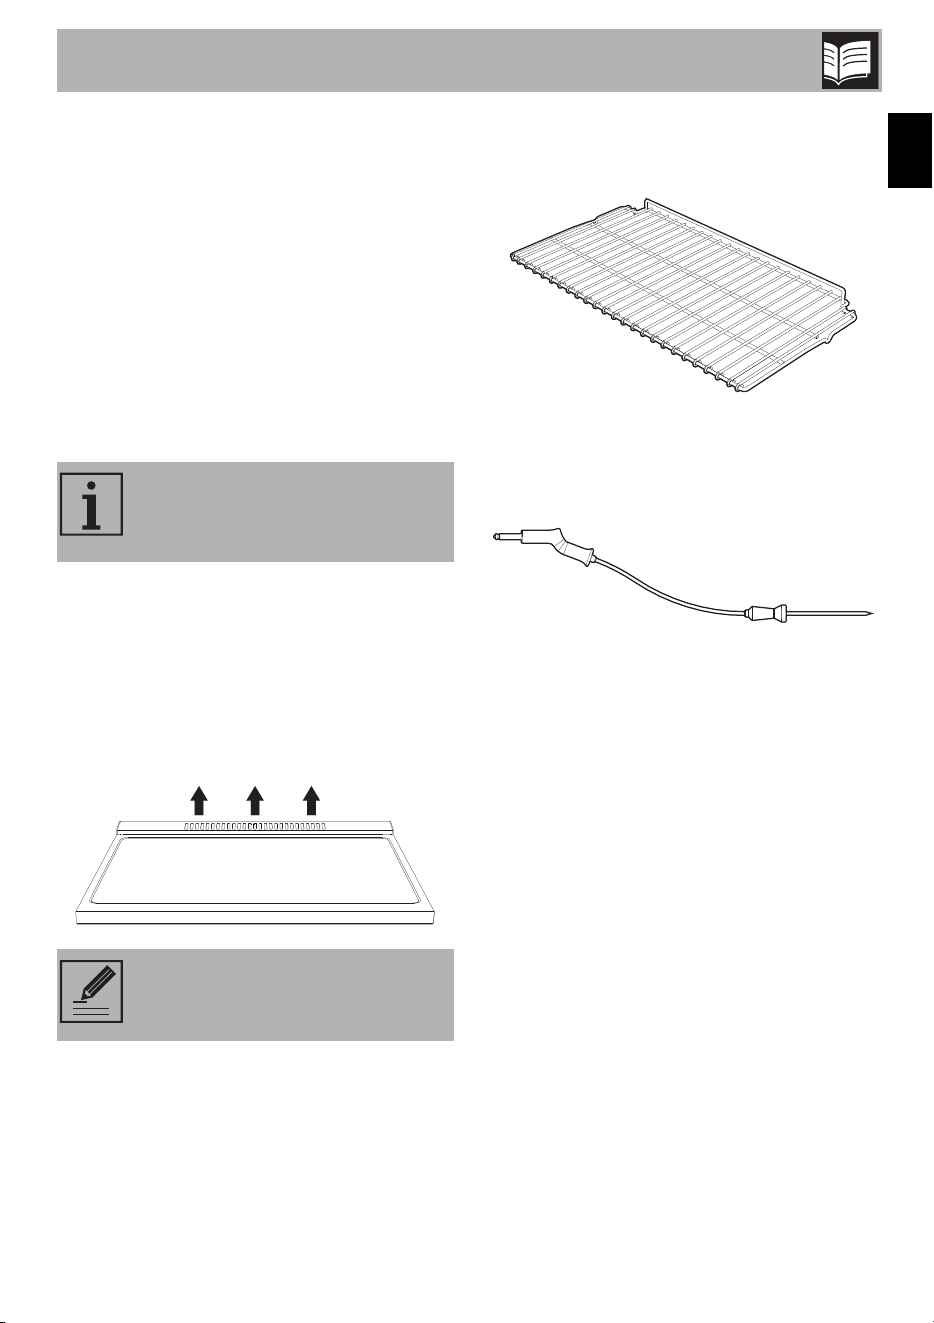
1.5 Available accessories
Rack
Used to hold containers containing food to
be cooked.
Temperature probe
With the temperature probe, you can cook
according to the temperature measured at
the center of the food.
NOTE: When the door is open, it
is not possible to turn off the interior
lighting.
NOTE: Do not obstruct ventilation
openings and heat dispersal slots.
Description
16
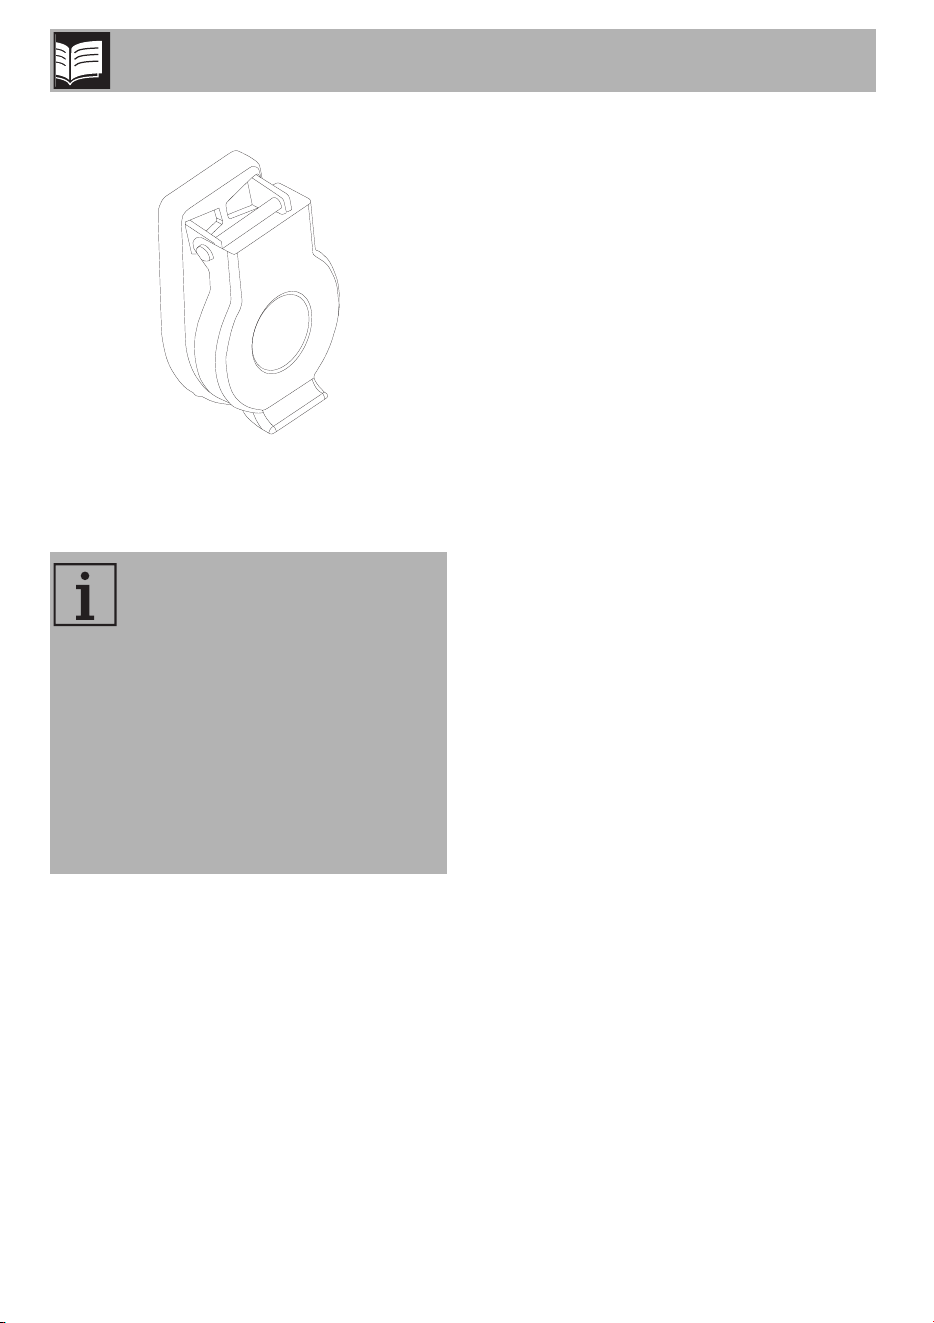
Protective cover
Used to cover and protect the temperature
probe socket when the temperature probe
is not in use.
NOTE: Some models are not
provided with all accessories.
NOTE: The accessories intended
to come into contact with food are
made of materials that comply with
the provisions of current legislation.
NOTE: Supplied and optional can
be requested from Authorized
Assistance Centers. Use only
original accessories supplied by
the manufacturer.
Use
17
EN
2 Use
2.1 Instructions
High temperature inside the oven
during use
Danger of burns
• Keep the oven door closed during
cooking.
• Protect your hands by wearing oven
gloves when moving food inside the
oven.
• Do not touch the heating elements inside
the oven.
• Do not pour water directly onto very hot
trays.
• Keep children under the age of 8 away
from the appliance when it is in use.
• If you need to move food or at the end
of cooking, open the door 5 cm for a
few seconds, let the steam come out,
then open it fully.
High temperature inside the oven
during use
Danger of fire or explosion
• Do not spray any spray products near
the appliance.
• Do not use or leave flammable materials
near the appliance or the storage
compartment.
• Do not use plastic cookware or
containers when cooking food.
• Do not put sealed tins or containers in
the oven.
• Remove all trays and racks which are
not required during cooking.
Improper use
Risk of damage to surfaces
• Do not cover the bottom of the oven
cavity with aluminium or tin foil sheets.
• If you wish to use greaseproof paper,
place it so that it will not interfere with the
hot air circulation inside the oven.
• Do not place pans or trays directly on
the bottom of the oven cavity.
• Do not use the open door to rest pans or
trays on the internal glass pane.
• Do not pour water directly onto very hot
trays.
• Cooking vessels or griddle plates
should be placed inside the perimeter of
the hob.
• All pans must have smooth, flat bottoms.
• If any liquid does boil over or spill,
remove the excess from the hob.
• Use only pans with perfectly flat and
smooth bases on the cooktop.
• Avoid letting heavy objects fall on the
cooktop surface.
• In the case of cracks or fractures or if
you cannot switch off the appliance,
disconnect the power supply
immediately and call Customer Service.
• Do not use the cooktop as a work
surface.
Use
18
First-time use of the range
1. Remove any protective film from the
outside or inside of the appliance,
including accessories.
2. Remove any labels (apart from the
technical data plate) from the
accessories and from the oven cavity.
3. Remove and wash all the appliance
accessories (see 3 Cleaning and
maintenance).
4. Heat the empty oven to the maximum
temperature to burn off any residues left
by the manufacturing process.
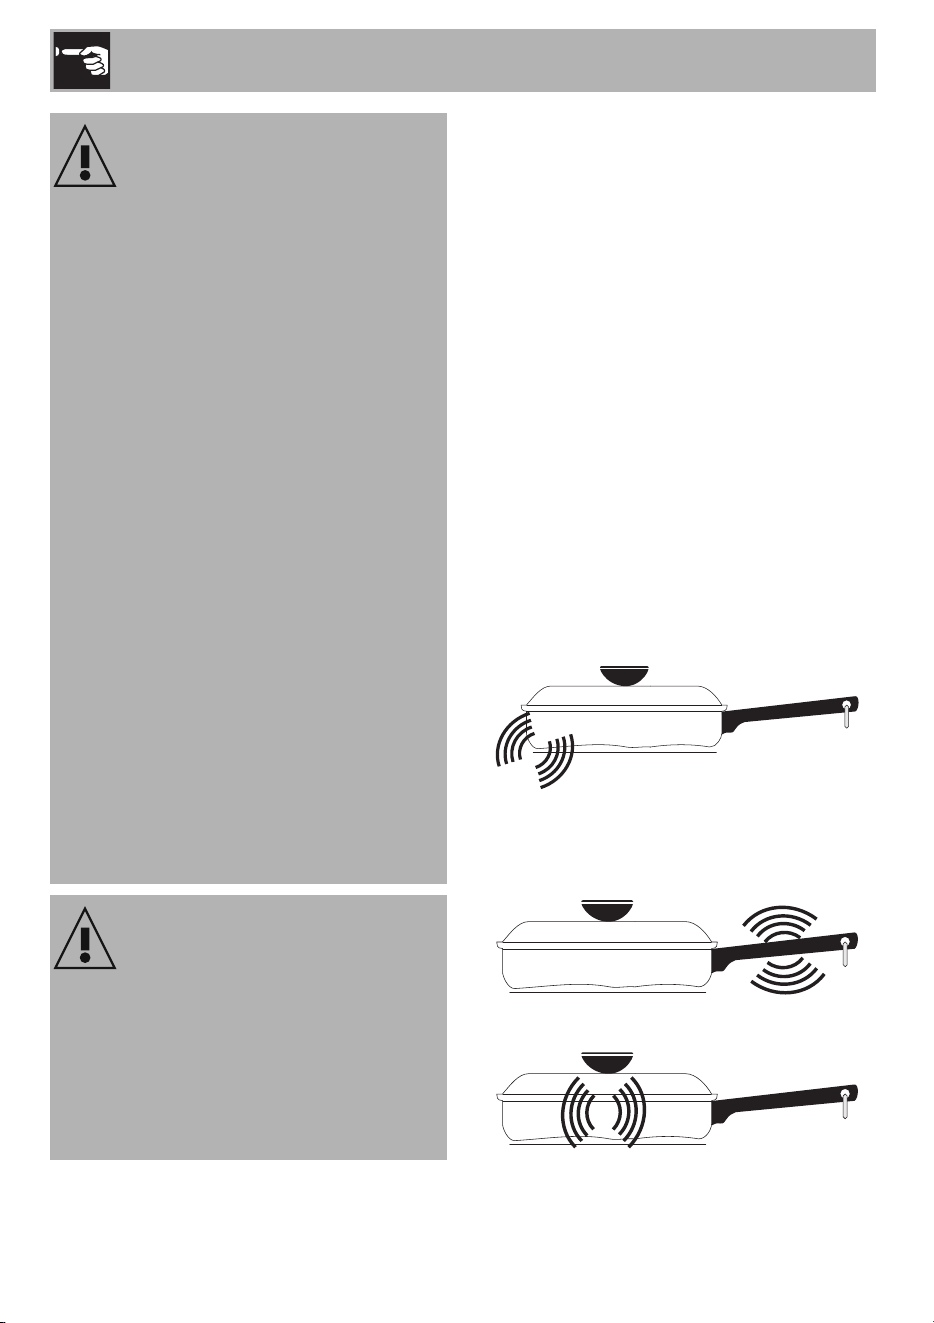
Sounds
The magnetic field over the induction
cooking zone may cause cookware to
vibrate, creating a buzzing or humming
noise. These sounds are not unusual,
especially at high settings.
Cookware that is not perfectly flat on the
bottom may vibrate slightly against the
cooktop.
A loose handle may vibrate in its socket.
Multi-material cookware may allow small
vibrations in its structure.
High temperature
Burn hazard
• Protect your hands with thermal gloves
during use.
• Do not touch or clean the cooktop
surface during operation or when the
residual heat warning lights are on.
• Surface units may be hot even though
they are dark in color.
• Do not place empty pots and pans on
the cooking zones when they are
switched on.
• Do not allow children of less than 8
years of age approach the appliance
during operation.
• Enables the control lock in the presence
of children or pets able to reach the
cooktop.
• After use, turn off the cooking zones.
They will remain hot for a certain period
of time after switching them off. Do not
touch the surfaces of the cooktop.
• Do not leave the appliance unattended
during cooking operations that could
release fats or oils.
High temperature inside the
storage compartment
Danger of burns
• Do not open the storage compartment
when the appliance is on and still hot.
• The items inside the storage
compartment could be very hot after
using the appliance.
Use
19
EN
Sounds are less likely to occur with heavier,
higher quality cookware.
An induction cooktop may also produce
faint clicking sounds from the electronic
switches that maintain the desired cooking
temperature. You may also hear a fan that
cools the electronics inside the cooktop.
2.2 Using the accessories
Racks and trays
Racks and trays have to be inserted into the
side guides until they come to a complete
stop. The mechanical safety locks that
prevent the rack from being taken out
accidentally have to face downwards and
towards the oven back.
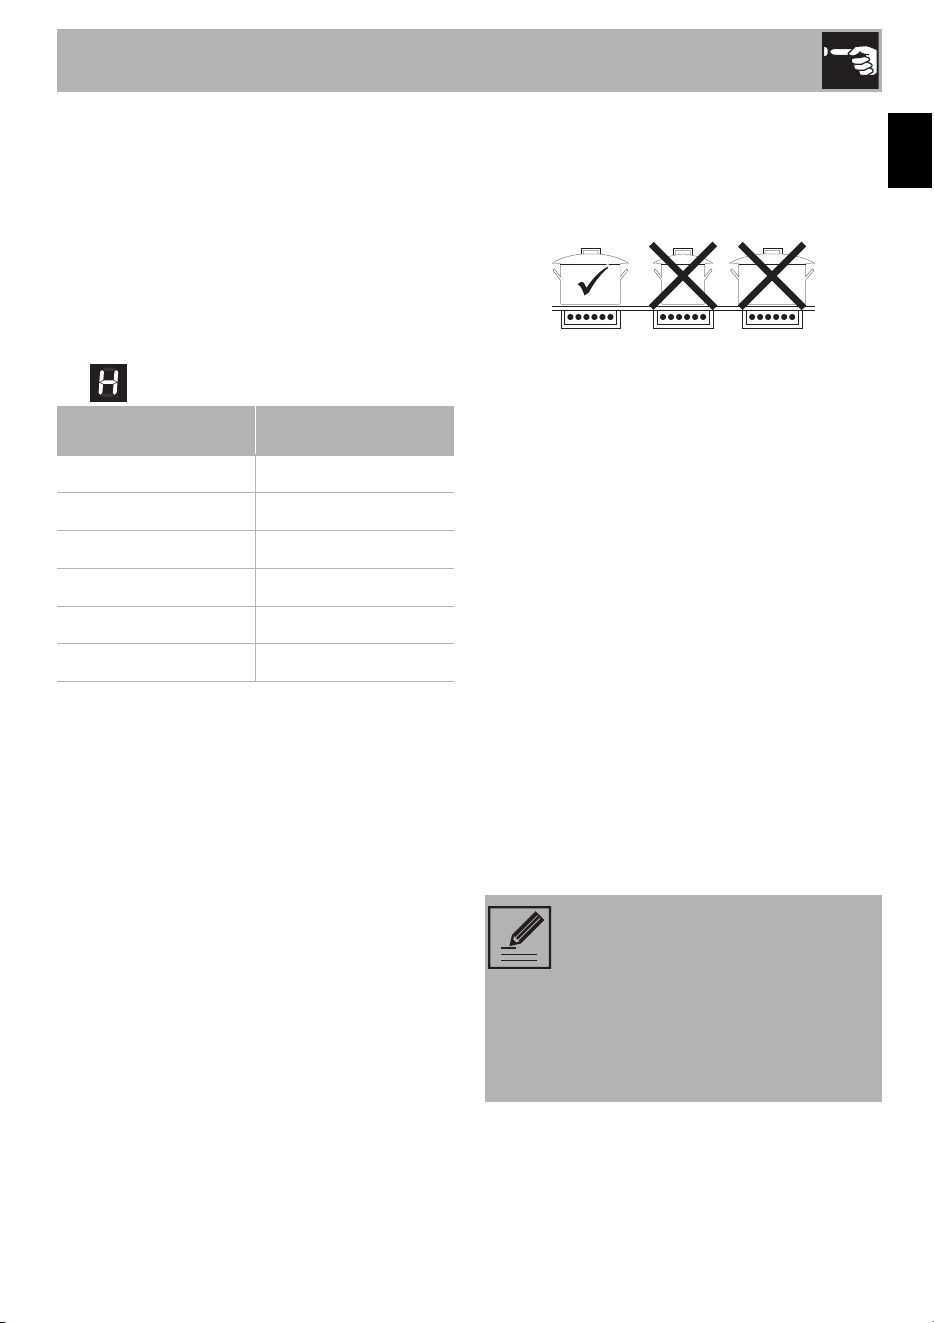
2.3 Using the cooktop
Cookware type
Ideally, cookware should have a flat
bottom, straight sides, a tight-fitting lid and
medium-to-heavy thickness.
Rough cookware finishes may scratch the
cooktop. Aluminum and copper may be
used in cookware as a core material or for
the base. However, when used as a base
they can leave permanent marks on the
cooktop or grates. Cookware properties
are a factor in how quickly and evenly heat
is distributed, which affects cooking results.
A non-stick finish has the same
characteristics as its base material. For
example, a non-stick finish on aluminum
cookware will take on the properties of
aluminum.
Refer to the following chart as a guide to
the physical properties of cookware.
Aluminum
• Heats quickly and evenly.
• Suitable for all types of cooking.
• Medium or heavy thickness is best for
most cooking tasks.
Cast iron
• Heats slowly and evenly.
• Good for browning and frying.
• Maintains heat for slow cooking.
Ceramic or glass-ceramic
• Follow the manufacturer’s instructions.
• Heats slowly but unevenly.
• Best results with low to medium heat
settings.
Copper
• Heats very quickly and evenly.
NOTE: Gently insert racks and
trays into the oven until they come
to a stop.
NOTE: Clean the trays before
using them for the first time to
remove any residues left by the
manufacturing process.
Use
20
Earthenware
• Follow the manufacturer’s instructions.
•Use low heat settings.
Porcelain enameled steel or cast iron
• See stainless steel or cast iron.
Stainless steel
• Heats quickly but unevenly.
• Stainless steel cookware with an
aluminum or copper core or bottom
provides even heating.
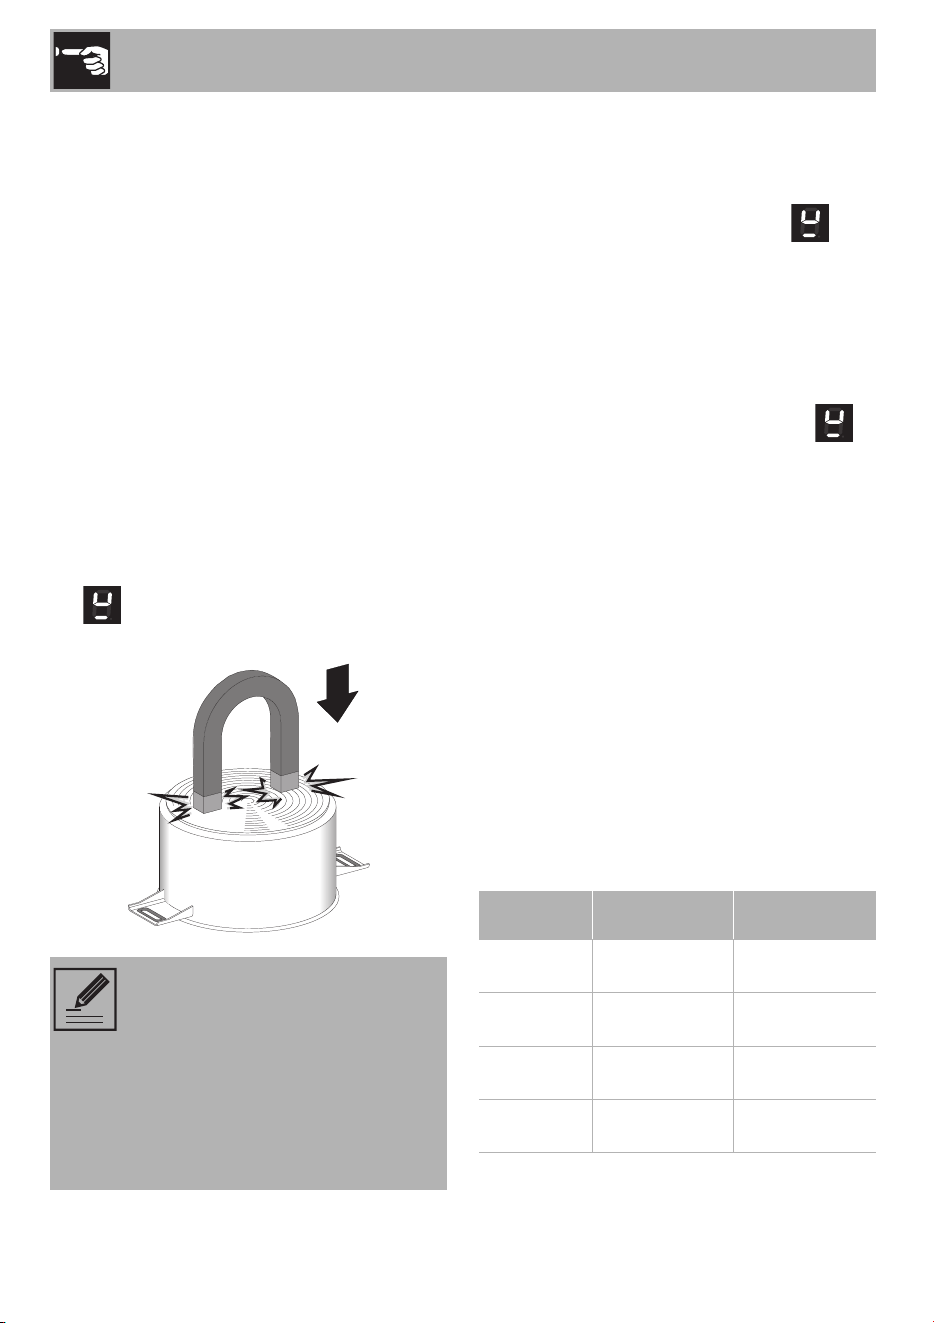
To see whether the pan is suitable, bring a
magnet close to the bottom: if it is attracted,
the pan is suitable for induction cooking. If
you do not have a magnet, you can put a
small amount of water in the pan, place it
on a cooking zone and start the hot plate. If
the symbol appears on the display, it
means the pan is not suitable.
Cookware recognition
When there is no saucepan on a cooking
zone or if the saucepan is too small, no
energy will be transmitted and the
symbol will appear on the display. If there is
a suitable saucepan on the cooking zone,
the recognition system detects it and
switches on the cooktop to the power level
set using the knob. Energy transmission is
also interrupted when the saucepan is
removed from the cooking zone (the
symbol will be shown on the display). If the
cookware recognition function is activated
in spite of the saucepan or frying pan on the
cooking zone being smaller than the zone
itself, only the necessary energy will be
transmitted.
Recommended pan size requirements
USE THE CORRECT SIZE COOKWARE -
The cooking zones available on the
Induction cooktop require a
RECOMMENDED pan size to be used at
each location. We recommend using
cookware with a diameter that allows
efficient cooking. Below is a summary table
showing the recommended diameter of the
cookware for each cooking zone.
*
this measurement refers to the length of an
elongated pan. For its width keep a maximum of
210 mm - 8” 4/16.
Use only cookware with a
perfectly flat bottom which is
suitable for induction hot plates.
Using cookware with an irregular
bottom could jeopardise the
efficiency of the heating system
and prevent cookware from being
detected on the hot plate.
Zone
Cooking zone
mode
Recommended
diameter
1-2-4-5 Single zone
205mm - 8” 1/
16
1-2-4-5
Single zone w/
Bridge
205mm - 8” 1/
16
1-2-4-5
Double zone w/
Bridge
400mm - 15”
3/4 *
3Single zone
270mm - 10”
5/8
Use
21
EN
Limiting the cooking duration
The hob has an automatic device which
limits the duration of use. If the cooking
zone settings are not changed, the
maximum duration of operation for each
zone depends on the power level selected.
When the device for limiting the duration of
use is activated, the cooking zone turns off,
a short alert sounds and, if the zone is hot,
the symbol appears on the display.
Protection from overheating
If the cooktop is used on full power for a
long period, the electronics will have
trouble cooling down if the room temperature
is high. To avoid excessively high
temperatures forming in the electronics, the
power to the cooking zone is reduced
automatically.
Advice on energy-saving
• The diameter of the base of the pan must
correspond to the diameter of the
cooking zone.
• When buying a pan, check whether the
diameter indicated is that of the base or
the top of the pan, as the top is almost
always larger than the base.
• When preparing dishes with long
cooking times, you can save time and
energy by using a pressure cooker,
which also helps to retain vitamins
contained in the food.
• Make sure that the pressure cooker
contains enough liquid as, if there is not
enough and it overheats, this may cause
damage to both the pressure cooker and
the cooking zone.
• If possible, always cover pans with a
suitable lid.
• Choose a pan suitable for the quantity of
food to be cooked. A large, half-empty
saucepan leads to a waste of energy.
Set power level
Maximum cooking
duration in hours
1 8
26
3 - 4 5
54
6 - 7 - 8 - 9 1 ½
P (Boost mode) 10 minutes
NOTE: Under certain
circumstances, if the cooktop and
the oven are being used at the
same time, the maximum power
limit that can be used by the
electrical system might be
exceeded.
Use
22
Switching the cooking zones on
To switch on a cooking zone simply push in
then turn left one of the cooktop cooking
zone knobs until its power level digit
appears on the cooktop display.
To switch a cooking zone off turn the
relative knob to the OFF (0) position.
Power levels
The power in the cooking zone can be
adjusted to various levels. The table shows
the levels suitable for various types of
cooking.
* see boost mode
Residual heat
If the cooking zone is still hot after being
switched off, the symbol will be
displayed on the display. The symbol clears
once the temperature drops below 60°C.
Boost mode
After activating the required cooking zone:
1. Push in a cooking zone knob and turn it
all the way to level 9.
2. Turn the knob again to the position.
3. the symbol appears on the display.
To deactivate Boost mode, simply bring the
knob to the OFF position or select another
power level.
Power level Suitable for:
0OFF setting
Melting butter, chocolate or
similar.
Warming dishes and keeping
small amounts of water boiling,
whisking egg yolk or butter
sauces.
Heating solid or liquid foods,
keeping water boiling, thawing
frozen foods, making 2- or 3-
egg omelets, fruit and vegetable
dishes, various preparations.
1 - 2
Cooking small amounts of food
(minimum power)
3 - 4 Cooking
5 - 6
Cooking large quantities of
food, roasting larger portions
7 - 8 Roasting, slow frying with flour
9Roasting
P *
Roasting / browning, cooking
(maximum power)
Improper use
Danger of burns
• Supervise children carefully as they
cannot easily see the residual heat
indicator. The cooking zones remain hot
for a certain period of time even after
they have been turned off. Make sure
that children never touch the hob.
NOTE: This function allows you to
use the maximum possible power
for a cooking zone
NOTE: After 10 minutes of
operation in Boost mode, the
cooktop automatically brings the
power to level 9.
Use
23
EN
Heating accelerator function
This function allows you to bring the
cooking zone to the selected power level
more quickly than when selecting the power
level.
To activate the Heating accelerator
function:
1. Press and hold a cooking zone knob.
2. Keep the knob pressed and turn it
counterclockwise to position or
until the symbol appears on
the corresponding cooking zone display
(a beep will be emitted).
3. Keep the knob pressed and select the
required power level within 3 seconds.
The corresponding cooking zone
display will show and the selected
power level number alternating.
You can increase the power level at any
time. The “acceleration” time frame will be
modified automatically.
To deactivate the Heating acceleration
function, simply bring the knob to the OFF
position or select a lower power level.
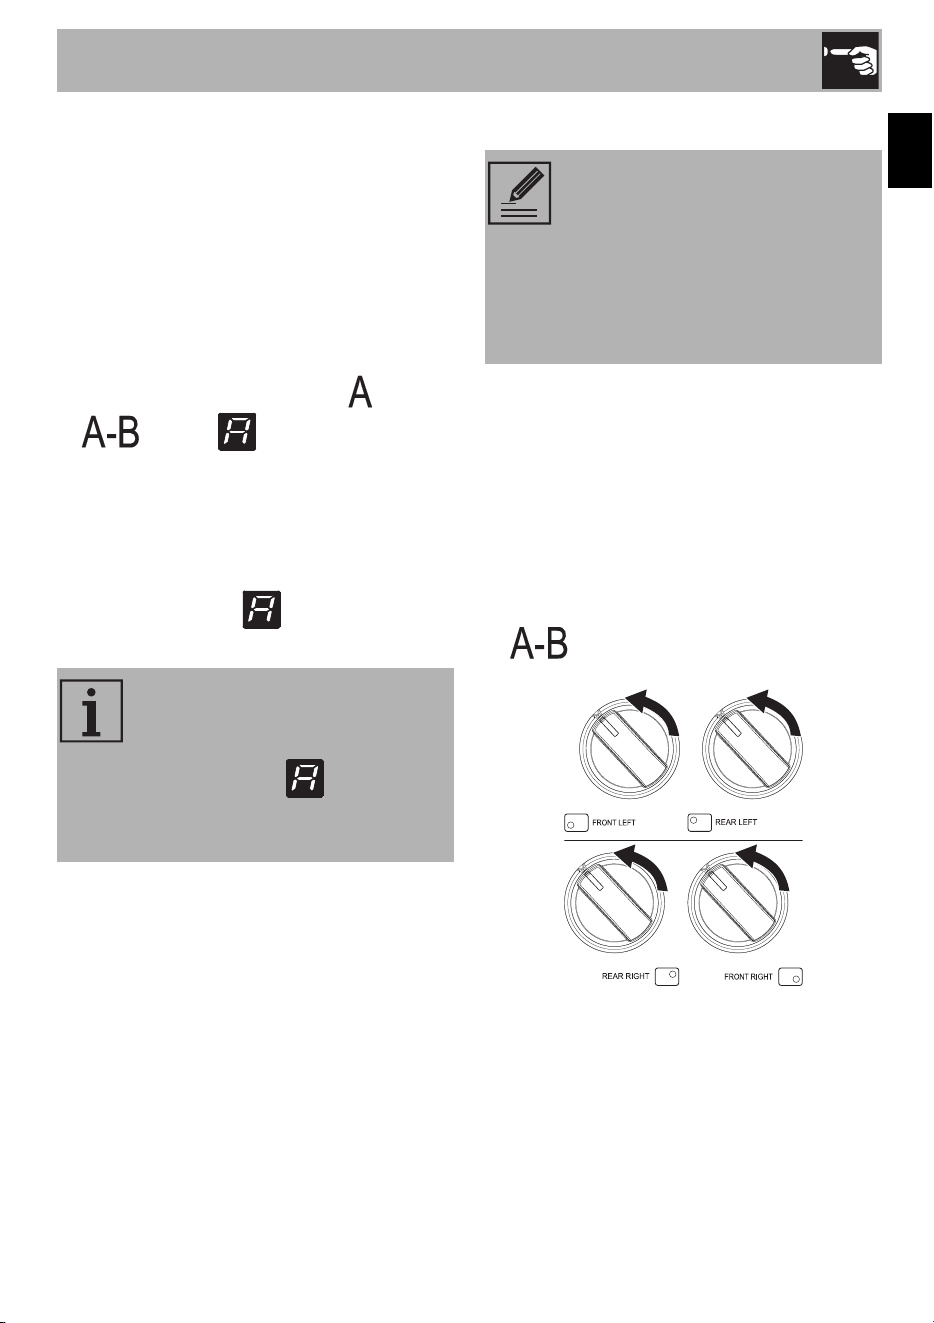
Bridge function
The bridge function allows you to control
two cooking zones simultaneously. This
function is useful when cooking with oblong
cookware such as roasting pans or fish
kettles, or when cooking with two pans at
the same time.
To activate the Bridge function:
1. Press and hold turn the front / rear left or
right knobs counterclockwise to the
positions (a short beep will be
emitted):
NOTE: Once the selected power
level is reached, the Heating
accelerator function will be
deactivated (the symbol will
disappear) and the power level
will remain the selected one.
• This function is only available for
pairs of front and rear zones (1 -
2 and 4 - 5). All the other zone
combinations are not allowed.
• With the bridge function
activated, is it not possible to
activate Boost mode.

Use
24
2. Press and turn the rear left or the front
right cooking zone knobs until you reach
power level 9 (a long beep will be
emitted):
Now both cooking zone displays shows
level 0 and flashing red dots appear on all
displays. The Bridge function is now
activated. You can control both the linked
zones using the front left or rear right
cooking zone knobs.
To deactivate the Bridge function, bring
both knobs to the OFF position.
Control lock function
The control lock is a device that protects the
appliance from accidental or inappropriate
use. Only the cooking zone knobs will be
locked. To activate the Control lock function
press and hold turn the central cooking
zone knob counterclockwise to the
position until all the cooking zone displays
show the symbols (two short beeps will
be emitted in the meantime).
To deactivate the Control lock function,
follow the previous instructions until the
symbols disappears.
• After about 10 seconds without
interacting with the cooktop
knobs, the cooking zone
displays will be turned off. To
check if the Control lock is active
or not, simply try to turn on any
cooking zone.
• When you activate Control lock
function, if you turn and hold the
central cooking zone knob for
more than 30 seconds, the
flashing symbol will appear
as an error message. Release
the knob to remove it.

Use
25
EN
2.4 Using the oven
To switch on the oven:
1. Select the cooking function using the
function knob.
2. Select the temperature using the
temperature knob.
3. If you wish, you can set the a timed
cooking with the programmer clock. If
you avoid using the programmer clock
and thus setting a manual cooking you
have to stop the oven manually by
turning both the temperature and the
function knobs to the OFF position.
Functions list
WARNING
Fire Hazard
• Keep the oven door closed when the
appliance is in use.
NOTE: If there is no power, the
cooling fan will not work. Do not
try to switch on the oven manually.
BAKE
As the heat comes from above and below
at the same time, this system is particularly
suitable for certain types of food. Traditional
cooking, also known as static cooking, is
suitable for cooking just one dish at a time.
Perfect for all types of roasts, bread and
cakes, and in any case, particularly suitable
for fatty meats such as goose and duck.
CONV BOTTOM
The combination of the fan with just the
bottom heating element allows cooking to
be completed more rapidly. This system is
recommended for sterilizing or for finishing
off the cooking of foods which are already
well-cooked on the surface, but not inside,
which therefore need a little more heat.
Perfect for any type of food.
BROIL
Using the heat released from the central
part of the broil element, this function allows
you to grill small portions of meat and fish
for making kebabs, toasted sandwiches
and any types of grilled vegetable side
dishes
BROIL MAX
The heat coming from the whole broil
element gives perfect grilling results above
all for thin and medium thickness meat and
in combination with the rotisserie (where
fitted) gives the food an even browning at
the end of cooking. This function is perfect
for sausages, ribs and ham. This function
enables large quantities of food,
particularly meat, to be grilled evenly.
CONV BROIL
The airflow produced by the fan softens the
strong heatwave generated by the broil
element, grilling perfectly even very thick
foods. Perfect for large cuts of meat (e.g.
shin of pork).
Use
26
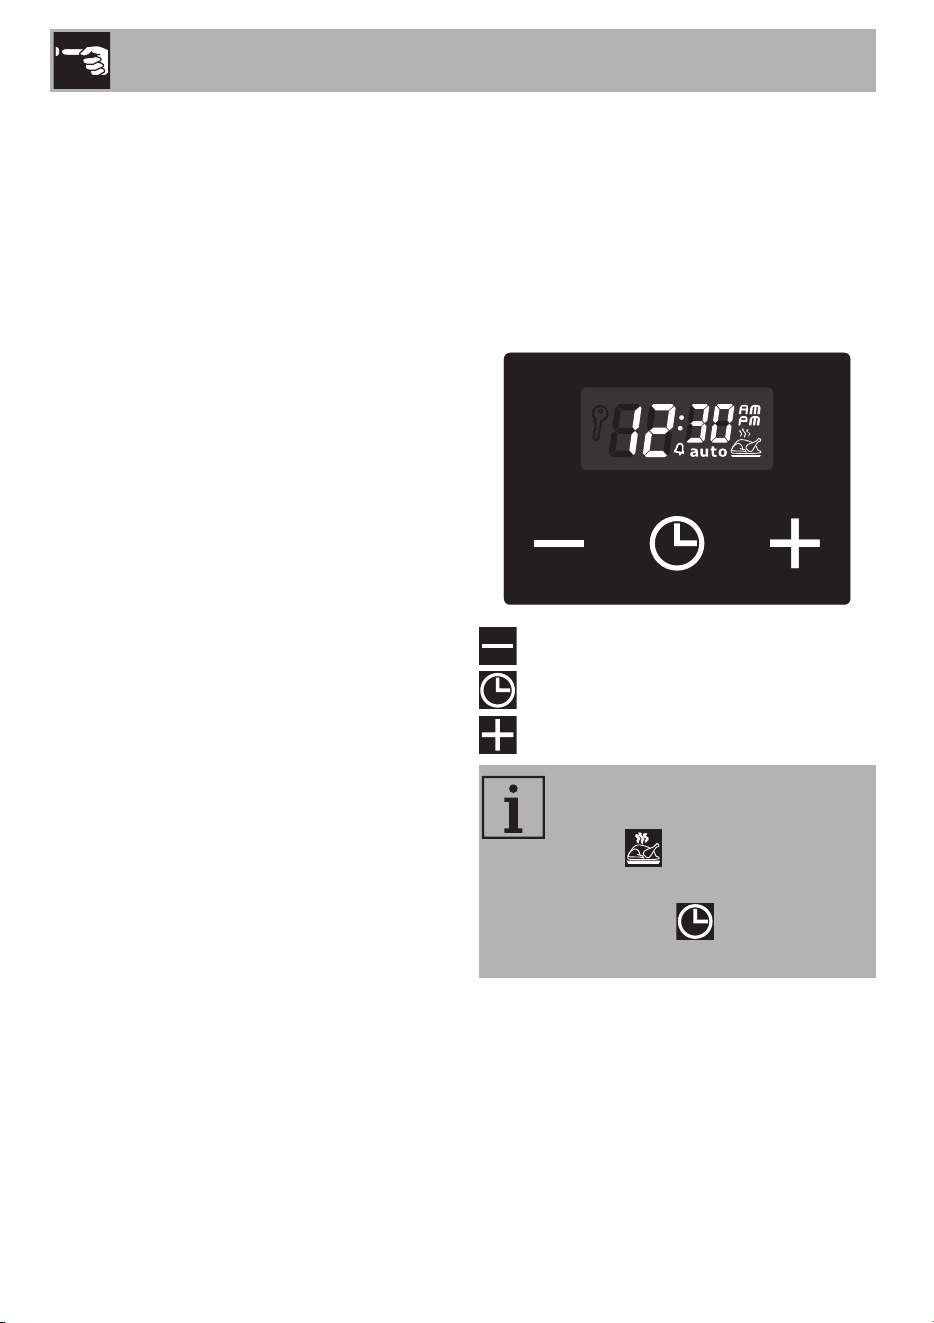
2.5 Programming clock
Value decrease key
Clock key
Value increase key
CONV BAKE
The operation of the fan, combined with
traditional cooking, ensures consistent
cooking even with complex recipes. Perfect
for biscuits and cakes, even when
simultaneously cooked on several levels.
(For multiple-level cooking, we recommend
using the 2nd and 4th shelves)
TRUE CONV
The combination of the fan and the circular
heating element (incorporated in the rear of
the oven) allows you to cook different foods
on several levels, as long as they need the
same temperatures and same type of
cooking. Hot air circulation ensures instant
and even distribution of heat. It will be
possible, for instance, to cook fish,
vegetables and biscuits simultaneously (on
different levels) without odours and flavours
mingling.
STEAM CLEAN
This function makes cleaning easier using
the steam produced by a little quantity of
water poured onto the appropriate groove
placed on the bottom (see “Steam clean
function”).
DEFROST (Rapid)
Rapid defrost is assisted by the activation of
a fan to ensure uniform distribution of room
temperature air inside the oven. This
function can be used for any type of food.
PIZZA
The operation of the fan, combined with the
broil and the bottom heating element,
ensures uniform cooking even with complex
recipes. Perfect not just for pizzas, but also
for biscuits and cakes
Ensure that the programmer clock
shows the cooking duration
symbol , otherwise it will not
be possible to turn on the oven.
Press the key to reset the
programmer clock.
Use
27
EN
Setting the time
On the first use, or after a power failure, the
digits will be flashing on
the appliance’s display.
1. Keep the clock key for two seconds.
The dot between the hours and the
minutes flashes.
2. The time can be set via the value
increase key and value decrease
key . Keep the key pressed in to
increase or decrease rapidly.
3. Wait 7 seconds. The dot between the
hours and the minutes stops flashing.
The symbol on the display indicates
that the appliance is ready to start cooking.
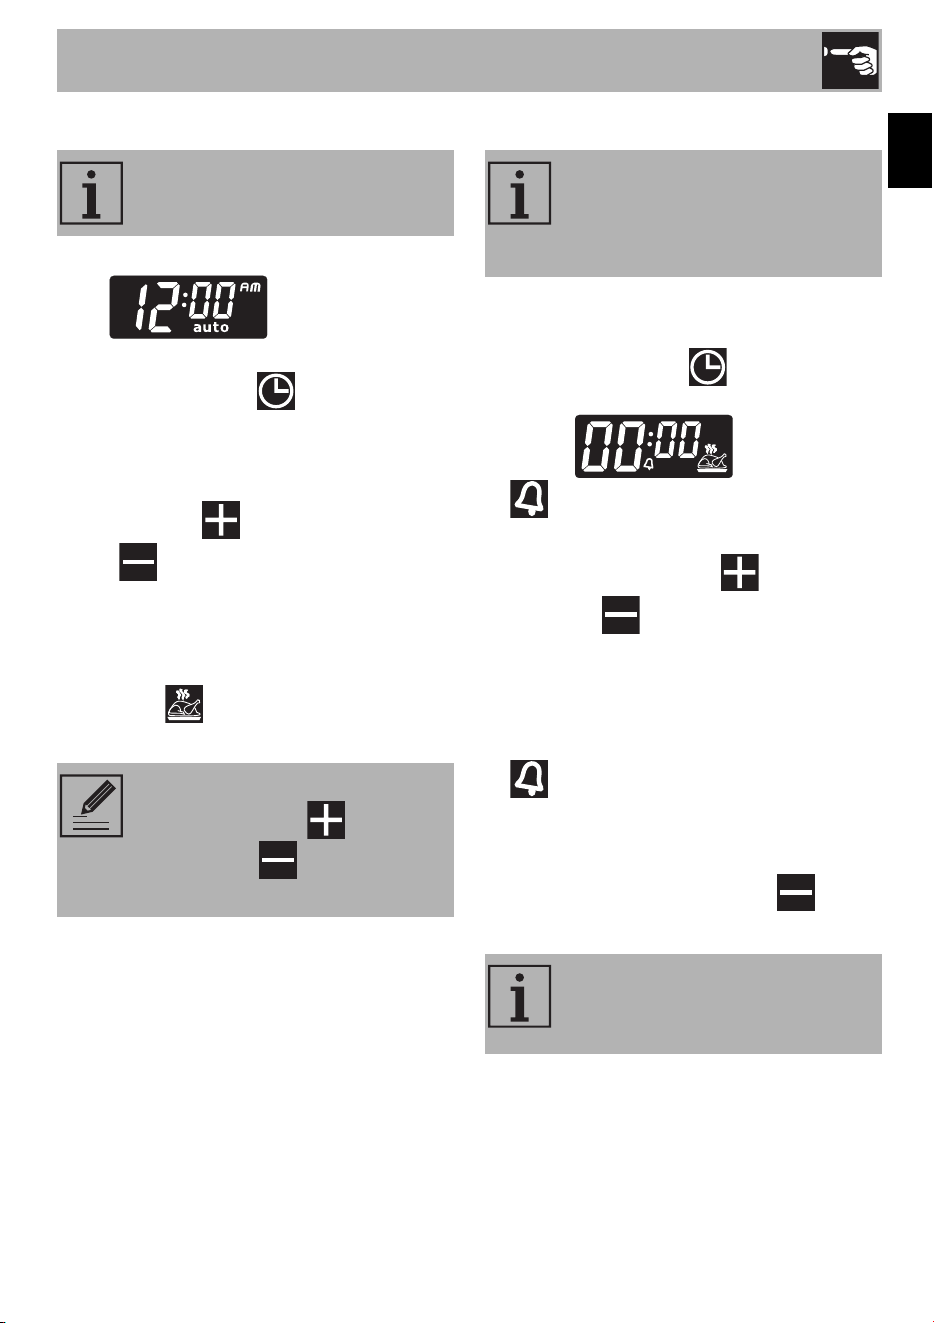
Minute minder timer
The minute minder timer can be activated at
any time.
1. Keep the clock key pressed for a
few seconds. The display shows the
figures and the symbol
flashing between the hours and
minutes.
2. Use the value increase and value
decrease keys to set the number of
minutes required.
3. Wait approx. 5 seconds without pressing
any key to finish setting the minute
minder. The current time and the symbol
appear on the display.
4. A buzzer will sound when the set time is
reached.
5. Press the value decrease key to turn
the buzzer off.
If the time is not set, the oven will
not switch on.
To change the time, hold down the
value increase key and value
decrease key at the same time
for two seconds, then set the time.
The minute minder timer does not
stop the cooking operation but
rather informs the user when the set
time has run out.
The minute minder timer can be set
from 1 minute to a maximum of 23
hours and 59 minutes.

Use
28
Timed cooking
1. Keep the clock key pressed for a
few seconds. The display shows the
figures and the symbol
flashing between the hours and
minutes.
2. Press the clock key again. On the
display the digit
appear alternating with the digit
and the symbol
flashing under the minutes.
3. Use the value increase and value
decrease keys to set the required
minutes of cooking.
4. Select a function and a cooking
temperature.
5. Wait approx. 5 seconds without pressing
any key in order for the function to
activate. The current time and the symbol
will appear on the display.
At the end of cooking the heating elements
will be deactivated. On the display, the
symbol turns off, the symbol
flashes and the buzzer sounds.
6. To turn the buzzer off, simply press one of
the programmer clock keys.
7. Press the clock key to reset the
programmer clock.
Timed cooking is the function
which allows a cooking operation
to be started and then ended after
a specific length of time set by the
user.
It is not possible to set a cooking
time of more than 10 hours.
To cancel the set programming
press and hold down the value
increase and the value
decrease keys at the same
time and then turn the oven off
manually.

Use
29
EN
Programmed cooking
1. Set the cooking time as described in the
previous point “Timed cooking”.
2. Press the clock key again. On the
display the digit
appear alternating with the current timen
digit and the symbol
flashing under the minutes.
3. Use the value increase and value
decrease to set the cooking end
time.
4. Select a function and a cooking
temperature.
5. Wait approx. 5 seconds without pressing
any key in order for the function to
activate. The current time and the symbol
will appear on the display.
The simbol disappear on the
display.
At the end of cooking the heating elements
will be deactivated. On the display, the
symbol turns off, the symbol
flashes and the buzzer sounds.
6. To turn the buzzer off, simply press one of
the programmer clock keys.
7. Press the clock key to reset the
programmer clock.
12h or 24h format
The default mode is 12h format.
1. Keep the value increase key for a
few seconds. The symbols or
disappear on the display and
24h format is set.
2. Keep the value increase key for a
few seconds to return in 12h format.
Selecting the buzzer
The buzzer can have 3 tones.
1. Hold down the value increase and
value decrease keys at the same
time.
2. Press the clock key . On the display
the digit appear.
3. Press the value decrease key to
select a different buzzer tone
( or ).
Programmed cooking is the
function which allows a cooking
operation to be started at a set
time and then ended after a
specific length of time set by the
user.
Use
30
2.6 Using the temperature probe
With the temperature probe, roasts, pork
loin and various cuts and sizes of meat can
be cooked to perfection.
The probe, in fact, allows foods to be
cooked to perfection because it accurately
monitors the core temperature of the food.
The core temperature of the food is
measured by a sensor located in the tip of
the probe.
High temperature of the
temperature probe
Danger of burns
• Do not touch the rod or the tip of the
probe after having used it.
• Wear oven gloves when handling the
temperature probe.
Improper use
Risk of damage to surfaces
• Take care not to scratch or damage
enamelled or chrome-plated surfaces
with the tip or the plug of the
temperature probe.
Improper use
Risk of damage to the appliance
• Do not insert the probe into openings
and slots on the appliance.
• When the probe is not in use, make sure
that the protective cover is properly
closed.
Improper use
Risk of injury
• Do not leave the temperature probe
unattended.
• Do not allow children to play with the
probe.
• Take care not to injure yourself on the
sharp parts of the probe.
Improper use
Risk of damage to temperature
probe
• Do not pull the cable to remove the
probe from the socket or from the food.
• Make sure that the probe or its cable do
not get caught in the door.
• No part of the probe should be allowed
to come into contact with the walls of the
oven cavity, the heating elements, the
racks or the trays when they are still hot.
• When not in use, the probe should not
be kept inside the appliance.
• Make sure the plug of the probe is fully
inserted into the socket.
• Do not use the probe to place food into
or to remove it from the oven cavity.
Use
31
EN
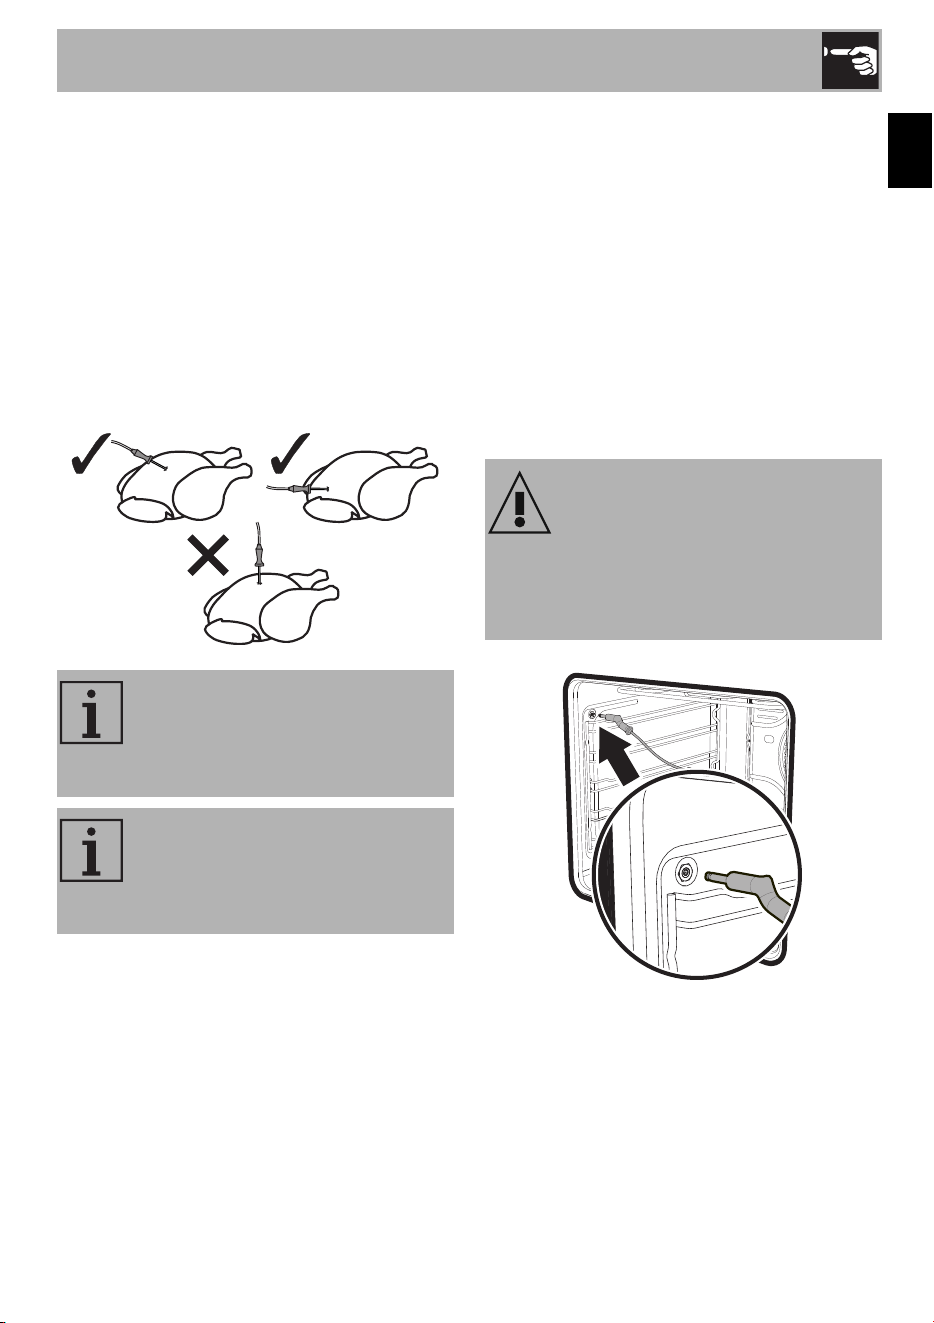
Positioning the probe
1. Place the food on a tray.
2. Insert the tip of the probe into the food
before placing it in the oven.
3. For best results, make sure that the
temperature probe is placed transversely
in the thickest part of the food and for
least 3/4 of its length. Make sure that it
does not touch the tray underneath and
that it does not protrude from the food.
Cooking using the temperature probe
With preheating:
1. Set manual cooking (see “Using the
oven”).
2. After preheating, open the door and
insert the tray onto which the food has
been placed into the appropriate
guides.
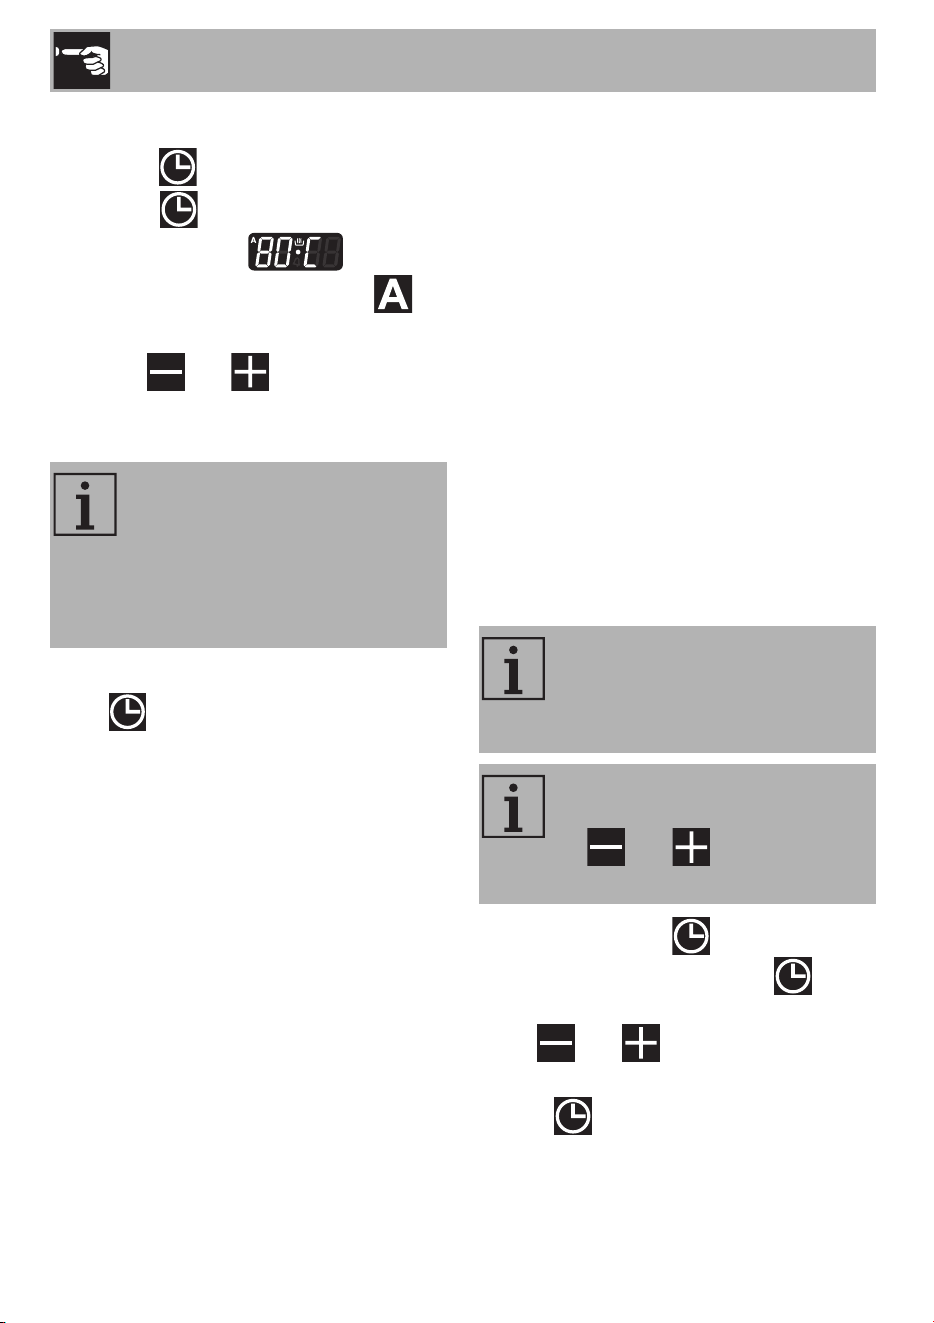
3. Insert the plug of the probe into the
socket at the side, using the probe to
open the cover.
In order for the probe to measure
the core temperature of the food
precisely, its tip must not be in
contact with bones or fat.
The minimum recommended oven
temperature when cooking using
the probe is 250°F, unless slow
cooking is used (see Chap. 2.7).
High temperature inside the oven
during use
Danger of burns
• Wear oven gloves when handling the
temperature probe.
Use
32
4. Close the door.
5. Press the button for a few seconds;
Press the button again. The default
target temperature (176°F) is
indicated on the display and the
symbol flashes.
6. Use the and buttons to regulate
the target temperature to a value
between the minimum and a maximum.
7. Wait for a few seconds and then press
the button to display the
instantaneous temperature measured by
the probe.
Cooking will now continue until the
instantaneous temperature measured by the
probe is the same as the target temperature
set by the user.
Without preheating:
1. Open the door.
2. Put the tray, on which the food has been
placed with the probe in position, into
the oven.
3. Insert the plug of the probe into the
socket at the side, using the probe to
open the cover.
4. Set the cooking using the probe as
indicated in steps 5, 6 and 7 in the
previous section.
5. Set manual cooking by selecting the
temperature and cooking function (see
“Using the oven”).
When cooking with the temperature
probe is in progress
1. Press and hold the button to activate
the minute minder timer; press again
to display the target temperature and use
the and buttons to adjust it
while cooking is in progress.
2. Press again or wait 5 seconds to
return to cooking mode.
• Minimum target temperature:
corresponds to the instantaneous
temperature measured by the
probe plus 2°C (35°F).
• Maximum target temperature:
99°C (210°F)
When the temperature probe is
used, it is not possible to set
programmed cooking or timed
cooking.
When cooking with the
temperature probe is in progress,
the and buttons are
disabled.

Use
33
EN
At the end of cooking
When the set target temperature for the
temperature probe is reached, the heating
elements are switched off and the
appliance emits a series of beeps.
1. Press a button on the programmer clock
to stop the buzzer.
2. Open the door.
3. Remove the probe from the food and
unplug it from the socket.
4. Remove the food from the oven.
5. Make sure that the protective cover is
properly closed.
2.7 Cooking advice
General advice
• Use pans/trays with a maximum width of
13-14” max.
• It is not possible to shorten cooking times
by increasing the temperature (the food
could be overcooked on the outside and
undercooked on the inside).
• It is recommended to preheat the oven
before baking.
• Using several ovens at the same time
might affect the final cooking results.
Advice for cooking meat
• Cooking times vary according to the
thickness and quality of the food and to
consumer taste.
• Turn the food to brown both sides.
• Use a meat thermometer when roasting
meat, or simply press on the roast with a
spoon. If it is hard, it is ready; if not, it
needs another few minutes cooking.
Advice for cooking with the Broiler
• Meat can be grilled even when it is put
into a cold oven or into a preheated
oven if you wish to change the effect of
the cooking.
• When using the Broil function, preheat
the oven for 15 minutes before cooking.
Cooking times may vary depending on
the thickness of the food.
• We recommend placing the food at the
center of the rack.
• Foods should be seasoned before
cooking. Foods should also be coated
with oil or melted butter before cooking.
• Use the oven tray on the first bottom shelf
to collect fluids produced by grilling.
Advice for cooking desserts and biscuits
• Temperature and cooking time depend
on the quality and consistency of the
dough.
• To check whether the dessert is cooked
right through, at the end of the cooking
time, put a toothpick into the highest point
of the dessert. If the batter does not stick
to the toothpick, the dessert is done.
• If the dessert collapses when it comes out
of the oven, on the next occasion reduce
the set temperature by about 50°F,
selecting a longer cooking time if
necessary.
• While cooking desserts or vegetables,
excessive condensation may form on the
glass. In order to avoid this, open the
door very carefully a couple of times
while cooking.

Use
34
Tips for cooking on two shelves:
• Use a fan-assisted function to achieve
uniform cooking at several levels. Use
shelves 2 and 4.
• It is recommended to use 2 racks (can
be requested from Authorized Assistance
Centers).
• To facilitate the flow of air, place the
molds/pans in the center of the racks
and make sure that their width/diameter
does not exceed 11”.
• Position the racks keeping an empty level
between them.
• Depending on the food and the
increased load in the oven, cooking on
two levels may take a few minutes longer
than on a single shelf.
• The functions indicated for cooking on
two shelves are the CONV functions.
Advice for defrosting and proving
• Place frozen foods without their
packaging in a lidless container on the
first shelf of the oven.
• Avoid overlapping the food.
• To defrost meat, use a rack placed on
the second level and a tray on the first
level. In this way, the liquid from the
defrosting food drains away from the
food.
• The tenderest parts of the food can be
protected with aluminum foil.
• For successful rising, a container of water
should be placed at the bottom of the
oven.
To save energy
• Unless otherwise indicated on the
packaging, defrost frozen food before
placing it in the oven.
• In case of multiple cooking, it is
advisable to cook the products one after
the other to make the most of the already
hot oven.
• Use preferably dark metal molds: they
help to absorb the heat better.
• Remove all trays and racks which are not
required during cooking.
• Stop cooking a few minutes before the
time normally used. Cooking will
continue for the remaining minutes with
the heat that has accumulated inside the
oven.
• Reduce any opening of the door to a
minimum to avoid heat dispersal.
• Keep the inside of the appliance clean at
all times.
Slow cooking with the probe
• This cooking mode is recommended for
tender and lean meat whose core
temperature should not exceed 65°C
(149°F). Set the temperature of the oven
to between 90° (194°F) and 100°C
(212°F). This increases the cooking time,
but maintains the quality of the food and
prevents an excessive reduction in its
volume.
• For a better result, before slow cooking,
brown the meat in a pan over high heat
for 1 or 2 minutes on each side.
Use
35
EN
Cooking information table
Preh = preheating
Runner = position from the bottom
Food Weight (Kg) Runner Function Preh
Temperature
(°F)
Time
(minutes)
MEAT
Roast chicken
1.2 2 - 3
CONV BAKE
Yes 450 65 - 70
Roast loin*
1.5 2 - 3
CONV BAKE
Yes 430 65 - 75
* in a pan on a rack.
DESSERTS
White cake
1
1.0 3
BAKE
Yes 350 28 - 30
Biscuits
2
n.9
55 g each.
2
BAKE
Yes 450 10 - 13
CONV BAKE
Sugar cookies
2
n.9
15 g each.
2
CONV BAKE
Yes 350 7 - 8
Apple pie
3
1.7
1.1 apple
3
BAKE
Yes 350 - 375 55 - 65
0.6 dough
Cupcakes
4
n.12
50 g each.
3
BAKE
Yes 350 - 370 25 - 30
1
in cake mold Ø 26 cm.
2
flat tray 33 cm wide on rack.
3
in cake mold Ø 23/25 cm.
4
in muffin mold on oven rack.
GRILLS
1
st
side 2
nd
side
Hamburger
*
n.4
140 g each.
5
BROIL
15’ - 9 6
thickness 1 cm
Sausages*
n.6
180 g each.
4
BROIL
15’ - 15 9
cut and open in half
*
food on rack with container underneath.
VEGETABLES
Roast potatoes*
0.7 2 - 3
CONV BAKE
Yes 450 45 - 50
*
in aluminum tray 28 x 30.
FRESH DOUGHS
Pizza
*
0.5 - 0.6 2
CONV BAKE
Yes MAX 11 - 14
*
in baking tray with low edge Ø 28/30 cm.
FRESH FISH
Bream*
0.6 2 - 3
CONV BAKE
Yes 400 25 - 30
*
in a pan on a rack.
The times indicated in the table do not include preheating times and are provided as a guide only.
Use
36
Temperature probe-cooking information table
Type and cut of meat
Target temperature
(°C)
Target temperature
(°F)
Beef
Roast beef: rare 50 - 53 122 - 127
Roast beef: medium 55 - 58 131 - 136
Roast beef: well done 65 - 70 149 - 158
Rib of beef: rare* 50 122
Rib of beef: medium* 58 136
Rib of beef: well done* 70 158
Pork
Roast loin 80 - 85 176 - 185
Shoulder 80 - 85 176 - 185
Sausages** 75 - 80 167 - 176
Veal
Veal roast 75 - 80 167 - 176
Poultry
Whole chicken 80 - 85 176 - 185
Whole turkey 80 - 85 176 - 185
Roast turkey (whole or breast) 80 - 85 176 - 185
Lamb
Leg of lamb with bone (rare) 65 149
Leg of lamb with bone (well done) 75 - 80 167 - 176
Slow cooking
Beef / roast beef: rare*** 50 - 54 122 - 129
Beef / roast beef: medium*** 55 - 60 131 - 140
* Cooking times vary according to the thickness of the fillet.
** For sausages, it is recommended to select a suitable function to ensure
they are well grilled externally.
*** It is recommend to brown the meat on each side in a pan for a few
minutes before putting it in the oven.

Cleaning and Maintenance
37
EN
3 Cleaning and maintenance
3.1 Instructions
Recommendations
To keep the surfaces in good condition,
they should be cleaned regularly after use.
Let them cool first.
Regular daily cleaning
Always use only specific products that do
not contain abrasives or chlorine-based
acids.
Pour the product onto a damp cloth and
wipe the surface, rinse thoroughly and dry
with a soft cloth or a microfiber cloth.
Food stains or residues
Do not use metallic sponges or sharp
scrapers as they will damage the surfaces.
Use ordinary non-abrasive products with
the aid of wooden or plastic utensils if
necessary. Rinse thoroughly and dry with a
soft cloth or a microfiber cloth.
Do not allow residues of sugary foods (such
as jam) to set inside the oven. If allowed to
set for too long, sugar residue could pit the
enamel lining of the oven.
WARNING
Electrical Shock Hazard
• Before servicing, disconnect the
appliance from the power supply.
WARNING
Risk of damage to surfaces
Improper use
• Do not use steam jets to clean the
appliance.
• Do not use cleaning products containing
chlorine, ammonia or bleach on steel
parts or parts with metallic finishes on the
surface (e.g. anodizing, nickel- or
chromium-plating).
• Do not use abrasive or corrosive
detergents on glass parts (e.g. powder
products, stain removers and metallic
sponges).
• Do not use rough or abrasive materials
or sharp metal scrapers.
• Keep cooktop area clear and free from
combustible materials, gasoline other
flammable vapors and liquids.
• Do not obstruct the flow of combustion
and ventilation air.
NOTE: We recommend the use of
cleaning products distributed by
the manufacturer.
NOTE: After cleaning, dry the
appliance thoroughly to prevent
any water or detergent from
interfering with its operation or
creating unsightly marks.

Cleaning and Maintenance
38
3.2 Cleaning the cooktop
Cleaning the glass ceramic surface
Light coloured marks from pans with
aluminium bases can be easily cleaned off
with a cloth moistened in vinegar. After
cooking, remove any burnt residues; rinse
with water and dry thoroughly with a clean
cloth.
Dirt which may have fallen on the hob
while cleaning lettuce or potatoes can
scratch the hob when moving pans.
Consequently, remove any dirt from the
cooking surface immediately.
Changes in colour do not affect the
operation and stability of the glass. These
are not alterations to the material of the hob
but just residues which have not been
removed and have then carbonised.
Shiny surfaces can form due to the bases
of pans, especially aluminium ones, rubbing
on the surface, and due to the use of
unsuitable detergents. They are difficult to
remove using conventional cleaning
products. It may be necessary to repeat the
cleaning process several times. Use of
corrosive detergents or rubbing of pan
bases can wear away the decoration on
the hob over time and contribute to the
formation of stains.
Weekly cleaning
Clean and maintain the hob once a week
using an ordinary glass ceramic cleaning
product. Always follow the manufacturer’s
instructions. The silicon in these products
creates a protective, water-repellent
membrane which also resists dirt. All marks
stay on the membrane and can therefore be
removed easily. After cleaning, dry the
surface with a clean cloth. Make sure that
there is no detergent left on the cooking
surface as it might undergo an aggressive
reaction when heated up and could modify
the structure of the cooking surface.
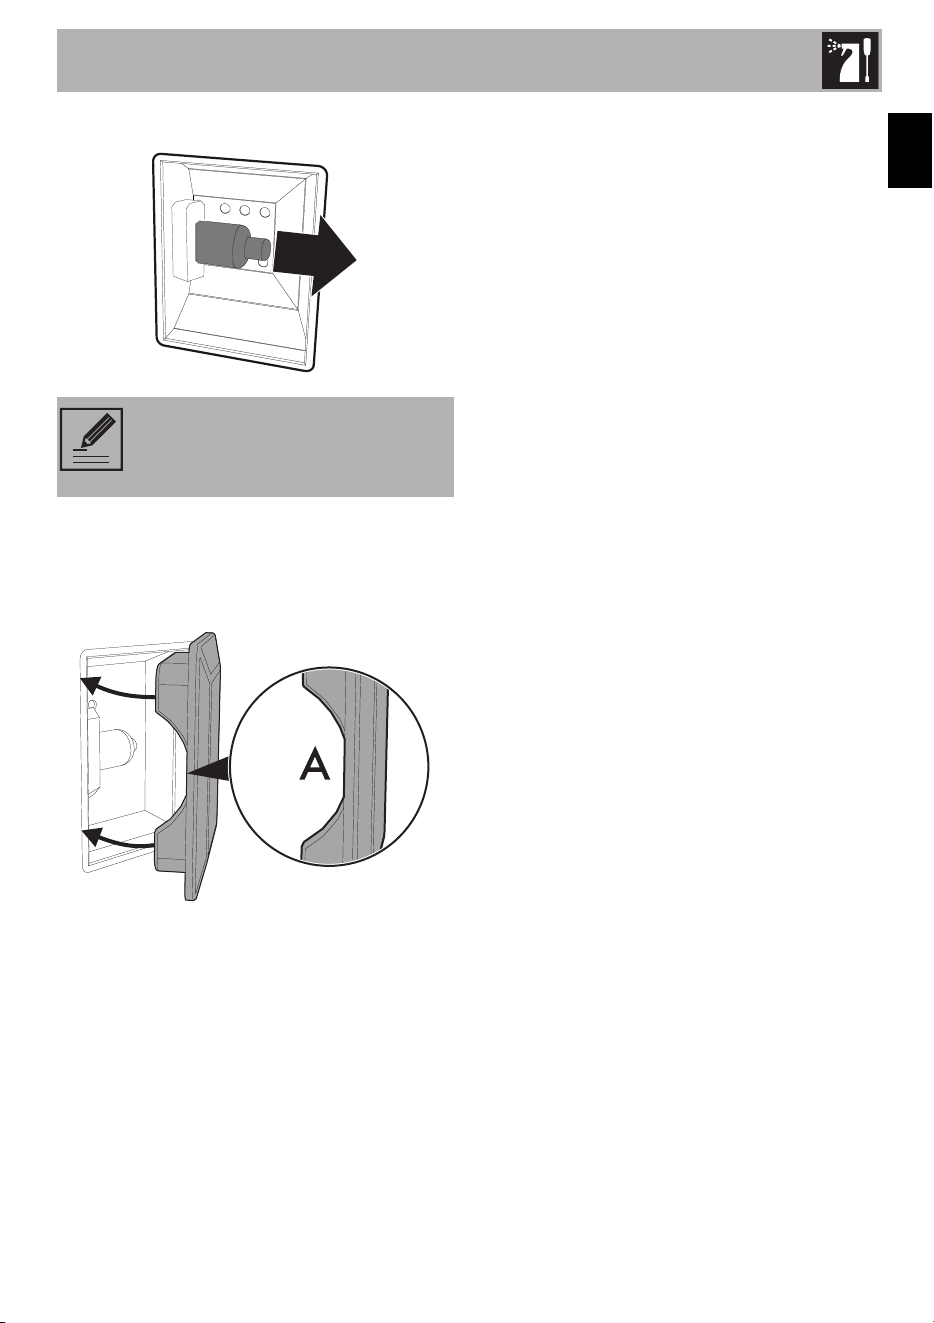
Knobs
The knobs should be cleaned with a soft
cloth dampened with lukewarm water, then
dried carefully. They can be removed by
pulling them out from their housings.
NOTE: Do not use aggressive
products containing alcohol or
products for cleaning steel and
glass when cleaning the knobs, as
these products could cause
permanent damage.
Cleaning and Maintenance
39
EN
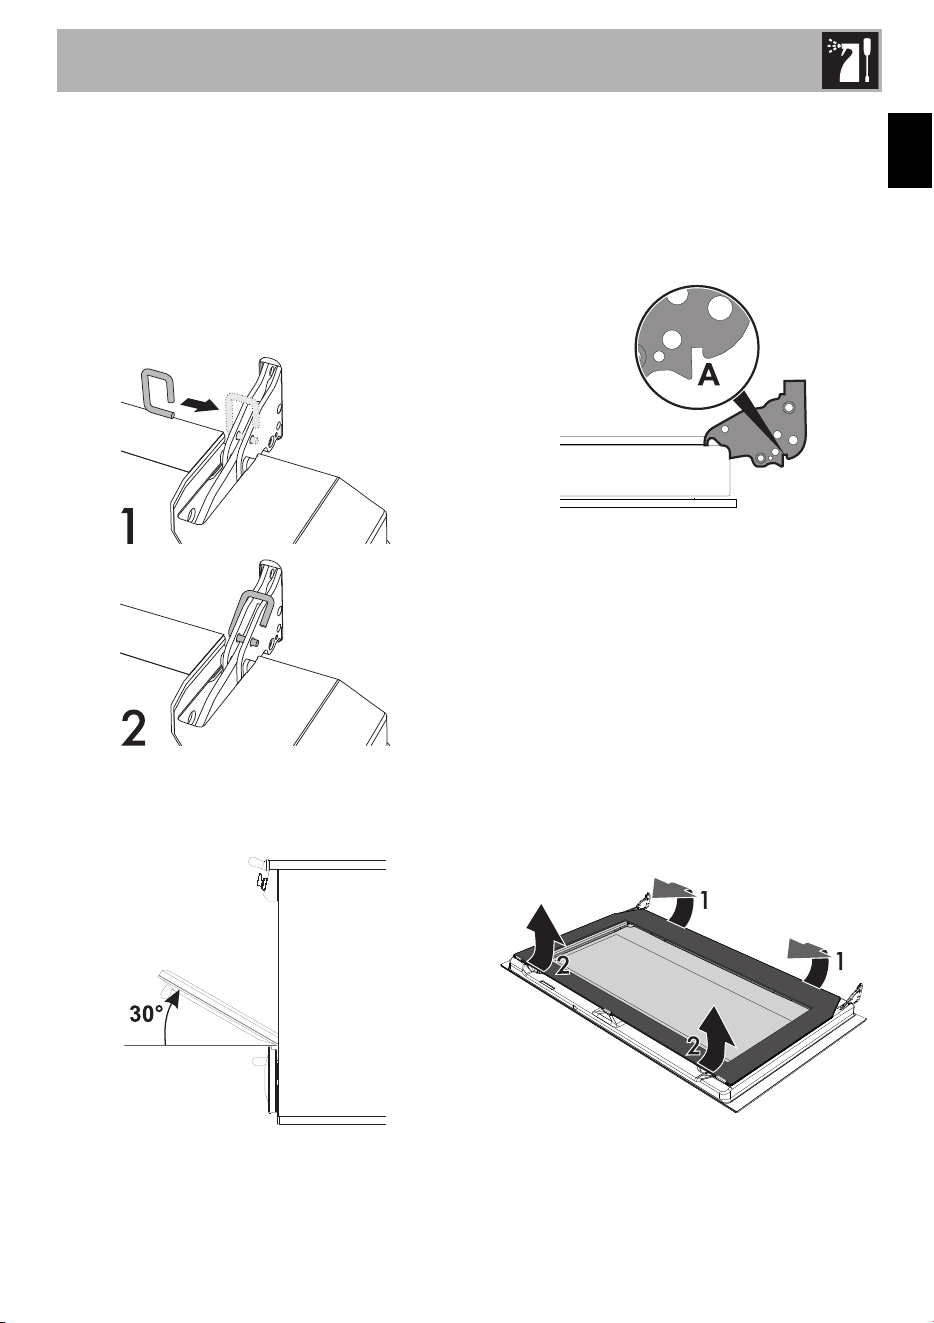
Removing the oven door
To facilitate cleaning, we recommend that
you remove the door and place it on a
towel.
To remove the door, proceed as follows:
1. Open the door completely and insert two
pins into the holes in the hinges, as
shown in the image.
2. Grasp the door on both sides with both
hands, lift it forming an angle of around
30° and remove it.
3. To reassemble the door, put the hinges in
the relevant slots in the oven, making sure
that the grooved sections A are resting
completely in the slots. Lower the door
and once it is in place remove the pins
from the holes in the hinges.
Cleaning the oven door glass
The oven door glass should always be kept
thoroughly clean. Use absorbent kitchen
roll. In case of stubborn dirt, wash with a
damp sponge and an ordinary detergent.
Removing the internal glass panes
To facilitate cleaning, the internal glass
panes of the door can be removed.
1. Pull the rear part of the internal glass
pane gently upwards, following the
movement indicated by the arrows (1).
Cleaning and Maintenance
40
2. Extract the internal glass pane from the
front strip (2) to remove it from the door.
3. Remove the intermediate glass pane by
lifting it upwards.
4. Clean the external glass pane and the
panes that were previously removed.
Use absorbent kitchen roll. In case of
stubborn dirt, wash with a damp sponge
and neutral detergent.
5. When you have finished cleaning, put
back the intermediate glass pane into its
housing in the door.
6. To put back the internal glass pane, slide
the upper part into the door strip and
insert the two rear pins into their seats by
pressing lightly.
3.3 Cleaning the oven cavity
In order to keep your oven in the best
possible condition, clean it regularly after
letting it cool down.
Avoid letting food residue dry inside the
oven cavity, as this could damage the
enamel.
Take out all removable parts before
cleaning.
For easier cleaning, we recommend
removing:
•the door;
• the rack/tray supports;
• removable guides, where fitted;
•the seal.
NOTE: If you use specific cleaning
products, we recommend running
the oven at maximum temperature
for 15-20 minutes in order to
eliminate any residues.
Cleaning and Maintenance
41
EN
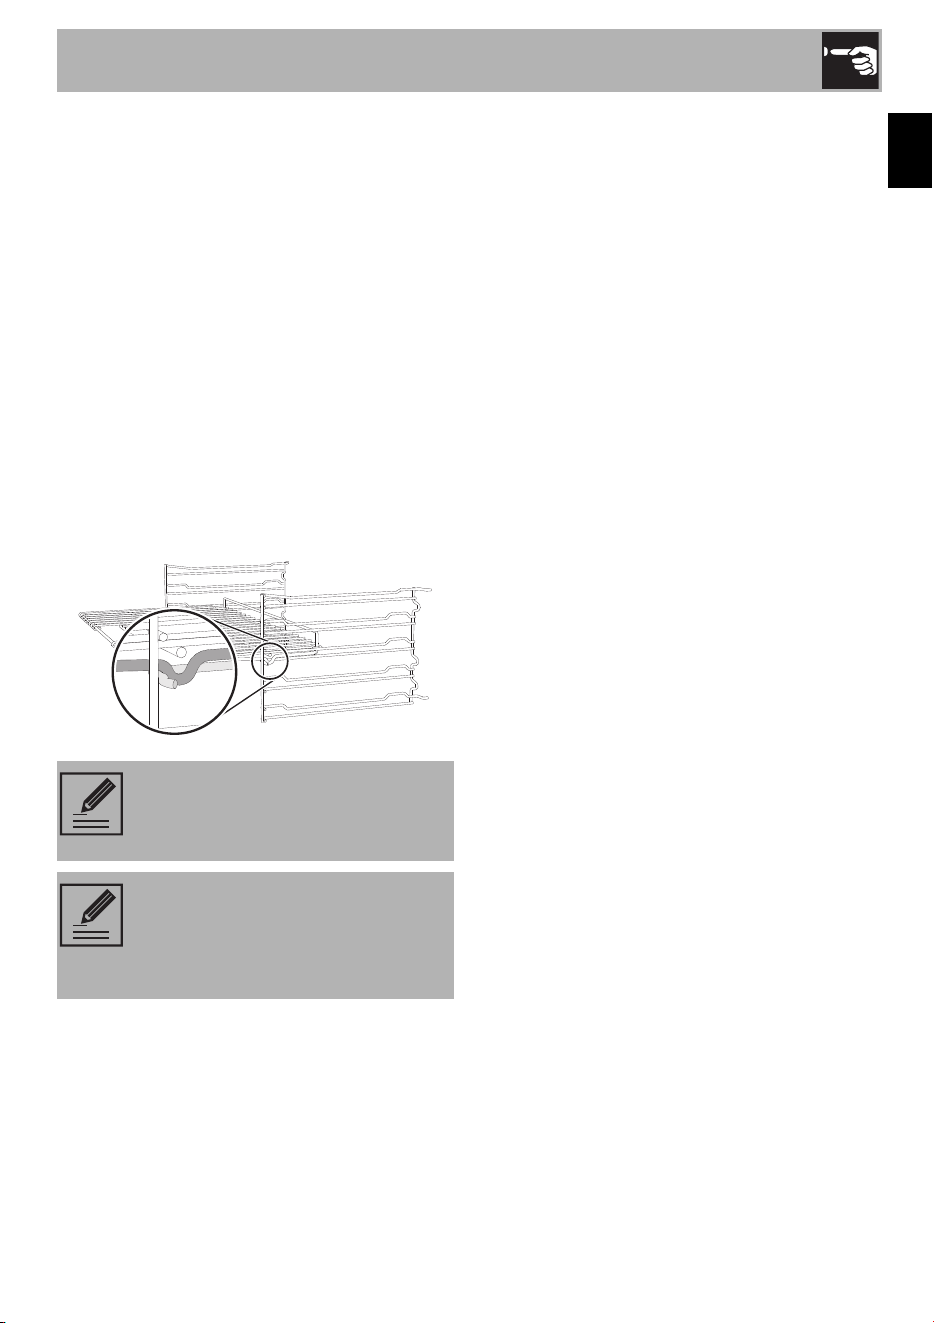
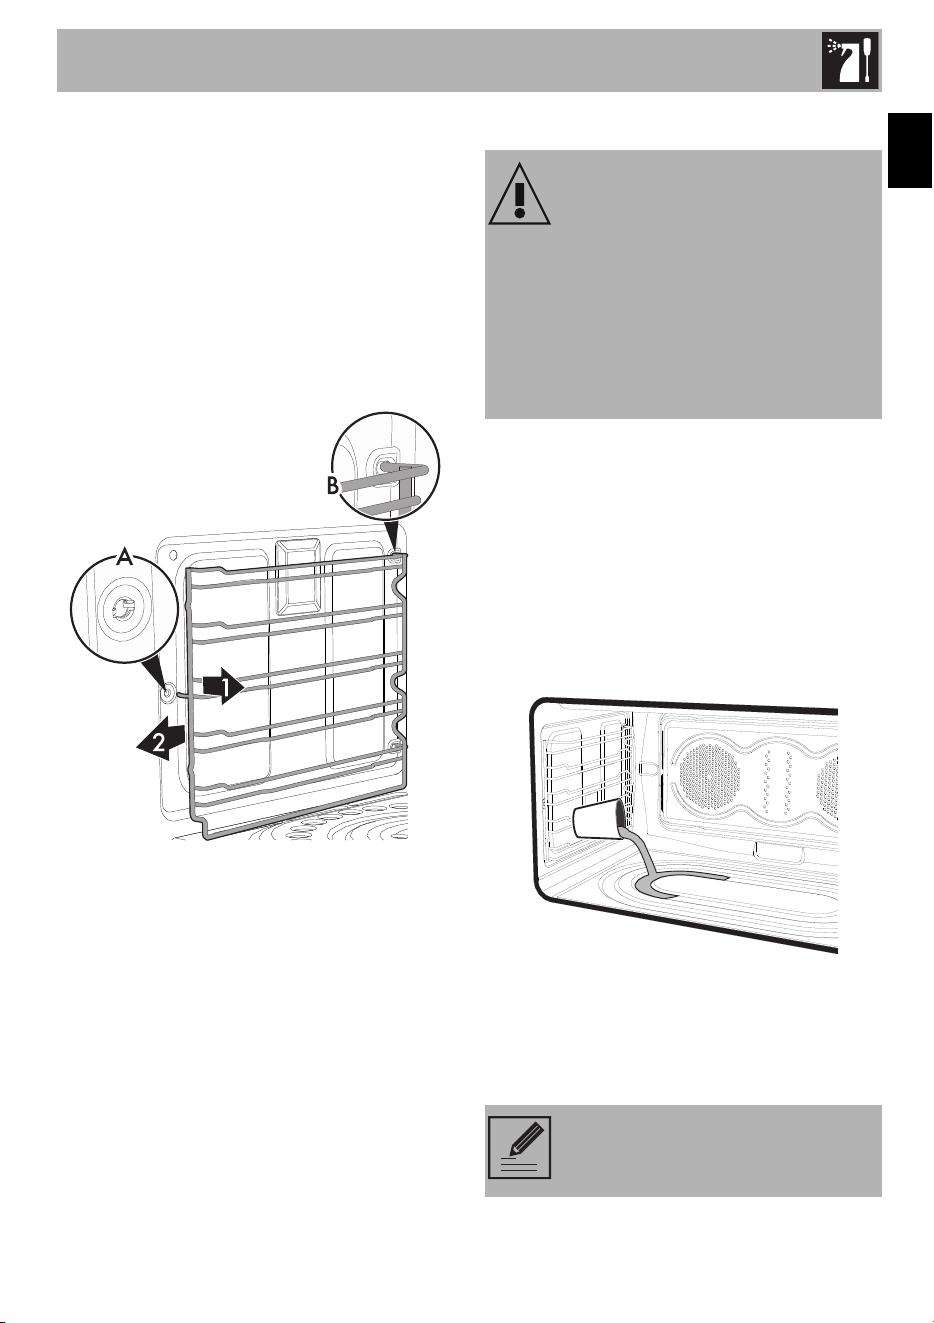
Removal of the rack/tray supports
Removing the guide frames makes it easier
to clean the sides of the oven. This must be
done each time you use the automatic
cleaning cycle (only on some models).
To remove the guide frames:
• Pull the frame towards the inside of the
oven to unhook it from its housing A, and
then slide it out of the grooves at the
back B.
• When you have finished cleaning the
oven, repeat the procedures indicated
above in reverse to replace the guide
frames.
3.4 Steam clean function
Preliminary operations
Before starting the Steam clean function:
1. Completely remove all accessories from
inside the oven. The upper guard can be
left inside the oven.
2. Pour approximately 13.5 fl. oz. (400 cc -
1.7 cup) of water onto the bottom of the
oven. Make sure it does not overflow out
of the cavity.
3. Spray a water and washing up liquid
solution inside the oven using a spray
nozzle. Direct the spray towards the side
walls, upwards, downwards and
towards the deflector.
4. Close the door.
CAUTION
Improper use
Risk of damaging the surfaces
• Remove any food residues or large spills
from previous cooking operations from
the inside of the oven.
• Carry out steam assisted oven cleaning
operations only when the oven is cold.
We recommend spraying
approx. 20 times at the most.
Cleaning and Maintenance
42
Steam clean settings
1. Turn the function knob to the STEAM
CLEAN position and the temperature
knob to 150°F (65°C)
2. Set a cooking time of 45 minutes using
the programmer clock.
3. At the end of the cooking time, the timer
will switch the oven heating elements off
and the buzzer will start to sound.
End of the Steam clean function
1. Open the door and wipe away the less
stubborn dirt with a damp cloth.
2. Use a non-scratch sponge with brass
filaments to remove hard deposits.
3. In case of grease residues use specific
oven cleaning products.
4. Remove the water left inside the oven.
For improved hygiene and to avoid food
being affected by any unpleasant odours,
we recommend that the oven is dried using
a convection function at 300°F for
approximately 10 minutes.
3.5 Special maintenance
Seal maintenance tips
The seal should be soft and elastic.
• To clean the seal, use a non-abrasive
sponge and wash with lukewarm water.
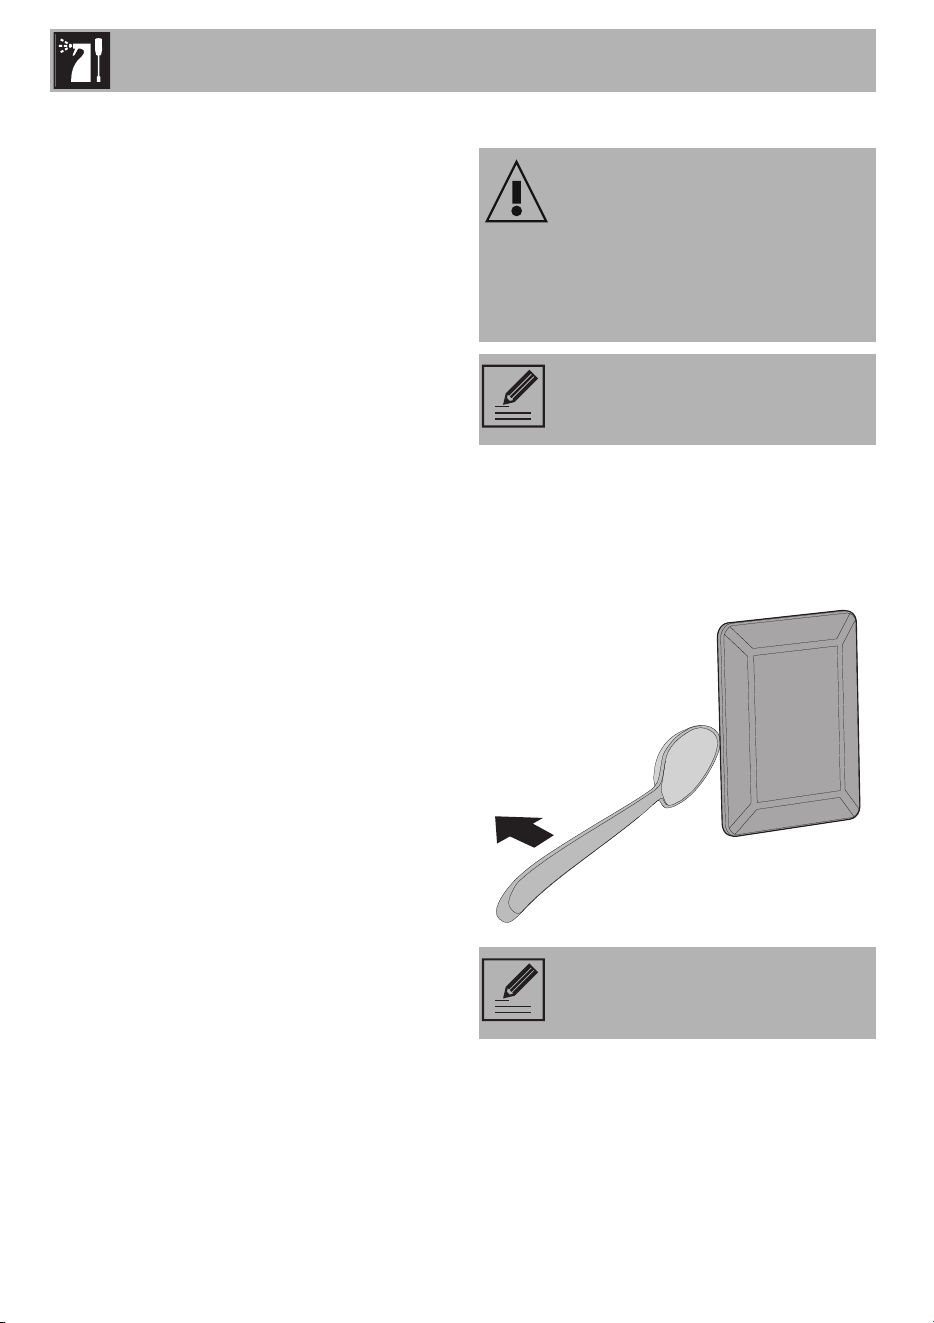
Replacing the internal light bulb
1. Completely remove all accessories from
inside the oven.
2. Remove the rack/tray supports.
3. Use a tool (e.g. a spoon) to remove the
bulb cover.
WARNING
Danger of electrocution
• Unplug the appliance.
• Use protective gloves.
NOTE: The oven is fitted with two
40W light bulbs.
NOTE: Pay attention not to scratch
the oven cavity enamel.
Cleaning and Maintenance
43
EN
4. Loosen and remove the light bulb.
5. Replace the bulb with a similar one
(40 W).
6. Reattach the cover. Leave the inside of
the glass molding (A) facing the door.
7. Press the cover firmly so that it adheres
tightly to the light bulb holder.
Do not touch the halogen bulb with
your fingers; cover it with an
insulating cloth.

PAGE INTENTIONALLY LEFT BLANK