
Owner's Manual
ICR"FT=M",.,Wl
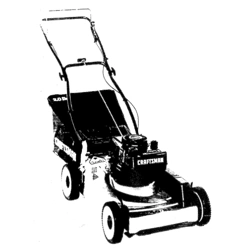
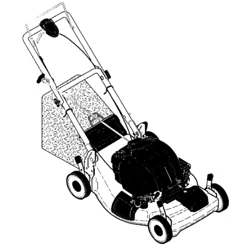
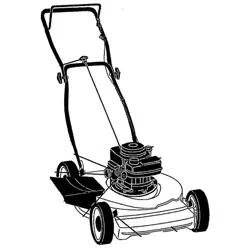
6.75 HORSEPOWER
22" REAR DISCHARGE
POWER PROPELLED
ROTARY LAWN MOWER
Model No.
917.377190
• Safety
• Assembly
• Operation
• Maintenance
• Espa_ol
• Repair Parts
CAUTION:
Read and follow all
Safety Rules and Instructions
beforeoperatingthisequipment
Sears, Roebuck and Co., Hoffman Estates, IL 60179
Visit our Craftsman website: www.sears.com/craftsman
Warranty 2 Product Specifications 11
Safety Rules 2 Service and Adjustments 14
Assembly 4 Storage 16
Operation 6 Troubleshooting 17
Maintenance Schedule 10 Repair Parts 37
Maintenance 10 Parts Ordering Back Cover
LIMITED TWO YEAR WARRANTY ON CRAFTSMAN POWER MOWER
For two years from date of purchase, when this Craftsman Lawn Mower is maintained,
lubricated, and tuned up according to the operating and maintenance instructions in the
owner's manual, Sears will repair free of charge any defect in material or workmanship.
If this Craftsman Lawn Mower is used for commercial or rental purposes, this warranty
applies for only 90 days from the date of purchase.
This Warranty does not cover:
• Expendable items which become worn during normal use, such as rotary mower
blades, blade adapters, belts, air cleaners and spark plug.
• Repairs necessary because of operator abuse or negligence, including bent crank-
shafts and the failure to maintain the equipment according to the instructions con-
tained in the owner's manual.
Warranty service is available by returning the Craftsman power mower to the nearest
Sears Service Center/Department in the United States. This warranty applies only while
this product is in use in the United States.
This Warranty gives you specific legal rights, and you may also have other rights which
vary from state to state.
SEARS, ROEBUCKAND CO., 13/817 WA, HOFFMAN ESTATES, ILLINOIS 60179
Safety standards require operator
presence controls to minimize the
risk of injury. Your unit is equipped
with such controls. Do not attempt to
defeat the function of the operator
presence controls under any
circumstances.
TRAINING:
• Road this operator's manual carefully.
Become familiar with the controls and
know how to operate your mower
properly. Learn how to quickly stop
mower,
• Do not allow children to use your mower.
Never allow adults to use mower without
proper instructions.
• Keep the area of operation clear of all
persons, especially small children and
pets.
• Use mower only as the manufacturer
intended and as described in this
manual.
2
• Do not operate mower if it has been
dropped or damaged in any manner.
Always have damage repaired before
using your mower.
• Do not use accessory attachments that
are not recommended by the manufac-
turer. Use of such attachments may be
hazardous.
• The blade turns when the engine is
running.
PREPARATION:
• Always thoroughly check the area to be
mowed and clear it of all stones, sticks,
wires, bones, and other foreign objects.
These objects will be thrown by the
blade and can cause severe injury.
• Always wear safety glasses or eye
shields when starting and while using
your mower.
• Dress properly. Do not operate mower
when barefoot or wearing open sandals.
Wear only solid shoes with good traction
when mowing.
• Check fuel tank before startingengine.
Do not fill gas tank indoors,when the
engine is runningor when the engine is
hot. Allow the engine to coolfor several
minutes before filling the gas tank. Clean
off any spilled gasoline before starting
the engine.
• Always make wheel height adjustments
before startingyour mower. Never
attempt to do this while the engine is
running.
• Mow only in daylightor good artificial
light.
OPERATION:
• Keep your eyes and mind on your
mower and the area being cut. Do not let
other interests distractyou.
• Do not mow wet or slipperygrass. Never
run while operating your mower. Always
be sure ofyour footing -- keep a firm
hold on the handles and walk.
• Do not put hands or feet near or under
rotatingparts. Keep clear of the dis-
charge opening at all times.
• Always stop the engine whenever you
leave or are not using your mower, or
before crossing driveways, walks, roads,
and any gravel--covered areas.
• Never direct discharge of material
toward bystanders nor allow anyone
near the mower while you are operating
it.
• Before cleaning, inspecting, or repairing
your mower, stop the engine and make
absolutely sure the blade and all moving
parts have stopped. Then disconnect the
spark plug wire and keep it away from
the spark plug to prevent accidental
starting.
• Do not continue to run your mower if you
hit a foreign object. Follow the procedure
outlined above, then repair any damage
before restarting and operating you
mower.
• Do not change the governor settings or
overspeed the engine. Engine damage
or personal injury may result.
• Do not operate your mower if it vibrates
abnormally. Excessive vibration is an
indication of damage; stop the engine,
safely check for the cause of vibration
and repair as required.
• Do not run the engine indoors. Exhaust
fumes are dangerous.
• Never cut grass by pulling the mower
towards you. Mow across the face of
slopes, never up and down oryou
might lose your footing. Do not mow
excessively steep slopes. Use caution
when operating the mower on uneven
terrain or when changing directions--
maintain good footing.
• Never operate your mower without
proper guards, plates, grass catcher or
other safety devices in place.
MAINTENANCE AND STORAGE:
• Check the blade and the engine
mountingbolts often to be surethey are
tightened properly.
• Check all bolts, nuts and screws at
frequent intervalsfor proper tightnessto
be sure mower is in safe working
condition.
• Keep all safety devices in place and
working.
• To reduce fire hazard, keep the engine
free of grass, leaves or excessive
grease and oil.
• Check grass catcher often for deteriora-
tion and wear and replace worn bags.
Use only replacement bags that are
recommended by and complywith
specificationsof the manufacturer of
your mower.
• Always keep a sharp blade on your
mower.
• Allow engine to cool before storing in
any enclosure.
• Never store mower with fuel in the tank
inside a buildingwhere fumes may
reach an open flame or an ignition
source such as a hotwater heater,
space heater, clothes dryer, etc.
_i,Look for this symbol to point out
important safety precautions. It means
CAUTION!!! BECOMEALERT!!! YOUR
SAFETY IS INVOLVED.
_CAUTION: Always disconnect spark
plug wire and place wire where it cannot
contact spark plug in order to prevent
accidental starting when setting up,
transporting, adjusting or making repairs.
_,WARNING
The engine exhaust from this product
contains chemicals known to the State of
California to cause cancer, birth defects,
or other reproductive harm.
3
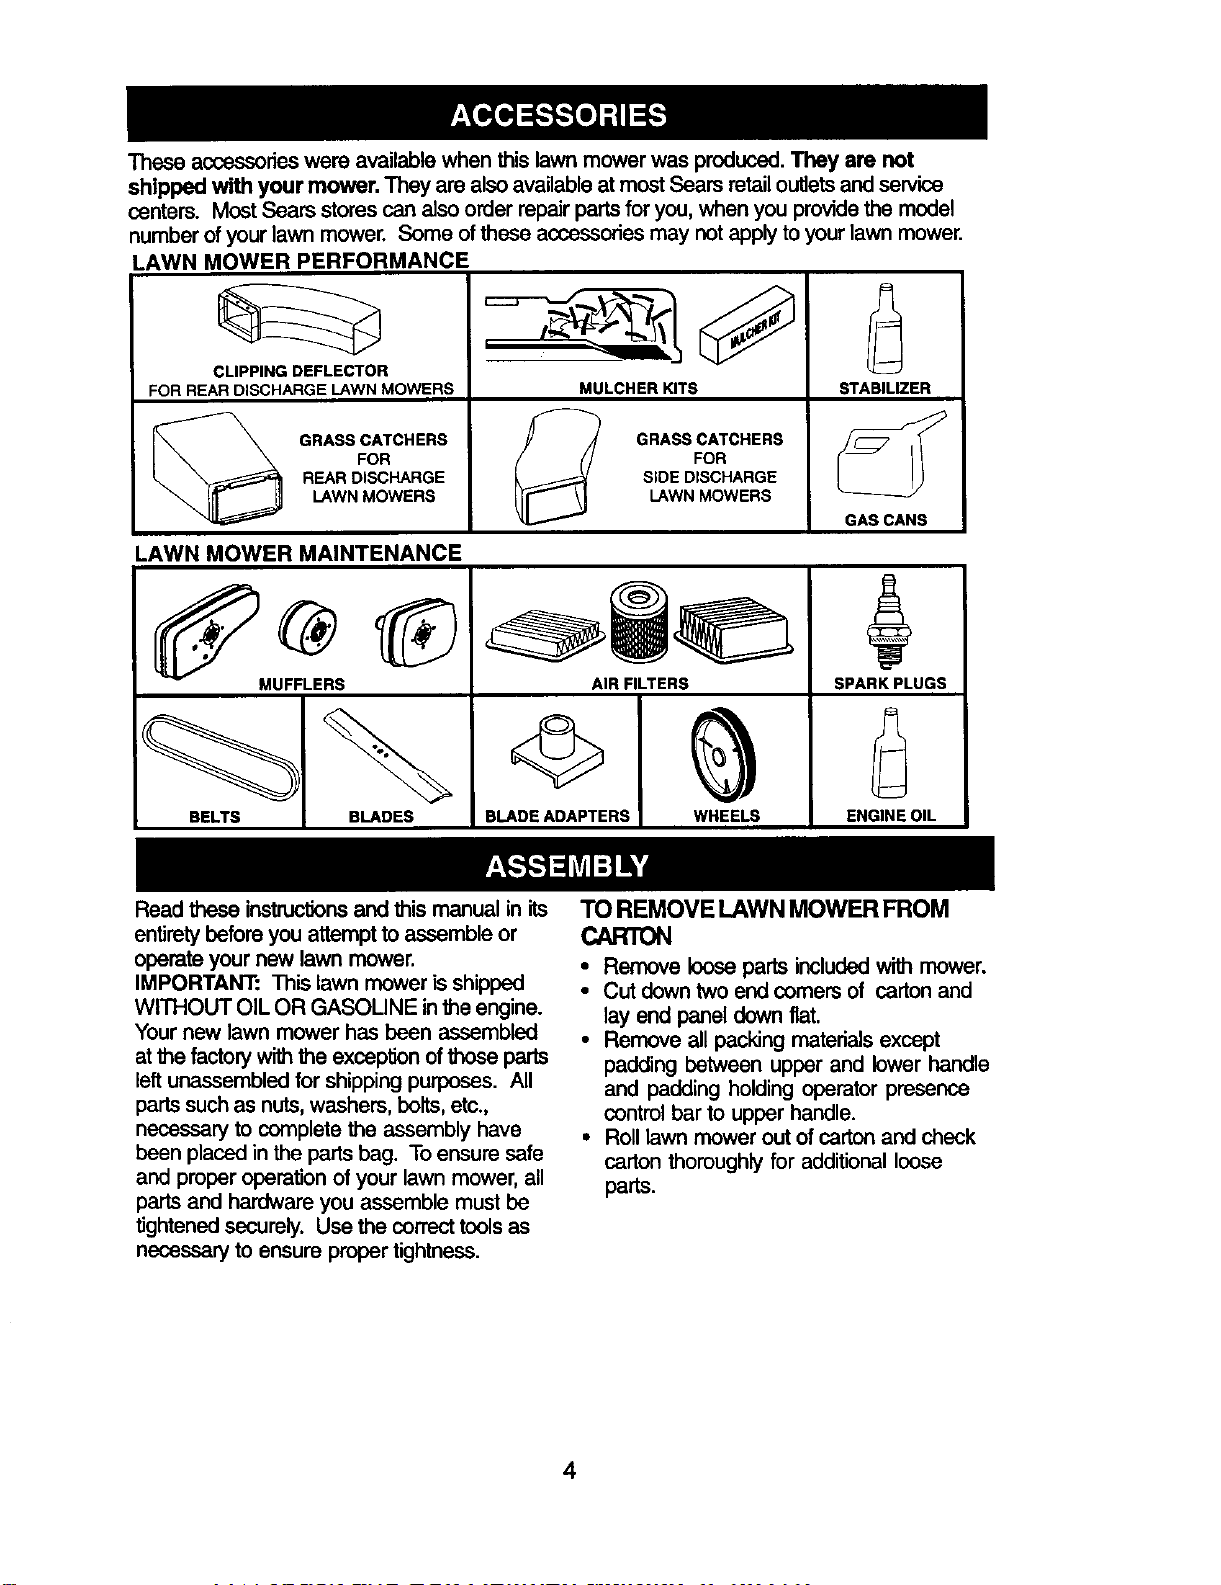
Theseaccessorieswereavailablewhenthislawn mower was produced. They are not
shipped with your mower. They are also availableat mostSears retailoutletsandservice
centers. MostSears storescanalso orderrepairpartsfor you,whenyou providethe model
numberof yourlawnmower. Some ofthese accessoriesmay notapplytoyourlawnmower.
LAWN MOWER PERFORMANCE
CLIPPING DEFLECTOR
FOR REAR DISCHARGE LAWN MOWERS
LAWN MOWER MAINTENANCE
GRASS CATCHERS
FOR
REAR DISCHARGE
LAWN MOWERS
MULCHER KITS
GRASS CATCHERS
FOR
SiDE DISCHARGE
LAWN MOWERS
MUFFLERS
BELTS BLADES BLADE ADAPTERS
AIR FILTERS
WHEELS
STABILIZER
GAS CANS
SPARK PLUGS
ENGINE OIL
Read these instructionsand this manual in its
entirety before you attempt to assemble or
operate your new lawn mower.
IMPORTANT: This lawn mower is shipped
WITHOUT OIL OR GASOLINE in the engine.
Your new lawn mower has been assembled
at the factory with the excep_n of those parts
leftunassembled for shipping purposes. All
parts such as nuts, washers, belts, etc.,
necessary to complete the assembly have
been placed in the parts bag. To ensure safe
and proper operation of your lawn mower, all
parts and hardware you assemble must be
tightened securely. Use the correct tools as
necessary to ensure proper tightness.
TOREMOVELAWNMOWERFROM
CARTON
• Remove loose parts included with mower.
• Cut down two end comers of carton and
lay end panel down flat.
• Remove all packing materials except
padding between upper and lower handle
and padding holding operator presence
control bar to upper handle.
• Roll lawn mower out of carton and check
carton thoroughly for additional loose
parts.
4
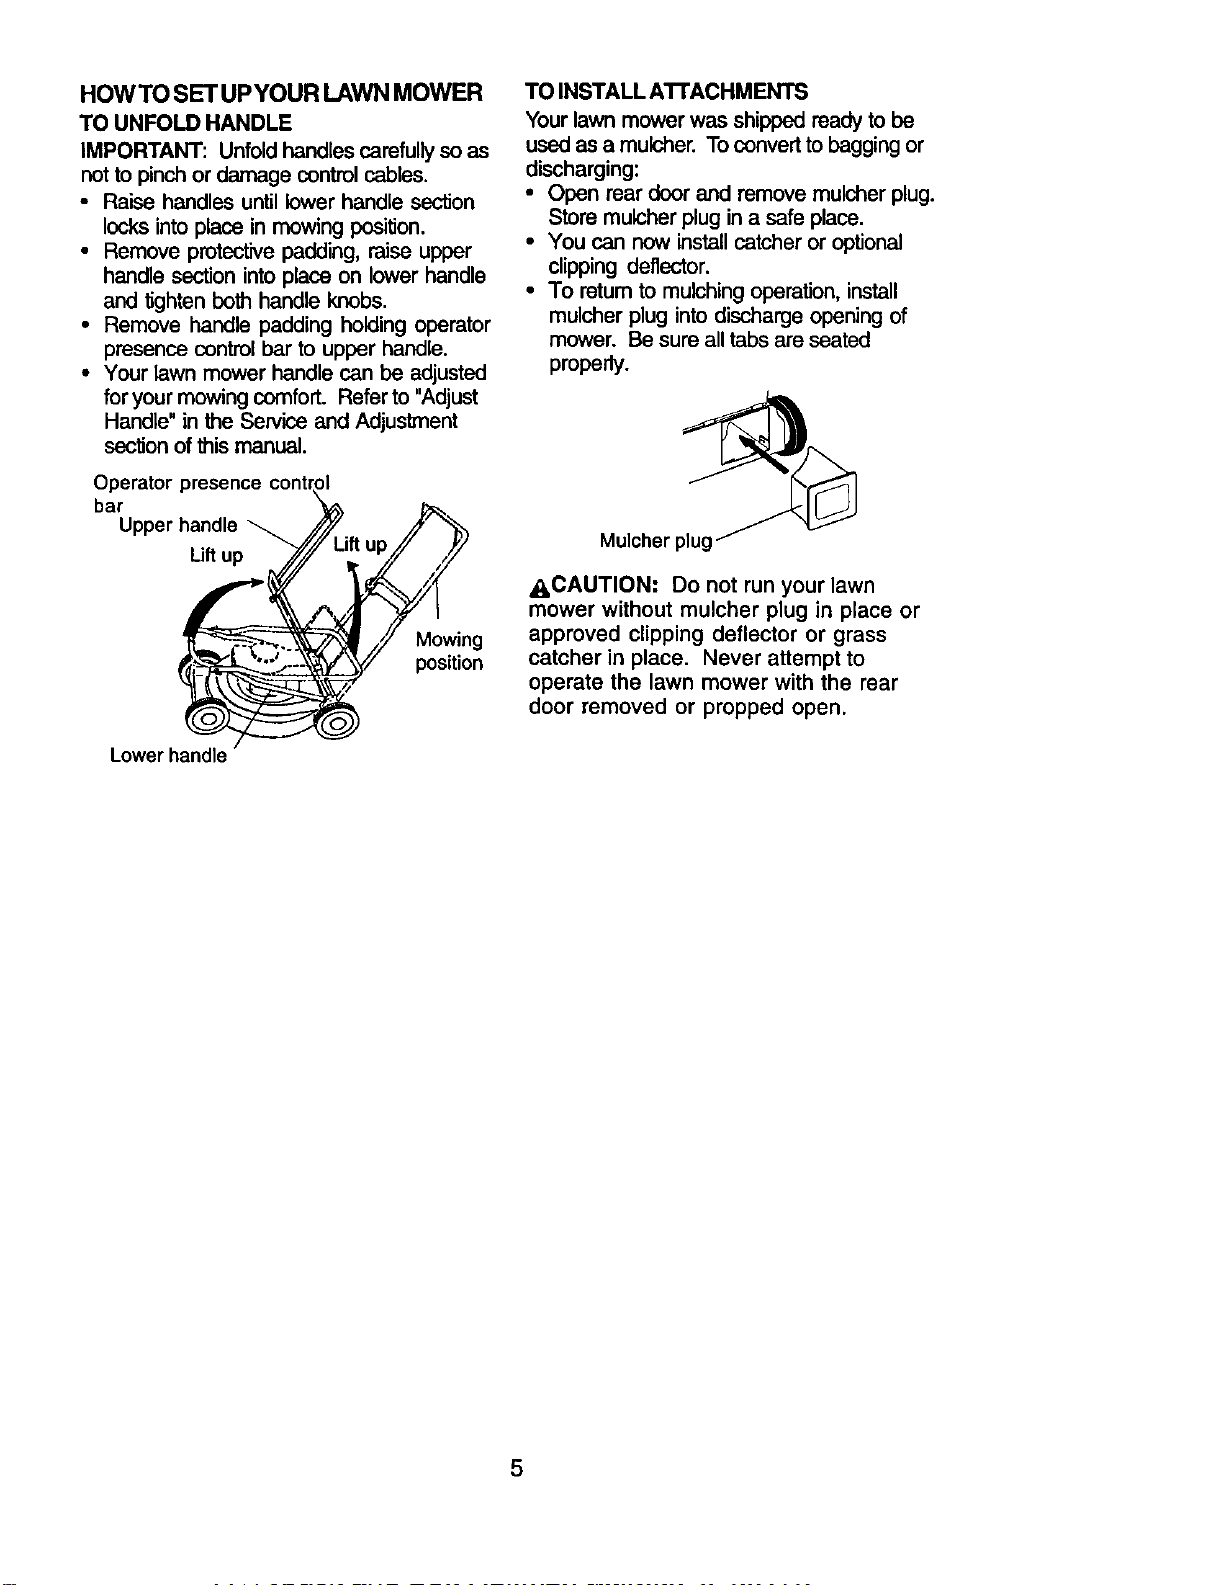
HOWTOSETUPYOURLAWNMOWER
TO UNFOLD HANDLE
IMPORTANT: Unfold handles carefully so as
not to pinch or damage control cables.
• Raise handles until lower handle section
locks into place in mowing position.
• Remove protective padding, raise upper
handle section into place on lower handle
and tighten both handle knobs.
• Remove handle padding holding operator
presence control bar to upper handle.
• Your lawn mower handle can be adjusted
for your mowing cemfort. Refer to "Adjust
Handle" in the Service and Adjustment
section of this manual.
Operator [
bar
Upper handle
Liftup
Mowing
position
Lower handle
TOINSTALLA'I'rACHMENTS
Your lawn mower was shipped ready to be
used as a mulcher. To convert to bagging or
discharging:
• Open rear door and remove mulcher plug.
Store mulcher plug in a safe place.
• You can now install catcher or optional
clipping deflector.
• To retum to mulching operation, install
mulcher plug into discharge opening of
mower. Be sure all tabs are seated
properly.
Mulcher pluc
,O,CAUTION: Do not run your lawn
mower without mulcher plug in place or
approved clipping deflector or grass
catcher in place. Never attempt to
operate the lawn mower with the rear
door removed or prepped open.
5
KNOW YOUR LAWN MOWER
READ THIS OWNER'S MANUALAND SAFETY RULES BEFORE OPERATING YOUR LAWN
MOWER. Compare the illustrations with your lawn mower to familiarize yourself wi_ the
location of various controls and adjustments. Save this manual for future reference.
Thesesymbolsmayappearonyour lawnrnowerorInnteratumsuppliedwiththeproduct.Learnandundersland
theremeaning.
CAUTION ENGINE ENGINE FAST SLOW CHOKE FUEL OIL DANGER, KEEP HANDS
OR WARNING ON OFF AND FEET AWAY
Engine zone controlcable
\
Operator presence controlbar
Drive control lever
Starter handle
Grass catcher
Mulcher plug
ob
Gasoline cap
Housing
Engine oil
cap w/
dipstick
Pdmer
IMPORTANT: This lawn mower is shipped
WITHOUT OIL OR GASOLINE in the engine.
Wheel adjuster
(on each wheel)
MEETS CPSC SAFETY REQUIREMENTS
Sears rotarywalk-behind power lawn mowers conform to the safety standards ofthe American
National Standards Institute and the U.S. Consumer Product Safety Commission. The blade
tums when the engine is running.
Operator presence control bar - must be
held down to the handle to start the engine.
Release to stop the engine.
Primer - pumps additional fuel from the
carburetor to the cylinder for use when
starting a cold engine.
Starter handle - used for starting the engine.
Drive control lever - used to engage power-
propelled forward motion of lawn mower.
Mulcher plug - must be removed to convert to
bagging or discharging operation.
6
The operation of any lawn
mower can result in foreign
objects thrown into the eyes,
which can result in severe eye damage.
Always wear safety glasses or eye shields
while operating your lawn mower or
performing any adjustments or repairs.
We recommend a wide vision safety mask
over spectacles or standard safety
glasses.
HOWTO USEYOUR LAWN MOWER
ENGINESPEED
The engine speed was set at the factory
for optimum performance. Speed is not
adjustable.
ENGINE ZONE CONTROL
_I,CAUTION: Federal regulations require
an engine control to be installed on this
lawn mower in order to minimize the risk
of blade contact injury. Do not under any
cimumstances attempt to defeat the
function of the operator control. The blade
turns when the engine is running.
• Your lawnmower isequippedwith an
operatorpresencecontrolbar which
requiresthe operatorto be positioned
behindthe lawnmowerhandletostartand
operatethe lawn mower.
TO ADJUST CUTTING HEIGHT
• Raise wheels for low cut and lower wheels
for high cuL
• Adjust cutting height to suit your require-
ments. Medium position is best for most
lawns.
• To change cutting height, squeeze adjuster
lever toward wheel. Move wheel upor
down to suit your requirements. Be sure all
wheels are in the same setting.
NOTE: Adjuster is properly positioned
when plate tab inserts into hole in lever.
Also, 9-position adjusters (if so equipped)
allow lever to be positioned between the
plate tabs.
Plate Tab
Lower Wheels for High Curt._ _
Raise Wheels for Low Cut
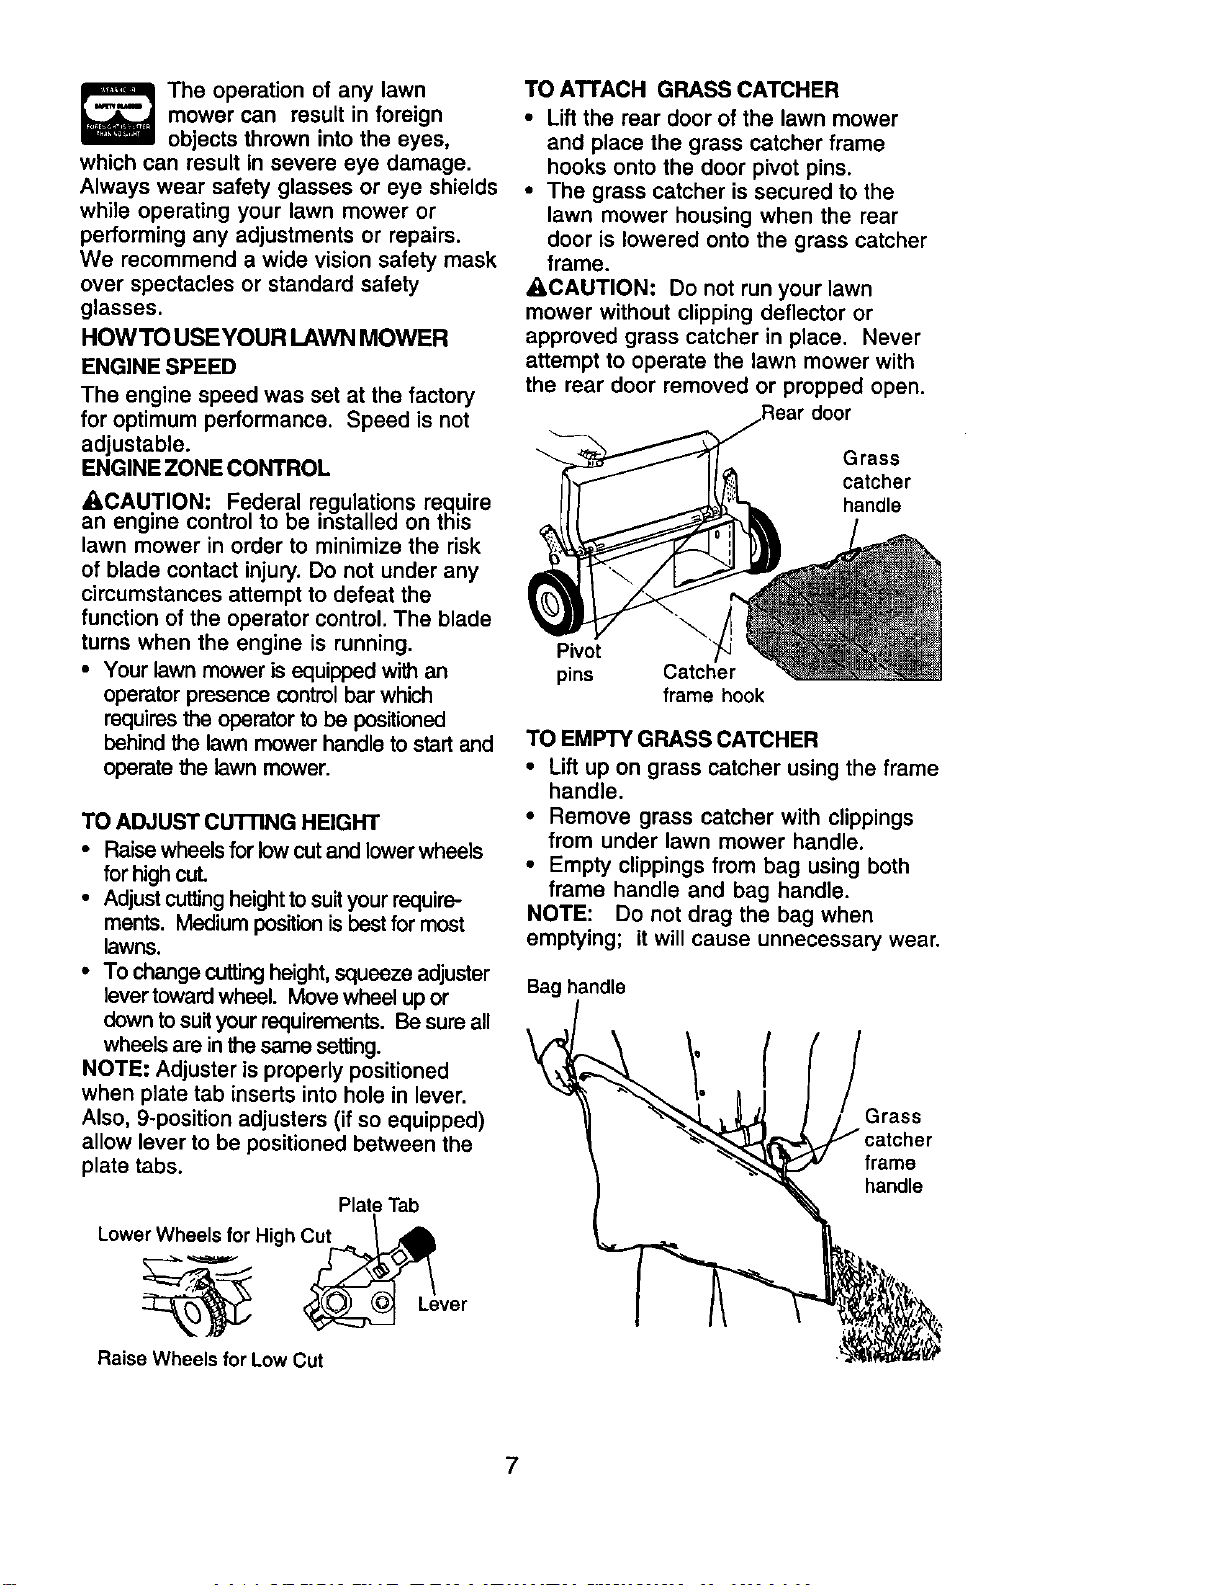
TO ATrACH GRASS CATCHER
• Lift the rear door of the lawn mower
and place the grass catcher frame
hooks onto the door pivot pins.
• The grass catcher is secured to the
lawn mower housing when the rear
door is lowered onto the grass catcher
frame.
_.,CAUTION: Do not run your lawn
mower without clipping deflector or
approved grass catcher in place. Never
attempt to operate the lawn mower with
the rear door removed or prepped open.
Grass
catcher
handle
Pivot "_"_'
pins Catcher
frame hook
TO EMPTY GRASS CATCHER
• Lift up on grass catcher using the frame
handle.
• Remove grass catcher with clippings
from under lawn mower handle.
• Empty clippings from bag using both
frame handle and bag handle.
NOTE: Do not drag the bag when
emptying; it will cause unnecessary wear.
Bag handle
(
Grass
frame
handle
7
DRIVE CONTROL
• Self-propelling is controlled by holding
the operator presence control bar down
to the handle and pushing the drive
control lever forward until it clicks; then
release the lever.
• Forward motion will stop when the
operator presence control bar is
released. To stop forward motion
without stopping engine, release the
operator presence control bar slightly
untilthe drive control disengages. Hold
operator presence control bar down to
handle to continue mowing without self-
propelling.
• To keep drive control engaged when
fuming corners, push down on handle
and liftfront wheels off ground while
turning lawn mower.
Operator presence controlbar
Drive
control
To engage drive Drive control
control disengaged
BEFORE STARTING ENGINE
OIL
Your lawn mower is shipped without oil in the
engine.
• Be sure mower is level and area around oil
fill is dean.
• Remove engine oil cap and fill to the full
line on the dipstick.
NOTE: Allow oil to settle down into engine
for accurate dipstick reading.
• Engine holds 20 ozs. of oil. For type and
grade of oil to use, see "ENGINE" in
Maintenance section of this manual.
• Pour oil slowly. Do not over fill.
• Check oil level before each use. Add oil if
needed. Fill to full line on dipstick.
• To reed proper level, tighten engine oil cap
each time.
• Reinstall engine oil cap and tighten.
• Change the oil after every 25 hours of
operation or each seeson. You may need
to change the oil more often under dusty,
dirty conditions.
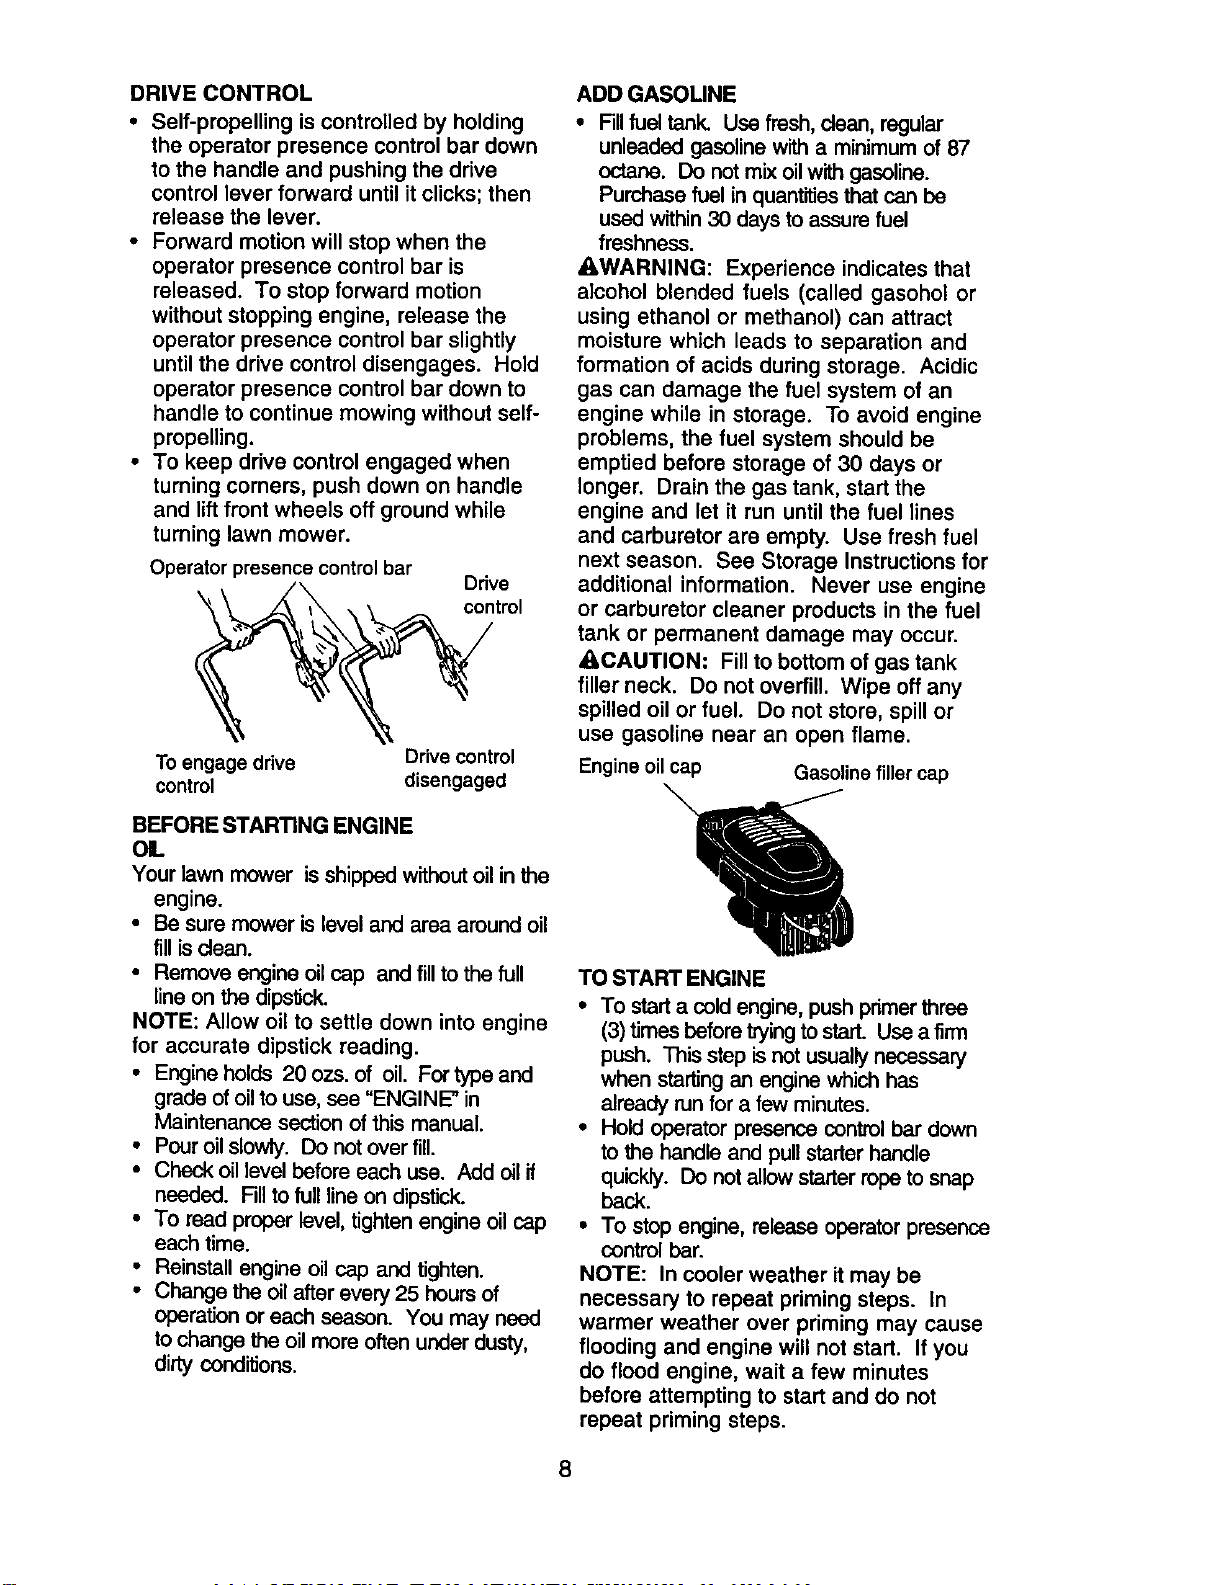
ADD GASOUNE
• Fill fuel tank. Use fresh, clean, regular
unleaded gasoline with a minimum of 87
octane. Do not mix oil with gasoline.
Purchase fuel in quantities that can be
used within 30 days to assure fuel
freshness.
&WARNING: Experience indicates that
alcohol blended fuels (called gasohol or
using ethanol or methanol) can attract
moisture which leads to separation and
formation of acids during storage. Acidic
gas can damage the fuel system of an
engine while in storage. To avoid engine
problems, the fuel system should be
emptied before storage of 30 days or
longer. Drain the gas tank, start the
engine and let it run until the fuel lines
and carburetor are empty. Use fresh fuel
next season. See Storage Instructions for
additional information. Never use engine
or carburetor cleaner products in the fuel
tank or permanent damage may occur.
_,CAUTION: Fill to bottom of gas tank
filler neck. Do not overfill. Wipe off any
spilled oil or fuel. Do not store, spill or
use gasoline near an open flame.
Engine oil cap Gasoline filler cap
TO START ENGINE
• To start a cold engine, push primer three
(3) times before trying to start. Use a firm
push. This step is not usually necessary
when starting an engine which has
already run for a few minutes.
• Hold operator presence control bar down
to the handle and pull starter handle
quickly. DO not allow starter rope to snap
back.
• To stop engine, release operator presence
control bar.
NOTE: In cooler weather it may be
necessary to repeat priming steps. In
warmer weather over priming may cause
flooding and engine will not start. If you
do flood engine, wait a few minutes
before attempting to start and do not
repeat priming steps.
8
MOWING TIPS
• Under certain conditions, such as very
tall grass, it may be necessary to raise
the height of cut to reduce pushing effort
and to keep from overloading the engine
and leaving clumps of grass clippings. It
may also be necessary to reduce
ground speed and/or run the lawn
mower over the area a second time.
• For extremely heavy cutting, reduce the
width of cut by overlapping previously
cut path and mow slowly.
• For better grass bagging and most
cutting conditions, the engine speed
should be set in the fast position.
• When using a rear discharge lawn
mower in moist, heavy grass, clumps of
cut grass may not enter the grass
catcher. Reduce ground speed (push-
ing speed) and/or run the lawn mower
over the area a second time.
• If a trail of clippings is left on the right
side of a rear discharge mower, mow in
a clockwise direction with a small
overlap to collect the clippings on the
next pass.
• Pores in cloth grass catchers can
become filled with dirt and dust with use
and catchers will collect less grass. To
prevent this, regularly hose catcher off
with water and let dry before using.
* Keep top of engine around starter clear
and clean of grass clippings and chaff.
This will help engine air flow and extend
engine life.
MULCHING MOWING TIPS
IMPORTANT: Forbestperformance,keep
mowerhousingfree ofbuilt-upgrassand
trash.See "Cleaning" inMaintenancesection
ofthismanual.
• The specialmulching bladewillrecutthe
grassclippingsmanytimesand reduce
them in sizeso that as they faUontothe
lawn they will disperse intothe grass and
not be noticed. Also, the mulched grass will
biodegrade quickly to provide nutrients lor
the lawn. Always mulch with your highest
engine (blade)speed as this willprovide the
best recutting action of the blades.
• Avoid cutting your lawn when itiswet. Wet
grass tendsto form dumps and interferes
with the mulching action. The best time to
mow your lawn is the early afternoon. At
this time the grass has dried and the newly
cut area will not be exposed to the direct
sun.
• For best resutts,adjust the lawn mower
cuttingheightso thatthe lawn mowercuts
offonlythetopone-thirdofthe grassblades.
Ifthe lawnisovergrownitwillbe necessary
toraisethe heightofcutto reducepushing
effortand tokeep from overloadingthe
engine and leavingdumps of mulched
grass.Forex-b'emelyheavymulching,
reduceyourwidthofcutby overlapping
previouslycutpathand mow slowly.
• Certain typesof grass and grass conditions
may requirethatan area be mulched a
secondtimeto completely hidethe
clippings.When doinga secondcut,mow
acrossorperpendiculartothefirst cutpath.
• Change yourcuttingpattemfrom weekto
weak. Mownorthtosouthone weekthen
changetoeasttowestthe next week. This
willhelppreventmatting andgrainingofthe
lawn.
9
AsYouCOMPLFrE ....
RE O RSERV,CE ERV,O
Check forLooseFasteners ¥1 I_
Clean/InspectGrass Catcher
(if Equipped) _ _
M Clean Lawn Mower
Clean Under DriveCover
(Power-PropelledMowers) !/
_ Check ddve belgpulleys
(Power-PropelledMowers) V'
R Check/Sharpen/Replace Blade _3
LubricationChart I_
Clean Battery/Recharge
IElectric Start MowersI If IV#'4
NE Check EngineOil Level
Chan_e EngineOil 5/'1.2
Clean Air Filter t_ l
InspectMuffler
N Clean or Replace Spark Plug
ReplaceAir FilterPaper Cartridge 1_2
1 - Change more often when operating under a heavy inad Orin high ambient temperatures,
2 - Sei_ice more often when operating in dirtyor dusty conditioas.
3 - Replace blades more often when mowing in sandy soil,
4 - Charge 48 hours at end of season,
GENERAL RECOMMENDATIONS
The warranty on this lawn mower does not
cover items that have been subjected to
operator abuse or negligence. To receive
full value from the warranty, operator must
maintain mower as instructed in this
manual.
Some adjustments will need to be made
pedodically to properly maintain your unit.
All adjustments in the Service and
Adjustments section of this manual should
be checked at least once each season.
• Once a year, replace the spark plug,
replace air filter element and check
blade for wear. A new spark plug and
oiean/new air filter element assures
proper air-fuel mixture and helps your
engine run better and last longer.
• Follow the maintenance schedule in this
manual.
BEFORE EACH USE
• Check engine oil level.
• Check for loose fasteners.
LUBRICATION
Keep unit well lubdcated (See "LUBRICA-
TION CHART').
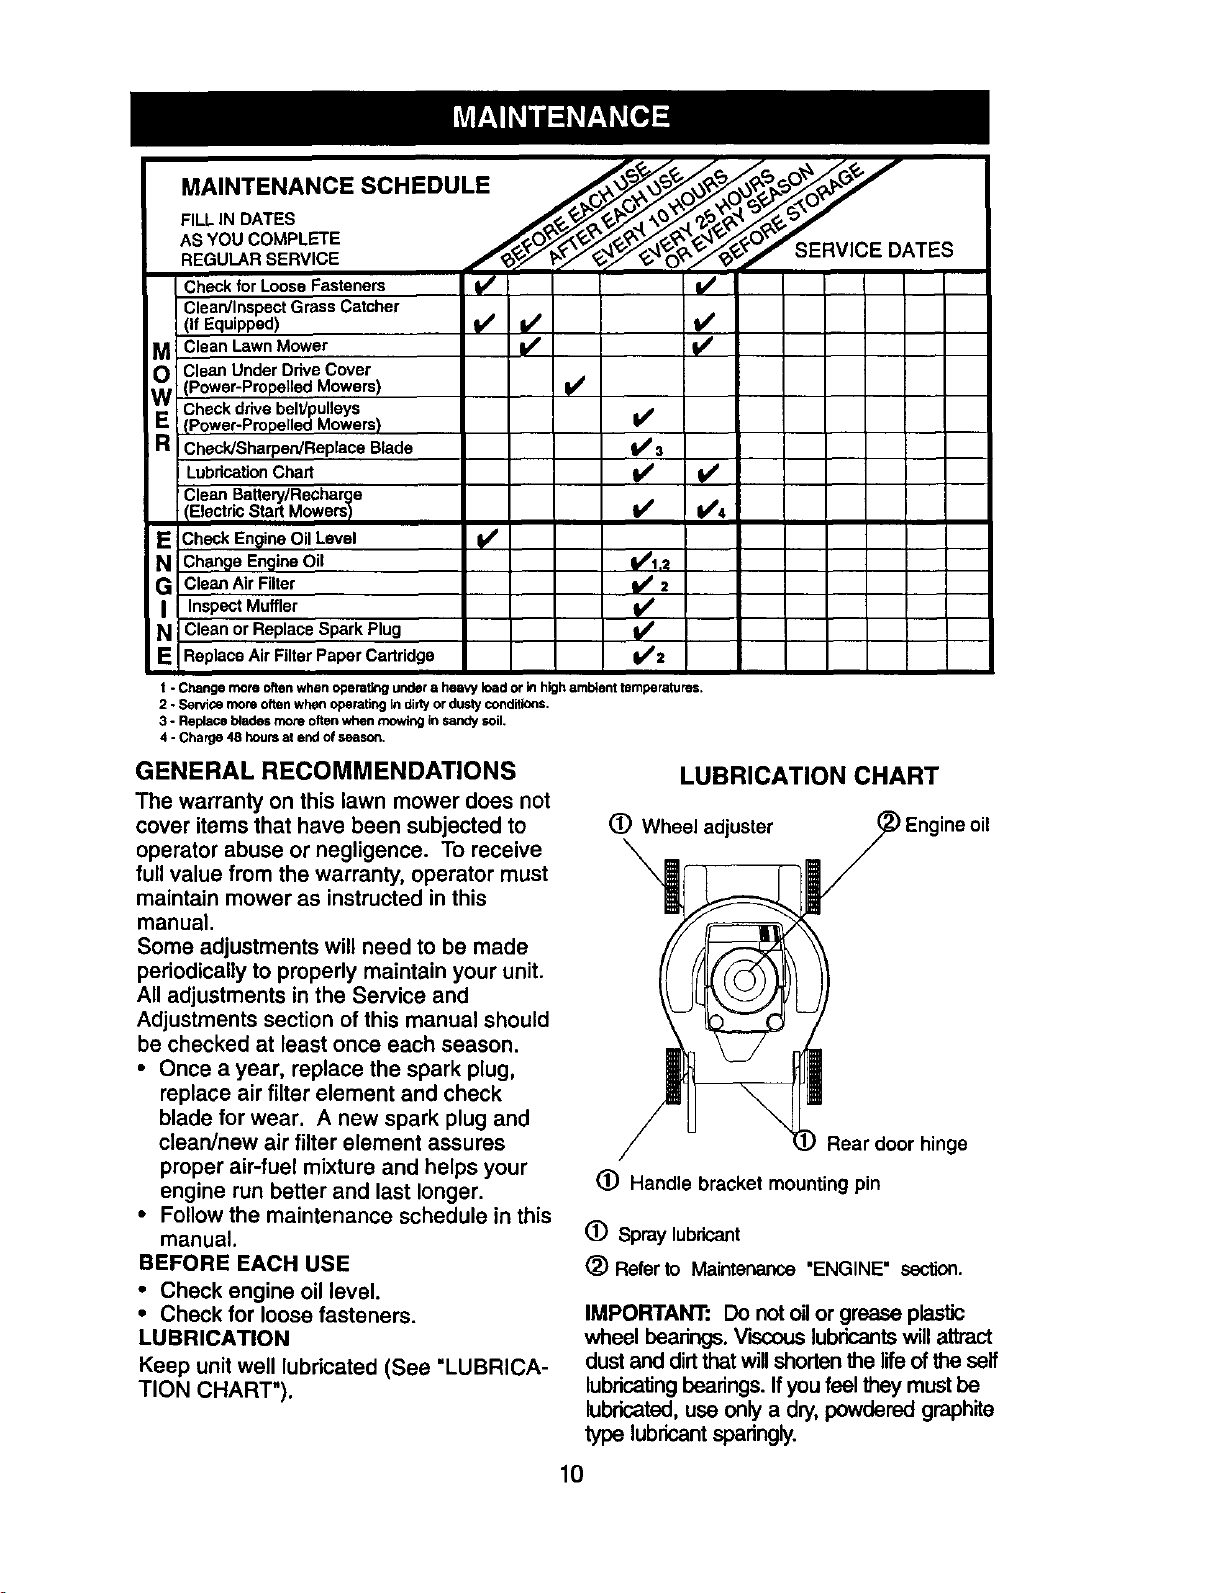
LUBRICATION CHART
(i) Wheel adjuster
\ --
ine oil
Rear door hinge
(_) Handle bracket mounting pin
(D Spray lubricant
(_) Referto Maintenance "ENGINE" section.
IMPORTANT: Do not oilor grease plastic
wheel bearings. Viscous lubricants will attract
dust and dirt that will shorten the life of the self
lubdcaSng bearings. If you feel they must be
lubricated, use only a dry, powdered graphite
type lubricant sparingly.
10
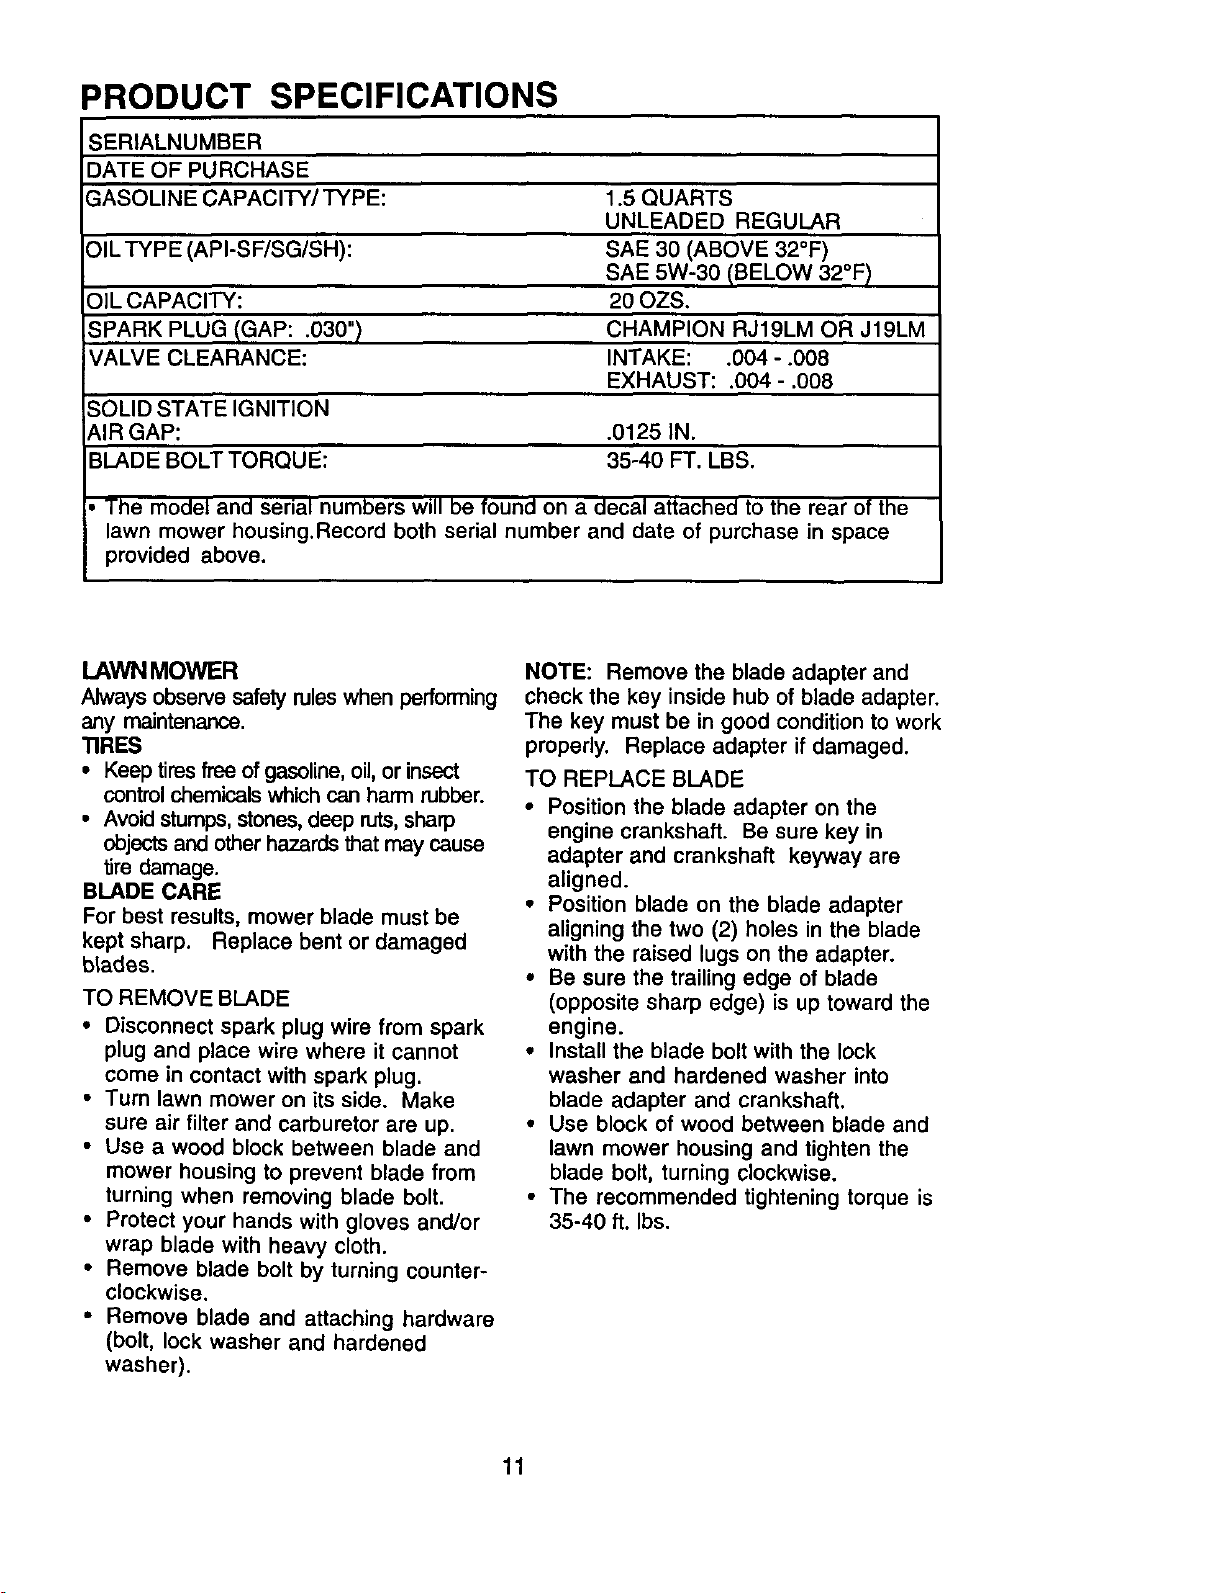
=RODUCT SPECIFICATIONS
;ERIALNUMBER
DATE OFPURCHASE
IASOLINECAPACITY/TYPE:
)IL TYPE (API-SF/SG/SH):
OIL CAPACITY:
SPARK PLUG (GAP: .030")
VALVE CLEARANCE:
SOLID STATE IGNITION
AIR GAP:
BLADE BOLT TORQUE:
1.5 QUARTS
UNLEADED REGULAR
SAE 30 (ABOVE 32°F)
SAE 5W-30 (BELOW 32°F)
20 OZS.
CHAMPION RJ19LM OR J19LM
INTAKE: .004 - .008
EXHAUST: .004 - .008
.0125 IN.
35-40 FT. LBS.
• The model and serial numbers will be found on a decal attached to the rear of the
lawn mower housing.Record both serial number and date of purchase in space
provided above.
LAWN MOWER
Always observe safety rules when performing
any maintenance.
TIRES
• Keep tires free of gasoline, oil, or insect
control chemicals which can harm rubber.
• Avoid stumps, stones, deep ruts, sharp
objects and other hazards that may cause
tire damage.
BLADE CARE
For best results, mower blade must be
kept sharp. Replace bent or damaged
blades.
TO REMOVE BLADE
• Disconnect spark plug wire from spark
plug and place wire where it cannot
come in contact with spark plug.
• Turn lawn mower on its side. Make
sure air tilter and carburetor are up.
• Use a wood block between blade and
mower housing to prevent blade from
turning when removing blade bolt.
• Protect your hands with gloves and/or
wrap blade with heavy cloth.
• Remove blade bolt by turning counter-
clockwise.
• Remove blade and attaching hardware
(bolt, lock washer and hardened
washer).
NOTE: Remove the blade adapter and
check the key inside hub of blade adapter.
The key must be in good condition to work
properly. Replace adapter if damaged.
TO REPLACE BLADE
• Position the blade adapter on the
engine crankshaft. Be sure key in
adapter and crankshaft keyway are
aligned.
• Position blade on the blade adapter
aligning the two (2) holes in the blade
with the raised lugs on the adapter.
• Be sure the trailing edge of blade
(opposite sharp edge) is up toward the
engine.
• Install the blade bolt with the lock
washer and hardened washer into
blade adapter and crankshaft.
• Use block of wood between blade and
lawn mower housing and tighten the
blade bolt, turning clockwise.
• The recommended tightening torque is
35-40 ft. Ibs.
11

IMPORTANT: Blade bolt is grade 8 heat
treated.
TO SHARPEN BLADE
NOTE: We do not recommend sharpen-
ing blade - but if you do, be sure the blade
is balanced.
Care should be taken to keep the blade
balanced. An unbalanced blade will
cause eventual damage to lawn mower or
engine.
• The blade can be sharpened with a file
or on a grinding wheel Do not attempt
to sharpen while on the mower.
• To check blade balance, drive a nail
into a beam or wall. Leave about one
inch of the straight nail exposed. Place
center hole of blade over the head of
the nail. If blade is balanced, it should
remain in a horizontal position. If either
end of the blade moves downward,
sharpen the heavy end until the blade
is balanced. Crankshaft
Blade keyway
Key
Blade
• Remove any trash or grass cuttings
from inside the dust cover, pinion and/
or drive wheel gear teeth.
• Put wheels back in place.
• If after cleaning, the drive wheels do
not turn freely, contact your nearest
authorized service center.
GEAR CASE
• To keep your drive system working
properly, the gear case and area
around the drive should be kept clean
and free of trash build-up. Clean under
the drive cover twice a season.
• The gear case is filled with lubricant to
the proper level at the factory. The only
time the lubricant needs attention is if
service has been performed on the
gear case.
• If lubricant is required, use only Texaco
Starplex Premium 1 Grease, Part No.
750369. Do not substitute.
ENGINE
LUBRICATION
Use only high quality detergent oil rated
with API service classification SF, SG or
SH. Select the oil's SAE viscosity grade
according to your expected operating
temperature.
bolt Crank
shaft
Lock Blade
washer Hardened edge adapter
washer
GRASS CATCHER
• The grass catcher may be hosed with
water, but must be dry when used.
• Check your grass catcher often for
damage or deterioration. Through normal
use itwill wear. If catcher needs replacing,
replace only with a manufacturer approved
replacement catcher. Give the lawn
mower model number when ordering.
DRIVE WHEELS
Check front drive wheels each time before
you mow to be sure they move freely.
The wheels not turning freely means
trash, grass cuttings, etc. are in the drive
wheel area and must be cleaned to free
drive wheels.
If necessary to clean the drive wheels,
check both front wheels.
• Remove hubcaps, hairpin cotters and
washers.
SAE VISCOSITY GRADES
.3O" .20" .10" O" 10' 29"
TEMPERAllJRE RANGE ANTICIPATED BEFORE NEXT OIL CHANGE
NOTE: Although multi-viscosity oils
(5W30, 10W30 etc.) improve starting in
cold weather, these multi-viscosity oils
will result in increased oil consumption
when used above 32°F. Check your
engine oil level more frequently to avoid
possible engine damage from running
low on oil.
Change the oil after every 25 hours of
operation or at least once a year if the
lawn mower is not used for 25 hours in
one year.
Check the crankcase oil level before
starting the engine and after each five (5)
hours of continuous use. Tighten oil plug
securely each time you check the oil
level.
• Remove wheels from wheel adjusters. 12

TO CHANGE ENGINE OIL
NOTE: Before tipping lawn mower to
drain oil, drain fuel tank by running
engine until fuel tank is empty.
• Disconnect spark plug wire from spark
plug and place wire where it cannot
come in contact with spark plug.
• Remove engine oil cap; lay aside on a
clean surface.
• Tip lawn mower on its side as shown
and drain oil into a suitable container.
Rock lawn mower back and forth to
remove any oil trapped inside of
engine.
• Wipe off any spilled oil on lawn mower
and on side of engine.
• Fill engine with oil. Fill only to the
"FULL" line on the dipstick. DO NOT
overfill.
• Replace engine oil cap.
• Reconnect spark plug wire to spark
plug.
Container
AIR FILTER
Your engine will not run properly and
may be damaged by using a dirty air
filter.
Replace the air filter every year, more
often if you mow in very dusty, dirty
conditions. Do not wash air filter.
TO CHANGE AIR FILTER
• Remove the air filter by turning
clockwise to the stop and pull away
from collar.
• Remove filter from inside of cover.
• Clean the inside of the cover and the
collar to remove any dirt accumulation.
• Insert new filter into cover.
• Put air filter cover and filter into collar
aligning the tab with the slot.
• Push in on cover and turn counter-
clockwise to tighten.
Collar
Slot
Clip
Turn
clockwise
to remove
Tab
Air filter
MUFFLER
Air filter
cover Turn counter-
clockwise to tighten
Inspect and replace corroded muffler as
it could create a fire hazard and/or
damage.
SPARK PLUG
Change your spark plug each year to
make your engine start easier and run
better. Set spark plug gap at .030 inch.
CLEANING
IMPORTANT: For best performance,
keep mower housing free of built-up
grass and trash. Clean the underside of
your mower after each use.
_,CAUTION: Disconnect spark plug wire
from spark plug and place wire where it
cannot come in contact with the spark
plug.
• Turn lawn mower on its side. Make
sure air filter and carburetor are up.
Clean the underside of your lawn
mower by scraping to remove build-up
of grass and trash.
• Clean engine often to keep trash from
accumulating. A clogged engine runs
hotter and shortens engine life.
• Keep finished surfaces and wheels
free of all gasoline, oil,etc.
• We do not recommend using a garden
hose to clean lawn mower unless the
electrical system, muffler, air filter and
carburetor are covered to keep water
out. Water in engine can result in
shortened engine life.
CLEAN UNDER DRIVE COVER
Clean under drive cover at least twice a
season. Scrape underside of cover with
putty knife or similar tool to remove any
build-up of trash or grass on underside
of drive cover.
13
_LCAUTION: Before performing any
service and adjustments:
• Release control bar and stop engine.
• Make sure the blade and all moving
parts have completely stopped.
• Disconnect spark plug wire from spark
plug and place where it cannot come
in contact with plug.
LAWN MOWER
TO ADJUST CUTTING HEIGHT
See "TO ADJUST CUNING HEIGHT" in the
Operation seclJon of this manual.
REAR DEFLECTOR
The rear deflector,attached betweenthe rear
wheels ofyour lawnmower,is providedto
minimize the possibilitythat objectswillbe
thrownoutthe rear ofthe lawnmowerintothe
operator's mowingposition.If the rear
deflectorbecomes damaged, itshouldbe
replaced.
TO REMOVE/REPLACE DRIVE BELT
• Remove drivecover. Remove belt by
pushingdownon gear case pulleyand roll
beitoff.
•Tum lawn mower on itsside with carbure-
tor and fuel cap up.
• Remove blade.
• Remove debris shield.
• Remove belt from engine pulley on
crankshaft.
• Install new belt by reversing above steps.
• Alwaysuse factory approvedbelt to assure
fit and longlife.
Belt _[_ _!
Push ImH
downI- Inl/! iii=
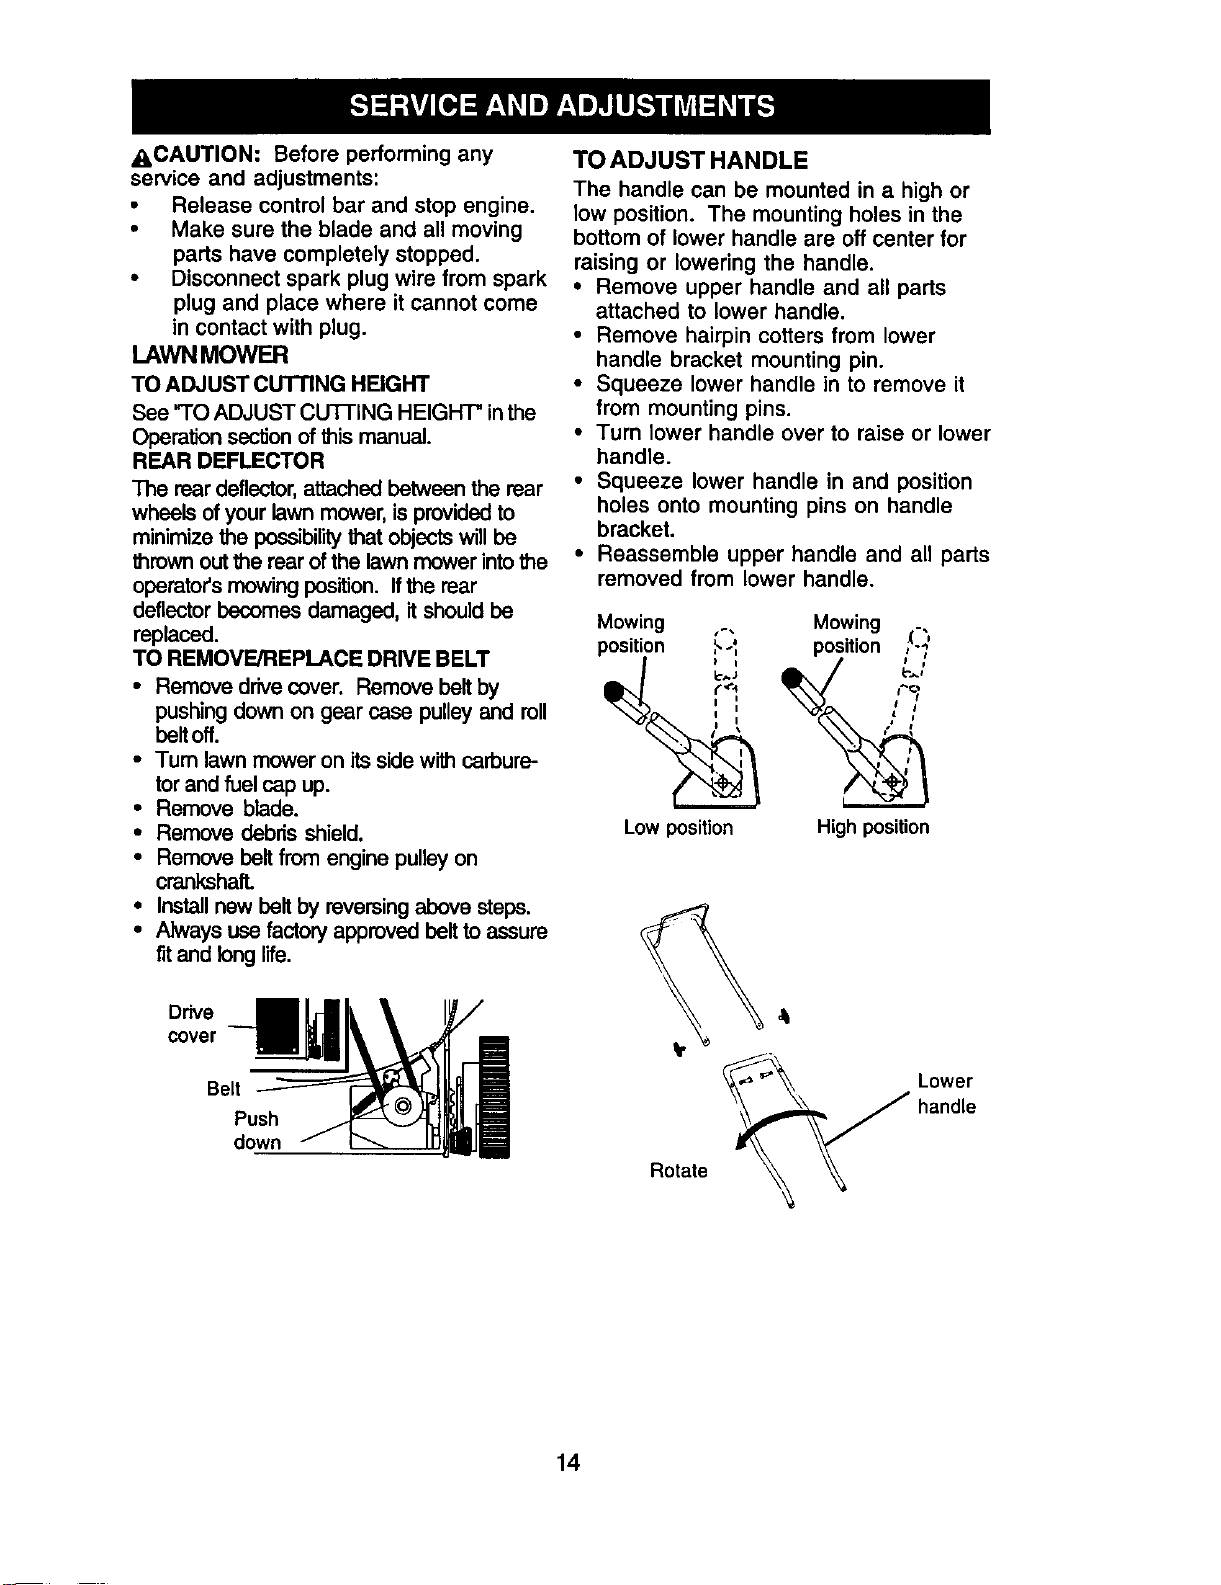
TO ADJUST HANDLE
The handle can be mounted in a high or
low position. The mounting holes in the
bottom of lower handle are off center for
raising or lowering the handle.
• Remove upper handle and all parts
attached to lower handle.
• Remove hairpin cotters from lower
handle bracket mounting pin.
• Squeeze lower handle in to remove it
from mounting pins.
• Turn lower handle over to raise or lower
handle.
• Squeeze lower handle in and position
holes onto mounting pins on handle
bracket.
• Reassemble upper handle and all parts
removed from lower handle.
Mowing ., Mowing .
position ,_._ position / i'
, !
• a
Low position High position
¥
Rotate
Lower
handle
14
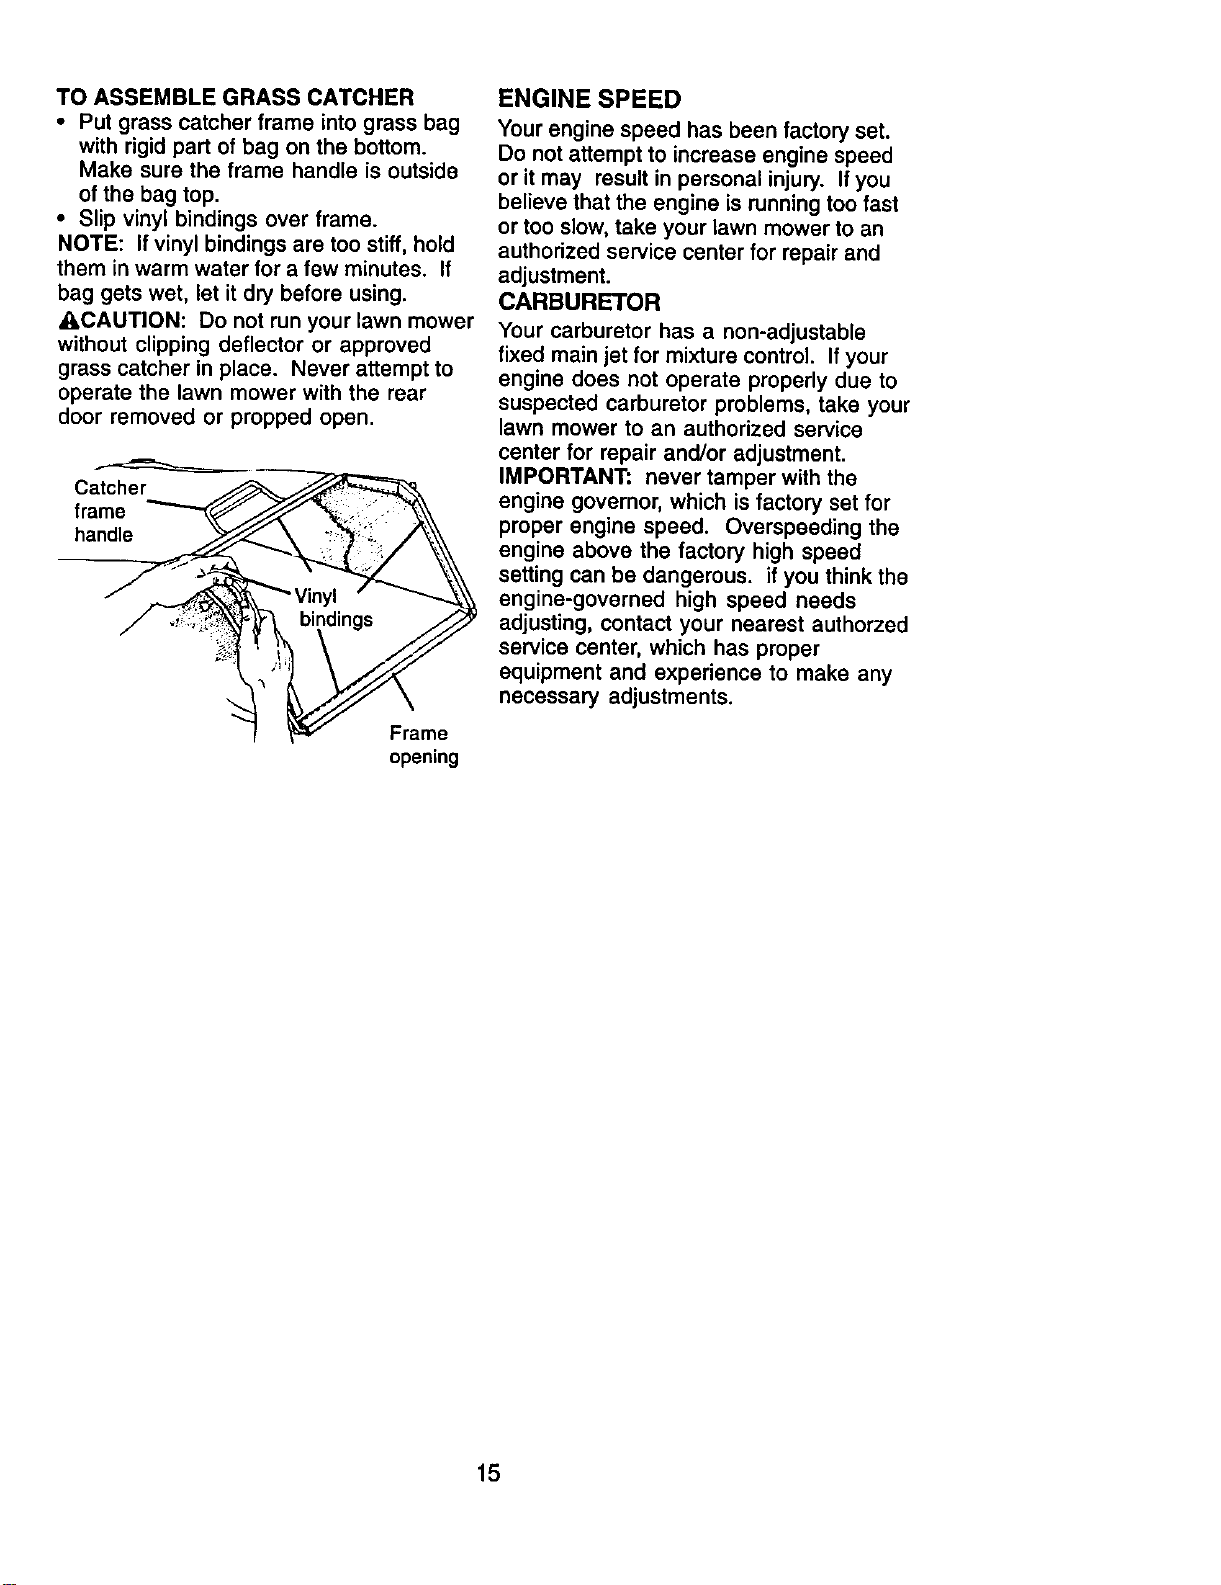
TO ASSEMBLE GRASS CATCHER
• Put grass catcher frame into grass bag
with rigid part of bag on the bottom.
Make sure the frame handle is outside
of the bag top.
• Slip vinyl bindings over frame.
NOTE: If vinyl bindings are too stiff, hold
them in warm water for a few minutes. If
bag gets wet, let it dry before using.
_CAUTION: Do not run your lawn mower
without clipping deflector or approved
grass catcher in place. Never attempt to
operate the lawn mower with the rear
door removed or propped open.
Catcher
frame
handle ._ .
bindings
opening
ENGINE SPEED
Your engine speed has been factory set.
Do not attempt to increase engine speed
or it may result in personal injury. If you
believe that the engine is running too fast
or too slow, take your lawn mower to an
authorized service center for repair and
adjustment.
CARBURETOR
Your carburetor has a non-adjustable
fixed main jet for mixture control. Ifyour
engine does not operate properly due to
suspected carburetor problems, take your
lawn mower to an authorized service
center for repair and/or adjustment.
IMPORTANT: never tamper with the
engine governor, which is factory set for
proper engine speed. Overspeeding the
engine above the factory high speed
setting can be dangerous, if you think the
engine-governed high speed needs
adjusting, contact your nearest authorzed
service center, which has proper
equipment and experience to make any
necessary adjustments.
15
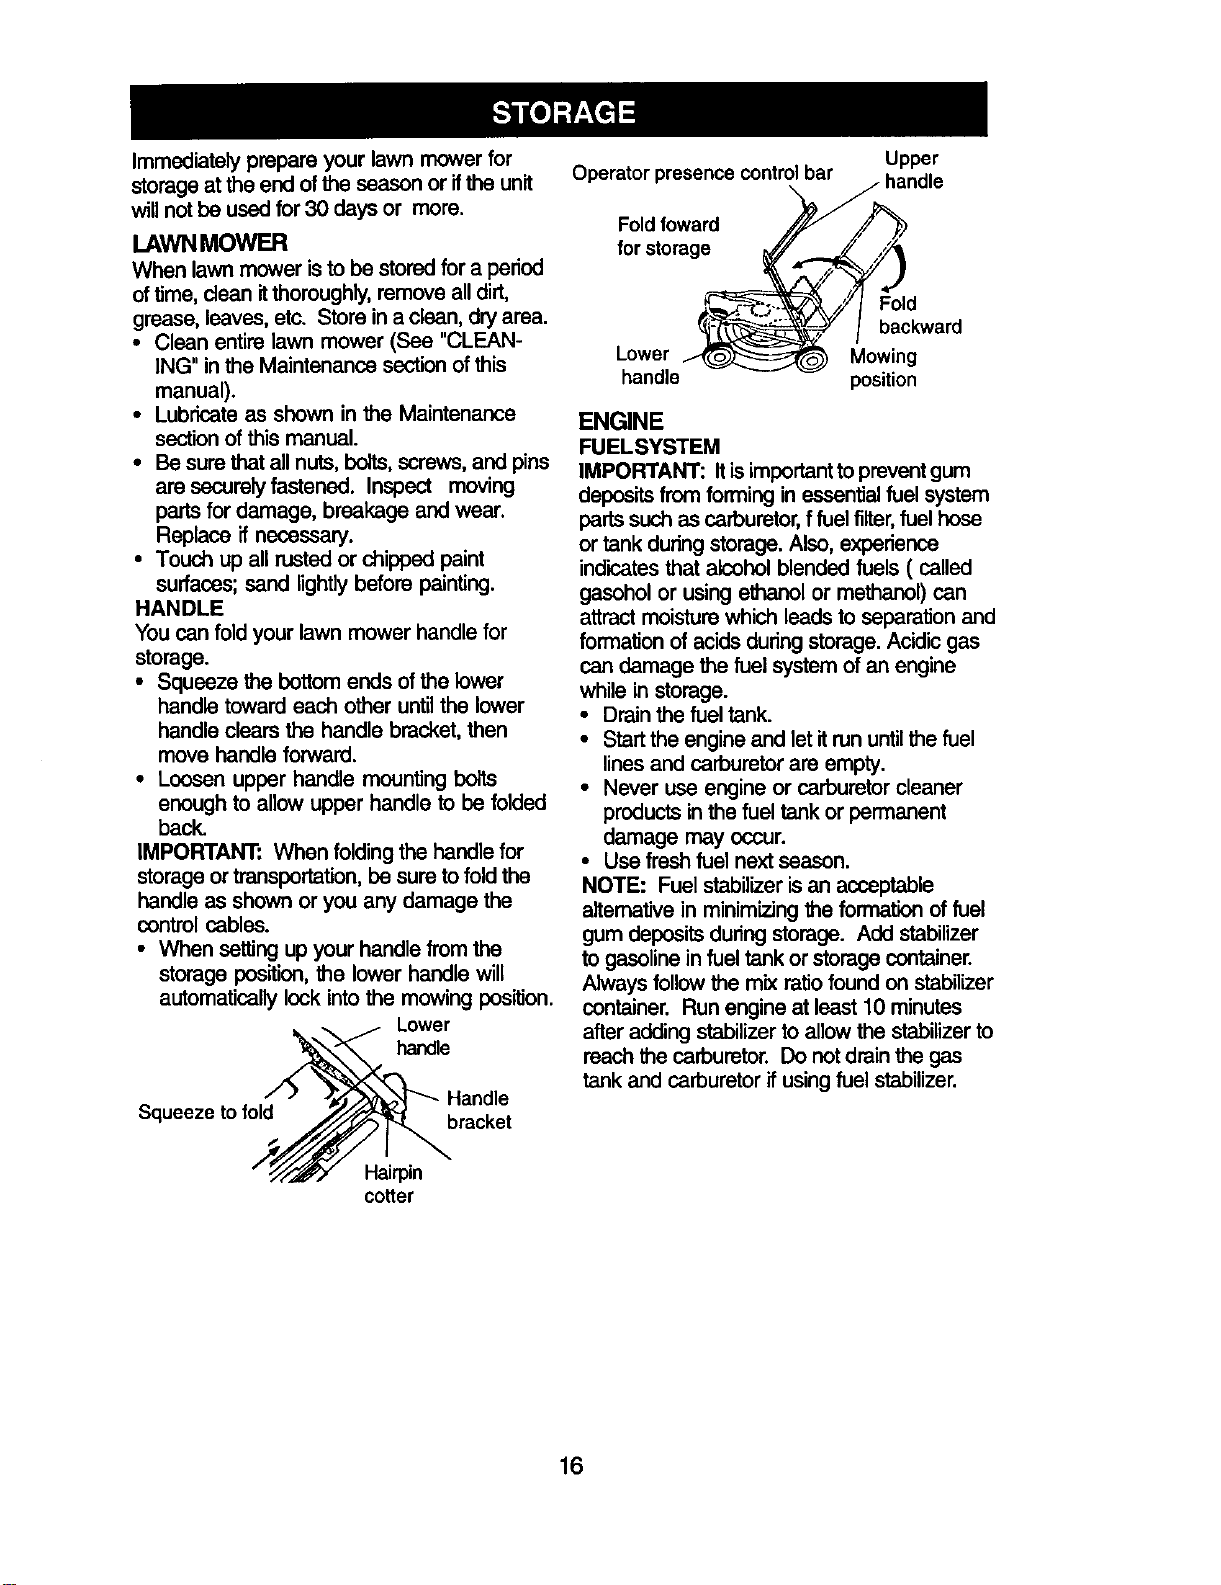
Immediatelyprepareyour lawn mowerfor
storageat theend ofthe seasonor ifthe unit
willnotbe usedfor 30 daysor more.
LAWNMOWER
When lawn mower is to be stored for a period
of time, clean it thoroughly, remove all dirt,
grease, leaves, etc. Store in a clean, dry area.
• Clean entire lawn mower (Bee "CLEAN-
ING" in the Maintenance section of this
manual).
• Lubricate as shown in the Maintenance
section of this manual.
• Be sure that all nuts, bolts, screws, and pins
are securely fastened. Inspect moving
parts for damage, breakage and wear.
Replace if necessary.
• Touch up all rusted or chipped paint
surfaces; sand lightly before painting.
HANDLE
You can fold your lawn mower handle for
storage
• Squeeze the bottom ends ofthe lower
handle toward each other until the lower
handle clears the handle bracket, then
move handle forward.
• Loosen upper handle mounting bolts
enough to allow upper handle to be folded
back.
IMPORTANT; When folding the handle for
storage or transportation, be sure to fold the
handle as shown or you any damage the
control cables.
• When setting up your handle from the
storage position, the lower handle will
automatically lock into the mowing position.
Lower
handle
Squeeze tofold
bracket
Operator presence controlbar
Fold foward
for storage
Upper
Fold
backward
Lower Mowing
handle position
ENGINE
FUELSYSTEM
IMPORTANT: It isimportanttopreventgum
depositsfrom formingin essentialfuel system
padssuchas carburetor,f fuelfilter, fuel hose
or tank duringstorage.Also,experience
indicatesthat alcoholblendedfuels ( called
gasoholor usingethanolormethanol) can
attract moisture whichleads to separationand
formation ofacidsduringstorage.Acidic gas
candamage the fuel systemof an engine
while in storage.
• Drainthe fuel tank.
• Startthe engineand letit rununtilthe fuel
linesand carburetor are empty.
• Never use engineor carburetor cleaner
productsinthe fuel tankor permanent
damage may occur.
• Usefresh fuel nextseason.
NOTE: Fuelstabilizerisan acceptable
aitemativein minimizingthe formation of fuel
gumdepositsduringstorage. Add stabilizer
to gasolineinfuel tankor storage container.
Alwaysfollow the mix ratiofound on stabilizer
container. Runengineat least 10minutes
afteraddingstabilizerto allowthe stabilizerto
reachthe carburetor. Do notdrain the gas
tankand carburetorif usingfuel stabilizer.
Hairpin
cotter
16
ENGINEOIL
Drain oil (with engine warm) and replace with
clean engine oil. (See "ENGINE" in the
Maintenance section of this manual).
CYLINDER
• Remove spark plug.
• Pour one ounce (29 rnl)of oilthrough spark
plug hole into cylinder.
• Pullstarter handle slowly a few fimas to
distribute oil.
• Replace with new spark plug.
OTHER
• Do not store gasoline from one season to
another.
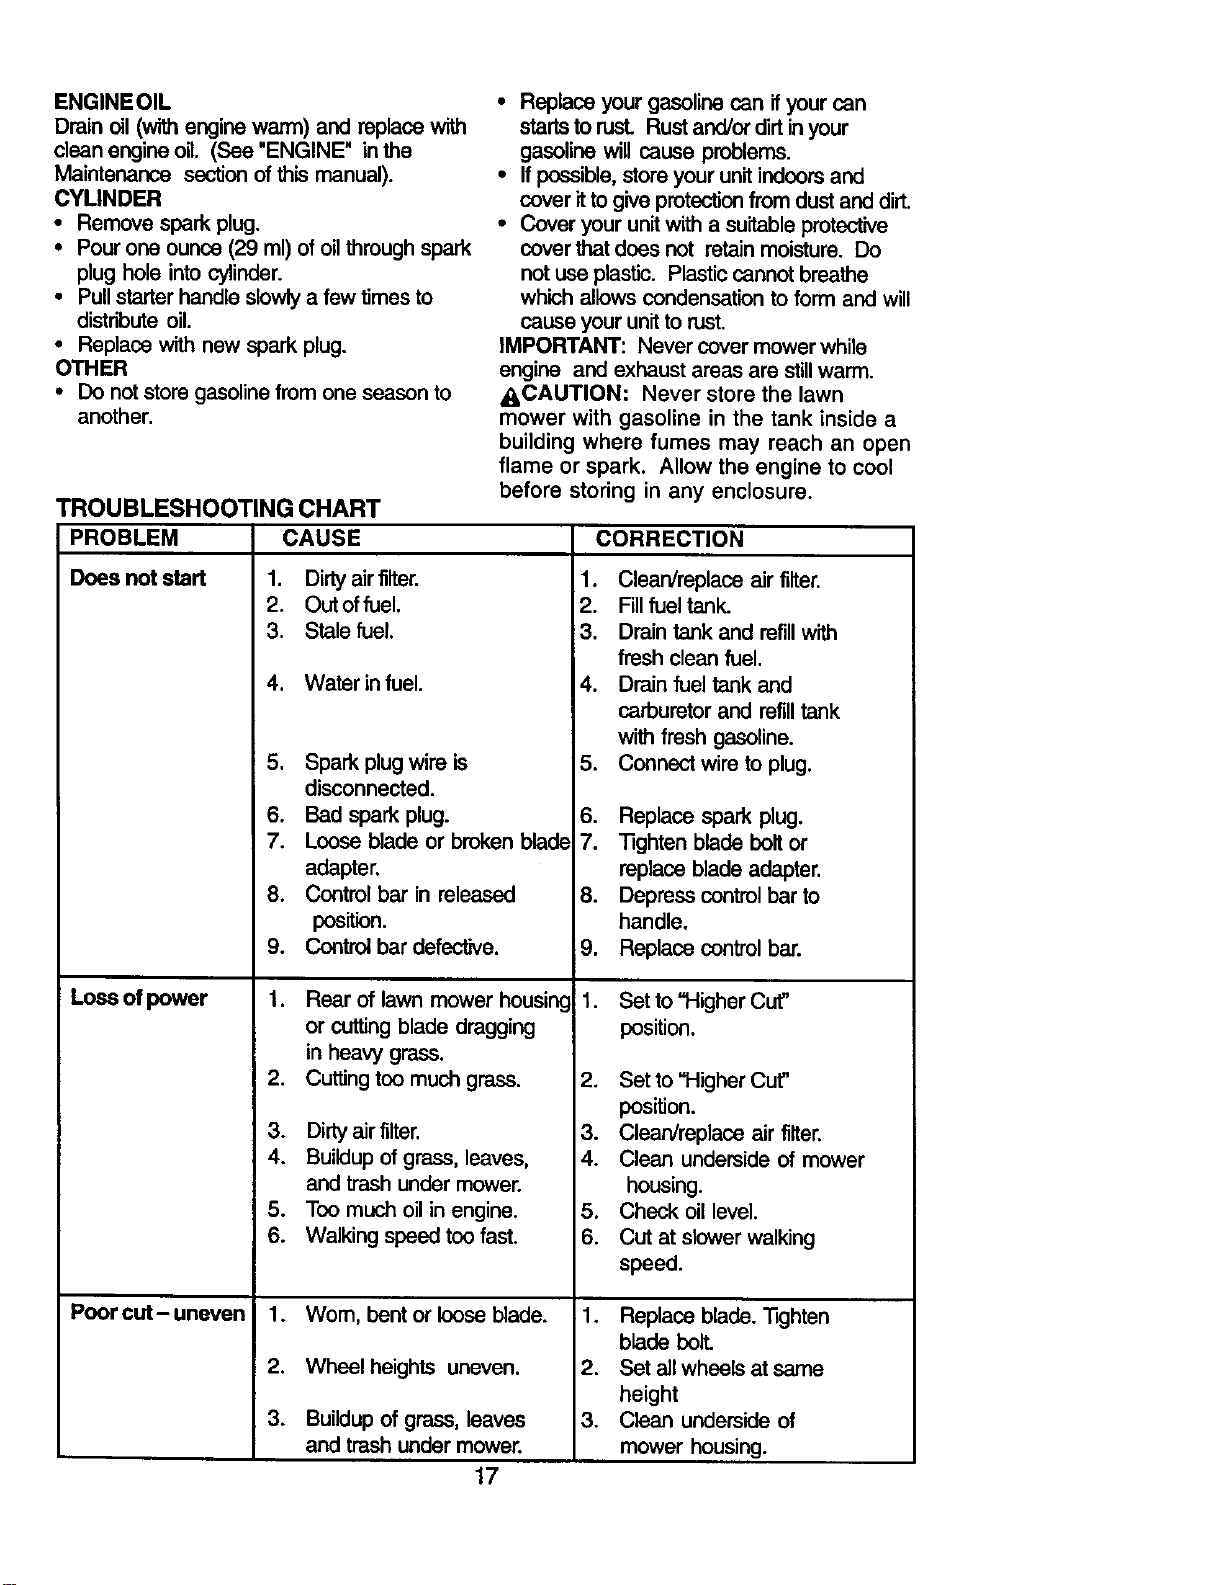
TROUBLESHOOTING CHART
PROBLEM CAUSE
Does not start 1. Dirtyairfilter.
2. Out offuel.
3. Stale fuel.
4. Water in fuel.
.
6.
7.
8.
g.
Loss of power 1.
2.
3.
4.
5.
6.
Poor cut- uneven 1.
2.
3.
Spark plug wire is
disconnected.
Bad spark plug.
Loose blade or broken blade
adapter.
Control bar in released
position.
Control bar defective.
Rear of lawn mower housing
or cutting blade dragging
in heavy grass.
Cutting too much grass.
Dirty air filter.
Buildup of grass, leaves,
and trash under mower.
Ton much oil in engine.
Walking speed too fast.
Wom, bent or loose blade.
Wheel heights uneven.
Buildup of grass, leaves
and trash under mower.
• Replace your gasoline can if your can
starts to rusL Rust and/or dirt inyour
gasoline will cause problems.
• If possible, store your unit indoors and
cover it to give protection from dust and dirt.
• Cover your unit with a suitable protective
cover that does not retain moisture. Do
not use plastic. Plastic cannot breathe
which allows condensation to form and will
cause your unit to rust.
IMPORTANT: Never cover mower while
engine and exhaust areas are still warm.
_,CAUTION: Never store the lawn
mower with gasoline in the tank inside a
building where fumes may reach an open
flame or spark. Allow the engine to cool
before storing in any enclosure.
CORRECTION
1. Clean/replace air filter.
2. Fill fueltank.
3. Drain tank and refillwith
fresh clean fuel.
4. Drain fuel tank and
carburetor and refill tank
with fresh gasoline.
5. Connect wire to plug.
6.
7.
8.
9.
1.
Replace sparkplug.
]3ghten blade holt or
replaceblade adapter.
Depresscontrolbar to
handle.
Replace controlbar.
Set to "Higher Cut"
position.
2. Set to "Higher Cut"
position.
3. Clean/replace air filter.
4. Clean underside of mower
housing.
5. Check oil level.
6. Cut at slower walking
speed.
1. Replace blade. "13ghten
blade holt.
2. Set all wheals at same
height
3. Clean underside of
mower housing.
17

TROUBLESHOOTING CHART
PROBLEM CAUSE CORRECTION
Excessive
vibration
Starter rope hard
topull
Loss of drive
Grasscatcher
notfilling(ifso
equipped)
Hard to push
1. Wom, bent orlooseblade.
2. Bentengine crankshaft.
1. Engineflywheel brake ison
when controlbar is released.
2. Bentenginecrankshaft.
3. Blade adapter broken.
4. Bladedraggingin grass.
1. Drive wheels notturning
with drivecontrolengaged.
2. Beltnot driving
1. Cuttingheighttee low.
2. Liftonbladewom oft.
3. Catchernotventingair.
1. Grassistee highor wheel
heightistee low.
2. Rear of lawnmower
housingor blade dragging
ingrass.
3. Grasscatchertee full.
4. Handle height positionnot
rightforyou.
1. Replace blade. 13ghten
blade bolt.
2. Contact an authorized
service center,
1. Depresscontrolbarto
upper handle before
pullingstarterrope.
2. Contactan authorized
servicecenter.
3. Replace blade adapter.
4. Move lawnmowertocut
grassor tohardsurface.
1. Adjust or replace drive control
cable.
2. Put belt on pulleys or
replace belts if broken.
1. Raise cuttingheight.
2. Replace blade.
3. Cleangrasscatcher.
1. Raise cuttingheight.
2. Raise rear of lawn mower
housingone (1) setting
higher.
3. Emptygrasscatcher.
4. Adjusthandleheightto
suit.
18
Garantl'a
Reglas de Seguridad
Montaje
Operaci6n
Mantenimiento
Programa de Mantenimiento
19 Especificaciones del Producto 28
19 Servicio y Adjustes 31
21 Almacenamiento 33
23 Identificaci6nde problemas 34
27 Partes de repuesto Vea el manual
27 ingl6s del due6o
Orden de Partes Contratapa
GARANFfA UMITADA DE DOS AIqOS PARA LA SEGADORA A MOTOR CRAFTSMAN
Perdos (2) a6es, apartirde la fecha de compra, cuando esta Segadora Craftsman se mantenga,lubrique
y afine segLinlasinstrucoianes para laoperacibn y el mantenimianto an el manuel del duefio, Sears
mpamrd gratistododefectoen el materialy lamano deobra.
Si laSegaderaCraftsman se usaparafinescomercialesode arriende,esta garantfas61ose aplicaper
noventa (90) d{asa parlJrdelafecha de compra.
EstaGarantfano cubre:
• Artfculos que se desgastandurante el usonormal talescomolascuchillassegadorasrotatorias,los
adaptadores de lacuchina,lascorreas,losfiltmsde airey lasbujfas.
• Reparacionesnecesariasdebido al abusooa lanegligenciadeloperador,inclw6ndosea los
cigOe_aiesdobladosy a latara demantenimientodel equiposegL_nlasinstrucelonesquase incluyen
en elmanualdeldue_o.
ELSERVICIO DE GARANTiAESTADISPONIBLE aldevolver lasegadpraa motorCraftsman alCentro/
Departmantode ServloioSearsmas osrcano enlosEstadosUnidos.Estagarantfase aplicasolamente
mientraselproductoesteen usoen losEstadosUnidos.
EstaGarant_'aleotorgaderechos legalesespecfficos, y puede quetambi6ntanga otrosderechos que
varfande estadea estade.
Sears, Roebuckand Co., D/817WA, HoffmanEstates,IL 60179 USA
Los estandrares de seguridedexJganla presencia
del operatoren loscontrolespara reduelra un
minimo eldesgo delesionarse.Suunidadviane
equipadacon dichoscontroles.Pot ningunmo_o
tratedel eliminarlafuncibn de loscontmlesque
exigenla presenciadel operador.
ENTRENAMIENTO:
• Lea este manualdeloperador
cuidedosamente.Familian'cesecon los
controlesy aprenda a operarsu segadora en
forma adecuade. Aprendaa parar su segadora
rdpidamente.
• No permita qua losni_osusensu segadora.
Nuncapermitaque losadultosoperanla
segadora sin contarcon las instrucoiones
adecuadas.
• Mantangaelz_u'eade operackSndespejade
de genre,especialmantede nirlospequerlos
y de animales_licos.
• Use la segadera solamente para losfines
propuestos pot el fabrloante y segOn
les explicacionesdescritas en este manual.
• No opere lasegadorasise ha cafdeo da_ade
en cualquieraforma.Siemprereparelosda_os
antesde usarta.
• No use accesork_ que no hayan side
recornendadospot el fabricante. [] usode
dichos accesoriospuede ser peligroso.
• La cuchilla gira cuandeel motor est_
funcionando.
PREPARACI(SN:
• Siemprerevisecuidadosamenteel drea que se
va a segar y desp_jelade todas laspiedras,
palos,elambres, huesosy otrosobjetos
extra£1os.Est_ objetosserdnlanzades con la
cuchillay pueden producirleslones graves.
• Siempre useanteojosde seguridado
protectoresde ojoscuando arranque y durante
eltiempoque usela segadora.
• Vfstase en fos'naadecuada. No operela
segadera sin zapatoso con sandalias
mientrasque el motor estd funcionando.
19
• Revise el estanque de combustible antes de
hacer arrancar el motor. No Ilene el
estanque de gasolina en recintos cerrados,
ni cuando el motor est_ lunoonando o
cuando estd caliente. Permita que el motor
se enfrfe por varios minutos antes de Ilenar
el estanque de gasolina. Umpie toda la
gasolina derramada antes de hacer
arrancar el motor.
• Siempre haga los ajustes de altura de las
ruedas antes de hacer arrancar su
segadora. Nunca trate de hacer _sto
mientras que el motor estd funcionando.
• Siegue siempre durante el dfa o con buena
luz artit_cia|.
OPERAC|ON:
• Mantenga sus ojos y su mente en la
segadora y en el drea que se estd cortando.
No permita que otres intereses Io distraigan.
• No corte cdsped mojado o resbaloso. Nunca
corra mientras est6 operando su segadora.
Siempre asegdrese de mantener el equilibrio
- mantenga el mango agarrado firmemente y
camine.
• No ponga las manos o los pies osrca
odebajo de las partes rotatodas. Mant_ngase
alejado de la abertura de descarga en todo
momento.
• Siempre pare el motor cuando se vaya
ocuando no est6 usendo su segadora, o
antes de atravesar las entradas pare autos,
los senderos, caminos y dreas cubiertas de
ripio.
• Nunca dirijala descarga del materialhacia
los espectadores ni permita a nadie cerca de
la segadora mientras la estd operando.
• Antes de limpiar, inspeccionaro de reparar I
a segadora, pare el motor y estd
completamente seguro de que la cuchillay
que todas las partes que se mueven se
hayan detenido. Luego, desconecte el
alambre de la bujfa y mant_ngalo alejado de
_sta para evitar el arranque por accidente.
• No continde haciendo funcionar su segadora
si te pega a un objeto extrafio. Siga el
procedimiento descrito anteriormente, luego
repara cualquier da£=oantes de volver a
arrancar y de operar su segadora.
• No cambie los ajustes del regulador o
hagaque el motor ande a una velcoidad
excesiva. Se pueden producir dahos en el
motor y I esiones personales.
• No opere su segadora si vibra fuera de Io
normal. La vibraci6n excesiva es una
indiosci6n de daho; pare el motor, revise en
lorma segura la causa de la v_braci6n y haga
las reparaciones seg_n sea necesado.
• No haga funcionar el motor en
recintoscerrados. Los gases de escape son
peligrosos.
• Nunca corte el crisped tirando la segadora
hacia usted. Siegue a travds de la cara de
las pendientes, nunca hacia arriba o hacia
abajo pues pueds perder el equilibrio.No
siegue pendientes demasiado empinadas.
Tenga cuidado cuando opere la segadora en
terreno disparejo o cuando cambie de
direcci6n- mantenga un buen equilibrio.
• Nunca opere la segadora sin las
protecciones adecuadas, las planchas, el
recogedor de c6sped y otros dispositivosde
seguridad en su lugar.
MANTENIMIENTO Y ALMACENAMIEN-
TO:
• Revise la ouchilla y los pemos de montaja
del motora menudo, para asegurarse que
estdn apretados en la forma adecuada.
• Revise todos los pemos, tuercas ¥ tomil_os a
intervalos frecuentes, para verificar si est:_n
apretados en forma adecuada, y
asegurarseque la segadora se encuentra en
condiciones de funcionamiento seguro.
• Mantenga todos los dispositivos de
seguridad en su lugar y listos pare funcionar.
• Para redu¢ir el peligro de insendio,
mantenga el motor sin c_sped, hojas y grasa
o aceite en exceso.
• Revise el recogedor de c_sped a menudo
para vedficar si hay detedore y desgaste y
cambie las bolsas desgastadas. Use
solamente las bolses de repuesto
recomendadas por el fabricante de su
segadora o que cumplen con las
especificaciones de 6ste.
• Siempre mantenga una cuchillaafUadaen su
segadora.
• Siempre permitaque el motorse enfrie
antes de guardada en cualquier recinto
cerrado.
• Nunca guarde la segadora con combustible
en el estanque dentre de un edificioen
donde los gases pueden alcanzar una llama
expuesta o una fuente de ignlci6n,tal como
el calentadorde agua, la estufa de
¢alefacci6n, la secadora de ropa, etc.
_,Busque este simbolo que sehala las
precauciones de seguridad de impor-tancia.
Quiere decir- lliATENCl0N!!! liiESTE
ALERTOll! SU SEGURIDAD ESTA
COMPROMETIDA.
APRECAUClON: Siempre desconecte el
alambre de la bujia y p6ngalo donde no pueda
entrar en contacto con ta buj(a, para evitar el
arranque por accidente, durante la
preparaci6n, el transports, el ajuste o cuando
se hacen reparaciones.
_,PRECAUCION: Es conocido por el Estado
de California que los gases de escape del
motor de este productor contienen qufmicos
los cuales a ciertos niveles, pueden ocasionar,
cdncer, defactos de nacimiento, y otros dahos
al sistema reproductivo.
20
Estosacossodosestaban disl:x_iblescuando se produjola segadora. No son facilltados junto al
cortacesped. Tambidn est,_L,qdisponiblosen lamayorfade laslJendesde Sears y en loscentresde
servicio.La mayorfade lastiendasSearstambi_npueden mandara pedir panes de repuestopara
usted,siles proporcionael n0mem del modelode su segadora.Algunosde estosaccesoriostalvez no
se apliquena susegadora.
RENDIMIENTO DE LA SEGADORA
DESVIADOR DE RECORTES
PARA SEGADORAS CON DESCARGA TRASERA
RECOREDOR
PAPA
SEGADORAS
CON DESCARGA
TPASEPA
JUEGOS PARA LA ACOLCHADORA
MANTENIMIENTO DE LA SEGADORA
RECOREDOR
PAPA
SEGADOPAS
CON DESCARGA
LATERAL
ESTABILIZADORIES
E_ASES
DE GASOLINA
SILENCIADORES
FILTROS DE AIRE
ADAPTADORES
DE CUCHILLA
RUEOAS
ACEn'E
DEL MOTOR
Lea estas instruccionesy este manual
completamente antesde tratarde mantar u
operarsu segadora nueva.
IMPORTANTE: Este cortacespedviene SIN
ACEITE O GASOUNA en el motor.
Su segadoranuew ha side montadeen lafdbrica
conla excepci6nde aquellaspartesque se
dejaron sinmontarporrazonesde envio.Todas
les partescomo las tuercas,las arandelas,los
pernos,etc., que son necesariaspara completar
el montajehart sidecolocadesen laboisede
partes.Para asegurarseque su segadora
funcioneen formasegum y adecuada, tedes les
panes y los artfculosde ferreter[a que se monten
tienenque serapretadesseguramente.Use las
herramientas correctes,coma sea necesario,
pera esegurar que se aprietenadecuadamente.
PARA REMOVER LA SEGADORA DE
LA CAJA DE CARTON
• Remueva laspartes sueltesque se induyen
con la segadera.
• Cortelasdos esquinasde losextremosde la
cajade cartSny tJendael paneldel extremo
• Rernueva todoel material de empaque, excepto
la cuba entreel mango supedory dl inferior,y la
cuba que sujeta la barra de los control que
exige la presencia del operador junto con el
mango superior.
• Haga rodar la segadora hacia afuerade la caja
de cart6ny reviselacuidadosamente pera
verificarsi tedavia quedan partes sueltas
adicionales.
COMO PREPARAR SU SEGADORA
PAPA DESDOBLAR EL MANGO
IMPORTANTE: Despliegueelmangocon mucho
cuidadepara no pellizcaro der_arloscablesde
control.
• Levante losmanges hastaque la secci6ndel
mangoinferiorse asegureen sulugar,en la
posici(_npara segar.
• Remueva la cuha pmtectora,levante la secoibn
del mangosuperiorhestasu lugaren el mango
inferior,y aprieteambas manillesdel mango.
• Remueva la cuSadel mangoque sujetala barra
de loscontrolque exige la presenciadel
operadorjuntocon el mangosuperior.
21
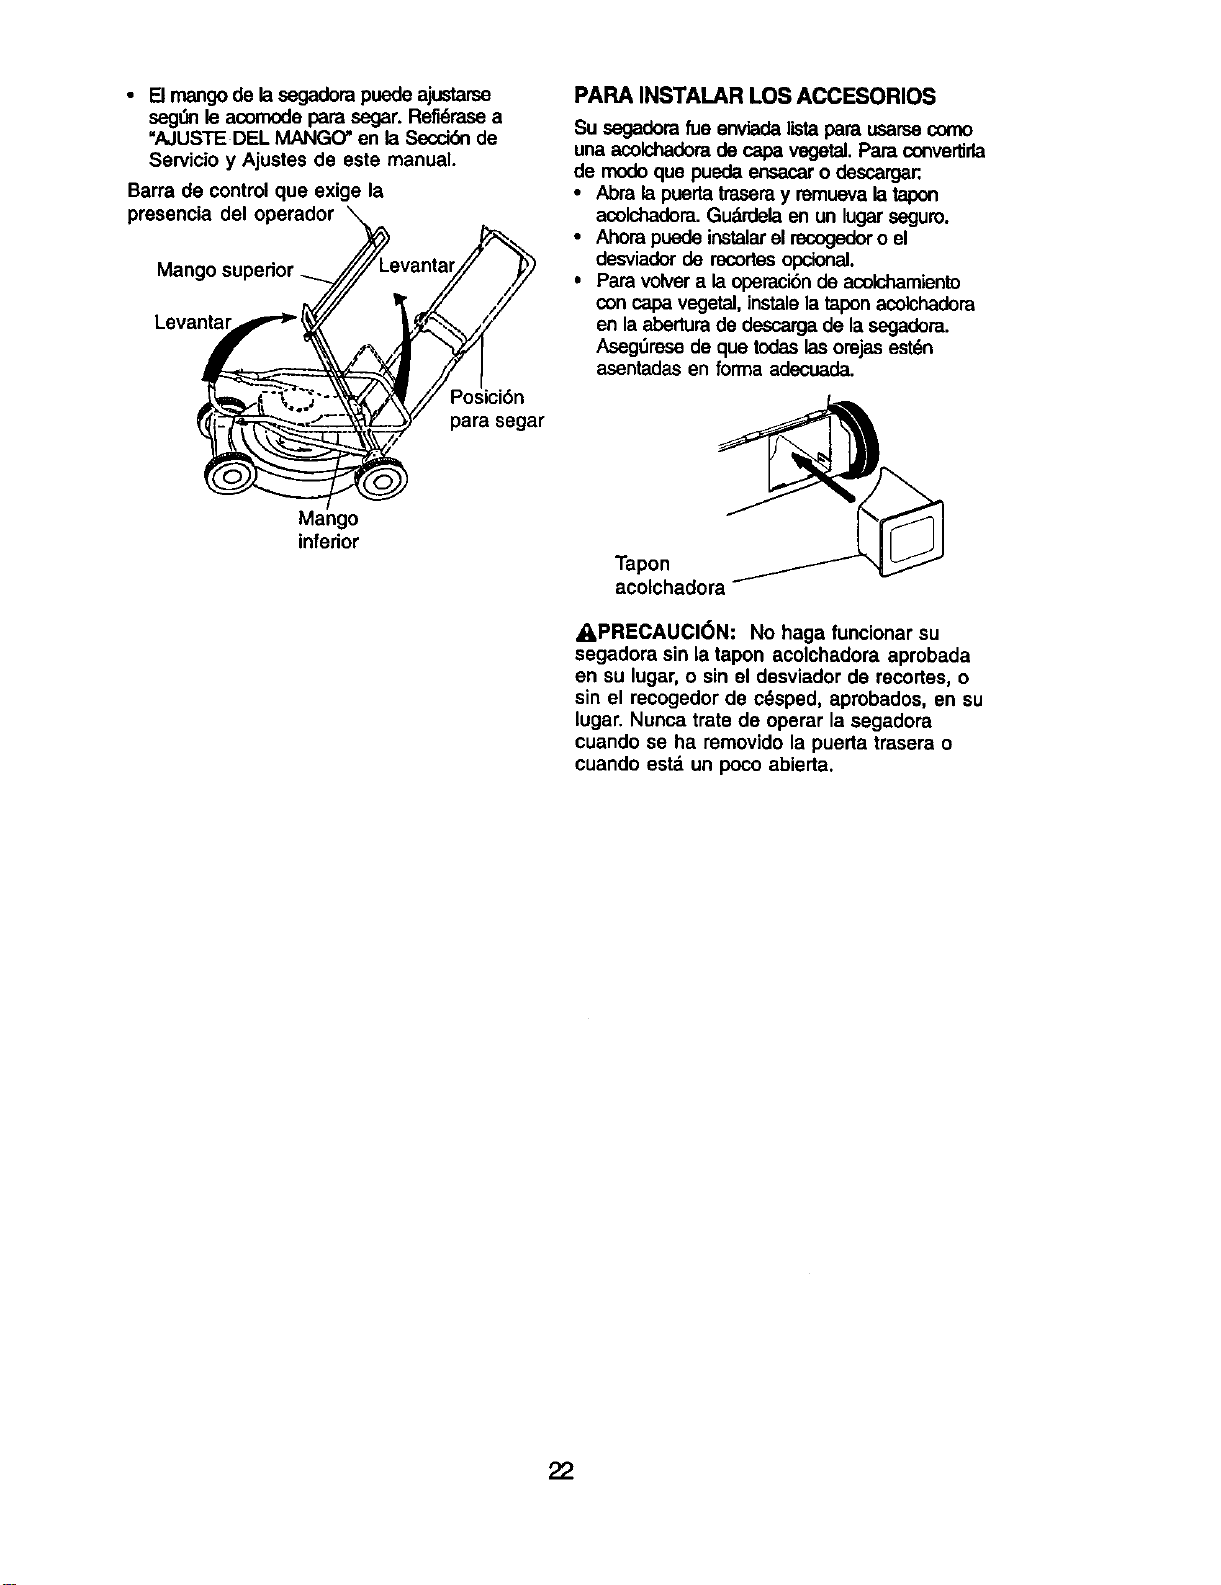
• Elmango de lasegadorapuedeajustarse
seg0nleacomoda parasegar.Refidrasea
"AJUSTE DEL MANGO _en laSecoidnde
Servicioy Ajustesde estemanual.
Barra de control que exige la
prosencia del operador
Mango superior
Levantar
PAPA INSTALAR LOS ACCESORIOS
Su segadorarue enviadalistapara usarsecomo
una acolchadorade capa vegetal.Para convertJrla
de modoque pueda ensacaro descarga_,
• Abrala puertatraseray remuevala tapon
acolchadora.Gu_rdela en un lugarseguro.
• Ahorapuedeinstalarel recogedoro el
desviadorde recortesopcional.
• Para volvera laoperack_nde acolchamiento
con capavegetal,instalala taponacolchadora
en la aberturade descargade la segadora.
Aseg_resede que todas lasorejasest_n
asentadas en forma adecuada.
parasegar
Mango
inferior
Tapon
acolchadora
_,PRECAUCl6N: No haga funcionar su
segadora sin la tapon acolchadora aprobada
en su lugar, o sin el desviador de recortes, o
sin el recogedor de c_sped, aprobados, en su
lugar. Nunca trate de operar la segadora
cuando se ha removido la puerta trasera o
cuando estd un poco abierta.
22
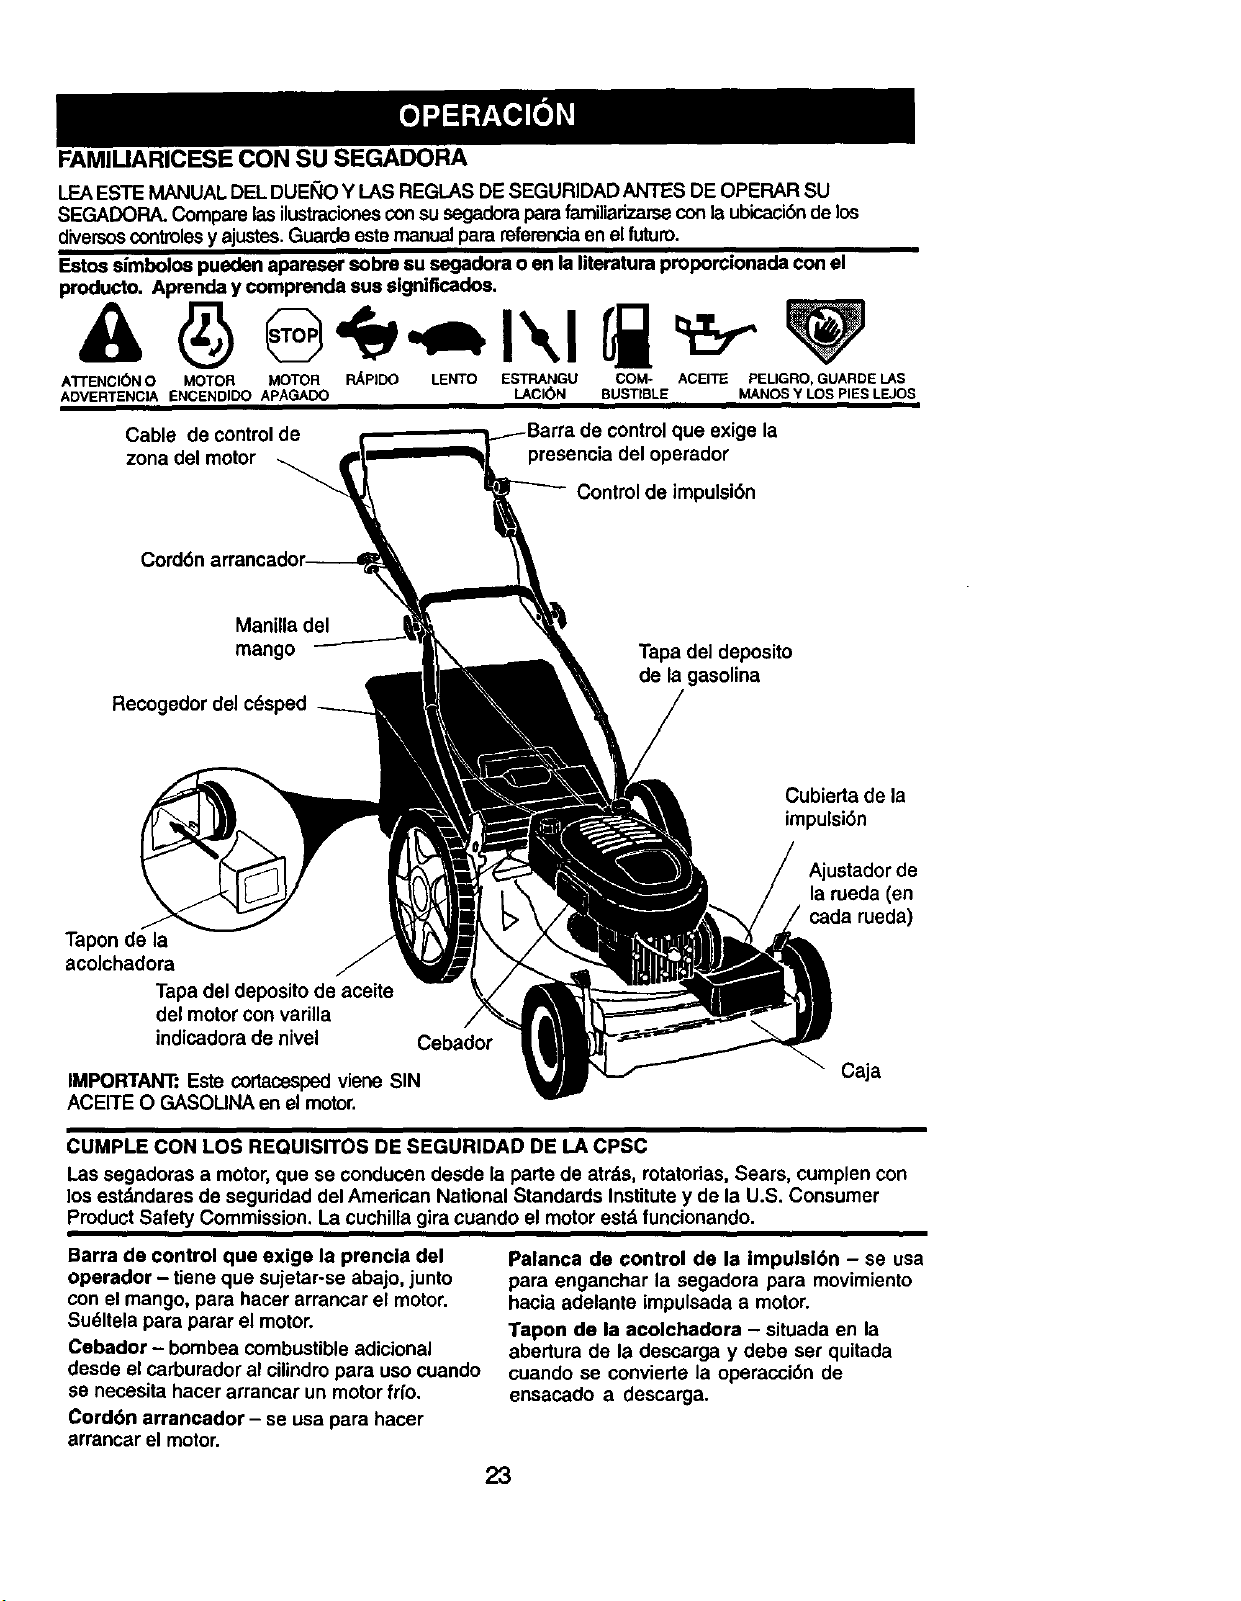
FAMIUARICESE CON SU SEGADORA
LEAESTE MANUAL DEL DUEI_IOY I_ASREGLAS DE SEGURIDAD ANTES DE OPERAR SU
SEGADORA. Comparelasilustracionesconsusegadoraparafamiliarizarse conla ubicaci6ndelos
diversoscontrolesy ajustes.Guarde estemanualpara referenciaen el futuro.
Estos slmbolos pueden apareser sobre su segadora o en la literatura proporcionada con el
producto. Aprenda y comprenda sus signiflcados.
ATrENCI(_N O MOTOR MOTOR R_PIDO LENTO ESTRANGU COM- ACEITE PELIGRO, GUARDE LAS
ADVERTENCIA ENCENDIDO APAGADO LACI(_N BUSTIBLE MANOS Y LOS PIES LEJOS
Cable de controlde
zona del motor --._
que exige la
presencia del operador
Control de impulsi6n
Manilla del
mango
Recogedor del c6sped
Tapa del deposito
de la gasolina
Cubierta de la
impulsi6n
Tapon de la
acolchadora
Tapa del depositode aceite
del motor con varilla
indicadora de nivel
Cebador
IMPORTANT: Este cortacespedviene SIN
ACEITE O GASOUHA en el motor.
Ajustador de
la roeda (en
cada rueda)
Caja
CUMPLE CON LOS REQUISITOS DE SEGURIDAD DE LA CPSC
Las segadoras a motor,que se conducen desde la parte de atrds, rotatodas, Sears, cumplen con
los estdndares de seguridad del American National Standards Institutey de la U.S. Consumer
Product Safety Commission. La cuchilla gira cuando el motor estd funcionando.
Barra de control que exige la prencla del
operador - tiene que sujetar-se abajo, junto
con el mango, para hacer arrancar el motor.
Sudltela para parar el motor.
Cebador - bombea combustible adicional
desde el carburador al cilindropara uso cuando
se necesita hacer arrancar un motorfifo.
Cord6n arrancador - se usa para hacer
arrancar el motor.
Palanca de control de la Impulsl6n - se usa
para enganchar la segadora para movimiento
hacia adelante impulsada a motor.
Tapon de la acolchadora - situada en la
abertura de la descarga y debe ser quitada
cuando se convierte la operacci6n de
ensacado a descarga.
23
La operaci6n de cuelquier segadora
puede hacer que salten objetos
extraSos dentro de sus ojos, Io qua
puede producir daSos graves en
6stos. Siempre use anteojos de seguridad o
proteccibn para los ojos mientras opere su
segadora o cuando haga ajustes o
reparaciones. Recomendamos una mascara
de seguddad de visi6n amplia, para uso
espejuelos o anteojos de seguridad
estandarte.
COMO USAR SU SEGADORA
VELOClDAD DEL MOTOR
La velocidad del motorse estableci6 en la
fdbrica pare un rendimiento6ptimo. La
velocidad no se puede ajustar.
CONTROL DE ZONA DEL MOTOR
_,PRECAUCI6N: Las regulaciones federales
exigen qua se instale un control para el motor
en esta segadora para reducir a un mfnimo el
riesgo de lesionarse debido al contacto con la
cuchilla. Por ningt_nmotivo trate do eliminar la
funci6n del controldel operador. La cuchilla
gira cuando el motor estd funcionando.
• Su segaderaviene equipadacon una barra de
controlque exige la presencia del operador, lo
que requiem que el operador estd detrds del
mango de la segadora para hacerla arrancary
operada.
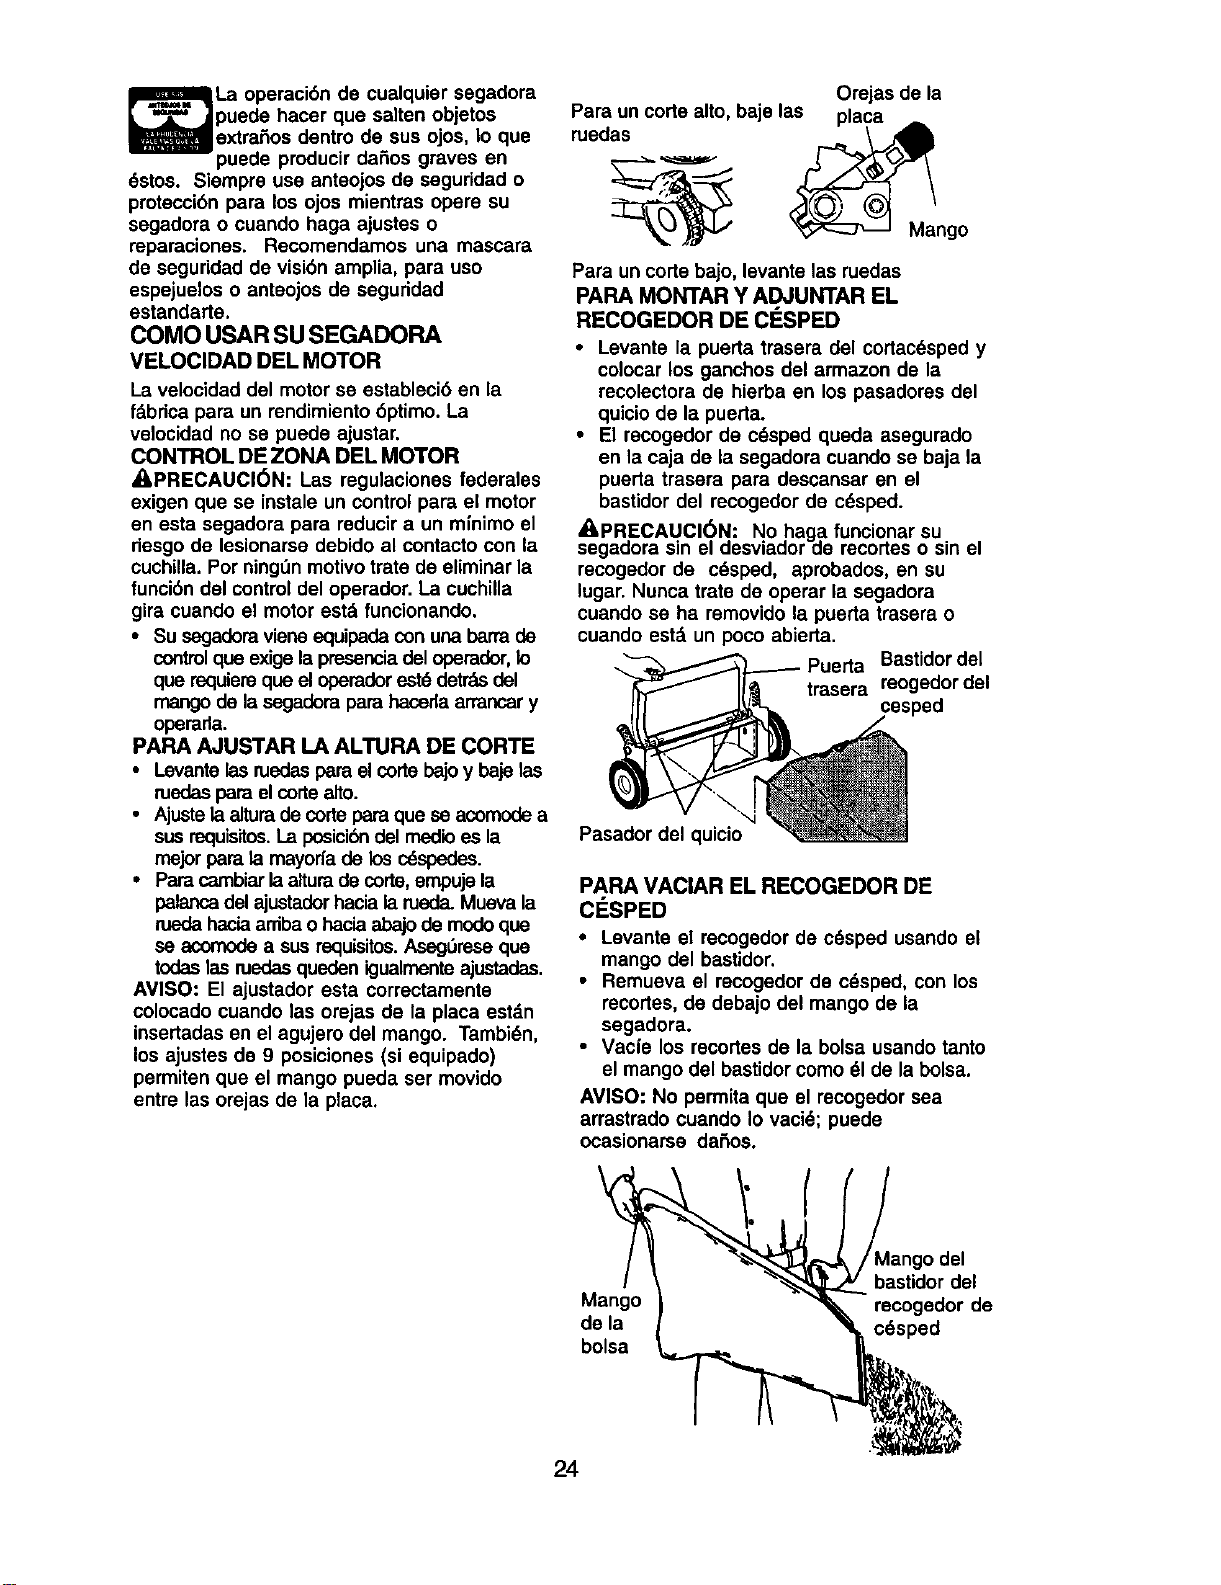
PARA AJUSTAR LA ALTURA DE CORTE
• Levantelas ruedaspara el corte bajoy baje las
ruedaspara el corte alto.
• Ajustelaalturade corte paraque se acomodea
susrequisitos.La posicibndel medioes la
majorpara la mayoda de los c_spedes.
• Para cambiarla altura de corte,empujela
palancadel ajustaderhaciaia meda. Mueva la
ruedahaciaardba o haciaabajode modoque
se acomodea sus requisitos.Aseg5rese que
todeslas ruedasqueden igualmenteajustadas.
AVISO: El ajustador esta correctamente
colocado cuando las orejas de la placa estdn
insertadas en el agujero del mango. Tambi6n,
los ajustes de 9 posiciones (si equipado)
permiten que el mango pueda ser movido
entre las orejas de la placa.
Orejas de la
P2r;uncortoelto,ba o'o
_ Mango
Para un corte bajo, levante las ruedas
PARA MONTAR Y ADJUNTAR EL
RECOGEDOR DE CESPED
• Levante la puerta trasera del cortac6sped y
celocar los ganchos del armazon de la
recolectora de hierba en los pasadores del
quicio de la puerta.
• El recogedor de c6sped queda asegurado
en la caja de la segadora cuando se baja la
puerta trasera para descansar en el
bastidor del recogedor de c6sped.
_,PRECAUCl6N: No .hagafuncionar su .
segadora sin el desviaaor as recortes o sin el
recogedor de c6sped, aprobados, en su
lugar. Nunca trate do operar la segadora
cuando se ha removido la puerta trasera o
cuando esterun _oco abierta.
Puerta Bastidordel
trasera reogedor del
cesped
Pasador del quic0o
PAPA VAClAR EL RECOGEDOR DE
ClaSPED
• Levante el recogedor de c6sped usando el
mango del bastidor.
• Remueva el recogedor de c_sped, con los
recortes, do debajo del mango de la
segaclora.
• Vacl'e los recortes de la bolsa usando tanto
el mango del bastidor como 61de la bolsa.
AVISO: No permita que el recogedor sea
arrastrado cuando Io vaci6; puede
ocasionarse daSos.
c/
del
basUdordel
Mango recogedor de
de la c6sped
bolsa
24
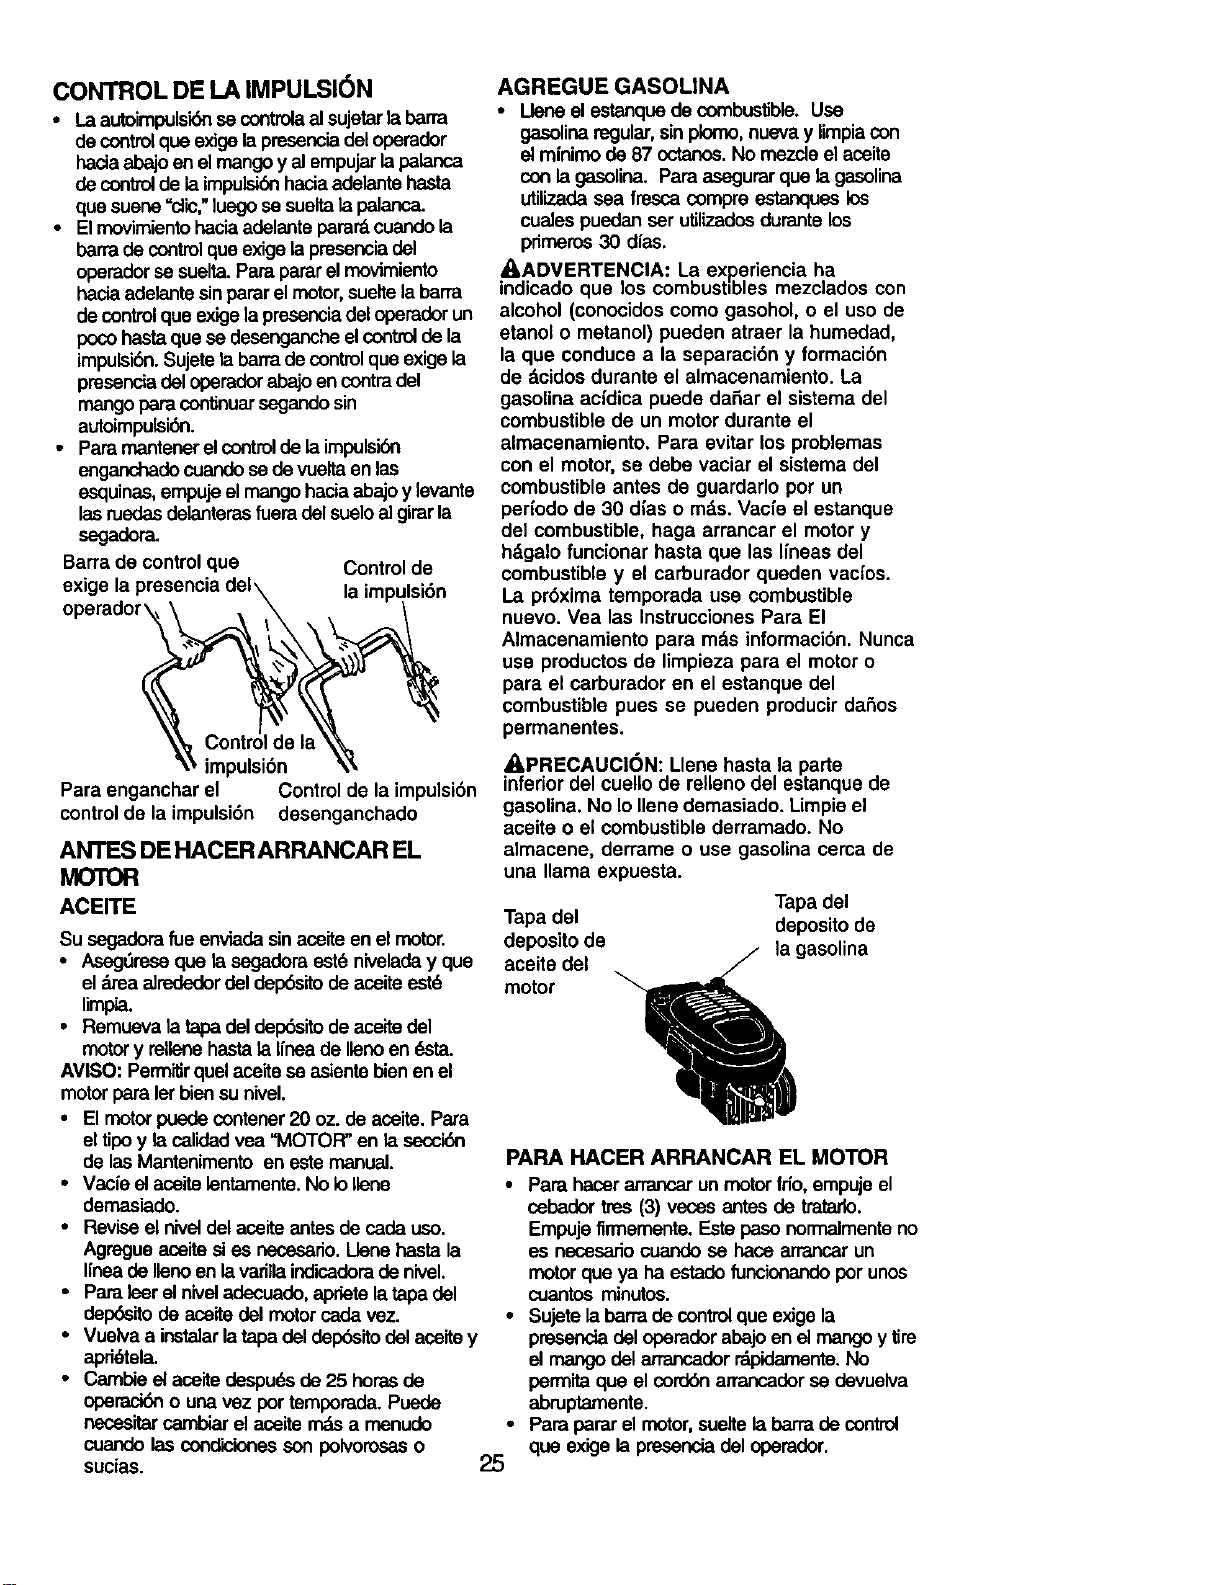
CONTROLDELA IMPULSIdN
• La autoimpulsk_se controlaalsujetarlabarra
de controlque exigelapmsenciadeloperador
haciaabajoen elmangoy el empujarlapalanca
de controlde laimpulsidnhaciaadelentehaste
que suene=dic,"luegose sueltala palanca.
• El movimient_ hacia adelante parard cuando la
barra de control que exige la presencia del
operador sesuelta. Para parar el rnovimianto
hacia adelante sin parar el motor,suelte la barra
de control que ex'_jelapresencia del operador un
poco hasta que se desenganche el controlde la
impulsibn. Sujete la barra de control que exige la
preseneladel operadorabajo an contradel
mangopara conUnuarsegandosin
autoimpulsibn.
• Paramantenerelcontrolde laimpulsibn
enganchado ¢uandose de vuelta en las
esquinas, empuje el mango hacia abajo y levante
las medas delanteras fueradel suelo al girar la
segadora.
Barra de control que Control de
exige la impulsidn
impulsidn
Para enganchar el Control de la impulsidn
control de la impulsidn desenganchado
ANTES DE HACER ARRANCAR EL
MOTOR
ACEITE
Su segadorafueenviadasinaceltean el motor.
• /_drese que la segadoraest6 niveladay que
eldrea alrededor del depdsitode aceiteestd
limp .
• Remueva tatapadel depdsito de aceltedel
motor y rellenehastata tineade Ilenoen dsta.
AVISO: Perm'_rquelacelte se aslente bienenel
motorpara let biensu nivel.
• El motorpuedecontener20 oz. de acelte. Para
el tipoy la calidadvea "MOTOR" en la seccidn
de las Mantenimento en este manuel.
• Vacle el aceite lentamente. No le Ilene
demasiado.
• Revise el niveldel aceiteantesde cada uso.
Agregueaceltesies necesario.Uene hastela
IIneade Ilenoen lavarillaindk:adoradenivel.
• Para leer elniveladecuado, aprietelatapa del
derx odeaceRedelmotorcada vez.
• Vuelva a instalarlatapa del del:x_sitodel aceitey
apddtela.
• Cambieel aceitede.spudsde 25 horasde
operack_ o unavez portemporada.Puede
necesitarcambiarelaceite mdsa menudo
cuandolas condicionesson polvoroseso
suc{as.
25
AGREGUE GASOUNA
• Lleneel estanquede combustible.Use
gasolinaregular,sin plomo,nuevay iimpiacon
el minimode 87 octanos.No mazcle el acelte
con lagasolina. Para asegurar que la gaselina
utilizada sea frescacompre estanques los
cueles puedan ser utilizados durantelos
primaros 30 d{as.
AADVERTENCIA: La experiencia ha
indicado que los combusbbles mezclados con
alcohol (conocidos como gasohol, o el uso de
etanol o metanol) pueden atraer la humedad,
la que conduce a la separacidn y formacidn
de dcidos durante el almacenamiente. La
gasolina acidica puede dafiar el sistema del
combustible de un motor durante el
almacenamiento. Para evitar los problemas
con el motor, se debe vaciar el sistema del
combustible antes de guardarlo por un
per{odo de 30 d{as o mds. Vac{e el estanque
del combustible, haga arrancar el motor y
hdgalo funeionar hasta que las lineas del
combustible y el carburador quedan vact'os.
La prdxima temporada use combustible
nuevo. Vea las Instrucciones Para El
Almacenamiento para rods informacidn. Nunca
use productos de limpieza para el motor o
para el carburador en el estanque del
combustible pues se pueden producir daSos
permanentes.
APRECAUCI()N: Llene hasta la parte
inferiordel cuello de relleno del estanque de
gasolina. No Io Ilene demasiado. Limpie el
aceite o el combustible derramado. No
almacene, derrame o use gasolina cema de
una llama expuesta.
Tapa del
deposito de
aceite del
motor
Tapa del
deposito de
la gasolina
PARA HACER ARRANCAR EL MOTOR
Para haser arrancar un motor Ido, empujeel
cebador tres (3) yeses antes de tratarlo.
Empujefirmemente.Este paso normalmente no
es necesariocuandose base _ un
motor que ya ha estado funcianando por unos
cuantos minutos.
Sffjete la barra de control que exigela
presencia del operaderabajo en el mango y tire
el mangodel arrancador rdpidamente.No
permita que el cordSn arrancador se devuelva
abruptamente.
Para parar el motor, suelte la barra de control
que exige la presencia del operador.
AVISO: En climas mds fdos puede que sea
necesario repetir los pesos del cebado. En
climas mds calurosos el cebar demasiado
puede producir el ahogo y el motor no va a
arrancar. Si se ahoga el motor espere unos
cuantos minutos antes de tretar de hacedo
arrancar y no repita los pasos del cebado.
CONSEJOS PARA SEGAR
• Bajo ciertas condiciones, tal como c6sped
muy alto, puede ser necesario el elevar la
altura del corte pare reducir el esfuerzo
necesario para empujar la segadora y para
evitar sobrecargar el motor, dejando
montones de recortes de c_sped. Puede
que sea necesario reducir la velocidad del
recorrido y/o haga funcionar la segadora
sobre el drea por segunda vez.
• Para un corte muy pesado, reduzca el
ancho del corte pasando parcialmente por
encima del lugar anteriormente cortado y
siegue lentamente.
• Para un mejor ensacado del c6sped y para
la mayoria de las condiciones de code, la
velocidad del motor debe ajustarse a la
posici6n de rdpido.
• Cuando use una segadora con descarga
trasera en c_sped h_medo y pesado, los
montones del c_sped cortado puede que no
entren en el recogedor de c6sped. Reduzca
la velocidad del recorrido (velocidad de
empuje) y/o haga funcionar la segadora
sobre el &rea por segunda vez.
• Si queda una huella de codes en el lado
derecho de una segadora con descarga
trasera, siegue en la direcci6n en que giran
las manillas del reloj, solapando un poco
para recaudar los recortes en la pr6xima
pasada.
• Los poros en los recogedores de c6sped de
tela pueden Ilenarse con mugre y polvo con
el uso y los recogedores recaudardn menos
c6sped. Para evitar _sto, rocfe el recogedor
con la manguera de agua regularmente y
d6jelo secarse antes de usarlo.
• Mantenga la pade superior del motor,
alrededor del arrancador, despejada y sin
recortes de crisped y paja. Esto ayudard el
flujo del aim del motor y extender& su
duraci6n.
CONSEJOS PARA SEGAR Y ACOLCHAR
IMPORTANTE: Pare obtenorel meW rendimeinto
mantangalacaja de lasegadora sin acumlacicn
de cesped y basura.Vea "LIMPIEZA" en seccion
de"Mantenimento"de este manual..
• La cuchillaacoichaderaespecialva a volvera
cortar los recortesde c_sped m_ veces,
y los reduceen tarna_, de modoque sise
caen en elc_sped se van a dispesarentre
6ste y no se van a notar. Tambi6n,el crisped
acolchadose va a deshacerrdpidamente
entmgando substanciasnutritivas para el
c__.sped.Siempreacolchecon laveiceldaddel
motor (cuchilla)m_s elta, pues asf se obtendr'&
la mejoraccibnde recortede lascuchiltas.
• Evitecortar el c_spedcuandoestdmojado.El
crispedmojadet_endea formarmontonese
inte_ere con la acck_nde acolchado.Lamejor
hora para segarel c_spedes tempranoen la
tarde.A esa hora6ste se hasecado y el drea
recidncortada no quedardexpuestael sol
directo.
• Pare obtenerlos mejores resultados,ajustela
alturadel corte de la segadorade modeque
dsta code solamenteel terciosuperiorde las
hojasde c_.sped.En el casode que elc6sped
haya crecidodemas_de, puedeser necesario
el elevar la eltura del corte para reducirel
esfuerzo necesado para empujar la segadora y
para evitar sobrecargar el motor, dejando
montonesde recortesde c_sped.Para un
acoichamientomuy pesade, reduzcael ancho
del corte pasandeporencirr_ del lugar
anterionnonte cortadoy sieguelentamente.
• Ciertos tipes de c_spedy sus condiciones
puedenexigirque un dreatenga que ser
acoichadaporsegundavez pera esconder
completamentelosrecortes.Cuando se haga
el segundocode, siegueatravesade o en
forma perpendicular a lapasada detpdmer
code.
• Cambie supetr_n de codede semanaa
semana. S'_gue de nortea suruna semanay
luego cambiede estea oeste la prbxima
semana. Esto evitardque elc_sped se enrede
y cambie de direcci6n.
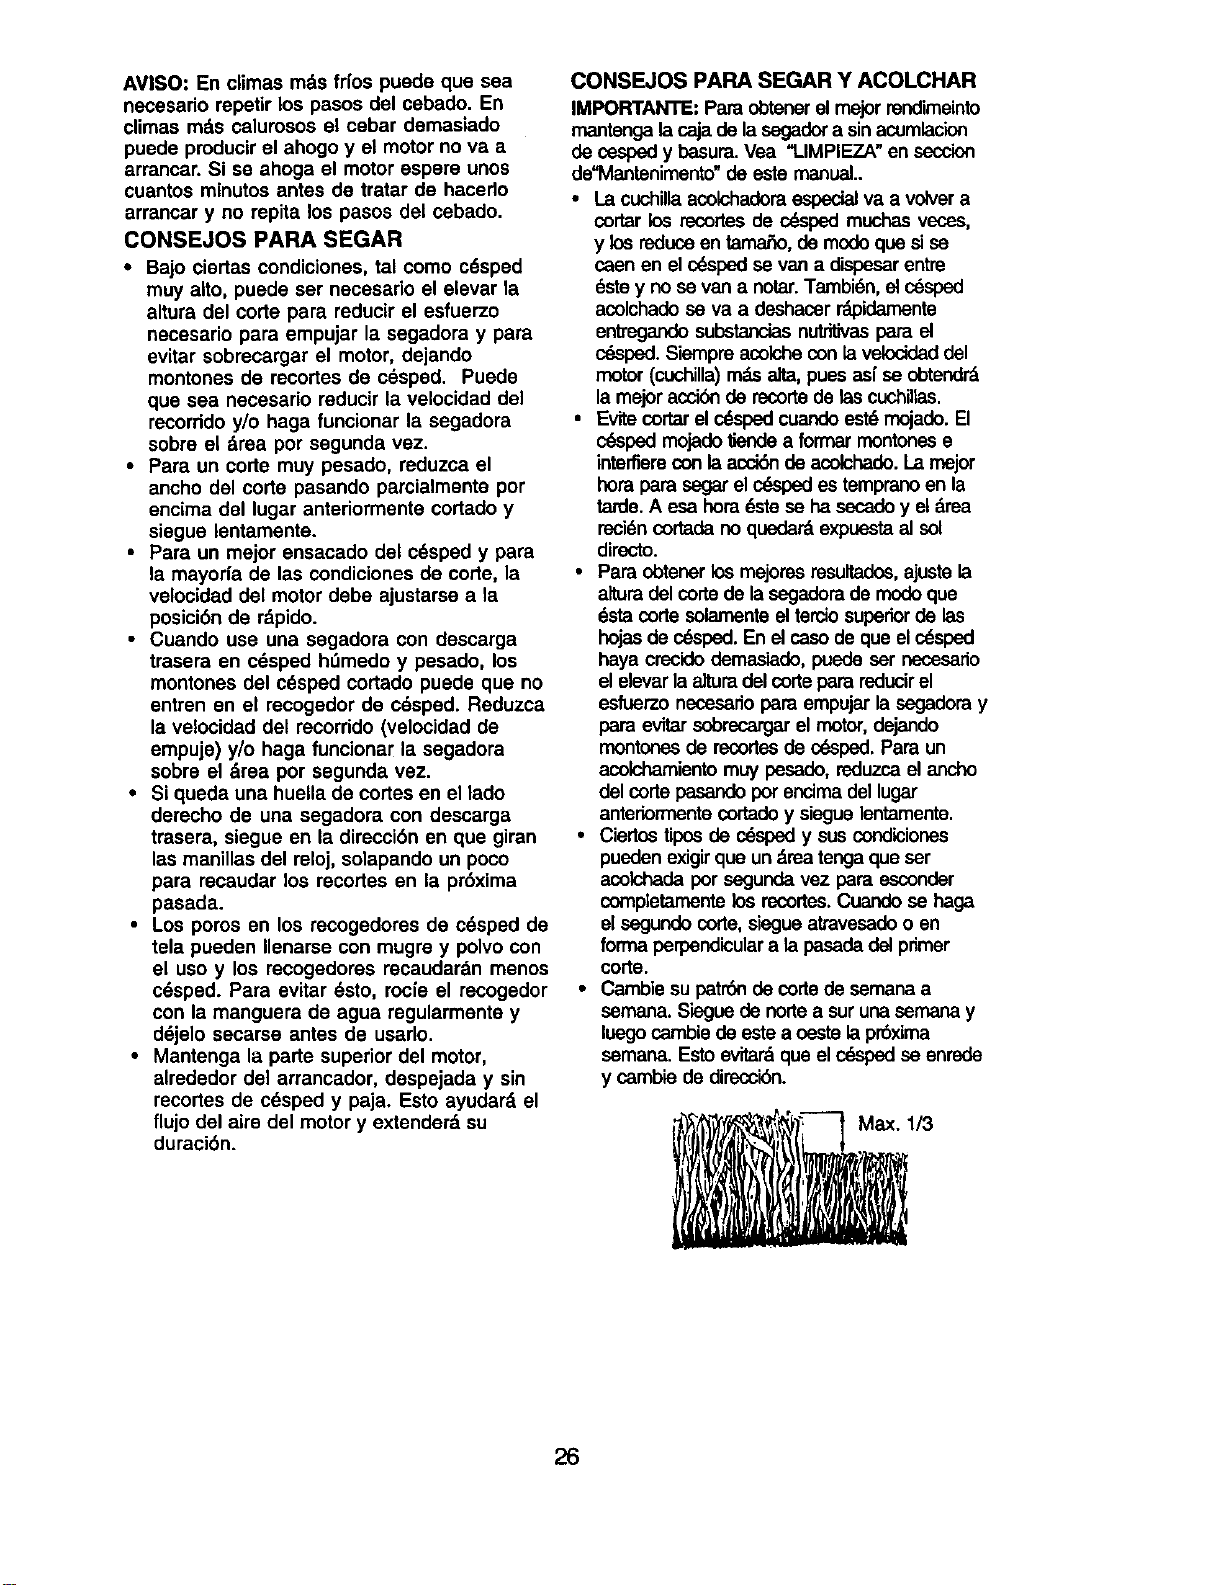
26
ooECOMPLETESUSE.V,C,O
Revisar el hay suietadores sueltos _
Umpiadinspeccionar el recogedor de
S c6sped (si viene equipad°) _ V_
Umpiar la segadora
_ Um_iar debajo de la cubieda de la trans-
rnis=bn(segadoras con poder propulsor) _#1
Revisar las correas y las poleas impul-
sadas (se_doras con poder propulsor)
OR Revisar o/afilar/cambiar la cuchilla t_1
A Tabla de lubdcacibn _ If
Lirnpiar la bateda/recargar
(segadoras con arranque elq_trlco) If IP/4
M Revisat el nivel del aceite _1_
O Carnbiar el aceite del motor 1_!,2
Umpiar el filtrode aire V'2
O Inspecoionar el silenciador I_
V
Lirnpiaro/carnbiar la bujra
Carnbiar el cartucho de pal)el del filtro 2
de aim
1- Cambiarrn_samenudocuandoseoperebajocargadesadao en ambientescon_tas temperaturas.
2 - Darse_iciornds@mertudocuandor,eopereencofldick_nessuclaso polvorosas,
3 - Camble las cuchillas _ a rnenudo ouando siegue en terreno arenoso.
4 - Cargat por 48 horas al fin de latemporada.
RECOMENDAClONES GENERALES
La garantla de esta segadora no cubre los
articulosque han estado sujetosal abuso o a la
negligencia del operador. Para recibirtodo el
valor de la garantla, el operador tiene que
mantener la segadora segL_nlas instrucciones
descritas en este manual.
Hay algunos ajustes que se tienen que hater en
forma peri_lica para poder mantener su unidad
adecuadamente.
Todos los ajustes en la secci6n de Servicio y
Ajustes de este manual tienen que set
revisados por Io menos un vez pot cada
temporada.
• Una vez al aRo,cambie la bujia, limpie o
cambie el elemento del filtro de aire y revise
si la cuchillaestd desgastada. Una bujl'a
nueva y un elemento del filtro de aim limpio/
nuevo aseguran la mezcla de aire-combus-
tibleadecuada y ayudan a que su motor
funcione mejor y que dure mds.
• Siga el programa de mantenimiento en este
manual.
ANTES DE CADA USO
• Revise el niveldel aceite del motor.
• Revise si hay sujetadores sueltos.
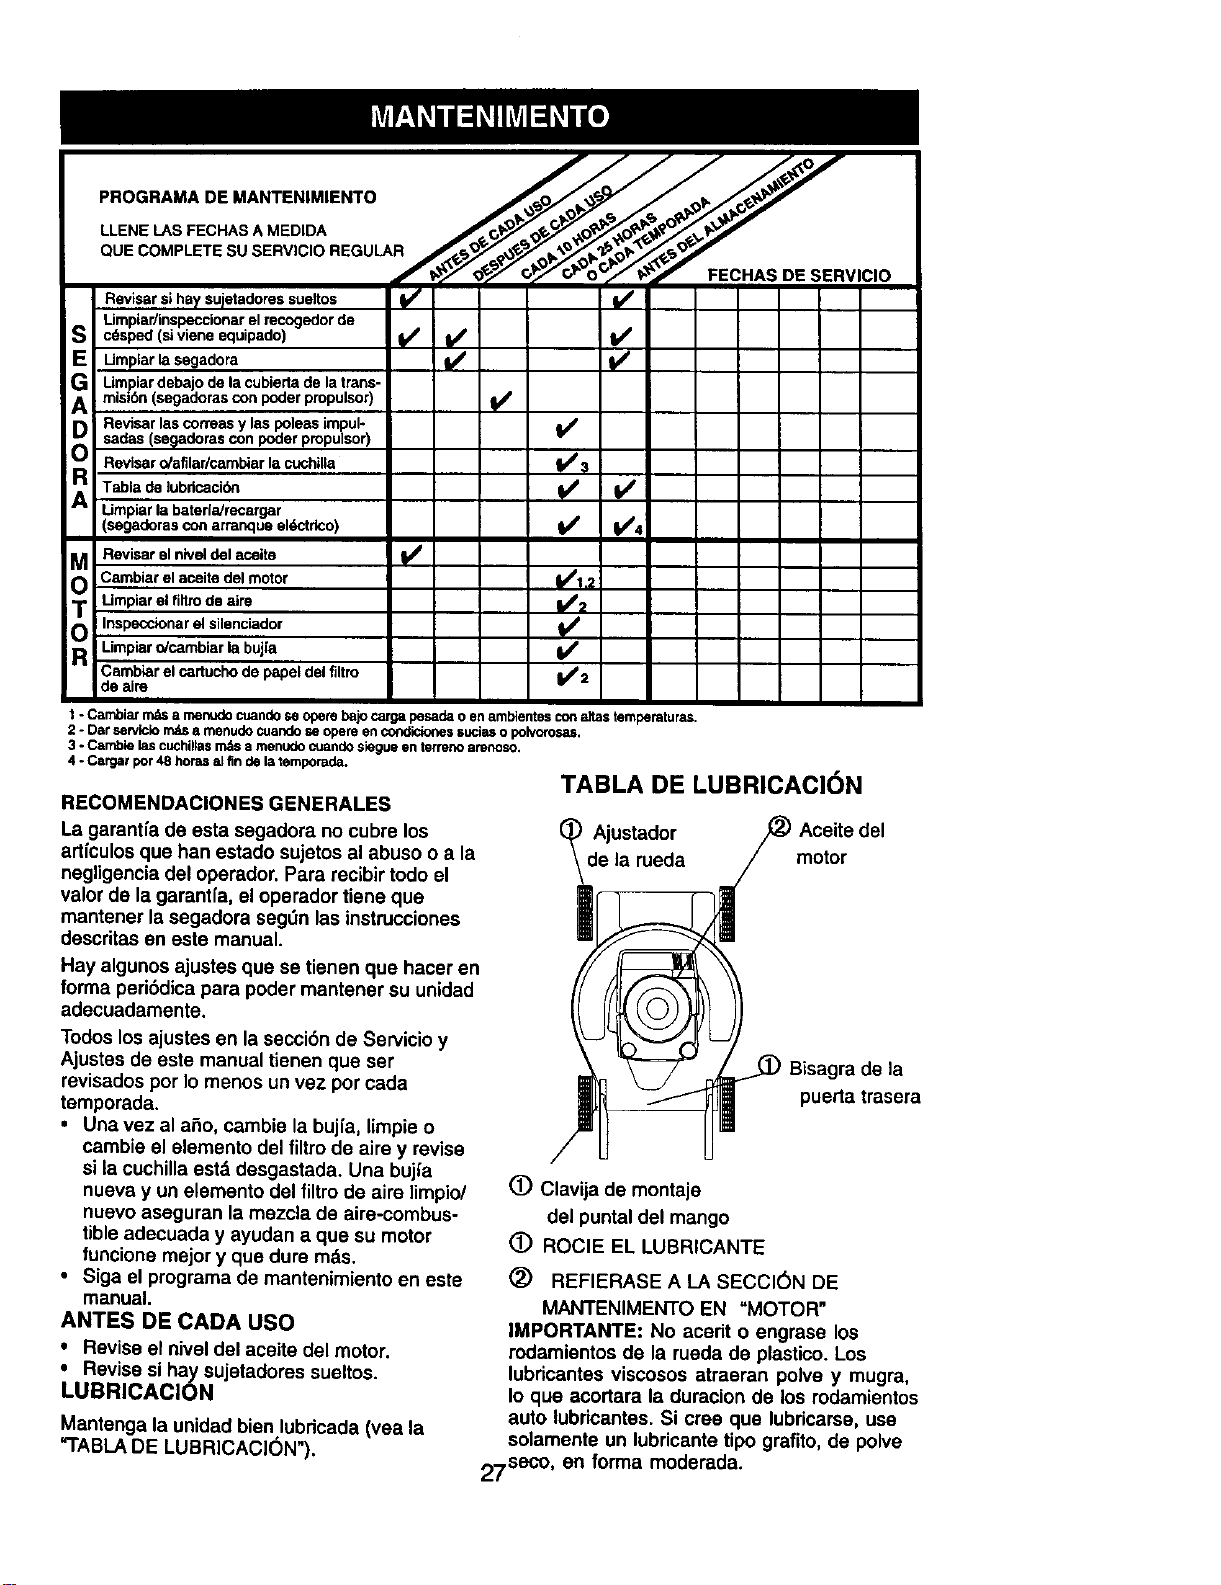
LUBRICAClON
Mantenga la unidad bien lubricada (yea la
"rABLA DE LUBRICACION").
TABLA DE LUBRICACION
(_d Ajustad°r
motor
/
(!) Clavija de montaje
del puntal del mango
(_ ROCIE EL LUBRICANTE
Bisagra de la
puerta trasera
(_) REFIERASE A LA SECCI(SN DE
MANTENIMENTO EN "MOTOR"
IMPORTANTE" No acerit o engrase los
rodamientos de la rueda de plastico. Los
lubdcantes viscosos atraeran polve y mugra,
Io que acortara la duracion de los rodamientos
auto lubricantes. Si cree que lubricarse, use
solamente un lubricante tipo grafito, de polve
27seco, an forma moderada.
ESPECIFICACIONES DEL PRODUCTO
NOMERO DE SERIE
FECHA DE COMPRA
CAPACIDAD Y TIPO
DE GASOLINA:
TIPO DE ACEITE:
(API-SF/SG)
CAPAClDAD DE ACEITE:
BUJ[A (ABERTURA: .030")
TOLERANClA DE VALVULA:
SENCENDIDO DE ESTADO
SOLIDO ABERTURA DE AIRE:
TORSION DEL PERNO
DE LA CUCHILLA:
1.5 Cuartos
REGULAR SIN PLOMO
SAE 30 (sobre 32°F)
SAE 5W-30 (debajo 32°F)
20 oz. de capacidad
CHAMPION RJ19LM o J19LM
ADMISION: .004 - .008
DESCARGA: .004 - .008
.0125 IN.
35-40 FT. LBS.
• El num_ro del nodelo y el de serie se encuentran en la calcomania adjunta a la parte
trasera de la caja de la segadora. Debe registrar tanto el num_ro de serie come la fecha de
compra y mantengalos en un lugar seguro para refencia en el futuro.
SEGADORA
Siempre observe las reglas de seguddad
cuando haga el mantenimiento.
LLANTAS
• Mantengalas Ilantassin gasolina,aceiteo
substanciasqufmicaspara controlde insectos
que puedendeSar la goma.
• Evite Io6 tocones,tas piedras,las gdetas
profundas, los objetos afiladosy otros peligros
que puedendefiar a lasIlantas.
CUIDADO DE LA CUCHILLA
Para obtener los mejores resultados, la
cuchilla de la segadora tienen que mantenerse
afUada.Cambie la cuchilla doblada o dafiada.
PARA REMOVER LA CUCHILLA
• Desconecte el alambre de la bujfa y p6ngalo
en donde no pueda entrar en contacto con
_sta.
• Haga descansar la segadora en su lado.
AsegL_reseque el filtro de aire y que el
carburador queden mirando hacia arriba.
• Use un bloque de madera entre la cuchilla y
la caja de la segadora para evitar que la
cuchilla gire cuando se le quite el pemo.
• Proteja sus manos con guantes y/o
envuelva la cuchilla con una tela gruesa.
• Remueva el pemo de la cuchilla gir&ndolo
en el sentido contrario en que giran las
manillas del reloj.
• Remueva la cuchilla y los artfculos de
ferreterfa adjuntadores (el perno, la
arandela de seguridad y la arandela
endurecida).
AVISO: Remueva el adaptador de la cuchillay
revise el cubo interiorde la ranura del
adaptador de la cuchilla. La ranura tiene que
ester en buenas condicionespara que
funcione en forma adecuada. Cambie el
adaptador si est& dafiado.
PARA CAMBIAR LA CUCHILLA
• Ponga el adaptador de la cuchina en el
ciguefial del motor, Aseg_rese que la ranura
del adaptador y que el chavetero del
ciguefial est_n alineados.
• Ponga la cuchilla en el adaptador de 6sta
alineando los dos (2) agujeros en la cuchilla
con las salientes elevadas en el adaptador.
• Asegt3rese de qua el borde de salida de la
cuchilla (opuesto al borde afilado) est_
hacia arriba hacia el motor.
• Instale el perno de la cuchilla con la
arandela de seguridad y la arandela
endurecida en el adaptador de la cuchilla y
el ciguefial.
• Use un bloque de madera entre la cuchillay
la caja de la segadora y apriete el pemo de
la cuchilla gir&ndolo en el sentido en que
giran las manillas del reloj.
• La torsibn para apretar recomendada es de
35 - 40 pies libras.
IMPORTANTE: El pemo de la cuchillaes
clase 8 tratado a calor.
28
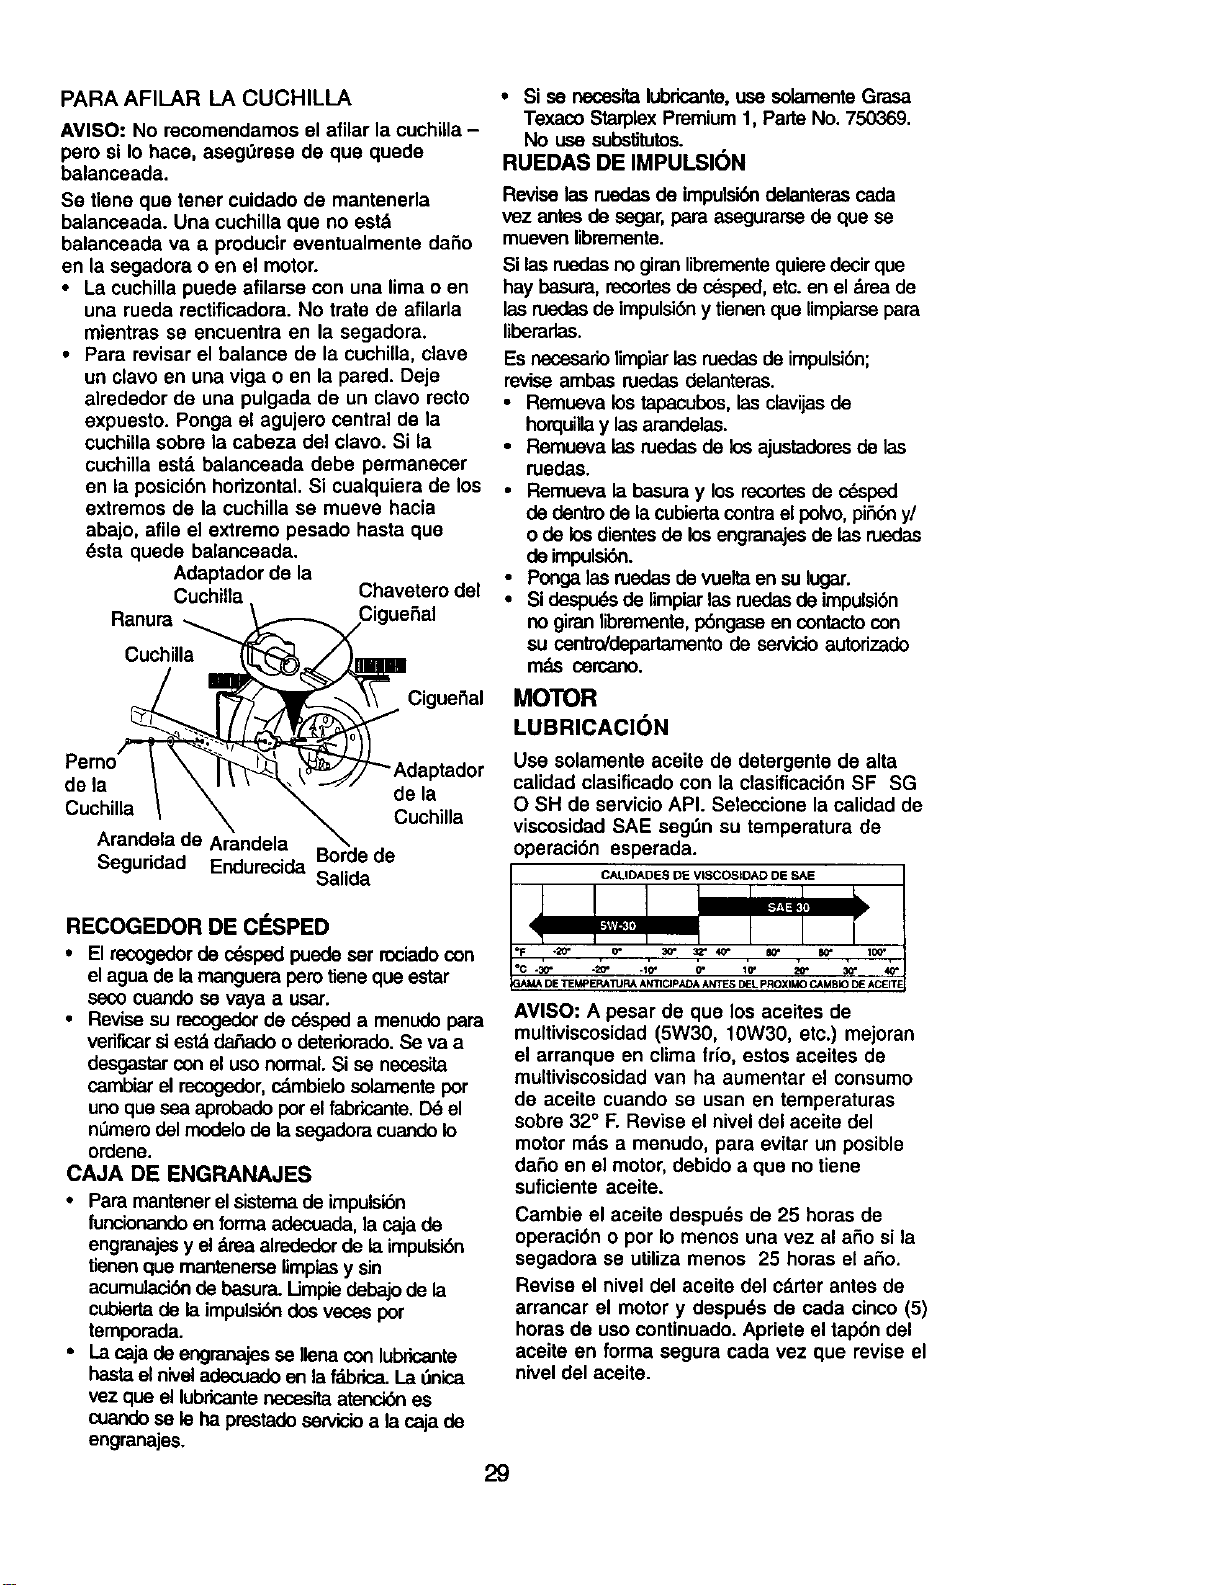
PARA AFILAR LA CUCHILLA
AVISO: No recomendamos el afllar la cuchilla-
pero si Io hace, aseg0rese de que quede
balanceada.
Se tiene qua tener cuidado de manteneda
balanceada. Una cuchilla que no est&
balanceada va a producir eventualmente daSo
en la segadora o en el motor.
• La cuchilla puede afilarse con una lima o en
una rueda rectiflcadora. No trate de afilarla
mientres se encuentra en la segadora.
• Para revisar el balance de la cuchilla, clave
un clavo en una viga o en la pared. Deje
alrededor de una pulgada de un clavo recto
expuesto. Ponga el agujero central de la
cuchilla sobre la cabeza del clavo. Si la
cuchilla estd.balanceada debe permanecer
en la posici6n horizontal. Si cualquiera de los
extremos de la cuchilla se mueve hacia
abajo, afile el extremo pesado hasta que
_sta quede balanceada.
Adaptador de la
Cuchilla Chavetero del
Ranura __,N/Cig ueiSal
Cuchilla _[]_mJII
CigueiSal
Perno _ \ I_1 t"_Adaptador
dela , / _u,_ _ --_// dela
Cuchilla I _ _ Cuchilla
Arandela de Arandela \
Borde de
Seguridad Endurecida
Salida
RECOGEDOR DE ClaSPED
• El recogedor de crispedpuedeser rociadocon
el agua de la mangueraperotiene que estar
seco cuando se vaya a usar.
• Revise su recogedorde cdspada menudo para
verir_ar si est_ da_ado o deteriorado. Se va a
desgastar con el use normal. Si se necesita
cambiar el recogeder,cdmbielo selamente por
unoquesea aprobadoporel fabric.ante.Dd el
n_mero del modelode lasegaderacuandoIo
ordene.
CAJA DE ENGRANAJES
• Para mantenerel sistemade impulsi6n
funcionando en forma adecuada, la cajade
engranajesy eld.reaalrededor de la impulsi6n
tienenque mantenerselimpiasy sin
acumulaci6nde basura. Umpie debajo de la
cubiertade la impulsi6ndosveces por
temporada.
• Lacajade engranajesse Ilenacon lubricante
hastaelnivel adecuadoan la f_brica. La i_nica
vez que el lubricantenocesita atenci6nes
cuando se le ha prestadosewicio a la cajade
engrenajes.
• Si se necesitalubricante,use solamenteGrasa
Texaco StarplexPremium1, Parte No. 750369.
No use substitutos.
RUEDAS DE IMPULSION
Revise las ruedasde impulsi6ndelanterascada
vez antes de segar,pare asegurarsede que se
mueven libremente.
Si lasruedasno giran libremente quiere decirque
hay basura,recortesde c_spad,etc.en el drea de
lasruedasde impulsi6ny tienenque limp'mrsepara
liberarlas.
Es necesario limpiar las ruedas de impulsibn;
revise ambas ruedas delanteras.
• Remueva los tapacubos, las clavijas de
horquilla y las arendelas.
• Remueva las ruedasde los ajustaderes de las
ruedas.
• Remueva la basura y los recortes de c__.sped
de dentro de la cubierta contra el polvo, pi56n y/
o de los dientes de los engranajes de las ruedas
de impulsi6n.
• Ponga las ruedas de vuelta en su lugar.
• Si despu_sde limpiar las ruedasde impulsibn
no giranlibremente,p6ngaseen contactocon
su centm/departamentode servicioautorizado
mds cercano.
MOTOR
LUBRICACI()N
Use solamente aceite de detergente de alia
calidad clasificado con la clasificaci6nSF SG
O SH de servicio API. Seleccione la calidad de
viscosidad SAE segOn su temperature de
operaci6n esperada.
CALIDADES DE VISCOSIDAD DE SAE
AVISO: A pesar de que los aceites de
multiviscosidad (5W30, 10W30, etc.) mejoran
el arranque en clima fHo, estos aceites de
multiviscosidadvan ha aumentar el consumo
de aceite cuando se usan en temperatures
sobre 32° F. Revise el nivel del aceite del
motor rods a menudo, para evitar un posible
daSo en el motor, dabido a que no tiene
suficiente aceite.
Cambie el aceite despuds de 25 horas de
operaci6n o per Io menos una vez al afio si la
segadore se utiliza menos 25 horas el afio.
Revise el nivel del aceite dol cdrter antes de
arrencar el motor y despu_s de cada cinco (5)
horas de uso continuado. Apriete el tap6n del
aceite en forma segura cada vez que revise el
nivel del aceite.
29
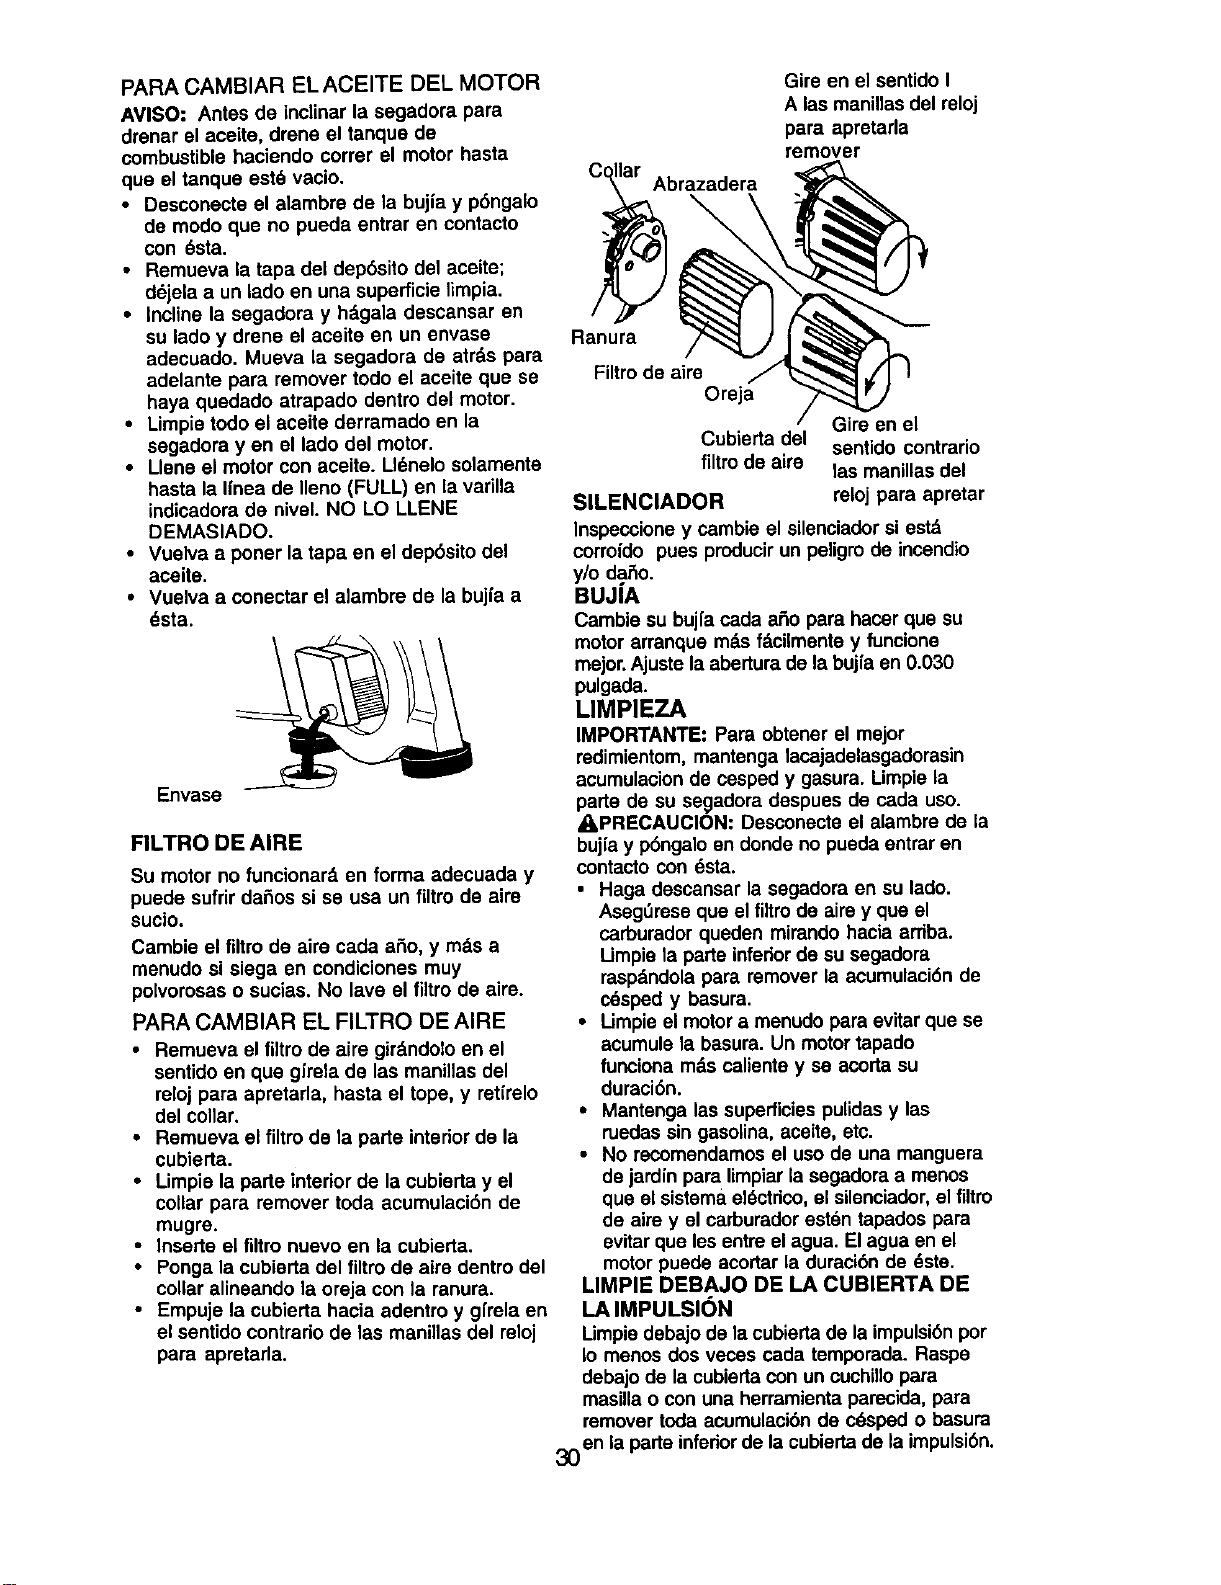
PARA CAMBIAR ELACEITE DEL MOTOR
AVlSO: Antes de inclinar la segadora para
drenar el aceite, drene el tanque de
combustible haciendo correr el motor hasta
que el tanque est6 vacio.
• Desconecte el alambre de la bujia y p6ngalo
de modo que no pueda entrar en contacto
con _sta.
• Remueva la tapa del dep6sito det aceite;
d6jela a un lado en una superficie limpia.
• Incline la segadora y h&gala descansar en
su lado y drene el aceite en un envase
adecuado. Mueva la segadora de atrds para
adelante para remover todo el aceite que se
haya quedado atrapado dentro del motor.
• Limpie todo el aceite derramado en la
segadora yen el lado del motor.
• Llene el motor con aceite. Ll_nelo solamente
hasta la Ifnea de Ileno (FULL) en la varilla
indicadora de niveL NO LO LLENE
DEMASIADO.
• Vuelva a poner la tapa en el dep6sito del
aceite.
• Vuelva a conectar el alambre de la bujia a
dsta.
Envase
FILTRO DE AIRE
Su motor no funcionarf_ en forma adecuada y
puede sufrir daSos si se usa un filtro de aire
sucio.
Cambie el filtro de aim cada aSo, y rods a
menudo si siega en condiciones muy
polvorosas o sucias. No lave el filtrode aim.
PARA CAMBIAR EL FILTRO DE AIRE
• Remueva el filtro de aire gir_.ndoloen el
sentido en que gffela de las manillas del
reloj para apretada, hasta el tope, y retirelo
del collar.
• Remueva el filtro de la parte interior de la
cubierta.
• Limpie la parle interior de la cubierta y el
collar para remover toda acumulaci6n de
mugre.
• Inserte el filtro nuevo en la cubierta.
• Ponga la cubierta del filtro de aim dentro del
collar alineando la oreja con la ranura.
• Empuje la cubierta hacia adentro y gfrela en
el sentido contrario de las maninas del reloj
para apretarla.
Gire en el sentido I
A las manillas del reloj
para apretarla
remover
Co;_brazadera
Ranura
Filtrode aire
Oreja
Cubierta del
filtrode aire
SILENCIADOR
Gire en el
sentido contrario
las manillas del
reloj para apretar
Inspeccione y cambie el silenciadorsi estd
corroido pues producir un peligro de incendio
y/o dai_o.
BUJ|A
Cambie su bujla cada ai_opara hacer que su
motor arranque m_.sfdcilmente y funcione
mejor. Ajustela abertura de la bujfaen 0.030
pulgada.
LIMPIEZA
IMPORTANTE: Para obtener el mejor
redimientom, mantenga lacajadelasgadorasin
acumulacionde cesped y gasura. Limpie la
parte de su segadora despues de cada uso.
_I=PRECAUClON: Desconecte el alambre de la
bujfay p6ngalo en donde no pueda entrar en
contacto con dsta.
• Haga descansar la segadora en su lado.
Aseg_rese que el filtrode aire y que el
carburador queden mirando hacia arTiba.
Umpie la parte inferiorde su segadora
raspd.ndolapara remover la acumulaci6n de
crisped y basura.
• Umpie el motora menudo para evitar que se
acumule la basura. Un motortapado
funciona mds caliente y se acorta su
duraci6n.
• Mantenga las superficiespulidasy las
ruedas sin gasolina, aceite, etc.
• No recomendamos el uso de una manguera
de jardfn para limpiarla segadora a menos
que el sistema el6ctdco, el silenciador,el filtre
de aim y el carburadorest6n tapados para
evitar que les entre el agua. El agua en el
motor puede acortar la duraci6n de 6ste.
LIMPIE DEBAJO DE I.A CUBIERTA DE
LA IMPULSION
Umpie debajo de la cubiertade la impulsi6npor
Io menos dos veces cada temporeda. Raspe
debajo de la cubierfa con un cuchillopara
masilla o con una herramienta parecida, para
remover toda acumulaci6nde c6sped o basura
30en la parte inferiorde la cubiertade la impulsi6n.

A.PRECAUCK_N:Antes de dar cuelquier
sercicio o de hacer ajustes:
• Soelte Labarra de o:_Ya'oly pare el motor.
• Aseg6reseque lacuchillay que todaslas
partes moviblesse hayan detenido
completamente.
• Desconecteel alambrede la bujfay Ix_ngaloen
donde no pueda entraren contactocon __,sta.
SEGADORA
PAPA AJUSTAR LA ALTURA DE CORTE
Vea "PAPA AJUSTAR LA ALTURA DE CORTE"
en la secci6nde Operack_ de este manual.
DESVIADOR TRASERO
Se proporcionaun desviadortrasero,adjunto
entretas ruedesbaseras de su segadota, par_
reducira un minimolaposibilidadque objetos
sean lanzados hacia afuerade _ partetraserade
la segadora,en la poaici6nen donde se encuentra
eloperador.Sise daSael desviadordebe
cambiarse.
PARA REMOVER/CAMBIAR LA CORREA
DE IMPULSION
• Remueva la cubiertade la impulsk_n.Remueva
la correaempujandohaciaabajoen tapoleade
lacajade engranajes.
• Haga descansarla segadoraen su _adoconel
flltmde aire y el carburadormirandohacia
arnba.
• Remueva lacuchilla.
• Remueva la defensaen contradel desperdicio.
• Remueva lacorreade la poleadelmotoren el
cigue_ai.
• Ins_e la correanueva siguiendolos
anterioresen el ordeninverso.
• Siempreuse la correaaprobadapot _ f_0_ca
para asegurarseque caicey dure.
Cubierta
de la
impt_lsion
Empujar /
hacia
abajo
PARA AJUSTAR EL MANGO
El mango puede ser montado a una posicibn
alta obaja. Los agujeros de montaje en el
mango inferior estdn fuera del centro para
levantar y bajar el mango.
• Remueva el mango superior y todas las
partes atadas al mango inferior.
• Remueva las clavijasde horquilla de la
clavija de montaje del puntal del mango.
• Apreite el mango inferior hacia dentro para
removerlo de las clavijas de montaJe.
• Gire el mango inlerior por encima para
levantar o bajar el mango.
• Vuelva a montar las clavijas de horquilla por
encima de las clavijas de montaje.
• Vuelva a montar el mango superior y todas
las partes removidas del mango inferior.
Posicibn
para segar ""
I 1
PosickSn baja
Posici6n
para segar,(',_,
°: ,'
Posicibn alta
31
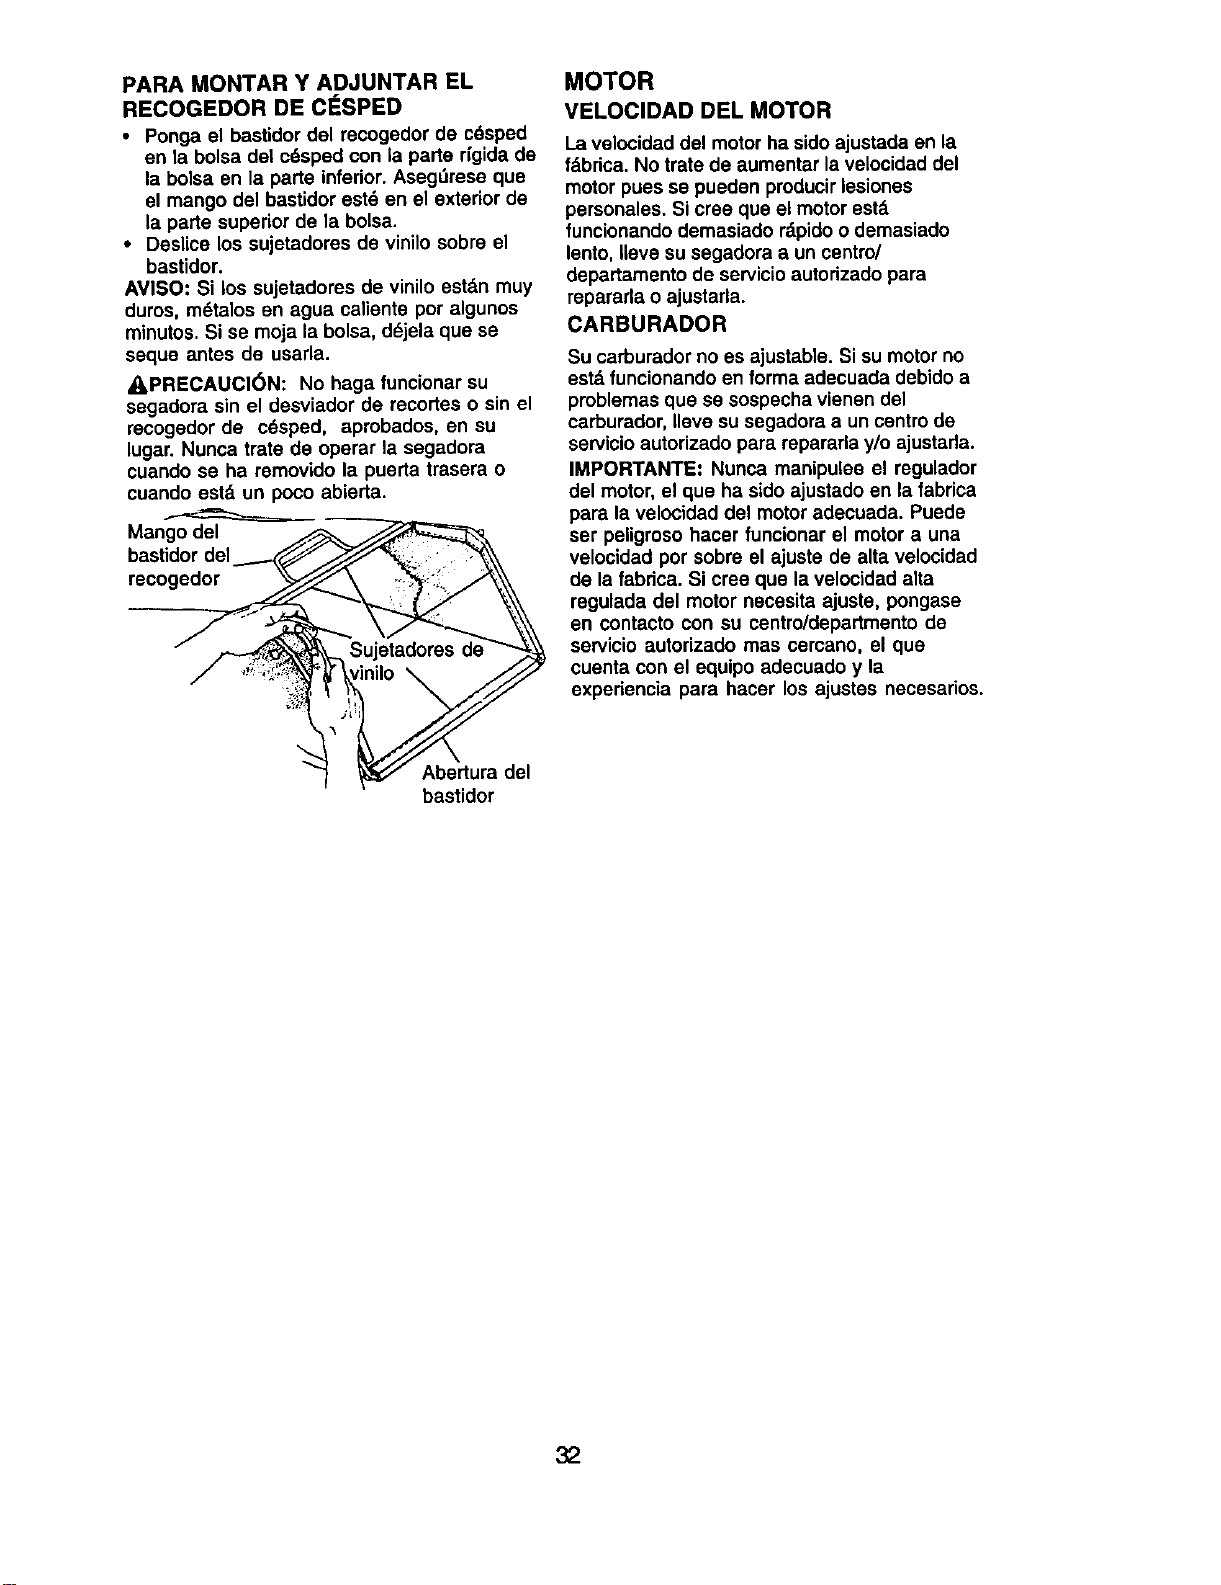
PARA MONTAR Y ADJUNTAR EL
RECOGEDOR DE ClaSPED
• Ponga el bastidor del recogedor de crisped
en la bolsa del c6sped con la parte dgida de
la bolsa en la parte inferior. Aseg=Jreseque
el mango del bastidor est_ en el exterior de
la parte superior de la bolsa.
• Deslice los sujetadores de vinilo sobre el
bastidor.
AVISO: Si los sujetadores de vinilo estdn muy
duros, m(_talosen agua caliente por algunos
minutos. Si se moja la bolsa, ddjela que se
seque antes de usarla.
_PRECAUCI(_N: No haga funcionar su
segadora sin el desviador de recortes o sin el
recogedor de c_sped, aprobados, en su
lugar. Nunca trate de operar la segadora
cuando se ha removido la puerta trasera o
cuando estd un poco abierta.
Mango del
bastidor del
recogedor _
t ni,o\ JF'F
bastidor
MOTOR
VELOClDAD DEL MOTOR
La velocidad del motor ha sidoajustada en la
fdbdca. No trate de aumentar la velocidad del
motor pues se pueden producirlesiones
personales. Si cree que el motor est,.
funcionando demasiado rdpido o demasiado
lento. Ileve su segadora a un centro/
departamento de servicioautorizado para
repararla o ajustarla.
CARBURADOR
Su carburador no es ajustable. Si su motor no
est,. funcionando en forma adecuada debido a
problemas que se sospecha vienen del
carburador, Ileve su segadora a un centro de
servicio autorizado para repararla y/o ajustada.
IMPORTANTE: Nunca manipulee el regulador
del motor, el que ha sido ajustado en la fabrica
para la velocidad del motor adecuada. Puede
ser peligroso hacer funcionar el motor a una
velocidad pot sobre el ajuste de alta velocidad
de la fabdca. Si cree que la velocidad alta
regulada del motor necesita ajuste, pongase
en contacto con su centro/departmento de
servieio autorizado mas cercano, el que
cuenta con el equipo adecuado y la
experiencia para hacer los ajustes necesarios.
32
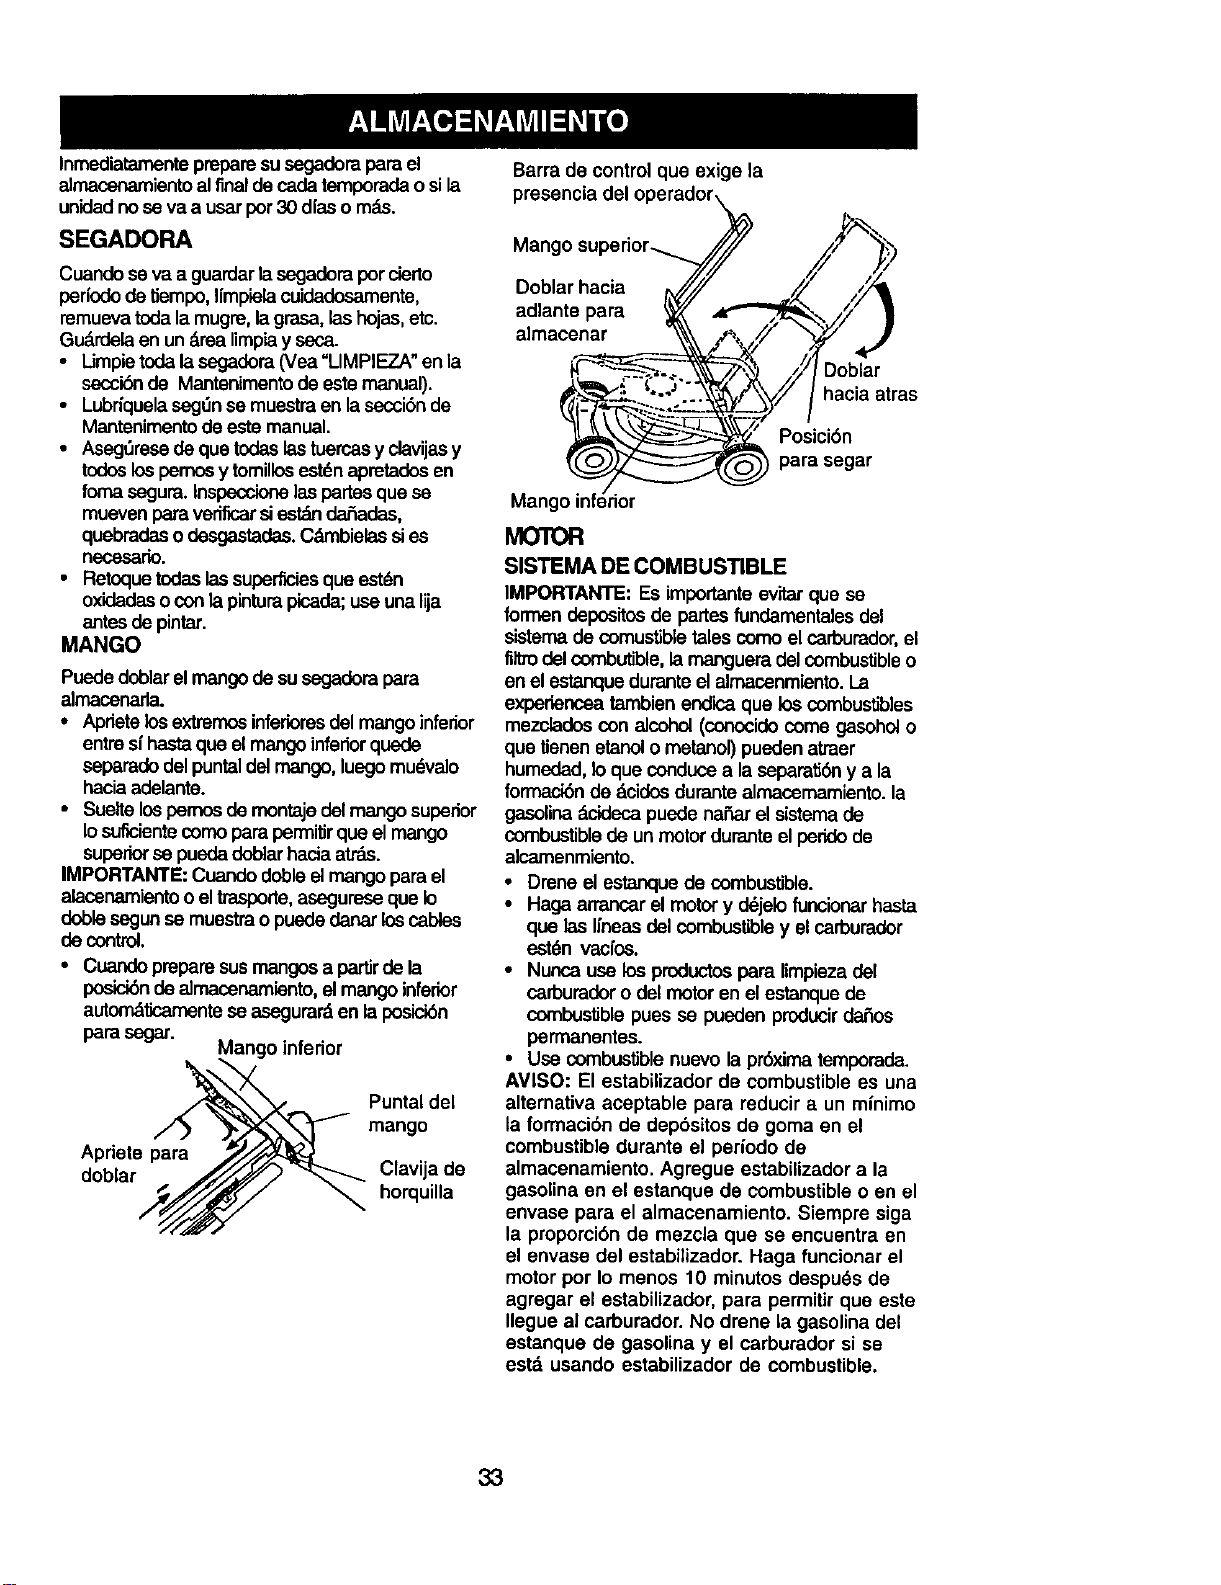
Inmediatamentepreperesusegadorapara el
almacenamiantoalfinaldecadatemporadaosila
unidadnose va a usar por30 dfaso rods.
SEGADORA
Cuando seva a guardar la segadera por clorto
perlodo de tiempo, I{mpielacuidadesamente,
remueva toda la mugre, la grasa, las hojas, etc.
Gu&rdela en un ._realimpiay seca.
• Limpietoda la segadera (Vea "LIMPIEZA" en la
secci6nde Mantanimento de este manual).
• Lubdquela segen se muestra en la secci6n de
Mantenimanto de este manual.
• Aseg_rese de que todaslastuercasy clavijasy
todeslospemcey tomillceest6napretadosen
foma segura.Inspeccionelaspartcequese
muevenparaveriflcarsiest_ndeJ_adas,
quebradasodesgastades.Cdmbielassies
necesario.
• Retoquetodaslassuperficiesque estdn
oxidadaso conlapinturaploada;useunalija
antesde pintar.
MANGO
Puede doblar el mango de susegadera para
almacenarla.
• Apriete los extrernceinferiomsdel mango inferior
entre sfhasta que el mango inferior quede
separade del puntal del mango,luego mu_velo
hacia adelante.
• SuelteIce pemos de montajedel mango superior
lo suficientecomopara permitirque elmango
superiorse puedadoblarhaciaatrds.
IMPORTANTE: Cuandodobleelmangoparael
alacenamientoo eltrasporte,asegureseque lo
deble segunse muestra o puededanarloscables
decontrol.
• Cuandoprepare susmangosa partirde la
pceici6nde almacenamiento, elmangoinferior
autom_ticamentese asegurarden la posiclon
para segar.
Mango inferior
Apriets para
doblar
Puntal del
mango
Clavija de
horquilla
Barra de controlque exigo la
presencia del operador\
Mango superior._i,;_ //z_ _._
//
Doblar hacia _'_/" ._ /._
adlantepara _ _ .,/y |
almacenar "_\\ J %_4// " _'/_
__ ,, Dobiar
_,_.._ _'?-..'_,,,_y// haciaatras
ICO)).Z_-----._"--_ _ para segar
Mango inferior
MOTOR
SISTEMA DE COMBUSTIBLE
IMPORTANTE: Es importanteev_tarque se
formendepceitce de partcefundamantalesdel
sistemade comu_ble tales comoel carburador,el
flltrodelcombutible,la mangueradelcombustibleo
onel estanqueduranteel almacenmiento.La
expedenceatambienendicaqua loscombustibles
mezcladescon alcohol(concoidecomegasohelo
que tianenetanolo metanol)puedenatraer
humedad,lo que conducea laseparafi6ny a la
formaci6nde dcidcedurantealmacemamiento,la
gasolinadcidecapuedenar3arelsistemade
combustiblede un motorduranteelperido de
alcamenmianto.
• Drene el estanquede combustible.
• Haga arrancarel motor y dejelo funcionarhasta
que las Ifneasdel combustibley el carburader
est6n vacfce.
• Nunca use losproductcepara limpiezadel
carburaderodel motoran el estanquede
combustiblepues se pueden producir dance
permanontes.
• Use combustible nuevo la pr6xima temporada.
AVISO: El estabilizador de combustible es una
altemativa aceptable para reducir a un minimo
la formaci6n de depbsitos do goma en el
combustible durante el periodo de
almacenamiento. Agregue estabilizador a la
gasolina on el estanque de combustibleo en el
envase para el almacenamiento. Siempre siga
la proporci6n de mezcla que se encuentra en
el envase del estabilizador. Haga funcionar el
motor por Io menos 10 minutos despu_s de
agregar el estabilizador, para permitir que este
Ilegue al carburador. No drene la gasolina del
estanque de gasolina y el carburador si se
estd usando estabilizador de combustible.
33
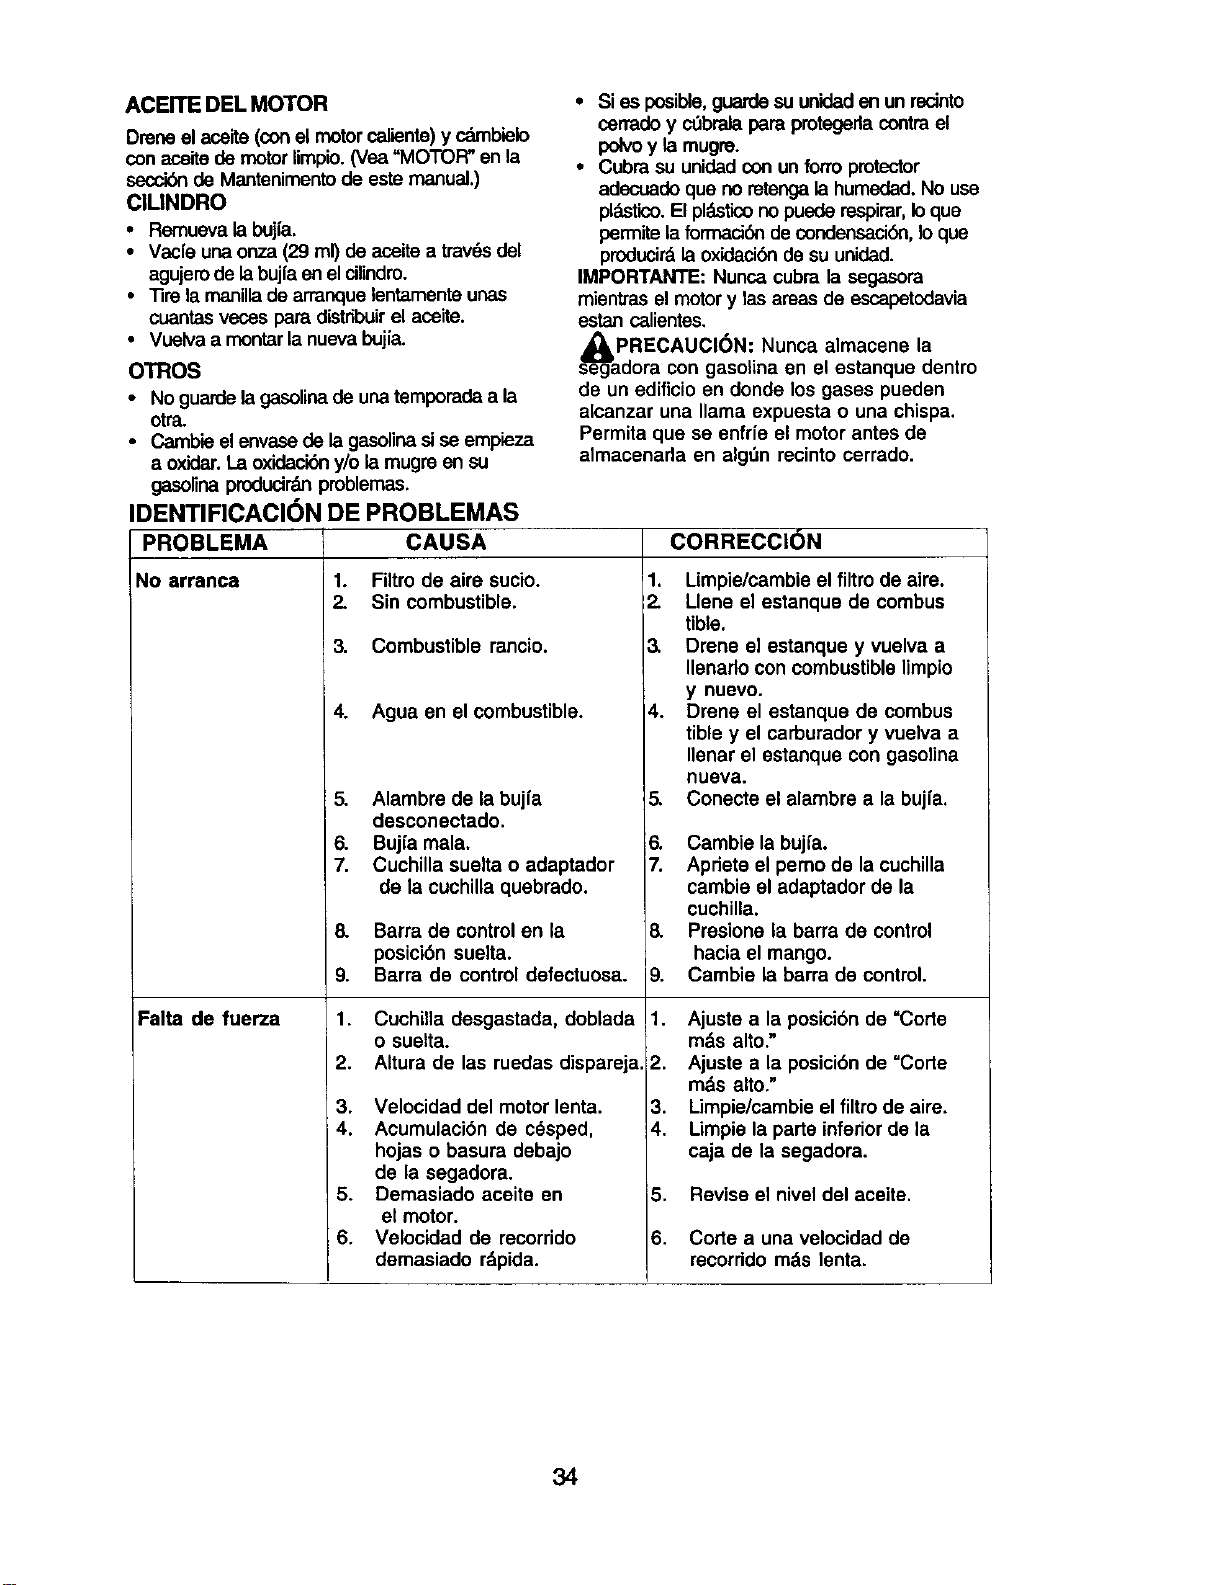
ACEITE DEL MOTOR
Drenoel aceite (conel motorcalienl_)y cambielo
conaceitede motorlimpio.(Vea =MOTOR" en la
secck_ de Mantenimentode este manual.)
ClMNDRO
• Remueva la buj[a.
• Vacfe una onza (29 ml)de aceite a travdsdel
agujerode labujfaen elcilindro.
• "13rela manilla de arranquelentamenteunas
cuantasveces para distribuirel aceite.
• Vuelva a montar lanueva bujia.
OTROS
• No guardelagasolinade unatemporadaa la
otra.
• Camb'e el envasede la gasolinasise empieza
a oxidar.La oxidaci6ny/o la mugreen su
gasolinaprodudrdnproblemas.
IDENTIRCAClON DE PROBLEMAS
PROBLEMA
No arranca
Falta de fuerza
• Sies posible,guardesuunidaden un recinto
cerracloy ct_bralapara protegerlacontrael
polvoy la mugre.
• Cubra su unidadcon un forroprotector
adecuadoque no retengala humedad.No use
pldstico.El pldsticono puederespirar,Io que
permitelaforrnaci6ndecondensacibn,Io que
producirdla oxidaci6nde su unidad.
IMPORTANTE: Nunca cubra la segasora
mientras el motory lasareas de escapetodavia
estan calientes.
&PRECAUCI6N: Nunca almacene la
segadora con gasolina en el estanque dentro
de un edificio en donde los gases pueden
alcanzar una llama expuesta o una chispa.
Permita qua se enfrie el motor antes de
almacenada en algt_nrecinto cerrado.
CAUSA CORRECCION
1. Filtrode aire sucio.
2. Sin combustible.
3. Combustible rancio.
4. Agua en el combustible.
5. Alambre de la buj{a
desconectado.
6. Bujl'amala.
7. Cuchilla suelta o adaptador
de la cuchilla quebrado.
8. Barra de controlen la
posici6n suelta.
9. Barra de control defectuosa.
1. Cuchilla desgastada, doblada
o suelta.
2. Altura de las ruedas dispareja.
3. Velocidad del motor lenta.
4. Acumulaci6n de c6sped,
hojas o basura debajo
de la segadora.
5. Demasiado aceite en
el motor.
6. Velocidad de recorrido
demasiado rdpida.
1. Limpie/cambie el filtrode aire.
2. Liana el estanque de combus
tibia.
3. Drene el estanque y vuelva a
Ilenarlo con combustible limpio
y nuevo.
4. Drena el estanque de combus
tibia y el carburador y vuelva a
Ilenar el estanque con gasolina
nueva.
5. Conecte el alambre a la buj[a.
6. Cambie la bujfa.
7. Apdeta el pemo de la cuchilla
cambie el adaptador de la
cuchilla.
6. Prosione la barra de control
hacia el mango.
9. Cambie la barra de control.
1. Ajuste a la posicibn de "Code
mds alto."
2. Ajuste a la posici6nde "Code
mds alto."
3. Limpie/cambie el filtro de aire.
4. Limpie la parte inferiorde la
caja de la segadora.
5. Revise el nivel del aceite.
6. Corte a una velocidad de
recorrido mds lenta.
34
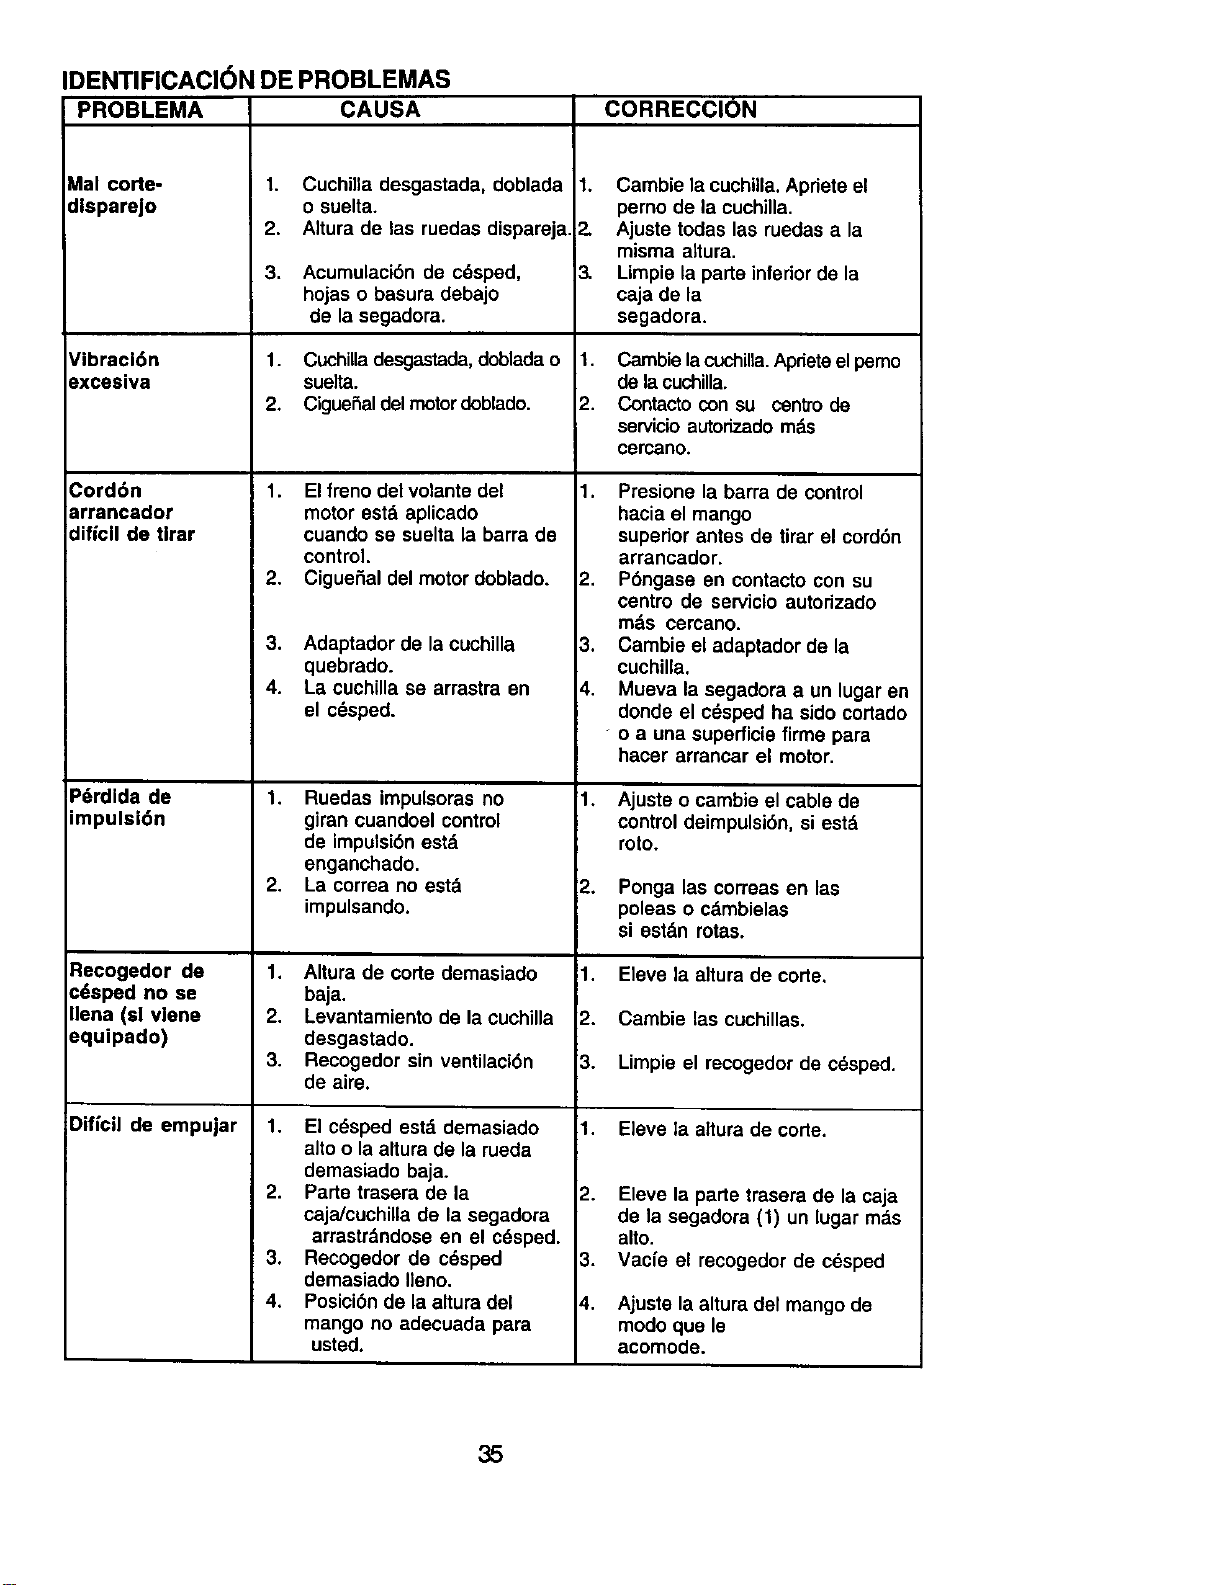
IDENTIFICACI6N DE PROBLEMAS
PROBLEMA CAUSA CORRECCION
Mal corte-
dlsparejo
Vibracl6n
excesiva
Cord6n
arrancador
dificll de Urar
P6rdida de 1.
impulsi6n
2.
Recogedor de 1.
cdsped no se
Ilena (el vlene 2.
equipado)
3.
Dificil de empujar 1.
2.
3.
4.
1. Cuchilla desgastada, doblada
o suelta.
2. Altura de las ruedas dispareja.
3. Acumulaci6n de cdsped,
hojas o basura debajo
de la segadora.
1. CuchiUadesgastada, doblada o
suelta.
2, Cigue_aldelmotordoblade.
1. El freno delvolante del
motor estd aplicado
cuando se suelta la barra de
control.
2. CigueSal del motor doblado.
3. Adaptador de la cuchilla
quebrado.
4. La cuchilla se arrastra en
el c_sped.
Ruedas impulsoras no
giran cuandoel control
de impulsi6n estd
enganchado.
La correa no estd
impulsando.
Altura de corte demasiado
baja.
Levantamiento de la cuchilla
desgastado.
Recogedor sin ventilaci6n
de aire.
El cdsped estd demasiado
alto o la altura de la rueda
demasiado baja,
Parts trasera de la
caja/cuchilla de la segadora
arrastr&ndose en el c6sped.
Recogedor de c6sped
demasiado Ileno.
Posici6n de la altura del
mango no adecuada para
usted,
1. Cambie la cuchUla.Apriete el
perno de la cuchilla.
2. Ajuste todas las ruedas a la
misma altura.
3. Umpie la parte inferior de la
caja de la
segadora.
1. Cambie la_iUa. Aprieteel pemo
de la cuchilla.
2. Contacts con su centro de
servicioautorizado mds
cercaRo.
1. Presione la barra de control
hacia el mango
superior antes de tirar el cord6n
arrancador,
2. P6ngase en contacto con su
centro de sewicio autorizado
rods cercano.
3. Cambie el adaptador de la
cuchilla.
4. Mueva la segadora a un lugar en
donde el cdsped ha sido cortado
o a una superficie firms para
hacer arrancar el motor.
1. Ajuste o cambie el cable de
control deimpulsi6n, si estd
roto.
2. Ponga las correas en las
poleas o cdmbielas
si estdn rotas.
1. Eleve la altura de corte,
2. Cambie las cuchillas.
3. Limpie el recogedor de c_sped.
1. Eleve la altura de corte.
_°
3.
Eleve la parte trasera de la caja
de la segadora (1) un lugar m_.s
alto.
Vacfe el recogedor de cesped
Ajuste la altura del mango de
mode que le
acomode.
35

36
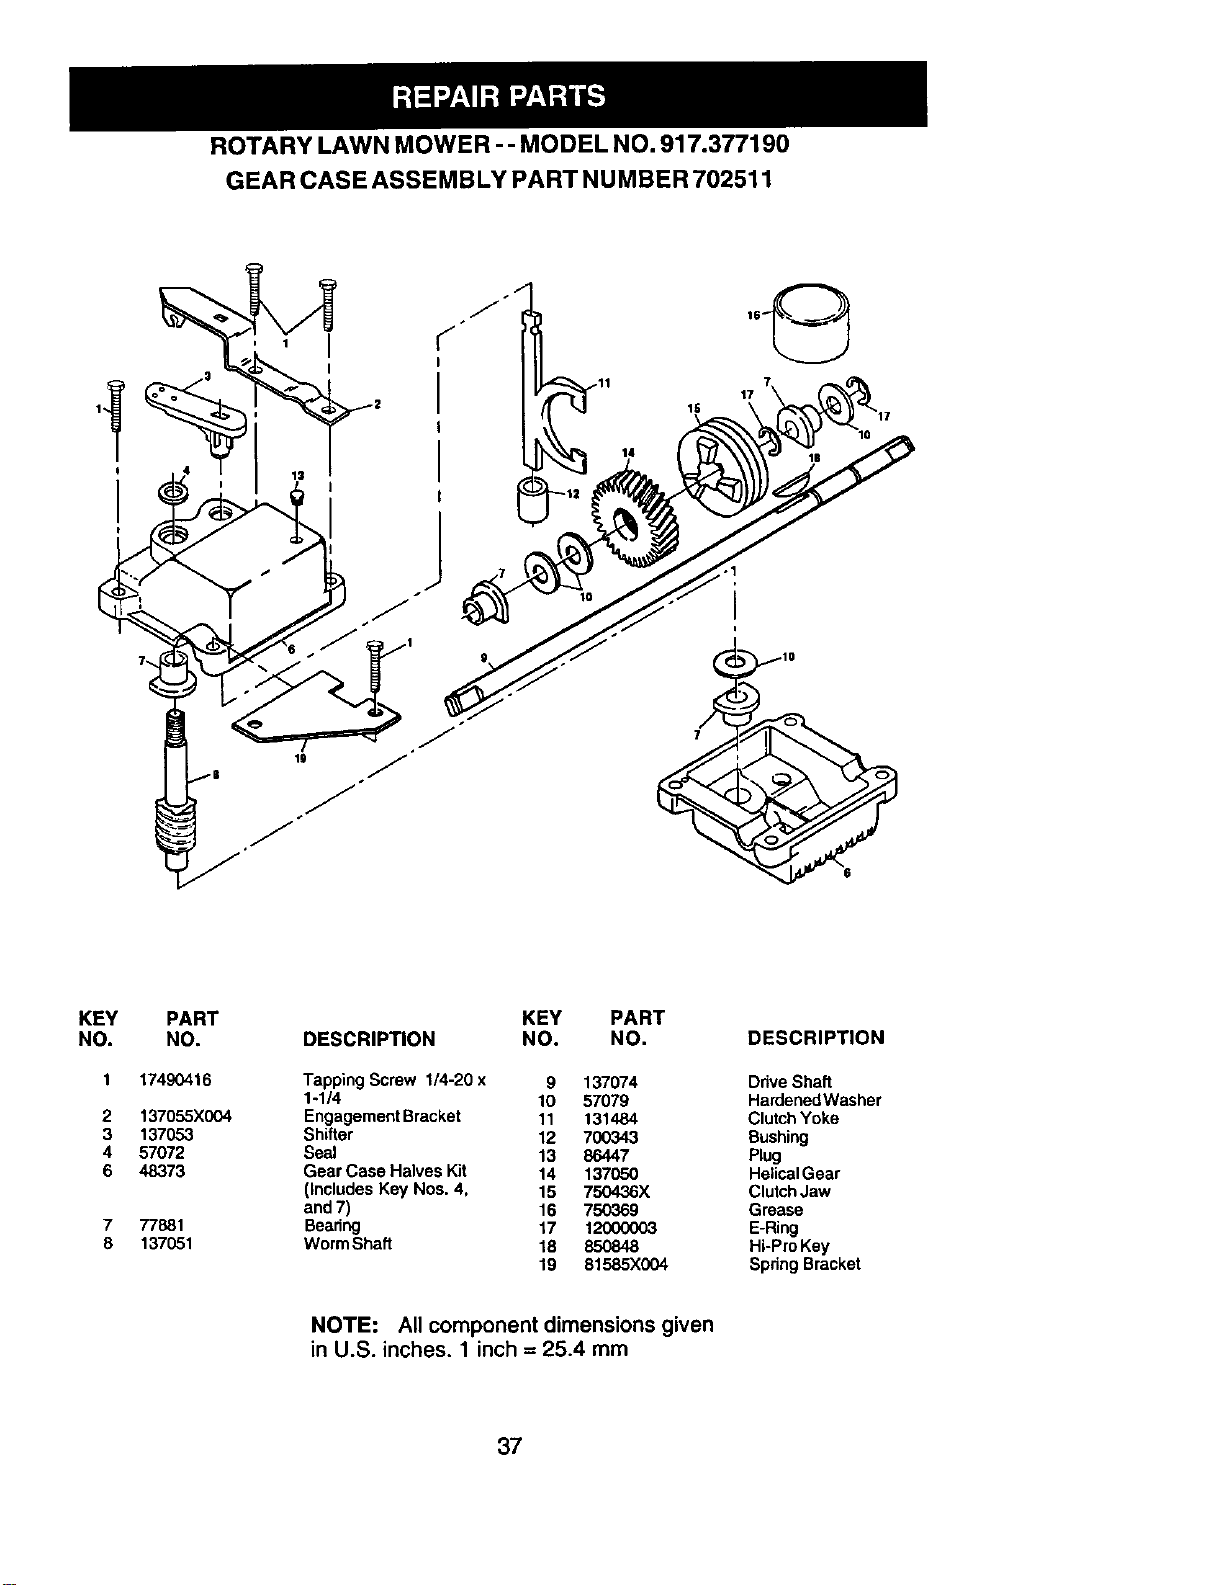
ROTARY LAWN MOWER - - MODEL NO. 917.377190
GEAR CASE ASSEMBLY PART NUMBER 702511
14
17
KEY
NO.
2
3
4
6
7
8
PART
NO.
17490416
137055X004
137053
57072
48373
77881
137051
KEY PART
DESCRIPTION NO. NO. DESCRIPTION
Tapping Screw 1/4-20 x 9 137074 Drive Shaft
1-1/4 10 57079 HardenedWasher
EngagementBracket 11 131484 ClutchYoke
Shifter 12 700343 Bushing
Seal 13 86447 Plug
Gear Case Halves Kit 14 137050 HelicalGear
(includes Key Nos. 4, 15 750436X ClutchJaw
and 7) 16 750369 Grease
Bearing 17 12000003 E-Ring
Worm Shaft 18 850848 Hi-Pro Key
19 81585X004 Spring Bracket
NOTE: All component dimensions given
in U.S. inches. 1 inch = 25.4 mm
37

ROTARYLAWN MOWERMODELNUMBER917.377190
61
10
31
3"_ 28
29
32
69
I
<.
15
16 12
31 35
34
53
56
52
41
29
28
69
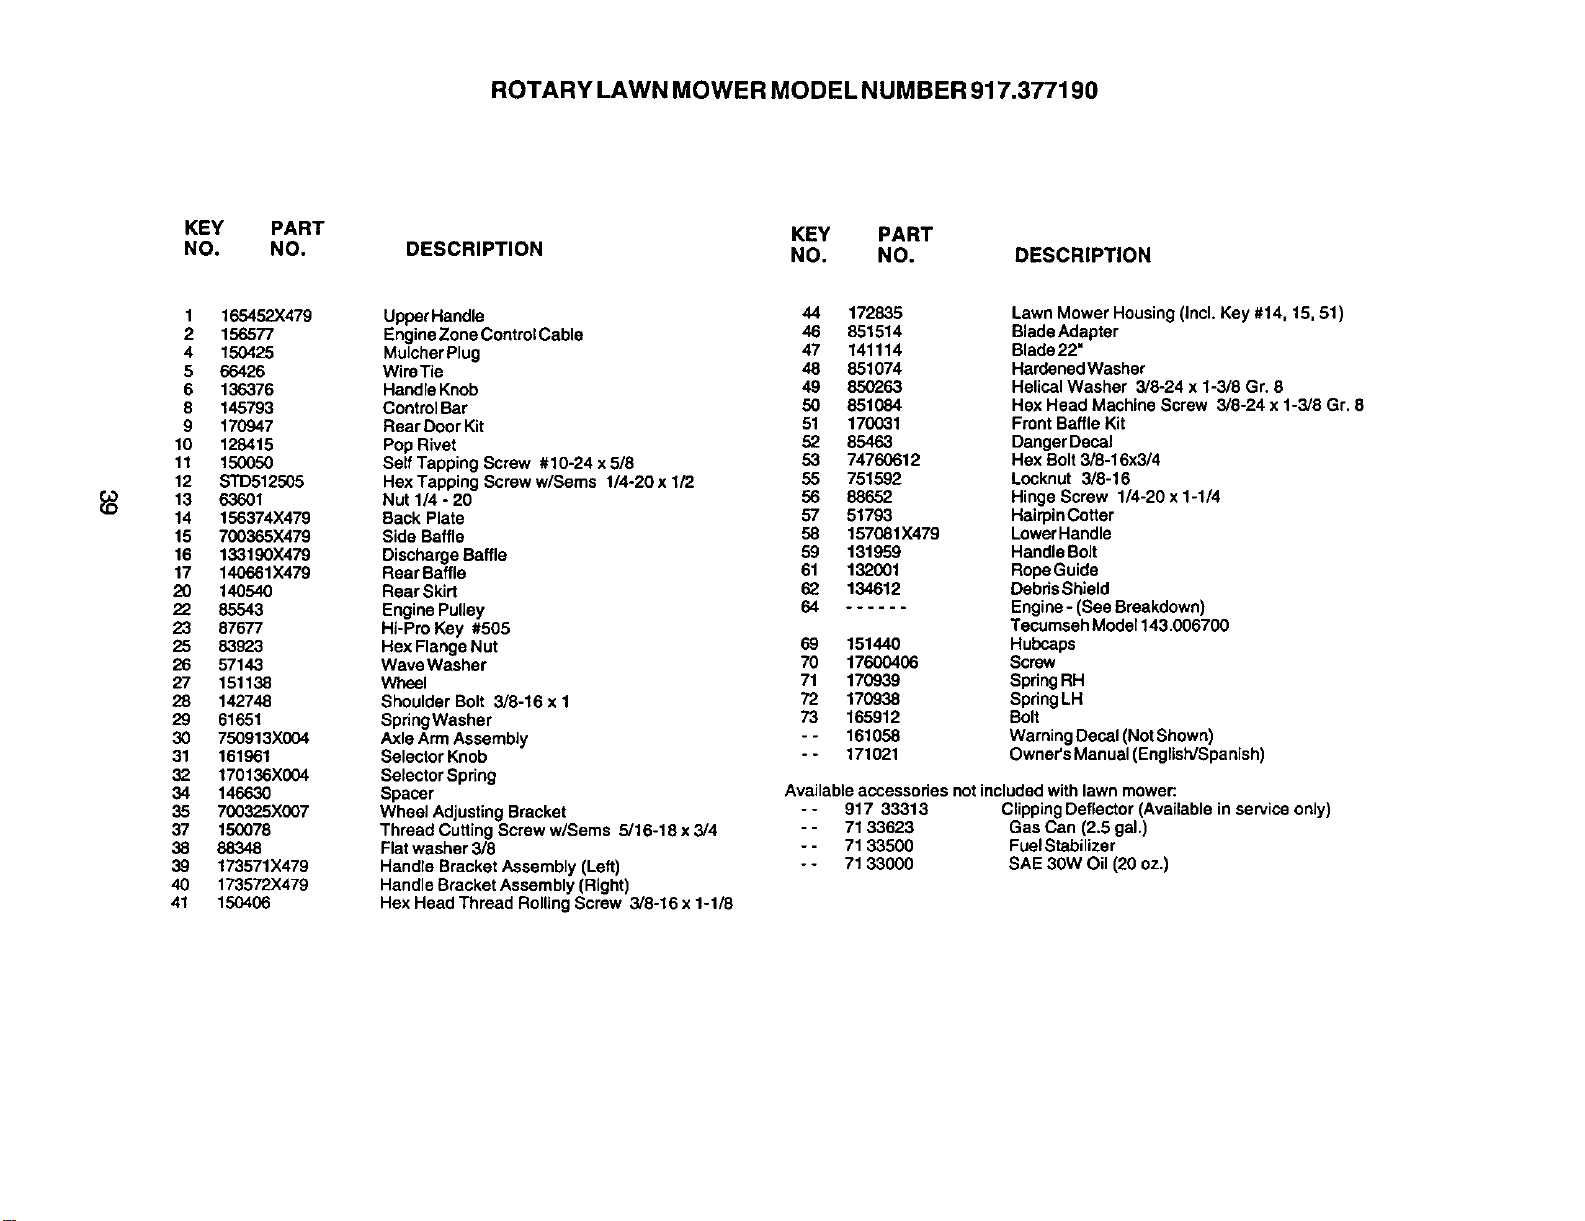
ROTARY LAWN MOWER MODEL NUMBER 917.377190
KEY PART
NO. NO. DESCRIPTION
KEY PART
NO. NO. DESCRIPTION
1 165452X479
2 156577
4 150425
5 66426
6 136376
8 145793
9 170947
10 128415
11 150050
12 STD512505
13 63601
14 156374X479
15 700365X479
16 133190X479
17 140661X479
20 140540
22 85543
23 87677
25 83923
26 57143
27 151138
28 142748
29 61651
30 750913X004
31 161961
32 170136X004
34 146630
35 700325X007
37 150078
38 88348
39 173571X479
40 173572X479
41 150406
UpperHandle
EngineZone Control Cable
Mulchar Plug
WireTie
Handle Knob
Control Bar
Rear Door Kit
Pop Rivet
Self Tapping Screw #10-24 x 5/8
HexTapping Screww/Sems t/4-20x 1/2
Nut 1/4 - 20
Sack Plate
Side Baffle
Discharge Baffle
Rear Baffle
Rear Skirt
Engine Pulley
Hi-Pro Key #505
Hex Flange Nut
WavaWasher
Wheel
Shoulder Bolt 3/8-16 x 1
SpringWasher
AxleArm Assembly
SelectorKnob
SelectorSpring
Spacer
Wheel AdjustingBracket
Thread CuttingScrew w/Seres 5/16-18 x3/4
Flatwasher 3/8
Handle Bracket Assembly (Left)
HandleBracket Assembly (Right)
Hex Head Thread RollingScrew 3/8-16 x 1-1/8
44 172835 Lawn Mower Housing(Incl.Key #14, 15, 51)
46 851514 BladeAdapter
47 141114 Blade22"
48 851074 HardenedWasher
49 850263 Helical Washer 3/8-24 x 1-3/8 Gr. 8
50 851084 Hex Head Machine Screw 3/8-24 x 1-3/8 Gr. 8
51 170031 Front Baffle Kit
52 85463 DangerDecel
53 74760612 Hex Bolt3/8-16x3/4
55 751592 Locknut 3/8-16
56 88652 Hinge Screw 1/4-20 x 1-1/4
57 51793 HairpinCotter
58 15708tX479 Lower Handle
59 131959 Handle Bolt
61 132001 RopeGuide
62 134612 DebdsShleld
64 ...... Engine- (See Breakdown)
TecumsehModel 143,006700
69 151440 Hubcaps
70 17600406 Screw
71 170939 SpringRH
72 170938 SpringLH
73 165912 Bolt
- - 161058 WarningDecal(NotShown)
- - 171021 Owner'sManual(English/Spanish)
Availableaccessories notincludedwith lawnmower:.
- - 917 33313 ClippingDeflector(Available in serviceonly)
- - 71 33623 Gas Can (2.5 gal.)
- - 71 33500 FuelStabilizer
- - 71 33000 SAE 30W Oil (20 oz,)
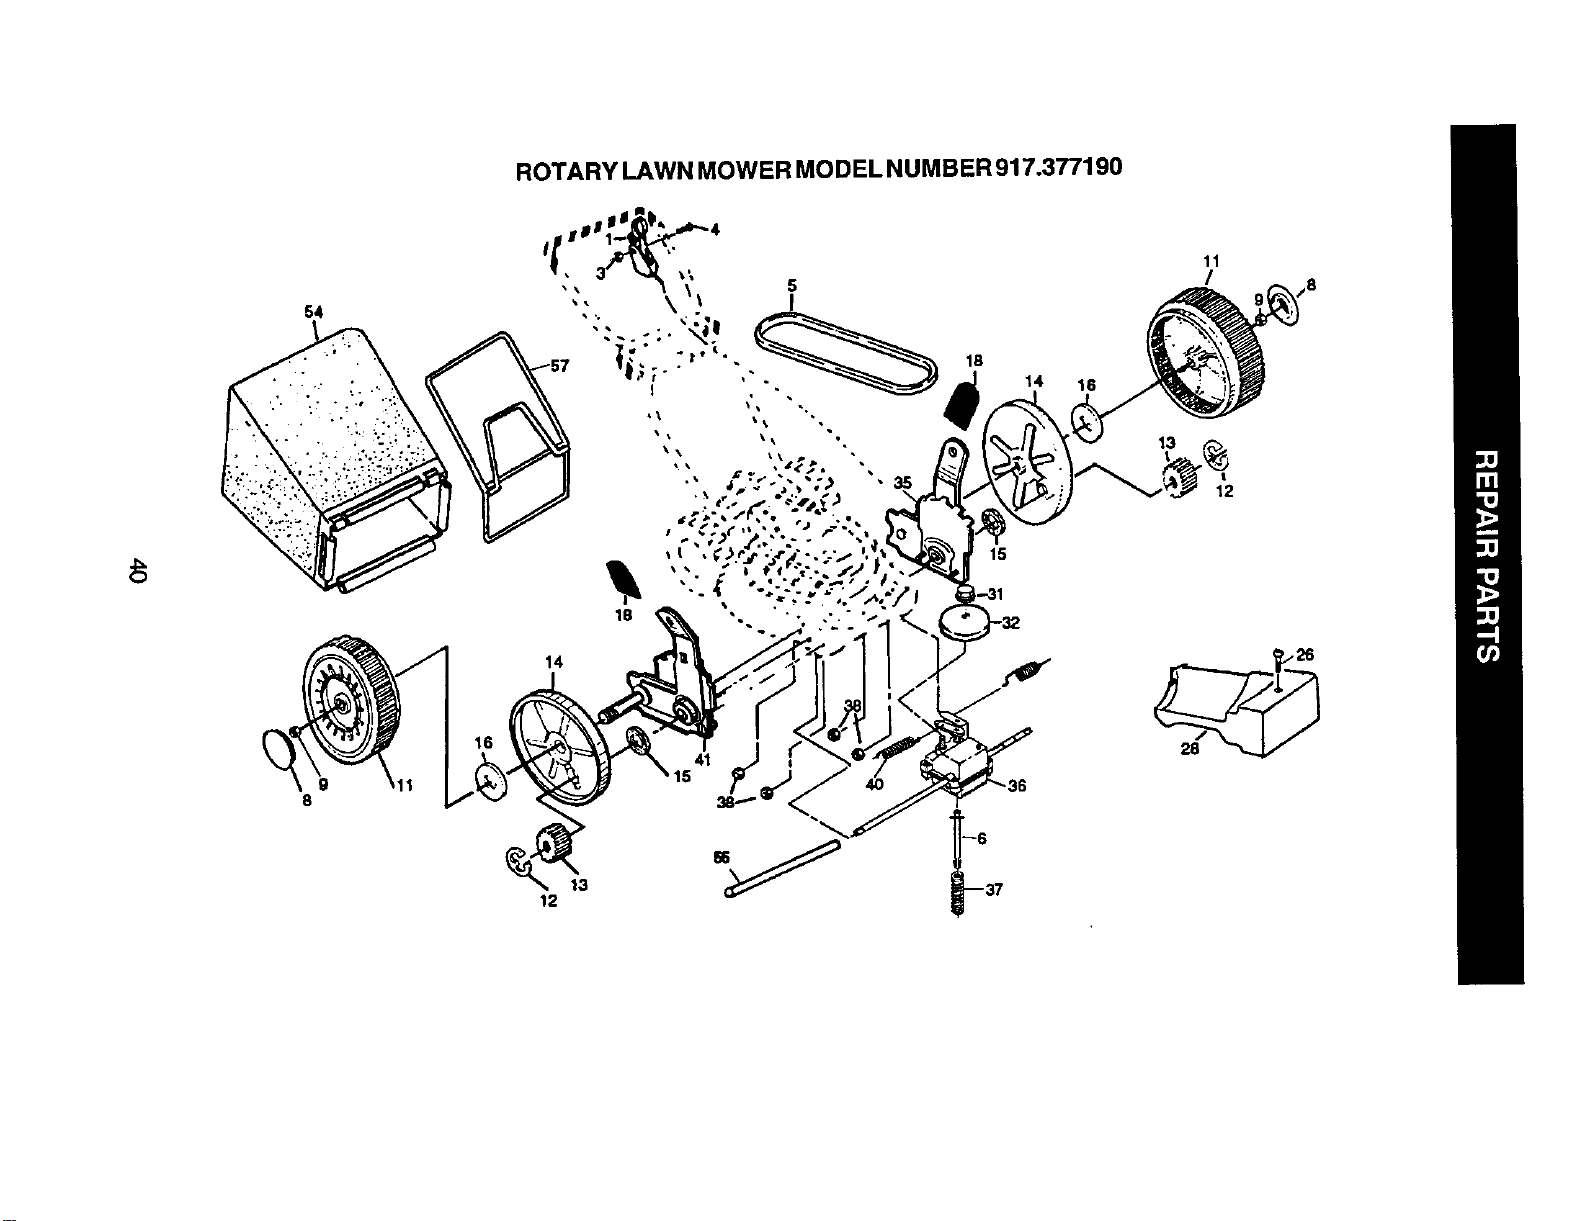
ROTARY LAWN MOWER MODEL NUMBER 917.377190
54
5
I
18
15
14 16
11
/
14
12
13
40 ,36
37
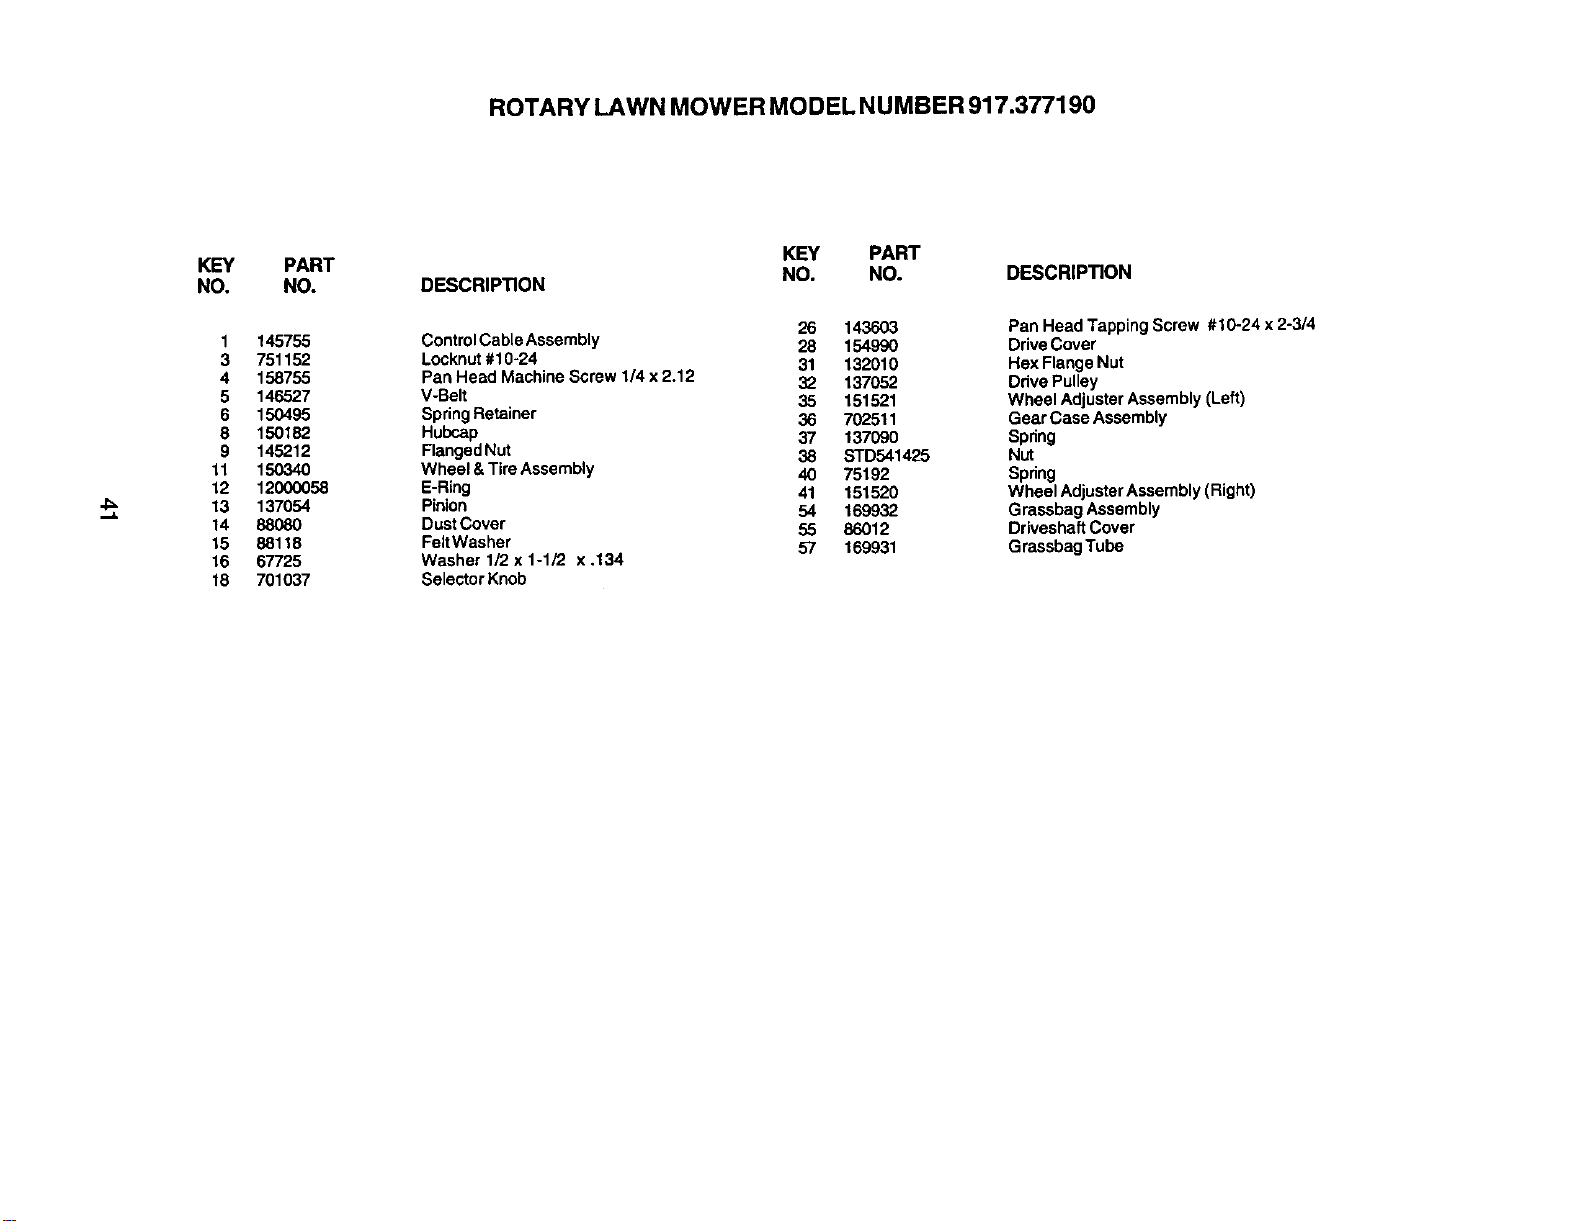
ROTARY LAWN MOWER MODEL NUMBER 917.377190
.b.
KEY
NO.
1
3
4
5
6
8
9
11
12
13
14
15
16
18
PART
NO.
145755
751152
158755
146527
150495
150182
145212
15034o
12000058
137054
88O8O
88118
67725
701037
DESCRIPTION
ControlCableAssembly
Locknut#10-24
Pan Head Machine Screw 1/4 x2.12
V-Belt
SpringRetainer
Hubcap
FlangedNut
Wheel &TireAssembly
E-Ring
Pinion
DustCover
FeltWasher
Washer 1/2 x 1-1/2 x .134
SelectorKnob
KEY PART
NO. NO. DESCRIPTION
26 1436O3
28 154990
31 132010
32 137052
35 151521
36 702511
37 137090
38 STD541425
40 75192
41 151520
54 169932
55 86012
57 169931
Pan Head Tapping Screw #10-24 x 2-3/4
DriveCover
HexFlange Nut
DrivePulley
Wheel Adjuster Assembly(Left)
Gear Case Assembly
Spring
Nut
Spring
Wheel AdjusterAssembly(Right)
GrassbagAssembly
DriveshaftCover
GrassbagTube
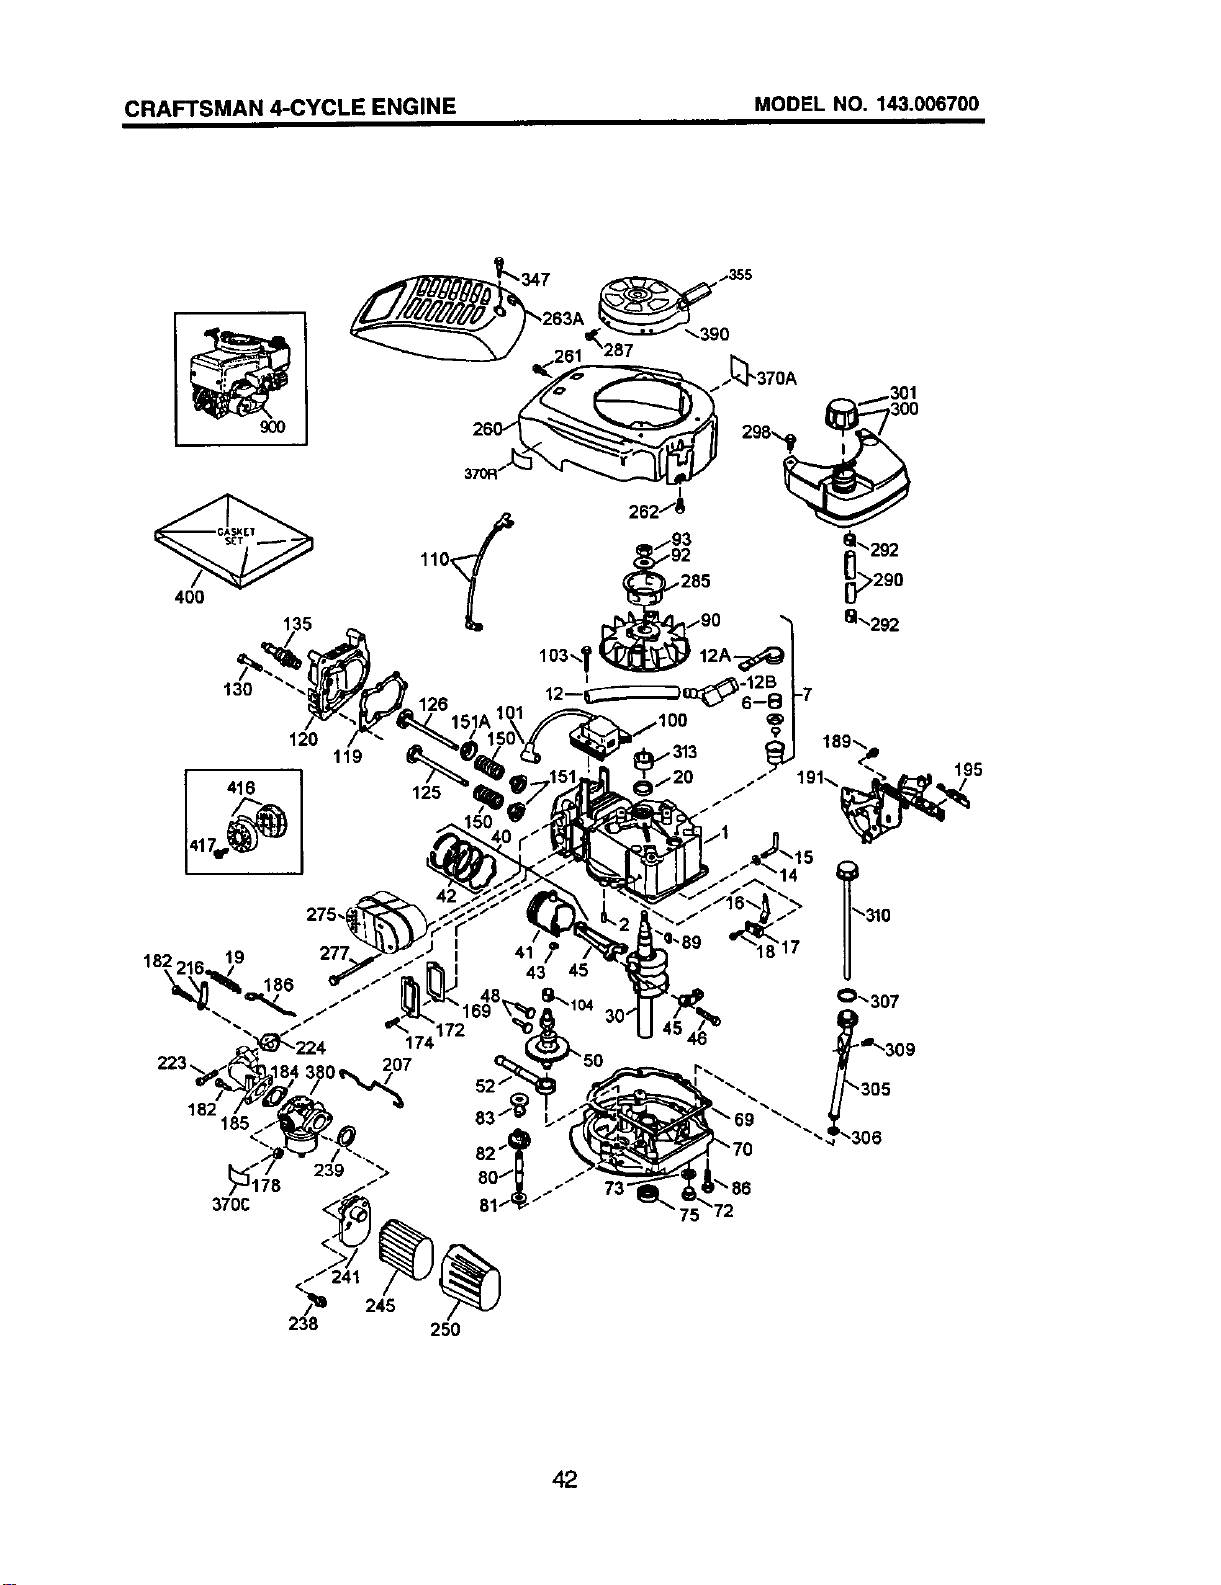
CRAFTSMAN 4-CYCLE ENGINE MODEL NO. 143.006700
400
130
120
416
417f_ )
126151A 1C
119
125
_390
245
238 250
42
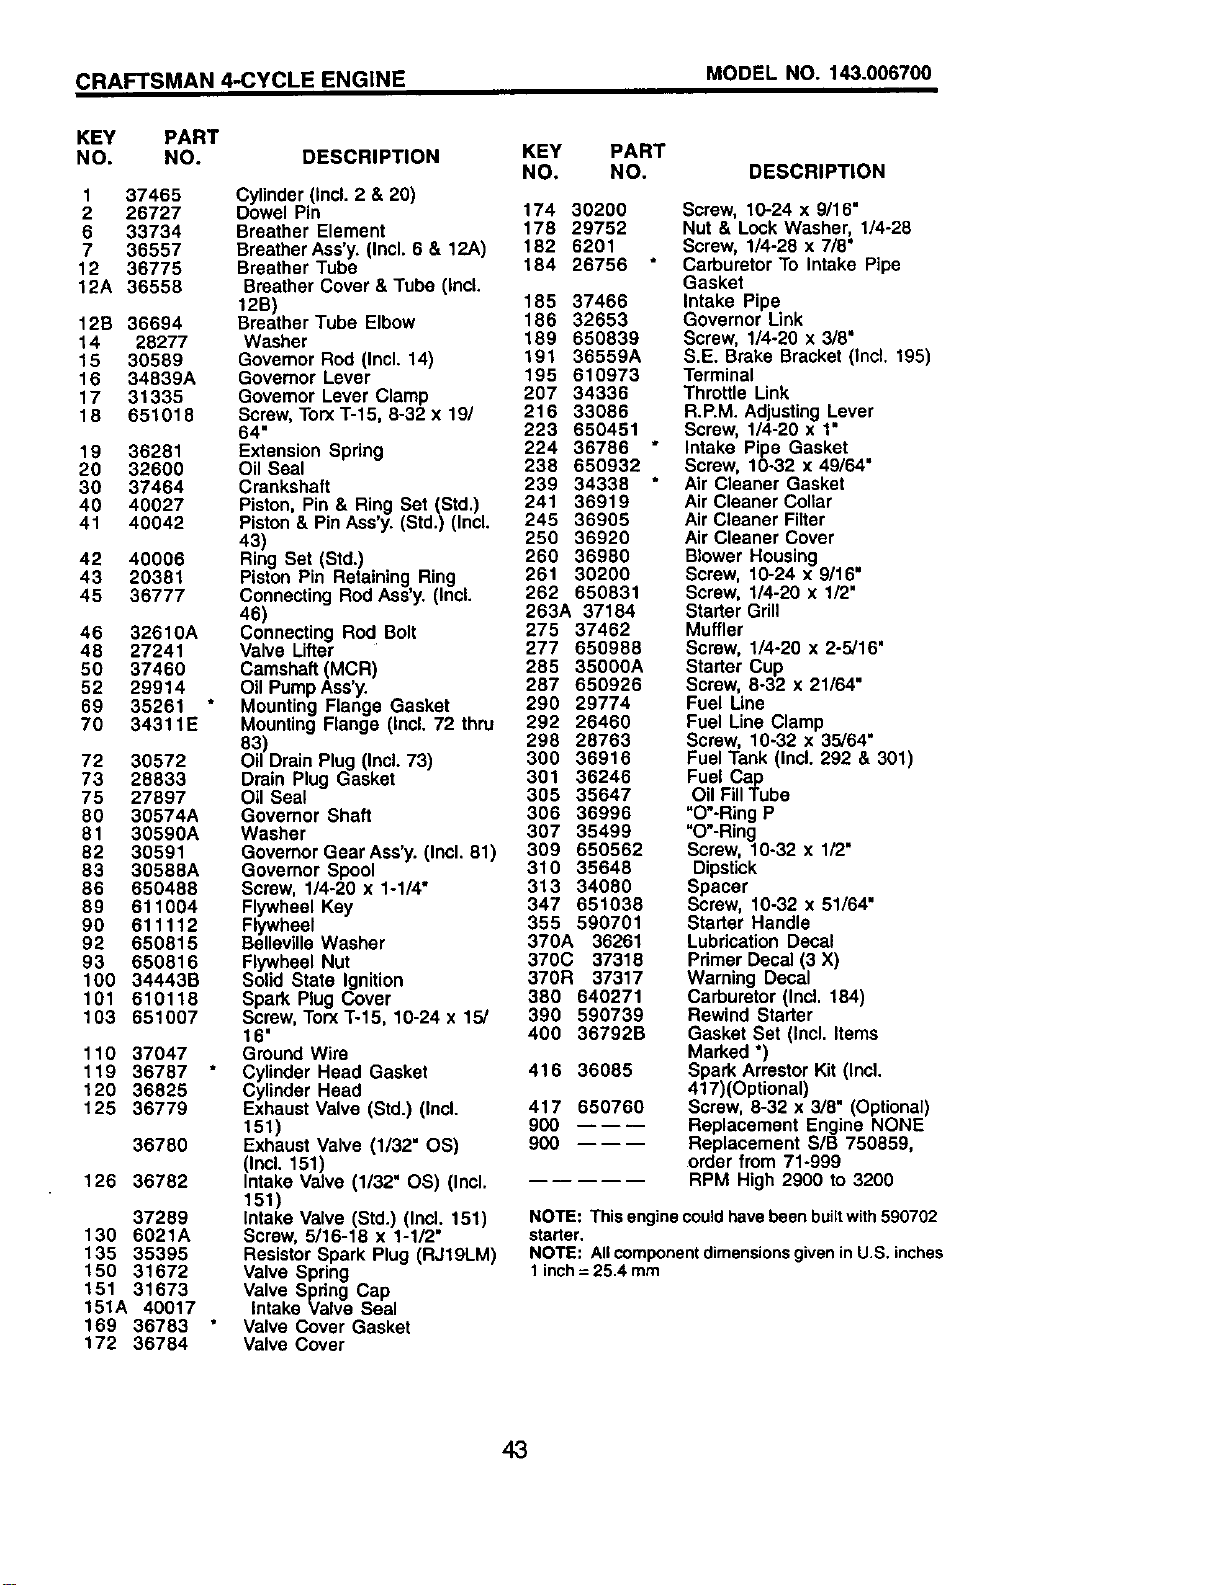
CRAFTSMAN 4.-CYCLE ENGINE MODEL NO. 143.006700
KEY PART
NO. NO. DESCRIPTION
KEY
NO.
PART
NO. DESCRIPTION
1 37465 Cylinder (Incl. 2 & 20)
2 26727 Dowel Pin 174 30200
6 33734 Breather Element 178 29752
7 36557 Breather Ass'y. (Incl. 6 & 12A) 182 6201
12 36775 Breather Tube 184 26756
12A 36556 Breather Cover & Tube (Incl.
12B) 185 37466
12B 36694 Breather Tube Elbow 186 32653
14 28277 Washer 189 650839
15 30589 Governor Rod (Incl. 14) 191 36559A
16 34839A Governor Lever 195 610973
17 31335 Governor Lever Clamp 207 34336
18 651018 Screw, Torx T-15, 8-32 x 19/ 216 33086
64" 223 650451
19 36281 Extension Spring 224 36786
20 32600 Oil Seal 238 650932
30 37464 Crankshaft 239 34338
40 40027 Piston, Pin & Ring Set (Std.) 241 36919
41 40042 Piston & Pin Ass'y. (Std.) (Incl. 245 36905
43) 250 36920
42 40006 Ring Set (Std.) 260 36980
43 20381 Piston Pin Retaining Ring 261 30200
45 36777 Connecting Rod Ass'y. (Incl. 262 650831
46) 263A 37184
46 32610A Connecting Rod Bolt 275 37462
48 27241 Valve Lifter 277 650988
50 37460 Camshaft (MCR) 285 35000A
52 29914 Oil PumpAss'y. 287 650926
69 35261 Mounting Flange Gasket 290 29774
70 34311E Mounting Flange (IncL 72 thru 292 26460
83) 298 28763
72 30572 Oil Drain Plug (Incl. 73) 300 36916
73 28833 Drain Plug Gasket 301 36246
75 27897 Oil Seal 305 35647
80 30574A Governor Shaft 306 36996
81 30590A Washer 307 35499
82 30591 Governor GearAss'y. (Incl. 81) 309 650562
83 30568A Governor Spool 310 35648
86 650488 Screw, 1/4-20 x 1-1/4" 313 34080
89 611004 Flywheel Key 347 651038
90 611112 Flywheel 355 590701
92 650815 Belleville Washer 370A 36261
93 650816 Flywheel Nut 370C 37318
100 34443B Solid State Ignition 370R 37317
101 610118 Spark Plug Cover 380 640271
103 651007 Screw, Torx To15, 10-24 x 15/ 390 590739
16" 400 36792B
110 37047 Ground Wire
119 36787 Cylinder Head Gasket 416 36085
120 36825 Cylinder Head
125 36779 Exhaust Valve (Std.) (Incl. 417 650760
151) 900
36780 Exhaust Valve (1/32" OS) 900
(Incl. 151)
126 36782 Intake Valve (1/32" OS) (Incl.
151)
37289 Intake Valve (Std.) (Incl. 151)
130 6021A Screw, 5/16-18 x 1-1/2"
135 35395 Resistor Spark Plug (RJ19LM)
150 31672 Valve Spring
151 31673 Valve Spring Cap
151A 40017 intake Valve Seal
169 36783 Valve Cover Gasket
172 36784 Valve Cover
Screw, 10-24 x 9/16"
Nut & Lock Washer, 1/4-28
Screw, 1/4-28 x 7/8"
CarburetorTo Intake Pipe
Gasket
Intake Pipe
Governor Link
Screw, 1/4-20 x 3/8"
S.E. Brake Bracket(Incl. 195)
Terminal
Throttle Link
R.P.M. AdjustingLever
Screw, 1/4-20 x 1"
Intake Pipe Gasket
Screw, 10-32 x 49164"
Air Cleaner Gasket
AirCleaner Collar
AirCleaner Filter
Air Cleaner Cover
Blower Housing
Screw, 10-24 x 9/16"
Screw, 1/4-20 x 1/2"
StarterGrill
Muffler
Screw, 1/4-20 x 2-5/16"
Starter Cup
Screw, 8-32 x 21/64"
Fuel Line
Fuel Une Clamp
Screw, 10-32 x 35/64"
FuelTank (Incl. 292 & 301)
Fuel Cap
Oil FillTube
"O"-Ring P
"O"-Ring
Screw, 10-32 x 1/2"
Dipstick
Spacer
Screw, 10-32 x 51/64"
Starter Handle
LubdcationDecal
Pdmer Decal(3 X)
Warning Decal
Carburetor(loci, 184)
Rewind Starter
Gasket Set (Incl, Items
Marked*)
Spark ArrestorKit (Incl.
417)(Optional)
Screw, 8-32 x 3/8" (Optional)
Replacement Engine NONE
Replacement S/B 750659,
order from 71-999
RPM High2900 to 3200
NOTE: This engine could have been builtwith590702
starter,
NOTE: All componentdimensionsgivenin U.S. inches
1inch = 25.4 mm
43
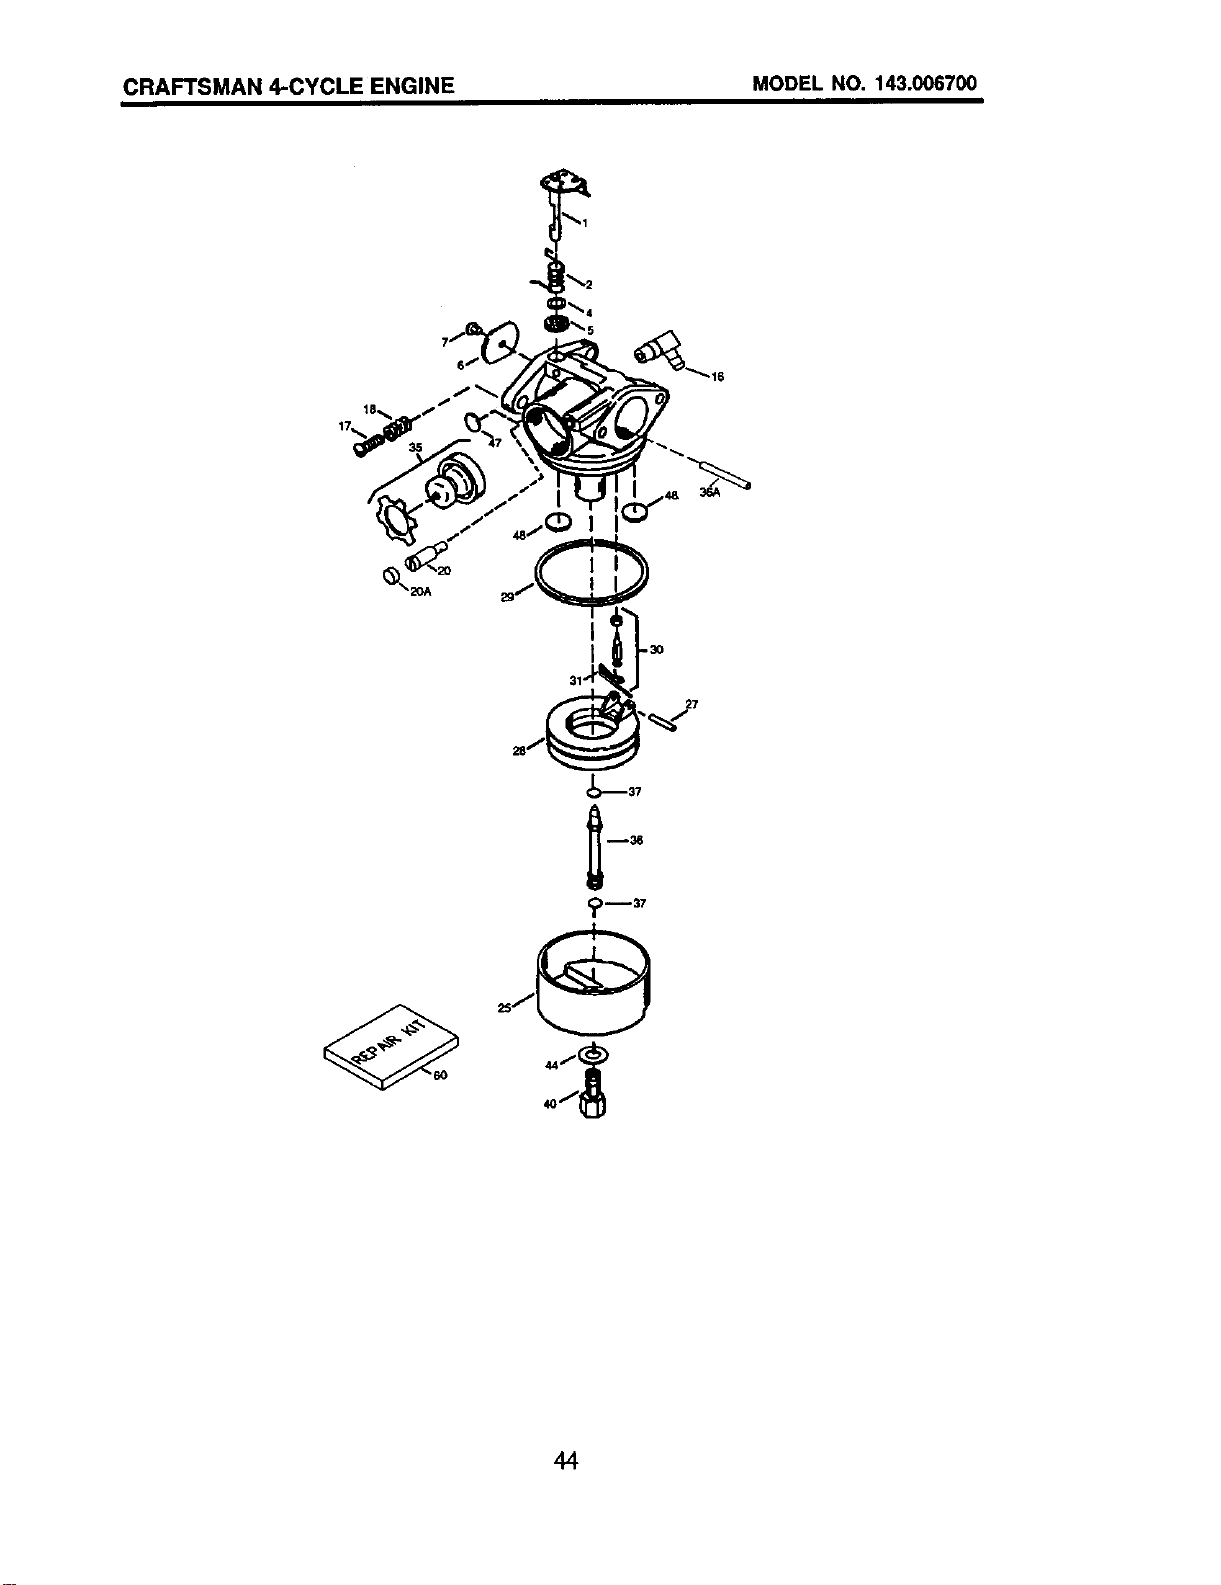
CRAFTSMAN 4-CYCLE ENGINE MODEL NO. 143.006700
17,_
36A
27
_37
_m37
4O
44
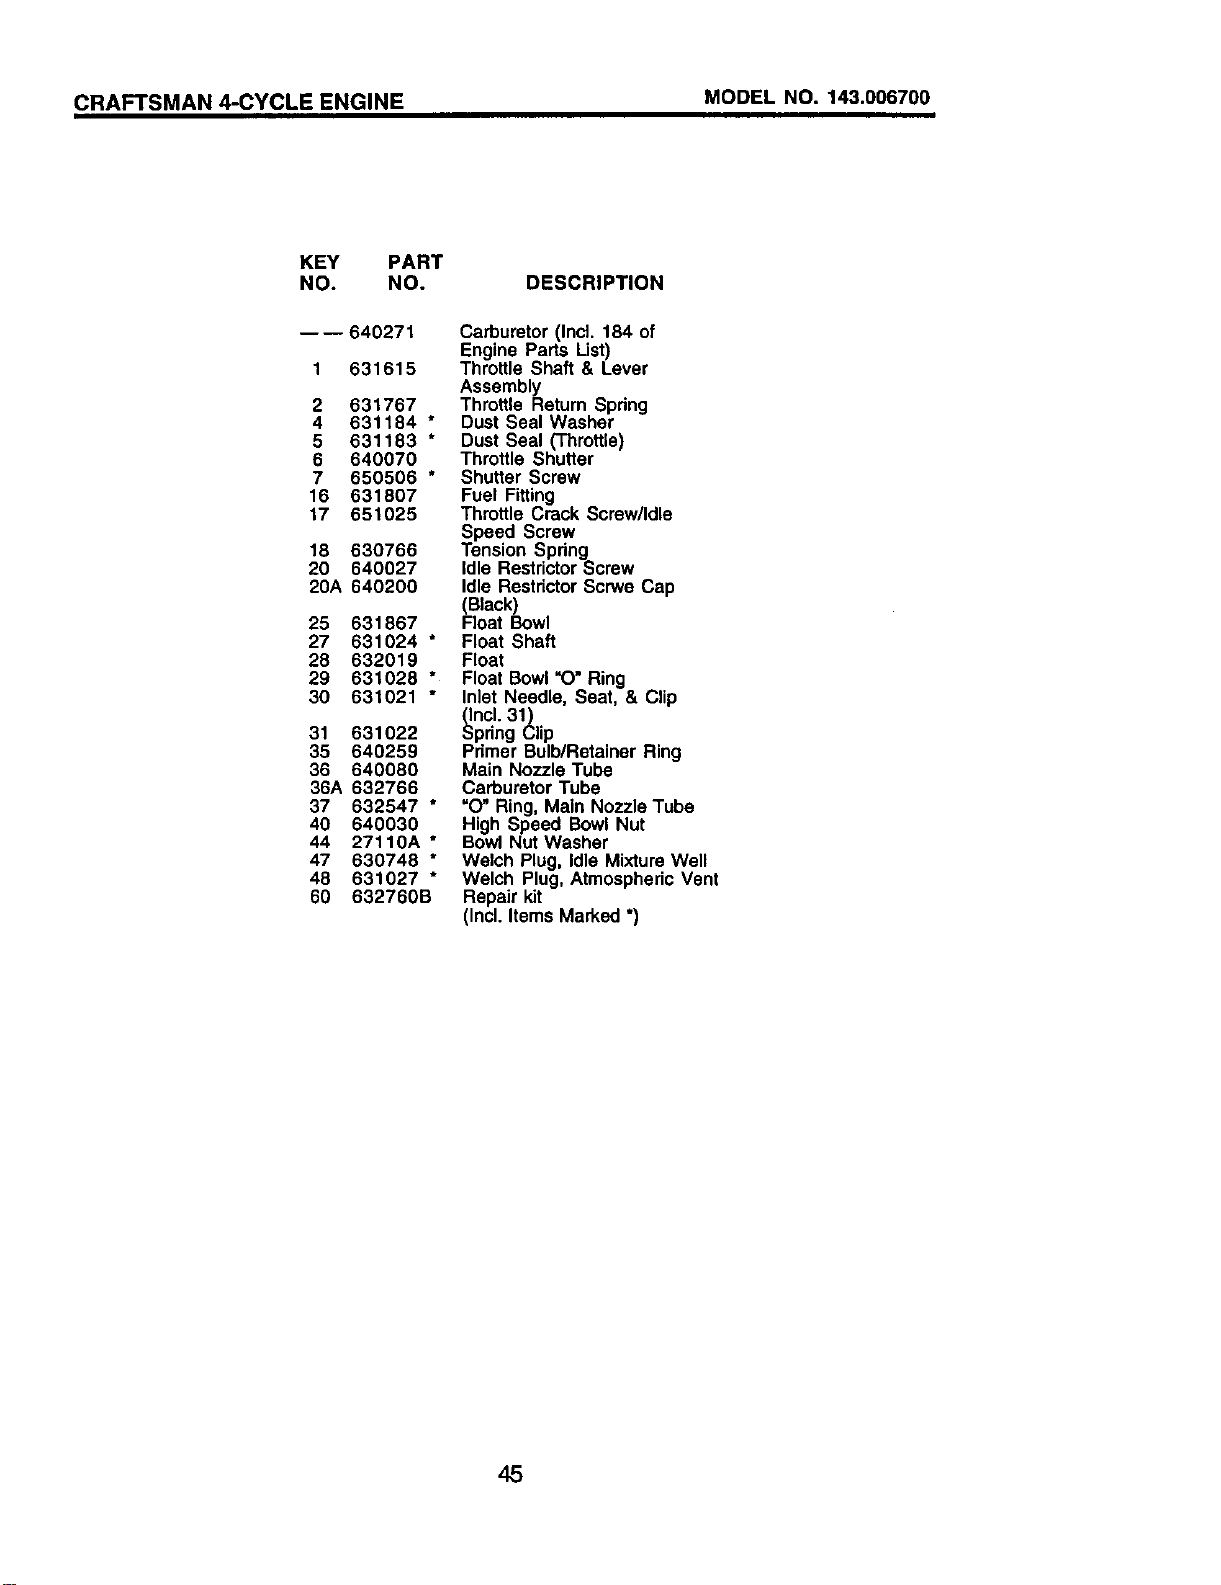
CRAFTSMAN 4-CYCLE ENGINE MODEL NO. 143.006700
KEY PART
NO. NO.
----640271
1 631615
2 631767
4 631184 "
5 631183 *
6 640070
7 650506 *
16 631807
17 651026
18 630766
20 640027
20A 640200
25 631867
27 631024 *
28 632019
29 631028 "
30 631021 "
31 631022
35 640259
36 640080
36A 632766
37 632547 *
40 640030
44 27110A *
47 630748 *
48 631027 *
60 632760B
DESCRIPTION
Carburetor(Ind. 184 of
Engine Parts Ust)
Throttle Shaft & Lever
Assembly
Throttle Return Spdng
Dust Seal Washer
Dust Seal (Throttle)
Throttle Shutter
Shutter Screw
Fuel Fitting
ThrottleCrack Screw/Idle
Speed Screw
Tension Spdng
Idle RestdctorScrew
Idle RestdctorScrwe Cap
(Black)
Float Bowl
Float Shaft
Float
FloatBowl=O"Ring
Inlet Needle, Seat, & Clip
_ncl. 31)
pringClip
Pdmer Bulb/RetainerRing
Main Nozzle Tube
CarburetorTube
"O" Ring,Main Nozzle Tube
High Speed Bowl Nut
BowlNut Washer
Welch Plug, Idle MixtureWell
Welch Plug, AtmosphericVent
Repair kit
(Incl. Items Marked *)
45
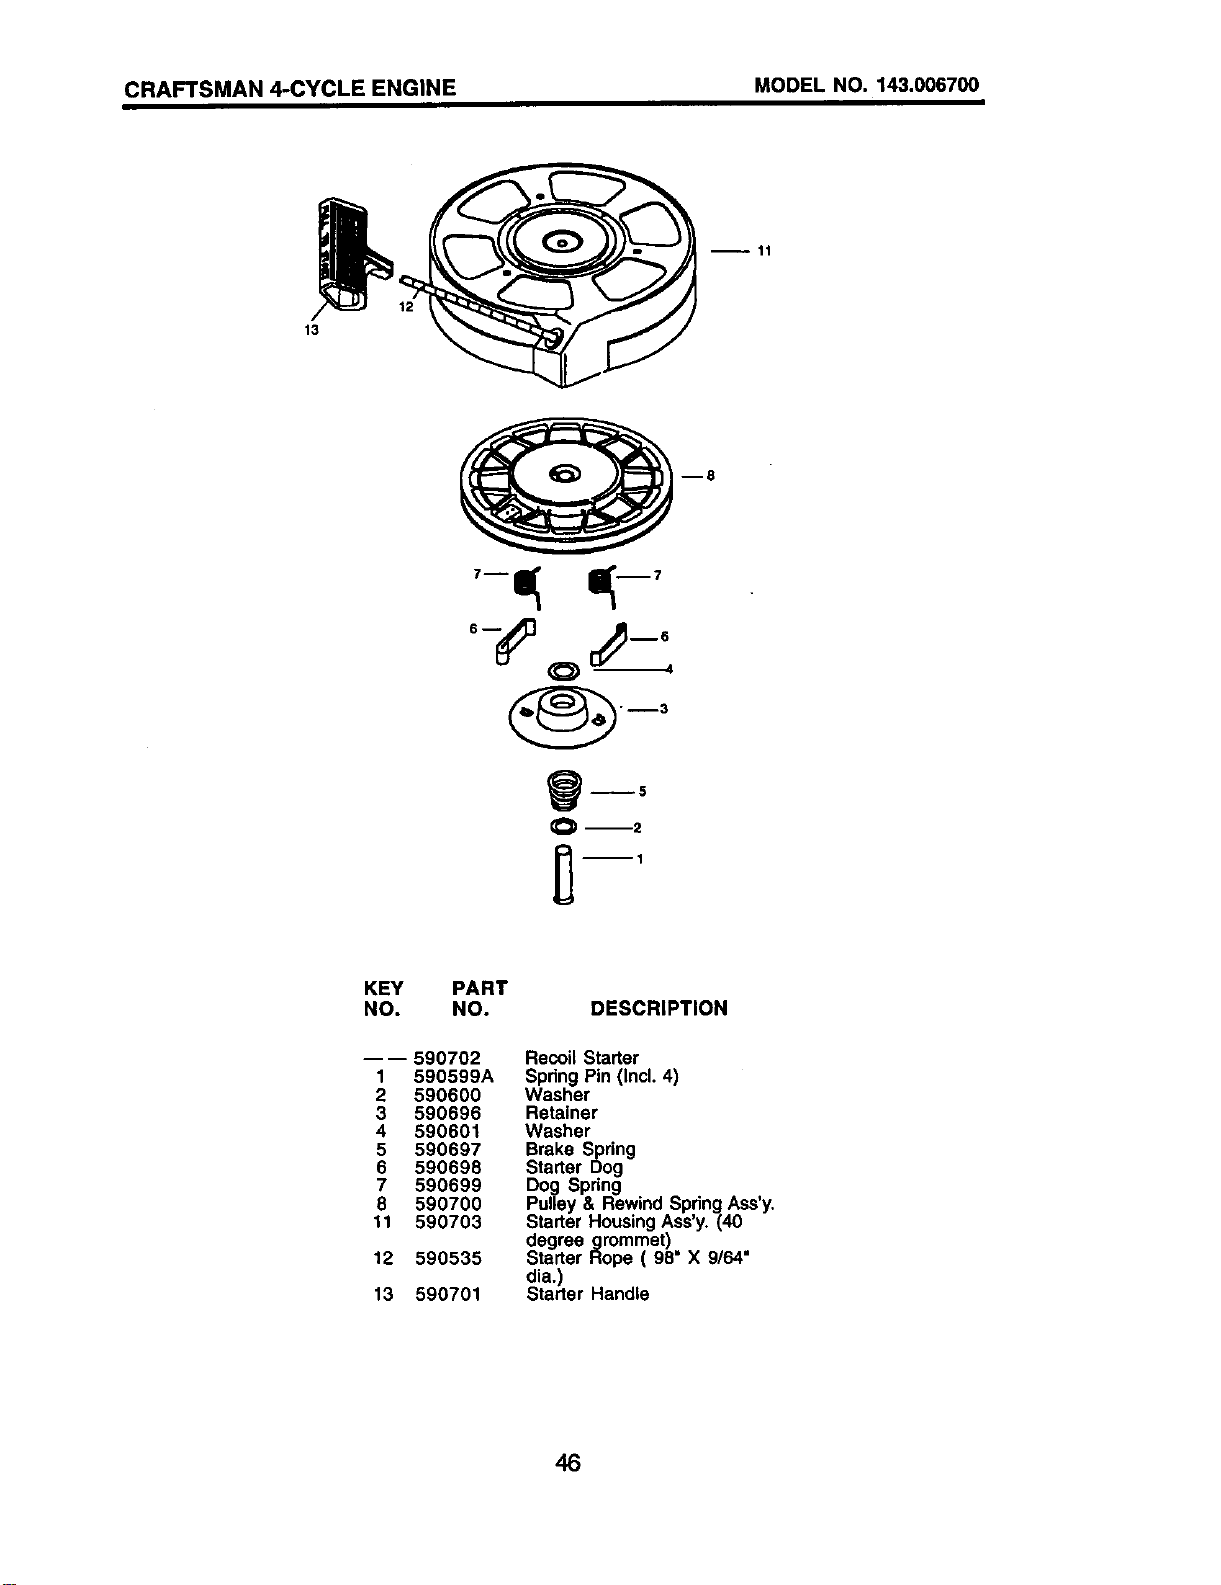
CRAFTSMAN 4-CYCLE ENGINE MODEL NO. 143.006700
--11
13
z-,
Ore2
KEY
NO.
PART
NO. DESCRIPTION
1
2
3
4
5
6
7
8
11
12
13
590702 Recoil Starter
590599A Spring Pin (Incl. 4)
590600 Washer
590696 Retainer
590601 Washer
590697 Brake Spring
590698 Starter Dog
590699 Dog Spring
590700 Pulley & Rewind Spring Ass'y.
590703 Starter Housing Ass'y. (40
degree grommet)
590535 Starter Rope ( 98" X 9/64"
dia.)
590701 Starter Handle
46
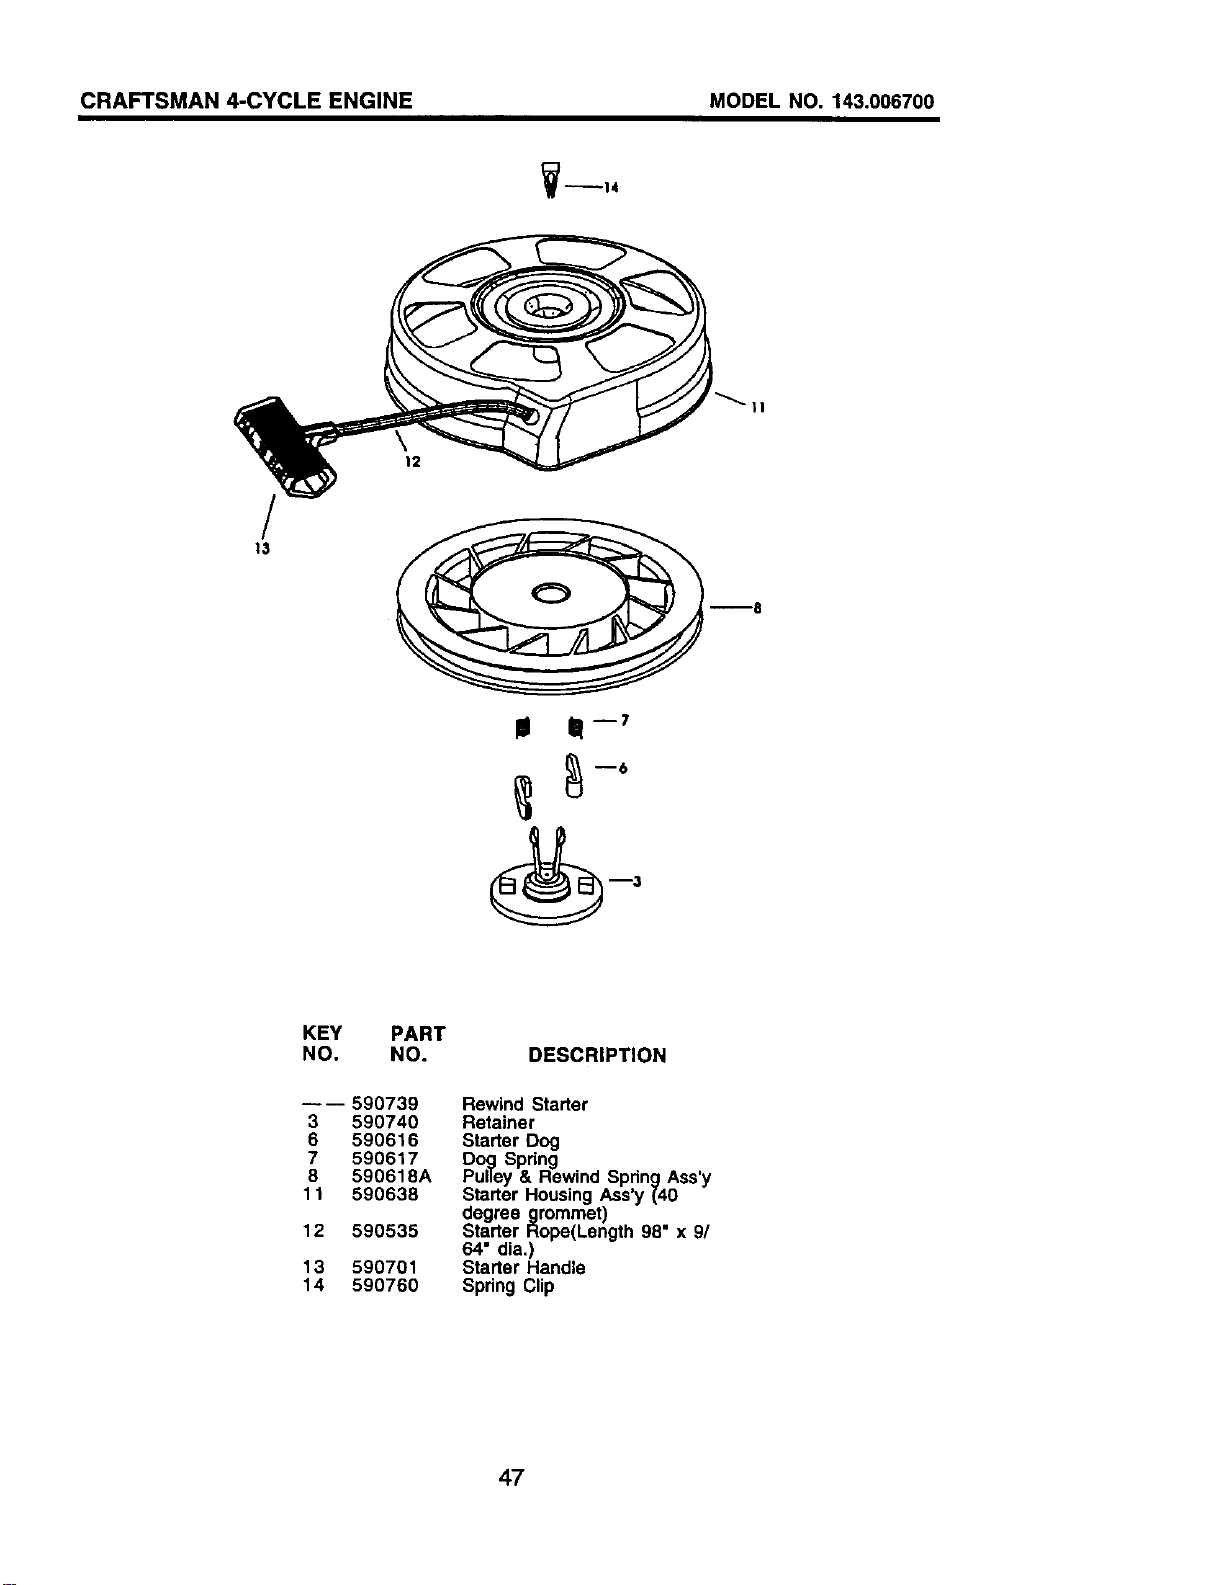
CRAFTSMAN 4-CYCLE ENGINE MODEL NO. 143.006700
V_I4
12
Ill Ill -7
KEY PART
NO. NO.
----590739
3 590740
6 590616
7 590617
8 590618A
11 590638
12 590535
13 590701
14 590760
DESCRIPTION
Rewind Starter
Retainer
Starter Dog
Dog Spring
Pulley & Rewind Spring Ass'y
Starter Housing Ass'y (40
degree grommet)
Starter Rope(Length 98" x 9/
64" dia.)
Starter Handle
Spring Clip
47
For repair of major brand appliances in your own home...
no matter who made it, no matter who sold it!
1-800-4-MY-HOME s. Anytime,dayor night
(1-800-469-4663)
www.sears,com
To bring in products such as vacuums,
lawn equipment and electronics for repair, call for
the location of your nearest Sears Parts & Repair Center.
1-800-488-1222 Anytime, day or night
www.sears.com
For the replacement parts, accessories and owner's manuals
that you need to do-it-yourself, call Sears PartsDirectSM!
1-800-366-PART 6am-11pm.CST,
(1-800-366-7278) 7 daysa week
www.sears.condpartsdirect
To purchase or inquire about a Sears Service Agreement:
1-800-827-6655
7 a.m.- 5 p.m. CST, Mon.- Sat.
Pare pedir servicio de reparaci_)n a domicilio, Au Canada pour service en frangais:
y para ordenarplazasconentregaa domicino: 1-877-LE-FOYER s.
(1-877-533-6937)
1-888"SU-HOGAR su
(1"888"784-6427)
© Sears, Roebuck and Co.
® Registered Trademark / T. Trademark of Sears. Roebuck and Co.
® Marca Registrada / TMMarca de F_brica de Sears, Roebuck and Co.
171021 Rev. 2 08.16.01 VB/MH Printedin U.S.A.