User Manual for Delonghi D28313-UX.BK
Table of contents
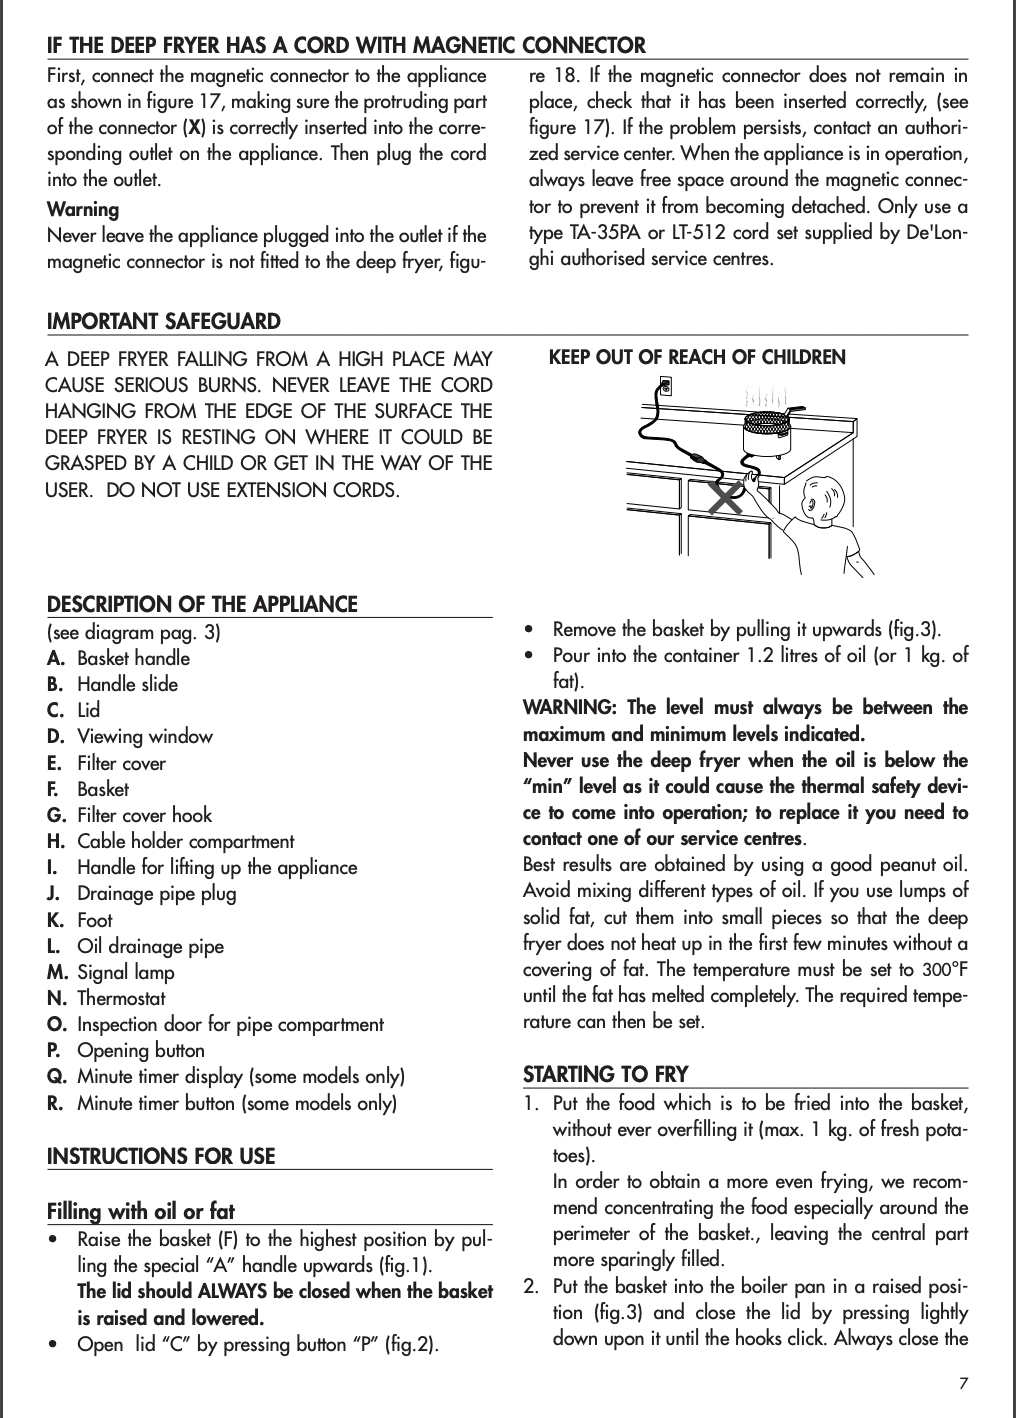
- IMPORTANT SAFEGUARDS
- DESCRIPTION OF THE APPLIANCE
- INSTRUCTIONS FOR USE
- STARTING TO FRY
- MODELS WITH ELECTRONIC MINUTE TIMER
- AFTER FRYING
- FILTERING THE OIL OR FAT
- MAINTENANCE OF THE ANTI-ODOUR FILTER
- CLEANING
- COOKING HINTS
- HOW LONG THE OIL OR FAT LASTS
- HOW TO FRY CORRECTLY
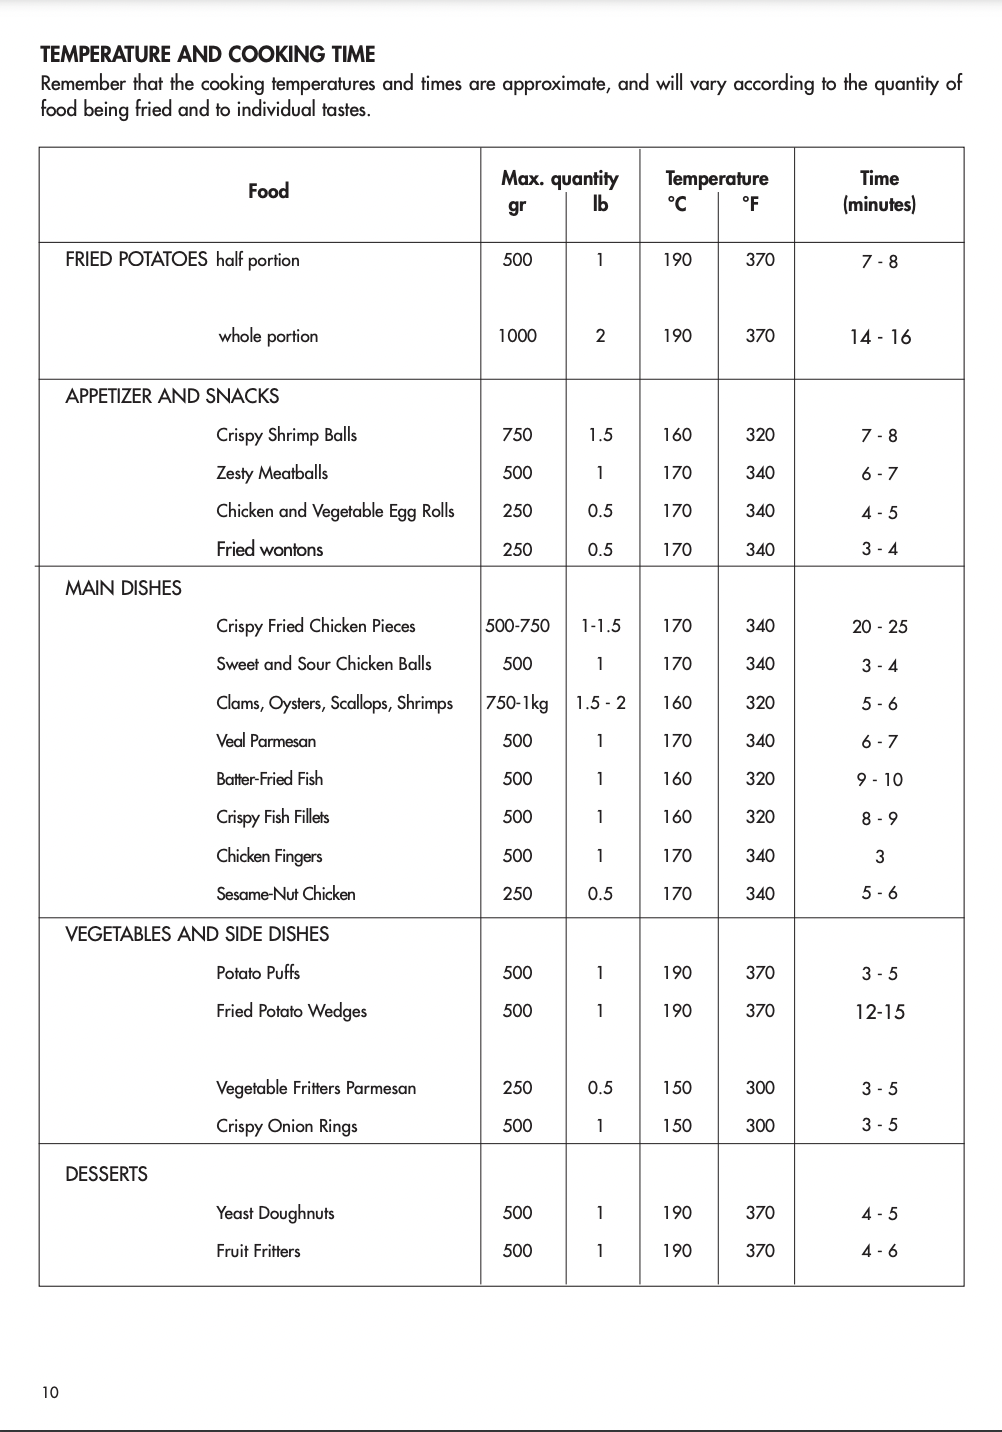
- TEMPERATURE AND COOKING TIME
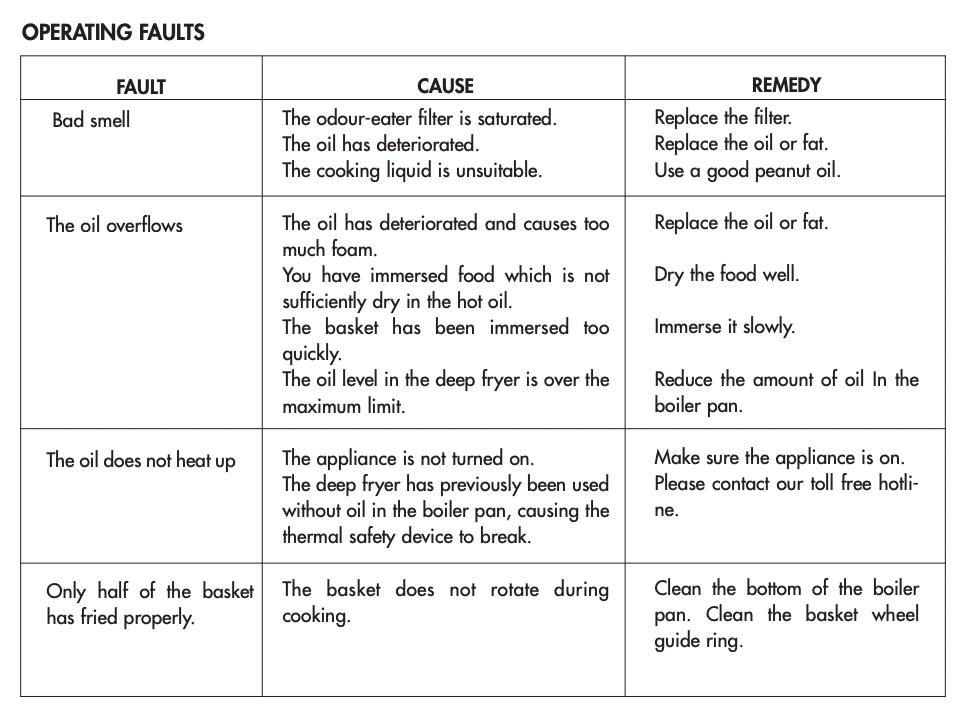
- OPERATING FAULTS
- Limited Warranty
STARTING TO FRY
1. Put the food which is to be fried into the basket, without ever overfilling it (max. 1 kg. of fresh potatoes). In order to obtain a more even frying, we recommend concentrating the food especially around the perimeter of the basket., leaving the central part more sparingly filled.
2. Put the basket into the boiler pan in a raised position (fig.3) and close the lid by pressing lightly down upon it until the hooks click. Always close the lid before lowering the basket in order to avoid hot oil from splashing out.
3. Plug into the mains socket and set thermostat knob “N” to the required temperature (fig.4). When the temperature set has been reached, signal lamp “M” will go off.
4. As soon as the signal lamp goes off, immerse the basket in the oil, lowering the handle slowly after sliding the handle’s “B” slider back.
• It is completely normal for a considerable amount of very hot steam to pour out of filter cover “E” immediately after this.
• At the start of cooking, immediately after the food has been immersed in the oil, the internal wall of viewing window “D” will steam up, before progressively clearing.
• It is normal for drops of condensation to form around the basket handle while the appliance is working.
MODELS WITH ELECTRONIC MINUTE TIMER
1 Set the cooking time by pressing the "R" button. The display "Q" will show the minutes set.
2 The numbers will straight away begin to flash. This shows that the cooking time has begun. The last minute is displayed in seconds.
3 If an error is made, the new cooking time can be set by holding the button down for more than 2 seconds. The display will reset and the process can then be repeated from point 1.
4 The minute timer will indicate the end of the cooking time with two series of beeps about 20 seconds apart. To turn the acoustic signal off, press the minute timer button "R".
IMPORTANT: the minute timer does not turn the appliance off.
Replacing the minute timer battery (fig. 16)
• Remove the minute timer from its housing by prising it from the lower side (see fig. 16A).
• Turn the battery cover on the back of the battery anticlockwise (fig. 16B) until it comes free.
• Replace the battery with another of the same type (L1131). When replacing or disposing of the appliance, the battery must be removed and disposed of according to current legislation as it represents a hazard to the environment.
AFTER FRYING
When the cooking time runs out raise the basket and check if the food has reached the required golden colour. In the models fitted with a viewing window this check can be carried out by looking through the window without opening the lid. If cooking is complete, turn off the appliance by unpluging from the outlet. Drain excess oil by leaving the basket inside the deep fryer for a while in the high position.
FILTERING THE OIL OR FAT
We recommend that you carry out this procedure each time you have finished frying as, especially when the food has been breaded or floured, the food particles tend to burn if they remain in the liquid thus causing much quicker deterioration in the oil or fat. Check that the oil is cool enough (waiting about 2 hours).
Models with drainage pipe
Bring the front part of the deep fryer to the edge of the work surface, taking care that the feet (K) never protrude over the edge (fig. 5).
1. Open the lid of the deep fryer and remove the basket (fig. 3).
2. Open inspection door “O” as shown in fig. 6.
3. Remove drainage pipe “L”.
4. Remove plug “J” while at the same time squeezing the pipe with two fingers to prevent the oil or fat from leaking out before the pipe has been directed into a container (fig. 7).
5. Allow the oil or fat to drip into a container (fig. 8).
6. Remove any deposits from the tank using a sponge or absorbent paper.
7. At the end of the procedure fit the plug back onto the drainage pipe and reposition it in its compartment.
8. Put the basket back in the high position and place one of the filters (optional) at the bottom of the basket (fig. 9). You can obtain the filters from your retailer or one of our service centres.
9. Next pour the oil or fat very slowly into the deep fryer so that it does not spill out of the filter (fig. 10).
10.The oil which has been filtered in this way can be preserved inside the deep fryer. However, if a long time elapses before it is next used, it is advisable to preserve the oil in a closed container in order to stop it deteriorating. It is good practice to keep oil used for frying fish separate from that used for frying other food. If fat is used, be careful not to let it cool down too much or it will solidify
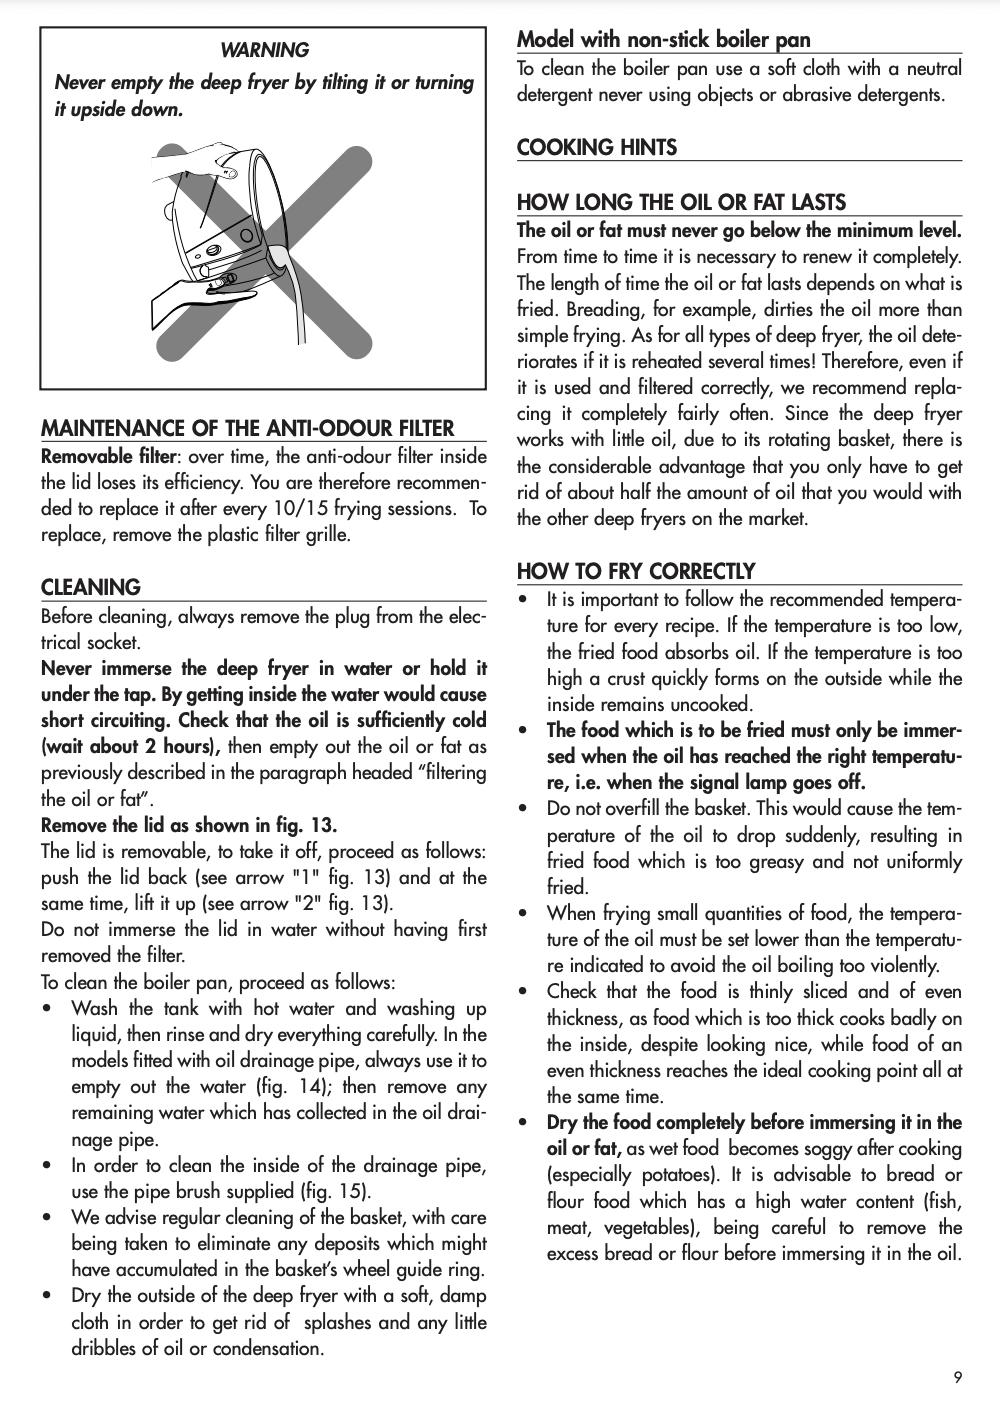
WARNING Never empty the deep fryer by tilting it or turning it upside down.
MAINTENANCE OF THE ANTI-ODOUR FILTER
Removable filter: over time, the anti-odour filter inside the lid loses its efficiency. You are therefore recommended to replace it after every 10/15 frying sessions. To replace, remove the plastic filter grille.
CLEANING
Before cleaning, always remove the plug from the electrical socket. Never immerse the deep fryer in water or hold it under the tap. By getting inside the water would cause short circuiting. Check that the oil is sufficiently cold (wait about 2 hours), then empty out the oil or fat as previously described in the paragraph headed “filtering the oil or fat”. Remove the lid as shown in fig. 13. The lid is removable, to take it off, proceed as follows: push the lid back (see arrow "1" fig. 13) and at the same time, lift it up (see arrow "2" fig. 13). Do not immerse the lid in water without having first removed the filter. To clean the boiler pan, proceed as follows:
• Wash the tank with hot water and washing up liquid, then rinse and dry everything carefully. In the models fitted with oil drainage pipe, always use it to empty out the water (fig. 14); then remove any remaining water which has collected in the oil drainage pipe.
• In order to clean the inside of the drainage pipe, use the pipe brush supplied (fig. 15).
• We advise regular cleaning of the basket, with care being taken to eliminate any deposits which might have accumulated in the basket’s wheel guide ring.
• Dry the outside of the deep fryer with a soft, damp cloth in order to get rid of splashes and any little dribbles of oil or condensation.
Model with non-stick boiler pan
To clean the boiler pan use a soft cloth with a neutral detergent never using objects or abrasive detergents.
COOKING HINTS
HOW LONG THE OIL OR FAT LASTS
The oil or fat must never go below the minimum level. From time to time it is necessary to renew it completely. The length of time the oil or fat lasts depends on what is fried. Breading, for example, dirties the oil more than simple frying. As for all types of deep fryer, the oil deteriorates if it is reheated several times! Therefore, even if it is used and filtered correctly, we recommend replacing it completely fairly often. Since the deep fryer works with little oil, due to its rotating basket, there is the considerable advantage that you only have to get rid of about half the amount of oil that you would with the other deep fryers on the market.
HOW TO FRY CORRECTLY
• It is important to follow the recommended temperature for every recipe. If the temperature is too low, the fried food absorbs oil. If the temperature is too high a crust quickly forms on the outside while the inside remains uncooked.
• The food which is to be fried must only be immersed when the oil has reached the right temperature, i.e. when the signal lamp goes off.
• Do not overfill the basket. This would cause the temperature of the oil to drop suddenly, resulting in fried food which is too greasy and not uniformly fried.
• When frying small quantities of food, the temperature of the oil must be set lower than the temperature indicated to avoid the oil boiling too violently.
• Check that the food is thinly sliced and of even thickness, as food which is too thick cooks badly on the inside, despite looking nice, while food of an even thickness reaches the ideal cooking point all at the same time.
• Dry the food completely before immersing it in the oil or fat, as wet food becomes soggy after cooking (especially potatoes). It is advisable to bread or flour food which has a high water content (fish, meat, vegetables), being careful to remove the excess bread or flour before immersing it in the oil.