TRD50615E
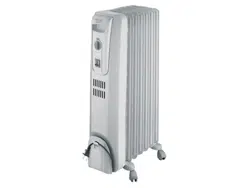
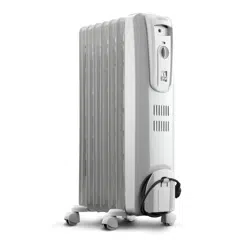
ELECTRIC OIL FILLED RADIATOR
Instructions for use. Keep these instructions
Visit www.delonghi.com for a list of service centers near you.
ELECTRIC CHARACTERISTICS
120 V~ 60 Hz 1500 W
RADIADOR ELÉCTRICO DE BAÑO DE ACEITE
Repase y guarde estas instrucciones.
Lea cuidadosamente este instructivo antes de usar su aparato.
Visite www.delonghi.com para ver la lista de centros de servicios
cercanos a usted.
CARACTERISTICAS ELECTRICAS:
120 V~ 60 Hz 1500 W
2
EN
ES
page 4 pág. 13
3
A
C
F
E
B
D
4
IMPORTANT
SAFEGUARDS
When using any electrical appliance, some basic safety
precautions should always be observed to reduce the risk
of re, electric shock, and/or injury to persons. Read all in-
structions carefully before using the appliance. Specically:
Danger!
Failure to observe the warning may result in life threatening
injury by electric shock.
- Do not operate any appliance with a dama-
ged cord or plug or after the appliance mal-
functions, has been dropped or damaged in
any manner.
If appliance has leaked any oil, discontinue
using the appliance and contact the service
centre as indicated in the instruction leaet.
Return appliance to authorized service faci-
lity for examination, electrical or mechanical
adjustment, or repair.
- This appliance is not intended for use in
bathrooms, laundry areas, or similar indo-
or locations. Never position the appliance
where it may fall into a bathtub or come in
contact with water.
- Use this appliance only as described in this
manual. Any other use not indicated by the
manufacturer may cause re, electric shock,
or injury to persons.
- CAUTION: To prevent electric shock, make
sure the wide prong of the plug is inserted
in the wide slot of the outlet.
-
Always use the appliance in an upright posi-
tion.
Important!
Failure to observe the warning could result in injury or
damage to the appliance.
- The appliance is not intended for use by
persons (including children) with reduced
physical, sensory or mental capabilities, or
lack of experience and knowledge, unless
they have been given supervision or instruc-
tion concerning use of the appliance by a
person responsible for their safety.
Children should be supervised to ensure that
they do not play with the appliance.
- Extreme caution is necessary when any ap-
pliance is used by or near children or invalids
and whenever the appliance is left operating
and unattended.
- Do not wrap the cord around the appliance
immediately after use.
- To prevent current overload and blown fu-
ses, make sure that no other appliance is
plugged into the same outlet or into another
outlet wired into the same circuit.
- If the power cord is damaged, to reduce the
risk of malfunction it must be replaced by
the manufacturer, its service agent, or a li-
censed and qualied professional.
- Do not use this appliance with an extension
cord or outlet strip. Connect the appliance
directly to a suitable outlet.
- Position the appliance so that the plug and
the outlet can be easily reached even after in-
stallation but not immediately under a xed
power socket.
Danger of burns!!
Failure to observe the warning could result in burns or
scalds.
- This appliance gets very hot when in use.
To prevent burns, do not touch hot surfaces
with bare skin. Use the handle when moving
the appliance. Keep all ammable materials,
such as furniture, pillows, bedding, paper,
clothing, and curtains at least 3 feet (90 cm)
from the front and top of the appliance, also
avoid contact with the sides and back.
- Do not run the power cord under carpeting.
Do not cover cord with throw rugs, runners,
or the like. Keep the cord away from any pas-
sageways where it could be tripped over.
- Do not insert or allow foreign objects to get
into the air intake or air outlet grille, as this
may cause electric shock or re, or damage
the appliance.
- To prevent a possible re, do not block air in-

5
take or air outlet grille in any way. Do not use
the appliance on soft surfaces, such as beds,
where the openings may become blocked.
- Do not cover the appliance while it is fun-
ctioning in order to avoid overheating and
the risk of re.
- The internal parts of the appliance can beco-
me very hot or produce sparks during opera-
tion. Do not use the appliance in areas where
gasoline, paints, or other ammable liquids
are used or stored.
- It is normal for appliance’s plug and cord to
feel warm to the touch. However, an exces-
sively hot or deformed plug or cord is not
normal and may be the result of a defective
electrical outlet. Defective outlets must be
replaced before using the appliance. Plug-
ging the appliance into a worn outlet may
result in overheating of the power cord or
may cause the risk of re.
- Do not place the appliance near a bed becau-
se objects such as pillows or blankets can fall
o the bed and be ignited by the appliance.
Please note:
This symbol indicates recommendations and important
information for the user.
- If your appliance is equipped with a
polyethylene tape used as a carry handle,
remove it before connecting appliance to
the outlet.
- Always disconnect the plug from the power
outlet when the appliance is not in use.
- Do not use the appliance outdoors.
-
To completely turn o the appliance, press
the POWER ON/STANDBY button, and then
unplug the appliance.
- Connect to properly polarized outlets only.
- Make sure that the plug is fully inserted into
the outlet. Wall outlets may deteriorate with
time, so check the plug periodically for signs
of overheating or deformation. If the outlet
has deteriorated, stop using it and have it
repaired.
- Check that neither the appliance nor the po-
wer cord have been damaged during ship-
ping.
- Make sure that no styrofoam or other pa-
cking materials remain in the appliance.
- Make sure that no pieces of polystyrene or
other packaging material have been left
between one element of the appliance and
another. It may be necessary to pass over the
appliance with a vacuum cleaner.
- The rst time the appliance is used, run it at
the maximum power for at least two hours.
During this time, ventilate the room thorou-
ghly to eliminate the “new” smell released
by the appliance. It is completely normal for
the appliance to emit “creaking” sounds the
rst time it is run.
- Extreme caution is necessary whenever the
appliance is left operating unattended.
- Do not open the appliance. No user-service-
able parts inside.
SAVE THESE
INSTRUCTIONS
THIS PRODUCT IS FOR HOUSEHOLD USE
ONLY
6
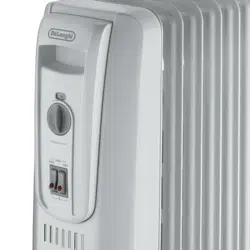
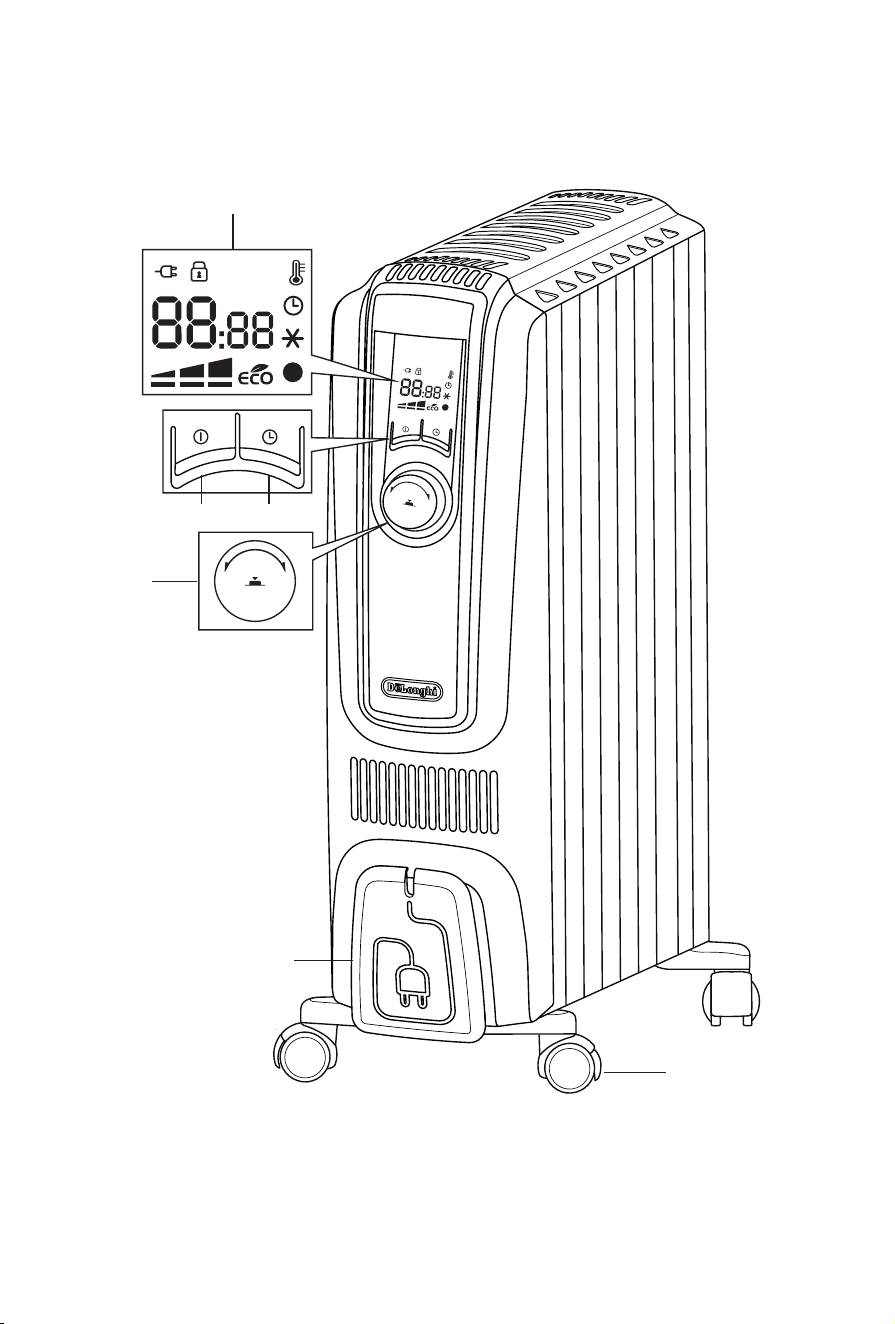
DESCRIPTION
A POWER ON/STANDBY button
B timer button
C control dial
D display
E wheel
F cord holder
Symbols shown on the unit's display
Key/child lock
power supply
temperature/clock
selected power levels
working power levels
Anti-freeze symbol
timer function
l (green) Temperature 1 (T1) indicator
l (red) Temperature 2 (T2) indicator
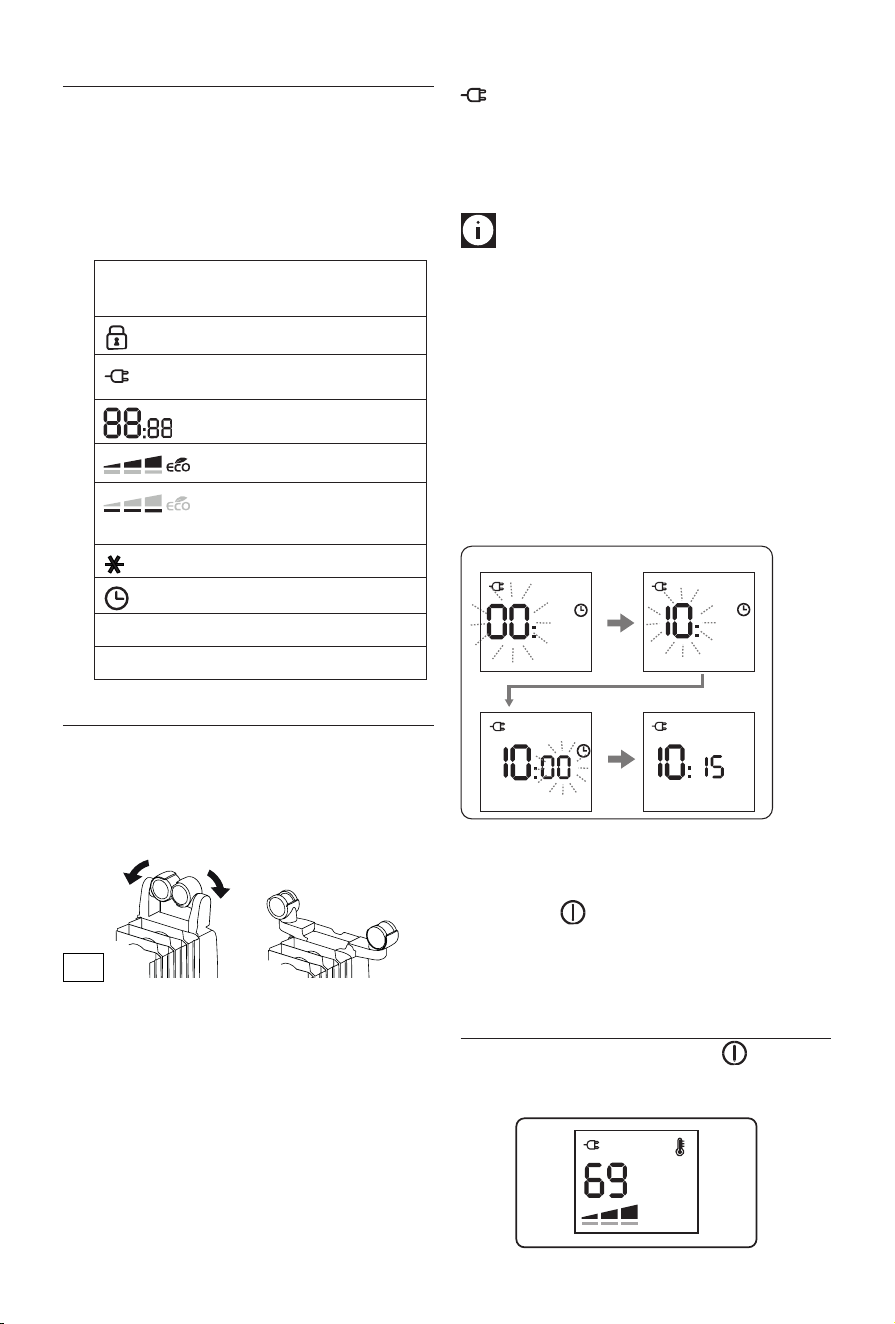
FIRST USE
“Easy wheel” system
Turn the radiator upside down on a rug or a soft surface in
order to prevent damaging the paint nish.
Fully unfold the wheels by turning them outwards (Fig. 1).
Turn the radiator back to its upright position.
Location
The heater must not be placed immediately below a power
outlet. Do not use this radiator in rooms having a surface area
of less than 43 square feet (4 sq.m.).
Power connection
Before using the appliance check that your supply voltage is
the same of that shown on the rating label of the unit and
that the power socket and power supply line correspond to
the load specied. After plugged in the appliance will show
the symbol in red color.
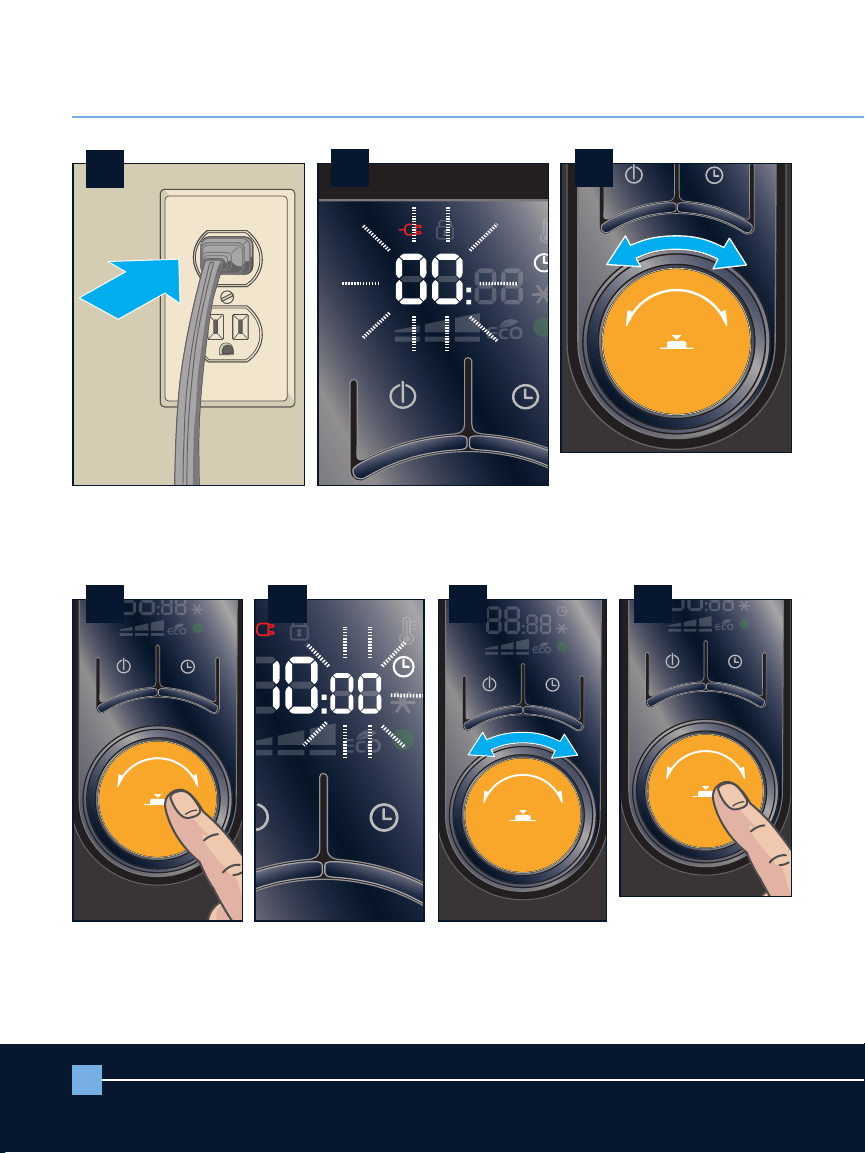
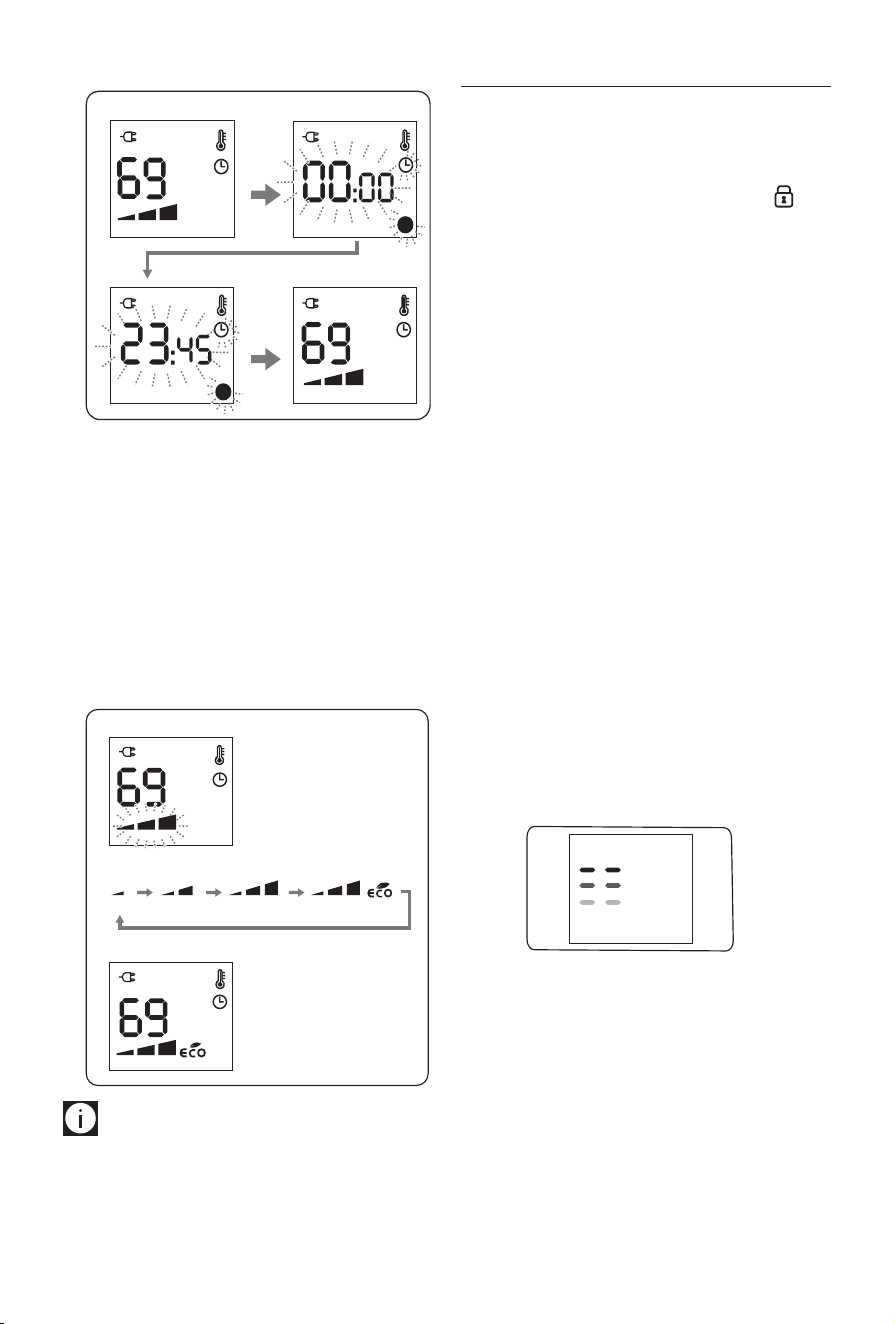
Setting the time
When using for the rst time or after it has been unplugged
for a long time, you need to set the current time.
Please note:
This is a 24 hour clock display. Example:
8am is displayed as 0800. 4pm is displayed as 1600. Keep that
in mind when setting clock and timer functions.
1. Plug the appliance into the outlet. The display will show
00 blinking.
2. Turn the control dial to select the current hour.
3. When the correct hour is set, press the dial and the min-
utes digits will blink.
4. Turn the control dial to set the minutes then press the
dial to conrm and you will hear a beep.
Example of display:
❶
❸
❷
❹
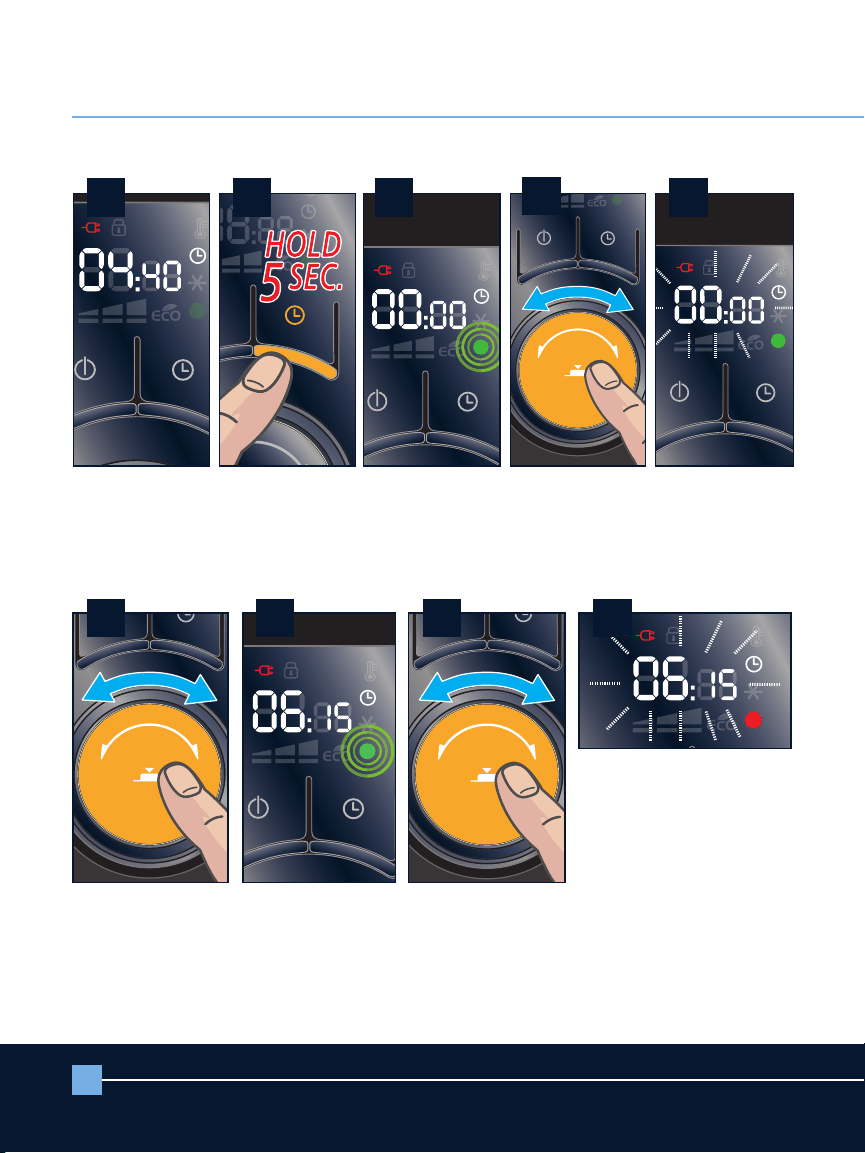
Changing the time
If you need to change the time, turn unit ON by pressing the
POWER ON button . Then, press and hold control dial for
5 seconds. Then, follow instructions 2 through 4 from “setting
the time” section above. After changing the clock, the unit
will remain ON.”
MANUAL OPERATION MODE
Turn the appliance on pressing the POWER ON button .
The unit will start operating in manual operation mode with
the following default settings:
Fig. 1
7
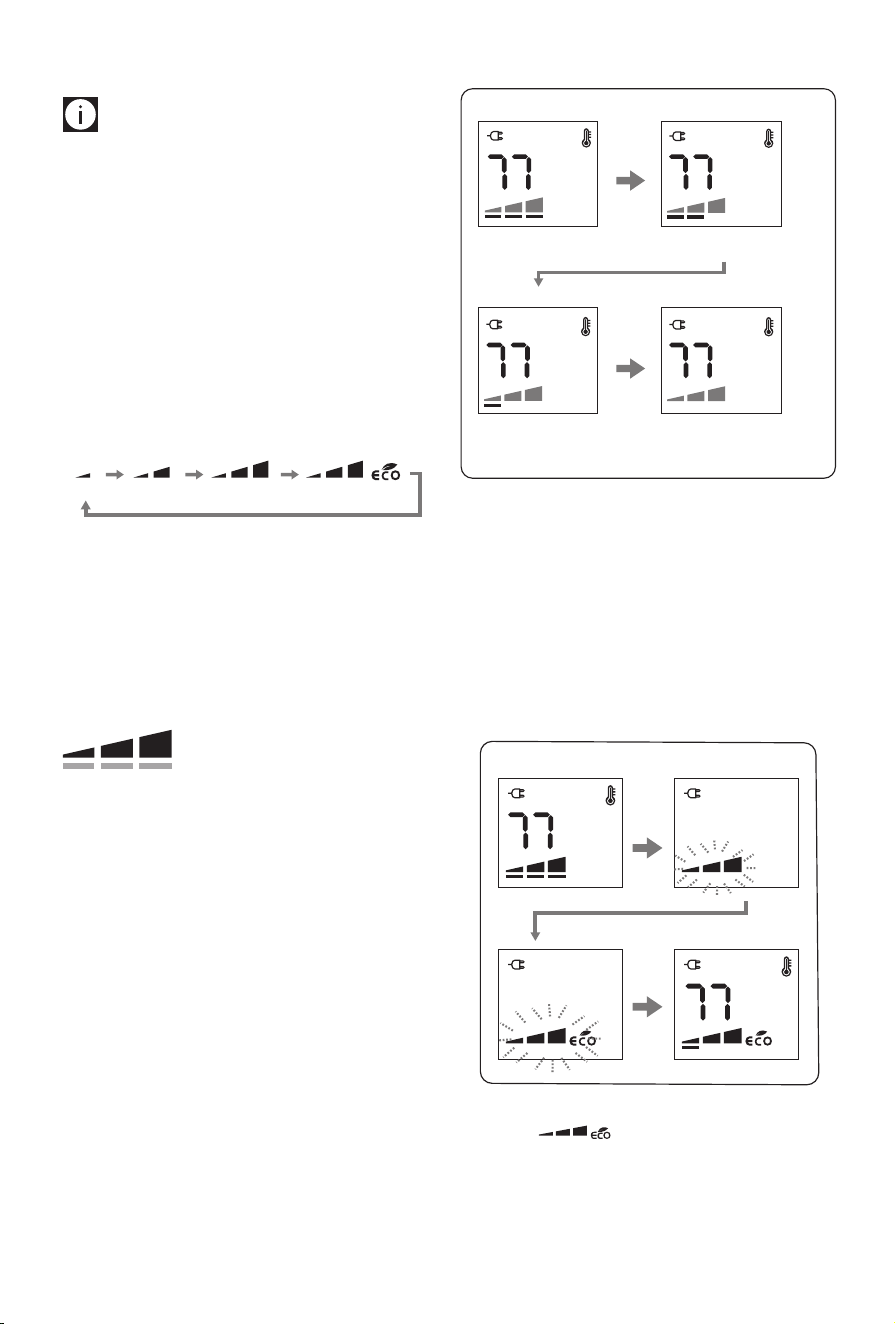
Setting the temperature
Please note:
This unit will only show temperature in
Fahrenheit. It is not possible to switch to Celsius.
To modify the temperature set point, turn the dial clockwise
to increase and counter clockwise to decrease the tempera-
ture.
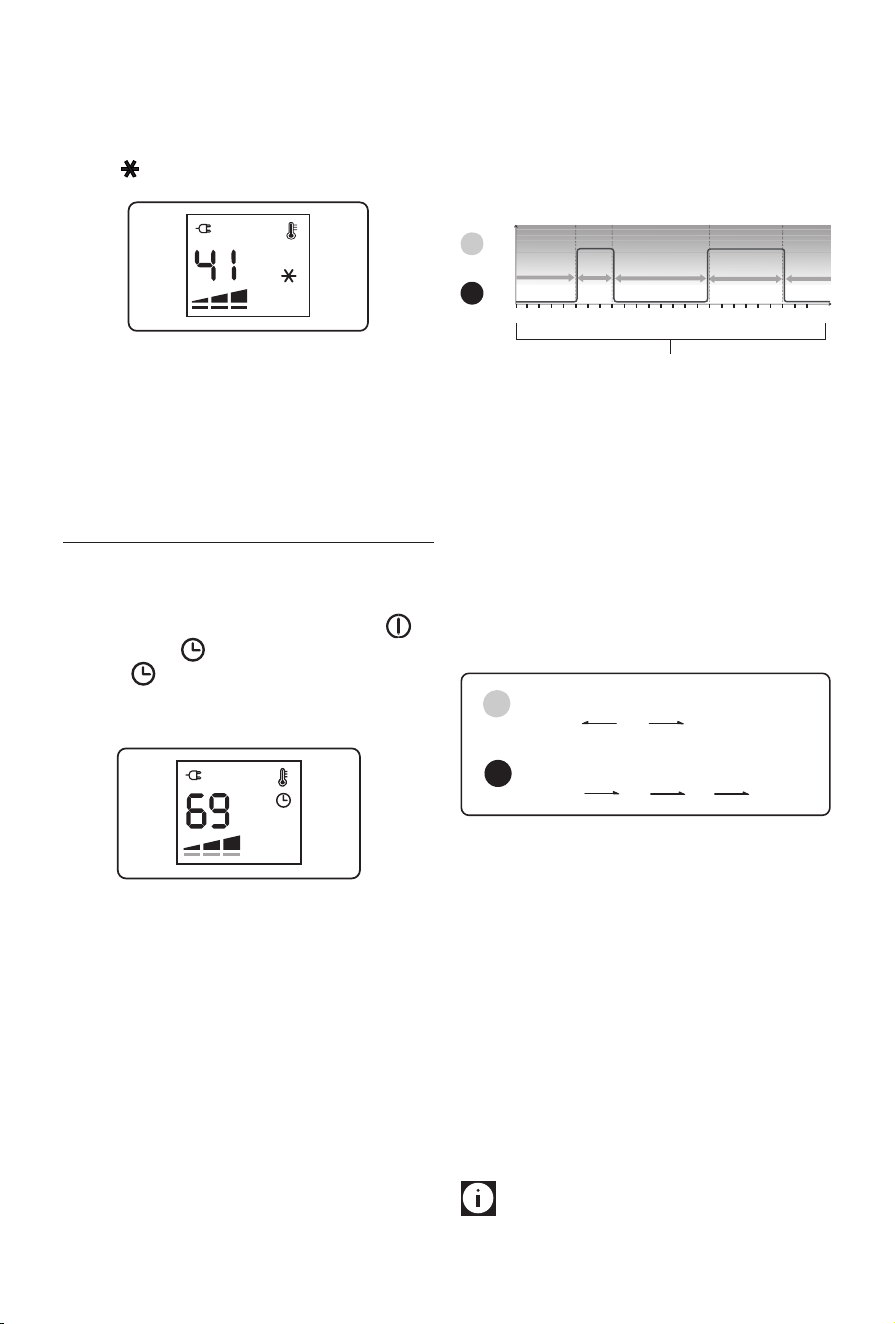
Temperature settings available are 41°F, and 50°F through
83 °F.
Setting to 41°F turns the unit to anti-freeze function. (see
Anti-freeze function at page 8).
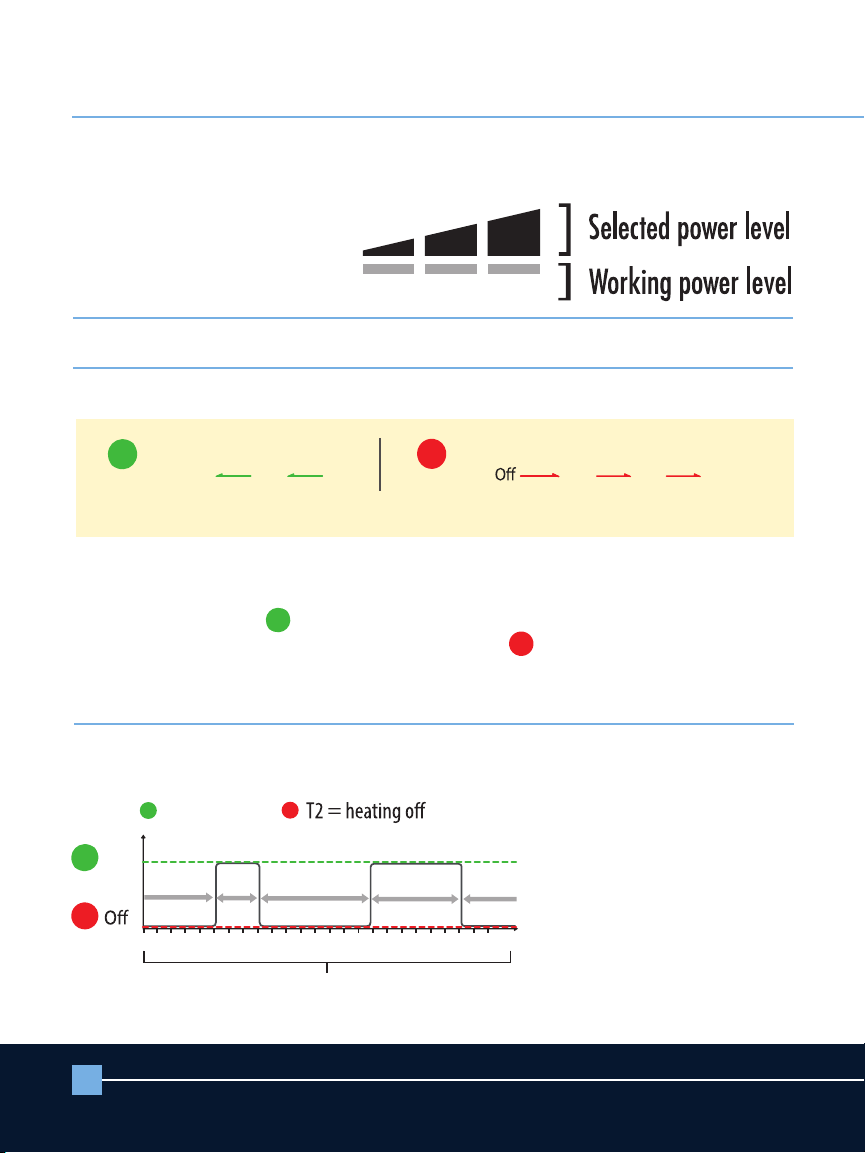
Selected power levels versus working power levels
There are 3 power levels (min/med/max) as well as ECO
mode.
min
med max max + eco
Depending on the selected power level, the working power
level may be less or equal to the selected power level.
The working heating power is always shown by the unit’s dis-
play by means of the thin bars below of the selected power
level.
]
]
- If the current room temperature is much lower than the
selected temperature, the appliance will start to heat
the room as rapidly as possible at the selected power
level.
- If the current room temperature is close to the selected
temperature, the appliance will heat the room using a
heating power lower than the selected power level.
- When the selected temperature is reached, the unit
stops heating.
Example: Operation is started at room temperature 64 °F, the
set temperature is 77 °F, and the selected power level is MAX.
Example of display:
Working power level: Max
Working power level: Min
When the room
temperature is reached
the appliance stops heating
Working power level: Med
❶
❸
❷
❹
Room temperature 64°
Room temperature 75° Room temperature 77°
Room temperature 71°
Setting the power level
1. Press twice dial during heating operation.
2. The power level will blink.
3. Choose one of the available power levels by turning the
dial.
4. Press the dial to conrm.
Example of display:
❶
❸
❷
❹
Eco mode
When the eco mode is activated, the unit will automatically
select the most convenient working power level from Max to
Min, and, if necessary, reduce the set temperature in order to
achieve energy savings while guaranteeing optimum comfort.
Selected power level
Working power level

8
Anti-freeze function
This function is useful to prevent freezing.
To activate this function, turn power ON and turn the dial
counter clockwise till the set point 41 is displayed and a
will appear.
In this operation mode the working power can not be set.
The appliance will automatically set to Max power level.
If you turn the dial clockwise, you will restore the previous
power setting.
TIMER OPERATION MODE
In Timer operation mode the unit works according to a pre-
set. Daily timer program that can be altered to suit your
needs. Turn on the unit by pressing the (A) button and
then press the button to activate the timer operation
mode.
The symbol will appear on the display together with the
pre-set temperature and power level assigned to the current
time interval.
Daily Timer program
The daily timer program consists of a 24 hour timeline that
can be divided into 96 time intervals of 15 minutes each.
To each time interval it is possible to associate one of the 2
timer temperature settings , T1 or T2.
The time intervals and the temperatures T1 and T2 can be
changed to suit your needs.
Preset daily timer program
The default preset daily timer program is the following:
l T1= 69°F
l T2= heating o
426
8
10 12 14 16 18 20 22 0
(24)
0
69°F
O
T2 T2 T2
T1T1
Time intervals
T1
T2
Note:
the chart above is showing T2 from midnight to 5am,
T1 from 5am to 8am, T2 from 8am to 4pm, T1 from 4pm to
10pm, T2 from 10pm to midnight.
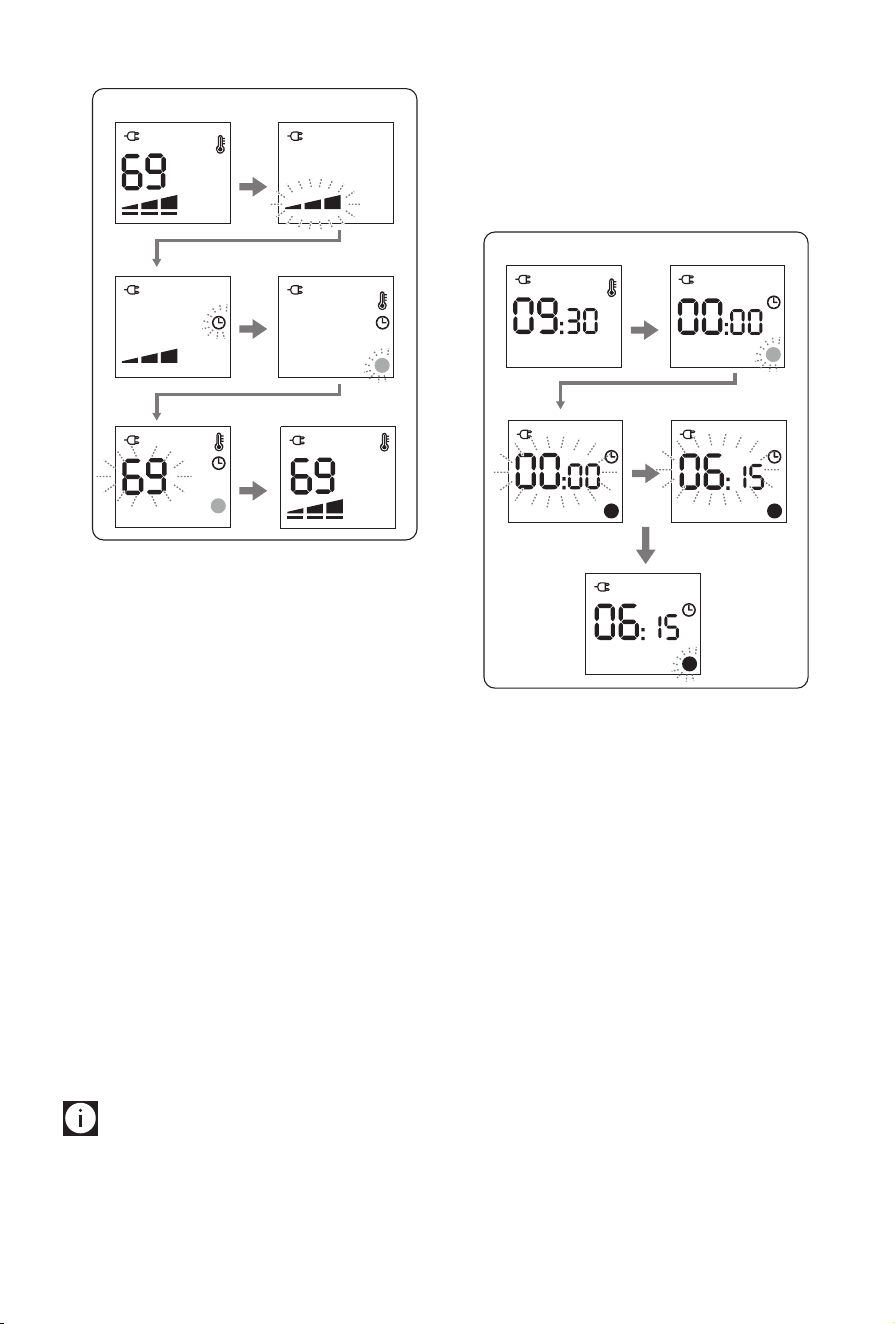
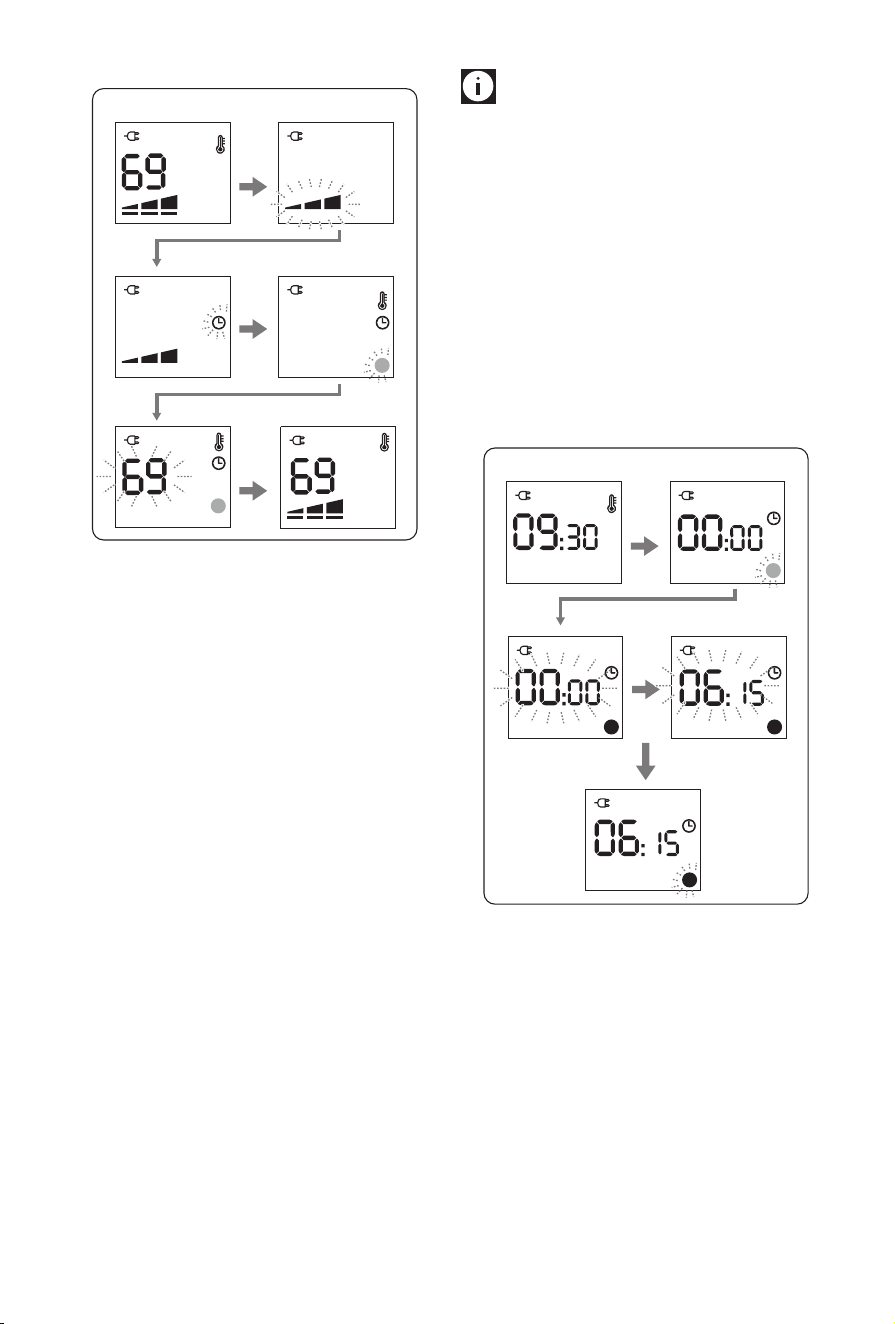
How to change the daily timer temperatures
It is possible to change the temperature settings for T1 and T2
to better suit your needs.
T1 is associated to Green light (l) and can be set at any
temperature from 50 to 83°F; T2 is associated to Red light
(l) and can be set from OFF to anti-freeze 41°F or to any
temperature from 50° to less than T1.
Min
50°F
Min
50°F
Max
less than T1
Max
83°F
Default
69°F
Default
O
Anti-frost
41°F
Red light
Green light
T1
T2
To change the timer temperature setting, with POWER ON:
1. Press the control dial.
2. The power level will blink.
3. Turn the dial till you see the clock icon blinking and press
the dial once.
4. A green light will appear in the display blinking. Turn
the dial to choose between green light (T1) or red light
(T2) and press the dial once to conrm.
5. The temperature digits will blink. Turn the dial to adjust
the temperature according to your needs and press the
dial to conrm.
6. The unit will exit the menu and the display will show
again the manual operation settings.
Please note:
Follow same 6 steps above to set the
other daily timer temperature not previously set.
9
Example of display:
❺❻
❶
❸
❷
❹
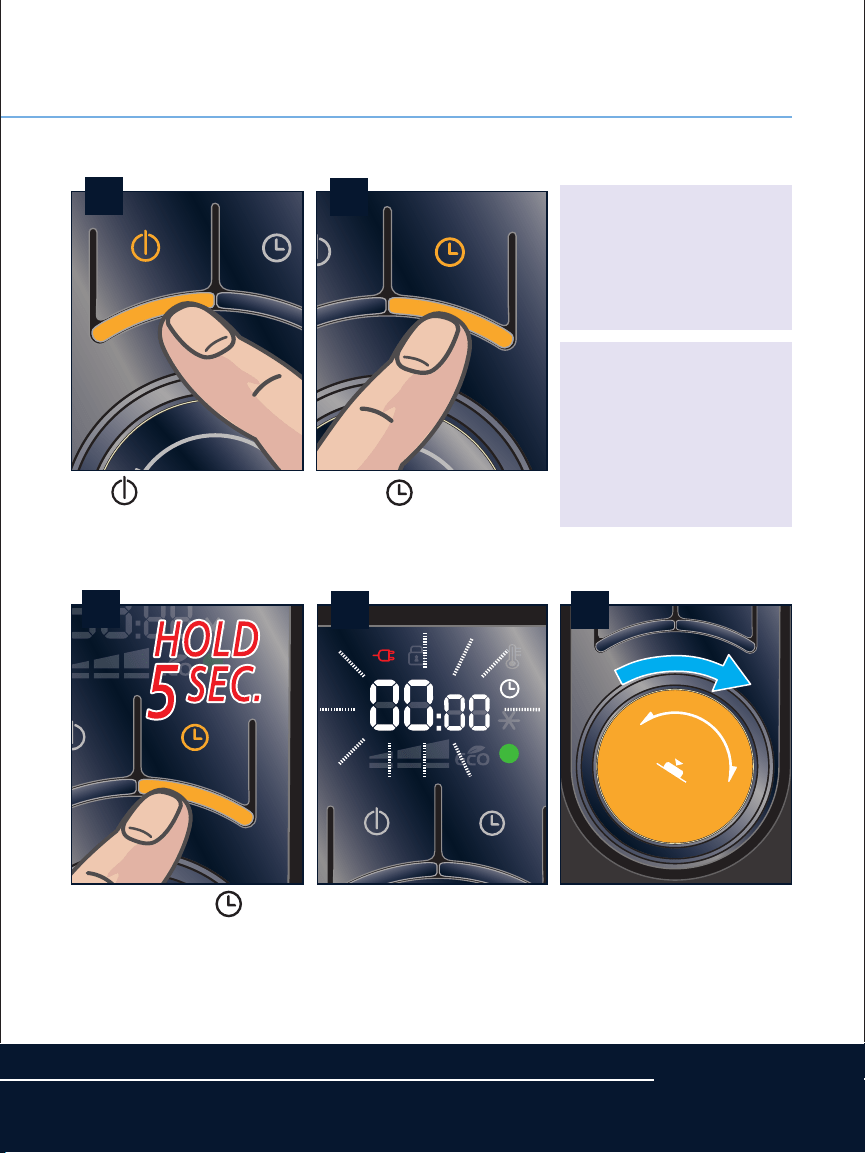
How to change the daily timer program
1. To change the preset daily timer program the unit must
be turned into standby mode (power OFF).
Then, press and hold the timer button for 5 seconds.
2. The unit will emit a beep and 00.00 and the blinking
green light simbol will be displayed.
Turn the dial to select the Temperature set T1=green
light , or T2=red light, that you would like to have in
the room at 00:00 (midnight) hours and press the dial
to conrm.
3. The time digits will start blinking to enable setting the
length of the time interval.
4. Turn the dial clockwise till you reach the desired ending
time for this program interval.
You will be able to choose any time intervals of minutes.
5. Press the dial to conrm the end of the time interval,
and the temperature indicator light will start blinking
again to enable you to set the next program interval.
Set the desired program intervals along the 24 hours till
00:00 to complete the daily timer program following
the same procedure described in steps 3 to 5 above.
Please note:
-
You must set timer settings to cover the entire 24 hour
period with last setting nishing at 00:00.
If you have set the timer settings correctly, you will hear
a beeping sound to conrm.
- You must conrm your settings within 2 minutes or
the unit will automatically return to STANDBY and
timer settings just made will not be saved.
- Once daily timer program is completed, unit will
automatically return to STANDBY (power OFF) mode.
Example of display:
❶
❷
❺
❸
❹
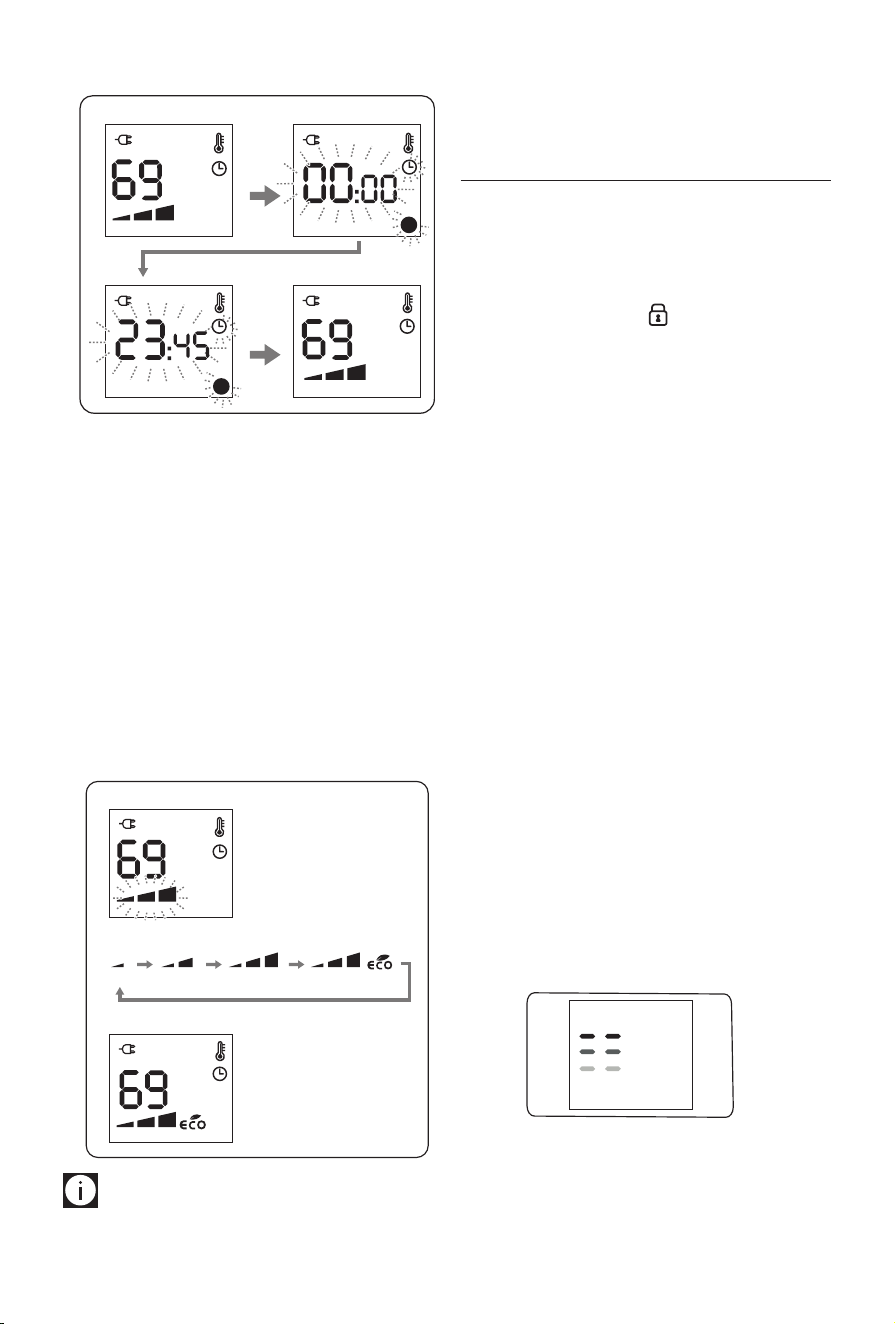
How to display the daily timer program
If you need to check your previous settings of the daily timer
program:
1. With the power ON, press the timer button once to acti-
vate timer function.
Then, press the timer button again and hold approxi-
mately 5 seconds.
2. The display will show 00:00, the temperature indicator
light (T1=green or T2=red) and the clock icon will be
blinking.
3. Turn the dial clockwise to display the daily timer pro-
gram from 00:00 till 23:45.
4. Push the control dial to exit.
10
Example of display:
❶
❸
❷
❹
Power level setting in timer operation mode
In timer operation mode, the unit works by default at max
power level.
It is possible to change the power level as follows:
1. With power ON, press timer button once then press the
control dial and the power level icon will blink.
2. Turn the dial to choose between min / med / max /
max+eco.
3. Press the dial to conrm.
Example of display:
min med max max + eco
❶
❸
❷
Please note:
If a procedure to modify or monitor the
unit settings is interrupted and no button is pressed for two
minutes, the settings shown on the display will not be main-
tained and the appliance will go back to the settings previ-
ously displayed.
EXTRA FUNCTIONS
Key/child lock
To prevent accidental button activation, it is possible to lock
the keys. To activate this function in either STANDBY or ON
mode, press the timer button and the control dial together
for at least 4 seconds. The display shows the symbol and a
beeping noise will be emitted.
When the appliance is ON and the key lock is activated:
- buttons and dial are blocked
- pressing the POWER ON/STANDBY button 1 time: the
unit is in standby, and the appliance remains in STAND-
BY even if the POWER ON/STANDBY button is pressed
again.
- to turn the appliance on again it will be necessary to
unlock the key lock.
When the appliance is OFF and the key lock is activated:
- all buttons and dial are blocked
- it’s not possible turn on the appliance
To deactivate the function, press the timer button and control
dial together for at least 4 seconds.
Display brightness regulation
After a few seconds of inactivity the display brightness is au-
tomatically reduced.
The brightness level during inactivity can be adjusted to the
desired level choosing from 3 levels available.
When the appliance is in STANDBY press and hold the con-
trol dial for about 5 seconds, the current level of brightness
appears.
Turn the dial till the desired brightness is reached, then press
the dial to conrm.
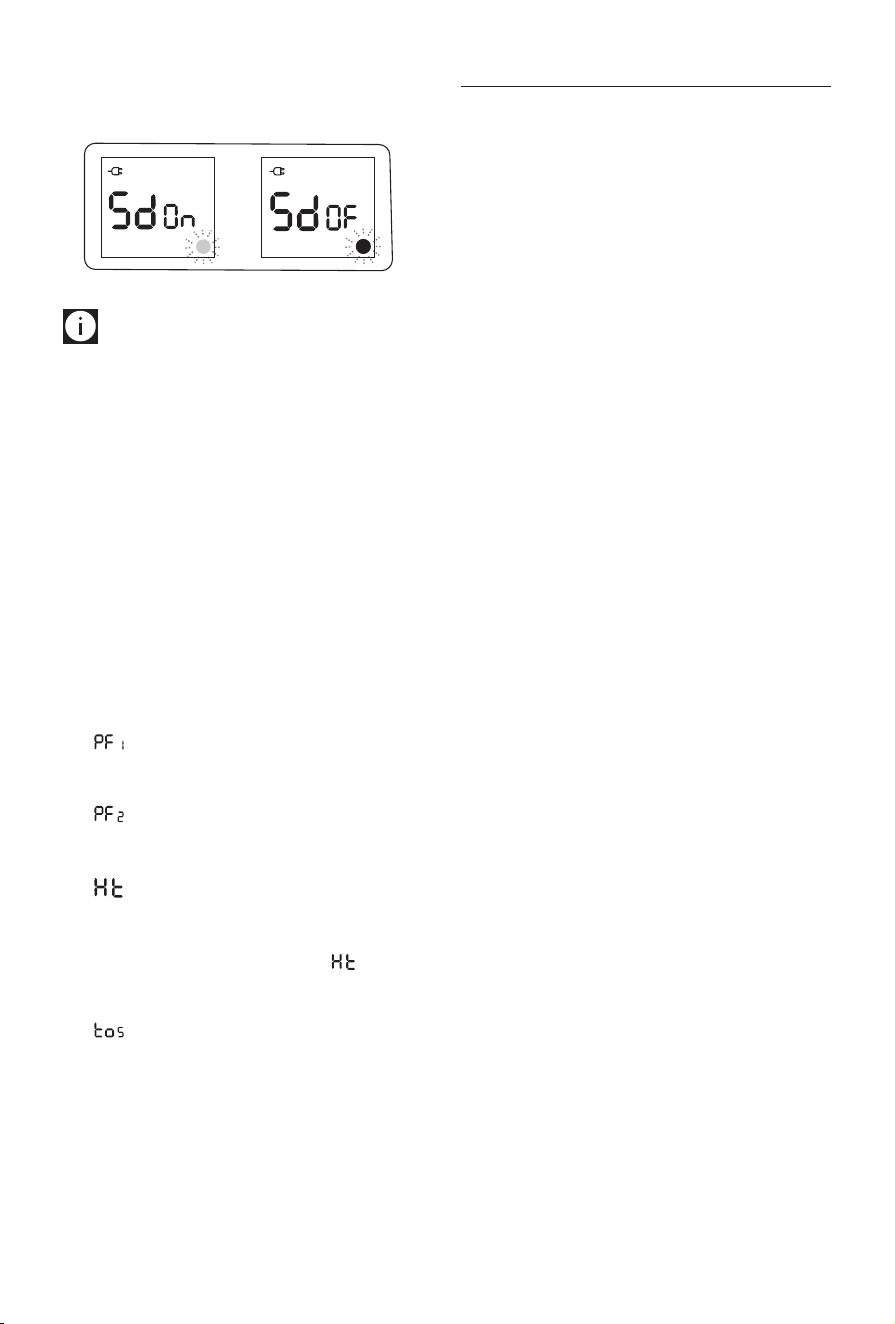
Buzzer sound on/o
When the appliance is in STANDBY press the control dial for
about 5 seconds, the current level of brightness appears:
press the timer button and turn the dial to modify the status
of the buzzer from ON (l green) to OFF (l red) and vice
versa.
Press the dial to conrm.

11
Please note: When you turn the beeper OFF, the beep-
er will still remain when you go from STANDBY to ON or ON
to STANDBY.
Memory
After an interruption of the power supply, when the power
returns, the appliance will resume in standby mode. When
the unit is switched on again by pressing the ON/STANDBY
button, the operating conditions will be same as previously
set in manual operation mode.
Alarms
The appliance has a diagnostic system that makes it possible
to signal malfunctions.
In case of problems, the display will show an alarm message
with a red square light:
- (Probe failure 1) + beep
Ambient temperature probe failure. Please contact
De’Longhi Customer Service.
- (Probe failure 2) + beep
Probe failure internal security. Please contact De’Longhi
Customer Service.
- (High temperature)
When the product internal temperature is too high, the
heating element will automatically be turned o. The
display shows for two seconds, cycling. To remove
the cause of this alarm check that the unit is not cov-
ered.
- (Tip over safety device): a tip over safety device
turns the appliance o if it falls over or is positioned
inappropriately in such a way as to jeopardize safety.
The appliance emits a beep and a TOS on the display.
The appliance resumes operation a few seconds after
being placed in an upright position again in STANDBY
mode.
MAINTENANCE
Always remove the plug from the power outlet and allow the
radiator to cool.
Wipe radiator with a soft damp cloth, do not use detergents
and abrasives. Should the radiator not be in use over a certain
length of time, wind the cord around the cord holder and
store it in a dry place. This appliance has been built to give
many years of trouble free service.
In case of malfunction or doubt, do not try to repair the heat-
er by yourself: this may result in a re hazard or electric shock.
Call De’Longhi Customer Service.

12
TROUBLESHOOTING
PROBLEM CAUSE SOLUTION
The display doesn't work Be sure it is plugged in and that the
electrical outlet is working
The safety device may have switched o
the appliance
Plug into the power outlet
Remove the obstruction and let the appliance
cool down. If the appliance doesn't work please
contact
De'Longhi Customer Service
The appliance doesn't
warm up
The temperature may be set too low
Set the temperature to a higher value
The display shows: +
unit o
(Probe failure 1)
It indicates that the room temperature
sensor has failed
Please contact De'Longhi Customer Service
The display shows: +
unit o
(Probe failure 2)
It indicates that the probe of the internal
safety of the device has failed
Please contact De'Longhi Customer Service
The display shows: Ht
(High temperature)
The unit has reached a too high internal
temperature
Check that the unit is not covered
and let the
appliance cool down
. When the product internal
temperature decreases, the alarm will disappear.
If the appliance still doesn't work, please contact
DeLonghi Customer Service.
The display shows:
and unit is o
The tip-over switch has been activated Make sure the appliance is standing upright on a
at surface. If the appliance doesn’t work please
contact De'Longhi Customer Service
13
INSTRUCCIONES
IMPORTANTES
Al utilizar aparatos eléctricos, es oportuno adoptar siempre
algunas precauciones fundamentales para evitar el riesgo de
incendios, descargas eléctricas y/o lesiones. Lea atentamente
todas las instrucciones antes de utilizar el aparato.
Especícamente:
¡Peligro!
El incumplimiento de la advertencia puede ser causa de
lesiones provocadas por descargas eléctricas.
- No utilice ningún aparato con el cable o el
enchufe dañado o si funciona mal en caso
de que se haya dejado caer o si se ha dañado
de algún modo. Si el aparato pierde aceite,
no lo utilice y póngase en contacto con el
centro de servicio indicado en el folleto de
instrucciones. Lleve el aparato a un centro de
servicio autorizado para su revisión, ajuste de
las piezas eléctricas o mecánicas o reparación.
- EI aparato no está diseñado para su uso
en baños, lavaderos o sitios similares en
interiores.
Nunca coloque el aparato donde pudiese caer
dentro de una bañera o entrar en contacto con
agua.
- Utilice este aparato sólo como se describe
en este manual. Cualquier otro uso no
recomendado por el fabricante puede ser
causa de incendios, descargas eléctricas o
lesiones.
- ADVERTENCIA: A n de evitar descargas
eléctricas, asegúrese de que la espiga ancha
del enchufe se introduzca en la ranura ancha
del tomacorriente.
-
Use el radiador solo en posición vertical.
¡Importante!
El incumplimiento puede ser o es la causa de lesiones o de
desperfectos al aparato.
- El aparato no está diseñado para ser utilizado
por personas (incluyendo niños) con
capacidades físicas, sensoriales o mentales
disminuidas o que carezcan de experiencia
y conocimiento, a menos que lo hagan bajo
la supervisión o instrucción de una persona
responsable de su seguridad. Los niños deben
ser supervisados para asegurarse de que no
jueguen con el aparato.
- Es necesario tener mucho cuidado cuando
cualquier aparato sea utilizado por o se
encuentre cerca de niños o inválidos y siempre
que el aparato esté funcionando sin vigilancia.
- No enrolle el cable alrededor del aparato
inmediatamente después de utilizarlo.
- Para impedir corrientes de sobrecarga y que
se fundan los fusibles, asegúrese de que
ningún otro aparato esté conectado al mismo
tomacorriente o a otro tomacorriente del
mismo circuito.
- Si el cable de alimentación está dañado, para
reducir el riesgo de mal funcionamiento debe
ser reemplazado por el fabricante, su agente
de servicio o un profesional calicado y
autorizado.
- No utilice este aparato con un cable
de extensión o una tira con tomas de
tomacorriente. Conecte el aparato
directamente a un tomacorriente adecuado.
- Ponga el aparato de forma que el enchufe y el
tomacorriente queden al alcance fácilmente
después de la instalación, pero que no quede
inmediatamente debajo de un tomacorriente
jo.
¡Peligro de quemaduras!
La inobservancia de esta advertencia puede ser causa de
quemaduras.
- Este aparato se calienta durante el uso. Para
evitar quemaduras no toque las supercies
calientes con las manos desnudas. Utilice el
asa para mover el aparato. Conserve todo
objeto inamable, tal como mobiliario,
almohadas, cobertores, papel, vestidos y
cortinas, a una distancia de al menos 90 cm
(3 pies) desde la parte frontal y superior del
aparato, evitando además el contacto con los
costados y la parte posterior.
- No pase el cable de alimentación debajo de

14
las alfombras. No cubra el cable con tapetes,
recubrimientos o similares. Extienda el cable
lejos de los pasillos donde se pueda tropezar
con el mismo.
- No introduzca ni permita introducir cuerpos
extraños en las rejillas de admisión o salida de
aire, dado que ello puede producir descargas
eléctricas, incendios o daños al aparato.
- Para evitar el riesgo de incendios, no bloquee
ninguna rejilla de entrada o salida de aire. No
use el aparato sobre supercies suaves, tales
como camas, donde las aberturas pudieran
obstruirse.
- No cubra nunca el aparato mientras esté
funcionando para evitar sobrecalentamientos
y riesgos de incendios.
- Las piezas internas del aparato pueden
calentarse mucho o producir chispas
durante el funcionamiento. No utilice el
aparato en lugares donde se utilicen o
almacenen gasolina, pinturas u otros líquidos
inamables.
- Es normal que el enchufe y el cable del
aparato se sientan calientes al tacto. Sin
embargo, no es normal que haya enchufes
o cables excesivamente calientes, lo cual
puede ser resultado de un tomacorriente
eléctrico defectuoso. Los tomacorrientes
defectuosos deben reemplazarse antes de
utilizar el aparato. Conectar el aparato a un
tomacorriente dañado puede sobrecalentar el
cable de alimentación o provocar un incendio.
- No coloque el aparato cerca de camas
debido a que objetos tales como almohadas
o cobertores pueden caerse de la cama e
incendiarse por el aparato.
Nota:
Este símbolo destaca consejos e información importantes
para el usuario.
- Si su aparato tiene una cinta de polietileno
que se utiliza como asa para moverlo,
retírela antes de conectar el aparato a un
tomacorriente.
- Desconecte siempre el enchufe del
tomacorriente cuando no utilice el aparato.
- No utilice el aparato al aire libre.
- Para apagar totalmente el aparato, oprima el
botón
on/stand-by
y después desconecte el
aparato.
- Conecte el aparato solamente en
tomacorrientes debidamente polarizados.
- Asegúrese de que el enchufe esté
introducido totalmente en el tomacorriente.
Los tomacorrientes de pared pueden
deteriorarse con el tiempo, así que
verique periódicamente que el enchufe
no presente señales de sobrecalentamiento
o deformación. Si el tomacorriente está
deteriorado, deje de usarlo y mándelo reparar.
- Revise que ni el aparato ni el cable de
alimentación se hayan dañado durante el
transporte.
- Asegúrese de que no haya espuma de estireno
u otros materiales de empaque remanentes
dentro del aparato.
- Asegúrese de que no haya piezas de
poliestireno u otro material de empaque
remanente(s) entre los elementos del aparato.
Puede ser necesario pasar el aparato con una
aspiradora.
- La primera vez que utilice el aparato, hágalo
funcionar a su máxima potencia durante
al menos dos horas. Durante este tiempo,
ventile bien la habitación a n de eliminar el
olor “a nuevo” que desprende el aparato. Es del
todo normal que el aparato emita “crujidos” la
primera vez que se utiliza.
- Es necesario tener mucho cuidado cuando el
aparato está funcionando sin vigilancia.
- No abra el aparato. No intente reparar las
piezas internas.
GUARDE ESTAS
INSTRUCCIONES
ÚNICAMENTE PARA USO DOMÉSTICO
15
DESCRIPCIÓN DEL APARATO
A Botón ON/STANDBY
B Botón del temporizador
C Mando
D Pantalla
E Rueda
F soporte del cable
Símbolos que aparecen en la pantalla del
aparato
Bloqueo/interruptor niños
alimentación
temperatura/reloj
niveles de potencia seleccionados
niveles de potencia de
funcionamiento
símbolo antihielo
función temporizador
l (verde) indicador Temperatura 1 (T1)
l (rojo) indicador Temperatura 2 (T2)
CÓMO USAR EL APARATO POR PRIMERA VEZ
Sistema “Easy wheel”
Vuelque el radiador, apoyándolo sobre una alfombra o sobre
otra supercie blanda para no arruinar la pintura.
Gire hacia afuera los soportes de las ruedas (Fig. 1). Coloque el
radiador en posición vertical.
Ubicación
El aparato no debe estar colocado inmediatamente debajo
de un tomacorriente. No utilice este radiador en habitacio-
nes que tengan una supercie menor de 43 pies cuadrados
(4 m2).
Conexión eléctrica
Antes de enchufar el aparato a la corriente, compruebe que
el voltaje de la red doméstica corresponda al valor indicado
en la placa de características del aparato y que el enchufe de
corriente y la línea de alimentacióńn sean adecuados para la
carga requerida. Después de enchufarlo aparecerá el símbolo
en color rojo.
Conguración de la hora
Al usar el aparato por primera vez o si ha estado desconecta-
do por mucho tiempo, es necesario congurar la hora actual.
Nota:
Es un reloj de 24 horas. Ejemplo: 8am corres-
ponde a 08:00. 4pm corresponde a 16:00. Recuérdelo cuando
ajuste el reloj y las funciones del temporizador.
1. Enchufe el aparato en el tomacorriente. En la pantalla
aparecerá 00 destellando.
2. Gire el mando para seleccionar la hora actual.
3. Una vez esté congurada la hora correcta, pulse el man-
do y comenzarán a destellar los minutos.
4. Gire el mando para ajustar los minutos y púlselo para
conrmar, oirá un tono de aviso.
Ejemplo de visualización:
❶
❸
❷
❹
Cambio de hora
Si es necesario cambiar la hora, encienda el aparato pulsan-
do el botón ON . Luego, pulse y mantenga apretado el
mando durante 5 segundos. Siga las instrucciones del punto
2 hasta 4 de la sección anterior “conguración de la hora”.
Después de cambiar la hora, la unidad quedará encendida.”
MODO DE FUNCIONAMIENTO MANUAL
Encienda el aparato pulsando el botón ON .
El aparato empezará a funcionar en modo manual con los
siguientes ajustes predeterminados:
Fig. 1
16
Conguración de la temperatura
Nota:
Este aparato mostrará la temperatura en grados
Fahrenheit únicamente. No es posible cambiar a Celsius.
Para modicar el set point de la temperatura, gire el mando
hacia la izquierda para bajar la temperatura.
Las regulaciones de temperatura disponibles son 41°F y 50°F
hasta 83°F.
Al ponerlo en 41°F el aparato se coloca en función antihielo.
(ver Función Antihielo en la página 17).
Niveles de potencia seleccionados contra niveles
de potencia de trabajo
Hay 3 niveles de potencia (mín/med/máx) y también el modo
ECO.
min
med max max + eco
De acuerdo con el nivel seleccionado, aquel de funcionamien-
to podrá ser mayor o igual que el nivel de potencia seleccio-
nado.
La potencia de calentamiento siempre se muestra en la pan-
talla del aparato con una barra debajo del nivel de potencia
seleccionado.
]
]
- Si la temperatura ambiente es más baja que la tempe-
ratura seleccionada, el aparato comenzará a calentar la
habitación lo más rápidamente posible al nivel de tem-
peratura seleccionado.
- Si la temperatura ambiente es cercana a la temperatura
seleccionada, el equipo calentará la habitación utilizan-
do una potencia de calentamiento inferior al nivel de
potencia seleccionado.
- Al alcanzarse la temperatura seleccionada, el aparato
deja de calentar.
Ejemplo: El funcionamiento comienza con una temperatura
ambiente de 64 °F, la temperatura congurada es 77 °F, y el
nivel de potencia seleccionado es MÁX.
Ejemplo de visualización:
Temperatura ambiente 64°
Nivel de potencia de
funcionamiento: Máx.
Nivel de potencia de
funcionamiento: Mín.
Temperatura ambiente 75° Temperatura ambiente 77°
Al alcanzar a la temperatura
ambiente el radiador deja de
calentar
Temperatura ambiente 71
Nivel de potencia de
funcionamiento: Med.
❶
❸
❷
❹
Ajuste del nivel de potencia
1. Pulse dos veces el mando durante el calentamiento.
2. El nivel de potencia destellará.
3. Seleccione uno de los niveles de potencia disponibles
girando el mando.
4. Pulse el mando para conrmar.
Ejemplo de visualización:
❶
❸
❷
❹
Modo ECO
Al activar el modo ECO, el aparato seleccionará automática-
mente el nivel de potencia más conveniente entre Máx y Mín,
y, si es necesario, reducirá la temperatura ajustada para aho-
rrar energía mientras garantiza un confort excelente.
Nivel de potencia seleccionado
Nivel de potencia de funcionamiento
17
Función antihielo
Esta función es útil para prevenir la congelación.
Para activar esta función, encienda el aparato y gire el man-
do hacia la izquierda hasta que se visualice el set point 41 y
aparezca .
En este modo de funcionamiento, no es posible ajustar la po-
tencia de funcionamiento.
El aparato se colocará automáticamente en el nivel de poten-
cia Máx.
Si gira el mando hacia la derecha, restablecerá el ajuste de
potencia anterior.
MODO DE FUNCIONAMIENTO TEMPORIZADOR
En el modo de funcionamiento Temporizador el aparato fun-
ciona según parámetros predeterminados. Es posible modi-
car el programa diario del temporizador para adaptarlo a sus
necesidades. Encienda el aparato pulsando el botón (A)
y después el botón para activar el modo temporizador.
El símbolo aparece en la pantalla junto con la tempera-
tura predeterminada y el nivel de potencia asignado al inter-
valo de tiempo actual.
Programa diario del temporizador
El programa diario del temporizador es un cronograma de 24
horas que puede dividirse en 96 intervalos de tiempo de 15
minutos cada uno.
Es posible asociar a cada intervalo de tiempo uno de los 2
ajustes de temperatura del temporizador, T1 o T2.
Los intervalos de tiempo y las temperaturas T1 y T2 pueden
ser modicados para adaptarlos a las necesidades personales.
Programa diario predeterminado del tempori-
zador
El programa predeterminado del temporizador es el siguien-
te:
l T1= 69°F
l T2= apaga el calentamiento
426
8
10 12 14 16 18 20 22 0
(24)
0
69°F
O
T2 T2 T2
T1T1
Intervalos de tiempo
T1
T2
Nota:
el diagrama de arriba muestra T2 desde la medianoche
a las 5am, T1 desde 5am a 8am, T2 desde 8am a 4pm, T1 des-
de 4pm a 10pm, T2 desde 10pm a medianoche.
Cómo cambiar las temperaturas del temporiza-
dor
Es posible cambiar los ajustes de temperatura para T1 y T2
para adaptarlos mejor a sus necesidades personales.
T1 está asociada a Luz verde (l) y puede ponerse en cual-
quier temperatura desde 50 a 83°F; T2 está asociado a Luz
roja (l) y puede regularse desde APAGADO a antihielo 41°F
o a cualquier temperatura desde 50° hasta por debajo de T1.
Min
50°F
Min
50°F
Max
menor que T1
Max
83°F
Predeter-
minado
69°F
Predeter-
minado
O
Antihielo
41°F
Luz roja
Luz verde
T1
T2
Para cambiar el ajuste de la temperatura del temporizador,
con el aparato ENCENDIDO:
1. Pulse el mando.
2. El nivel de potencia destellará.
3. Gire el mando hasta que el icono del reloj comience a
destellar y pulse el mando una vez.
4. En la pantalla, aparecerá una luz verde que destella.
Gire el mando para seleccionar entre luz verde (T1) o luz
verde (T2) y pulse el mando una vez para conrmar.
5. Las cifras de la temperatura destellará. Gire el mando
para ajustar la temperatura de acuerdo a sus necesida-
des y pulse el mando para conrmar.
6. La unidad saldrá del menú y la pantalla mostrará de
nuevo los ajustes de funcionamiento manual.
Nota:
Siga los 6 pasos anteriores para congurar la
otra temperatura del temporizador que no se conguró antes.
18
Ejemplo de visualización:
❺❻
❶
❸
❷
❹
Cómo se cambia el programa diario del tempo-
rizador
1. Para cambiar el programa diario predeterminado del
temporizador coloque el aparato en modo standby (en
OFF).
Luego pulse y mantenga apretado el interruptor tempo-
rizador durante 5 segundos.
2. El aparato emitirá un tono de aviso y 00.00 y aparecerá
el símbolo de luz verde.
Gire el mando para seleccionar la temperatura T1=luz
verde o T2=luz roja, que desea tener en la habitación a
00:00 horas (medianoche) y pulse el mando para con-
rmar.
3. Las cifras de la hora comenzarán a destellar para poder
congurar la duración del intervalo de tiempo.
4. Gire el mando hacia la derecha hasta que llegue a la
hora en que quiere que termine este intervalo progra-
mado.
Podrá seleccionar cualquier intervalo de tiempo en mi-
nutos.
5. Pulse el mando para conrmar el nal del intervalo de
tiempo y el indicador luminoso de la temperatura co-
menzará a destellar de nuevo para que pueda congurar
el intervalo siguiente.
Congure los intervalos deseados a lo largo de las 24
horas hasta 00:00 para completar el programa diario
del temporizador siguiendo el mismo procedimiento
descrito en los pasos de 3 a 5.
Nota:
-
se debe congurar el temporizador para que abarque
las 24 horas con un último intervalo que termine a las
00:00.
Si ha congurado correctamente el temporizador, será
conrmado por una señal acústica (bip).
- Debe conrmar la conguración dentro de los 2
minutos siguientes, por el contrario el aparato volverá
automáticamente a STANDBY y no se guardarán las
conguraciones del temporizador apenas realizadas.
- Una vez programado el temporizador, el aparato
retornará automáticamente al modo STANDBY
(apagado).
Ejemplo de visualización:
❶
❷
❺
❸
❹
Cómo se visualiza el programa diario del tempo-
rizador
Si necesita comprobar las conguraciones anteriores del pro-
grama diario del temporizador:
1. Con el aparato encendido, pulse el botón del temporiza-
dor una vez para activarlo.
Después, pulse de nuevo el botón del temporizador y
manténgalo apretado durante 5 segundos.
2. En la pantalla aparecerá 00:00, la luz del indicador de
temperatura (T1=verde o T2=rojo) y el icono del reloj
destellarán.
3. Gire el mando hacia la derecha para visualizar el progra-
ma diario del temporizador desde 00:00 hasta 23:45.
4. Pulse el mando para salir.
Ejemplo de visualización:
❶
❸
❷
❹
Conguración del nivel de potencia en modo de
funcionamiento con temporizador
En el modo de funcionamiento con temporizador, el aparato
funciona por defecto al nivel máximo de potencia.
Es posible cambiar el nivel de potencia de la siguiente ma-
nera:
1. Con el aparato encendido, pulse el botón del tempori-
zador una vez y luego el mando, el icono del nivel de
potencia comenzará a destellar.
2. Gire el mando para escoger entre mín / med / máx /
máx+eco.
3. Pulse el mando para conrmar.
Ejemplo de visualización:
min med max max + eco
❶
❸
❷
Nota:
Si se interrumpe un procedimiento para modi-
car o monitorear la conguración del aparato y no se pulsa
ningún botón durante dos minutos, la conguración mostra-
da en la pantalla no se mantendrá y el dispositivo volverá a la
conguración visualizada anteriormente.
FUNCIONES EXTRAS
Botón/bloqueo para niños
Para evitar la activación accidental de los botones, es posi-
ble bloquearlos. Para activar esta función en modo STANDBY
o ENCENDIDO, pulse el botón del temporizador y el mando
contemporáneamente durante al menos 4 segundos. En la
pantalla aparecerá el símbolo y emitirá una señal acús-
tica (bip).
Cuando el aparato está ENCENDIDO y el bloqueo está activa-
do:
- los botones y el mando están bloqueados
- al pulsar el botón de ENCENDIDO “ON” / STANDBY 1 vez:
la unidad está en espera y el aparato permanece en
STANDBY incluso si se presiona nuevamente el botón de
ENCENDIDO “ON”/ STANDBY.
- para volver a encender el aparato será necesario desblo-
quear el bloqueo de los botones.
Cuando el aparato está APAGADO y el bloqueo está activado:
- los botones y el mando están bloqueados
- No es posible encender el aparato
Para desactivar esta función, pulse el botón del temporiza-
dor y el mando contemporáneamente durante al menos 4
segundos.
Regulación del brillo de la pantalla
Después de unos segundos de inactividad, el brillo de la pan-
talla se reduce automáticamente.
El nivel de brillo durante la inactividad se puede ajustar al
nivel deseado eligiendo entre 3 niveles disponibles.
Cuando el aparato está en STANDBY , mantenga presiona-
do el mando durante unos 5 segundos, aparecerá el nivel de
brillo actual.
Gire el mando hasta alcanzar el brillo deseado, luego pulse el
mando para conrmar.
Zumbador encendido/apagado
Cuando el aparato esté en STANDBY, pulse el mando durante
aproximadamente 5 segundos, aparecerá el nivel de brillo
actual: pulse el botón del temporizador y gire el mando para
modicar el estado del zumbador de ENCENDIDO (l verde)
a APAGADO (l rojo) y viceversa.
Pulse el mando para conrmar.
Atención: Cuando desactiva la señal acústica, esta se-
guirá activa cuando pase de STANDBY a ON o de ON a STAN-
DBY.
Memoria
Después de una interrupción de la alimentación, cuando la
energía retorne, el dispositivo se reactivará en el modo stan-
dby. Cuando se vuelve a encender la unidad presionando el
botón ENCENDIDO “ON”/ STANDBY, las condiciones de opera-
ción serán las mismas que las conguradas previamente en el
modo de funcionamiento manual.
Alarmas
El aparato tiene un sistema de diagnóstico que permite seña-
lar averías de funcionamiento.
En caso de problemas, la pantalla mostrará un mensaje de
alarma con una luz cuadrada roja:
- (Avería de la sonda 1) + señal acústica
Avería de la sonda de temperatura ambiente. Contacte
con el servicio de atención al cliente De’Longhi.
- (Avería de la sonda 2) + señala acústica
Avería de la sonda de seguridad interna.. Contacte con el
servicio de atención al cliente De’Longhi.
- (Alta temperatura)
Cuando la temperatura interna del producto es dema-
siado alta, el elemento calentador se apagará auto-
máticamente. En la pantalla aparece durante dos
segundos, intermitente. Para eliminar la causa de esta
alarma, verique que el aparato no esté cubierto.
- (Dispositivo de seguridad antivuelco): el disposi-
tivo de seguridad antivuelco apaga el aparato en caso
de caída o si se coloca de forma incorrecta, poniendo en
peligro la seguridad.
El dispositivo emite una señal acústica (bip) y aparece
TOS en la pantalla.
El dispositivo reanuda el funcionamiento unos segundos
después de colocar el aparato de nuevo en posición ver-
tical en modo STANDBY .
MANTENIMIENTO
Quite siempre el enchufe del tomacorriente y deje que el ra-
diador se enfríe.
Limpie el radiador con un trapo suave y húmedo, no use de-
tergentes ni abrasivos. Si el radiador no se usa por un período
prolongado, enrolle el cable en su soporte y guárdelo en un
lugar seco. Este aparato se ha fabricado para brindar muchos
años de servicio sin problemas.
En caso de mal funcionamiento o de duda, no intente arre-
glar (reparar) el radiador por su cuenta: podría provocar un
incendio o choque eléctrico. Contacte con el servicio de aten-
ción al cliente De’Longhi.

21
SI ALGO NO FUNCIONA
PROBLEMA CAUSA SOLUCIÓN
La pantalla no funciona Controle que esté enchufado y que el
tomacorriente funcione.
El dispositivo de seguridad podría haber
apagado el aparato
Conecte el enchufe
Elimine cualquier obstrucción y déjelo enfriar. Si
el aparato no funciona
contacte con el Servicio de
atención al cliente de De'Longhi
Si el aparato no se calienta La temperatura podría estar muy baja
Ajuste la temperatura a un valor más alto
En la pantalla aparece:
+ aparato apagado
(o)
(Avería de sonda 1)
Indica que el sensor de temperatura
ambiente no funciona
Contacte con el servicio de atención al cliente
De’Longhi
En la pantalla aparece:
+ aparato apagado
(o)
(Avería de sonda 2)
Indica que la sonda del dispositivo interno
de seguridad no funciona
Contacte con el servicio de atención al cliente
De’Longhi
En la pantalla aparece: Ht
(Alta temperatura)
El aparato ha alcanzado una temperatura
demasiado alta
Compruebe que el aparato no esté cubierto
y deje
que se enfríe
. Cuando la temperatura interna del
producto disminuye, la alarma desaparecerá.
Si el aparato aún no funciona, comuníquese con el
Servicio de atención al cliente de DeLonghi.
En la pantalla aparece:
y el aparato está
apagado (o)
El dispositivo de seguridad antivuelco se
ha activado
Asegúrese de que el aparato se encuentre en
posición vertical sobre una supercie plana, Si el
aparato no funciona contacte con el Servicio de
atención al cliente de De'Longhi

www.delonghi.com
5711011421_00_0219
Printed in China