
EN
VRT 94129 VI
01M-8910693200-3521-02
User Manual
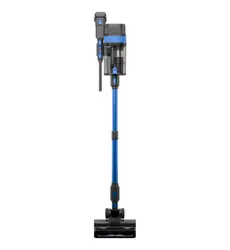
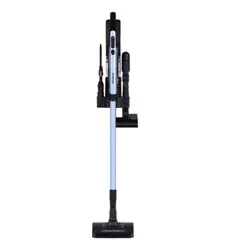
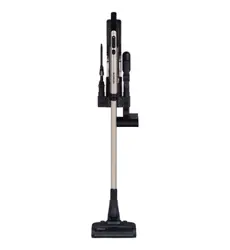
Cordless Stick Vacuum Cleaner
Please read this guide first!
Dear Customer,
Thank you for choosing a BEKO product. We would like you to achieve the optimal efficiency
from this high quality product which has been manufactured with state of the art technology.
Please make sure you read and understand this guide and supplementary documentation fully
before use and keep it as a reference. Include this guide with the unit if you hand it over to
someone else. Observe all warnings and information herein and follow the instructions.
Symbols and their meanings
These symbols are used throughout this guide:
C
Important information and recommenda-
tions regarding the use of the appliance.
A
CAUTION: Warnings on personal injury
or property damage.
Protection class against electric shock.
This product has been manufactured at modern facilities respectful to the environment without harming nature.

3 / EN
Cordless Stick Vacuum Cleaner / User Manual
CONTENT
1 Important safety and
environment instructions 4-7
1.1 General safety . . . . . . . . . . . . . . . . . . . . 4
1.2 Compliance with AEEE regulations and
waste disposal . . . . . . . . . . . . . . . . . . . . . . . 7
1.3 Packaging information. . . . . . . . . . . . . . . 7
1.4 Waste batteries. . . . . . . . . . . . . . . . . . . . 7
1.5 Actions to be taken for energy saving . . . . 7
2 Overview 8-10
2.1 Controls and components . . . . . . . . . . . . 9
2.2 Technical data. . . . . . . . . . . . . . . . . . . . . 9
External Power Supply Parameter . . . . . . . . . 9
3 Installation 11
3.1 Intended use. . . . . . . . . . . . . . . . . . . . . 11
3.2 Installation of the mobile charging dock . 11
3.3 Installation of the body and the brush. . . 12
4 Operation 13-19
4.1 Charging the appliance . . . . . . . . . . . . . 13
4.2 Operation . . . . . . . . . . . . . . . . . . . . . . . 14
4.3 LCD Display . . . . . . . . . . . . . . . . . . . . . 15
4.3.1 Main Screen . . . . . . . . . . . . . . . . . . . 15
4.3.2 Changing the speed . . . . . . . . . . . . . . 16
4.3.3 Charging . . . . . . . . . . . . . . . . . . . . . 16
4.3.4 Automatic floor detection . . . . . . . . . . 16
4.3.5 Warning screens . . . . . . . . . . . . . . . . 17
4.3.5.1 Filter cleaning warning . . . . . . . . . . 17
4.3.5.2 Brush blockage warning . . . . . . . . . 18
4.3.5.3 Vacuum duct blockage warning . . . . 18
4.4 Accessories . . . . . . . . . . . . . . . . . . . . . 19
5 Cleaning and maintenance 20-27
5.1 Cleaning of the dust reservoir . . . . . . . . 20
5.2 Cleaning of the metal filter and inlet foam 22
5.3 Cleaning of the EPA E12 Filter and outlet
foam . . . . . . . . . . . . . . . . . . . . . . . . . . . . . 24
5.4 Cleaning of the brush . . . . . . . . . . . . . . 25
5.5 Removal of the blockages . . . . . . . . . . . 26
5.6 Storage . . . . . . . . . . . . . . . . . . . . . . . . 27
5.7 Transportation and handling. . . . . . . . . . 27
6 Problems and remedies 28-29

4 / EN
Cordless Stick Vacuum Cleaner / User Manual
This section includes the safety
instructions necessary to prevent
the risk of personal injury or ma-
terial damage.
Failure to observe these instruc-
tions will void any and all warran-
ties.
1.1 General safety
• The device complies with
international safety standards.
• This appliance is intended to be
used in household and similar
applications such as:
- Staff kitchen areas in shops,
offices and other working
environments;
- Farm houses;
- By clients in hotels, motels
and other residential type
environments;
- Bed and Breakfast type
environments;
- It is not fit for industrial use.
• This device can be used by
children over 8 years of age,
people with physical, sensory
or mental challenges or people
with lack of experience or
knowledge; as long as control
is ensured or information is
provided regarding the hazards.
Children must not play with the
appliance. Cleaning and user
maintenance shall not be carried
out by unattended children.
• Do not use the appliance if the
power cord or the appliance is
damaged. Contact authorized
service.
• Your mains power supply shall
be in align with the specified
information on the type tag.
• Do not use the appliance with
an extension cord.
• To prevent the power cord get
damaged, make sure that it
does not get stuck, bent or
contact with sharp edges.
• Do not touch the plug of the
appliance with damp or wet
hands while the appliance is
plugged in.
1 Important safety and environmental instructions

Cordless Stick Vacuum Cleaner / User Manual
5 / EN
• Do not pull on the cord while
unplugging the appliance.
• Do not vacuum flammable
materials and ensure that the
cigarette ashes are cooled down
before vacuuming them.
• Do not vacuum water and other
fluids.
• Protect the appliance against
precipitation, humidity and heat
sources.
• Do not use the appliance near
or on explosive or flammable
environments or materials.
• Unplug the appliance before
cleaning and maintenance.
• Do not immerse the appliance
or its power cord in water for
cleaning.
• Do not disassemble the
appliance.
• Only use the authentic
parts or the manufacturer’s
recommended parts.
• To prevent blockage of the filter
or damage to the motor, do
not vacuum cement, plaster or
fragments of compressed paper.
• Use the appliance with the
adapter delivered with the
appliance only.
• Do not use the appliance without
filters, it may get damaged.
• Keep packaging materials away
from the reach of children.
• This appliance is not intended
to be used by persons, including
children, with physical, sensory
and mental disabilities or those
who have not adequate experi-
ence and knowledge regarding
its use, unless they are under
the supervision of a person re-
sponsible for their safety or they
are informed about the opera-
tion of the appliance.
• The children shall be supervised
to prevent them from playing
with the appliance.
• Unplug the adaptor and remove
the battery pack before any
cleaning or maintenance
procedure.
1 Important safety and environmental instructions

6 / EN
Cordless Stick Vacuum Cleaner / User Manual
1 Important safety and environmental instructions
• To avoid any risk of hazard,
a damaged adaptor shall be
replaced by the manufacturer,
the authorized representative of
the manufacturer or a similarly
qualified technician.
• Keep your fingers, hair and loose
clothes away from moving parts
or clearances while vacuuming.
• Batteries shall be removed from
the appliance before discarding
the appliance.
• Disconnect the appliance from
power supply before removing
the battery.
• Please discard used batteries in
accordance with local laws and
regulations.
• The batteries included in this
appliance may only be replaced
with qualified persons.
• CAUTION: Use the
YLS0241A-A360060 removable
supply unit delivered with the
appliance to charge to the battery.
• Please install/remove batteries
as per the instructions specified
in the user guide.
• Do not use batteries of different
types or old and new batteries
together.
• Batteries shall be installed with
the correct polar layout.
• Remove the depleted batteries
from the appliance and dispose
of these batteries in a safe way.
• If you do not intend to use the
appliance for a long while, the
batteries shall be removed.
• Fluid may leak from batteries
damaged as a result of incorrect
operation. Do not contact this
fluid. Discard damaged batteries
as per the laws and legislation
and contact the authorized
service.
• Do not short circuit the supply
terminals.
• Use with ZB 2007 batteries
only.
Cordless Stick Vacuum Cleaner / User Manual
7 / EN
• This appliance shall not be
operated by children and
people with limited physical,
sensory and cognitive skills or
people with lack of experience
and knowledge unless they
are under supervision or they
are provided with the relevant
instructions.
• The children shall be supervised
to prevent them from playing
with the appliance.
1.2 Compliance with the WEEE
Directive and disposal of the waste
product
This product complies with EU WEEE Directive
(2012/19/EU). This product bears a
classification symbol for waste electrical and
electronic equipment (WEEE).
This symbol indicates that this product shall
not be disposed with other household wastes at the end
of its service life. Used device must be returned to offical
collection point for recycling of electrical and electronic
devices. To find these collection systems please contact
to your local authorities or retailer where the product
was puchased. Each household performs important role
in recovering and recycling of old appliance. Appropriate
disposal of used appliance helps prevent potential
negative consequences for the environment and human
health.
1 Important safety and environmental instructions
1.3 Packaging information
The product's packaging is made of recycla-
ble materials, in accordance with the National
Legislation.
Do not dispose the packaging waste with the household
waste or other wastes, dispose it to the packaging col-
lection areas specified by local authorities.
1.4 Waste batteries
Ensure that the waste batteries are disposed
of in accordance with local laws and regula-
tions. The symbol on the battery and packag-
ing indicates that the battery delivered with
the product should not be considered as
household waste. This symbol may be used in combina-
tion with a chemical symbol in some regions. If the bat-
teries contain more than 0.0005 % mercury and more
than 0.004 % of lead, the Hg chemical is added for
mercury and the Pb chemical symbol is added for lead
under the symbol. By ensuring that the batteries are dis-
posed correctly, you shall contribute to the prevention of
potential damage to the environment and human health
due to improper disposal of the batteries.
1.5 Actions to be taken for energy
saving
• To avoid redundant energy consumption while using
the device, set the speed levels according to the floor
you are sweeping.
• Under normal conditions, low speeds are used to
clean the hard floors, curtains and sofas, and high
speeds are used to clean the carpets.
8 / EN
Cordless Stick Vacuum Cleaner / User Manual
18 19 20
21 22 23
24 25
1
2
3
5
6
2 Overview
9
10
11
12
13
14
7
8
15
16
17
4

9 / EN
Cordless Stick Vacuum Cleaner / User Manual
The values provided with the appliance or its accompanying documents are laboratory readings in
accordance with the respective standards. These values may differ depending on the use and ambient
conditions.
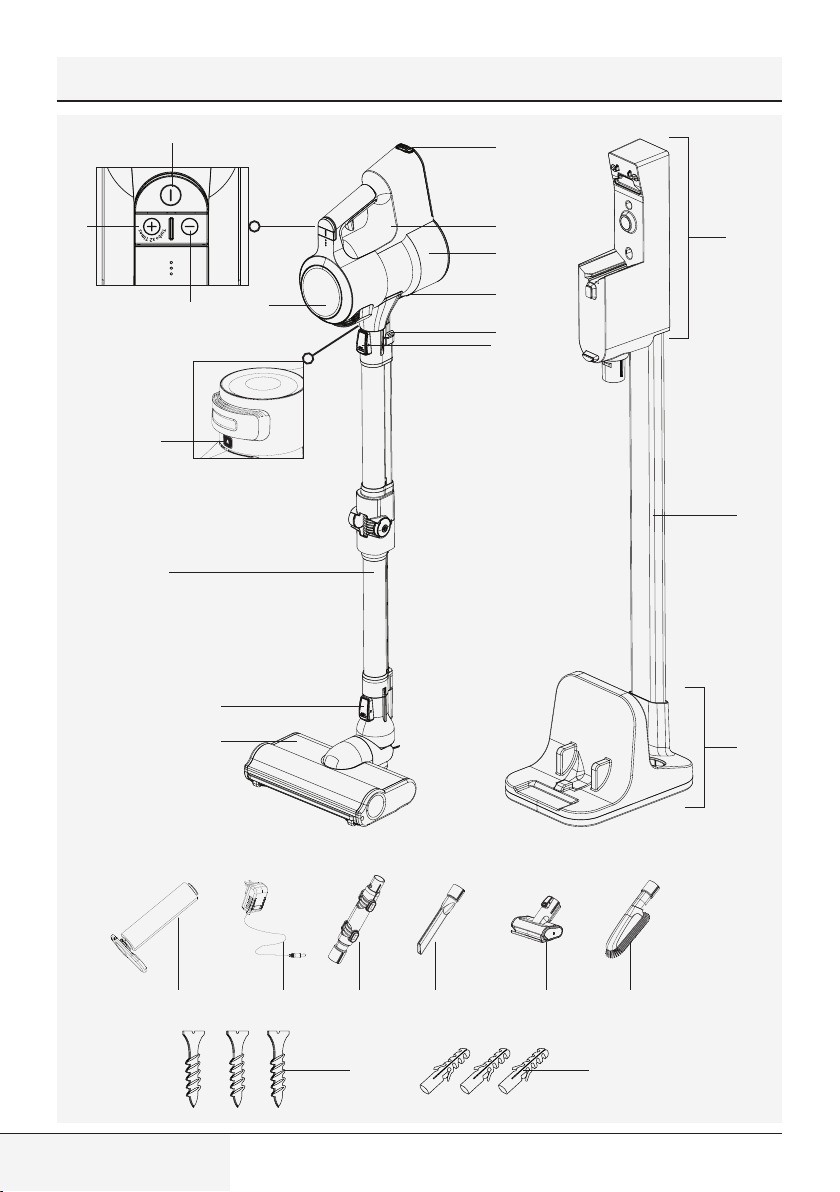
2.1 Controls and components
1. On-Off switch
2. Mode button +
3. Mode button -
4. LCD Display
5. Filter cover release button
6. Foldable wand
7. Brush release button
8. Electric turbo brush
9. Battery pack release button
10. Appliance body
11. Dust container
12. Dust reservoir lid opening button
13. Foldable wand button
14. Wand release button
15. Charging dock
16. Charging dock tube
17. Charging dock support
18. Hard floor roll
19. Charge adaptor
20. Elbow
21. Narrow mouth nozzle
22. Mini turbo brush
23. Dust brush
24. Screw
25. Dowel
2.2 Technical data
Nominal input power: 550 W
Input: 100 - 240 V~ 50-60 Hz 0.8 A (max.)
Output: 36 V
0.6 A
Charging period: 4-5 hours
Operation period under maximum power:
up to 7 min.
Operation period under medium power: up
to 30 min.
Operation period under minimum power:
up to 60 min.
The rights to make technical and design changes
are reserved.
2 Overview
10 / EN
Cordless Stick Vacuum Cleaner / User Manual
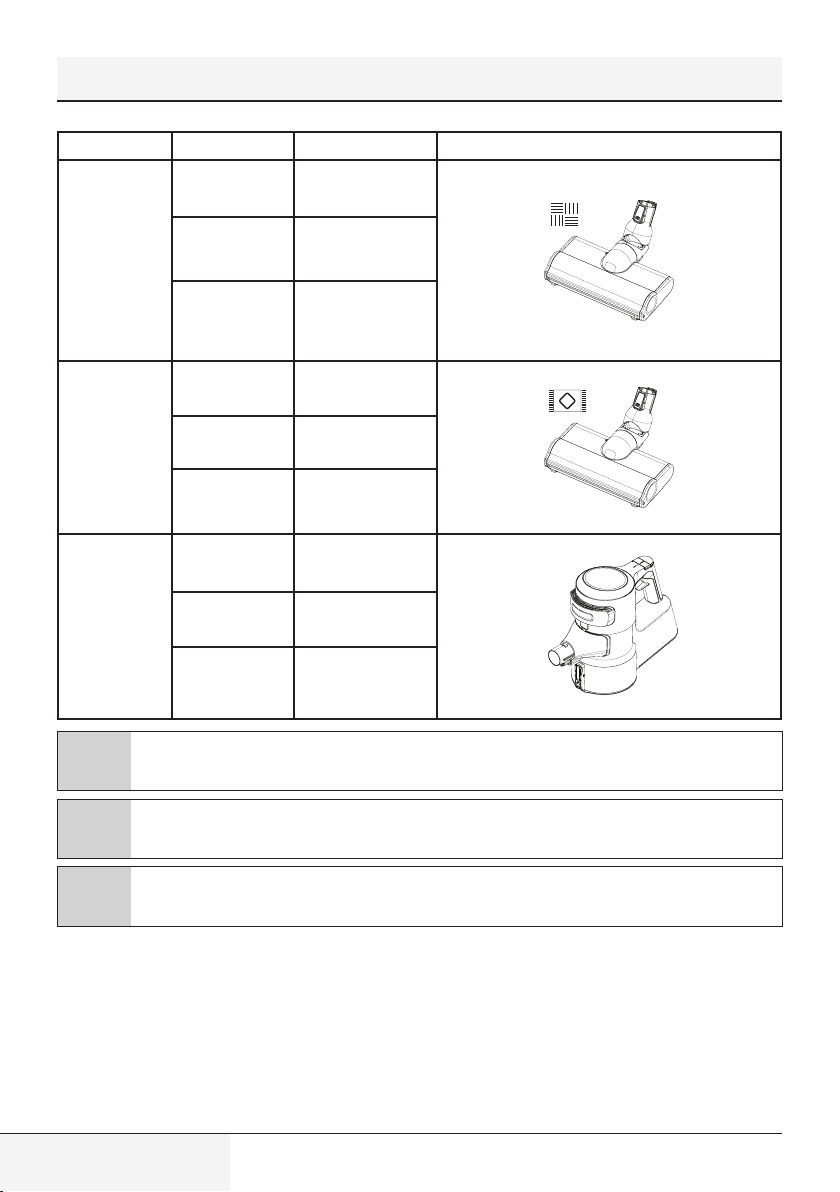
Intended Use Speed rating Operating period
Hard floor
Minimum speed
Up to 60 min.
Medium speed
Up to 30 min.
Maximum speed
Up to 15 min.
Carpet floor
Minimum speed
Up to 30 min.
Medium speed
Up to 15 min.
Maximum speed
Up to 7 min.
Hand-held type
Minimum speed
Up to 90 min.
Medium speed
Up to 30 min.
Maximum speed
Up to 8 min.
C
The operating periods specified above are valid under full charge (100%).
C
Electric turbo brush (8) detects the floor automatically. Operating periods may vary as per switching
between floor types during operation.
C
Operating periods for hand-held type are valid for operation with no accessories, and operation with
an elbow (20), with a dust brush (23) and with the narrow mouth nozzle (21). Period varies in case of
operation with mini turbo brush (22).
2 Overview
11 / EN
Cordless Stick Vacuum Cleaner / User Manual
3 Installation
3.1 Intended use
This appliance is intended for household use and it is not suitable for industrial use.
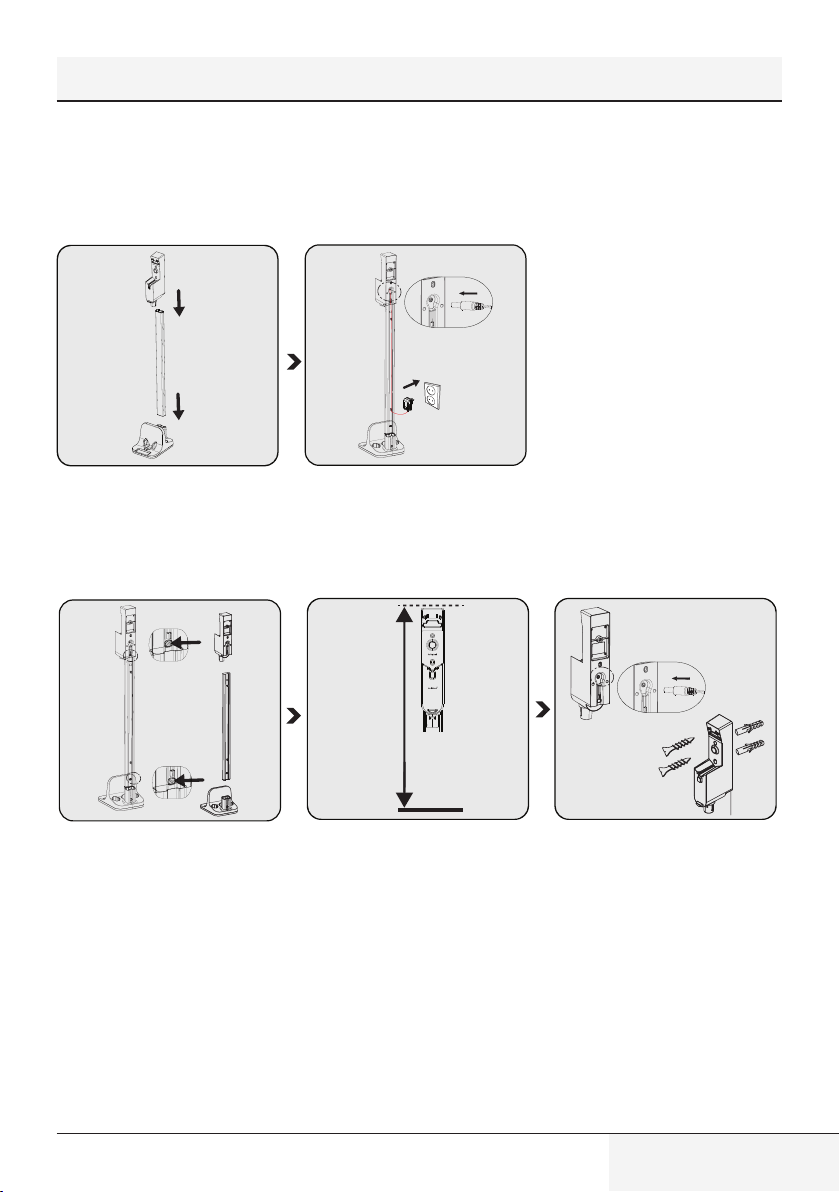
3.2 Installation of the mobile charging dock
1
2
Install charging dock tube (16) to
the charging dock support (17),
then install the charging dock (15)
to the charging dock tube (16).
Install the thin end of the charger to
the seat on the charging dock (15).
Plug the charging adaptor (19) to
the outlet.
1
2
102-104 cm
1
2
If you want to install the charging
dock (15) to the wall, detach
the charging unit from the tube
(16) and support (17) using two
separate buttons.
Position the charging dock (15) at
a height of 102-104 cm from the
ground.
Install the end of the charging
adaptor (19) to the seat on the back
of the charging dock (15).
Put the cord of the charging
adaptor through the power cord
securing ring behind the charging
dock tube and secure the cord.
Install the charging dock (15) to the
wall using two screws (24) and two
dowels (25).
12 / EN
Cordless Stick Vacuum Cleaner / User Manual
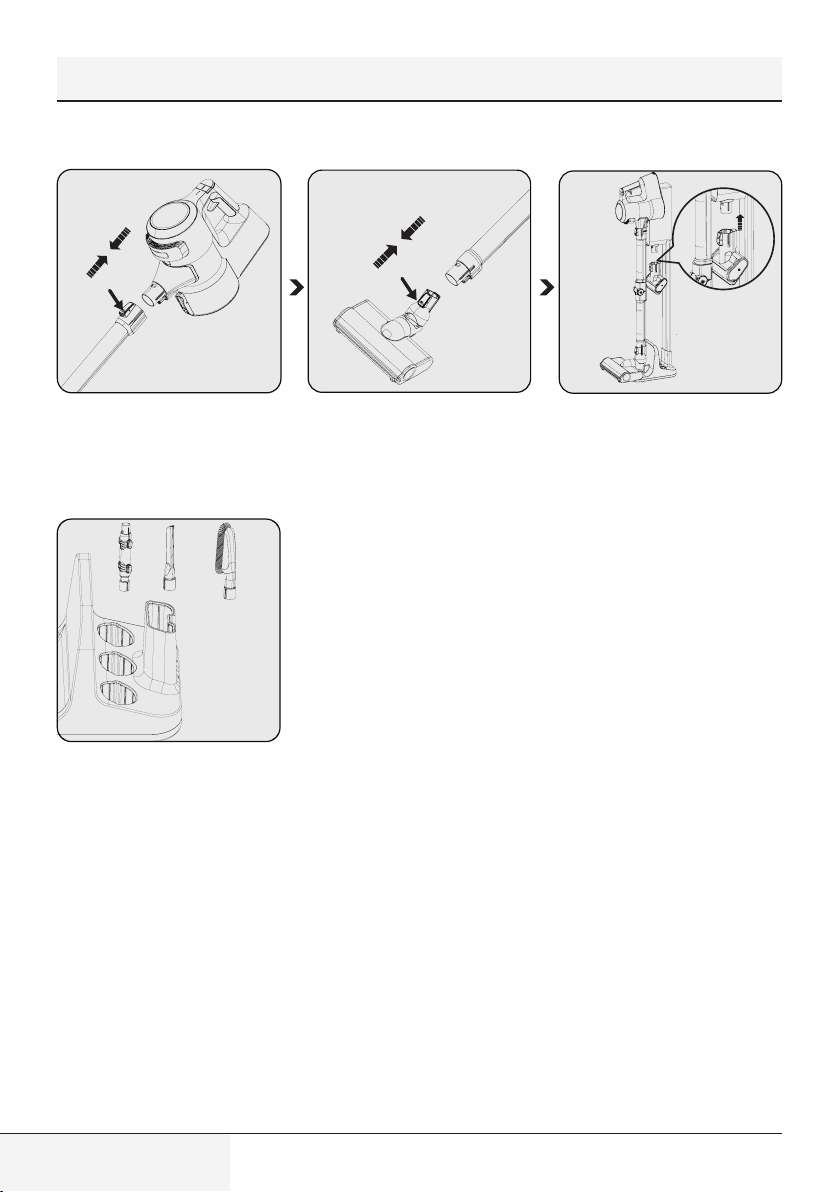
3.3 Installation of the body and the brush
1
Install the wand to the end of the
body (10).
Remove it by pressing the release
button (14).
Press the electric turbo brush
release button (7) on the electric
turbo brush (8) and push it in the
direction of arrow towards the
wand.
Install the mini turbo brush (22) to
the charging dock (15).
1
2
3
1
2
3
Place other accessories to the
charging dock support (17).
3 Installation
13 / EN
Cordless Stick Vacuum Cleaner / User Manual
4 Operation
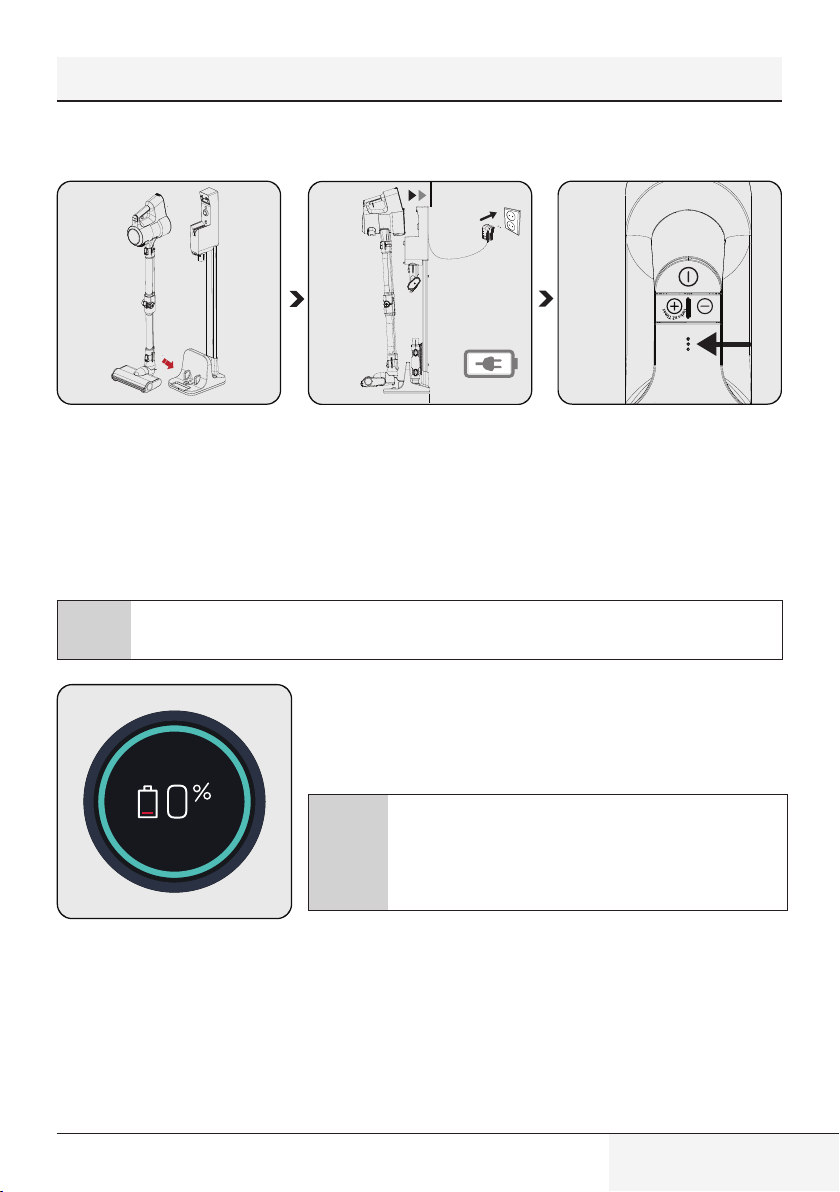
4.1 Charging the appliance
1
2
Secure the electric turbo brush (8)
to the charging dock support.
Install the body (10) to the charging
dock (15).
Plug the charging adaptor (19) to
the outlet.
Flashing of the charge indicator
LEDs in white colour indicates that
the appliance is being charged.
– When all levels of the charge
indicator LEDs are illuminated,
this indicates that the charging of
the appliance is completed.
C
It takes up to 5 hours to charge the appliance completely. The appliance shall not be operated while
charging.
When you place appliance to the charging dock (15), it starts to charge
and the battery charge percentage shall be displayed on the screen
(4). Percentage (%) and battery charge indicator are increased as the
appliance is charged. The circle around the screen is illuminated in blue
and as moving around.
C
The screen (4) darkens 3 minutes after connecting the
appliance to the charging dock and the battery status is
displayed by 3 LEDs on the appliance.
To see the charge percentage of the appliance, press + (2)
or - (3) mode button once while it is charging.
14 / EN
Cordless Stick Vacuum Cleaner / User Manual
4.2 Operation
C
It may be connected for charging before the complete discharging of the battery. The appliance may
be kept continuously on the charging dock (15) until the next operation.
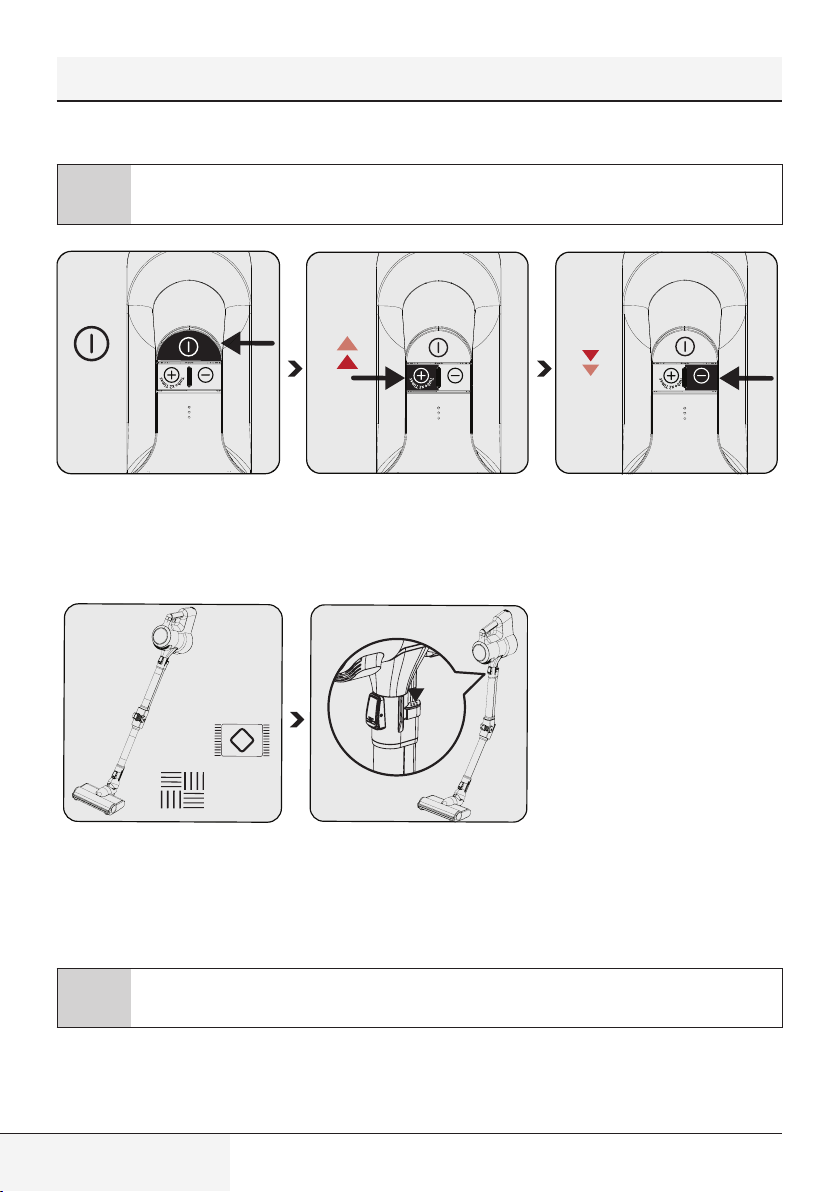
ON/OFF
TURBO
Press the on/off button (1) to
operate the appliance. The
appliance starts operating with the
minimum speed when the on/off
button is pressed.
Press the “+” mode button (2)
once to operate the appliance with
medium speed. Press once more to
operate it with the maximum speed.
Press the “-” mode button (3)
once to switch to a lower speed
while operating at maximum speed
or medium speed.
This appliance is suitable for use on
carpets and hard floors.
Press one of the two buttons (13)
on the wand to fold the wand. Thus,
you may reach hard-to-reach areas
such as the areas under the seats.
C
If the adaptor on the charging is plugged to the outlet, the appliance stops operating automatically if it
is placed on the charging dock (15) while it is being operated.
4 Operation
15 / EN
Cordless Stick Vacuum Cleaner / User Manual
4 Operation
4.3 LCD Display
4.3.1 Main Screen
Speed level
indicator
Colour
indicator
Remaining
operating
period
Battery charge
indicator
Speed level indicator
Maximum speed
Medium speed
Low speed
Battery charge indicator: Varies
as per the remaining operating
period.
Remaining operating period:
Indicates the remaining charge
level in minutes as per the speed
level and floor type used.
Colour indicator: Indicates your
remaining operating period as
green, yellow and red.
Speed level indicator: Indicates
the speed level that the appliance
is being used.
For example, all three bar indicators
are illuminated in white while using
the appliance at maximum speed.
The circle around the display (4) changes colour as per the remaining oper-
ating period.
Simultaneously, the battery charge indicator changes as per the remaining op-
erating period.
Colour indicator:
Low speed level
• Illuminates in green between 60 minutes and 30 minutes at full charge.
• Illuminates in yellow in the last 30 minutes to 3 minutes.
• Illuminates in red in the last 3 minutes of remaining charge.
Medium speed level
• Illuminates in yellow between 30 minutes and 3 minutes at full charge.
• Illuminates in red in the last 3 minutes of remaining charge.
Maximum speed level
• Illuminates in yellow between 7 minutes and 3 minutes at full charge.
• Illuminates in red in the last 3 minutes of remaining charge.
C
The remaining operating period, battery charge indicator and colour indicator displayed on the screen
(4) vary as per the speed level and floor type used.

16 / EN
Cordless Stick Vacuum Cleaner / User Manual
4 Operation
4.3.2 Changing the speed
When the speed level is changed a moving brush symbol and the speed level
indicator shall be displayed on the screen. Then, the main screen shall be
displayed.
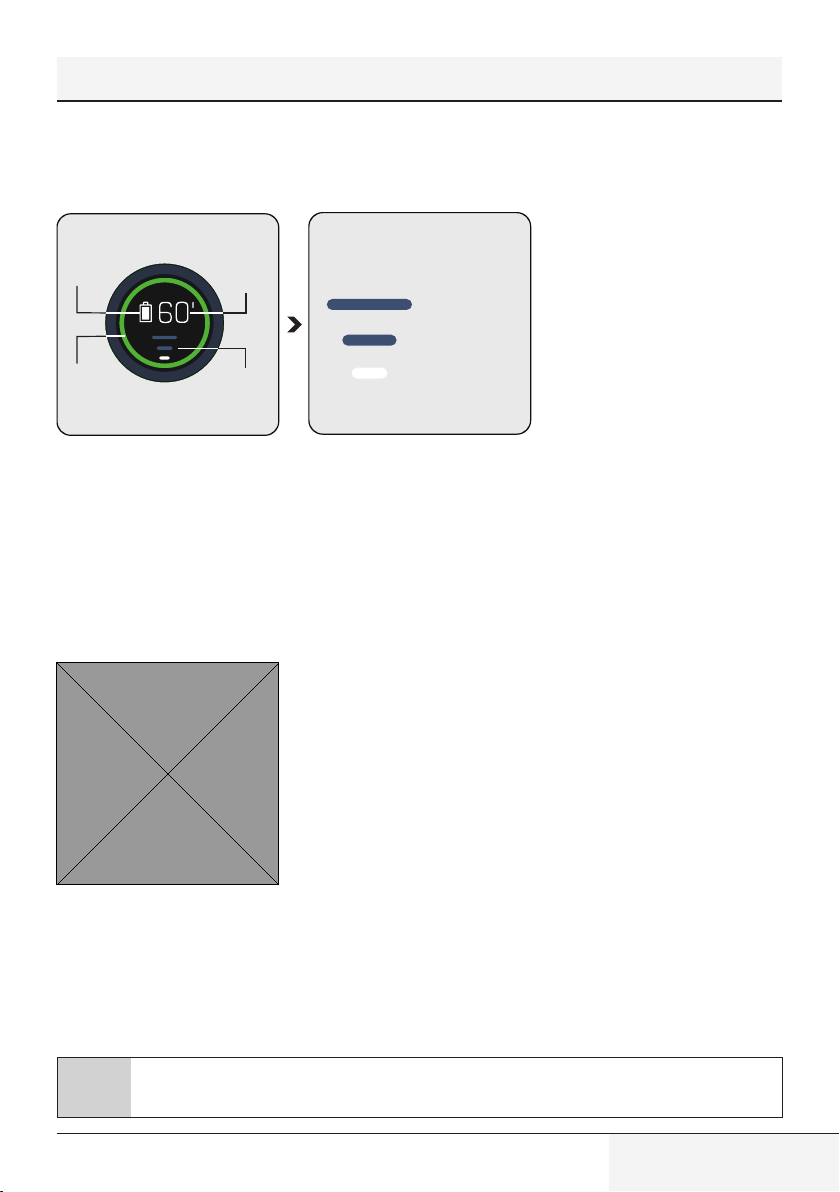
4.3.3 Charging
When you place the appliance to the charging dock (15), it starts to charge
and the battery charge percentage shall be displayed on the screen (4).
Percentage (%) and battery charge indicator are increased as the appliance
is charged. The circle around the screen is illuminated in blue and as moving
around.
C
The screen darkens 3 minutes after connecting the appliance
to the charging dock (3) and the battery status is displayed by
3 LEDs on the appliance.
To see the charge percentage of the appliance, press + or -
mode button once while it is charging.
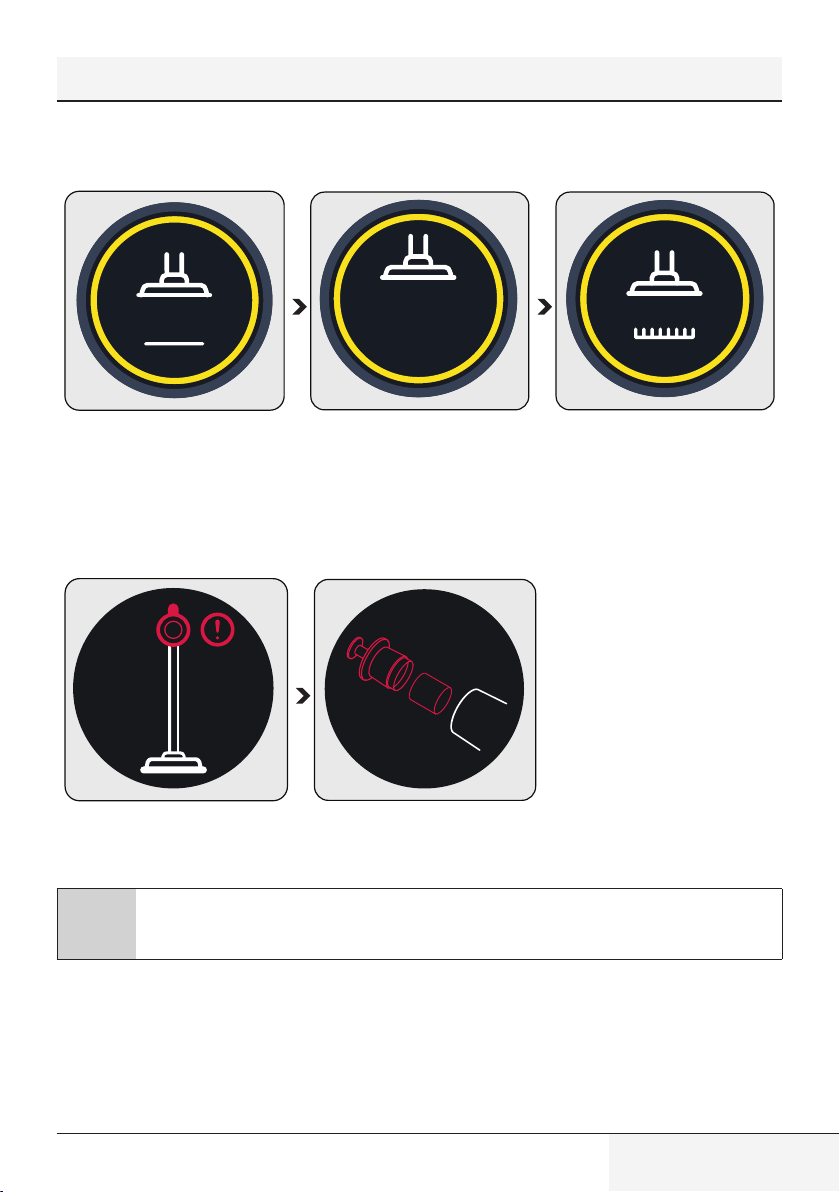
4.3.4 Automatic floor detection
17 / EN
Cordless Stick Vacuum Cleaner / User Manual
When the auto floor detecting brush (8) moves from a carpet floor to a hard floor, the figures shown above shall be
animated on the screen (4).
When the auto floor detecting brush (8) moves from a hard floor to a carpet floor, the figures shown above shall be
animated on the screen (4).
4.3.5 Warning screens
4.3.5.1 Filter cleaning warning
The filters shall be cleaned regularly to prevent loss of performance. When it is not cleaned regularly (in case of
excessive dust), a filter cleaning animation is displayed on the screen for a very short period of time to indicate that
the metal filter and inlet foam shall be cleaned. However, the appliance continues to operate.
C
It is recommended to clean the metal filter and the inlet foam as described in Section “5.2 Cleaning
of the metal filter and inlet foam” before continuing with the cleaning.
4 Operation
18 / EN
Cordless Stick Vacuum Cleaner / User Manual
4 Operation
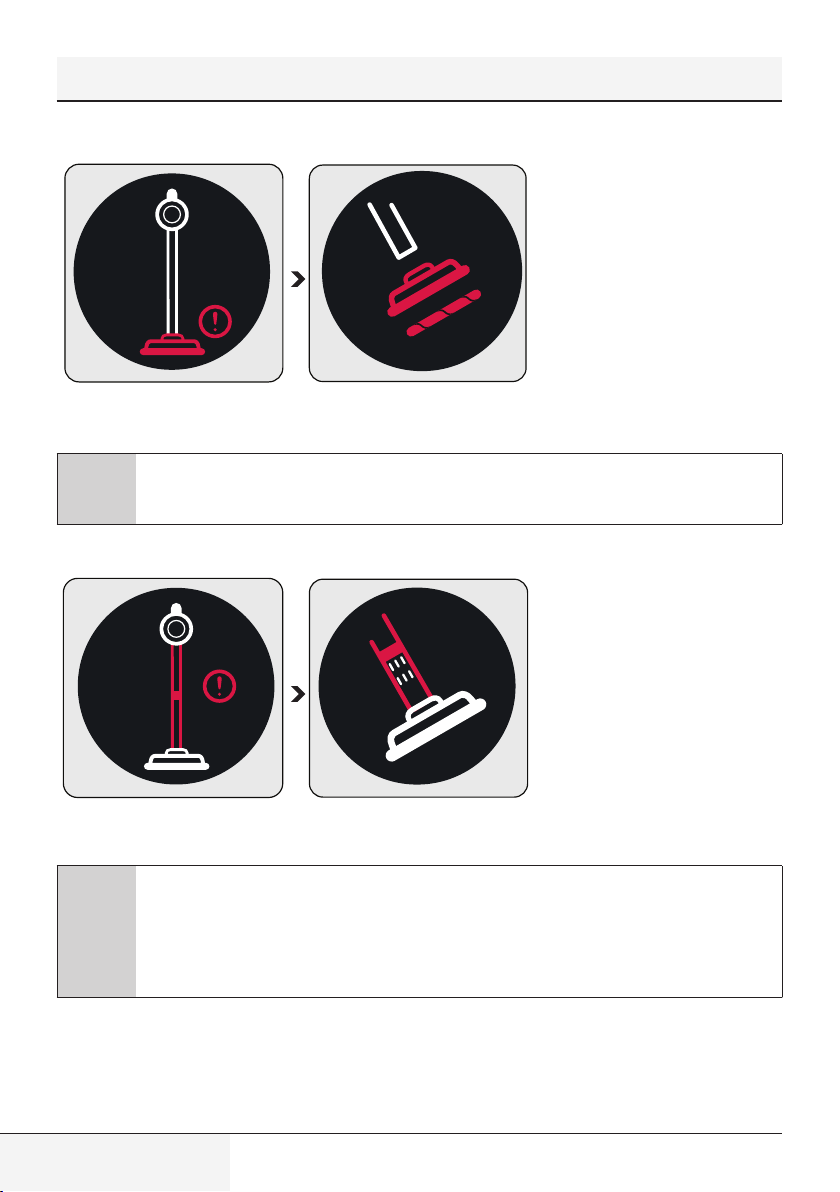
4.3.5.2 Brush blockage warning
When the turbo brush is blocked or too many hair, etc. materials are tangled on the rotating roll, the animation
indicating the brush blockage warning is displayed on the screen continuously and the appliance stops operating.
C
It is recommended to clean the brush as described in Section “5.4 Cleaning of the brush” before
continuing with the cleaning. Remove the turbo brush (8) from the foldable wand (6). Inspect the turbo
brush to the wand connection and remove any blockages.
4.3.5.3 Vacuum duct blockage warning
When the vacuum duct is blocked, the animation indicating that the duct is blocked is displayed on the screen
continuously and the appliance stops operating. Determine the reason of the blockage of the vacuum duct.
C
It is recommended to determine the reason of blockage as described in Section “5.5 Cleaning of
the blockages” before continuing with the cleaning. Remove the turbo brush (8) from the foldable
wand (6). Remove the foldable wand from the body of the appliance. Inspect the turbo brush to the
wand connection and remove any blockages. Inspect the wand from the inlet and outlet ends of the
foldable wand, and remove any blockages. Inspect the vacuum nozzle of the appliance body (10) and
remove any blockages.
19 / EN
Cordless Stick Vacuum Cleaner / User Manual
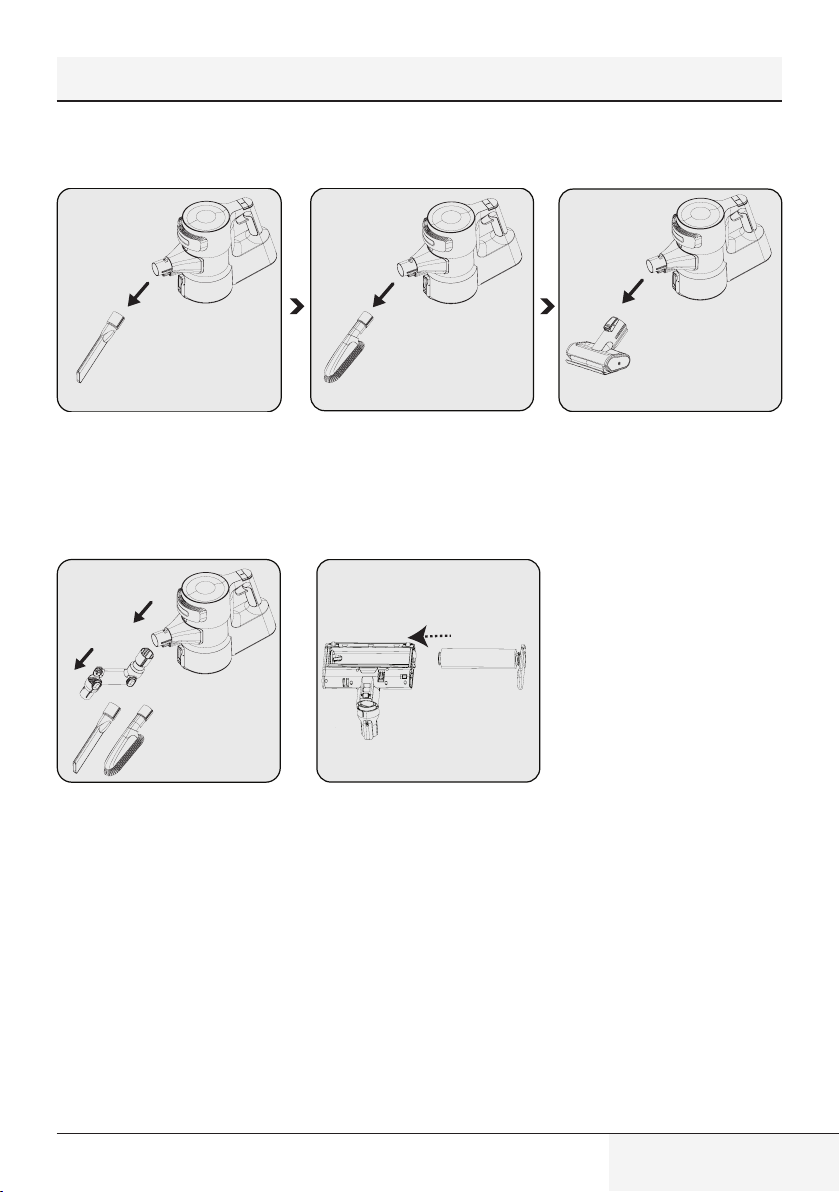
4.4 Accessories
You may use the accessories by installing them to the end of the body.
Narrow mouth nozzle (21):
Suitable for vacuuming the rear of
the furnitures, hard to reach areas
and narrow areas.
Dust brush (23): Suitable for
vacuuming curtains, waxed
furniture and delicate and fragile
objects.
Mini turbo brush (22): Suita-
ble for vacuuming floorings, stair
steps, car interiors, sofas and seat,
etc. It is also used for vacuuming
pet hair on such surfaces.
You may use the elbow (20) by
installing it to the end of the body
(10) to access hard to reach places.
This accessory is suitable for use
on delicate hard floors (natural
hardwood, etc.).
4 Operation
20 / EN
Cordless Stick Vacuum Cleaner / User Manual
5 Cleaning and maintenance
Turn off and unplug the appliance before cleaning.
A
CAUTION: Do not use benzene, solvents, abrasive cleaners, metal objects or hard brushes to clean
the appliance.
A
CAUTION: Deformation may occur on the filters within time as a result of usage. It shall be replaced
with a new one to prevent loss of performance. Contact with the customer services to buy a new
one. (see P. 25)
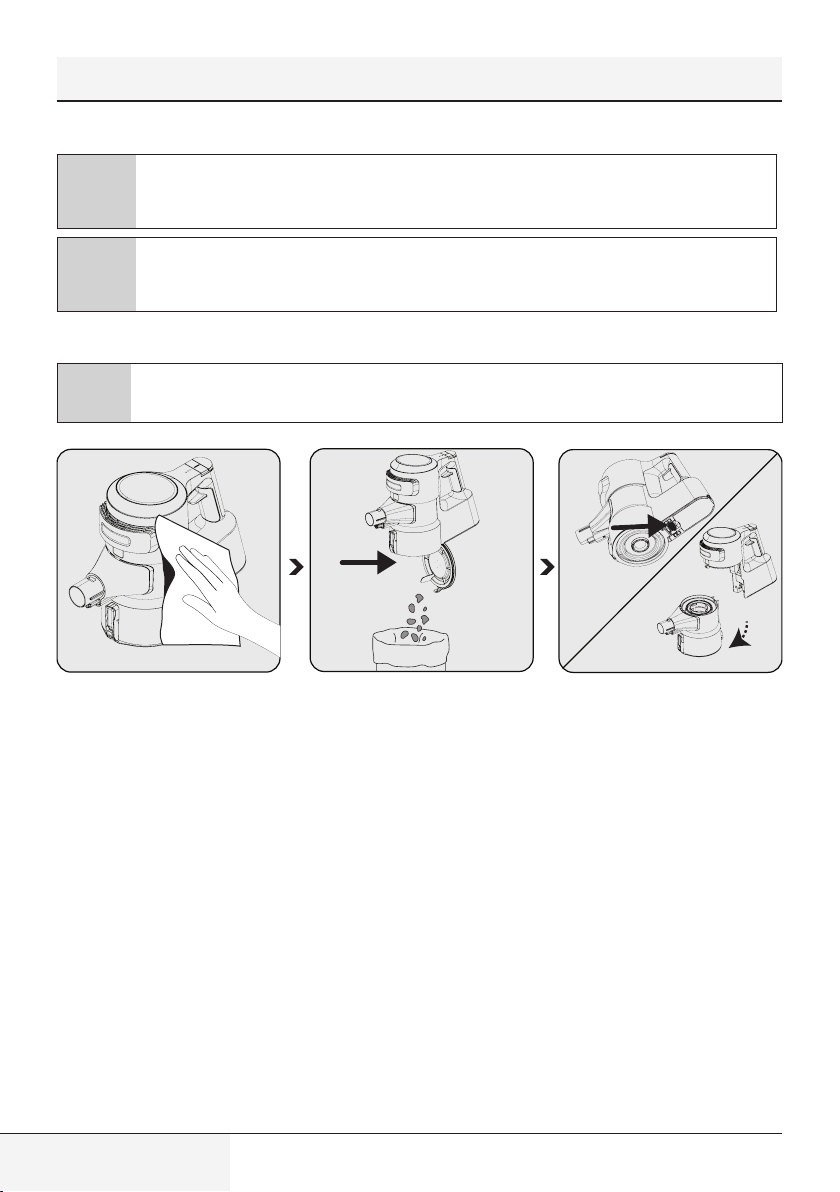
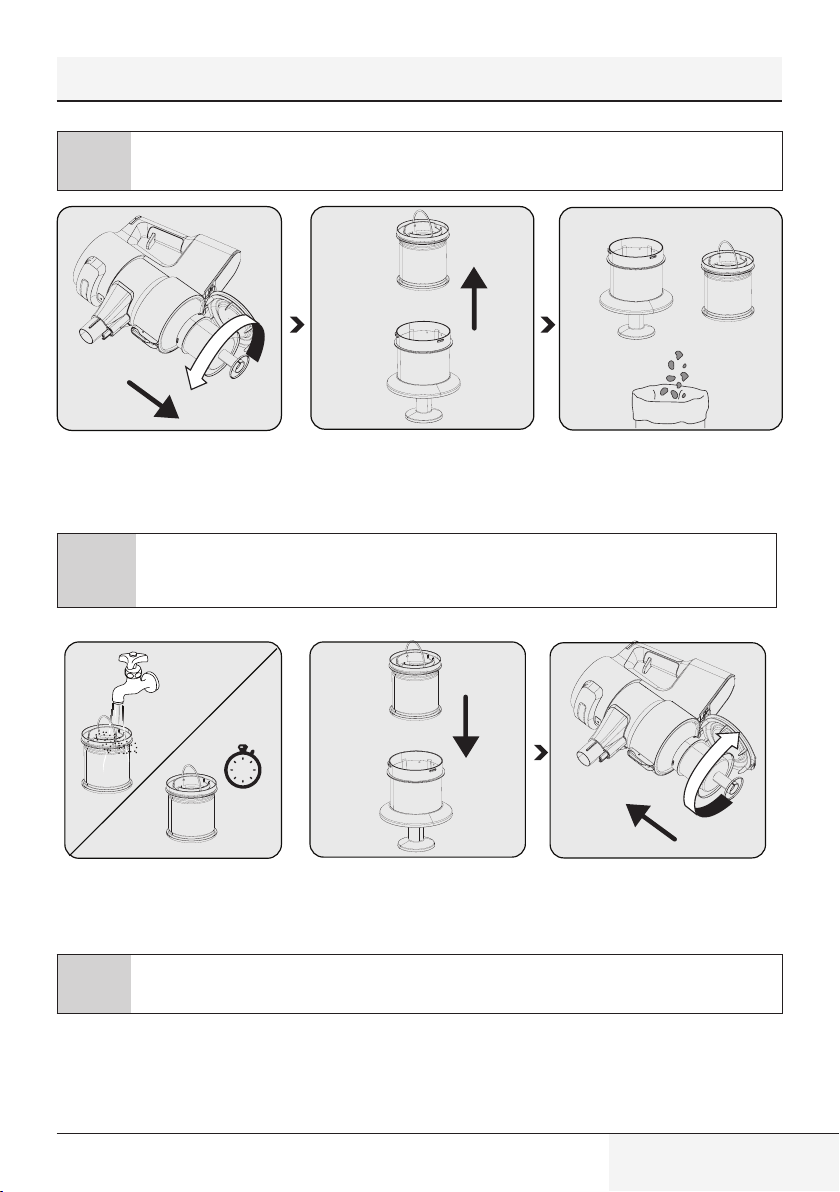
5.1 Cleaning of the dust reservoir
C
We recommend you to clean the dust reservoir (11) after each operation.
1
2
Wipe the surface of the body with a
wet cloth (10).
Press the dust reservoir lid opening
button (12) to open the dust
reservoir (11) and discharge the
dust collected inside.
Push the trigger under the appli-
ance to clean the dust reservoir
(11).
Detach the dust reservoir (11) from
the body (10).
21 / EN
Cordless Stick Vacuum Cleaner / User Manual
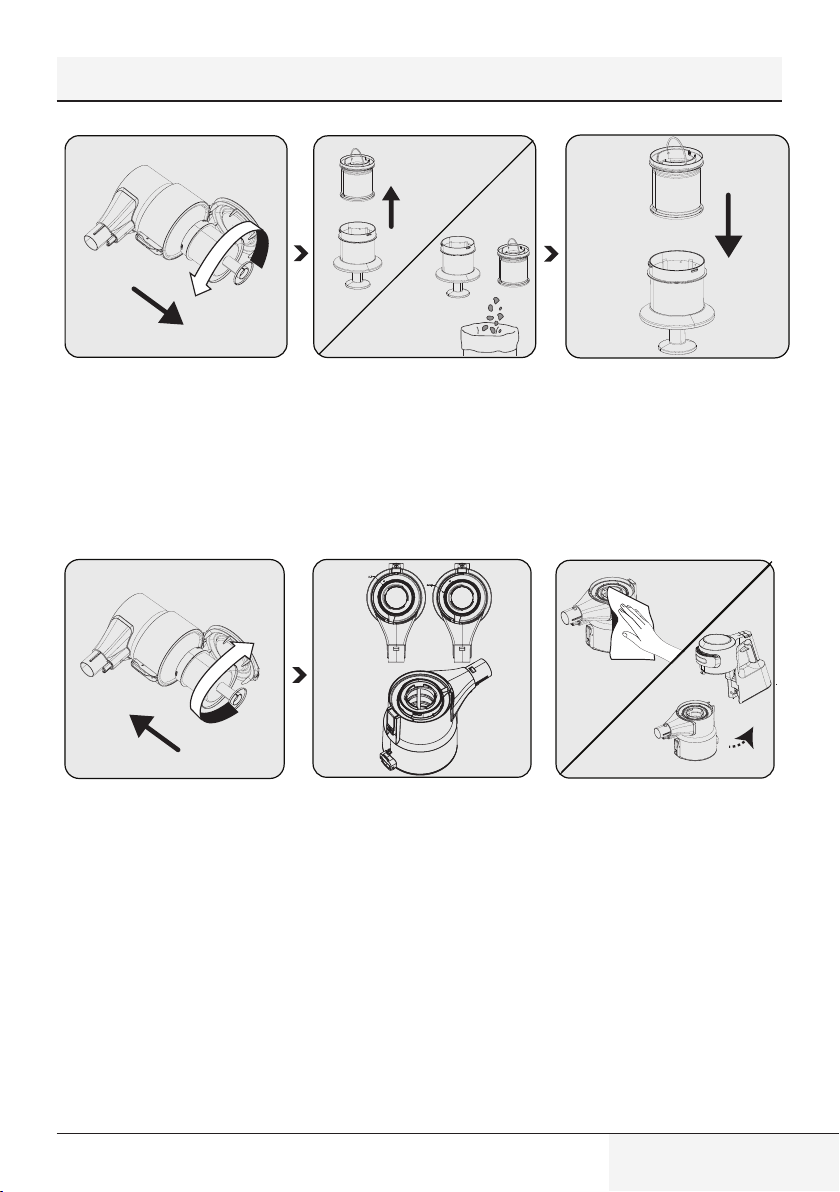
Remove the metal filter and inlet
foam inside the dust reservoir (11)
by rotating the metal filter coun-
ter-clockwise.
Remove the inlet foam inside the
metal filter.
Remove the dust on the metal filter
and inlet foam by tapping them to a
hard surface such as a waste bin or
by using a brush.
Install the inlet foam to the metal
filter.
1
2
Install the metal filter inside the
dust reservoir (11) by rotating it
clockwise.
While installing the metal filter and
inlet foam to the dust reservoir you
have detached them from, place
them as per the lock symbols on
the dust reservoir.
1. Wipe the body (10) with a wet
cloth.
2. Install the body (10) to the dust
reservoir (11).
5 Cleaning and maintenance
22 / EN
Cordless Stick Vacuum Cleaner / User Manual
5 Cleaning and maintenance
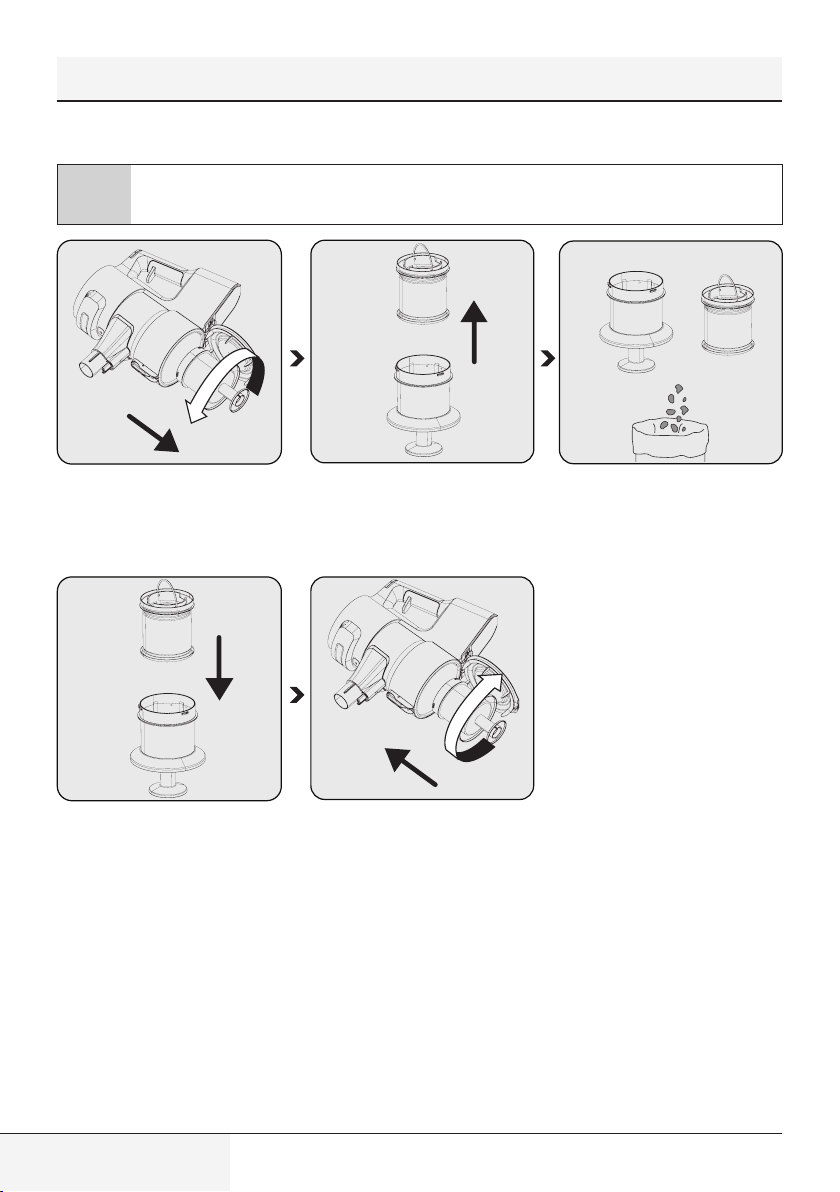
5.2 Cleaning of the metal filter and inlet foam
C
The metal filter and inlet foam shall be cleaned regularly.
Remove the metal filter and inlet
foam inside the dust reservoir (11)
by rotating the metal filter counter-
clockwise.
Remove the inlet foam inside the
metal filter.
Remove the dust on the metal filter
and inlet foam by tapping them to a
hard surface such as a waste bin or
by using a brush.
1
2
Install the inlet foam to the metal
filter.
Install the metal filter and inlet foam
inside the dust reservoir (11) by
rotating the metal filter clockwise.
23 / EN
Cordless Stick Vacuum Cleaner / User Manual
5 Cleaning and maintenance
C
Clean the metal filter and inlet foam by washing under running cold water once a month after removing
the dust on them.
Remove the metal filter and inlet
foam inside the dust reservoir (11)
by rotating the metal filter counter-
clockwise.
Remove the inlet foam inside the
metal filter.
Remove the dust on the metal filter
and inlet foam by tapping them to a
hard surface such as a waste bin or
by using a brush.
A
CAUTION: Wash with cold water. Warm water deteriorates the structure of the filter.
1
2
1
2
24h
Wash the inlet foam under running
cold water and let it dry.
Install the dried inlet foam to the
metal filter.
Install the metal filter and inlet foam
inside the dust reservoir (11) by ro-
tating the metal filter clockwise.
C
It may 24 to 48 hours to dry the washed inlet foam. Reinstall it once you are sure that it is dried.
24 / EN
Cordless Stick Vacuum Cleaner / User Manual
5 Cleaning and maintenance
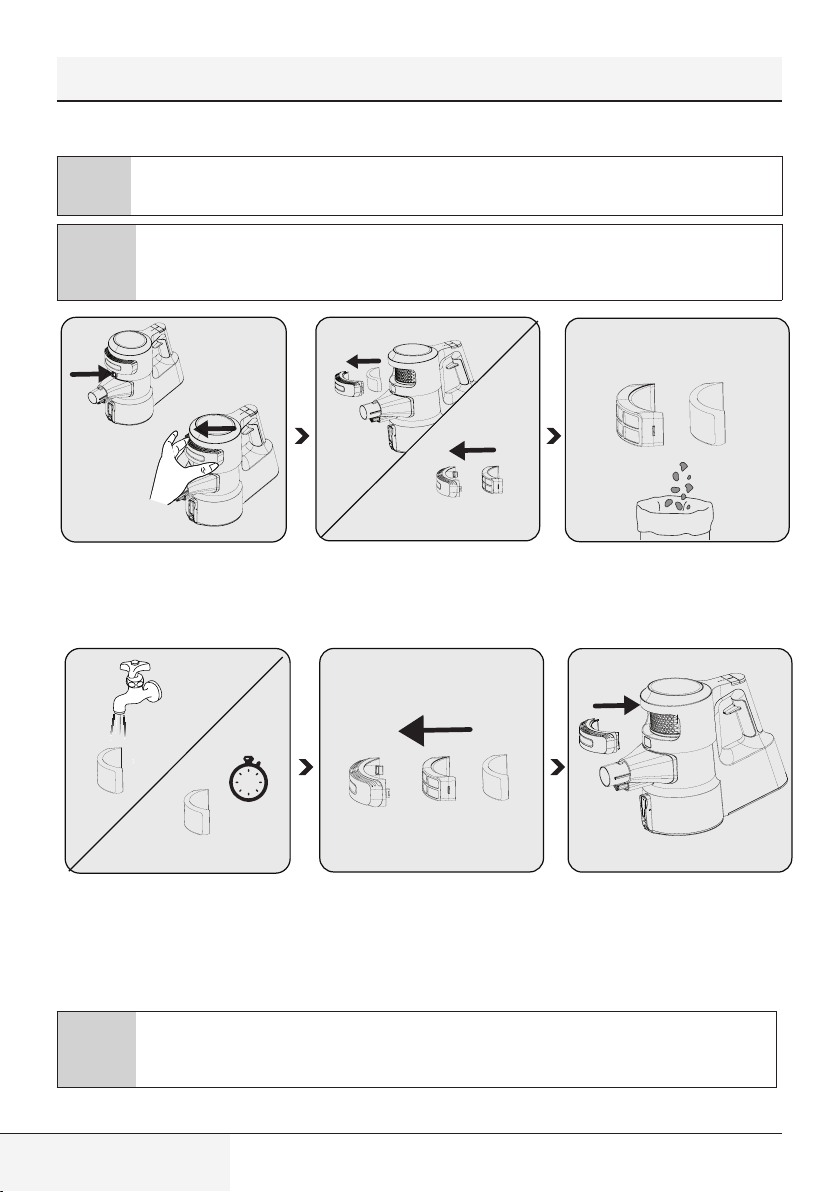
5.3 Cleaning of the EPA E12 Filter and outlet foam
C
Clean the EPA E12filter and outlet foam regularly.
A
CAUTION: Do not wash the EPA E12 filter.
1
2
Remove the lid simultaneously
while pressing the EPA E12 filter
release button.
Remove the EPA E12 filter and the
outlet foam inside it.
Remove the dust on the EPA E12
filter and outlet foam by tapping
them to a hard surface such as a
waste bin or by using a brush.
1
2
24h
Inspect the outlet foam regularly.
Clean it by washing under running
cold water after removing the dust
on them in case of excessive dust .
Reinstall it once it is dried.
Install the EPA E12 filter and outlet
foam to the lid.
Place the lid back.
A
CAUTION: Wash with cold water. Warm water deteriorates the structure of the filter.
25 / EN
Cordless Stick Vacuum Cleaner / User Manual
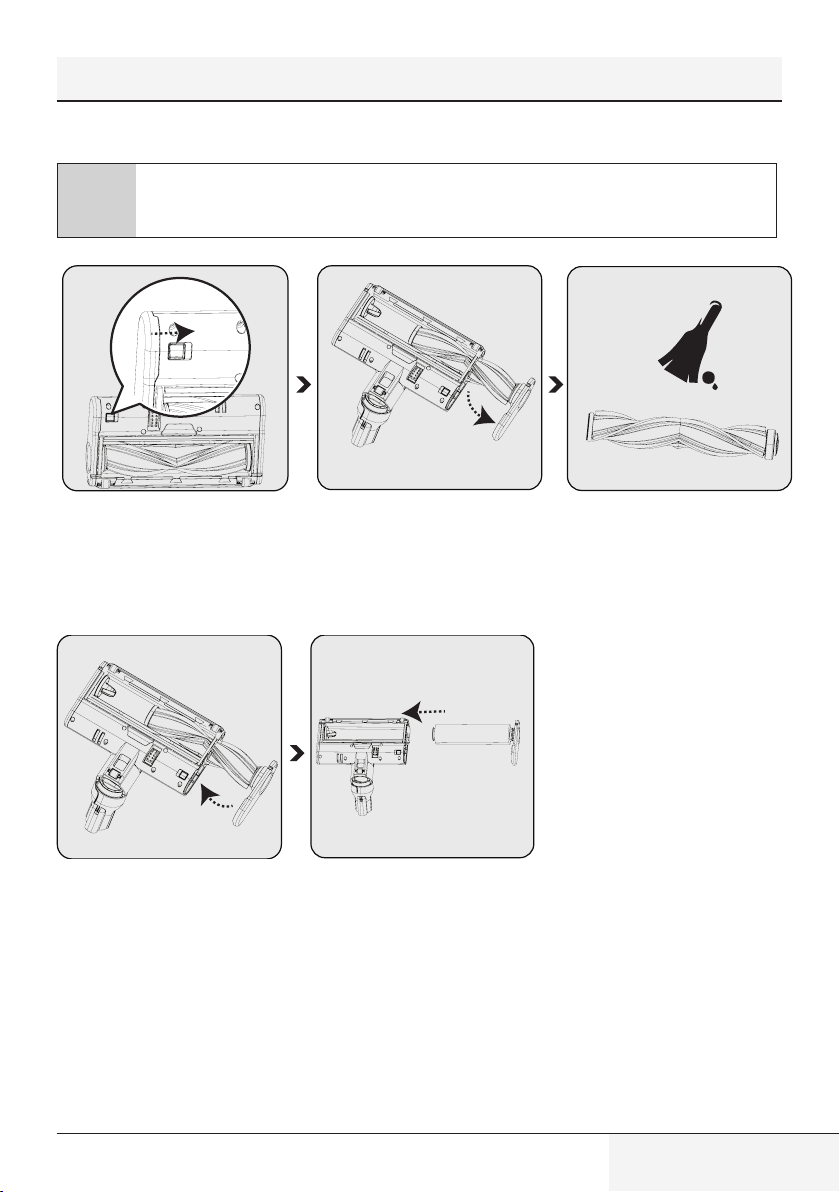
5.4 Cleaning of the brush
A
CAUTION: Do not wash the turbo brush (8) and the main roll brush.
To remove the electric turbo brush
(8), keep the roll brush release
tab pressed so that the lock shall
be opened in the direction of the
arrow, rotate the roll cover towards
yourself and pull it to the left.
Remove the main roll brush. Remove the dust on it by tapping it
lightly to a hard surface or remove
the dust with a brush. If any hair,
etc. is tangled, remove it by cutting
it off.
Re-install the main roll brush after
cleaning it. A “click” is heard from
the tab.
You may replace the main roll brush
with delicate hard floor roll as per
your preferences.
5 Cleaning and maintenance

26 / EN
Cordless Stick Vacuum Cleaner / User Manual
5 Cleaning and maintenance
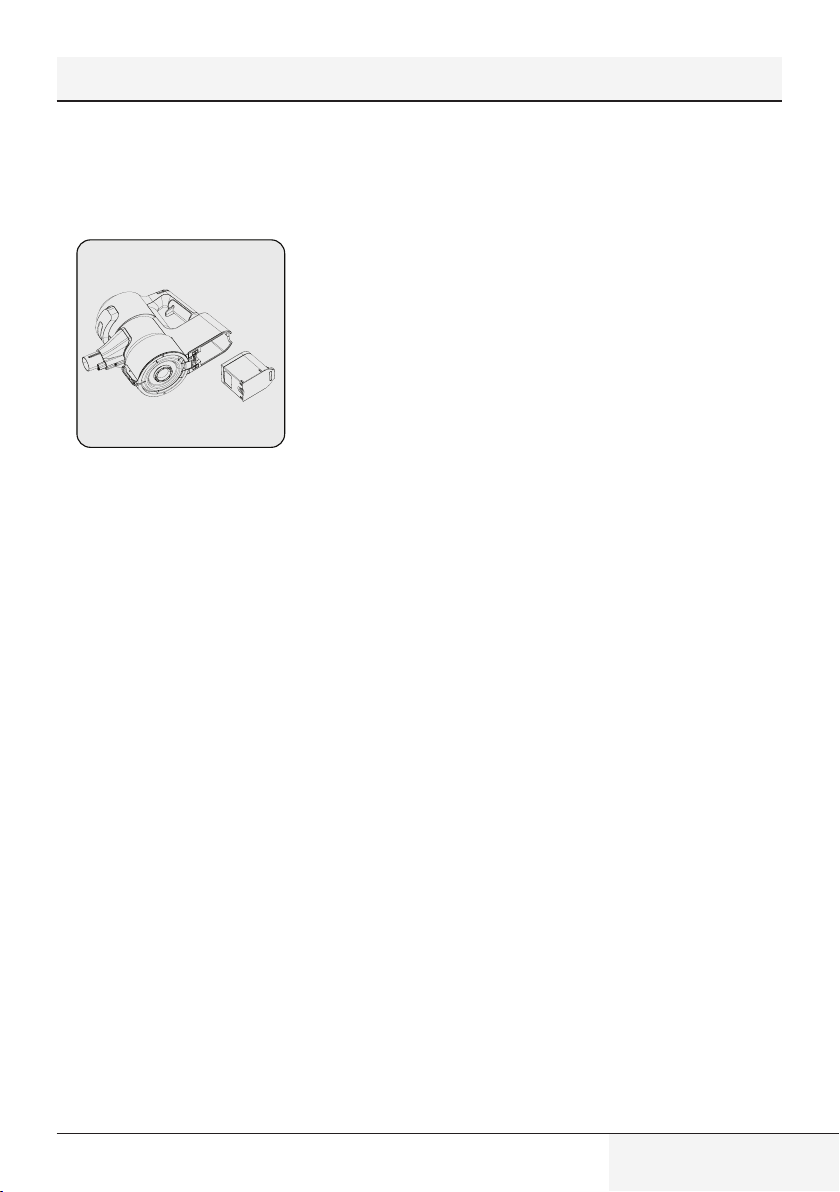
5.5 Removal of the blockages
When you see the vacuum duct blockage warning on the screen (4), detach the brush (8) from the wand (6) to
remove the blockages. Detach the wand (6) from the body of the appliance (10).
Inspect the connection point of the
brush (8) and the vacuum nozzle.
Remove any foreign materials.
Inspect the inlet and outlet of the
foldable wand (6). Remove any
foreign materials.
Inspect the vacuum nozzle of the
appliance body (10). Remove any
foreign materials.
27 / EN
Cordless Stick Vacuum Cleaner / User Manual
5.6 Storage
• If you do not plan to use the appliance for a long while, store carefully.
• Unplug the appliance.
• Ensure that the appliance is kept out of reach of children.
•
If you shall not be using the appliance for a long period of time, please keep
the battery in a cool and dry place at half charged condition after removing
it from the appliance. Do not charge or discharge completely.
• Store the battery on a non-conducting material, and do not allow the battery to contact metal directly. This shall
damage the battery.
5.7 Transportation and handling
• Keep the appliance in its package during transportation and handling. The package will protect the appliance
against physical damage.
• Do not place heavy objects on the appliance or the package. The appliance may get damaged.
• If the appliance is dropped, it may malfunction or permanent damage may be inflicted.
5 Cleaning and maintenance

28 / EN
Cordless Stick Vacuum Cleaner / User Manual
6 Problems and remedies
A
CAUTION: Check the following points before asking for repair assistance from the service department.
PROBLEM POSSIBLE CAUSE SOLUTION
Not operating
Battery is discharged. Charge it.
Battery may be unseated.
Remove the battery and install it
again.
Vacuum connection is blocked.
Separate the appliance as body (10),
brush (8) and wand (6). Inspect and
clean the connection points.
Suction power is getting reduced.
Dust reservoir (11) is full.
Clean the dust reservoir (11) and
the filter.
You may have reached the cleaning
period of the filters.
Clean the filters.
Filters may be deformed as a result
of operation and their replacement
period may have come.
Please contact the customer
services to buy a new filter.
Motor inlet foam is not cleaned.
Clean the filters and recharge the
appliance.
Hair and similar materials may have
tangled on the rotating roll on the
turbo brush (8).
Clean the turbo brush roll.
There is disturbing noise from the
motor.
Vacuum connection is blocked.
Separate the appliance as body
(10), brush (8) and wand (6).
Inspect and clean the connection
points.
Something may have stuck between
the dust reservoir and the filter.
Open the dust reservoir and inspect
the filter area.
Cannot charge the vacuum cleaner.
The vacuum cleaner is not installed
to the charging dock (15).
Install the vacuum cleaner to the
charging dock (15). Make sure that
it is seated properly. Check the
connection.
Operates for a very short time after
charging.
It is not charged for the adequate
period.
Charge for 4-5 hours as per the
instructions.
Motor inlet foam is not cleaned.
Clean the filters and recharge the
appliance.
Battery life is deteriorated.
Contact the customer services to
buy a new battery.
The colour indicator on the screen
is illuminated in red.
Your appliance is about to
discharged.
Charge it.
The animation indicating that the
brush is blocked is displayed on
the screen and the appliance has
stopped operating.
Hair and similar materials may have
tangled on the rotating roll on the
turbo brush (8).
Clean the turbo brush roll.
29 / EN
Cordless Stick Vacuum Cleaner / User Manual
6 Problems and remedies
The animation indicating that the
vacuum is blocked is displayed on
the screen and the appliance has
stopped operating.
A blockage has occurred on the
vacuum duct.
Remove the blockages.
The animation indicating that the
filter is blocked is displayed on
the screen and the appliance has
stopped operating.
Filters are filled with excessively
dust.
Clean the motor inlet foam and the
metal filter.
The appliance has stopped
operating while being operated.
When the appliance is connected
to charge, the charging screen
is displayed on the screen. But,
the battery percentage does not
change.
Battery is faulty. Contact the customer services.
The appliance stopped operating
without any warning animation
being displayed on the screen.
Battery may be overheated.
Wait for appliance to cool down and
try to operate it again.
While charging, 1 LED light on the
appliance flashes rapidly in red
and the battery percentage on the
screen does not change.
You may have inadvertently plugged
the adaptor of another appliance,
and thus the charge current is
excessive.
Use the proper adaptor.
While charging, 1 LED light on the
appliance is illuminated solidly in
red and the battery percentage on
the screen does not increase.
Battery be overheated than
expected.
Contact the customer services.
While charging, 1 LED light on the
appliance flashes both in red and
white alternately and the battery
percentage on the screen does not
is shown as 00%.
The Body (10) is not installed
properly to the charging dock
(15). Or the battery is not installed
properly to the body of the
appliance.
Remove the adaptor (19) from the
charging dock (15) and remove the
body (10) from the charging dock.
Ensure that the battery is installed
properly on the body. Install the
body (10) to the charging dock
again and plug the adaptor to the
charging dock again.
A bad smell (light humidity, dust,
plastic material odour) occurs on
the air outlet.
Have you purchased the appliance
within the last 3 months?
It is normal that a bad smell (light
odour of plastic) occurs within 3
months after the purchase date.
The dust reservoir (11) and the
filters are not cleaned properly.
Clean the dust reservoir (11) and
the filters.
Filters may be installed while wet
after they are washed.
Remove the filters and ensure that
they are dry before installing them
to the appliance.
Filters may be deformed as a result
of the frequency of operation and
their replacement period may have
come.
Please contact the customer
services to buy a new filter.


55 Blanck Street, Ormeau Q 4208
P O Box 354, Ormeau Q 4208
p : 5549 3146 f : 5549 3546
ABN : 49 152 055 162
Sensitivity: Public
ORIGINAL MANUFACTURER’S WARRANTY
ADVICE FORM
BEKO SMALL DOMESTIC APPLIANCE
12 months warranty, full parts and labour warranty only.
WARRANTY CONDITIONS
The following conditions apply only in relations to the warranty expressly given on this Warranty Advice Form supplied with the product. This
warranty only applies to appliances purchased and used in Australia or New Zealand and is in addition to (and does not exclude, restrict or
modify in any way) other rights and remedies under a law to which the appliances relate, including any non-excludable statutory guarantees in
Australia and New Zealand. It applies to the original purchaser and for appliances used in domestic applications only.
1. This warranty does not apply:
(a) if the identification number attached to the appliance has been altered, rendered illegible or removed;
(b) to light globes;
(c) to paint and vitreous enamel finishes and glass;
(d) to surfaces damaged by use of aerosols or cleaners;
(e) if the appliance has been –
(i) subject to misuse, abuse, negligence, accident, fire or floods;
(ii) connected or improper, inadequate or faulty electricity, gas, water or drainage services or intake or exhaust
ducts or flues, or operated using incorrect or contaminated fuels or lubricants;
(iii) installed, maintained or operated otherwise than in accordance with the instructions furnished by Beko including the
improper use of detergents, bleaches, cleaners or other additives;
(iv) damaged by foreign objects in the appliance;
(v) serviced, repaired or altered otherwise than by Beko authorised service agents of Beko, or using other than Beko
approved replacement parts.
2. The purchaser shall be responsible for any expenses involved in making the appliances readily accessible for servicing, the purchaser
shall be responsible for any costs of transporting the appliance or parts thereof to and from the nearest Beko authorised service agent.
3. This warranty is the only expressed warranty given by Beko.
4. Beko reserves the right to determine whether or not the fault is caused by faulty workmanship or material or that any part is defective.
5. Where permitted by law, this warranty shall not apply to loss suffered through or resulting from the non-operation or the ineffective
operation of the appliance or any part of the appliance.
6. The purchaser must produce proof of the date of purchase together with this Warranty Advise Form when making a claim.
7. Subject to your statutory rights as to the merchantable quality of the product or accessory. In the event of a product or accessory being
replaced during the guarantee, the guarantee on the replacement will expire at the original date, i.e., 12 months from the original
purchase date.
8. Australia: For Appliances and services provided by Beko in Australia, Beko goods come with a guarantee by Beko that cannot be
excluded under the Australian Consumer Law. You are entitled to a replacement or refund for a major failure and for compensation for
any other reasonably foreseeable loss or damage. You are also entitled to have the Appliance repaired or replaced if the Appliance
fails to be of acceptable quality and the failure does not amount to a major failure. ‘Acceptable quality’ and ‘major failure’ have the
same meaning as referred to in the Australian Consumer Law.
9. New Zealand: For Appliances and services provided by Beko in New Zealand, the Appliances come with a guarantee by Beko
pursuant to the provisions of the Consumer Guarantees Act, the Sales of Goods Act and the Fair Trading Act. Where the Appliance
was purchased in New Zealand for commercial purposes the Consumer Guarantee Act does not apply.
These Warranty Conditions supersedes and excludes all other representations, conditions and warranties, except those implied
by legislation previously referred to.
For Service or Spare Parts: Aust 1300 282 356 NZ 0800 692 356

Beko A&NZ Pty Ltd
55 Blanck Street , Ormeau QLD,
4208 AUSTRALIA
www.beko.com.au