2
Instruction
Manual
Hitachi
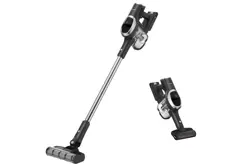
Cordless Stick
Vacuum Cleaner
Model
PV-XH4P
PV-XHE4PL
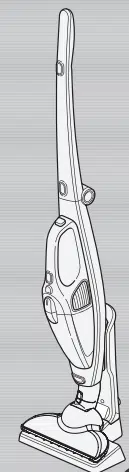
Thank you for purchasing a Hitachi
Cordless Stick Vacuum Cleaner.
This vacuum cleaner is intended for use in
domestic households only and not
designed for commercial use.
To ensure proper use, read this manual
carefully before using the vacuum cleaner.
For future reference, keep this manual in
an easily accessible place.
To ensure proper use, read the safety
precautions.
ENGLISH
Figure shown is a vacuum cleaner Model PV-XH4P

Contents
Before using the vacuum cleaner
Safety precautions
Usage notes
Part names and assembly
Attachments and assembly
Storing the vacuum cleaner
Using the vacuum cleaner
Controls and indicators
Control buttons
Indicator during charging
Indicators during use
Assembling the charging station
Charging the vacuum cleaner
Disassembling the charging station
Using the vacuum cleaner
Using the attachments
Power head Model PV-XH4P
Power head Model PV-XHE4PL
Handy brush
Mini power brush
2-way crevice nozzle
Multi angle nozzle with brush
After vacuuming completes
Emptying the dust case and cleaning the filters
Checking the level of dust and debris in dust case
Emptying the dust case
Cleaning the filters
Attaching the dust case
Maintenance
Vacuum cleaner, attachments, attachment accessories
...
Washable parts
Maintaining (washing with water) the filters
Cleaning the power heads
Maintaining the power head Model PV-XH4P
Maintaining the power head Model PV-XHE4PL
Maintaining the mini power brush
Appendix
Troubleshooting
Replacing the battery and disposing of the vacuum cleaner
Replacing the battery
Disposing of the vacuum cleaner
Specifications
EN-2
EN-6
EN-7
EN-8
EN-8
EN-9
EN-9
EN-11
EN-12
EN-13
EN-14
EN-15
EN-15
EN-16
EN-17
EN-18
EN-19
EN-20
EN-21
EN-24
EN-26
EN-27
EN-27
EN-27
EN-28
EN-30
EN-30
EN-32
EN-34
EN-36
EN-39
EN-40
EN-40
EN-41
EN-21
EN-21
EN-9
EN-10
EN-2
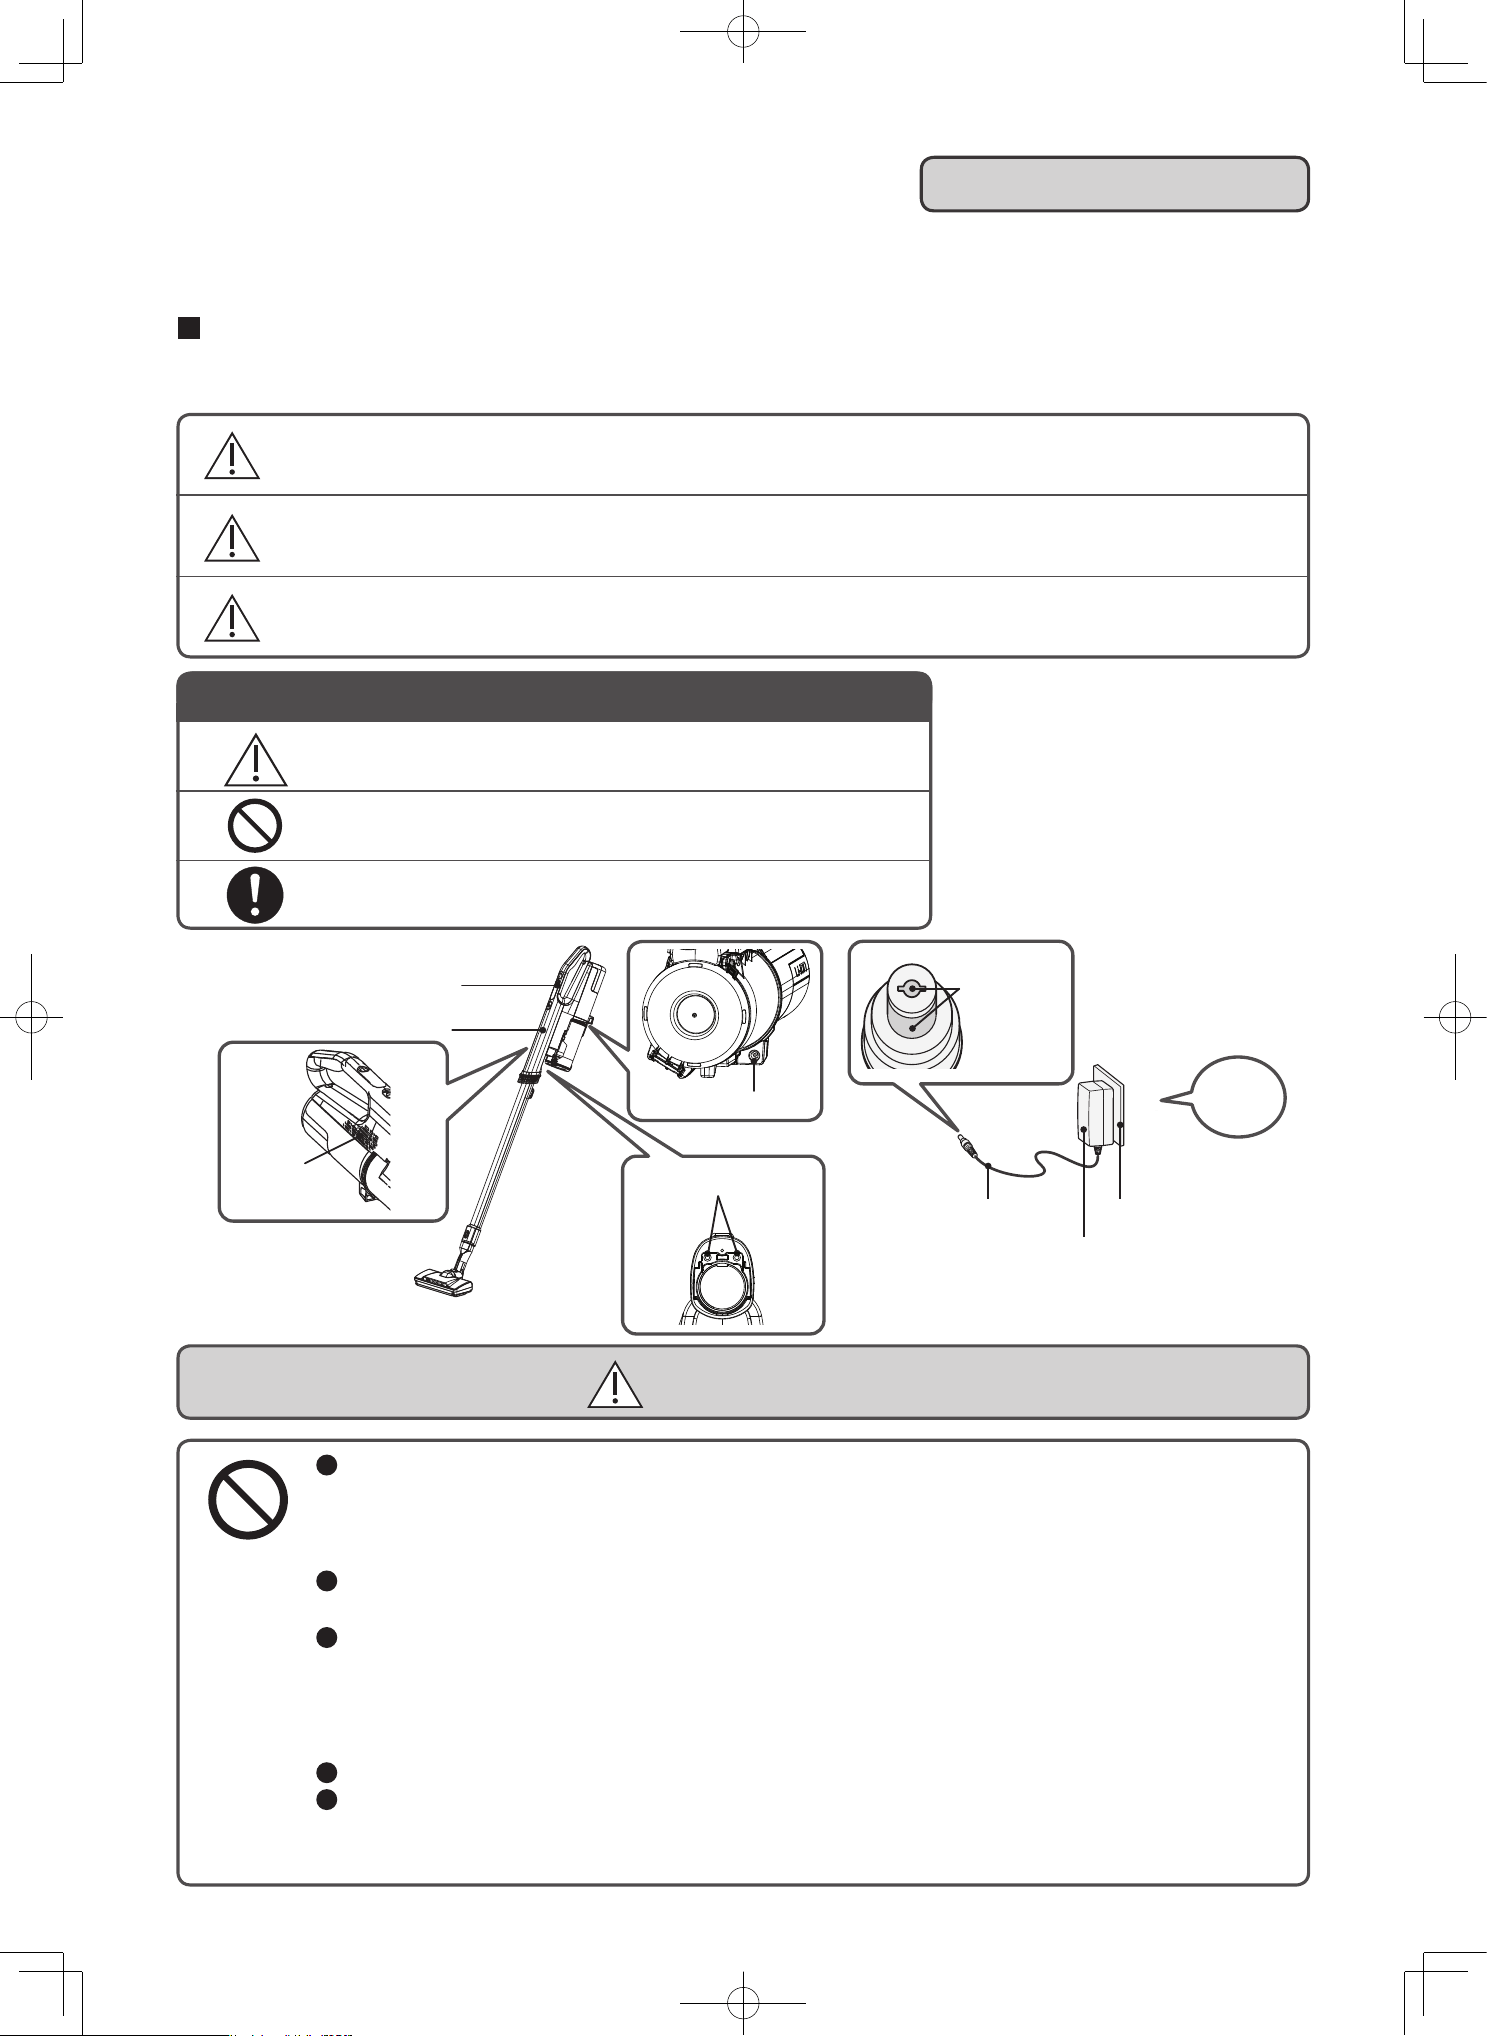
Safety precautions
Please follow these safety precautions.
Warning symbols used in this manual
Control buttons
Vacuum cleaner
Exhaust
port
Figure shown is a vacuum cleaner
Model PV-XH4P
Terminal
Terminal
Terminal
Cord
AC adapter
Outlet
This section describes safety precautions that must be followed in order to prevent injury to the user or other
people, or damage to property. Please thoroughly read and follow the precautions in this manual.
The severity of injury or damage that might occur if these precautions are ignored or the vacuum cleaner is used
improperly is classified and explained below. Hitachi will not be held responsible for any injury or damage that occurs
as a result of ignoring these precautions.
DANGER
Do not repair or modify any part of the vacuum cleaner. Do not disassemble any part of the
vacuum cleaner unless instructed to in this manual.
Failure to heed this warning might cause leaking of the battery, the generation of heat, fire, or injury.
For repairs, please contact a Hitachi authorized service agent.
Keep the vacuum cleaner and AC adapter away from water and other liquids.
Failure to heed this warning might lead to rupturing of the battery, fire, malfunction, or electric shock.
Do not connect the terminals of the vacuum cleaner and AC adapter with metal objects such
as a wire and pin.
Do not carry or store with metal necklaces, hairpins, etc.
Failure to heed this warning might cause the vacuum cleaner to malfunction or cause the
battery to short-circuit, resulting in leaking, the generation of heat, rupturing, or fire.
Do not throw into fires or apply heat.
Do not charge, use, or leave near sources of heat such as fire or a stove, under direct sunlight
or in cars exposed to the sun, etc.
Failure to heed this warning might cause the battery to leak, generate heat, rupture, smoke, fire, deform, or malfunction.
DANGER
WARNING
CAUTION
This indicates warnings that, if ignored, could present imminent danger of
serious injury or death.
This indicates warnings or cautionary notes.
This indicates prohibited actions that must not be performed.
This indicates instructions that must be followed.
This indicates warnings that, if ignored, could result in serious injury or death.
This indicates warnings that, if ignored, could result in minor injury or
property damage.
AC100-
240V
EN-3
If the vacuum cleaner malfunctions or you notice any of the following problems, stop using the vacuum cleaner immediately.
Do not touch.
Safety
switch
Rotary
brush
WARNING
The vacuum cleaner does not turn on when you press a control buttons, even though the battery is fully charged.
The power turns on and off when you move the AC adapter cord or connector.
The vacuum cleaner sometimes stops in the middle of operation.
The vacuum cleaner makes unusual sounds in the middle of operation.
The vacuum cleaner or AC adapter is deformed or abnormally hot.
The power cord is damaged or abnormally hot.
It smells like something is burning.
You notice some other problem or malfunction.
Outlet, plug, cord, and AC adapter
Use an AC100-240V outlet.
Do not use an extension cord, and do not plug the AC adapter in the same outlet as other appliances.
Periodically clean the plug of any dust and debris by using a dry cloth.
Insert the plug of the AC adapter all the way into the outlet.
Disconnect the AC adapter from the charging station before performing maintenance on the charging station.
Do not damage the cord.
(Do not damage or modify the cord. Do not forcefully bend, bundle, pull, or twist it, and do not
put it under heavy objects or pinch it between objects.)
Do not use the vacuum cleaner if the cord or the AC adapter’s plug or connector is damaged,
and do not plug the AC adapter into a loose outlet.
Make sure the cord does not get caught in the rotary brush of the power head.
Do not handle the plug (insert the plug into an outlet or remove the plug from an outlet) with wet hands.
Do not touch the terminals on the AC adapter or vacuum cleaner.
To charge the vacuum cleaner, use the AC adapter that was provided with the vacuum cleaner.
Do not attempt to charge the vacuum cleaner by using other AC adapters.
Do not use the AC adapter that was provided with the vacuum cleaner to charge other
rechargeable batteries or to charge non-rechargeable batteries.
Failure to heed this warning might cause fire or electric shock.
Power head, mini power brush, wet power brush
Do not touch the rotary brush or the safety switch.
Failure to heed this warning might cause injury. Be careful
especially around children.
Do not place the power head, mini power brush or wet power brush on parts of your body
(on top of your feet, etc.) when pulling the power head , mini power brush or wet power brush.
Failure to heed this warning might cause injury.
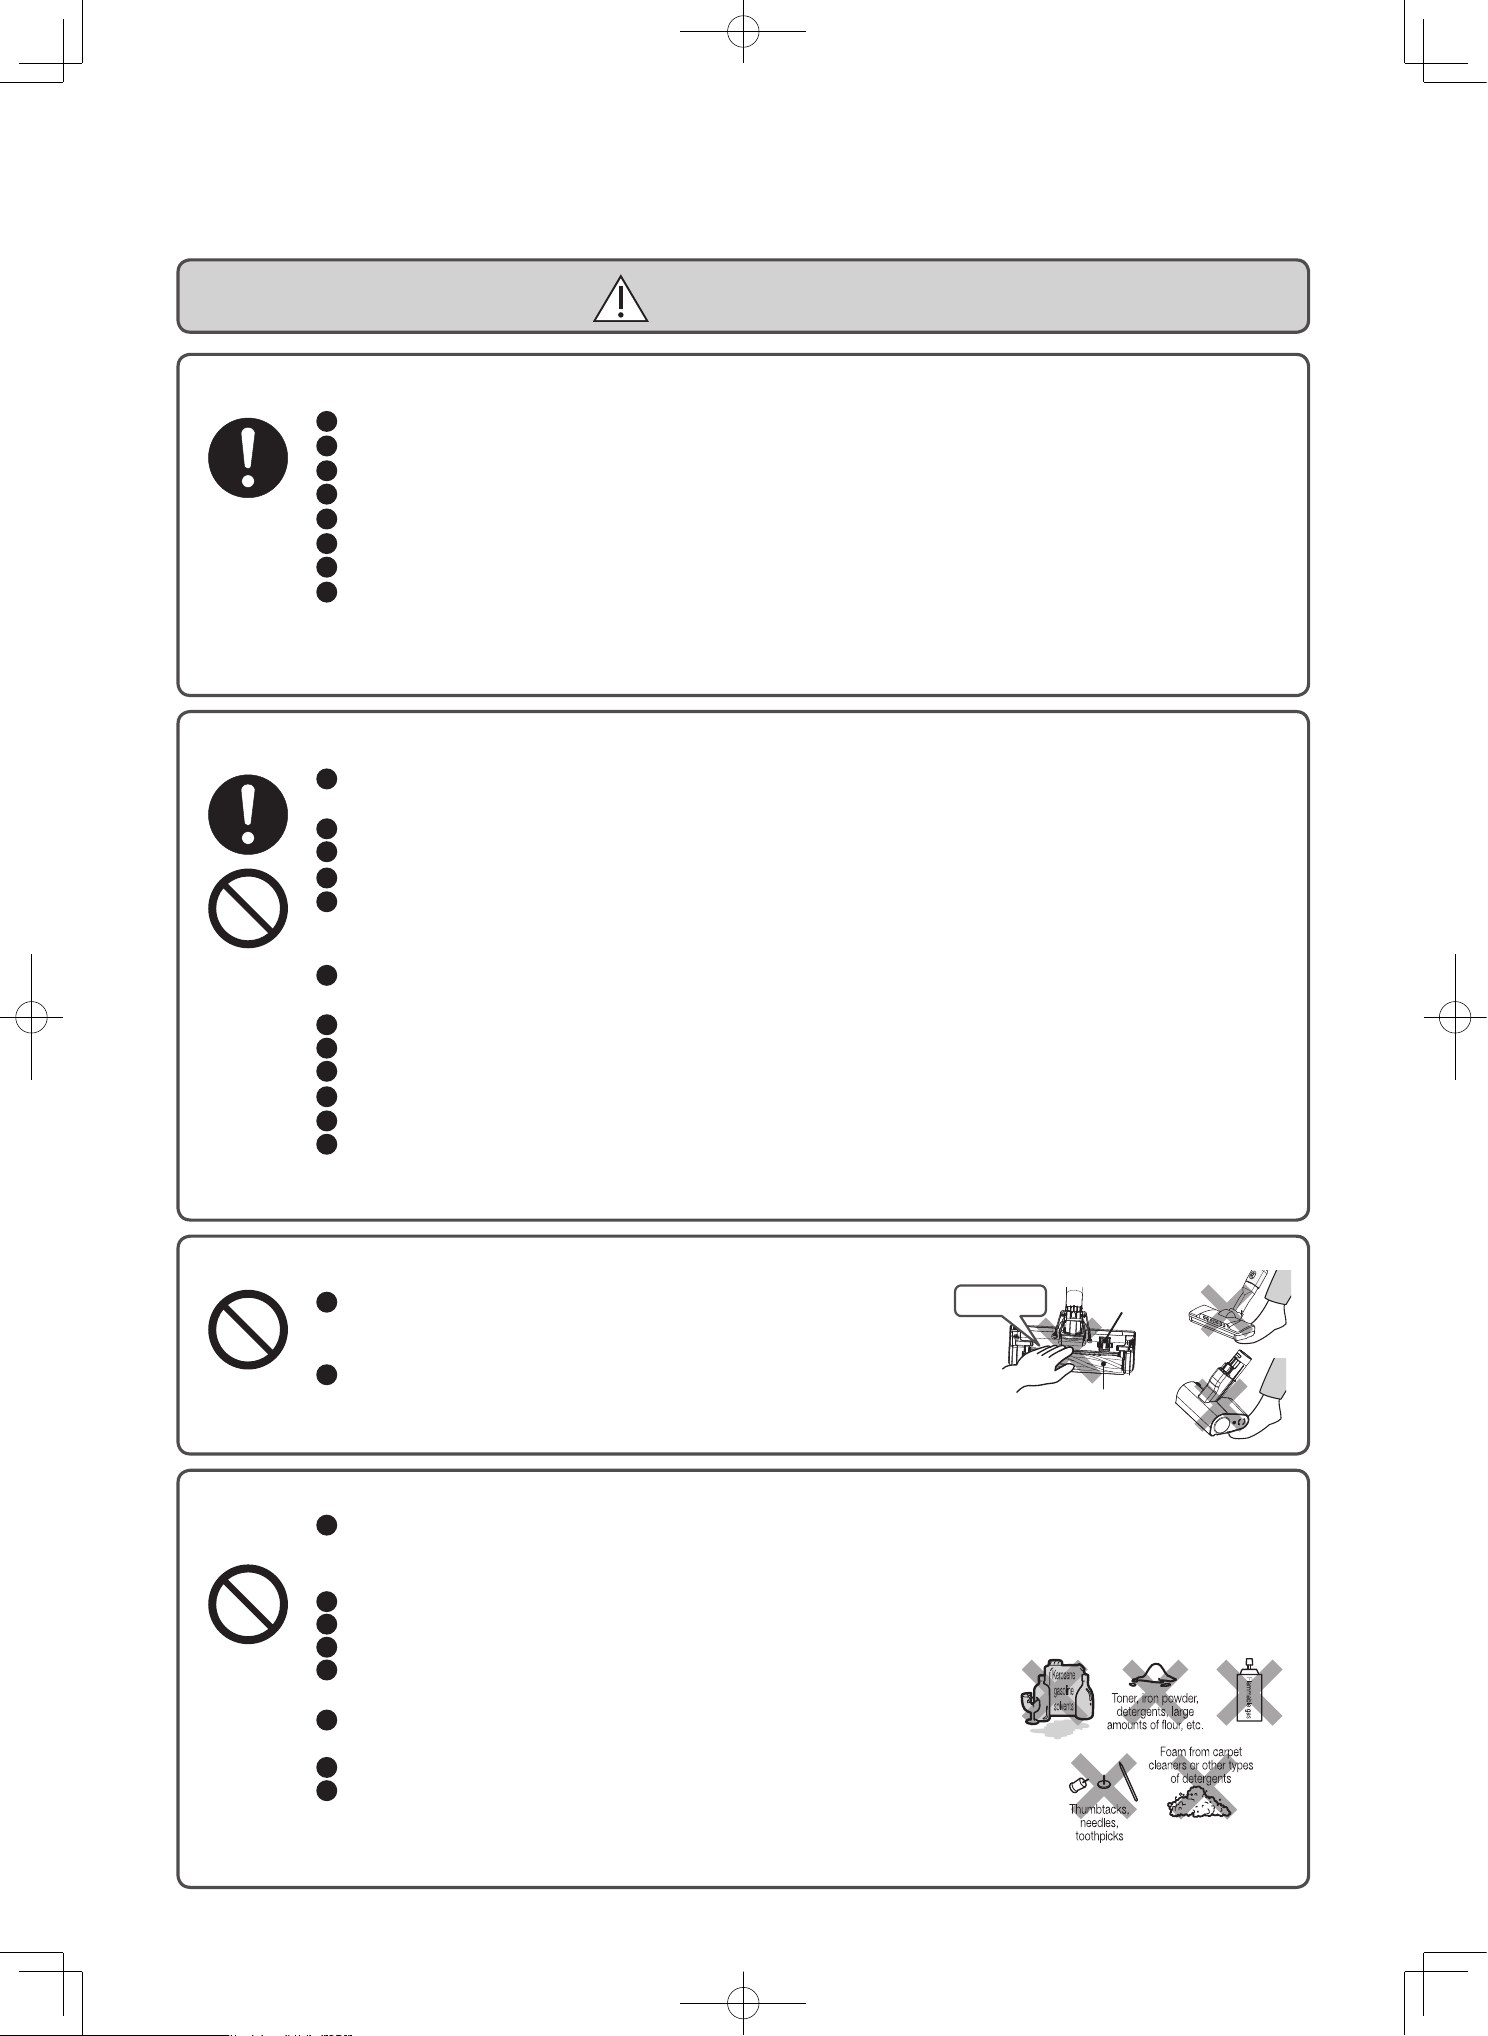
Others
Do not use the vacuum cleaner near inflammable or combustible items or materials (kerosene,
gasoline, paint thinner, benzine, toner, iron powder, detergents, large amounts of flour, aerosol
sprays, flammable gas, cigarette butts, etc.), or to clean up such items or materials.
Do not use the vacuum cleaner to clean up things with sharp points (thumbtacks, needles, toothpicks, hairpins, etc.).
Do not use the vacuum cleaner to clean up suds or foam from carpet cleaners or other types of detergents.
Do not use the vacuum cleaner outdoors.
Do not wash any part of the vacuum cleaner with water unless that part is listed
as a part that can be washed. Do not use the vacuum cleaner in the shower or bathtub.
Do not charge or store the vacuum cleaner in a location prone to high humidity.
Failure to heed this warning might cause eruption, fire, electric shock, or injury.
Do not lean the vacuum cleaner against a wall or other surface.
Make sure that the power head is attached when using the vacuum
cleaner stand.
The vacuum cleaner might fall over, becoming damaged or causing
injury or damage to the floor.
Continuing to use the vacuum cleaner under these conditions could result in smoke, fire, or electric shock.
Turn off the vacuum cleaner immediately and unplug the AC adapter from the outlet. Then, contact a
Hitachi authorized service agent to request an inspection and repair.
Figure shown is a vacuum cleaner Model PV-XH4P
EN-4
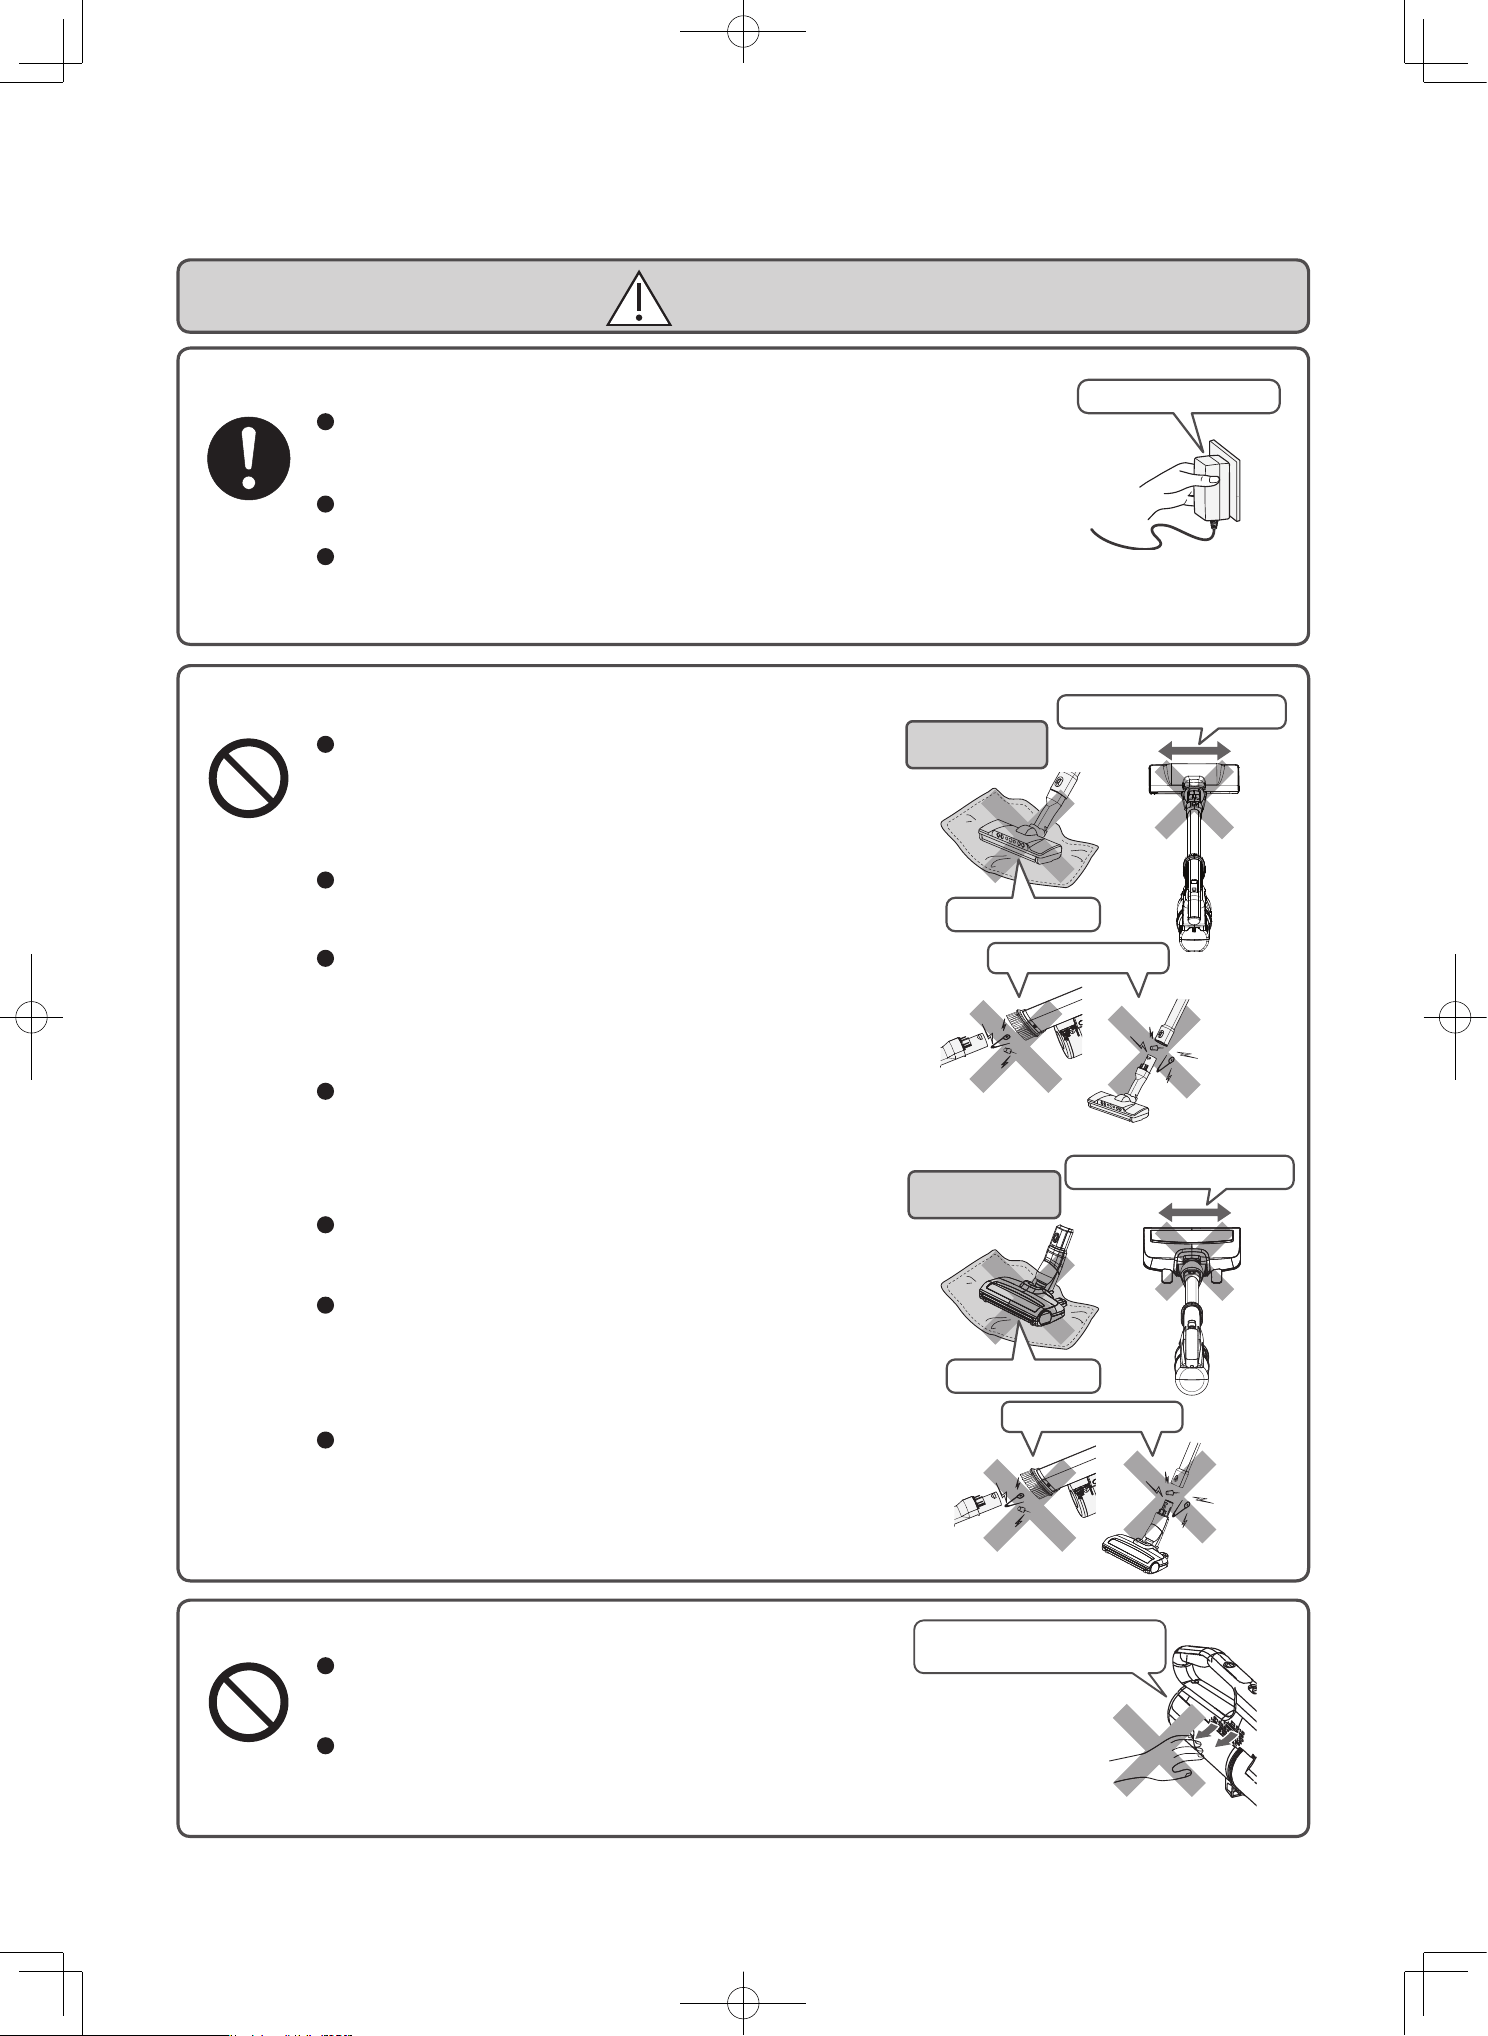
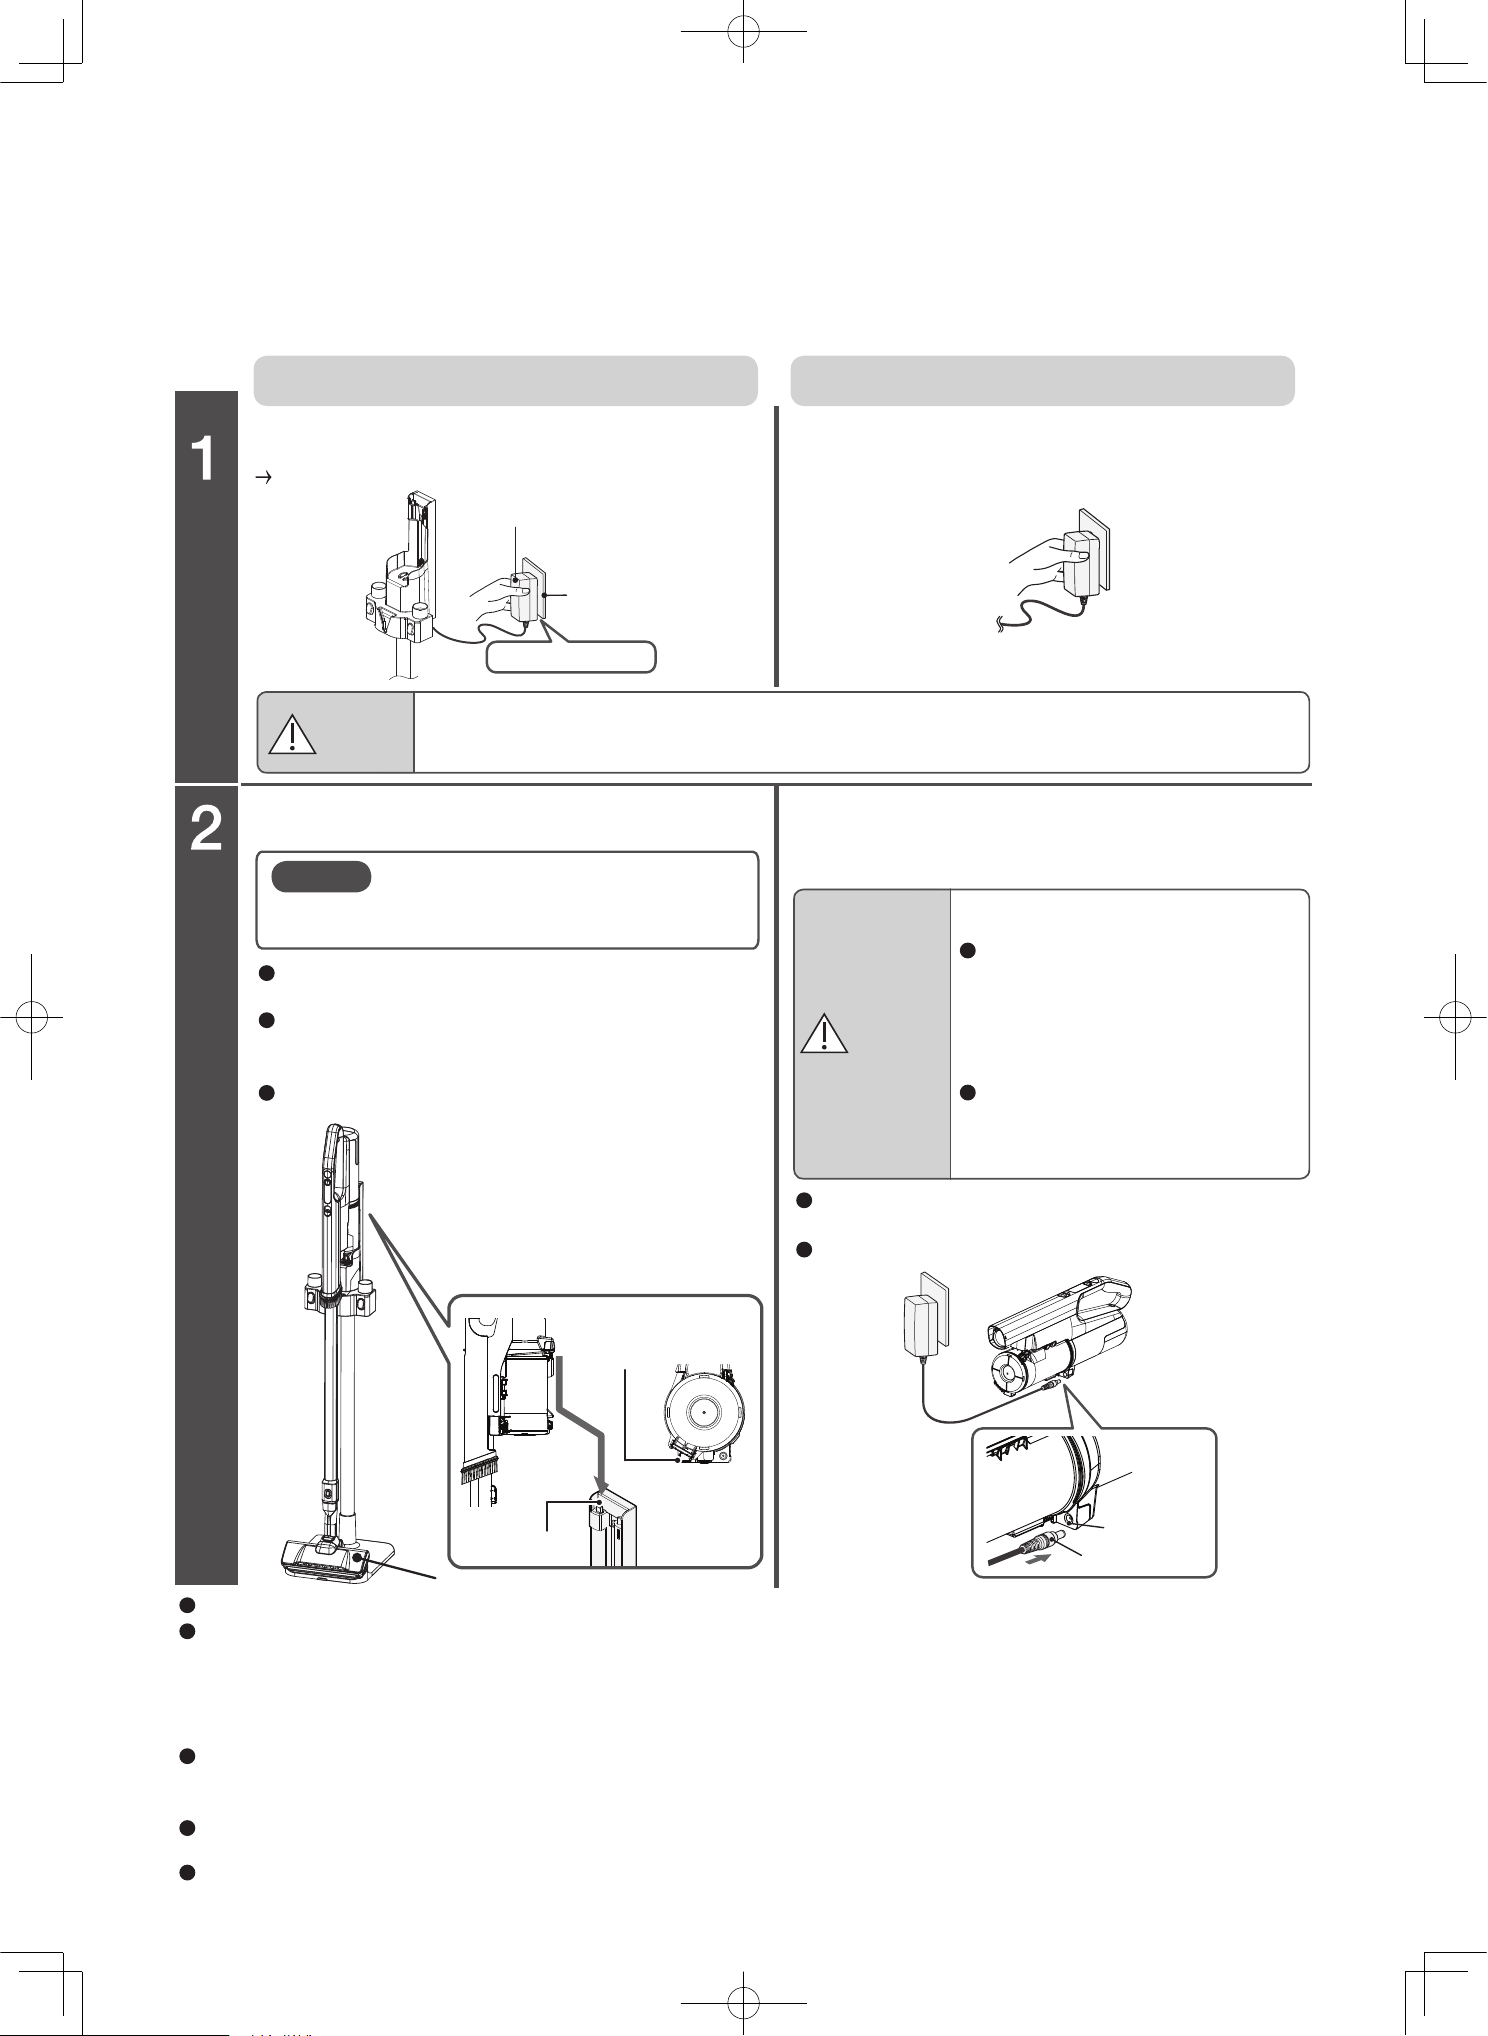
Hold onto the AC adapter.
Outlet, AC adapter, cord
CAUTION
Hold onto the AC adapter when you unplug it. Do not pull on the cord.
Pulling on the cord might damage the cord and cause short-circuiting, resulting
in electric shock or fire.
Do not wrap the cord around the charging station.
Damaging the cord might cause electrical shock or fire.
If you will not be using the vacuum cleaner for a long time, unplug the AC adapter.
Failure to heed this warning might lead to deterioration of the insulation, causing
electric shock, short-circuiting, or fire.
Power head, mini power brush, extension pipe, wet power brush
Do not let the vacuum cleaner run for an extended
period of time with the inlet blocked.
Failure to heed this warning might cause overheating,
leading to fire or the deformation of the vacuum cleaner
and power head, mini power brush or wet power brush.
Before performing maintenance on the vacuum cleaner,
remove the power head from the vacuum cleaner.
Failure to heed this warning might cause injury.
Do not attach any of the parts of this vacuum cleaner to
objects other than this vacuum cleaner.
Failure to heed this warning might cause overheating,
leading to fire or the deformation of the power head,
mini power brush or wet power brush.
Do not clean using the tip of extension pipe, and do not
insert pins or other objects in the connections of this
vacuum cleaner, extension pipe.
Doing so might cause a short circuit resulting in electric
shock, fire, malfunction and damage to floors.
Do not move the power head, mini power brush or wet
power brush left and right while they are facing forward.
Doing so might damage floors or fabrics.
Do not use any of these attachments if any foreign
objects (including sand or small pebbles) are stuck to
the attachment.
Failure to heed this warning might result in damage to
floors or cloth surfaces.
Do not use the vacuum cleaner under or in between
blankets.
Failure to heed this warning might cause overheating,
leading to fire or the deformation.
Do not expose your body
for long periods of time.
Exhaust port
Do not block the exhaust port.
Failure to heed this warning might cause overheating, leading to
fire or the deformation of the vacuum cleaner.
Do not expose your body to the air released from the exhaust
port for long periods of time.
Failure to heed this warning might cause minor burns.
Hold onto the AC adapter.
Do not block
Do not move it left and right
Do not stick pins
Outlet, AC adapter, cord
CAUTION
Hold onto the AC adapter when you unplug it. Do not pull on the cord.
Pulling on the cord might damage the cord and cause short-circuiting, resulting
in electric shock or fire.
Do not wrap the cord around the charging station.
Damaging the cord might cause electrical shock or fire.
If you will not be using the vacuum cleaner for a long time, unplug the AC adapter.
Failure to heed this warning might lead to deterioration of the insulation, causing
electric shock, short-circuiting, or fire.
Power head, mini power brush, extension pipe, wet power brush
Do not let the vacuum cleaner run for an extended
period of time with the inlet blocked.
Failure to heed this warning might cause overheating,
leading to fire or the deformation of the vacuum cleaner
and power head, mini power brush or wet power brush.
Before performing maintenance on the vacuum cleaner,
remove the power head from the vacuum cleaner.
Failure to heed this warning might cause injury.
Do not attach any of the parts of this vacuum cleaner to
objects other than this vacuum cleaner.
Failure to heed this warning might cause overheating,
leading to fire or the deformation of the power head,
mini power brush or wet power brush.
Do not clean using the tip of extension pipe, and do not
insert pins or other objects in the connections of this
vacuum cleaner, extension pipe.
Doing so might cause a short circuit resulting in electric
shock, fire, malfunction and damage to floors.
Do not move the power head, mini power brush or wet
power brush left and right while they are facing forward.
Doing so might damage floors or fabrics.
Do not use any of these attachments if any foreign
objects (including sand or small pebbles) are stuck to
the attachment.
Failure to heed this warning might result in damage to
floors or cloth surfaces.
Do not use the vacuum cleaner under or in between
blankets.
Failure to heed this warning might cause overheating,
leading to fire or the deformation.
Do not expose your body
for long periods of time.
Exhaust port
Do not block the exhaust port.
Failure to heed this warning might cause overheating, leading to
fire or the deformation of the vacuum cleaner.
Do not expose your body to the air released from the exhaust
port for long periods of time.
Failure to heed this warning might cause minor burns.
Do not block
Do not move it left and right
Do not block
Do not move it left and right
Do not stick pins
Do not stick pins
Power head
Model PV-XH4P
Power head
Model PV-XHE4PL
EN-5
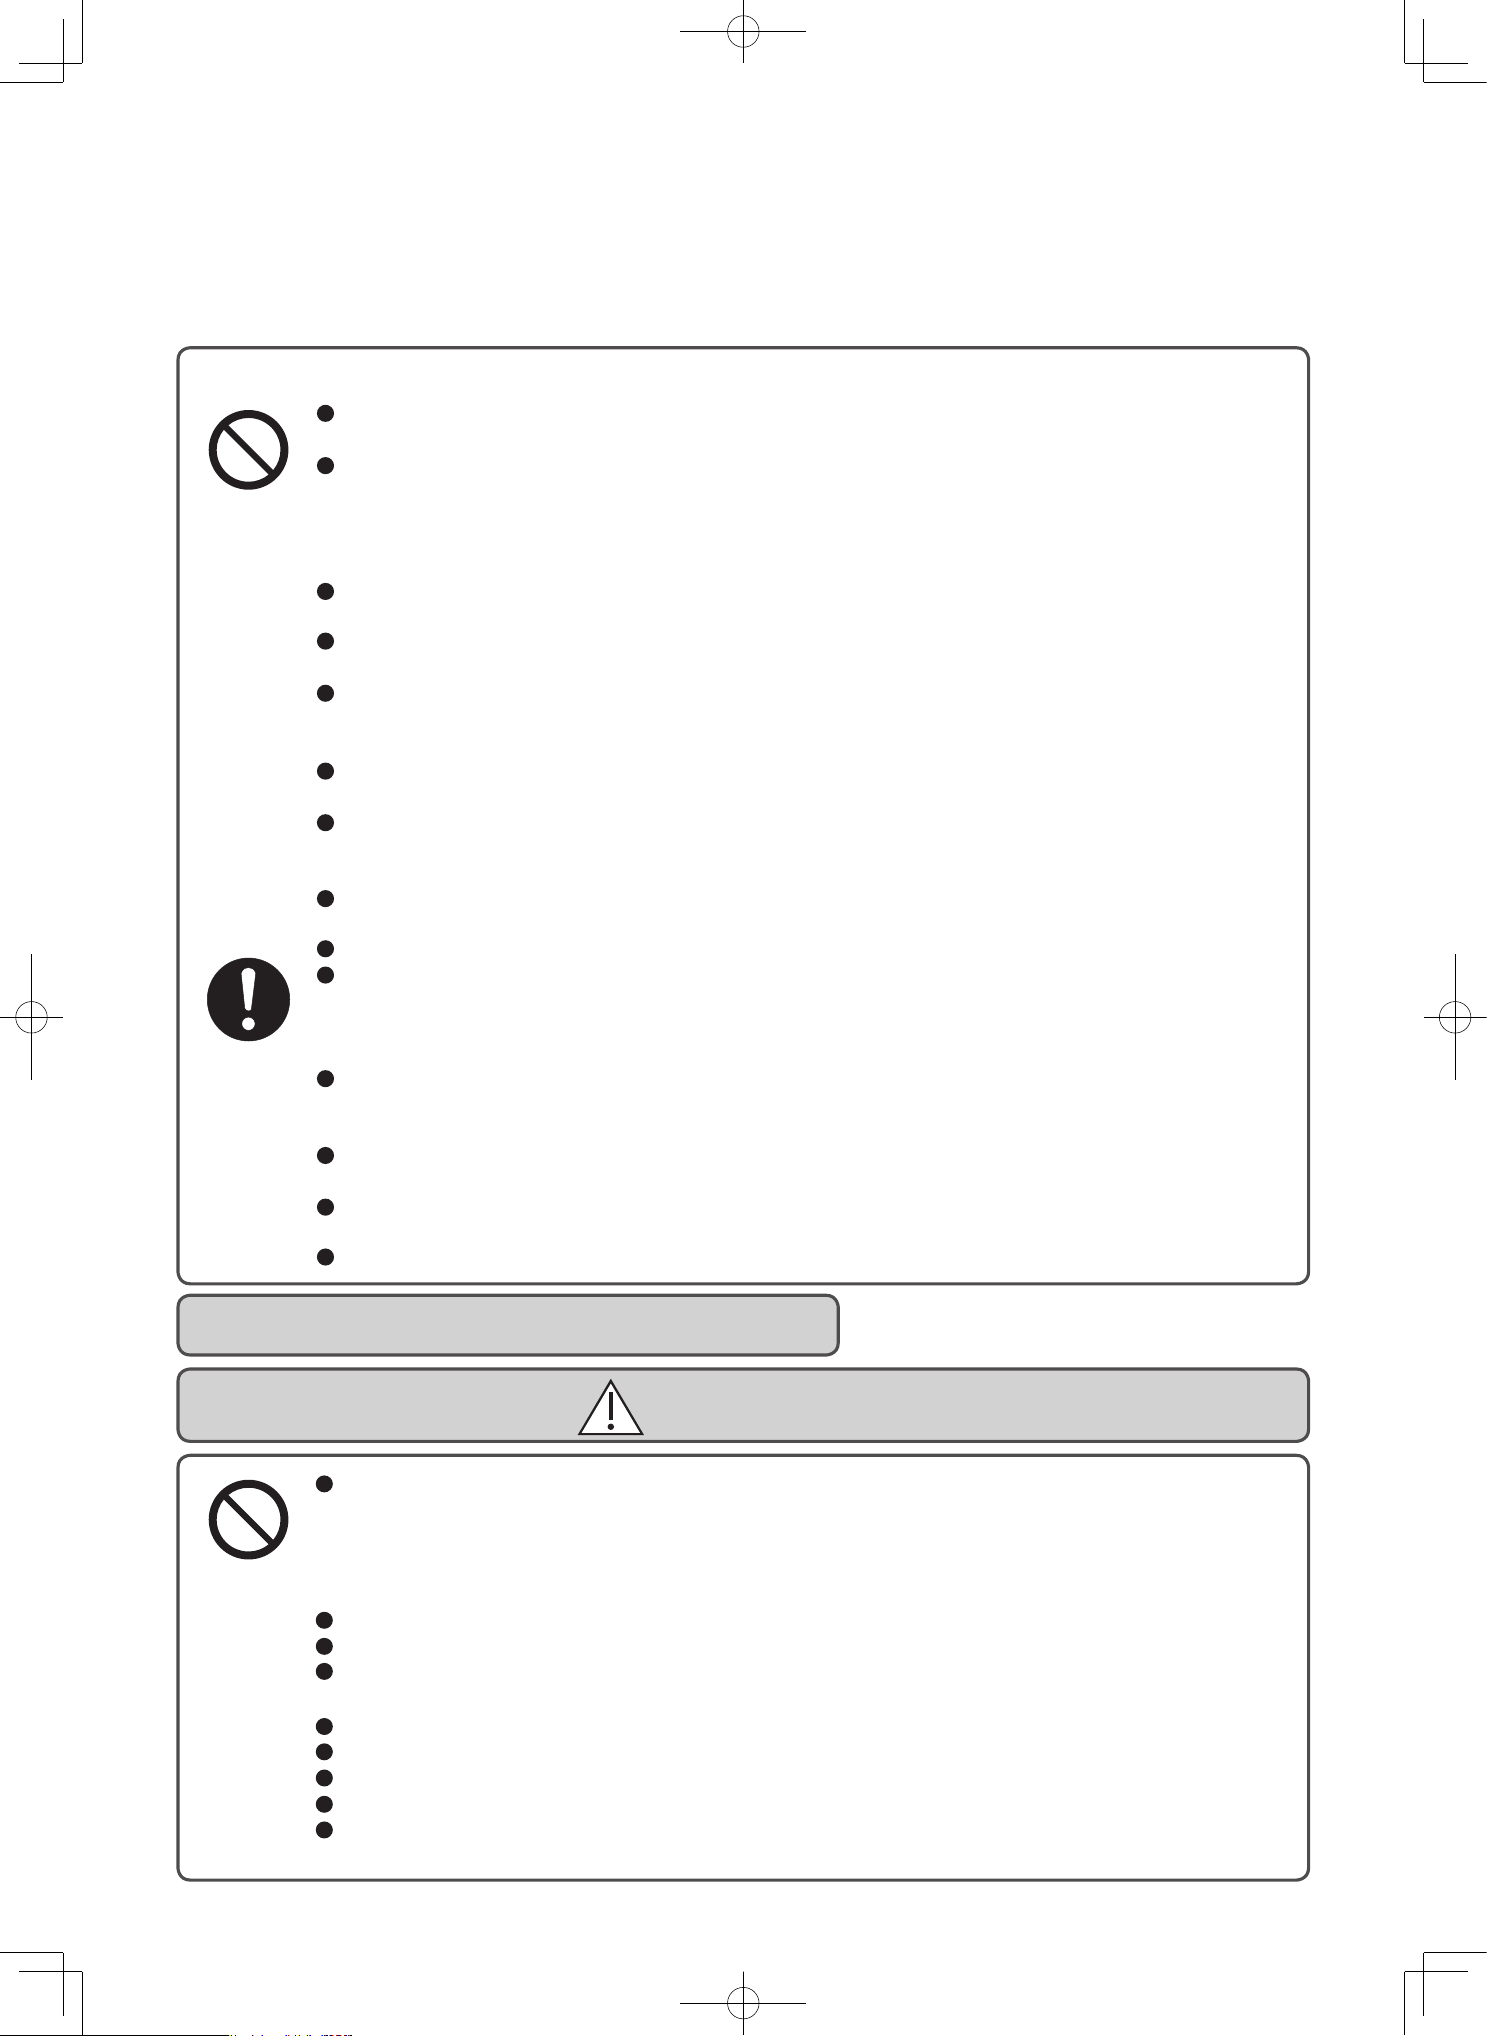
Others
When carrying the vacuum cleaner, do not hold the dust case.
The vacuum cleaner might fall and cause injury or damage the floor.
Keep away from fire.
Failure to heed this warning might cause short-circuiting due to vacuum cleaner deformation,
resulting in fire.
If the vacuum cleaner is used near a flame, exhaust from the vacuum cleaner might cause the
flame to grow into a conflagration.
Turn off the vacuum cleaner before performing maintenance.
Failure to heed this warning might cause injury.
Do not carry the vacuum cleaner while it is set on the charging station.
The vacuum cleaner might fall off, which could cause an injury or damage the floor.
Do not clean using the tip of the vacuum cleaner without the handy brush.
Failure to heed this warning might cause short-circuiting, resulting in electric shock, fire, or
damage to the vacuum cleaner or to the floor.
Do not put the charging station where dew condensation occurs or in a humid place.
This might discolor the wall.
Do not drop the vacuum cleaner, power head, extension pipe, AC adapter, charging station, or
any of the attachment accessories from high places.
Failure to heed this warning might cause injury or damage to the floor or dropped part.
Avoid looking directly into the LED lights.
Doing so might hurt your eyes.
Children should be supervised to ensure that they do not play with the appliance.
This appliance is not intended for use by persons (including children) with reduced physical,
sensory or mental capabilities, or lack of experience and knowledge, unless they have been
given supervision or instruction concerning use of the appliance by a person responsible for
their safety.
Only allow children at least 8 years old to use the AC adapter. Give sufficient instruction so
that the child is able to use the AC adapter in a safe way and explain that it is not a toy and
must not be played with.
Instruct the child not to try and recharge non-rechargeable batteries because of the danger of
eruption.
Examine the AC adapter regularly for damage, especially the Cord, plug and enclosure. If the
AC adapter is damaged, it must not be used.
Cleaning and user maintenance shall not be made by children without supervision.
Do not connect the battery to anything other than this vacuum cleaner. Do not disassemble, modify,
or solder the battery. Do not charge the battery when it is not connected to the vacuum cleaner.
Replacement of the battery is to be performed by a trained service technician.
Do not remove the battery except when disposing of this vacuum cleaner.
Please consult with a Hitachi authorized service agent.
Do not touch the terminals or connect them by using metal items such as wires and pins.
Do not transport or store the battery in the same container as metal objects such as necklaces, hairpins, coins, or keys.
Do not subject the battery to strong physical shock. For example, do not put nails into the
battery, hit the battery with a hammer, step on the battery, or throw the battery.
Keep away from fire.
Do not leave the battery near sources of heat such as a fire or stove, under direct sunlight, or in a car in the sun.
Do not use any battery other than the one specified for this vacuum cleaner.
Do not put the battery in a microwave or an oven.
Do not submerge the battery in water or other types of liquid, or expose it to water or other types of liquid.
Failure to heed this warning might cause the battery to leak, generate heat, rapture, smoke, fire, electric shock, or injury.
Battery (lithium-ion battery)
DANGER

EN-6
If the liquid inside the battery enters your eyes, do not rub your eyes, but thoroughly wash
them with clean water immediately, and then consult a doctor.
Failure to do so might cause damage to your eyes.
Do not use the battery if it is damaged, has an abnormal odor, discoloration, deformation,
damage from being dropped, or any other unusual characteristics.
Failure to heed this warning might cause the generation of heat or smoke, rupturing, or fire. If
liquid from the battery leaks onto the floor, it might damage the floor.
Keep the battery away from infants and children.
Failure to heed this warning might cause electric shock or injury.
If the battery is leaking, do not touch it with bare hands.
Failure to heed this warning might cause skin irritation.
Do not touch the battery with wet hands.
Doing so might cause heat to be generated, a fire, or an electric shock.
Do not charge the vacuum cleaner if the battery is not attached.
Doing so might cause heat to be generated, a fire, or an electric shock.
If liquid from the battery gets on your clothes, immediately wash them in clean water. If the
liquid gets on your skin, consult a doctor.
Failure to heed this warning might cause skin irritation.
When charging the battery, make sure the ambient temperature is between 5 ° C and 35 ° C.
Charging the battery in temperatures outside of this range might prevent the battery from being
fully charged. As a result, the battery might take a long time to charge, or you might only be able
to use the vacuum cleaner for a short time. Failure to heed this warning might cause the battery
to deteriorate.
If the battery is still charging longer than the specified charging time, unplug the AC adapter.
Do not touch the battery for a long period of time while charging or operating the vacuum cleaner.
Failure to heed this warning might cause minor burns.
Store the vacuum cleaner in a location with low humidity or little dust and debris.
Failure to heed this warning might cause the generation of heat or smoke, rupturing, or fire.
WARNING
CAUTION
Usage notes
To prevent malfunction and other problems, be sure to follow these instructions.
Be sure to thoroughly read these instructions, as well as those indicated by Note in other locations in this
manual, and to use the vacuum cleaner in accordance with these instructions.
Do not subject the vacuum cleaner, the power head,
extension pipe, charging station , AC adapter, or
attachment accessories to strong physical shock.
Failure to heed this warning might cause the
deformation or damage.
Do not use the vacuum cleaner to clean up the following objects.
Failure to follow this warning may result in
damage or abnormal odors.
Water or other liquids, wet objects, or desiccants.
Large amounts of sand or powder, long string or thread, or glass.
Do not ride on the vacuum cleaner, the power
head, charging station, or attachment accessories.
Doing so might cause malfunctions.
Thoroughly air dry parts washed with water.
Failure to heed this warning might cause strange
odors or malfunction.
Do not remove the battery while the vacuum
cleaner is running or being charged.
Doing so might cause malfunctions.
EN-7
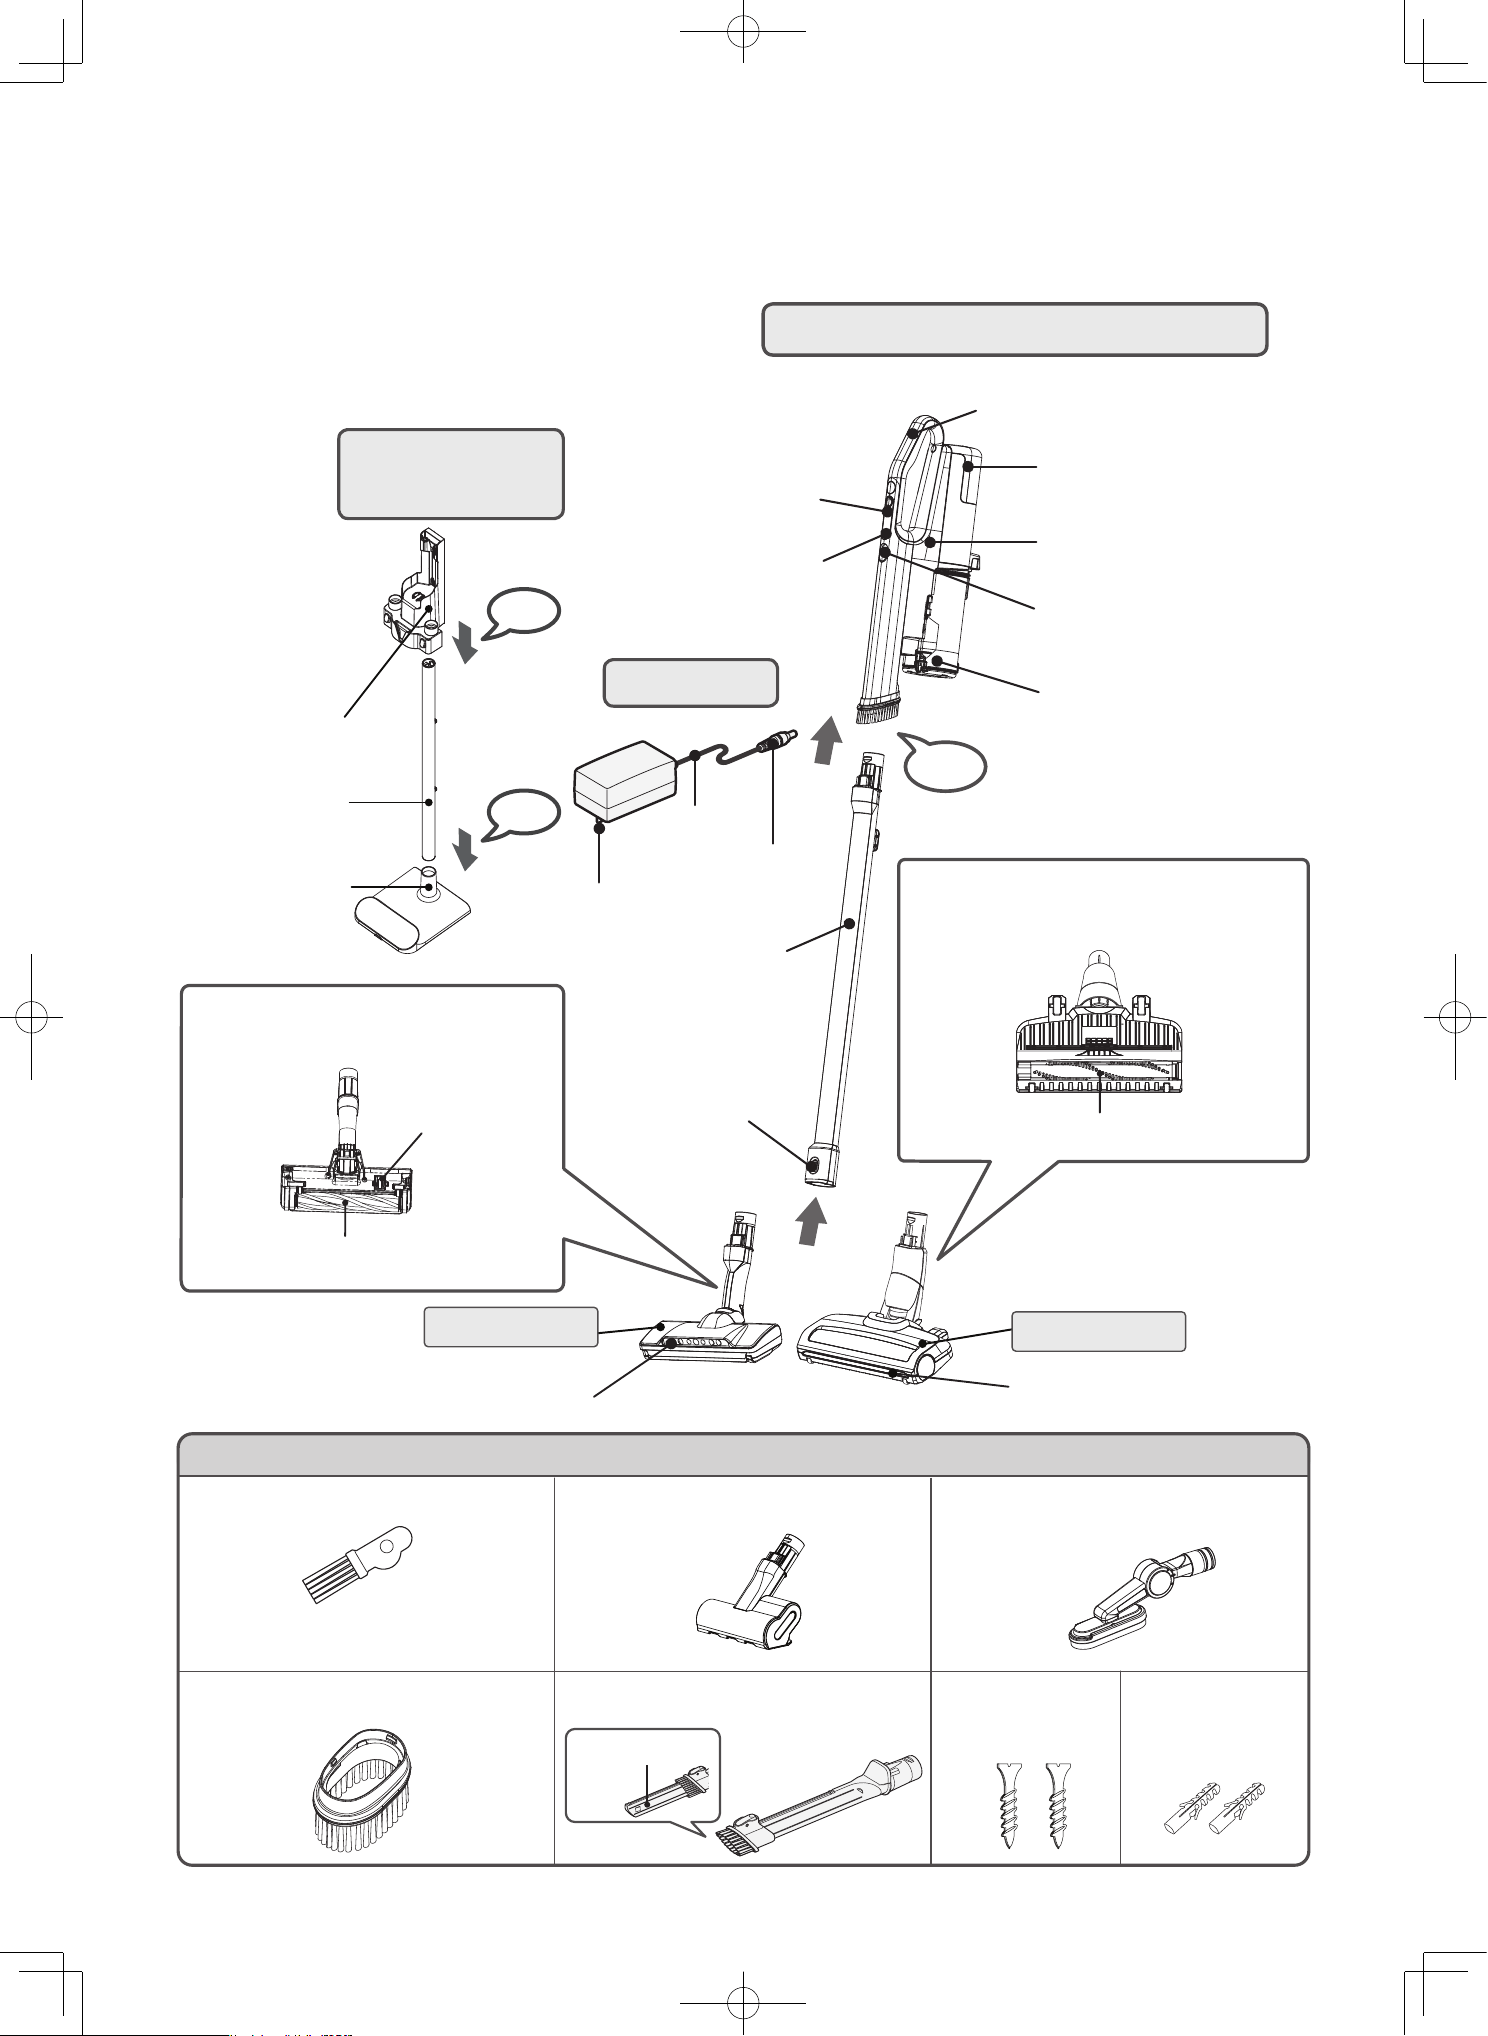
Part names and assembly
Stick vacuum cleaner configuration
Click
Handle
Control buttons
Indicator
Extension
pipe
Release
button
Battery
Vacuum cleaner
Release button
Dust case
Attachment accessories
Crevice nozzle
2-way crevice nozzle (1 pc.) Screws (2 pcs.) Screw anchors
(2 pcs.)
(Attached to the back
side of the dust case)
Handy brush (1 pc.)
Maintenance brush (1 pc.) Mini power brush (1 pc.) Multi angle nozzle with brush (1 pc.)
Plug
Cord
Connector
Wall bracket
Stand pipe
Stand base
AC adapter
Charging station
configuration
Click
Click
Reverse side
Safety switch
Rotary brush
LED lights
Power head
LED lights
Reverse side
Rotary brush
Power head
EN-8
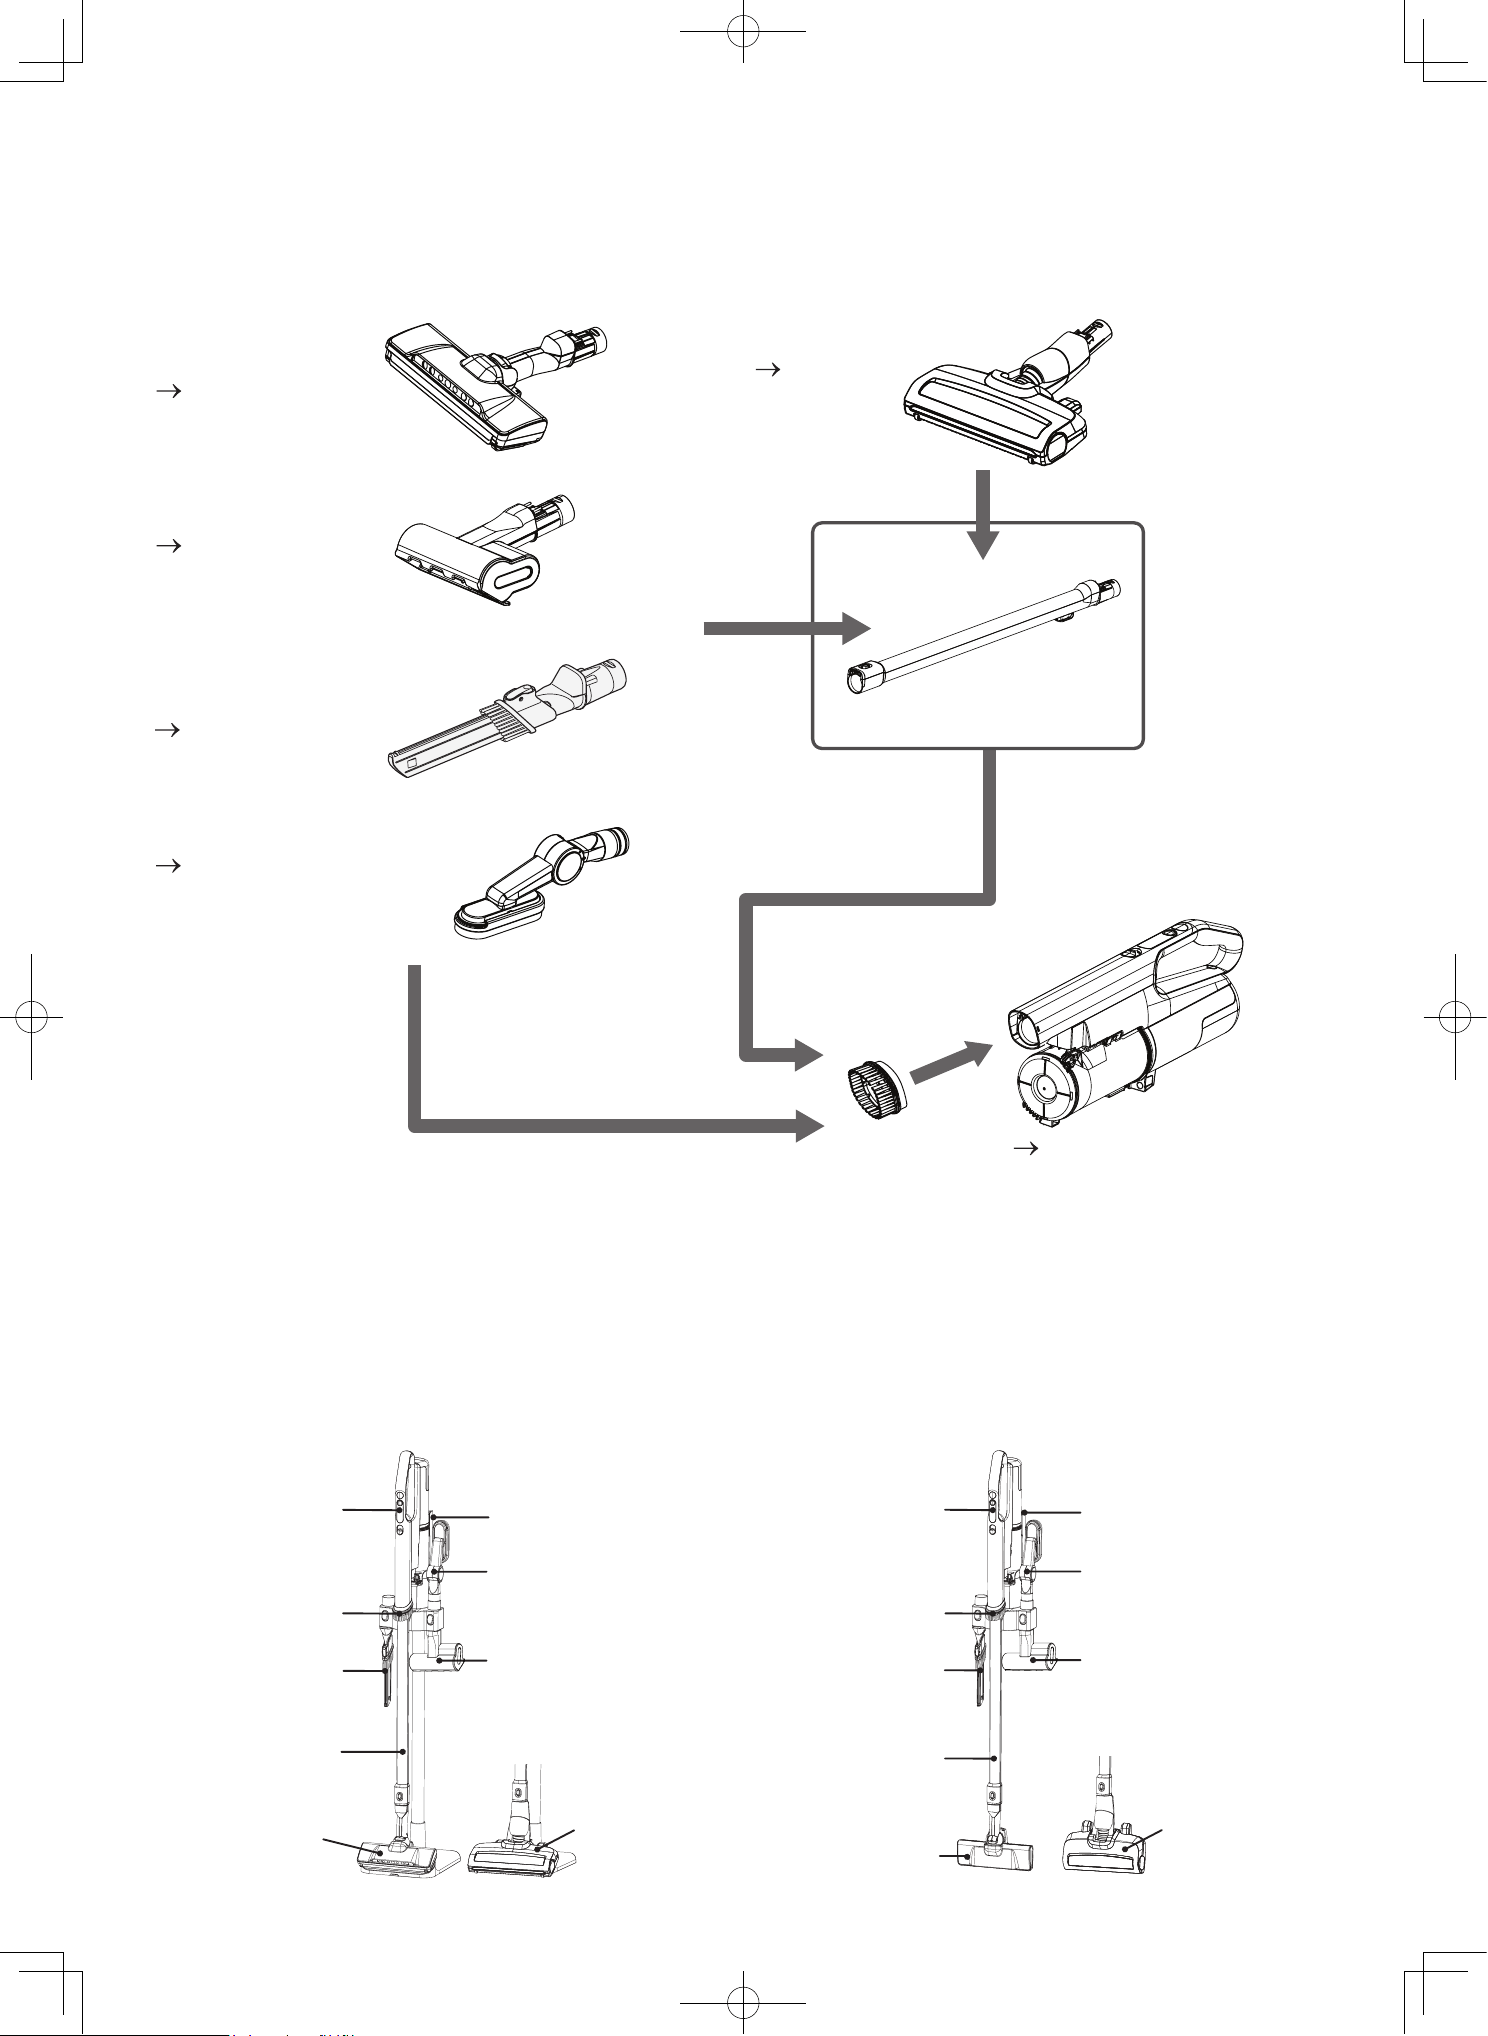
Storing the vacuum cleaner
Attachments and assembly
2-way crevice nozzle
(P.EN-19)
Extension pipe
Vacuum cleaner
Storing the vacuum cleaner, extention pipe, and accesories with charging station
Attachments can be attached to the vacuum cleaner and extension pipe.
Power head
of PV-XH4P Model
(P.EN-15)
Power head
of PV-XHE4PL Model
(P.EN-16)
Multi angle nozzle with brush
(P.EN-20)
Handy brush
(P.EN-17)
On the wallOn the charging stand
Mini power brush
(P.EN-18)
Mini power brush
Multi angle nozzle
with brush
Extension pipe
Charging station
Vacuum
cleaner
2-way crevice
nozzle
2-way crevice
nozzle
Vacuum
cleaner
Handy brush Handy brush
Mini power brush
Extension pipe
Power head of
PV-XH4P Model
Power head of
PV-XHE4PL Model
Multi angle nozzle
with brush
Charging station
Power head of
PV-XH4P Model
Power head of
PV-XHE4PL Model

EN-9
To operate
To On/Off operation
Controls and indicators
Control buttons
Indicator during charging
Press and hold the button to turn
on. Press again to turn off. Wait 3
seconds before turning it on again.
If the display C3 blinks, this indicates an abnormality with the AC adapter or the battery. (P.EN-39)
If you remove the vacuum cleaner from the charging station (or disconnect the AC adapter) after the battery indicator turns
off, and then set the vacuum cleaner back onto the charging station, the battery indicator turns on, but this does not indicate a
problem with the vacuum cleaner.
If you remove the battery while charging, after a short time, the indicator blinks. If this happens, remove the vacuum cleaner
from the charging station (or disconnect the AC adapter) and then attach the battery back onto the vacuum cleaner. Then, set
the vacuum cleaner back onto the charging station or reconnect the AC adapter.
Battery Indicator
On
Blinking
Off
Charging status
The battery is charging.
PV-XH4P: Charge time is approx. 3 hours.
PV-XHE4PL: Charge time is approx. 5 hours.
Depending On the ambient temperature,
usage time, etc, if the battery’s temperature is
very hot, charging may automatically go into
standby until the temperature lowers to an
appropriate temperature for charging,
causing the charging time to increase.
(P.EN-39)
The battery is fully charged.
When the battery is fully charged, the battery
indicator turns off.
During the charging in 0 - 49%
Blinking
Blinking
During the charging in 50 - 74%
Off
During the charging in 75 - 99%
The battery is fully charged.
Battery level Indicator
Operating status
Press the button.
Each time the button is pressed, the
operation status will be the order of
“Low” “Mid” “High” “Low”... is
switched.
Low: For normal cleaning.
Mid: For gentle carpet cleaning.
High: For powerful cleaning in heavily dirty
areas.
WARNING
Do not touch the terminals on the AC adapter or vacuum cleaner.
Failure to heed this warning might cause electric shock or injury.
Do not charge the vacuum cleaner if the battery is not attached.
Failure to heed this warning might cause malfunction or electric shock.
Note
Do not remove the battery while the vacuum cleaner is being charged.
Battery indicator
Battery
level
EN-10
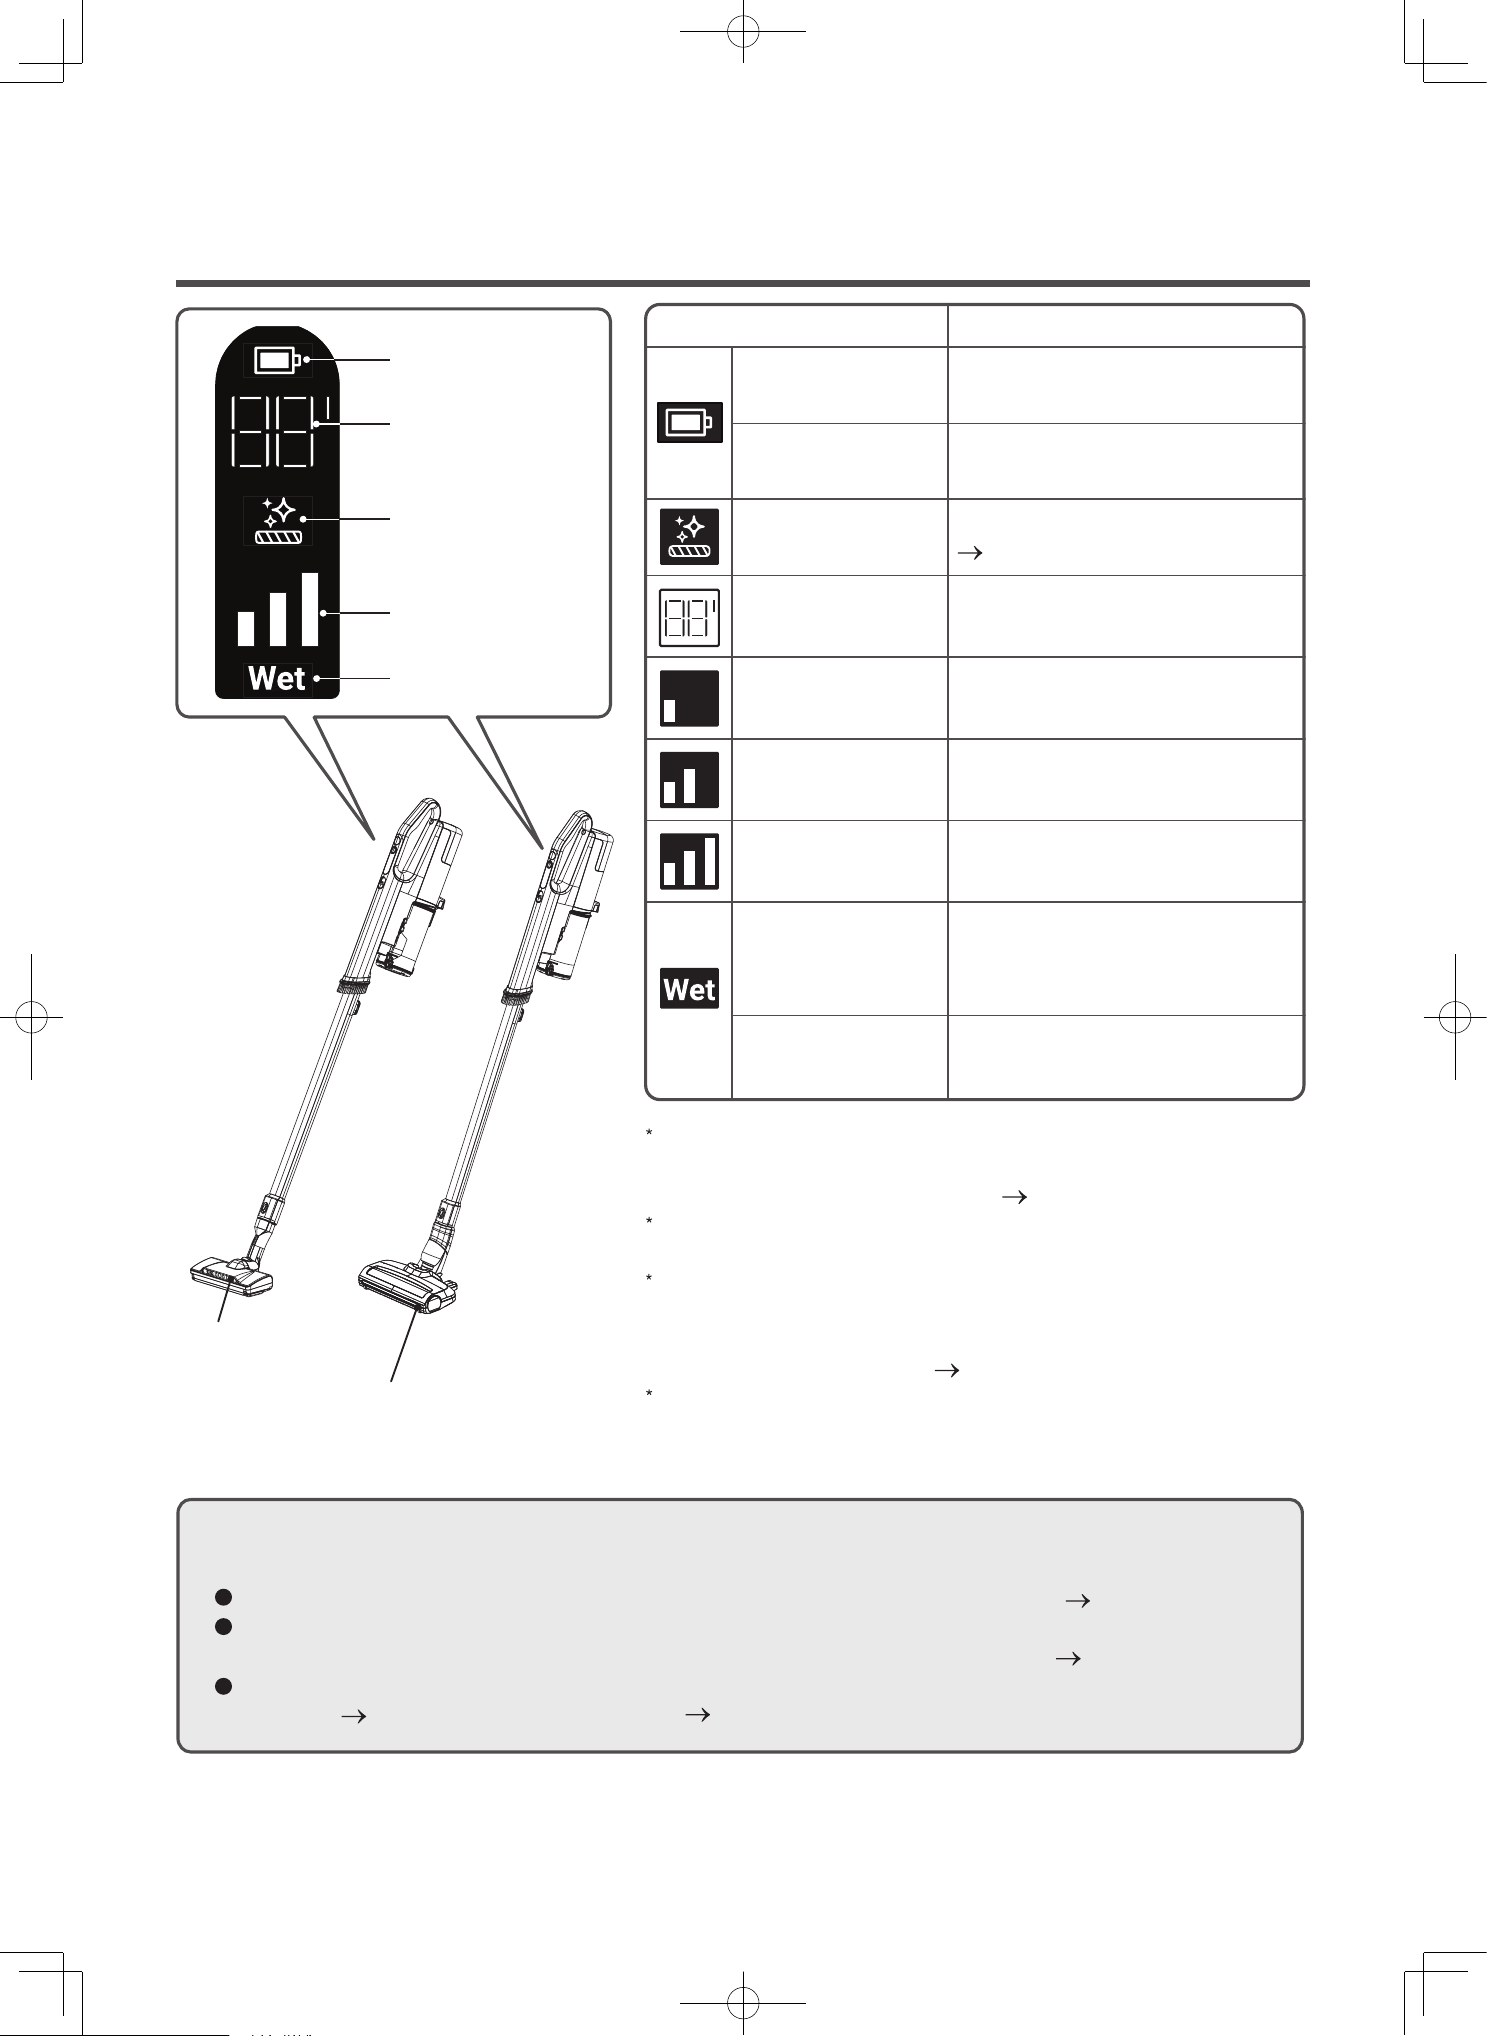
Indicators during use
Battery indicator
Operation times
indicator
Filter indicator
“Low”, “Mid”, “High”
mode indicator
Wet mode indicator
If the display C1 blinks, this indicates that the vacuum cleaner
might be running in safe mode to prevent overheating of the
vacuum cleaner’s motor or battery. (P.EN-39)
The filter indicator does not blink while the vacuum cleaner is being
operated in the Low mode setting.
If the display C2 blinks, this indicates that the power head and
mini power brush might have automatically turned off (and its LED
indicator turned off) in order to prevent overheating of the power
head and mini power brush. (P.EN-36)
If the battery indicator and high mode indicator light are blinking,
the battery level is low and the vacuum cleaner will not operate in
High mode.
If the filter indicator on the vacuum cleaner blinks while the vacuum cleaner is
running or after the vacuum cleaner stops:
Empty the dust case and remove any dust and debris attached to each of the filters. (P.EN-21 to EN-26)
If the filter indicator on the vacuum cleaner blinks while the vacuum cleaner is running, even though dust
and debris has already been removed from each filter, wash each filter with water. (P.EN-28 to EN-29)
Objects might get caught in the rotary brush of the power head. If this happens, remove the object.
PV-XH4P (P.EN-30 to EN-31), PV-XHE4PL (P.EN-32 to EN-33)
Indicator
Off
The remaining battery level is
high.
The remaining battery level is low.
Charge the battery.
The filter needs to be cleaned.
(P.EN-24, EN-25)
Blinking
Blinking
Displays usage time in each
mode.
On
Displays operation at Low
mode.
On
Displays operation at Mid
mode.
On
Displays operation at High
mode.
On
Displays operation at Wet
mode after attached Wet
accessories.
Displays operation at
Self-Cleaning Mode.
On
Blinking
Operating status
LED lights
Model PV-XH4P
LED lights
Model PV-XHE4PL
EN-11
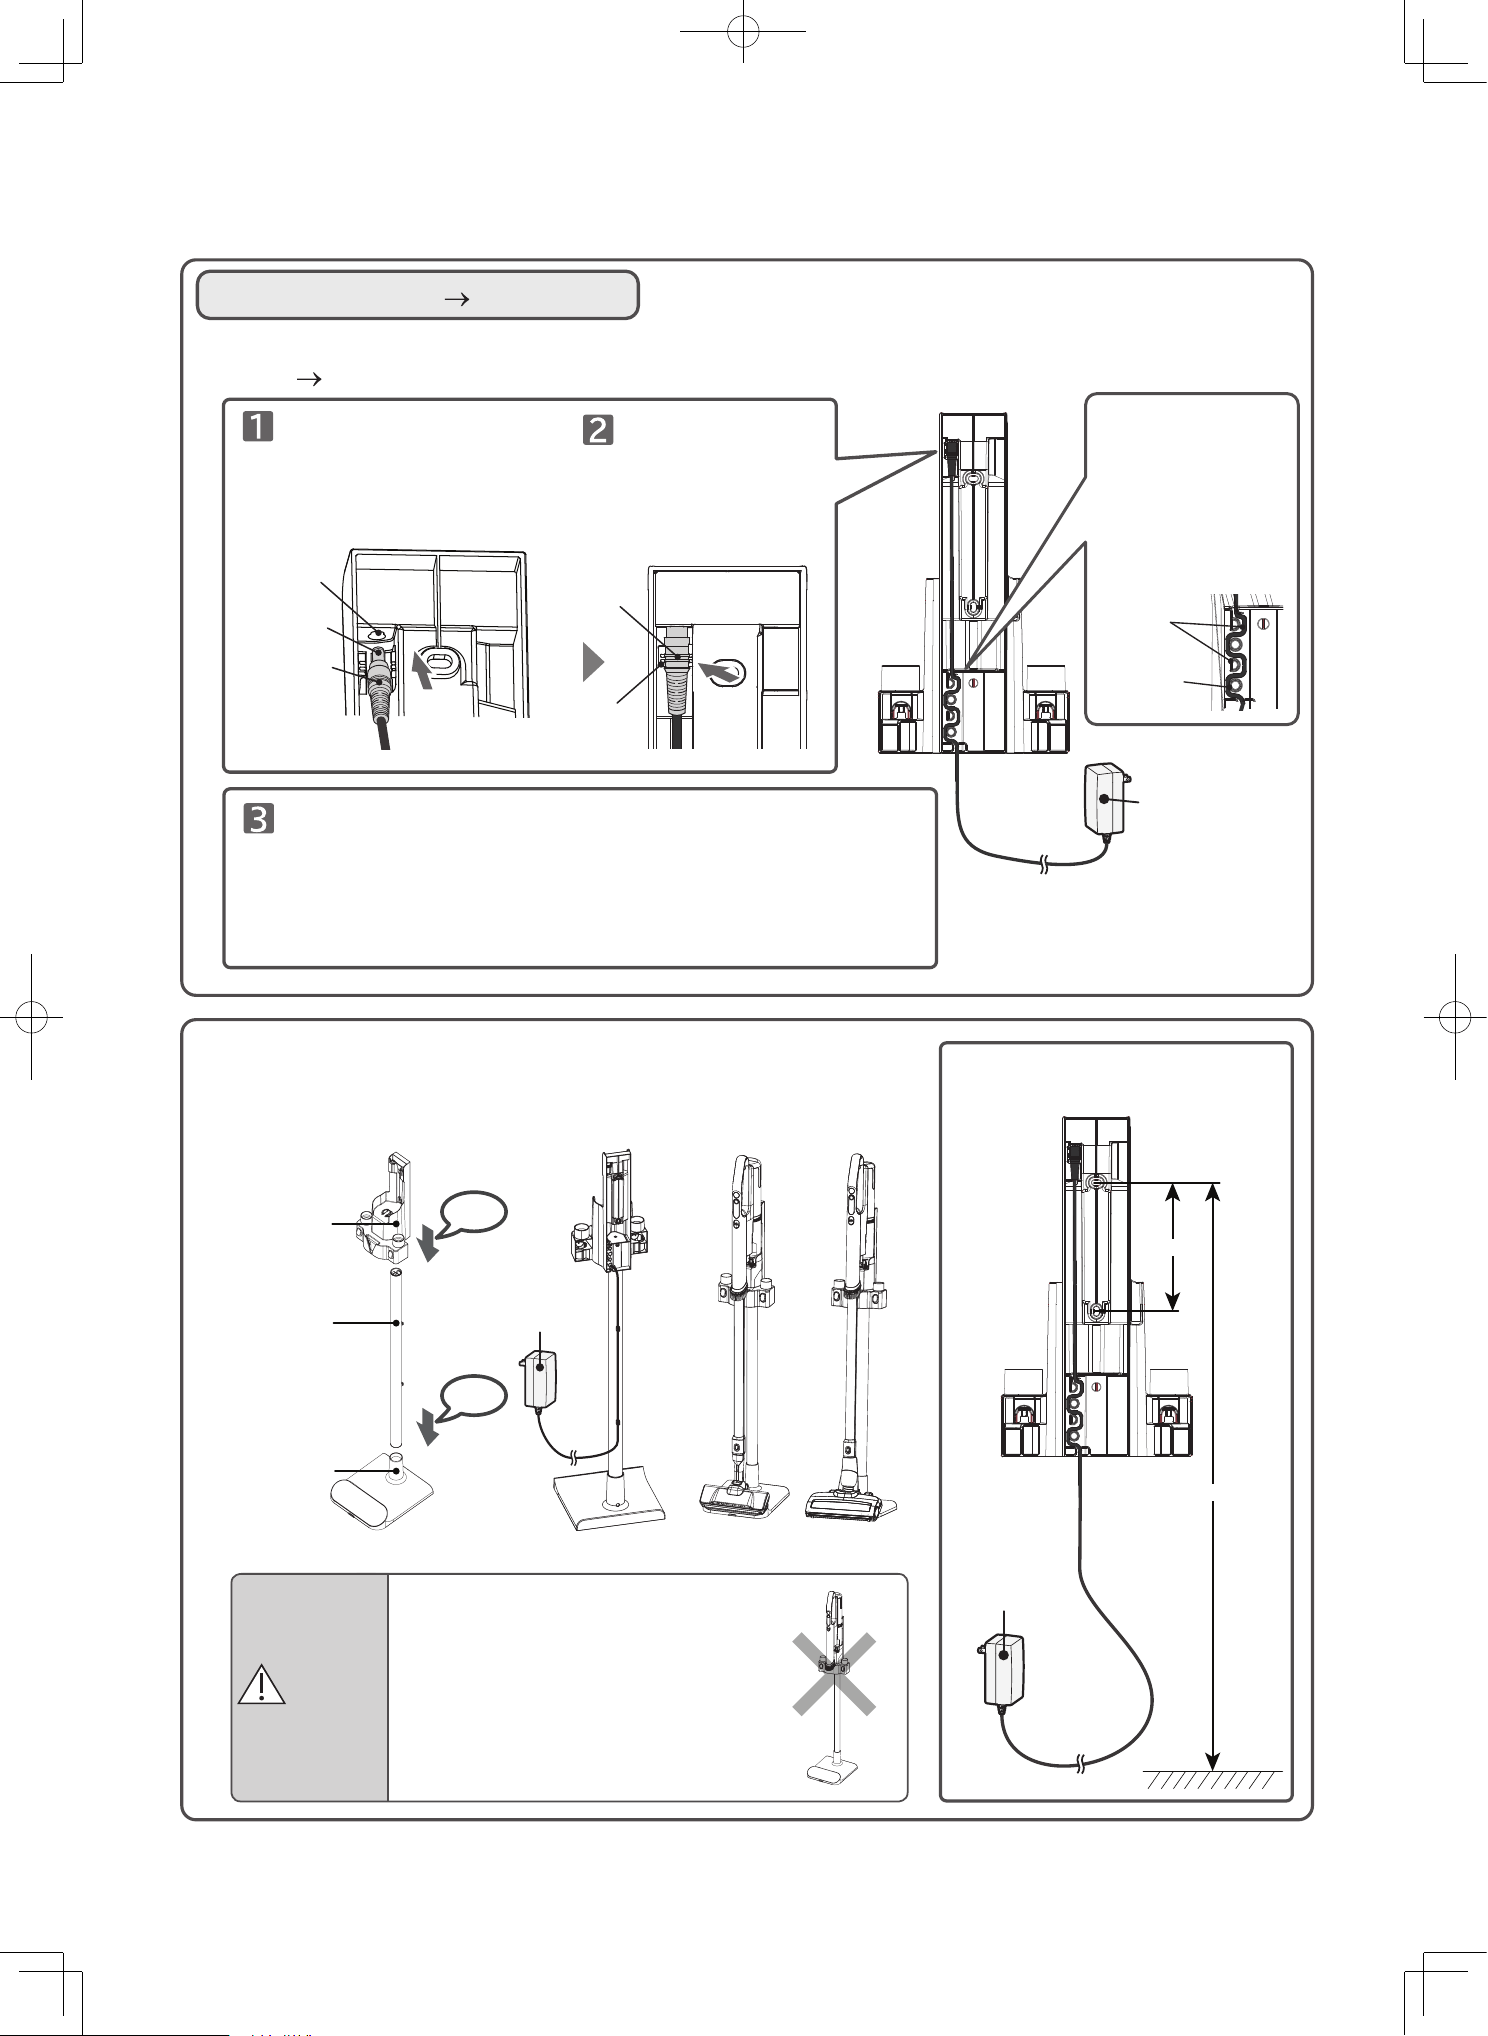
127mm.
1050mm.
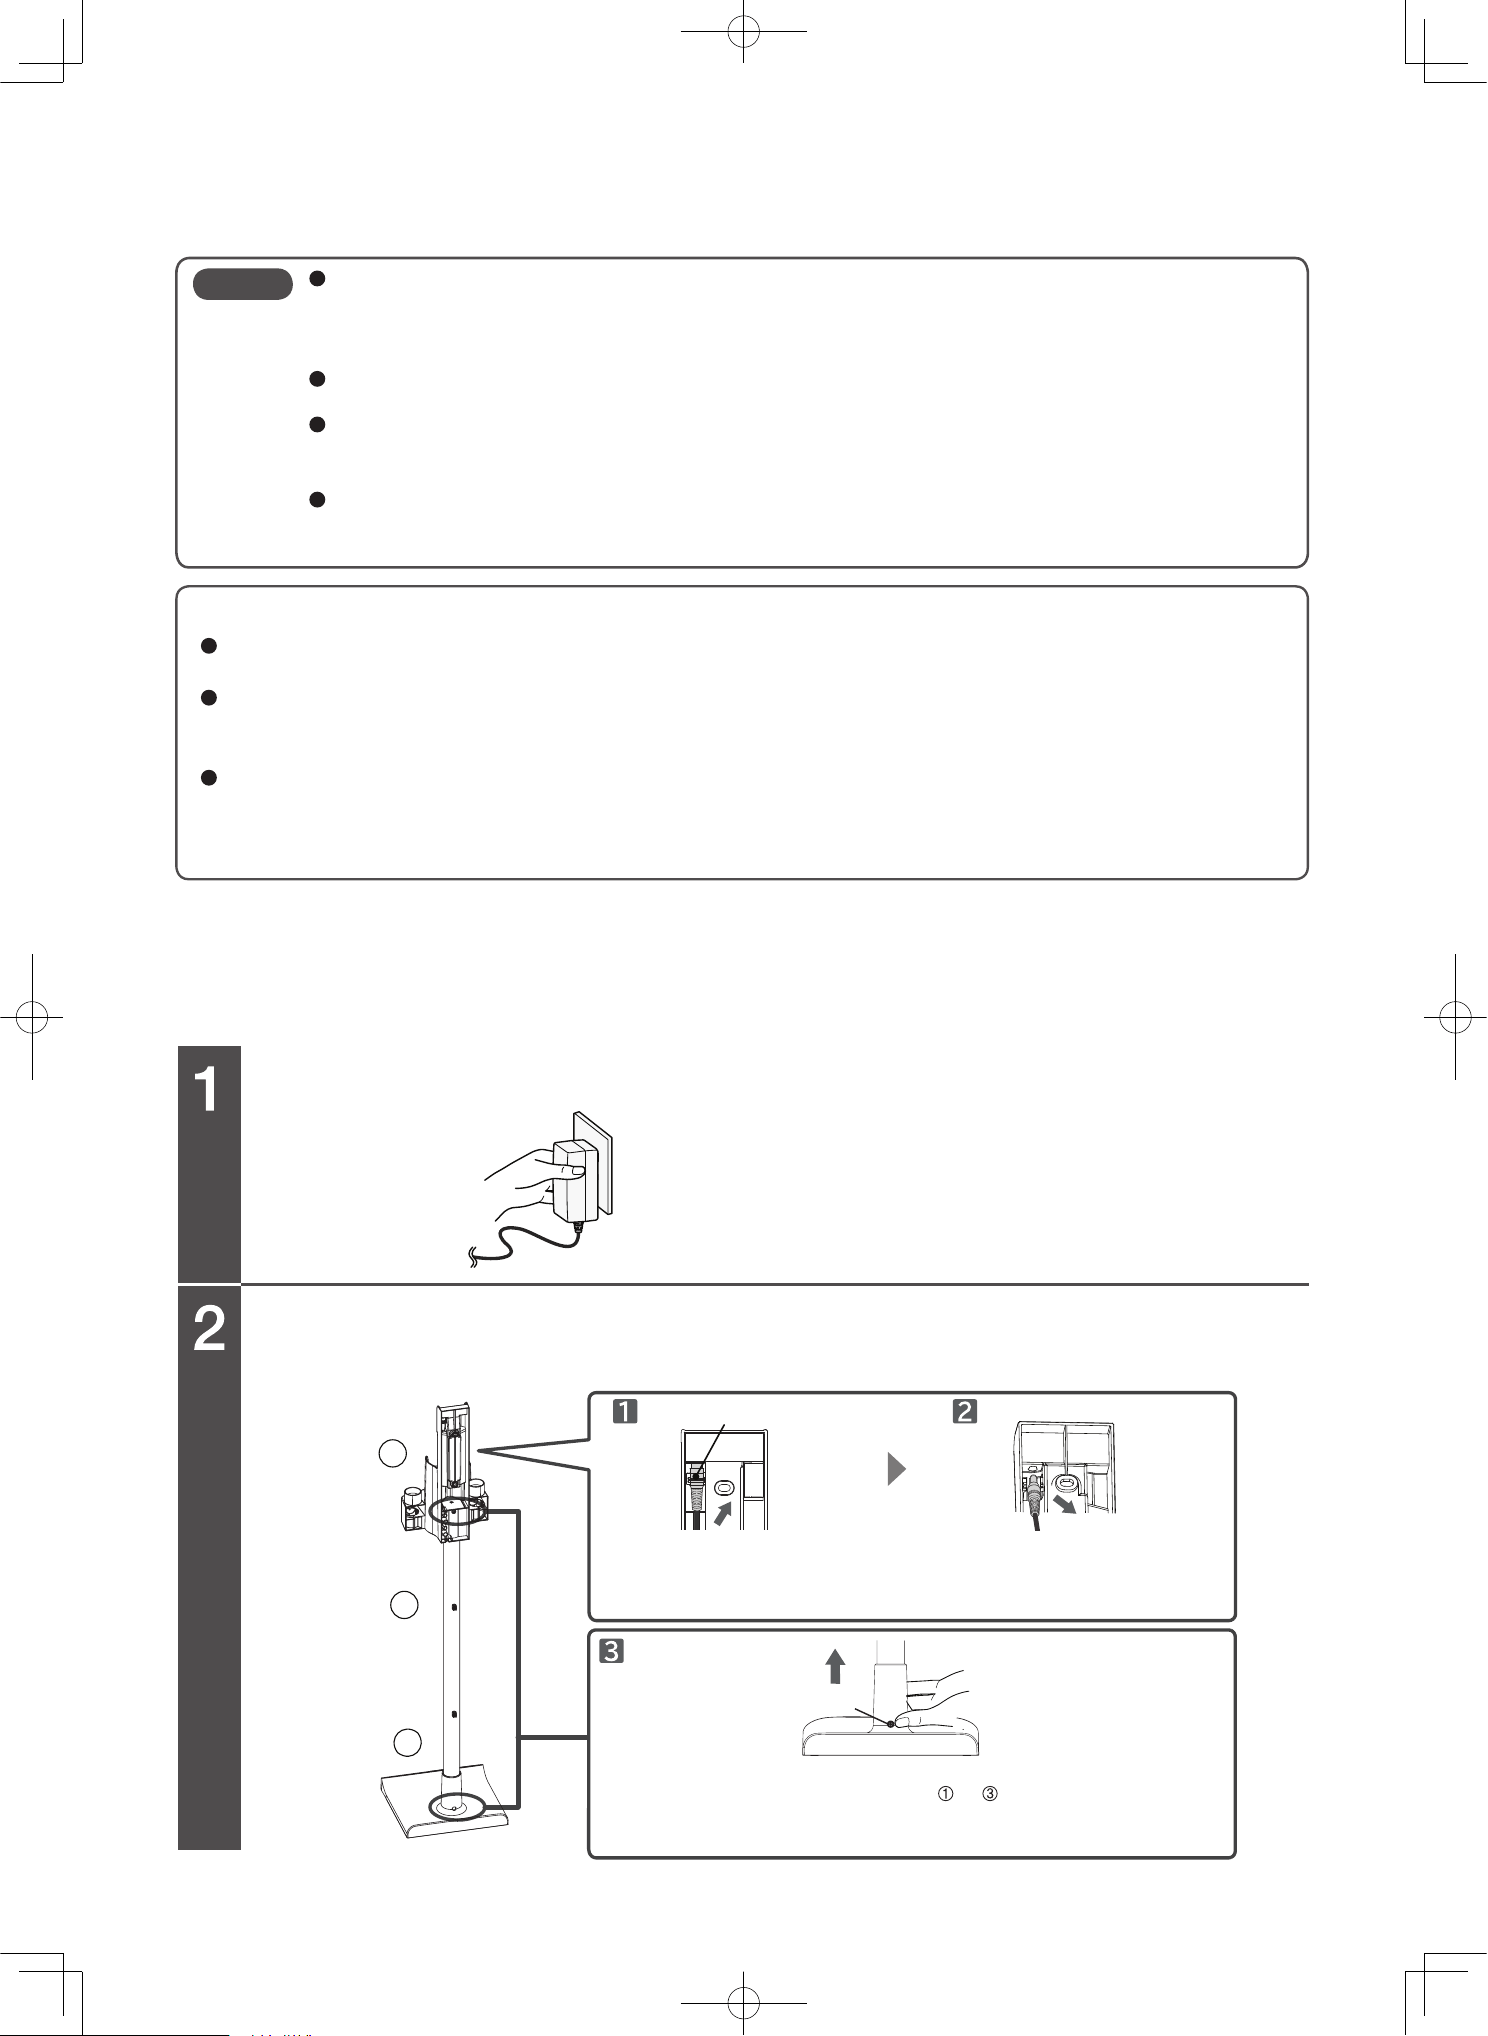
Assembling the charging station
Charging station (P.EN-12)
Hole
Mark
Groove
AC adaptor
You can charge the vacuum cleaner by connecting it to the AC adapter directly, instead of using the charging
station (P.EN-12)
Terminal
Connector
Insert the connector
terminal into the hole until
the mark aligns with the
groove.
Protrusion
Cord
On the charging
station, insert the
cord between
protrusion and
protrusion so align
the cord in every
position.
Push the connector
in the direction
indicated by the
arrow until the
terminal is
completely vertical.
Install the charging station to the stand platform by first
connecting the stand pipe to the stand base, then assemble the
charging station to the stand pipe. Alternatively, install the
charging station to the wall with two screws and two screw
anchors, using screws appropriate for the type of wall. Please
ensure that the charging station is mounted securely.
AC adaptor
CAUTION
Do not set the vacuum cleaner on
the charging station if the vacuum
cleaner is being used as a
hand-held vacuum cleaner.
The vacuum cleaner might fall off
of the charging station, causing
injury or damage to the floor.
Wall bracket
Stand pipe
Stand base
On the charging stand
On the wall
AC adaptor
Click
Click
EN-12
Charging the vacuum cleaner
To change the vacuum cleaner using the charging station
To charge the vacuum cleaner by connecting it to the AC adapter.
Charge the battery fully before use, as the battery is not fully charged at the time of purchase.
It generally takes about 3 hours to charge the battery. (It might take longer to charge the battery depending on
factors such as the ambient temperature and how long the vacuum cleaner was in use.)
AC adapter
Outlet
Hold the AC adapter
Attachment
groove
Protrusion
Terminal
Connector
If you want to charge the vacuum cleaner by
using the charging station, make sure the
dust case is attached to the vacuum cleaner.
lnsert the charging station protrusion into the
attachment groove of the vacuum cleaner.
When the vacuum cleaner is set on the charging
station and the AC adapter is connected, the
battery indicator turns on.
When fully charged, the battery indicator turns off.
When the AC adapter is connected to the vacuum
cleaner, the vacuum cleaner indicator turns on.
When fully charged, the battery indicator turns off.
If you will not be using the vacuum cleaner for a long time, unplug the AC adapter and remove the battery from the vacuum cleaner.
While the AC adapter is connected to the vacuum cleaner, the battery will be automatically and periodically charged when the
remaining battery level becomes low. However, if the vacuum cleaner is left unused for two months or longer, the remaining battery
level might become low, even if the vacuum cleaner is connected to the AC adapter and the AC adapter is plugged in. If this
happens, before using the vacuum cleaner, remove the connector of the AC adapter from the vacuum cleaner and then insert the
connector back into the vacuum cleaner.
If you disconnect the AC adapter from the vacuum cleaner after the battery indicator turns off (indicating that the battery is fully
charged), and then reconnect the AC adapter to the vacuum cleaner, the battery indicator turns on (indicating that the battery is
being charged), but this does not indicate a problem with the vacuum cleaner.
While the vacuum cleaner is being charged, the vacuum cleaner or AC adapter might become hot, but this does not indicate a
problem with the vacuum cleaner.
The vacuum cleaner will not operate even if the control buttons is pressed while charging.
Set the vacuum cleaner on
the charging station while the
vacuum cleaner is propped
up, and insert the charging
station protrusion into
the attachment groove of the
vacuum cleaner.
Note
CAUTION
When unplugging the AC adapter, hold the AC adapter. It is not recommended to pull the cord.
Pulling on the cord might damage the cord and cause short-circuiting, resulting in electric shock or fire.
CAUTION
Risk of damage to the floor.
lf you want to charge the vacuum
cleaner by connecting the AC adapter
to the vacuum cleaner, make sure the
vacuum cleaner is resting on the
floor or some other flat, level surface.
Do not drag the vacuum cleaner
while it is resting on the floor or any
other flat, level surface.
Plug the AC adapter into an outlet.
Attach the AC adapter to the charging station.
(P.EN-11) Then, plug the AC adapter into an outlet.
Set the vacuum cleaner on the charging station.
Insert the connector of the AC adapter
into the terminal on the vacuum cleaner.
Figure shown is a vacuum cleaner Model PV-XH4P
EN-13
1
2
3
When charging the battery, make sure the ambient temperature is between 5 ° C and 35 ° C.
Charging the battery in temperatures outside of this range might prevent the battery from being
fully charged. As a result, the battery might take a long time to charge, or you might only be able
to use the vacuum cleaner for a short time.
If the battery indicator does not turn on, or it turns on briefly and then turns off, remove the
vacuum cleaner from the charging station and then set it back onto the charging station.
If you are using the vacuum cleaner for the first time or after the vacuum cleaner was left unused
for a long time, the battery might take a long time to charge, or you might only be able to use the
vacuum cleaner for a short time.
Charging it near a radio might cause sound interference when the radio is in operation. When
charging the vacuum cleaner, plug the AC adapter into an outlet that is at least 2 meters away
from any radio equipment.
To prolong battery life
Be sure to charge the vacuum cleaner after each use, even if you only used the vacuum cleaner for a short
period of time.
If the vacuum cleaner is not to be used for more than a month, please fully charge the battery before storing
it. Charging it once a year if the vacuum cleaner is not in use will prolong the battery life. (Storing a depleted
battery will deteriorate the battery performance and battery life.)
If the vacuum cleaner stops in the middle of operation because the battery has run out, you might still be able
to use the vacuum cleaner for a short while by pressing the control buttons. However, this type of action is
not recommended.
Performing this type of action will shorten the battery life.
Note
Unplug the AC adapter.
Disconnect the cord and connector, and then detach the wall bracket
and stand pipe.
Disassembling the charging station
Connector
Button
To disassemble the charging station, remove each segment, starting
from the top. At each of the locations
to , hold onto the upper
segment, hold down the button, and slowly pull in the direction
indicated by the arrow.
Gently pull the cord in the
direction indicated by the
arrow.
Hold the connector, and
disconnect it by polling in
the direction of the arrow.
Handle
EN-14
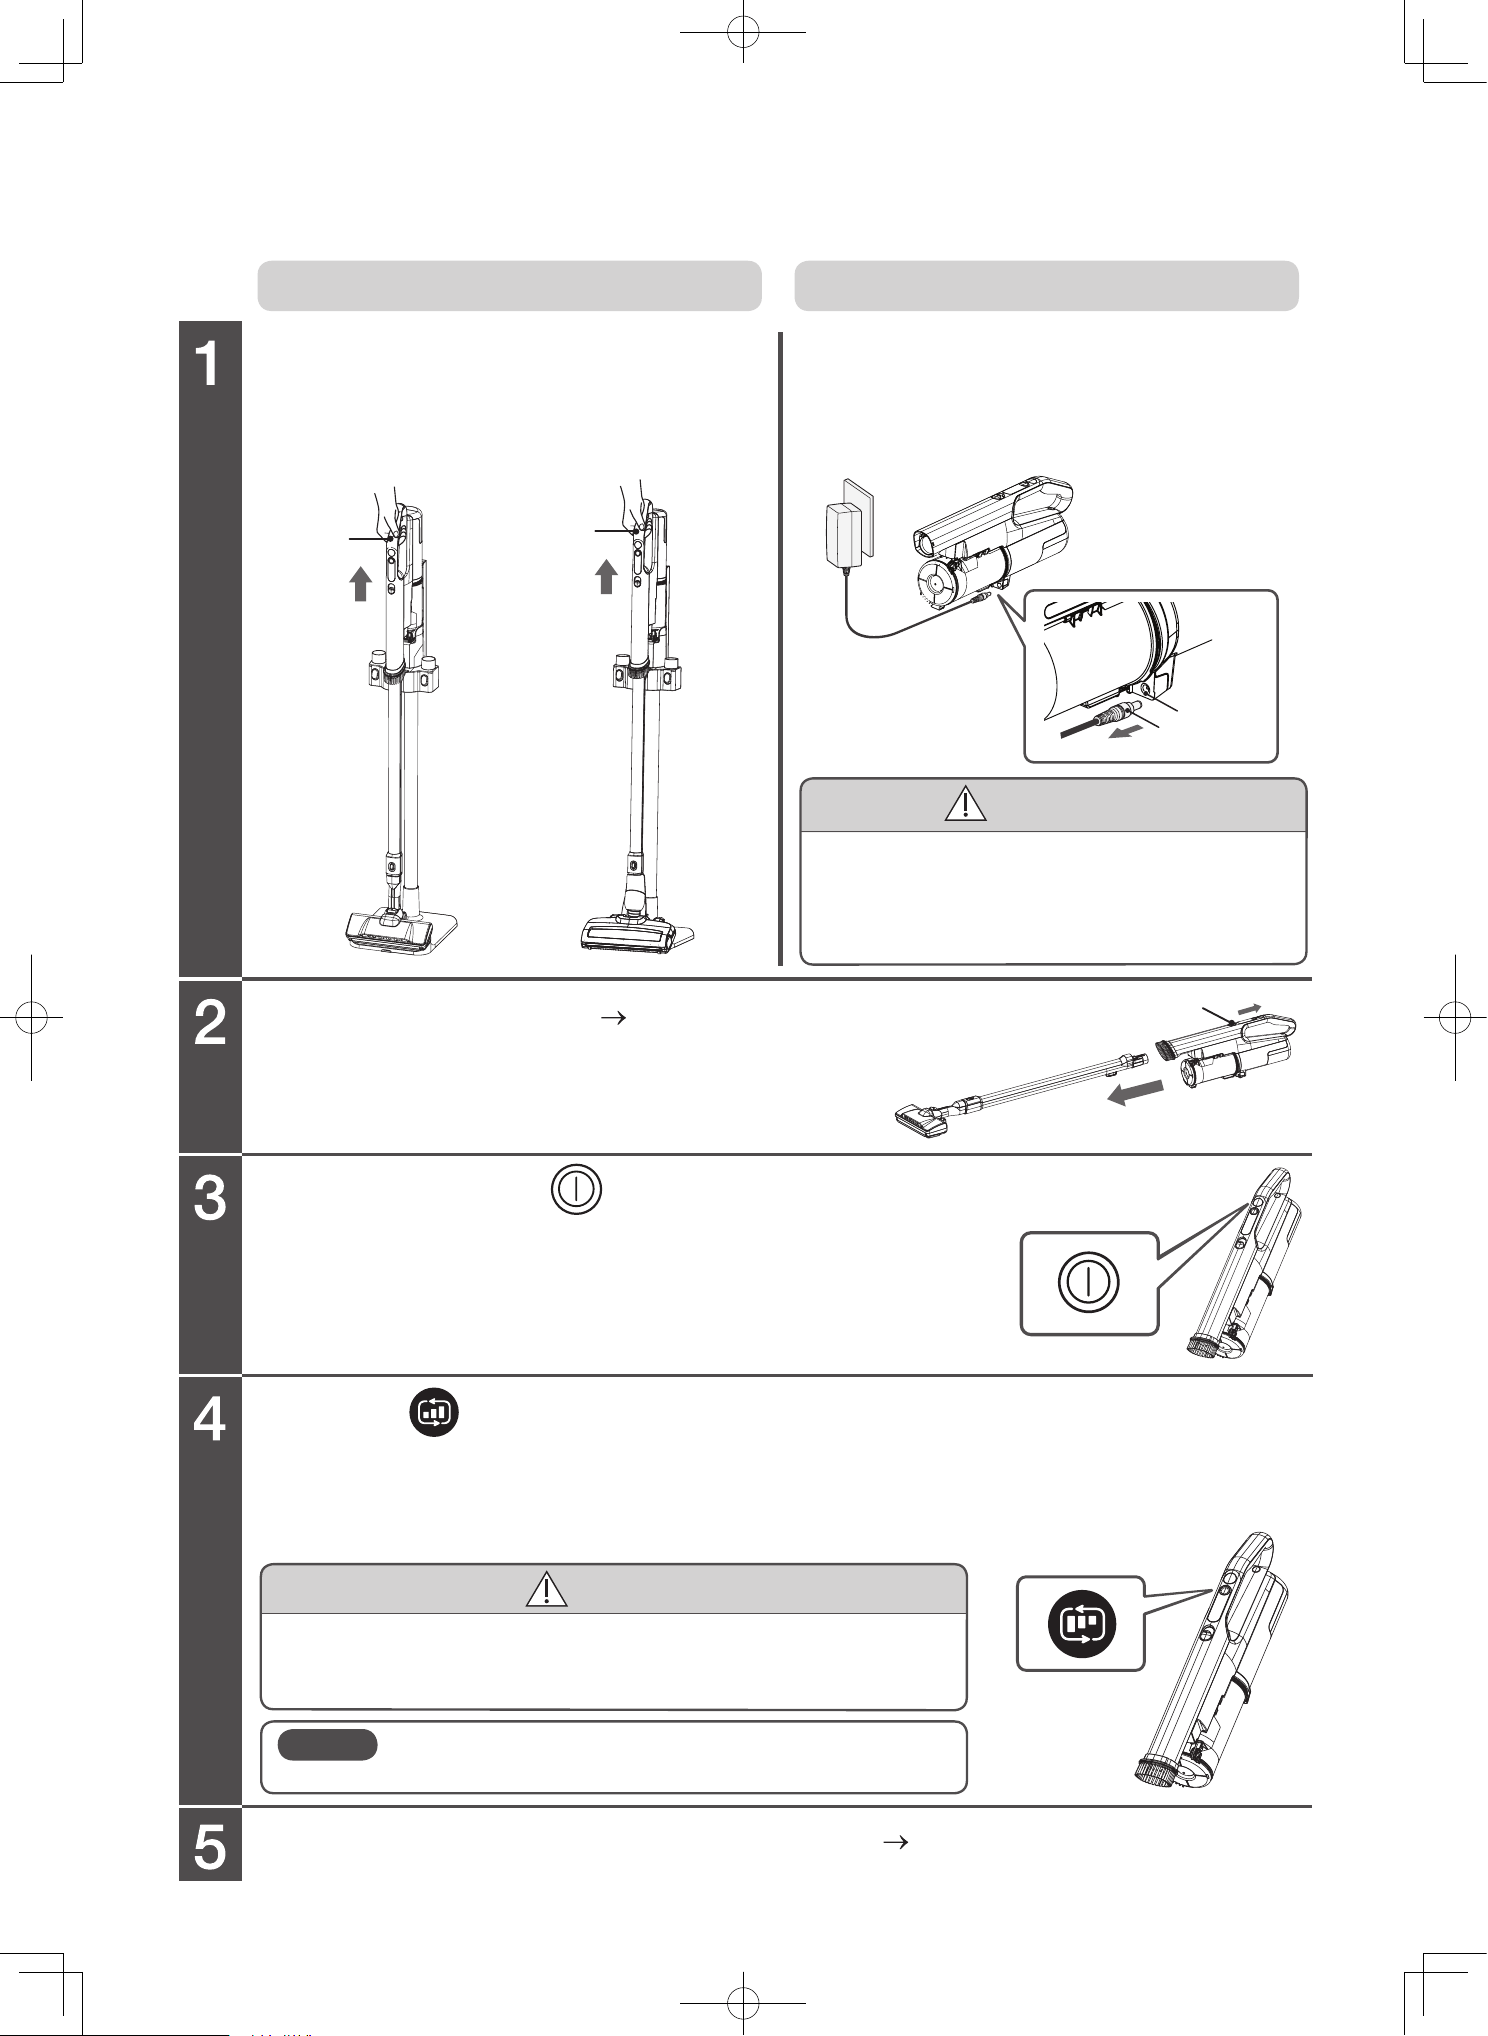
Using the vacuum cleaner
Hold the handle and pull the vacuum cleaner upward.
Attach an attachment. (P.EN-8)
Charge the vacuum cleaner after using it.
(P.EN-12)
Press the button to change operation mode.
Holding onto the connector of the AC adapter,
disconnect it from the vacuum cleaner.
Release button
If the vacuum cleaner is set on the charging station.
If the AC adapter is directly connected to the vacuum cleaner.
CAUTION
CAUTION
When disconnecting the AC adapter, hold the
connector. Do not pull on the cord.
Pulling on the cord might damage the cord and cause
short-circuiting, resulting in electric shock or fire.
Risk of injury or damage to the floor.
Do not strongly press or hit the vacuum cleaner against the floor.
The vacuum cleaner might be deformed or the dust case might fall.
When replacing an attachment, remove it by sliding the release
button in the direction of the arrow and pulling the attachment
in the direction of the arrow.
Low: For normal cleaning. Mid: For gentle carpet cleaning.
High: For powerful cleaning in heavily dirty areas.
Continuous operating time can be found in the specifications.
Note that the usage time may vary depending on the environment and usage.
When you need to start again after stopping, please wait 3 seconds
before starting.
Remove the connector of the AC
adapter from the vacuum cleaner.
Remove the vacuum cleaner
from the charging station.
Note
Do not remove the battery from the vacuum cleaner
while operating. Doing so might cause malfunctions.
Terminal
Connector
Press and hold the button to start and press
again to stop.
Handle
Figure shown is a vacuum cleaner Model PV-XH4P
EN-15
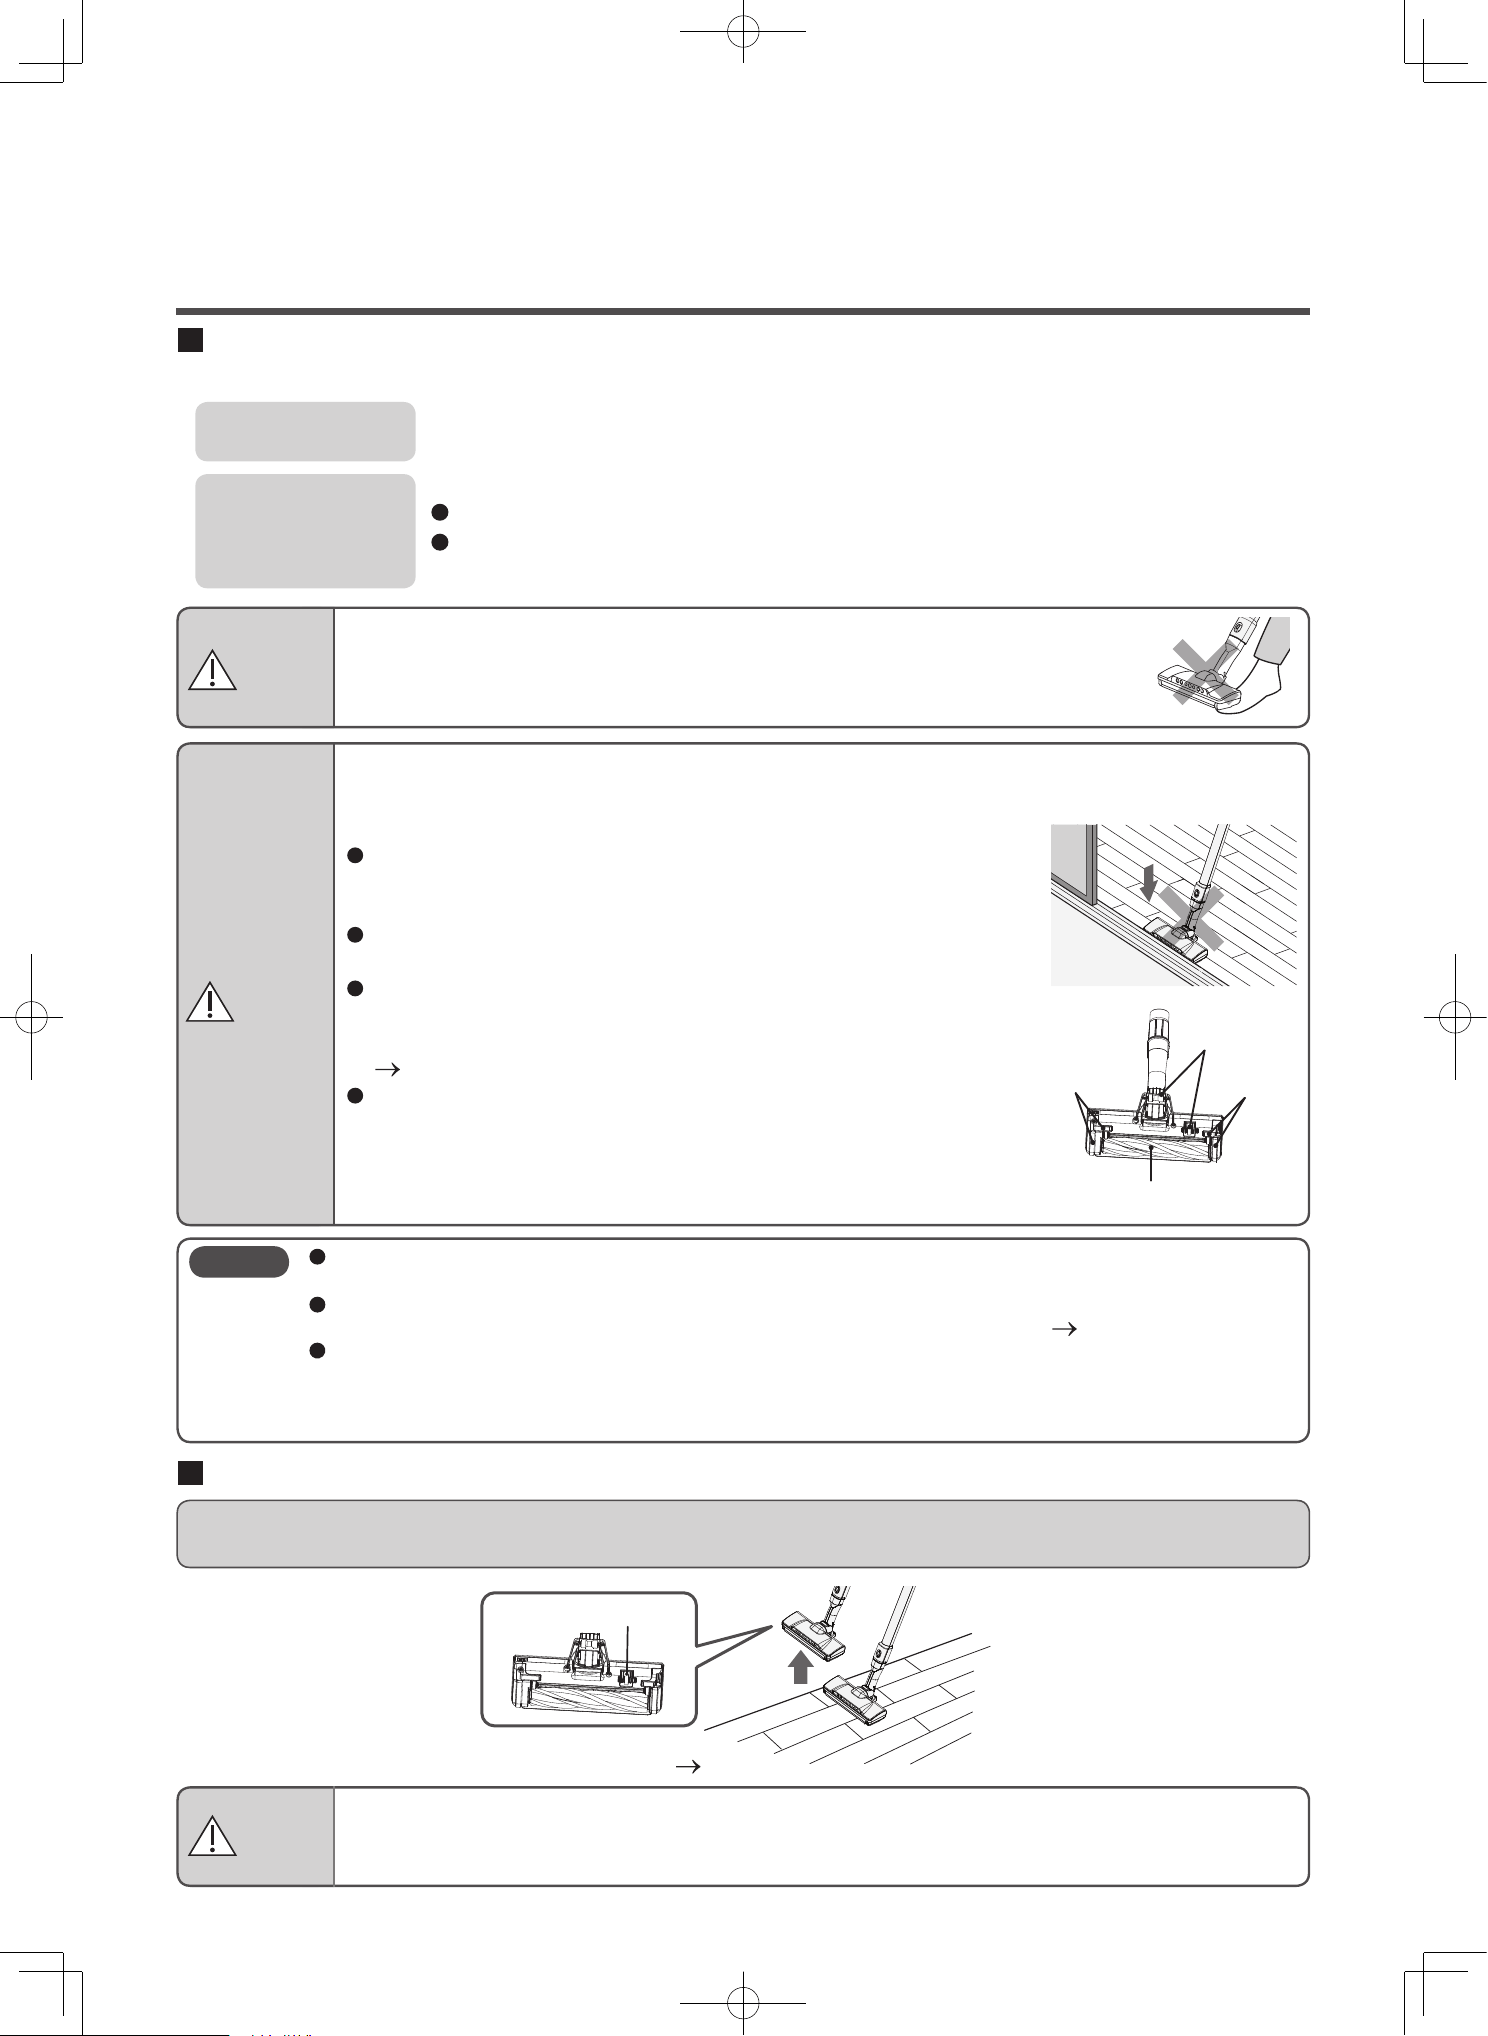
Power head (only PV-XH4P)
Use in accordance with the floor type
The safety switch of the power head
When you lift the power head from the floor, the safety switch activates and the rotary brush stops rotating for
your safety.
For information on maintaining the safety switch
(P.EN-30)
Carpet
Flooring/
Tatami
Vacuum efficiently and thoroughly by moving the power head back and forth across floor.
Clean by moving back and forth. Dust and debris will be collected thoroughly when pulling back.
When cleaning a new carpet for the first time, the cleaner might collect many loose threads.
To prevent damage to the floor, move along the grain of the flooring.
When cleaning a new tatami, its surface might become polished.
If dust and debris still remain on the floor after you move the vacuum cleaner toward you, lift the
power head and then move the vacuum cleaner away from you (back over the dust and debris).
Rotary brush
Brushes
Wheels
Brushes
Safety switch
Stop
Rotate
Using the attachments
WARNING
WARNING
CAUTION
Risk of injury
Do not place the power head on parts of your body (on top of your feet, etc.)
when pulling the power head.
It might get your body parts caught in the rotary brush.
Risk of injury
Do not touch the rotary brush or the safety switch of the power head.
The rotary brush might rotate. Be careful especially around children.
Risk of damage to the floor
When pulling the power head.
Do not firmly press the power head against the floor.
The floor might be damaged if it is easily damaged especially
such as cypress or padded flooring*.
*
Padded flooring is flooring where the surface is cushioned using vinyl chloride, etc.
Firmly pressing the power head against uneven surfaces such as
thresholds might wear out the wheels and damage the floor.
If dust and debris gets tangled in the wheels, the wheels cannot
rotate, which might cause wear and tear and floor damage.
Perform periodic maintenance (at least once a month).
(P.EN-30, EN-31)
After extended use, the brushes, wheels, and rotary brush might
wear down. Using the power head while they are worn out might
damage the floor. You cannot replace the brushes or wheels by
yourself. Please contact a Hitachi authorized service agent to
have the brushes, wheels, and rotary brush replaced as a set.
The vacuum cleaner may be harder to use depending on the floor type. In such cases, switch to
the low mode.
If the suction power becomes weak, there might be dust and debris blocking the power head
inlet. In this case, perform maintenance for (wash with water) each filter.
(P.EN-28 to EN-29)
Do not push the power head against the floor with excessive force, because the power head
might leave a mark on the floor.
If the power head leaves a mark on the floor, please refrain from using the vacuum cleaner in that
area, and remove the mark by using a soft cloth.
Note
EN-16
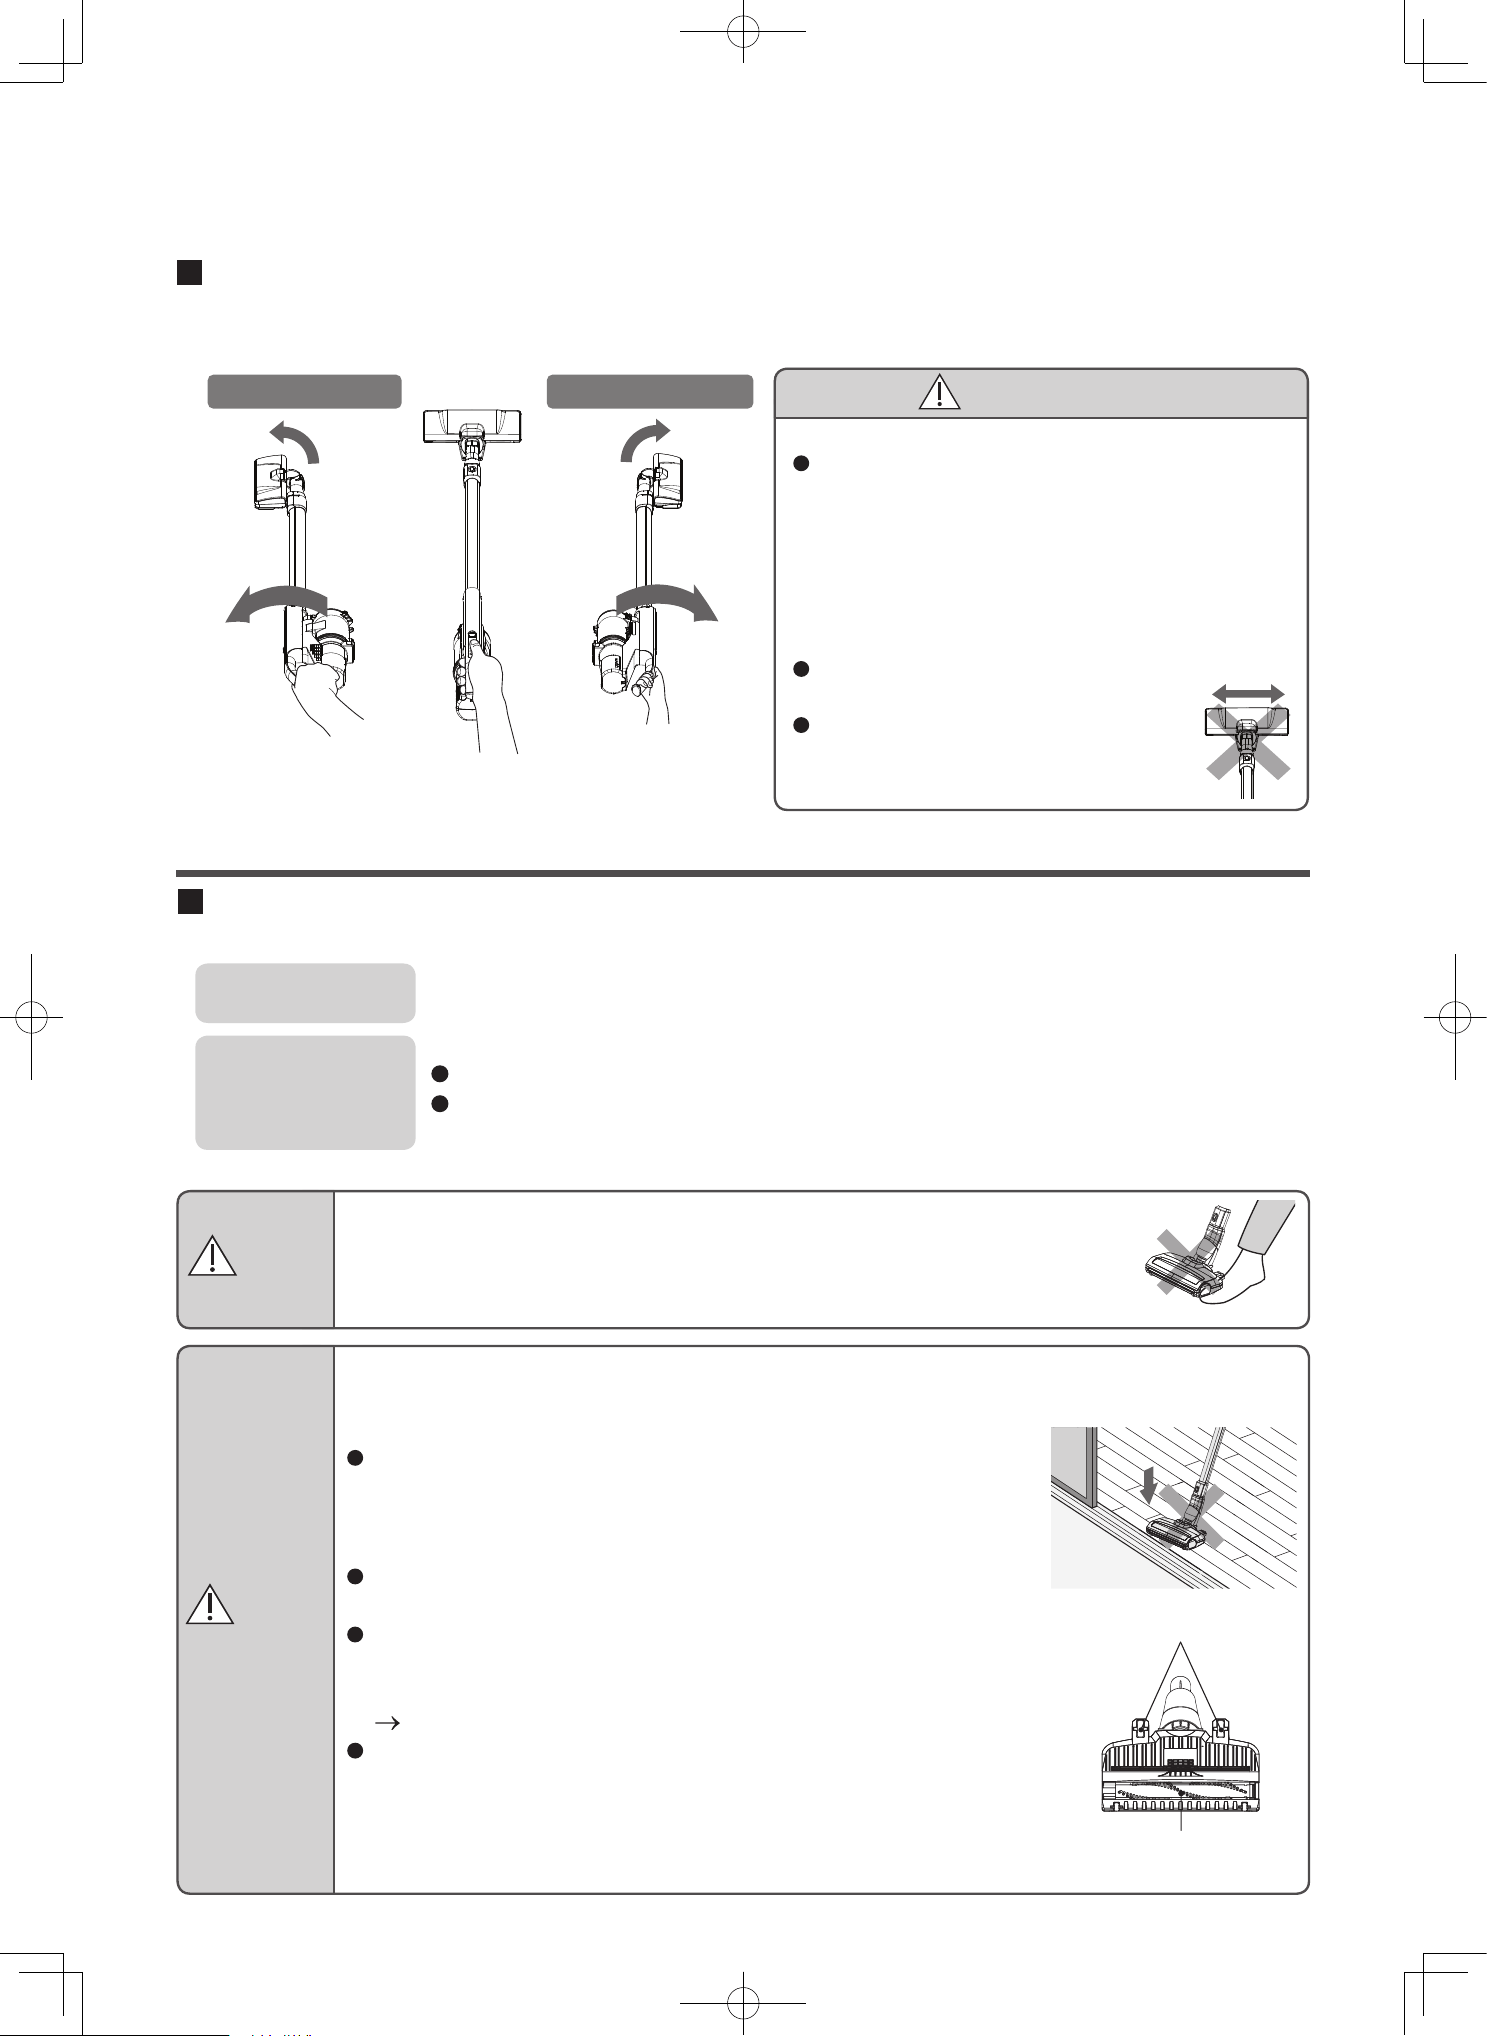
Multi angle head
Turning the handle changes the orientation of the power head. Narrow places can be efficiently vacuumed.
Rotate to the left
Rotate Rotate
Rotate to the right
CAUTION
Risk of damage to the floor
After extended use, the brushes, wheels, and
rotary brush might wear down. Using the power
head while they are worn out might damage the
floor. You cannot replace the brushes or wheels
by yourself. Please contact a Hitachi authorized
service agent to have the brushes, wheels, and
rotary brush replaced as a set.
Do not move the power head left and
right while they are facing forward.
Do not pull the power head
backwards while holding it aloft.
Power head (only PV-XHE4PL)
Use in accordance with the floor type
Carpet
Flooring/
Tatami
Vacuum efficiently and thoroughly by moving the power head back and forth across floor.
Clean by moving back and forth. Dust and debris will be collected thoroughly when pulling back.
When cleaning a new carpet for the first time, the cleaner might collect many loose threads.
To prevent damage to the floor, move along the grain of the flooring.
When cleaning a new tatami, its surface might become polished.
If dust and debris still remain on the floor after you move the vacuum cleaner toward
you, lift the power head and then move the vacuum cleaner away from you (back over
the dust and debris).
Rotary brush
Wheels
WARNING
CAUTION
Risk of injury
Do not place the power head on parts of your body (on top of your feet, etc.)
when pulling the power head.
It might get your body parts caught in the rotary brush.
Risk of damage to the floor
When pulling the power head.
Do not firmly press the power head against the floor.
The floor might be damaged if it is easily damaged especially
such as cypress or padded flooring*.
*Padded flooring is flooring where the surface is cushioned using
vinyl chloride, etc.
Firmly pressing the power head against uneven surfaces such as
thresholds might wear out the wheels and damage the floor.
If dust and debris gets tangled in the wheels, the wheels cannot
rotate, which might cause wear and tear and floor damage.
Perform periodic maintenance (at least once a month).
(P.EN-32, EN-33)
After extended use, the brushes, wheels, and rotary brush might
wear down. Using the power head while they are worn out might
damage the floor. You cannot replace the brushes or wheels by
yourself. Please contact a Hitachi authorized service agent to
have the brushes, wheels, and rotary brush replaced as a set.
EN-17
WARNING
Risk of injury
Do not touch the rotary brush of the power head.
The rotary brush might rotate. Be careful especially around children.
The vacuum cleaner may be harder to use depending on the floor type. In such cases, switch to
the low mode.
If the suction power becomes weak, there might be dust and debris blocking the power head
inlet. In this case, perform maintenance for (wash with water) each filter.
(P.EN-28 to EN-29)
Do not push the power head against the floor with excessive force, because the power head
might leave a mark on the floor.
If the power head leaves a mark on the floor, please refrain from using the vacuum cleaner in that
area, and remove the mark by using a soft cloth.
Note
Handy brush
Attaching the handy brush
Match the position of the protrusion on the
side of the handy brush with the groove on
the vacuum cleaner.
Press in the direction of the arrow.
Press the grooved area of the handy brush and
pull in the direction of the arrow.
Detaching the handy brush
Attach to the vacuum cleaner before use.
Attachments can be applied while the handy brush is attached to the vacuum cleaner.
Handy brush
Groove
Grooved
area
Protrusion
CAUTION
Risk of electric shock, fire, malfunction or damage.
Do not clean using the tip of the vacuum cleaner without the handy brush.
Do not press against areas that are particularly easy to be damaged, such as pianos.
It might be damaged if excessive force is applied.
If the handy brush is pressed down on floors with too much force, it might become damaged,
crack, or damage to the floor.
The handy brush can be washed with water. After washing with water, allow it to dry naturally
before use. Using it while wet might lead the vacuum cleaner to malfunction.
Note
EN-18
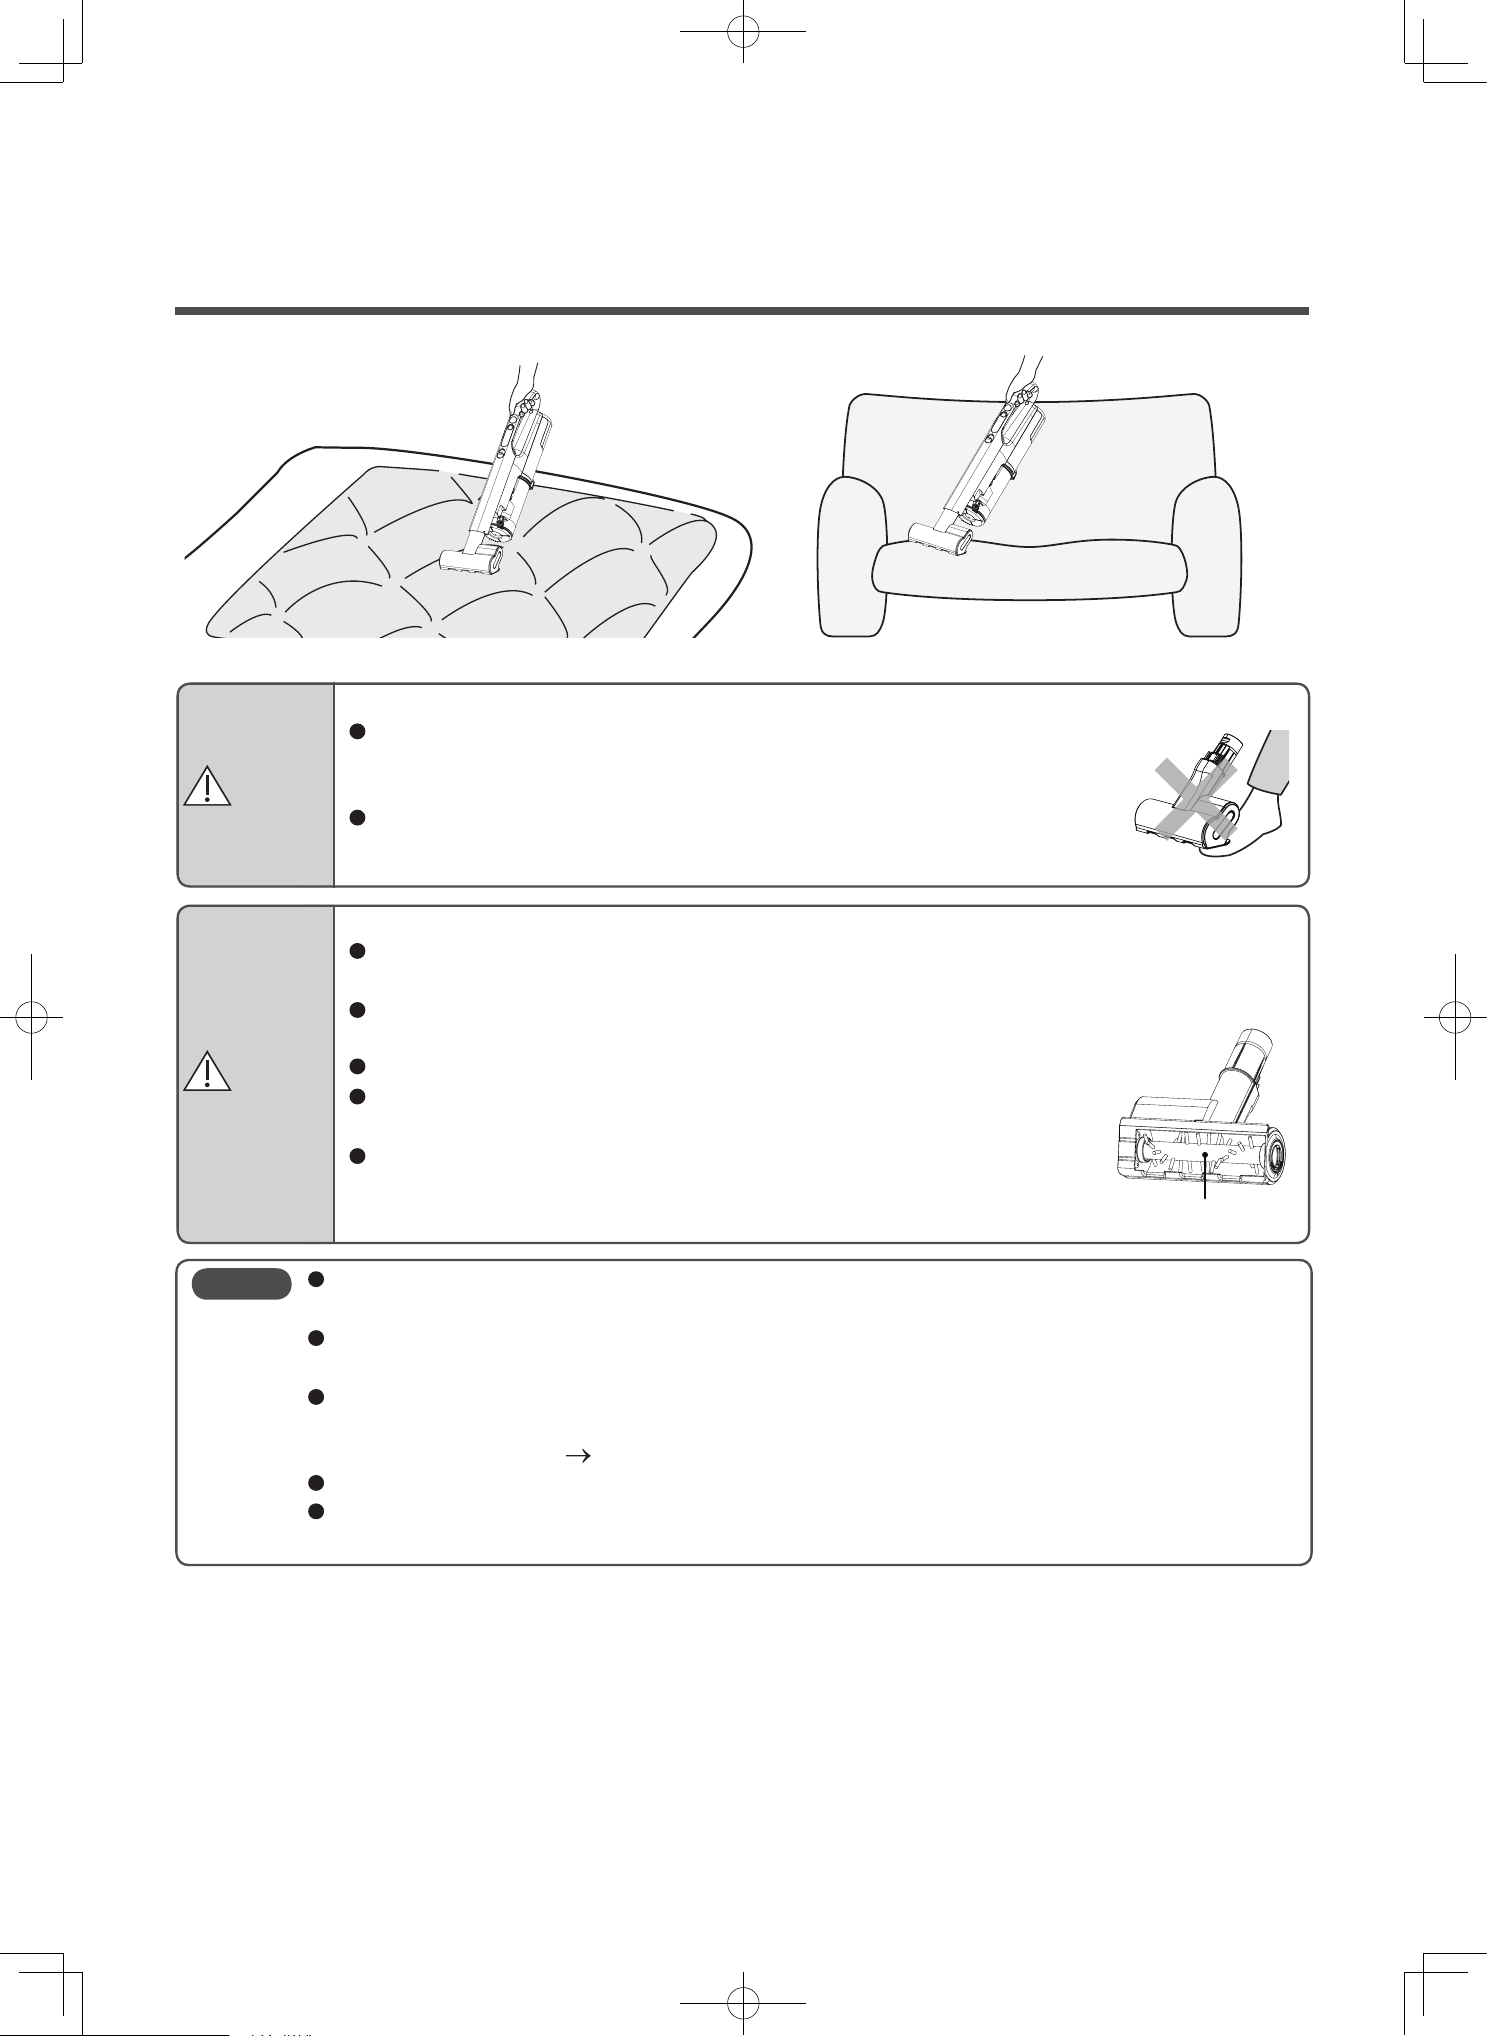
Mini power brush
This is a compact suction head that can be used on sofas, car seats, and bedding.
CAUTION
Risk of damage to the fabric.
Use on bedding, mattresses, bed covers, pillows, seat cushions, fabric sofas, and other
fabric products.
Do not use on wood furniture, wood floors, or locations with a glossy surface that is easily
damaged.
Do not press against fabrics that are easily damaged, such as leather.
Do not leave the mini power brush stopped in the same position while
operating.
After extended use, the wheels and rotary brush might wear down.
Using the mini power brush while they are worn out might damage
the fabric.
WARNING
Risk of injury
Do not place the mini power brush on parts of your body (on top of your
feet, etc.) when pulling the mini power brush.
It might get your body parts caught in the rotary brush.
Do not touch the rotating rotary brush of the mini power brush.
The rotary brush might rotate. Be careful especially around children.
When cleaning fabrics, lay the fabric flat, and do not press firmly.
If you clean fabrics while folded, they might become tangled and be damaged.
The vacuum cleaner might be difficult to use depending on the cleaning location.
In such a case, switch to the low mode operation.
If the suction power becomes weak, there might be dust and debris blocking the mini power
brush inlet.
Perform maintenance.
(P.EN-33 to EN-34)
Do not clean the mini power brush with water.(Only the rotary brush can be cleaned with water.)
Do not leave the mini power brush in locations with high temperatures, such as in a parking lot
under the blazing sun.
Note
Rotary brush
EN-19
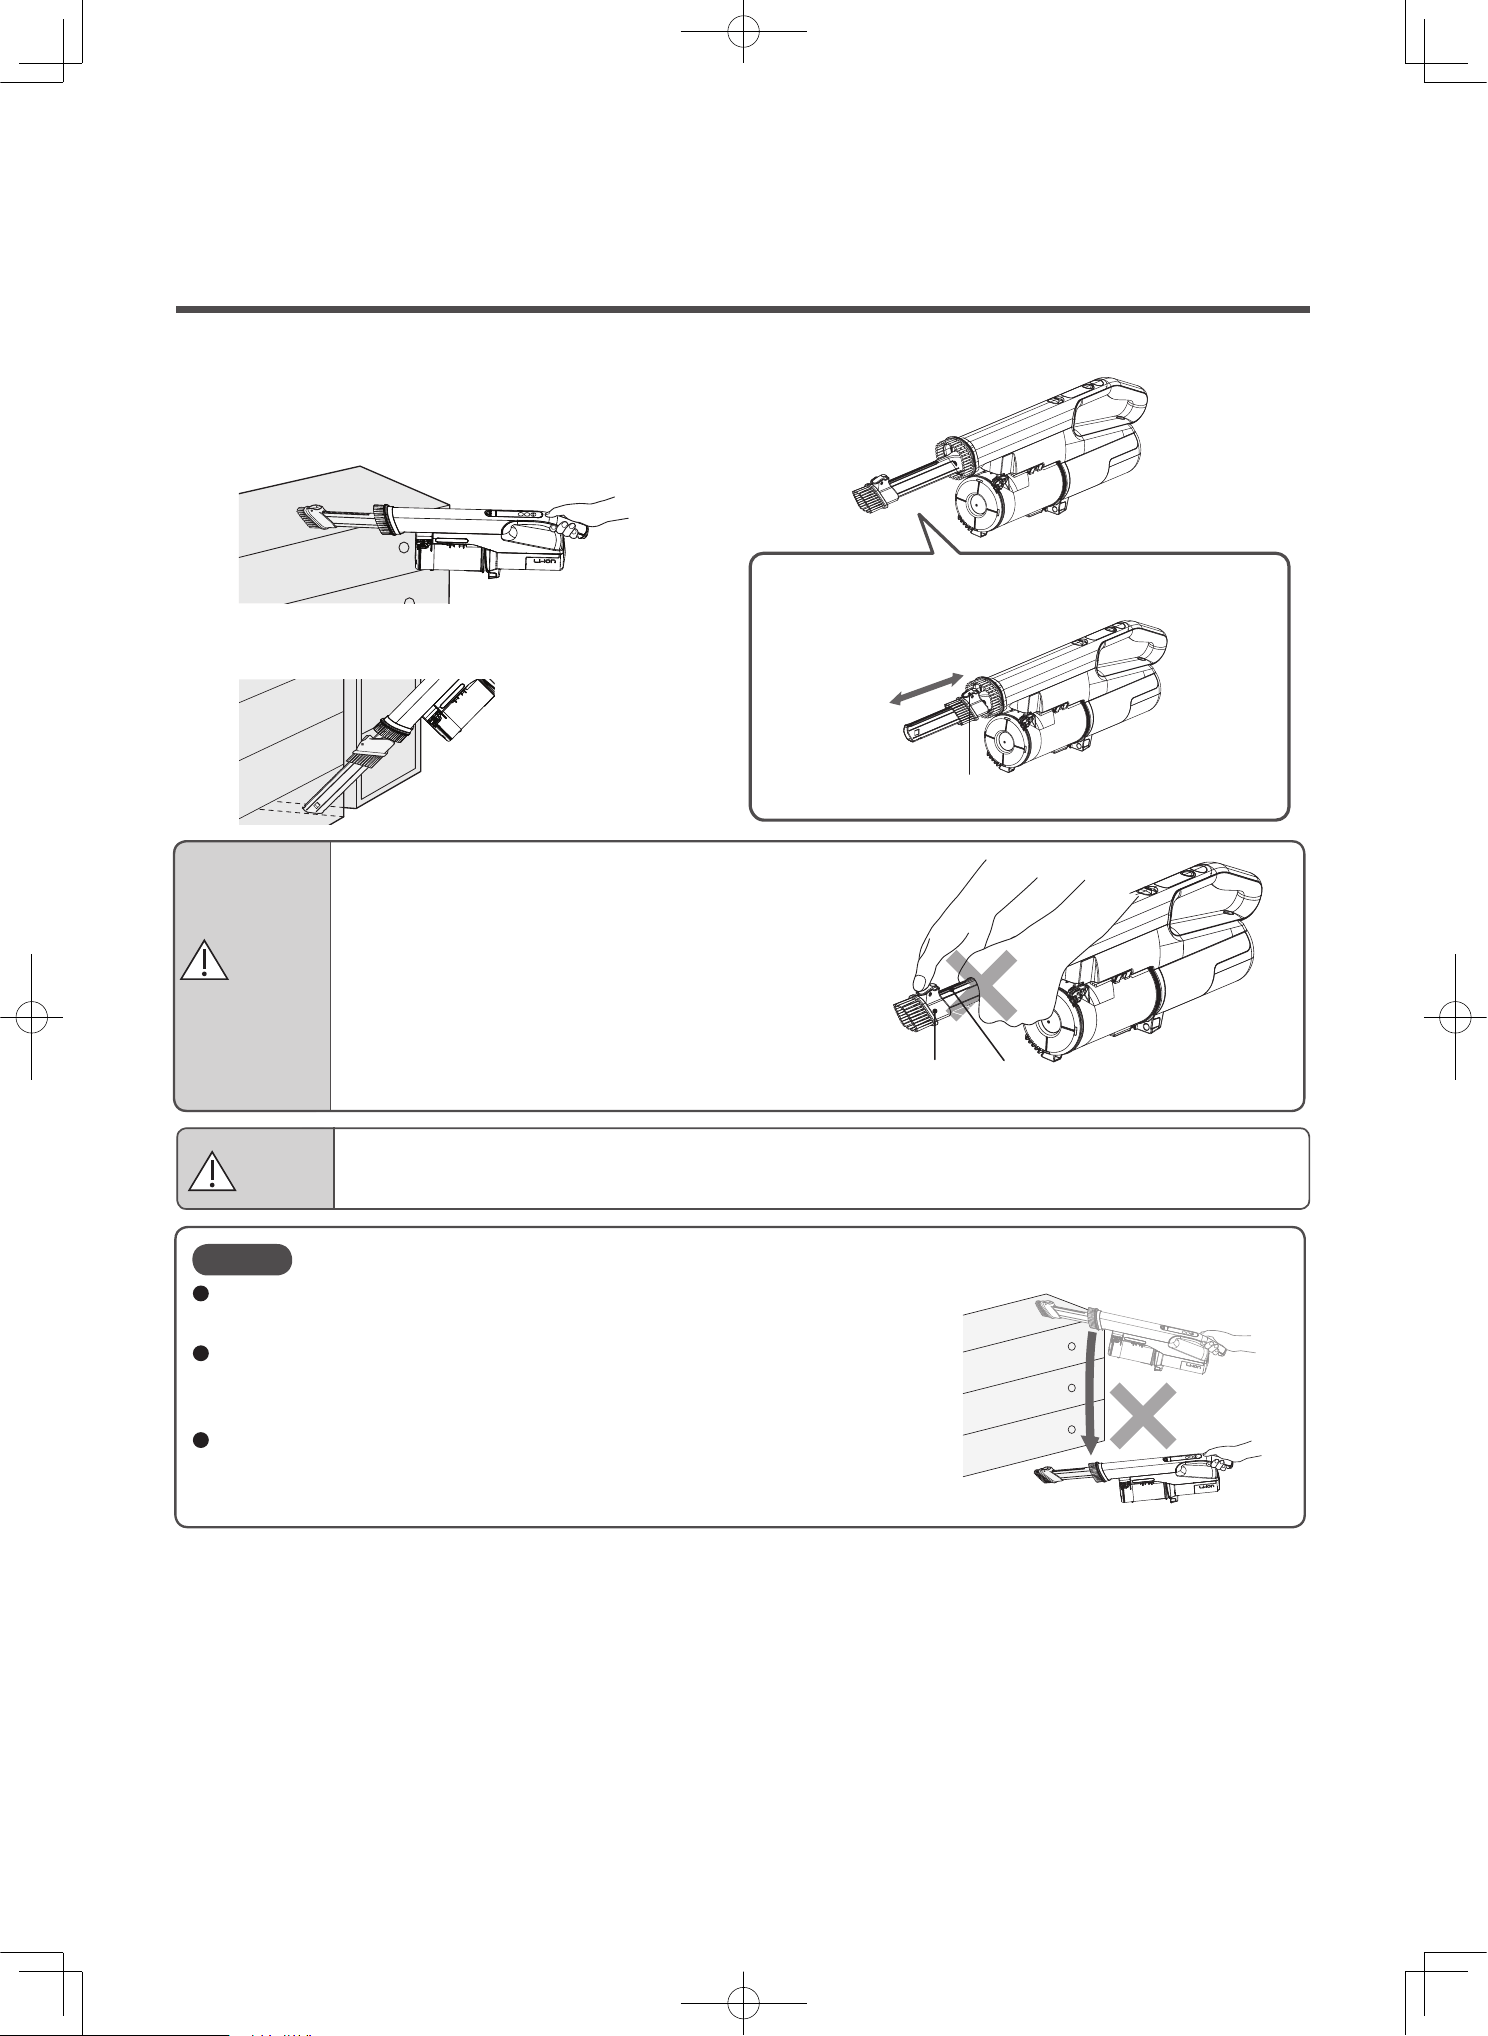
2-way crevice nozzle
Swiftly perform cleaning with the brush on the tip.
The mode can be switched to crevice nozzle mode with one touch so it is
useful when cleaning book shelves and crevices.
To switch between the crevice nozzle and the crevice
brush, hold down the button and slide the brush in the
direction indicated by the arrow.
Adjust
Brush Slide groove
Slide the brush while holding down the button
WARNING
Risk of injury
When sliding the brush, do not hold onto the slide
grooves. Your hand might get pinched.
Risk of damage
Do not press against areas that are particularly easy to be damaged, such as pianos.
CAUTION
It might be damaged if excessive force is applied.
Do not drop from high places.
You can wash the 2-way crevice nozzle. After washing, allow it to dry
naturally before use.
Using it while wet might lead the vacuum cleaner to malfunction.
If there is dust and debris on the tip or inside the nozzle, or within the
groove of the slide, remove the dust and debris.
Note
EN-20
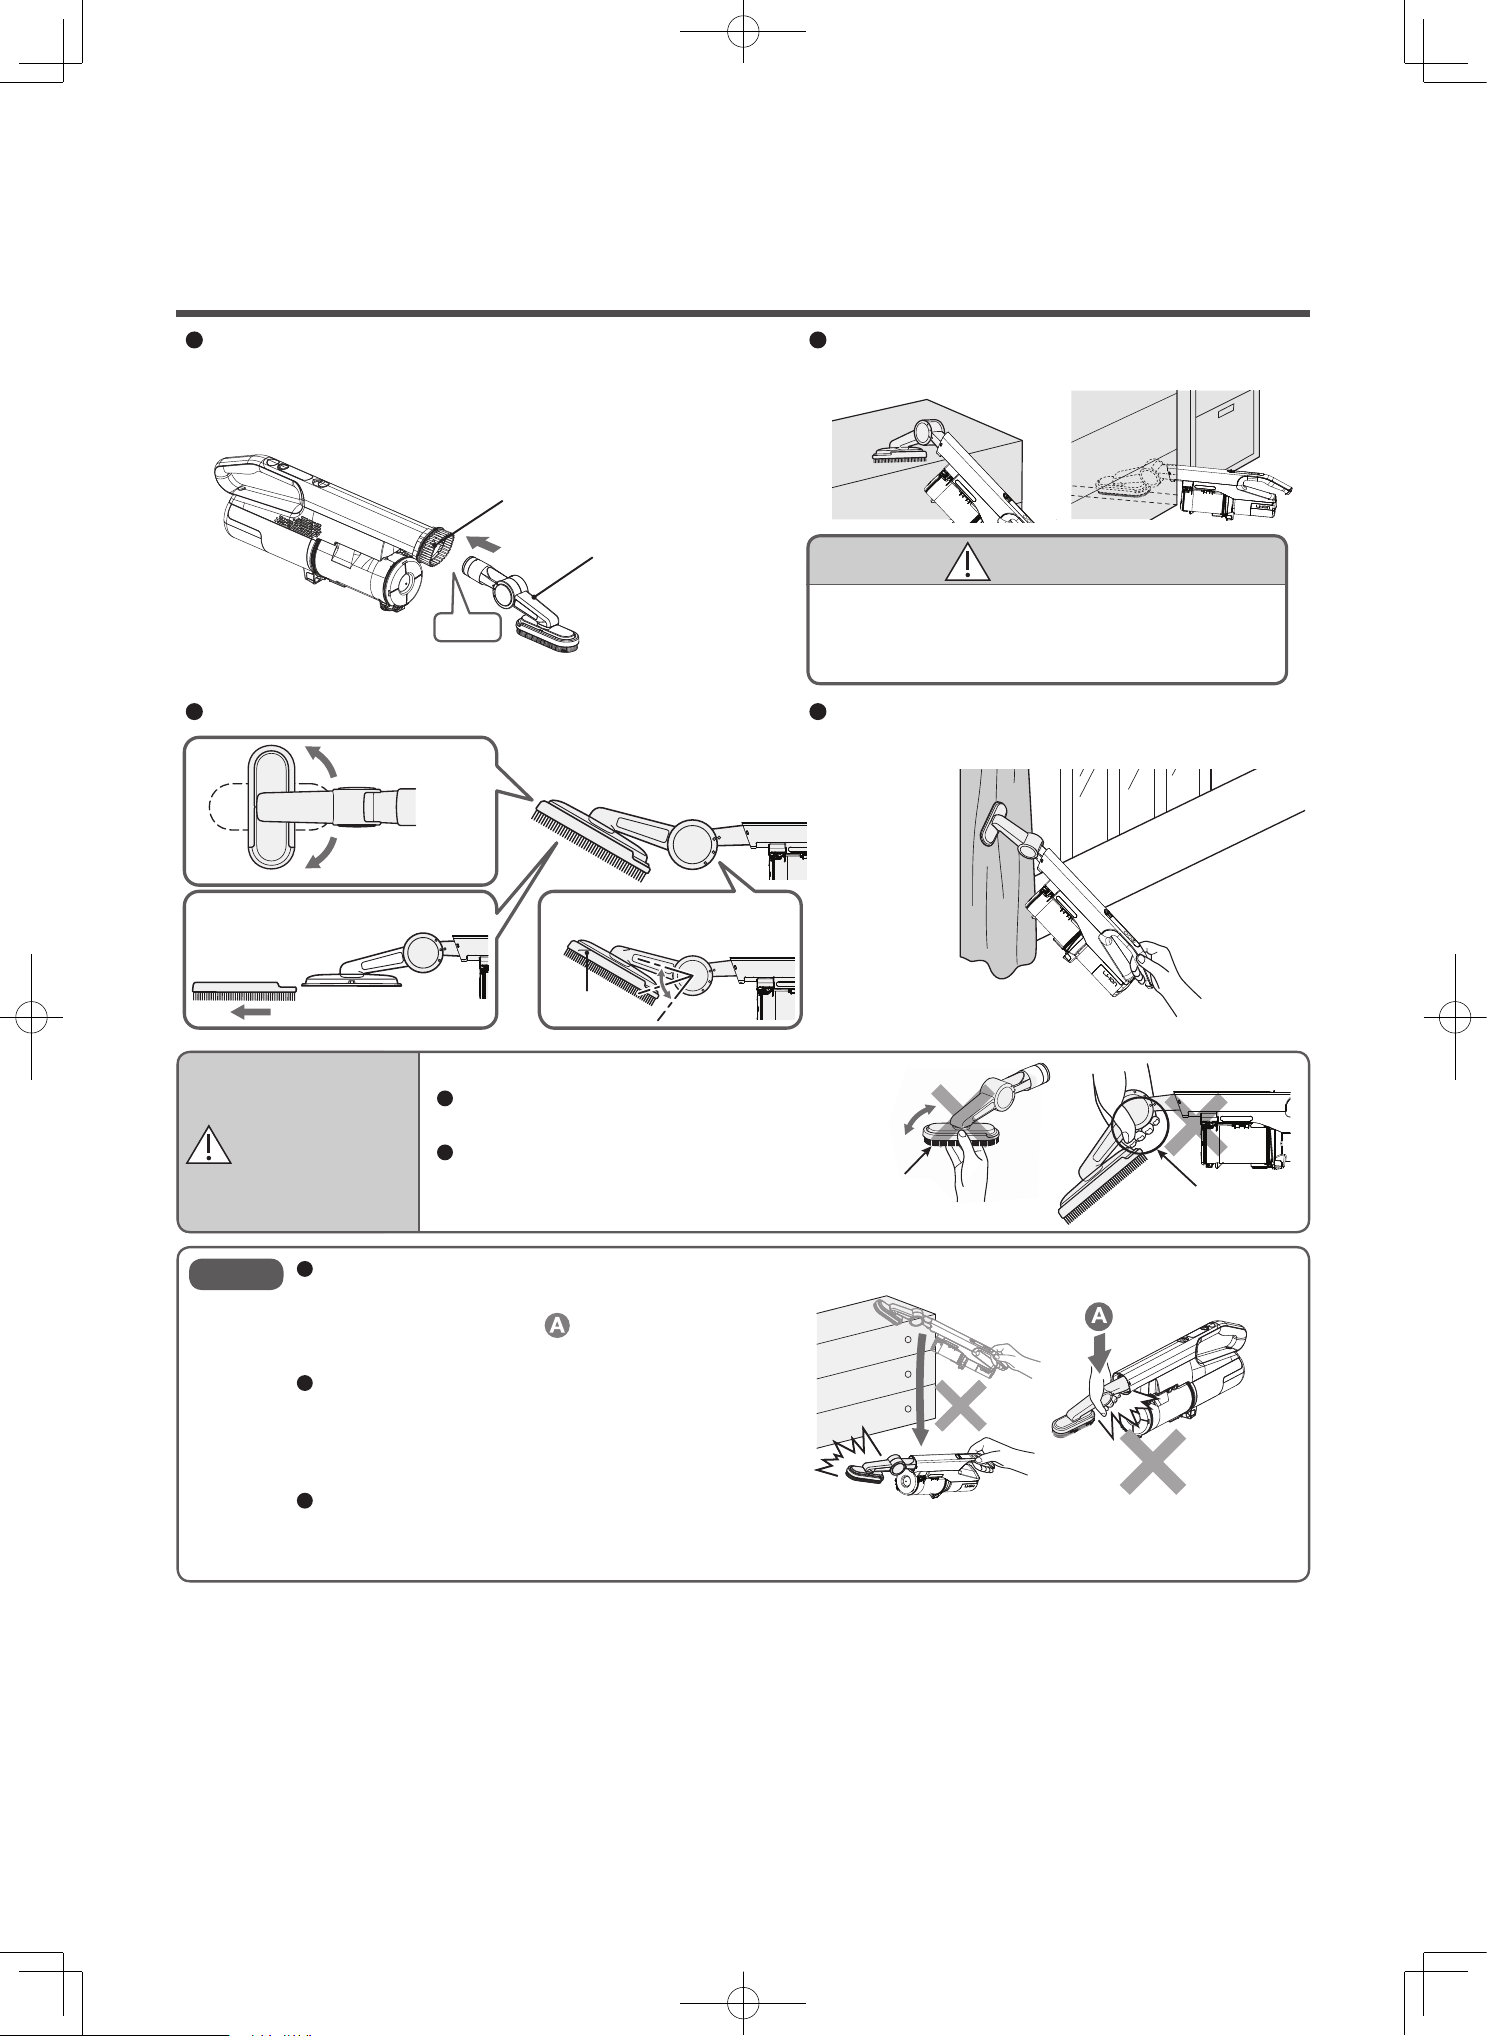
Multi angle nozzle with brush
Use by attaching to the inlet of the handy cleaner.
Inlet
You can rotate in
90° increments.
You can remove the brush
and perform
maintenance.
Side
Brush
Rotating section
Inlet
(do not insert fingers)
3 angles are available.
Insert
Multi angle nozzle
with brush
You can change to various angles according to the area to be cleaned.
If you are using the nozzle with the brush removed,
use it to collect dust on clothing, curtains, etc.
It is a free rotating nozzle that can reach far
above furniture and into crevices.
WARNING
Risk of injury.
When changing the angle, do not hold the
rotating section. Your hand may get pinched.
Do not rotate while your fingers are inserted /
into the inlet of the Multi angle nozzle (with
brush). Your fingers may get pinched.
When using the Multi angle nozzle (with brush),
do not let it fall or add excessive force in the
direction of the arrow in.
Doing so may result in damage.
You can wash the Multi angle nozzle (with brush)
with water. After washing, thoroughly air dry
before use. Vacuuming water may result in
damage.
If fibrous dust clogs the end or interior of the
Multi angle nozzle with brush, suction power is
reduced, so remove the dust.
Note
CAUTION
Risk of damage.
Do not press against areas that are particularly
easy to be damaged, such as pianos.
EN-21
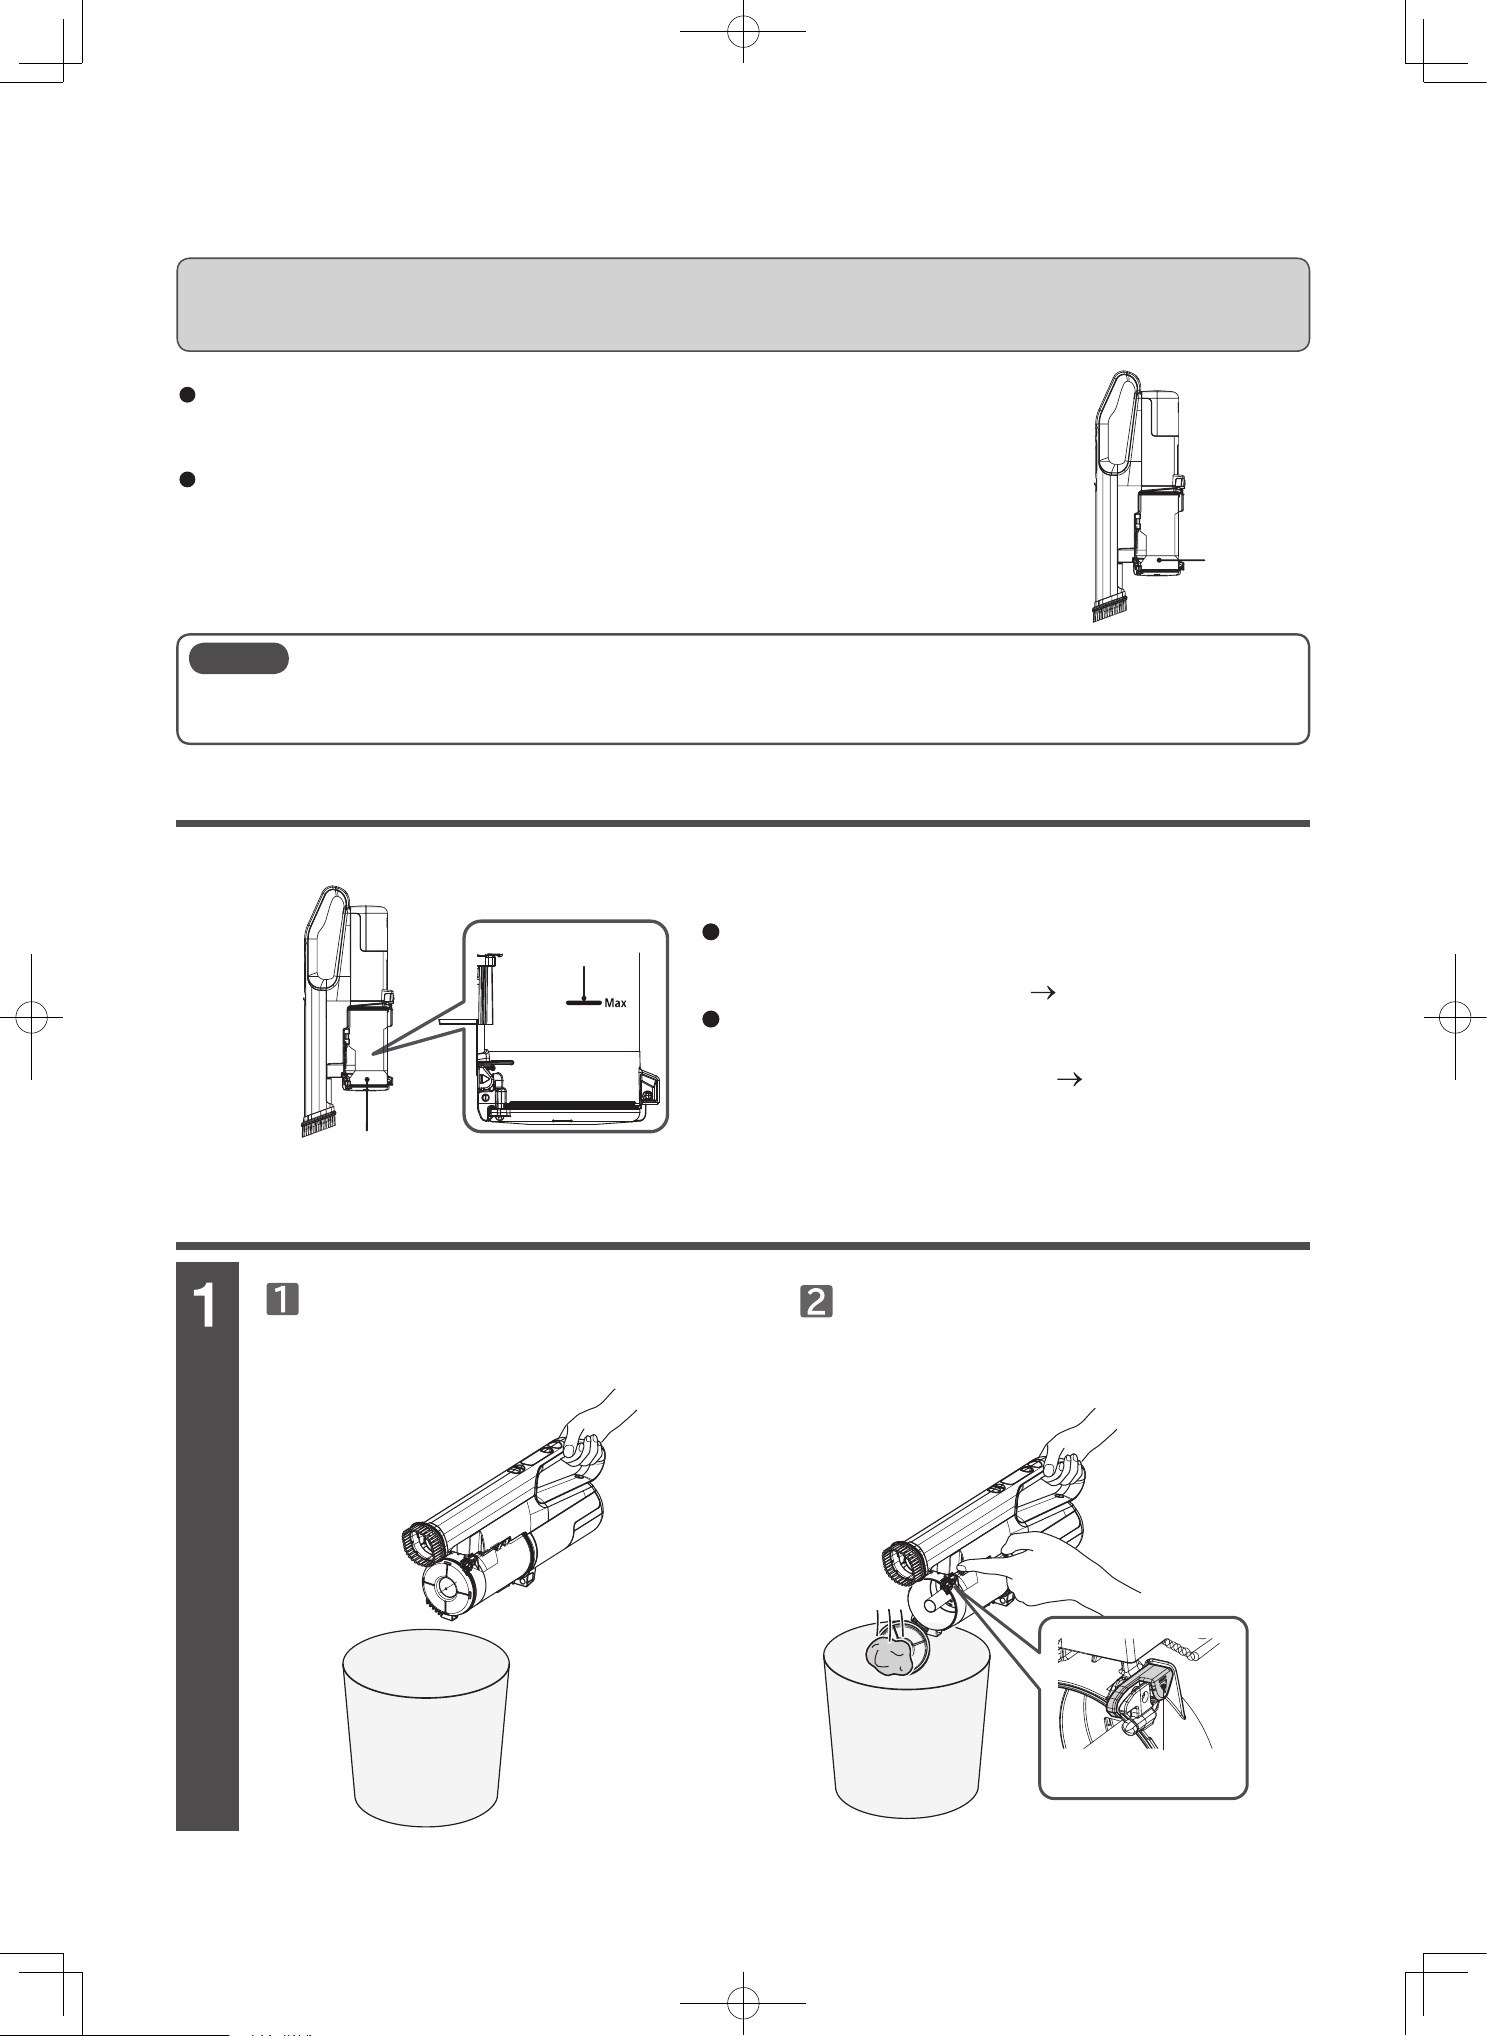
Checking the level of dust and debris in dust case
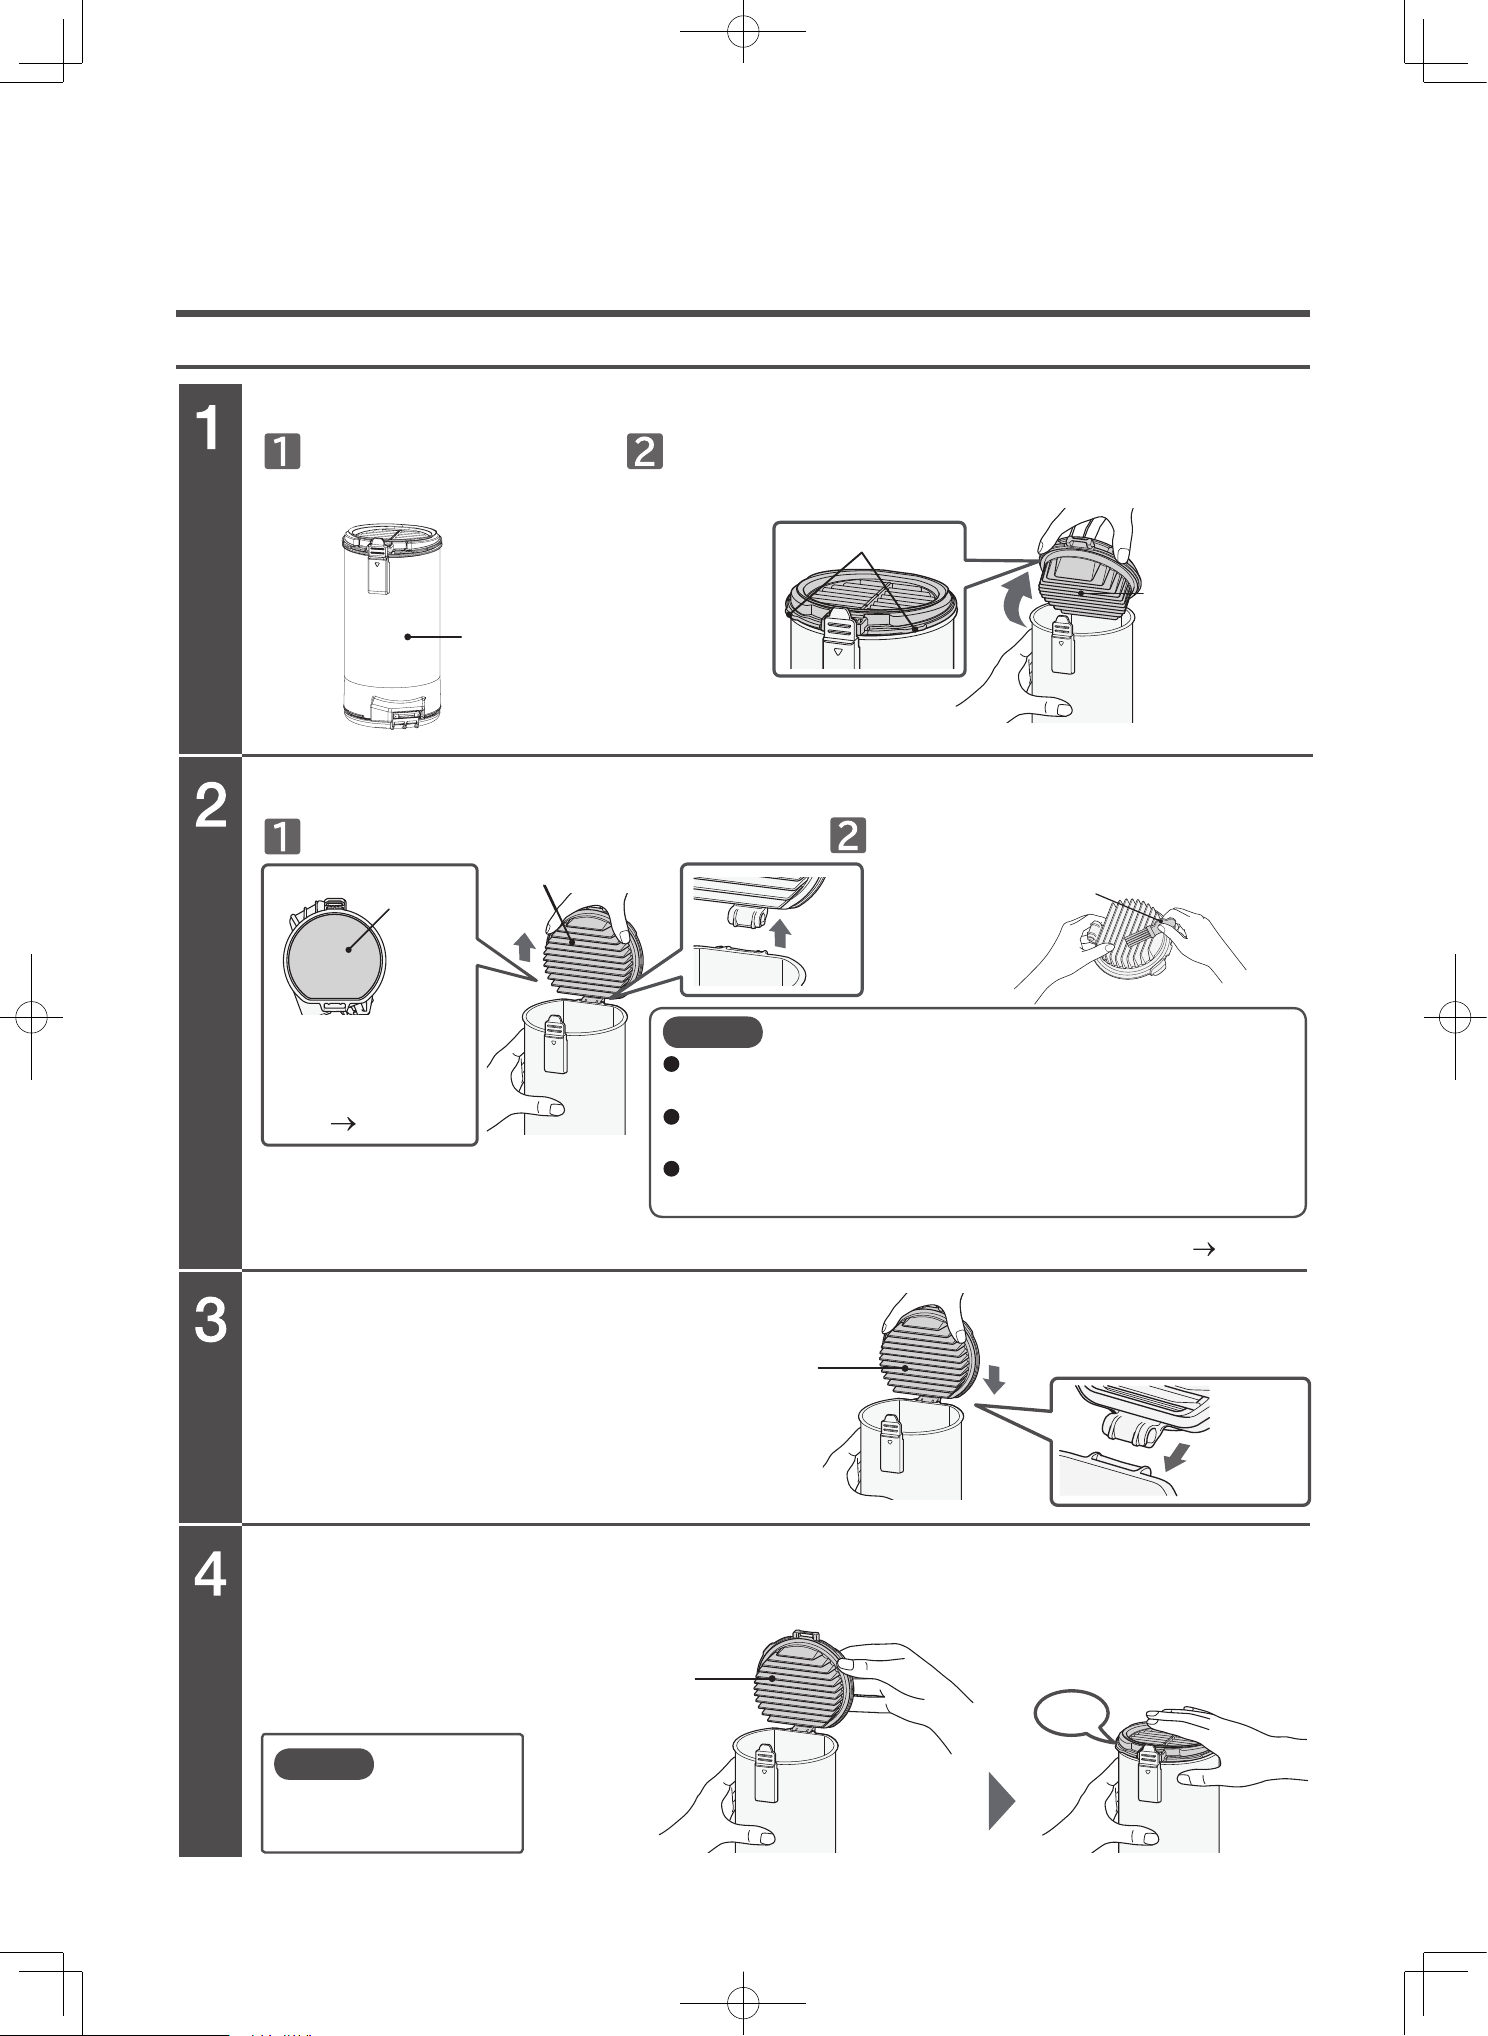
Emptying the dust case [when attached to the vacuum cleaner]
Dust case
Max line
Dust case
When dispose the dust and debris from the dust
case, remove the dust and debris adhered to the
dust case and clean the filter.
(P.EN-21, EN-23)
If dust and debris is wrapped around the inner
cylinder filter and cannot be removed, detach and
maintain the inner cylinder filter. (P.EN-25)
Emptying the dust case and cleaning the filters
Fine dust and debris might disperse in the air when emptying the dust case.
Empty the dust case in a well-ventilated environment such as outdoors, or wear a mask and avoid
breathing in the dust and debris.
Check whether the dust and debris in the dust case has reached the max line.
Note
Cyclonic cleaners does not require using paper bags as high suction power is used to compress dirt and
debris. We recommend disposal of dust and debris after each use, and frequent filter maintenance.
Tilt the vacuum cleaner and position the dust
case to face the trash can.
Press the disposal button.
Empty the dust case before the dust level reaches the Max line as indicated in the
manual. If the dust exceeds the Max line, it may become more difficult to remove
the dust and debris from the case.
Dust and debris might not rotate depending on the type of dust and debris and
how it accumulates, which is normal.
Dust disposal button
EN-22
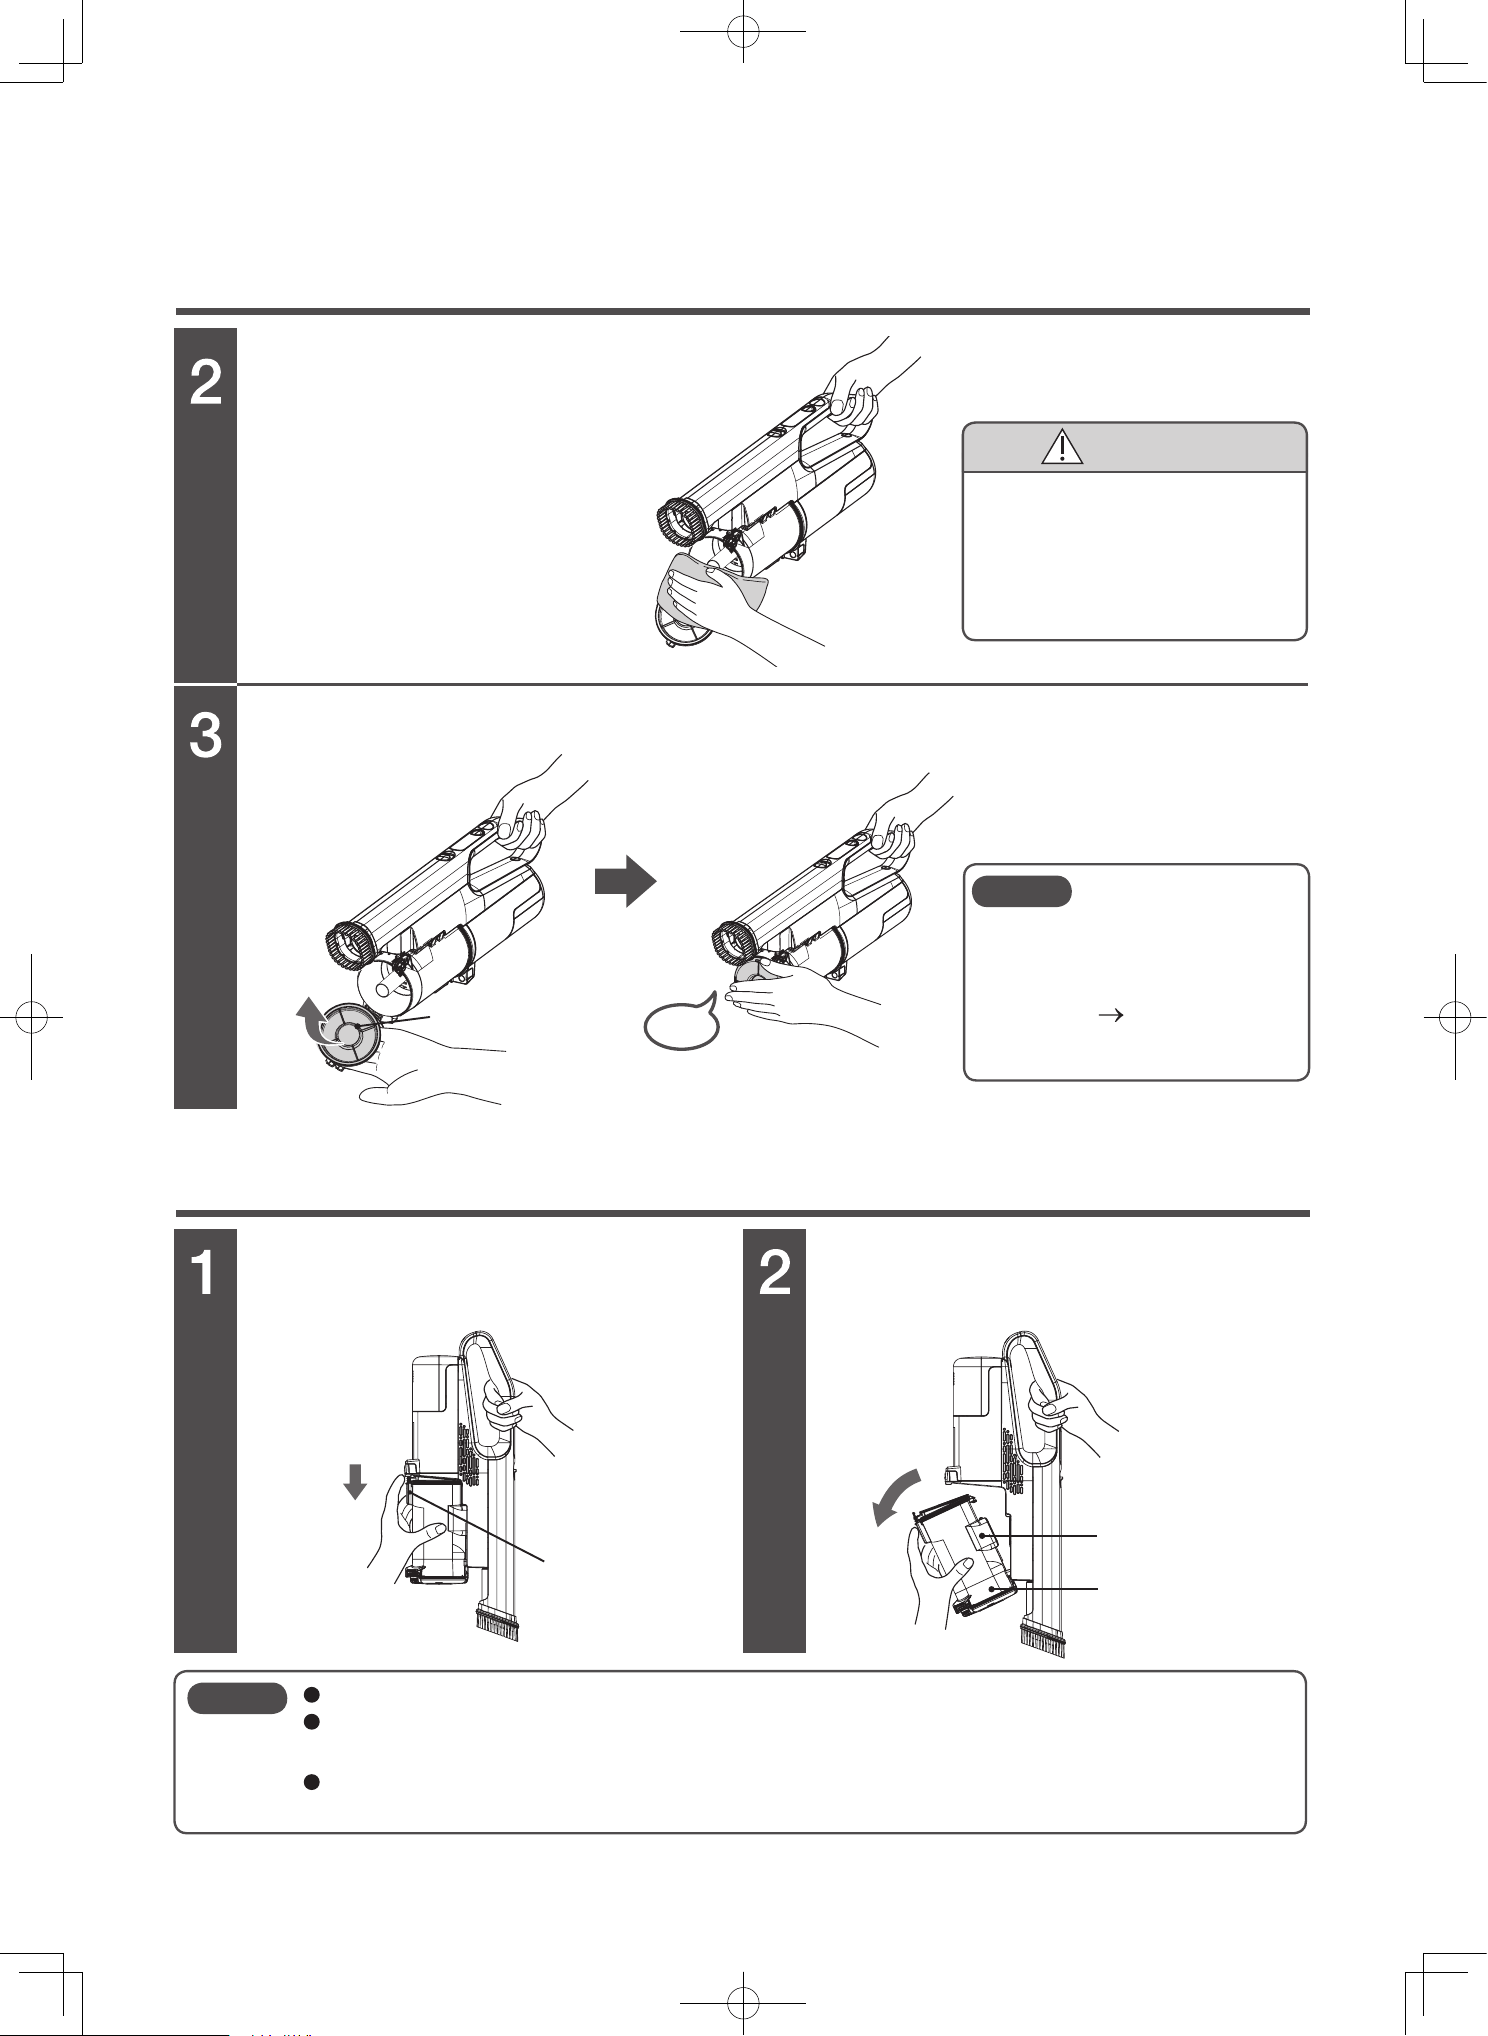
Emptying the dust case (continued)
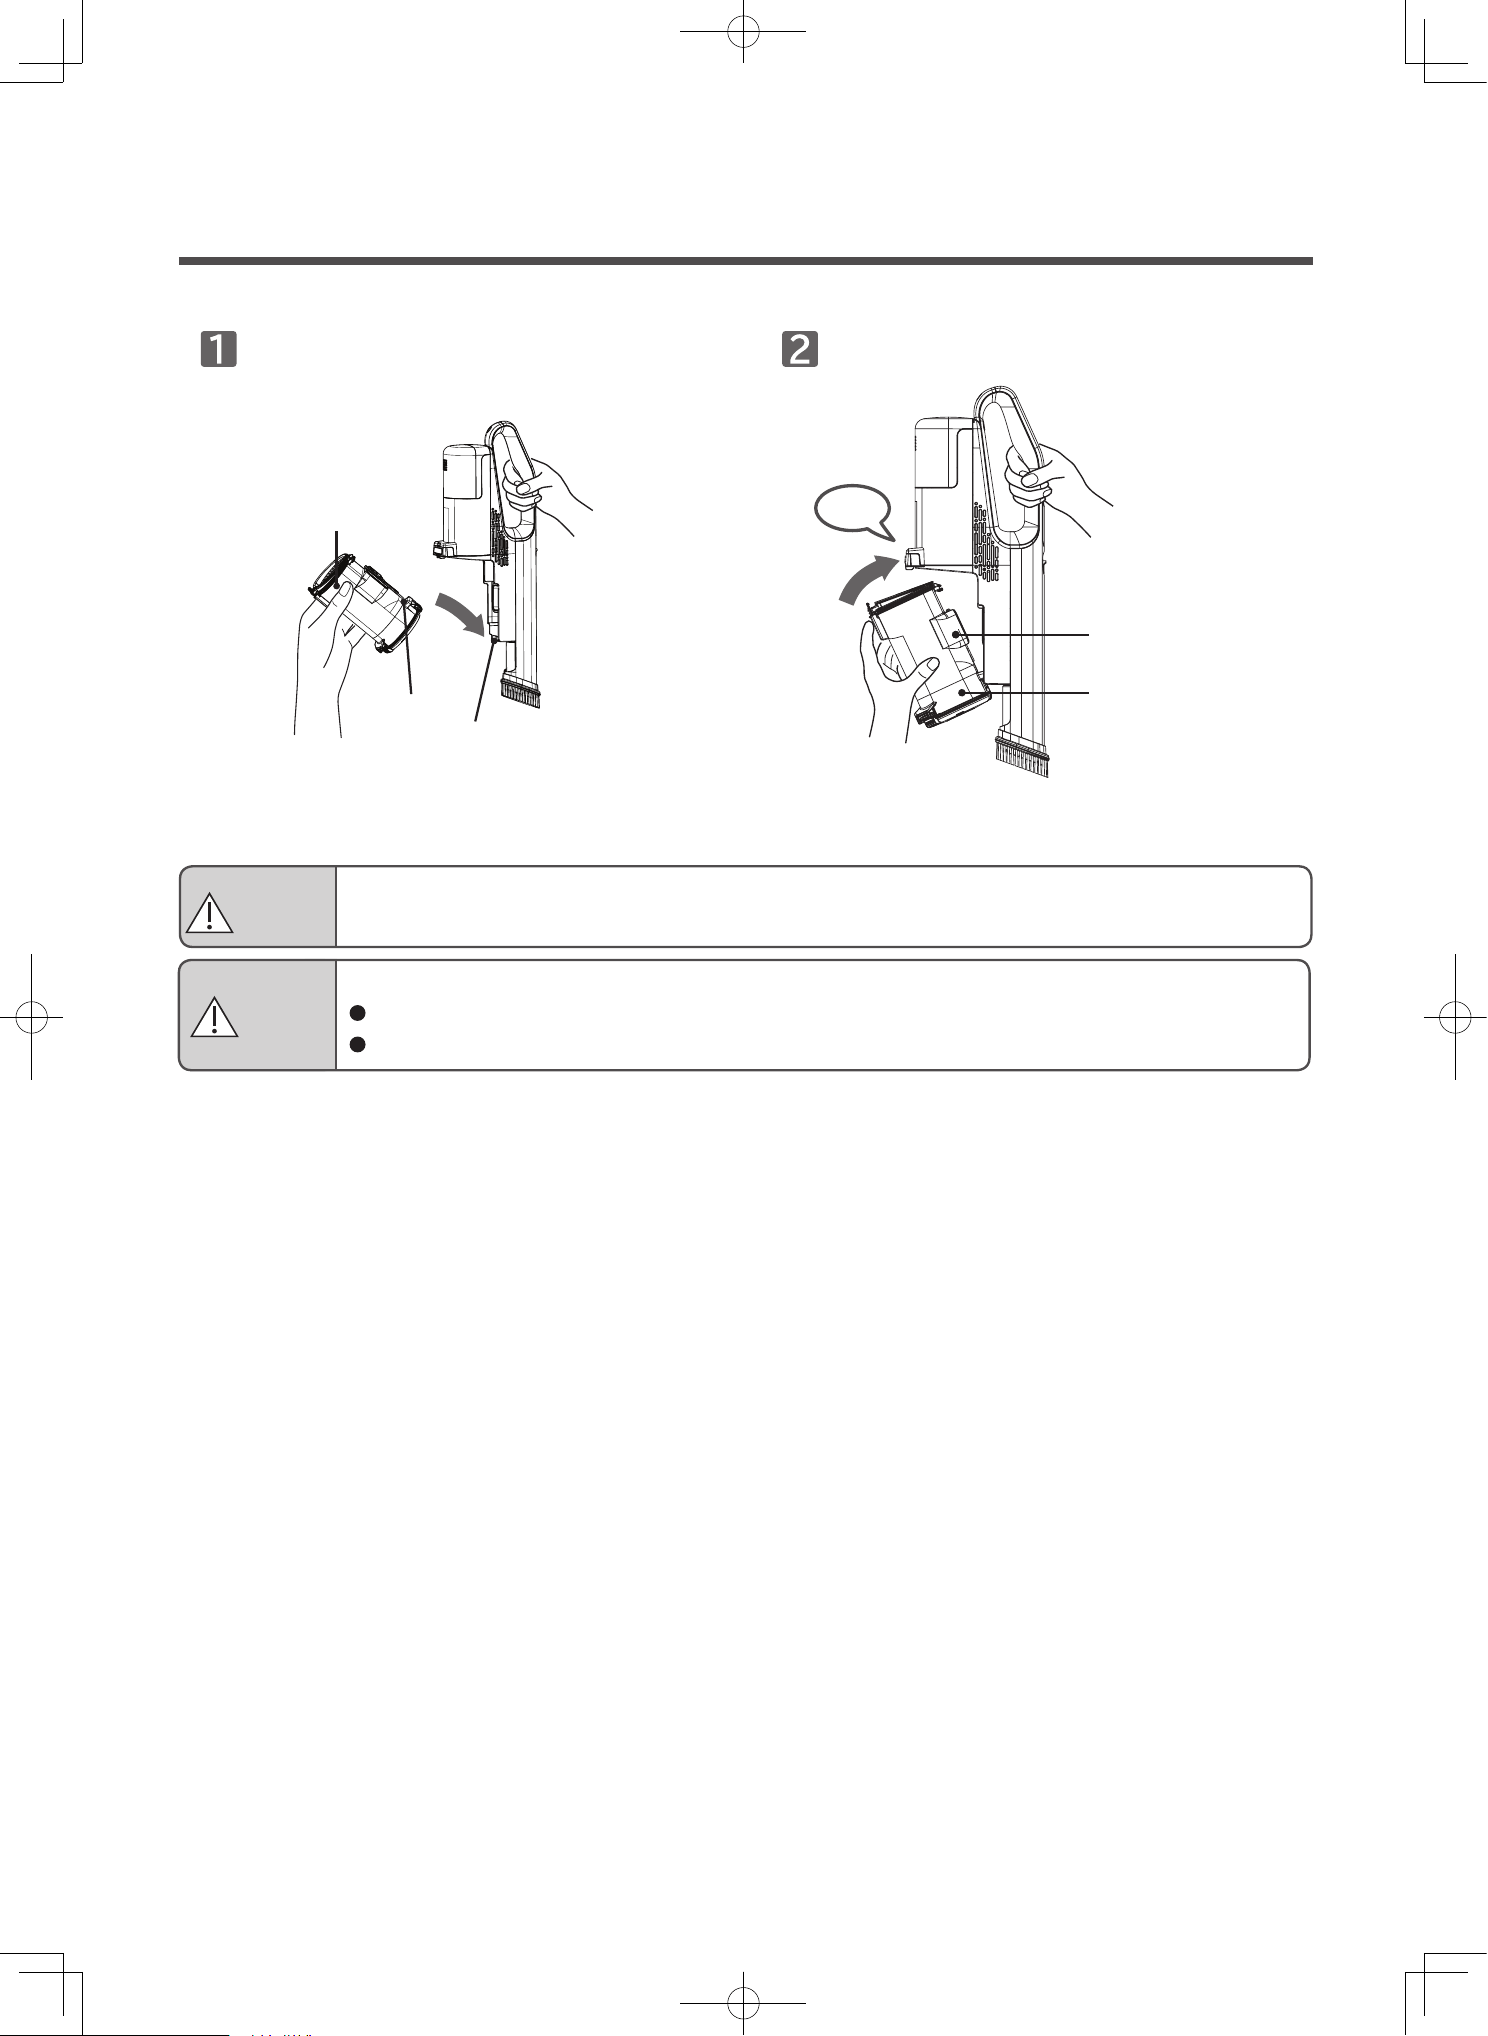
Emptying the dust case [when removed from the vacuum cleaner]
Remove attached dust and debris.
Close the dust case lid.
Hold the dust case and pull the
dust case release button.
Pull out the dust case in the
arrow direction.
Remove the dust and debris and
fine dust and debris using soft
cloths, etc.
Close until you hear a “click” sound.
Dust case lid
Dust case
release button
Dust and debris
collection inlet
Dust case
Pull
Pull
Click
In order to maintain strong
sucking power, regularly perform
frequent maintenance
of the filter.
(P.EN-24, EN-25,
EN-28)
Do not detach the dust case with the vacuum cleaner set down. Dust and debris might spill.
If dust and debris spills inside the vacuum cleaner, remove the dust and debris and attach the
dust case as it was.
Do not turn the dust and debris collection inlet downward when holding the dust case or placing it.
Dust and debris might spill.
Note
Note
CAUTION
Risk of damage
You might have unintentionally
vacuumed sharp objects such
as glass shards or pins. Be
careful when performing
maintenance.
EN-23
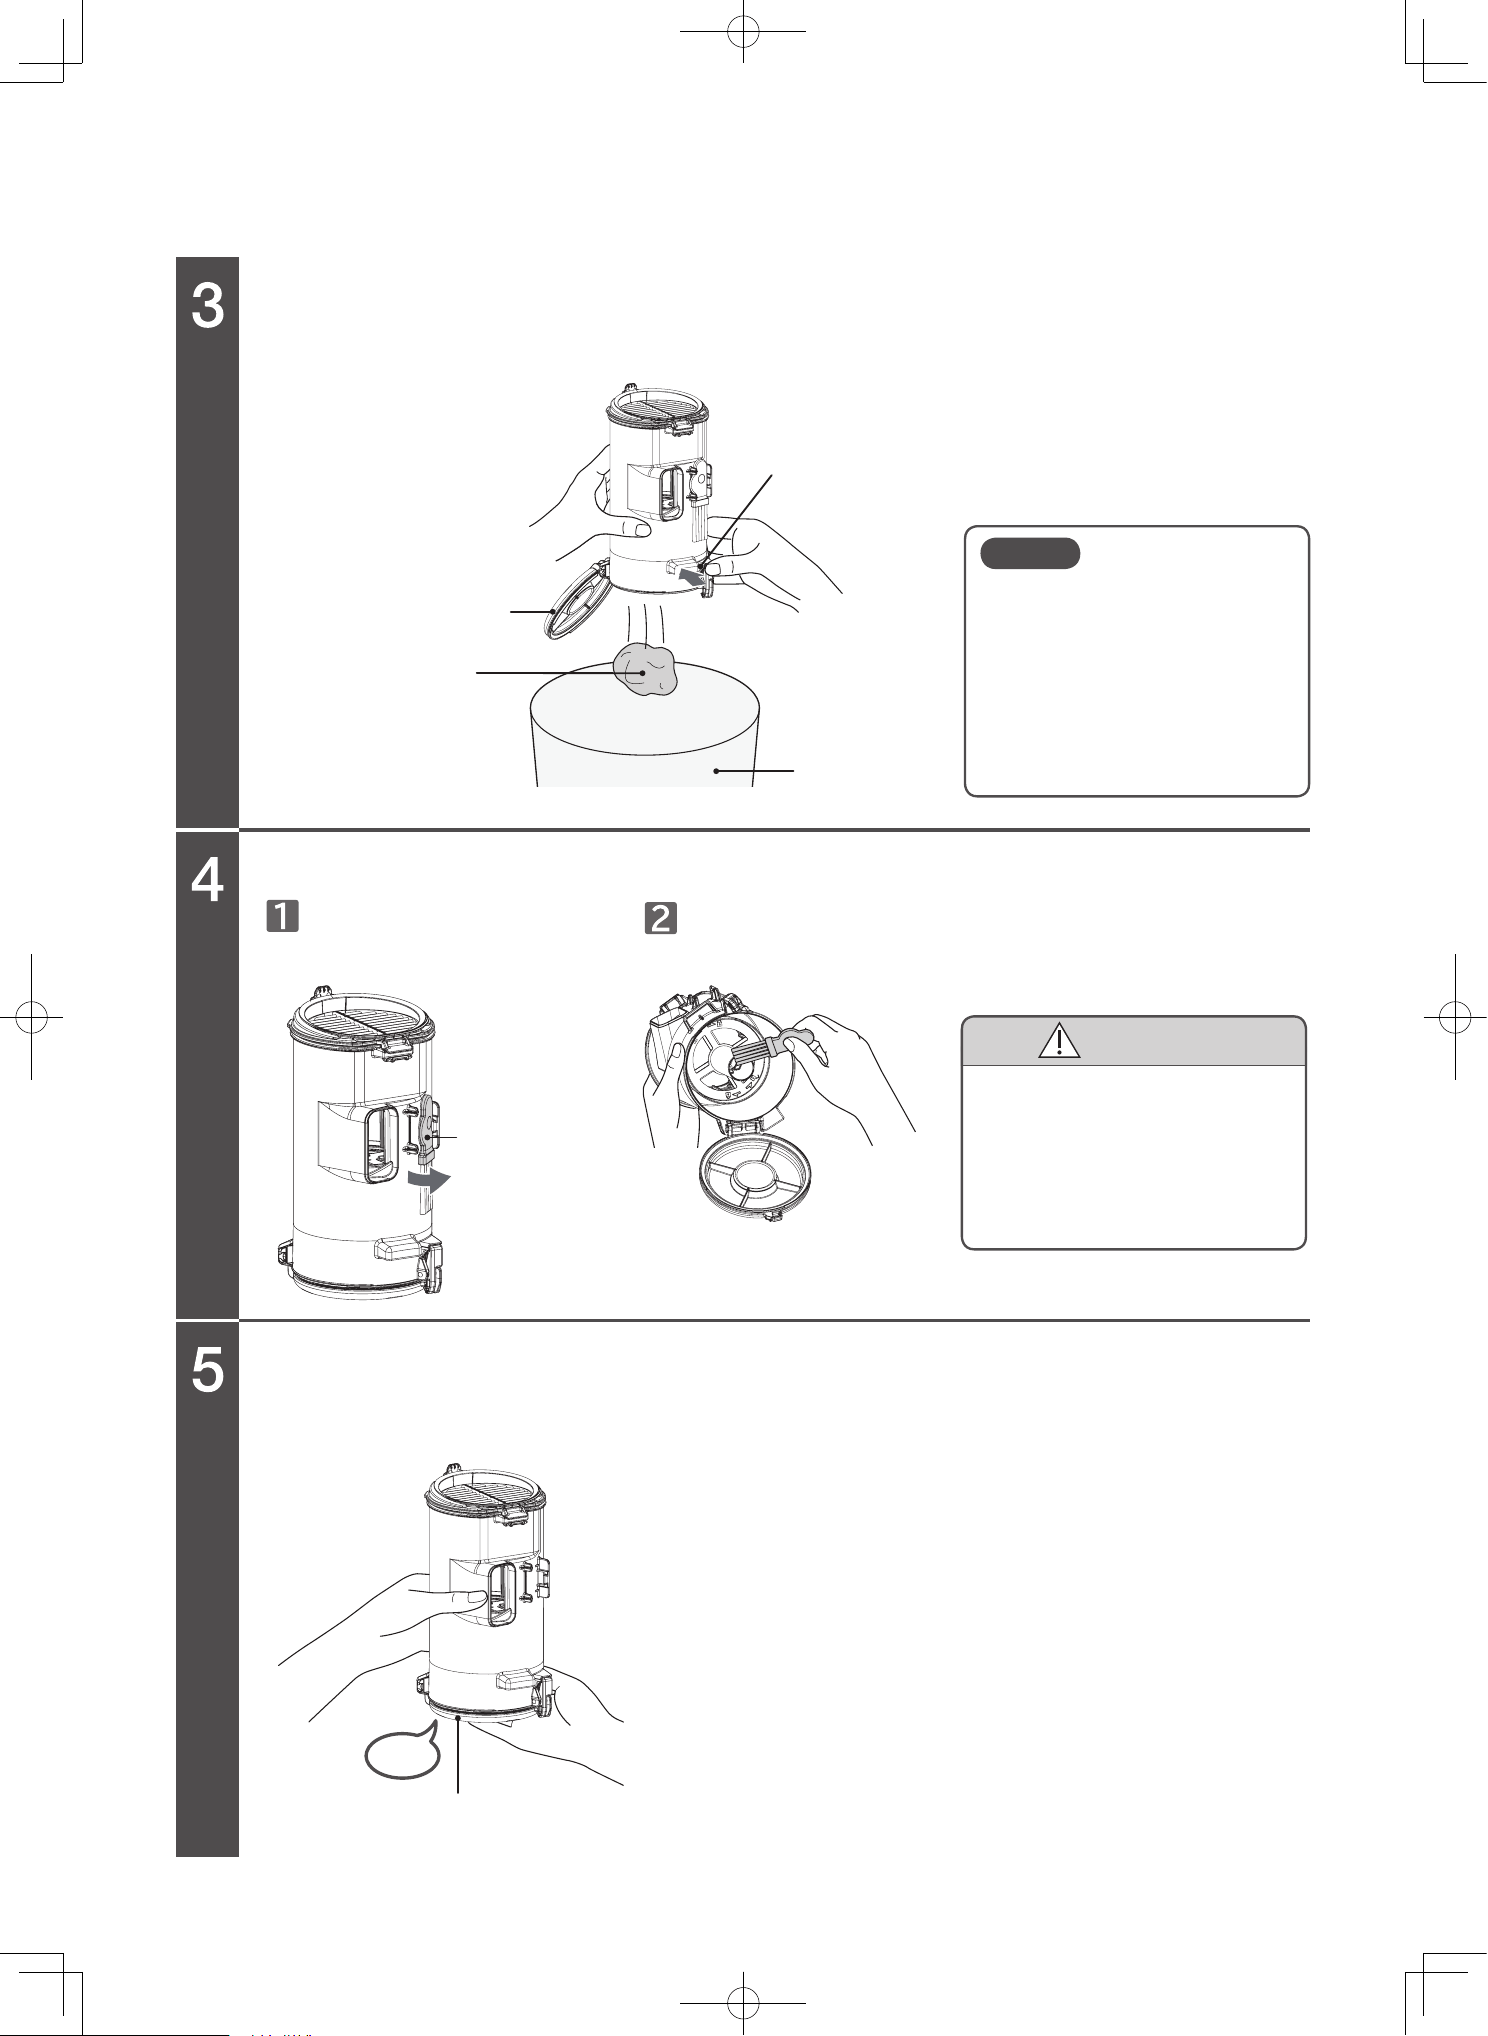
Open the dust case lid and empty the dust case.
Remove attached dust and debris.
Close the dust case lid.
Close until you hear a “click” sound.
Detach the maintenance brush
attached to the back side of the
dust case.
Remove the dust and debris and fine dust and debris with the
maintenance brush.
Make sure the dust case lid is facing down, and then press the dust disposal button.
Dust case lid
Dust disposal button
Dust and debris
Maintenance
brush
Click
Dust case lid
Trash can
Dust and debris might be hard
to remove depending on the
type of dust and debris and
how it accumulates. Add
vibration by tapping the sides
of the dust case or detaching
the inner cylinder filter.
Note
CAUTION
Risk of injury
You might have unintentionally
vacuumed sharp objects such
as glass shards or pins. Be
careful when performing
maintenance.
Safety precautions
Warning symbols used in this manual
Control buttons
Vacuum cleaner
Exhaust
port
Power head
This section describes safety precautions that must be followed in order to prevent injury to the user or other
people, or damage to property. Please thoroughly read and follow the precautions in this manual.
The severity of injury or damage that might occur if these precautions are ignored or the vacuum cleaner is used
improperly is classified and explained below. Hitachi will not be held responsible for any injury or damage that occurs
as a result of ignoring these precautions.
Do not repair or modify any part of the vacuum cleaner. Do not disassemble any part of the
vacuum cleaner unless instructed to in this manual.
Failure to heed this warning might cause leaking of the battery, the generation of heat, fire, or injury.
For repairs, please contact a Hitachi authorized service agent.
Keep the vacuum cleaner and AC adapter away from water and other liquids.
Failure to heed this warning might lead to rupturing of the battery, fire, malfunction, or electric shock.
Do not connect the terminals of the vacuum cleaner and AC adapter with metal objects such
as a wire and pin.
Do not carry or store with metal necklaces, hairpins, etc.
Failure to heed this warning might cause the vacuum cleaner to malfunction or cause the
battery to short-circuit, resulting in leaking, the generation of heat, rupturing, or fire.
Do not throw into fires or apply heat.
Do not charge, use, or leave near sources of heat such as fire or a stove, under direct sunlight
or in cars exposed to the sun, etc.
Failure to heed this warning might cause the battery to leak, generate heat, rupture, smoke, fire, deform, or malfunction.
DANGER
WARNING
CAUTION
This indicates warnings that, if ignored, could present imminent danger of
serious injury or death.
This indicates warnings or cautionary notes.
This indicates prohibited actions that must not be performed.
This indicates instructions that must be followed.
This indicates warnings that, if ignored, could result in serious injury or death.
This indicates warnings that, if ignored, could result in minor injury or
property damage.
EN-24
Cleaning the filters
Clean filter
Open the clean filter.
Remove dust and debris from the clean filter.
Attach the clean filter.
Close the clean filter.
Attach the clean filter in the
reverse order of removal.
Press firmly until you hear a “click”
sound.
Clean filter
Clean filter
Attach
Click
Set the dust case on the
floor.
Detach the clean filter. Remove attached dust and debris by using
the maintenance brush.
Grab and hold the lower part of the dust case, lift up the
knobs of the clean filter, and open the cover in the direction
indicated by the arrow.
Dust case
Knobs
Clean filter
Maintenance brush
Sponge filter
Detach
Wash the sponge
filter with water if
there is dirt on the
filter. (P.EN-30)
Clean filter
Perform maintenance (wash with water) when you are concerned about dirt or the suction power is weak. (P.EN-28)
When removing dust and debris, do not slap the clean filter
onto the floor, etc. Failure to do so might cause damage.
Be sure to attach the sponge filter after emptying the
dust case or cleaning the filters.
To clean the clean filter, use the maintenance brush that
was provided with the vacuum cleaner.
Note
Make sure the sponge
filter is attached.
Note
Safety precautions
Please follow these safety precautions.
Warning symbols used in this manual
Terminal
Terminal
Terminal
Cord
AC adapter
Outlet
This section describes safety precautions that must be followed in order to prevent injury to the user or other
people, or damage to property. Please thoroughly read and follow the precautions in this manual.
The severity of injury or damage that might occur if these precautions are ignored or the vacuum cleaner is used
improperly is classified and explained below. Hitachi will not be held responsible for any injury or damage that occurs
DANGER
Do not repair or modify any part of the vacuum cleaner. Do not disassemble any part of the
vacuum cleaner unless instructed to in this manual.
Failure to heed this warning might cause leaking of the battery, the generation of heat, fire, or injury.
For repairs, please contact a Hitachi authorized service agent.
Keep the vacuum cleaner and AC adapter away from water and other liquids.
Failure to heed this warning might lead to rupturing of the battery, fire, malfunction, or electric shock.
Do not connect the terminals of the vacuum cleaner and AC adapter with metal objects such
Do not carry or store with metal necklaces, hairpins, etc.
Failure to heed this warning might cause the vacuum cleaner to malfunction or cause the
battery to short-circuit, resulting in leaking, the generation of heat, rupturing, or fire.
Do not throw into fires or apply heat.
Do not charge, use, or leave near sources of heat such as fire or a stove, under direct sunlight
or in cars exposed to the sun, etc.
Failure to heed this warning might cause the battery to leak, generate heat, rupture, smoke, fire, deform, or malfunction.
This indicates warnings that, if ignored, could present imminent danger of
serious injury or death.
This indicates warnings or cautionary notes.
This indicates prohibited actions that must not be performed.
This indicates instructions that must be followed.
This indicates warnings that, if ignored, could result in serious injury or death.
This indicates warnings that, if ignored, could result in minor injury or
property damage.
AC100-
240V
EN-25
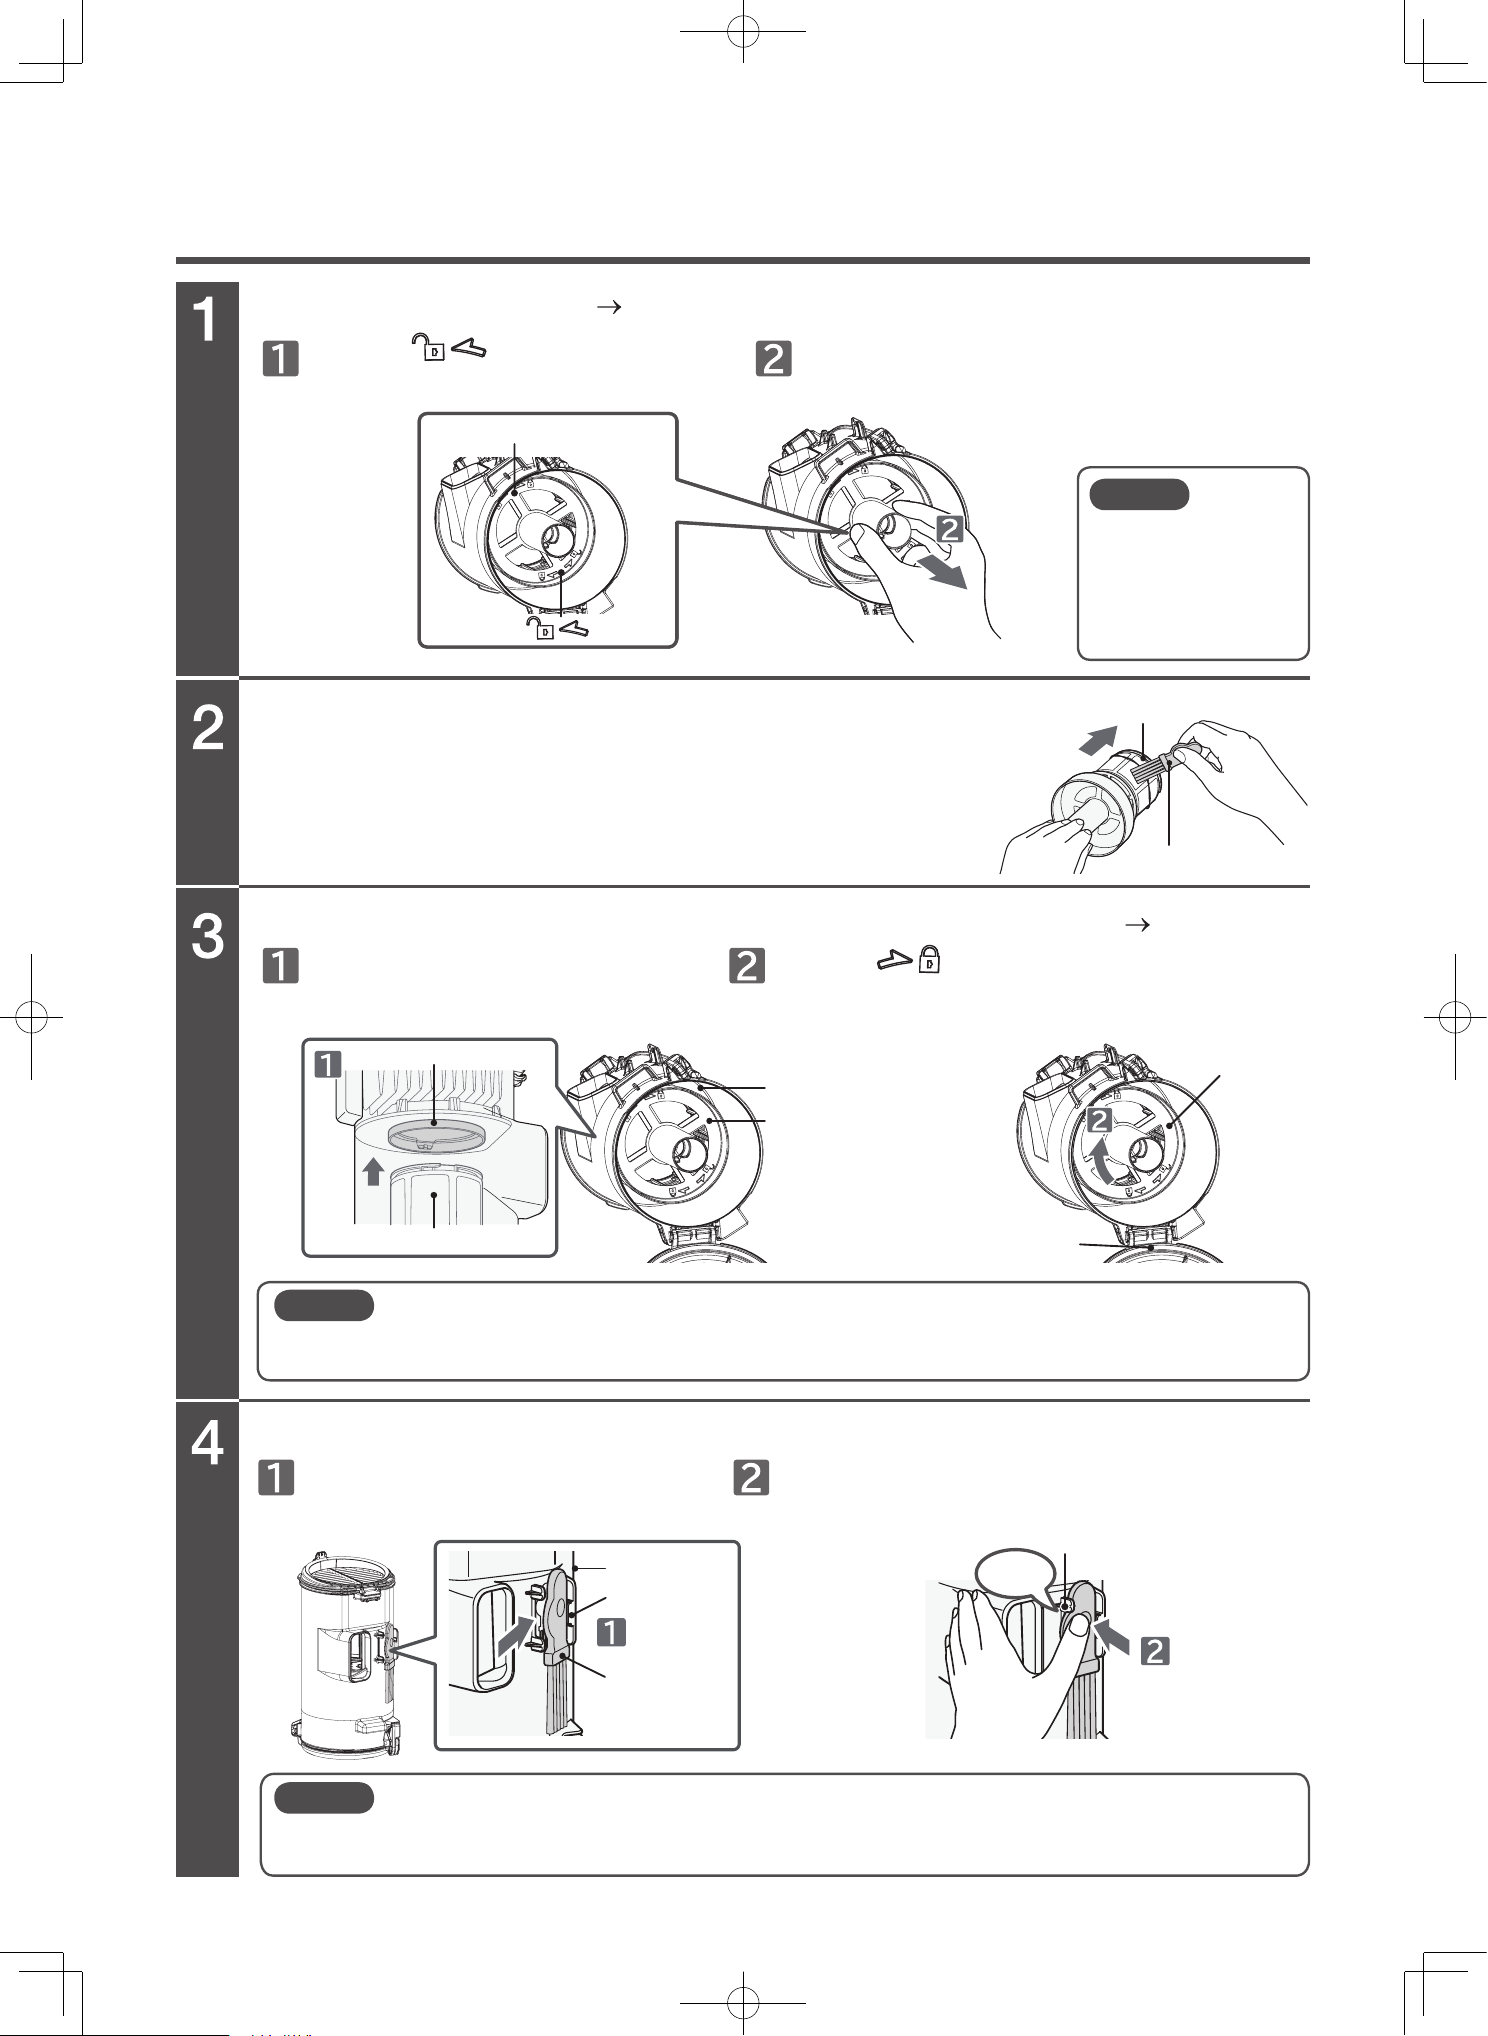
Open the dust case lid (P.EN-23) and remove the inner cylinder filter.
Remove dust and debris from the inner cylinder filter.
Attach the inner cylinder filter and close the dust case lid. (P.EN-23)
Attach the maintenance brush to the back side of the dust case.
You can easily remove dust and debris caught in the inner cylinder
filter by sliding the maintenance brush in the direction indicated by the
arrow.
Inner cylinder filter • inner cylinder cap
Turn the mark on the cap Turn
until it stop
Inner cylinder fill in the center of the
dust case
Attach the maintenance brush
to the hook of the dust case.
Firmly attach the knob of the maintenance
brush until you hear a “click” sound.
Turn the mark on the cap on the dust case
until you hear a “click” sound.
Lift the inner cylinder filter straight up.
Base of the inner cylinder cap
Inner cylinder filter
Maintenance brush
Inner cylinder
Dust case
Dust case
Click
Knob
Push
Hook
Attach
Maintenance
brush
Center
Inner cylinder
Inner cylinder
Dust case lid
Note
Dust and debris
might spill when the
dust case is
removed. Remove
the dust case over a
newspaper, etc.
Note
If the filter is not securely attached, it might fall when you empty the dust case. Additionally,
using the vacuum cleaner with the filter not securely attached might cause abnormal
sounds around the filter.
Note
If the maintenance brush is not securely attached to the back of the dust case, the brush
might fall off when you use the vacuum cleaner. Securely attach the maintenance brush to
the back side of the dust case.
EN-26
Attaching the dust case
Attach the dust case
Attach the groove of the dust case to the
protrusion of the vacuum cleaner.
Dust case
Groove
Protrusion
Click
Dust and debris
collection inlet
Dust case
Firmly attach the dust case until you hear a
"click" sound.
WARNING
Risk of injury
Do not leave the vacuum cleaner leaned up against furniture and place it horizontally on a flat surface.
Risk of injury or damage to the floor.
When carrying the vacuum cleaner while it is set on the charging station, the vacuum cleaner might detach.
Do not move the vacuum cleaner on the floor while it is set on the charging station.
CAUTION
EN-27
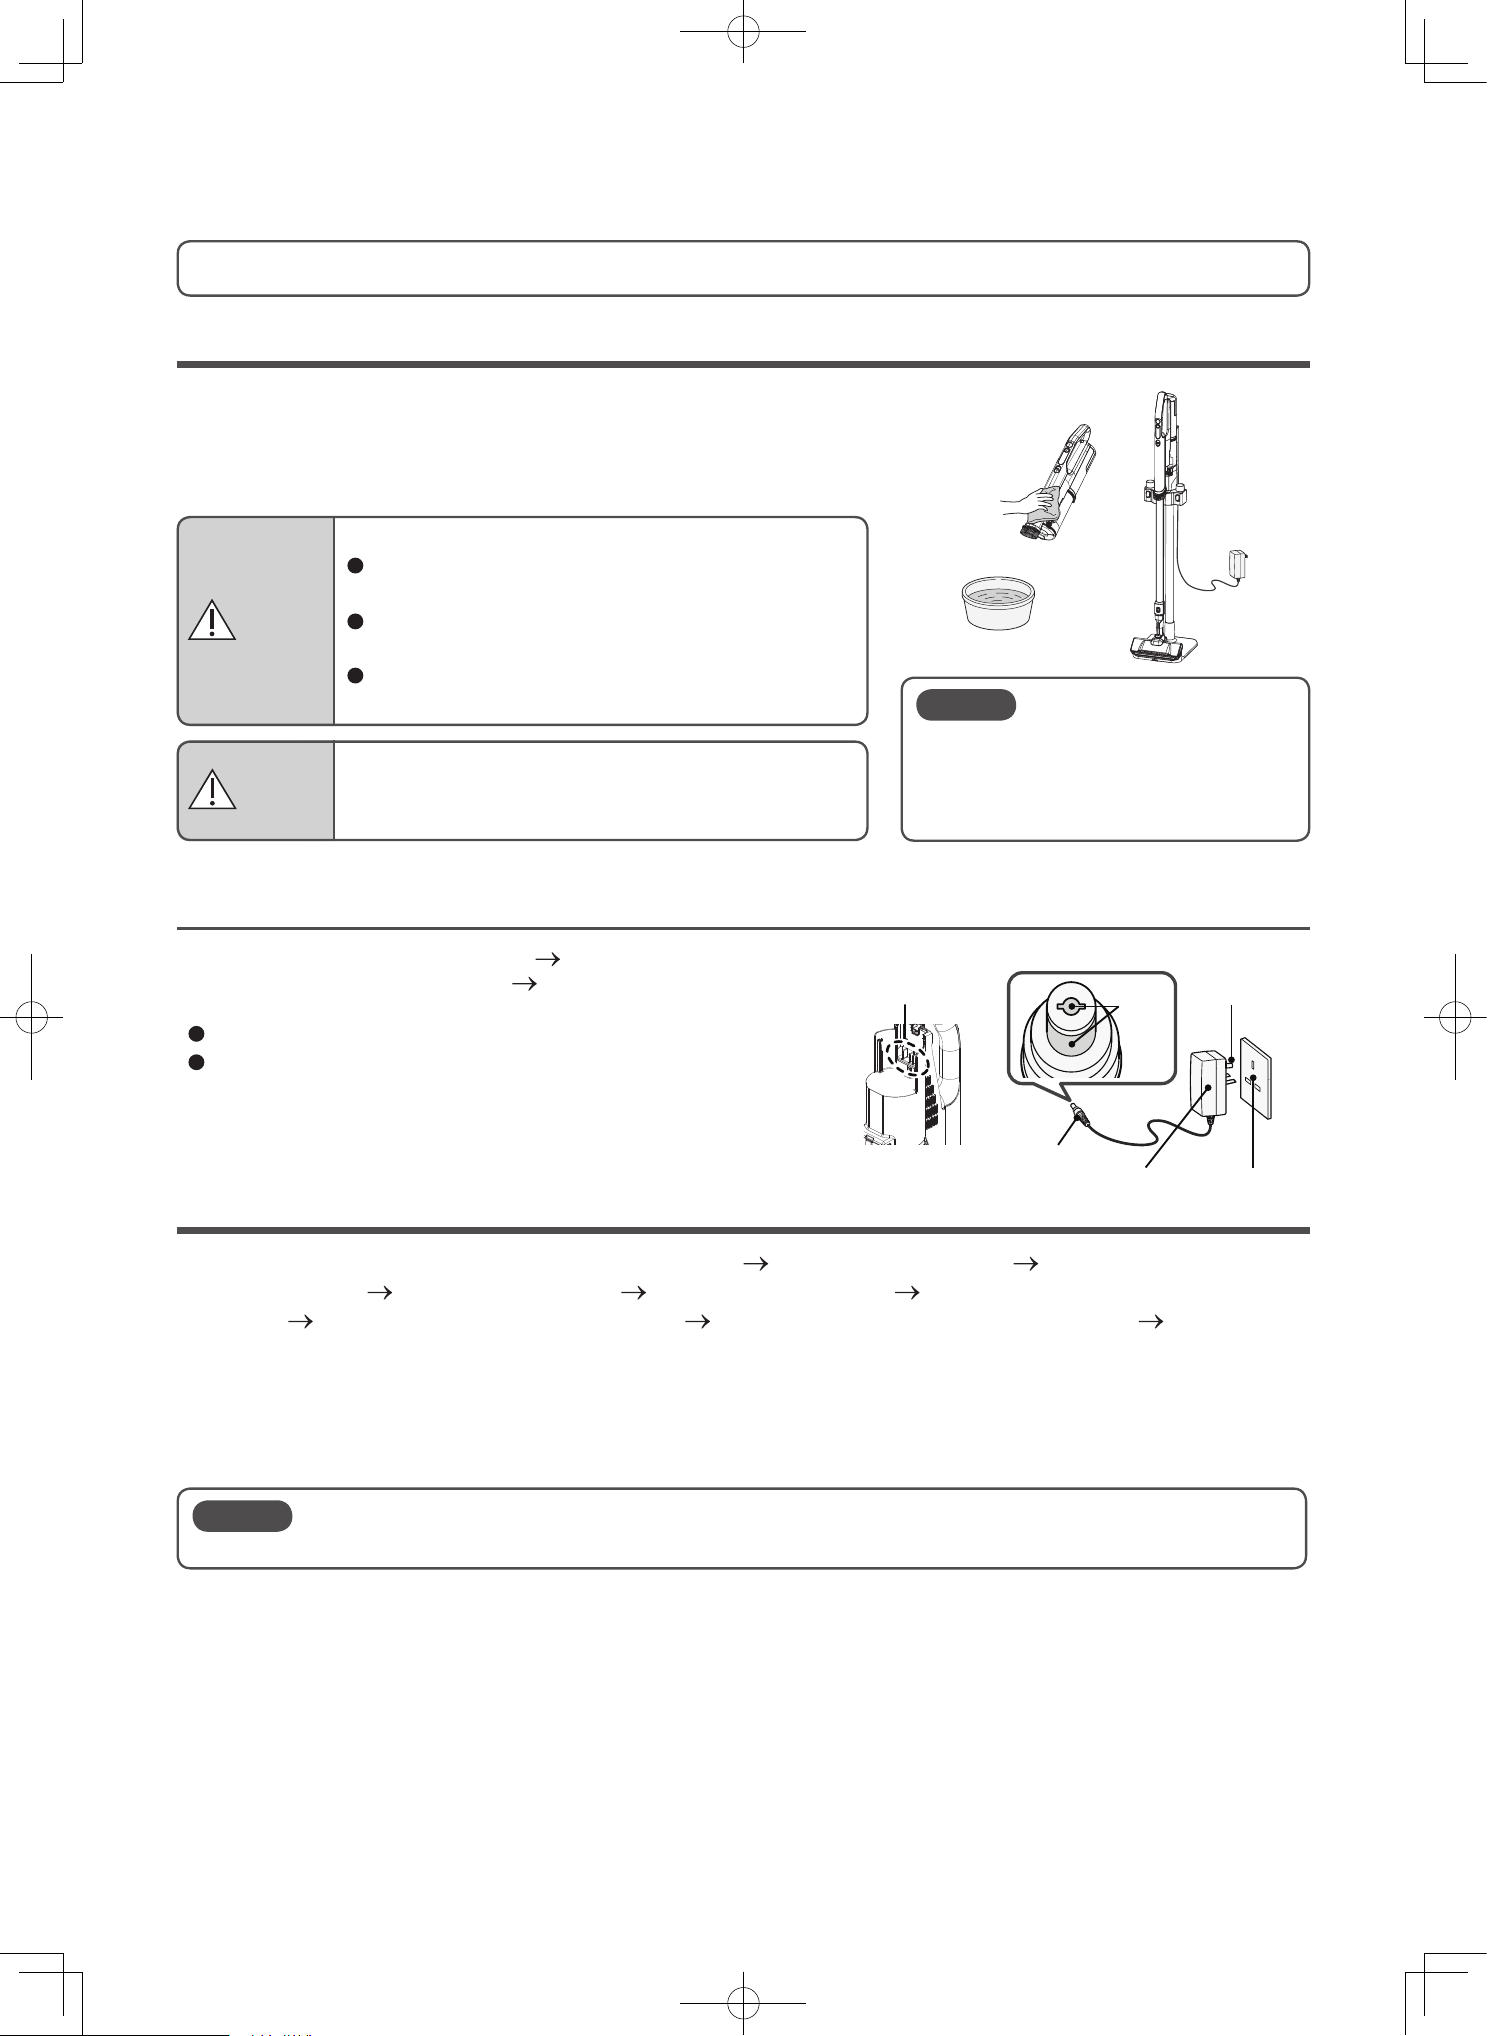
Vacuum cleaner, attachments, attachment accessories
Washable parts
Terminals on the vacuum cleaner and on the AC adapter
Stop operating the vacuum cleaner (P.EN-9), remove the
battery from the vacuum cleaner (P.EN-40), and wipe with a
dry soft cloth.
Disconnect the plug of the AC adapter from the outlet.
Before performing maintenance on the vacuum cleaner,
disconnect the connector of the AC adapter from the
vacuum cleaner.
You can wash the following parts: 2-way crevice nozzle (P.EN-19), handy brush (P.EN-17), multi angle
nozzle with brush (P.EN-20), clean filter (P.EN-28), sponge filter (P.EN-28), inner cylinder filter and
dust case (P. EN-29), rotary brushes PV-XH4P (P.EN-31), and rotary brushes PV-XHE4PL
Do not wash any other attachments or parts with water.
After washing any attachment or part with water, allow it to dry thoroughly before using it.
About 24 hours is required for the clean filter and sponge filter to dry.
(The drying time varies depending on the environment and season.)
Perform maintenance when you are concerned about dirt.
Moisten a soft cloth and then wring it out thoroughly.
To clean with high suction power, we recommend performing frequent maintenance.
Terminals
Terminals
AC adapter
Connector
Outlet
Plug
Maintenance
Risk of injury
Before performing maintenance on the vacuum
cleaner, make sure the vacuum cleaner is turned off.
Risk of eruption, fire, electric shock, or injury.
When cleaning the charging station, unplug the
plug of AC adapter from outlet.
When cleaning the vacuum cleaner, disconnect the
connector of AC adapter from vacuum cleaner.
Do not use flammable objects, combustibles
(thinner, benzene), etc.
Do not use alcohol, cleansers, chemical
dust cloths, etc.
They might cause cracks or
discoloration.
Note
During maintenance, fine dust and debris might disperse into the air. Perform maintenance in a
wellventilated environment (for example, outdoors) or wear a mask to avoid breathing in the dust and debris.
Note
WARNING
CAUTION
Figure shown is a vacuum cleaner Model PV-XH4P
(P.EN-33)
EN-28
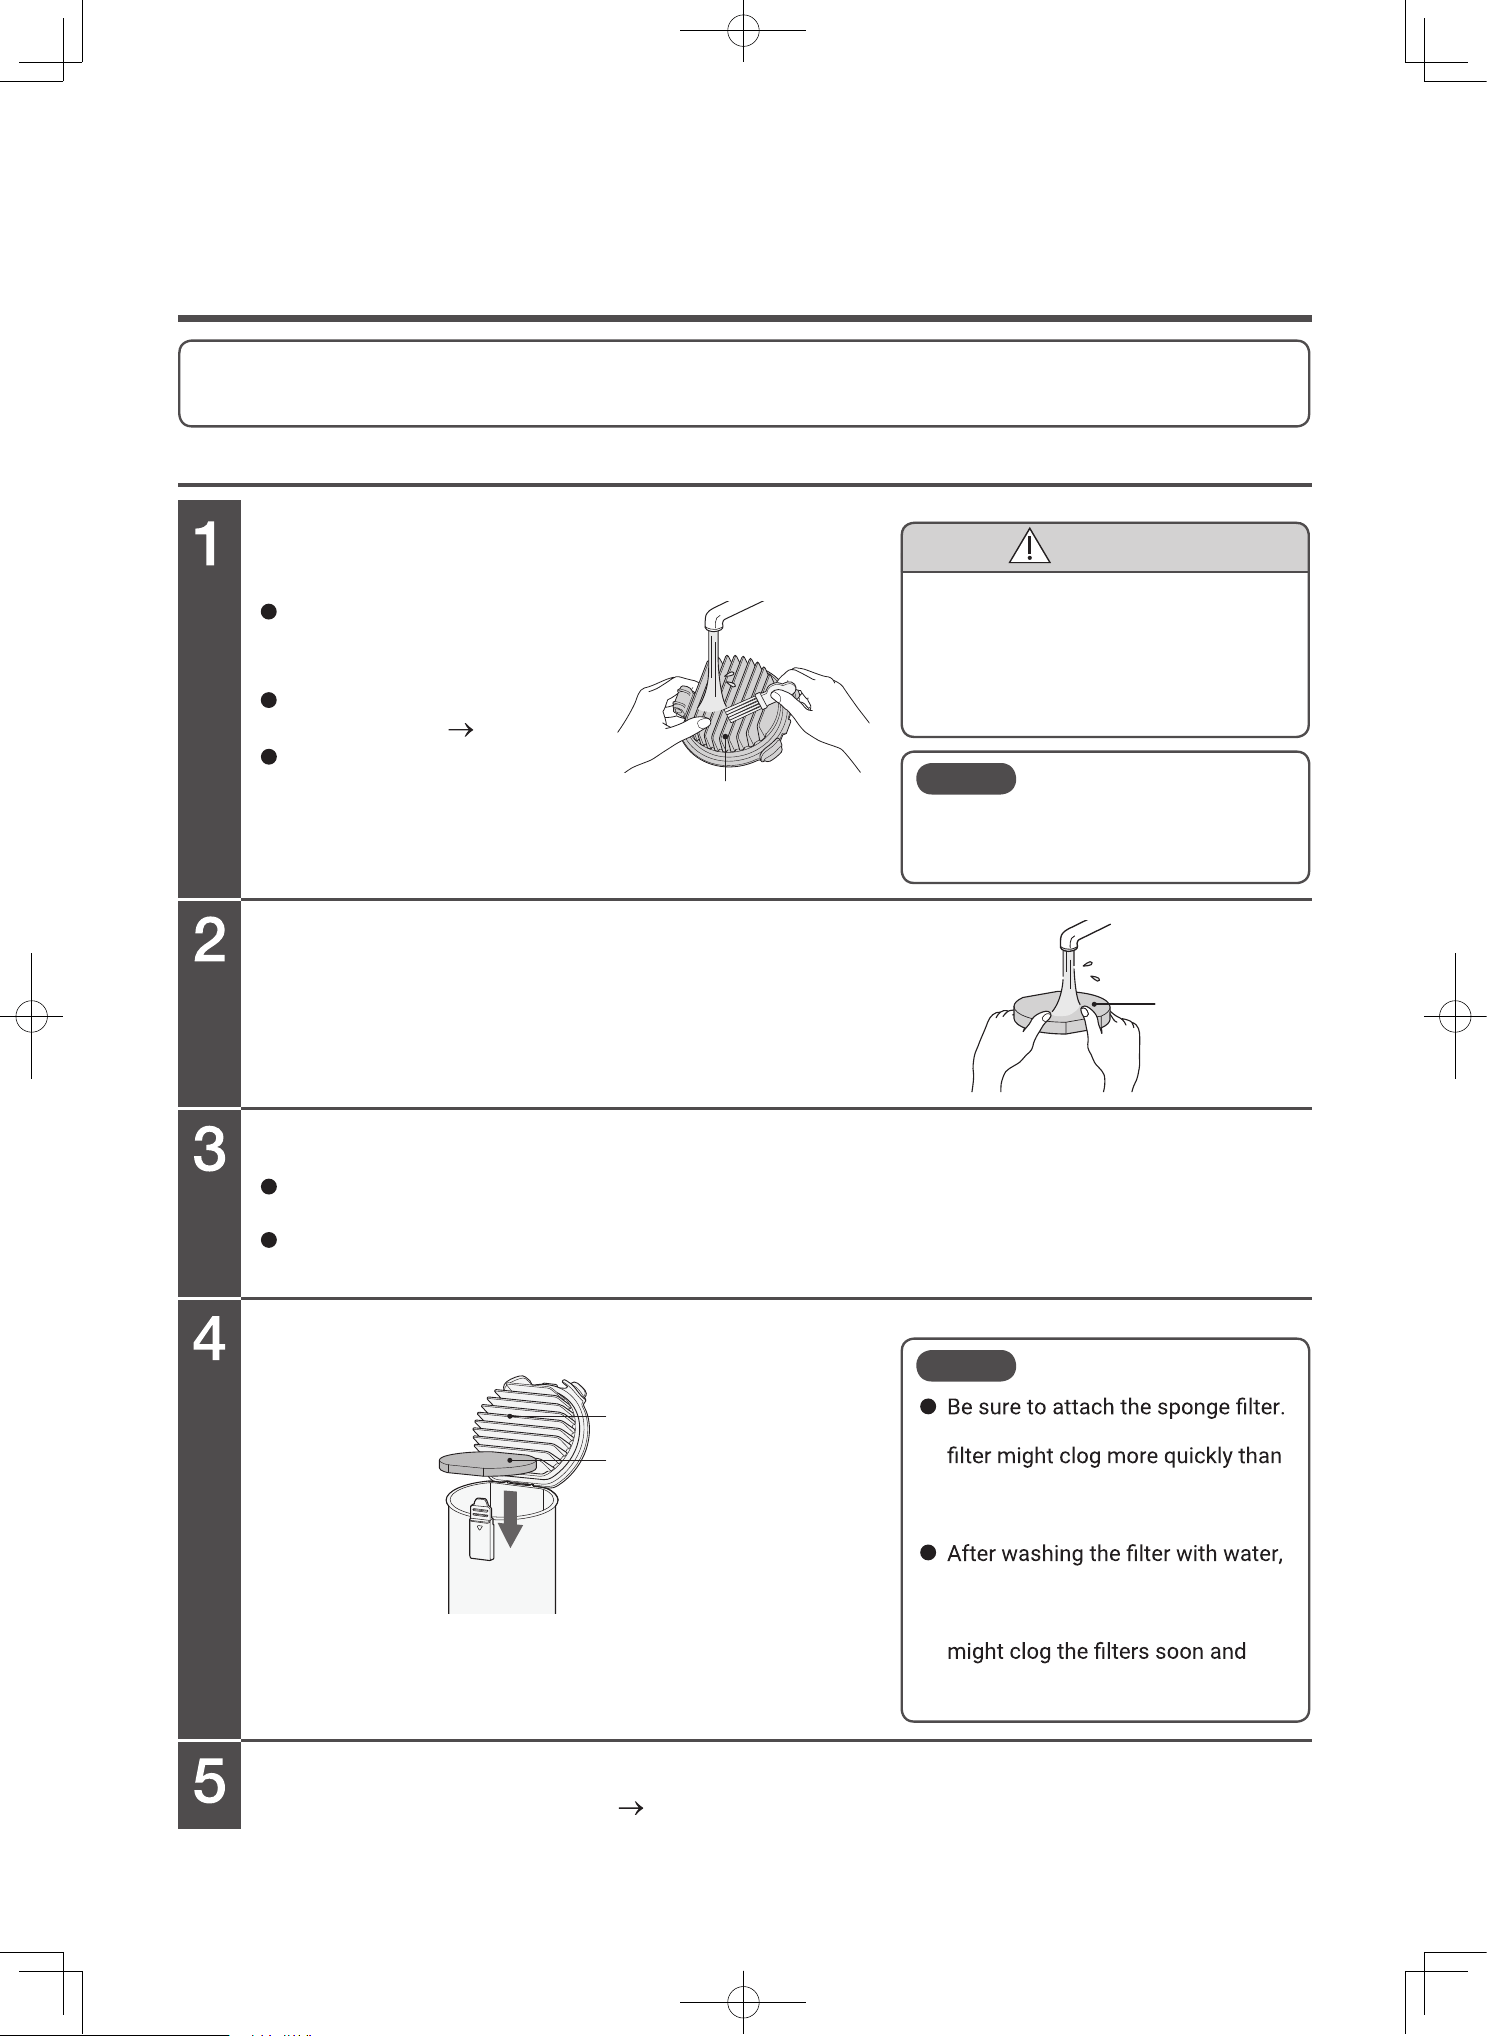
Maintaining (washing with water) the filters
Clean filter, sponge filter
Wash the filters with water, if the filter indicator blinks in red or the vacuum cleaner's
suction power is weak.
Clean filter
Sponge filter
Clean filter
Sponge filter
Wash the filters with water by using the
maintenance brush.
To wash the sponge filter, gently squeeze
the sponge filter while holding it under
running water.
Air dry the filter.
Attach the sponge filter.
Attach the clean filter.
Attach the reverse order of removal. (P.EN-24)
Gently remove any attached
dust and debris from the filters
before washing them with water.
Detach and then wash the clean
filter with water
(P.EN-24)
When washing the clean filter
with water, thoroughly remove
any dust and debris stuck in
its folds.
Drying the clean filter and the sponge filter requires approx. 24 hours.
(The drying time varies depending on the environment and season.)
Also, do not dry it with hot air such as that from a hair dryer.
Doing so might cause a performance degrade, damage, or deformation.
To clean the clean filter, use the
maintenance brush that was provided
with the vacuum cleaner.
Note
If you do not attach it, the paper
usual, and the vacuum cleaner
might make abnormal sounds
during use.
allow it to thoroughly air dry before
you reassemble it. Do not use
them without drying. Doing so
cause weak suction power or
abnormal odor.
Note
CAUTION
Risk of injury
You might have unintentionally
vacuumed sharp objects such as
glass shards or pins. Be careful when
performing maintenance.
EN-29
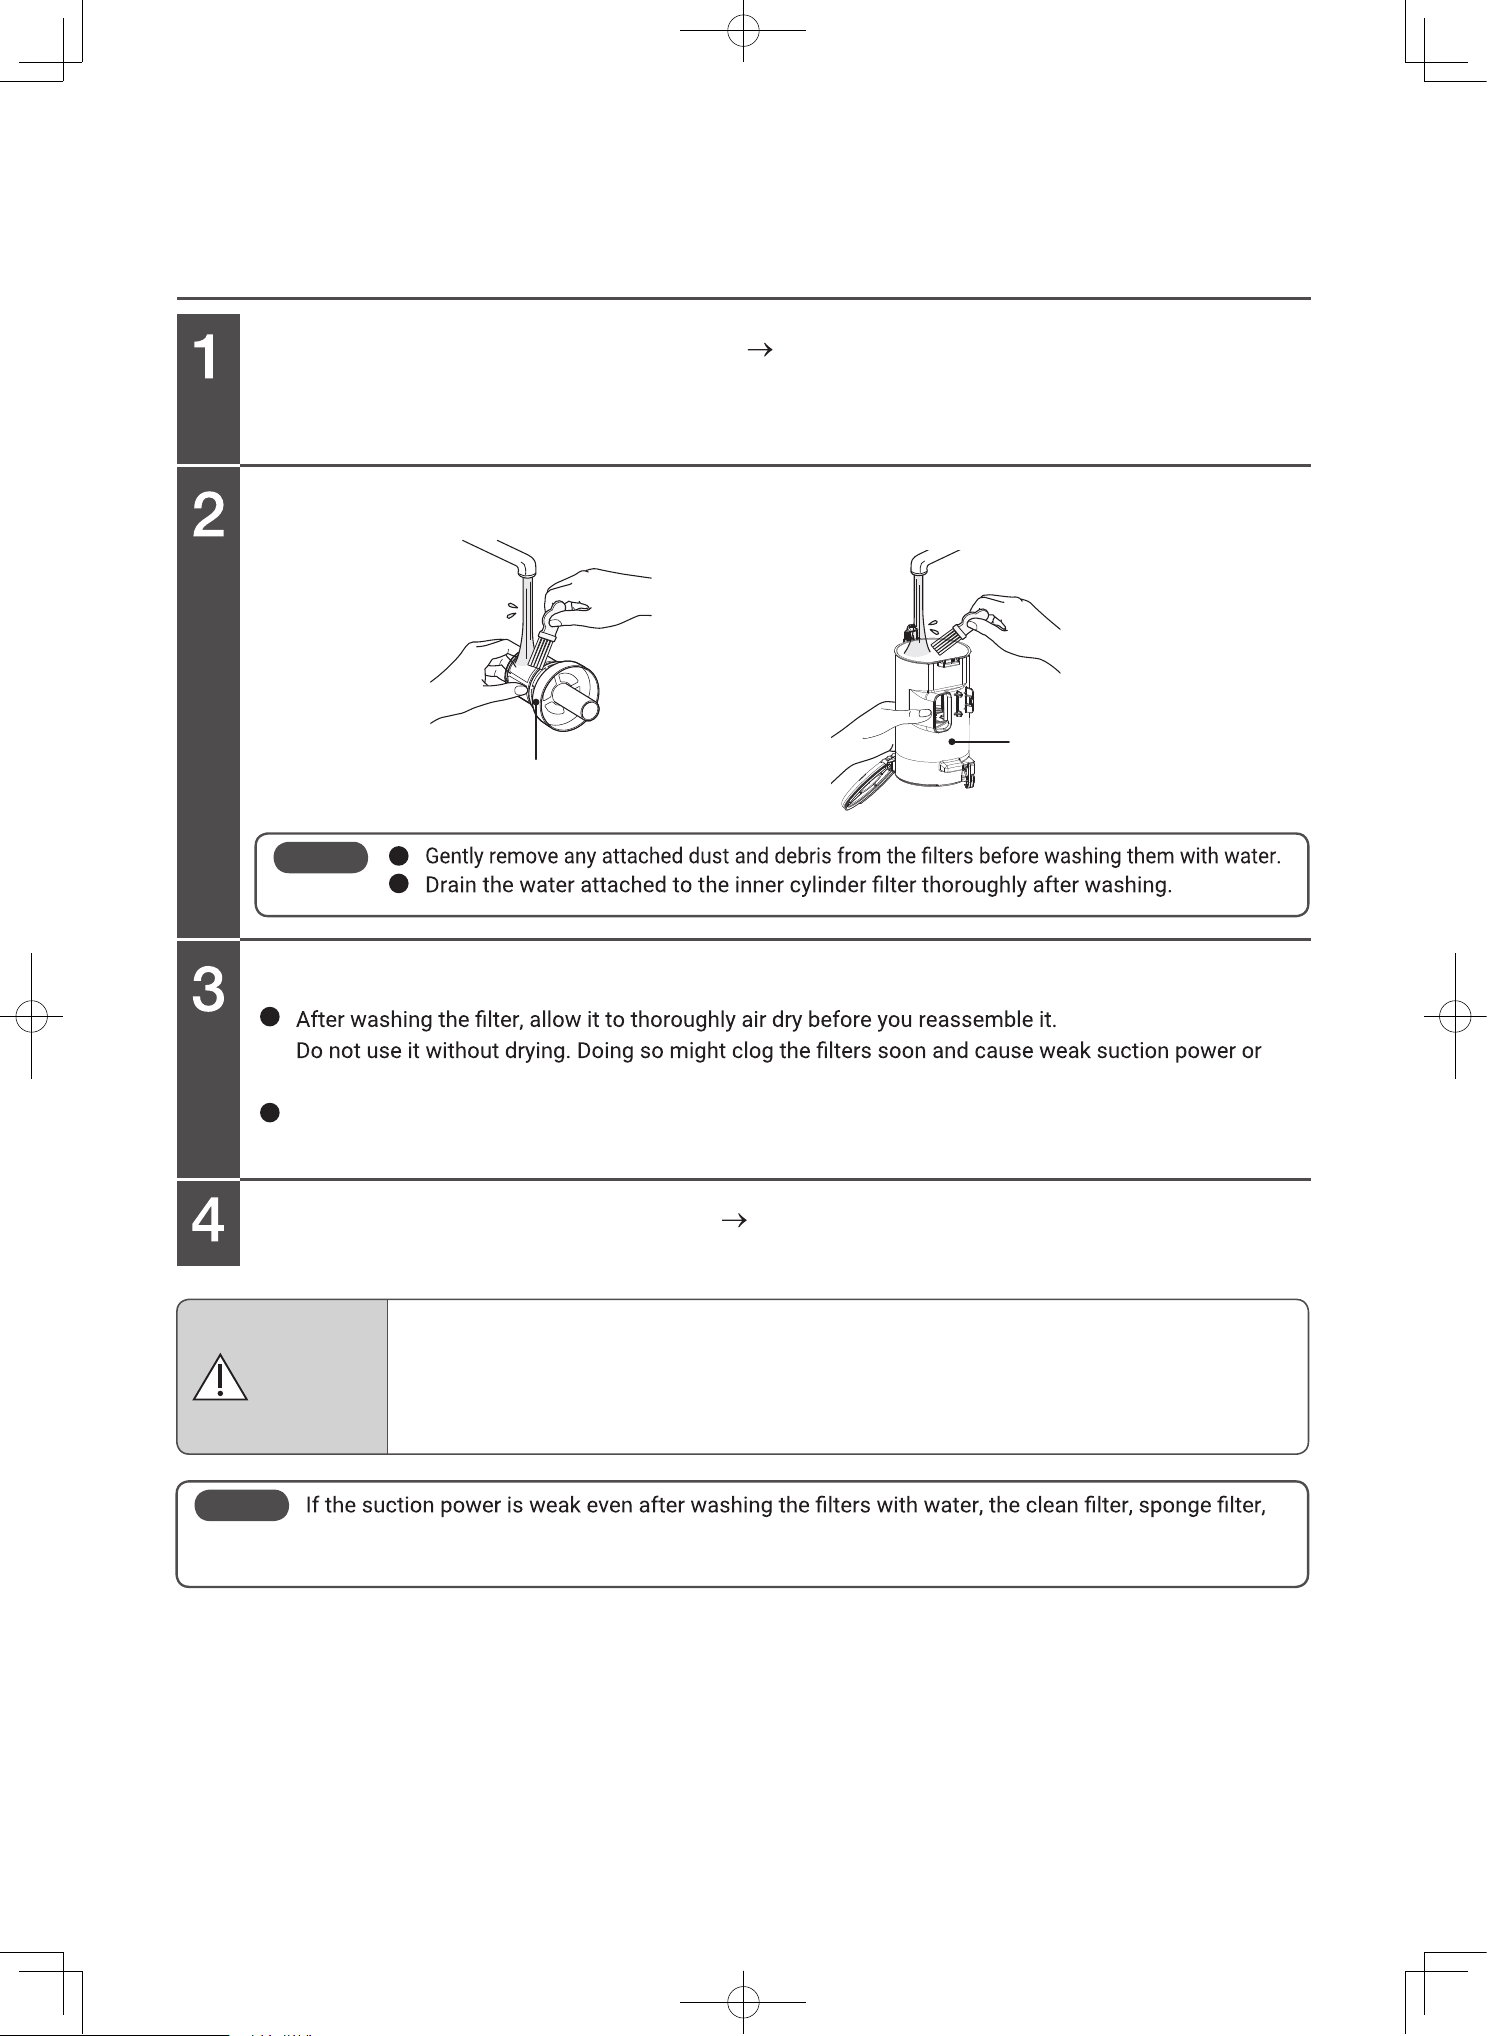
Inner cylinder filter • inner cylinder cap
Remove the inner cylinder filter.
(P.EN-25)
Wash the inner cylinder filter and dust case with water.
Air dry the filter.
Attach the inner cylinder filter.
(P.EN-25)
Inner cylinder filter
Dust case
abnormal odor.
Also, do not dry it with hot air such as that from a hair dryer.
Doing so might cause a performance degrade, damage, or deformation.
Note
Note
etc. might be worn.
To request replacement, please contact a Hitachi authorized service agent.
Risk of damage to the vacuum cleaner
Attach the dust case and filters before operation.
If any dust or debris enters the motor, the filter inside the vacuum cleaner might become
clogged, and abnormal sounds might come from the vacuum cleaner.
In this case, please consult a Hitachi authorized service agent.
CAUTION
EN-30
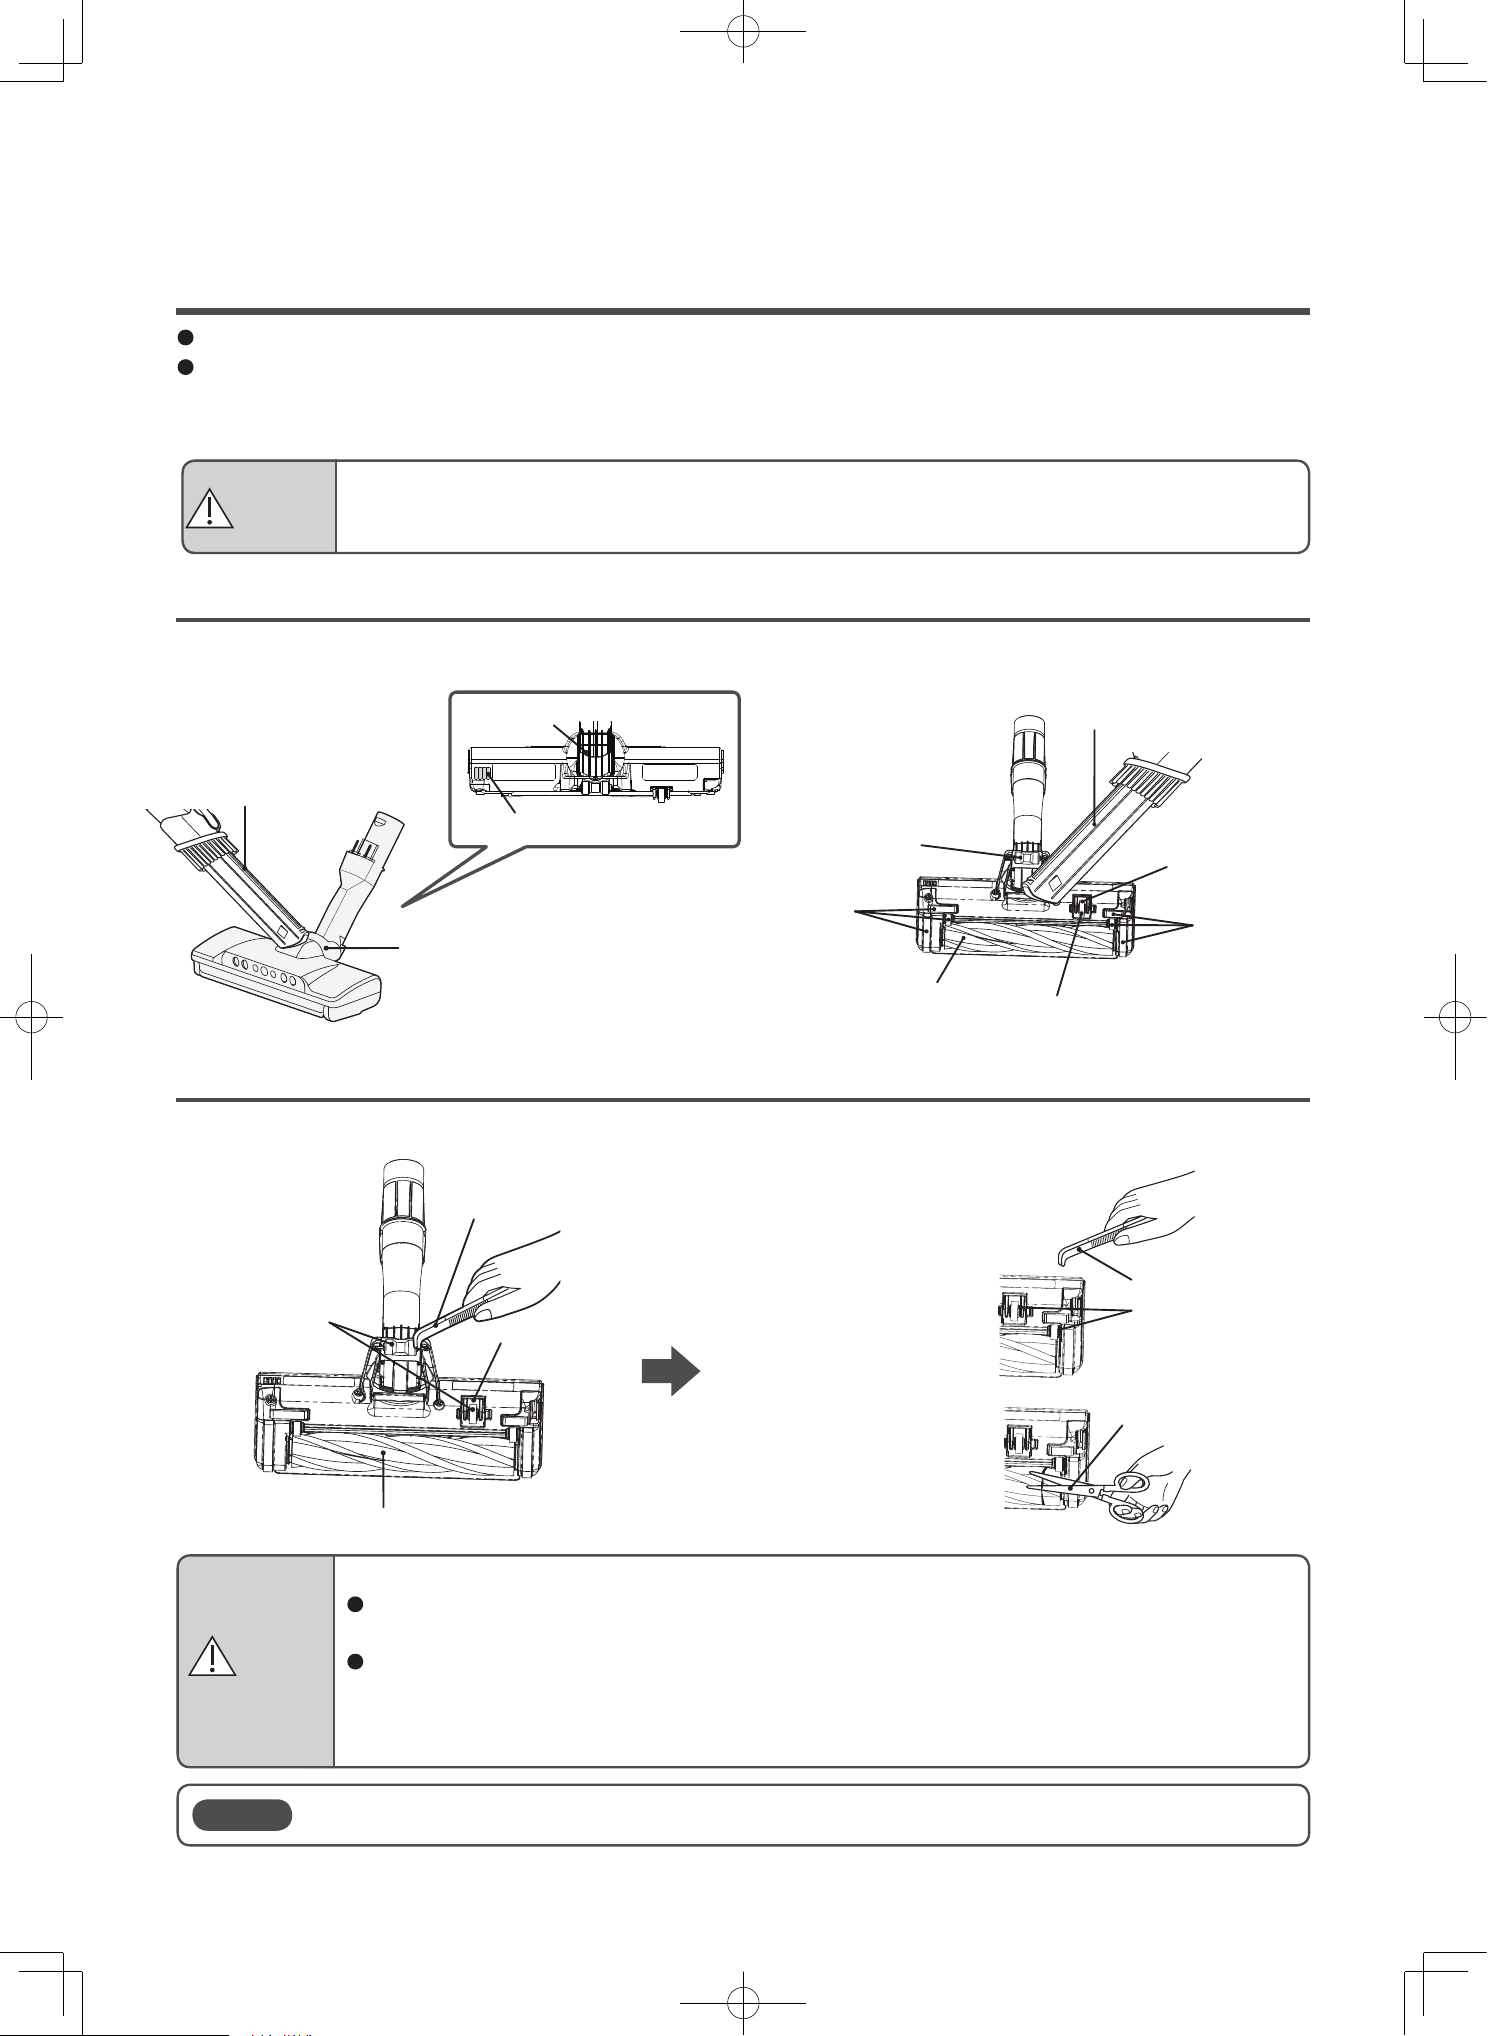
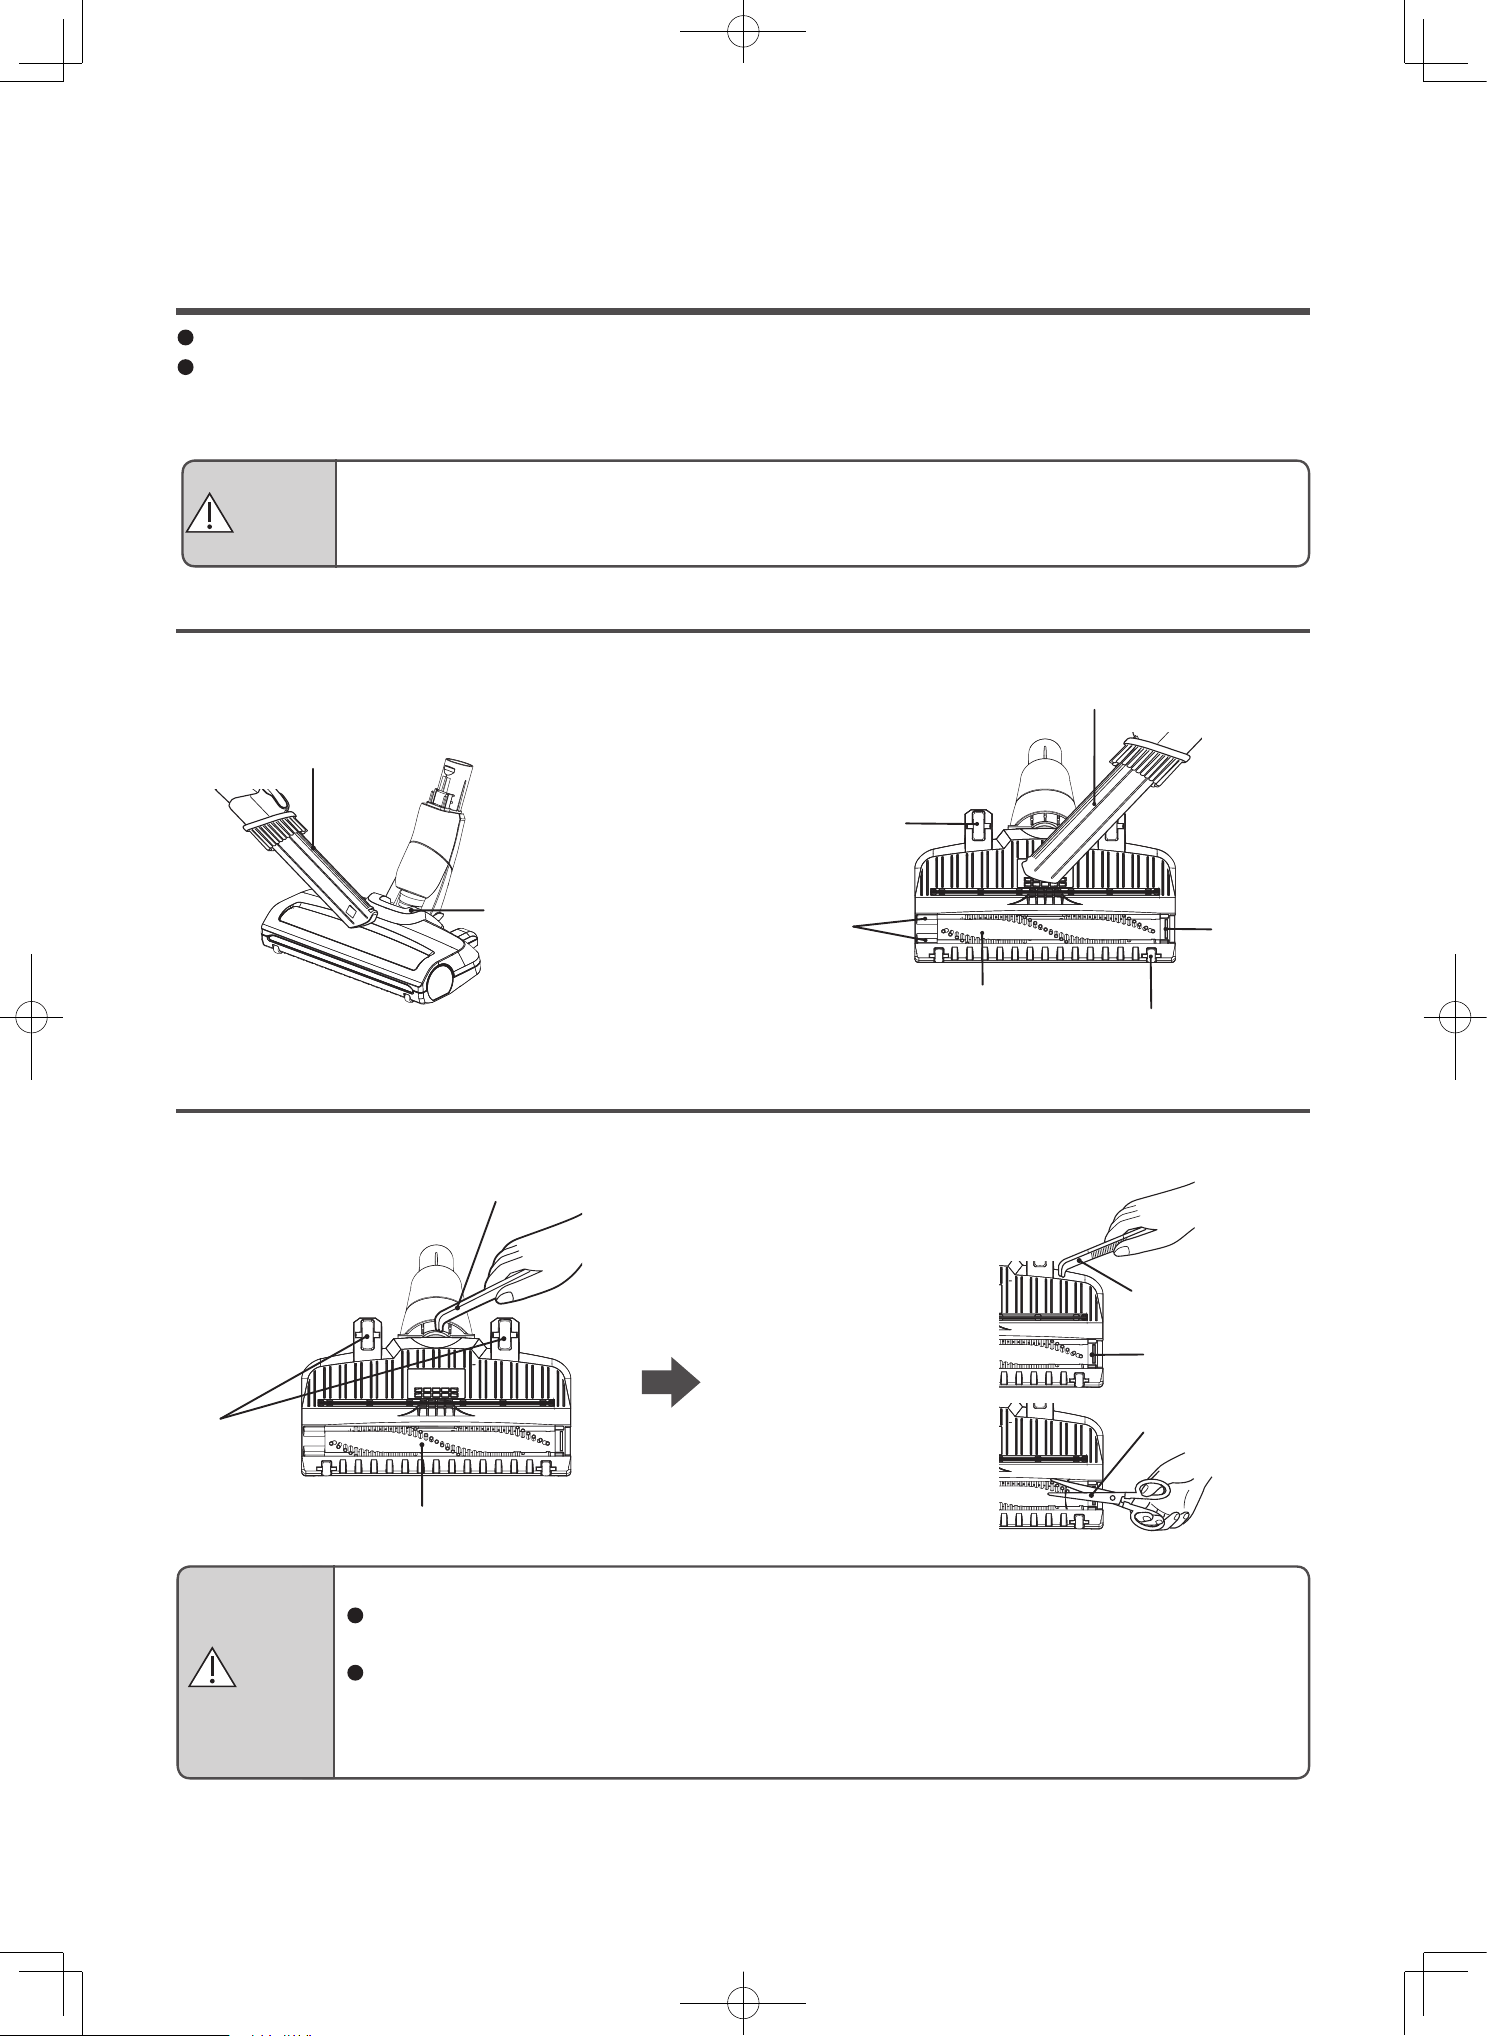
Maintaining the power head (only PV-XH4P)
Remove attached dust and debris
Remove tangled dust and debris
Perform maintenance when suction power is weak or when dirt becomes a concern.
We recommend periodic maintenance (at least once a month).
Dust and debris stuck to the safety switch, rotary brush, brushes, wheels, air inlet, and rotating sections
might cause reductions in suction power or malfunctions.
Remove the attached dust and debris by using the 2-way crevice nozzle or other tools.
Remove tangled dust and debris using tweezers, etc.
Remove dust and
debris tangled in the
shaft using tweezers
or other tools.
Remove dust and
debris tangled in the
rotary brush by using
scissors or other tools.
2-way crevice nozzle
Rotating sections
Air inlet
Rotating sections
Wheels
Brushes
Tweezers
Wheels
Rotary brush
Safety
switch
Tweezers
Shafts
Scissors
Rotary brush
Wheels
Brushes
Safety switch
2-way crevice nozzle
Cleaning the power heads
Note
Do not subject the safety switch to excessive force. Failure to do so might cause damage.
Risk of damage to the floor
If dust and debris gets tangled in the wheels, the wheels cannot rotate, which might cause
wear and tear and floor damage.
After extended use, the brushes, wheels, and rotary brush might wear down. Using the power
head while they are worn out might damage the floor. You cannot replace the brushes or
wheels by yourself. Please contact a Hitachi authorized service agent to have the brushes,
wheels, and rotary brush replaced as a set.
CAUTION
Risk of injury
Before performing maintenance, detach the power head from the vacuum cleaner or extension
pipe and smart hose.
CAUTION
EN-31
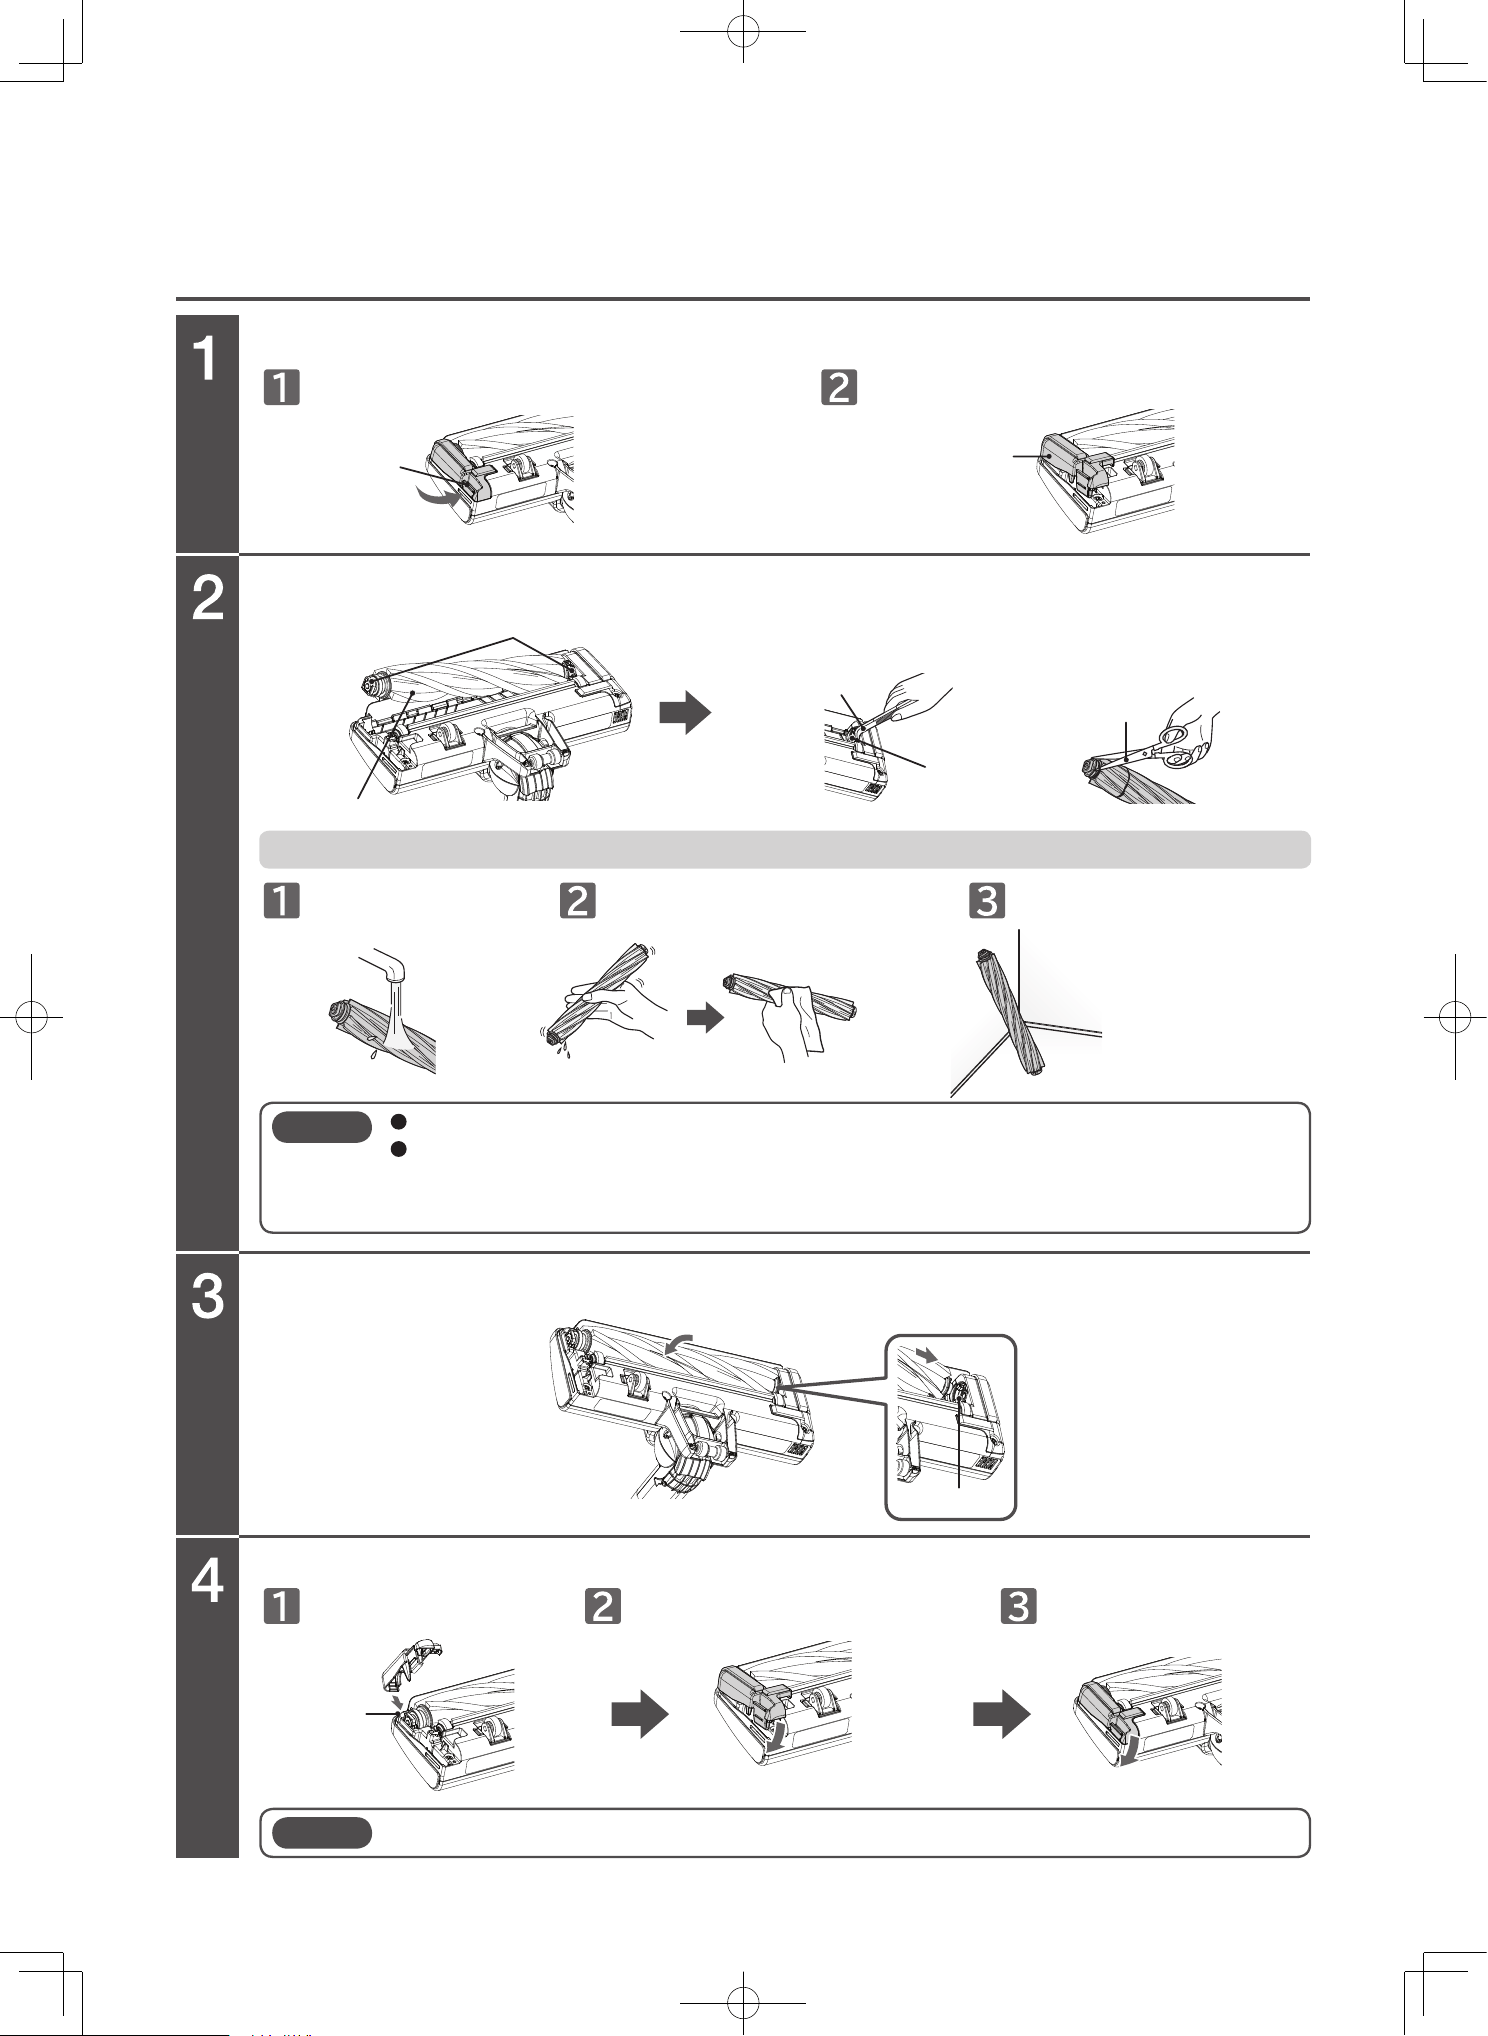
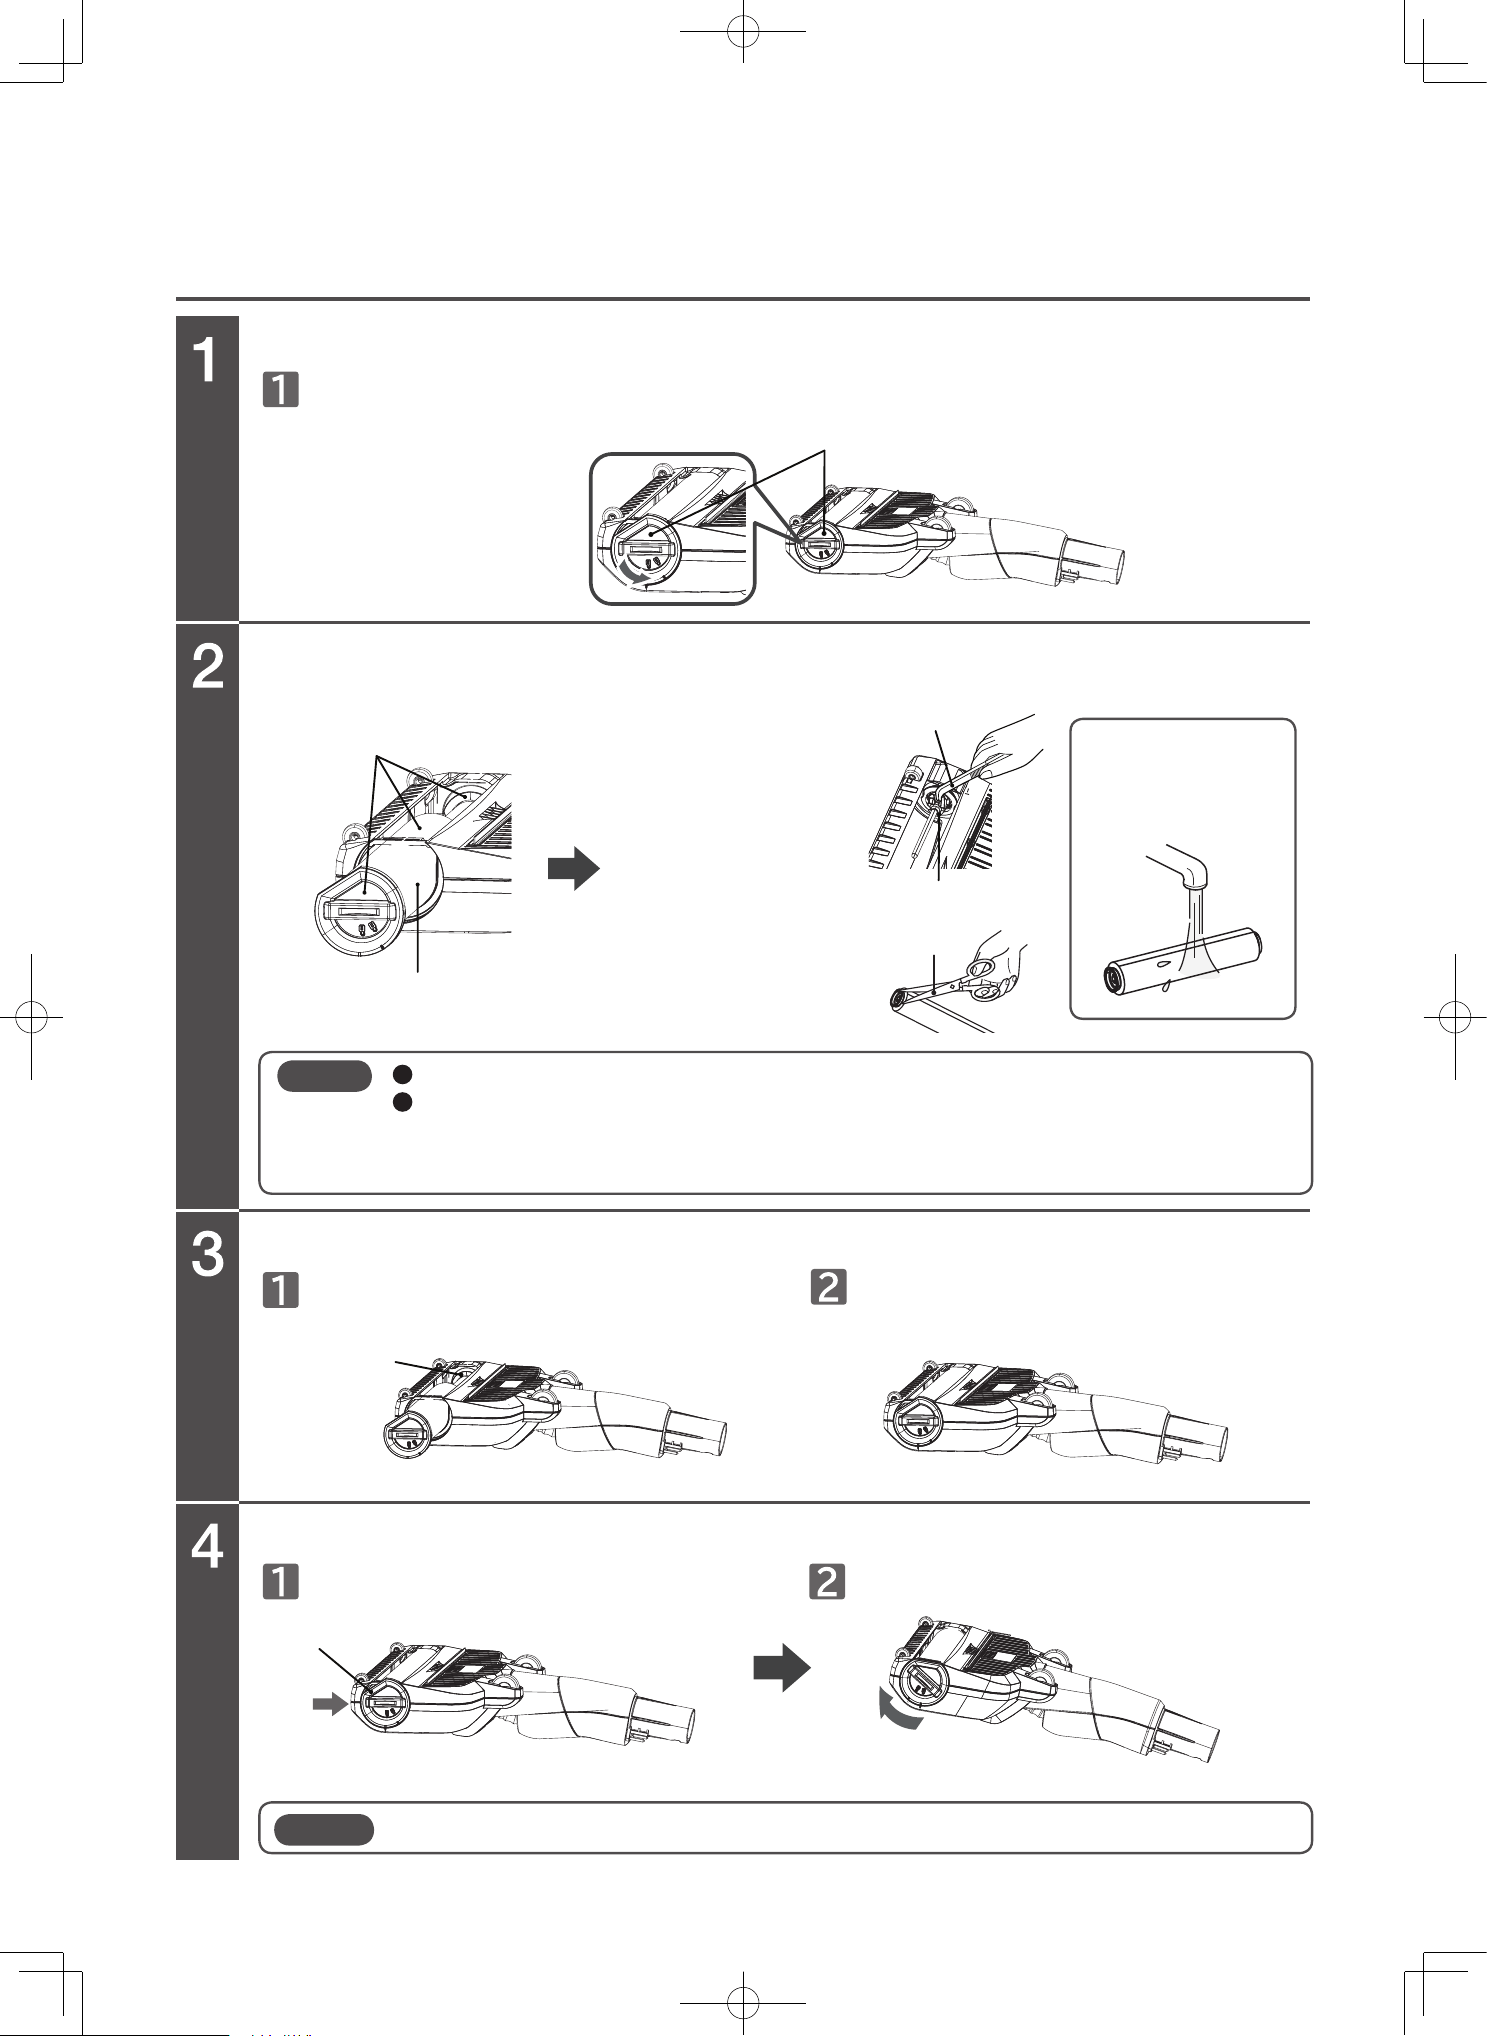
Rotary brush maintenance (only PV-XH4P)
Remove the brush holder.
Detach the rotary brush and remove dust and debris.
Adjust the rotary brush with the groove and attach it to its original position.
Attach the brush holder.
Flip over the power head and open the lever.
Wash with water. Shake to remove excessive water. Thoroughly air dry.
Insert the hook. Attach the brush holder. Close the lever.
To wash the rotary brush with water
Remove the brush holder.
Lever
Rotary brush
Remove dust and debris tangled in
the groove using tweezers, etc.
Remove dust and debris
tangled in the rotary
brush by using scissors.
Lean them against an
object to dry in the
shade.
Remove dust and debris
Scissors
Groove
Groove
Hook
Tweezers
Brush holder
Note
Do not use cleansers, bleach, etc. Doing so might cause discoloration, deformation, etc.
After washing with water, thoroughly air dry it in the shade before attaching it.
Drying it requires approx. 24 hours. (The drying time varies depending on the environment
and season.)
Note
When attaching the brush holder, fasten the hook first. Failure to do so might cause damage.
EN-32
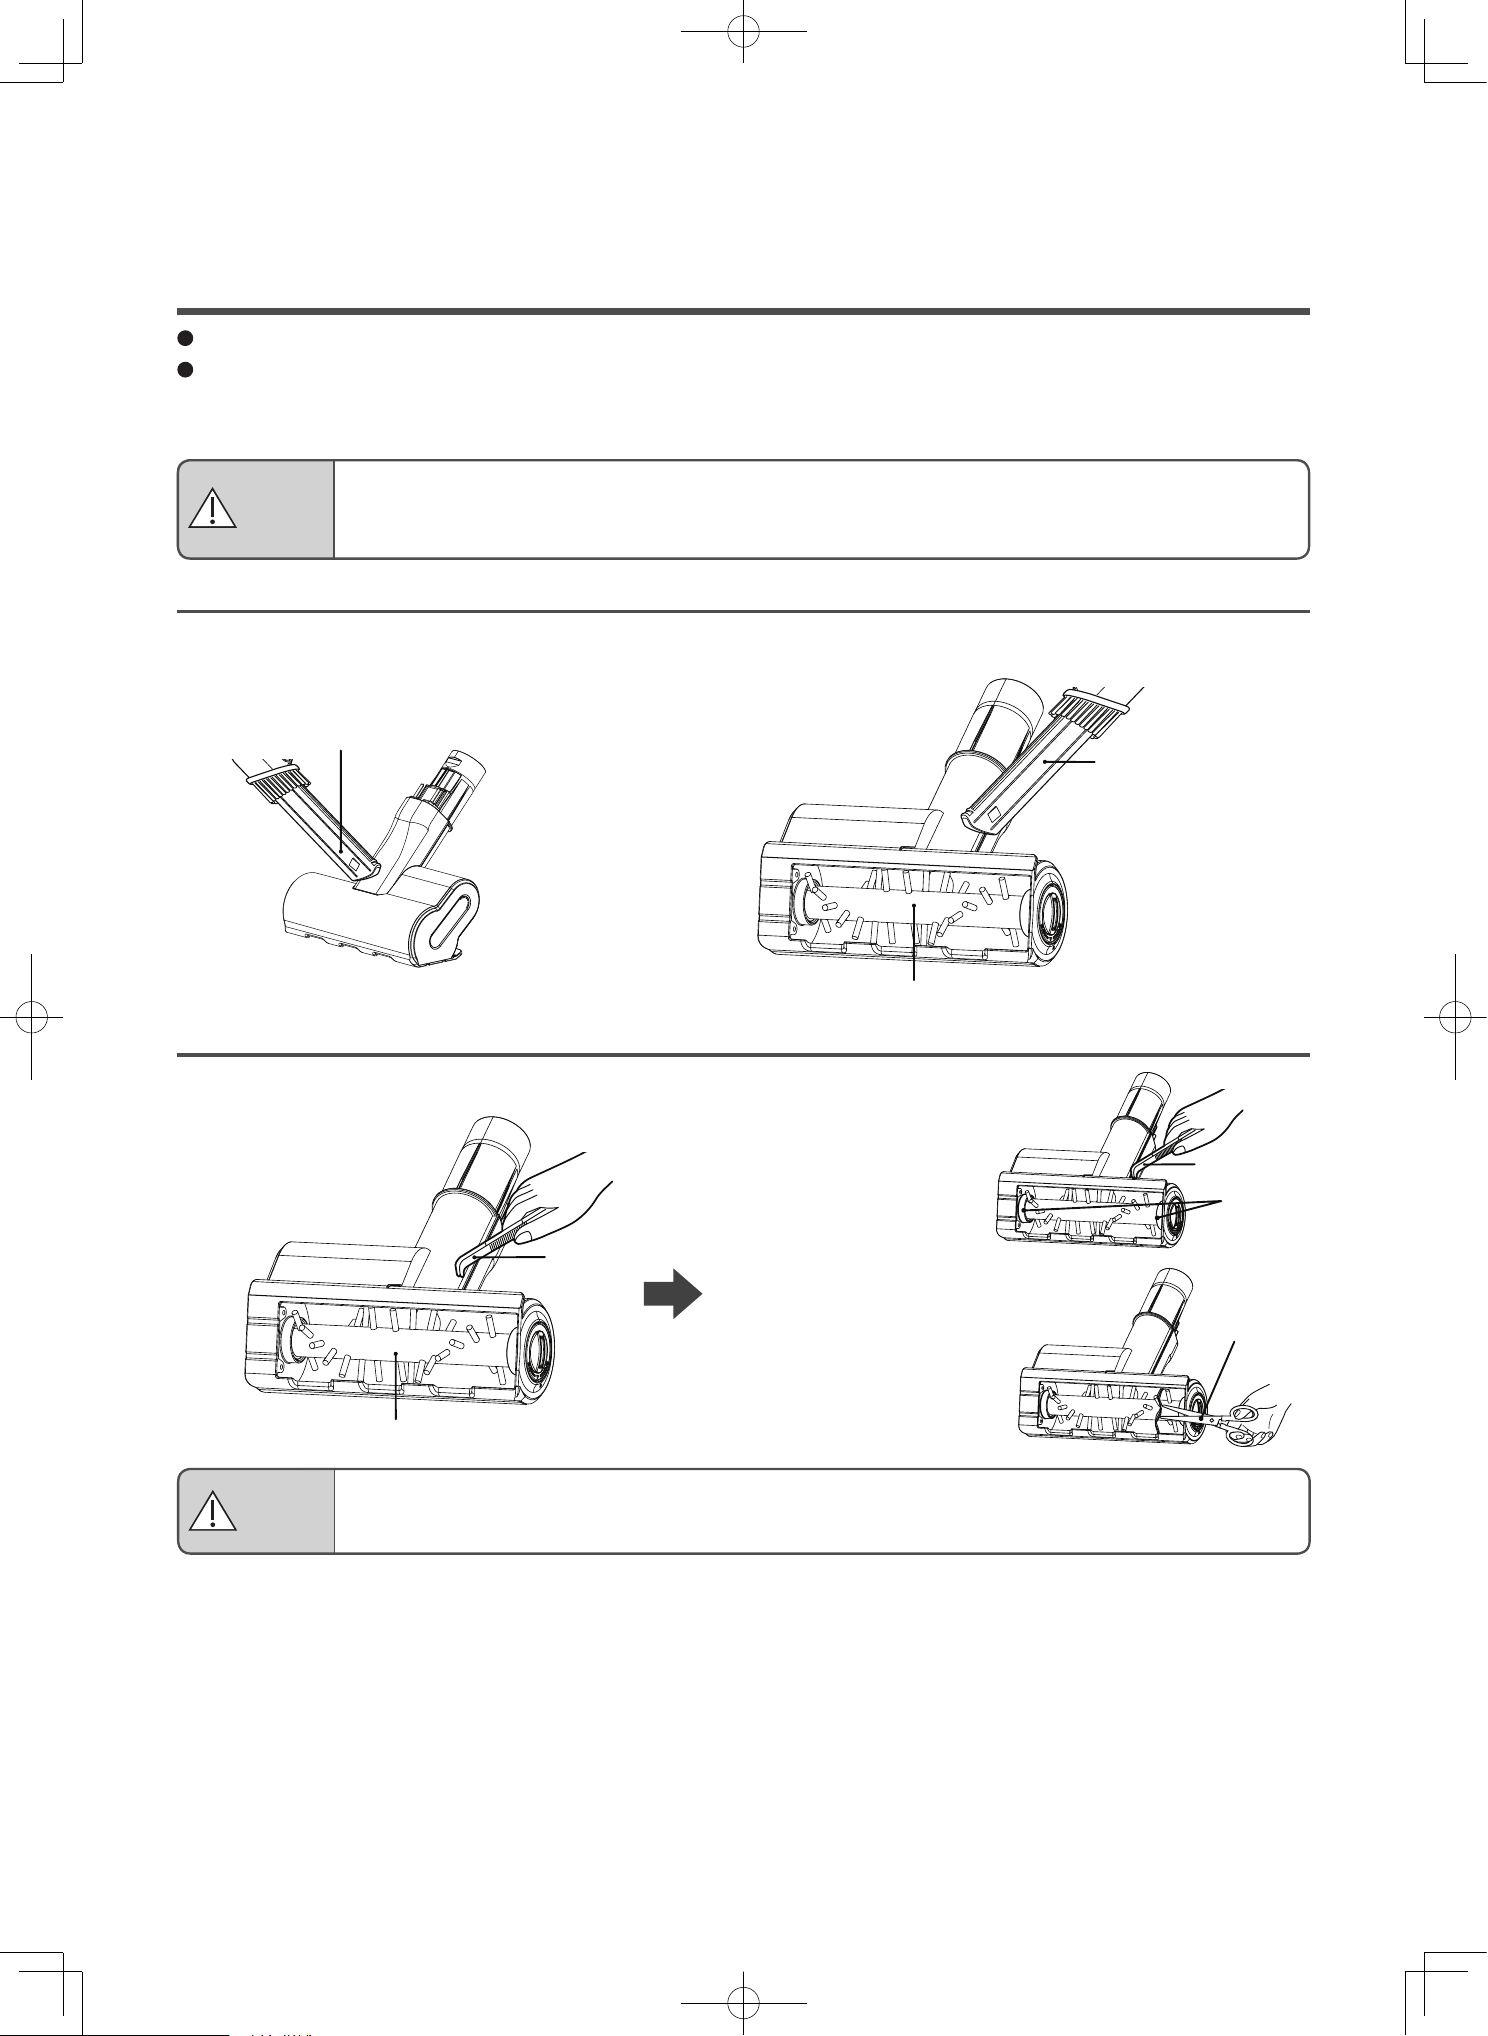
Maintaining the power head (only PV-XHE4PL)
Remove attached dust and debris
Remove tangled dust and debris
Perform maintenance when suction power is weak or when dirt becomes a concern.
We recommend periodic maintenance (at least once a month).
Dust and debris stuck to the rotary brush, brushes, wheels, air inlet, and rotating sections might cause reductions
in suction power or malfunctions.
Remove the attached dust and debris by using the 2-way crevice nozzle or other tools.
Remove tangled dust and debris using tweezers, etc.
Remove dust and
debris tangled in the
shaft using tweezers
or other tools.
Remove dust and
debris tangled in the
rotary brush by using
scissors or other tools.
2-way crevice nozzle
Rotating sections
Wheels
Brushes
Tweezers
Wheels
Rotary brush
Tweezers
Shafts
Scissors
Rotary brush
Wheels
Brushes
2-way crevice nozzle
Cleaning the power heads
Risk of damage to the floor
If dust and debris gets tangled in the wheels, the wheels cannot rotate, which might cause
wear and tear and floor damage.
After extended use, the brushes, wheels, and rotary brush might wear down. Using the power
head while they are worn out might damage the floor. You cannot replace the brushes or
wheels by yourself. Please contact a Hitachi authorized service agent to have the brushes,
wheels, and rotary brush replaced as a set.
CAUTION
Risk of injury
Before performing maintenance, detach the power head from the vacuum cleaner or extension
pipe.
CAUTION
EN-33
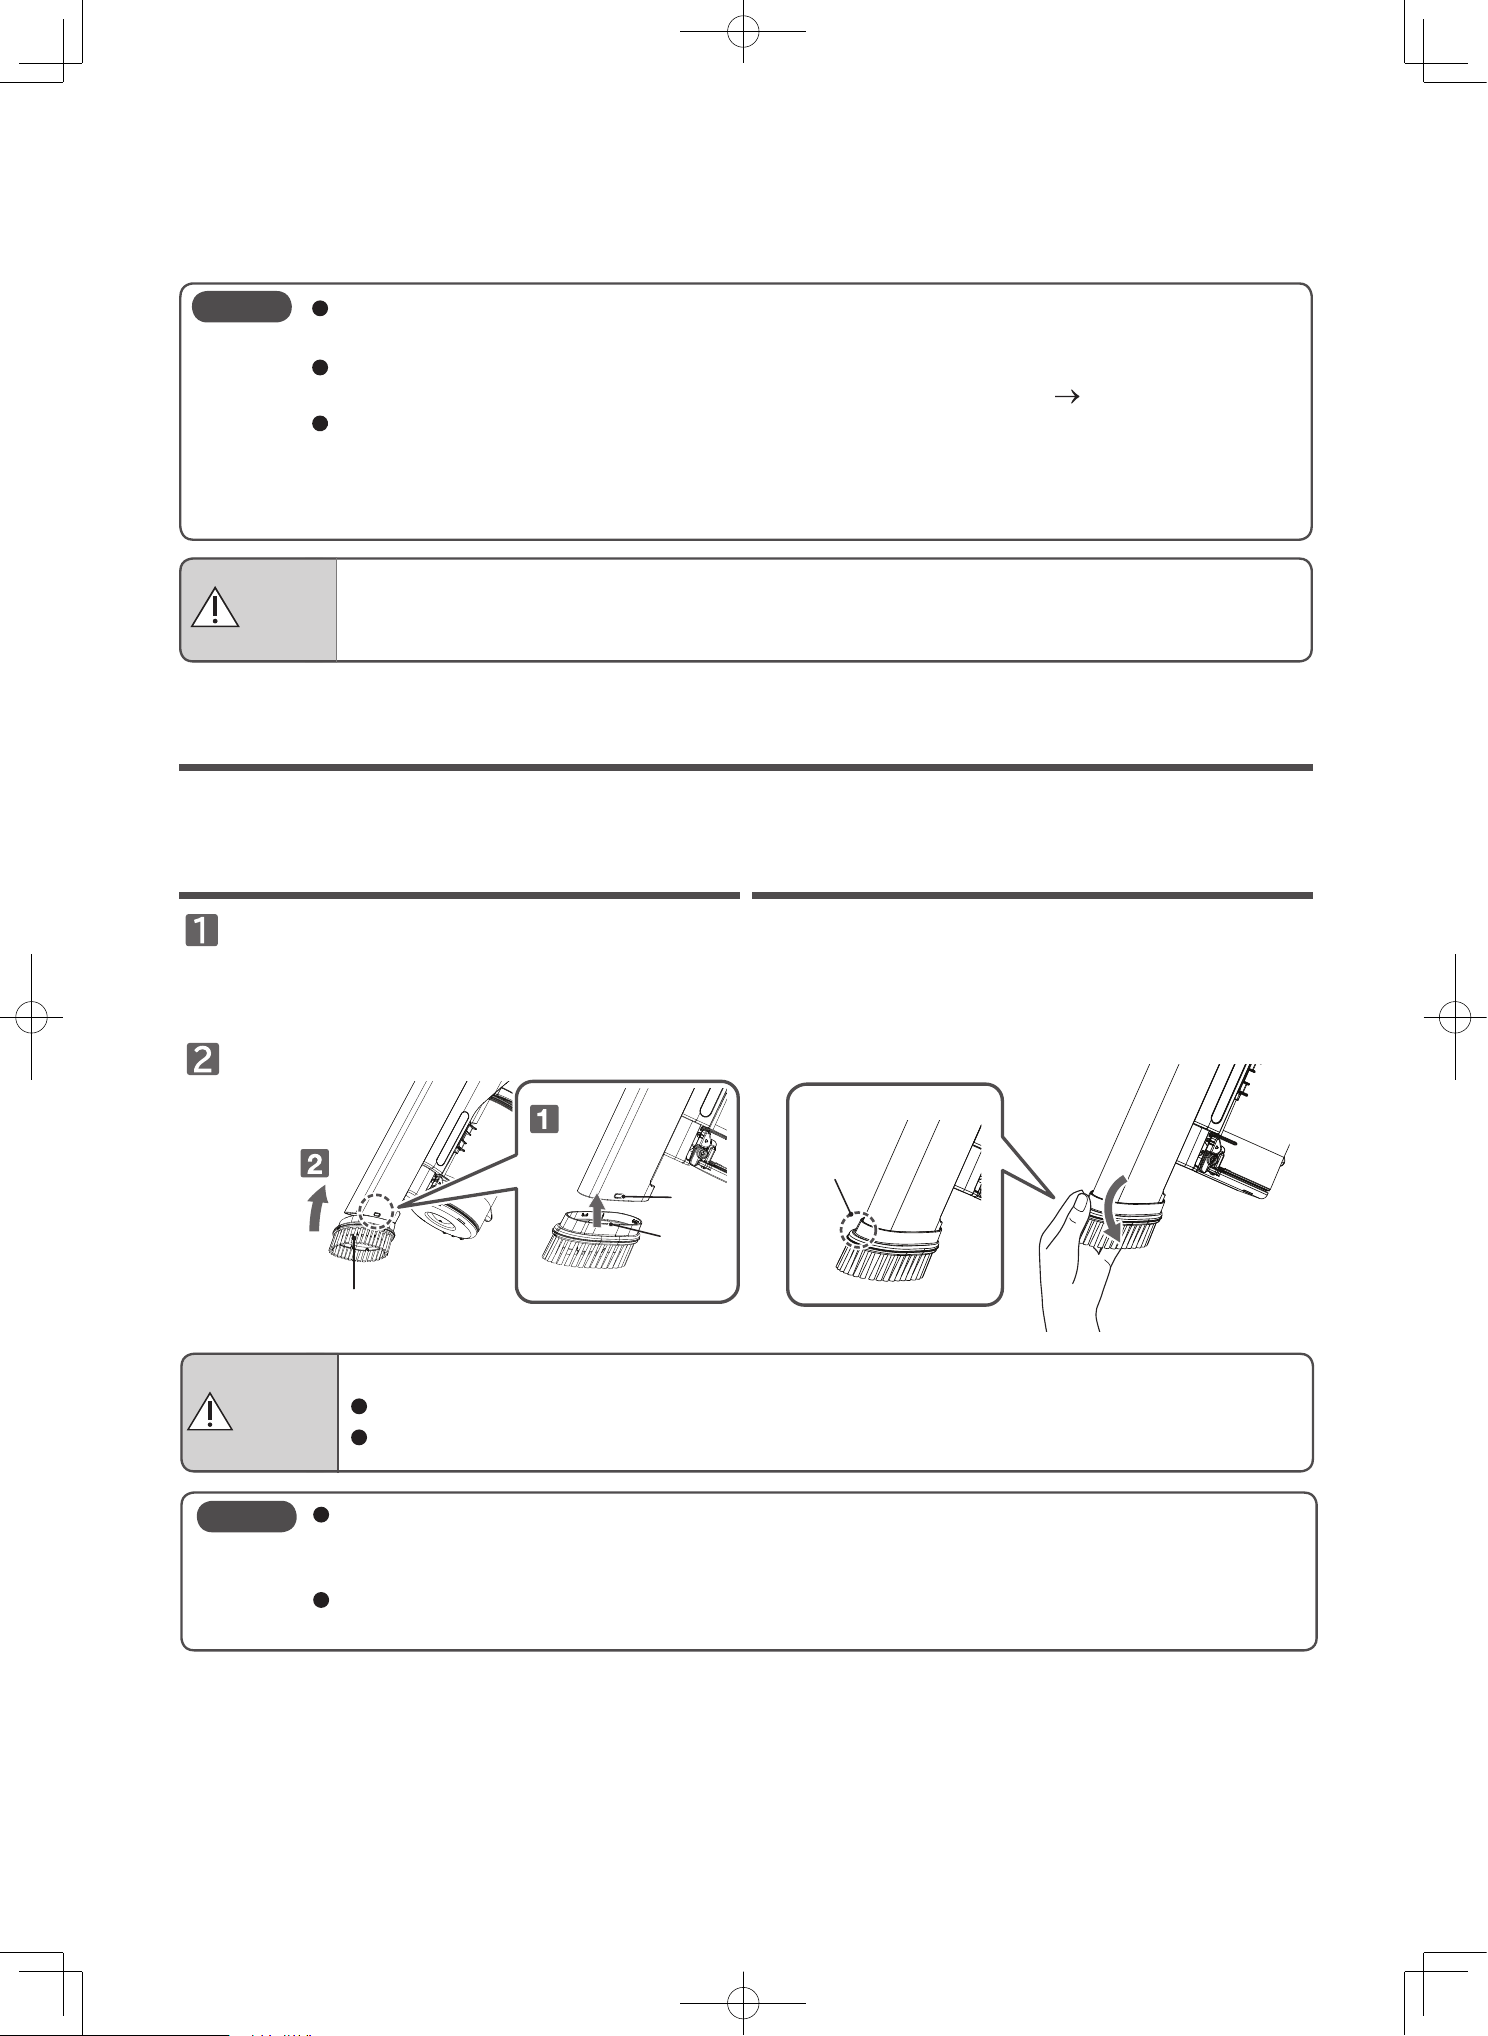
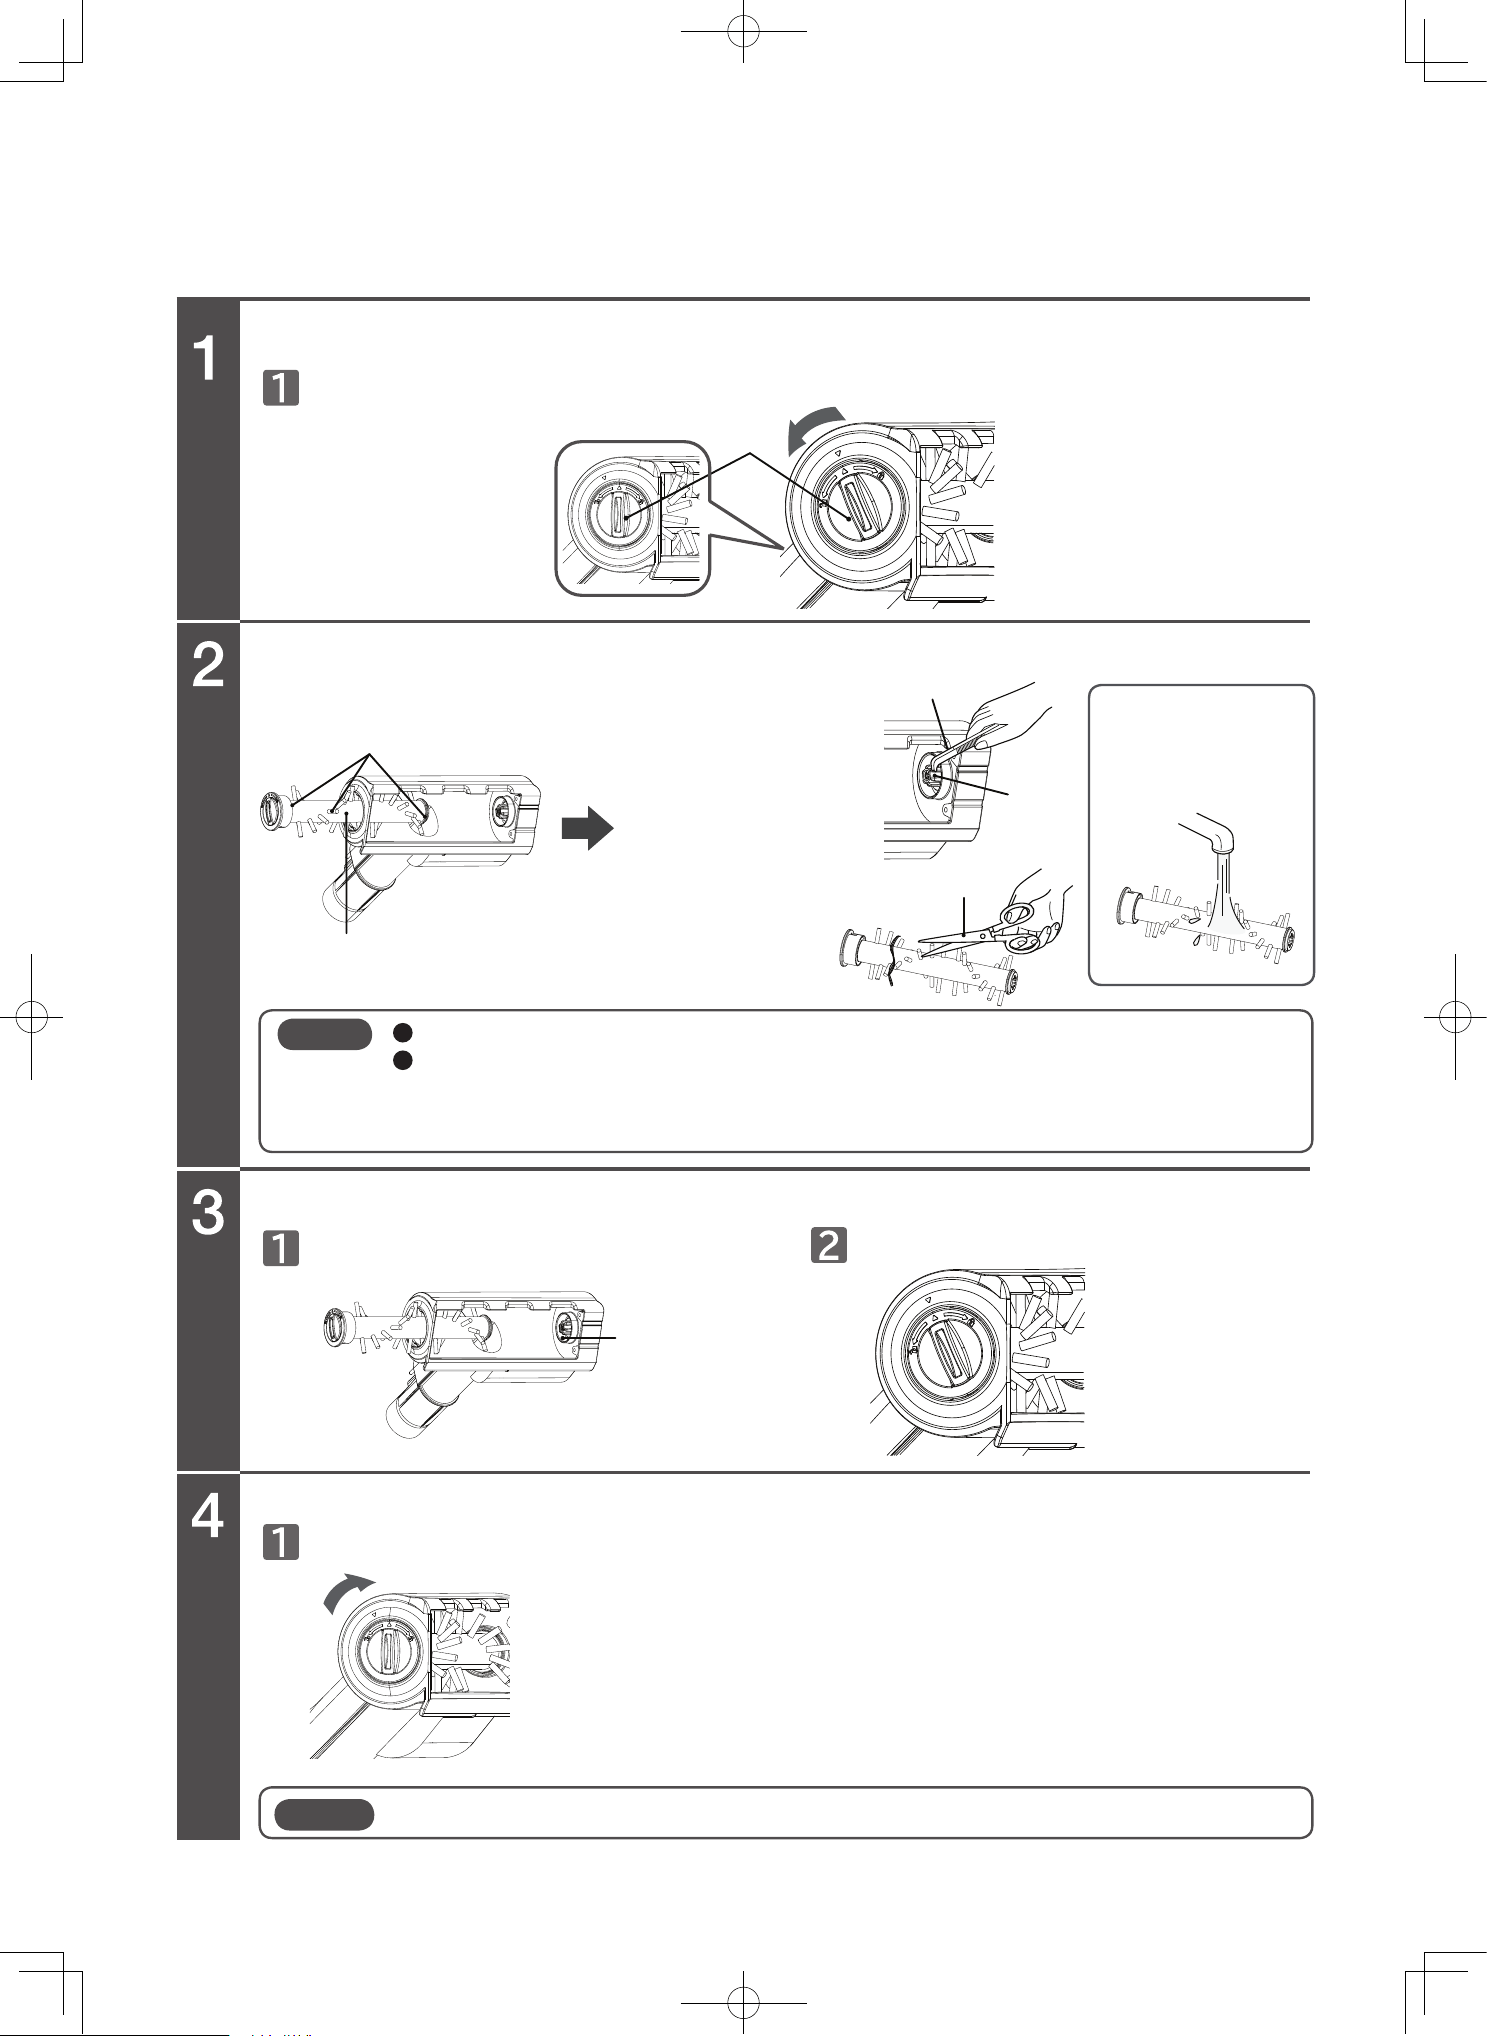
Rotary brush maintenance (only PV-XHE4PL)
Remove the brush holder.
Detach the rotary brush and remove dust and debris.
Adjust the rotary brush with the groove and attach it to its original position.
Flip over the mini power brush and turn on the cover.
Adjust the rotary brush with the groove. Attach it to its original position.
Attach the brush holder.
Push the cover firmly. Close the cover.
Cover
Remove dust and debris
Tweezers
Groove
The rotary brush
can be washed
with water.
Remove dust and
debris tangled in the
groove using
tweezers, etc.
Cut and remove dust
and debris tangled in
the rotary brush
using scissors, etc.
Rotary brush
Groove
Cover
Do not use cleansers, bleach, etc. Doing so might cause discoloration, deformation, etc.
If the rotary brush has been washed with water, attach it after thoroughly drying it naturally in
the shade.
Drying it requires approx. 24 hours. (The drying time may differ depending on the
environment or season.)
Note
When attaching the brush holder, fasten the hook first. Failure to do so might cause damage.
Note
Scissors
Tweezers
Groove
2-way crevice nozzle
Rotary brush
Tweezers
EN-34
Remove attached dust and debris
Remove tangled dust and debris
Maintaining the mini power brush
Perform maintenance when suction power is weak or when dirt becomes a concern.
We recommend periodic maintenance (at least once a month).
Dust and debris stuck to the rotary brush, brushes, wheels and rotating sections might cause reductions in
suction power or malfunctions.
Remove the attached dust and debris by using the 2-way crevice nozzle or other tools.
Remove tangled dust and debris using tweezers, etc.
Risk of injury
Before performing maintenance, detach the mini power brush from the vacuum cleaner or
extension pipe.
CAUTION
2-way crevice nozzle
Remove dust and
debris tangled in the
groove using tweezers
or other tools.
Remove dust and
debris tangled in the
rotary brush by using
scissors or other tools.
Risk of damage
Do not press against areas that are particularly easy to be damaged, such as pianos.
CAUTION
Scissors
Rotary brush
Cover
Remove dust and debris
Rotary brush
Scissors
The rotary brush
can be washed
with water.
Tweezers
Groove
Groove
EN-35
Rotary brush maintenance
Remove the brush holder.
Detach the rotary brush and remove dust and debris.
Adjust the rotary brush with the groove and attach it to its original position.
Flip over the mini power brush and turn the cover to align the arrow with the mark.
Adjust the rotary brush with the groove. Attach it to its original position.
Attach the brush holder.
Rotate to the locked position.
Remove dust and
debris tangled in the
groove using
tweezers, etc.
Cut and remove dust
and debris tangled in
the rotary brush
using scissors, etc.
Do not use cleansers, bleach, etc. Doing so might cause discoloration, deformation, etc.
If the rotary brush has been washed with water, attach it after thoroughly drying it naturally in
the shade.
Drying it requires approx. 24 hours. (The drying time may differ depending on the
environment or season.)
Note
When attaching the brush holder, make sure it is securely locked in position. Failure to do so may cause damage.
Note
EN-36
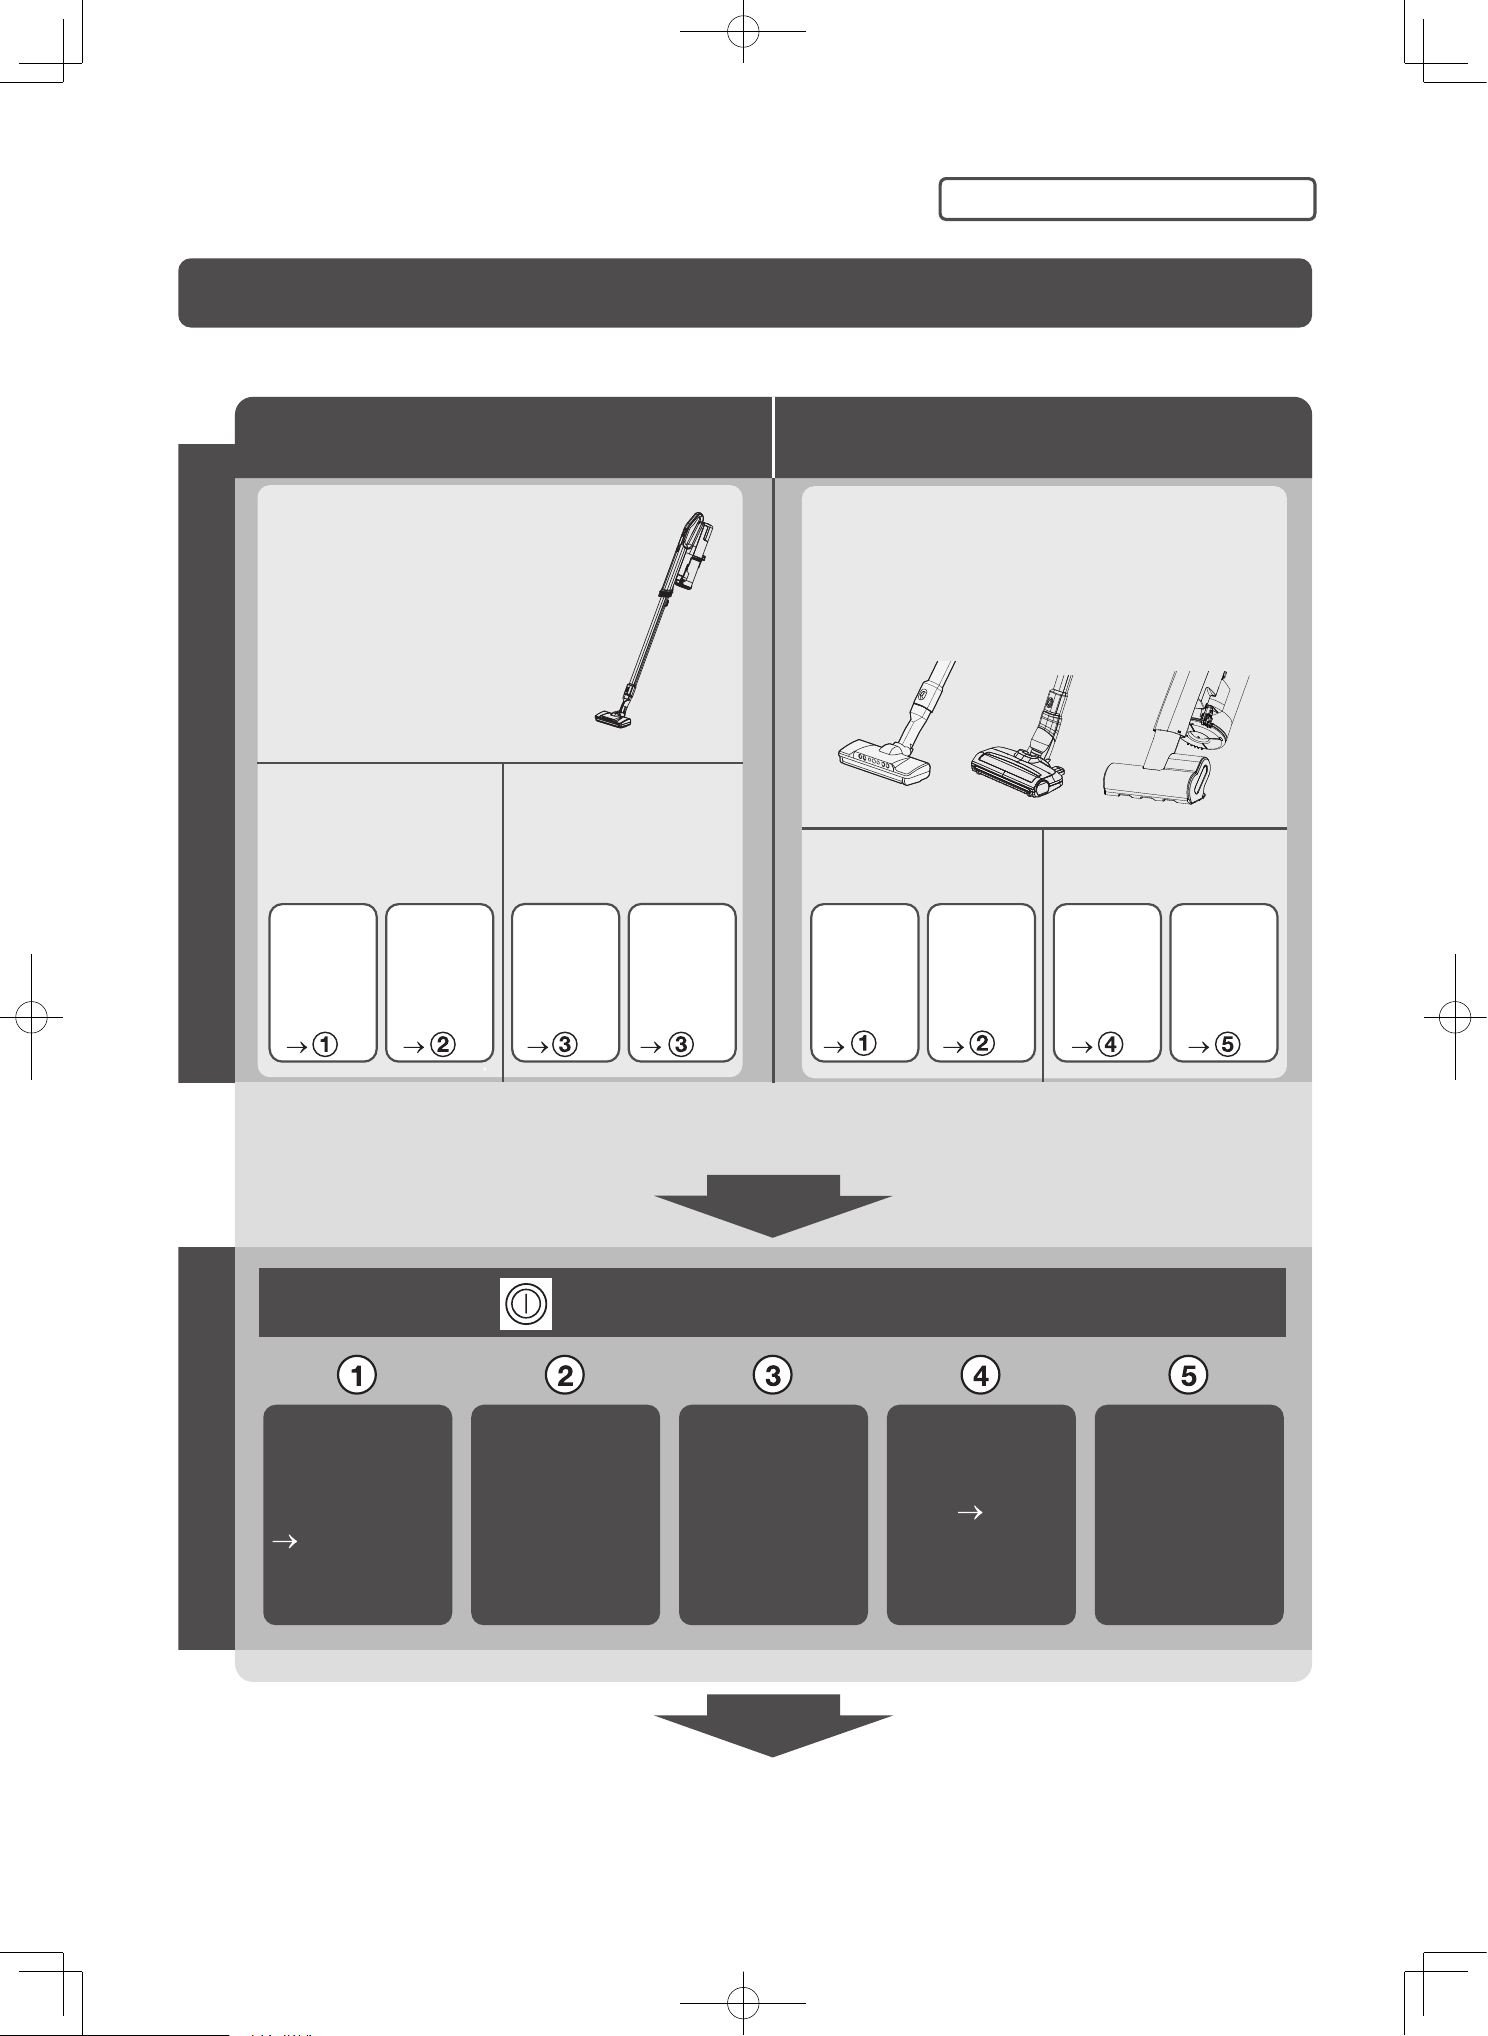
Troubleshooting
Before requesting for repair
The vacuum cleaner does not operate, or stops while the vacuum cleaner is running. The suction power is weak. The rotary brush does not rotate.
Press the button of the vacuum cleaner to stop operation.
Empty the dust
case or maintain
the dust case or
filters.
(P.EN-21~EN-26,
EN-28~EN-29)
Remove the
object that is
blocking the
inlet.
Wait for the
vacuum cleaner
to cool down,
which may take
a moment.
Remove the
foreign substance
from the rotary
brush
(P.EN-30~EN-32
EN-34)
Do not firmly
press the power
head against the
floor or carpet.
The safeguard might be operating. Release the safeguard with the following instructions.
If the vacuum cleaner continues to operate further, it stops automatically.
The safeguard is released after 5 to 60 minutes, and you can use
the cleaner normally.
Safeguard and cause Instructions
Suction power of the vacuum cleaner becomes weak
or stops while the vacuum cleaner is running.
The rotary brush of the power head, mini
power brush or wet power brush stops.
Check the following points again
To prevent the vacuum motor or
the battery from overheating, the
vacuum cleaner might
sometimes automatically enter
safe mode, in which the vacuum
cleaner runs with less electricity
and reduced suction power.
The filter indicator is blinks
and strays, the vacuum
cleaner switches to low
mode or the vacuum
cleaner stops working.
Dust and
debris
clogged in
clean filter or
sponge filter
Operation
while
blocking
the inlet
The
battery is
hot
The
vacuum
cleaner
motor is
hot
Power head
pressed
against the
area to clean
Foreign
substance
stuck in
vacuum
cleaner
Operation
while
blocking
the inlet
Dust and debris
clogged in
clean filter or
sponge filter
The display C1 is
blinking.
The filter indicator is
blinking.
The display C2 is
blinking.
If the vacuum cleaner is continuously
operated in a state where there is a lot of
resistance to the rotary brush, the rotation of
the rotary brush stops automatically to
prevent the motor from overheating.
Figure shown is a vacuum cleaner Model PV-XH4P
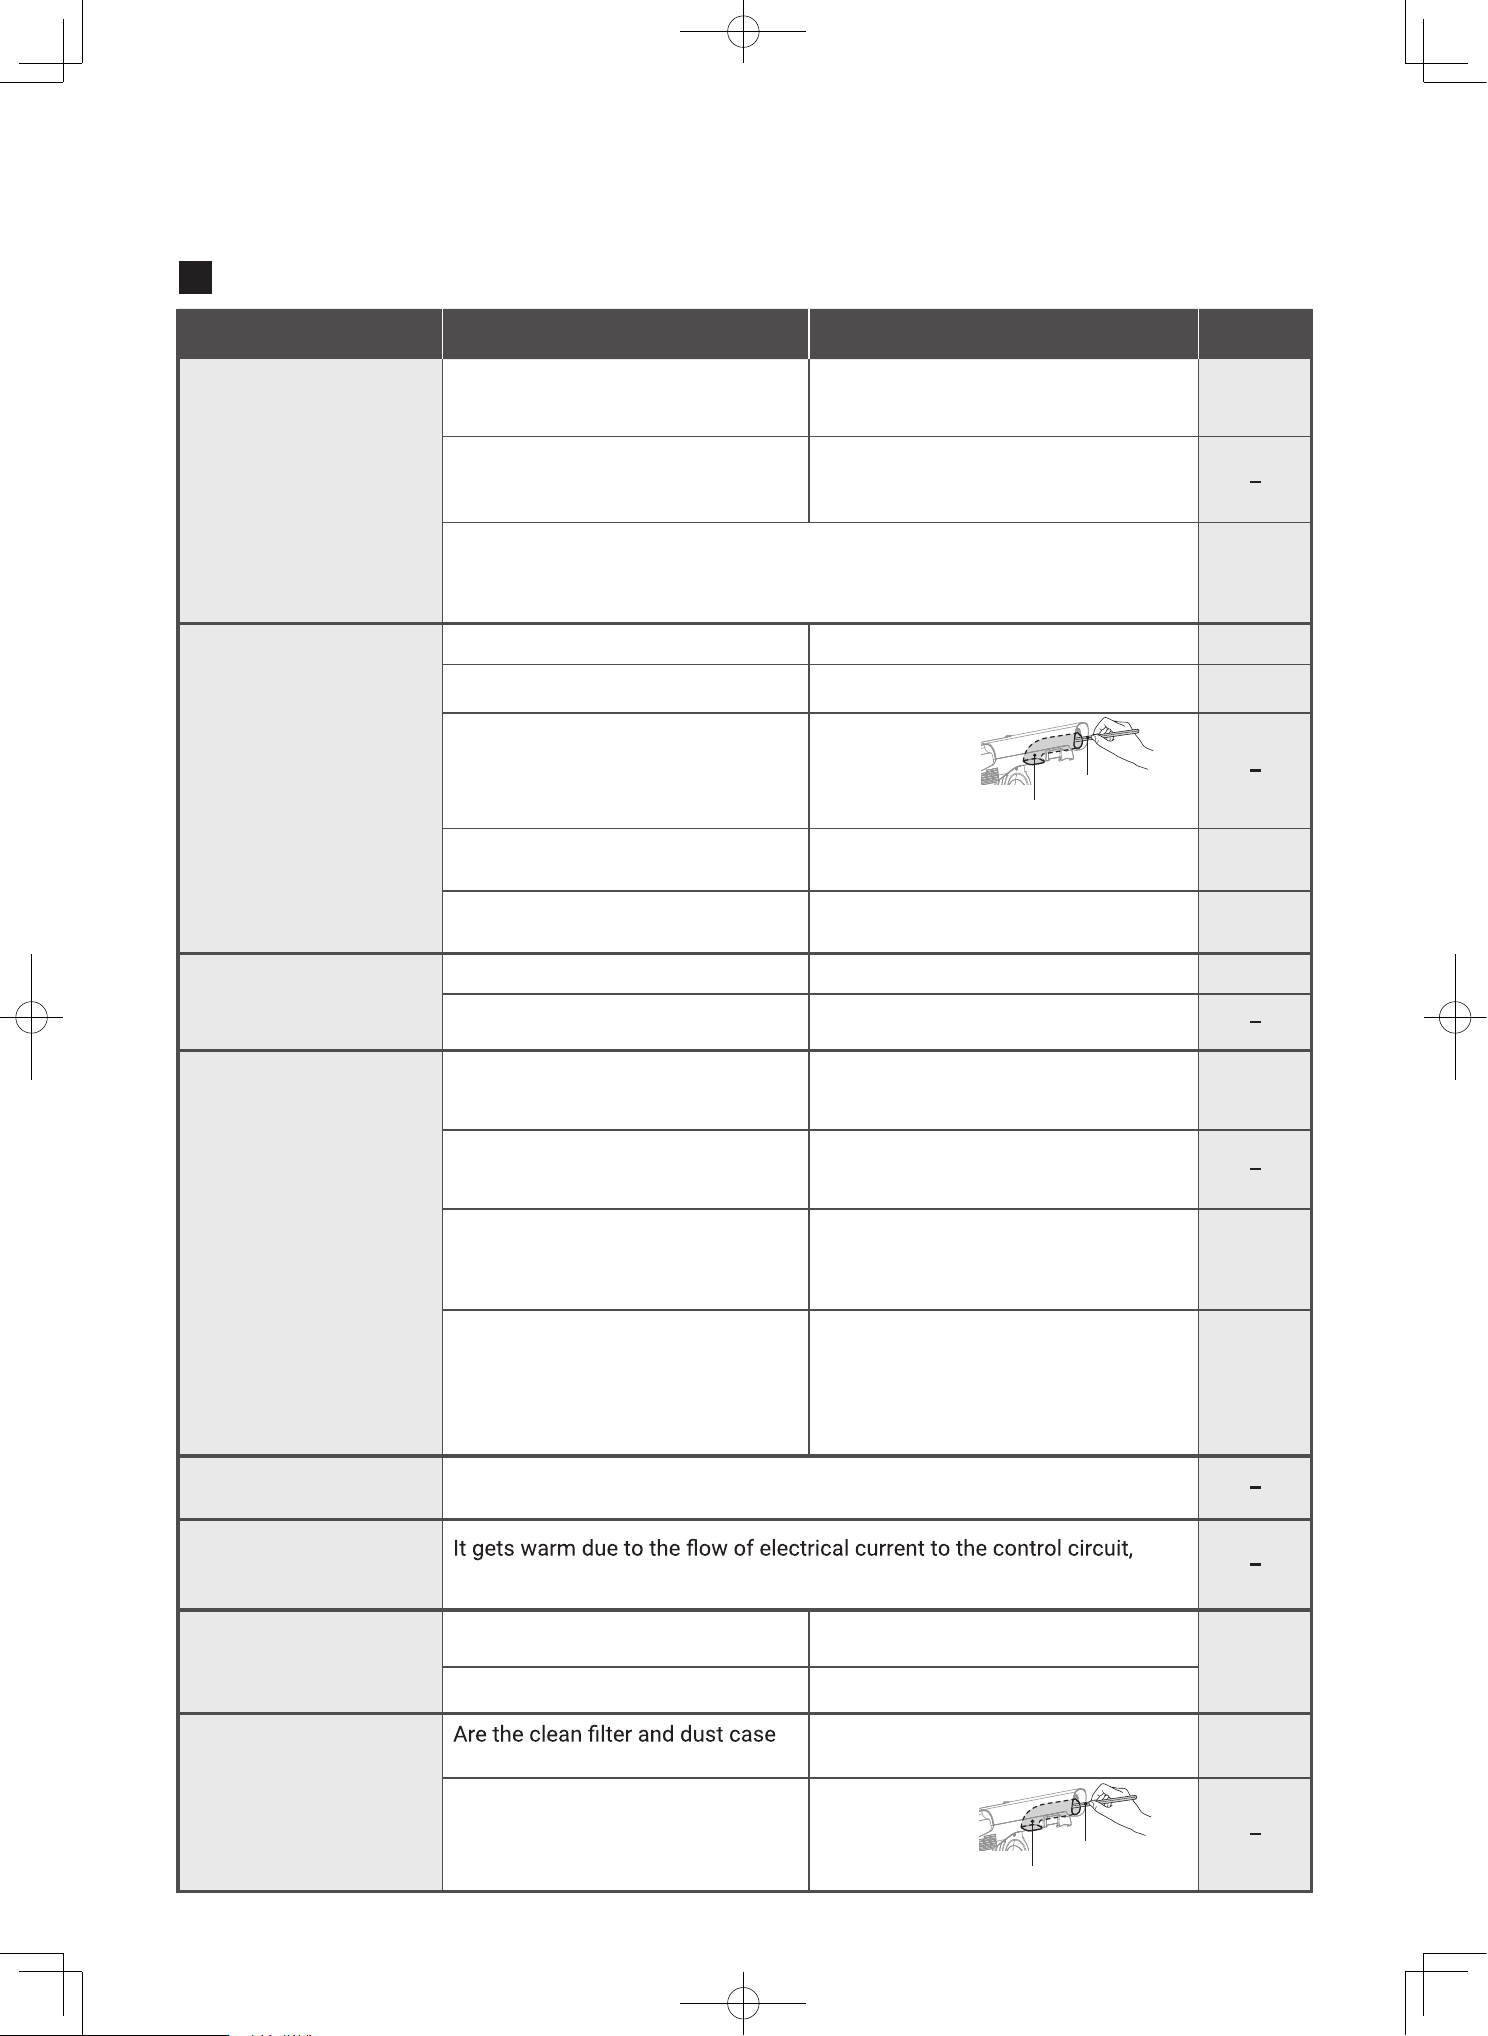
EN-37
Disposable chopsticks
Disposable chopsticks
Vacuum cleaner air duct
Vacuum cleaner air duct
Other problems
Problem
Suction power becomes
weak or stops during
operation.
Is the remaining battery level low?
[Battery indicator is blinking (about
once times per second)]
Is the exhaust abnormally hot?
Is the dust case full of dust and debris?
Is dust and debris stuck in the filters?
Is dust and debris clogging the
vacuum cleaner air duct?
Is dust and debris clogging the power head,
mini power brush or wet power brush?
Did you vacuum fine sand or dust
and debris?
Is the remaining battery level low?
Is the vacuum cleaner being
charged?
Is the room temperature lower
than 5°C or higher than 35°C?
Are you using the vacuum cleaner
in a cold place?
Did you leave the vacuum
cleaner unattended for a long
period of time without charging it?
Is the battery exhausted?
Is dust and debris stuck in the filters?
Are the filters thoroughly dried after washing?
securely attached?
Is dust and debris clogging the
vacuum cleaner air duct?
The motor is being cooled via air flow, which is normal.
which is normal.
When continuously operating in places of high temperature, such as under
direct sunlight or in cars exposed to the sun, the safeguard might operate
and the suction power might become weak to prevent the vacuum cleaner
motor and battery from overheating.
Charge the vacuum cleaner by setting the vacuum
cleaner on the charging station or by connecting
the AC adapter to the vacuum cleaner.
Stop operation by pressing the control
button. Wait for the vacuum cleaner to
cool down, and then start operation again.
Empty the dust case.
Clean the filters (wash with water).
Remove the dust
and debris using
disposable
chopsticks, etc.
Remove the dust and debris.
Empty the dust case and perform maintenance
(wash with water) on the filters.
Charge the battery.
Remove the vacuum cleaner from the charging
station or disconnect the AC adapter.
When using the vacuum cleaner or charging
the battery, make sure the ambient
temperature is between 5°C and 35°C.
Leave the vacuum cleaner in an area where the
ambient temperature is between 5°C and 35°C. Wait
for the vacuum cleaner to warm up, and then try again.
The battery capacity might be
temporarily recovering poorly. Use
until the battery is drained, then charge
it fully. Repeat this process 2-3 times.
If the vacuum cleaner stops running after a
short time even though it is fully charged and
the filters are clean (wash with water), you
might need to replace the battery. Please
consult with a Hitachi authorized service agent.
Perform maintenance for (wash
with water) each filter.
After washing with water, thoroughly air dry the filters.
Securely attach them.
Remove the dust
and debris using
disposable
chopsticks, etc.
Suction power becomes
weak or stops during
operation.
(Filter indicator is
blinking.) The operation
sound increased.
The cleaner does not
operate, or stops during
operation
Operating time is short
even after charging
The exhaust or vacuum cleaner
gets warm (during operation)
There are abnormal
sounds coming from
around the dust case.
The exhaust has an
abnormal odor.
The vacuum cleaner or
AC adapter gets warm
(during charging).
Things to check Instructions Page
P.EN-12
P.EN-36
P.EN-21-EN-23
P.EN-24-EN-26
EN-28-EN-29
P.EN-30 to
EN-35
P.EN-21 to EN-25
EN-28-EN-29
P.EN-12
P.EN-13
P.EN-13
P.EN-21 to
EN-25
EN-28-EN-29
P.EN-28-
EN-29
P.EN-24 to
EN-26
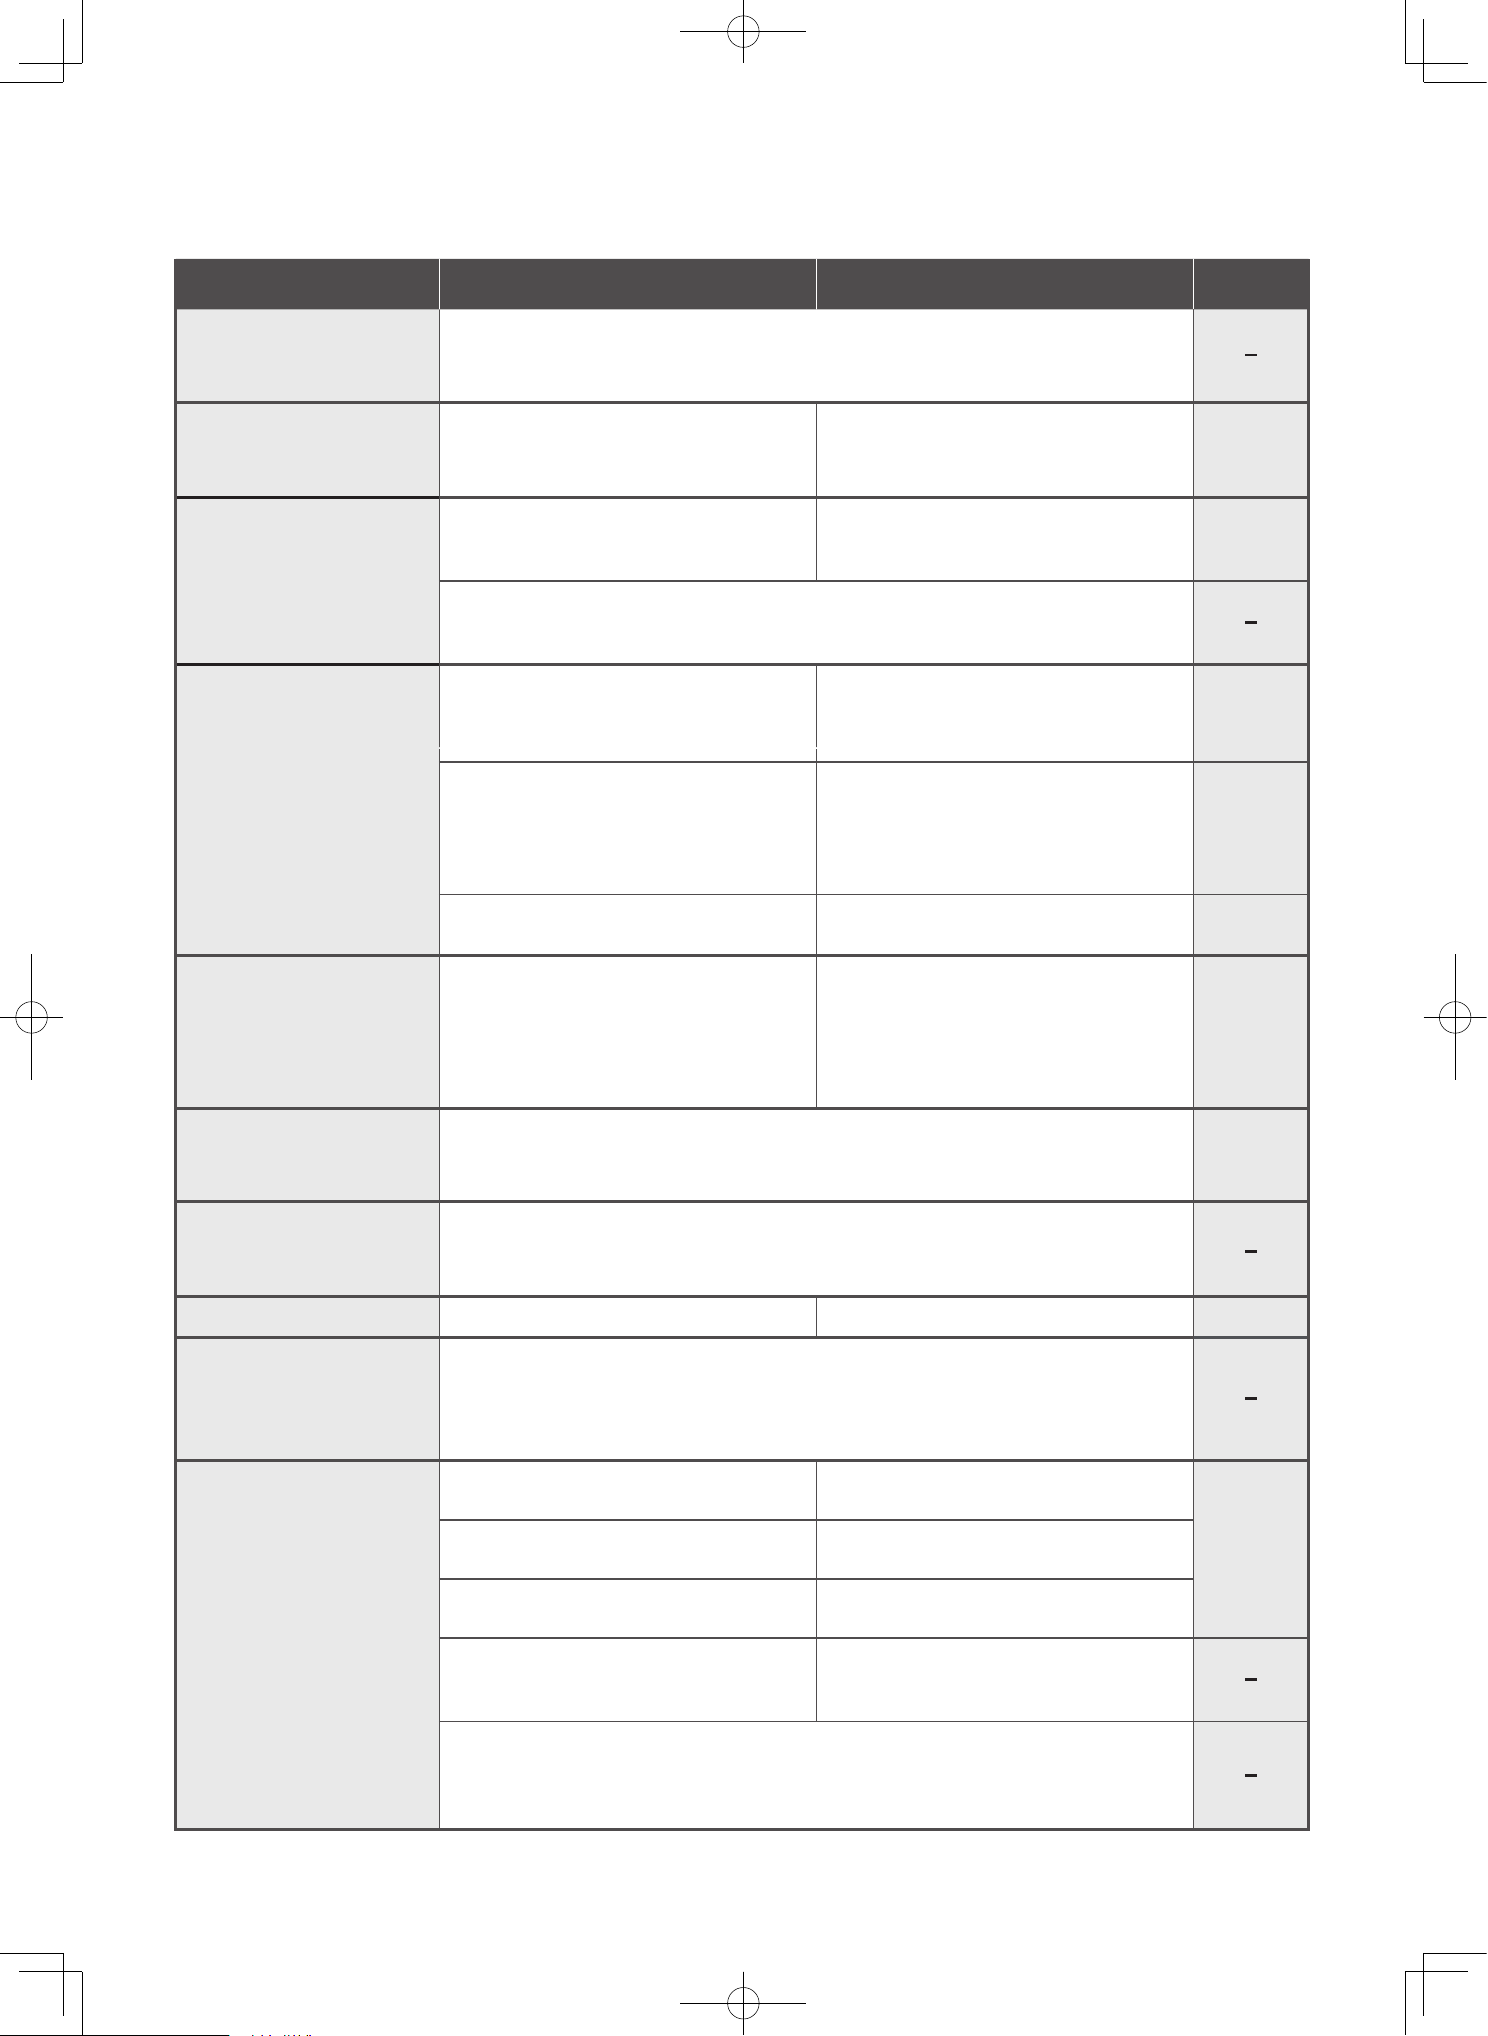
EN-38
The dust and debris
of the dust case does
not rotate
Dust and debris spills out of
the vacuum cleaner when
the dust case is removed.
Dust and debris spills
out when attachments
are removed.
The rotary brush of the
power head, mini power
brush or wet power
brush stops or rotates
poorly.
The rotary brush of the
power head stops or the
LED lights turn off.
Tick sound when moving
the power head
LED lights are dim
There is a clattering
sound coming from the
power head
The battery Indicator
does not turn on
(remains off) even after
the vacuum cleaner is
charged.
Dust and debris might not rotate depending on the type of dust and
debris and how it accumulates, which is normal.
Has the dust and debris in the dust
case exceeded the max line of the
dust case?
Has the dust and debris in the dust
case exceeded the max line of the
dust case?
If operation is stopped while the vacuum cleaner is in operation facing
upwards, dust and debris might remain in the vacuum cleaner air duct.
Stop operation while the vacuum cleaner is facing downwards.
Are the power head, mini power
brush or wet power brush securely
attached?
Did you lift the power head off of the
surface (floor or fabric) to be
cleaned?
Is dust and debris stuck to the rotary
brush, safety switch, etc.?
The rotary brush might stop
automatically to prevent the power
head motor from overheating.
This is the sound that occurs due to the structure of the power head. This
is normal.
Is the remaining battery level low?
This sound is produced because of the way the safety switch is designed.
The sound does not indicate a problem with the product.
Is the AC adapter firmly plugged into
the outlet?
Is the connector of the AC adapter firmly
inserted into the vacuum cleaner?
Is the battery fully charged?
Are the terminals on the AC
adapter or vacuum cleaner dirty?
Did you not use the vacuum cleaner and leave it unattended for a long
period of time without charging it? When leaving it unattended, the battery
might have to be replaced because its performance and life might be
deteriorated. Please consult with the Hitachi authorized service agent.
Dispose the dust and debris before
it exceeds the max line of the dust
case.
Dispose the dust and debris before
it exceeds the max line of the dust
case.
Securely attach it.
The power head are designed to stop
rotating when they are not in contact
with a surface to be cleaned. Make
sure the power head is in contact
with the surface to be cleaned.
Remove the dust and debris.
Empty the dust case and perform
maintenance (wash with water) on
the filters. Remove the object that is
blocking the inlet.
The rotary brush of the
mini power head stops.
The rotary brush might stop automatically to prevent the motor from
overheating.
The safeguard is released after 5 to 60 minutes automatically.
Charge the battery.
Firmly insert the plug.
Firmly insert the connector.
When fully charged, the battery
Indicator turns off.
Unplug the plug and remove the
battery, and remove the dust and debris
on the terminals with a dry cloth.
Problem Things to check Instructions Page
P.EN-21 to
EN-23
P.EN-21 to
EN-23
P.EN-30 to
EN-35
P.EN-21 to
EN-25
EN-28 to
EN-29
P.EN-12
P.EN-36
P.EN-12
P.EN-8
P.EN-15
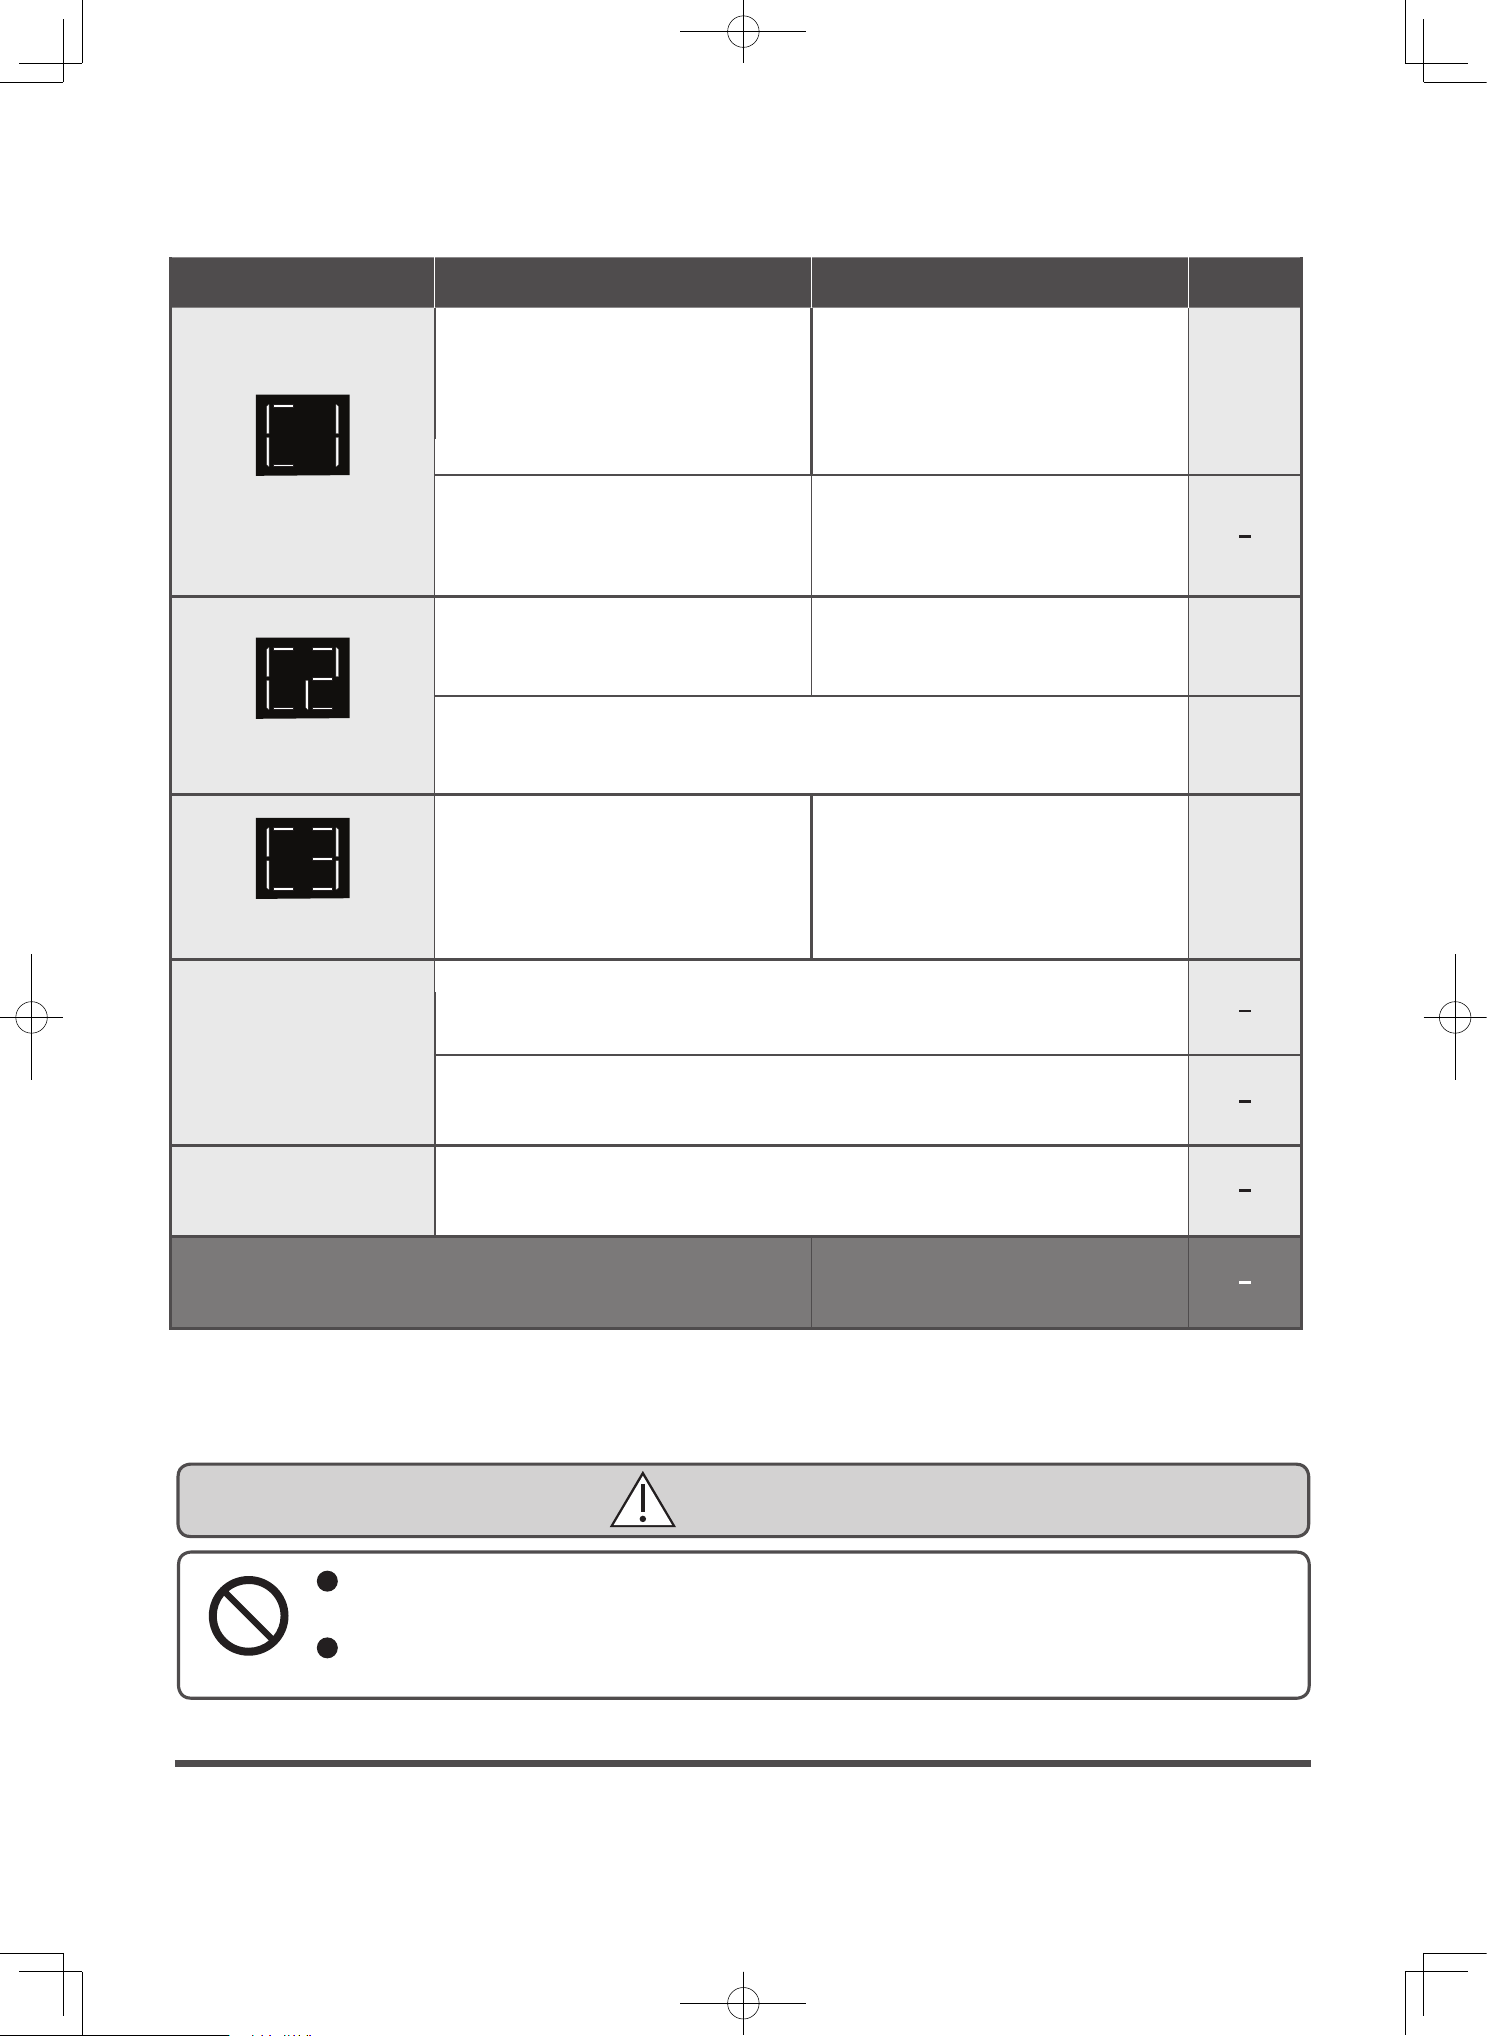
EN-39
Replacing the battery
The battery is a consumable item. When the usage time of the battery becomes short even when properly
charging, the life of the battery has reached its end.
Please replace the battery. Consult with your Hitachi authorized service agent when replacing the battery
without disposing of the product due to the life of the battery reaching its end, etc.
Replacing the battery and disposing of the vacuum cleaner
DANGER
Do not connect the battery to devices other than this vacuum cleaner.
Also, do not disassemble, modify, or solder the battery, or charge the battery on its own.
Failure to heed this warning might cause the battery to leak, generate heat, rupture, smoke, fire, electric shock, or injury.
Do not detach the battery while the vacuum cleaner is in operation.
Failure to heed this warning might cause smoke, fire, electric shock, or injury.
It takes a long time
to charge.
Electrostatic
If the problem persists
Do not attempt to repair it yourself.
Please contact a Hitachi authorized
service agent.
Is the room temperature between
5 °C and 35 °C?.
Use the vacuum cleaner while the
dust collector is full?
Use the vacuum cleaner with the
suction head or brushes clogged?
Use the vacuum cleaner in an
environment with a temperature
between 5 °C and 35 °C.
Remove dust, dirt or blockages.
This is a notice of protective
operation to prevent overheating of
the vacuum cleaner's motor and
battery.
Display C1 blink
Display C2 blink
Display C3 blink
Wait for the vacuum cleaner to cool
down, and then start operation
again.
Turn off the vacuum cleaner and
check that is the brush clogged by a
foreign object?
Are you using the AC adapter that
was provided with the vacuum
cleaner?
The rotary brush might stop automatically to prevent the motor from
overheating.
The safeguard is released after 5 to 60 minutes automatically.
Do not use AC adapter other than
the one that was provided with the
vacuum cleaner.
Charging time of battery might be longer according to the usage
environment and conditions such as the ambient temperature and usage
frequency.
If the battery indicator doesn't disappear even after charging the battery
for over 7 hours, the device might be damaged, so please consult with the
Hitachi authorized service agent.
Static electricity may cause a reaction, where a slight transfer of electric
charge is felt upon contact, but this is not a malfunction. If it occurs
frequently, please consult with the Hitachi authorized service agent.
Remove the foreign object and begin
using the new vacuum cleaner.
Problem Things to check Instructions Page
P.EN-13
P.EN-41
P.EN-36
P.EN-30 to
EN-33
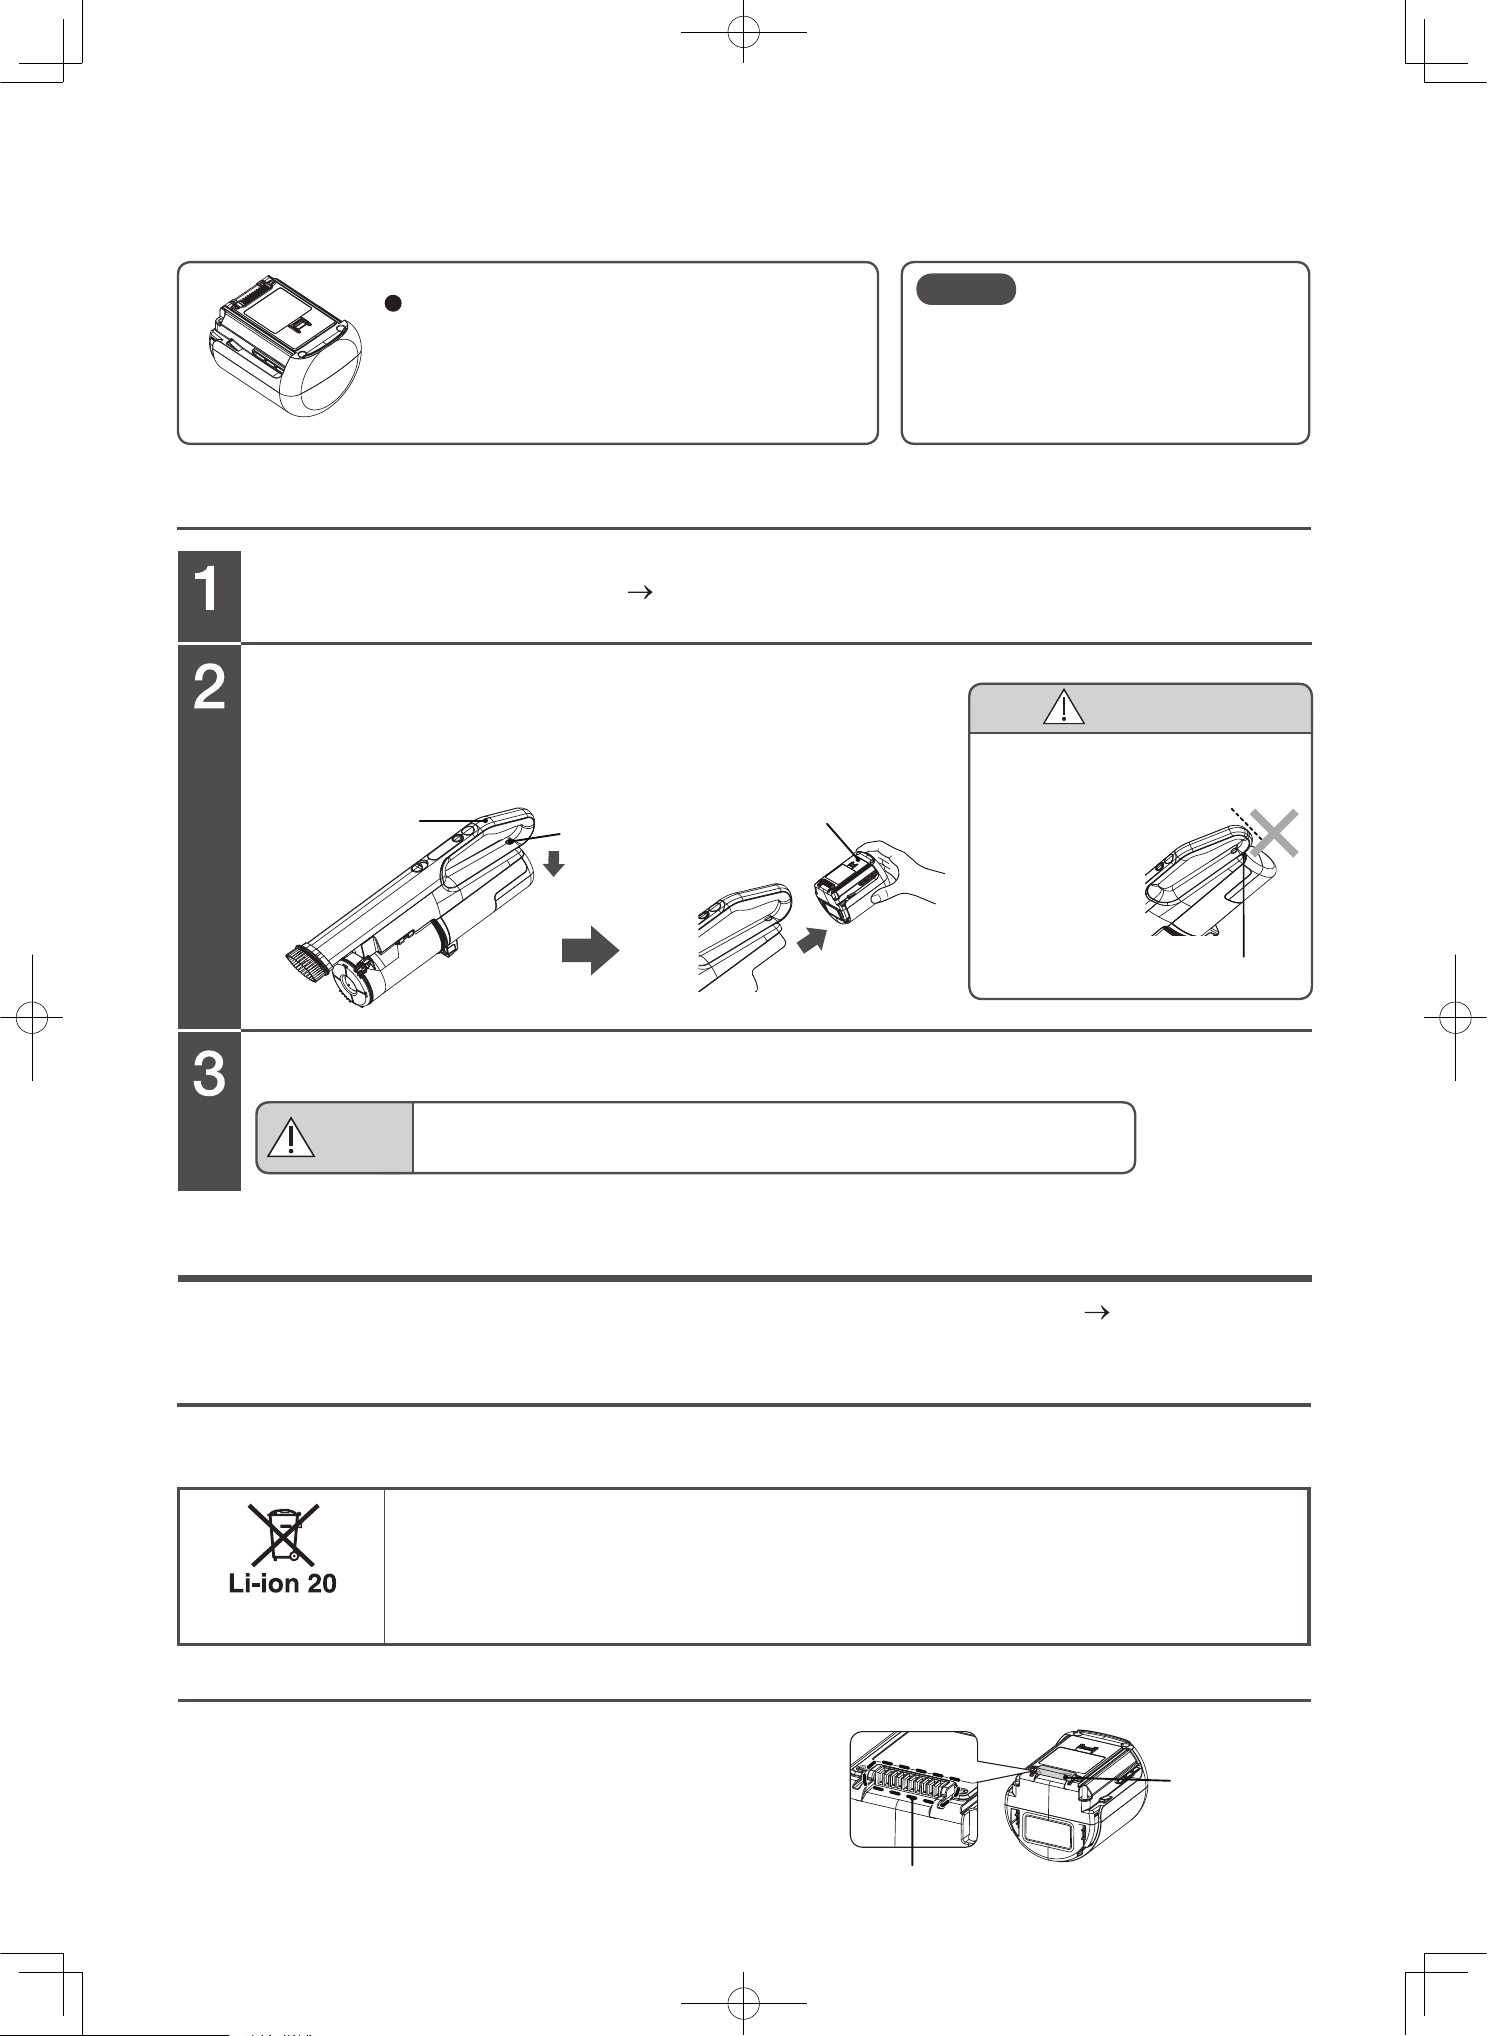
EN-40
Replacement of the battery
Recycling the battery (when disposing the product)
Detaching the battery (When disposing of the product)
Detach the attachments
(P.EN-14) from the vacuum cleaner.
Detach the battery.
Attaching the new battery.
Battery exclusive for the Hitachi electric
vacuum cleaner
Model: PVB-2530A, PVB-2530B,
or PVB-2550A
Hold the handle, push the battery release button in the direction of the
arrow, hold the side of the battery, and pull it out in the direction of the
arrow.
To prevent damage to property and personal injury, please thoroughly read the Safety precautions (P.EN-2 to EN-6)
and dispose the product properly.
This product uses a lithium-ion battery.
Lithium-ion batteries are a valuable, recyclable resource.
To dispose of the vacuum cleaner, detach the battery according to the following procedure, and
then bring the vacuum cleaner to a Hitachi authorized service agent or one of our recycling
partner stores. Alternatively, ask local authorities about the proper method of disposing of the
vacuum cleaner, and follow your local recycling regulations.
*Recycling rules might vary depending on the local authorities.
Follow the procedure 1 to 2 of the replacement of the battery.
Insulate the battery terminal by attaching vinyl tape.
Replacing the battery and disposing of the vacuum cleaner (continued)
Disposing of the vacuum cleaner
Battery
release
button
Battery
Handle
Vinyl tape
Terminals
Correctly attach the battery to the vacuum cleaner.
Doing so might cause heat to be generated, a fire, or an electric shock.
WARNING
If a battery other than the exclusive
battery is used, the performance
and quality of the vacuum cleaner is
not guaranteed.
Note
CAUTION
Risk of injury
Do not let your finger stick out
from the battery
release button
when removing
the battery.
Battery release button
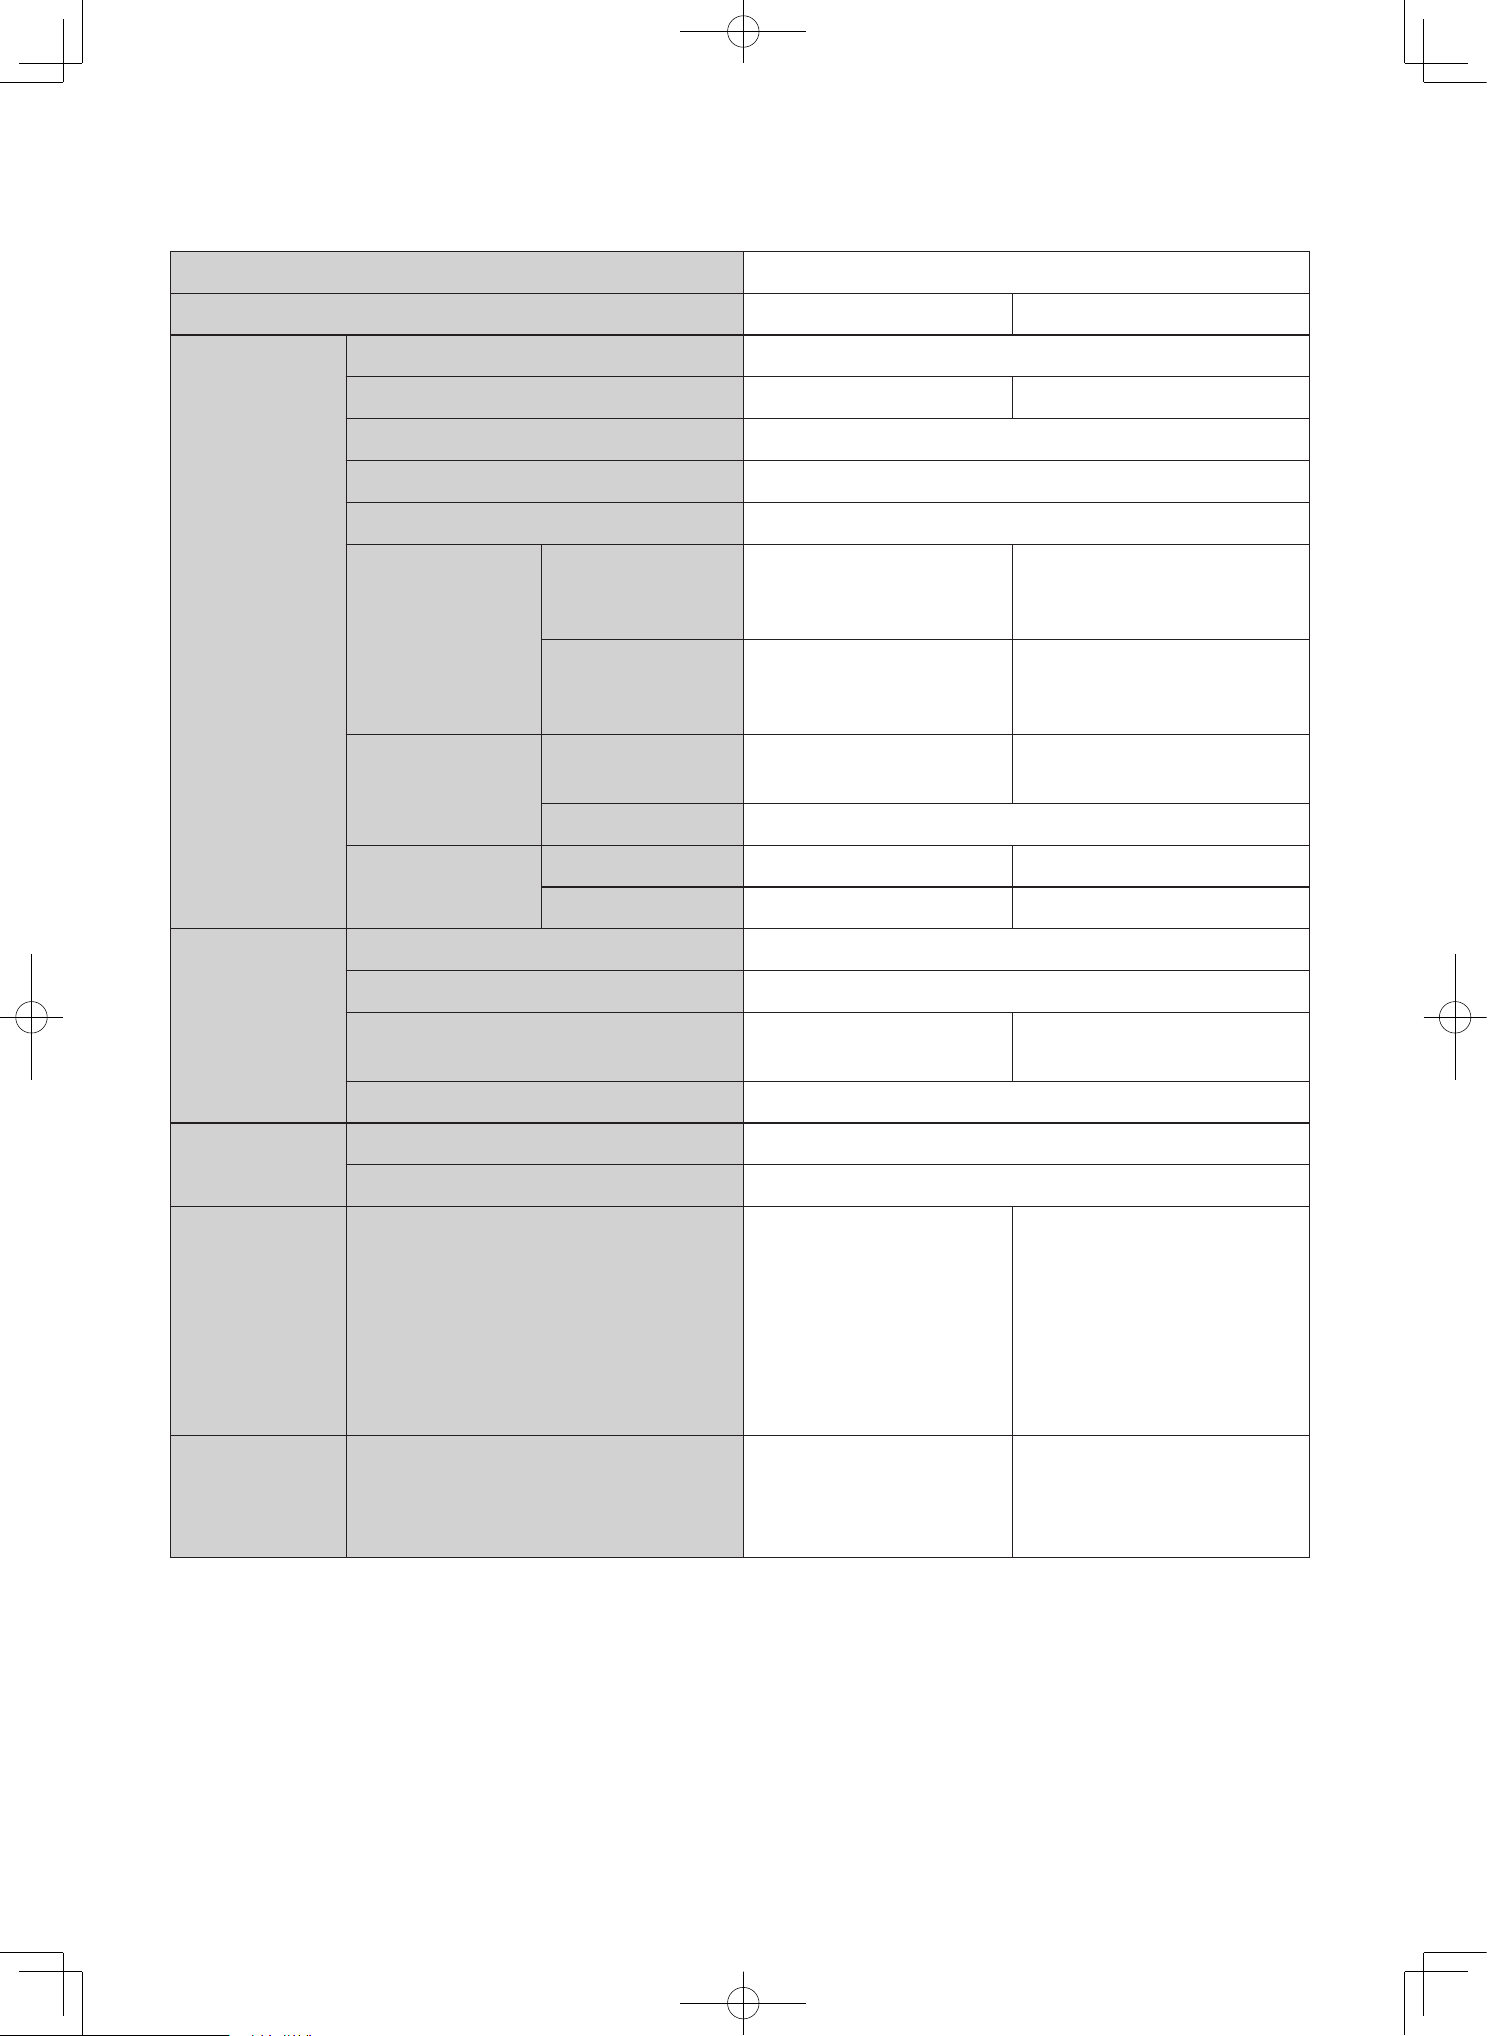
EN-41
Product name Cordless Stick Cleaner Vacuum Cleaner
Model name PV-XH4P PV-XHE4PL
Body
Rated voltage DC25.2V
Nominal capacity 3,000 mAh. 5,000 mAh.
Dust bin capacity 0.5 L
Dust capacity (Max line) 0.4 L
Battery Lithium-ion battery (7 cells)
Continuous
operating time*
Stick cleaner
Low : Approx. 45 minutes
Mid : Approx. 20 minutes
High : Approx. 8 minutes
Low : Approx. 80 minutes
Mid : Approx. 45 minutes
High : Approx. 15 minutes
Handy cleaner
Low : Approx. 60 minutes
Mid : Approx. 25 minutes
High : Approx. 8 minutes
Low : Approx. 100 minutes
Mid : Approx. 45 minutes
High : Approx. 15 minutes
Dimensions
(L × W × H) (mm)
Stick cleaner 250 × 230 × 1,222 275 × 252 × 1,232
Handy cleaner 181 × 90 × 470
Weight
Stick cleaner 1.95 kg. 2.65 kg.
Handy cleaner 1.5 kg. 1.65 kg.
AC adapter
Input AC 100-240V, 50/60Hz, 1.0A
Output DC 29.9V, 0.9A
Charge time
Approx. 3 hours Approx. 5 hours
Cord length 1.6 m.
Charging
station
Outer dimensions (L × W × H) (mm) 256 × 230 × 1060
Weight 2.6 kg.
Attachments
Power Head .................................. 1 pc.
Extension pipe .............................. 1 pc.
AC adapter
*1
.................................. 1 pc.
Wall bracket .................................. 1 pc.
Stand pipe ..................................... 1 pc.
Stand base .................................... 1 pc.
Wet accessories ........................... 1 pc.
Stand tray...................................... 1 pc.
o
o
o
o
o
o
-
-
o
o
o
o
o
o
-
-
Attachment
accessories
Handy brush ................................. 1 pc.
2-way crevice nozzle ....................1 pc.
Mini power brush ......................... 1 pc.
Multi angle nozzle with brush .....1 pc.
o
o
o
o
o
o
o
o
Note: * The battery lift varies depending on the ambient temperature and other condition under which the vacuum
cleaner is used (At full charge, new battery, 20°C).
:
Ac adapter Model and plug Type
PVA-H299090-UK or PVA-J299090-UK : Type-G plug shape
PVA-H299090-EU or PVA-J299090-EU : Type-C plug shape
PVA-H299090-AU or PVA-J299090-AU : Type-I plug shape
Specifications
(Varies depending on room temperature
and operating time, etc)
*1
01M-3VPL165171-2225-01
Factory: Arcelik Hitachi Home Appliances (Thailand) Ltd.