Electronic Pressure Cooker
INSTRUCTION MANUAL
SIMPLY
MING

When using pressure cookers, basic safety precautions should always be followed:
1. Read all instructions carefully.
2. Do not touch hot surfaces. Use handles or knobs and a potholder.
3. Do not close or clog the safety valves under any circumstance.
4. To protect against risk of electrical shock, do not put power cord, plug or body of the appliance in
water or other liquid.
5. Close supervision is necessary when any appliance is used by or near children.
6. Unplug from outlet when not in use and before cleaning. Allow to cool before putting on or taking o
parts.
7. Do not operate any appliance with a damaged cord or plug or after the appliance malfunctions or is
dropped or damaged in any manner. Return the appliance to an authorized service facility for examination,
repair, or electrical or mechanical adjustment.
8. Do not ll the unit over 2/3 full. When cooking foods that expand during cooking such as rice or dried
vegetables, do not ll the unit over 1/2 full. Over lling may cause a risk of clogging the vent pipe and
developing excess pressure. See “Using Your Pressure Cooker” section of this manual.
9. Be aware that certain foods, such as applesauce, cranberries, pearl barley, oatmeal or other cereals,
split peas, noodles, macaroni, rhubarb, or spaghetti can foam, froth, and sputter, and clog the pressure
release device (steam vent). These foods should not be cooked in a pressure cooker.
10. The use of attachments not recommended or sold by the appliance manufacturer may cause re,
electric shock, or injury.
11. Do not use outdoors.
12. Do not place the appliance on or near hot gas or electric burners, or in a heated oven.
13. Do not let cord hang over edge of table or counter or touch hot surfaces, including the stove.
14. Extreme caution must be used when moving an appliance containing hot contents or liquids.
15. This appliance cooks under pressure. Improper use may result in scalding injury. Make certain unit is
properly closed before operating. See “Using Your Pressure Cooker” section of this manual.
16. Do not use this appliance for other than intended use.
17. To reduce the risk or electric shock, cook only in removable container.
18. Always attach power cord to appliance rst, and then plug cord into wall outlet. To disconnect, turn
unit o, grasp plug, and pull from the wall. Never yank on cord.
19. Always check the pressure release devices for clogging before use.
IMPORTANT SAFEGUARDS
1

IMPORTANT SAFEGUARDS
SAVE THESE INSTRUCTIONS
HOUSEHOLD USE ONLY
20. Do not open the pressure cooker until unit has cooled and internal pressure has been released. If
the lid is dicult to open, this indicates that the cooker is still pressurized - do not force it open. Any
pressure in the cooker can be hazardous. See “Using Your Pressure Cooker” section of this manual.
21. Do not operate this appliance in the presence of explosives and/or ammable fumes.
22. Do not use pressure cooking for pressure frying with oil.
GROUNDING INSTRUCTIONS: This appliance must be grounded. It is equipped with a 3-prong cord
having a grounded plug. The plug must be plugged into an outlet which is properly installed and
grounded.
Warning: Improper use of the grounded cord can result in the risk of electric shock. Consult a
qualied electrician if necessary. Do not attempt to defeat this safety feature by modifying plug.
A short power-supply cord is provided to reduce the hazards resulting from entanglement or
tripping over a longer cord. If it is necessary to use an extension cord, it should be positioned such
that it does not drape over the counter or tabletop where it can be pulled on by children or tripped
over and:
A. Use only 3-prong extension cord with 3-blade grounding plug.
B. The marked rating of the extension cord must be equal to or greater than the rating of this
appliance. The electrical rating is listed on the bottom of this unit.
Before First Use
Carefully unpack the pressure cooker and parts, and remove all packaging materials. Wash
the REMOVABLE POT, lids and gasket in warm, soapy water to remove any dust that may have
accumulated during packaging. Wipe cord and pressure cooker housing with a dry cloth. Do not
immerse the cord or plug in water or other liquid. Dry all parts thoroughly before use.
2

• Ensure that your LID GASKET is properly in place and is free of food particles or is not damaged in any
way.
• WARNING: Do not release steam manually with recipes containing lots of liquid, such as soups and
stews. Turn the Pressure Cooker o by pressing the Start/Cancel button and unplug the cooker from
the wall outlet. Allow to sit until the red PRESSURE INDICATOR PIN drops AND the lid turns without any
resistance whatsoever
• NEVER place the pressure cooker LID on the pressure cooker without it being in the CLOSED position.
Secure the LID on pressure cooker by aligning the Triangle-symbol (see gure 1) on the pressure cooker
housing with square symbol on the pressure cooker LID. Turn the LID counter-clockwise until the square
symbol on the lid aligns with the Triangle-“CLOSE” text (see gure 2) on the pressure cooker housing.
Improper use may result in scalding injury.
• NEVER push the PRESSURE INDICATOR PIN down in an attempt to open the lid, a serious scalding
injury could occur.
• Do not ll the POT over 2/3 full. When cooking foods that expand during cooking such as rice or dried
vegetables, do not ll the POT over 1/2 full. Overlling may cause a risk of clogging the STEAM VENT and
developing excess pressure. See “COOKING FUNCTIONS” section of the instruction manual.
• Be aware that certain foods, such as applesauce, cranberries, pearl barley, oatmeal or other cereals,
split peas, noodles, macaroni, rhubarb, or spaghetti can foam, froth, and sputter, and clog the STEAM
VENT. These foods should not be cooked in a pressure cooker.
• Always check the STEAM VENT for clogging before use.
• Do not use the pressure cooker without liquid; this could damage the pressure cooker severely.
• Do not use pressure cooker for storage purposes nor insert any utensils.
3
Additional Safety Information
Know Your Electric Pressure Cooker
4

COOKING FUNCTIONS
5
Your Pressure Cooker has six functions, PRESSURE COOK, SLOW COOK, OPEN SEAR, STEAM, KEEP
WARM, and DELAY TIMER which include specic temperature and times for each dierent function.
The below outlines features of each function. Ensure that you have read and are fully familiar with all
sections of this manual before rst use.
Cooking Pot Markings
Inside the removable cooking POT are two sets of markings. One is marked “2/3 MAX PRESSURE
COOK”, which indicates the maximum ll line when cooking any food, other than rice in the pressure
cooker. The other is marked “RICE” for cooking rice. When pressure cooking rice, never ll the pressure
cooker more then 1/2 full.
WARNING: To avoid a serious burn injury when cooking foods other than rice, never exceed the 2/3
MAX PRESSURE COOK mark of combined volume of liquids and solids.

6
PRESSURE COOK
LID ON
STEAM RELEASE DEVICE: SEAL
1. Gather all ingredients and be familiar with your recipe. Pour required amount of liquid into
removable cooking POT, and then add food. Use the RACK, if desired. Except when cooking rice, never
load POT above the maximum ingredient level line marked “2/3 MAX PRESSURE” on cooking POT. See
instructions in section “PRESSURE COOKING RICE” in the manual.
2. Make sure LID GASKET is securely positioned in the LID. Always examine the gasket before
installing and before each use. Make sure it is in good working order and free of any tears.
3. Secure the LID on pressure cooker by aligning the Triangle-Open symbol on the pressure
cooker housing with square-close symbol on the pressure cooker LID. Turn the LID counter-clockwise
until the square symbol on the lid aligns with the Triangle-CLOSE symbol (see gure 2) on the pres-
sure cooker housing. Do not attempt to cook in your pressure cooker unless the LID is in the “CLOSE”
position as shown in gure 2.
4. Set the PRESSURE RELEASE DEVICE to the SEAL position (see gure 3).
5. Plug power cord into unit rst and then into a 120-volt 60 Hz AC only outlet, the display will
show “00”.
6. Press the PRESSURE COOK button. The PRESSURE COOK indicator light will illuminate and stay
on throughout the preheat and cooking process.
7. The TIMER DISPLAY will show 40 minutes (default time) and begin blinking. Press “+” or “-“keys
to adjust the cooking time in 1 minute increments (01 – 99). The timer can only be changed while the
TIMER DISPLAY is blinking.
8. Press START/CANCEL to begin the preheating process. The display will show alternating blink-
ing “00”. If you do not press Start/Cancel within 5 minutes the display will change back to “00”. Once
the pressure cooker reaches operating pressure the TIMER DISPLAY show the set time and begin
counting down in 1 minute increments.
9. When the cooking time has elapsed you will hear 3 beeps and the pressure cooker will auto-
matically switch to KEEP WARM. The KEEP WARM indicator light will illuminate and the TIMER DISPLAY
will change to 0.0. The TIMER will start counting up in half hour increments (0.5, 1.0, 1.5 etc.) to show
how long the cooker has been in KEEP WARM mode. The pressure cooker will stay in KEEP WARM
mode up to 8 hours or until the START/CANCEL button is pressed. Once 8 hours have elapsed 3 beeps
will sound and the KEEP WARM indicator light will turn o and the TIMER DISPLAY will show 00.
10. The pressure can be released manually or on its own. If a recipe states “let pressure drop on its
own” unplug the cooker and let sit until the PRESSURE INDICATOR PIN has dropped (see Figure 5) AND
the LID turns without any resistance whatsoever.
WARNING: Do not release steam manually with recipes containing lots of liquid, such as soups and
stews. NEVER force the Pressure Cooker LID open. If there is any resistance whatsoever in opening the
LID and the PRESSURE INDICATOR PIN is raised (see Figure 6) it indicates that your Pressure Cooker is
still under pressure and can cause a serious scalding injury if forced open.
11. Pressure is completely reduced when the PRESSURE RELEASE DEVICE is in the VENT position
(see Figure 4) AND you no longer hear steam escaping from the valve AND the Red Pressure Indicator
Pin has dropped (see Figure 5) AND the lid opens freely with no resistance whatsoever. Only then is it
safe to remove pressure cooker LID and serve food. Remove LID by grasping the handle and twisting
lid clockwise to the OPEN position.
7
POWER INTERRUPTION
If the power is interrupted in PRESSURE COOK, SLOW COOK, STEAM, KEEP WARM and DELAY TIMER
the cooker will remember the settings as long as the power is restored within 30 minutes. The power
interruption mode will not work in OPEN/SEAR mode.

8
SLOW COOK
LID ON
STEAM RELEASE DEVICE: REMOVED
1. Remove vent valve when cooking in SLOW COOK mode.
2. Press the SLOW COOK button. The SLOW COOK indicator light will illuminate.
3. The TIMER DISPLAY will show 5.0 hours (default time) and begin blinking. Press “+” or “-“keys to
adjust the cooking time in half hour increments (displayed as 0.5) up 24 hours. The timer can only be
changed while the TIMER DISPLAY is blinking.
4. Press START/CANCEL button to begin the cooking process. The TIMER/DISPLAY will immedi-
ately start counting down from the set time If you do not press START/CANCEL within 5 minutes the
TIMER DISPLAY will change back to “00”.
5. When the cooking time has elapsed you will hear 3 beeps and the cooker will automatical-
ly switch to KEEP WARM. The KEEP WARM indicator light will illuminate and the TIMER DISPLAY will
change to 0.0. The TIMER will start counting up in half hour increments (0.5, 1.0, 1.5 etc.) to show
how long the cooker has been in KEEP WARM mode. The cooker will stay in KEEP WARM mode up to
8 hours or until the START/CANCEL button is pressed. Once 8 hours have elapsed 3 beeps will sound
and the KEEP WARM indicator light will turn o and the TIMER DISPLAY will show 00.
NOTE: Press START/CANCEL anytime during the cooking or keep warm modes to cancel all settings.
POWER INTERRUPTION
If the power is interrupted in PRESSURE COOK, SLOW COOK, STEAM, KEEP WARM and DELAY TIMER
the cooker will remember the settings as long as the power is restored within 30 minutes. The power
interruption mode will not work in OPEN/SEAR mode.
OPEN SEAR
LID: OFF ONLY
1. Never use the OPEN/SEAR mode with the LID on the cooker
2. Press the OPEN SEAR button. The OPEN SEAR indicator light will illuminate and stay on during
the cooking process.
3. The TIMER DISPLAY will show 20 minutes (default time) and begin blinking. Press “+” or “-“keys
to adjust the cooking time in 1 minute increments (01 – 20). The timer can only be changed while the
TIMER DISPLAY is blinking.
4. Press START/CANCEL to begin the preheating process. The display will show alternating blink-
ing 00. If you do not press START/CANCEL within 5 minutes the display will change back to 00. Once
the cooker reaches operating temperature the TIMER DISPLAY show the set time and begin counting
down in 1 minute increments.
5. When the cooking time has elapsed you will hear 3 beeps. The TIMER/DISPLAY will change to
0.0.
NOTE: Do not use OPEN/SEAR mode greater than 20 minutes, let the appliance cool-down for 30 min-
utes before using this mode a second time.

9
STEAM
LID ON
STEAM RELEASE DEVICE: SEAL
1. Gather all ingredients and be familiar with your recipe. Pour required amount of liquid into
removable cooking POT, and then add food. Use the RACK, if desired. Except when cooking rice, never
load POT above the maximum ingredient level line marked “2/3 MAX PRESSURE” on cooking POT. See
instructions in section “PRESSURE COOKING RICE” in the manual.
2. Make sure gasket is securely positioned in the inner lid. Always examine the gasket before
installing and before each use. Make sure it is in good working order and free of any tears.
3. Secure the LID on pressure cooker by aligning the Triangle-Close symbol (see gure 1) on the
pressure cooker housing with square symbol on the pressure cooker LID. Turn the LID clockwise until
the square symbol on the lid aligns with the Triangle-CLOSE text (see gure 2) on the pressure cooker
housing. Do not attempt to cook in your pressure cooker unless the LID is in the “CLOSE” position as
shown in gure 2.
4. Set the PRESSURE RELEASE DEVICE to the SEAL position. (See Figure 3).
5. Plug power cord into unit rst and then into a 120-volt 60 Hz AC only outlet, the display will
show “00”.
6. Press the STEAM button. The STEAM indicator light will illuminate and stay on throughout the
preheat and cooking process.
7. The TIMER DISPLAY will show 20 minutes (default time) and begin blinking. Press “+” or “-“keys
to adjust the cooking time in 1 minute increments (05 – 30). The timer can only be changed while the
TIMER DISPLAY is blinking.
8. Press START/CANCEL to begin the preheating process. The display will show alternating blink-
ing “00”. If you do not press START/CANCEL within 5 minutes the display will change back to 00. Once
the cooker reaches operating temperature the TIMER DISPLAY show the set time and begin counting
down in 1 minute increments.
9. When the cooking time has elapsed you will hear 3 beeps and the cooker will automatical-
ly switch to KEEP WARM. The KEEP WARM indicator light will illuminate and the TIMER DISPLAY will
change to 0.0. The TIMER will start counting up in half hour increments (0.5, 1.0, 1.5 etc.) to show how
long the cooker has been in KEEP WARM mode. The pressure cooker will stay in KEEP WARM mode
up to 8 hours or until the START/CANCEL button is pressed. Once 8 hours have elapsed 3 beeps will
sound and the KEEP WARM indicator light will turn o and the TIMER DISPLAY will show 0.0.
10. The pressure can be released manually or on its own. If a recipe states “let pressure drop on its
own” unplug the cooker and let sit until the PRESSURE INDICATOR PIN has dropped (see Figure 5) AND
the LID turns without any resistance whatsoever.
WARNING: Do not release steam manually with recipes containing lots of liquid, such as soups and
stews. NEVER force the Pressure Cooker LID open. If there is any resistance whatsoever in opening the
LID and the PRESSURE INDICATOR PIN is raised (see Figure 6) it indicates that your Pressure Cooker is
still under pressure and can cause a serious scalding injury if forced open.
11. Pressure is completely reduced when the PRESSURE RELEASE DEVICE is in the VENT position
(see Figure 4) AND you no longer hear steam escaping from the valve AND the Red Pressure Indicator
Pin has dropped (see Figure 5) AND the lid opens freely with no resistance whatsoever. Only then is it
safe to remove pressure cooker LID and serve food. Remove LID by grasping the handle and twisting
lid clockwise to the OPEN position.

POWER INTERRUPTION
If the power is interrupted in PRESSURE COOK, SLOW COOK, STEAM, KEEP WARM and DELAY TIMER
the cooker will remember the settings as long as the power is restored within 30 minutes. The power
interruption mode will not work in OPEN/SEAR mode.
KEEP WARM MODE – MANUAL MODE ONLY
LID: ON OR OFF
STEAM RELEASE DEVICE: SEAL OR VENT
1. Press the KEEP WARM button. The KEEP WARM indicator light will illuminate and stay on while
the KEEP WARM mode is active.
2. The TIMER DISPLAY will show 1.0 hour (default time) and begin blinking. Press “+” or “-“keys to
adjust the cooking time in half hour increments (0.5, 1.0, 1.5 etc.) up to 24 hours. The timer can only
be changed while the TIMER DISPLAY is blinking.
3. Press START/CANCEL to begin the KEEP WARM process. The TIMER/DISPLAY will immediately
start counting down from the set time. If you do not press START/CANCEL within 5 minutes the TIMER
DISPLAY will change back to 0.0.
4. When the KEEP WARM time has elapsed you will hear 3 beeps and the timer will switch to 00.
POWER INTERRUPTION
If the power is interrupted in PRESSURE COOK, SLOW COOK, STEAM, KEEP WARM and DELAY TIMER
the cooker will remember the settings as long as the power is restored within 30 minutes. The power
interruption mode will not work in OPEN/SEAR mode.
DELAY MODE
LID: SEE SECTION FOR COOKING MODE SELECTED
STEAM RELEASE DEVICE: SEE SECTION FOR SELECTED COOKING MODE
The Delay Time function can be used for all modes except OPEN SEAR and KEEP WARM. The time
represents the amount of time BEFORE the cooker begins the selected cooking mode that you wish to
delay start. Cooking time start can be delayed up to 24 hours.
1. Press the DELAY button. The DELAY indicator light will blink and the TIMER DISPLAY will il-
luminate and show 0.5 (half hour). Press “+” or “-“button to adjust the delay time in 0.5 (half hour)
increments (0.5, 1.0, 1.5 etc.) up to 24 hours. The timer can only be changed while the indicator light is
blinking.
2. Once you select your desired delay time press the function that you wish to delay (PRESSURE
COOK – SLOW COOK – STEAM) and follow the directions in this manual for the selected cooking mode
3. Once the START CANCEL button is pressed for the selected mode the timer will display the
delay countdown time remaining until the selected cooking mode begins.
4. Once the delay time has elapsed cooker will begin the selected mode’s cooking process.
10

11
Pressure Cooking Rice
Follow instructions from the PRESSURE COOK section of this manual and the recommended times
in this section. When measuring rice, ONLY USE THE RICE MEASURE CUP PROVIDED; DO NOT USE A
STANDARD MEASURING CUP. Use the Rice Measure Cup, along with the REMOVABLE POT markings to
make perfect rice every time. For example, when making 6 cups rice, use 6 rice cup measures of rice
and ll with water to the “6” mark. When pressure cooking rice the combined volume of rice and water
must not exceed the 6-cup marking as shown on the inside of the REMOVABLE POT. As a general rule,
when cooking 2 cups (or less) of uncooked rice, use 1 tablespoon of butter or oil. For measurements
greater than 2 cups, use 2 tablespoons of butter or oil. This will prevent foaming during the cooking
process. Set the TIMER to 6 minutes. The TIMER will not start counting down until pressure has been
reached. For brown rice set the TIMER to 15 minutes. You can adjust the cooking time to suit your own
personal taste. If you desire a greater volume of rice, follow the recommended water-to-rice ratio as
outlined above.
HELPFUL HINTS
• Read this manual thoroughly and follow all recommendations.
• Be familiar with the recipe and have all ingredients ready before you begin. Be sure the lid is
secured properly before beginning.
• You may wish to brown some meats before cooking with other ingredients. To do so, select
OPEN SEAR function and follow the OPEN SEAR function instructions in this manual. Add oil and
brown meat. Do not cover when browning.
• Cut foods into uniform-size pieces to promote even cooking. In recipes that call for various
ingredients, cut those that cook more quickly into larger pieces and those that cook more slowly into
smaller pieces.
• Many dierent cooking liquids can be used in a pressure cooker: wine, beer, bouillon, fruit juic-
es, water and more.
• After becoming familiar with your pressure cooker, you can convert conventional recipes for
pressure cooking. In general, reduce cooking times by two thirds. The amount of liquid used may also
have to be adjusted because there is very little evaporation from the pressure cooker. Reduce the
amount of liquid so there is only about 1/2 cup more than desired in the nished product. Remember,
however, there must always be some liquid in the pressure cooker to form the necessary steam. Try
this formula: 1 cup of liquid for the rst 15 minutes of pressure cooking then 1/3 cup of liquid for each
subsequent 15 minutes.
• Since avors are more concentrated, reduce amounts of herbs and seasonings when convert-
ing conventional recipes. Fresh herbs are better for pressure cooking than dried herbs.
• Generally speaking, pressure cookers cook foods in about 1/3 the time of conventional cook-
ing methods.
• Increase cooking times by about ten percent when cooking in high altitudes over 3,500 feet.

• If you wish to cook food for less time than the pre-programmed amount, watch the timer and
press Start / Cancel when desired cooking time has elapsed.
• When you are using frozen meats in your recipes, the cooking time does not need to be al-
tered. Pressure will not be achieved until the internal temperature in the REMOVABLE POT is at higher
than the boiling point of water. The cooking time will not begin until pressure is achieved; it will just
take longer to come to pressure. Always check to make sure your gasket and oat valve are clean and
in good working order.
• Remember if you are not using the basket while pressure cooking the liquid will avor what
you are cooking. Try using fresh herbs or aromatic vegetables like onions or garlic, wine or stock. The
avor transference will be wonderful.
• Do not attempt to boil pasta with pressure lid on; the foam can clog the pressure valve.
• When cooking under pressure, never ll above the ll line of PC markings. If you are making
soup and you are at the ll line, do not release pressure manually because hot liquid could spurt out.
• Never attempt to open lid while under pressure!!! Always open pressure cooker with the lid
facing away from you.
• When releasing steam manually, evaporation of some liquid may occur (i.e. when making rice
or risotto). This is normal, but caution must be used to prevent injury.
12

13

14

15
CARE & CLEANING
1. Allow pressure cooker to cool completely before cleaning. Unplug the power cord from the
outlet and then from the pressure cooker.
2. The pressure cooker HOUSING can be washed with a warm damp cloth, do not use abrasive
cleaners or cleaning pads, or immerse the pressure cooker HOUSING or POWER CORD in water or any
other liquid. Ensure all parts are dried thoroughly.
3. Wash the pressure cooker REMOVABLE POT, LID GASKET and LID by hand with warm, soapy
water. Dry all parts thoroughly. Do not place these parts in the dishwasher.
4. Replace sealing gasket securely in lid. After each use, check the LID GASKET for any tears and
make sure the PRESSURE RELEASE DEVICE and STEAM VENT are in good working order. To inspect the
STEAM VENT, remove the PRESSURE RELEASE DEVICE from the top of the lid. Hold the LID up to a light
and inspect the STEAM VENT to ensure it is clear and free of any particles. You must ensure that this is
inspected after each use. If there are any food particles within the STEAM VENT use a narrow utensil, if
necessary, to poke through the STEAM VENT to remove them.
5. The following parts can be placed in the top rack of the dishwasher, or washed by hand with
warm soapy water: RACK, RICE CUP, and SPOON
6. Do not store pressure cooker with LID locked in place. If you store the LID locked onto the
pressure cooker it will reduce the life of the gasket.
ERROR CODES
E1 -The pressure switch is damaged. Permanent failure and the unit would need to be replaced.
E3 -The temperature sensor has malfunctioned and the PCB has shut the unit o. Unplug the unit
and wait for it to cool down. Plug it back in, if the E3 comes back the unit would need to be replaced,
otherwise proceed as normal.
E4 -Permanent failure and the unit would need to be replaced.
E5 -The unit detects that the temperature is continuing to rise with no food or water in the pot. If the
pressure cooker does not sense anything in the pot after 6 minutes it will shut the unit o. Unplug
the unit and wait for it to cool down. Plug it back in, if the E5 comes back the unit would need to be
replaced, otherwise proceed as normal.

LIMITED ONE-YEAR WARRANTY
Congratulations on your purchase of the Ming Tsai Pressure Cooker. This product is warranted to be free
from defects in material and workmanship under normal use and service for a period of one year from
the date of original purchase with receipt. The manufacturer’s obligation shall be limited to repairing or
replacing, FOB N.Y.,any part of the product that is defective. Such warranty shall not apply to damages
resulting from accidents, abuse or misuse. This warranty is valid only for rst quality goods purchased
from an authorized selling agent of IDL.
16
Ingenious Designs LLC • 2060 9th Avenue • Ronkonkoma, NY 11779 • (800)248-3002

SIMPLY
MING
ELECTRONIC PRESSURE COOKER
RECIPE BOOK

50/50 House Rice
1
For more from Ming Tsai, please visit HSN.com
INGREDIENTS: Yields 6 cups
1 1/2 cups brown rice
1 1/2 cups white rice
Water
INSTRUCTIONS:
1. Rinse 1½ cups brown rice and soak it in fresh cold water to cover for 1 hour.
Transfer the rice to a medium saucepan.
2. Put 1½ cups white rice in a large bowl in the sink. Rinse the rice by lling the
bowl with cold water and stirring the rice with your hand. Drain and repeat until
the water in the bowl is clean. Transfer the rice to the same saucepan.
3. Flatten the rice with your palm and without removing it, add water until it
touches the highest knuckle of your middle nger. Cover and boil over high heat
for 10 minutes. Lower the heat to medium and simmer for 30 minutes.
4. Turn o the heat and let the rice stand, covered, to plump, for 20 minutes.
5. Stir gently and serve.
Note: You can also use your pressure cooker to cook rice. Be sure to use included
RICE MEASURE CUP along with REMOVABLE POT markings. PRESSURE COOK for 6
minutes.

50/50 House Rice
2
Curried Chicken and Leeks
For more from Ming Tsai, please visit HSN.com
INGREDIENTS: Serves 4
4 chicken leg quarters, skin-on, thigh and drumstick separated
2 tablespoons curry powder, plus chicken seasoning
2 ounces pancetta, ¼-inch julienne
1 ½-inch nger of ginger, peeled, long slices
10 garlic cloves, smashed
1 cup carrot nubs, roughly chopped
4 ribs celery, roughly chopped
1 jalapeño pepper, thinly sliced with seeds
1 cup organic wheat-free tamari
3 large leeks, washed, split lengthwise and cut into 1/3-inch lengths, white and
light green parts only
Canola oil
Chicken stock or Water
Serve with steamed 50/50 House rice (recipe included).
INSTRUCTIONS:
1. Season the chicken with salt, freshly ground pepper and a dust of curry powder.
Press the OPEN SEAR button and heat bottom of cooker. Coat lightly with oil.
2. Add the chicken quarters, skin-side down and cook until golden, brown and
delicious, about 5-8 minutes. Flip and cook the other side another 3-5 minutes.
Transfer the chicken to a plate and reserve.
3. Add pancetta, ginger, garlic, red onion, carrot, celery, jalapeño and edamame
and remaining curry powder. Sauté for about 1 minute.
4. Deglaze with the tamari and add enough chicken stock or water to amply
submerge the vegetables. Taste the cooking liquid and adjust the seasoning if
necessary. Return the chicken to the pressure cooker, submerging it.
4. Cancel OPEN SEAR function. Ready appliance for pressure cooking as directed
and lock lid. PRESSURE COOK for 30 minutes.
5. When nished, slowly turn the PRESSURE RELEASE valve to VENT position,
carefully releasing the steam. When ready to open, the PRESSURE INDICATOR PIN
will have dropped and the lid will turn without any resistance.
6. Divide the rice into 4 bowls. Spoon chicken and vegetables over and serve
immediately.

Apple-Fennel Salad
3
For more from Ming Tsai, please visit HSN.com
INGREDIENTS: Serves 4
1 tablespoon Dijon mustard
1/4 cup fresh lemon juice
1/4 cup fresh lime juice
1 garlic clove, minced
1 shallot, minced
1 1/2 cups grapeseed or canola oil
1 bulb fennel, shaved
3 Granny Smith apples, julienned
Kosher salt and freshly ground black pepper
INSTRUCTIONS:
1. In a blender, combine mustard, lemon juice, lime juice, garlic and shallot; blend
until smooth.
2. With blender running, slowly drizzle in oil until vinaigrette is emulsied. Check
for seasoning and add salt and pepper if necessary.
3. In a large bowl, combine fennel and apples and dress with vinaigrette. Reserve
extra vinaigrette for later use.

Apple-Fennel Salad
4
Asian Braised Baby Back Ribs with
Apple-Fennel Salad
For more from Ming Tsai, please visit HSN.com
INGREDIENTS: Serves 4
4 pounds baby back pork ribs
1 large onion, roughly chopped
2 carrots, roughly chopped
2 celery stalks, roughly chopped
1 medium fennel bulb, sliced
1 tablespoon minced ginger
3 tablespoons minced garlic
2 lemons, cut into 8 wedges,
including peel, pith, zest
2 Granny Smith apples, chopped
1/2 cup red wine
INSTRUCTIONS:
1. Preheat your pressure cooker with the OPEN SEAR function.
2. Add 1 tablespoon oil to lightly coat bottom of pan. Add onions, carrots, celery,
fennel, lemon wedges and apples. Saute, stirring frequently, until soft, about 3-5
minutes. Add ginger and garlic in the last minute.
3. Add wine, soy sauce, stock, sugar, thyme, bay leaf, cinnamon, star anise and Thai
bird chilis and stir to combine and dissolve sugar.
4. Season ribs with salt and pepper. Add to pot with extra water to cover. Check for
seasoning. (Liquid should be well-seasoned but not salty, since liquid will reduce
and salt will intensify.)
5. Cancel OPEN SEAR function. Ready appliance for pressure cooking as directed
and lock lid. PRESSURE COOK for 30 minutes. Ribs should be tender.
6. When nished, carefully turn the PRESSURE RELEASE valve to VENT. When ready
to open, the PRESSURE INDICATOR PIN will have dropped and the lid will turn
without any resistance.
7. Remove ribs to a platter and serve with apple fennel salad.
1/2 cup dark soy sauce
3 cups low-sodium chicken stock
1/2 cup brown sugar
1 sprig fresh thyme
1 bay leaf
1 teaspoon cinnamon
1 star anise
2 dried Thai bird chilis
Kosher salt and freshly ground black
pepper
Grapeseed or canola oil
Apple-Fennel Salad

Beef Barbacoa
5
For more from Ming Tsai, please visit HSN.com
INGREDIENTS: Serves 4-6
1 beef brisket
1 1/2 qt canned tomatoes, broken apart with your hands
3/4 cup red wine
3/4 cup lime juice
3 tablespoons salt
3 tablespoons ground cumin
3 tablespoons ground coriander, toasted
6 Thai bird chilis
3 bunch cilantro stems
1 pint shallots
3 tablespoons oregano
3 tablespoons olive oil
1 can chipotles
1 1/2 teaspoons ground cloves
INSTRUCTIONS:
1. Combine all ingredients (except the meat) in a large bowl. Place meat in large
re-sealable plastic bag. Pour marinade over and refrigerate for 24 hours, ipping
occasionally to ensure coverage on all sides.
2. Preheat cooker with OPEN SEAR function.
3. Remove meat from bag and save marinade. When cooker is hot, add meat and
sear all sides until colored, about 4-5 minutes.
4. Cancel OPEN SEAR and set SLOW COOK. Pour saved marinade into pot. Secure
lid and cook for 5 hours, until meat is fork tender. Let cool in liquid.
5. Slice brisket into 1/4 inch thick pieces. Serve with cooking liquid

Beef Barbacoa
6
Berry Cobbler
For more from Ming Tsai, please visit HSN.com
INGREDIENTS: Serves 4-6
2½ cups all purpose our, divided
1¼ cups sugar, divided
2 teaspoons baking powder
1/2 teaspoon cinnamon
2 eggs
1/2 cup milk
4 tablespoons canola oil
1/4 teaspoon salt
4 cups fresh berries (blueberries, strawberries and/or raspberries)
Serve with vanilla ice cream
INSTRUCTIONS:
1. In a medium bowl, whisk together 2 cups our, 1/4 cup sugar, baking powder
and cinnamon. Then add the eggs, milk and oil. Stir to combine.
2. Prepare the slow cook pot by applying a thin layer of vegetable oil. Transfer
mixture to pot and lightly tap sides to evenly spread.
3. In a separate bowl, combine the remaining our, sugar and salt. Add berries and
toss to coat. Spoon berry mixture equally on top of batter.
4. Place lid on cooker and lock. SLOW COOK for 2 hours.
5. When ready, removed lid and let cool for 10 minutes. Spoon into bowls and top
with ice cream.

Braised Chicken and Apples
7
For more from Ming Tsai, please visit HSN.com
INGREDIENTS: Serves 4
2 pounds chicken thighs
2 onions sliced
3 large carrots, peeled, roll cut
zest and juice of 2 lemons
1 cup apple juice
5 apples, 2 julienne tossed in acidulated water, 3 cored and quartered
1 cup dried cranberries, plus 2 tablespoons for apple salad
1 cinnamon stick
1 teaspoon nutmeg
INSTRUCTIONS:
1. Preheat cooker with OPEN SEAR function.
2. Season chicken well with salt and pepper. Add 1 tablespoon oil to cooker
and swirl to coat the bottom. Working in batches, sear the chicken pieces until
browned on all sides, about 12-15 minutes. Remove to a plate. Drain o fat, leaving
2 tablespoons in the cooker.
3. Add onions, carrots, zest and juice, season with salt and pepper and sweat until
rawness is cooked out, about 1-2 minutes. Deglaze with apple juice.
4. Add back meat, apples, cranberries, cinnamon stick and nutmeg and pour in just
enough water to almost cover. Check for avor and season if necessary.
5. Cancel OPEN SEAR and program SLOW COOK. Cook for 1½ - 2 hours, until meat
is fork tender.
6. Meanwhile, toss julienne apples with cranberries.
7. Portion chicken into individual serving bowls. Garnish each with apple salad on
top.

Braised Chicken and Apples
8
Braised Eight-Spice Lamb Shoulder
with Couscous
For more from Ming Tsai, please visit HSN.com
INGREDIENTS: Serves 4
1 tablespoon ground coriander
1 tablespoon cumin
1 tablespoon freshly ground black
pepper, plus additional for seasoning
1 tablespoon paprika
1 tablespoon cayenne
1 tablespoon powdered ginger
1 tablespoon ground fennel seed
1 tablespoon cinnamon
Kosher salt
INSTRUCTIONS:
1. Make the rub: in a small bowl combine the coriander, cumin, pepper, paprika,
cayenne, ginger, fennel and cinnamon, and blend.
2. Season the lamb with salt and coat with the rub. (You may not need it all. Save
any extra for seasoning steak or chicken.)
3. Preheat your cooker with OPEN SEAR function. Add 1 tablespoon oil and swirl
to coat the bottom. When the oil is hot, and working in batches, add the meat and
sear on all sides just until colored, about 6 minutes. Wipe out pot between batches
to avoid burning spices. Use additional oil for each batch. Transfer the meat to a
large plate.
4. Without wiping out the pot, add the onions, garlic, carrots and celery and season
with salt and pepper. Sauté over medium-high heat, stirring, for 2 minutes. Return
the meat and its juices to the pot and add enough water to almost cover it. Adjust
the seasoning if necessary, add the banana.
5. Cancel OPEN SEAR function. Ready appliance for pressure cooking as directed
and lock lid. PRESSURE COOK for 45 minutes.
6. When nished, carefully turn the PRESSURE RELEASE valve to VENT. When ready
to open, the PRESSURE INDICATOR PIN will have dropped and the lid will turn
without any resistance.
Meat should be fork tender. Banana should be disintegrated. If it hasn’t, mash it
into the liquid.
7. Spoon the couscous to a large deep platter, top with the lamb, vegetables and
serve.
3 pounds lamb shoulder, cut into 1-inch
cubes
Canola oil, for searing the meat
2 large onions, cut into 1-inch dice
Cloves from 1 garlic head, smashed with
the at of a knife
1 pound carrot nubs
1 bunch celery, stalks cut into 1-inch
lengths
1 banana, peeled
Serve with cooked couscous

Braised Delmonico Beef
9
For more from Ming Tsai, please visit HSN.com
INGREDIENTS: Serves 4-6
1 3-pound Delmonico-cut steak (chuck roast)
1 cup all-purpose our
8 ounces of roughly chopped peeled carrots (about 6 regular or 4 large carrots)
1 onion, thinly sliced
1 star anise
½ cup sweet chili sauce (Mae Ploy)
3 tablespoons dark brown sugar
2 cloves garlic, smashed
1 cup low-sodium chicken stock
12 ounces lager beer
1 tablespoon Worcestershire sauce
¼ cup low-sodium soy sauce
Kosher salt and freshly ground black pepper to taste
Optional for serving: Mashed potatoes
INSTRUCTIONS:
1. Preheat cooker with OPEN SEAR function.
2. Season the steak with salt and pepper, then dredge in the our, shaking to
remove excess.
3. Add 1 tablespoon oil and swirl to coat the bottom of cooker. Add the steak and
seer each side, approximately for 5 minutes. Add the carrots, onion and star anise.
4. Meanwhile, in a medium bowl, whisk the sweet chili sauce, brown sugar, garlic,
chicken stock, beer, Worcestershire sauce and soy sauce until combined.
5. Pour the liquid over the top of the meat and vegetables. Cover and lock. Cancel
OPEN SEAR and change the setting to “SLOW COOK”. Cook for 6 hours.
6. Gently remove the beef, skim the fat and serve with mashed potatoes if desired,
serving the cooked vegetables with the meat.

Braised Delmonico Beef
10
Mashed Potatoes
For more from Ming Tsai, please visit HSN.com
INGREDIENTS: Serves 4
5 each baking potatoes, peeled and diced
1 tablespoon Kosher salt
2 ounces unsalted butter
50/50 mix of water and milk
Black pepper
INSTRUCTIONS:
1. In the pot of the pressure cooker, place the potatoes. Fill pot with water/milk
mixture until it reaches 1/2 way up of potatoes. Add the butter and salt.
2. Ready appliance for pressure cooking as directed and lock lid. PRESSURE COOK
for 15 minutes.
3. When nished, carefully turn the PRESSURE RELEASE valve to VENT. When ready
to open, the PRESSURE INDICATOR PIN will have dropped and the lid will turn
without any resistance.
4. Mash potatoes with plastic or rubber masher. Season to taste with salt and
pepper.

Braised Ginger-Cranberry
Duck “Cassoulet”
11
For more from Ming Tsai, please visit HSN.com
INGREDIENTS: Serves 4
6 duck legs
2 slices thick bacon
2 onions, sliced
6 slices of ginger
2 Serrano chilis, halved
1 cup dried cranberries
1 cup carrot nubs
2 cups edamames, out of the pods
1 cup red wine
Kosher salt and freshly ground black pepper, to taste
Canola oil, for cooking
INSTRUCTIONS:
1. Preheat the cooker with OPEN SEAR function.
2. Season the ducks legs well with salt and pepper. Add 1 tablespoon oil to cooker
and swirl to coat bottom. In batches, add legs and sear skin-side down, until fat is
rendered and skin is crispy, about 20 minutes. Remove duck legs to a plate, pour
o all but a thin coating of duck fat (reserve duck fat for a later use).
3. Add the bacon, onions, ginger and chilis, season with salt and pepper and sauté
for a few minutes, until slightly softened. Add cranberries, carrots and edamames
and deglaze with red wine and reduce by 75%.
4. Add back duck legs and pour water over just to slightly cover. Check for avor
and season if necessary.
5. Cancel OPEN SEAR and change setting to SLOW COOK. Cover and lock, cook for
2-3 hours until duck is fork tender.
6. Serve family-style in a shallow bowl, removing bacon if desired.

Braised Ginger-Cranberry
Duck “Cassoulet”
12
Braised Pork Belly and
Jalapeno-Pineapple Salsa
For more from Ming Tsai, please visit HSN.com
INGREDIENTS: Serves 4
2 cups naturally brewed soy sauce
½ cup brown sugar
1 cup port
6 large thin slices of ginger
10 smashed cloves of garlic
2 bunches scallions, 3 stalks thinly sliced and rest in 2 inch pieces
2 cinnamon sticks
2 pounds Pork Belly cut into 2x2x2 inch cubes, brined overnight*
2 cups ½ inch dice pineapple from 1 small pineapple
1 green jalapeño, stemmed, minced with seeds
Kosher salt and freshly ground black pepper to taste
INSTRUCTIONS:
1. Preheat your pressure cooker with OPEN SEAR function.
2. Combine all and bring to a simmer, check for avor.
3. Rinse o and dry brined pork cubes. Add to simmering liquid, water to cover,
check for avor and adjust seasoning, as necessary.
4. Cancel OPEN SEAR function. Ready appliance for pressure cooking as directed
and lock lid. PRESSURE COOK for 40 minutes.
5. When nished, carefully turn the PRESSURE RELEASE valve to VENT. When ready
to open, the PRESSURE INDICATOR PIN will have dropped and the lid will turn
without any resistance.
6. Meanwhile, in a small bowl combine pineapple, sliced scallions, jalapeño and
season.
7. On individual pasta plates, place one cube down, top with salsa and sauce.
*Brine method: Use sweet sea water ratio: 1/2 cup sugar, 1/2 cup kosher salt to 1
quart water, multiply as necessary to fully submerge protein in a large container.
Cover and refrigerate overnight. Rinse under running water before cooking.

Braised Shortribs with
Root Vegetables
13
For more from Ming Tsai, please visit HSN.com
INGREDIENTS: Serves 4
1 1/2 cups all-purpose our
1 teaspoon chili powder
6 one-bone shortribs or 3 two-bone
2 onions, cut into 1-inch dice
1 bag carrot nubs
6 ribs celery, cut into1-inch dice
1 celeriac, cut into 1-inch dice
1 large sweet potato, cut into 1-inch dice
1 large parsnip, cut into 1-inch roll cut
4 oranges, zested and juiced
2 star anise
1 tablespoon naturally brewed soy sauce
Kosher salt and freshly ground black pepper to taste
Canola oil for cooking Crusty bread for serving
INSTRUCTIONS:
1. In a pie plate, combine our and chili powder. Season short ribs and coat in our
mixture.
2. Press the OPEN SEAR button and heat the bottom of the pressure cooker. Coat
lightly with oil. In batches, brown the coated shortribs, about 4 minutes per side,
and set aside.
3. Carefully wipe out pot and again coat with oil. Add onions, season and sweat
down. Add the carrots, celery, celeriac, potato and parsnip. Season and sauté for
about 1 minute to cook some of the rawness out. Add shortribs, orange juice and
zest, star anise, naturally brewed soy sauce and water to cover. Taste and adjust
seasoning, as necessary.
4. Cancel OPEN SEAR function. Ready appliance for pressure cooking as directed
and lock lid. PRESSURE COOK for 90 minutes.
5. When nished, slowly turn the PRESSURE RELEASE valve to VENT position,
carefully releasing the steam. When ready to open, the PRESSURE INDICATOR PIN
will have dropped and the lid will turn without any resistance.
6. Transfer shortribs and vegetables into 4 serving bowls. Serve immediately along
with crusty bread.

Braised Shortribs with
Root Vegetables
14
Chicken Sausage with Fennel
Rice Pilaf
For more from Ming Tsai, please visit HSN.com
INGREDIENTS: Serves 4
2 1-pound package raw chicken sausage
1 1/2 cups coarsely ground coriander
2 medium onions, 1 inch dice
3 fennel heads, halved, de-cored, ¼ inch slices, save fronds for garnish
3 ribs celery, 1 inch dice
2 cups jasmine rice (or 1 cup brown rice and jasmine)
3 cups chicken stock
Kosher salt and freshly ground black pepper to taste
Canola or grapeseed oil for cooking
INSTRUCTIONS:
1. Preheat your cooker with OPEN SEAR function.
2. Remove sausage from casings and roll into ½ inch balls. Place ground coriander
in a pie plate and roll sausage balls in coriander.
3. Add 1 tablespoon canola oil to cooker and swirl to coat the bottom. Sear meatballs
until dark golden brown. About 6-8 minutes. Remove to a plate.
4. Add onions, fennel and celery to cooker and season with salt and pepper. Cook
until softened, about 4-6 minutes. Add rice and stir to combine. Add back the
sausage meatballs and pour in chicken stock. Bring to a simmer.
5. Cancel OPEN SEAR function. Ready appliance for pressure cooking as directed
and lock lid. PRESSURE COOK for 15 minutes.
6. When nished, carefully turn the PRESSURE RELEASE valve to VENT. When ready
to open, the PRESSURE INDICATOR PIN will have dropped and the lid will turn
without any resistance. Let set for another 10 minutes.
7. Transfer to a platter and serve family style.

Chili Miso Pork Stew
15
For more from Ming Tsai, please visit HSN.com
INGREDIENTS: Serves 6-8
4 jalapeño peppers
3 green bell peppers
1 tablespoon paprika
1 tablespoon chili powder
1 tablespoon natural onion powder
1 tablespoon natural garlic powder
2 tablespoons kosher salt, plus additional for seasoning
2 pounds pork butt (shoulder), cut into 1-inch cubes
3 tablespoons canola oil, plus additional if needed
2 large onions, cut into 1-inch pieces
1 tablespoon minced garlic
Freshly ground black pepper
2 quarts fresh chicken stock or low-sodium bought
4 tablespoons shiro miso
2 large sweet potatoes, peeled and cut into ½-inch dice
2 cups shelled edamame
Crusty bread
INSTRUCTIONS:
1. Turn a gas burner to high. Skewer the jalapeños on a metal skewer and place
on the burner. Allow the peppers to bubble and turn black, 2 to 3 minutes. When
one side is charred, protecting your ngers with a potholder or kitchen towel, turn
the skewer and char the peppers on the second side, 2 to 3 minutes. Alternatively,
char the peppers under the broiler. Transfer to a brown paper bag, close the bag
and let sit to steam for 5 or 10 minutes. This helps loosen the skin. Remove the
peppers from the bag, and with your ngers or a damp paper towel, rub o the
skin. Remove and discard the stem, seeds, and veins. Repeat the procedure with
the bell peppers, turning them with tongs until they’re blistered on all sides. Cut
the peppers into 1-inch pieces and transfer them and the chilis to a plate. Set aside.

Chili Miso Pork Stew
16
Chili Miso Pork Stew
For more from Ming Tsai, please visit HSN.com
CONTINUED:
2. In a medium bowl, combine the paprika and the chili, onion and garlic powders.
Add the 2 tablespoons salt and mix well. Add the pork, toss to coat it well, and
transfer to the refrigerator to avor for at least 1 hour or overnight.
3. Heat your pressure cooker with OPEN SEAR function. Add 1 tablespoon of the
oil and swirl to coat the bottom. Add half the pork and brown on all sides, 4 to 5
minutes. Transfer the pork to a plate and set aside. Repeat with another tablespoon
of oil and the remaining pork.
4. Wipe out the pot and reheat. Add the remaining 1 tablespoon oil. Swirl to coat
the bottom and when the oil is hot, add the onions and sauté, stirring to cook out
some of the rawness about 1 to 2 minutes. Add garlic and the peeled peppers,
return the pork to the pot. Add the stock and bring to a simmer. Place the miso in
a strainer, dip it into the stock, and whisk to dissolve the miso into the soup. Taste
liquid and adjust seasoning with salt and pepper, as needed.
5. Cancel OPEN SEAR function. Ready appliance for pressure cooking as directed
and lock lid. PRESSURE COOK for 30 minutes.
6. When nished, carefully turn the PRESSURE RELEASE valve to VENT. When ready
to open, the PRESSURE INDICATOR PIN will have dropped and the lid will turn
without any resistance. Add the sweet potatoes and edamame into the pot. Re-
secure lid and cook for another 15 minutes.
7. Repeat instructions to release steam.
8. Transfer to individual bowls and serve with the bread.

Country Mashers
17
For more from Ming Tsai, please visit HSN.com
INGREDIENTS: Serves 4
4 large Idaho potatoes
3 tablespoons butter
Kosher salt and freshly ground black pepper to taste
INSTRUCTIONS:
1. Wash and prick potatoes with a fork and microwave 12-15 minutes until done.
2. Mash hot potatoes with butter and season. Yes, keep the skin for avor and
nutrition.

Country Mashers
18
Asian Beef Strogano
For more from Ming Tsai, please visit HSN.com
INGREDIENTS: Serves 4
2 pounds hanger steak, 1x1 inch pieces or 2 pounds steak tips
1 head of garlic, peeled, sliced
3 large carrots, peeled, roll cut
5 stalks celery, roll cut
2 yellow onions, 1 inch dice
2 cups red wine
1 tablespoon dried thyme
1/4 cup naturally brewed soy sauce or wheat free tamari
Water to cover
Kosher salt and freshly ground black pepper to taste
2 cups sour cream or nonfat Greek yogurt
1 bunch scallions sliced thinly, separate white and green sliced
INSTRUCTIONS:
1. Preheat your cooker with the OPEN SEAR function.
2. Season meat well with salt and pepper. Add 1 tablespoon oil to the cooker and
swirl to coat the bottom. When oil is hot, add the meat in batches and sear until
browned on all sides, about 8 minutes. Remove to a plate.
3. Wipe out the cooker. Add another tablespoon of oil to again lightly coat the
bottom. Add carrots, celery and onions. Season with salt and pepper and sweat
until beginning to soften, about 3-4 minutes. Add garlic during the nal minute.
4. Deglaze the cooker with wine. Add back meat and thyme and pour in just enough
water to almost cover. Add naturally brewed soy sauce. Check for avor and season
if necessary.
5. Cancel OPEN SEAR and program SLOW COOK. Secure lid and cook for 3 hours.
Meat should be fork tender.
6. Meanwhile, mix scallions with sour cream.
7. Transfer strogano to large serving bowl. Serve hot over country mashers.
Garnish with scallion sour cream.

Coconut Braised Chicken with Carrots
19
For more from Ming Tsai, please visit HSN.com
INGREDIENTS: Serves 4
4 chicken legs and thighs, separated, skin on, brined*
2 large onions, sliced
3-4 jalapeno chilis
2 tablespoons sh sauce
4 large carrots, peeled, roll-cut into large pieces
2 cans coconut milk
Juice of 3 limes
1/4 cup molasses
Water to cover
Canola oil to cook
Kosher salt and freshly ground black pepper to taste
Serve with 50/50 House Rice (recipe included)
INSTRUCTIONS:
1. Preheat your cooker with OPEN SEAR function.
2. Season chicken with salt and pepper and sear until browned on all sides. Add
1 tablespoon oil to cooker and swirl to coat bottom. When oil is hot, working in
batches, sear chicken pieces both sides until colored. Remove chicken to a plate,
keeping chicken fat in casserole.
3. Add onions and chilis to casserole, season with salt and pepper, sauté for 1-2
minutes to remove some of the rawness. Deglaze with sh sauce and add carrots,
coconut milk, lime juice and molasses. Stir to combine.
4. Add chicken and any collected juices back in. Pour in just enough water to cover.
5. Replace lid, cancel OPEN SEAR and program SLOW COOK for 2-3 hours, or until
meat is almost falling o bone.
6. Transfer chicken and carrots to large serving platter. Serve with 50/50 rice on
side.

Coconut Braised Chicken with Carrots
20
Crème Brulee
For more from Ming Tsai, please visit HSN.com
INGREDIENTS: makes 8 4-ounce servings (cooks only 4 at a time)
1 quart heavy cream
2/3 cup milk
1 teaspoon pure vanilla extract
3/4 cup sugar
8 egg yolks
2 eggs
Sugar in the raw
INSTRUCTIONS:
1. In a medium sauce pan, combine the cream, milk, vanilla and 1/2 the sugar. Bring
to a simmer, just under scalding.
2. While the cream mixture is heating, in a separate bowl, whisk together the yolks,
eggs and remaining sugar.
3. When the cream mixture has reached the appropriate temperature, temper the
yolk mixture by adding a small amount of the hot cream and whisking to warm
eggs. Add the heated egg mixture back into the milk/cream mixture and stir to
combine.
4. Pour custard base into a metal container and place in an ice bath, stirring
occasionally, then place in the refrigerator.
Preferably let the base sit overnight to develop a more intense avor from vanilla.
5. Fill 4 ramekins with custard base, leaving a little lip at the top. Cover each ramekin
with tin foil.
6. Add 1½ cups water to bottom of pressure cooker. Add the four ramekins. Ready
appliance for pressure cooking as directed and lock lid. PRESSURE COOK for 6
minutes.
7. When nished, carefully turn the PRESSURE RELEASE valve to VENT. When ready
to open, the PRESSURE INDICATOR PIN will have dropped and the lid will turn
without any resistance.
8. Carefully remove ramekins and chill completely before serving.
9. Brulee custards using “Sugar in the Raw” with a propane torch or under a broiler.
Sprinkle a thin and even layer of sugar over top of custard and brulee. Let sit for a
minute so the sugar cools and gets hard before serving.

Garlic Braised Osso Bucco and Celeriac
21
For more from Ming Tsai, please visit HSN.com
INGREDIENTS: Serves 4
1 1/2 cups all-purpose our
1 tablespoon chili powder
6 large oxtails
2 onions, cut into 1-inch dice
20 peeled garlic cloves, sliced
1 bag carrot nubs
4 ribs celery, cut into1-inch dice
2 cups red wine
INSTRUCTIONS:
1. Preheat your pressure cooker with OPEN SEAR function.
2. In a pie plate, combine our and chili powder. Season oxtail with salt and pepper,
coat in our mixture.
3. Add 1 tablespoon oil to pressure cooker pot and swirl to coat bottom. Brown the
coated oxtail, about 4 minutes per side, and set aside.
4. Wipe out pot and re-coat with oil. Add onions, carrots and celery. Season and
sauté for 1-2 minutes. Add sliced garlic and cook another 30 seconds.
5. Add wine, bring to a simmer and reduce by 50%.
6. Add back oxtail, naturally brewed soy sauce, thyme and water to cover. Season
with salt and pepper, check for avor.
7. Cancel OPEN SEAR function. Ready appliance for pressure cooking as directed
and lock lid. PRESSURE COOK for 50 minutes.
8. When nished, carefully turn the PRESSURE RELEASE valve to VENT. When ready
to open, the PRESSURE INDICATOR PIN will have dropped and the lid will turn
without any resistance.
Remove cover and add celeriac. Re-seal cooker and cook for 15 minutes. Repeat
instructions to release pressure.
9. To serve, transfer celeriac rst into center of large bowl. Top with oxtail and sauce.
Serve with crusty bread.
2 large celeriac, cut into ½ inch dice
¼ cup naturally brewed soy sauce
3 sprigs thyme
Kosher salt and freshly ground black
pepper to taste
Canola oil for cooking
Crusty bread for serving

Garlic Braised Osso Bucco and Celeriac
22
Ginger Braised Pork ‘Osso Bucco’
For more from Ming Tsai, please visit HSN.com
INGREDIENTS: Serves 4
8 pieces pork shank
1 cup rice our
2 large onions, sliced
1 pound bag organic carrot nubs
4 stalks celery, 1-inch roll cut
6 smashed cloves of garlic
8 slices ginger, peeled
3 jalapenos, sliced
1/4 cup naturally brewed soy sauce
2 oranges, halved
Water to cover
Canola oil to cook
Kosher salt and freshly ground black pepper to taste
INSTRUCTIONS:
1. Preheat the pressure cooker with OPEN SEAR function.
2. Season with salt and pepper, our the shanks. Add 1 tablespoon oil to pot and
swirl to coat the bottom. Working in batches, add the pork and brown evenly, set
aside.
3. In the same pot coated lightly with oil, sauté the onions, carrots and celery for 1-2
minutes. Add the garlic, ginger and jalapenos during the last 30 seconds. Season
with salt and pepper.
4. Deglaze the pot with naturally brewed soy sauce, add oranges and cover
vegetables with water. Taste liquid, adjusting seasoning as necessary. Add the
shanks and more water may be needed to cover.
5. Cancel OPEN SEAR function. Ready appliance for pressure cooking as directed
and lock lid. PRESSURE COOK for 1 hour.
6. When nished, carefully turn the PRESSURE RELEASE valve to VENT. When ready
to open, the PRESSURE INDICATOR PIN will have dropped and the lid will turn
without any resistance.
7. Remove ginger slices. Transfer to a large bowl and serve family style.

Homemade Granola
23
For more from Ming Tsai, please visit HSN.com
INGREDIENTS: Serves 4
2/3 cup honey
1/3 cup butter
1/2 cup peanut butter
2 teaspoons cinnamon
1 teaspoon pure vanilla extract
5 cups oats
1/2 cup almonds, sliced
1 cup dried cranberries
1/2 teaspoon salt
INSTRUCTIONS:
1. Add the honey, butter, peanut butter, cinnamon and vanilla. Press the OPEN
SEAR function. Cook for 3 minutes, stirring
occasionally to mix all melted ingredients.
2. Add oats and almonds. Mix together until all fully incorporated.
3. Cancel OPEN SEAR and ready SLOW COOK. Secure lid and cook for 2 hours.
Check and stir mixture every 30 minutes.
4. Once complete, open lid and mix in salt. Let cool. (NOTE: mixture will be soft at
rst, but will harden as it cools.)
5. Once cooled, add dried cranberries.
6. Enjoy on its own, or with milk, yogurt, or your favorite ice cream.

Homemade Granola
24
Orange-Ginger Lamb Shanks with
Garlic Barley ‘Risotto’
For more from Ming Tsai, please visit HSN.com
INGREDIENTS: Serves 4
2 cups pearl barley
1 head garlic, minced
4 lamb shanks, about 4 pounds,
preferably from the hind legs
Kosher salt and freshly ground
black pepper
2 tablespoons grapeseed or canola oil
2 large onions, roughly chopped
3 carrots, peeled and roughly chopped
3 celery stalks, roughly chopped
1 bottle dry red wine
INSTRUCTIONS:
1. In a large pot, cook the barley in an ample quantity of boiling water until tender,
about 45 minutes. Using a large strainer, drain the barley and run cold tap water
through it until it’s cold. Drain and set aside at room temperature.
2. Meanwhile, preheat your cooker with OPEN SEAR function. Season the lamb with
salt and pepper. Add the oil, and when hot, add the lamb. Cook on all sides until
brown, 8 to 10 minutes. Transfer to a plate.
3. Add the onions, carrots and celery to the pot, season with salt and pepper,
and cook, stirring, until the vegetables have softened, about 3 minutes. Add the
wine, deglaze the pot, and simmer until the wine is reduced by a quarter, about 8
minutes. Add the orange quarters, soy sauce, brown sugar, ginger and chilis. Return
the lamb shanks to the pot and add enough water to barely cover them. Season
with salt and pepper.
4. Bring the liquid to a simmer, cover. SLOW COOK until the meat is falling o the
bones, about 3 hours.
5 When nearly ready, add the butter to a sauté pan over medium heart. Add the
garlic and cook until tan. Add barley, toss to combine, check nal seasoning.
6. Mound the barley on four individual serving plates or a platter, top with the
lamb, spoon the braising liquid over, and serve.
5 large oranges, 4 quartered,
one cut into 1/4-inch slices, for garnish
1/2 cup naturally brewed soy sauce
1 cup dark brown sugar
Four 1/4-inch slices unpeeled ginger,
cut lengthwise from a 2- to 4-inch piece
3 dried Thai bird chilis
1 ounce butter

Red Curry Braised Pork on Rice
25
For more from Ming Tsai, please visit HSN.com
INGREDIENTS: Serves 4
3 tablespoons canola oil, plus more if needed
2 pounds pork shoulder, trimmed and cut into 1-inch cubes
Kosher salt and freshly ground black pepper
2 large onions, cut into 1-inch pieces
1 tablespoon minced ginger
2 red or green jalapeño peppers, minced
1 tablespoon chili powder
1 tablespoon coriander, coarse grind
1 tablespoon paprika
1 pound carrot nubs
2 large sweet potatoes, peeled and cut into 1-inch dice
1 cup unsweetened coconut milk
1 bay leaf
Juice of 1 lime
6 cups 50-50 House Rice (recipe included)
INSTRUCTIONS:
1. Season the pork with salt and freshly ground pepper. Press the OPEN SEAR button and
heat bottom of cooker. Coat lightly with oil.
2. Working in batches, add the pork, with additional oil if necessary, and color on all sides,
about 4-6 minutes. Transfer to a plate and keep warm. ,
3. To the same pot, add the remaining 1 tablespoon oil and swirl to coat the bottom.
Add the onions, ginger, and jalapeños and sauté, stirring until the onions have softened
about 1-2 minutes.
4. Add the chili powder, coriander, paprika and sauté, stirring, for 30 seconds. Add the
carrots, sweet potatoes, coconut milk, and bay leaf and add water to cover the vegetables
by 1 inch. Adjust the seasoning, if necessary, and return the pork to the pot. If the pork
isn’t completely covered, add more water.
5. Cancel OPEN SEAR function. Ready appliance for pressure cooking as directed and lock
lid. PRESSURE COOK for 1 hour.
6. When nished, slowly turn the PRESSURE RELEASE valve to VENT position, carefully
releasing the steam. When ready to open, the PRESSURE INDICATOR PIN will have dropped
and the lid will turn without any resistance.
7. Remove the bay leaf and add the lime juice, stir, and serve with rice.

Red Curry Braised Pork on Rice
26
Red Roast Pork with Sweet
Potatoes and Chinese Broccoli
For more from Ming Tsai, please visit HSN.com
INGREDIENTS: Serves 4
1 bottle dry red wine
2 cups Shaoxing wine or 1 cup dry sherry
1 cup dark soy sauce
3 cups soy sauce
4 cups water
2 pounds rock candy or dark brown sugar
1 5-inch piece fresh ginger, cut into long
1/4-inch slices
1 head garlic, unpeeled and halved
horizontally
1 bunch scallions, white part sliced into
3-inch lengths, green part sliced
1/8-inch thick
INSTRUCTIONS:
1. Heat your pressure cooker with OPEN SEAR function.
2. Add red wine, Shaoxing wine, dark soy sauce, soy sauce and water and bring to a boil.
3. Add rock sugar, ginger, garlic, white part of scallions, garlic chives, star anise, Thai bird
chilies, cinnamon sticks and tangerine; stir to dissolve sugar.
4. Season pork lightly with salt and pepper and add pork and sweet potatoes to cooker. If
liquid doesn’t cover pork, add more water.
5. Cancel OPEN SEAR function. Ready appliance for pressure cooking as directed and lock
lid. PRESSURE COOK for 40 minutes.
6. When nished, carefully turn the PRESSURE RELEASE valve to VENT. When ready to
open, the PRESSURE INDICATOR PIN will have dropped and the lid will turn without any
resistance.
7. Cancel PRESSURE COOK function. Start OPEN SEAR. With a slotted spoon, remove pork
and potatoes to a platter and cover with foil to keep warm. Add Chinese broccoli to red
roast braising liquid and bring to boil, uncovered. Cook for about 7-10 minutes, until
Chinese broccoli is tender and liquid has reduced to light syrup consistency.
8. Transfer pork and sweet potatoes to a serving platter and surround with Chinese
broccoli. Glaze pork with reduced braising liquid, garnish with scallion greens, and serve
family-style.
1 bunch garlic chives
2 star anise
3 dried Thai bird chilies
2 cinnamon sticks
1 tangerine, washed and halved
8-pound whole, bone-in pork butt
2 large sweet potatoes, unpeeled,
scrubbed, cut into 1-inch rounds
1 bunch Chinese broccoli
Kosher salt and freshly ground
black pepper

Red Wine-Fermented Black Bean
Pot Roast
27
For more from Ming Tsai, please visit HSN.com
INGREDIENTS: Serves 4
1 8-10 pound pot roast
2 tablespoons minced fermented black beans
2 tablespoons minced garlic
1 tablespoon minced ginger
1 bunch scallions sliced thinly, separate white and green
1 bottle dry red wine
¼ cup naturally brewed soy sauce
1 bag carrot nubs
2 sprigs rosemary
8 medium sized Yukon golds, washed and wrapped in foil and baked thru in same
oven
Kosher salt and freshly ground black pepper to taste
Canola or grapeseed oil for cooking
Serve with crusty bread and favorite mashed potatoes
INSTRUCTIONS:
1. Preheat cooker with OPEN SEAR function.
2. Heavily season pot roast with salt and pepper. Add 1 tablespoon of oil and swirl
to coat bottom. Sear the pot roast on all sides, about 15 minutes, until brown. Set
aside.
3. Pour o excess fat and sauté black beans, and scallions for about 1-2 minutes.
Add garlic and ginger in last 30 seconds. Deglaze with wine and reduce by 25%.
4. Add carrots and rosemary, season and place pot roast in and cover with lid, lock.
SLOW COOK for 4-5 hours until meat is fork tender.
5. Serve sliced on top of your favorite mashed potatoes. Have crusty bread on the
side.

Red Wine-Fermented Black Bean
Pot Roast
28
Sake-Lemon Chicken
For more from Ming Tsai, please visit HSN.com
INGREDIENTS: Serves 4
4 chicken leg quarters, skin-on
Salt and freshly ground pepper
2 onions, roughly chopped
6 stalks celery roughly chopped
1/2 bag carrot nubs, cut in half
3 garlic cloves, sliced
8 thick slices of washed ginger
12 ounces TYKU Silver Sake
½ cup organic wheat-free tamari
2 lemons, washed, unpeeled, with ends cut o, quartered
1 cup water
Served with 50/50 House rice (recipe included)
INSTRUCTIONS:
1. Season the chicken with salt and freshly ground pepper. Press the OPEN SEAR
button and heat bottom of cooker.
2. Add the chicken quarters, skin-side down and cook until golden, brown and
delicious, about 5-8 minutes. Flip and cook the other side another 3-5 minutes.
Transfer the chicken to a plate and reserve.
3. Add the onions, celery and carrots, garlic and ginger, to the pressure cooker and
sauté for about 1 minute to cook some of the rawness out. Deglaze with the sake,
tamari, and lemons and add the water. Check and adjust for seasoning.
4. Return the chicken to the pressure cooker. Ensure that water covers the chicken.
5. Cancel OPEN SEAR function. Ready appliance for pressure cooking as directed
and lock lid. PRESSURE COOK for 30 minutes.
6. When nished, slowly turn the PRESSURE RELEASE valve to VENT position,
carefully releasing the steam. When ready to open, the PRESSURE INDICATOR PIN
will have dropped and the lid will turn without any resistance.
7. Place rice in the center of a large serving platter. Transfer chicken and vegetables
on top and serve immediately.

Sambal Red Roast Duck
29
For more from Ming Tsai, please visit HSN.com
INGREDIENTS: Serves 4
3 tablespoons sambal
1 bunch scallions, green and white parts, cut into 1-inch lengths
3 cloves garlic, peeled
2 tablespoons minced ginger
1/2 bottle red wine
5 uid ounces soy sauce, to taste
1 1/4-ounce bag (about 1 cup) rock candy or brown sugar
2 cinnamon sticks
3 star anise
8 duck legs
Water to cover if needed
Serve with basmati rice
INSTRUCTIONS:
1. In the cooking pot, add sambal, scallions, garlic, ginger, red wine, soy sauce, rock
candy, cinnamon sticks and star anise. Push OPEN SEAR and bring to a simmer.
2. Add duck legs and then add enough water to cover duck. Bring liquid back to a
simmer. Taste braising liquid and adjust seasoning, if necessary.
3. Cancel OPEN SEAR function. Ready appliance for pressure cooking as directed
and lock lid. PRESSURE COOK for 30 minutes.
4. When nished, slowly turn the PRESSURE RELEASE valve to VENT position,
carefully releasing the steam. When ready to open, the PRESSURE INDICATOR PIN
will have dropped and the lid will turn without any resistance.
5. To serve family style, transfer duck legs to a large wide bowl and pour sauce over
top. Serve with basmati rice.

Sambal Red Roast Duck
30
Shiitake Coq au Vin
For more from Ming Tsai, please visit HSN.com
INGREDIENTS: Serves 4
2 tablespoons canola oil
1 whole chicken, cut into 8 pieces
1 red onion, roughly chopped
1 bag carrot nubs
4 cloves minced garlic
2 tablespoons minced ginger
1 bunch scallions, green and white parts,
cut into 1-inch lengths
INSTRUCTIONS:
1. Heat one tablespoon of canola oil in pressure cooker on the OPEN SEAR setting.
Season chicken pieces with salt and pepper. Add chicken, in batches, and cook
until skin in golden brown. Remove chicken and set aside.
2. Add remaining canola oil, onion, carrot, garlic, ginger, scallion, shiitake mushrooms
and fennel to pressure cooker. Season with salt and pepper. Sauté for about 1 a
minute to cook some of the rawness out.
3. Add red wine, soy sauce and celery. Taste liquid for seasoning and adjust, as
necessary. Add chicken back to pressure cooker and stir to combine with vegetables.
4. Cancel OPEN SEAR function. Ready appliance for pressure cooking as directed
and lock lid. PRESSURE COOK for 30 minutes.
5. When nished, slowly turn the PRESSURE RELEASE valve to VENT position,
carefully releasing the steam. When ready to open, the PRESSURE INDICATOR PIN
will have dropped and the lid will turn without any resistance.
6. To serve family style, transfer chicken pieces and vegetables to a large wide bowl
and pour sauce over top.
2 cups large shiitake mushrooms,
stemmed and halved
1 fennel bulb, sliced
1 bottle red wine
2 tablespoons soy sauce plus
more to taste
4 stalks celery, sliced
Kosher salt and freshly ground
black pepper

South East Asian Lamb Stew
31
For more from Ming Tsai, please visit HSN.com
INGREDIENTS: Serves 4
2 pound lamb stew meat, 1” dice
4 heaping tablespoons red curry paste
Juice of 2 limes
1 tablespoon paprika
1 cup coconut milk, shaken
1 pound button mushrooms, stemmed, halved
1 pound carrot nubs
4 cups cooked couscous
Canola or Grapeseed oil to coat
Kosher salt and freshly ground black pepper to taste
Serve with couscous
INSTRUCTIONS:
1. Preheat the cooker with OPEN SEAR function.
2. Season the lamb with salt and pepper. Add 1 tablespoon oil to cooker and swirl
to coat bottom. In batches, add lamb and brown meat all sides. Set aside and keep
warm.
3. In same pot, add the curry paste, paprika, coconut milk and stir. Add the
mushrooms and carrots and return the meat to the pot and cover with water.
Season with salt and pepper and check for avor. Adjust as necessary.
4. Cancel OPEN SEAR function. Ready appliance for pressure cooking as directed
and lock lid. PRESSURE COOK for 45 minutes.
5. When nished, carefully turn the PRESSURE RELEASE valve to VENT. When ready
to open, the PRESSURE INDICATOR PIN will have dropped and the lid will turn
without any resistance.
6. Transfer to large serving bowl. Serve with warm couscous.

South East Asian Lamb Stew
32
Soy-Lime Braised Oxtail with
Carrot and Daikon
For more from Ming Tsai, please visit HSN.com
INGREDIENTS: Serves 4
8 pieces oxtail
2 cups all-purpose our
2 large onions, 1 inch dice
1 bag carrot nubs
1 large daikon, peeled, roll cut
2 heads of garlic, split
4 ribs celery, cut into 1-inch dice
2 cups red wine
INSTRUCTIONS:
1. Preheat your slow cooker with OPEN SEAR function.
2. Season oxtail with salt and pepper and dredge in our. Add 1 tablespoon oil to
cooker and swirl to coat bottom. Brown the oxtail on all sides, about 8 minutes, and
set aside.
3. Wipe out pot and coat again with oil. Add onions, carrots, daikon, garlic and
celery. Sauté mixture for 1-2 minutes to cook out some of the rawness.
4. Deglaze with red wine and naturally brewed soy sauce. Add star anise, sugar,
lime juice and oxtail back. Add water to cover and check liquid for avor. Adjust
seasoning as necessary.
5. Cancel OPEN SEAR function. Ready appliance for pressure cooking as directed
and lock lid. PRESSURE COOK for 1 hour.
6. When nished, carefully turn the PRESSURE RELEASE valve to VENT. When ready
to open, the PRESSURE INDICATOR PIN will have dropped and the lid will turn
without any resistance.
5. Serve over 50/50 House rice.
2 cups naturally brewed soy sauce
2 star anise
1 cup dark brown sugar
Water to cover
Kosher salt and freshly ground black
pepper to taste
Canola oil for cooking
50/50 House rice for serving (recipe
included)

Vegetarian 3 Bean Chili
31
For more from Ming Tsai, please visit HSN.com
INGREDIENTS: Serves 4
2 medium red onions, 1/3 inch dice
2 tablespoons minced garlic
2 tablespoons minced fermented black beans
2 Serrano chilis, minced and extras to munch on while eating
¼ cup organic tamari
1 bunch scallions sliced thinly, separate white and green
2 cups edamame
1 small can white beans, rinsed and drained
1 small can black beans, rinsed and drained
2 cups roma tomatoes with juice, rough chopped
1 quart vegetarian stock or unsweetened black tea
1 Greek yogurt
Juice and zest of 1 lemon
Canola or grapeseed oil for cooking
INSTRUCTIONS:
1. Preheat cooker with OPEN SEAR function.
2. Add 1 tablespoon oil and sauté onions, fermented black beans, chilis and scallion
whites, about 1-2 minutes. Add ginger and cook for an additional 30 seconds.
Season with salt and pepper.
3. Deglaze cooker with tamari. Add all other beans, tomatoes and stock and bring
to a simmer. Add lemon juice and check for avor.
4. Cancel OPEN SEAR and ready for SLOW COOK. Replace lid and cook for 8 hours.
Beans should be soft and liquid should be reduced by 20% and thickened.
5. Meanwhile, mix the yogurt with scallion greens and zest and season.
6. Portion the chili into individual bowls. Garnish with yogurt.

Vegetarian 3 Bean Chili
32
Coconut Rice Pudding
For more from Ming Tsai, please visit HSN.com
INGREDIENTS: Serves 4
1 cup sushi rice (rinsed until clear)
3 cups coconut milk
1 cup milk
1 cup water
2 teaspoon vanilla extract
1/2 cup sugar
INSTRUCTIONS:
1. Mix together all of the ingredients in the pot of the pressure cooker.
2. Ready appliance for pressure cooking as directed and lock lid. PRESSURE COOK
for 15 minutes.
3. When nished, unplug and let sit for another 10 minutes. Then carefully turn the
PRESSURE RELEASE valve to VENT. When ready to open, the PRESSURE INDICATOR
PIN will have dropped and the lid will turn without any resistance.
4. Pudding can be served both warm or cold. Top with your favorite dried fruit and
nut mixture.
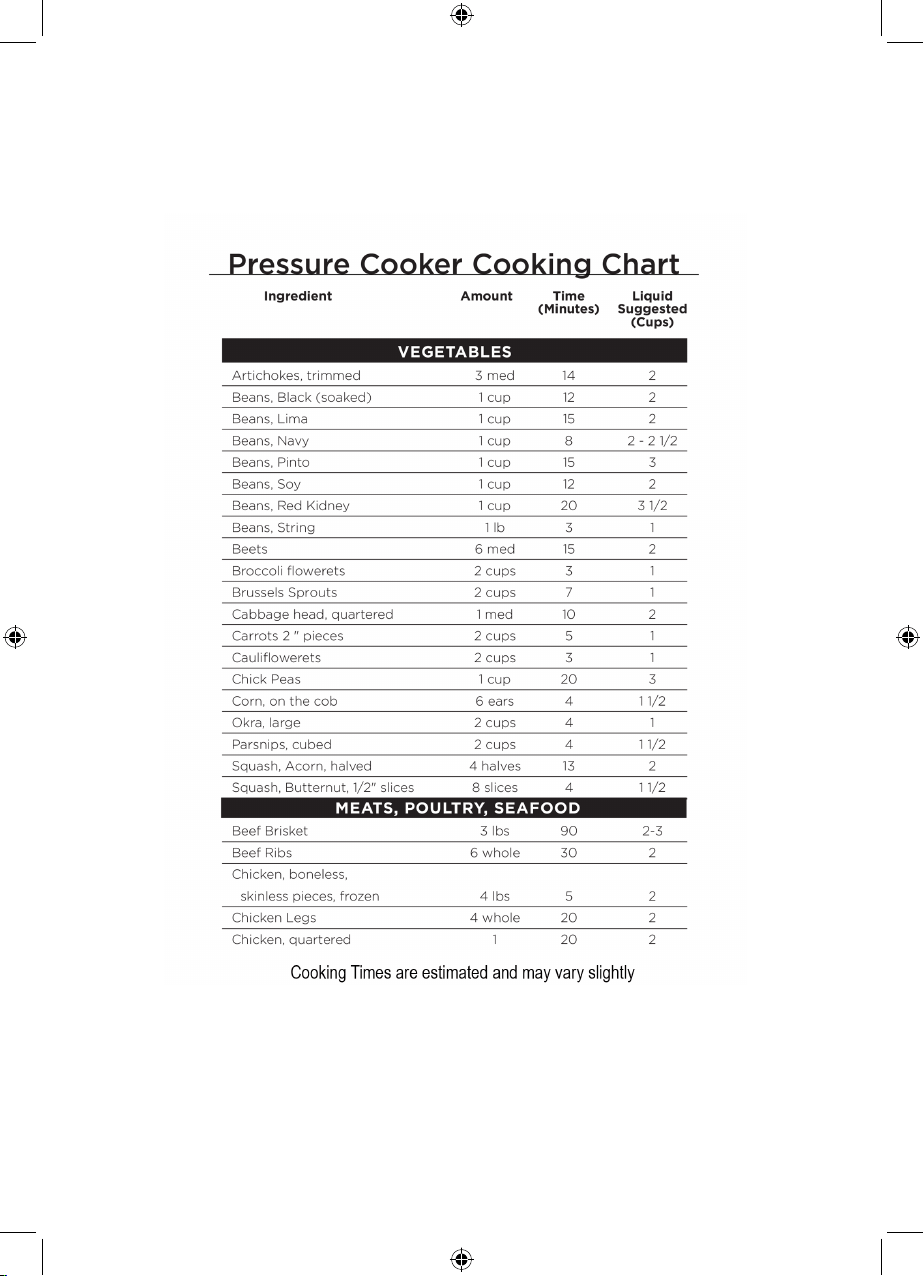
13
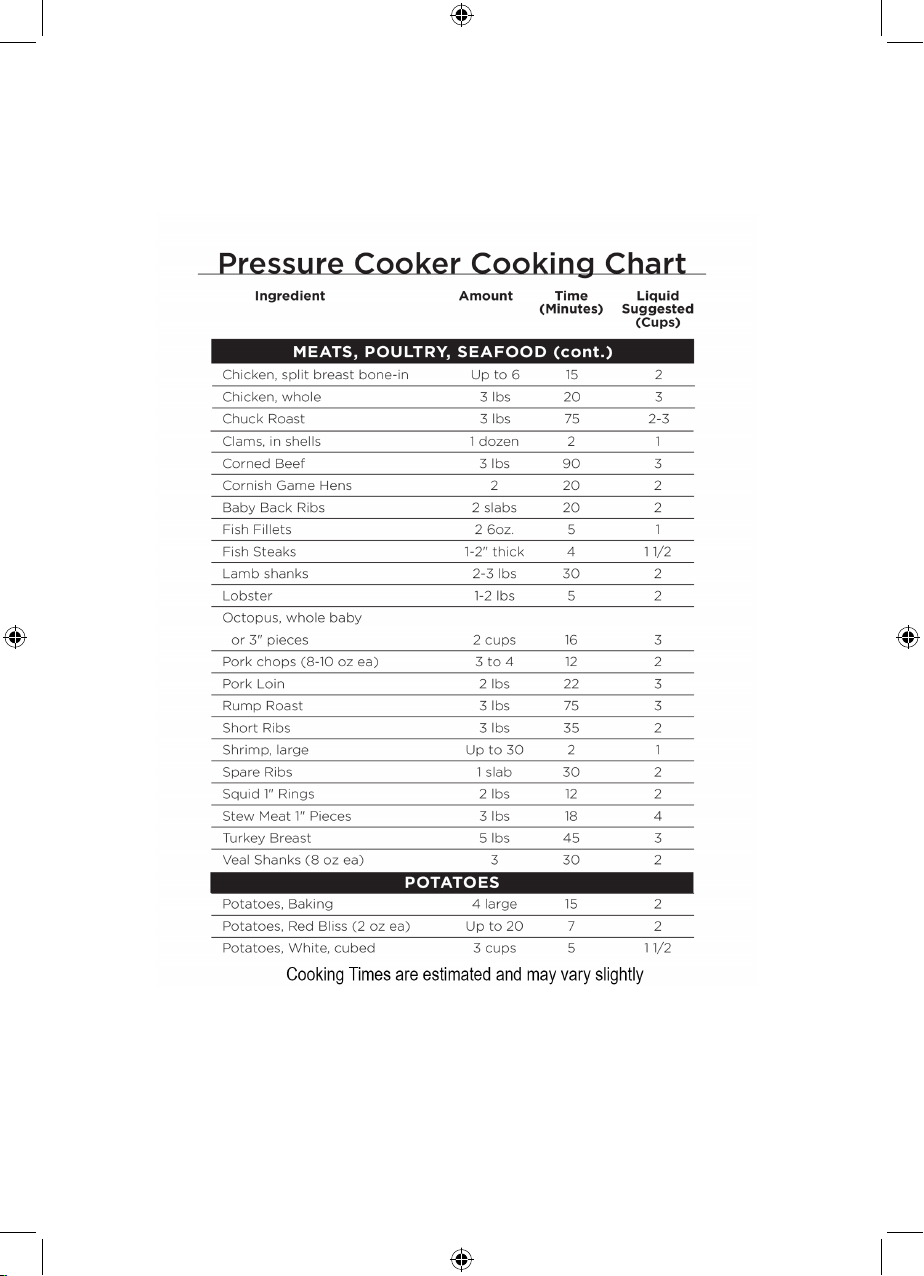
14