Automatic Electric Spiralizer
INSTRUCTION MANUAL
SIMPLY
MING
SO-314484_15367,15368,15369_Simply Ming_Spiralizer_IM_rev_2.indd 1 2017-07-10 9:55 AM

When using electrical appliances, basic safety precautions should always
be followed, including the following:
1. READ ALL INSTRUCTIONS CAREFULLY.
2. To protect against risk of electrical shock, do not put cord, plug, or appliance
in water or other liquid.
3. This appliance is not intended for use by persons (including children) with
reduced physical, sensory or mental capabilities, or lack of experience
and knowledge, unless they have been given supervision or instruction concerning
use of the appliance by a person responsible for their safety.
4. Close supervision is necessary when any appliance is used by or near children.
5. Unplug from outlet when not in use, before putting on or taking off parts, and
before cleaning.
6. Avoid contacting moving parts.
7. Do not operate any appliance with a damaged cord or plug or after the
appliance malfunctions, or is dropped or damaged in any manner. Bring it
to a qualied technician for examination, repair or electrical or mechanical
adjustment.
8. The use of attachments not recommended or sold by the manufacturer may
cause re, electric shock or injury.
9. Do not use outdoors.
10. Do not let cord hang over edge of table or counter.
11. Do not let cord contact any hot surface, including the stove.
12. Use the cleaning brush to remove debris when the Spiralizer is OFF.
13. Blades are sharp. Handle carefully.
14. To reduce the risk of injury, always press the blade assembly RELEASE button
before removing the blade assembly. (See Figure 2.)
15. To reduce the risk of injury, never place cutting blades on sliding blade
assembly holder without the protective blade cover in position.
16. Always use the cutting blade handle to lift the blade assembly off the sliding
blade assembly holder.
17. Carefully remove the protective blade cover before turning the Spiralizer ON.
WARNING: The cutting blades are very sharp! Use extreme care when handling.
WARNING: Make sure the protective blade cover is locked into position when
adjusting the spiral setting or when attaching or removing the blade assembly
from the sliding blade assembly holder.
WARNING! To reduce the risk of severe injury to persons, keep hands and utensils
away from moving blades while spiralizing or removing spiraled food.
SAVE THESE INSTRUCTIONS
FOR HOUSEHOLD USE ONLY
IMPORTANT SAFEGUARDS
1
SO-314484_15367,15368,15369_Simply Ming_Spiralizer_IM_rev_2.indd 3 2017-07-10 9:55 AM

1. All users of this appliance must read and understand this instruction manual before
operating or cleaning this appliance.
2. The cord to this appliance should be plugged into a 120V AC electrical outlet only.
3. Do not leave this appliance unattended during use.
4. If this appliance begins to malfunction during use, immediately press the ON/ OFF
and unplug the cord. Do not use or attempt to repair the malfunctioning appliance.
5. If this appliance falls or accidentally becomes immersed in water, unplug
it immediately. Do not reach into the water! Do not use this appliance after it has fallen
into or becomes immersed in water.
6. To reduce the risk of injury to persons or property, never use this appliance
in an unstable position.
7. Do not use this appliance for other than its intended use.
2
ADDITIONAL IMPORTANT
SAFEGUARDS
SO-314484_15367,15368,15369_Simply Ming_Spiralizer_IM_rev_2.indd 4 2017-07-10 9:55 AM

NOTES ON THE PLUG
This appliance has a polarized plug (one blade is wider than the other). To reduce
the risk of electric shock, this plug will t in a polarized outlet only one way. If the
plug does not t fully into the outlet, reverse the plug. If it still does not t, contact
a qualied electrician. Do not modify the plug in any way.
NOTES ON THE CORD
The provided short power-supply cord (or detachable power-supply cord) should
be used to reduce the risk resulting from becoming entangled in or tripping over
a longer cord. An extension cord is not recommended for use with this product.
Always plug directly into a wall outlet/receptacle.
PLASTICIZER WARNING
CAUTION: To prevent Plasticizers from migrating to the nish of the counter top or
table top or other furniture, place NON-PLASTIC coasters or place mats between
the appliance and the nish of the counter top or table top. Failure to
do so may cause the nish to darken; permanent blemishes may occur or stains
can appear.
ELECTRIC POWER
If the electrical circuit is overloaded with other appliances, your appliance may
not operate properly. It should be operated on a separate electrical circuit from
other appliances.
3
SO-314484_15367,15368,15369_Simply Ming_Spiralizer_IM_rev_2.indd 5 2017-07-10 9:55 AM
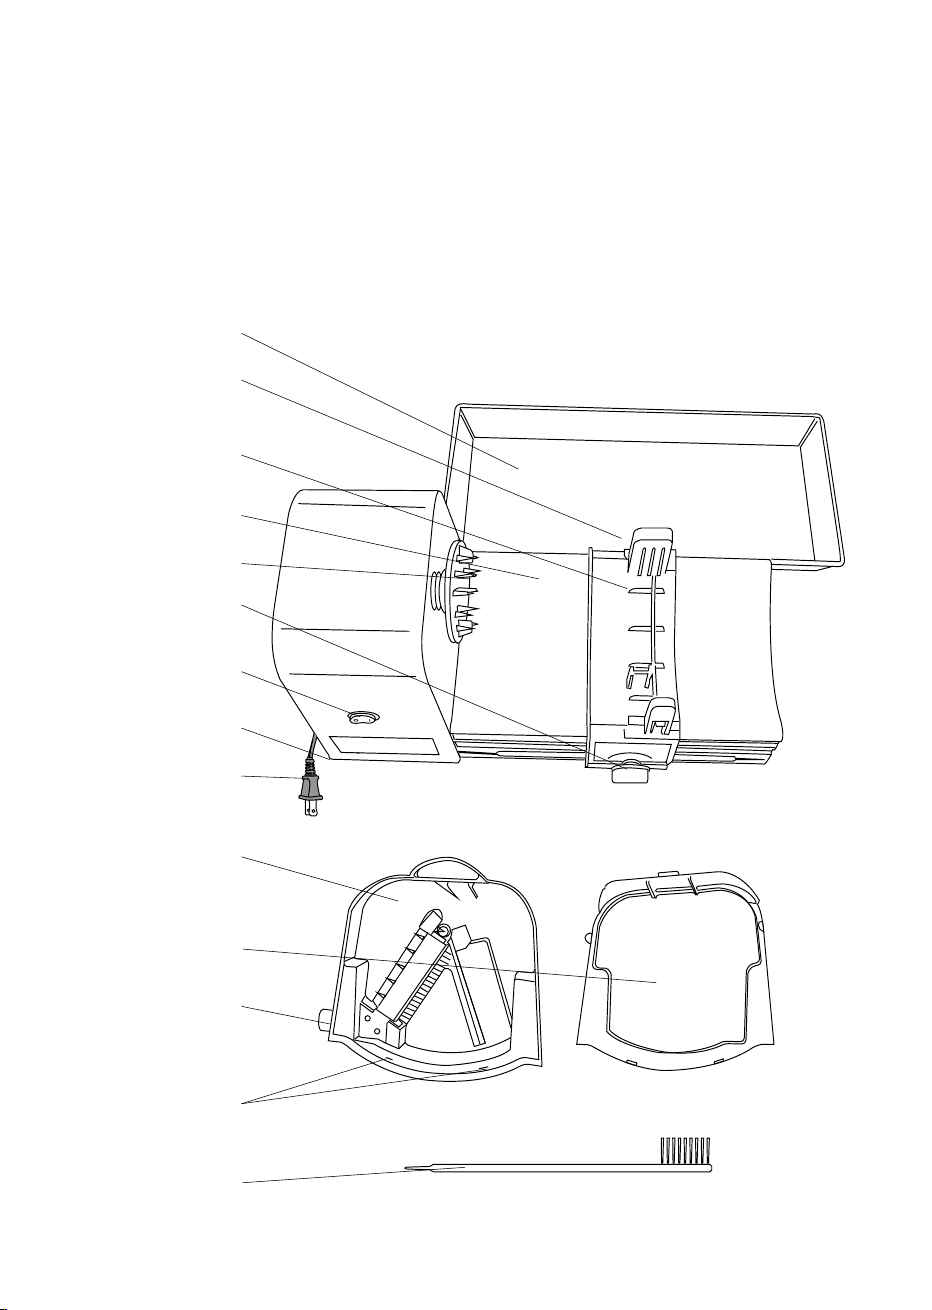
Getting to Know Your Spiralizer
Product may vary slightly from illustration
4
Food Tray
Figure 1
Blade Assembly
Release Button
(not shown)
Sliding Blade
Assembly Holder
Food Bed
Veggie Holder
Blade Assembly
Lock Dial
ON/OFF Switch
Nonslip Feet
(not shown)
Polarized Plug
Cutting Blades
with Handle
Protective Blade
Cover with Tabs
Sprial Dial
(1-2-3-4)
Blade Cover Slots
Cleaning Brush
Handle
Blade Assembly
SO-314484_15367,15368,15369_Simply Ming_Spiralizer_IM_rev_2.indd 6 2017-07-10 9:55 AM
5
Before Using for the First Time
1. Your Spiralizer comes fully assembled, topped with the food tray. Carefully unpack
the Spiralizer and remove all packaging materials. Lift the food tray from the Spiralizer.
Pull the power cord out from the underside of the food bed.
2. Turn the blade assembly lock dial clockwise to UNLOCK the blade assembly holder.
Slide the blade assembly holder away from the veggie holder.
3. Make sure the sliding blade assembly holder is locked in position on the food bed
by turning the sliding blade assembly holder lock dial counter-clockwise to the
LOCK position.
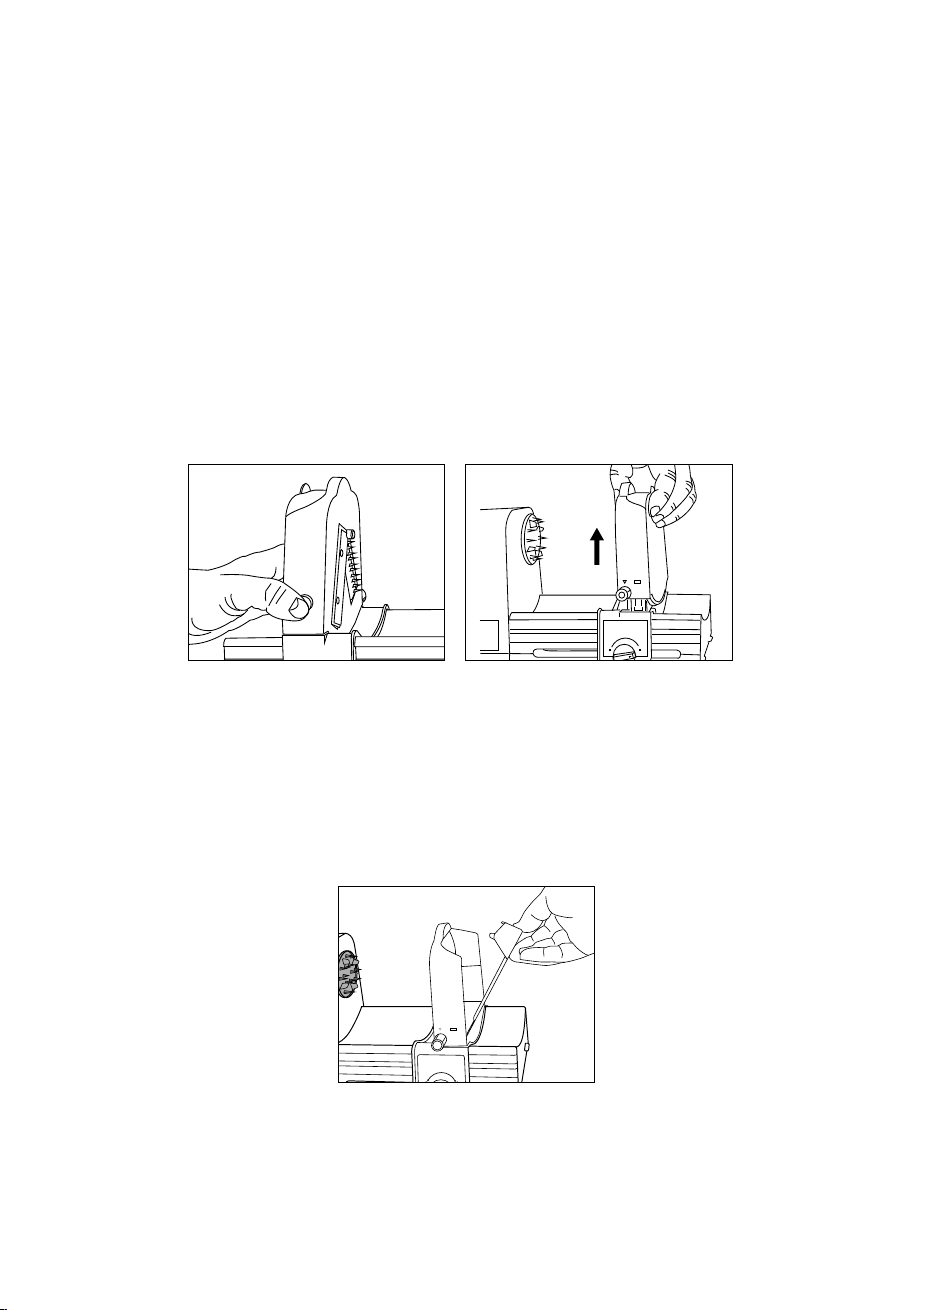
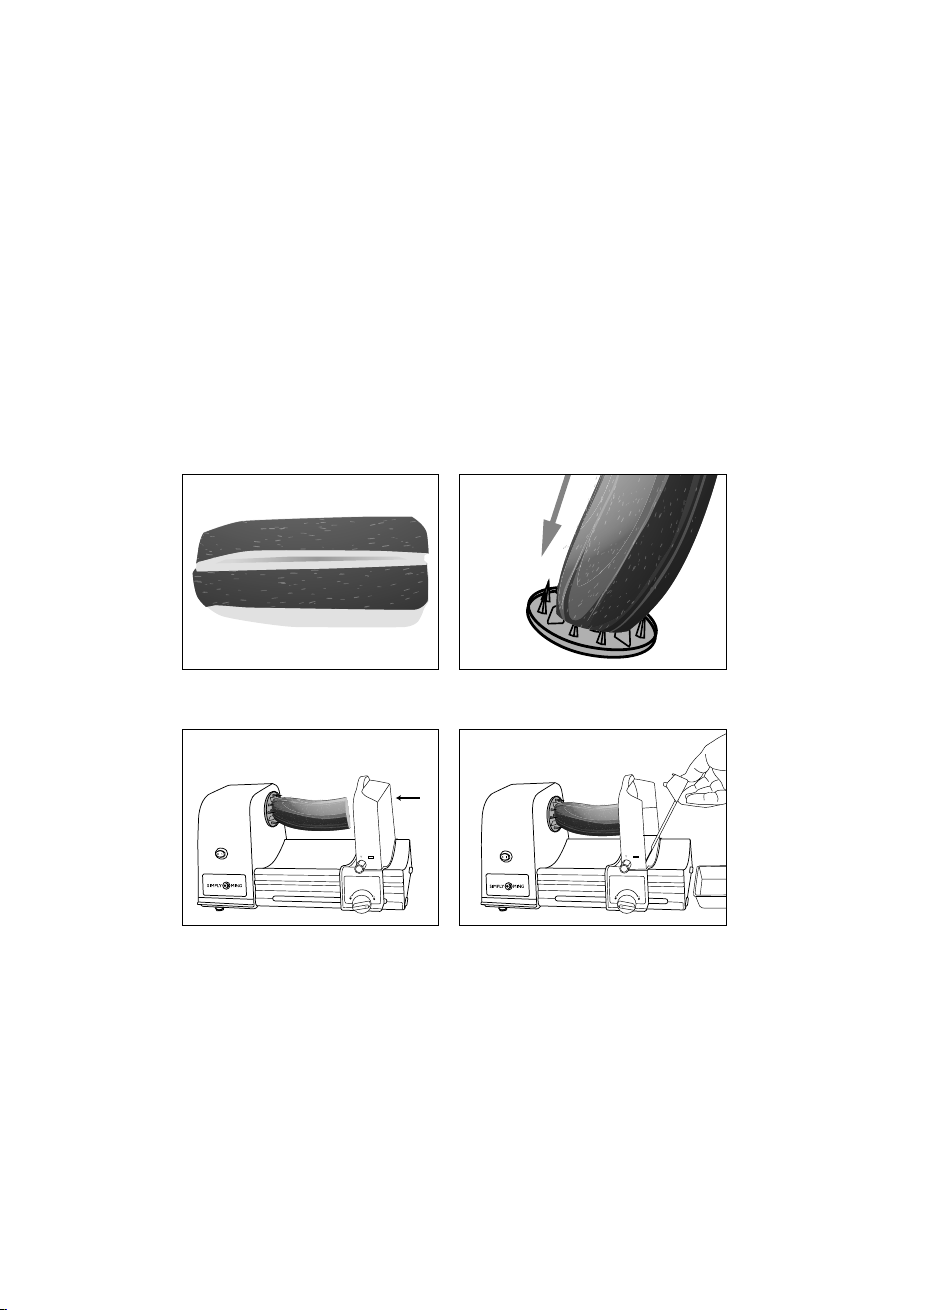
4. Remove the blade assembly from the sliding blade assembly holder.
Press and hold the blade assembly RELEASE button located on the backside of the
sliding blade assembly holder. (See Figure 2.)
5. Firmly grasp the handle and carefully lift the blade assembly up and off the sliding
blade assembly holder. (See Figure 3.)
IMPORTANT: Make sure the sliding holder is locked before removing the blade
assembly.
WARNING: ALWAYS grasp the protective blade cover’s handle when removing
the blade assembly. Failure to do so can result in personal injury.
6. Remove the protective blade cover. Press down on the top of the blade cover to
facilitate easy removal. Lift the cover up and out of the bottom slots. (See Figure 4.)
7. Use the cleaning brush to rinse and wash the cutting blade warm, soapy water.
WARNING: Cutting blades are very sharp! Use extreme care when handling.
8. Wipe the Spiralizer motor base and food bed with a soft, moistened cloth.
WARNING: Never immerse the Spiralizer motor base in water or any other liquid.
9. Dry each part thoroughly before use.
Figure 2 Figure 3
Figure 4
SO-314484_15367,15368,15369_Simply Ming_Spiralizer_IM_rev_2.indd 7 2017-07-10 9:55 AM
6
10. Replace protective blade cover by inserting both tabs into the slots on the base
of the cutting blade assembly. Press down on the top of the blade cover to make sure
the top tabs are enclosed and the blade assembly is properly fastened.
WARNING: The cutting blades are very sharp! Use extreme care when handling.
CAUTION: Make sure the protective blade cover is locked into position when attach-
ing or removing the blade assembly. (See Figure 4.)
Operating Instructions
Adjusting the Spirals (1-2-3-4)
1. Before attaching the blade assembly onto the holder, check the spiral dial setting.
2. To change the spiral width, following the detailed procedures described in “Before
Using for the First Time” section of this instruction manual, remove the blade assembly.
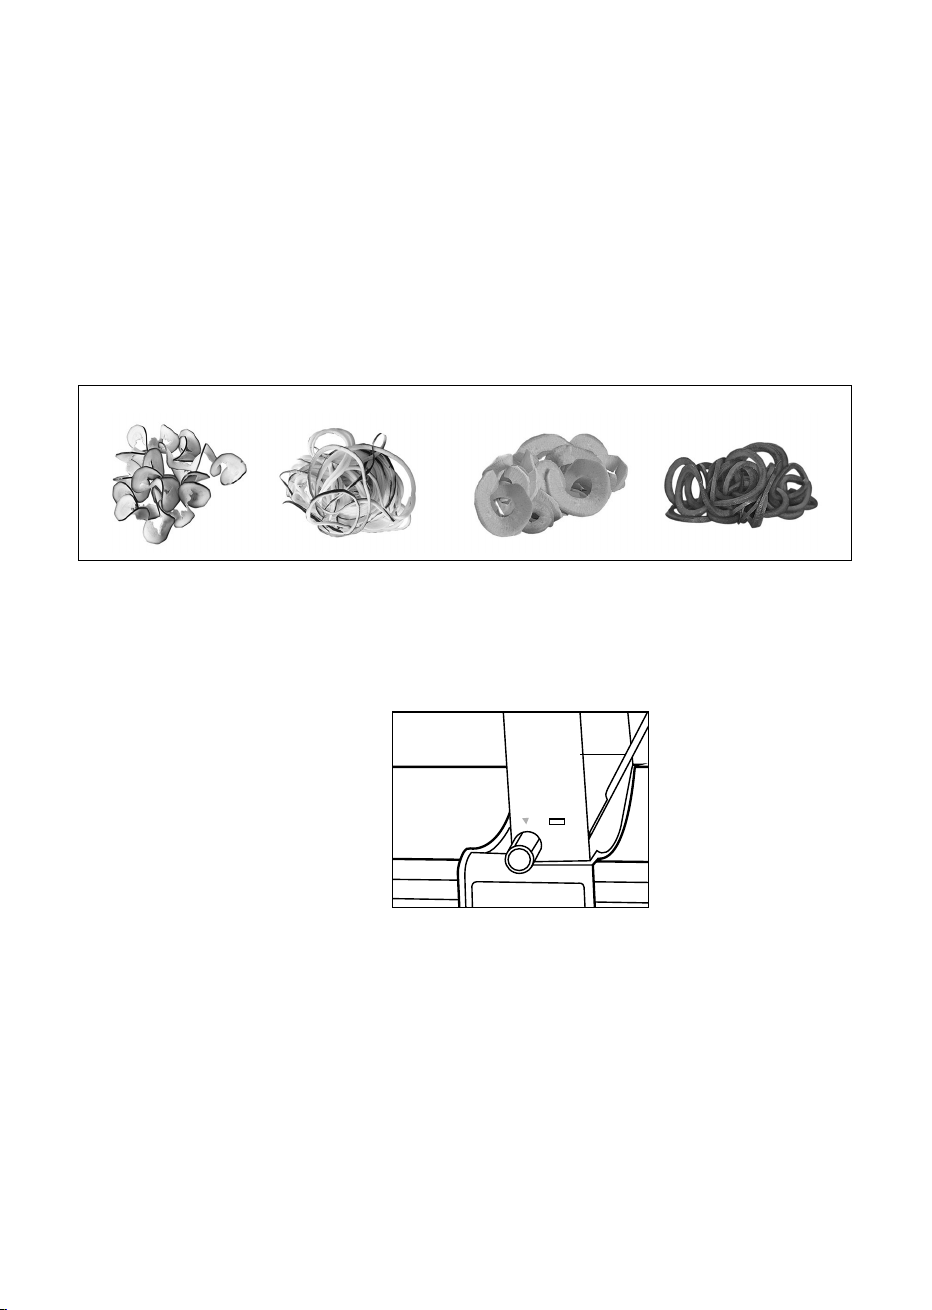
3. Turn the spiral dial to change to any of 4 widths: 1, 2, 3 or 4. (See Figure 5).
CAUTION: Make sure the blade assembly is NOT attached to the unit.
CAUTION: Make sure the protective blade cover is locked into position when adjust-
ing the spiral setting, attaching or removing the blade assembly. (See Figure 4.)
4. Replace blade assembly into the sliding blade assembly holder. Push down rmly
on the top of the blade assembly. An audible click can be heard as the blade as-
sembly locks into place. (See Figure 3.)
5. Prepare food to be spiralized. The Spiralizer works best with fruits and vegetables
that have solid esh. Foods should be rm with no hard seeds or pits. Use with deli-
cate fruits and vegetables, such as tomatoes, is not recommended. Very hard foods
that are impenetrable with an ordinary knife should also be avoided.
6. Remove any thick peel or skin from foods before spiralizing. Trim food so both ends
are at. For best results, food should be 1 to 3 inches in diameter and no longer than
6 inches long.
1- Ribbons 2- Fettuccine/Curly Fries 3- Linguine 4- Spaghetti
Figure 5
SO-314484_15367,15368,15369_Simply Ming_Spiralizer_IM_rev_2.indd 8 2017-07-10 9:55 AM
7
7. The Spiralizer makes continuous spirals of food.
HINT! For single coins, make a half-inch horizontal cut from the left to the right side --
to the center of the vegetable or fruit. (See Figure 6.) Turn the spiral dial to #1 Ribbons
to make beautiful paper-thin, discs of cucumbers, carrots, potatoes, zucchini, etc. in
minutes!
8. Unlock the sliding blade assembly holder.
9. Attach the vegetable or fruit to the veggie holder, press the prongs rmly into the
left side of the food.
NOTE: For foods that are more difcult to attach, turn the veggie holder towards you
to remove. Place on a clean, at surface. Gently press the food into the prongs so that
the t is secure.
(See Figure 7.) Replace the veggie holder; turn clockwise until it locks into position.
WARNING: Veggie holder prongs are sharp. Use caution when handling.
10. Move the blade assembly to the food so that it lies at against, and is centered on
the spindle. (See Figure 8.)
NOTE: Push rmly on the back of the protective blade cover into the food to assure a
tight t.
11. Turn the lock counter-clockwise to lock.
12. Place the food tray next to the food bed to keep spirals together while processing.
13. Remove the protective blade cover. (See Figure 9.)
14. Plug the cord into a 120V AC electrical outlet.
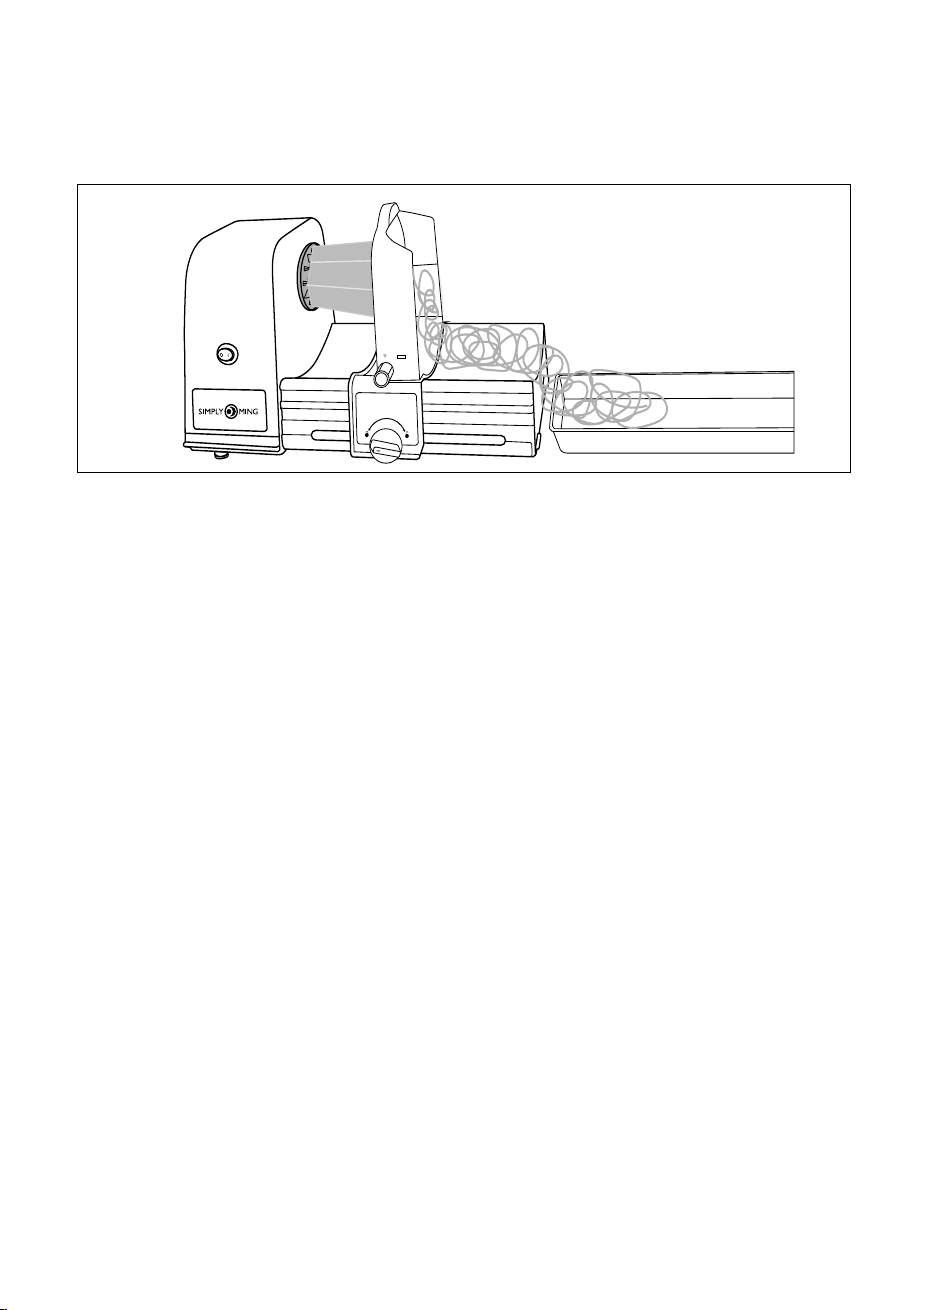
15. Press the ON/OFF switch. The veggie holder will begin to spin food against the
cutting blades as spiralized food spills out the back. The movable blade assembly
holder slowly advances to the end of the food bed. (See Figure 10.)
WARNING! To reduce the risk of severe injury to persons, keep hands and utensils
away from moving blades while spiralizing or removing spiraled food.
Figure 6 Figure 7
Figure 8 Figure 9
Spindle
SO-314484_15367,15368,15369_Simply Ming_Spiralizer_IM_rev_2.indd 9 2017-07-10 9:55 AM
8
16. The Spiralizer will stop automatically. Press the ON/OFF switch to OFF.
IMPORTANT! The Spiralizer will remain ON and will automatically resume operation
unless the ON/OFF switch is pressed to OFF.
17. Turn the blade assembly lock dial clockwise to UNLOCK the blade assembly hold-
er. Slide the blade assembly holder away from the veggie holder.
18. Turn the sliding blade assembly holder lock dial to the counter-clockwise to the
LOCK position.
19. Carefully remove the last food remnant from the veggie holder.
20. Check cutting blades before spiralizing more food. Following the detailed proce-
dures described in the “Cleaning Instructions” at the end of this instruction manual,
dislodge food debris with the cleaning brush and rinse well.
CAUTION: Do not touch the cutting blades with your ngers. Blades are very sharp
and can cause injury if touched. Use extreme care when handling the cutting blades.
21. Unplug the Spiralizer when not in use.
22. The unit should be used for maximum 1 minute at a time. Always make sure that
you allow 1 minute in between use.
Suggested Fruits & Veggies for Spiralizing
• Apples, rm, cored
• Beets (peeled)
• Butternut Squash
(peeled)
• Carrots
• Celery Root
• Cucumber
• Daikon Radish
• Potatoes, red
or white
• Rutabaga
• Sweet Potatoes
• Turnips
• Yellow Squash
• Zucchini Squash
Figure 10
SO-314484_15367,15368,15369_Simply Ming_Spiralizer_IM_rev_2.indd 10 2017-07-10 9:55 AM

Spiralizing Hints for Best Results
• This Spiralizer is not intended for meat or cheese.
• Use spiraled vegetables to replace pasta and noodles.
• Spirals are perfect to use in salads or soups.
• IMPORTANT: The Spiralizer works best with fruits and vegetables that have solid
esh. Foods should be rm with no hard seeds or pits. Use with delicate fruits
and vegetables, such as tomatoes, is not recommended.
• Very hard foods that are impenetrable with an ordinary knife should also
be avoided.
• IMPORTANT: Always remove thick peels or skin from foods before spiralizing.
• Many important vitamins and nutrients are found in the skin of fruit and vegetables,
so only remove if peels or skins are very thick.
• Select vegetables that are as straight as possible.
• Cut the ends of the food to create at surfaces to ease attaching to the veggie
holder.
• Food should be 1 to 3 inch diameter and no longer than 6 inches. Cut large foods
to t. To avoid waste, cut vegetables or fruit in half. For example, if a cucumber
is 8-inches long, for best results, cut it into 2 (4-inch) segments.
User Maintenance Instructions
This appliance requires little maintenance. It contains no user-serviceable parts.
Any servicing requiring disassembly other than cleaning must be performed
by a qualied appliance repair technician.
Care & Cleaning Instructions
1. Unplug the Spiralizer.
2. Turn the blade assembly lock dial clockwise to UNLOCK the blade assembly holder.
Slide the blade assembly holder away from the veggie holder.
3. Make sure the sliding blade assembly holder is locked in position on the food bed
by turning the sliding blade assembly holder lock dial counter-clockwise to the
LOCK position.
4. Remove the veggie holder. Turn the veggie holder towards you to remove.
WARNING: Veggie holder prongs are sharp. Use caution when handling.
Wash in warm, soapy water and dry.
5. Following the detailed procedures described in “Before Using for the First Time”
section of this instruction manual, carefully remove the blade assembly.
6. Carefully remove the protective blade cover. Use the cleaning brush to dislodge
food debris and rinse well.
WARNING: The cutting blades are very sharp! Use extreme care when handling
cutting blades.
NOTE: The veggie holder, complete blade assembly (including the protective blade
cover), and the food tray are top-rack dishwasher safe.
9
SO-314484_15367,15368,15369_Simply Ming_Spiralizer_IM_rev_2.indd 11 2017-07-10 9:55 AM

LIMITED ONE-YEAR WARRANTY
Congratulations on your purchase of the Ming Tsai Spiralizer. This product is warranted
to be free from defects in material and workmanship under normal use and service for
a period of one year from the date of original purchase with receipt. The manufacturer’s
obligation shall be limited to replacing, FOB N.Y.,any part of the product that is defective.
Such warranty shall not apply to damages resulting from accidents, abuse or misuse.
This warranty is valid only for rst quality goods purchased from an authorized selling
agent of IDL.
Imported Ingenious Designs LLC 2060 9th Avenue Ronkonkoma, NY 11779 (800)248-3002
7. Wipe the motor base with a damp cloth.
8. WARNING: NEVER IMMERSE MOTOR BASE IN WATER OR ANY OTHER LIQUID.
9. If necessary, wipe exterior surface of the motor base with a moist cloth or sponge
and dry thoroughly with a soft cloth.
10. Wash nonslip feet if needed, with a moist cloth or sponge and dry thoroughly
with a soft cloth.
CAUTION: Never use scouring pads or harsh cleansers.
Storing Instructions
WARNING! Be sure to store the cutting blade assembly away from the reach
of children.
1. Spiralizer should be cleaned and assembled before storage.
2. Turn the blade assembly lock dial clockwise to UNLOCK the blade assembly holder.
Slide the blade assembly holder away from the veggie holder.
3. Make sure the sliding blade assembly holder is locked in position on the food bed
by turning the sliding blade assembly holder lock dial counter-clockwise to the
LOCK position.
4. Fold cord tightly and insert into the cord storage area under the food bed.
5. Place the Spiralizer on top of the food tray. Press down rmly until the unit snaps
into the sides of the tray.
6. Store Spiralizer in its original box in a cool, dry place.
10
SO-314484_15367,15368,15369_Simply Ming_Spiralizer_IM_rev_2.indd 12 2017-07-10 9:55 AM

Zucchini Spiral Carbonara
With all the delicious bacon and cheese avours of a classic carbonara, you won’t
miss the pasta in this zucchini version. Serves: 4.
PREP TIME: 10 mins COOK TIME: 10 mins TOTAL TIME: 20 mins
4 medium zucchini
3 egg yolks
1/2 cup grated Parmesan cheese, divided
2 tbsp nely chopped fresh parsley, divided
2 tbsp olive oil
4 slices bacon, chopped
2 cloves garlic, minced
1/2 tsp salt
1/2 tsp freshly cracked pepper
Trim ends of zucchini; cut into halves or thirds. With the Spiralizer on spaghetti
setting, spiralize zucchini into long strands, trimming with clean kitchen sheers
as needed.
In large bowl, whisk together egg yolks, 1/3 cup cheese and 1 tbsp parsley; set aside.
Heat oil in large skillet set over medium heat; cook bacon for about 5 minutes or until
golden brown but not crisp. Add garlic; cook for 1 minute. Stir in zucchini noodles;
cook for about 2 minutes or until tender.
Add zucchini mixture to egg yolk mixture; toss to combine.
Season with salt and pepper. Sprinkle with remaining cheese and parsley.
Tip: Substitute Pecorino Romano for Parmesan cheese, if desired.
11
SO-314484_15367,15368,15369_Simply Ming_Spiralizer_IM_rev_2.indd 13 2017-07-10 9:55 AM

Sweet Potato Linguine Stir-Fry
Faster than ordering take-out, these quick and healthy Asian-style noodles take only
minutes to cook. Serves: 6
PREP TIME: 10 mins COOK TIME: 15 mins TOTAL TIME: 30 mins
2 large sweet potatoes (about 2 lb), peeled and halved
2 tbsp oyster sauce
2 tbsp soy sauce
1 tbsp sriracha hot sauce
2 tsp red wine vinegar
1 tsp sesame oil
1/2 tsp granulated sugar
3 tbsp vegetable oil, divided
8 baby bok choy, quartered
1 small onion, chopped
3 cloves garlic, minced
1 tbsp minced fresh ginger
1/4 tsp each salt and pepper
2 green onions, thinly sliced
With the Spiralizer on linguine setting, spiralize sweet potatoes into long strands,
trimming with clean kitchen sheers as needed. Whisk together oyster sauce, soy
sauce, 1 tbsp water, hot sauce, vinegar, sesame oil and sugar; set aside.
Heat 1 tbsp vegetable oil in wok or large skillet set over high heat; stir-fry bok choy for
about 3 minutes or tender-crisp. Transfer to plate. Heat remaining vegetable oil; stir-fry
onion, garlic and ginger for 1 minute. Add sweet potato noodles; stir-fry for about
1 minute or until noodles start to soften.
Stir in reserved sauce; return bok choy to pan. Cook for about 1 minute or until sweet
potato noodles are well coated and just tender. Season with salt and pepper. Sprinkle
with green onions.
Tip: Garnish with sesame seeds if desired.
12
SO-314484_15367,15368,15369_Simply Ming_Spiralizer_IM_rev_2.indd 14 2017-07-10 9:55 AM

Spicy Vegetable Ribbon Soup
Spiced with chili akes, this fresh and light soup is very comforting and soothing.
Serves: 4
PREP TIME: 10 mins COOK TIME: 25 mins TOTAL TIME: 50 mins
1 large carrot, peeled
1 medium zucchini
1 small sweet potato, peeled (about 1 lb)
1 small potato, peeled (about 1/4 lb)
2 tbsp olive oil
1 onion, sliced
3 cloves garlic, minced
1 tbsp nely chopped fresh thyme
1/2 tsp salt
1/2 tsp red chili akes
4 cups low-sodium vegetable broth
1 bay leaf
1/4 cup chopped fresh basil, divided
1 tbsp white wine vinegar
With the Spiralizer on ribbon setting, spiralize carrot, zucchini, sweet potato and
potato into long strands, trimming with clean kitchen sheers as needed.
Heat oil in saucepan set over medium heat; cook onion, garlic, thyme, salt and chili
akes for about 5 minutes or until softened. Add vegetable broth and bay leaf; bring
to boil. Reduce heat to medium-low; cook for 5 minutes.
Stir in vegetable ribbons; cook for 12 to 15 minutes or until vegetables are ten-
der-crisp. Remove bay leaf. Stir in basil and vinegar. Spoon into 4 bowls.
Tip: Substitute parsley or cilantro for basil if desired.
13
SO-314484_15367,15368,15369_Simply Ming_Spiralizer_IM_rev_2.indd 15 2017-07-10 9:55 AM

Spiralized “Borscht” Soup
This vegetarian take on a classic Eastern European beet soup is rich and avourful.
Serves: 4
PREP TIME: 20 mins COOK TIME: 30 mins TOTAL TIME: 60 mins
4 large beets, peeled
1 small potato, peeled (about 1/4 lb)
2 tbsp olive oil
1 onion, chopped
2 cups sliced red cabbage
2 cloves garlic, minced
1/2 tsp each salt and pepper, divided
Pinch caraway seeds
2 tbsp tomato paste
4 cups low-sodium vegetable broth
2 bay leaves
2 tbsp red wine vinegar
2 tbsp honey
1/4 cup chopped fresh dill, divided
1/2 cup sour cream
With the Spiralizer on linguine setting, spiralize beets and potato into long strands,
trimming with clean kitchen sheers as needed.
Heat oil in saucepan set over medium heat; cook onion, cabbage, garlic, half each
of the salt and pepper, and caraway seeds for about 5 minutes or until softened. Stir
in tomato paste; cook for 1 minute.
Add beets and potato noodles, vegetable broth and bay leaves; bring to boil.
Reduce heat to medium-low; cook for 20 to 25 minutes or until beets are tender.
Remove bay leaves.
Stir in vinegar, honey and remaining salt and pepper. Stir in half of the dill. Spoon into
6 bowls. Top with dollop of sour cream and sprinkle with remaining dill.
Tip: Substitute plain Greek yogurt for sour cream if desired.
14
SO-314484_15367,15368,15369_Simply Ming_Spiralizer_IM_rev_2.indd 16 2017-07-10 9:55 AM

15
Spiralized Slaw with Lemon Poppy Seed Vinaigrette
Serve this sweet and tangy slaw with grilled chicken or sh for a healthy dinner any
night of the week. Serves: 8
PREP TIME: 10 mins COOK TIME: 0 mins TOTAL TIME: 15 mins
1/2 small red cabbage (about 1 lb)
1 carrot, peeled and cut in half
1 Granny Smith apple, cored
1 medium beet, peeled
2 green onions, nely sliced
1 tbsp nely chopped fresh cilantro
Vinaigrette:
1 tsp lemon zest
1/4 cup lemon juice
3 tbsp olive oil
4 tsp honey
1 tbsp Dijon mustard
1 tbsp mayonnaise
1 tbsp poppy seeds
1 small shallot, minced
1/2 tsp salt
1/4 tsp pepper
With the Spiralizer on ribbon setting, spiralize cabbage, carrot, apple and beet into
long strands, trimming with clean kitchen sheers as needed.
Vinaigrette: Whisk together lemon zest, lemon juice, oil, honey, mustard, mayonnaise,
poppy seeds, shallot, salt and pepper until blended.
Toss vegetable and apple ribbons with vinaigrette until well coated. Sprinkle with
green onions and cilantro.
Tip: Substitute maple syrup for honey if desired.
SO-314484_15367,15368,15369_Simply Ming_Spiralizer_IM_rev_2.indd 17 2017-07-10 9:55 AM

16
Roasted Parmesan Potato Spirals
These tasty potatoes are deliciously addictive. They’re perfect for a side dish or just for
snacking. Serves: 4
PREP TIME: 5 mins COOK TIME: 30 mins TOTAL TIME: 40 mins
4 medium Yukon Gold potatoes, peeled
3 tbsp olive oil
1/4 cup grated Parmesan cheese, divided
1 tsp garlic powder
1/2 tsp salt
1/4 tsp pepper
1 tbsp nely chopped chives
Preheat oven to 400˚F. With the Spiralizer on linguine setting, spiralize potatoes into
long strands, trimming with clean kitchen sheers as needed.
Toss potato noodles with oil, half of the cheese, garlic powder, salt and pepper;
arrange on two large parchment paper¬–lined baking sheets. Bake on top and
bottom racks, rotating and switching pans halfway through, for 30 to 40 minutes
or until golden brown and crispy. Sprinkle with remaining cheese and chives.
Tip: Add 2 tsp chopped fresh rosemary to potatoes if desired.
SO-314484_15367,15368,15369_Simply Ming_Spiralizer_IM_rev_2.indd 18 2017-07-10 9:55 AM

17
Spiralized Sweet Potato and Chicken Enchilada Casserole
Perfect for weeknight dinners, potlucks or game nights, this Tex-Mex casserole will
please any crowd. Serves: 12
PREP TIME: 10 mins COOK TIME: 55 mins TOTAL TIME: 1 hour 10 mins
2 lb sweet potatoes, peeled
2 cups shredded cooked chicken
1 cup (8 oz) chunky salsa
1 can (10 oz) enchilada or taco sauce
1 can (14 oz) black beans, drained and rinsed
1 cup frozen corn kernels
1 tsp ground cumin and dried oregano
1/2 tsp each salt and pepper
2 cups shredded Monterey Jack cheese
2 green onions, thinly sliced
2 tbsp chopped fresh cilantro
Preheat oven to 400˚F. With the Spiralizer on linguine setting, spiralize sweet potatoes
into long strands, trimming with clean kitchen sheers as needed.
Arrange sweet potatoes in bottom of greased 13- x 9-inch baking dish. Toss together
chicken, salsa, enchilada sauce, black beans, corn, cumin, oregano, salt and pepper.
Layer over sweet potatoes; sprinkle evenly with cheese.
Cover with foil; bake for about 40 minutes or until sweet potatoes are tender. Remove
foil; bake, uncovered, for 15 to 20 minutes or until cheese is golden brown. Sprinkle
with green onions and cilantro.
Tip: Serve with sour cream, chopped avocado, salsa and pickled jalapeños for
an enchilada feast.
SO-314484_15367,15368,15369_Simply Ming_Spiralizer_IM_rev_2.indd 19 2017-07-10 9:55 AM

18
Sweet Potato Hash with Fried Eggs
Perfect for weekend brunches, this easy hash with a hint of Cajun seasoning can also
be served as a quick weeknight dinner. Serves: 4
PREP TIME: 10 mins COOK TIME: 15 mins TOTAL TIME: 25 mins
2 lb sweet potatoes, peeled
2 tbsp olive oil
1 large onion, sliced
1 red bell pepper, sliced
2 cloves garlic, minced
1 tbsp Cajun seasoning
1/2 tsp salt
1/4 tsp pepper
1/3 cup vegetable broth
4 fried eggs
2 tbsp nely chopped green onion
With the Spiralizer on fettuccine setting, spiralize sweet potatoes into long strands,
trimming with clean kitchen sheers as needed.
Heat oil in large skillet set over medium heat; cook onion, pepper, garlic, Cajun sea-
soning, salt and pepper for about 5 minutes or until vegetables start to soften. Stir in
sweet potato noodles; cook for about 2 minutes or until well coated.
Stir in broth; cover and cook for 3 to 4 minutes or until sweet potatoes are tender.
Remove lid; cook for 1 to 2 minutes until moisture has evaporated. Divide among 4
plates. Top with fried eggs and sprinkle with green onion.
Tip
• Add crumbled bacon or diced ham to hash if desired.
• Alternatively, top with poached eggs.
SO-314484_15367,15368,15369_Simply Ming_Spiralizer_IM_rev_2.indd 20 2017-07-10 9:55 AM

19
Teriyaki Broccoli Noodles with Shrimp
These healthy broccoli stem noodles make for a delicious stir-fry with shrimp.
Serves: 4
PREP TIME: 10 mins COOK TIME: 10 mins TOTAL TIME: 30 mins
4 thick broccoli stems, trimmed and peeled
3 tbsp vegetable oil, divided
1 lb peeled deveined large shrimp, tails removed
2 cloves garlic, minced
1 tbsp minced fresh ginger
1/2 tsp salt
1/4 tsp pepper
1/2 cup teriyaki sauce
1 tbsp lime juice
2 tbsp chopped pickled ginger
1 tbsp toasted sesame seeds
Cooked rice (optional)
With the Spiralizer on spaghetti setting, spiralize broccoli stems into long strands, trim-
ming with clean kitchen sheers as needed.
Heat half of the oil in wok or large skillet set over high heat; stir-fry shrimp, garlic,
minced ginger, salt and pepper for 2 to 3 minutes or just until shrimp are pink and
cooked through. Transfer to plate.
Heat remaining oil in same pan set over high heat; stir-fry broccoli noodles for 4 to 6
minutes or until tender-crisp. Stir in teriyaki sauce and lime juice; bring to boil. Cook
for about 2 minutes or until broccoli noodles are just tender. Divide among 4 plates;
top with pickled ginger and sesame seeds. Serve with rice (if using).
Tip: This stir-fry is just as delicious made with cubed chicken, pork or beef instead
of shrimp.
SO-314484_15367,15368,15369_Simply Ming_Spiralizer_IM_rev_2.indd 21 2017-07-10 9:55 AM

20
Butterscotch Apple Crumble
With all the avours of apple pie and butterscotch in one dessert, this irresistible treat
will satisfy any sweet craving. Serves: 6
PREP TIME: 10 mins COOK TIME: 10 mins TOTAL TIME: 20 mins
4 apples, cored
3 tbsp butter
1/2 cup packed brown sugar
1/2 tsp ground cinnamon
Pinch ground nutmeg
1/2 cup 35% whipping cream
3 tbsp whiskey
1 tsp vanilla extract
1 cup vanilla Greek yogurt
1 cup granola
1/4 cup dried cherries
With the Spiralizer on ribbon setting, spiralize apples into long strands, trimming
with clean kitchen sheers as needed.
Melt butter in large skillet set over medium-high heat. Stir in brown sugar, cinnamon
and nutmeg; cook for 2 to 3 minutes or until sugar starts to dissolve. Stir in whipping
cream, whiskey and vanilla; bring to simmer. Stir in apples; cook for 4 or 5 minutes
or until sauce is thickened and apples are tender.
Divide among 4 bowls. Dollop with spoonfuls of Greek yogurt; sprinkle with granola
and cherries. Serve warm.
Tip: Replace cherries with other dried fruits, such as cranberries or apricots,
or pumpkin seeds if desired.
SO-314484_15367,15368,15369_Simply Ming_Spiralizer_IM_rev_2.indd 22 2017-07-10 9:55 AM